Sports photography is a fascinating genre. In fact, many professional photographers specialise in one sport because knowing the game and its rules is crucial to taking great pictures.
But sports shooting can be a part of your photography even if you’re not a professional. Your kid might have just started playing football and you want to immortalise his first game for example.
If you just got a new E-mount camera and are interested in action photography, this article is for you. I’ll guide you through the best photography settings for your Sony A7 III and other full frame models.
A7/A9 series compatibility
The content of this post is valid for all the Sony full frame E-mount cameras, with specific attention given to the A7 mark III, mark IV and A9 generations. The differences between the various models are mentioned as well.
Note: Throughout the article, I’ll include where the various settings can be found in the menu. I took as reference the latest version which was introduced with the A7 III series. Please note that the location of some settings might be a bit different from one product to the other. You probably have some of them assigned to custom buttons, the Fn Menu or the My Menu.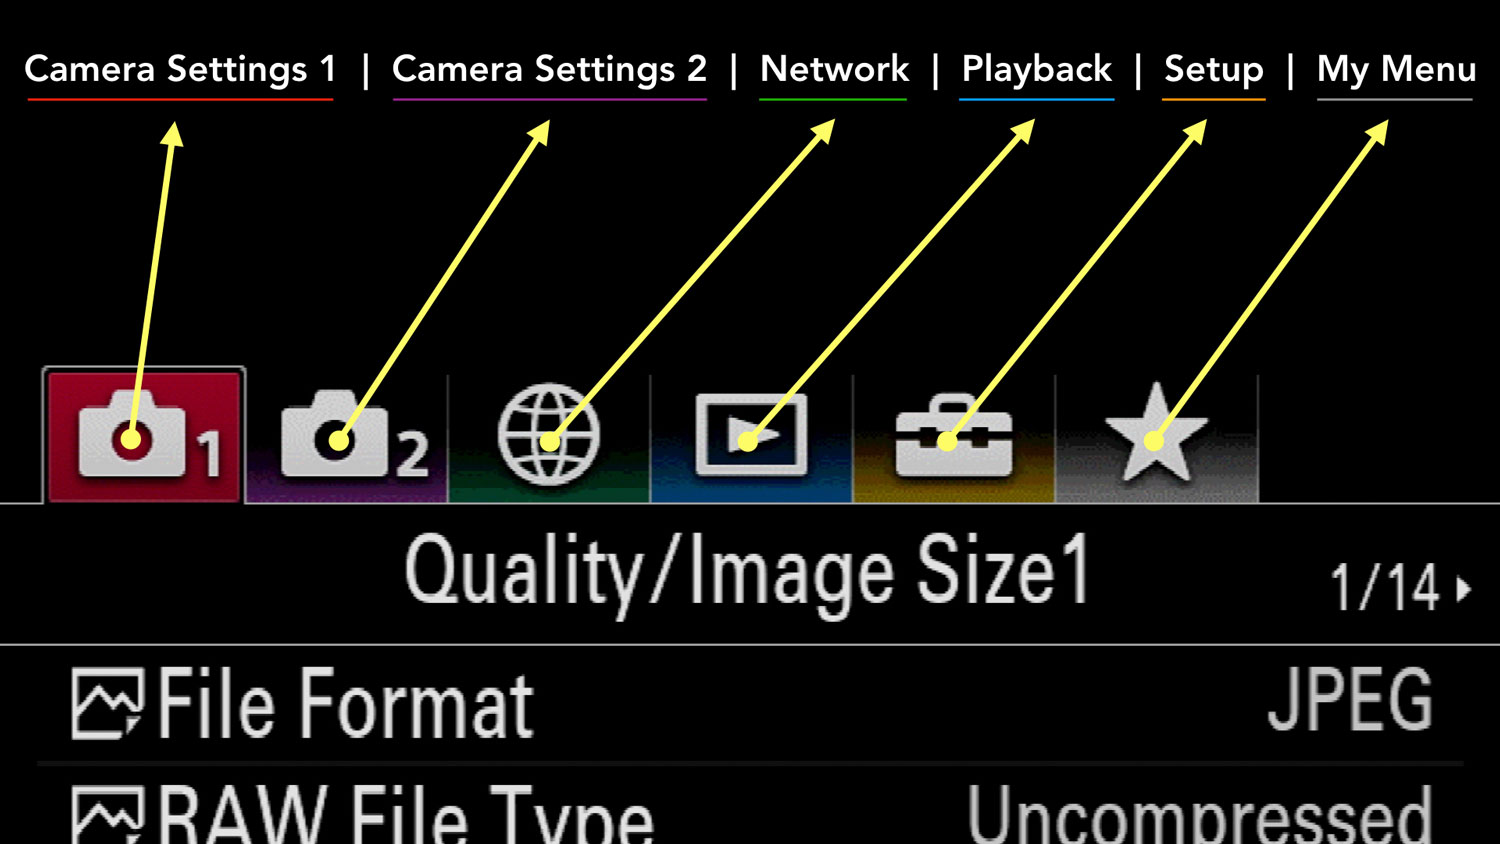
Be aware that older models (A7 II series and below) have an older menu system with more differences starting with the icons on top.![]()
![]()
Ethics statement: the following is based on our personal experience with various Sony A7 and A9 cameras, specifically the A7 III and A7R III that we own. We were not asked to write anything about these products, nor were we provided with any sort of compensation. Within the article, there are affiliate links. If you buy something after clicking the link, we will receive a small commission. To know more about our ethics, you can visit our full disclosure page. Thank you!
TABLE OF CONTENTS
1. Prepping the Camera
2. Exposure and Metering
3. Autofocus Settings
4. Drive and Shutter Modes
5. Additional Settings
6. Sample Images
7. Sony Mirrorless Resources
Reminder: the links below are affiliate links. If you decided to buy something after clicking the link, we will receive a small commission.
Check price of the Sony A7 III on:
Amazon | Amazon UK | B&H Photo | eBay
Check the price of the Sony A7R III on:
Amazon | Amazon UK | B&H Photo | eBay
Check price of the Sony A7R IV on
Amazon | Amazon UK | B&H Photo | eBay
Check price of the Sony A9 on
Amazon | Amazon UK | B&H Photo | eBay
Check price of the Sony A7 II on:
Amazon | Amazon UK | B&H Photo | eBay
Check price of the Sony A7R II on:
Amazon | Amazon UK | B&H Photo | eBay
Second-hand Sony gear on
MPB US | MPB UK
Sony A7 III, A7R III, A9 for Sports: Prepping the Camera
Autofocus and continuous shooting are among the most important settings to configure, but before we dive into those, let’s have a look at other action related settings for your Sony A7 III and how to set them up.
Button Configuration
In sports situations, you need to change settings on the fly, and a good customisation of your camera is essential. Below is a suggestion on how to assign the most important action photography settings to the custom buttons of your A7 III, A7R III and other Alpha model.

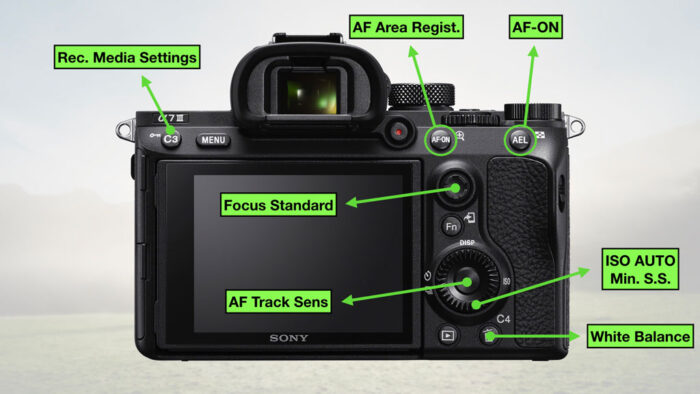
I also advise you to have the settings below in the Fn Menu or My Menu. You won’t need to use them as much as the ones above but accessing them from either quick menus is faster than looking inside the main menu.
- File Format
- RAW File Type
- JPEG Quality
- Creative Style
- SteadyShot
- Metering
- Priority Set in AF
- Setting Effects / Live View Display
- Finder Frame Rate
Older models have fewer buttons and some settings might not be available.
To find out more about how to customise your Sony A7/A9 camera, check the article below.
Image quality
Camera Settings 1 / Quality Image Size1 (page 1/14)
I always use the RAW File Format to take pictures of sports. Given that my job is reviewing cameras, I don’t have to share images right away, and I like to have more freedom in post, even to make just a few adjustments.
It is important to choose Compressed for the RAW File Type. It will give you smaller files, which means that the buffer memory of your camera clears faster, and the files are written more quickly to the card too. Also, on some models the fastest burst speed is not available when using Uncompressed RAW.
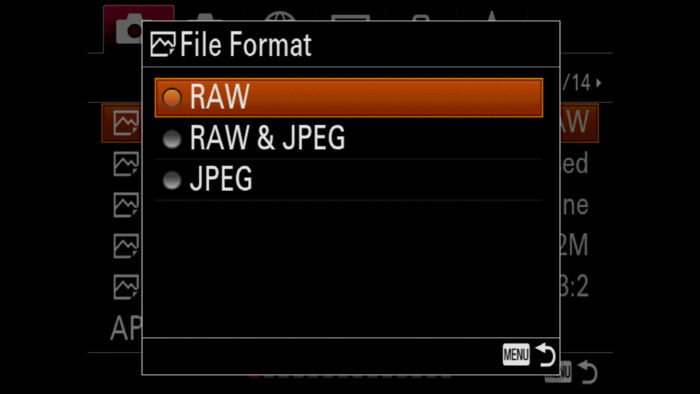
For the A7 I series, there is no RAW File Type setting. RAW is compressed by default.
If you want to save space on your card because you have a very long day of shooting ahead, you need to share images right away or you simply don’t care about post processing, then choose the JPEG File Format and select Fine for JPEG Quality.
You can of course choose RAW & JPG, but the buffer memory can fill up more quickly which means that the continuous shooting speed will slow down more quickly too.
Tip: for Sony cameras that have a dual SD card slot (A7 III, A7 IV and A9 series), you can record both files and save them to different cards. Go to Menu Setup 6 (page 6/7) then Rec. Media Settings. Choose Sort (RAW/JPG) for the Recording Mode, then choose Slot 1 in Prioritise Rec. Media. This way, the RAW files are saved to Slot 1 (where you can use faster UHS-II cards) and the JPEGs are saved to Slot 2.
To find out more about the dual memory card setup, and to find out which SD card to buy for your Sony camera, check out our dedicated articles below.
White Balance and Colours
Camera Settings 1 / Colour WB Img. Processing (page 12/14)
As I’ve said in other articles, if you work with RAW files, the White Balance and Colour Profile settings won’t affect your images. You may want to set the WB correctly to have a better preview on your screen.
If you’re working with JPGs, you want to make sure that the white balance is correct. Choosing the right setting will depend on the light situation.
Are you working outside? Then the Sun preset, or a WB of around 5600˚k will work. Raise it a bit more if it is cloudy, or use the Cloudy preset.
Are you and your Sony A7 III doing indoor sports photography, or taking pictures outside in the evening? Then the artificial lights used to illuminate the field will determine your white balance setting. The Fluorescent DayLight or Fluorescent Day White preset should work (usually these lights have a similar colour temperature to natural daylight). Where I usually take pictures of football games, the temperature averages around 5000˚k.
Of course you can leave the White Balance to Auto and take a few test shots to make sure that the colours of your images are balanced.
In some situations you’re going to have to deal with mixed light sources. For example, a game can start when there is still daylight and finish when it is dark. At some point during the event, the venue is going to turn on the artificial lights that illuminate the field. While these lights warm up, they can cast a magenta or green tint on your colours. It’s nothing drastic but the overall colour balance of your image can be a bit off.
Tip: for indoor venues or evening sports, if you see that there is a tendency for magenta or greenish colour dominance, you can use the WB Adjustment setting to correct that.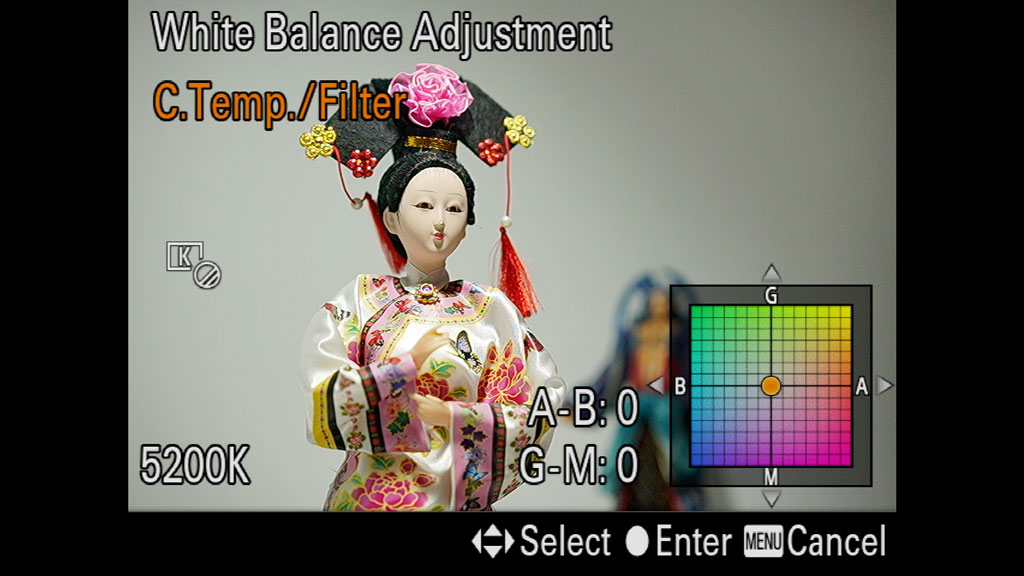
As for the Creative Style, I would advise choosing a profile that is not too charged with contrast or saturation. Standard works fine, Vivid is ok if you want a tad more contrast, whereas Light will make the image brighter and can work well too.

Because you’re likely to take pictures at high ISOs, I advise you to keep the High ISO NR (Noise Reduction) to Low, which is a good compromise on all Sony cameras. You can find it in Camera Settings 1 / Quality Image Size 2 (page 2/14).
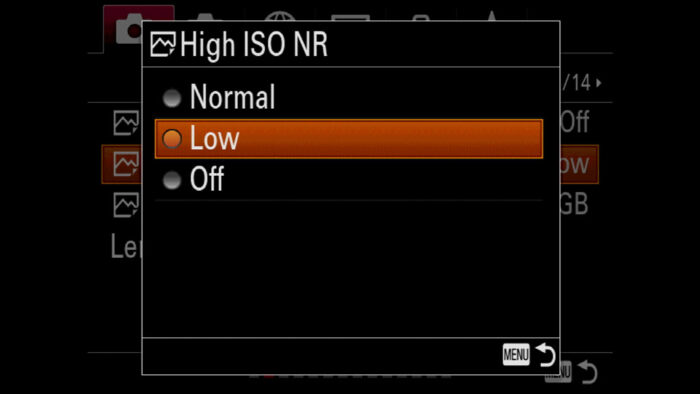
Image Stabilisation
Not available on the A7 I series.
Even though we use fast shutter speeds when taking pictures of sports, I leave the SteadyShot function active for a few reasons.
First we have the stabilisation preview in the viewfinder when half pressing the shutter button. If you’re using a long telephoto lens, this can be very useful to compose better.
Second, you may slow down the shutter speed momentarily when subjects are not moving fast (for example an injured player being treated on the ground). Having the stabilisation already active is one less thing to worry about.
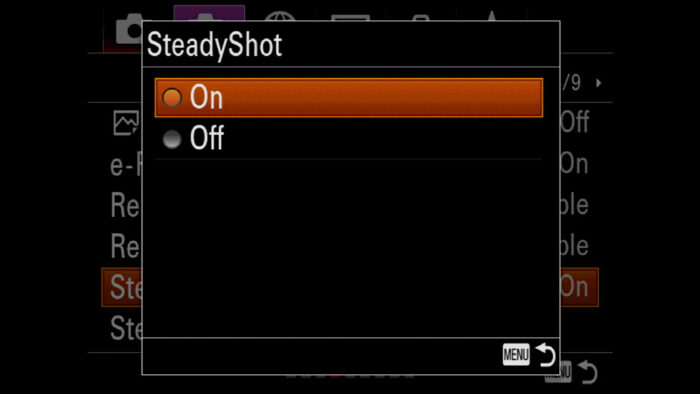
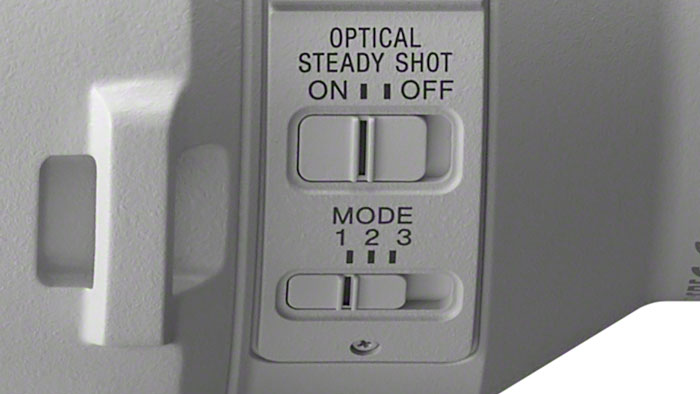
When an OSS lens is attached, Sony cameras use a mix of sensor and optical stabilisation. They will automatically apply more compensation on the body or the lens depending on the focal length. Plus, you can activate or deactivate image stabilisation from the lens directly with the dedicated switch on the barrel.
Some telephoto lenses have an additional switch to choose different types of stabilisation (two or three modes). Mode 1 will compensate for all shakes, Mode 2 will prioritise vertical shakes (useful when panning) and, on select lenses, Mode 3 enhances the stabilisation in the viewfinder to help you track dynamic subjects better.
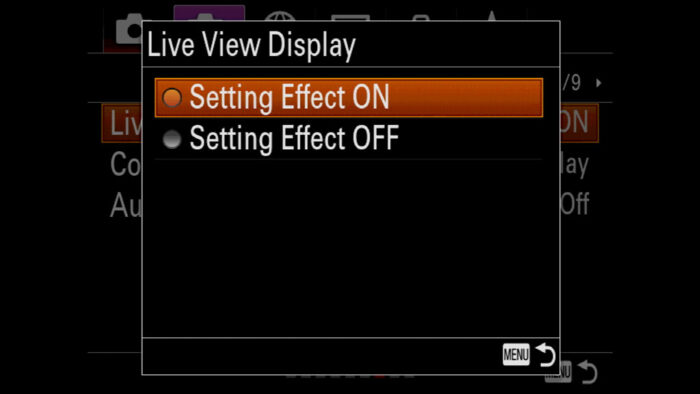
Setting Effects
The electronic viewfinder allows you to see in real time how your exposure looks, as well as colours, contrast and white balance. It is the best indicator to see if the image is too dark or the colours are too warm. As a general rule, I’d say you can leave this setting on.
However if you find yourself in a situation where there is a lot of contrast in your scene, or your subject goes from one light situation to another, the real time exposure preview can be a bit annoying. In that case, turn Setting Effects off and the viewfinder will keep an optimal brightness at all times. You can then check your exposure with other tools as explained in the next chapter.
Sony A7 III, A7R III, A9 Sports Settings: Exposure and Metering
If you’re shooting indoors or in the evening, I advise you to work in M mode (Manual Mode) to have better control over your exposure settings.
If you’re outside during the day in the sunshine, you can work in A mode (Aperture priority) because the strong light should encourage the camera to keep a fast speed at all times. Be careful however of situations where your subject goes into the shades because the change can be quite dramatic.
Shutter Speed
For sports shooting, the most important exposure setting is the shutter speed. It allows you to freeze the action and ensures that all the details of the subject are sharp.
The general rule is the faster your subject goes, the higher you need to set your shutter speed. The speed needed can vary depending on the specific sport, or even the specific situation. For example, the action of a baseball player hitting the ball is faster than the baseball player running across the field.
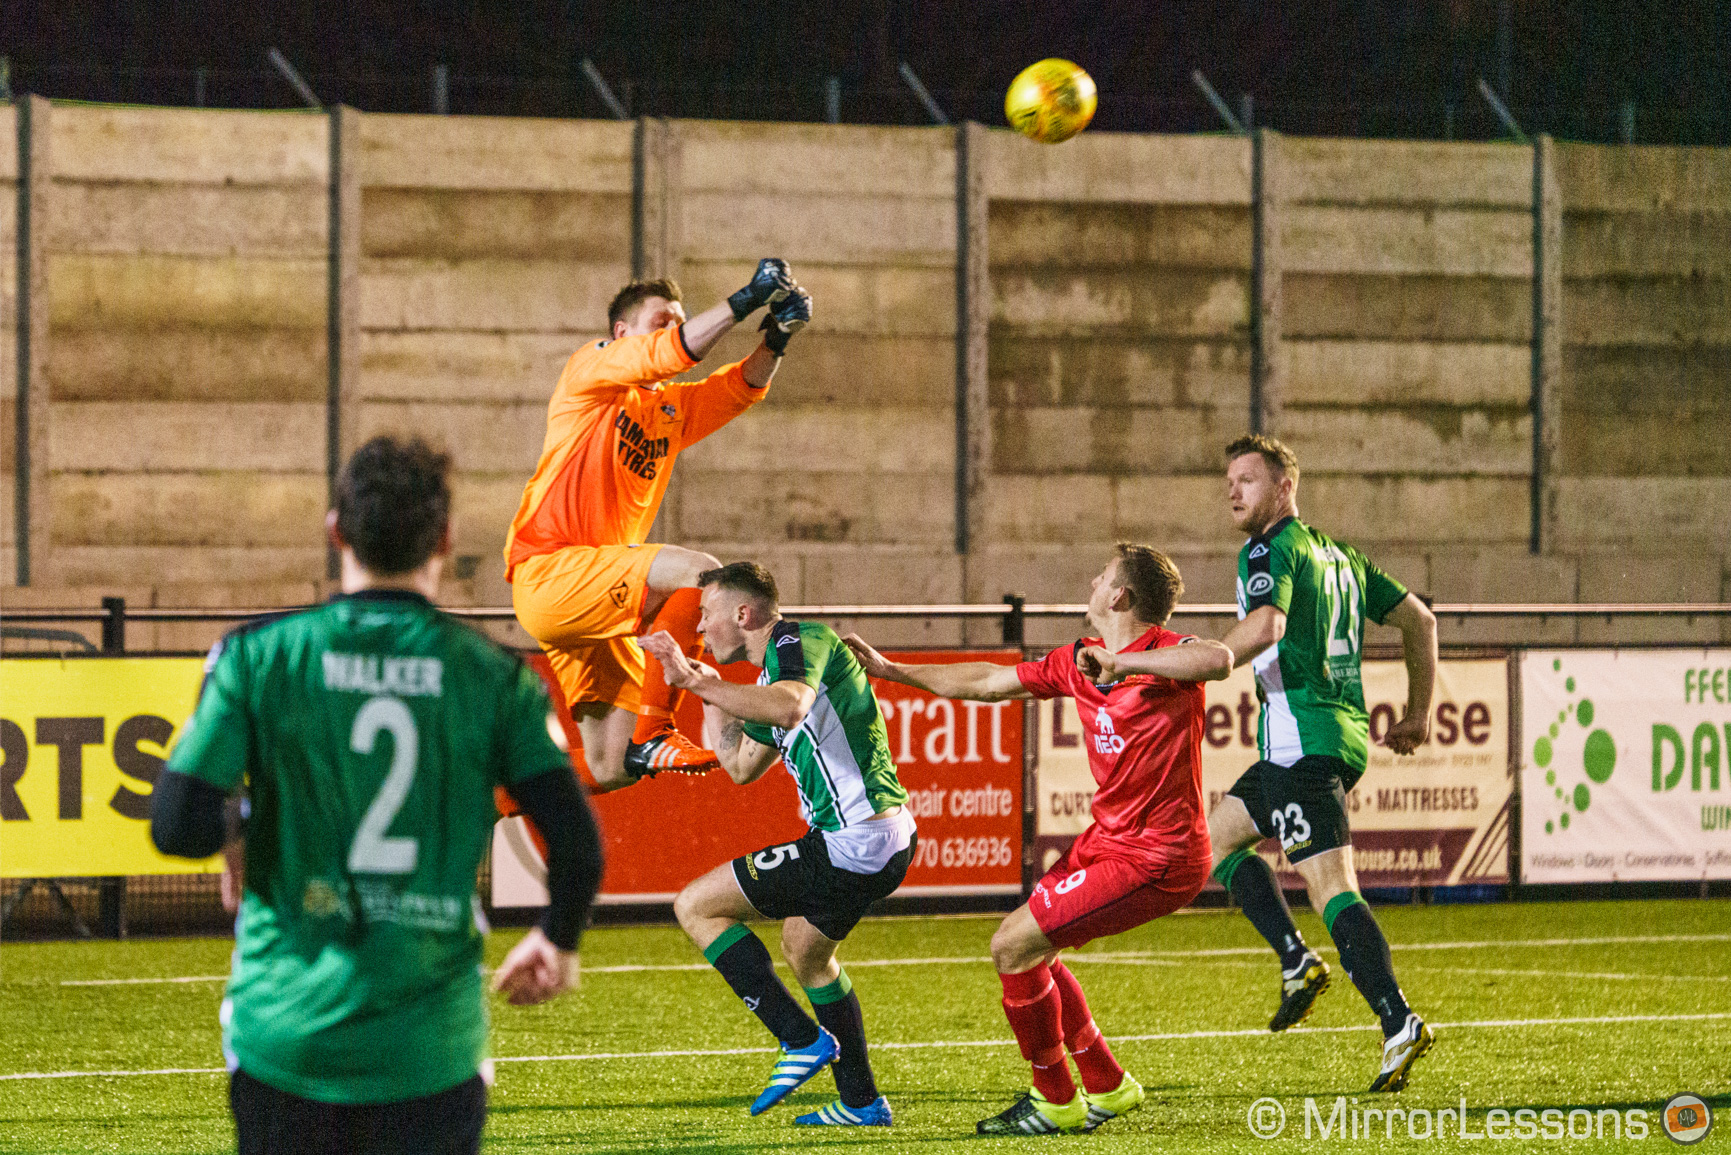
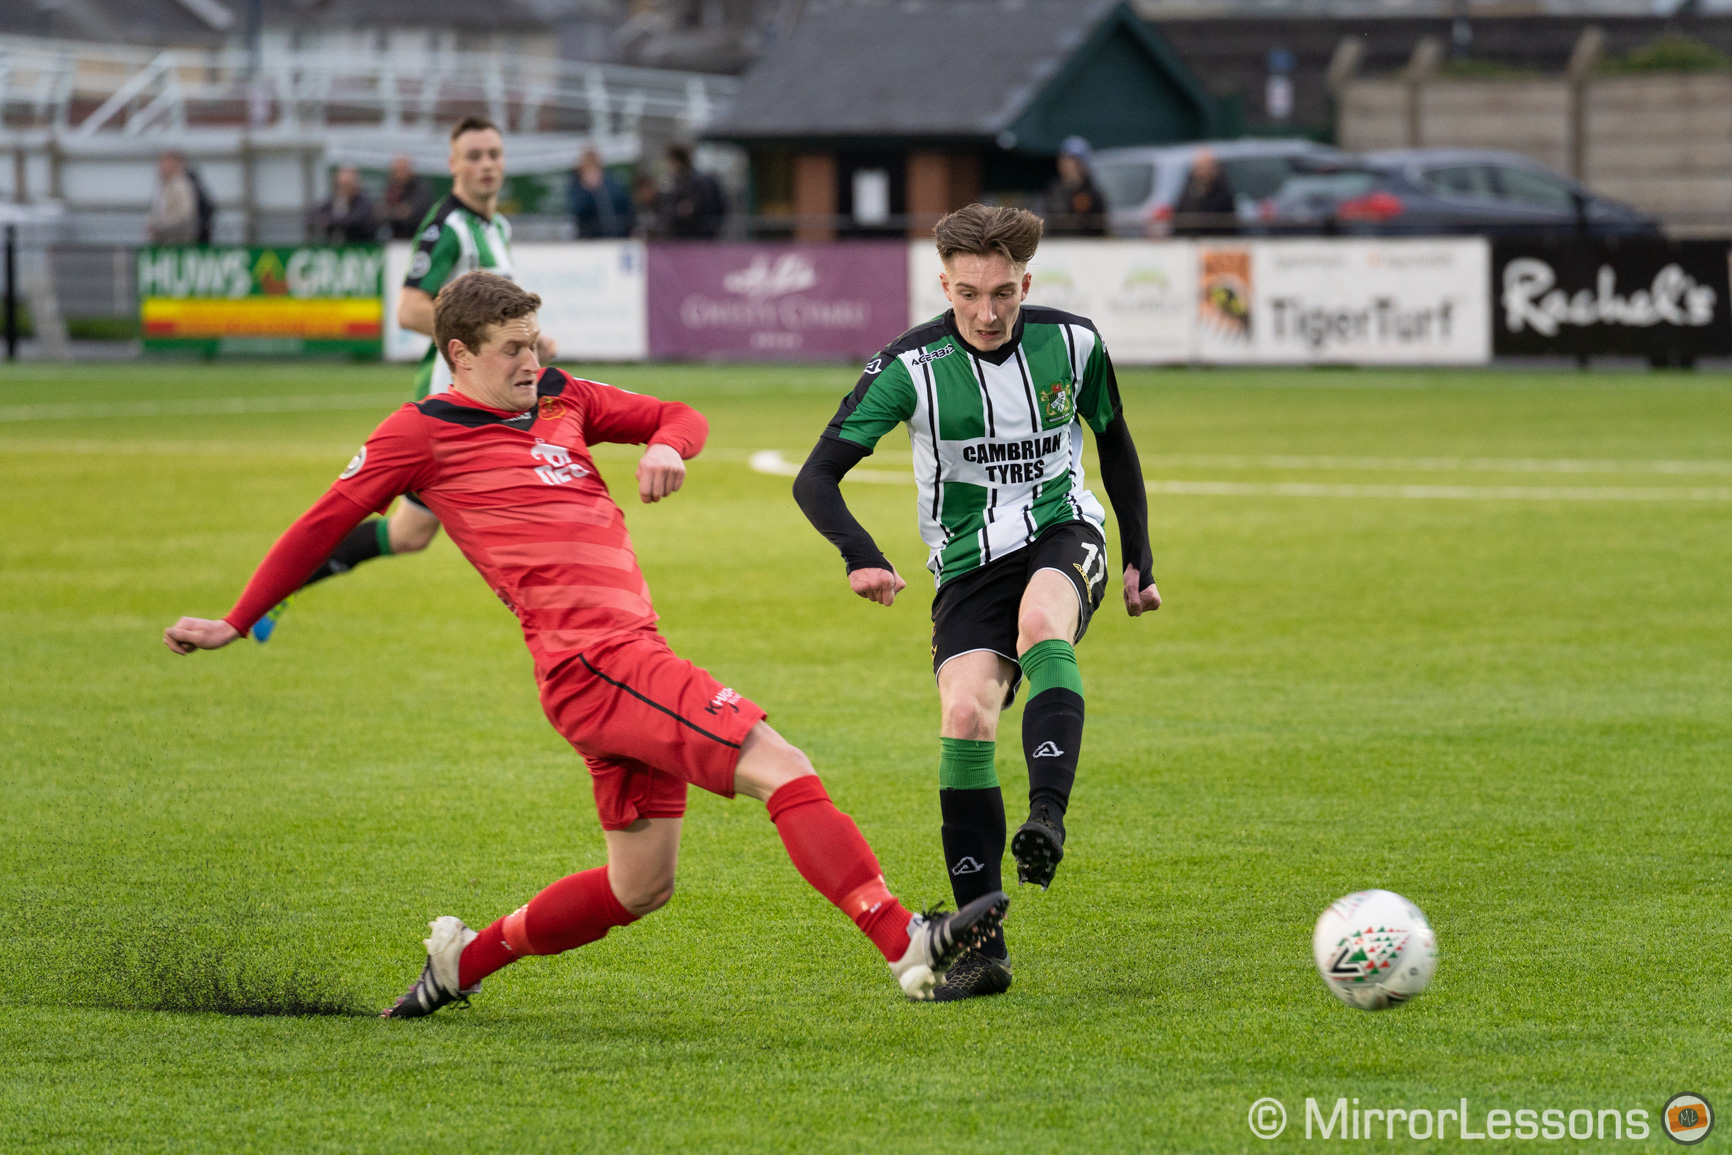
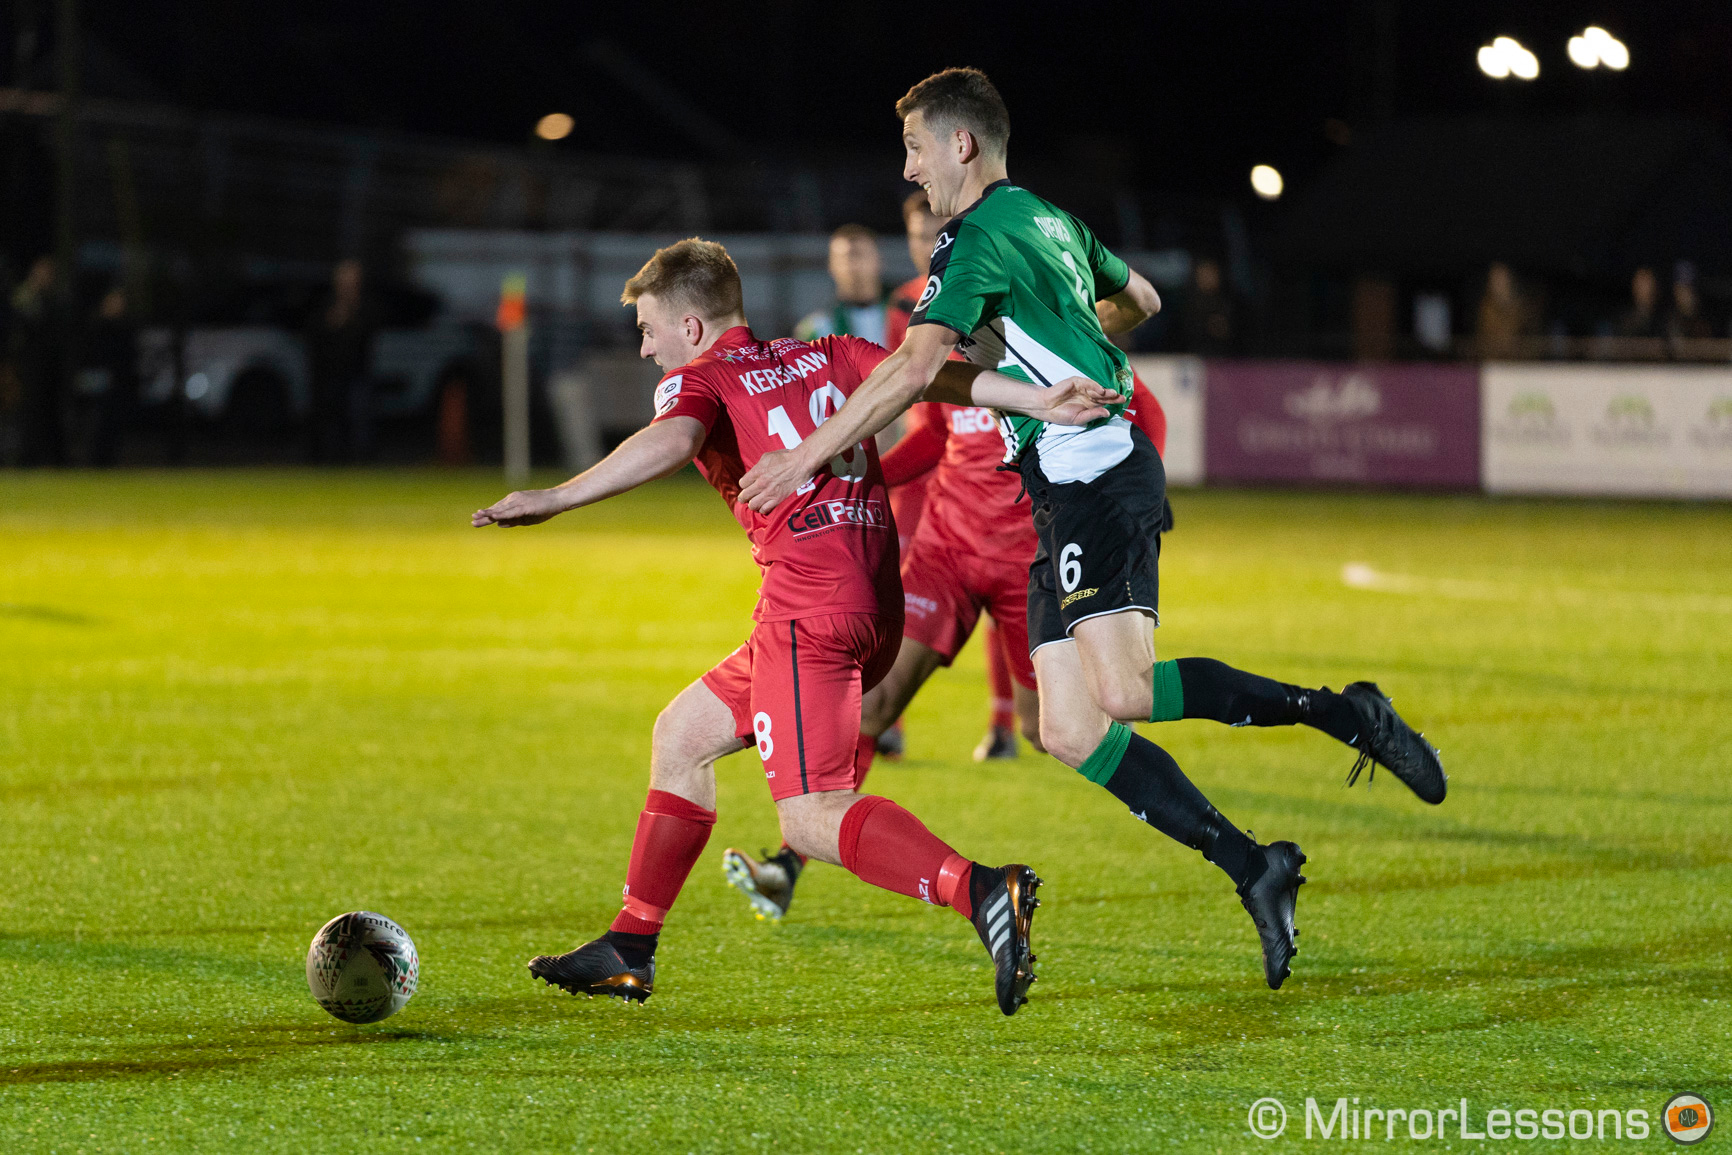
For football, I usually keep my shutter speed between 1/500s and 1/800s. If you want everything perfectly sharp including the ball, you need to go higher.
The reason you may try to keep the speed as low as possible is to get better image quality. With fast shutter speeds, the sensor is exposed to the light for a short amount of time, and if you can’t open the aperture further, the only option left is to raise the ISO which introduces more noise. But remember that it is better to have a sharp shot with a bit more noise, than have motion blur and a lack of details.
Here are a few recommendations for the minimum shutter speeds to use for various sports. Take these as a starting point:
- Football: 1/500s to 1/800s
- Rally: 1/500s to 1/800s if coming towards you and when in a corner, 1/1000s or faster if it’s coming at full speed from the left or right
- Motorbike Race: 1/1000s or higher
- Mountain Bike Downhill Race: 1/500s to 1/1000s
- Marathon: 1/400s or higher
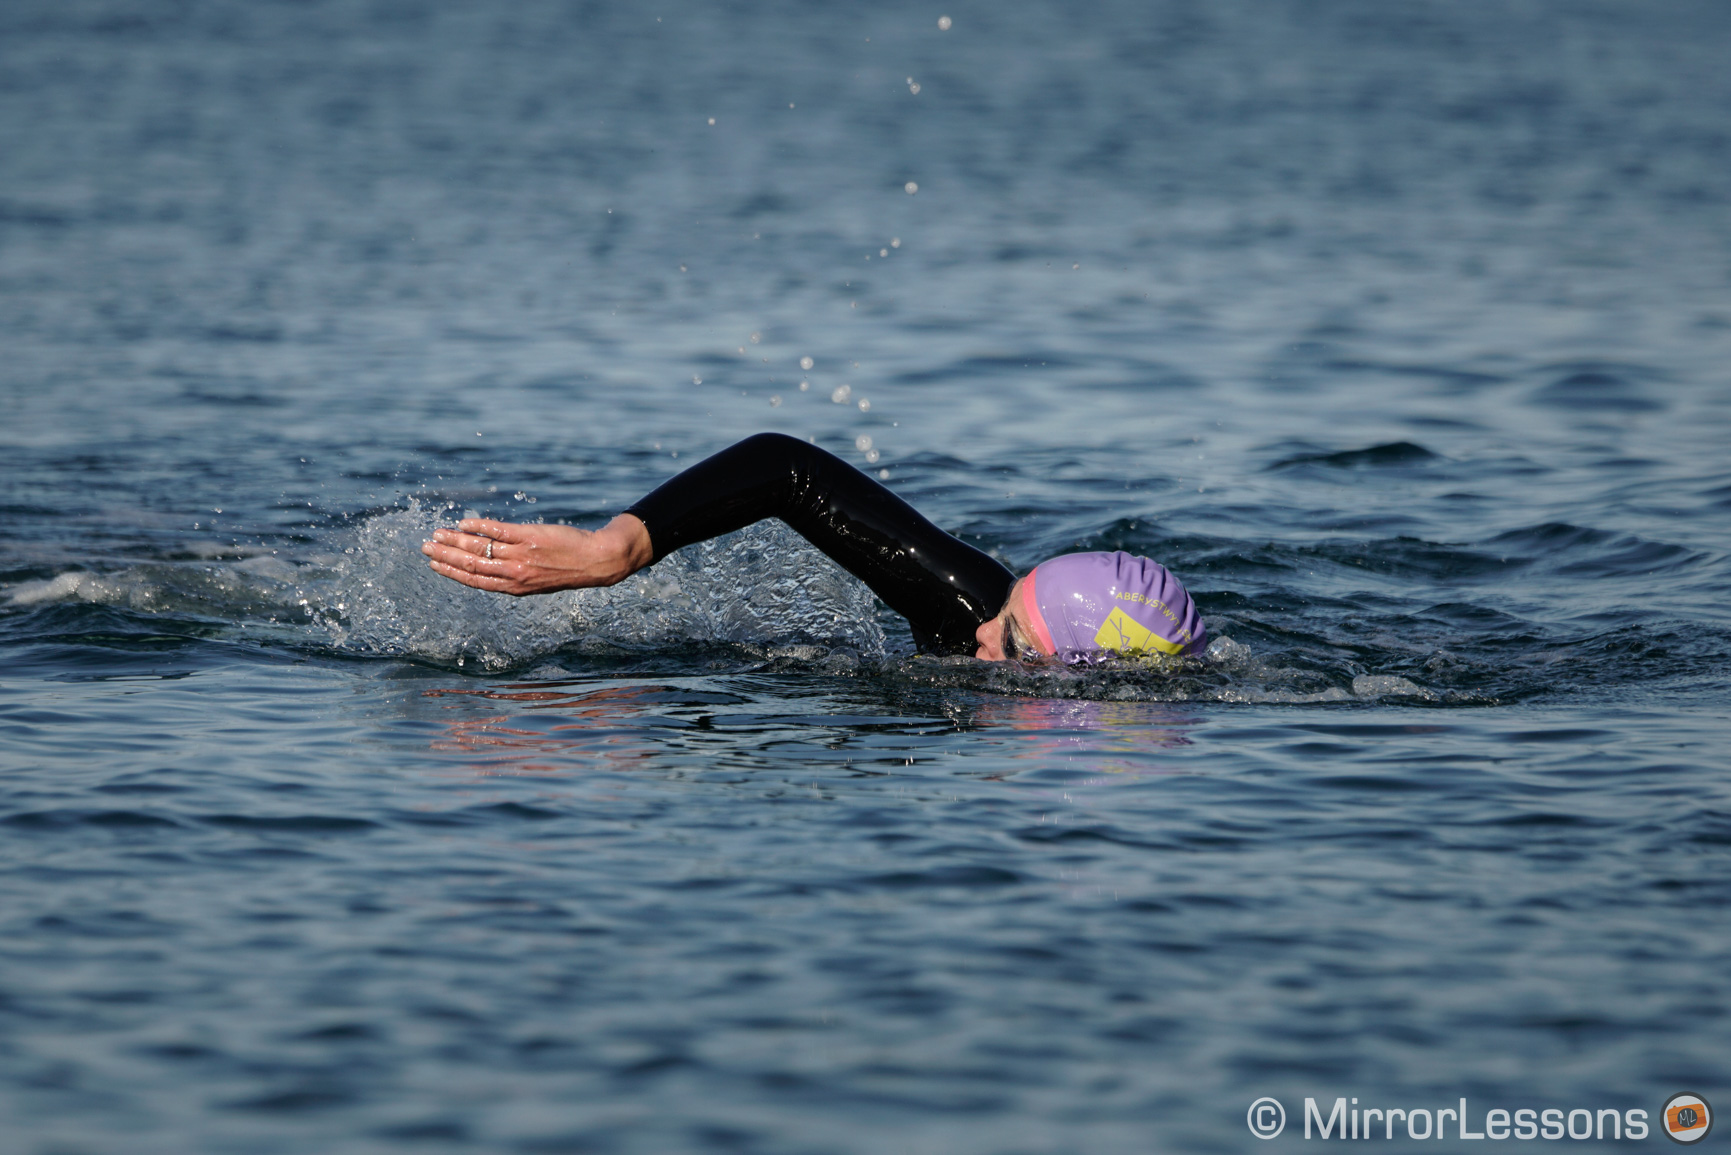
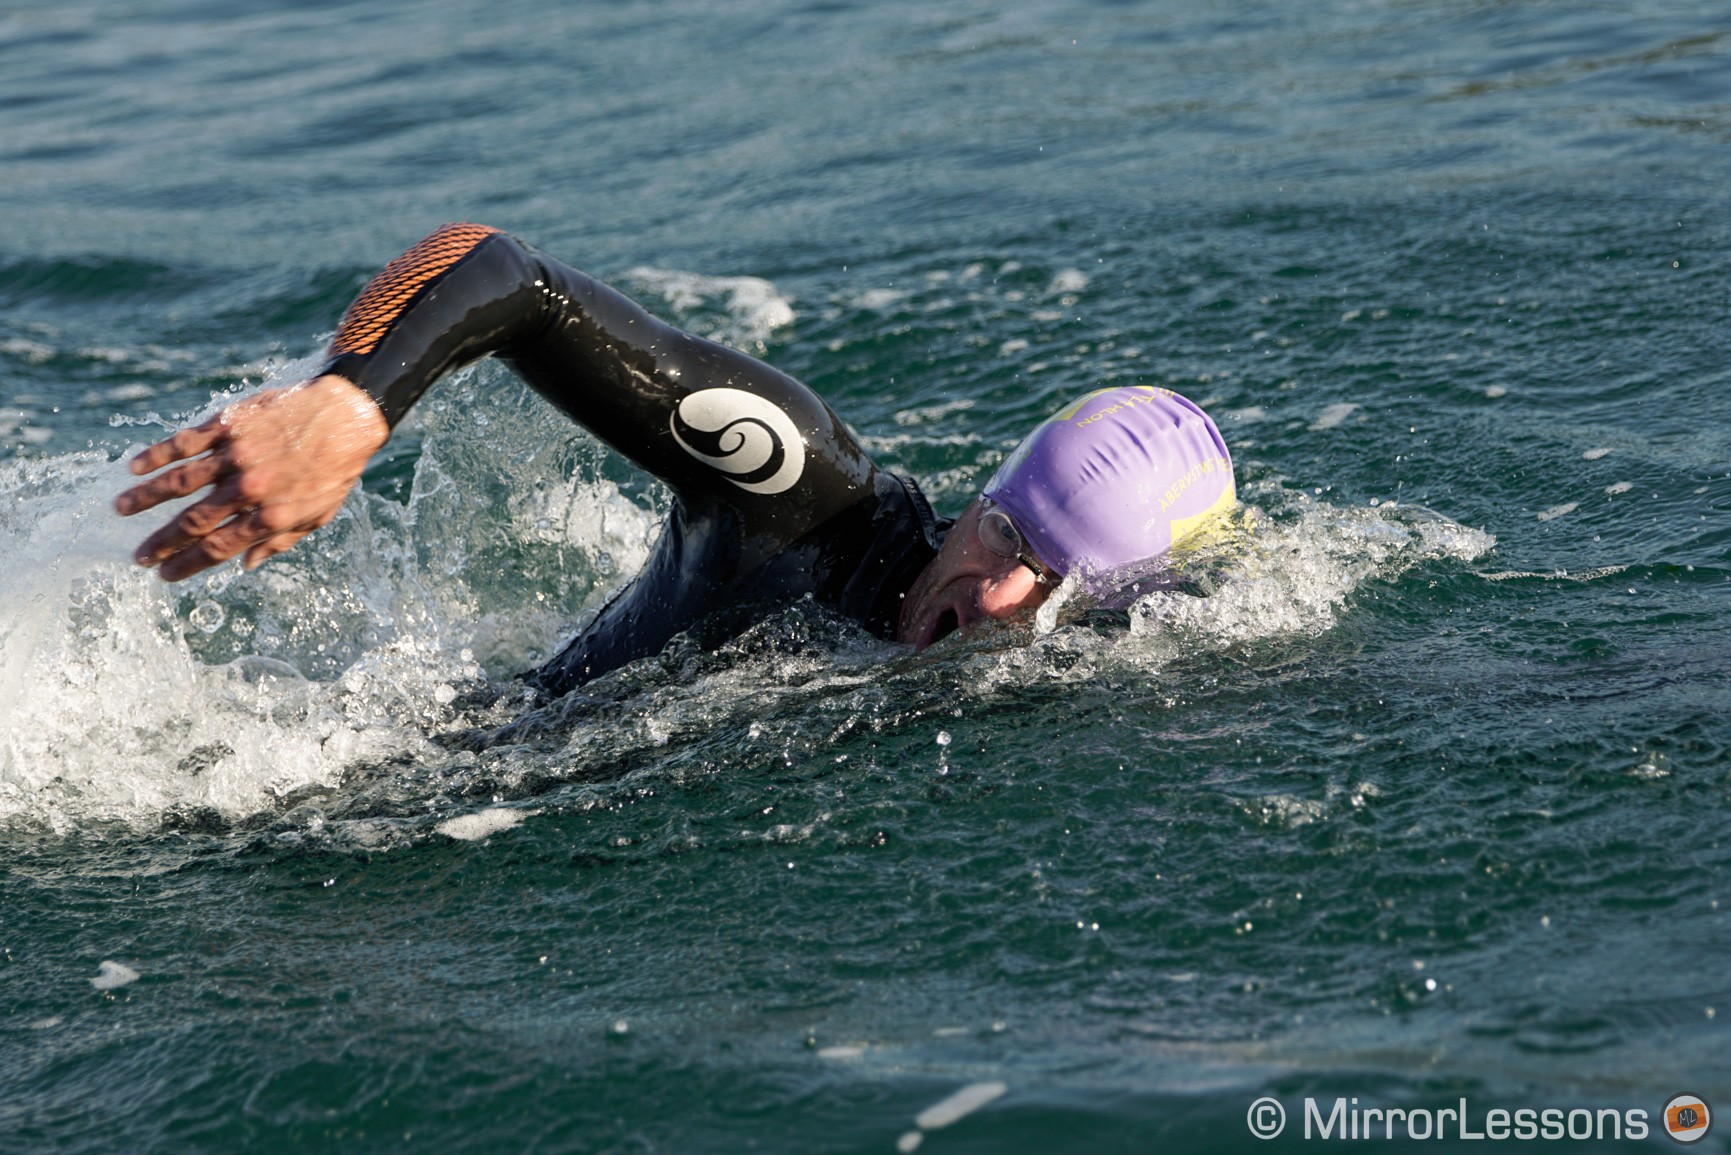
- Swimming: 1/640s or higher
- Tennis: 1/2000s
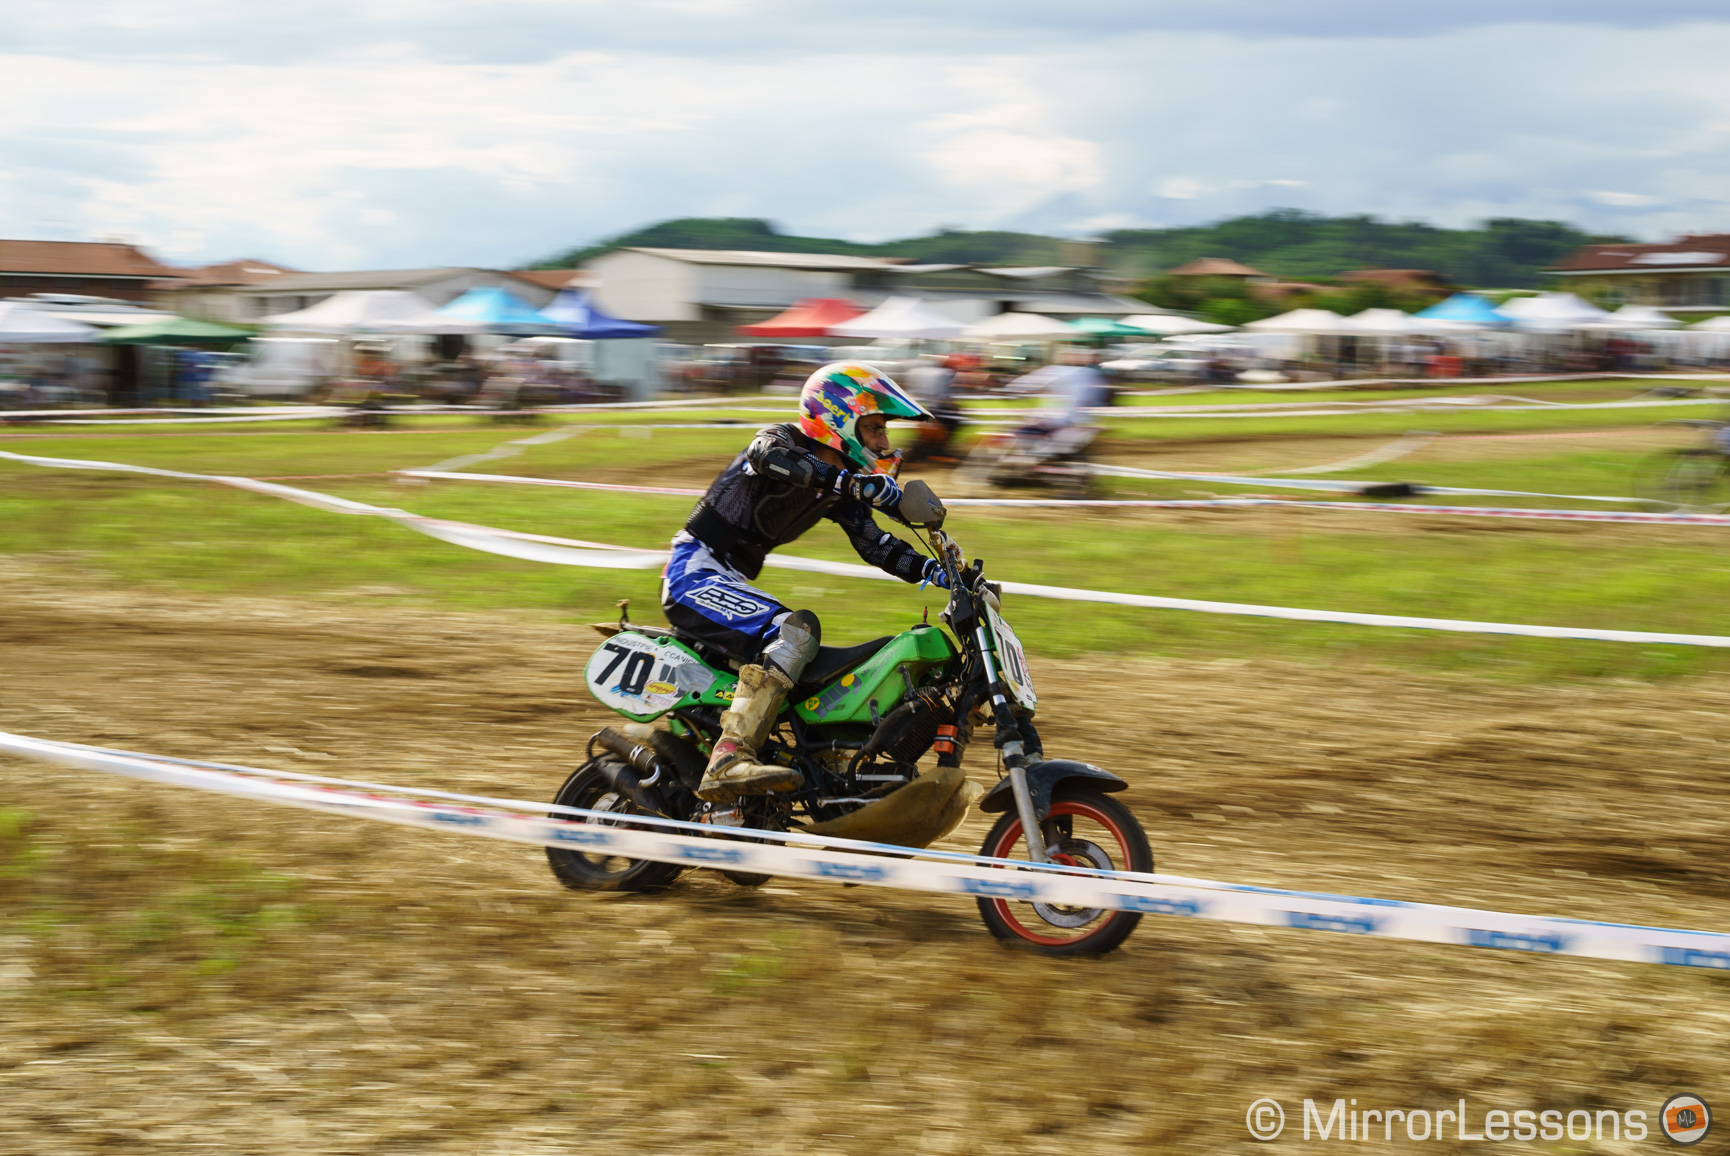
Shutter Speed and Panning
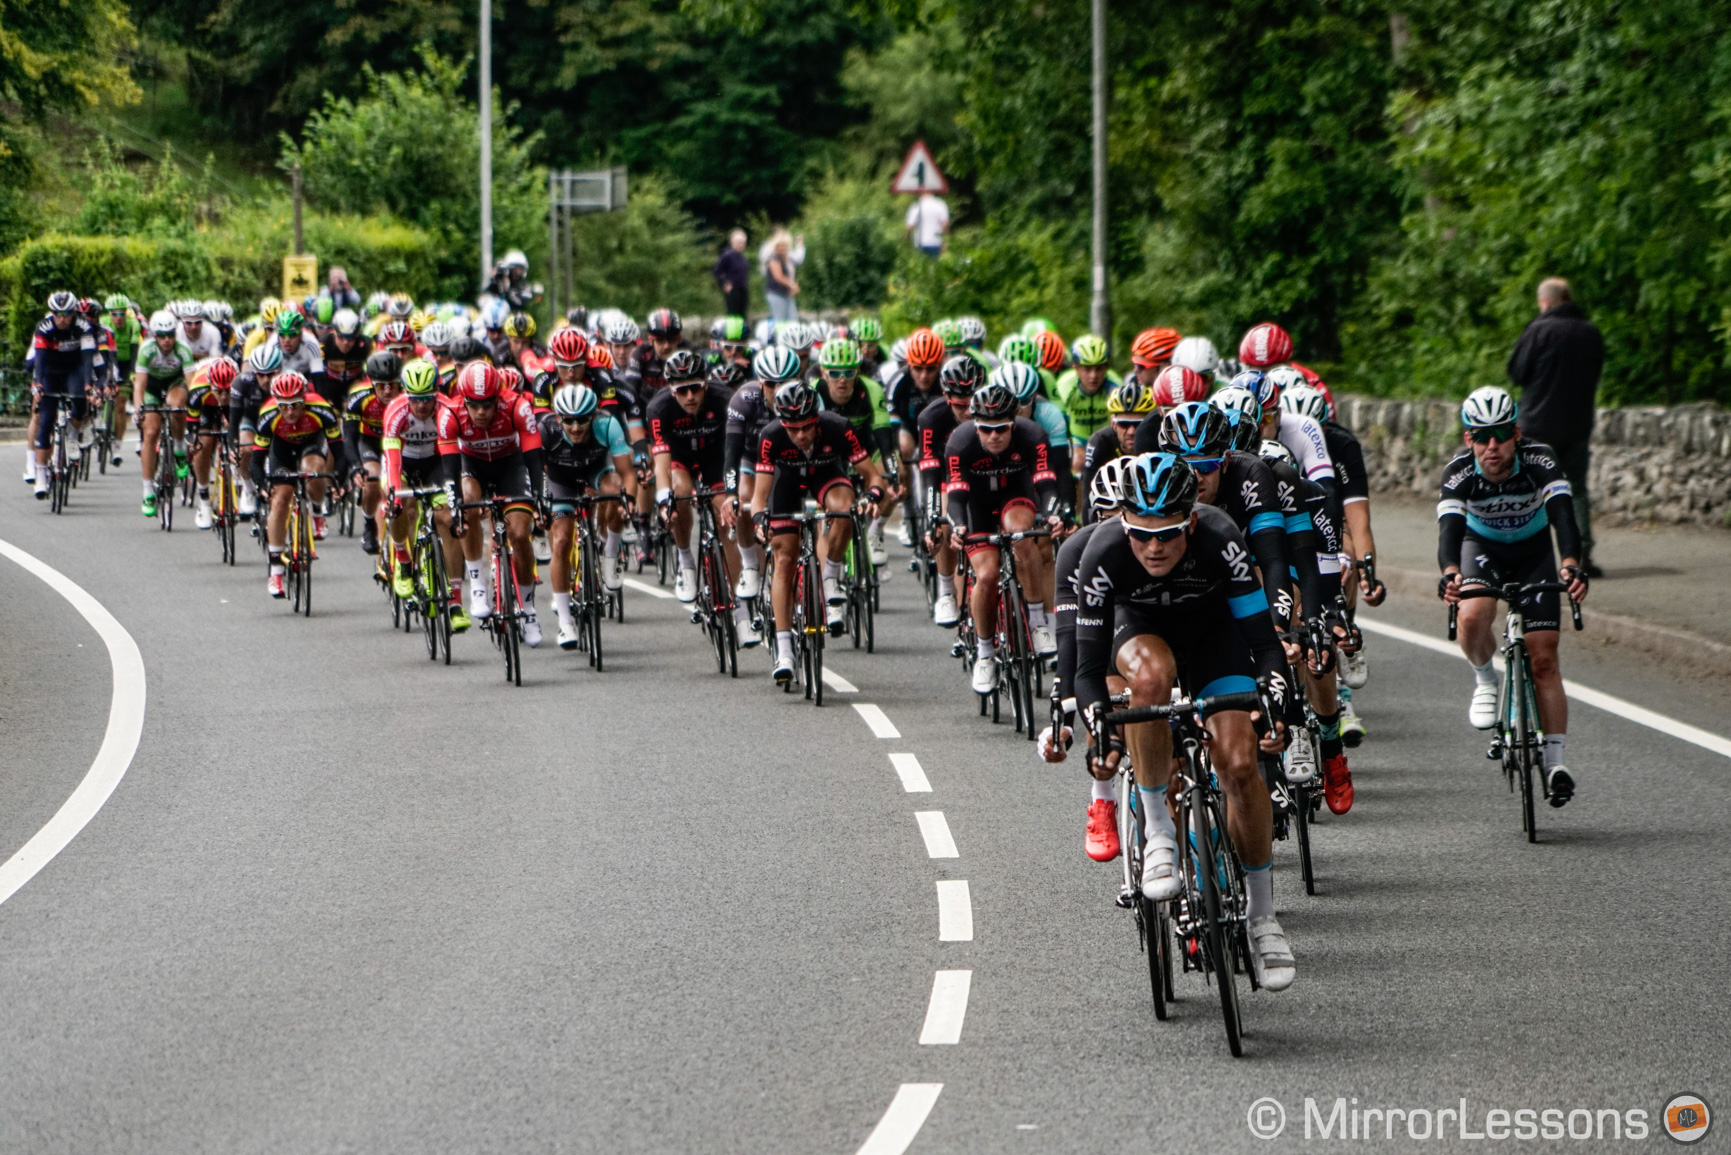
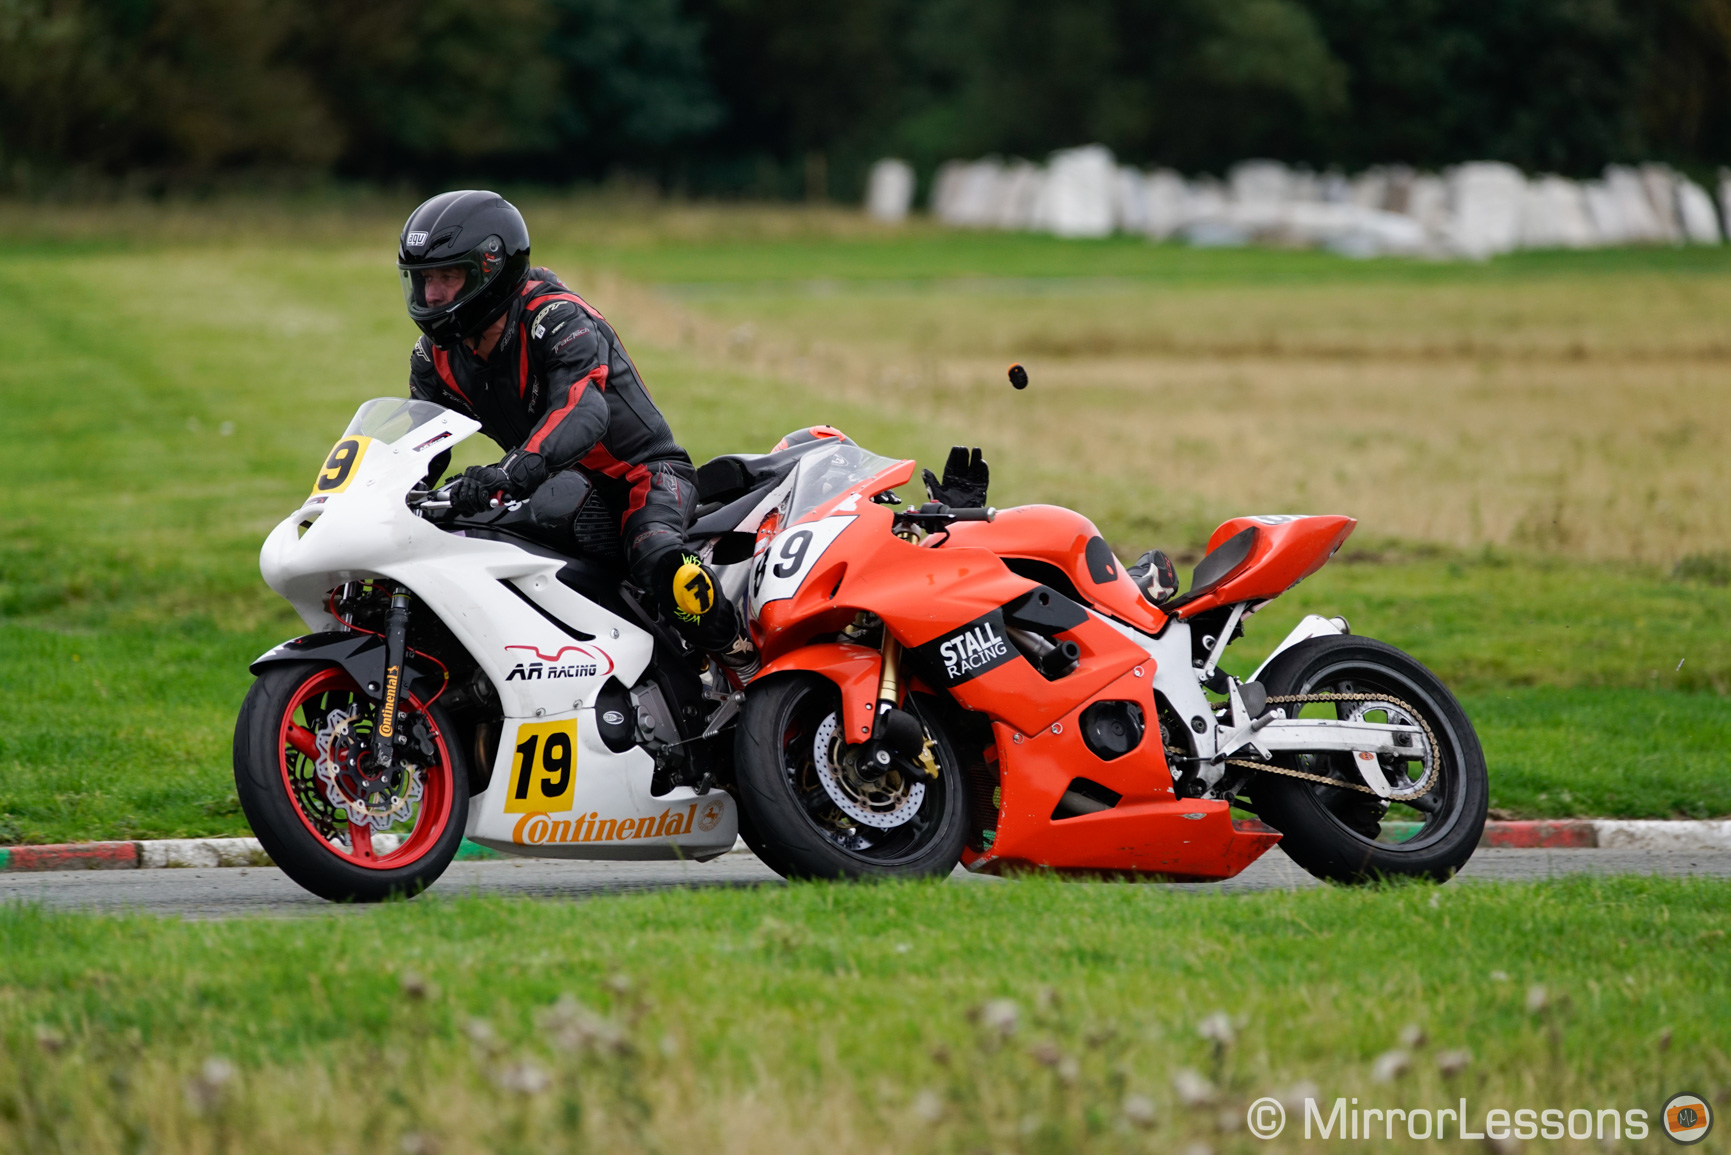
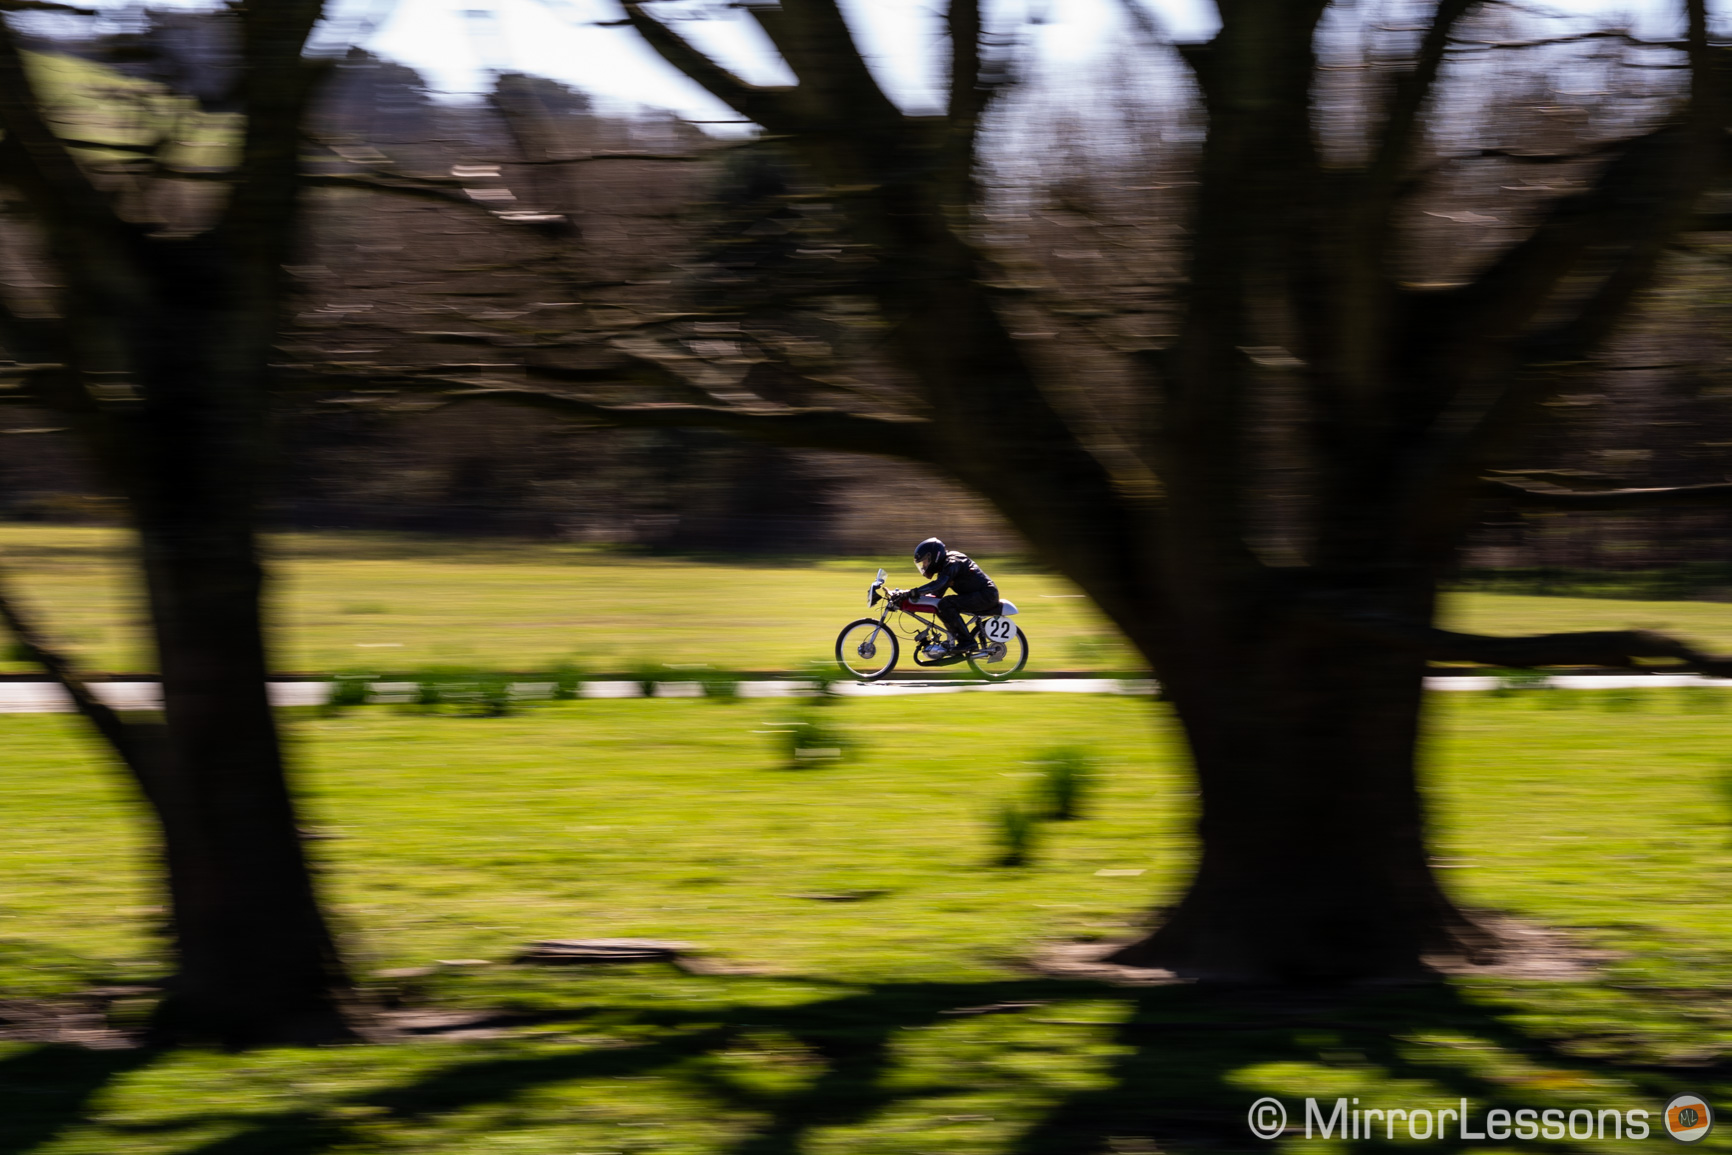
There is a technique where using a slow shutter speed can improve the dynamism of your image, and it is known as the panning technique. One of the most common uses is for car or motorbike races.
If you take a picture of motorsport with a fast shutter speed, you will have everything in focus but the subject may also appear static, especially if the wheels are full of details and look frozen in time.
If you look at the photo below, the scene looks quite static despite the dramatic moment where one of the riders falls off his bike.
If you use a slow shutter speed, you can create motion blur in the background and on the wheels, giving the idea of movement. You can try various speeds depending on how fast the subject goes.
The photo below, taken in the same corner, gives you a greater sense of speed, not only because of the background but also the blurred white rider trying to overtake.
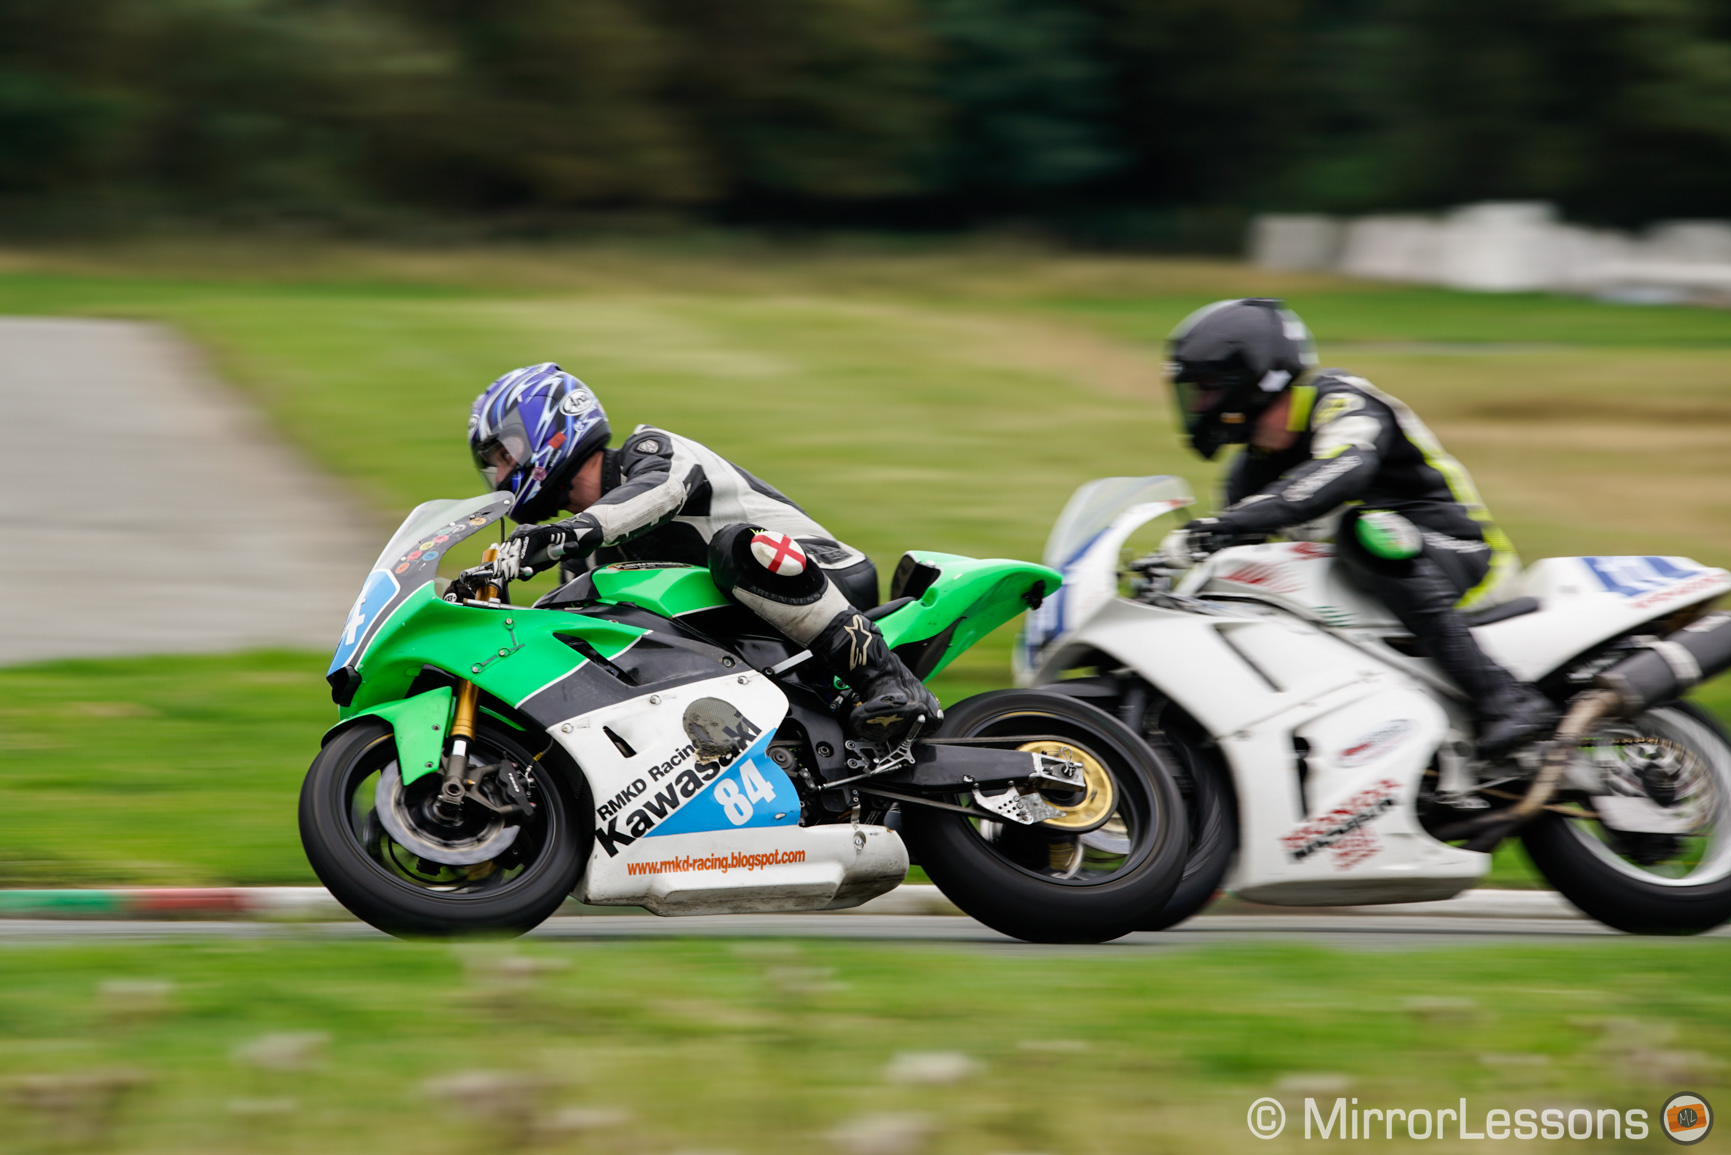
The key in taking a good panning shot is to keep your subject at the centre of the frame throughout the entire sequence, and perform your movement from left to right (or vice versa) with a constant speed (don’t pan quickly and then slow down). The goal is to move at the same speed as the passing subject. And you can be quite creative with composition too!
Aperture
If you’re using a fast telephoto lens (2.8 zoom for example), you have some margin to control the quality output of your images. A setting of 2.8 will allow you to keep your ISO level down and have less noise.
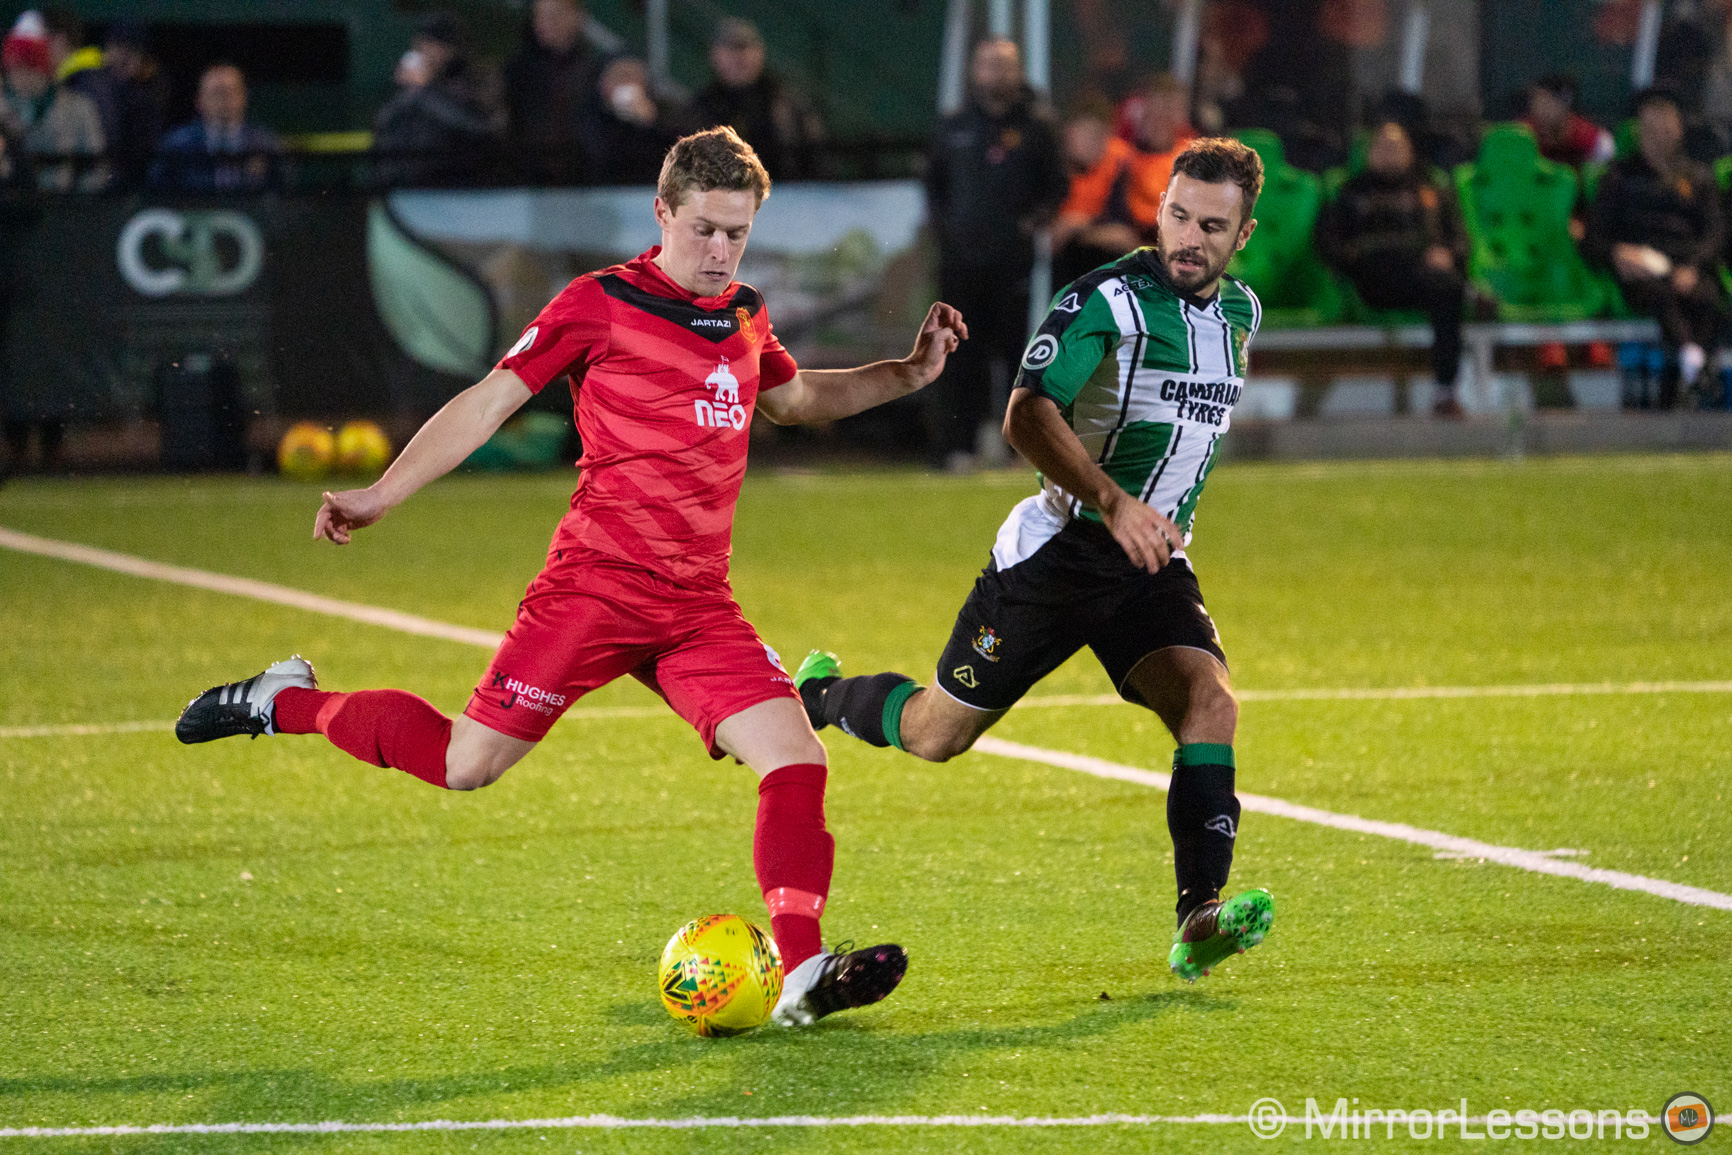
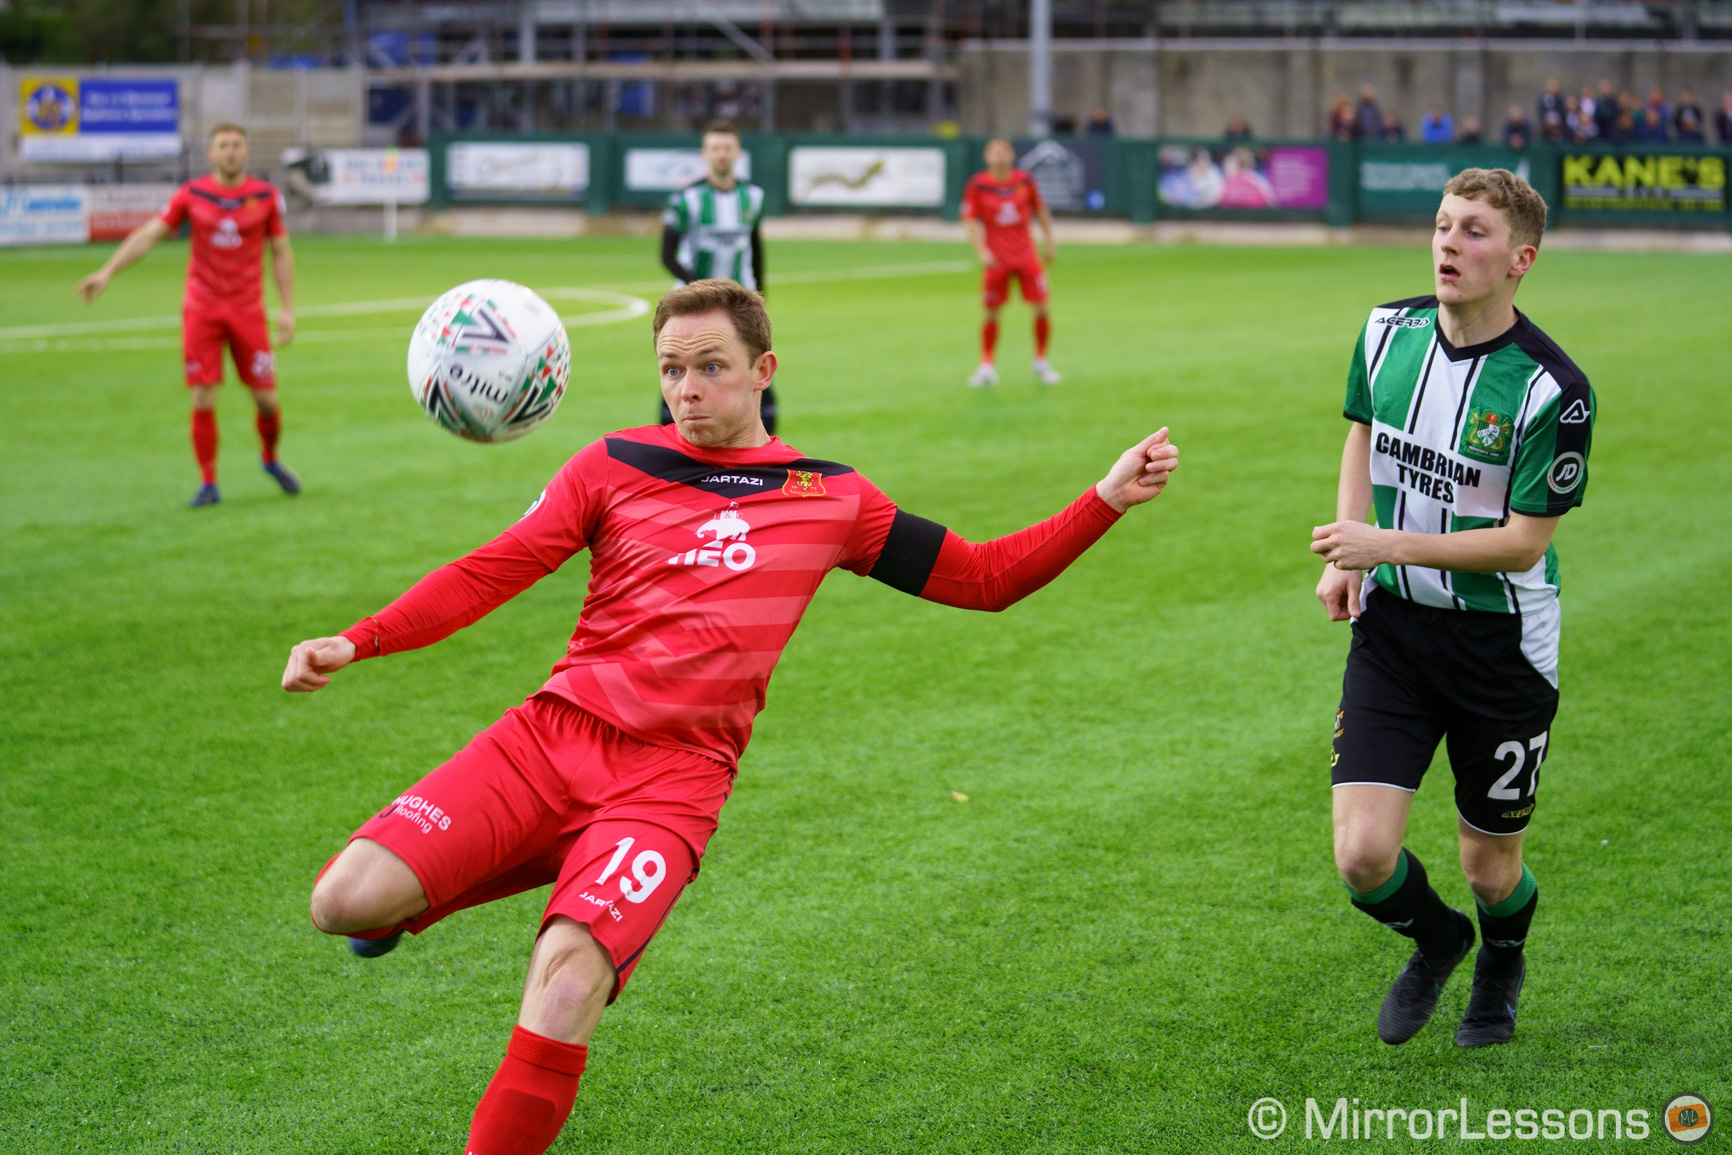
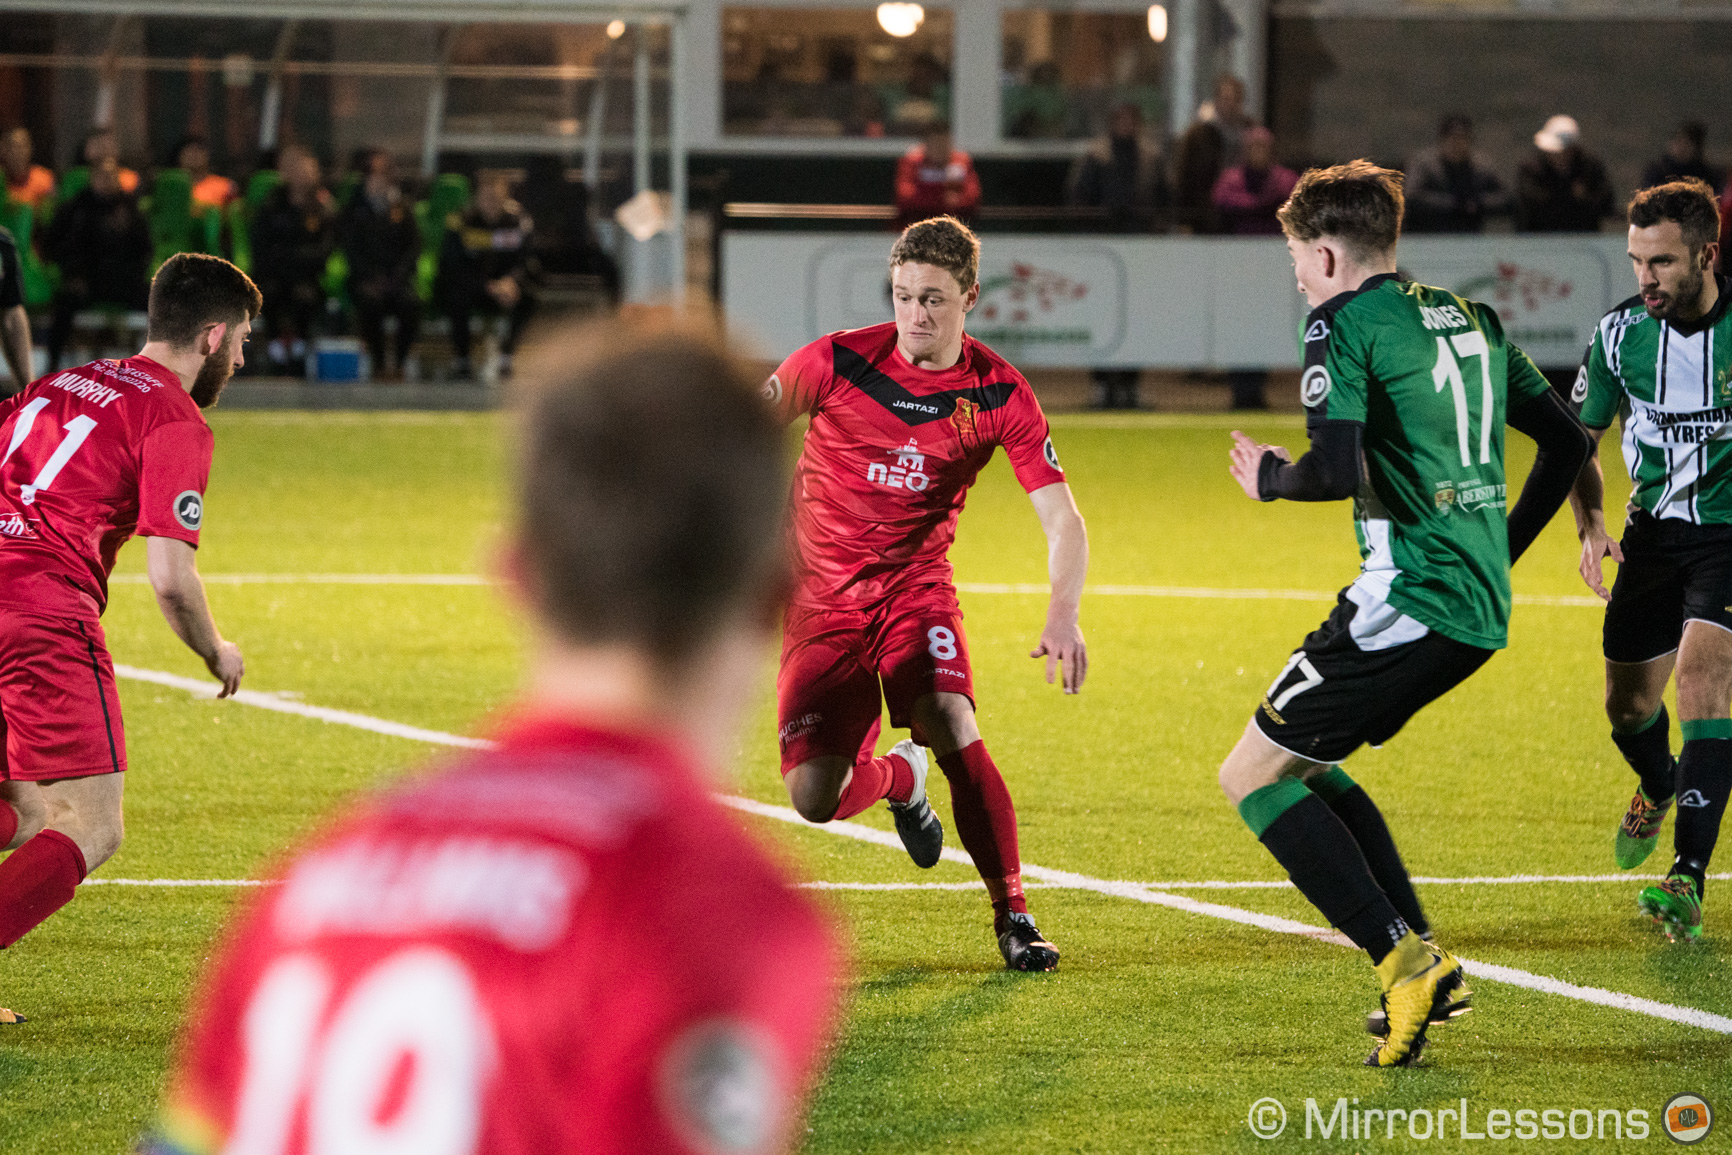
In my experience, I had no problem using a fast aperture such as 2.8 with a telephoto lens, but remember that you’re using a 35mm format camera, so the depth of field can easily become shallow. See the two examples below.
In the first image, the two players are both in focus because they are at an equal distance from the lens.
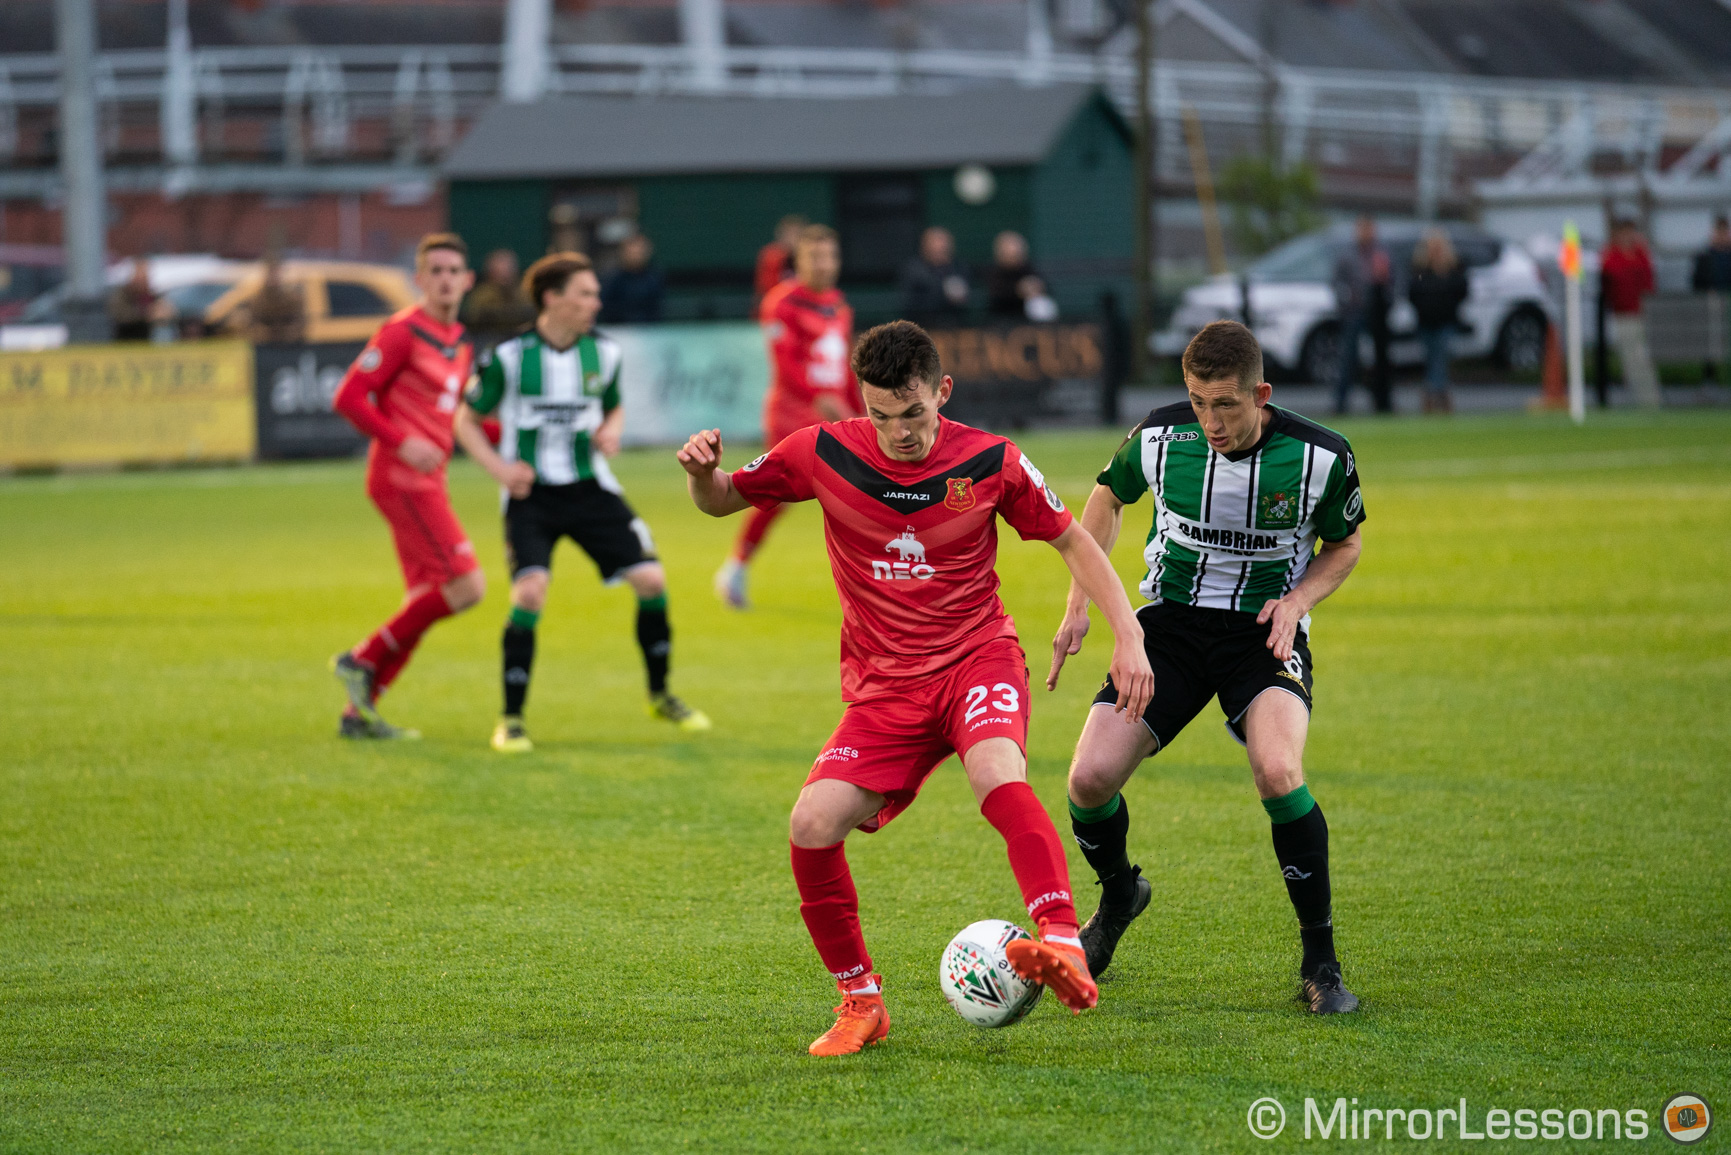
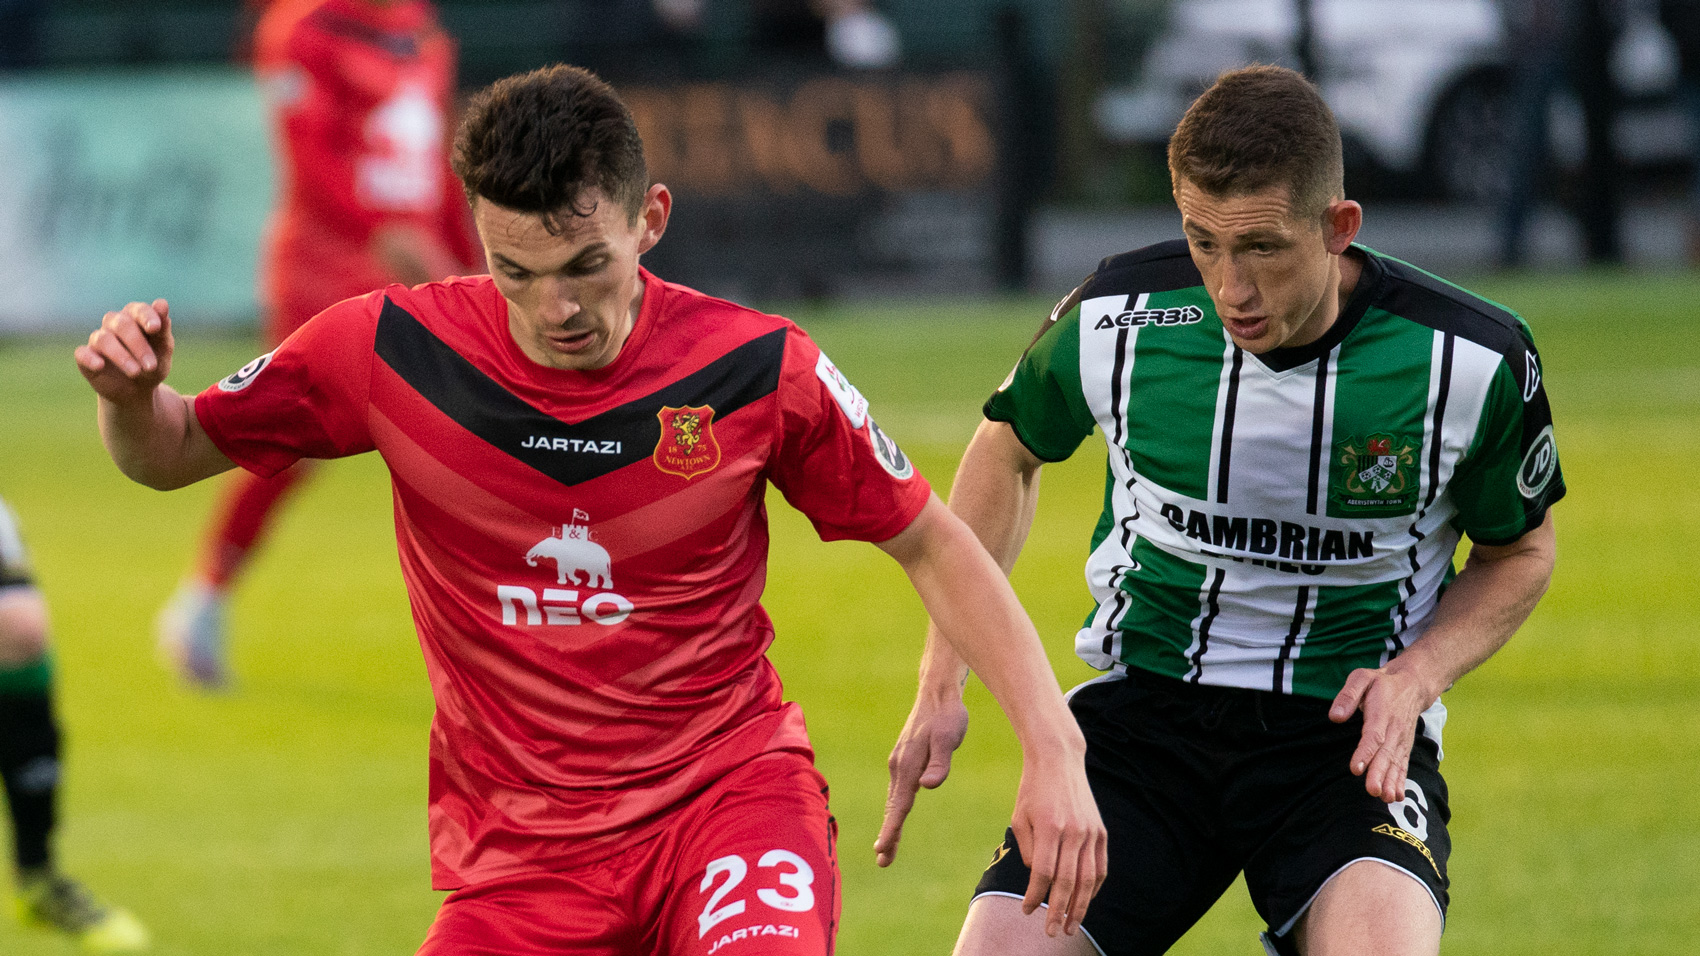
In the second shot, two players are in focus (second and fourth, starting from the left) whereas the player on the far left that is looking back is out of focus, and the third in the background is sligthly out of focus.

So choosing the right aperture is important depending on how many people are in your frame, and of course the effect you want to produce. In the case of the photo above, the 2.8 aperture helped me separate the players from the wall in the background.
ISO
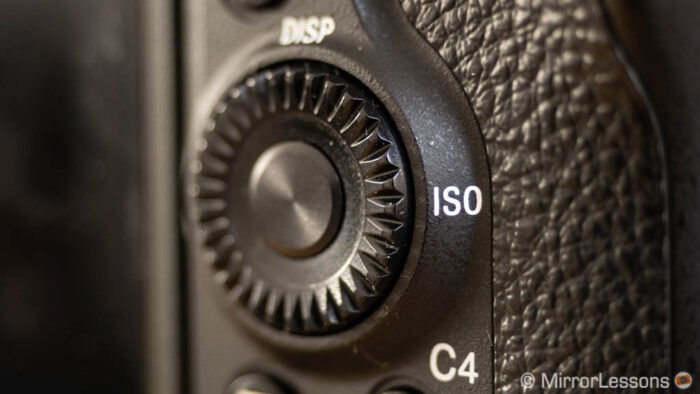
I always set my ISO to Auto and let the camera decide. I set the maximum to 12800 since the quality of recent Sony cameras is more than decent at that level. You can control the ISO with the dedicated button on the right side of the control wheel.
Don’t be surprised if you often end up with images around 6400 or 12800 ISO with a fast shutter speed, and perhaps a medium aperture of f/4 or f5.6. There is not a lot of margin left to get the right exposure, if not by raising the ISO.
Metering
Camera Settings 1 / Exposure1 (page 9/14)
Metering allows the camera to measure the brightness of your image and indicate whether it is correctly exposed or not. If you use an automatic or semi automatic mode like Auto ISO, the camera will choose the appropriate setting according to the metering measurement. You can read the measurement at any time with the ±3Ev values located at the bottom centre of the screen.

If the light is even across the entire playing field, choose Multi. This is the one I use most of the time for various sports.
Centre can work if you want to give priority to your subject at the centre but balance it with the rest of the scene. Spot only measures the very centre of the frame and if your subject goes outside of it, you can get an incorrect measurement.
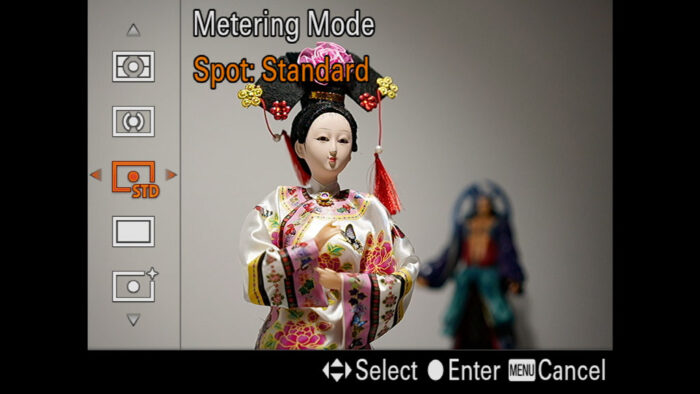
If you’re working in a situation where there is uneven light (like half the field in the shade), take advantage of the exposure compensation tool. There will be moments where the camera is confused about what to expose for, and the exposure compensation dial can force it in the right direction.
To know more about Metering, check our Photography Settings guide.
Sony A7 III, A7R III, A9 Sports Settings: Autofocus
Some of the AF Settings for Sports that I’m going to mention are obvious, but there are a few more things worth knowing.
The A7S and A7S II models use contrast detection autofocus only, which is slower than phase detection when it comes to fast action.
Focus Mode
In most situations, you’ll want to set the Focus Mode to AF-C (Continuous AF). This is where Sony cameras show their full potential and in fact, I often use this mode for static scenes as well.
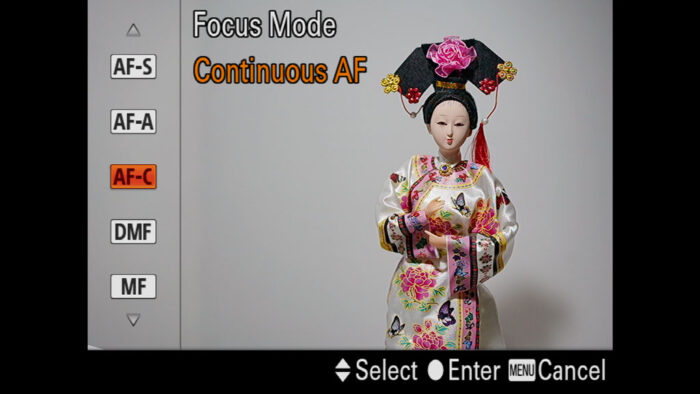
Tip: In situations where you know exactly where the athlete is going to be (example Pole Vault), you can prefocus on the desired area and then either switch to MF, or just take the shot if the shutter button is separated from AF (back button focus method).
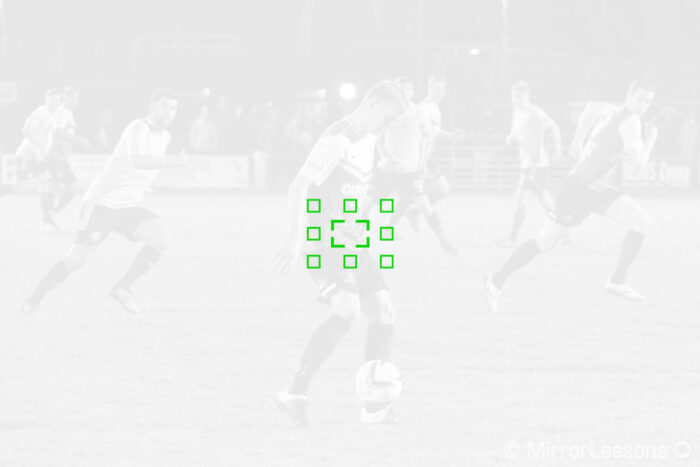
Focus Area
The Focus Area that I happen to use all the time is Zone. It offers a large set of focus points that is enough for most situations. You have enough leeway if the subject is not at the centre, and Sony’s intelligent 4D Focus almost always knows where your subject is.
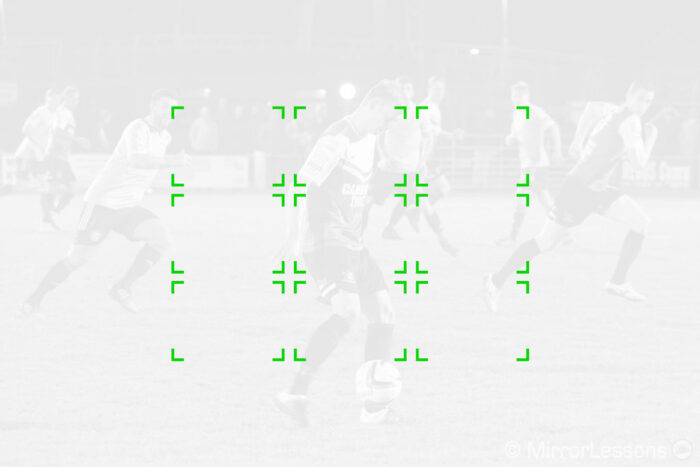
If there are elements that can interfere with a large focus area, like for example a horse rider with spectators in the background and obstacles in the foreground, choose a smaller area such as Expand Flexible Spot.
Expand Flexible Spot is not available on the A7 I series or A7 mark II model.
The latter is also useful when taking pictures of somebody swimming. With all the waves the athlete produces, the camera can easily be confused and focus in front or behind him.
Note: on the A7R IV, A9 and A9 II, a good alternative is to use the Tracking mode. These cameras have the latest real-time algorithm and perform remarkably well with the Tracking setting. It is also useful when you’re not sure in which direction the subject is going to go. To know more about Tracking, check our Autofocus Guide.
Recall a Focus Area with a Custom Button
Not available in the A7 I and A7 II series
If you want to switch between two focus areas quickly, for example from Zone to Expand Flexible Spot and vice versa, you can do so with a custom button.
- Turn On AF Area Regist. in Camera Settings 1 / AF3 (page 7/14)
- Exit the menu and choose a focus area you want to save
- Press and hold the Fn button to register it
- Go to Camera Settings 2 / Custom Operation 1 (page 8/9)
- Enter the first Custom Key setting and select a button
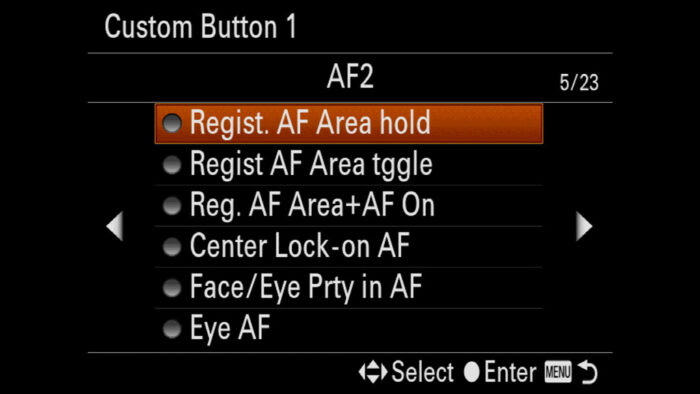
- Scroll right until you reach AF2 (page 5/23)
- Choose either Regist. AF Area hold or Regist. AF Area tggle.
- Exit the menu, choose a second focus area, then press the custom button to switch between the two
Note: the difference between hold and toggle is that with the former, you have to press and hold the button, whereas with the second you press once to change the area and a second time to go back. You also have a third option, Reg. AF Area+AF ON, which means that the camera changes the area and engages focus (you have to press and hold in that case).
AF Track Sens
Camera Settings 1 / AF2 (page 6/14)
Not available on the A7 I and A7 II series
This parameter determines how reactive the autofocus is. It works from 1 (Locked on) to 5 (Responsive). The higher the value, the more responsive the autofocus is, which means it will change more rapidly to keep your subject sharp. On the other hand, the lower the value, the less responsive the autofocus is.
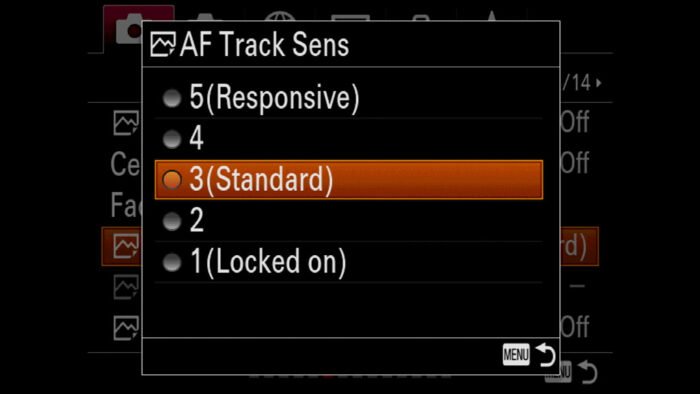
With sports, you need a bit of everything. If you’re waiting for a rally car to come out from behind a blind corner at full speed, you want the AF to track as fast as it can, so set AF Track Sens to 5.
However if you are tracking a car or motorcycle and the view is not clear, you don’t want the autofocus to react too quickly to a foreground element that covers your subject momentarily. In that case, you lower the value to 2 or even 1.
The same can happen for football when players in the foreground cover the subject momentarily. If the AF is too reactive, it’s going to change the focus point too soon and it may not be what you want.

The level 3 (Standard) is a good starting point and will work for many sports. But every situation is different, so if you find the AF doesn’t behave the way you want, the AF Track Sens setting can help you.
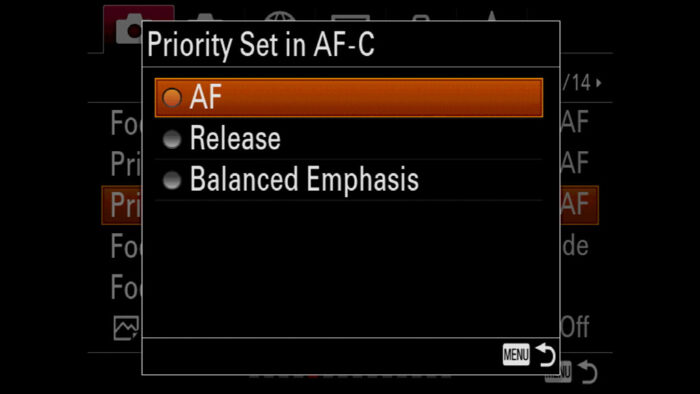
Priority Set in AF-C
Camera Settings 1 / AF1 (page 5/14)
Not available on the A7 I series and the A7 mark II model
You can decide whether the camera gives priority to focus acquisition or releasing the shutter. Sports photographers often prefer Release priority because they want to make sure not to lose a single moment of action. But if you see that the camera is mis-focusing more than it should, select AF priority.
Sony cameras (A7 I series excluded) also have a third setting called Balanced Emphasis, where the camera gives priority to either the AF or Release. I’m not sure how it decides on one or the other to be honest, so I never use it.
Eye AF
For action, I don’t find Eye AF useful, but during momentary breaks when you are able to get closer to the players or the coach to take a few portraits, then Eye AF can be very useful because it focuses on the eyes automatically. To find out more about it, read our Portrait and Eye AF Setup article below.
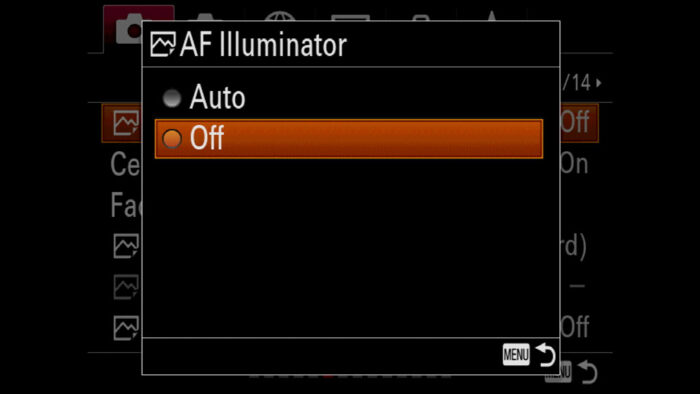
AF Illuminator
Camera Settings 1 / AF2 (page 6/14)
This might sound a bit silly, but it’s better to put it in as a reminder. The AF Illuminator is small red light on the front of your camera that can be triggered automatically if the camera struggles to focus. However it can annoy the players, and in some venues they might even ask you to turn it off. So just keep it off from the start.
Tip: while you’re at it, also turn off the Audio Signals in Camera Settings 2 (page 9/9).
There are other things such as Back Button Focus that can be useful for Sports Photography. To learn more about all the AF settings of your Sony camera, check our in-depth article below.
Sony A7 III, A7R III, A9 Sports Settings: Drive and Shutter Modes
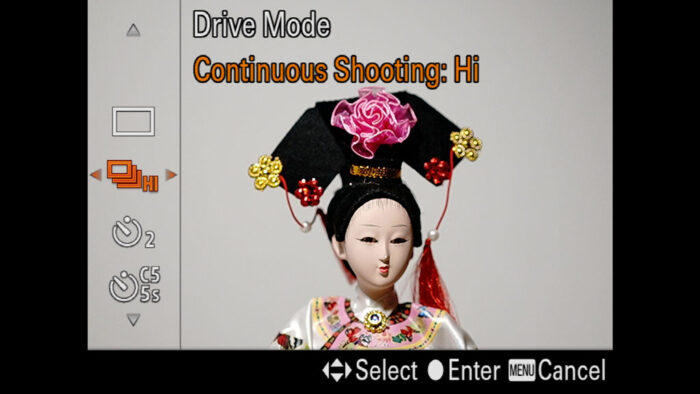
A key setting to work with when dealing with action is the continuous shooting speed. When you press the shutter release button, the camera takes pictures consecutively until you lift your finger from the shutter button.
Continuous Shooting
Depending on the Sony Alpha model you own, the continuous shooting speeds will differ. Currently, the A9 and A9 II are the fastest at 20fps, whereas older models such as the original A7 only goes up to 5fps. What’s more, older cameras may lock focus on the first frame when using the fastest speed.
Your Sony camera has the Drive Mode assigned by default on the left button of the rear control wheel. Press it and scroll one step down. You’ll see three or four speed options.
On the A7 I and A7 II series, there are only two speeds available and they are called Cont. Shooting and Speed Priority Cont. Shooting.
Below is a recap of the drive speeds of all the A7 and A9 models.
| Hi+ | Hi | Mid | Lo | |
|---|---|---|---|---|
| A9, A9 II (e-shutter) | – | 20fps* | 10fps | 5fps |
| A9, A9 II | – | 10fps* | 8fps | 3fps |
| A7 III, A7R III, A7R IV | 10fps* | 8fps | 6fps | 3fps |
| A7S, A7S II | – | 5fps | – | 2.5fps* |
| A7, A7 II | – | 5fps* | – | 2.5fps |
| A7R | – | 4fps | – | 1.5fps* |
*Note: the bolded and underlined values represent the speed for which AF and AE tracking is maintained.
You don’t need the fastest speed every time. It depends on how fast the action you’re shooting is, or if there are fast and unpredictable moments where capturing more frames per second gives you a higher chance of freezing the perfect moment.
Also, choosing a slower speed helps the camera clear the buffer memory more quickly. The buffer is where the camera stores new images temporarily while it writes the files to the memory card.
Continuous Shooting and Live View
Up to a certain speed, most Sony cameras show you a live view of your scene with intermittent blackouts.
At the highest speed, most products disable the live view and show you the images that have just been taken instead. The sequence is more clear to watch because there are no blackouts, but the delay is bigger because what you see has already happened.
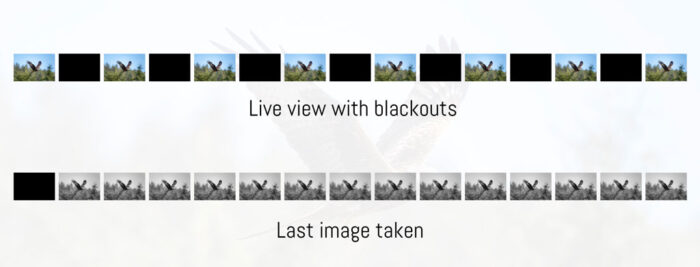
Below you can see which camera enables live view at which speed.
| Cont. Shooting with Live View | |
|---|---|
| A9, A9 II | 20fps |
| A7 III, A7R III, A7R IV | 8fps |
| A7, A7 II, A7S, A7 II | 2.5fps |
| A7R | 1.5fps |
Choosing one or the other really depends on the type of action. For unpredictable subjects, you’ll react to a change in direction more quickly with live view. If the scene is more static and the subject stays in the same place, then not having live view matters less.
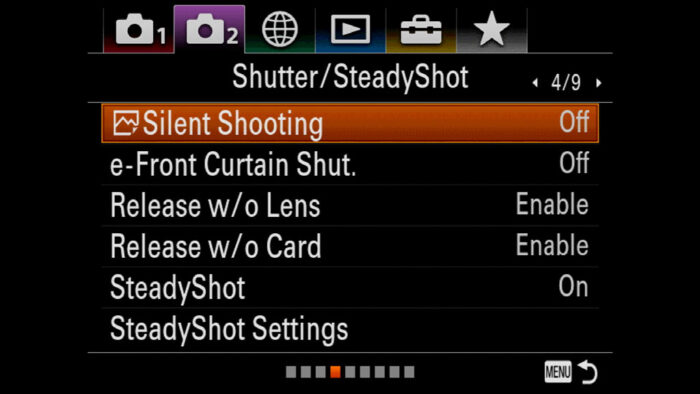
Silent Shooting
Camera Settings 2 / Shutter SteadyShot (page 4/9)
Most Sony cameras allow you to choose between a mechanical shutter (normal, set by default), an electronic first curtain shutter and a full electronic shutter (called Silent Shooting).
Silent Shooting is not available on the A7, A7R and A7 mark II.
Silent Shooting can be very useful in some situations where you would not normally be allowed to take pictures because of the noise the camera produces (certain moments in golf for example).
Remember however that Silent Shooting can create distortion with fast movements (known as the rolling shutter effect), as well as banding under specific artificial light sources. Unless you’re using a Sony A9 or A9 II (see below), be careful when to using the Silent Shooting mode.
Silent Shooting on the Sony A9 and A9 II
The exception is the Sony A9 series because of its special stacked sensor that contains a DRAM memory and allows the cameras to process more data at the same time.
As a result, they can take pictures up to 20fps with the electronic shutter. Distortion or banding is rarely a problem thanks to the superior sensor readout speed. Furthermore, you get live view and no blackouts which is a better experience when tracking fast subjects.
Find out more about the Sony A9 and electronic shutters below.
In-Depth:
Electronic Shutter Evolution
Sony A7 III, A7R III, A9 Sports Photography: Additional Settings
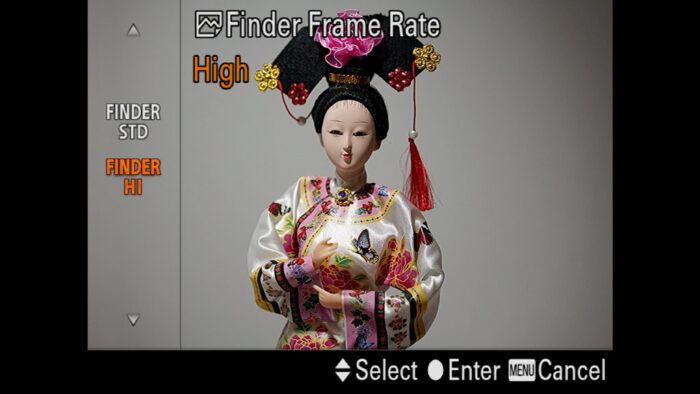
Viewfinder Frame Rate
Camera Settings 2 / Display Auto Review 1 (page 6/9)
Not available on the A7 I, A7 II series, and the A7 III.
Select Sony cameras offer the possibility to increase the frame rate of the finder from Standard (50 or 60fps) to High (100 or 120fps). This is useful when following fast action because the higher refresh rate gives you a sharper and smoother view of the scene.
Flicker Reduction
Camera Settings 1 / Shooting Assist (page 14/14)
Not available on the A7 I and A7 II series.
When taking consecutive pictures in venues illuminated by artificial light sources (fluorescent lighting for example), you can end up with slightly different exposures and colours between shots.
This happens because the light source’s brightness constantly fluctuates up and down (flickering). It is not visible to our eyes because it happens very fast but the camera can pick it up because of the combination of fast shutter speeds and fast continuous shooting that is not synced with the light frequency.
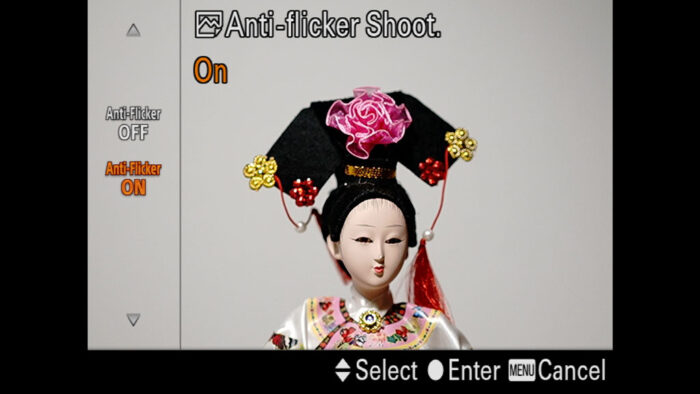
To counteract this, there is a setting called Anti-Flicker Shoot. that once active, will take images when flickering has the least impact.
Note: the shutter release lag, as well as the continuous shooting speed can decrease when this setting is activated. Furthermore, this applies to the mechanical shutter only and doesn’t work with the electronic shutter.
ISO Auto Minimum Shutter Speed
Camera Settings 1 / Exposure1 (page 9/14)
Not available on the A7 I series or the A7 mark II model.
If you like to work with Auto ISO and Aperture priority (where the camera selects the shutter speed automatically), you want to look at a useful setting called ISO AUTO Min. SS.
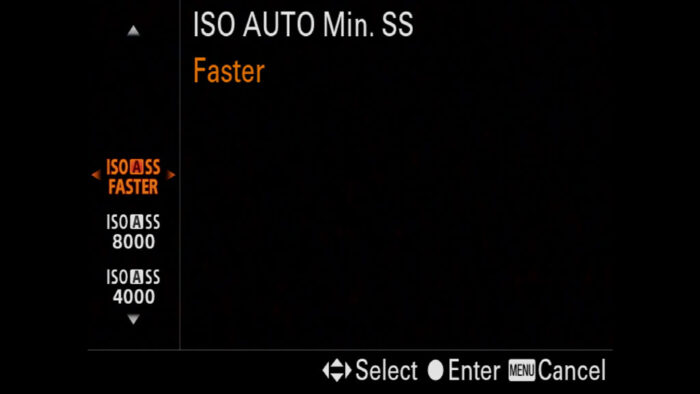
Why is it useful? Well, the problem with Aperture priority is that if the camera determines that there is not enough light, it might prioritise a slow shutter speed over a higher ISO level (or it might have already reached the highest ISO available). With action, this can result in bad photos with too much motion blur.
ISO AUTO Min. SS. allows you to set a minimum shutter speed limit so that the camera doesn’t go under. For football for example, you can set a limit of 1/500s so that the camera doesn’t choose a slower speed like 1/200s or 1/100s.
Long story short, you can let the camera pick the ISO and Shutter Speed automatically but give it some rules by setting the maximum ISO level, and the limit for the shutter speed.
*Limitation: be aware that the camera may bypass the ISO AUTO Min. S.S. setting if it can’t get an optimal exposure with the current parameters. Make sure that your Sony A7 has enough range to work with, or use the exposure compensation dial to underexpose your image a bit and keep a safe shutter speed.
Here is how you can set ISO Auto Min. S.S.:
- Go to Camera Settings 1 / Exposure 1 (page 9/14)
- Enter ISO AUTO Min. S.S.
- In the first row, you can choose between Slower / Slow or Fast / Faster. They correspond to a ±2Ev in comparison to the shutter speed the camera is going for (Standard). For example, if the camera tends to select 1/100s but you want a faster speed, choose Fast or Faster and the camera will pick 1/200s or 1/400s respectively. With Slow/Slower, it will do the opposite (1/50s, 1/25s)
- Keep scrolling down and you can choose the minimum shutter speed limit manually.
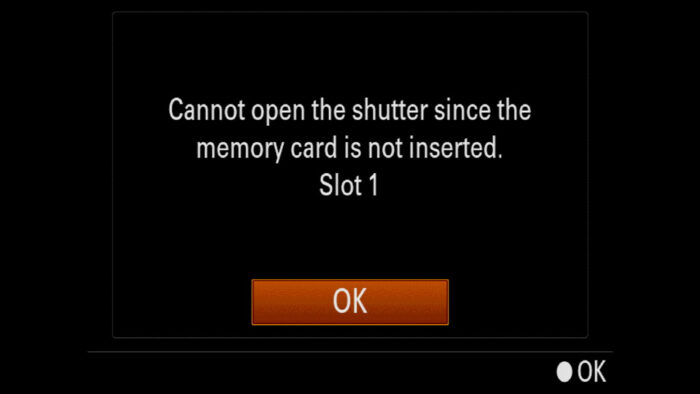
Release Without Card
Camera Settings 2 / Shutter SteadyShot (page 4/9)
Imagine taking pictures of a tennis game only to realise after a half an hour that there are no cards in the camera? Silly, I know, but sometimes we photographers can make the stupidest of mistakes.
To make sure that never happen, you can disable the Release w/o Card setting. If there is no card, the camera won’t take any picture and will show you a warning message.
Picture Rating and Protect Image
After taking loads of images in one day, it can be a bit time consuming to go back through all your photos if you need to share a bunch right away. To help you with that, you can assign your images a rating, and you can do this quickly with a custom button.
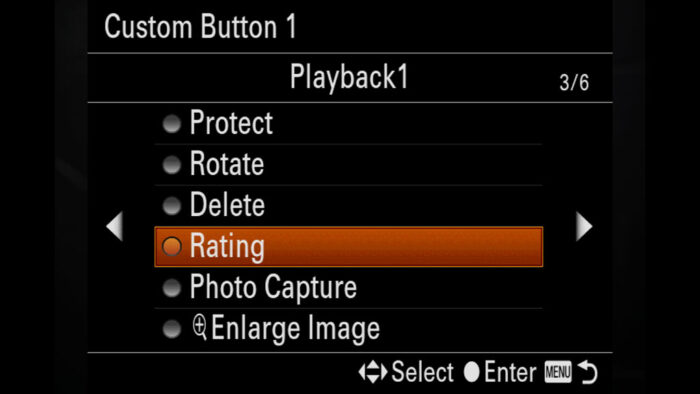
- Go to Camera Settings 2 / Custom Operation1 (page 8/9)
- Select the third Custom Key entry (the one with the “play” symbol)
- Choose a custom button (only four are available)
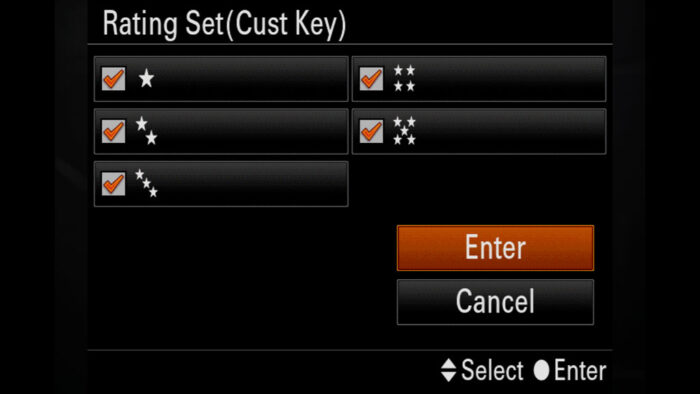
- Scroll right to page 3/6 (Playback1) and choose Rating
- Choose how many ratings you want to be able to assign (from 1 to 5 stars). If you only need to label your images quickly to find them later, you can choose just one.
- Press Enter
- Take a picture
- Go to Playback mode and press the custom button you configured. The star rating should appear at the top centre of the screen. Keep pressing to change the rating.
- You can repeat the same process and assigned the Protect option to another custom button (it might already be there by default)
Note: the rating is saved in the image metadata. When you open it with a photo editor, the rating will appear there as well so that you can find it more quickly.
Now, what happens at the end of my day when I want to quickly find an image I rated in the morning? There’s a solution for that too!
- Go to Menu Playback 3 (page 3/4)
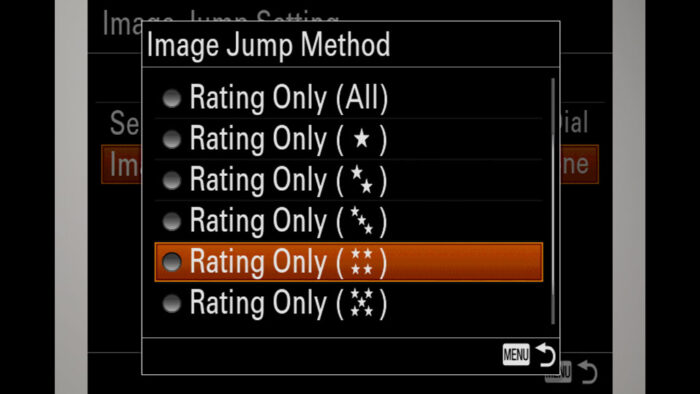
- Scroll down to Image Jump Setting
- Choose which dial you want to use (front or rear)
- Choose the Image Jump Method. In our example, you want to select Rating Only (All) or choose one specific rating if you’re always assigning the same rating to all your images.
- Now go in Playback mode to see your images
- Use the front or rear dial to quickly jump between your rated images
Note: the display viewing in playback mode needs to be set to Date View for the jump to work. You can use the DISP button to change the type of view.
A9 II
This is the only camera that allows you to record an audio memo and attach it to your images. It is a popular feature among professional photographers because you can quickly record important information such as the name of a person, describe an important moment in the game and other things.
Memory Recalls
If you take pictures of different sports, or the same sport in various conditions, you can save a whole bunch of settings and recall them all at once when needed (focus mode, focus area, drive mode, custom buttons etc.). These custom modes can be accessed with the main dial on top, or a custom button.
To know more about how to set up Memory Recalls, check our Menu and Buttons setup guide below.
Reminder: the links below are affiliate links. If you decided to buy something after clicking the link, we will receive a small commission.
Check price of the Sony A7 III on:
Amazon | Amazon UK | B&H Photo | eBay
Check the price of the Sony A7R III on:
Amazon | Amazon UK | B&H Photo | eBay
Check price of the Sony A7R IV on
Amazon | Amazon UK | B&H Photo | eBay
Check price of the Sony A9 on
Amazon | Amazon UK | B&H Photo | eBay
Check price of the Sony A7 II on:
Amazon | Amazon UK | B&H Photo | eBay
Check price of the Sony A7R II on:
Amazon | Amazon UK | B&H Photo | eBay
Second-hand Sony gear on
MPB US | MPB UK
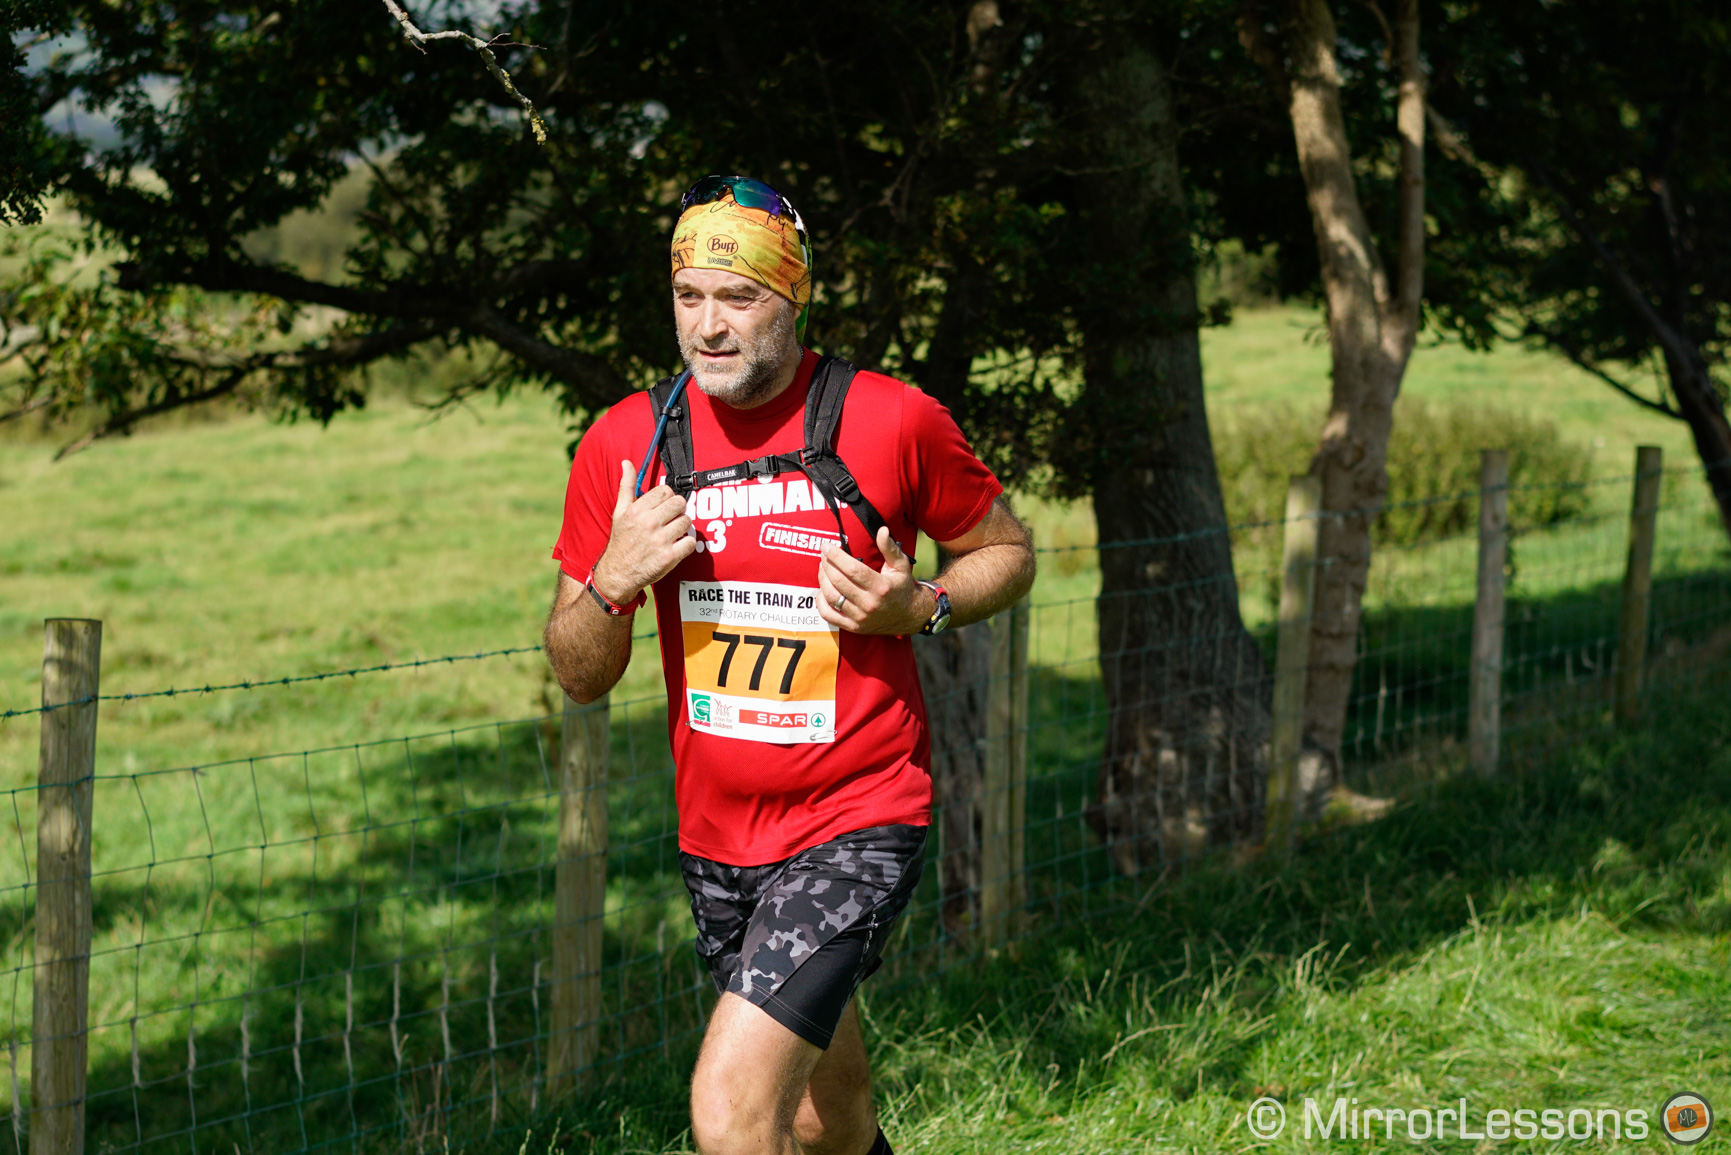
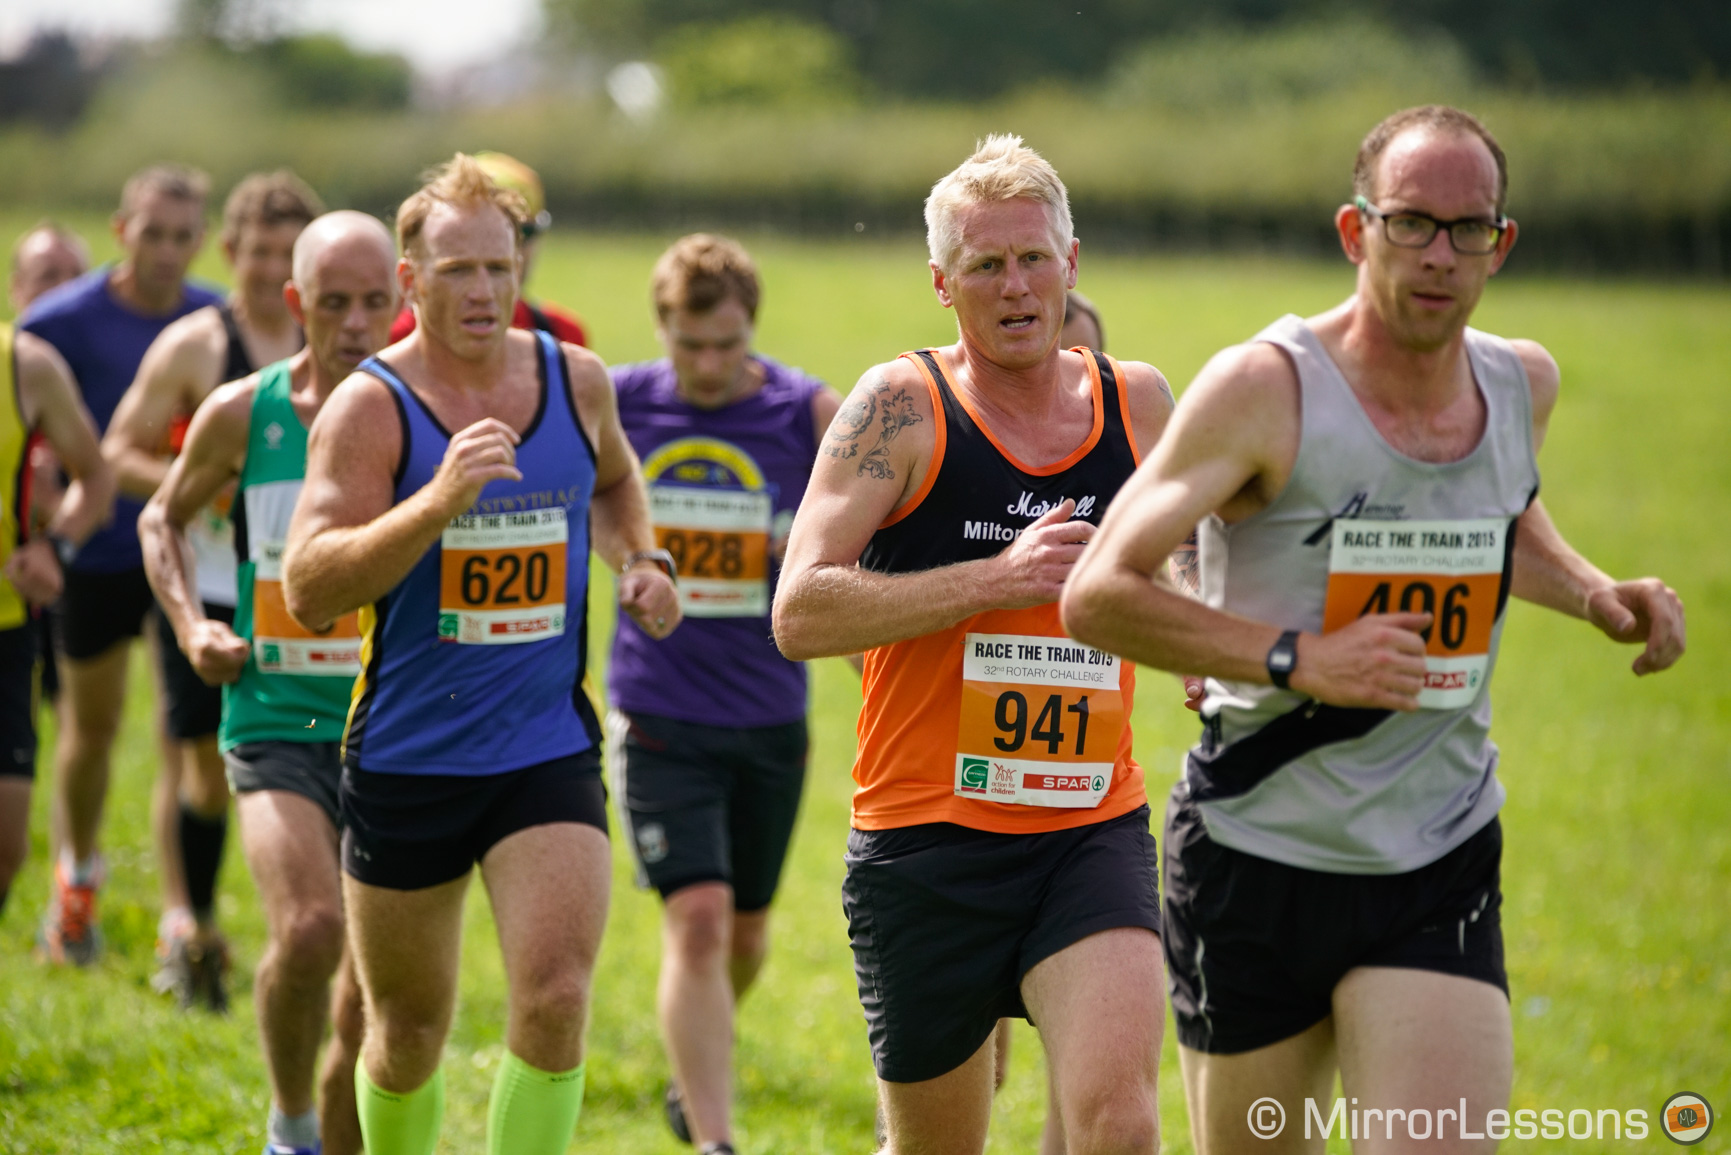
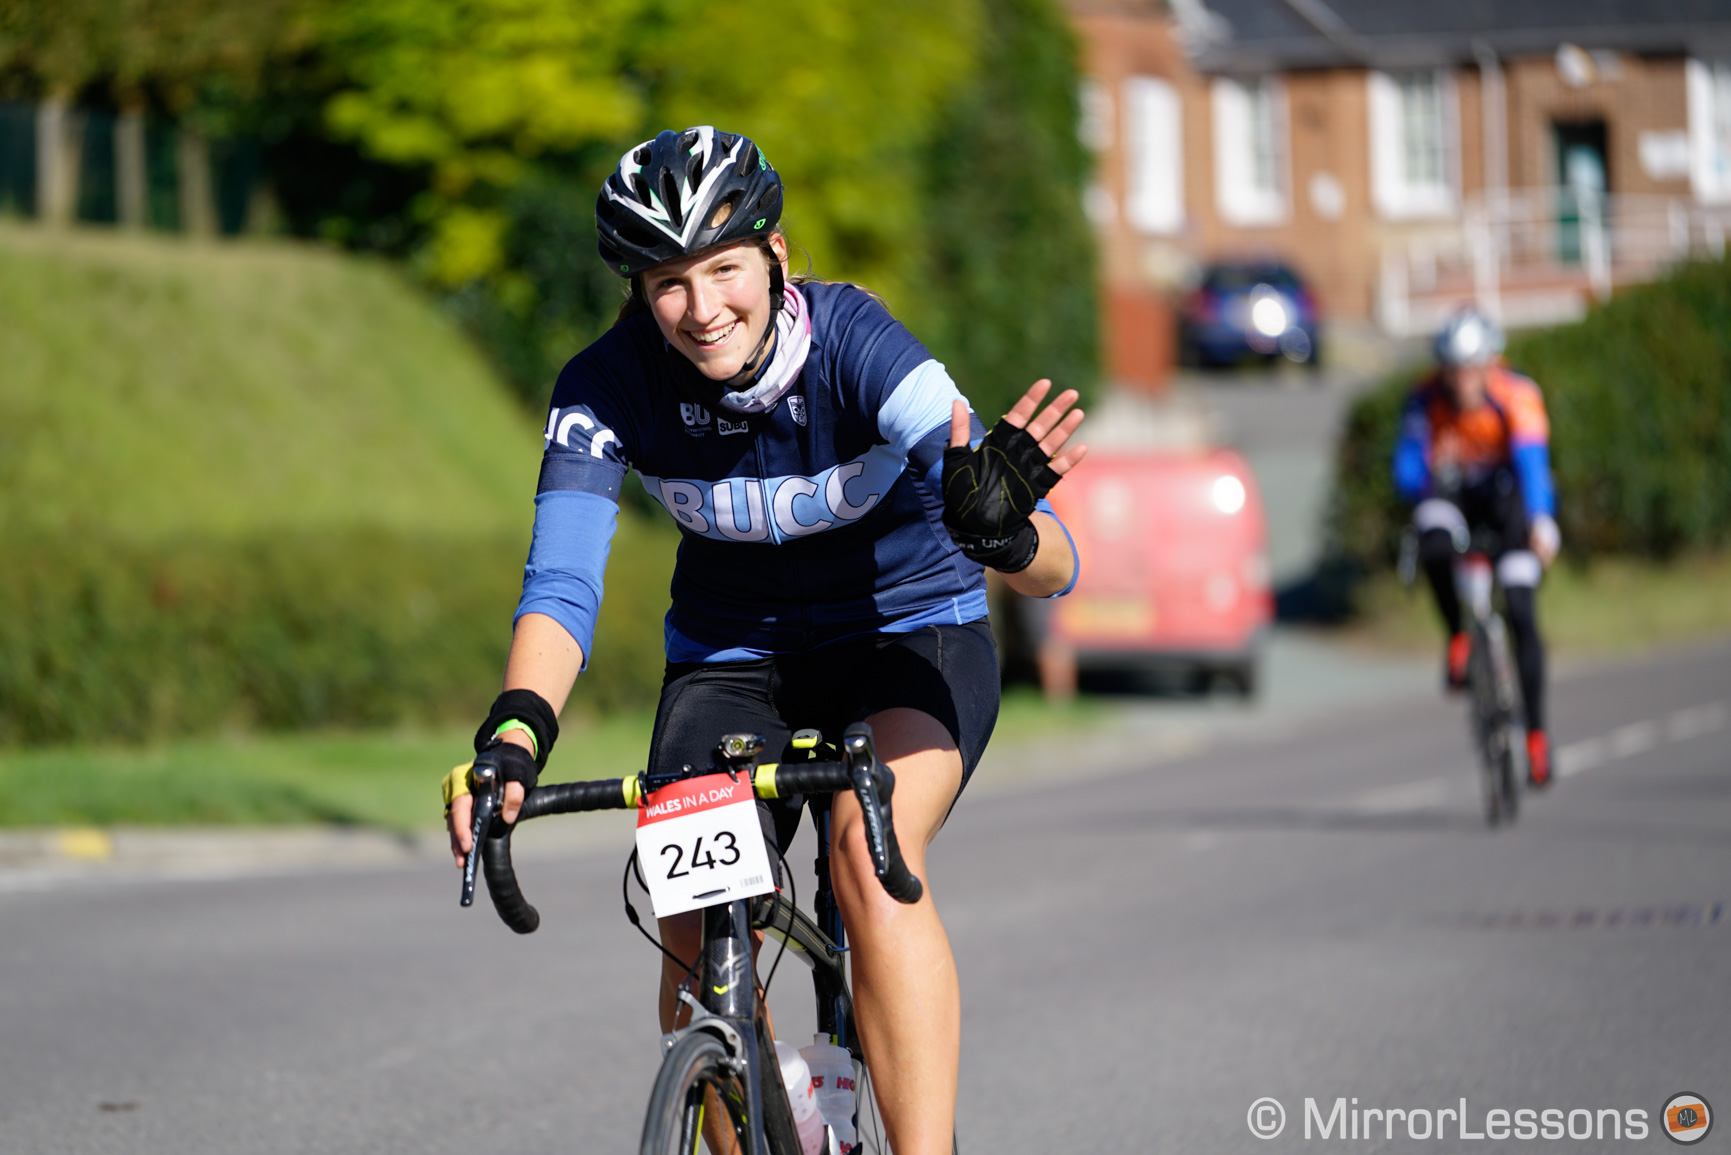
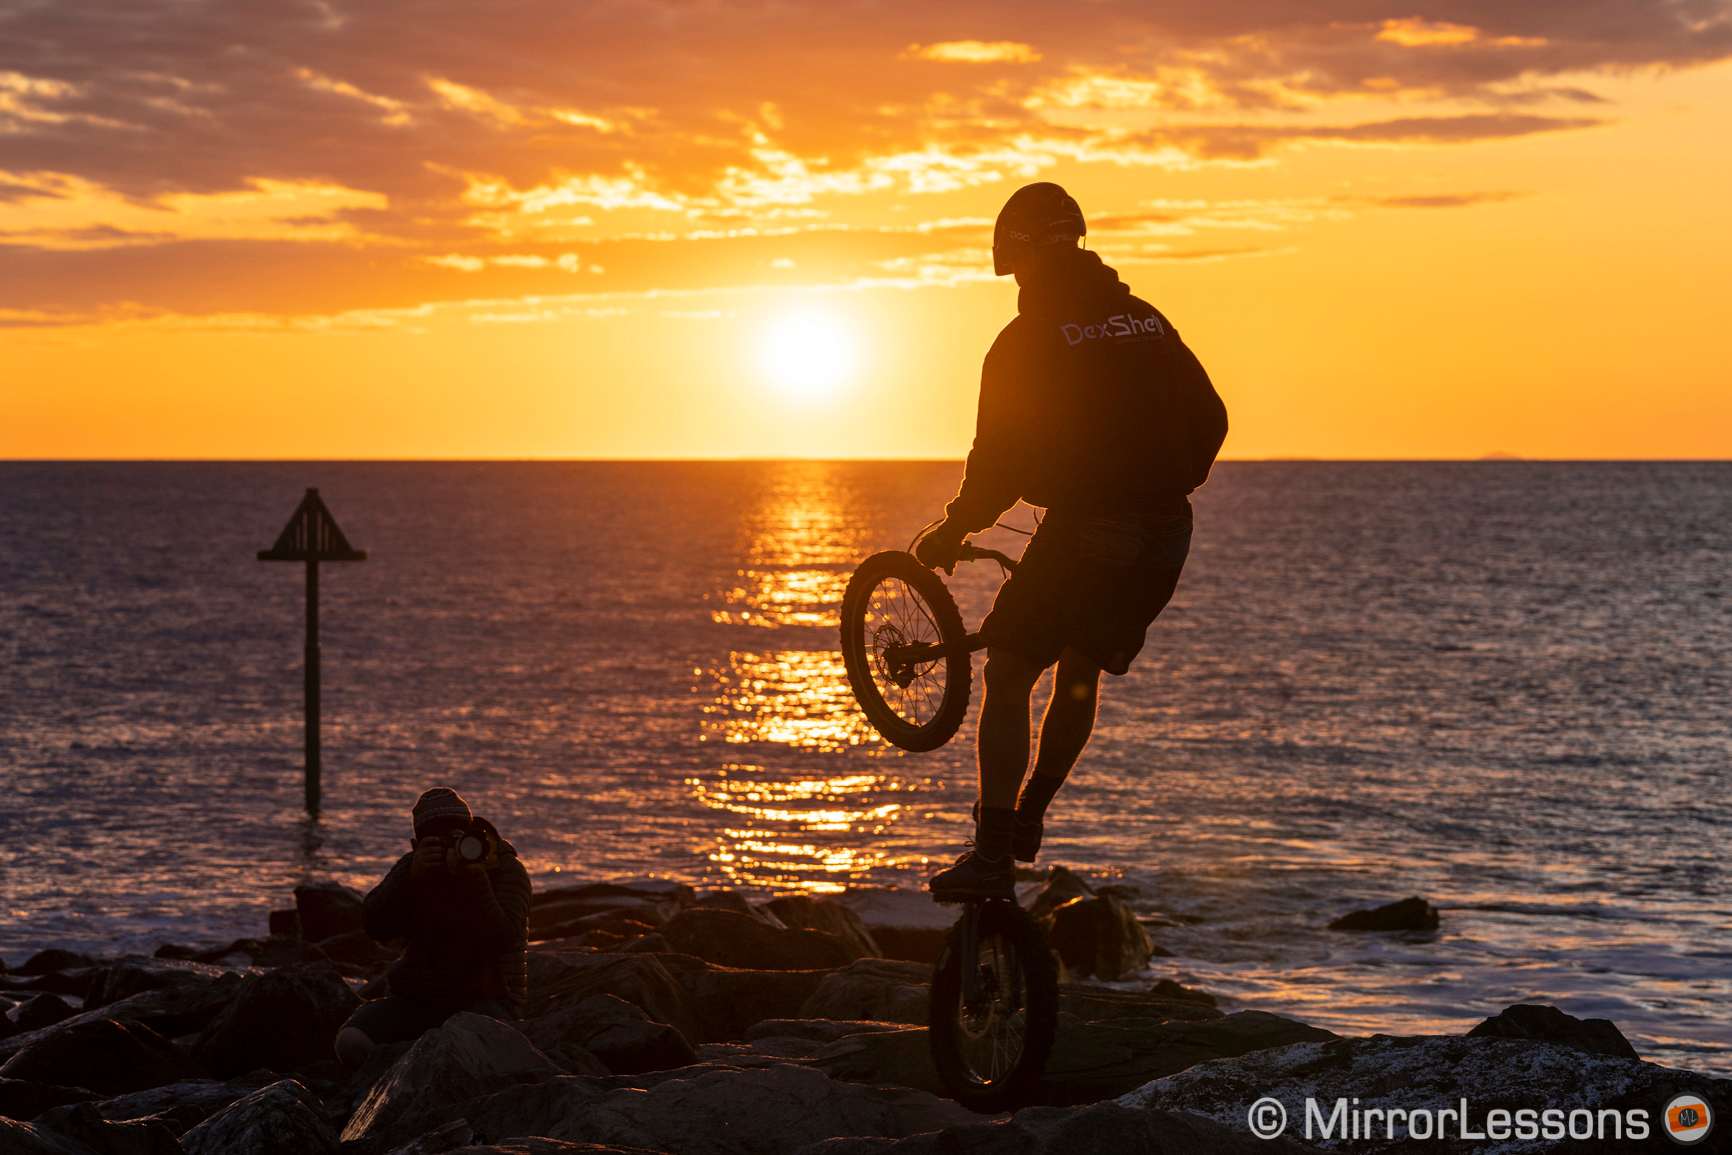
Sony A7 III, A7R III for Sports Photography: Sample Images
Below you can see various sports images taken with different Sony cameras over the years.


Sony A7 / A9 Mirrorless Cameras Resources on Mirrorless Comparison
We have even more tutorials for your A7 camera, as well as many comparisons. Check the list below!
Real World Comparisons
- Sony A7 III vs A7R III
- Sony A7R III vs A7R IV
- Sony A7R II vs A7R III
- Sony A7R III vs A9
- Sony A7 III vs Nikon Z6
- Sony A7R III vs Nikon Z7
- Sony A7R III vs Fujifilm GFX 50s
- Sony A7R III vs Panasonic S1R
- Sony A7 III vs Canon EOS R
- Sony A7 III vs Fujifilm X-T3
- Sony A7 II vs Canon EOS RP
Sample Photos
- Sony A7 III sample images
- Sony A7R III sample images
- Sony A7R IV sample images
- Sony A7 II sample images
- Sony A7R II sample images
- Sony A7S sample images