Taking portraits with your Sony A7 III can be an easy genre to begin with if your partner, kid or friend is happy to be photographed. And, while portrait photography can evolve into a more complex form of art involving lighting, extra accessories and specific locations, all you need to start with is your camera and a lens.
Using the Sony A7 III for portrait photography is no different from any other Sony camera, or any other camera for that matter as far as the basics are concerned. In fact, many will say that the lens plays a more important role than the camera itself.
That being said, there are some interesting features to know about when using a Sony A7 for portraits, including the best of them all, Eye AF. In this article, I explain all the portrait photography settings you can use to take better photos.
A7/A9 series compatibility
The content of this post is valid for all the Sony full frame E-mount cameras, with specific attention given to the A7 mark III, mark IV and A9 generations. The differences between the various models are mentioned as well.
Note: throughout the article, I’ll mention where the various settings can be found in the menu. I took as a reference the latest version which was introduced with the A7 III series. Please note that the location of some settings might vary from product to product. You probably have some of them assigned to custom buttons, the Fn Menu or the My Menu.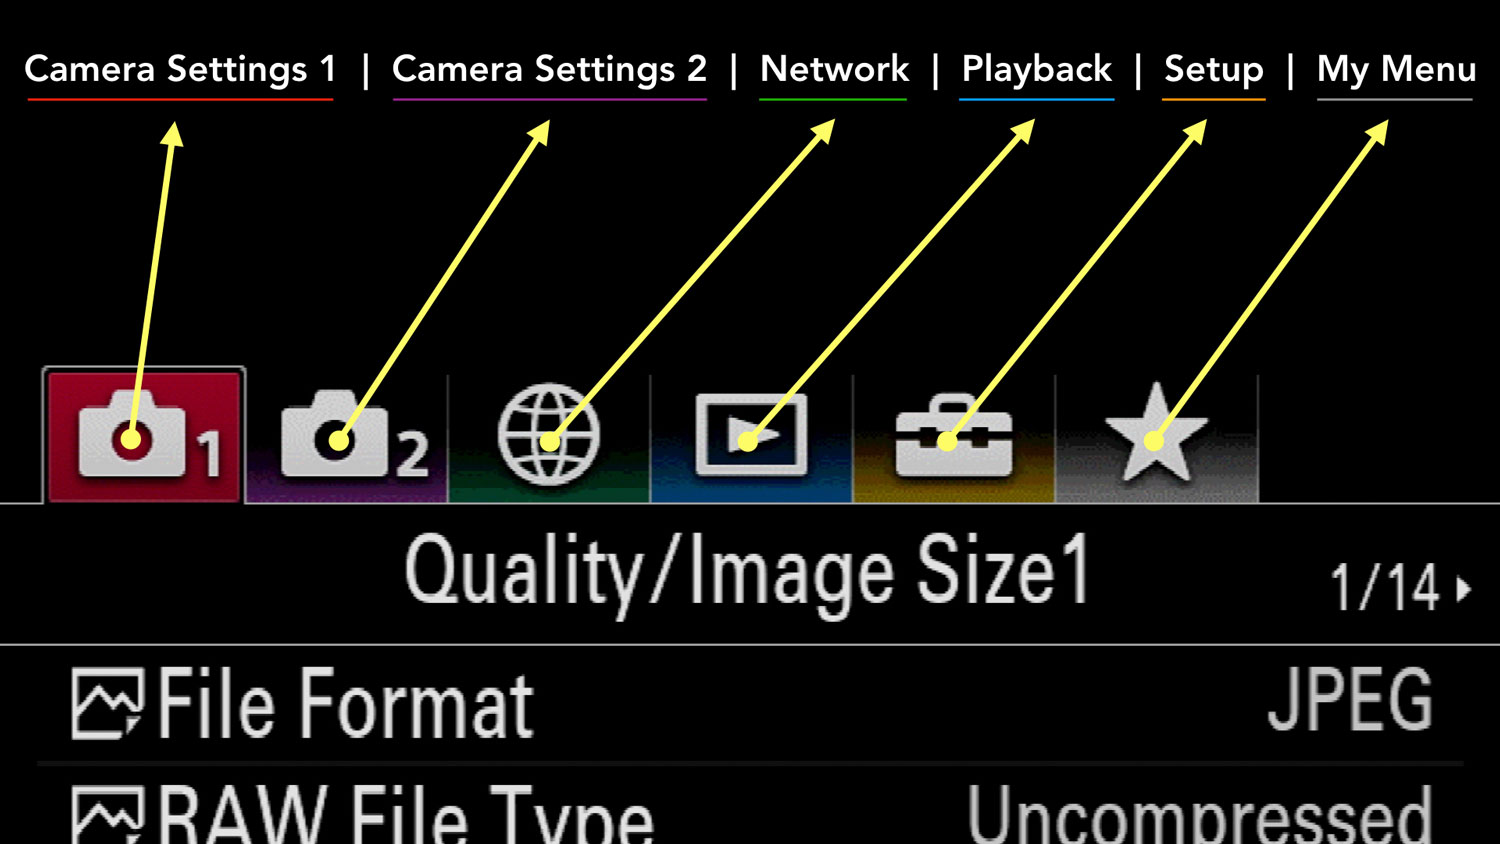
Be aware that older models (A7 II series and below) have an older menu system with more differences, starting with the icons on top.![]()
![]()
Ethics statement: the following is based on our personal experience with various Sony A7 and A9 cameras, specifically the A7 III and A7R III which we own. We were not asked to write anything about these products, nor were we provided with any sort of compensation. Within the article, there are affiliate links. If you buy something after clicking the link, we will receive a small commission. To know more about our ethics, you can visit our full disclosure page. Thank you!
TABLE OF CONTENTS
1. Image Quality Settings
2. Aperture and Exposure
3. Metering and Zebra
4. Eye AF Setup
5. Face AF Setup
6. Additional Settings
7. Image Samples
8. Sony A7 / A9 Series Resources
Reminder: the links below are affiliate links. If you decided to buy something after clicking the link, we will receive a small commission.
Check price of the Sony A7 III on:
Amazon | Amazon UK | B&H Photo | eBay
Check the price of the Sony A7R III on:
Amazon | Amazon UK | B&H Photo | eBay
Check price of the Sony A7R IV on
Amazon | Amazon UK | B&H Photo | eBay
Check price of the Sony A9 on
Amazon | Amazon UK | B&H Photo | eBay
Check price of the Sony A7 II on:
Amazon | Amazon UK | B&H Photo | eBay
Check price of the Sony A7R II on:
Amazon | Amazon UK | B&H Photo | eBay
Second-hand Sony gear on
MPB US | MPB UK
Sony A7 III, A7R III, A9 Settings for Portraits: Image Quality
Sony A7 and A9 cameras have excellent full frame sensors which suit the genre very well. When it comes to image quality, choosing the type of file format as well as the right colour settings is important.
File Format: RAW or JPEG for Portraits?
Camera Settings 1 / Quality Image Size1 (page 1/14)
If you plan to post process your images on your computer, choose the RAW File Format. You’ll have much more leeway to adjust exposure and colour parameters without degrading the file. If you want the best quality the camera is able to give you, select Uncompressed for the RAW File Type.
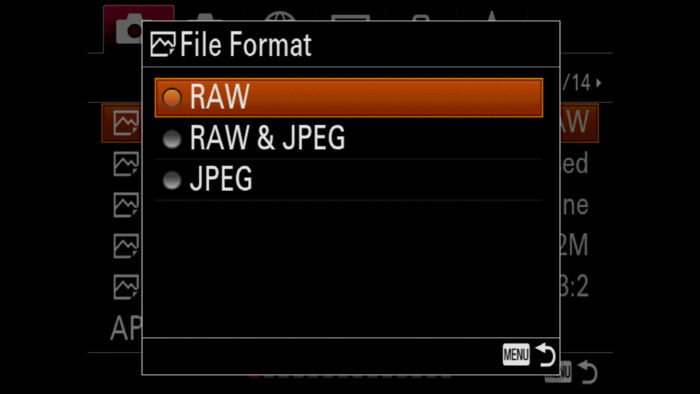
Uncompressed RAW is not available on the A7 I series.
If you want to share images right away, or don’t have time for post production, the JPEG File Format is the way to go. For the JPG Quality setting, choose Extra Fine.
Of course you can choose to have the best of both worlds and select RAW & JPEG for the File Format. This allows you to share some JPG files right away and post process RAW images later on.
White Balance Settings for Portraits
Camera Settings 1 / Colour WB Img. Processing (page 12/14)
When working with JPGs, the colour settings in-camera become very important because unlike with RAW, you don’t have a lot of room to change them later on. Specifically, you want to look at two things:
- White Balance (WB)
- Creative Style (Colour Profile)
Note: although not essential, setting the right White Balance when shooting RAW is helpful to get an accurate preview on the LCD screen.
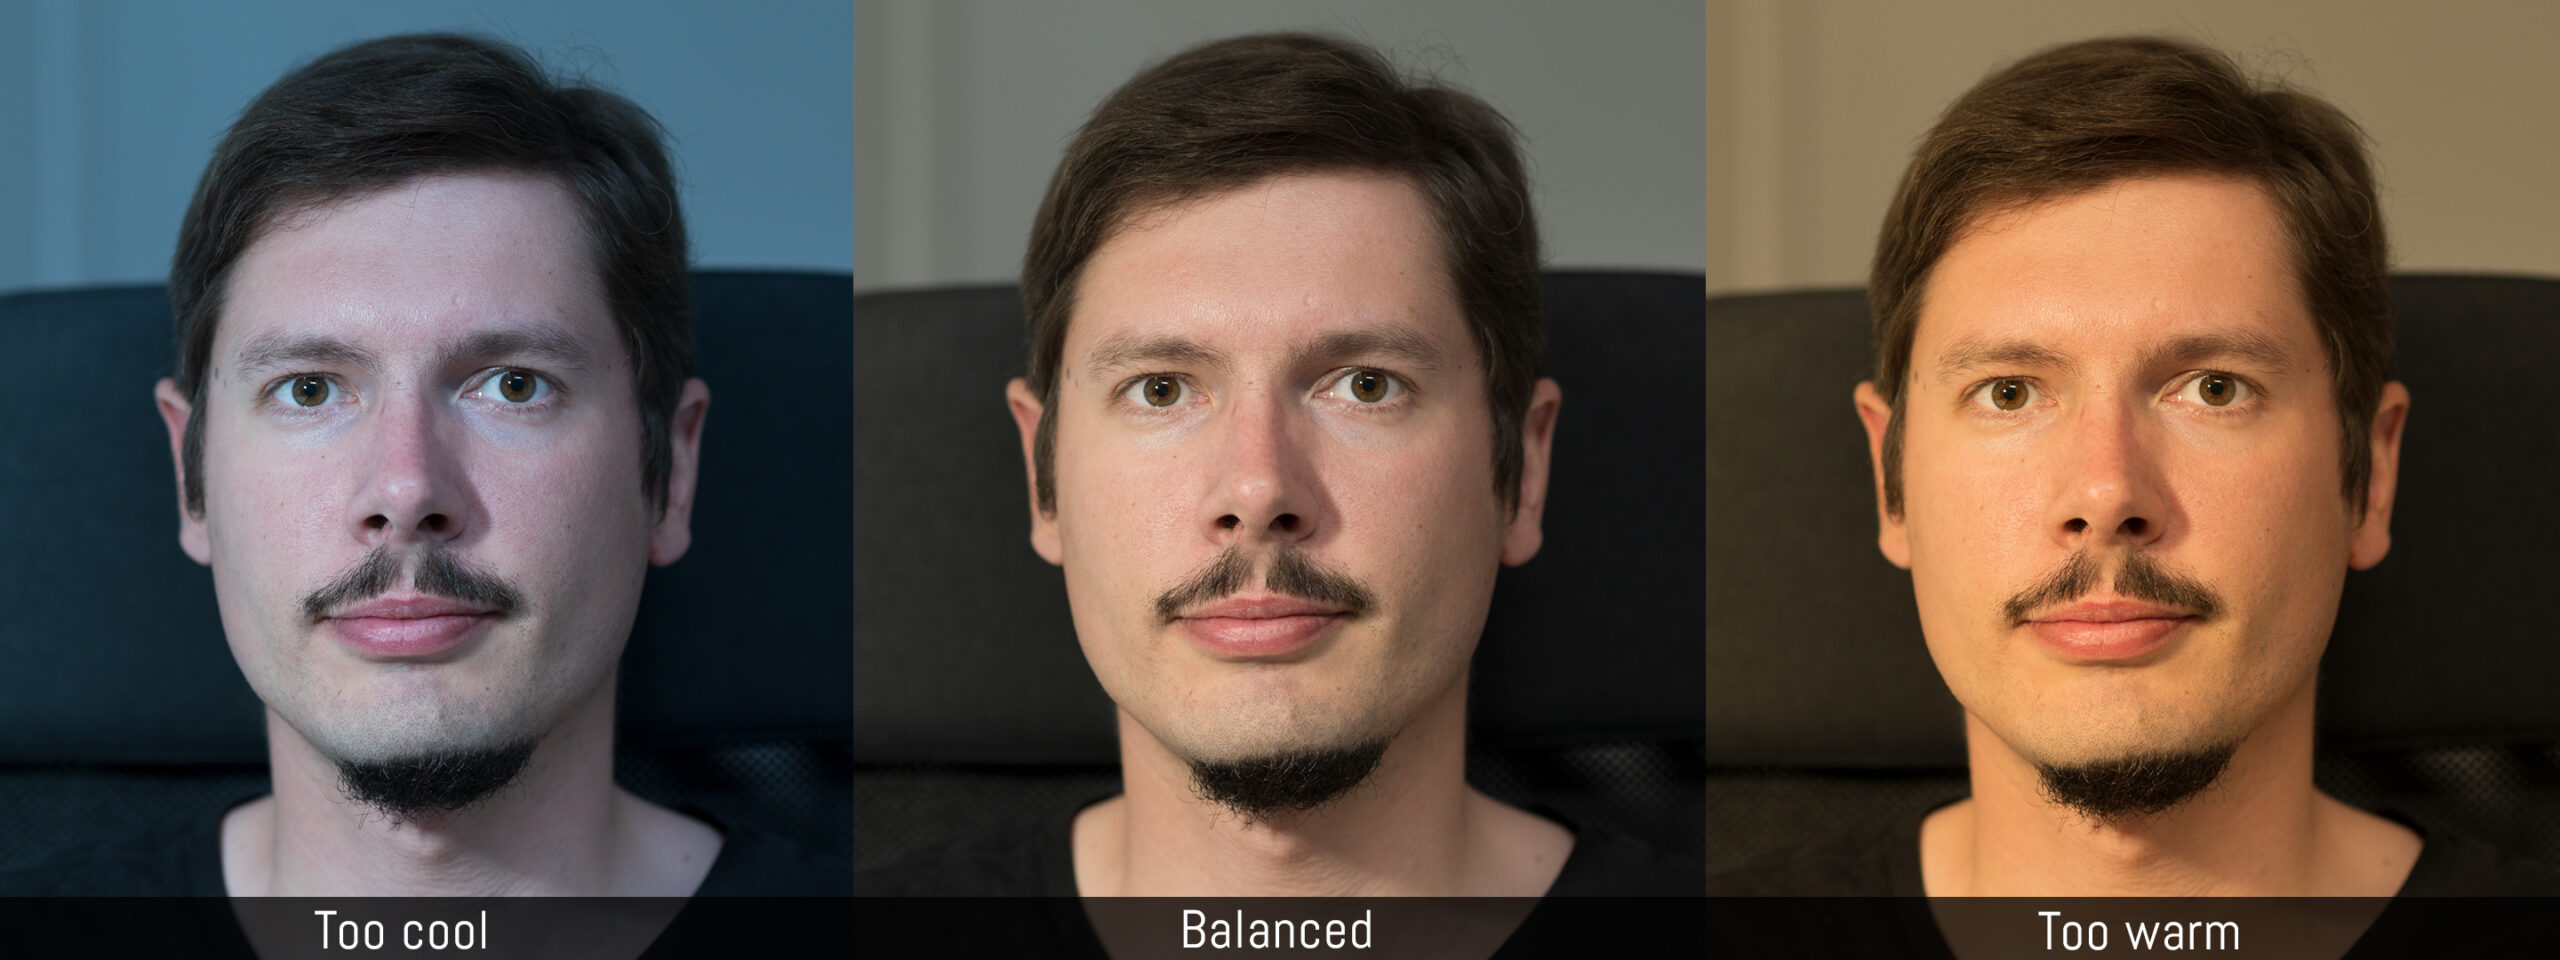
Choosing an accurate white balance ensures that colours are reproduced faithfully without a warm or cool tint dominance. Choosing the right one depends on the light of your scene: are you working with natural light? Artificial Light? Flash? These will affect the settings of your camera.
If you have Settings Effects On active (Camera Settings 2, page 7/9), you can see a preview of how your colours appear in the live view. The LCD monitor is not as accurate as a proper computer monitor but it gives you a hint if your White Balance is off.
Sony cameras offer various presets for the white balance, but you can also choose the colour temperature manually.
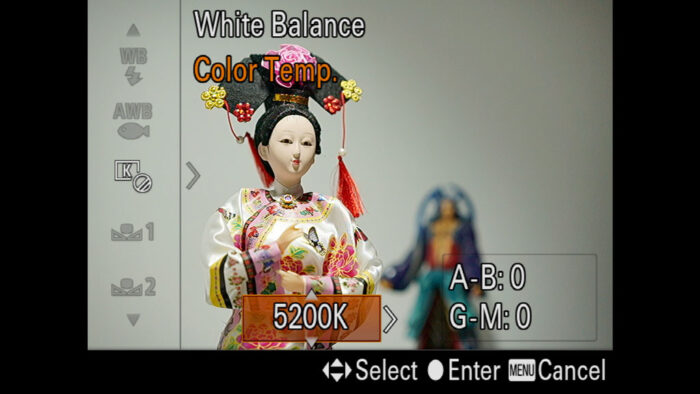
As a starting point, know that 5600˚k is the colour temperature of daylight, whereas 3200˚k is your classic artificial light bulb. Flashes are usually around 5900˚k but it can vary from product to product. LED lights can have different temperatures and some of them are variable.
From there you can fine-tune the value depending on your specific scene. If you are outside in the shade, or under a cloudy sky for example, you may need to raise the temperature to 6000˚k for example.

With the White Balance, there is also the WB Adjustment tool which can be useful to adjust a tint dominance. For example if you find your image to be a bit too red, you can move the point towards amber.
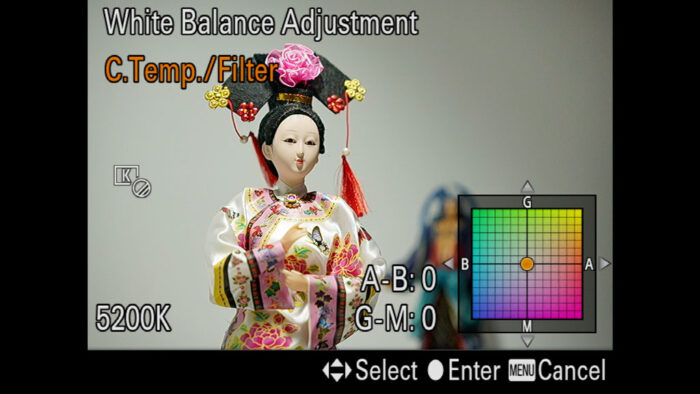

If you want to be even more precise, the camera allows you to measure the white balance of your scene and save it to a custom WB setting. To do this you’ll need a grey card or a white piece of paper.
More on WB in our Photography Settings Guide
Creative Style (Colour Profile) for Portraits
Camera Settings 1 / Colour WB Img. Processing (page 12/14)
The Creative Style setting is where you choose a picture profile (or colour profile) for your image. There are 13 different types designed for various genres and effects.
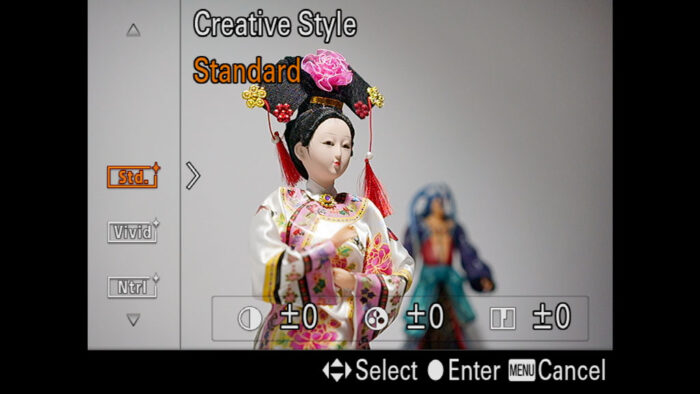
Note: as for the White Balance, the Creative Style doesn’t affect your RAW file because the photo editor you use will apply its own profile when opening the image.
One of these styles is called Portrait which – surprise surprise – is designed for what we’re talking about in this article.
What the Portrait Style does is soften the image so that the details on the skin are not over-sharpened. It also renders more subtle tone transitions with less contrast than other profiles such as Standard or Vivid.


On older models (mark I and mark II generation), the Portrait style produces too much yellow on the skin so I never liked it that much. But lately Sony has improved the colour rendering of its picture profiles, and I find that the Portrait style isn’t as bad as it was before. Be aware however that it can tend to add a bit more magenta shift than the other profiles. (This is where the WB Adjustment setting comes in handy).
Generally I would say that the Standard style is a good starting point. You can also try Portrait and Light which work well too.
Tip: if you’re using an older Sony camera (A7 I or A7 II) series, try the Standard or Neutral profile instead.
You can also change three parameters for each Creative Style (contrast, saturation and sharpness) so that you can create your own version.
My advice is to experiment, try different settings and see which one you like the most. Everybody has different tastes when it comes to colour.
Beware: among the other settings that can affect the JPG, there is one called DRO. It is designed to increase the dynamic range of your image but can produce unnatural results on the skin. My advice is to leave it to Off. If you want to try it, don’t choose Auto and don’t go higher than Lv1 or Lv2.
Portrait settings for Sony A7 III, A7R III, A9: Aperture and Exposure
When taking portraits, I always use the M mode (Manual Exposure) to have full control.
The most important exposure setting is the aperture because it allows you to control the depth of field and how much background blur there is behind your subject, determining how much you separate your subject from the background.
Typically, when we think of a portrait, we imagine it being taken with an 85mm lens or similar, with a fast aperture of 1.8 or 1.4 that can render a nice, creamy, blurred background (also called bokeh).
As beautiful as a picture taken at 1.4 can be, keep in mind that the depth of field on a full frame camera can be very small which means that you can end up with one eye in focus but the other out of focus, as well as the nose and the ears.

To have the entire head or even the entire body in focus, you need to stop down the aperture. If your subject is against a neutral background like in a studio, then there is no need to use a very fast aperture anyway.

Keep also in mind the optical quality of your lens. If it is too soft at its fastest aperture, you will get better sharpness by stopping down, even by just 1 Ev (from f1.4 to f2 for example).
Long story short, the aperture is both an exposure and creative setting, so it is the one you should determine first.
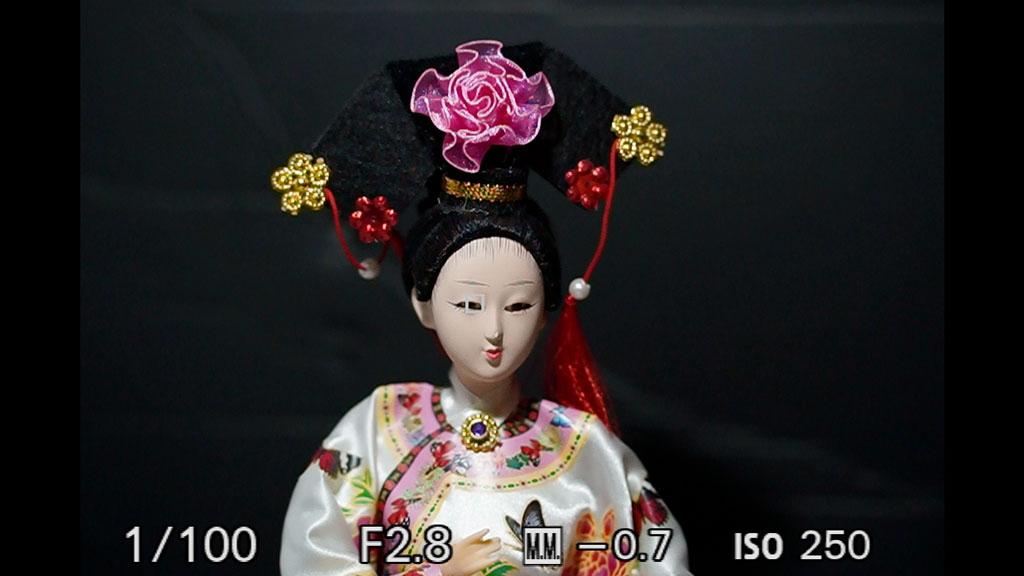
Next we have the shutter speed. If your subject is relatively still, you can go as slow as 1/25s but always be careful because even small movements can produce some motion blur. The focal length used can also influence the result (the longer it is, the faster your shutter speed should be).
When I take portraits, I always try to stay around 1/100s or above. If your session is more dynamic, or you’re trying to take pictures of your kids, you’ll be surprise that you often need to go up to 1/400s at the very least.
Shutter speed can also be a creative tool if there is movement around your subject.

Once aperture and shutter speed are set, the last setting to look at is the ISO.
In some situations like studio photography where the light is controlled precisely, you can set a value manually. If you’re outside in the shade, or other situations where the light is less controlled, don’t hesitate to choose Auto ISO. All recent Sony cameras perform really well and you can set a maximum value for it to make sure it doesn’t go too high.
Portrait settings for Sony A7 III, A7R III, A9: Metering and Zebra
If Settings Effects On is selected for Live View Display (Camera Settings 2, page 7/9), you will see a preview of your exposure on the screen and you can tell if the image is too dark or too bright.
However depending on your composition and the light conditions of your scene, you may want to use more precise instruments.
Metering Setting for Portraits
Camera Settings 1 / Exposure1 (page 9/14)
At the bottom centre of the LCD or viewfinder, you can read the measurement (Ev) to see if your image is underexposed (minus) or overexposed (plus).

The camera offers various metering modes to measure the brightness of your scene on the entire frame or on select zones.
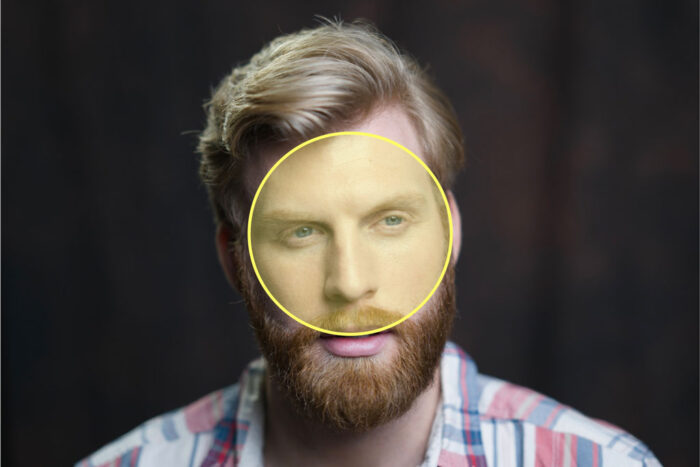
If you subject is at the centre of the scene, Spot Metering is ideal because the camera measures the exposure on the face / skin. Depending on how much space the person occupies in the frame, you can choose the Spot Standard or Large size.
Centre Metering can also work well because it balances the exposure on a larger area than Spot, while keeping the central portion of the frame a priority.
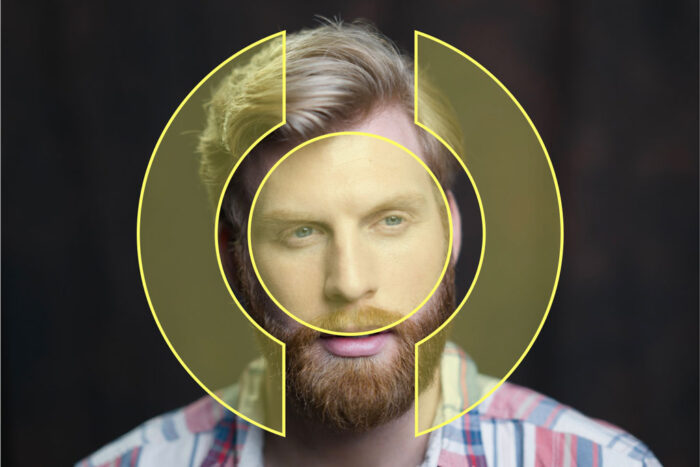
However, if your subject is not at the centre of the frame, Spot and Centre Metering will measure other things such as hair, clothes or even the background, which can lead to incorrect exposure.
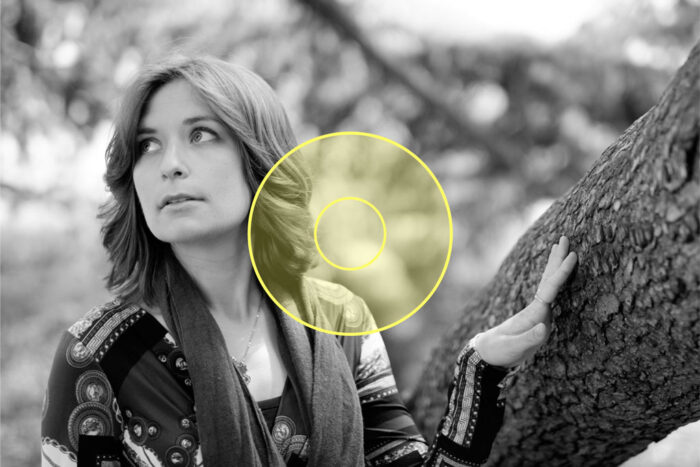
One solution can be to centre your subject in your frame, measure and lock the exposure (AEL function) and then recompose. Or you could set Metering to Multi and measure the entire frame. But there is a more precise method to keep metering priority on the face.
Metering with Focus Point Priority for Portraits
If you select the Expand Flexible Spot or the Flexible Spot area, you can link Spot Metering to the focus point.
- Go to Camera Settings 1 / Exposure1 (page 9/14)
- Choose Spot in Metering Mode
- Go to Camera Settings 1 / Exposure2 (page 10/14)
- Select Spot Metering Point
- Choose Focus Point Link
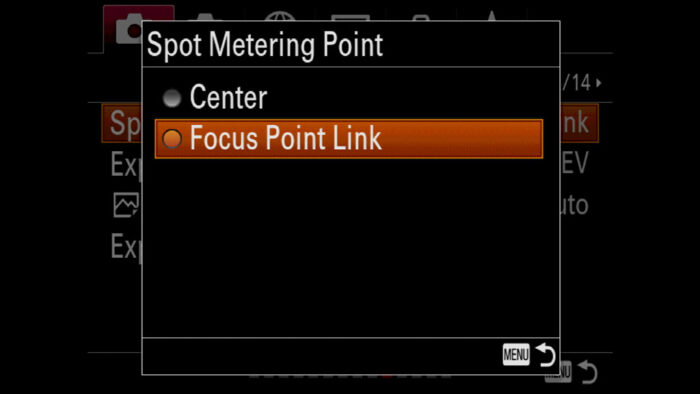
This way the camera will measure the exposure where the focus point is placed (meaning where your subject is), even if it is not at the centre of the frame.
Metering with Face Priority for Portraits
Another similar method is to prioritise metering on the person’s face.
- Go to Camera Settings 1 / Exposure1 (page 9/14)
- Set the Metering Mode to Multi
- Turn On Face Prty in Mlti Mtr
- Go to Camera Settings 1 / AF2 (page 6/14)
- Enter Face/Eye AF Set
- Select On in Face/Eye Priority in AF
- Make sure Human is selected in Subject Detection
Now the camera will prioritise faces to measure the correct brightness.

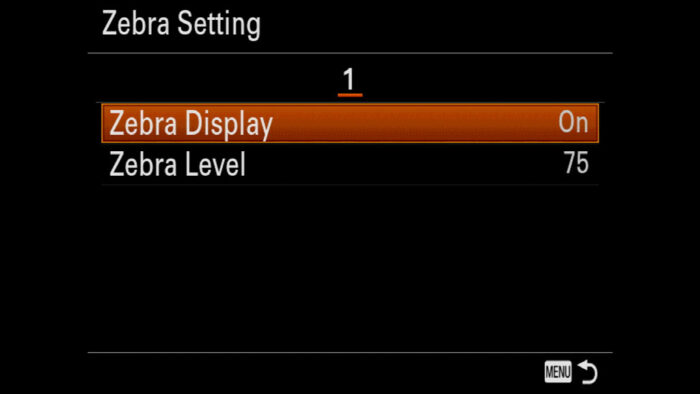
Zebra Pattern for Portraits
The Zebra setting is more popular among filmmakers and has been on camcorders for ages. Now that many digital cameras have more advanced video capabilities, Zebra has become a common setting too and it can be used for stills as well.
The Zebra setting indicates exposure levels by displaying diagonal lines on the EVF or LCD screen.
Zebra can be used in two ways:
- to check overexposed areas in your image
- to check the correct exposure of a specific area of your image
For portraits, it is the second option that you want. You can set up Zebra so that the lines appearing on your subject’s face tell you that the exposure is correct.
- Make sure that Settings Effects On is selected for Live View Display in Camera Settings 2 (page 7/9), otherwise the zebra pattern won’t work properly
- Go to Camera Settings 2 / Display Auto Review1 (page 6/9)
- Scroll down to Zebra Setting
- Turn On Zebra Display
- Select a Zebra Level between 70 and 80
Now try to adjust your exposure by making your image darker, then brighter. You’ll see that the lines change position on your image depending on the exposure. When they appear on your subject’s face, take a picture and have a look right away. The face should be optimally exposed.
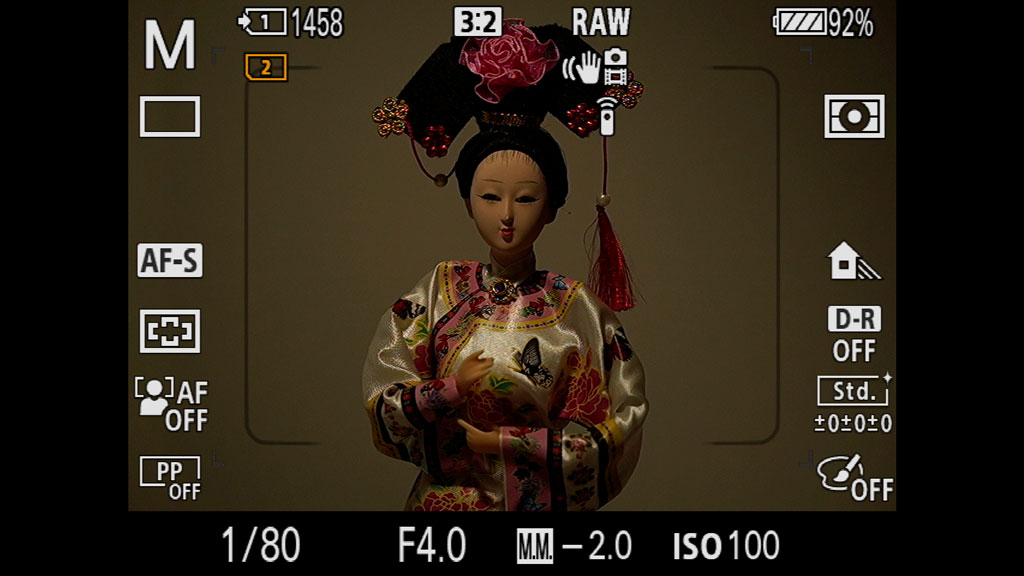
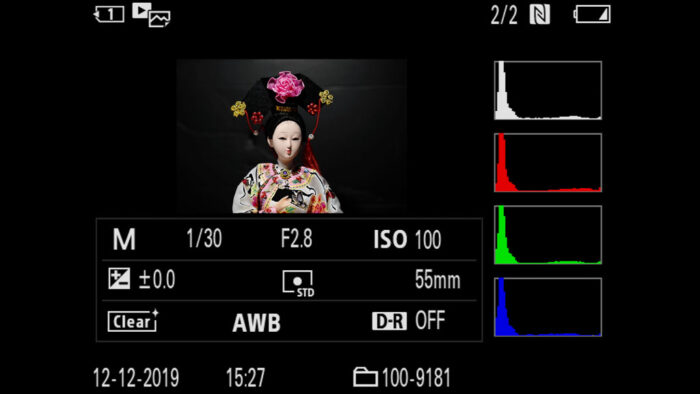
Let’s see a visual example. We have a bright image in the live view with almost no zebra pattern on the face. If we take a picture…
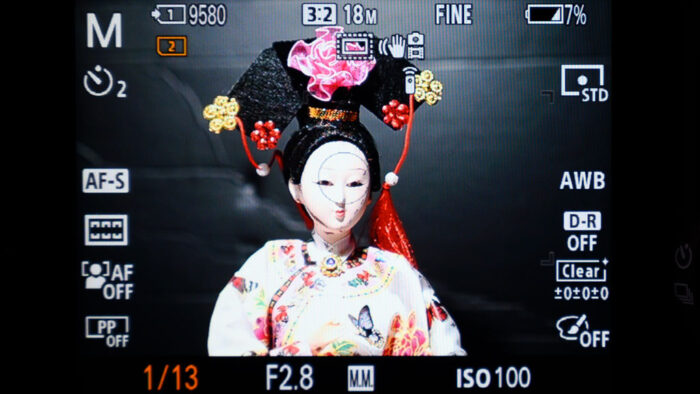
…and look at it in Playback mode, the face appears too bright.
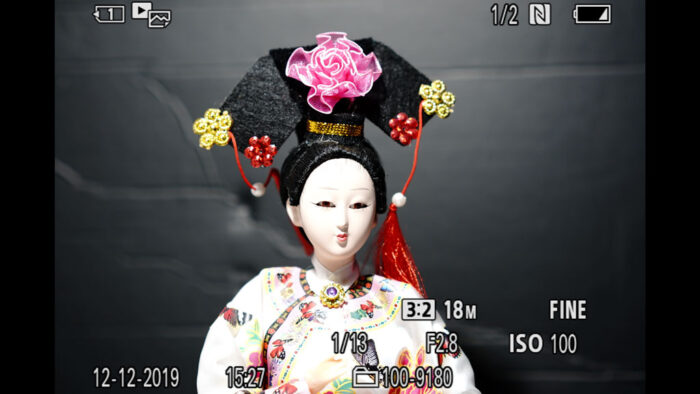
This is confirmed by the histogram and highlight warning (black overlay): the face is overexposed.
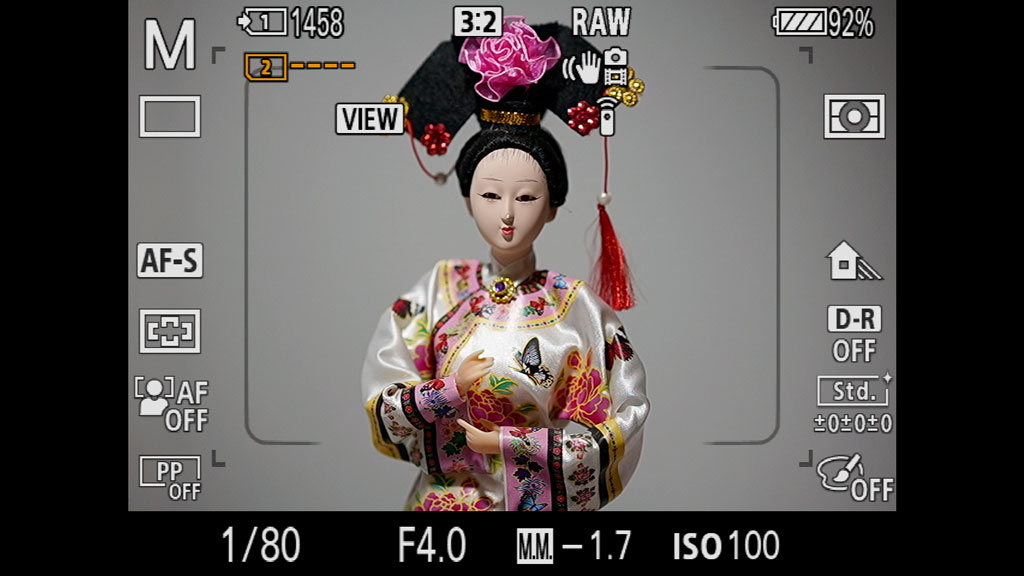
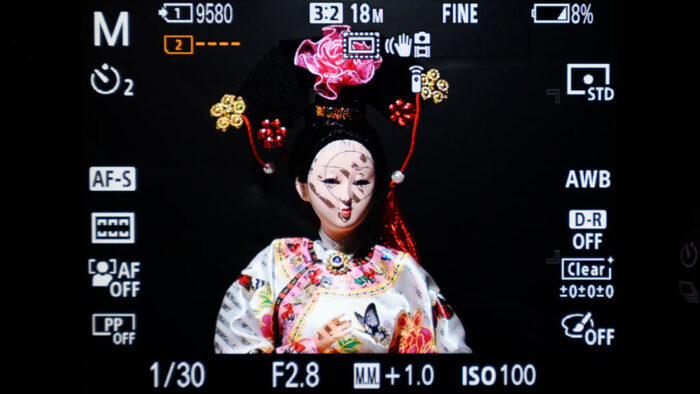
Now let’s adjust our exposure until we see the pattern on the face. The brightness looks good. We take a second shot and…
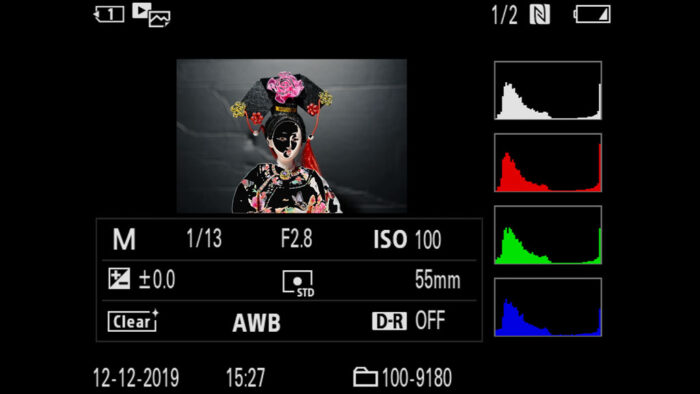
…it looks fine in Playback mode.
The histogram confirms the absence of overexposure, and there is no highlight warning on the face. The exposure is correct.
Keep in mind that you may need to change the Zebra Level a little bit depending on the specific light, or even the skin colour of the person you’re photographing.
You can also choose a custom level setting. Select Std+Range, a level of 75 and then adjust the sensitivity range in ±10.
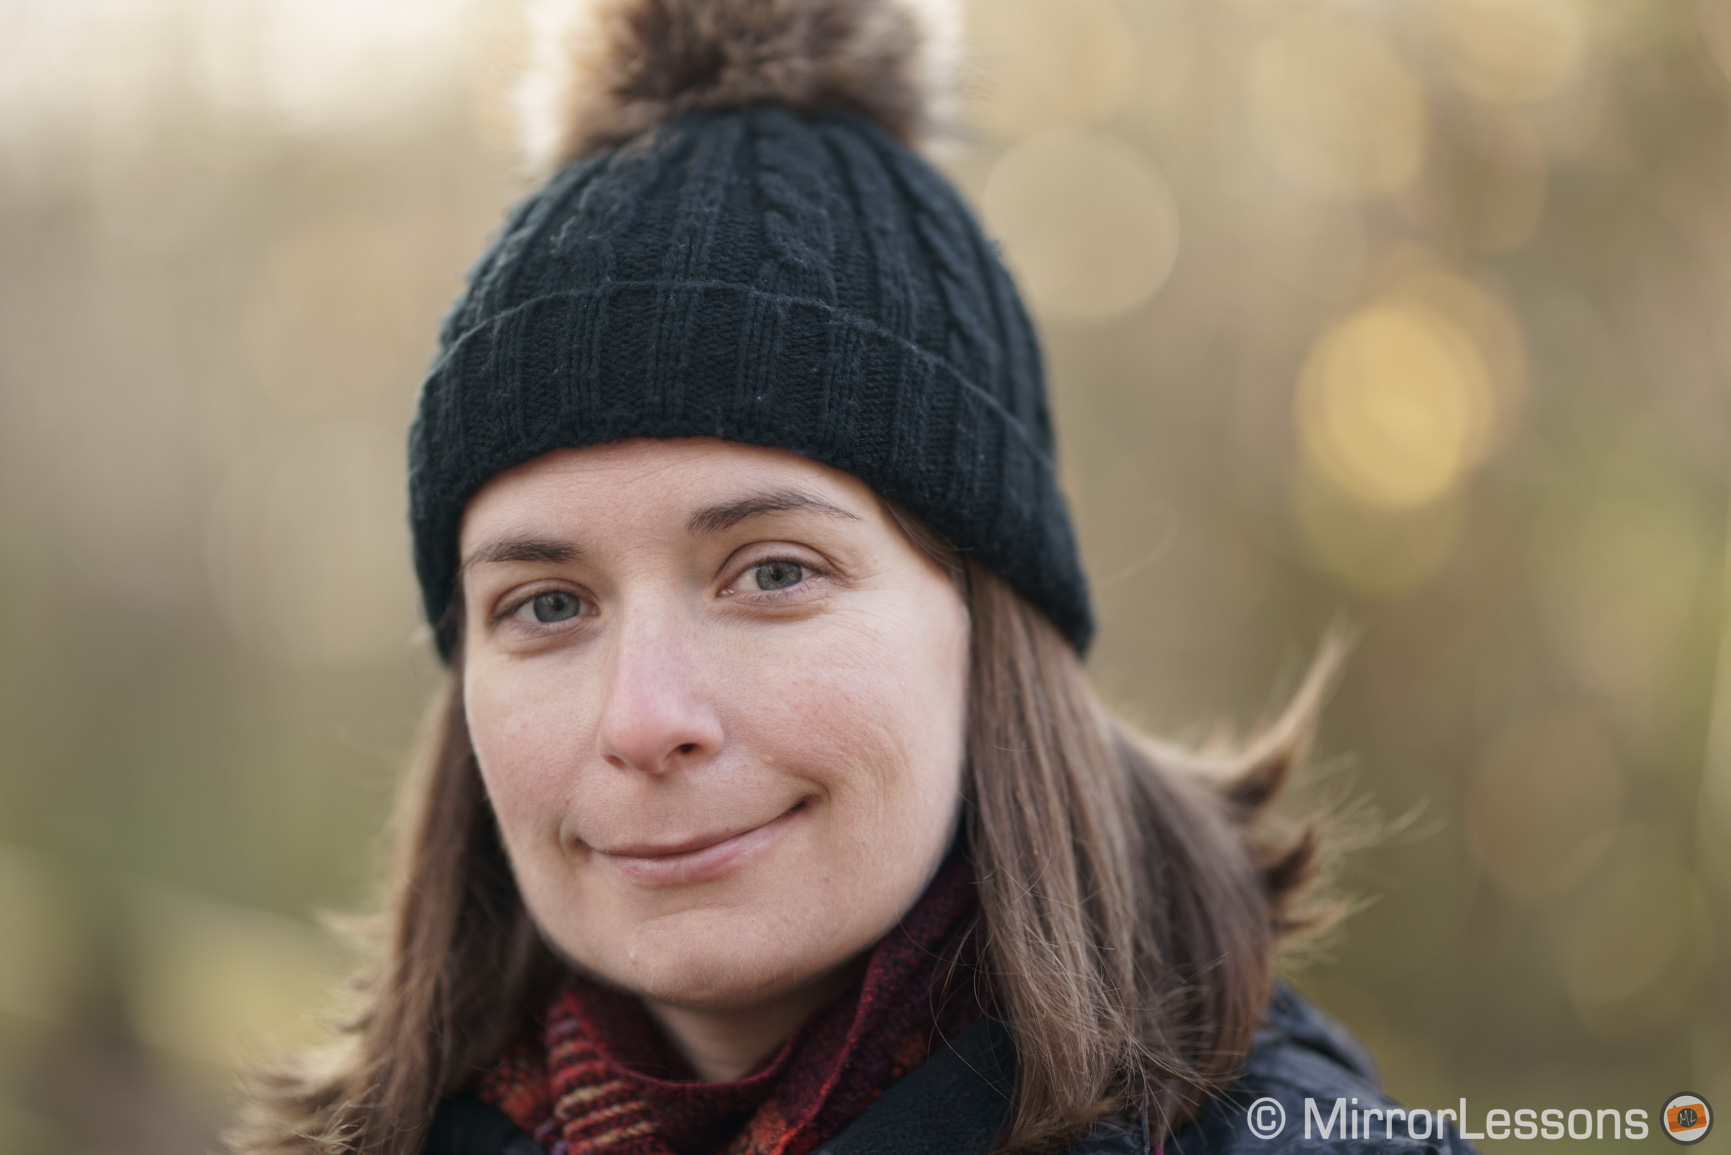
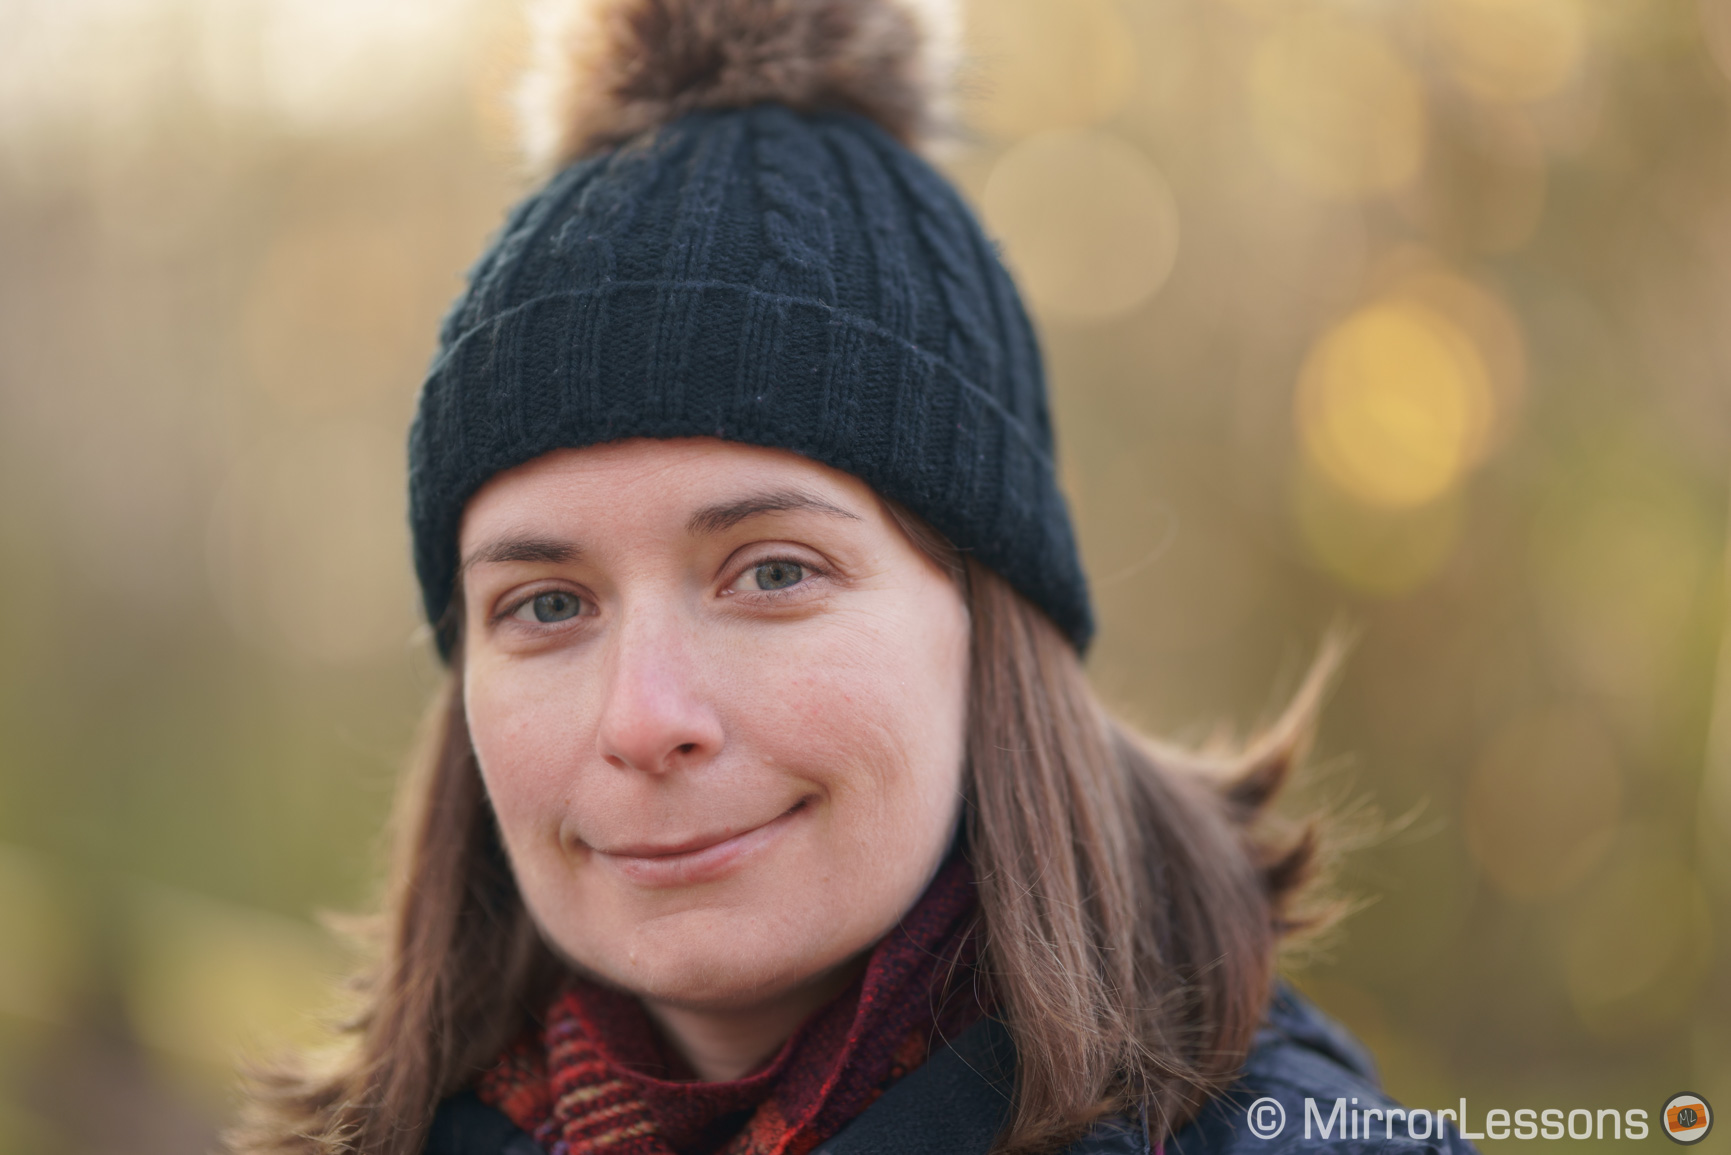
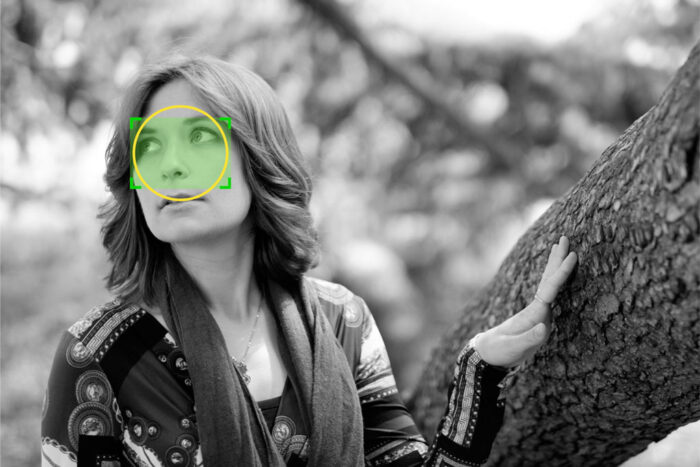
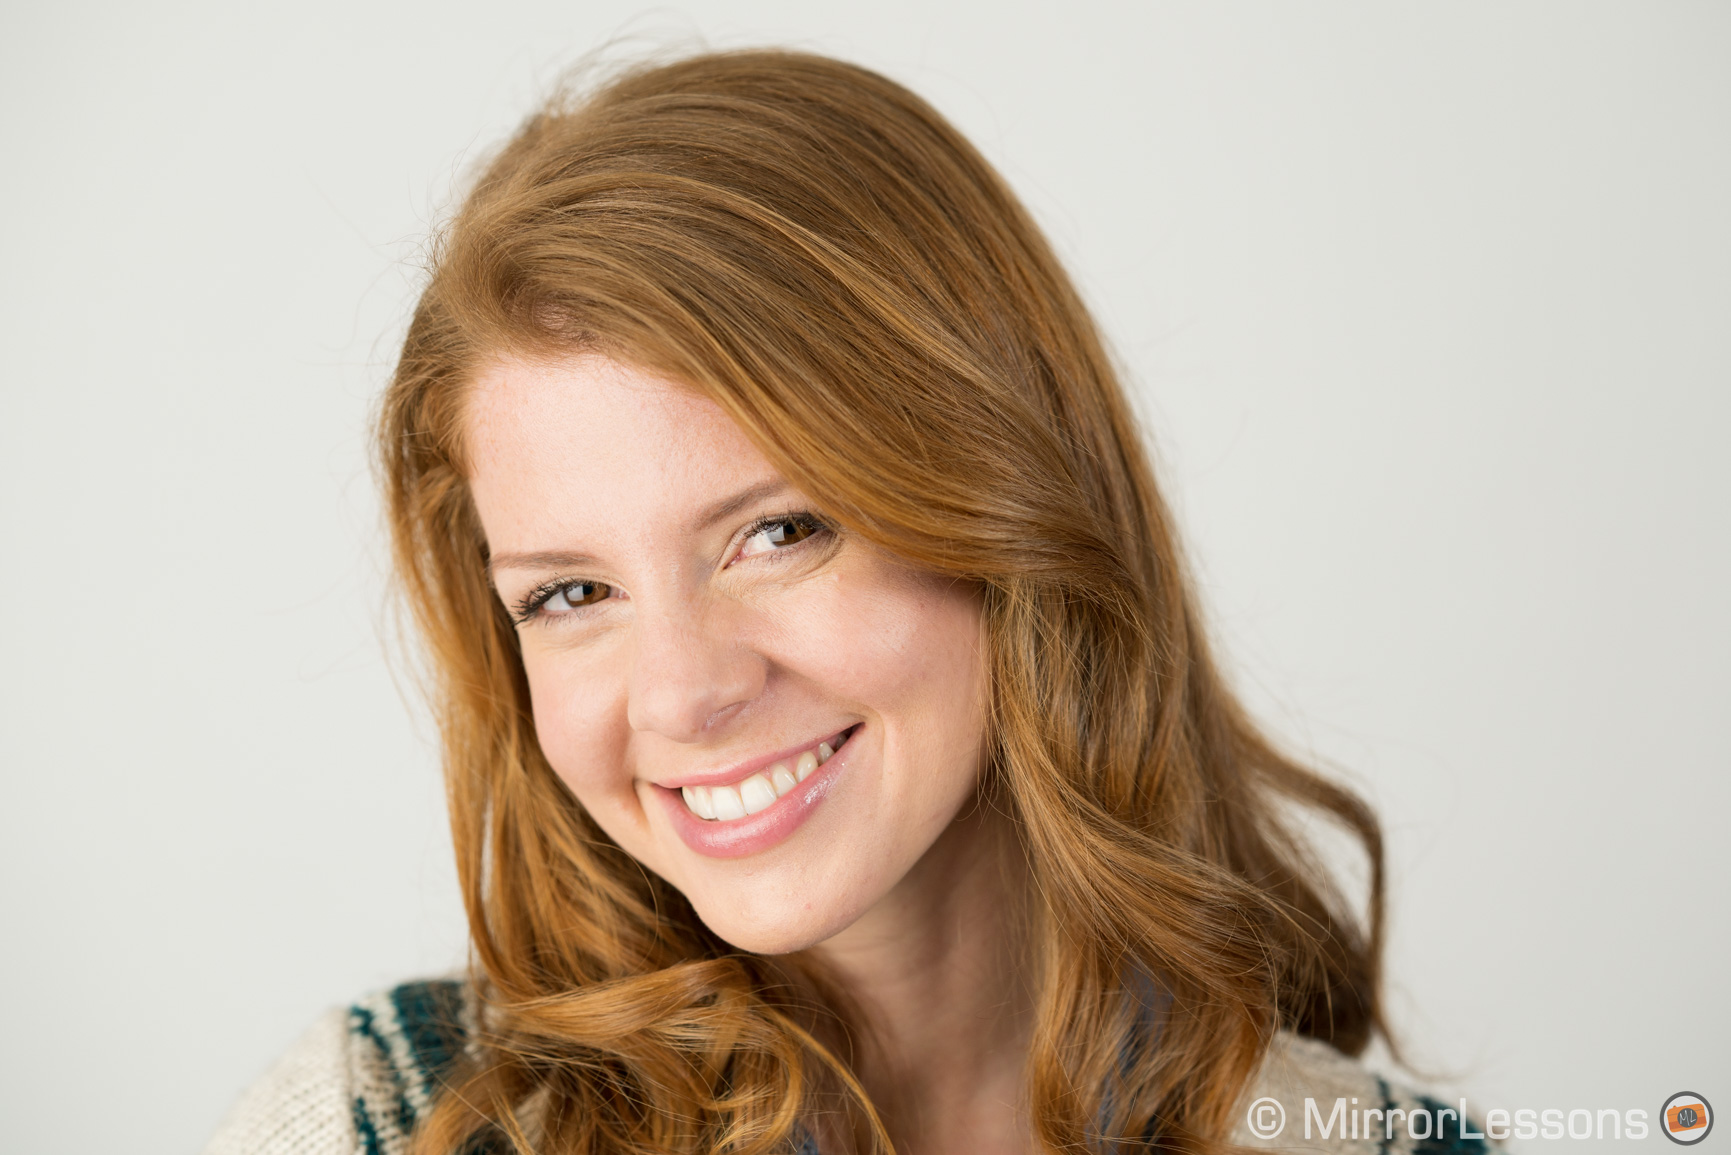
Sony A7 III, A7R III, A9 Eye AF Setup for Portraits
When it comes to the A7 III and AF settings for portraits, there is one feature that stands out from the rest: Eye AF, sometimes known as eye autofocus, eye tracking or eye focus.
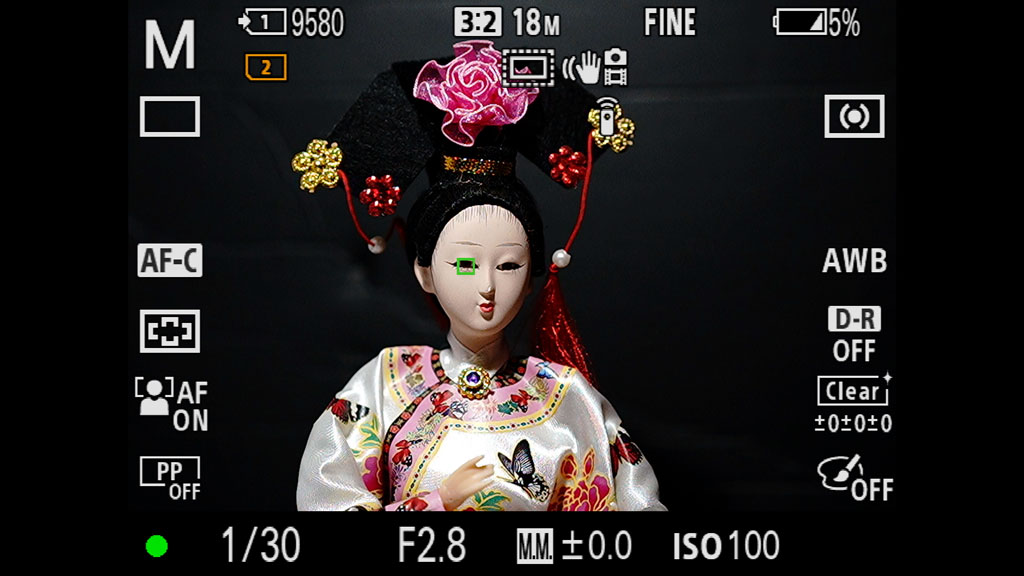
Eye AF means that the camera detects the eyes of a subject and places a single small AF point on the left or right eye to track it.
It is perhaps the best autofocus setting you can find on modern Sony cameras. Whether you’re taking professional portraits or pictures of your kids or dog, this function is very useful.
Depending on the specific camera, the way you enable Eye AF can change. Let’s see how to set up Eye AF on the Sony A7 III and other models.
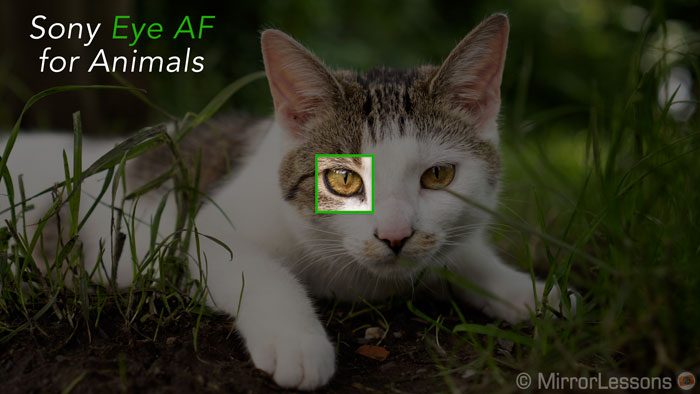
In this chapter we concentrate on Eye AF for Humans. The function works in a similar way for animals. To know more about Eye AF for animals, read our separate article below.
In-Depth:
Sony Eye AF for Animals Guide
Real Time Eye AF on the Sony A7 III, A7R III, A9
Also valid for the A9, A9 II and A7R IV
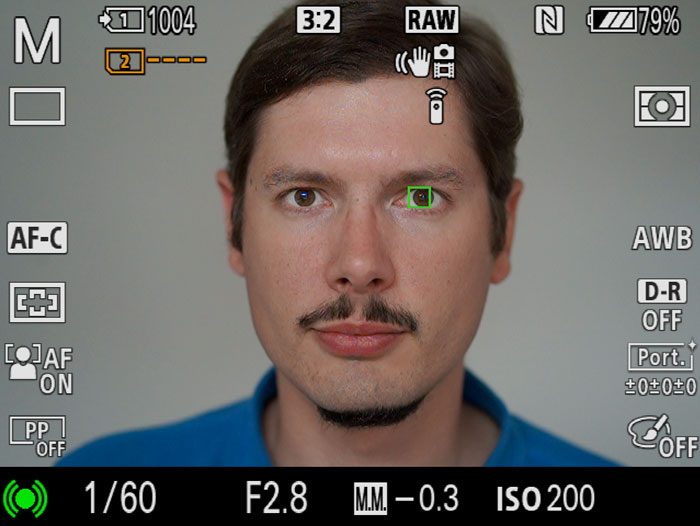
On the A7 III and other specific models, Real Time Eye AF means that the camera starts to track the eyes automatically when you engage focus. However this doesn’t happen by default and needs to be configured in the menu.
Follow the instructions below to turn on Eye Autofocus on your A7 III and other compatible Alpha bodies.
- Set a large Focus Area such as Zone or Wide. This is important because Real Time Eye AF works within the focus area you select. If the focus area is too small and your subject goes outside of it, Eye AF will stop working.
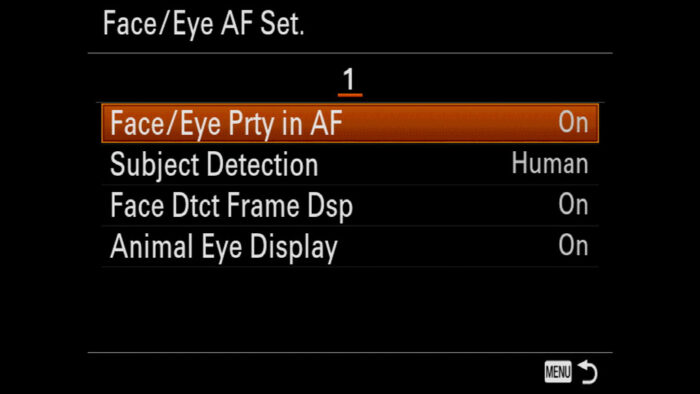
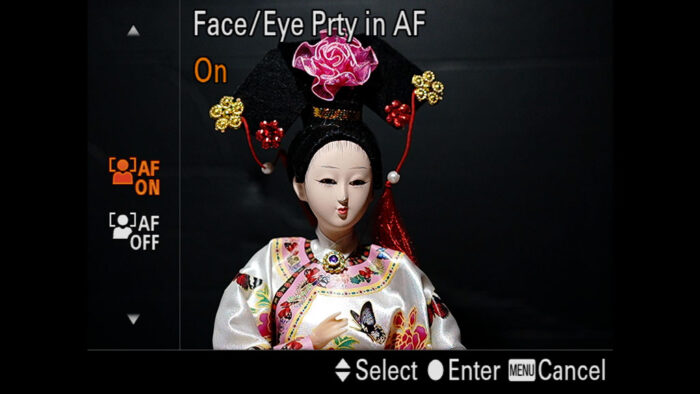
- Go to Camera Settings 1 / AF2 (page 6/14)
- Enter Face/Eye AF Set.
- Turn On Face/Eye Prty in AF
- Make sure Human is selected for Subject Detection
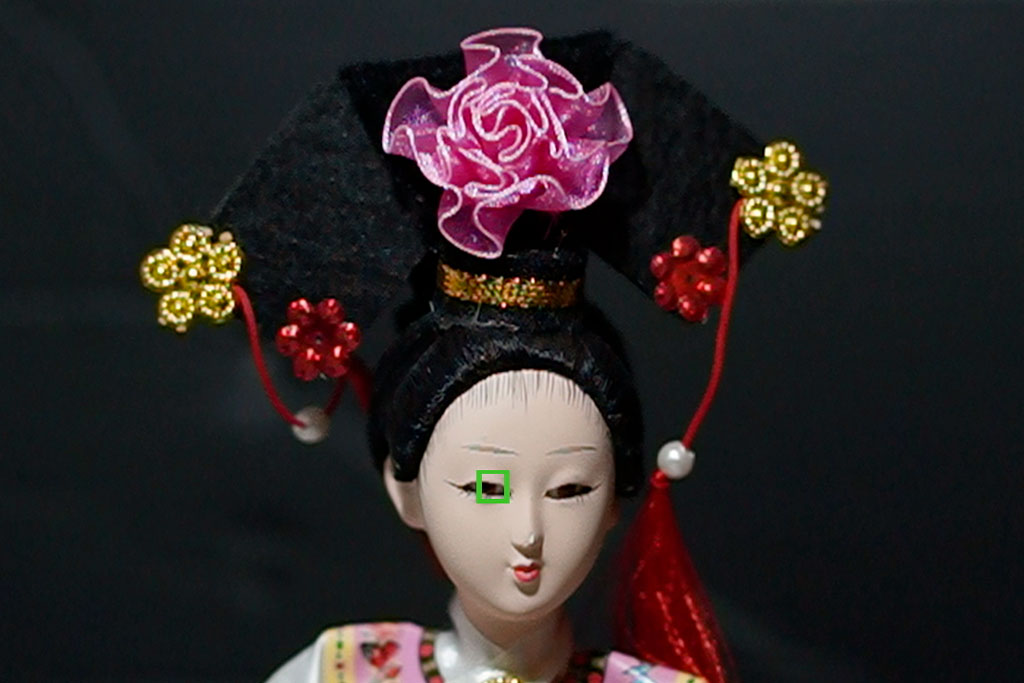
- Back in the live view, you should see a white square around the face of your subject, which means that the camera is detecting the presence of a person in the scene*
- Press the focus button (shutter release halfway or back button focus) and the green square should appear on the eye of your subject.
*Note: when Face/Eye Priority in AF is enabled but you’re not focusing, some cameras (A9, A9 II and A7R IV) may display a small white square on the eye, whereas others (A7 III, A7R III) will show a bigger white square around the face. In other words, some models concentrate on the face, others on the eye. However once you engage autofocus, the eye gets priority either way.

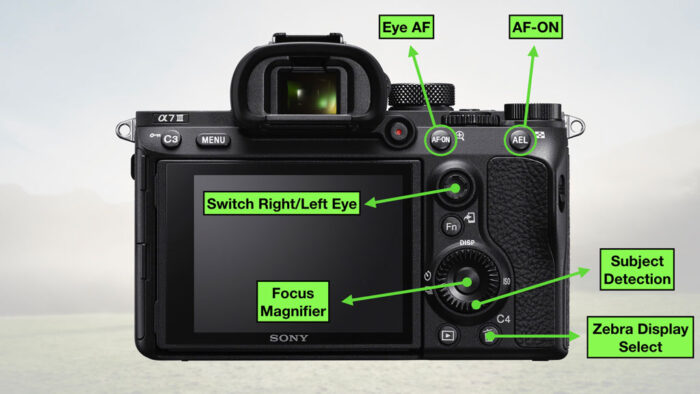
Eye AF on Sony A7 III, A7R III, A9 with a Custom Button
Valid for all A7 / A9 cameras
Setting up Eye AF on your Sony A7 III with a custom button offers two main advantages. For older models such as the A7 II series, it is the only way to use this function because there is no real time mode.
The first advantage of using Eye AF with a custom button is that it will track the eye of your subject no matter which focus area you’ve selected. Even if you’re using a small area and the subject is not in it, the button will override the focus area and track the eyes no matter where they are.
The second advantage is that you have more control. You engage Eye AF only when you need it and furthermore, you don’t have to activate Face Detection, so you can basically keep Eye AF independent from the other settings.
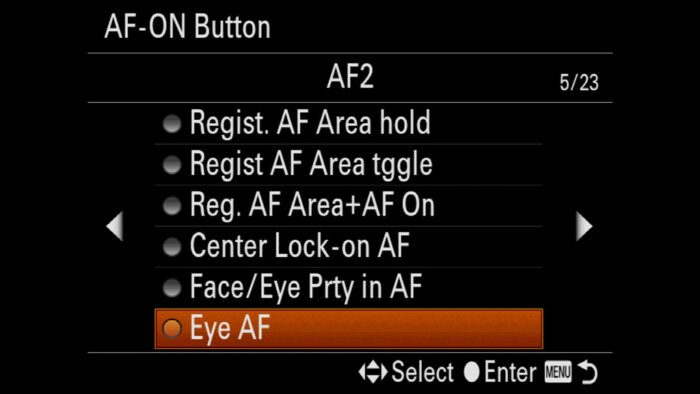
- Go to Camera Settings 2 / Custom Operation1 (page 8/9)
- Choose Custom Key, the first one on top
- Select a custom button. (I use the AF-ON one)
- Scroll left to AF 2 (page 5/23) and choose Eye AF
- Press the customised button to focus on the eye, press and hold to focus continuously (when C-AF is selected)
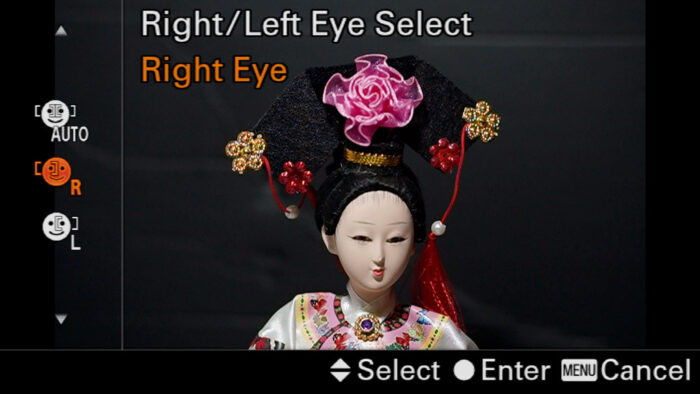
Sony Eye AF Setting: Right/Left Eye Selection
Not available on the A7 I, A7 II and, surprisingly, the A7 III series.
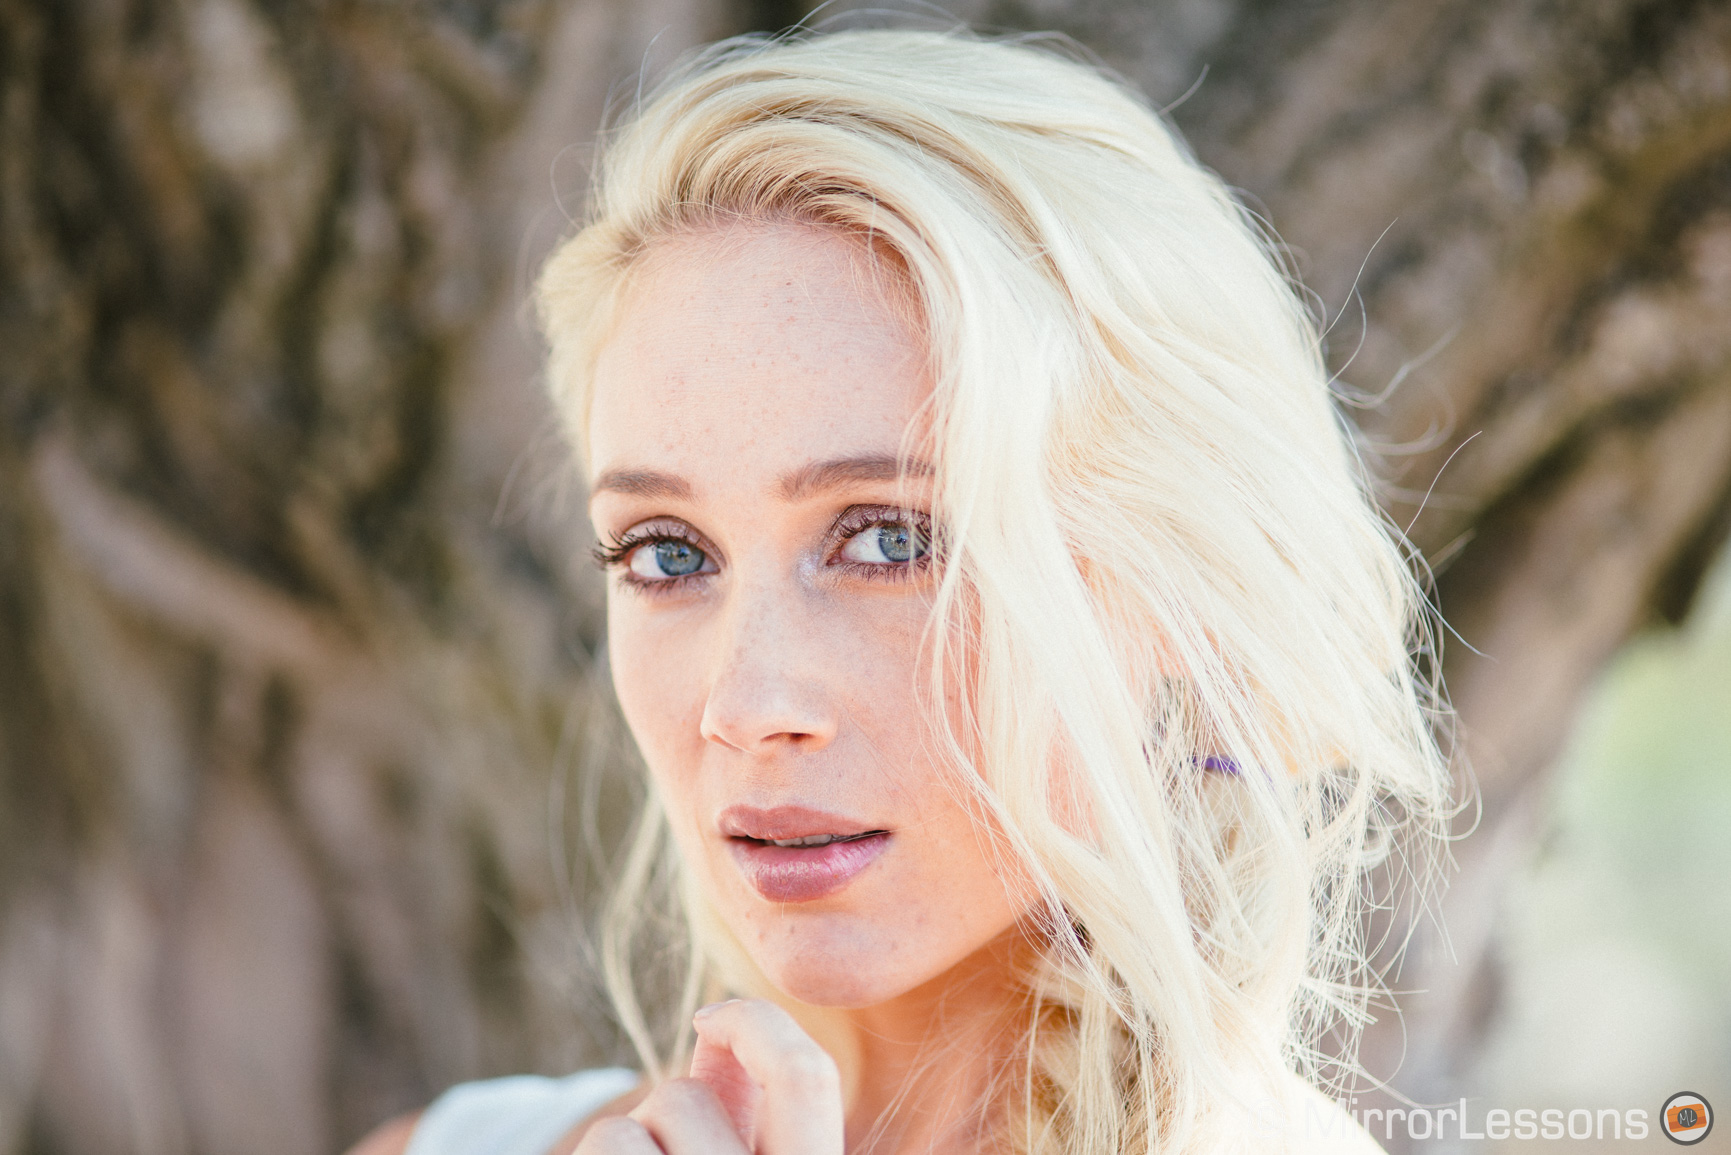
Depending on your subject’s position, you may not have the two eyes on the same focal plane, especially if you’re using a fast aperture or a short focus distance. You want the closest eye to be in focus to get the best result.
Some Sony models allow you to prioritise the left or right eye. This is very useful because often Eye AF doesn’t focus on the nearest eye unless it is very evident.
- Go to Camera Settings 1 / AF2 (page 6/14)
- Enter Face/Eye AF Set.
- In Right/Left Eye Select, choose which one you want to prioritise.
To select left and right more quickly, you can use a custom button:
- Go to Camera Settings 2 / Custom Operation1 (page 8/9)
- Choose the first Custom Key
- Choose a custom button
- Scroll right to AF3 (page 6/25) and choose Switch Right/Left Eye
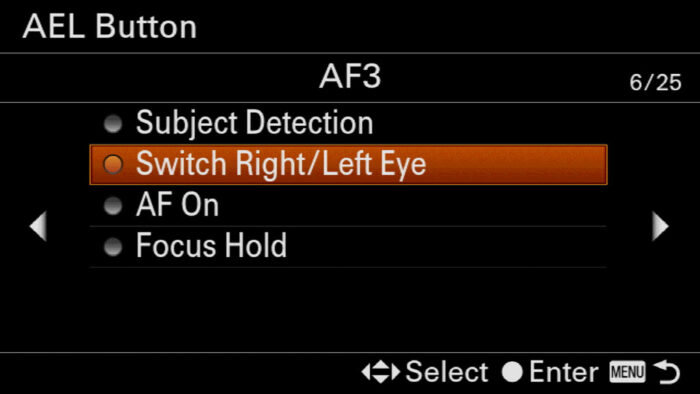
Note: by left and right, Sony means the point of view of your subject, not yours the photographer. So for example, if you choose Left, the camera focuses on the left eye of the person from his/her perspective, meaning it is the right eye on your screen.

Sony A7 III, A7R III, A9 Eye AF Continuous Focus
Eye AF works in S-AF only on the A7 I series and the A7 mark II model.
On recent Sony cameras, Eye AF can be used in S-AF or C-AF modes. My advice is to keep C-AF at all times for two reasons:
- it is more reliable
- subjects rarely stay completely still so it’s better to have the camera track the eye constantly
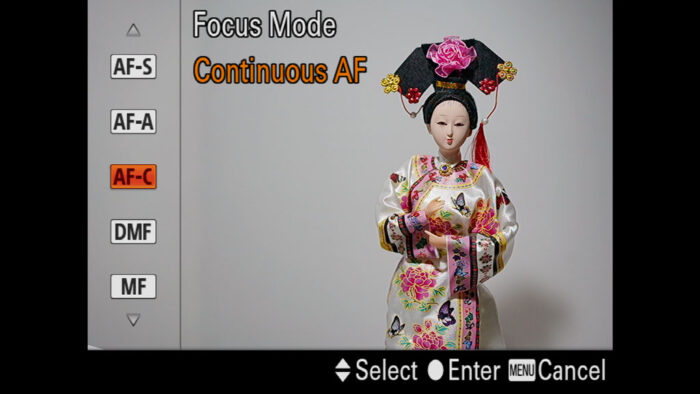
With C-AF, you can also use the AF Track Sens setting to make it more or less responsive. Usually I keep it on level 3 (standard) which is more than enough. You can find this in Camera Settings 1 / AF2 (page 6/14).
When Eye AF is Not Working on your Sony A7 III, A7R III, A9
If you’re having trouble using Eye AF on your Sony A7 III or other models, have a look at the suggestions below. Some of them might look stupid but sometimes it is the simplest of reasons that cause the issue:
- you’re in MF (Manual Focus) mode
- you’re in a focus mode other than AF-S (for A7 I series and A7 mark II model)
- the AF/MF switch on your lens is set to MF
- the subject is outside the Focus Area (when using real time eye AF)
- Subject Detection is set to Animal
- you’re using the Landscape, Night or Sunset Scene mode
- you’re using the digital zoom function (when using a Power Zoom lens)
Over the years, Sony has made Eye AF very reliable and I was surprised to see it work even for people wearing sunglasses and masks.
But of course it is not perfect and can fail occasionally if the backlight is too strong, if the person’s face is covered or if the eyes close momentarily.
In the example below, the person was closing her eyes a lot while posing, and in the first shot the camera mis-focused. The eyebrows are sharp but the eyeballs are not.
Thankfully I was able to get another picture a few minutes later.


Sony A7 III, A7R III, A9 Eye AF Lens compatibility
Eye AF is compatible with all native E-mount lenses that feature autofocus. This includes the APS-C series, the Samyang AF series, the Zeiss Batis line-up and the Tamron Di III lenses.
If you adapt a Canon DSLR lens with an electronic adapter, Eye AF may or many not work properly. It depends on the adapter and the lens itself.
On recent models such as the A9, A7 III and A7 IV series (but also the A7 II and A7R II if I’m not mistaken), Eye AF works with adapters like the Sigma MC-11 and the Metabones Smart Adapter V. For the latter, the adapter needs to be set in Advanced Mode. Check the Metabones website to find out more.

Sony A7 III, A7R III, A9 Face AF
As well as eyes, the camera can detect and track human faces.
- Choose Wide for the Focus Area to ensure that the camera focuses on the face no matter where it is positioned on the screen
- Go to Camera Settings 1 / AF2 (page 6/14)
- Go to Face/Eye AF Set.
- Select On for Face/Eye Prty in AF
- Select Human in Subject Detection
- Select On for Face Dtct Frame Disp to see the square overlay on the face in the LCD screen, useful to have a visual confirmation
Note: When you start focusing, the camera will switch to Eye AF if you’re using an A7 III, A7 IV or A9 series. If the eyes can’t be detected, face AF will be used.
Multiple Faces and Priority
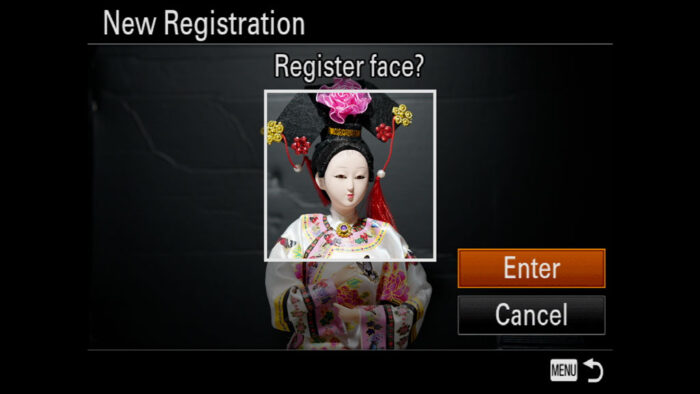
If multiple faces are in your frame, there isn’t a quick way to tell the camera which one to prioritise. The only method is to use a function called Face Registration.
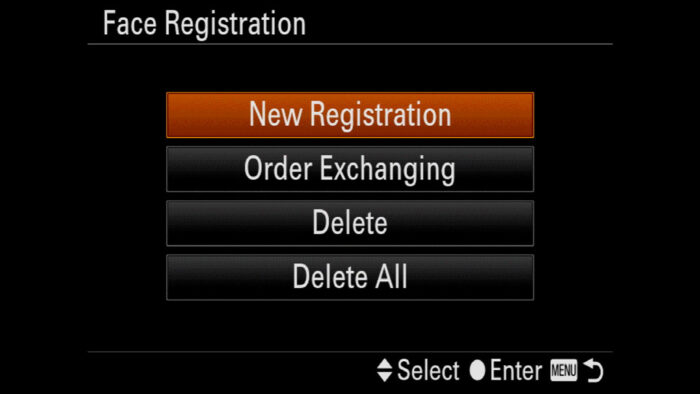
With this function, you can register up to 8 faces in the camera’s database. When one or more of these people are in your frame, the camera will prioritise focus on them. It can be useful to make sure the camera always focuses on your son’s face first versus other kids around him. You can also change the order of priority if more than one person is registered.
- Go to Camera Settings 1 / Shooting Assist (page 14/14)
- Go to Face Registration
- Choose New Registration
- Frame the person’s face in the rectangle at the beginning and press the shutter button. Click Enter to confirm.
- Back on the previous screen, you can repeat the operation to register other faces, change the priority order, or delete all faces.
- Go back to Camera Settings 1 / Shooting Assist (page 14/14)
- Choose On for Regist. Faces Priority
Note: for the A7R IV and A9 series, an alternative method is to use Touch Tracking AF because it works by analysing the face and eye of the subject among other things. On the other cameras you can use Lock-on AF but it is not exactly the same thing. Check our Autofocus article to find out more.
Sony A7 III, A7R III, A9 Portrait Photography: Additional Settings
We’ve seen the most important settings relating to image quality and autofocus but there are other parameters you may want to look at.
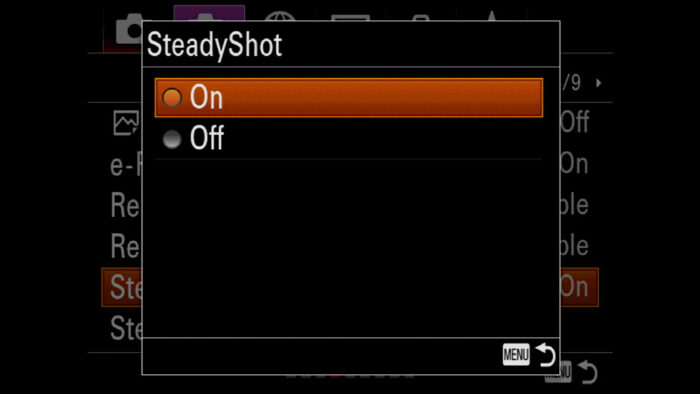
Image stabilisation
Camera Settings 2 / Shutter SteadyShot (page 4/9)
Not available for the A7 I series
If you’re taking pictures hand-held, you want the SteadyShot to be active. It reduces the chance of having motion blur in your image when using shutter speeds around 1/50s, especially with a medium or long focal length.
Shutter Mode
Camera Settings 2 / Shutter SteadyShot (page 4/9)
You can activate the e-front curtain shutter to reduce the chance of shutter shock between 1/50s and 1/400s. It doesn’t happen often and it’s model specific (A7R series mainly), but it’s better to be safe than sorry.
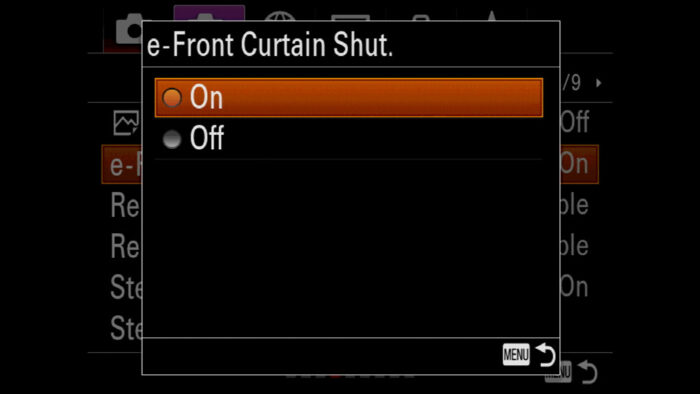
Limitation: with shutter speeds faster than 1/500s, the e-front curtain shutter can distort the bokeh in the background, so be careful when using it and make sure to be in M shooting mode so that you can control the shutter speed manually. It can also create banding when using flash (HSS especially).
Another useful feature is Silent Shooting, where the electronic shutter is activated. This can be handy if you don’t want your model to hear the shutter sound and know when you take a picture.
Note: if you’re using flash, you can’t use Silent Shooting.
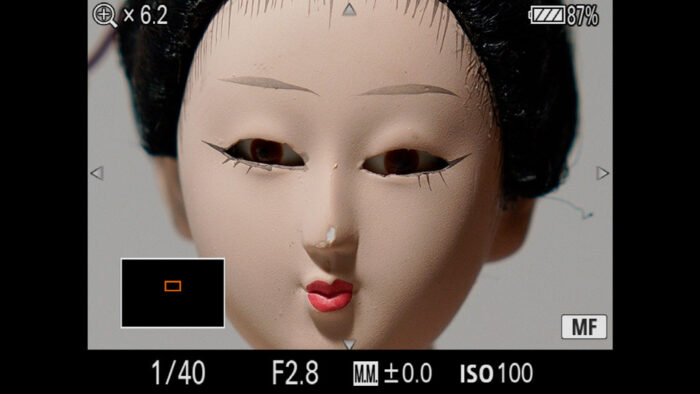
Focus Magnifier
If you’re using a manual focus lens, the Focus Magnifier assist can be of great help to double check focus on the subject. I find it more reliable than Peaking. The easiest way to use it is to assign it to a function button.
Flash
When using flash in the studio, you choose exposure settings that are calibrated on the flash output, but they are usually too dark for the ambience. To make sure that the live view of your camera is bright enough to compose properly, select Settings Effects Off in Live View Display (Camera Settings 2 (page 7/9).
Note: with select Sony or third party products, Setting Effects Off may activate automatically when you insert the flash in the hot-shoe.
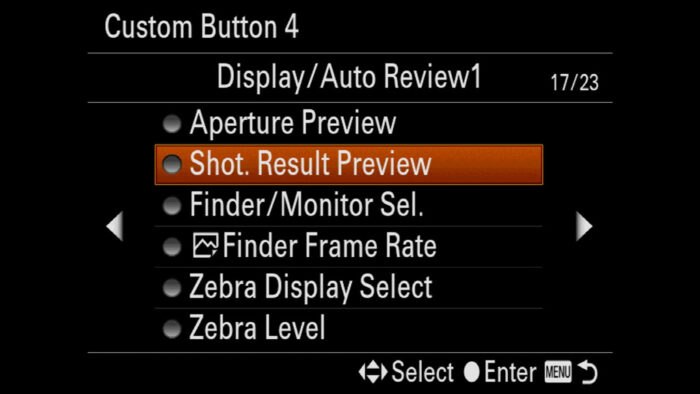
If you need to momentarily check the ambience exposure, you can assign the Shot. Result Preview option to a custom button (Display Auto Review1 17/23).
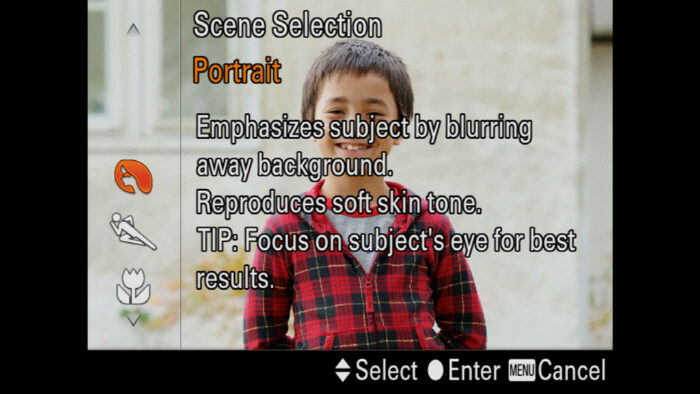
Sony A7 III, A7R III, A9 Portrait Scene Mode
On certain cameras like the A7R III and A7R IV, the Scene modes are selected automatically when working in Auto mode.
On the A7 III and other select models, you can rotate the main top dial to SCN (scene) and choose the Portrait mode.
The camera automatically picks a fast aperture to blur the background, activates Face and Eye AF and chooses the Wide Area. Other settings such as ISO, WB and Creative Style can’t be changed. It doesn’t work in C-AF so you won’t have the best AF performance.
Button Setup for Portraits
If portraiture is your main genre of interest, you want to have all the most important settings ready at your finger tips. He is an idea of how to configure the various buttons of your Sony Alpha camera.

Also consider having the following assigned to the Fn Menu or saved in My Menu:
- Creative Style
- White Balance
- Metering
- Zebra Level
- File Format
- Face/Eye in AF
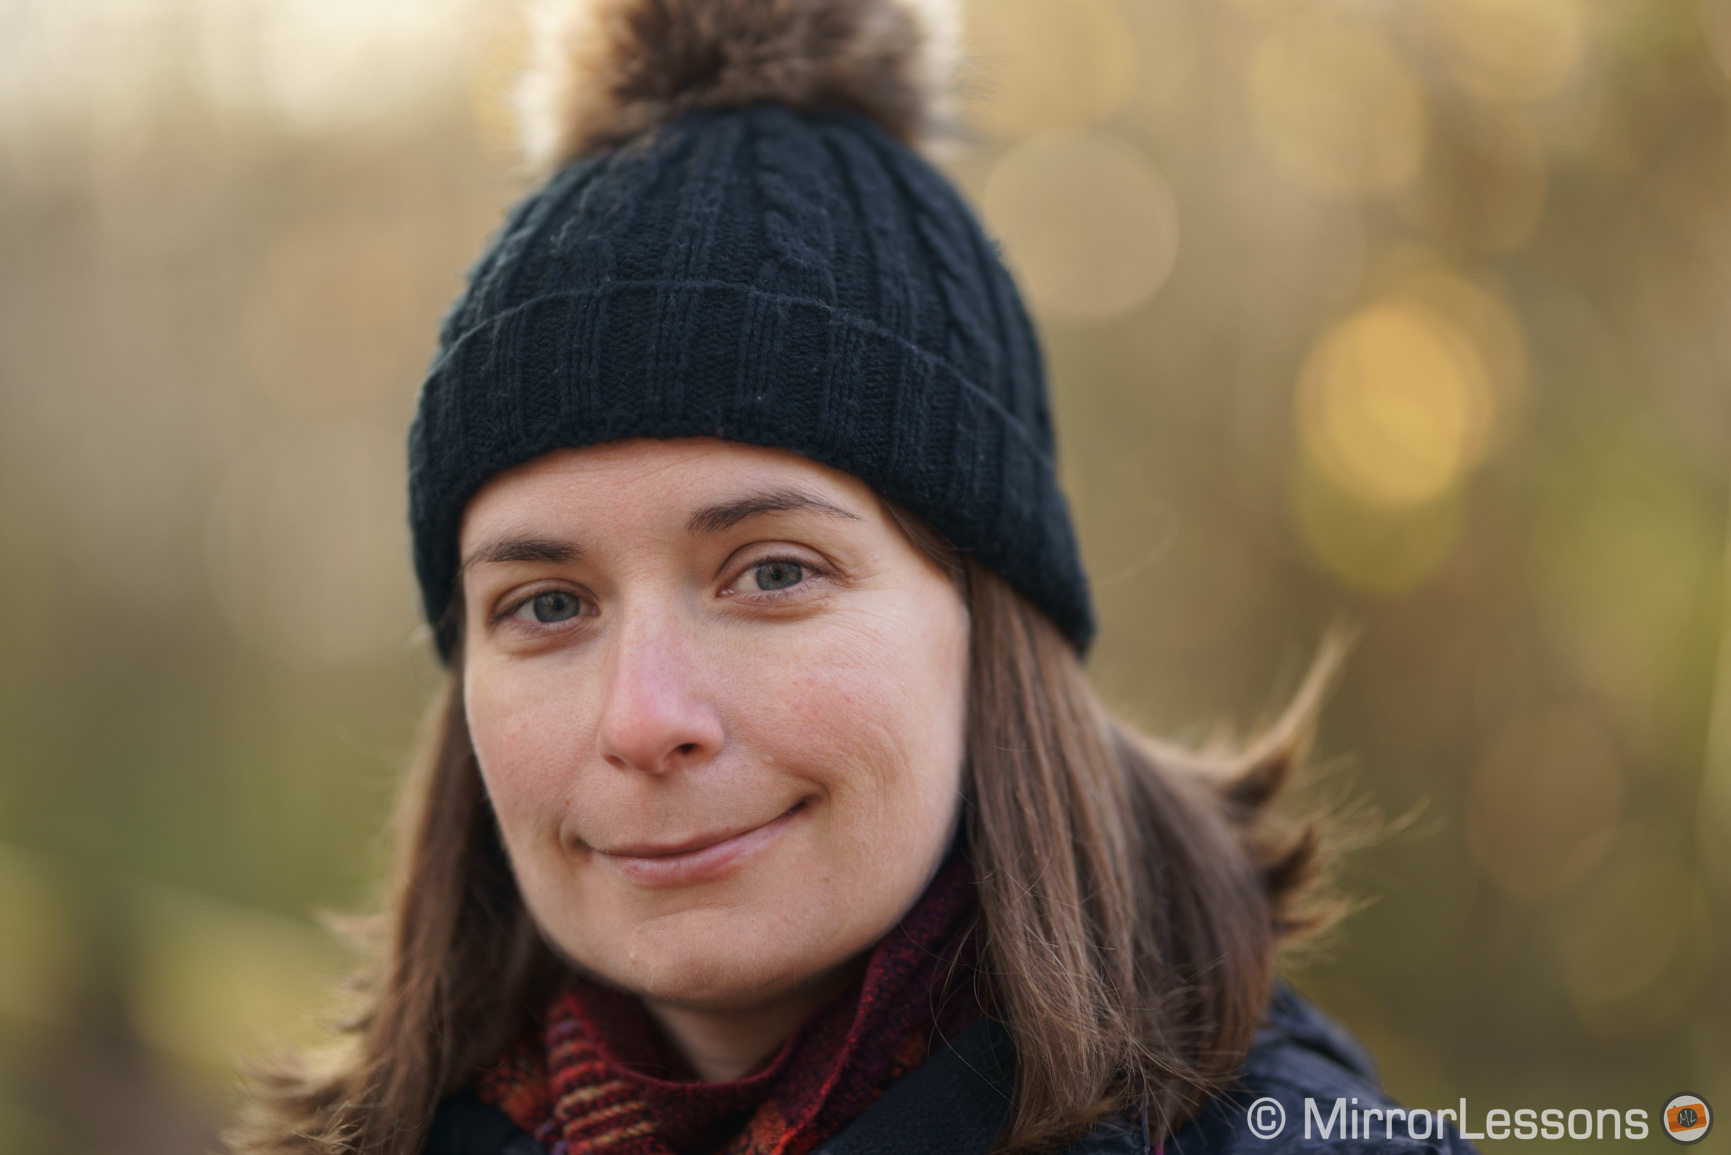
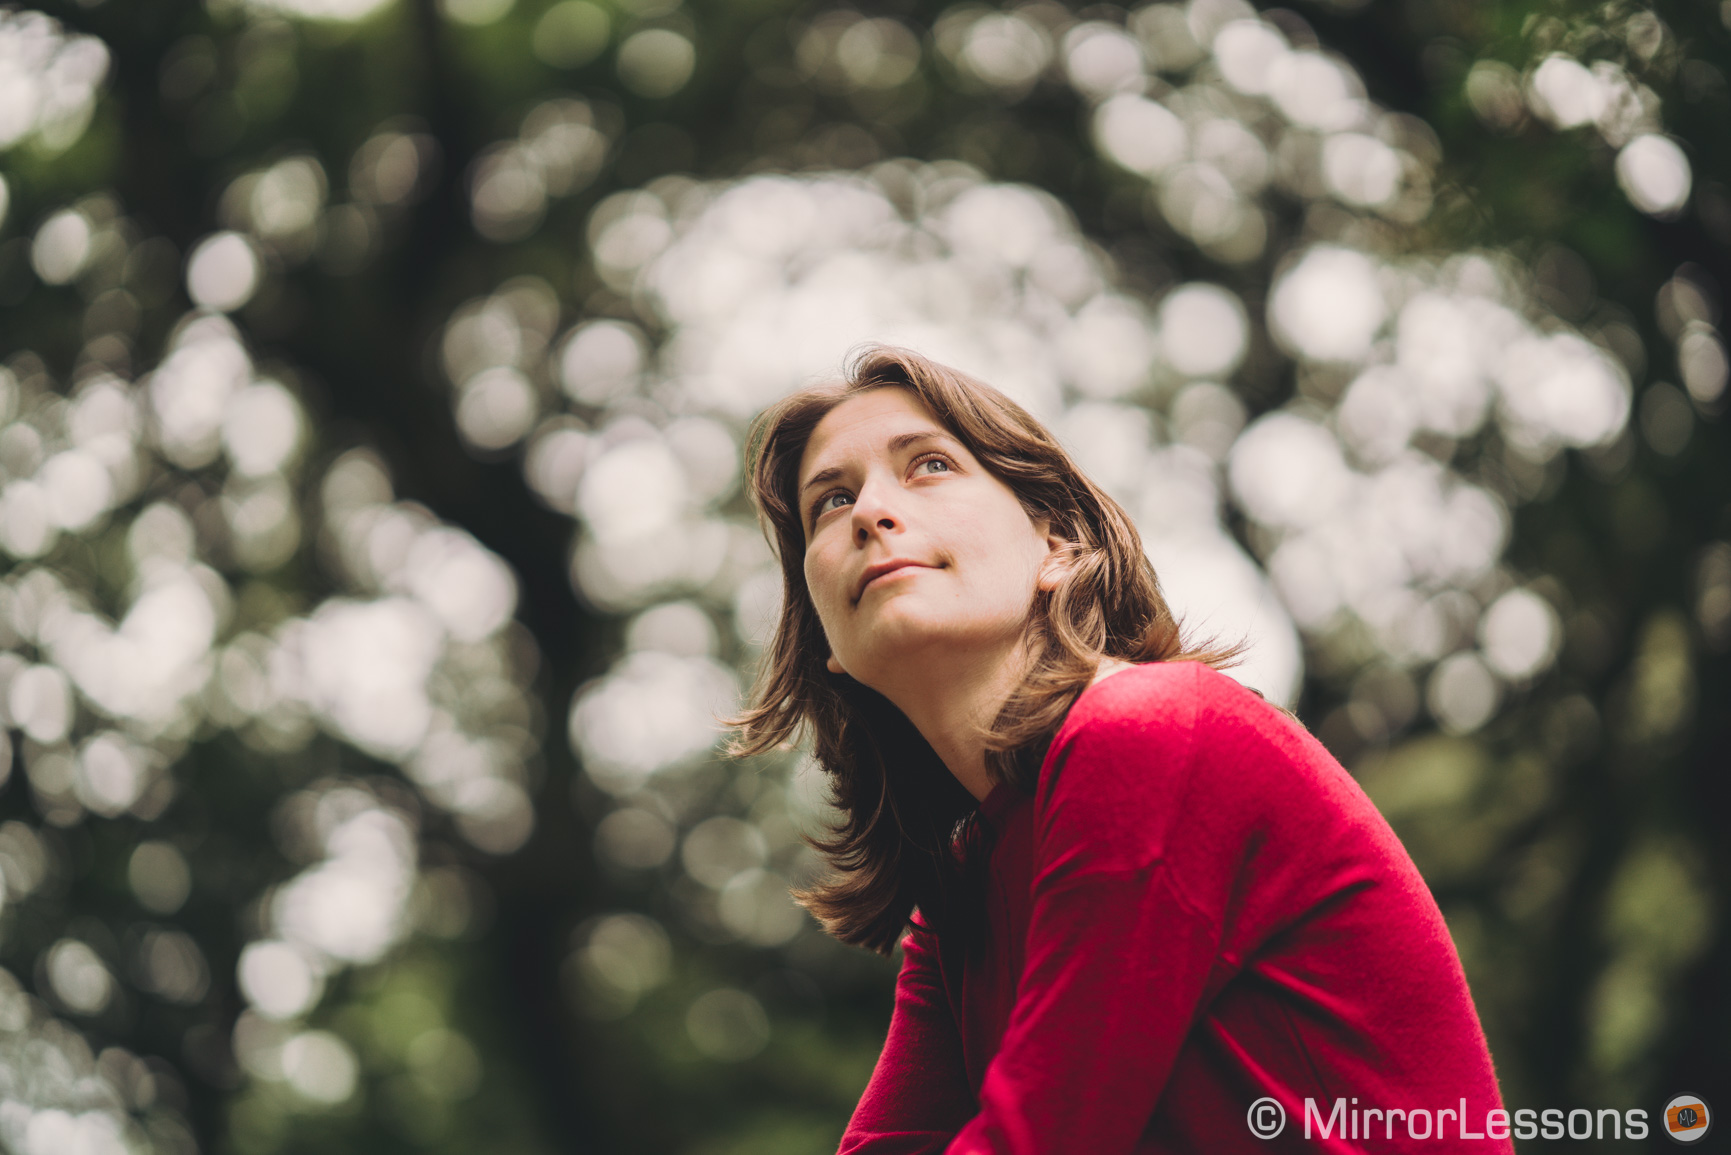
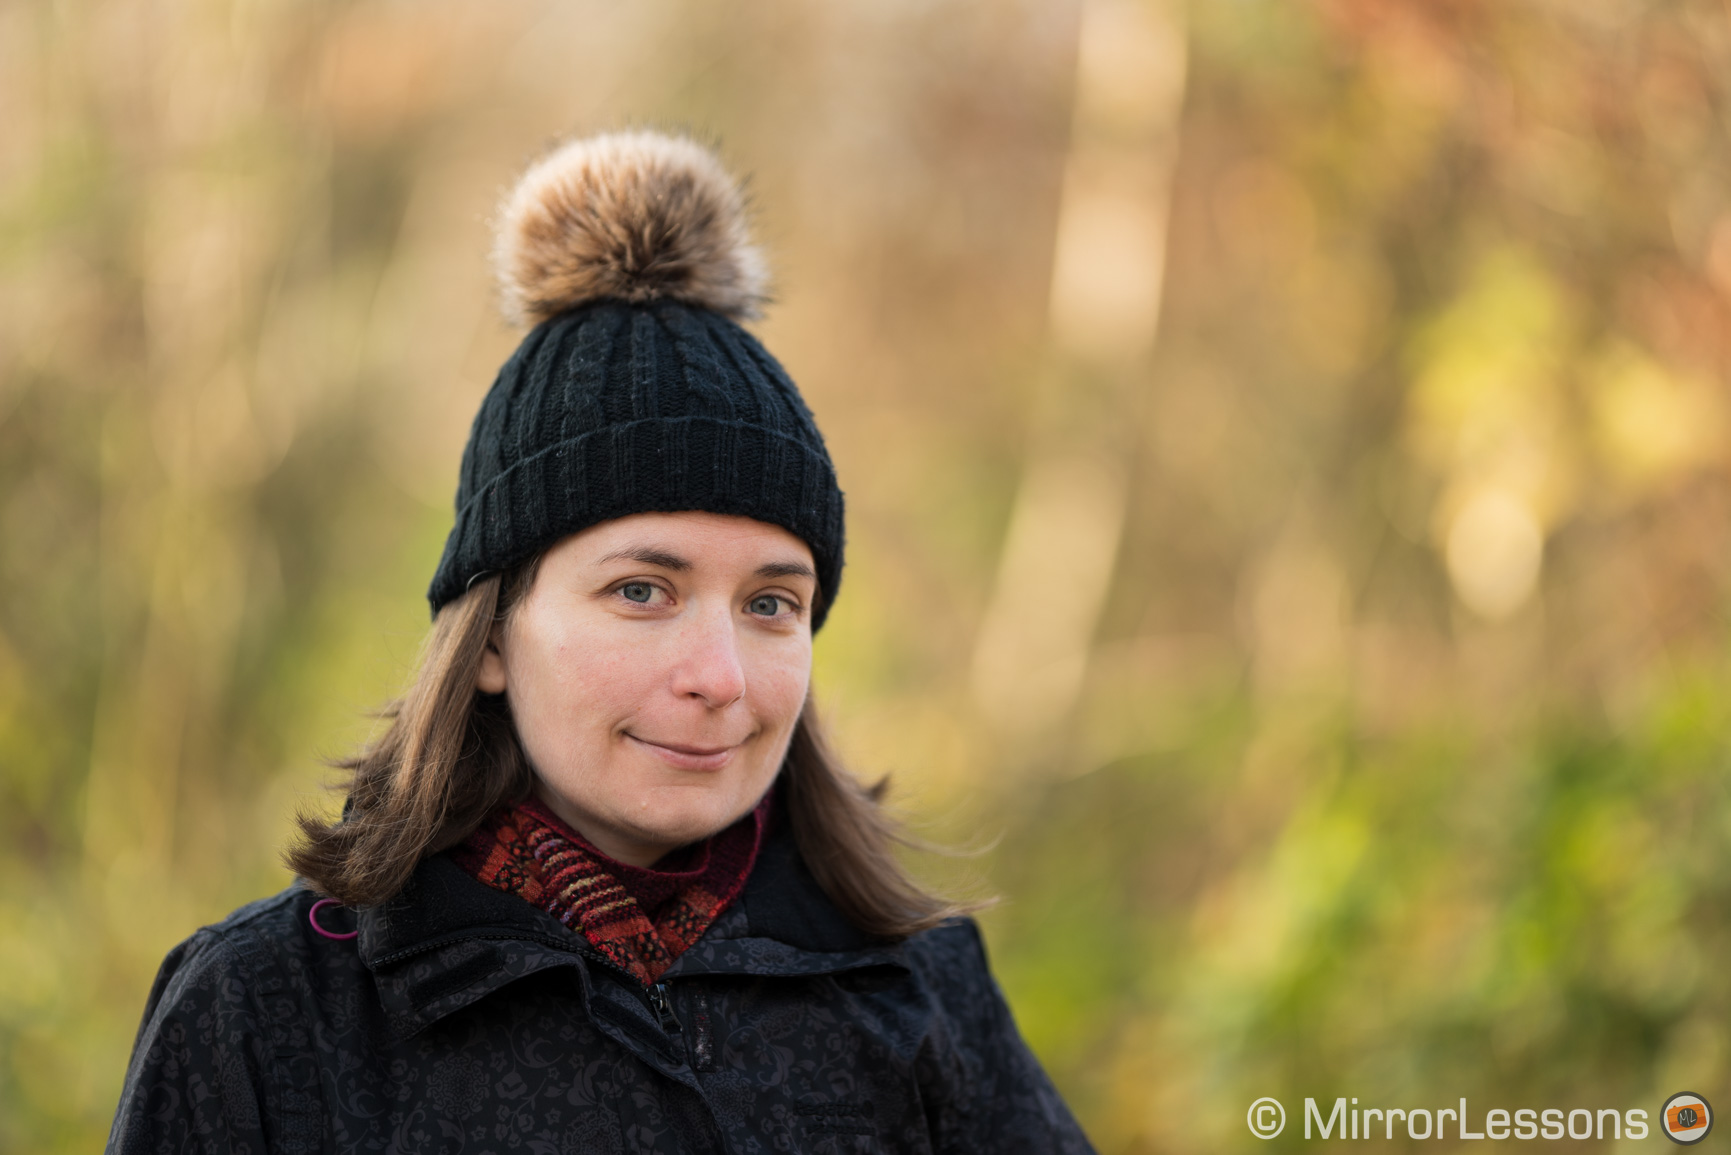
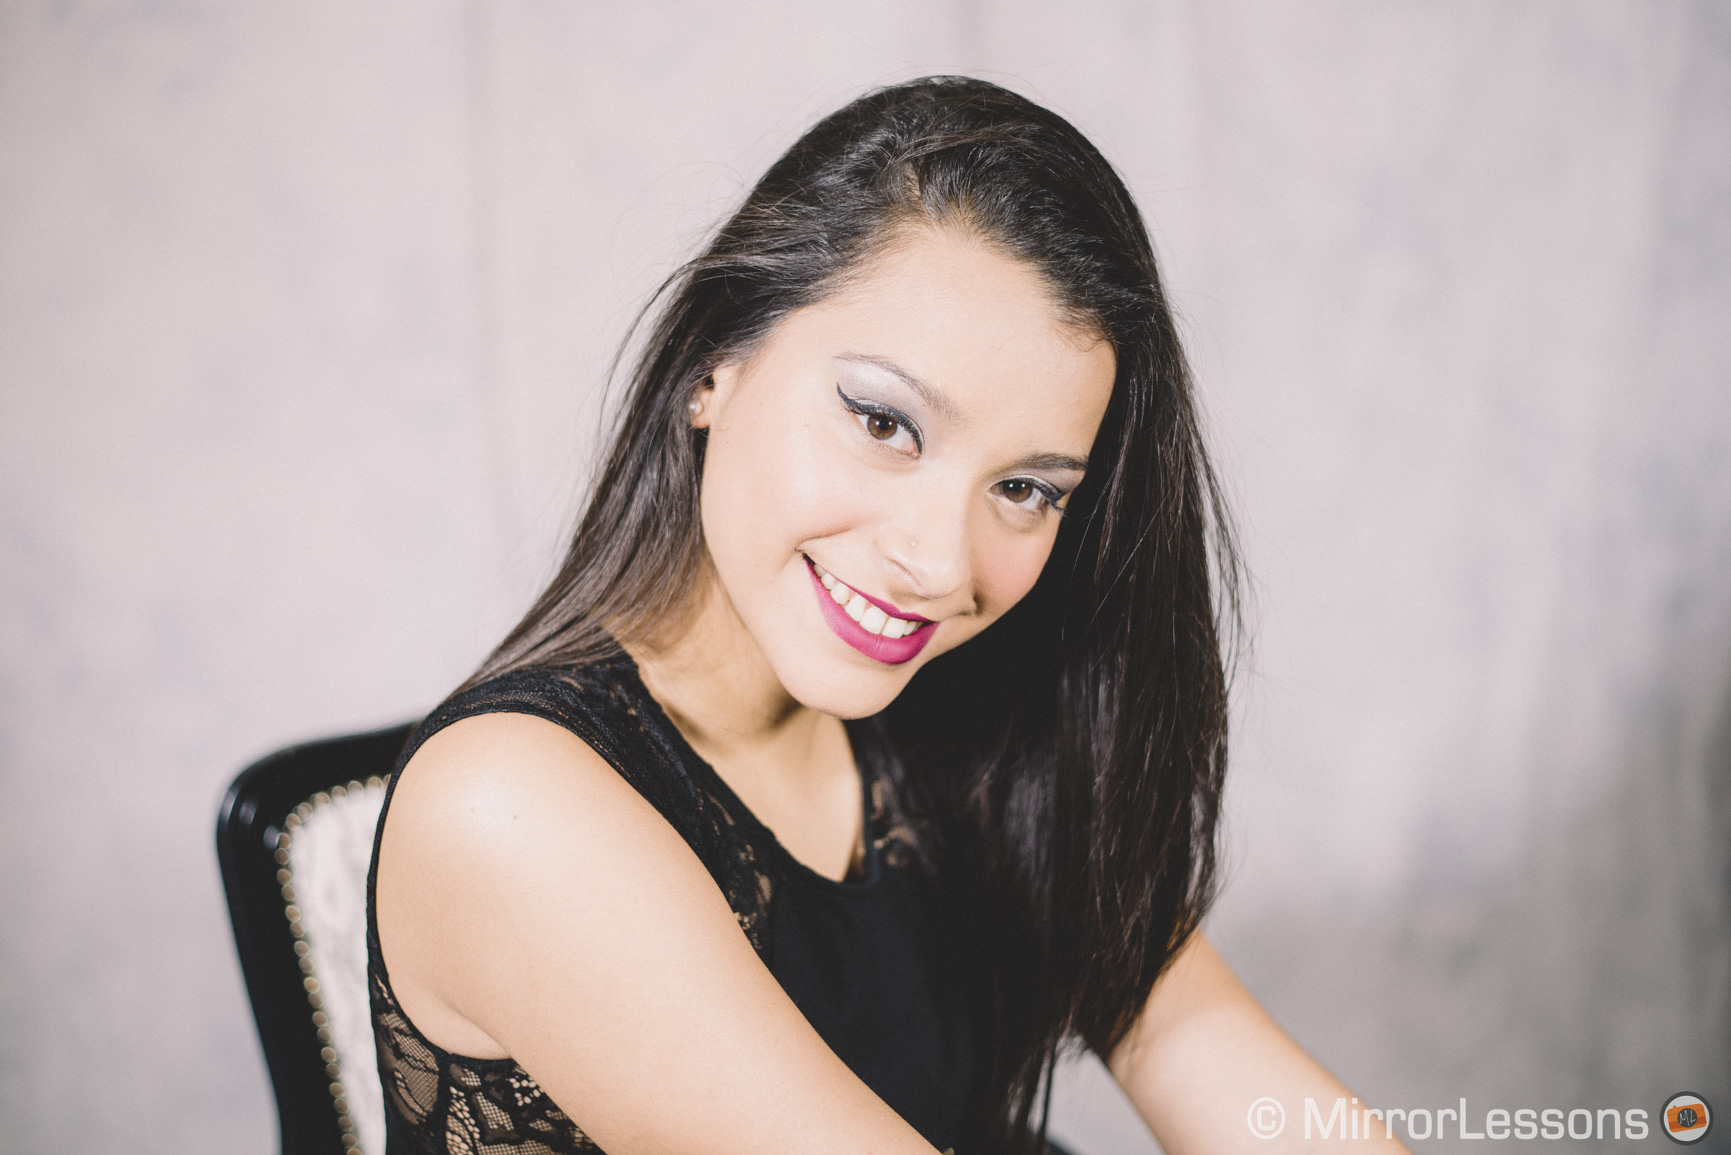
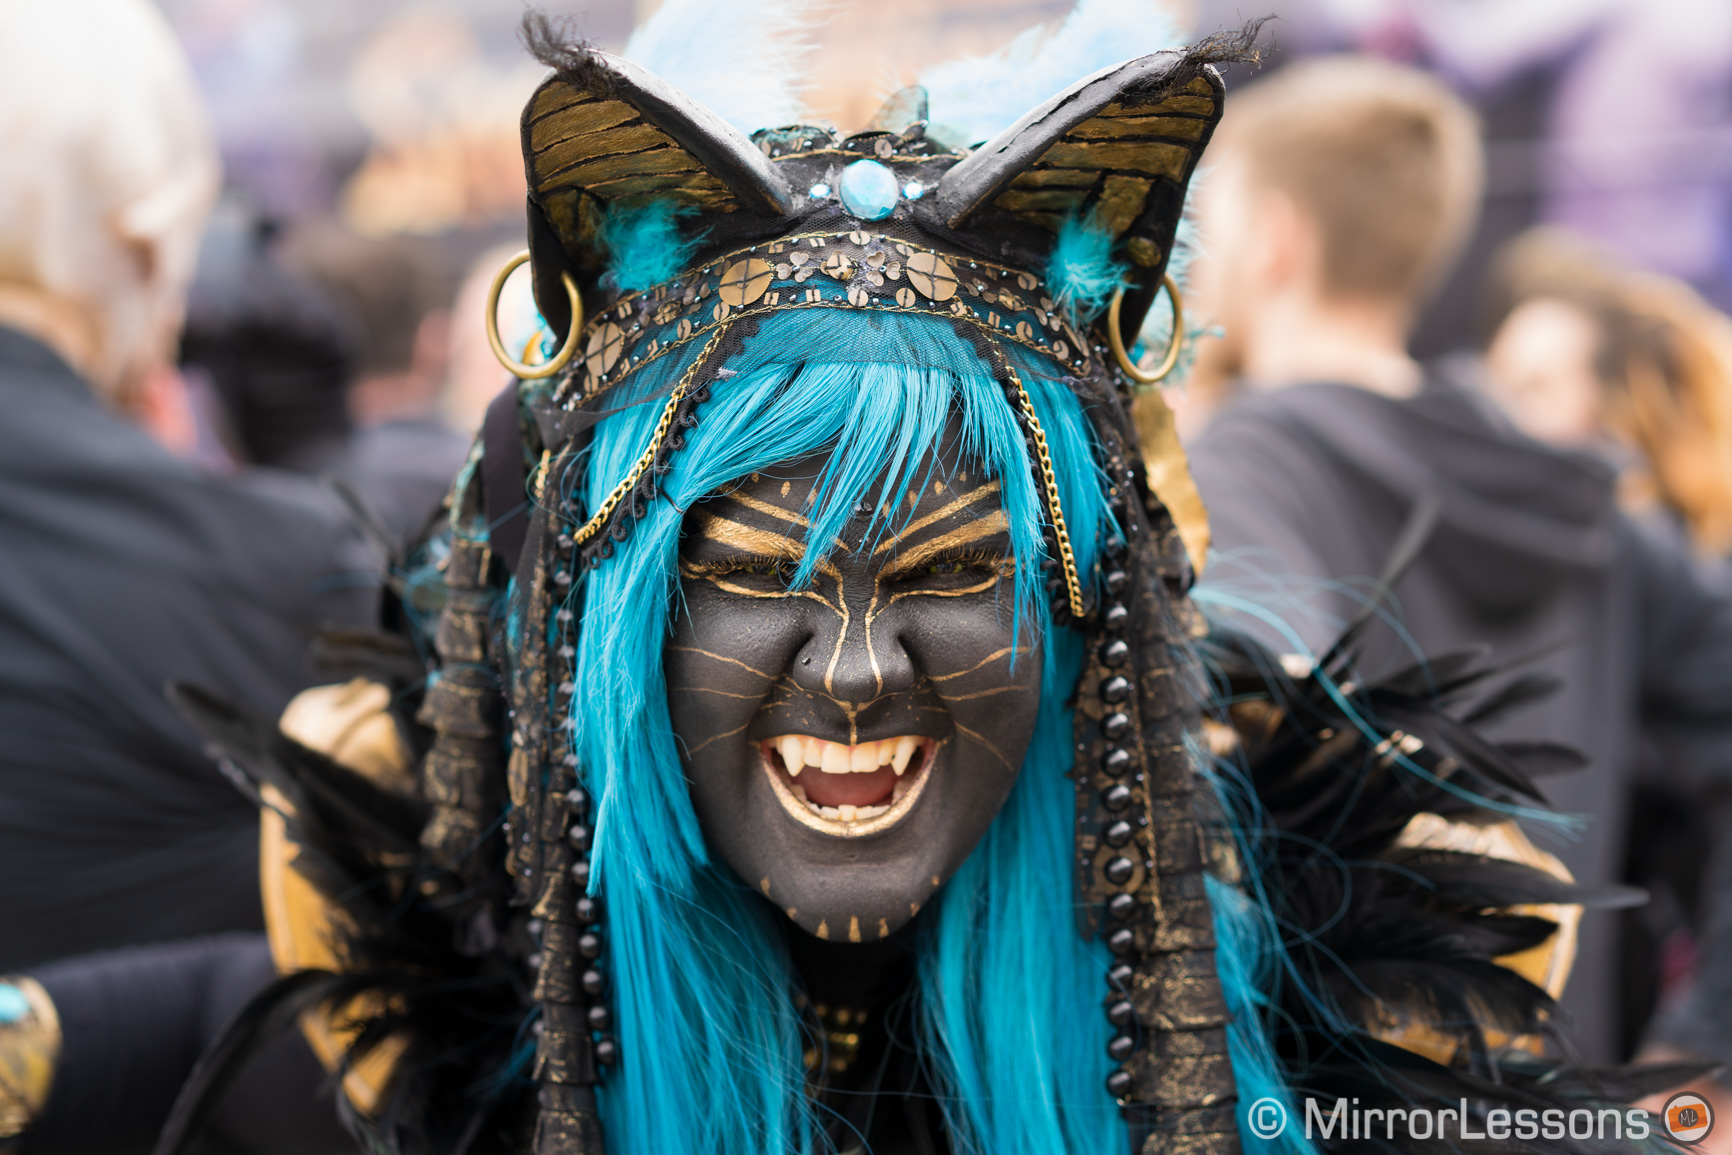
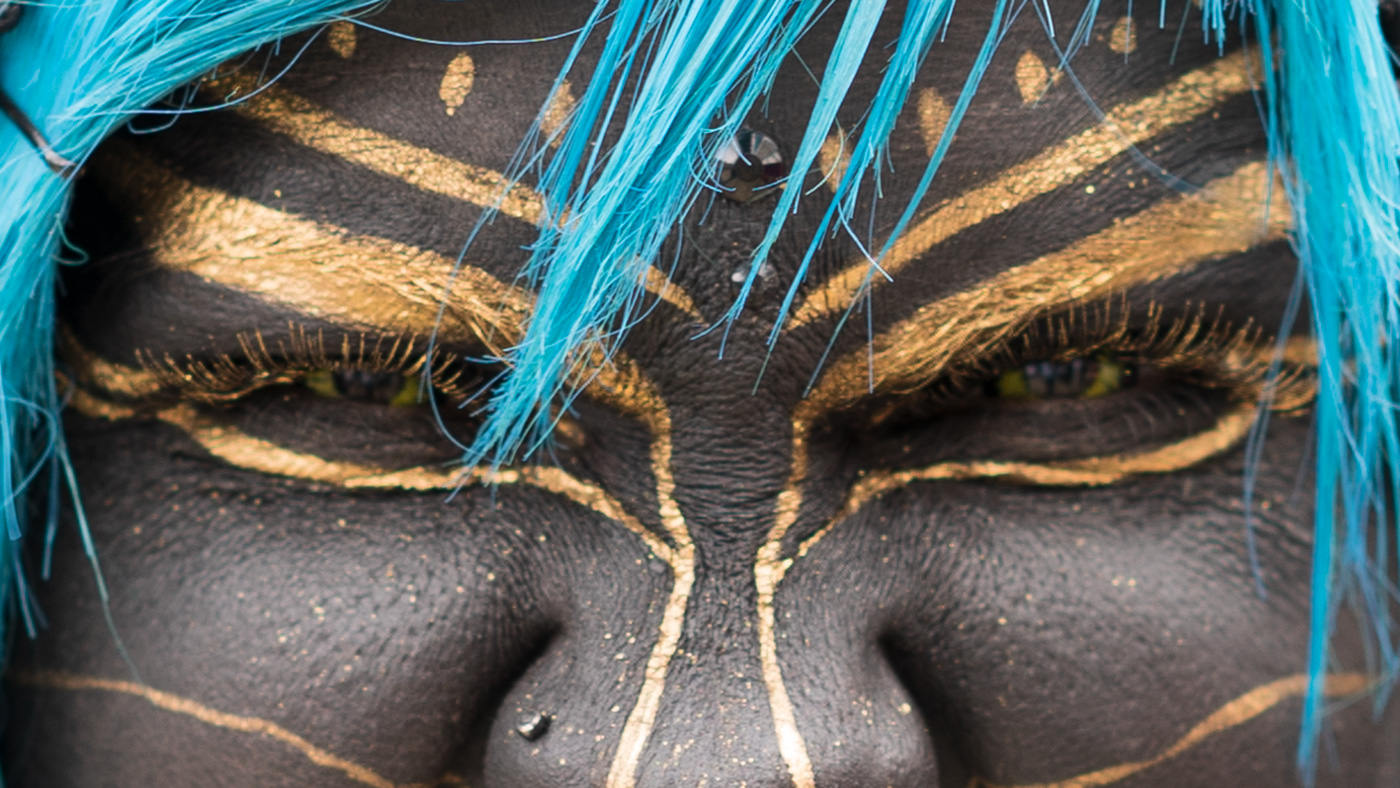
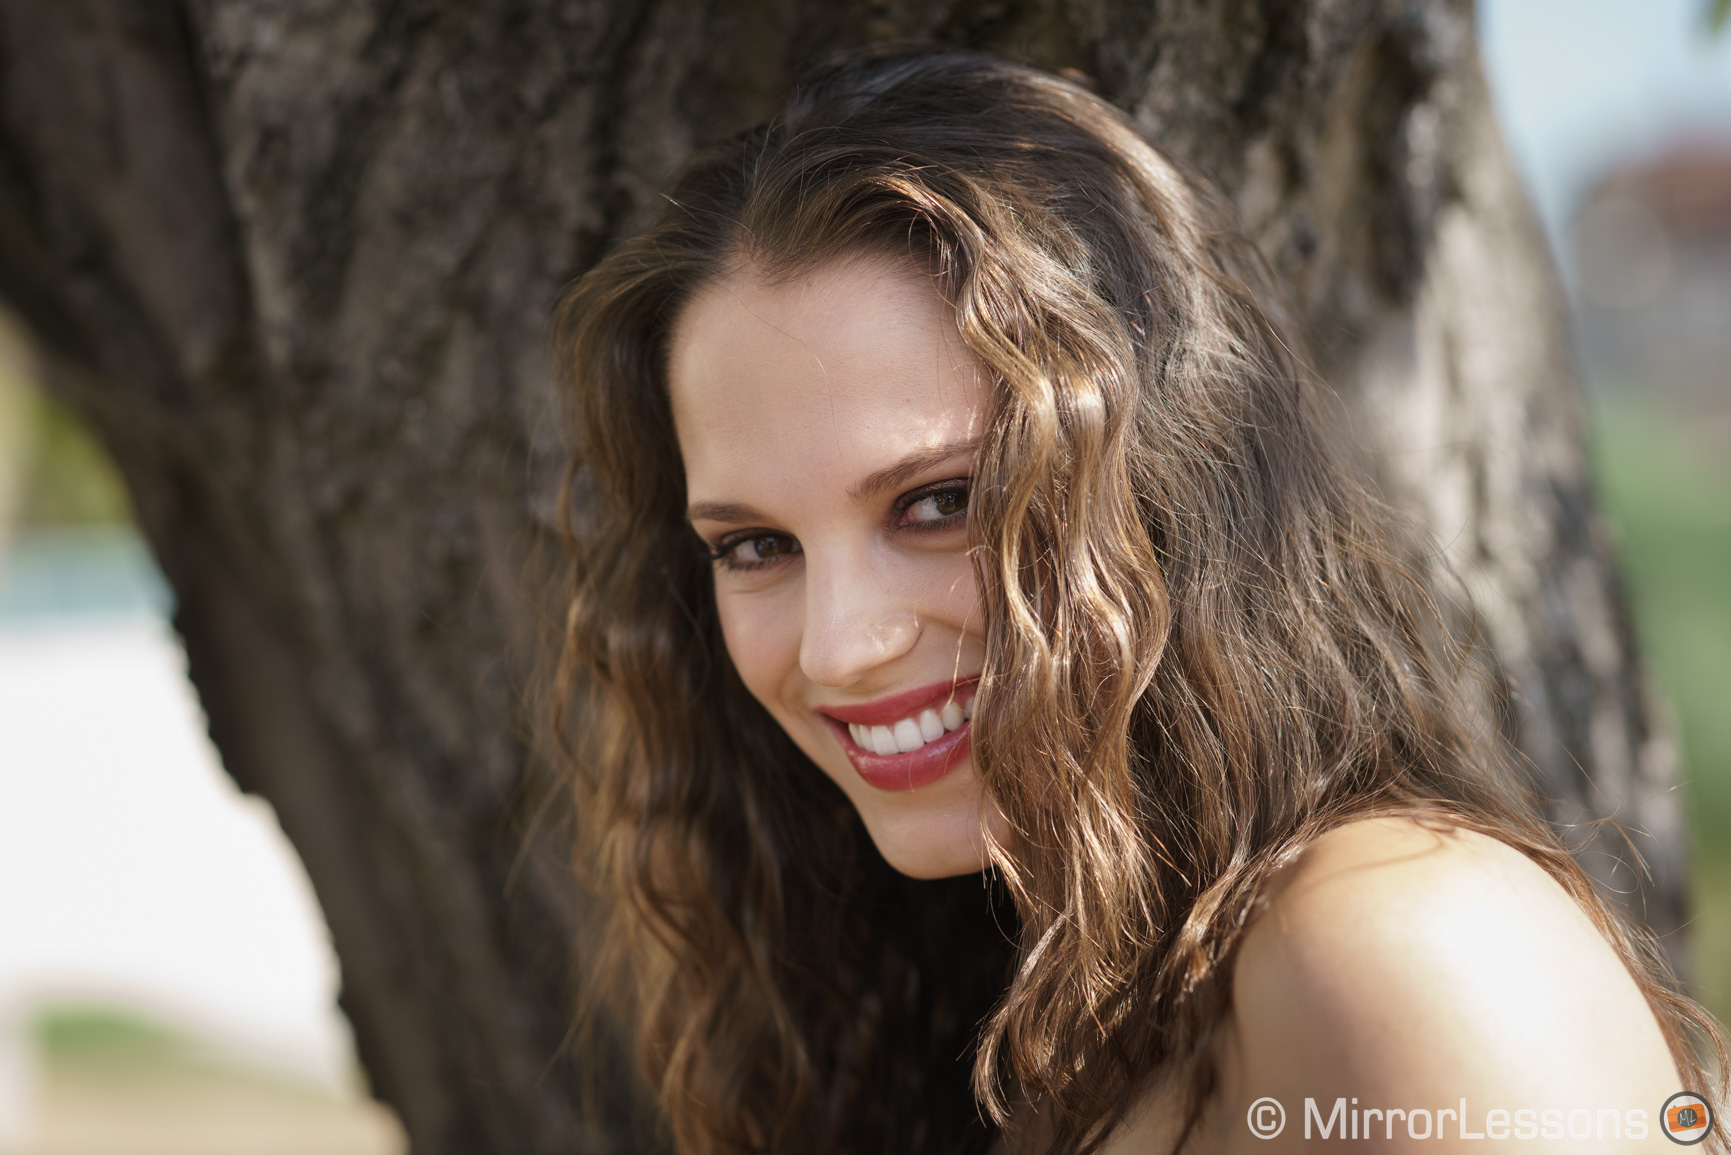
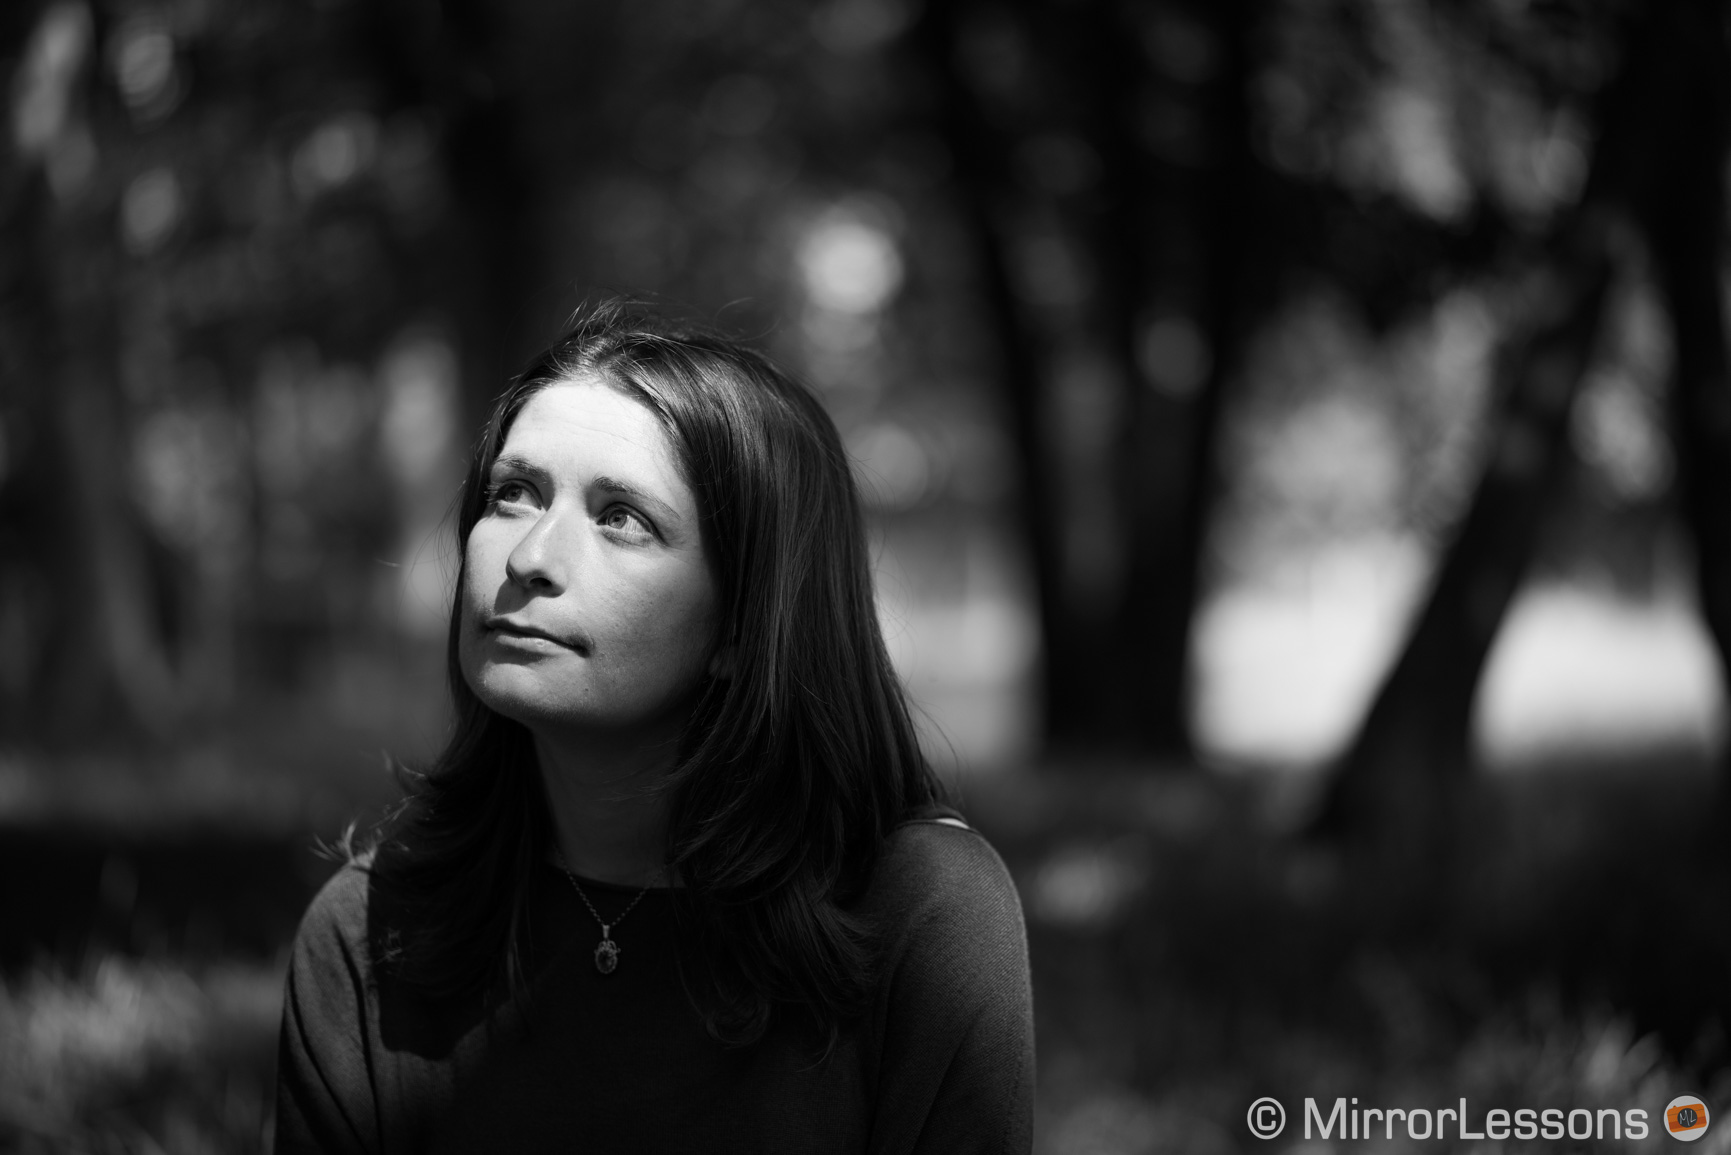
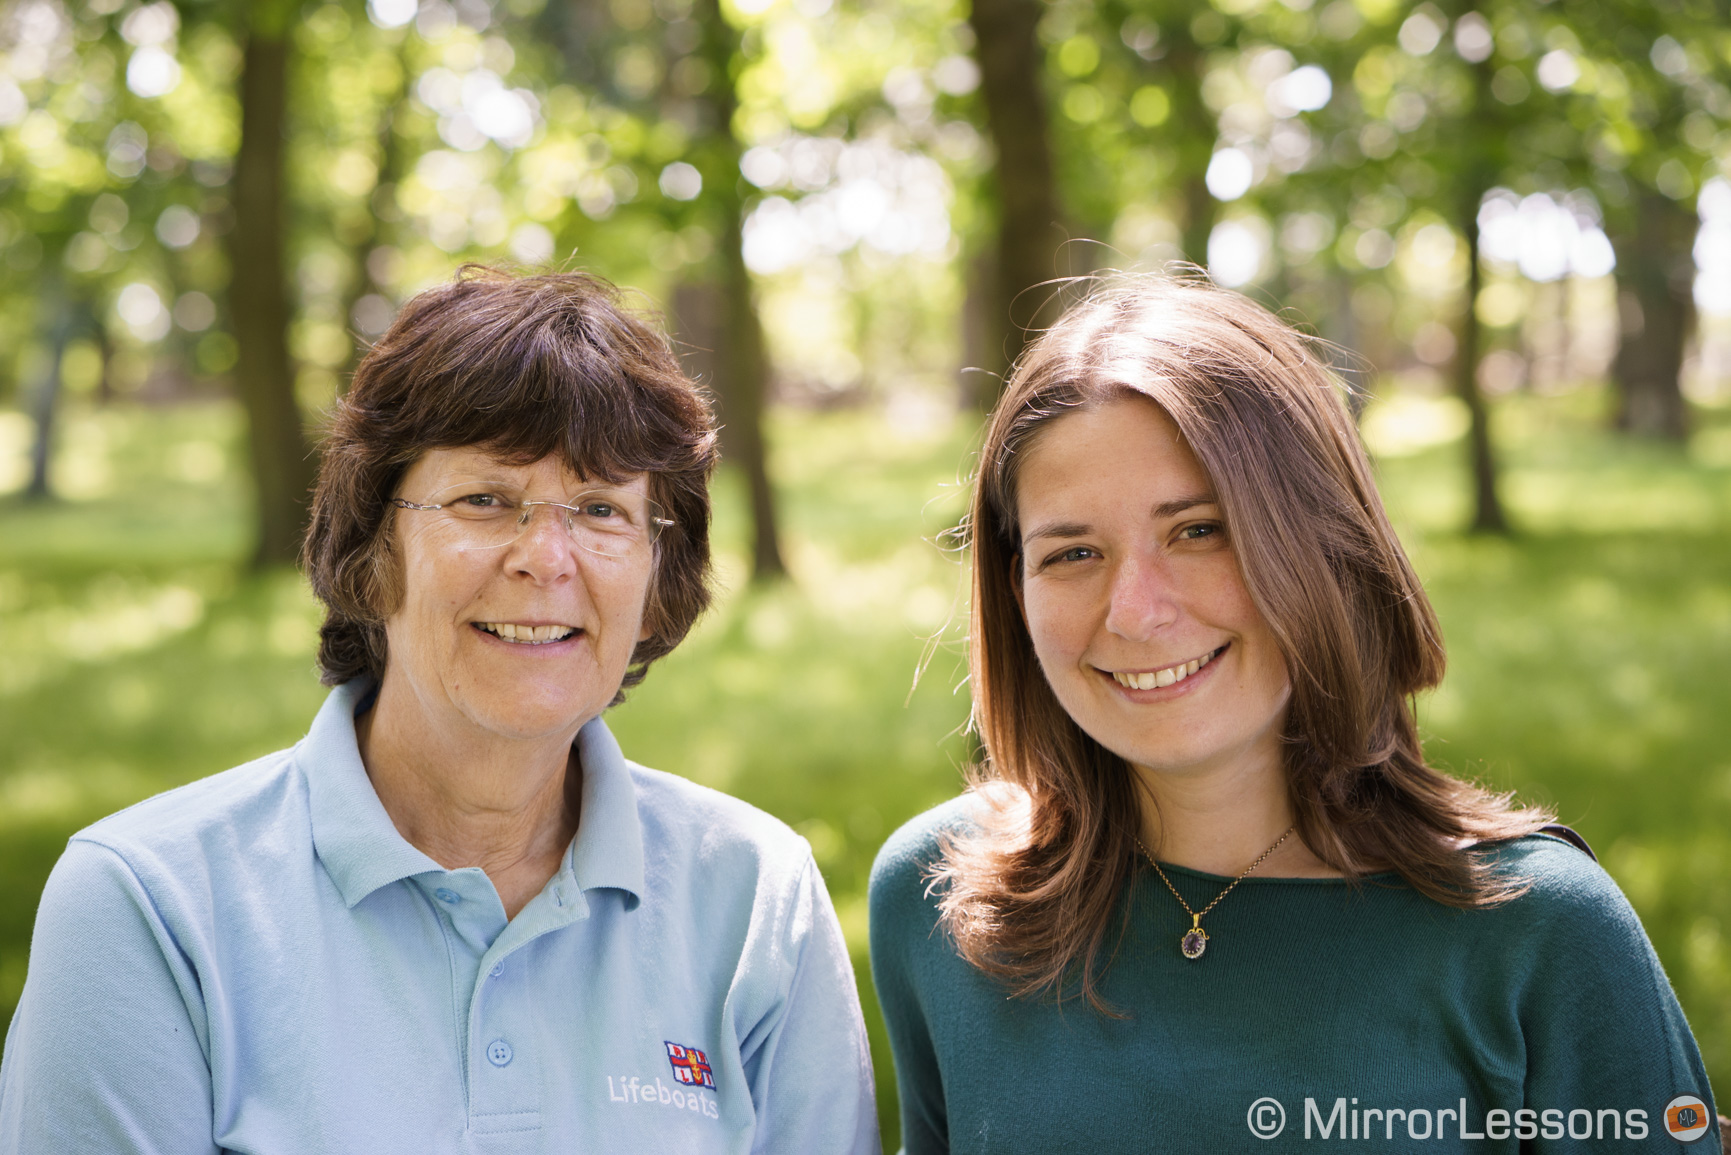
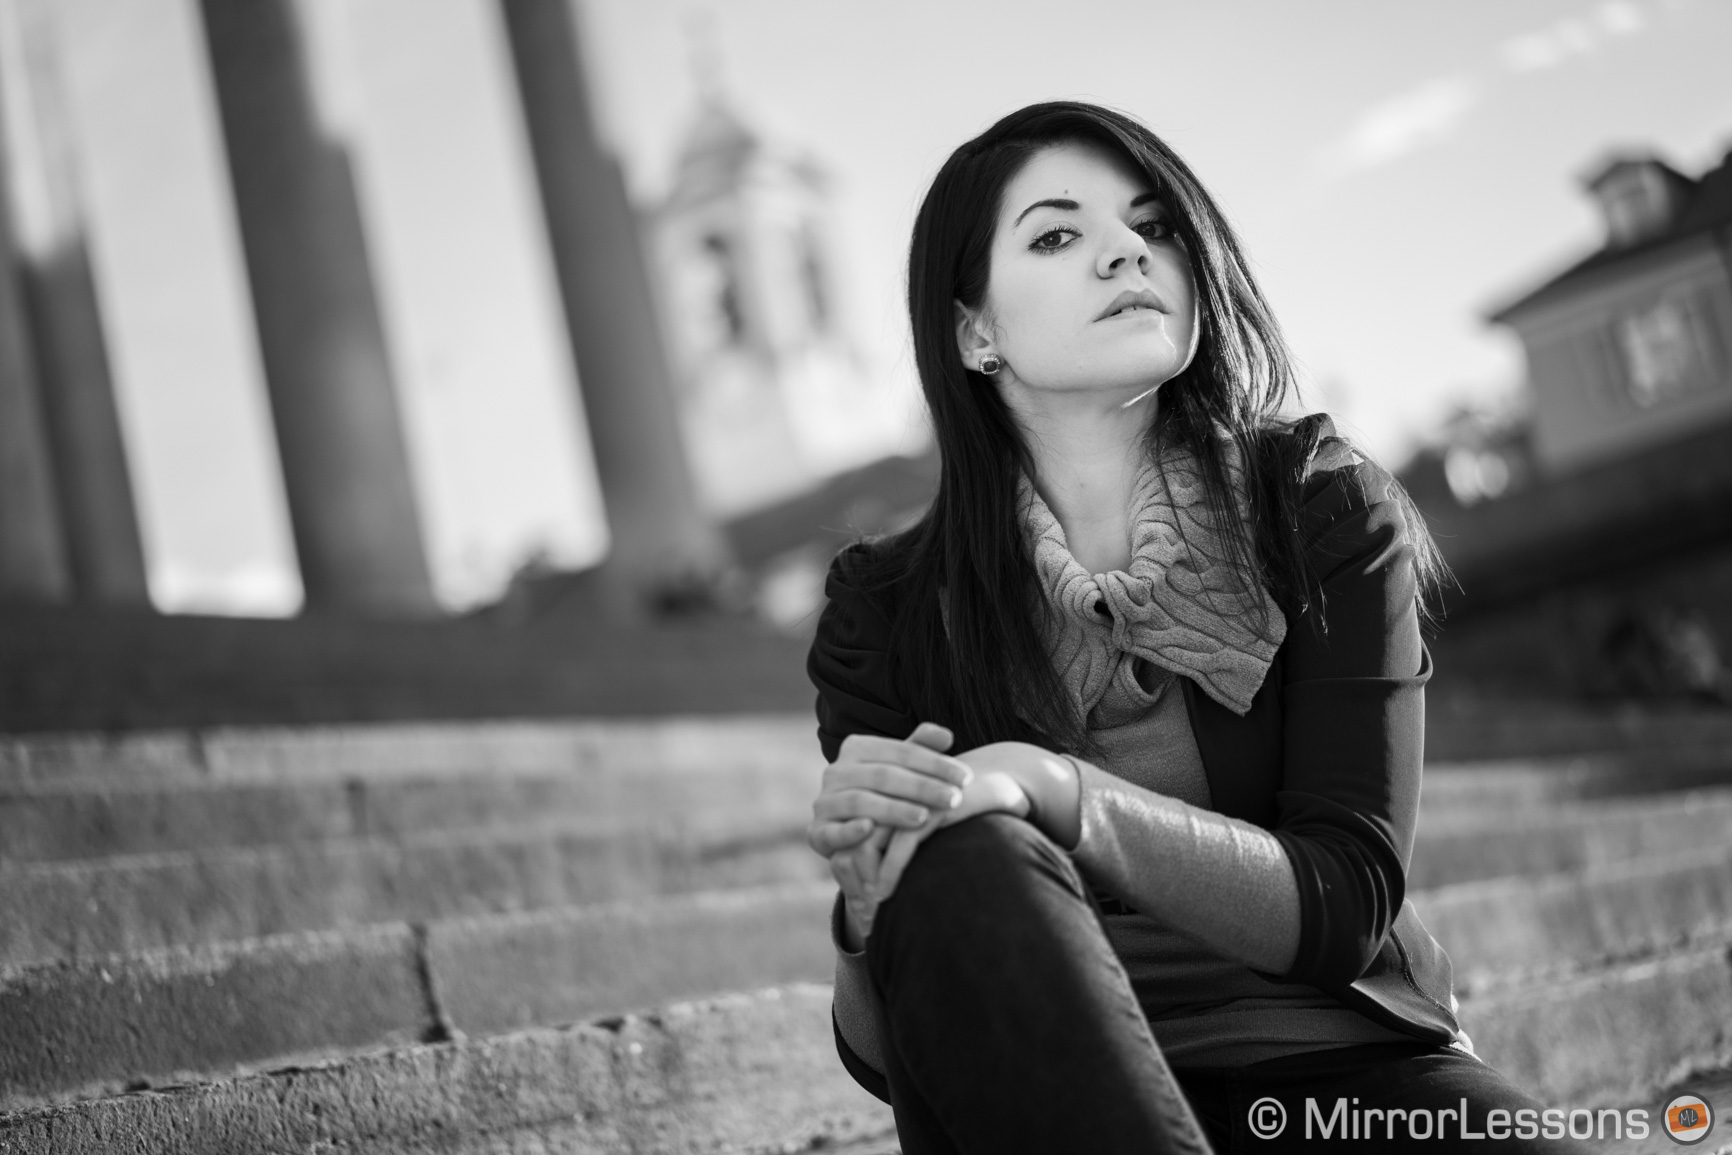
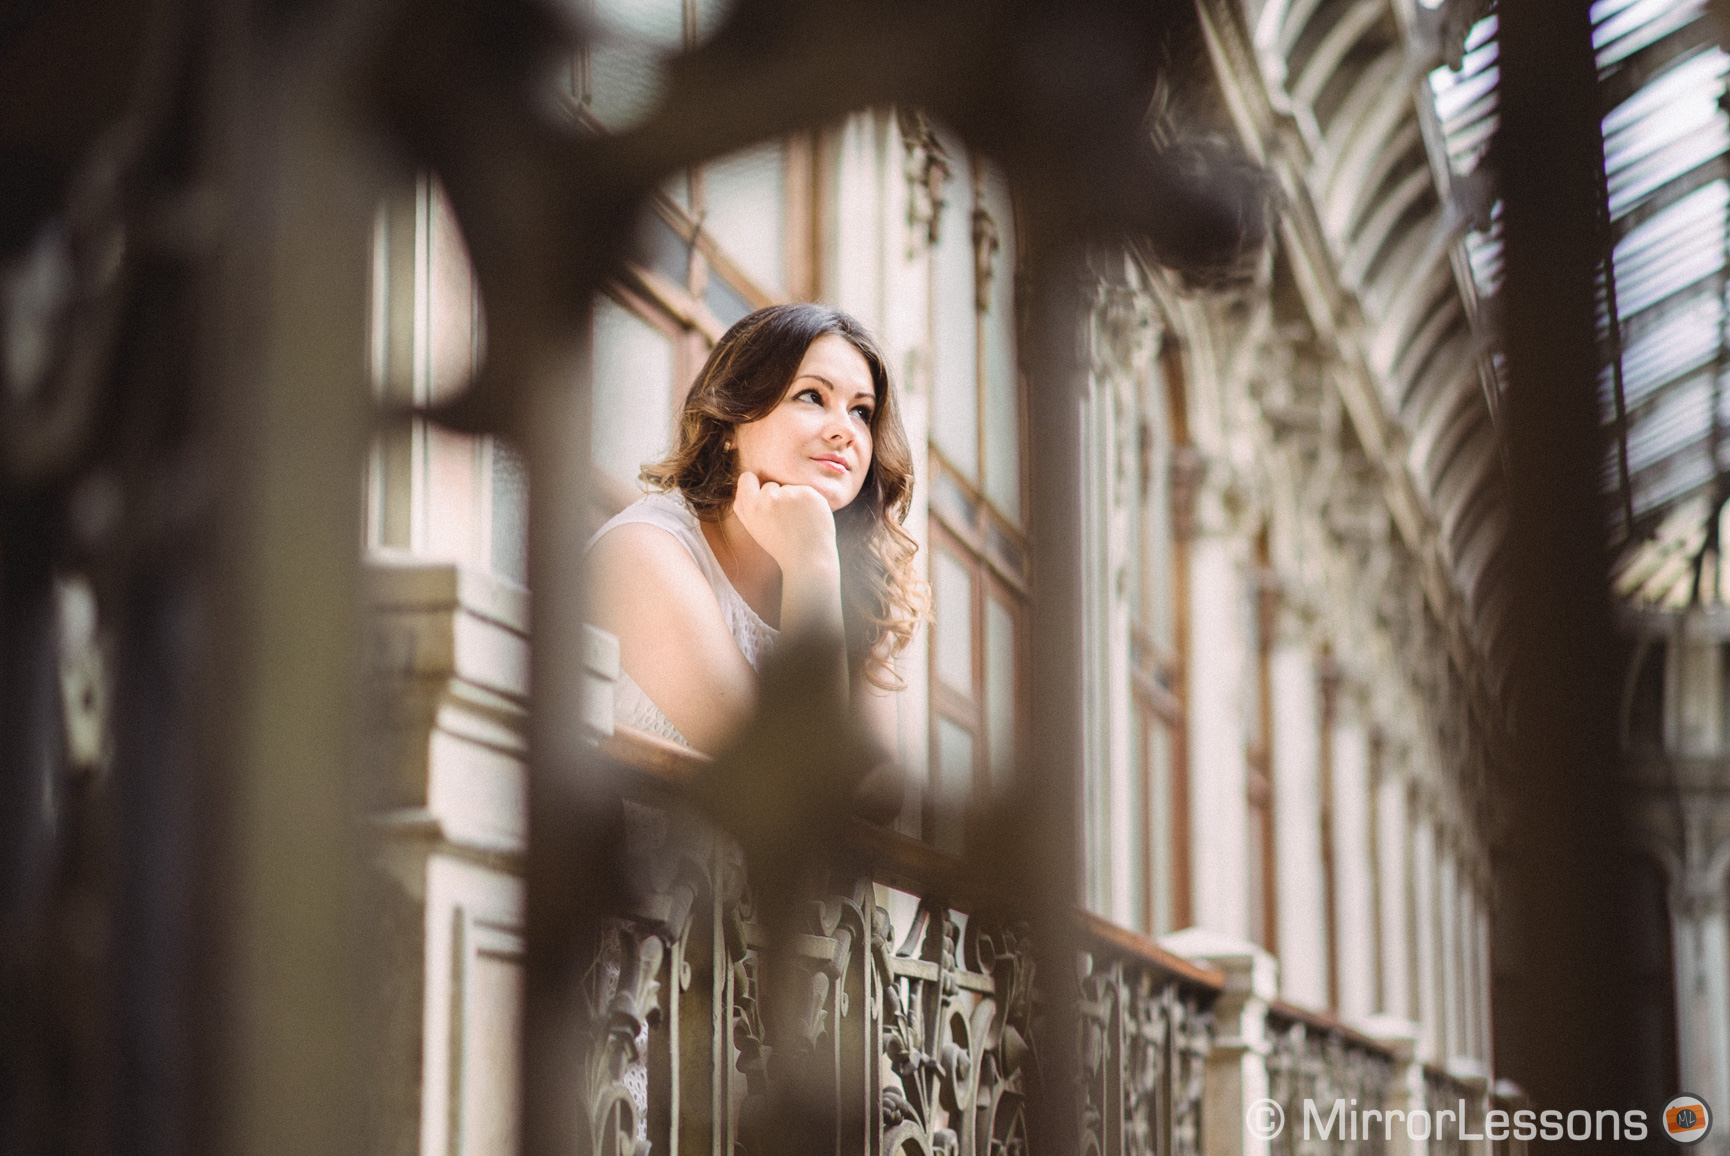
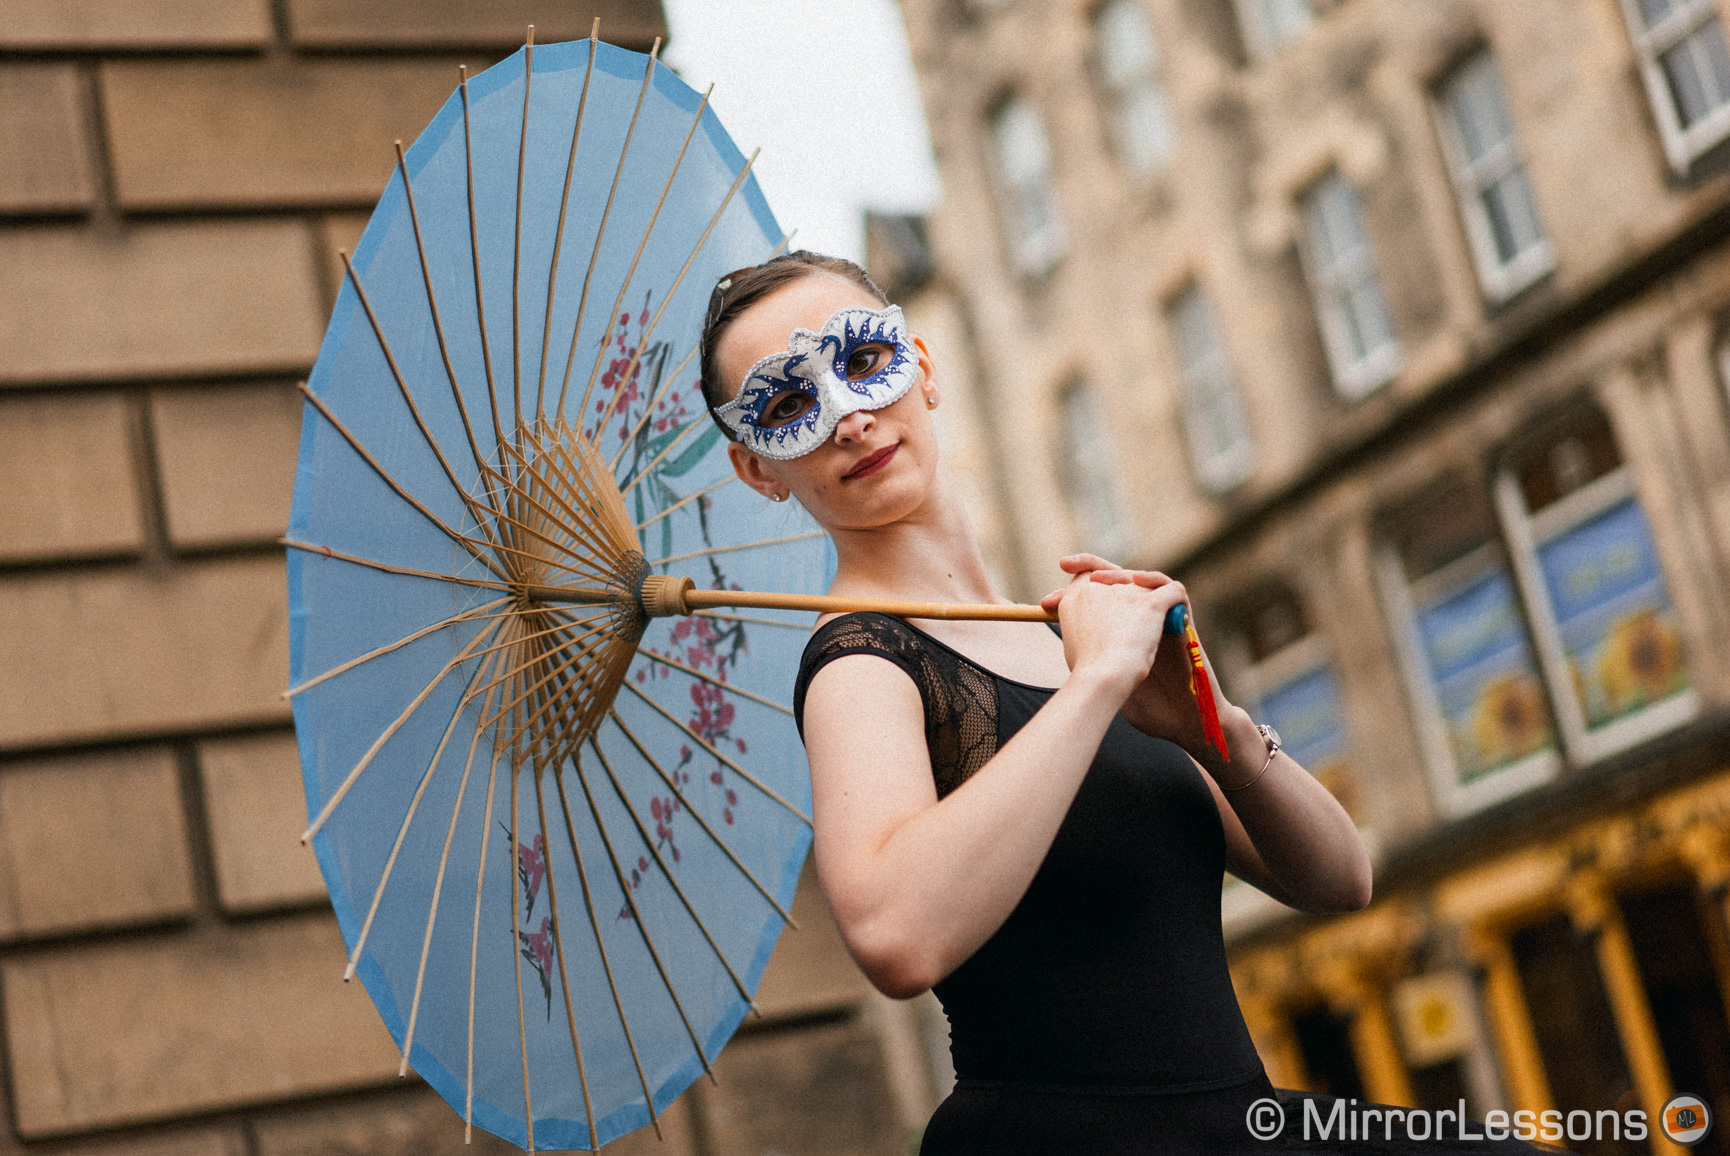
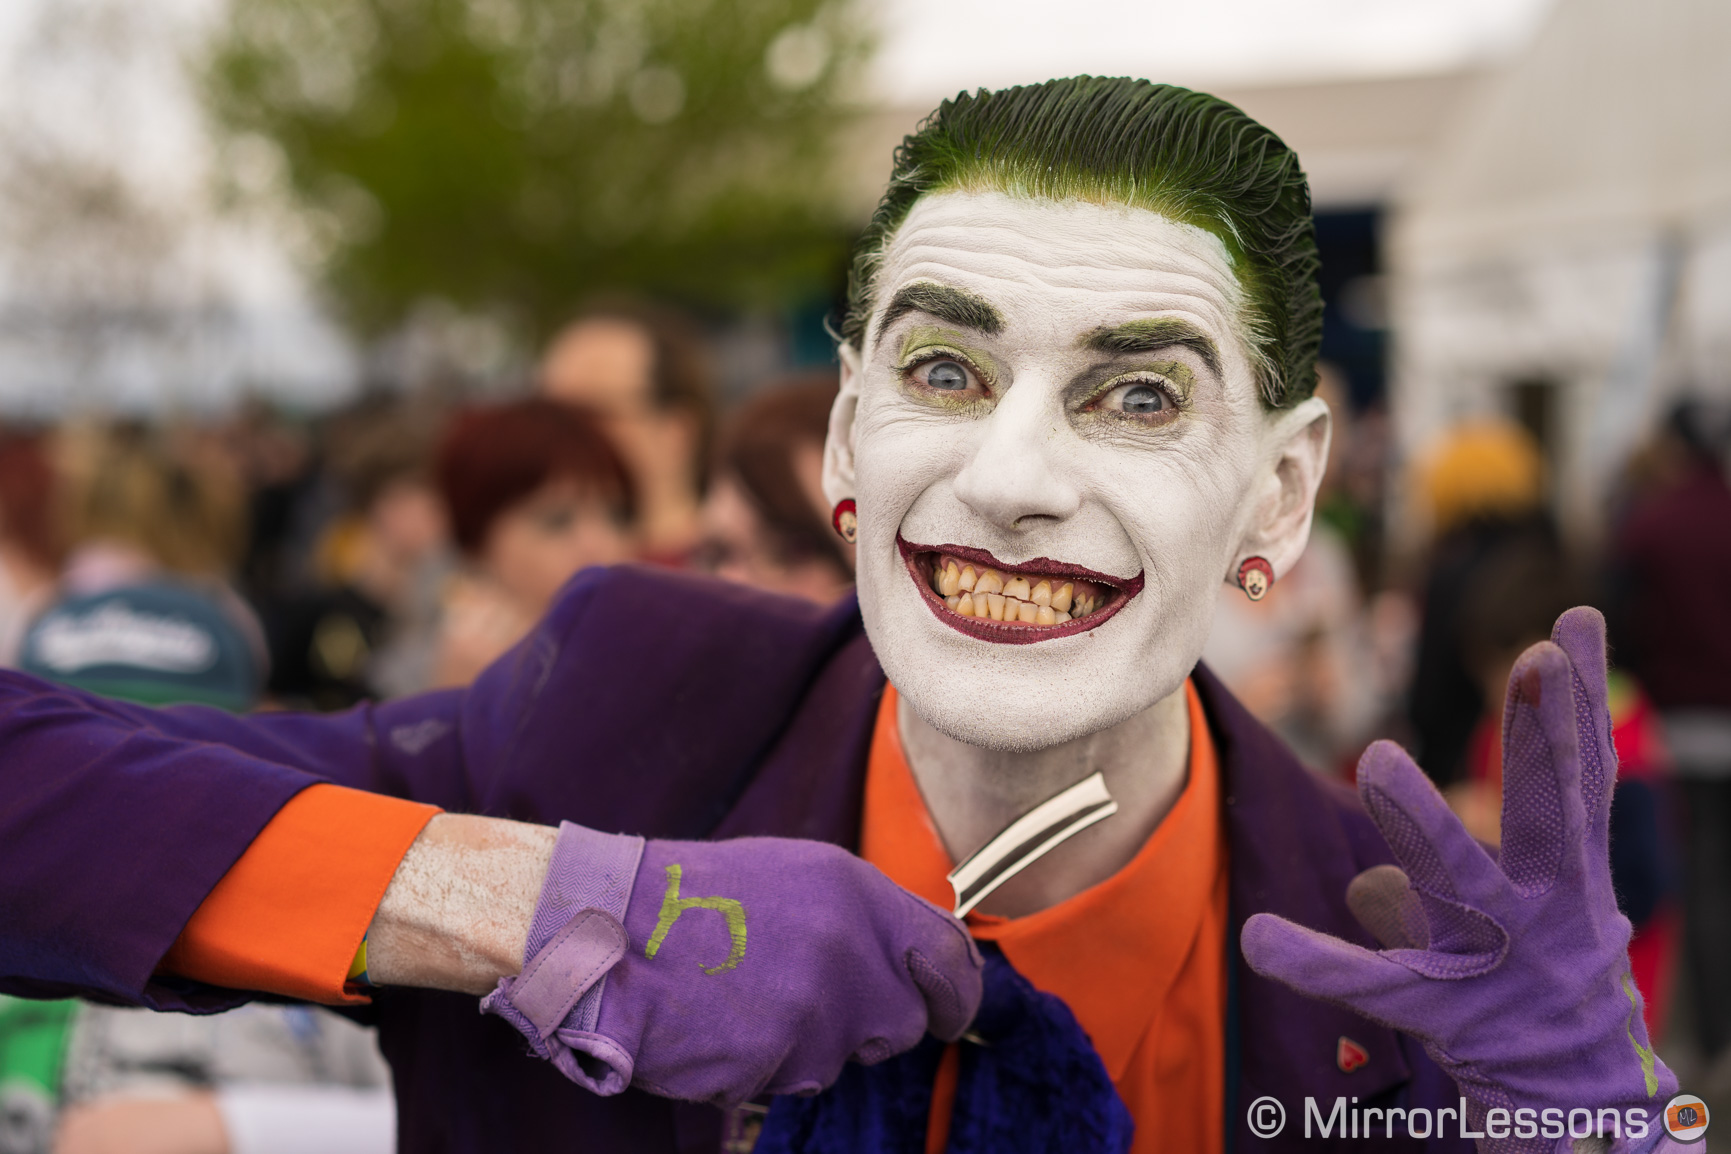
Sony A7 III, A7R III Portrait Samples
Below you can see a series of portraits taken with various camera bodies and portrait lenses.


Reminder: the links below are affiliate links. If you decided to buy something after clicking the link, we will receive a small commission.
Check price of the Sony A7 III on:
Amazon | Amazon UK | B&H Photo | eBay
Check the price of the Sony A7R III on:
Amazon | Amazon UK | B&H Photo | eBay
Check price of the Sony A7R IV on
Amazon | Amazon UK | B&H Photo | eBay
Check price of the Sony A9 on
Amazon | Amazon UK | B&H Photo | eBay
Check price of the Sony A7 II on:
Amazon | Amazon UK | B&H Photo | eBay
Check price of the Sony A7R II on:
Amazon | Amazon UK | B&H Photo | eBay
Second-hand Sony gear on
MPB US | MPB UK
Sony Alpha Mirrorless Cameras Resources on Mirrorless Comparison
Below you will find lots of content related to the A7 III, A7R III and other Sony full frame mirrorless cameras.
Real World Comparisons
- Sony A7 III vs A7R III
- Sony A7R III vs A7R IV
- Sony A7R II vs A7R III
- Sony A7R III vs A9
- Sony A7 III vs Nikon Z6
- Sony A7R III vs Nikon Z7
- Sony A7R III vs Fujifilm GFX 50s
- Sony A7R III vs Panasonic S1R
- Sony A7 III vs Canon EOS R
- Sony A7 III vs Fujifilm X-T3
- Sony A7 II vs Canon EOS RP
Sample Photos
- Sony A7 III sample images
- Sony A7R III sample images
- Sony A7R IV sample images
- Sony A7 II sample images
- Sony A7R II sample images
- Sony A7S sample images