The autofocus of your Sony A7 III is among the best you can find today but it is far from the only Sony model that can claim that statement. In fact, all recent Sony E-mount cameras perform really well, with the Sony A9 setting the benchmark in the mirrorless category.
If you look inside the menu, you may feel overwhelmed by the sheer number of settings. I created this article to guide your through them, help you understand what they do, and explain how to use the autofocus of your Sony A7 III, or other A7 model, at its very best.
A7/A9 series compatibility
This guide is valid for all full frame E-mount cameras, with a focus on recent products such as the A7 III, A7R III, A7R IV, A9 and A9 II.
Note: the Sony menu system is quite complex so I’ll mention the position of each setting so that you can find it more easily. Please be aware that some of these settings might be in a slightly different position depending on the model.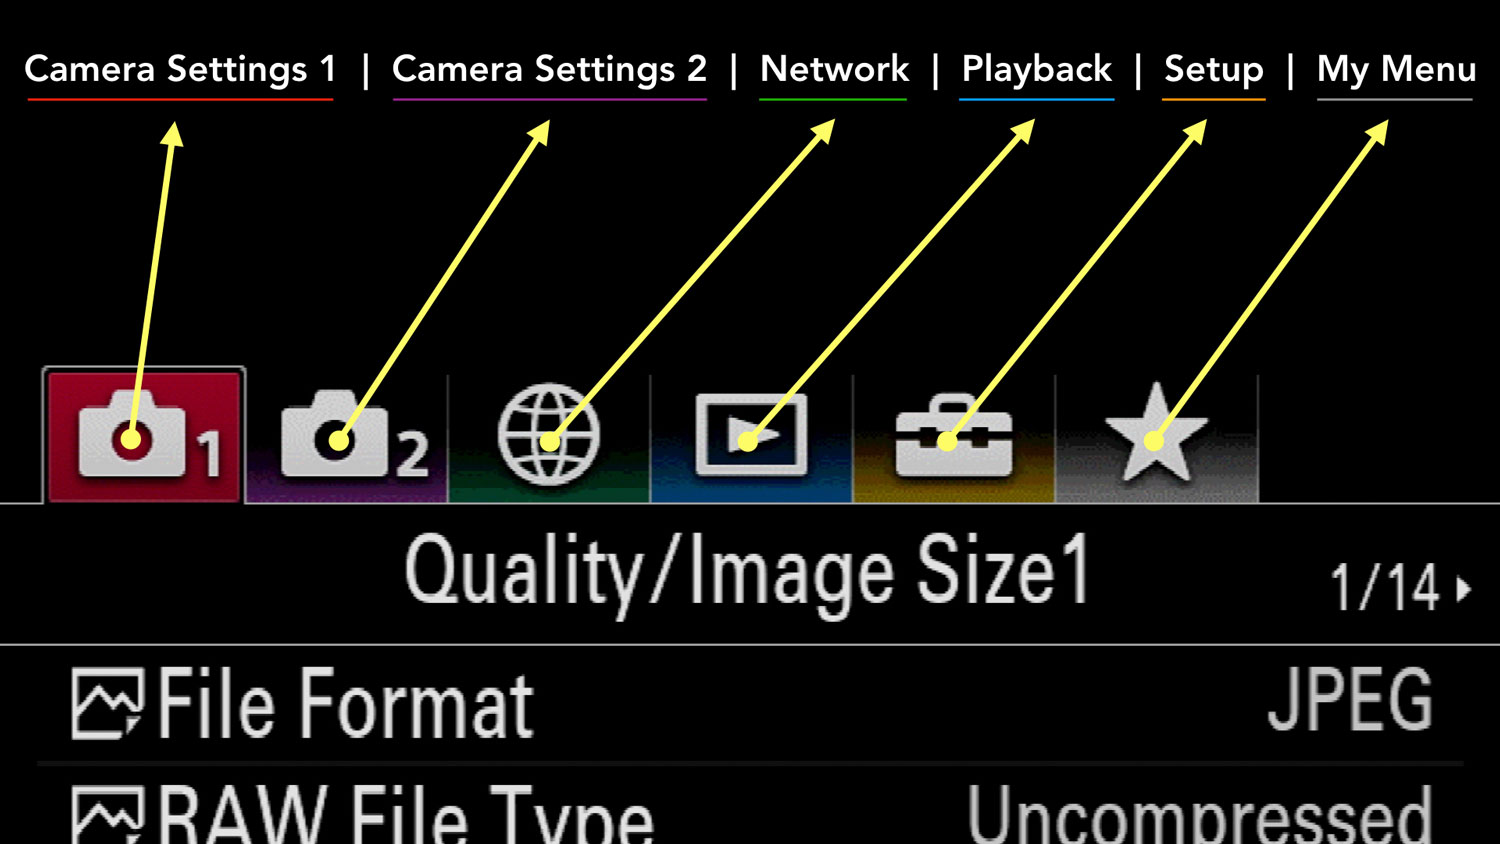
The A7 I and A7 II series use an older menu system so there are bigger differences.![]()
![]()
Ethics statement: we own the A7 III and A7R III mirrorless cameras, and we have tested most of the other models. We were not asked to write anything about these products, nor were we provided with any sort of compensation. Within the article, there are affiliate links. If you buy something after clicking the link, we will receive a small commission. To know more about our ethics, you can visit our full disclosure page. Thank you!
TABLE OF CONTENTS
1. Best Autofocus Settings by Genre
2. Best Autofocus Settings – Overview
3. Sony Hybrid AF and Autofocus Points
4. Sony Autofocus Modes
5. Sony Autofocus Areas
6. Back Button Focus
7. Continuous AF and AF Track Sens
8. Autofocus Tracking / AF Lock-on
9. Eye AF and Face AF
10. Touch Screen Autofocus
11. Touchpad Settings
12. Autofocus with Canon / DSLR lenses
13. AF with Magnification
14. Autofocus Sound
15. AF Illuminator
16. Eye Start AF and Pre AF
17. Additional settings
18. Sony Mirrorless Cameras Resources
Reminder: the links below are affiliate links. If you decided to buy something after clicking the link, we will receive a small commission.
Check price of the Sony A7 III on:
Amazon | Amazon UK | B&H Photo | eBay
Check the price of the Sony A7R III on:
Amazon | Amazon UK | B&H Photo | eBay
Check price of the Sony A7R IV on
Amazon | Amazon UK | B&H Photo | eBay
Check price of the Sony A9 on
Amazon | Amazon UK | B&H Photo | eBay
Check price of the Sony A7 II on:
Amazon | Amazon UK | B&H Photo | eBay
Check price of the Sony A7R II on:
Amazon | Amazon UK | B&H Photo | eBay
Second-hand Sony gear on
MPB US | MPB UK
Sony A7 III, A7R III, A9 Best Autofocus Settings by Genre
If you’re curious to know what the best AF settings are for specific genres such as sports, wildlife, portraits or video, please refer to our dedicated articles where we also explain other important parameters.
- Best Settings for Sports
- Best Settings for Wildlife
- Best Settings for Portrait
- Best Settings for Low Light
- Best Settings for Video
Sony A7 III, A7R III, A9 Best Autofocus Settings
This article describes all the autofocus settings you can find on your Sony Alpha camera. Let’s begin with a quick recap of the best autofocus settings to use. All of them are explain in-depth further down in the article.
Sony A7 III, A7R III, A9 Best AF Settings: Button Setup
Below is a suggestion on how to configure the buttons of your A7 III and A7R III for general AF settings.

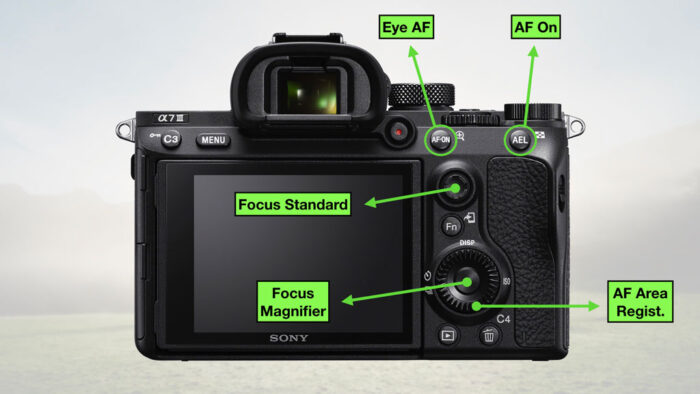
- C1: Focus Mode (AF-S, AF-C etc.)
- C2: Focus Area (Wide, Zone etc.)
- Multi-Slc Center Btn (joystick): Focus Standard (this allows you to reset the focus point at the centre of the frame when pressing the joystick)
- Center Button: Focus Magnifier assist (useful when focusing manually)
- Down Button: AF Area Registration (to quickly change a focus area that you use frequently)
- AEL: AF On (Back Button Focus, see chapter further down)
- AF-ON: Eye AF
- Focus Hold Button (on selected lenses): Focus Hold
The A7 I series has only one custom button on top. The A7 I and A7 II series lack the Multi-Selector (AF Joystick) on the rear, and the button arrangement is somewhat different too.
To learn more about how to customise the buttons of your Sony camera, check our guide below.
Sony A7 III, A7R III, A9 Best AF Settings: Back Button Focus
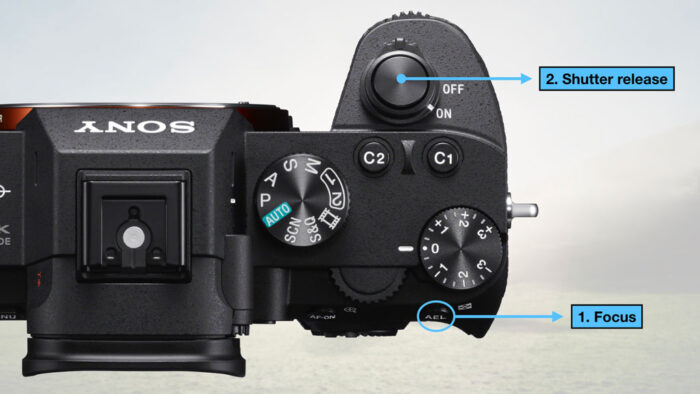
I focus with the AEL button on the rear rather than half-pressing the shutter button. This is known as the Back Button Focus method. That way I can keep the focus and shutter release separate.
Sony A7 III, A7R III, A9 Best AF Settings: Continuous AF
I set the Focus Mode to C-AF most of the time. With Continuous AF, the camera priorities phase detection which is faster and more reliable. The Back Button Focus method allows me to precisely control when I want the camera to focus and when I want it to stop. In a way, it is like having S-AF and C-AF all in one.
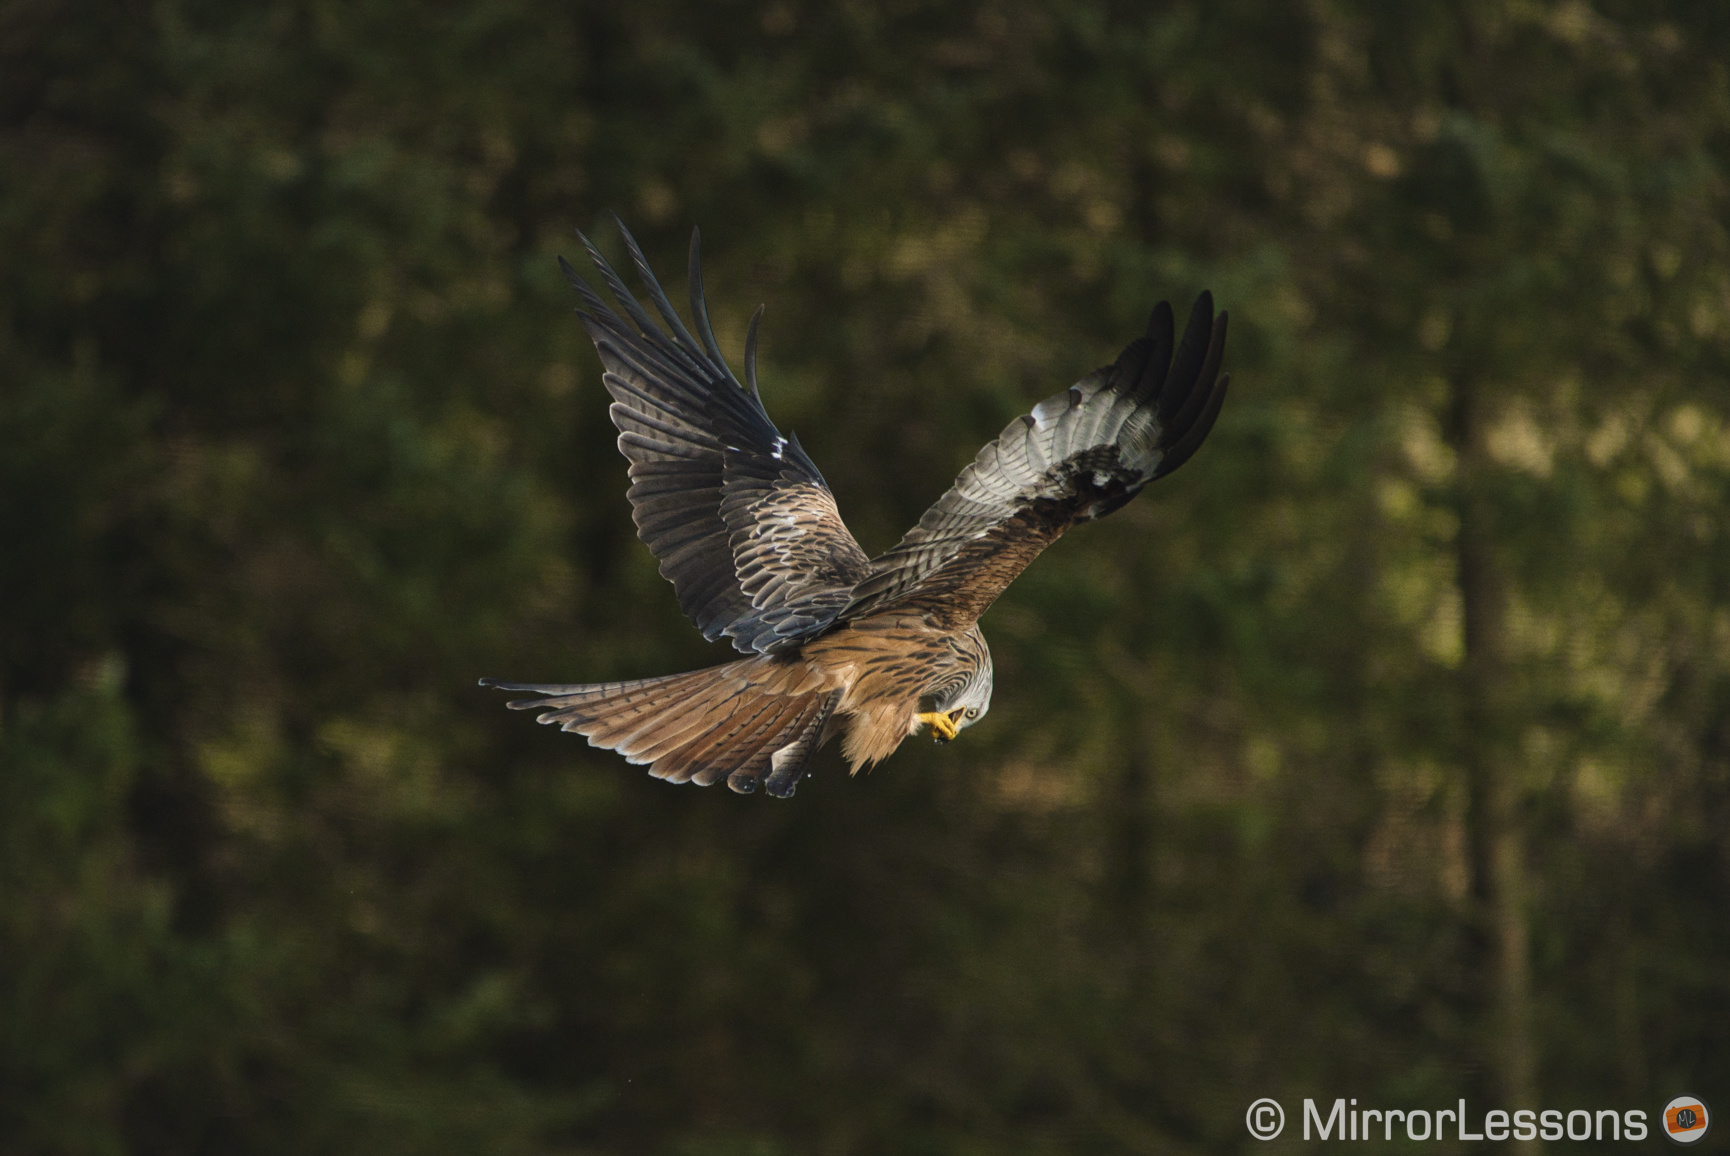
I leave the AF Track Sens to 3 (Standard) most of the time and raise it to 5 (Responsive) for birds in flight.
Sony A7 III, A7R III, A9 Best AF Settings: Focus Areas
When I need a small focus area, I use the Expand Flexible Spot, which I found to be the most reliable.
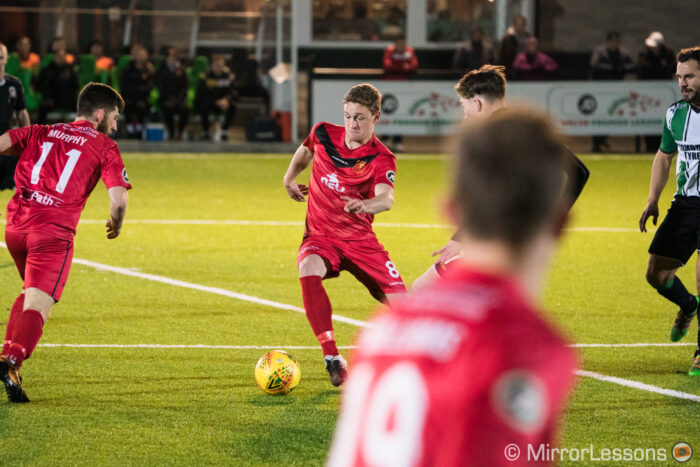
For action such as sports or birds in flight, I switch to Zone Area.
If I’m focusing with a very fast aperture (shallow depth of field) or doing macro, I select the Flexible Spot S (Small) area, or use AF in Magnification mode.
What’s more, you can save a specific focus area to a custom button at any time (once AF Area Regist. is set up), which is quite a handy option to have at your fingertips in order to quickly switch from one area to the other.
A7R IV, A9 and A9 II owners can take advantage of the Real-Time Tracking mode as well, which is very reliable.
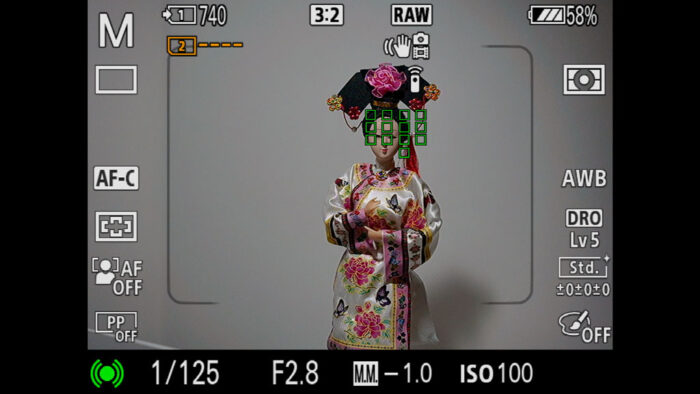
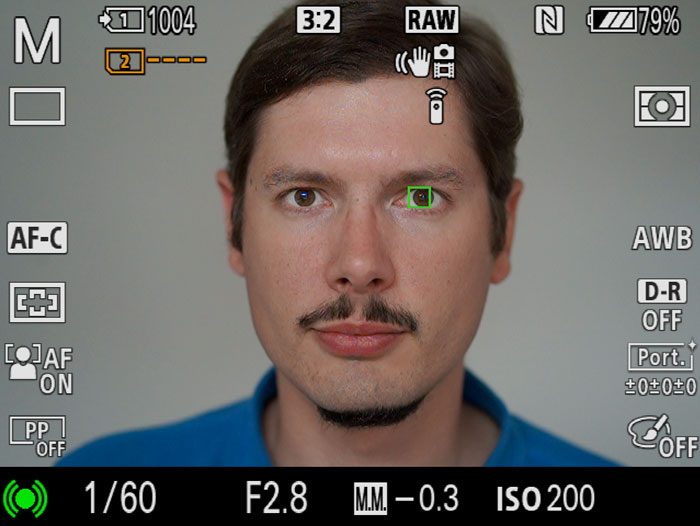
Sony A7 III, A7R III, A9 Best AF Settings: Eye AF
For pictures of people, there is nothing better than Eye AF, Sony’s eye detection system. It is the best you can find, all brands and system considered. I have Eye AF assigned to a custom button, so that I can activate it whenever I want, regardless of the focus area used, and without the need to have Face AF active.
Sony Hybrid AF and Autofocus Points
Over the years, Sony has introduced various improvements to increase the autofocus performance of its mirrorless cameras. As a result, there are key differences between all the models, both older and more recent.
Sony A7 III, A7R III, A9 Hybrid AF
Hybrid AF means that the camera uses contrast and phase detection autofocus. Most A7 cameras have a hybrid AF. The only models to use contrast detection exclusively are the A7R, A7S and A7S II.
With Contrast, the camera moves the lens elements back and forth while searching for the best contrast in the image.
With Phase, there are tiny sensors that work in pairs to analyse the incoming light, establish the phase difference and allow the camera to calculate accurate focus. Unlike Contrast, Phase AF requires physical sensors on the image sensor. It is faster and more reliable with moving subjects.
Note: phase detection points are not cross-type (horizontal and vertical detection), unlike the ones you find on DSLRs.
Sony A7 III, A7R III, A9 Autofocus Points
Over the years, Sony has added more AF points that cover a larger portion of the sensor. The more AF points there are, the more precise the camera can be, especially with the help of its 4D Focus technology that concentrates as many points as needed on the subject.
More points also means that they are distributed across a larger area of the frame, so the camera can track a subject no matter where its position is. For example, the phase detection points found on the A7 III and A9 series cover 93% of the sensor’s surface, whereas on the A7R II and A7R III they cover a smaller portion.
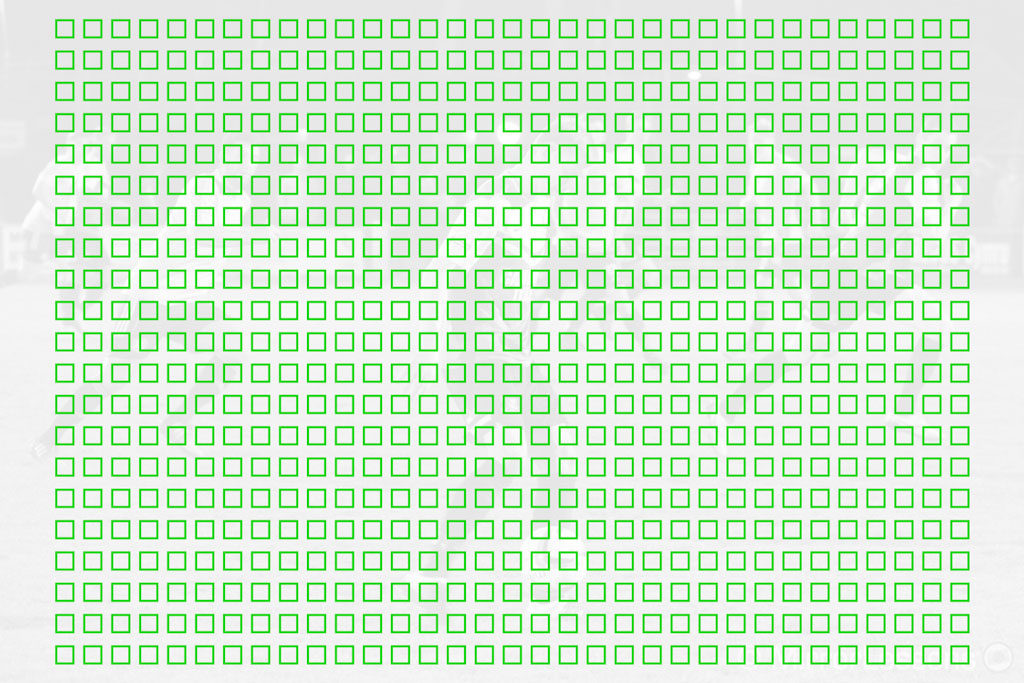
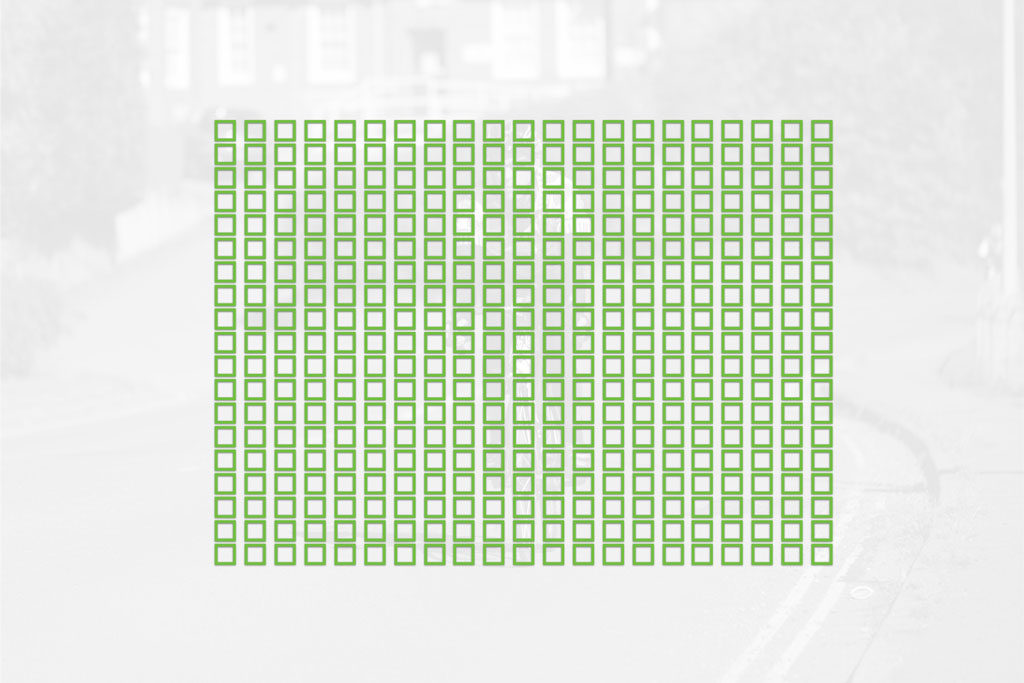
Contrast detection areas are available across a good part of the sensor surface.
Below you can see the number of points for every full frame mirrorless E-mount camera released by Sony to date.
| Phase | Contrast | |
|---|---|---|
| A7, A7 II | 117 | 25 |
| A7R, A7S | – | 25 |
| A7S II | – | 169 |
| A7R II | 399 | 25 |
| A7R III | 399 | 425 |
| A7R IV | 567 | 425 |
| A7 III, A9, A9 II | 693 | 425 |
Sony A9, A9 II Autofocus Speed
Sony doesn’t always disclose the specifications of focus acquisition speed, or how fast the system works per second.
We know that the Sony A9 and A9 II are the fastest Sony cameras currently on the market. They can calculate AF at 60 times per second without interruption while focusing or releasing the shutter.
Such data is not available for other cameras, but we know first hand that models such as the A7 III, A7R III and A7R IV perform really well when it comes to autofocus. The only products that feel older in this regard is the original A7 series, as well as the A7 II, and the A7S II that only uses contrast detection.
Sony A7 III, A7R III, A9 Autofocus Modes
You can select five Focus Modes on your Sony camera. You can change them in Camera Settings 1 / AF1 (page 5/14), although it makes more sense to have this setting linked to a custom button or in the Fn Menu.
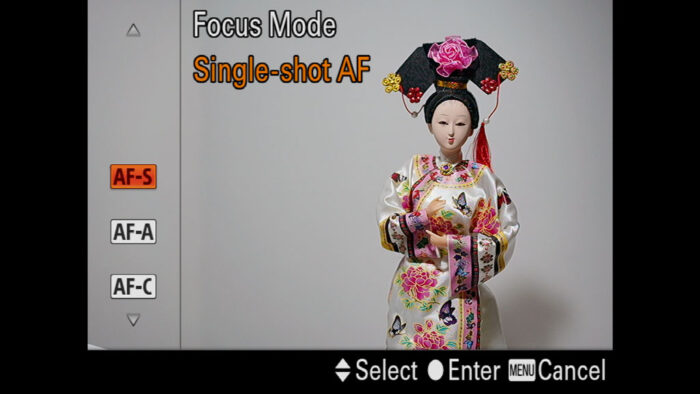
Sony Autofocus Modes: AF-S (Single-Shot AF)
With AF-S, your camera engages the AF only once when half-pressing the shutter button (or pressing the back button focus), and then locks the focus.
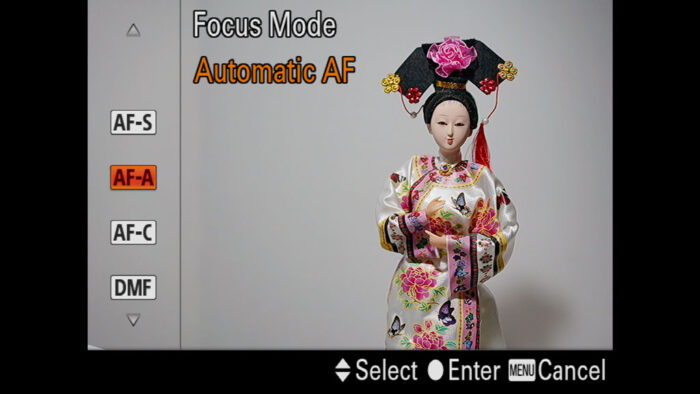
Sony Autofocus Modes: AF-A (Automatic AF)
Not available on the A7 I series or the A7 mark II model.
With AF-A, your camera switches from single to continuous autofocus automatically when it detects that the subject is moving. This is useful for unpredictable subjects that may move at any time without warning.
On recent models, it is reactive and reliable enough, but it is not a setting I use often because of how I’ve configured my cameras (C-AF and Back Button Focus, more on this further down)
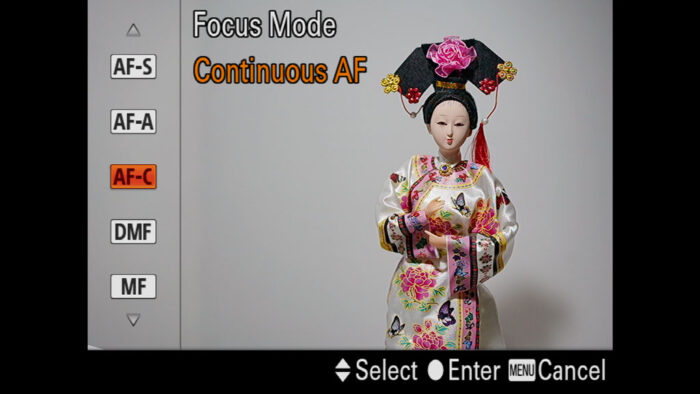
Sony Autofocus Modes: AF-C (Continuous AF)
Your camera continues to focus while the button is pressed. This is the must-have setting for any movement involved in your scene.
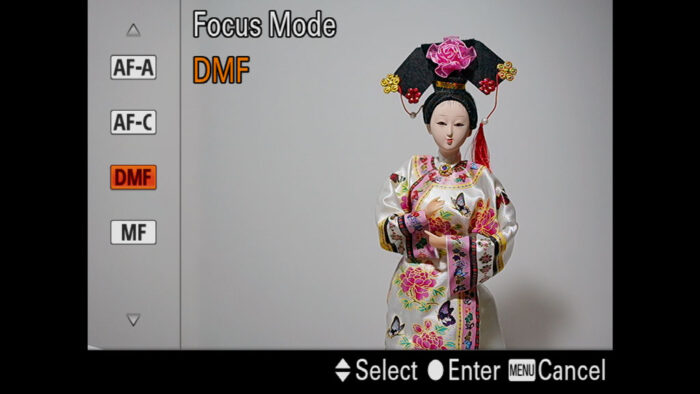
Sony Autofocus Modes: DMF (Direct Manual Focus)
After focusing automatically, you can fine-tune the focus point manually by turning the focus ring of your lens while the shutter button is half pressed. It is useful for macro shooting.
Sony Autofocus Modes: MF (Manual Focus)
Focus must be set manually by rotating the focus ring of your lens. Various Focus Assists are available to help you.
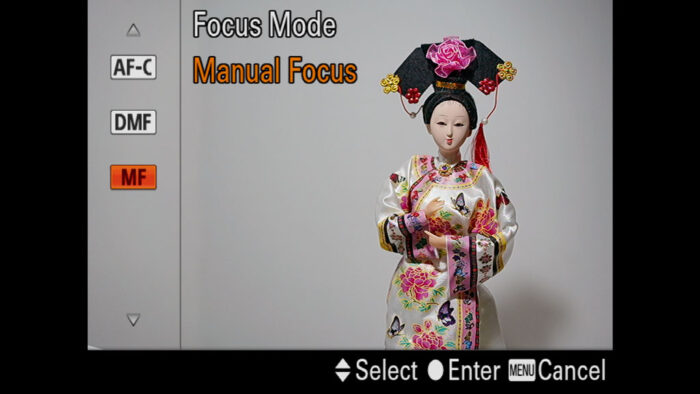
Learn more about Focus Assist in our Display Guide
Sony A7 III, A7R III, A9 Autofocus Points / Areas
Focus Areas activate a set number of AF points among the ones available on the sensor. Sony cameras offer six different focus areas. Some are larger while others are smaller.
You can set the focus area in Camera Settings 1 / AF1 (page 5/14), but again you’re better off having this setting assigned to a custom button or in the Fn Menu.
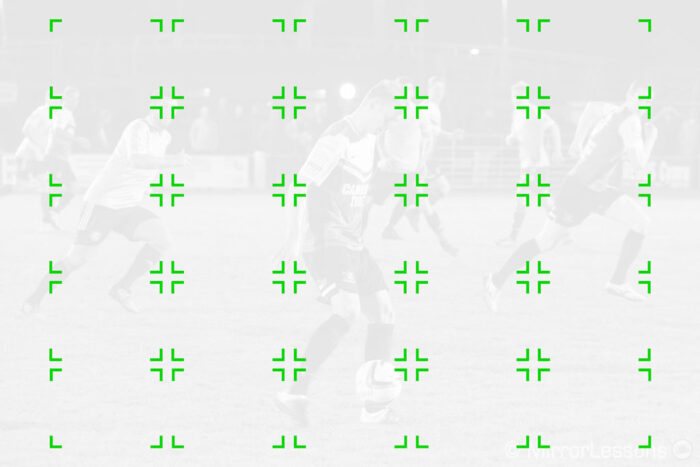
Sony Autofocus Points: Wide Area
All the points available on your camera are active. The camera picks the number needed according to your scene and subject.
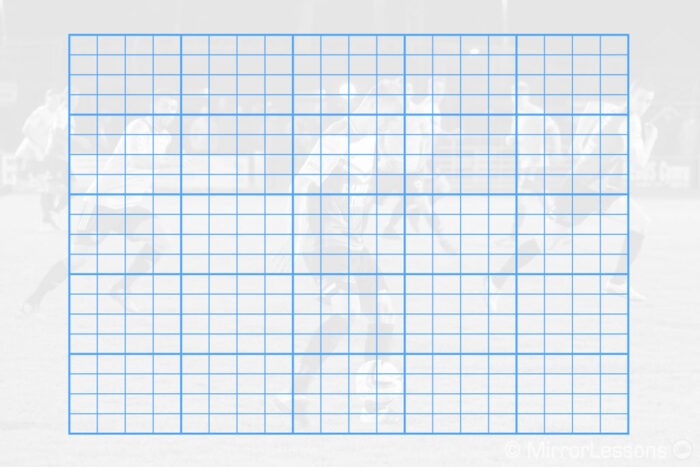
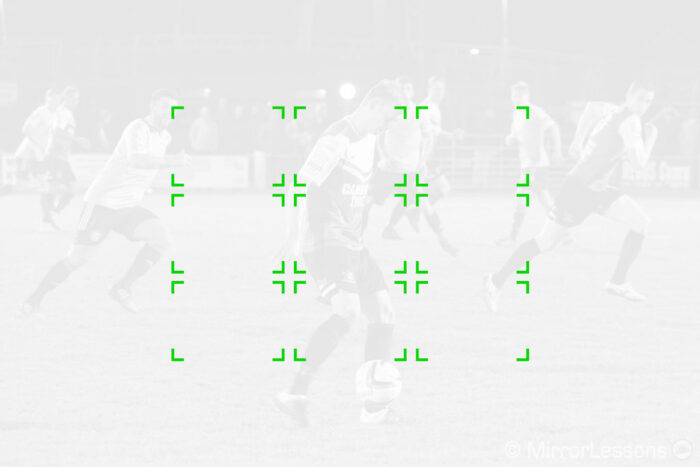
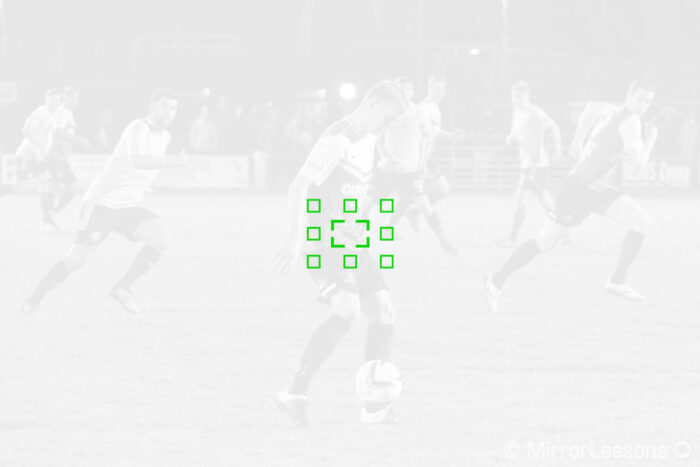
Sony Autofocus Points: Zone Area
The same concept as Wide but it works on a smaller area. The camera selects the AF points needed within that zone.
I use it all the time for sports and birds in flight because although it provides a smaller area than Wide, it is enough for the job. By limiting the number of points the camera can pick, there is less chance of it being confused and choosing random points at the edges. Zone Area can be moved around in your frame but I always keep it at the centre.
Sony Autofocus Points: Centre Area
A fixed small area at the centre. This can be useful if you like to focus and recompose rather than moving the focus point.
Tip: if you focus and recompose, remember to keep the shutter button half-pressed while recomposing. If you release it, the camera will refocus next time you press it. An alternative way is to use the Back Button Focus method, or have Focus Hold assigned to a custom button to stop the camera from focusing again.
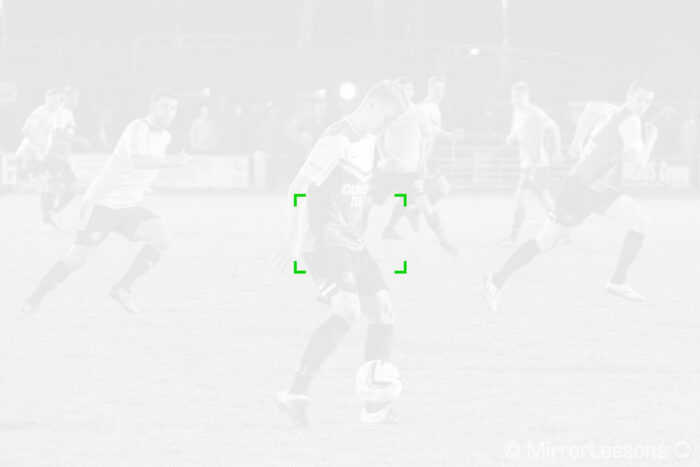
Sony Autofocus Points: Flexible Spot Area
A single area with three sizes available. It can be moved anywhere across the screen.
The smallest Flexible Spot is useful for macro photography, or when using a very fast aperture where you need to very precise in setting the focus point.

Sony Autofocus Points: Expand Flexible Spot Area
Not available on the A7 I series or A7 mark II model.
It uses a small flexible spot and additional points around it to improve accuracy and speed if the camera cannot focus with the central point.
It is my go-to setting for static subjects because it is like having multiple sizes in one. If the small point at the centre doesn’t work, the camera will pick the one next to it.
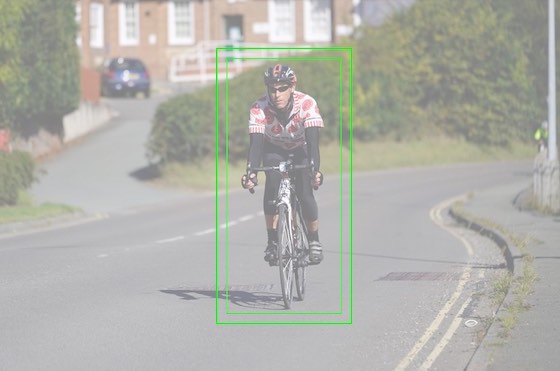
Sony Autofocus Points: Lock-on AF / Tracking
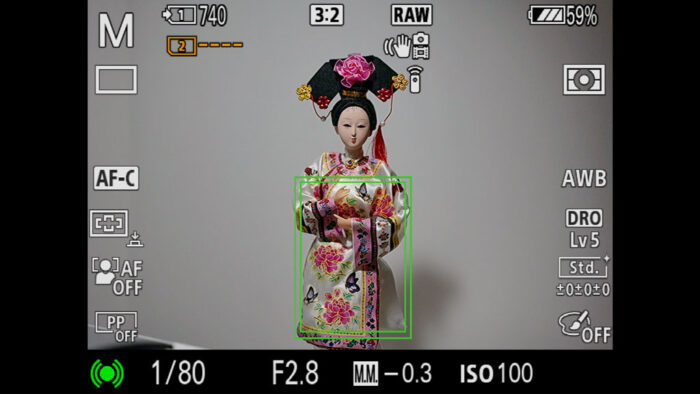
This is a tracking mode and is available in AF-C only. When focusing on a subject, the camera starts tracking it and follows it no matter its position in the frame. It will also vary the focus area size accordingly.
You can start tracking with any focus area described on this list (scroll left or right when Lock-on AF is selected), but to be more accurate and make sure tracking starts where you want, I advise you to use it with Expand Flexible Spot.
On the A9, A9 II and A7R IV, these modes are called Tracking. You can read more about this further down.
Note: There is another setting called Centre Lock-on AF which works in a slightly different way.
Sony A7 III, A7R III, A9 AF-On Button / Back Button Focus
I’ve mentioned the Back Button Focus method many times already in this article, so let me explain a bit better what it is.
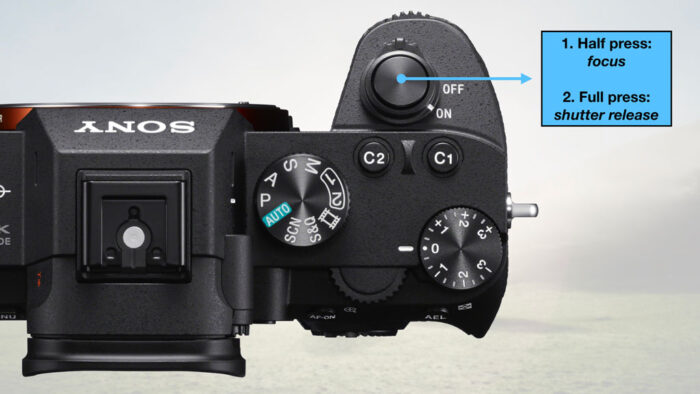
By default, when you unbox your camera and turn it on, you engage focus by half-pressing the shutter release button. You then take the shot by pressing the same button fully. There is nothing wrong with this method and that’s probably how most people use their cameras.
Using the shutter button to focus can have some limitations however.
Every time the shutter button is triggered, the camera will refocus. Even if your composition stays the same and you take multiple shots, the camera refocuses every time. This is unnecessary, and can occasionally lead to mis-focused shots (particularly when using S-AF where Contrast Detection is prioritised with certain Focus Areas).
In other situations, separating focus from the shutter button allows you to control when one and the other happens with added precision.
I find this useful for birds in flight and sports. I follow the subject, start focusing and then take the shot when I feel it is the right moment. This way I don’t end up taking images by mistake. It becomes especially useful in the winter when wearing gloves, because the sensitivity of your finger on the shutter button is reduced.
But my favourite reason to use the Back Button Focus method is that I can leave the camera to AF-C, where phase detection AF is prioritised at all times, without having to focus continuously. Even for a landscape image, I can press the back button to focus quickly then lift my finger. It’s basically combining Single and Continuous AF into one solution: you press the button once for S-AF, you press and hold for C-AF.
If any of these reasons have convinced you, here is how to set up your A7 III with the back button focus.
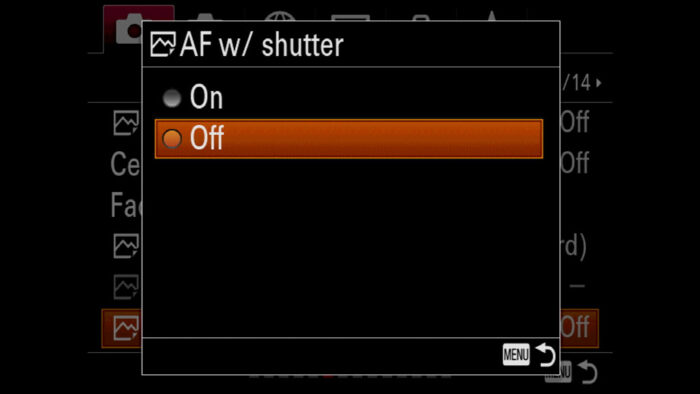
- Enter the menu and go to Camera Settings 1 / AF2 (page 6/14)
- Choose AF w/shutter and select Off
- Navigate to Camera Settings 2 / Custom Operation1 (page 8/9)
- Choose the first Custom Key entry (with the picture icon)
- Choose a button in the list
- Scroll left until you reach AF3 (page 6/23) and select AF On
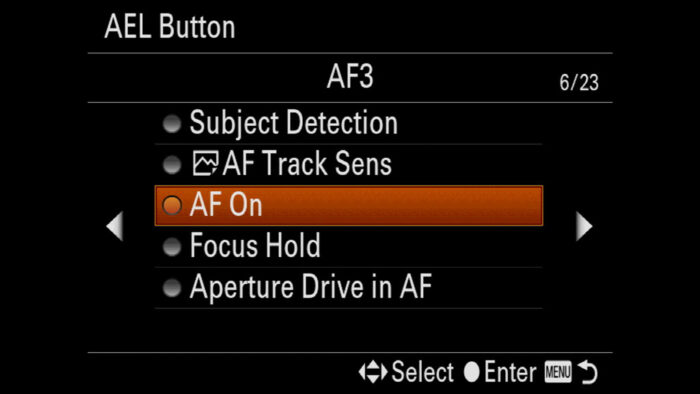
Note: on select cameras, AF On is assigned by default to the AF-On button which of course makes sense. Personally I find that button too close to the EVF and a bit uncomfortable to reach because I use my left eye to compose. The AEL button is further away from the EVF and easier for me to use.
Sony A7 III, A7R III, A9 AF Track Sens
Not available on the A7 I and A7 II series
When setting your Sony A7 III in continuous autofocus mode, you can control the sensitivity of the focus acquisition. The setting you’re looking for is called AF Track Sens, and is found in Camera Settings 1 / AF2 (page 6/14).
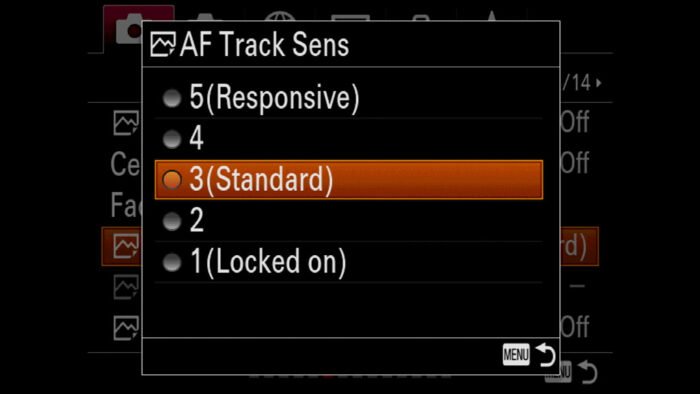
This setting can be adjusted in five levels from 1 (Locked on) to 5 (Responsive).
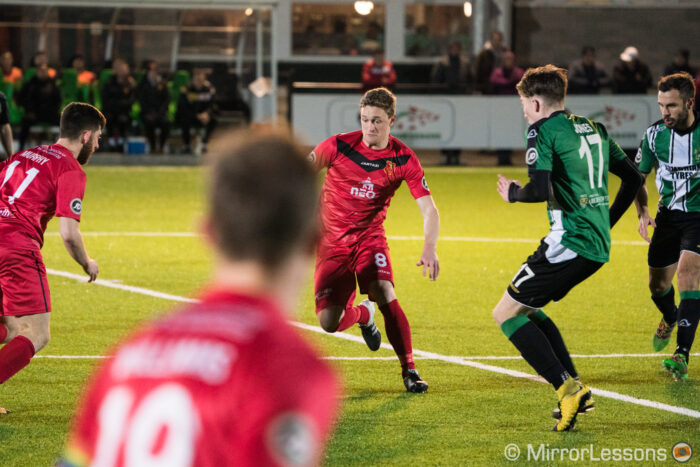
Locked on means that the camera won’t react right away when a person passes in front of your subject. A typical scenario is a group sport such as football. You’re following a single player when a second player appears in front of him. With AF Track Sens set to 1 or 2, your A7 III won’t try to refocus as soon as the second player enters your focus area, unless he stays in front of him for too long (more than a few seconds).
However having the sensitivity at 1 or 2 means that the camera is slower at continuously changing focus. That is not good if a subject is moving very fast, possibly towards you. In that case, you want the best sensitivity there is so choose 4 or 5. (The latter is the one I use for birds in flight.)
The level 3 (Standard) is usually a good compromise and in many cases you want to leave it there. Even for sports, I often find that I don’t need to lower the sensitivity that much but of course every situation is different.
Sony A7 III, A7R III, A9 Autofocus Tracking / AF Lock-on
I’ve touched upon tracking already in the article, but let’s talk about it a bit more in-depth because there are some differences depending on the specific camera you use.
Sony Center Lock-on AF and Lock on AF
Valid for all A7 series cameras except the A7R IV, A9 and A9 II
Lock-on is the way Sony calls autofocus tracking: you acquire focus on a specific area of the screen, and the camera will then glue the AF to that area no matter its position in the frame. It may also enlarge or reduce that area depending on your subject’s position and distance. The camera tracks the subject based on things like its colour.
On your A7 III, Lock-on is found in two different positions in the camera menu, and can therefore be activated in two different ways.
Sony Lock-on AF with Focus Area
You can select Lock-on AF from the normal Focus Area list, which is useful because you can start tracking anywhere on the screen. Once you start focusing, the camera will continue to track the subject even if it moves away from the focus area.
- Choose AF-C in Focus Mode
- Go to Camera Settings 1 / AF1 (page 5/14) and select Focus Area
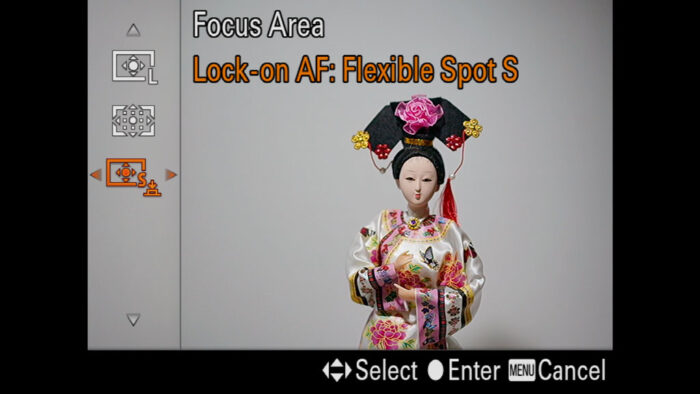
- Scroll down to the last option called Lock-on AF
- Scroll left or right to choose a focus area as a starting point. To be more precise, use a small area such as Flexible Spot and move it to the portion you want to track. Once tracking has started, it will work anywhere on the screen.
- Start focusing and tracking will be activated.
- To cancel tracking, stop pressing the focus button
Sony A7 III, A7R III Center Lock-on AF
The principal is the same, but the difference is that you can only start tracking from the centre of the frame.
- Set the Focus Area to Wide
- Go to Camera Settings 1 / AF2 (page 6/14)
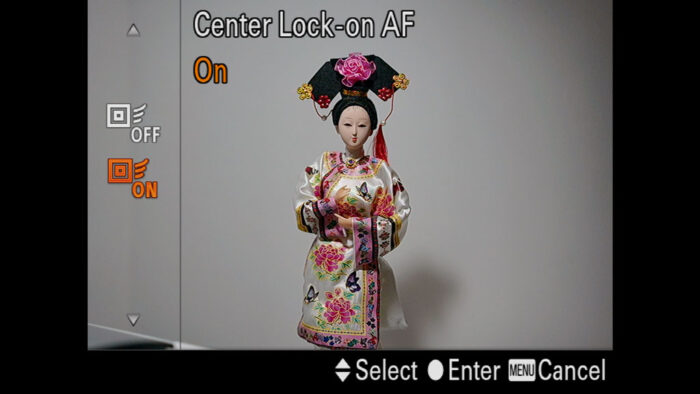
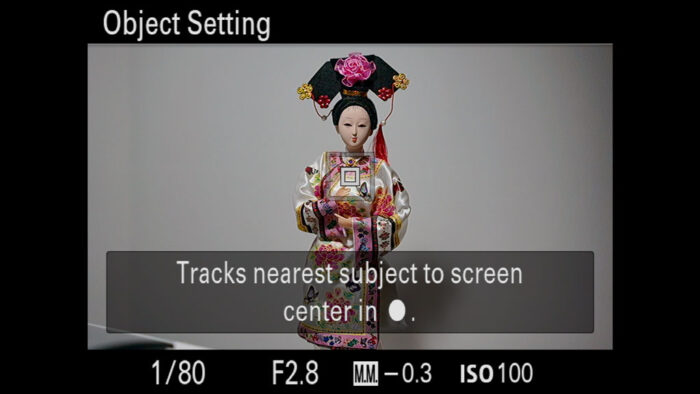
- Select Center Lock-on AF and choose On: a square will appear in the middle of the screen. Move your camera so that the square overlays your subject, then press the centre button. The camera will start tracking.
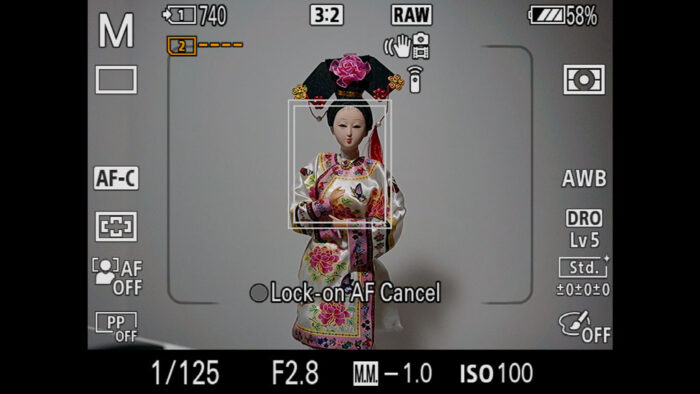
- To cancel tracking, press the centre button again or touch the small icon on the top right part of the LCD screen (for touch sensitive cameras).
Tip: depending on your camera setup, you may find that the only way to use Centre Lock-on AF again is to go back into the menu and turn it off and on again. A quicker solution is to assign the Focus Standard option to a custom button (AF1 page 4/23). That way you can press it to reactivate tracking without going into the menu.
The advantage of center lock-on autofocus on your A7 III and other A7 cameras is that:
- it works in S-AF and C-AF modes, whereas the Lock-On Focus Area setting is only available in C-AF
- it can be activated with the touch screen (on compatible cameras)
- it remains active even when you’re not focusing. With the other Lock-on method, if you stop focusing tracking is lost.
Sony Real-Time Tracking AF
Valid for the A9 series and A7R IV
Starting with the A6400 APS-C camera, Sony introduced a new generation of autofocus algorithm, and one of the main improvements is called Real-Time Tracking.
Once the mode is activated, the camera analyses brightness, patterns, colours, faces, eyes and depth to track the subject more accurately, and uses AI technology to recognise the subject faster.
For the A9 series and A7R IV, the terms Lock-on and Center Lock-on have been replaced by Tracking. The concept remains the same. You can select it in the Focus Area setting, by touching the screen or by assigning it to a custom button.
To select Tracking using the Focus Area setting (C-AF only):
- Go to Camera Settings 1 / AF1 (page 5/14) and select Focus Area (or use a custom button)
- Scroll down to the last option called Tracking
- Scroll left or right to choose a focus area as a starting point. Again, use a small area such as Flexible Spot and to be more precise.
- Start focusing and tracking will be activated.
- Remember that if you stop focusing, tracking is deactivated.
To select Tracking using the touch screen:
- Make sure that the Touch Operation is On in Setup 2 (page 2/7)
- Go to Camera Settings 2 / Custom Operation2 (page 10/14)
- Scroll down to Func. of Touch Operation and choose Touch Tracking
- Touch anywhere on the screen to start tracking your subject
To select Tracking with a custom button (works in C-AF only):
- Go to Camera Settings 2 / Custom Operation1 (page 8/9)
- Enter in the first Custom Key setting
- Choose a custom button
- Assign the function Tracking On to it (AF2 page 5/25)
- When pressing the custom button, the camera will start tracking and override the Focus Area mode
Wide Area or Tracking: which is best?
Modern Sony cameras (A9, A7 III, A7 IV series) are better at detecting where and what the subject is, even if we don’t give it a hint. I am often surprised by how well the camera picks out my subject straight away when I test the Wide Focus Area mode.
The autofocus is intelligent enough that you could probably leave it to Wide on many occasion, but of course it cannot be 100% trusted. There might be a few situations where it fails, or focuses on something else because of a change of light, or if the subject’s colour matches the colour of the background for example.
So while Wide can be useful at times, Lock-On AF / Tracking allows you to tell the camera what your subject of interest is, thus lowering the chance of the camera misbehaving. Of course even Lock-On AF can fail occasionally, but it doesn’t happen often, especially with the new Real Time Tracking mode of recent Sony cameras.
Sony A7 III, A7R III, A9 Eye AF and Face AF
Eye AF is perhaps the best autofocus setting you can find on modern Sony cameras. It is a huge ally when taking pictures of people. The camera will use a single point and place it on the eye of your subject automatically. Whether you’re taking professional portraits or pictures of your kids and pets, this function is very useful.
To find out more about how to use Eye AF for portraits of people, or for taking pictures of animals, please check the two articles below.
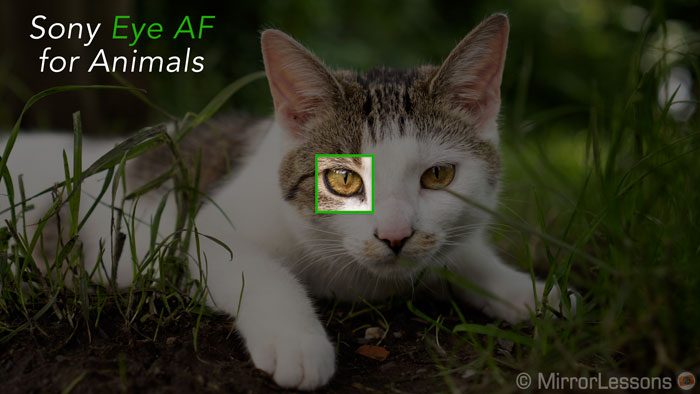
Guide:
Sony Eye AF for Animals
Sony A7 III, A7R III, A9 Touch Screen Autofocus
Not available on the A7 I and A7 II series
After enabling Touch Operation in the Menu Setup 2 page, you can tap anywhere with your finger on the LCD to activate touch screen focus on your A7 III & co.
If you’re using a large focus area such as Wide or Zone, touching the screen will override that setting and the camera will focus on the area you touched with your finger. If you’re using a single focus area (Flexible Spot, Expand Flexible Spot), you can use the touch screen to move that point around.
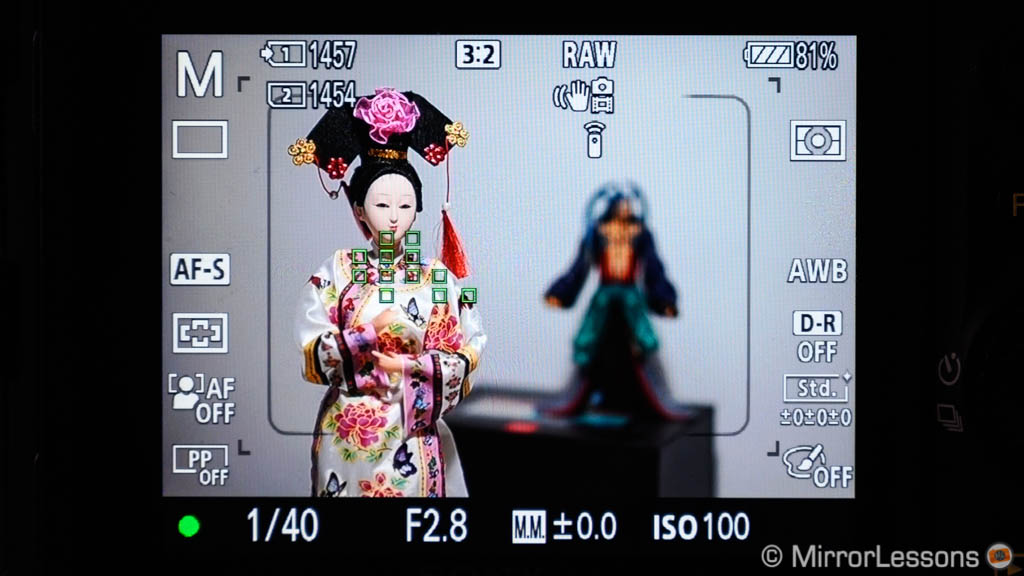

Important: when you touch the screen, the camera activates the focus area but doesn’t focus automatically. You need to press the shutter button halfway or press the back button focus in order for the camera to perform autofocus.
How to enable real “Touch to Focus” on the Sony A7 III, A7R III, A9
If you want a real “touch focus” function, where tapping the screen forces the camera to autofocus just like it does when you press the shutter button, turn On the Centre Lock-On AF (Camera Settings 1 / AF2 page 6/14). Then, on any area of the monitor you touch, the camera won’t just select the focus area but will also start tracking and focusing on that area.
With the A7R IV, A9 and A9 II, you can do the same thing with the Touch Tracking setting.
Sony A7 III, A7R III, A9 Touchpad Settings
Not available on the A7 I and A7 II series
In Menu Setup 3, there are additional options to control the A7 III touch screen:
- Touch Panel / Pad: you can choose in which situation the touch screen is active (when using the EVF, the LCD, or both)
- Touch Pad Settings: you can customise how the Touch Pad function works.

The Sony A7 III Touch Pad allows you to use the touch screen to move the AF point while composing with the viewfinder. It is an alternative to the AF Joystick found on the rear.
Once you’ve entered the Touch Pad Settings, you’ll see three options:
- Operation in V Orient.
- Touch Pos. Mode
- Operation Area
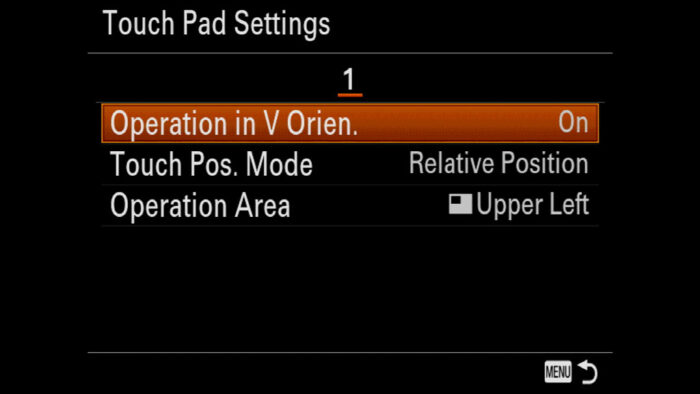
The first, Operation in V Orient., allows you to enable or disable the Touch Pad when working in vertical orientation (portrait mode). Unless you have a clear reason to disable it, leave it On.
The second, Touch Pos. Mode, has two settings: Absolute Position or Relative Position.
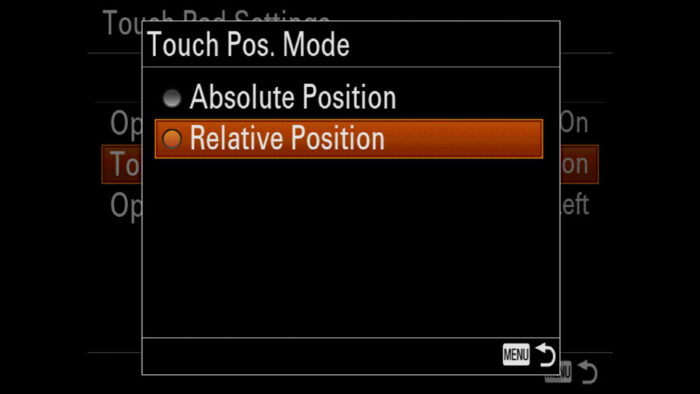
Absolute position means that the focus point will go wherever you touch the screen. This can be useful to go quickly from one area to the other, like for example from the top right to the bottom left zone of the frame.
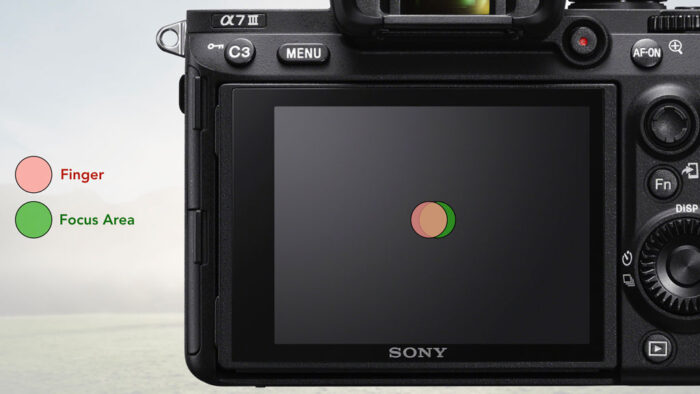
Relative position means that you can control the focus point by touching a different position than the focus point location. For example you might find it easier to touch the bottom right part of the screen rather than move your finger across the entire surface of the LCD panel.
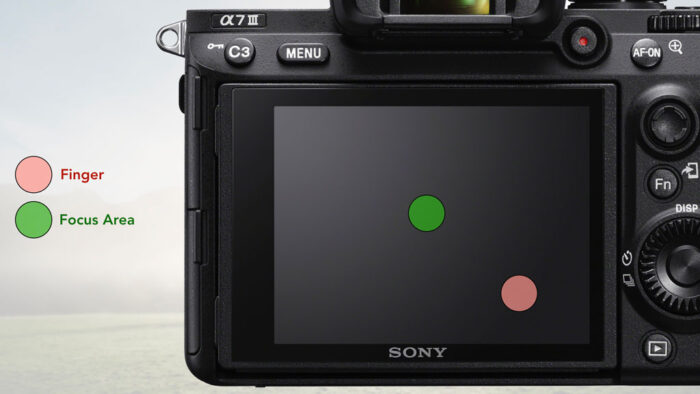
Honestly, you need to try to understand what works best for you. I think relative position can be better for small adjustments, but if you need to shift the focus point from one side to the other, Absolute position works best.
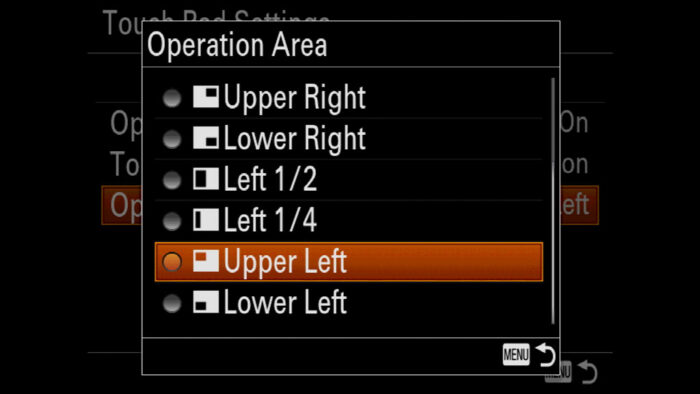
The last setting found in Touch Pad Settings is called Operation Area. You can make the entire screen sensitive, or just half, or just the bottom right corner. There are nine options in total. This is useful to avoid having your nose touch the screen and move the focus point when the entire screen is active. Again, you need to figure out which options work best for you.
Sony A7 III, A7R III, A9 Autofocus with Canon lenses
Since the release of the A7R II, Sony has opened up its autofocus system to DSLR lenses, and although you will only find Sony’s A-mount products mentioned in the user manual, it is compatible with Canon lens autofocus as well as Sigma, Tamron and Nikon products.
Note: you need a compatible adapter in order to use DSLR lenses.
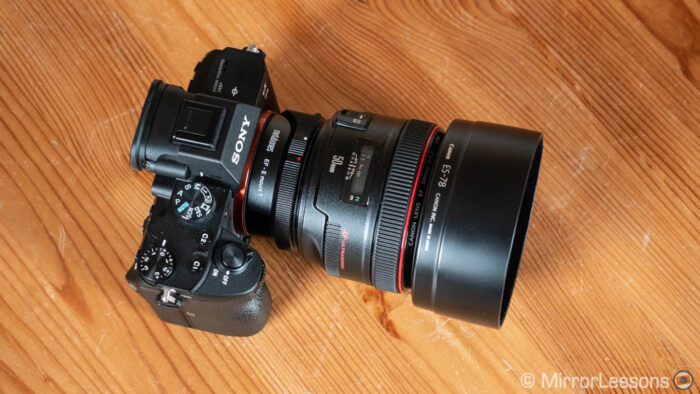
The camera works in the same way when a DSLR lens is mounted as with a native lens. The only setting you need to check is that phase detection autofocus is enabled.
- Go to Camera Settings 1 / AF2 (page 6/14)
- Scroll down to AF System
- Choose Phase Detection AF to guarantee faster focusing
Note: the performance may vary from adapter to adapter. Some AF settings might not be available. This is not valid for Canon RF and Nikon Z lenses that are designed for mirrorless systems.
The AF System setting is not available on the A7 I series and the A7S II, which limits the performance and compatibility.
Sony A7 III, A7R III, A9 AF with Magnification
Not available on the A7 I and A7 II series.
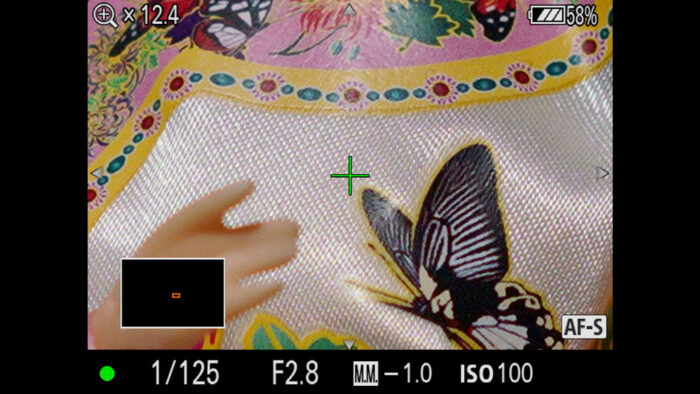
Focus Magnifier is one of the manual focus assists available on your Sony camera. Recent models also allows you to engage the autofocus while magnification is active. This can be very useful for macro photography when you need to focus on a very precise zone.
- Go to Camera Settings 1 / Focus Assist (page 13/14)
- Select On for AF in Focus Mag.
- Go to Camera Settings 2 / Custom Operation 1 (page 8/9)
- Select the first Custom Key entry
- Choose a custom button and assign the Focus Magnifier option (Focus Assist page 12/23)
- Select the AF-S Focus Mode
- Press the custom button you configured to activate magnification. You’ll see a small cross in the middle of the screen.
- Move the magnified area with the control wheel or the joystick to have the cross on the exact area you want in focus.
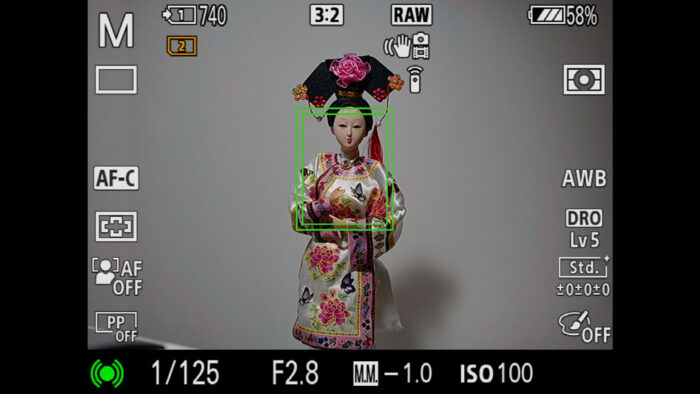
- Press the focus button (shutter release half way or back button focus). The cross becomes green once focus is acquired successfully.
Sony A7 III, A7R III, A9 Autofocus Sound / Beep
By default, your A7 III emits a sound when focusing. You can disable this in two ways.
- Activate Silent Shooting in Camera Settings 2 / Shutter SteadyShot (page 4/9).
- Turn Off Audio Signals in Camera Settings 2 / Custom Operation2 (page 9/9). This method allows you to get rid of your Sony A7 III AF beep completely no matter which settings you use.
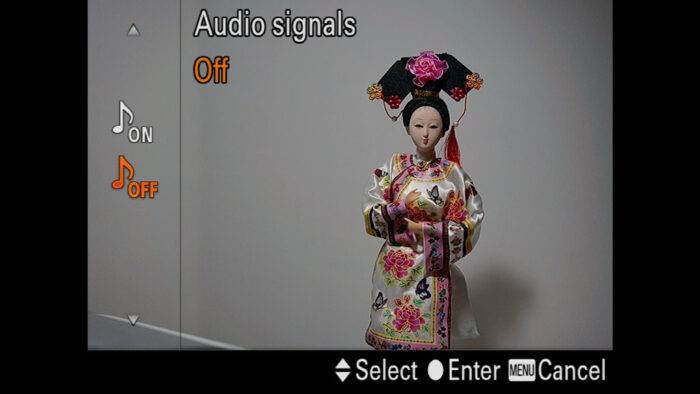
Note: be aware that the Silent Shooting function uses the electronic shutter and there can be some banding or distortion issues in certain conditions (read more about this in the Photography Settings guide below).
Sony A7 III, A7R III, A9 AF Illuminator
As with the AF sound, by default your A7 III AF illuminator will turn on when focusing. It usually activates when there isn’t a lot of light in your scene.
If you are in a pitch dark conditions, this function can be very useful, but otherwise it can draw some attention or even annoy your subjects.
If you want to deactivate the AF Assist beam of your Sony A7 III or other A7 / A9 model:
- Go to Camera Settings 1 / AF2 (page 6/14)
- Turn Off the AF Illuminator
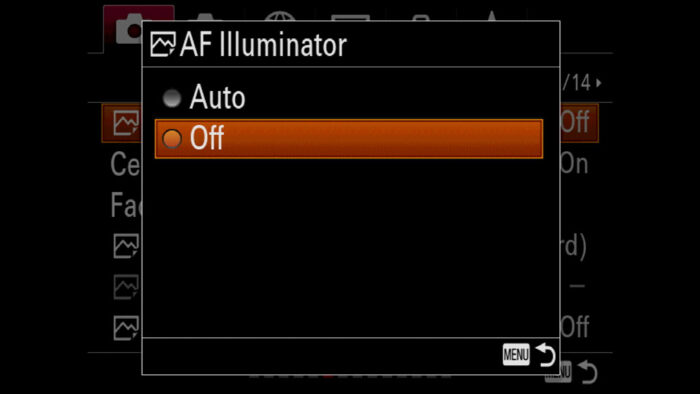
Note: the AF Illuminator doesn’t work with a flash unless the latter has an AF Illuminator function.
Sony A7 III, A7R III, A9 Eye Start AF and Pre AF
I’ve talked about two different ways of engaging autofocus on your Sony camera: half-pressing the shutter release button or using the Back Button Focus method. But there are two additional options.
Sony A7 III, A7R III, A9 Pre AF
When this setting is enabled, the camera adjusts focus constantly, even when the shutter button or the back button focus are not pressed.
To activate Pre AF:
- Go to Camera Settings 1 / AF3 (page 7/14)
- Turn Pre-AF On
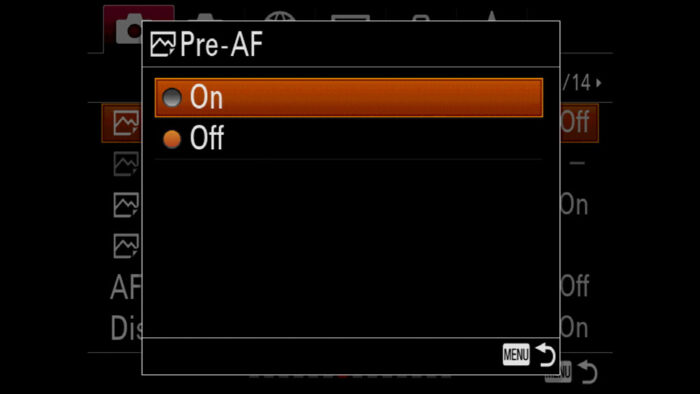
The advantage is that the camera is always ready for focus acquisition, which means if you see something, all you have to do is to take the shot (in theory).
In practice, I find it to lack some reactivity most of the time. Keep in mind that it works better if your composition is more or less ready, otherwise the camera might focus on something completely different. Also, this function will drain the battery life more quickly. Personally, I’ve never found the need to use it.
Sony A7 III, A7R III, A9 Eye Start AF
This setting is potentially more useful. If you use your viewfinder a lot, you can engage focus when you bring the camera to your eye. The sensor below the EVF that triggers the live view switch from LCD to EVF will also trigger the autofocus.
Unfortunately, it only works when an A-mount lens is attached with the LA-EA2 or LA-EA4 adapter which is a shame. But if you still want to know where it is, you can find it in Camera Settings 1 / AF3 (page 7/14).
Sony A7 III, A7R III, A9 Autofocus: additional settings
If you thought that this article was already long enough as it is, I’m sorry to say there is more!
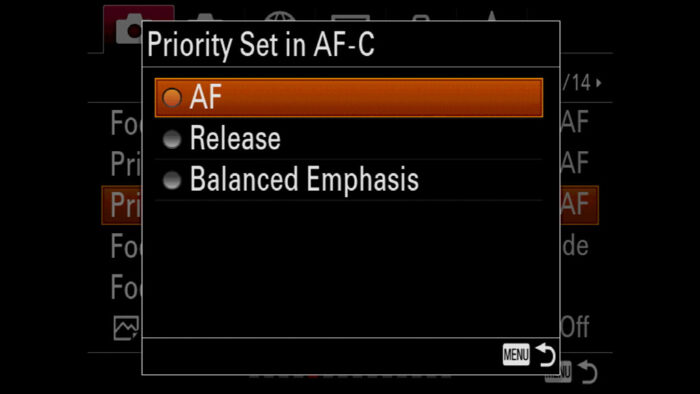
Priority Setting in AF-S / AF-C
Camera Settings 1 / AF1 (page 5/14)
Not available on the A7 I series and the A7 mark II model
Choose whether the camera gives priority to focus or shutter release:
- With AF priority, the camera won’t take the image until focus is acquired. This is the setting I use all the time because it allows me to assess the accuracy of the autofocus of the camera I am testing.
- With Release priority, the camera will take the shot even if the photo is not in focus. Sports photographers often prefer this setting because they don’t want the risk of missing an important moment. Theoretically, if the AF is good enough, it should cope and guarantee accurate focus. But if you find that is not the case, switch back to AF priority.
- The third option is called Balanced Emphasis and it kind of sits in the middle. I honestly don’t know how the camera chooses to take the picture or wait for focus acquisition with this setting, so I just tend to ignore it.
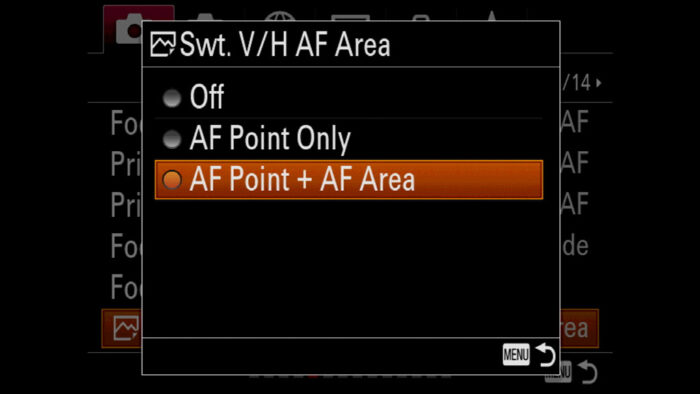
Sony Switch Vertical / Horizontal AF area
Camera Settings 1 / AF1 (page 5/14)
Not available on the A7 I and A7 II series
If you often change camera orientation between horizontal and vertical framing, this setting allows you to change the focus area and/or the focus position automatically when rotating the camera.
For example, you may want Flexible Spot on the right in Horizontal mode, and Zone Area on top in vertical mode. This function lets you do exactly that. Just set the area and position you want for each orientation and the camera will memorise them.
AF Area Registration
Camera Settings 1 / AF3 (page 7/14)
Not available in the A7 I and A7 II series
This function allows you to save a specific focus area to a custom button. This way, you can recall it quickly when necessary.
For example when shooting wildlife, you may use Zone Area for birds in flight, but if a bird settles down on a branch, it is better to use a smaller focus area such as Expand Flexible Spot. Being able to activate the latter with a custom button rather than scrolling through the Focus Area list is definitely quicker.
Furthermore, registering and overwriting an AF Area is a very quick process so you may find yourself using this feature quite a lot in various situations.
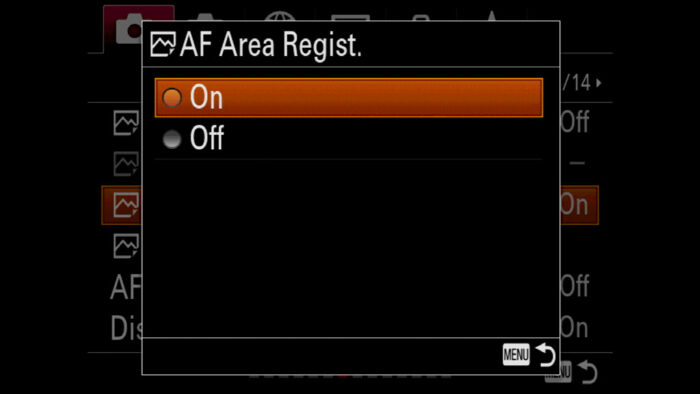
To use the AF Area Registration setting:
- Go to Camera Settings 1 / AF3 (page 7/14)
- Highlight AF Area Regist. and choose On
- Exit the menu and choose your focus area
- Press and hold the Fn button on the rear to memorise the focus area. The camera will give you confirmation on the screen.
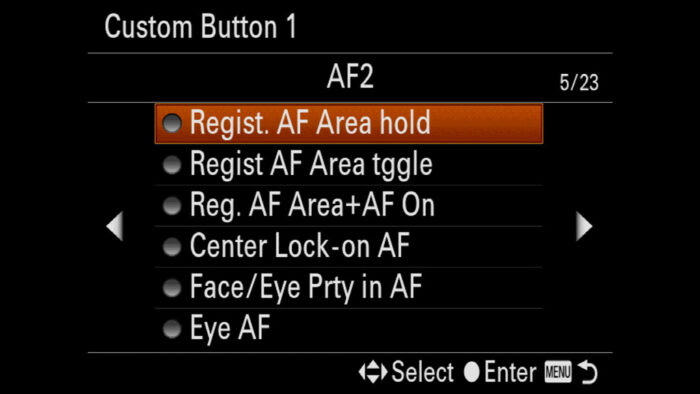
- Go to Camera Settings 2 / Custom Operation 1 (page 8/9)
- Enter the first Custom Key setting
- Choose a button, then navigate to AF2 (page 5/23)
- Select Regist. AF Area hold or Regist. AF Area tggle. With the former, you need to press and hold the button to change the area, whereas with the latter you press once to change, you press a second time to go back to the previous focus area.
- If you want to delete the registered area, you can overwrite it by choosing another one and pressing/holding the Fn button. Alternatively, go to Camera Settings 1 / AF3 (page 7/14) and choose Del. Reg. AF Area.
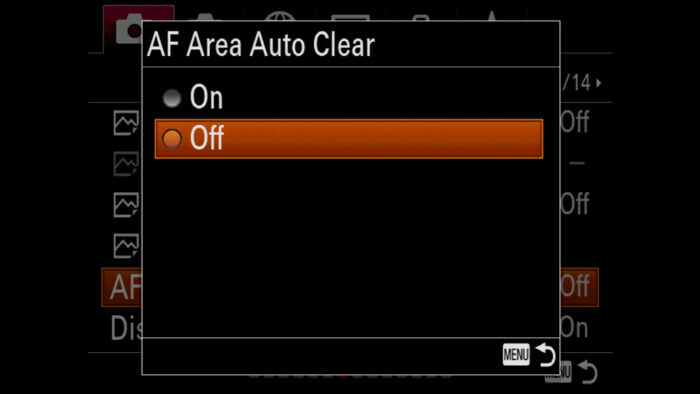
AF Area Auto Clear
Camera Settings 1 / AF3 (page 7/14)
Not available on the A7 I and A7 II series
If set to On, the focus area will disappear shortly after focusing (when keeping the shutter release button half-pressed, or holding down the back button focus). I always leave this to off because I like to see the focus points at all time.
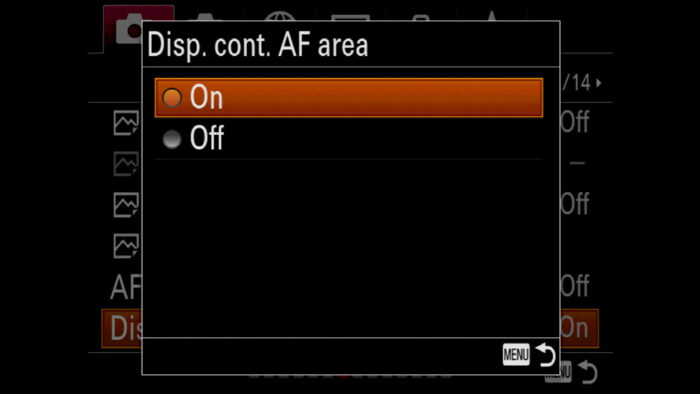
Display Contrast AF area
Camera Settings 1 / AF3 (page 7/14)
Not available in the A7 I series
When this setting is turned off, the focus area won’t become green when focus is acquired in continuous AF. I always leave it on because I like the visual confirmation once again.
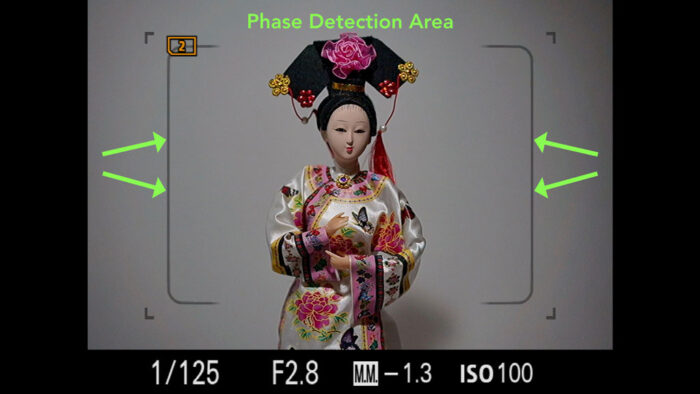
Phase Detection Area
Camera Settings 1 / AF4 (page 8/14)
A7R II, A7R III and A7R IV only
It displays the area of your frame in the live view where the phase detection points are located.
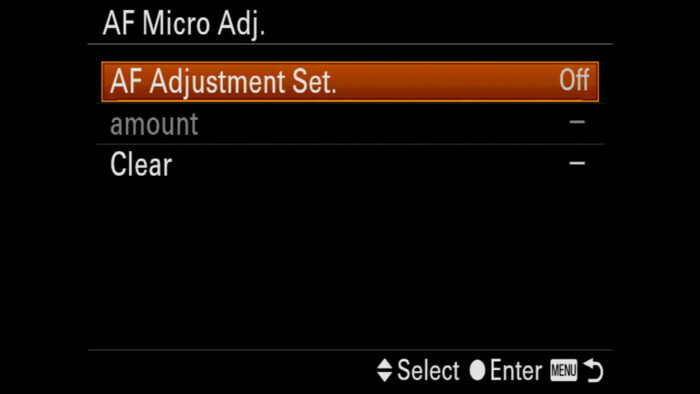
AF Micro Adjustment
Camera Settings 1 / AF4 (page 8/14)
When adapting Sony DSLR lenses with the LA-EA2 or LA-EA4 adapter which have a separate focus sensor inside, you can use the AF micro adjustment setting on your A7 III to adjust the autofocus position if the lens has front or back focus problems.
Aperture Drive in AF
Camera Settings 1 / AF4 (page 8/14)
Not available on the A7 I and A7 II series
You can make the sound of the aperture iris more silent with compatible lenses, which is useful for video recording.
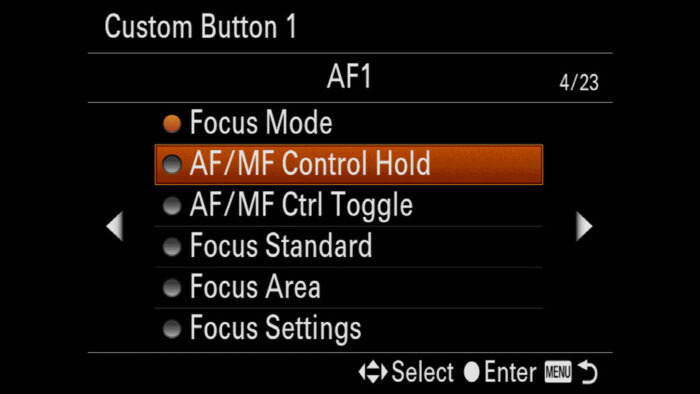
AF/MF Control Hold or Ctrl Toggle
AF1 (page 4/23) in the list of options to assign to a custom key
These options can be assigned to a function button to switch between Auto and Manual focus modes. If the lens you use has an AF/MF switch, it is not necessary.
On the A7 I and A7 II series, it is assigned by default to the AF/MF position of the rear lever.
Focus Hold (AF Lock)
AF3 (page 6/23) in the list of options to assign to a custom key
Once this function is assigned, pressing the button will stop the camera from focusing. By default it is configured to the function button of select Sony lenses.

Reminder: the links below are affiliate links. If you decided to buy something after clicking the link, we will receive a small commission.
Check price of the Sony A7 III on:
Amazon | Amazon UK | B&H Photo | eBay
Check the price of the Sony A7R III on:
Amazon | Amazon UK | B&H Photo | eBay
Check price of the Sony A7R IV on
Amazon | Amazon UK | B&H Photo | eBay
Check price of the Sony A9 on
Amazon | Amazon UK | B&H Photo | eBay
Check price of the Sony A7 II on:
Amazon | Amazon UK | B&H Photo | eBay
Check price of the Sony A7R II on:
Amazon | Amazon UK | B&H Photo | eBay
Second-hand Sony gear on
MPB US | MPB UK
Sony Alpha Mirrorless Cameras Resources on Mirrorless Comparison
Below you will find lots of content related to the A7 III, A7R III and other Sony full frame mirrorless cameras.
Real World Comparisons
- Sony A7 III vs A7R III
- Sony A7R III vs A7R IV
- Sony A7R II vs A7R III
- Sony A7R III vs A9
- Sony A7 III vs Nikon Z6
- Sony A7R III vs Nikon Z7
- Sony A7R III vs Fujifilm GFX 50s
- Sony A7R III vs Panasonic S1R
- Sony A7 III vs Canon EOS R
- Sony A7 III vs Fujifilm X-T3
- Sony A7 II vs Canon EOS RP
Sample Photos
- Sony A7 III sample images
- Sony A7R III sample images
- Sony A7R IV sample images
- Sony A7 II sample images
- Sony A7R II sample images
- Sony A7S sample images