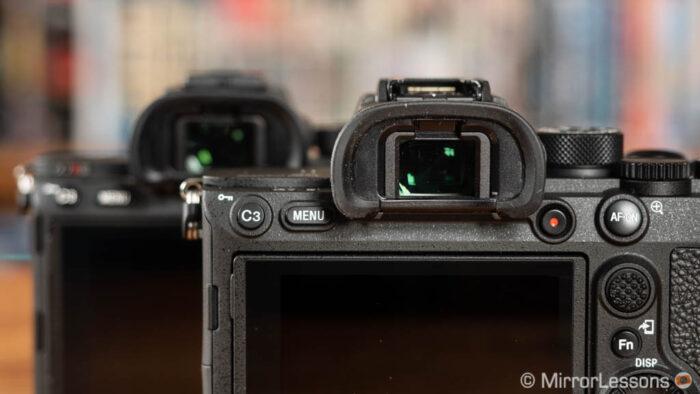
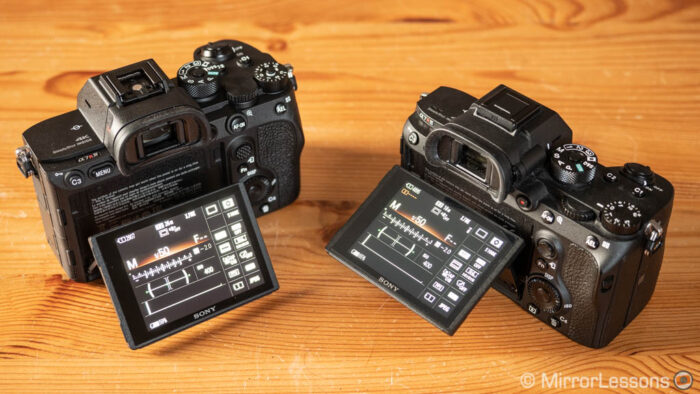
The third and fourth generation A7 cameras, as well as the A9 series, have a built-in viewfinder and a tilting LCD screen on the rear with touch capabilities. There are several settings you can configure to get the most out of your EVF and monitor. Let’s take a look at them.
A7/A9 series compatibility
This article is valid for the following Sony cameras: A7 III, A7R III, A7R IV, A9 and A9 II. Some have different specifications and settings (especially concerning the EVF) so I’ve made sure to highlight this information in the article. The post can be considered valid for previous generation A7 cameras too, although they have less features (touch sensitivity being the most relevant one).
Note: throughout the article, I will mention various pages of the menu system. When entering the Menu, your A7 III will display icons on top of the screen. Each refers to a main section as you can see below.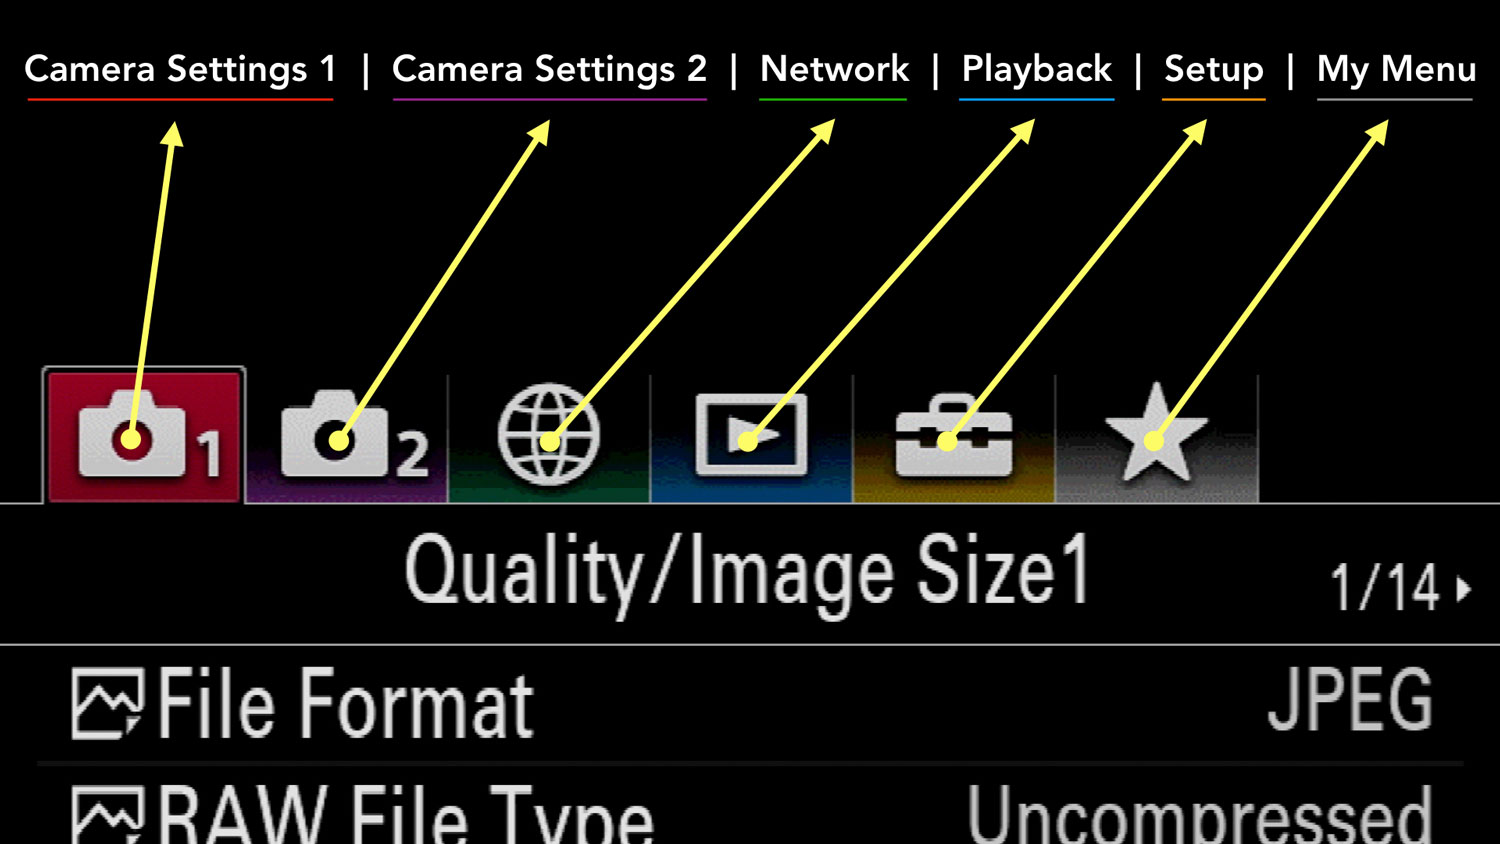
The exact position of a setting might vary slightly from one camera to the other. Most likely, it will be on the previous or next page to the one I mention.
On older Sony cameras (mark I and II generation), Camera Settings 2 is called Custom Settings, the icons are a bit different (see below), some settings are in a different part of the menu, and there is no title or page number.![]()
![]()
TABLE OF CONTENTS
1. The One Setting to Start With
2. DISP button
3. Viewfinder Settings
4. Viewfinder Blackout
5. How To Turn Off the Viewfinder
6. Monitor Settings
7. How To Turn the Screen Off
8. Display Quality Setting (LCD & EVF)
9. Display Options (LCD & EVF)
10. Manual Focus Assist
11. Touch Screen Settings
12. Touch Screen Autofocus
13. Touchpad Settings
14. External Monitor Settings
Ethics statement: we own the A7 III and A7R III, and we’ve tested all the Sony full frame cameras. We were not asked to write anything about these products, nor were we provided with any sort of compensation. Within the article, there are affiliate links. If you buy something after clicking the link, we will receive a small commission. To know more about our ethics, you can visit our full disclosure page. Thank you!
Reminder: the links below are affiliate links. If you decided to buy something after clicking the link, we will receive a small commission.
Check price of the Sony A7 III on:
Amazon | Amazon UK | B&H Photo | eBay
Check the price of the Sony A7R III on:
Amazon | Amazon UK | B&H Photo | eBay
Check price of the Sony A7R IV on
Amazon | Amazon UK | B&H Photo | eBay
Check price of the Sony A9 on
Amazon | Amazon UK | B&H Photo | eBay
Check price of the Sony A7 II on:
Amazon | Amazon UK | B&H Photo | eBay
Check price of the Sony A7R II on:
Amazon | Amazon UK | B&H Photo | eBay
Second-hand Sony gear on
MPB US | MPB UK
The One Setting to Start With
In this article we’re going to dive into a lot of parameters, but if you’ve just bought your first mirrorless camera, there is one setting I must introduce to you first.
It is called Live View Display and is found in Camera Settings 2 / Display Auto Review 1 or 2 (page 6/9 or 7/9).
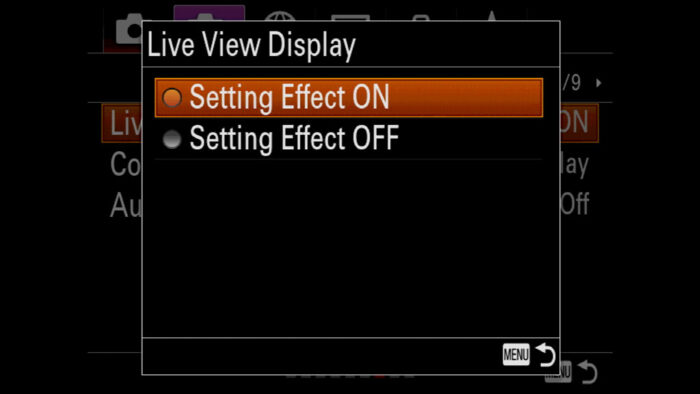
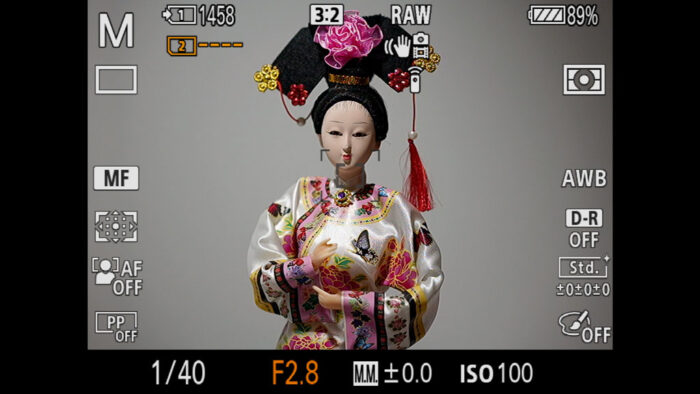
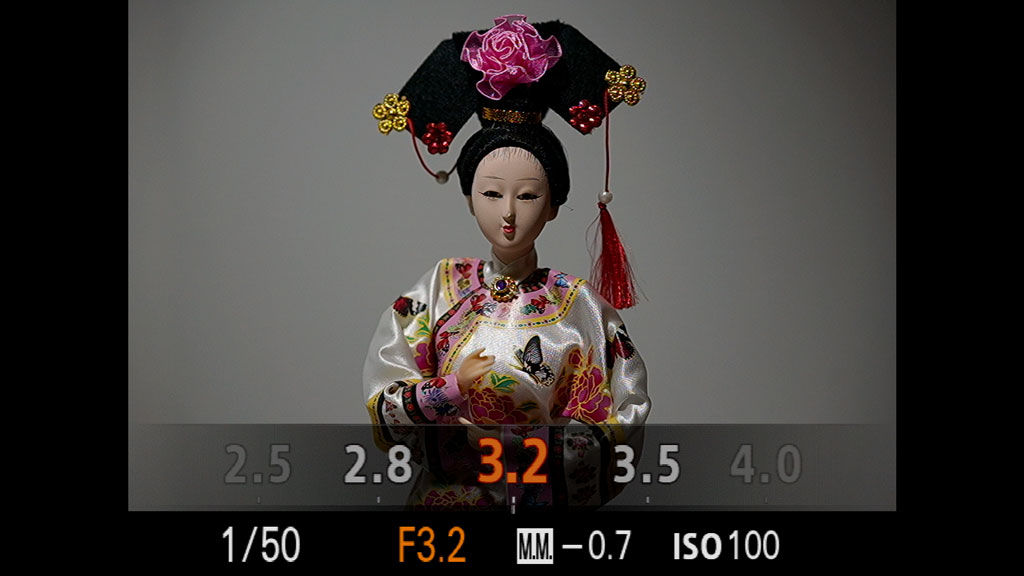
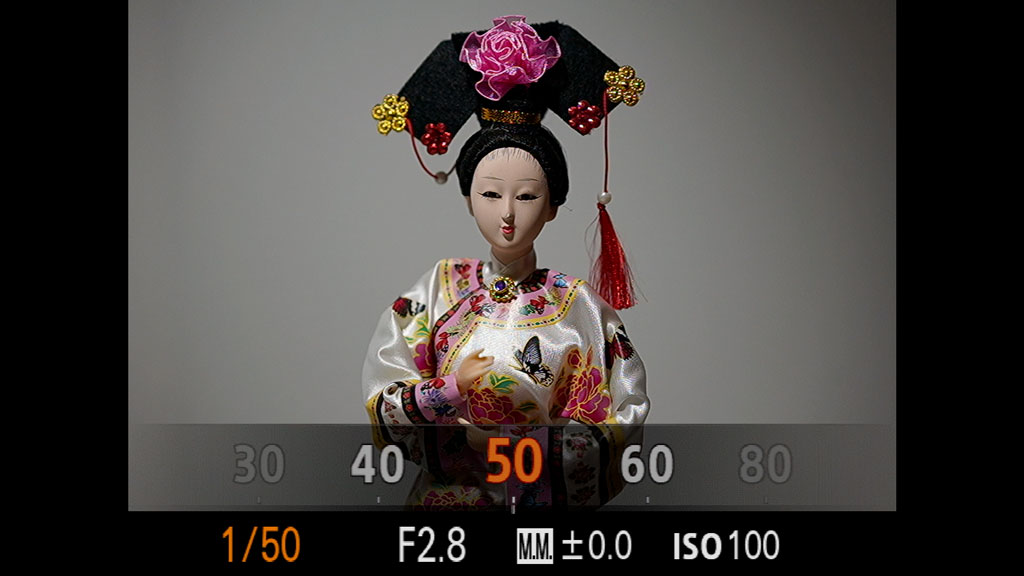
If you choose Setting Effect ON, the monitor and viewfinder will show you the real exposure of your scene, meaning it will preview the effect of your shutter speed, aperture, ISO and exposure compensation settings. Other parameters such as the Creative Style (colour profiles) and White Balance are also represented.
This is one of the main benefits of working with a mirrorless camera. The exposure preview is very useful to see right away if you’re over or under exposing the photograph, or if the colours don’t look right. With DSLRs, you can check this by activating Live View on the rear monitor, but you can’t have it in the viewfinder since it is not electronic.
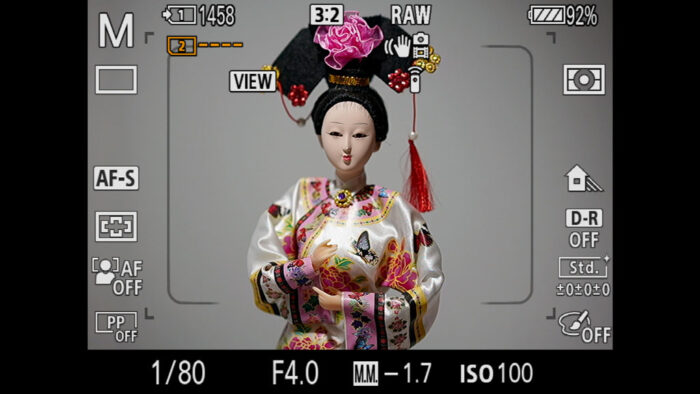
If you choose Setting Effect OFF, the camera will ignore your exposure parameters and give you optimal brightness and colours for the EVF or LCD screen, no matter the situation you’re working in. The word VIEW appears on the screen. You have to keep an eye on the metering indicator and make sure you’re using the right settings.
When to choose Setting Effect OFF?
There are times where you want to have the best brightness possible to see what’s going in your scene, regardless of the exposure settings used. For example when working in a studio with flash, the exposure preview might be too dark because the flash emits light only when you take the photograph. Other situations where you may want Setting Effect Off is for birds in flight and astro-photography.
Sony A7 III, A7R III, A9 DISP Button
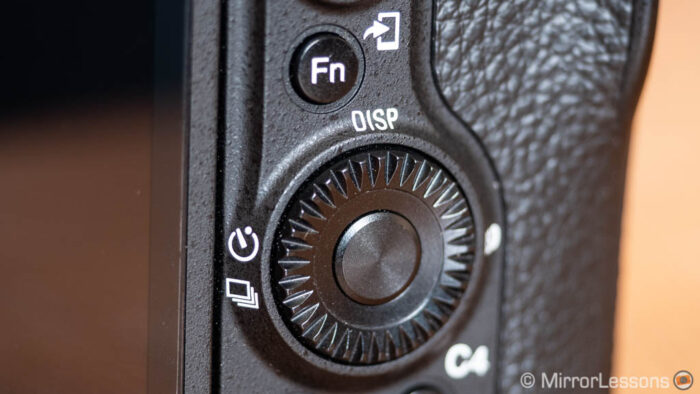
The next thing to look at is a dedicated button that controls the two screens of your camera (LCD and EVF): the DISP button. You can find it on the rear, on top of the control wheel.
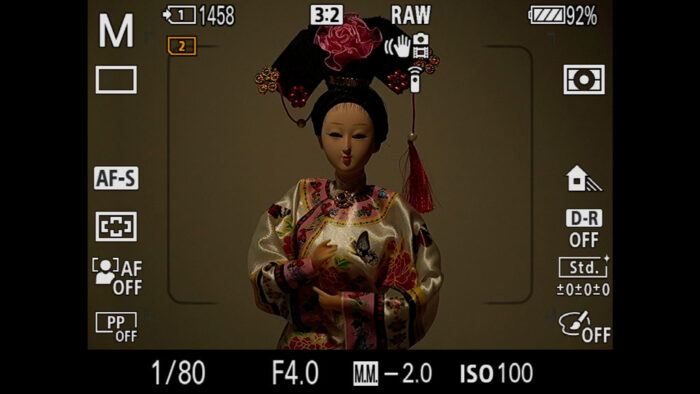
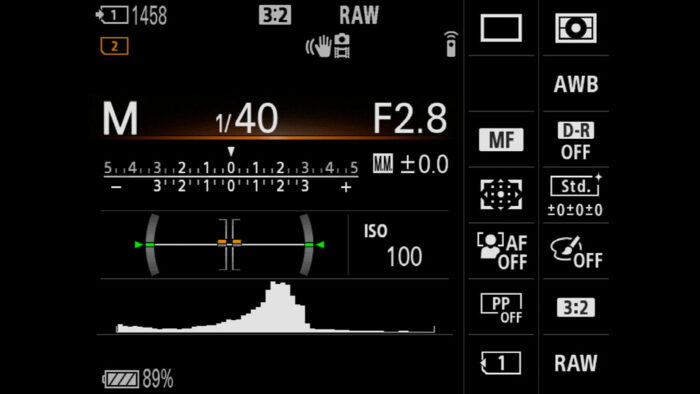
If you press it repeatedly, you’ll see that the amount of information overlaying the LCD or EVF changes. By default the camera should show you the live view of your scene with lots of information around the four edges.
Press the DISP button once and it will show basic information such as exposure settings and card capacity.
Press it a second time to display the histogram on your A7 III or other A7 model.
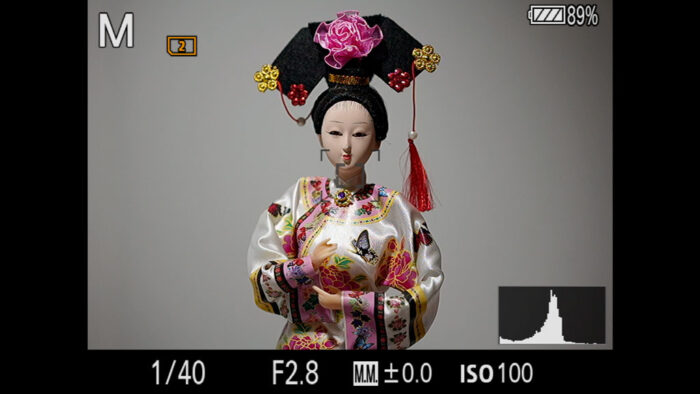
A third press will display the level, which is very useful to make sure that the camera is balanced and that your horizon is straight horizontally.
The final press will disable live view on the rear monitor and show you all the settings in use as well as the Fn menu. This last mode is not available in the EVF.
Note: the information displayed is independent for the LCD and viewfinder. For example, if you activate the histogram in the viewfinder of your A7 III, it won’t appear on the LCD screen automatically unless you press the DISP button while working with the rear monitor.
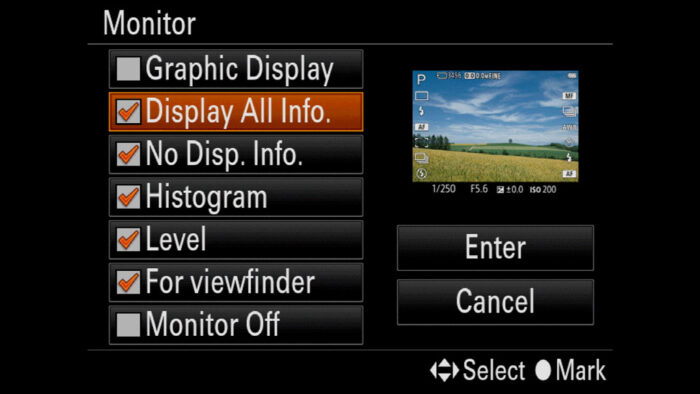
Some of the information shown when pressing the DISP button can be customised in the menu. To do this:
- Go to Camera Settings 2 / Display Auto Review 1 (page 6/9)
- Go to DISP Button
- Choose Monitor or Finder
- Check or uncheck the various options you want to display on the screen
- Highlight Enter and press the Centre button to confirm.
- Repeat for the Monitor or Finder if you need to
Overall there is a lot of information that can appear on the screen but there is one that won’t show. You can’t display the focal length on your A7 III or other A7 cameras. The only time this information appears on the LCD or EVF is when using a Sony Power Zoom lens such as the 18-105mm f4 G.
Sony A7 III, A7R III, A9 Viewfinder Settings
There are a few differences between the various Sony cameras when it comes to specifications, EVF quality and settings.
The A7 III viewfinder resolution is the lowest with 2.36 million dots. This is the same resolution found on the first and second generation of A7 cameras.
The A7R IV EVF resolution is the highest with 5.7 million dots. The Sony A7R III, A9 and A9 II have a resolution of 3.6M dots.
The Sony A7 III EVF magnification is 0.78x and it is the same found on the other recent models. Older bodies like the A7 II have a smaller magnification.
Then we have the frame rate: the Sony A7 III EVF refresh rate is approximately 60Hz and is the only camera here, along with the older mark I and II models, that doesn’t allow you to change this parameter.
The A7R III viewfinder refresh rate is set to 50/60Hz by default, but you can raise it to 100/120Hz. The same can be done with the A9 series and the A7R IV.
When to change the EVF frame rate?
A faster frame rate gives the viewfinder a more fluid view, which is useful when panning quickly to follow birds or fast action.
To change the viewfinder refresh rate on the A7R III, A7R IV, A9 and A9 II:
- Go to Camera Settings 2 / Display Auto Review 1 (page 6/9)
- Select Finder Frame Rate
- Choose Standard (50/60Hz) or High (100/120Hz)
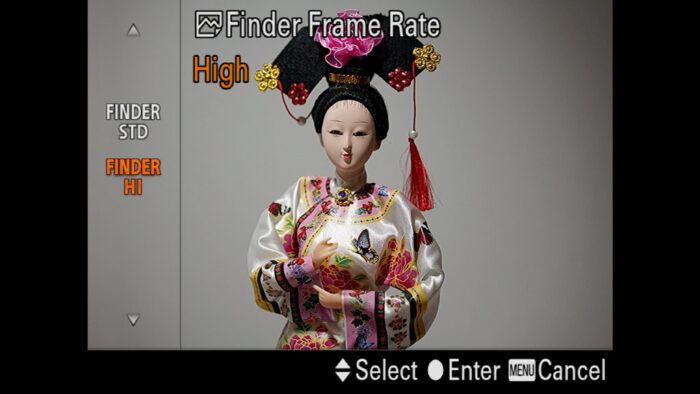
Note: in PAL mode, the frame rate works at 50 and 100Hz. In NTSC mode, it’s 60 or 120Hz. You can switch from PAL to NTSC in Setup Menu 2 / NTSC PAL Selector, but be aware that changing this parameter affects your video recording settings, and you may have to format the memory card. So unless you need to change it for other reasons than the EVF frame rate, I would leave it as it is.
Some of the A7 III EVF settings such as brightness and colour temperature are found on the other cameras too.
With color temperature, you can make the EVF colours look warmer or colder. Personally I always keep it to 0 on all cameras. If you want to change this:
- Go to Setup Menu 1 (page 1/7)
- Select Finder Color Temp.
- Look at the viewfinder
- Adjust the setting in ±2 steps
- Press OK
The A7 III viewfinder brightness, as well as that of the other A7/A9 models, can be set in automatic or manual mode. Auto works well in many cases and I don’t find myself wanting to change it very often. But if I want maximum performance from the EVF, I’ll occasionally raise the brightness to +2.
- Go to Setup Menu 1 (page 1/7)
- Select Viewfinder Bright.
- Look in the viewfinder
- Choose Manual
- Adjust the brightness in ±2 steps
- Press the centre button on the rear to confirm
Note: increasing the brightness can reduce the battery life a little, but all the Sony cameras that use the NP-FZ100 unit won’t suffer too much from this.
Sony A7 III, A7R III, A9 Viewfinder Blackout
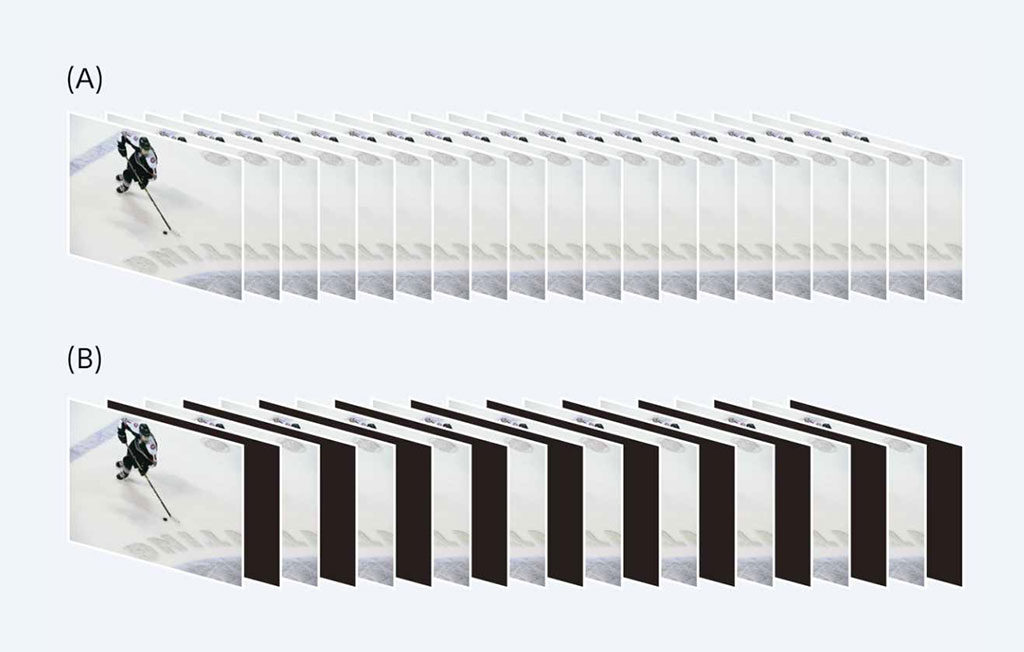
Blackout means that when you take a picture, the EVF goes black for an instant while the exposure is being recorded. You can notice the same thing on the rear LCD screen. This happens with the mechanical, first electronic curtain and electronic shutter.
Blackouts are visible in single shot mode and in continuous mode up to 8fps (Hi setting). With the latter, the camera alternates blackouts with live view. If you set the highest drive speed of 10fps (Hi+), the live view is disabled and the camera shows you the last images taken instead. This also eliminates the LCD / EVF blackout, but you’re seeing what has just happened rather than what it is happening, so there is a lag between your scene and what is shown on the screen.
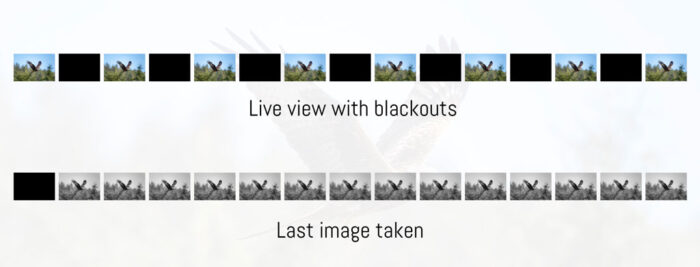
Older models such as the A7 I series, A7S series and the A7 II show live view up to 2.5fps.
The Sony A9 and A9 series work in a different way. Thanks to their stacked sensor and superior processing speed capabilities, the cameras can maintain an uninterrupted live view when using the Silent Shooting mode (electronic shutter). There are no blackouts either because the cameras have enough power to maintain live view while recording the images. This is valid in single and continuous mode up to 20fps.
If you want to find out more about this, you can read our dedicated article about the evolution of the electronic shutter.
How To Turn Off the Viewfinder on the Sony A7 III, A7R III, A9
When you bring the camera to your eye, a dedicated sensor on top of the EVF (eye sensor) can disable the monitor and activate the viewfinder automatically. When you move the camera away from your face, the viewfinder is disabled and live view goes back to the LCD screen.
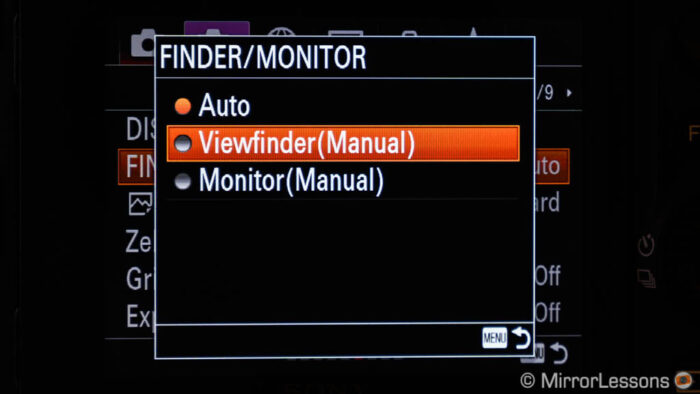
If you wish, you can control which screen remains active manually. In fact, the only way to disable the viewfinder on Sony cameras is to deactivate the Finder / Monitor automatic switch. To do this:
- Go to Camera Settings 2 / Display Auto Review 1 (page 6/9)
- Scroll down to Finder / Monitor and press OK
- Select Monitor (Manual) and press OK. The EVF is disabled and you can only use the rear LCD screen.
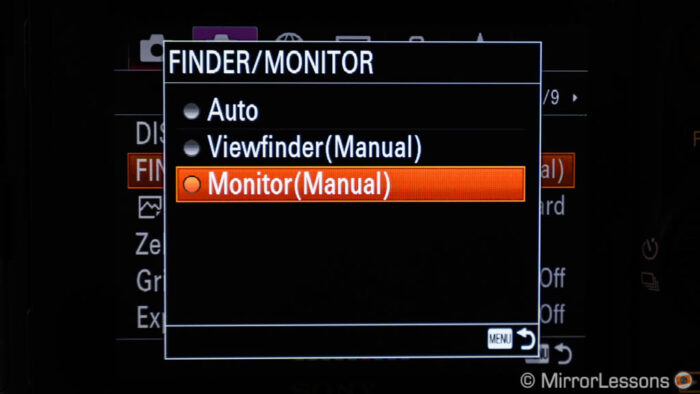
When to turn off the A7 III, A7R III EVF?
This method is useful in situations where you’re only working with the rear monitor, and you don’t want the camera accidentally disabling it when your fingers are close to the eye sensor. The sensor can also be triggered by keeping the camera too close to your body.
If you wish, you can assign Finder / Monitor to a custom button.
To know more about how to customise your Sony camera, check our dedicated article below.
Sony A7 III, A7R III, A9 LCD Monitor Settings
The Sony A7 III LCD resolution is 921k dots whereas other cameras like the A7R III, A7R IV and A9 series have a resolution of 1.44M dots.
The Sony A7 III LCD screen size is 3.0-inches (7.5mm), which is the same found on the other A7/A9 cameras.
All the LCD screens can tilt up to approximately 95˚ and down to 45˚.
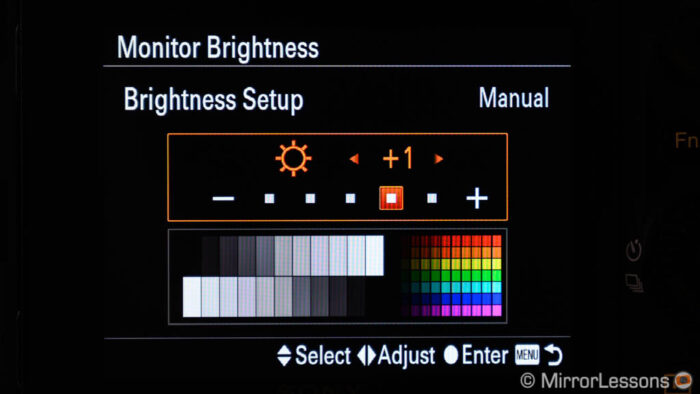
There aren’t specific settings for the rear monitor apart from the brightness adjustments. (For touch screen capabilities, please refer to the dedicated chapter below.)
The rear monitor presents two type of adjustments when it comes to brightness: Manual and Sunny Weather.
With Manual you can set brightness in ±2 steps. I leave it to +2 because the default value (0) is not very bright, especially when working outside. Sunny Weather boosts the brightness further, but also makes colours look unnatural so I tend to avoid it (+2 in manual mode is enough).
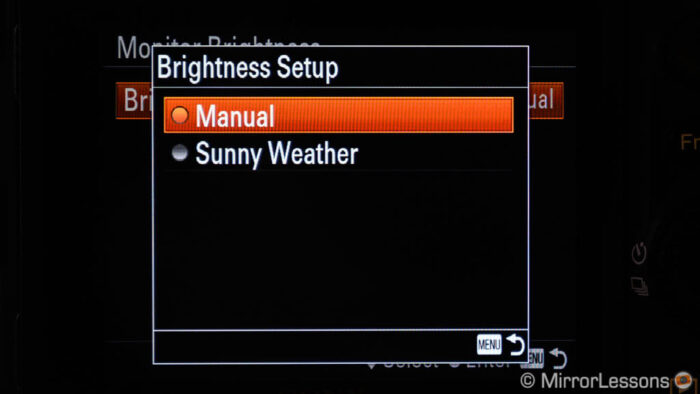
To adjust the LCD screen brightness:
- Go to Setup Menu 1 (page 1/7)
- Select Monitor Brightness
- Choose Manual or Sunny Weather
- If you’ve chosen Manual, adjust the brightness ±2 levels
- Press OK to confirm.
On older Sony cameras (A7 mark I and mark II series), Sunny Weather is disabled when recording 4K or 1080/120p video.
Sony A7 III/A7R III LCD Screen Protector
I have a screen protector on my A7 III and A7R III. They are inexpensive, don’t interfere with touch operation and give an extra layer of protection to the rear monitor of your camera. Check out our dedicated accessory article to find out more.
How To Turn the A7 III, A7R III, A9 Screen Off
There are two ways to disable the rear screen of your A7 camera.
Method 1
Not valid for A7 I and II series.
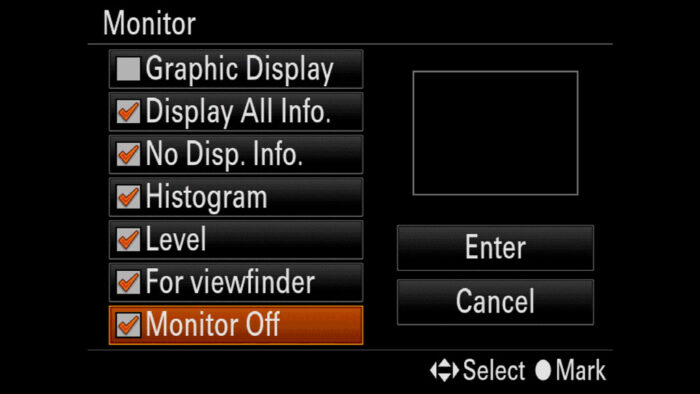
The first solution to turn your Sony A7 III display off is to use the DISP button.
- Go to Camera Settings 2 / Display Auto Review 1 (page 6/9)
- Go to DISP Button
- Choose Monitor
- Check the Monitor Off option
- Highlight Enter and press the OK button to confirm
- Exit the Menu
- press the DISP button until the screen goes completely black
Method 2
The second solution is similar to the one we described for the viewfinder.
- Go to Camera Settings 2 / Display Auto Review 1 (page 6/9)
- Scroll down to Finder / Monitor and press OK
- Select Viewfinder (Manual). The rear LCD screen is now disabled.
Note: with both methods, TouchPad on the screen remains active if this option is enabled. You can find out more about the touch screen capabilities further down.
Sony A7 III, A7R III, A9 Display Quality Setting (LCD & EVF)
One setting shared by all the cameras is found in Menu Setup 2 and is called Display Quality. You can choose between Normal and High.
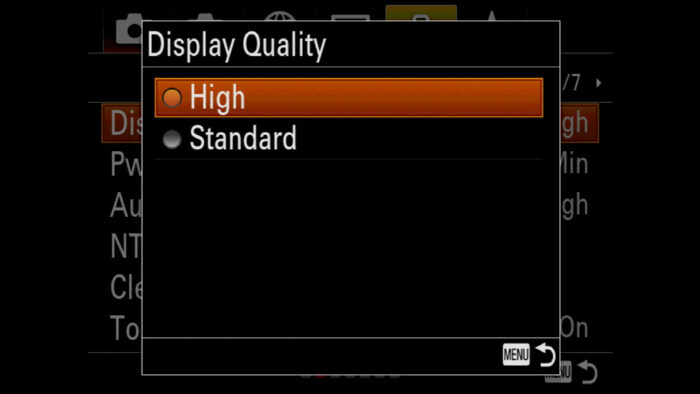
With High, the quality of the LCD and EVF increases because the resolution increases. In other words, the EVF and LCD use the full resolution available whereas with Normal, it drops to preserve more battery life.
It is useful to set Display Quality to High when manually focusing, or working in a situation where there are a lot of details in your scene and you want to see them better. The difference is not immediately noticeable but small details are crisper and there is no aliasing.
Limitation: in video mode, the resolution of the EVF/LCD drops significantly and the Display Quality setting is not that effective.
Sony A7 III, A7R III, A9 Display Options (LCD & EVF)
Scrolling deep into the menu system, you will find other settings related to your camera’s displays.
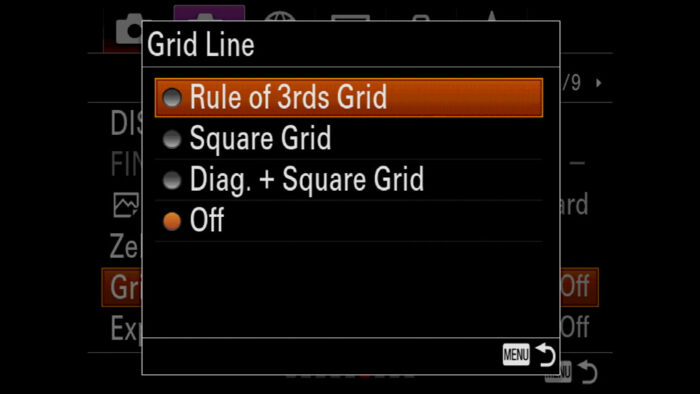
Grid Line
Camera Settings 2 / Display Auto Review 1 (page 6/9)
You can activate a series of thin grey lines in the live view to help you with the composition. There are three options:
- Rule of 3rds Grid: the screen is divided into 9 blocks to represent the classic rule of third composition in photography
- Square Grid: a 6×4 block grid
- Diag + Square Grid: a 4×4 block grid with two diagonal lines that go from one corner to the other
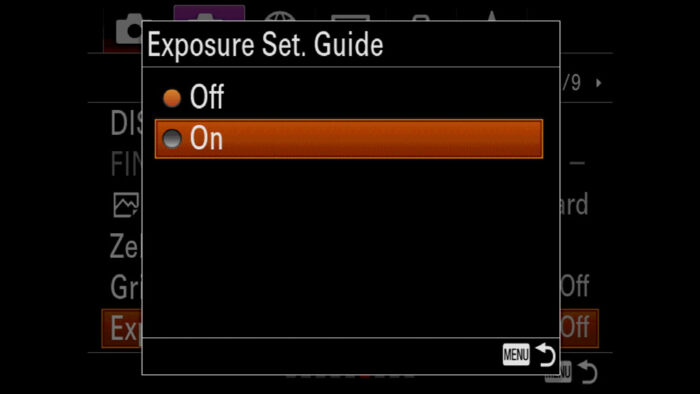
Exposure Set. Guide
Camera Settings 2 / Display Auto Review 1 (page 6/9)
It displays a graphic guide when changing shutter speed or aperture rather than just showing the number changing. I personally find it distracting and a bit slow, so I keep it off. It can be useful for beginners to understand these values better when learning basic exposure.
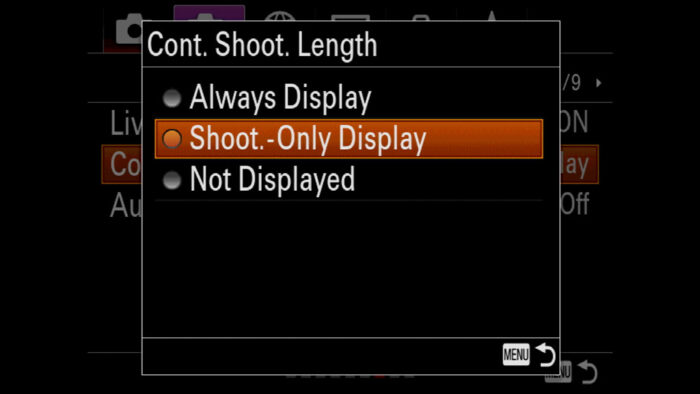
Cont. Shoot. Length
Camera Settings 2 / Display Auto Review 2 (page 7/9)
Not available on A7 mark I and mark II series.
When shooting in continuous mode, the camera can display an indicator (vertical bar) on the left to show you how much buffer memory is left. When the bar is almost empty, the word SLOW will appear and the continuous shooting speed will decrease. There are two options:
- Always Display: the bar is always displayed when you are in continuous shooting mode
- Shoot.-Only Display.: the bar appears only when starting to take pictures (this is the one I use)
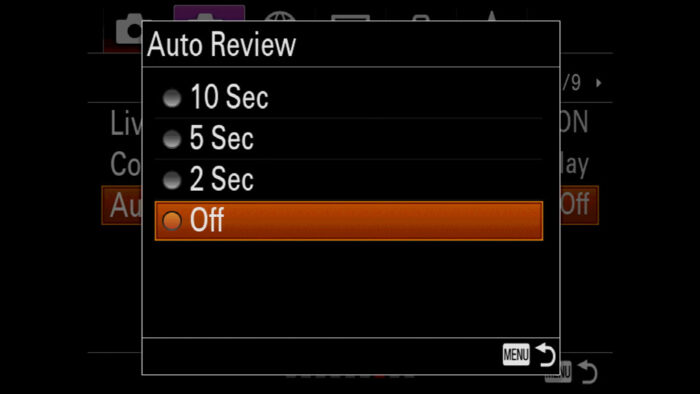
Auto Review
Camera Settings 2 / Display Auto Review 2 (page 7/9)
I always turn this off because I prefer to go back to live view as soon as possible after taking a shot. If you prefer, you can have the image you just captured appear on the EVF or LCD for a set duration (2s to 10s).
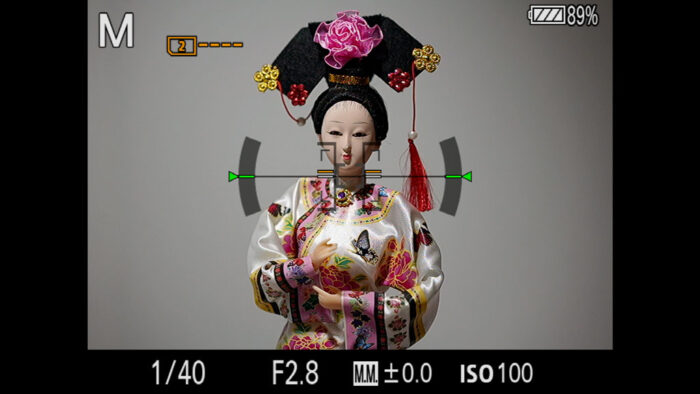
Autofocus areas
Camera Settings 1 / AF3 and AF4 (page 8 and /14)
Not available on A7 mark I series.
You can enable or disable the focus areas that appear when the camera is focusing in continuous AF mode (Disp. cont. AF area), as well as see the zone covered by phase detection points (Phase Detect. Area).
Gamma Disp. Assist
Menu Setup 1 (page 1/7)
Not available on A7 mark I series, A7 II and A7R II.
When recording video with a S-Log or HLG profile, enabling the Gamma Disp. Assist makes the image preview on the LCD or EVF appear with natural contrast and colours, as opposed to the flat and desaturated look of an S-Log gamma curve.
You can find out more about video settings and S-Log in our dedicated article (coming soon).
Sony A7 III, A7R III, A9 Manual Focus Assist
The A7 III has a few focus assist modes to help you focus manually. You will find them in Camera Settings 1 / Focus Assist (page 13/14).
Sony A7 III, A7R III, A9 Focus Assist: Focus Magnifier
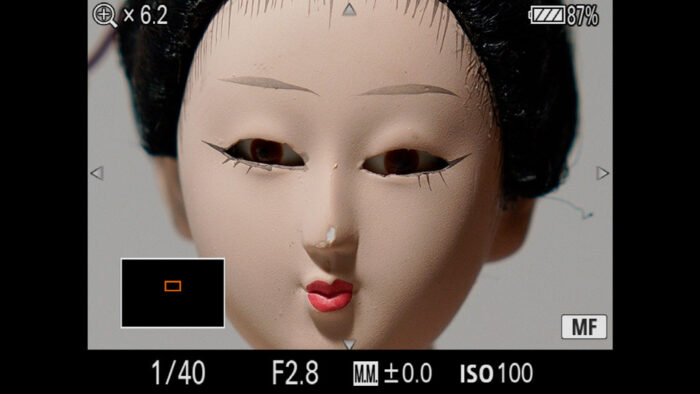
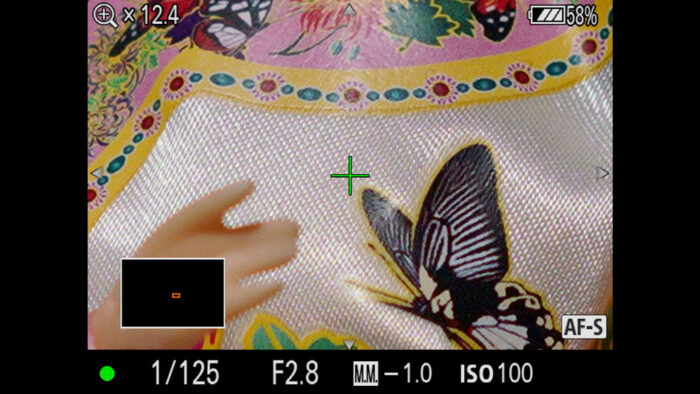
The first MF assist on the A7 III & co. is called Focus Magnifier and it is the one I use the most. You can assign it to a function button and it allows you to zoom in on your scene to see if the details are sharp.
To configure it:
- Go to Camera Settings 2 / Custom Operation 1 (page 8/9)
- Select the first Custom Key entry (with the image icon)
- Choose one of the buttons available (mine is set to the Centre Button)
- Navigate to Focus Assist (page 12/23) and choose Focus Magnifier
- Press OK and exit the Menu
- Set the camera to Manual Focus
- Press the button you’ve customised to activate magnification, press it a second time to zoom in more.
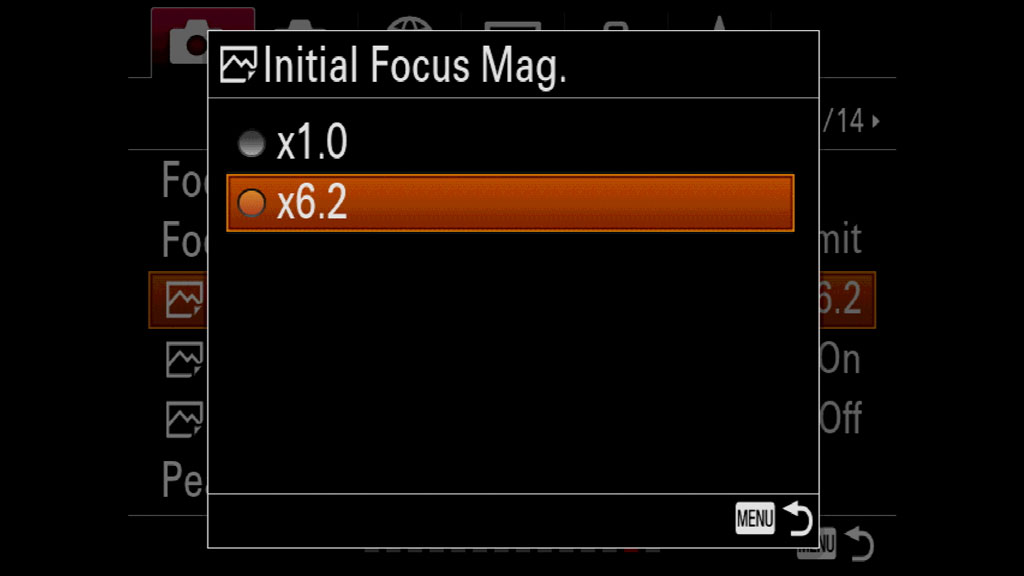
You can configure how long the magnification remains active (2s, 5s or No Limit), as well as set which magnification starts first when you press the button (1x or 6.2x). You’ll find these options in Camera Settings 1 / Focus Assist (page 13/14). Look for Focus Magnif. Time and Initial Focus Mag.*
*Initial Focus Mag. is not available on the A7 mark I and mark II series.

I found that Focus Magnifier is the best way to check focus accuracy on the A7 cameras. Unfortunately in video mode, the resolution of the live view decreases a lot so details are not as sharp as when working in still mode. Often I fine tune my focus point in still mode and then switch to movie mode.
Focus Magnifier in AF-S
Not available on A7 mark I and II series.
The magnification assist also works in AF-S mode. Once magnified, you can half press the shutter button (or press the back focus button) to focus while you are in magnification mode. A green cross in the middle of the screen will confirm that focus is acquired.
Make sure that AF in Focus Mag. is turned On (Camera Settings 1 / Focus Assist (page 13/14).
Activate Focus Magnifier with the focus ring
With a lens that has electronic contacts, you can set the Focus Magnifier to activate automatically when turning the focus ring on your lens. To do that, turn MF Assist On in Camera Settings 1 / Focus Assist (page 13/14).
Activate Focus Magnifier with the touch screen
Not available on A7 mark I and II series.
If touch operation is turned On, you can double tap on the screen to activate magnification.
Sony A7 III, A7R III, A9 Focus Assist: Focus Peaking
The other MF assist available is Focus Peaking (peaking display) for your Sony A7 III and other A7 model.
You can choose three levels (High, Mid, Low) and three colours (Red, Yellow or White). You can configure these settings in Camera Settings 1 / Focus Assist (page 13/14) by entering Peaking Setting.
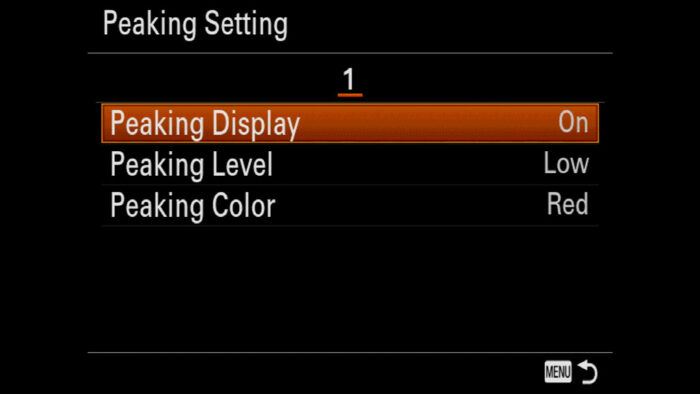
Low gives you fewer coloured outlines which makes it easier to focus more precisely. However in some situations (such as when the subject is not close enough), they might not appear at all unless you set it to Mid level. As for colours, it really depends on the colours of your scene. I generally go for yellow or red.
Peaking can be useful to perform a quick adjustment and set focus on the right area. For fine tune adjustments however, it can lack some precision, so I would always double check with the Focus Magnifier.
Tip if you’re shooting RAW
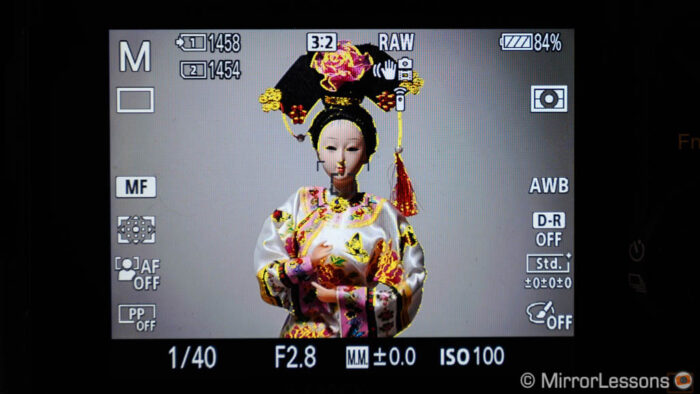
Peaking can be easier to use when the live view is in Black and White. Unfortunately there isn’t a setting to make the EVF or LCD monochrome. The workaround is to select the B&W Creative Style (Camera Settings 1, page 12/14) and turn On Setting Effect for the Live View Display (Camera Settings 2, page 7/9). This works if you’re shooting RAW files because they are not affected by the Creative Style settings. If you’re shooting JPGs, this is not ideal because you’ll end up with B&W images!
Sony A7 III, A7R III, A9 Touch Screen Settings
Not available on the A7 I and A7 II series.
The rear monitor of the A7 III, A7 IV and A9 series is touch sensitive. There isn’t a lot you can do with it unlike many of the competing cameras from other brands.
There is no touch shutter mode on the A7 III or other E-mount full frame cameras for example. This is curious because Sony implemented this functionality onto the old a5100 APS-C camera and also the recent a6400. Why they haven’t implemented touch shutter on all compatible models remains an enigma.
The touch operation is limited to the selection of a focus point. You can also double tap to enable magnification in recording or playback modes.
The touch screen settings are found in Menu Setup 2 and Setup 3 (page 2/7 and 3/7).
In Setup 2, you’ll find Touch Operation where you simply enable or disable touch sensitivity. If touch focus isn’t working on your A7 model, it is likely because the setting is disabled.
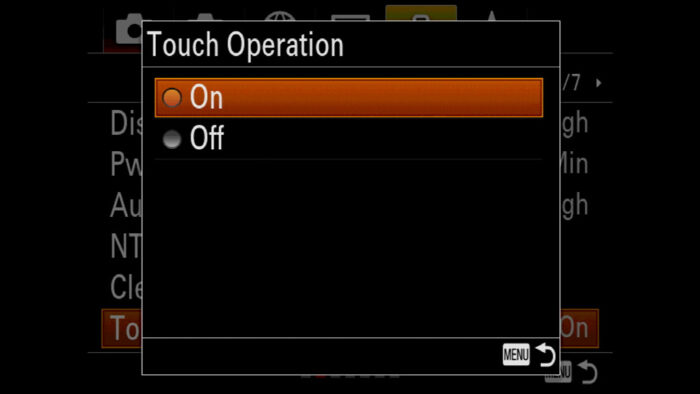
Tip: Touch Operation can be assigned to a custom button if you often need to turn touch sensitivity on or off. (I have it on the C4 button).
To know how to use the touch screen for autofocus, please read our Sony A7 autofocus guide.
Sony A7 III, A7R III, A9 External Monitor Settings
The last chapter of this article explains how to connect the A7 III and other A7 cameras to an external monitor or external recorder.
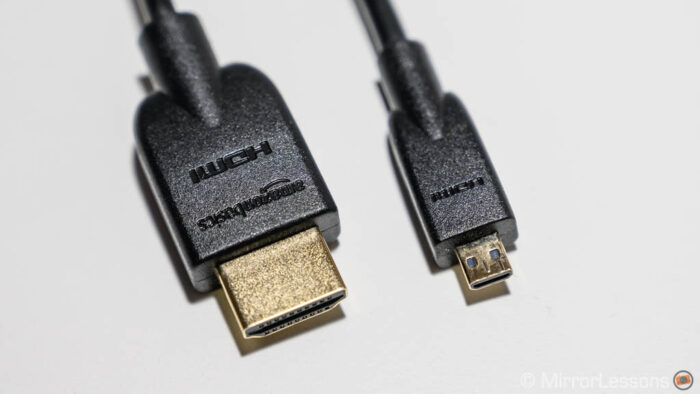
First, you need an HDMI cable. All the A7/A9 cameras have a Micro Type D port, so you’ll likely need a Micro D to full size HDMI lead (but check the input of you monitor to be sure).
In Menu Setup 3 and Setup 4 you’ll find the HDMI settings where you can control things such as resolution output, TimeCode and other things.
Typically, there are two scenarios where you want an external monitor setup for your A7 camera.
Sony A7 III, A7R III, A9 External Recording and Monitoring
If you’re connecting your A7 III to an external recorder, or want to monitor your composition without distractions, make sure that the camera doesn’t embed the setting information you see on the LCD screen, but rather gives you a clean video output.
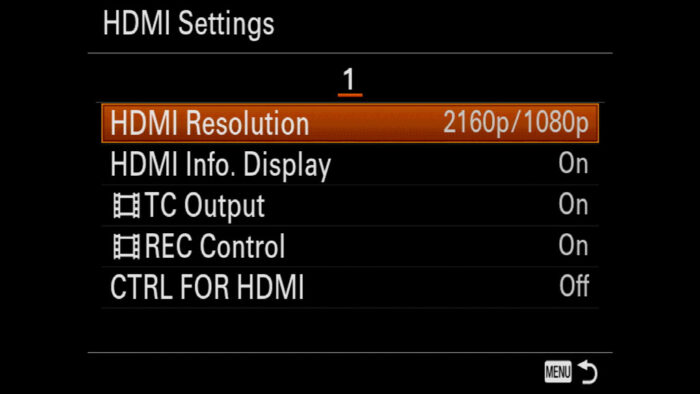
- Go to Menu Setup 3 (page 3/7)
- Scroll down to HDMI Settings
- In HDMI Resolution, choose the output that you want or that the recorder supports
- Turn Off the HDMI Info. Display. This ensures that your signal is clean without overlaying information
- If the camera is connected to a Sony Bravia TV, you can control your A7 with the TV remote. To do that, turn On CTRL FOR HDMI.
For an external recorder, there are additional settings (excluding the A7 I series):
- Turn the TC Output (TimeCode) On or Off depending on your needs. This is a bit advanced if you’re just starting out, so if in doubt leave it off.
- If you want to control the external recorder from the camera (Start/Stop the recording), turn On REC Control. Note that TC Output also needs to be On for this to work.
Then, connect your A7/A9 camera to the external monitor/recorder and turn the monitor/recorder on.
The rear LCD of the camera should remain active, and you should see the clean video feed on the external recorder connected to your A7 III. From there, you need to set up the recording on the external device. Refer to the manual of the specific model you are using.
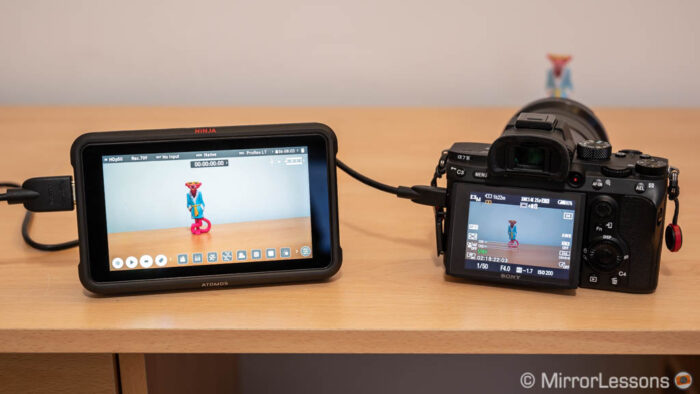
Note: when your Sony A7 III is connected to the external recorder, the LCD screen of the camera can go black when triggering the recording from the camera.
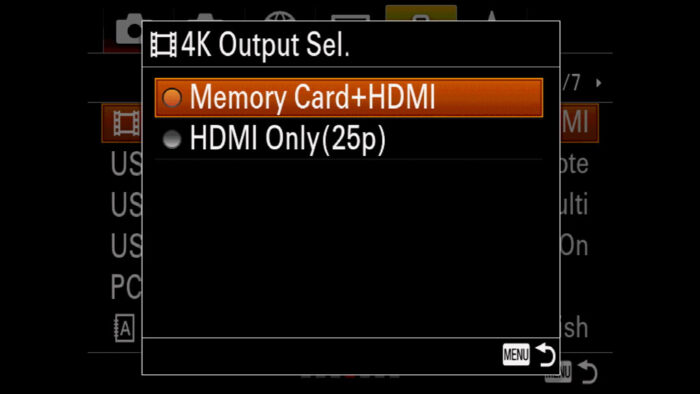
In Setup page 4, you’ll find the 4K Output Sel. setting with two options:
- Memory Card + HDMI: record 4K on the SD card while sending a 4K signal via HDMI at the same time, which means you can record on both camera and recorder.
- HDMI Only (24p, 25p or 30p): 4K is available via the HDMI output only. The frame rate is 24 or 30p (NTSC), or 25p (PAL). You cannot record 4K video internally on the SD card.
To know more about video on A7 and A9 cameras, check out our dedicated article below.
Monitoring composition and settings on the external monitor
If you want to replicate the exact view you get on the rear LCD of your camera, including all the information on the screen, turn On the HDMI Info. Display. The rear LCD of your camera will turn off and you can work with the external monitor instead.
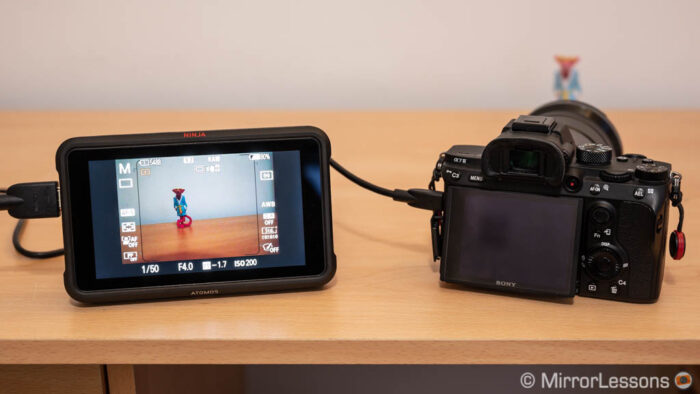
Note: if you have set up 4K recording in the camera, the info won’t be displayed on the external monitor. You need to select XAVC S HD or AVCHD for this to work.
Reminder: the links below are affiliate links. If you decided to buy something after clicking the link, we will receive a small commission.
Reminder: the links below are affiliate links. If you decided to buy something after clicking the link, we will receive a small commission.
Check price of the Sony A7 III on:
Amazon | Amazon UK | B&H Photo | eBay
Check the price of the Sony A7R III on:
Amazon | Amazon UK | B&H Photo | eBay
Check price of the Sony A7R IV on
Amazon | Amazon UK | B&H Photo | eBay
Check price of the Sony A9 on
Amazon | Amazon UK | B&H Photo | eBay
Check price of the Sony A7 II on:
Amazon | Amazon UK | B&H Photo | eBay
Check price of the Sony A7R II on:
Amazon | Amazon UK | B&H Photo | eBay
Second-hand Sony gear on
MPB US | MPB UK
Sony Alpha Mirrorless Cameras Resources on Mirrorless Comparison
Below you will find lots of content related to the A7 III, A7R III and other Sony full frame mirrorless cameras.
Real World Comparisons
- Sony A7 III vs A7R III
- Sony A7R III vs A7R IV
- Sony A7R II vs A7R III
- Sony A7R III vs A9
- Sony A7 III vs Nikon Z6
- Sony A7R III vs Nikon Z7
- Sony A7R III vs Fujifilm GFX 50s
- Sony A7R III vs Panasonic S1R
- Sony A7 III vs Canon EOS R
- Sony A7 III vs Fujifilm X-T3
- Sony A7 II vs Canon EOS RP
Sample Photos
- Sony A7 III sample images
- Sony A7R III sample images
- Sony A7R IV sample images
- Sony A7 II sample images
- Sony A7R II sample images
- Sony A7S sample images