It seems like just yesterday that Sony introduced its full-frame mirrorless system which began with the A7 and A7R. More than five years later, we’ve arrived at the fourth generation of a series that has grown significantly in terms of popularity and performance.
The “R” segment used to place image quality and high resolution at the top of the priority chain, but the introduction of the A7R II changed that. On this model, not only was image quality of the highest priority but so was speed.
The A7R IV follows the same trend, ramping up the specifications up to levels never seen before. At the heart of the camera is a 61 megapixel sensor, a world’s first for a 35mm system.
Naturally, the question we always end up asking ourselves is: how does the new camera compare to its predecessor and do the improvements merit investing in the new model? We’re here to find that out.
Ethics statement: We own the A7R III and rented the A7R IV for a week. We were not asked to write anything about these products, nor were we provided any other compensation of any kind. Within the article, there are affiliate links. If you buy something after clicking one of these links, we will receive a small commission. To know more about our ethics, you can visit our full disclosure page. Thank you!
Table of Contents:
1. Main Specs
2. Design and Ease of Use
3. Viewfinder and Rear Monitor
4. Image Quality
5. Pixel Shift Multi Shooting
6. Autofocus
7. Shutter, Continuous Shooting and Buffer
8. Image Stabilisation
9. Video
10. Flash and Extra Features
11. Battery Life
12. Price
13. Conclusion
14. Additional Images and Links
Main Specs
- A7R III
- Sensor: 42.4MP 35mm format BSI Exmor R CMOS
- Lens system: E-mount
- Weatherproof: Yes
- Internal Stabilisation: Yes (5-axis)
- Autofocus: Hybrid with 399 phase and 425 contrast detection points
- Continuous shooting: 3fps to 10fps with AE/AF Tracking
- ISO Sensitivity: 100 – 32000 ISO (pull 50, push 51200 to 102400)
- Shutter Speeds: 1/8000 to 30s, Bulb
- Viewfinder: 0.5in OLED with 3,686k dots, 23mm eye point, 0.78x magnification and 120fps refresh rate
- Rear monitor: Tilting 3″ LCD (1.44M dots) with touch sensitivity
- Movie recording: 4K up to 30fps, Full HD up to 120fps, S-Log and HLG gamma
- Built-in Flash: No
- Extra Features: WiFi, Bluetooth, Bracketing, Pixel Shift Multi Shooting, Intervalometer, Tethering, Dual SD slots
- Dimensions: 126.9 x 95.6 x 73.7mm
- Weight: 657g (including battery and memory card)
- Firmware version: 3.01
- A7R IV
- Sensor: 61.0MP 35mm format BSI Exmor R CMOS
- Lens system: E-mount
- Weatherproof: Yes
- Internal Stabilisation: Yes (5-axis)
- Autofocus: Hybrid with 567 phase and 425 contrast detection points
- Continuous shooting: 3fps to 10fps with AE/AF Tracking
- ISO Sensitivity: 100 – 32000 ISO (pull 50, push up to 102400)
- Shutter Speeds: 1/8000 to 30s, Bulb
- Viewfinder: 0.5in OLED with 5,760k dots, 23mm eye point, 0.78x magnification and 120fps refresh rate
- Rear monitor: Tilting 3″ LCD (1.44M dots) with touch sensitivity
- Movie recording: 4K up to 30fps, Full HD up to 120fps, S-Log and HLG gamma
- Built-in Flash: No
- Extra Features: WiFi, Bluetooth, Bracketing, Pixel Shift Multi Shooting, Intervalometer, Wifi Tethering, Dual SD slots
- Dimensions: 128.9 x 96.4 x 77.5mm
- Weight: 665g (including battery and memory card)
- Firmware version: 1.00
Design and ease of use
The A7R mark IV is slightly larger, taller and heavier than the A7R mark III but when holding the two bodies at the same time, I didn’t notice a substantial difference.
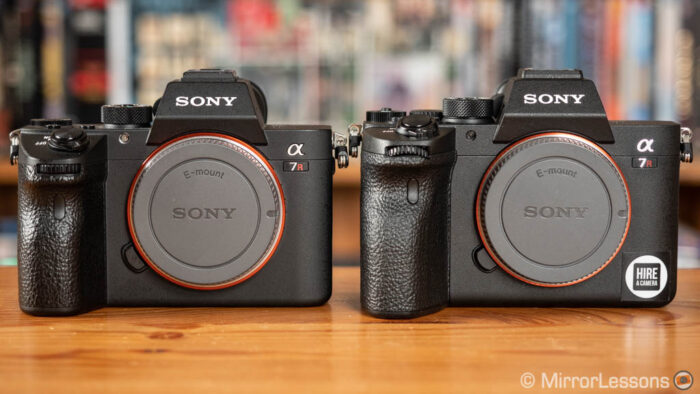
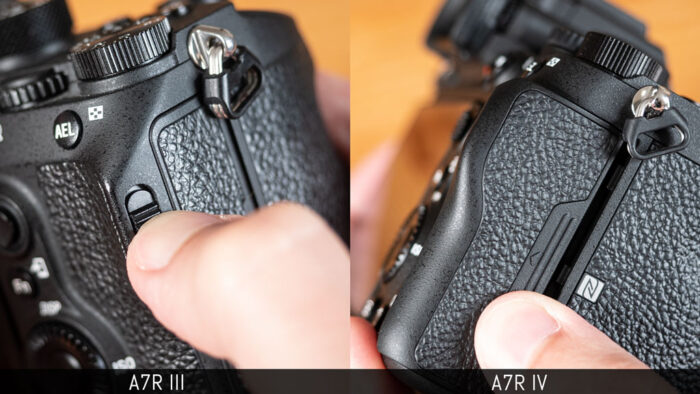
What you will notice straight away is the larger grip on the mark IV model, and this is a welcome improvement. It is taller, longer and allows your fingers to rest more comfortably. The indentation is deeper and reinforces the grip.
You’ll notice the difference as soon as you hold the camera, and especially when using heavy lenses. For example when swapping the Sigma 35mm 1.2 Art between the two cameras, I found that the A7R IV was much more comfortable to hold right from the start.
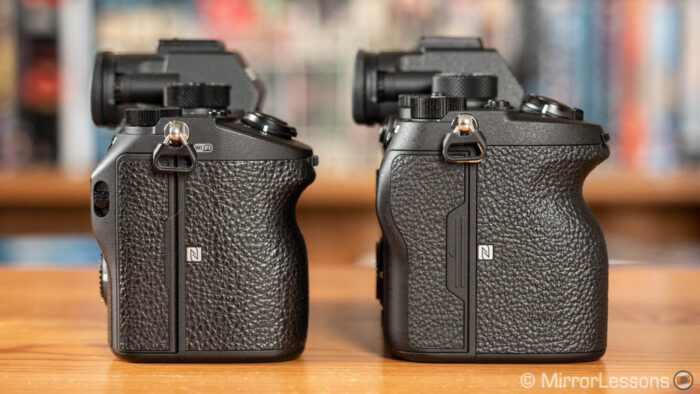
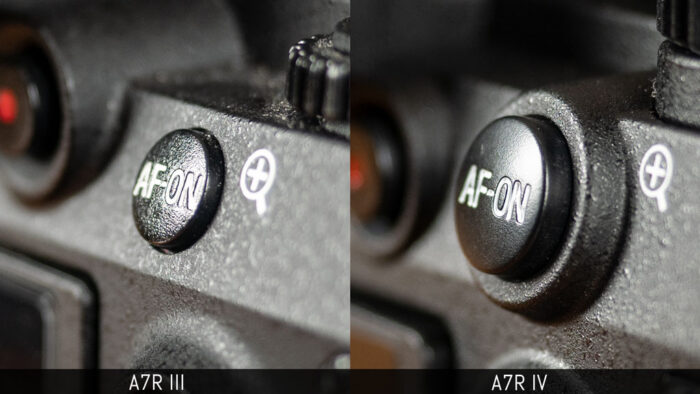
Other changes have been made to the button layout. All the buttons are thicker on the A7R IV with more depth which improves the tactile feedback. The AF-ON button is larger too.
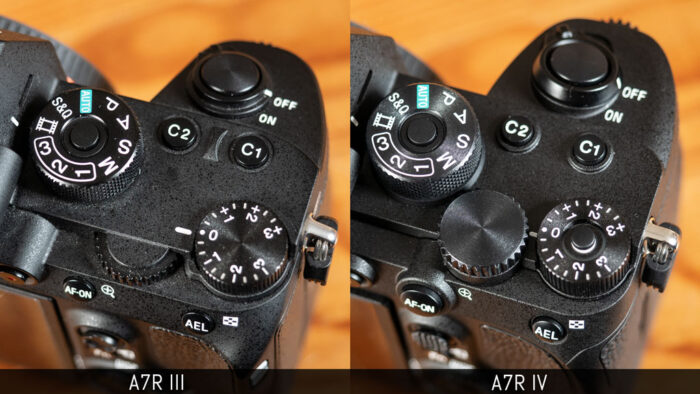
Both front and rear dials are easier to turn on the new camera and feel a bit more precise in use. The front dial is now angled upward, whereas the rear dial sticks out on top which means there is more surface to grab onto. The exposure compensation dial can be locked to avoid unwanted changes.
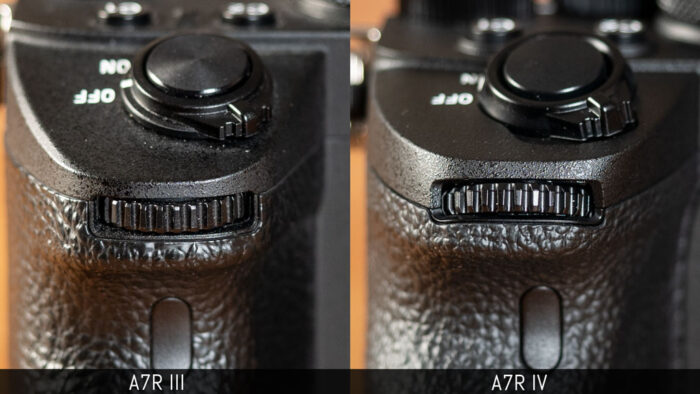
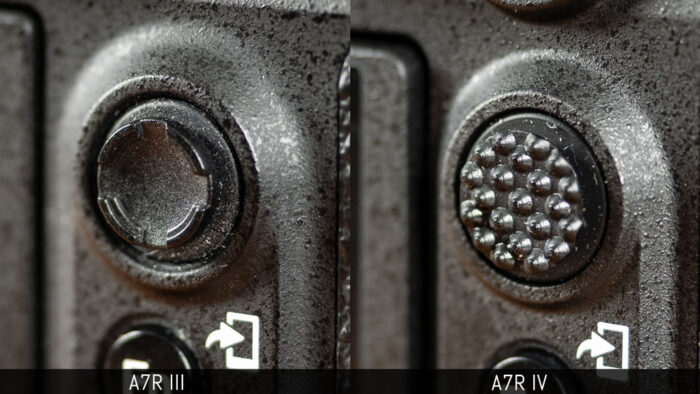
On the rear, the command wheel is a bit thicker as well and moves a little less freely. The Multi-Selector (AF Joystick) has a new texture and is no longer concave which makes it more pleasant to the touch. The reactivity and speed remain the same however.
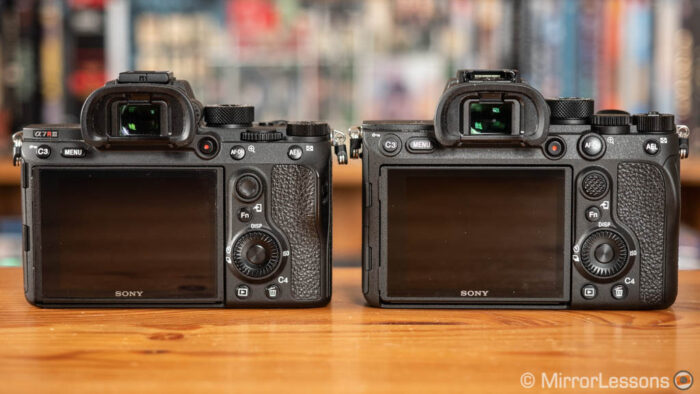
Concerning customisation, each camera has 12 custom buttons and a long list of options you can assign to each one of them. They can be configured separately for stills and video.
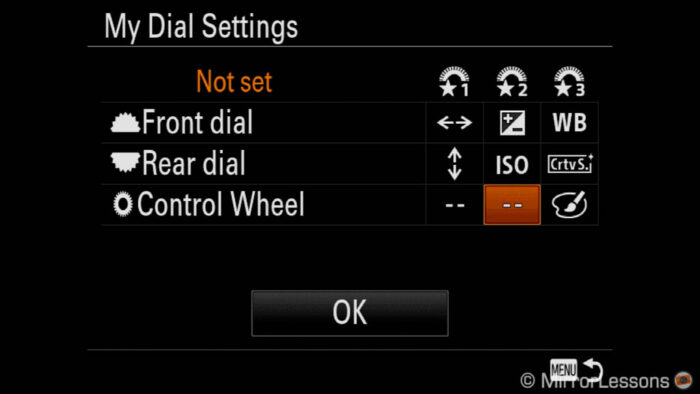
The A7R IV has a new My Dial setting: you can add more functions to the front and rear dials and call them up instantly thanks to a custom button.
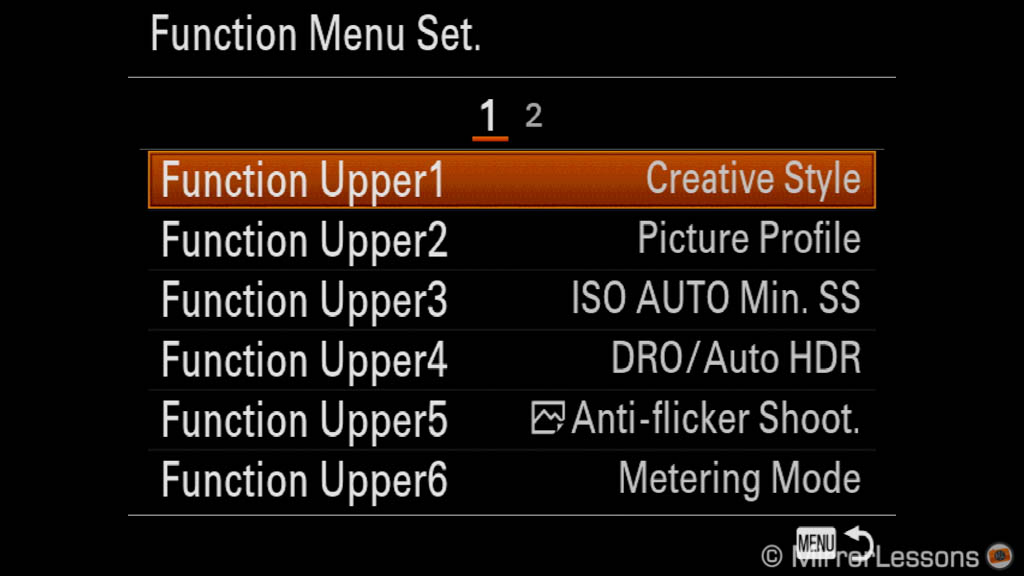
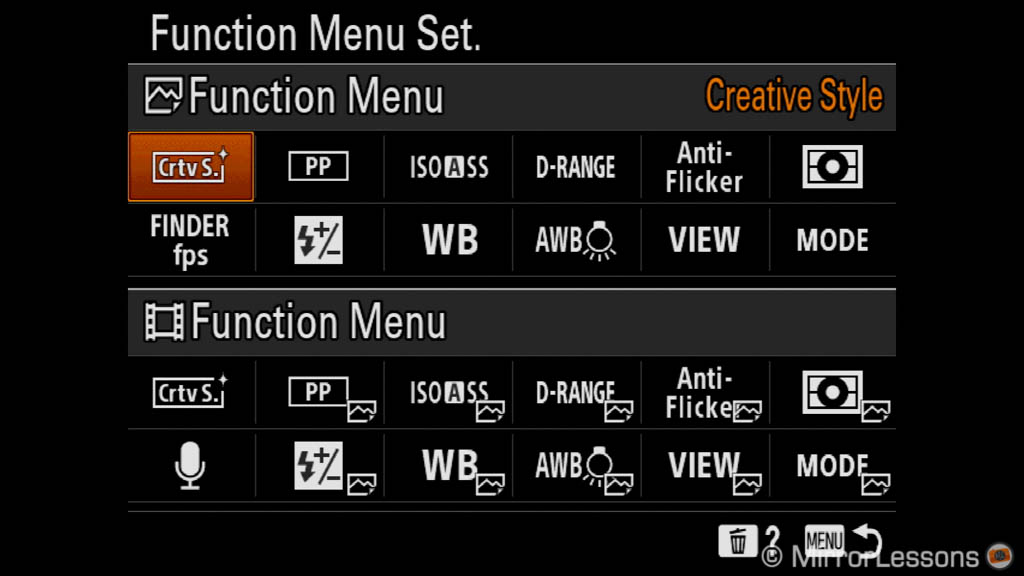
On the new camera you can customise the Fn menu differently for stills and video, as well as limit the number of focus areas that appear when changing the settings.
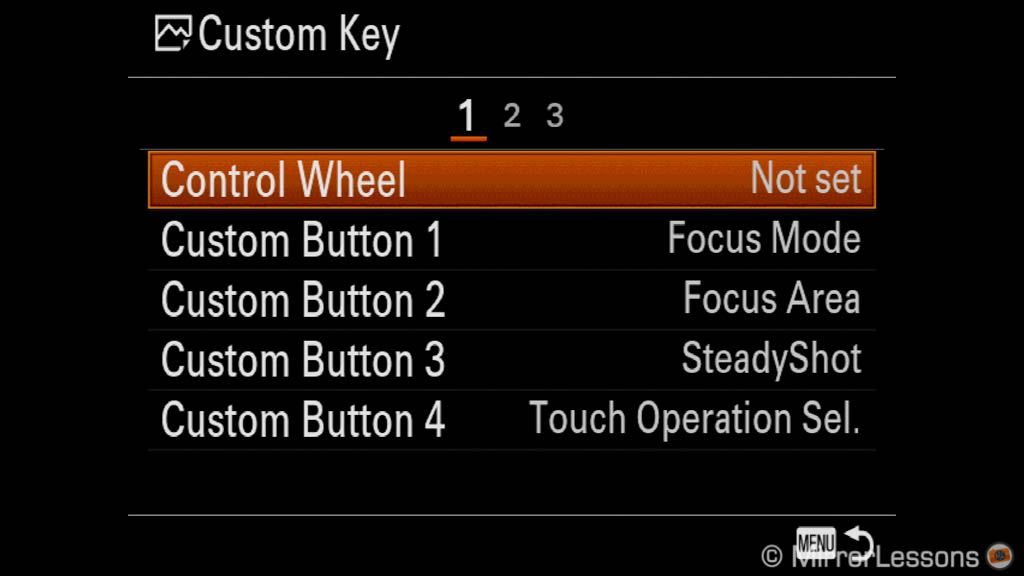
The main menu is more or less the same with a few graphic improvements. The text on the A7R IV has is narrower, and certain pages like the Custom Key settings have a visual aid to help you see which button you’re changing. Other sections have been simplified to make it possible to select a setting more quickly and a few items have been moved to improve the order (ex. ISO Auto Min. S.S. is now under the ISO setting).

The My menu page which allows you to save your favourite settings is present on both cameras and is so handy that I rarely go into the main menu anymore.
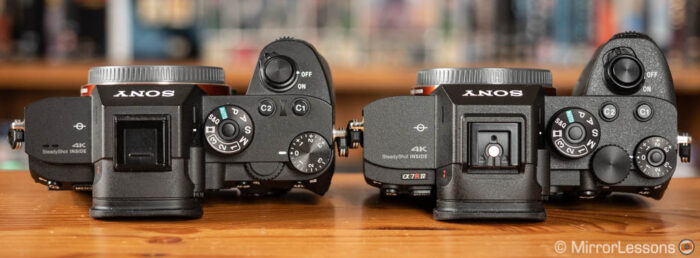
Both cameras are able to accept two SD cards. The difference is that the A7R III has one UHS-I and one UHS-II slot, whereas the A7R IV can work with two UHS-II cards.

Sony has re-designed the memory card cover as well: on the mark III you move a small switch to open it, whereas on the mark IV you simply slide it backwards.
Finally, the physical connections are the same. They include a:
- flash sync socket
- 3.5mm microphone input
- 3.5mm headphone output
- USB 3 Type C
- Micro HDMI
- Micro USB 2 / Multi terminal
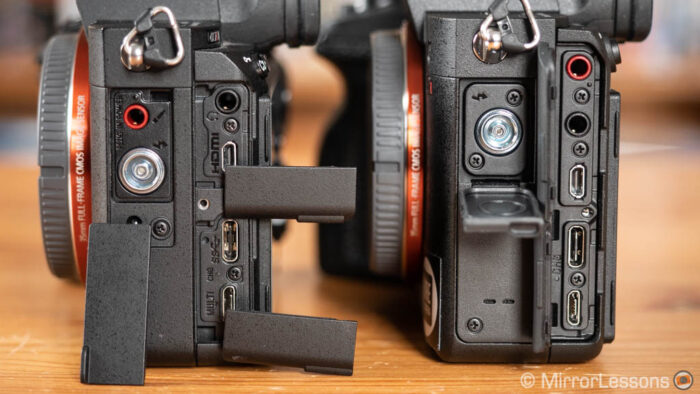
The mic input has been relocated above the headphone port on the mark IV model. Also note that the new camera uses the 3.2 Gen 1 version for the USB C which is twice as fast as the 3.1 Gen 1 version on the older camera (10Gbps vs 5Gbps).
Viewfinder and LCD monitor
The A7R III has an excellent viewfinder with 3.6 million dot, 0.78x magnification, a refresh rate that goes up to 120fps (100fps in PAL mode) and a good eye point of 23mm which means that it is comfortable enough to use when wearing glasses. It’s sharp, bright and easy to use when focusing manually.
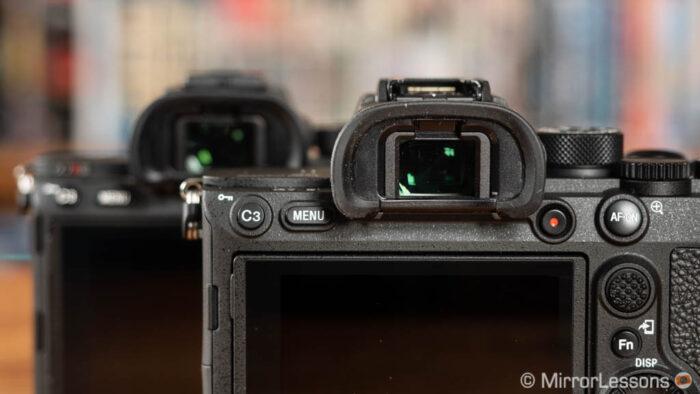
Of course technology improves year after year, and what I once considered one of the best viewfinders when it came out is now second to others, including that found on the A7R IV whose resolution is 5.7 million dots. This means an even sharper view which you’ll also notice when using focus magnification (for stills). The other specifications are the same.
The LCD monitor on the rear is no different however. It has a 1.44M dot panel, can be tilted up or down, and features touch sensitivity. Touch sensitivity is useful to move the focus point or start tracking a subject. It offers good precision and reactivity but there is not much else you can do.
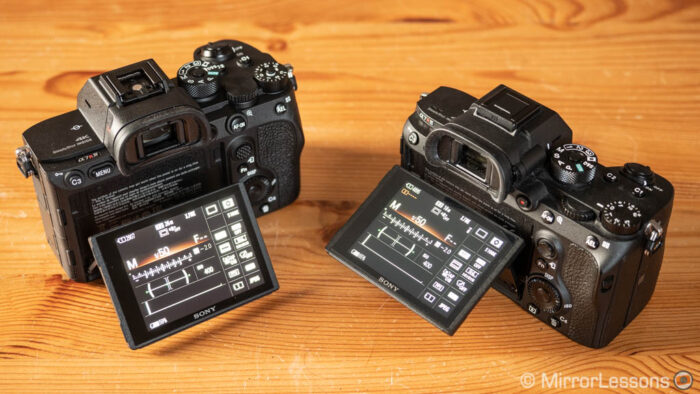
Sony seems a bit reluctant to add more touch capabilities to its cameras for the time being (as well as more resolution), while other brands have already moved forward. I’m sure we’ll get an upgrade eventually. Colour accuracy and default brightness aren’t the best either. When working outside, you can activate the Sunny Weather mode which will boost the brightness but colours become completely inaccurate.
One thing that hasn’t changed is the live view sharpness when working in movie mode. The resolution drops a lot and even focus magnification becomes useless. This is true for both the EVF and the LCD screen.
When focusing manually, I always revert to the manual shooting mode, fine tune my focus there and then go back to the movie mode. Before doing that, I make sure I’m in MF mode so that the camera won’t refocus when switching back to the movie mode. Lenses that have an AF/MF switch make the whole operation a bit more reliable.
Sony A7R III vs A7R IV – Image quality
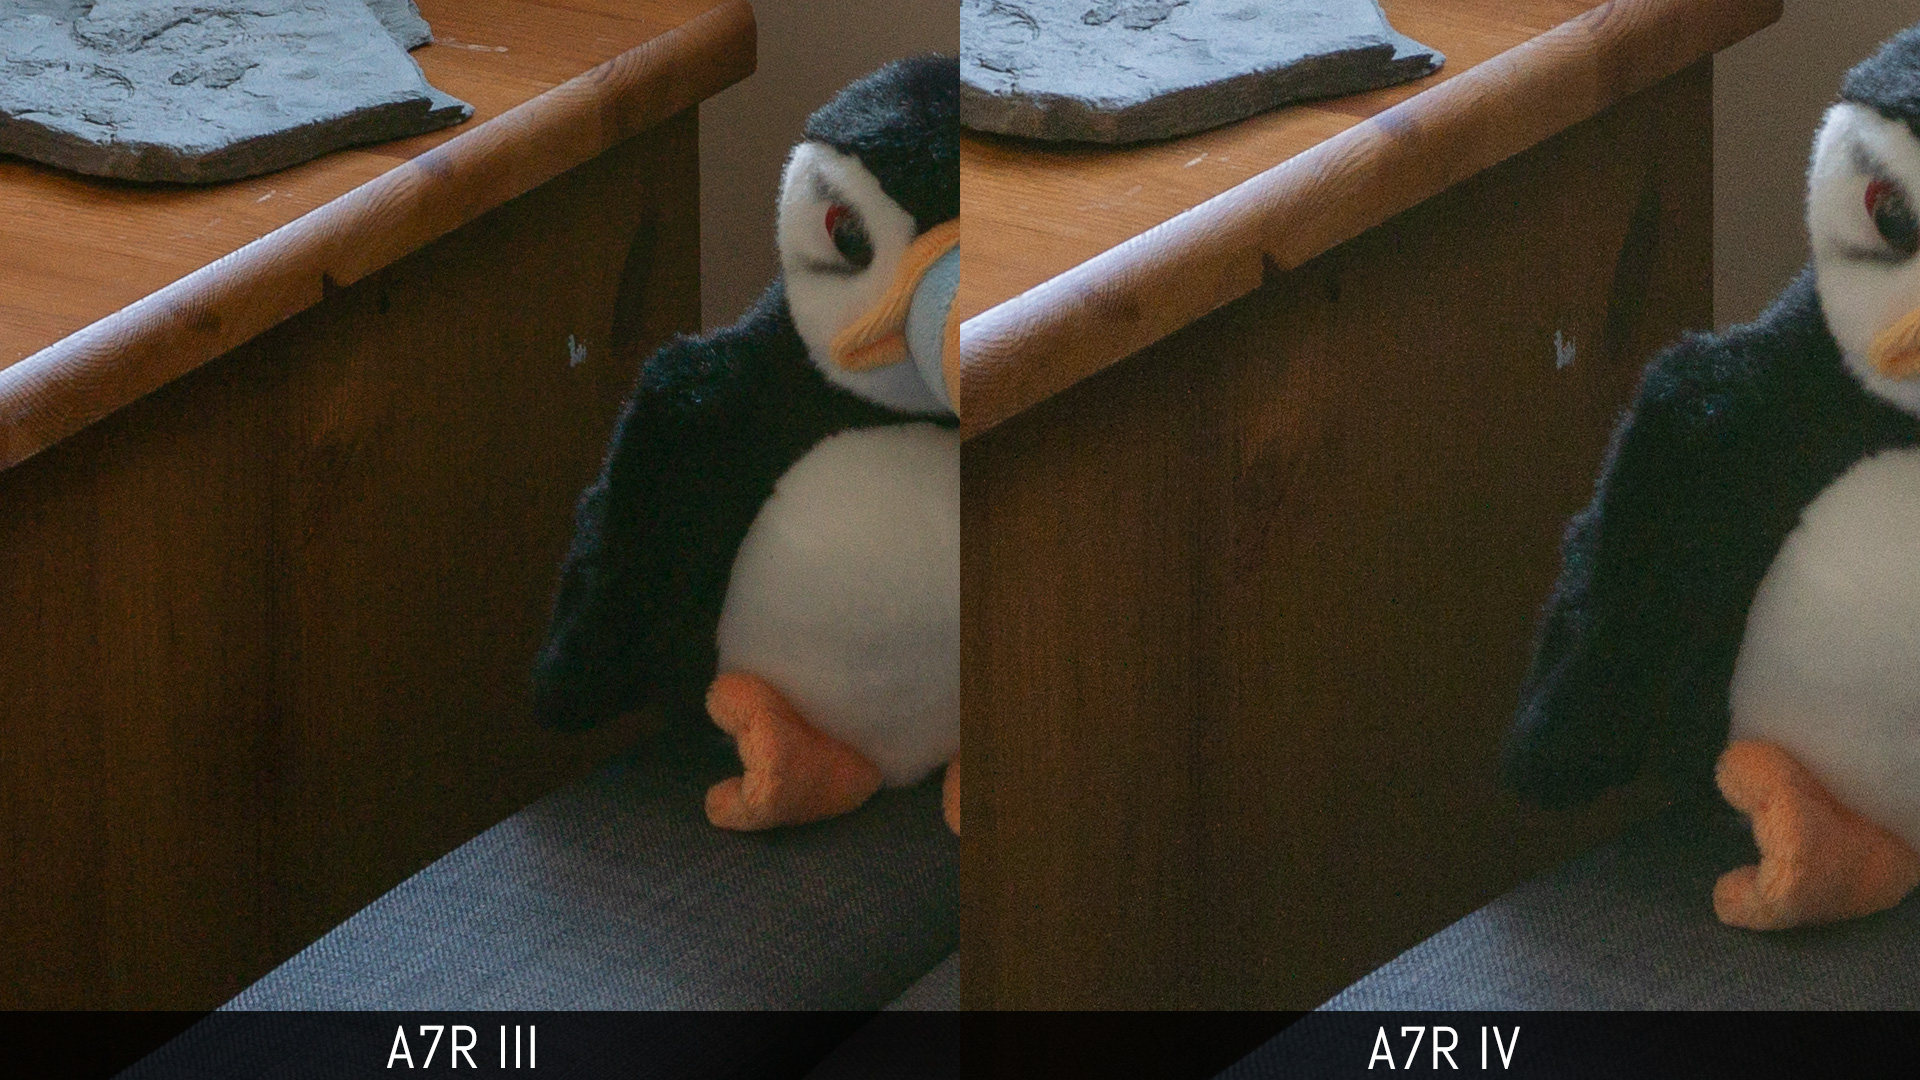
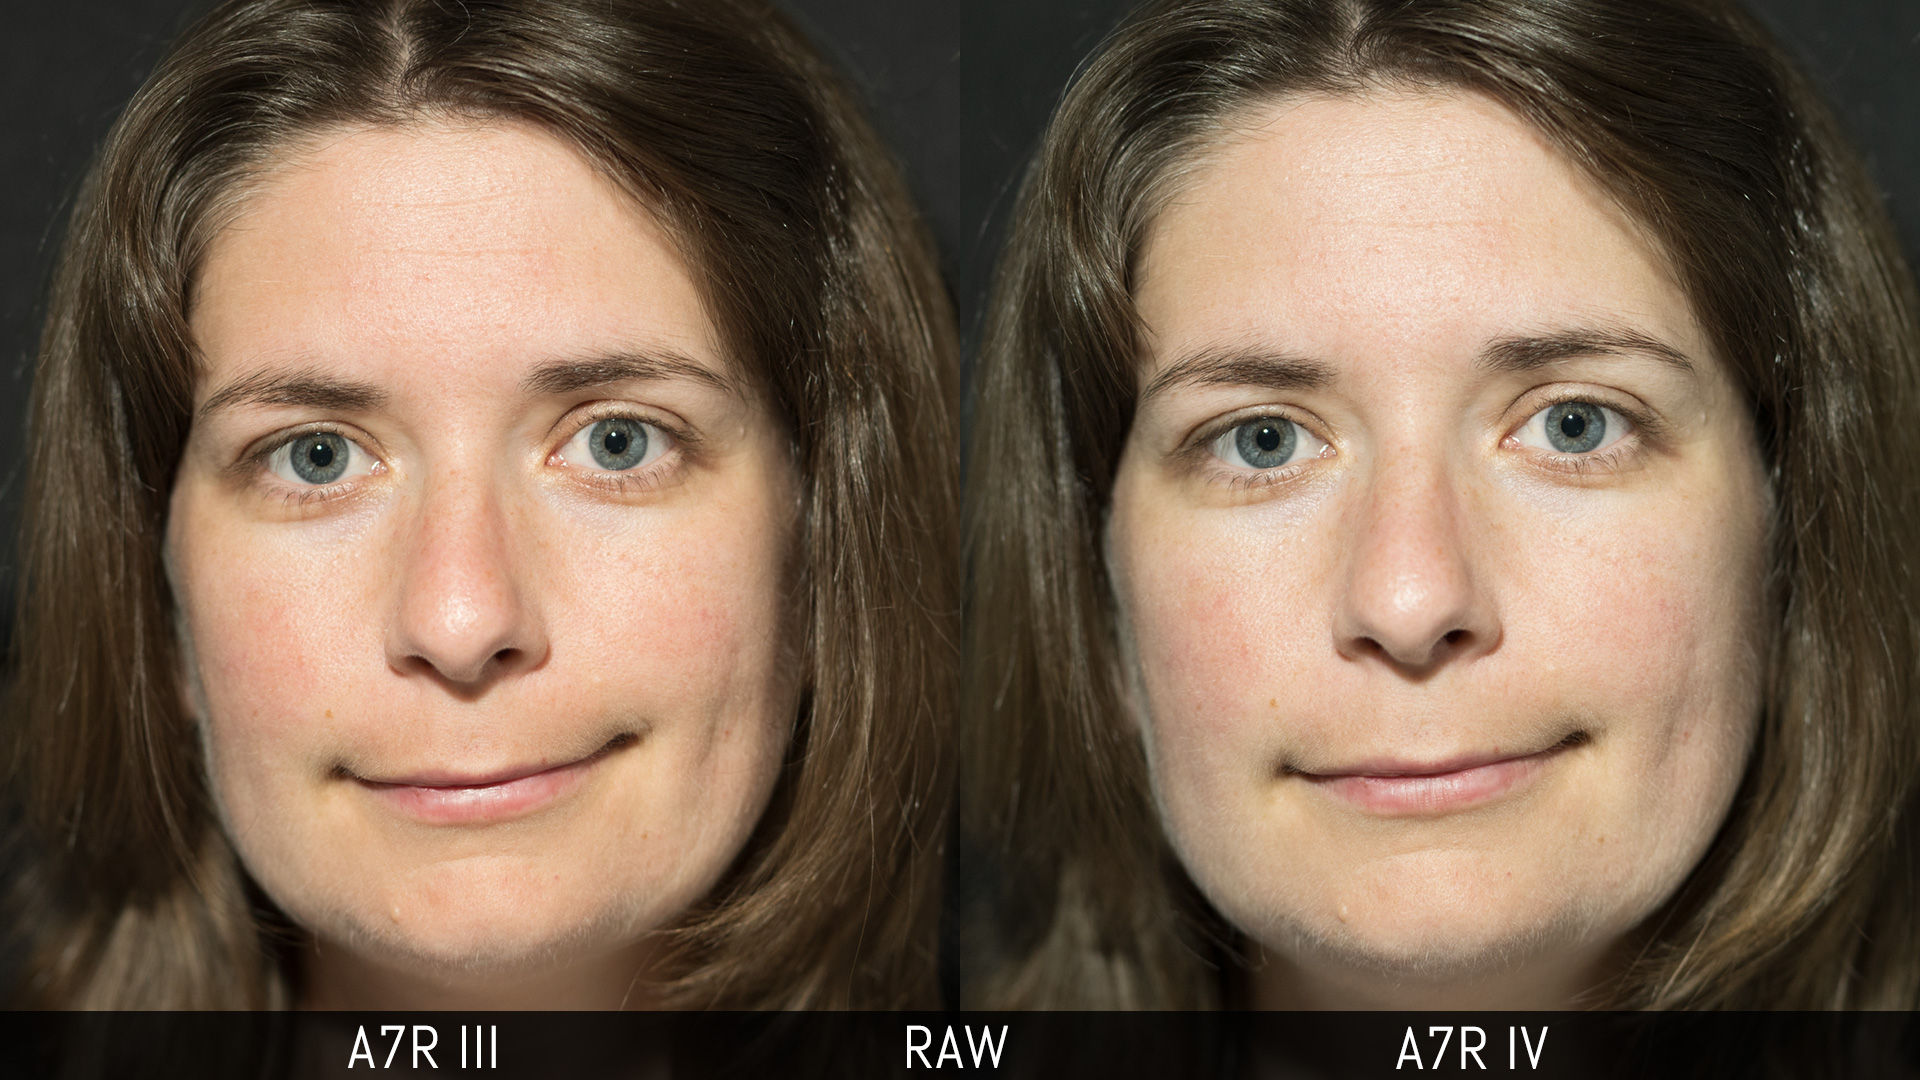
Both cameras feature a full frame (35mm format) sensor with a BSI design (Back-illuminated) and no anti-aliasing filter to maximise sharpness. The only difference is the resolution: 42.4MP for the A7R III and 61.0MP for the A7R IV.
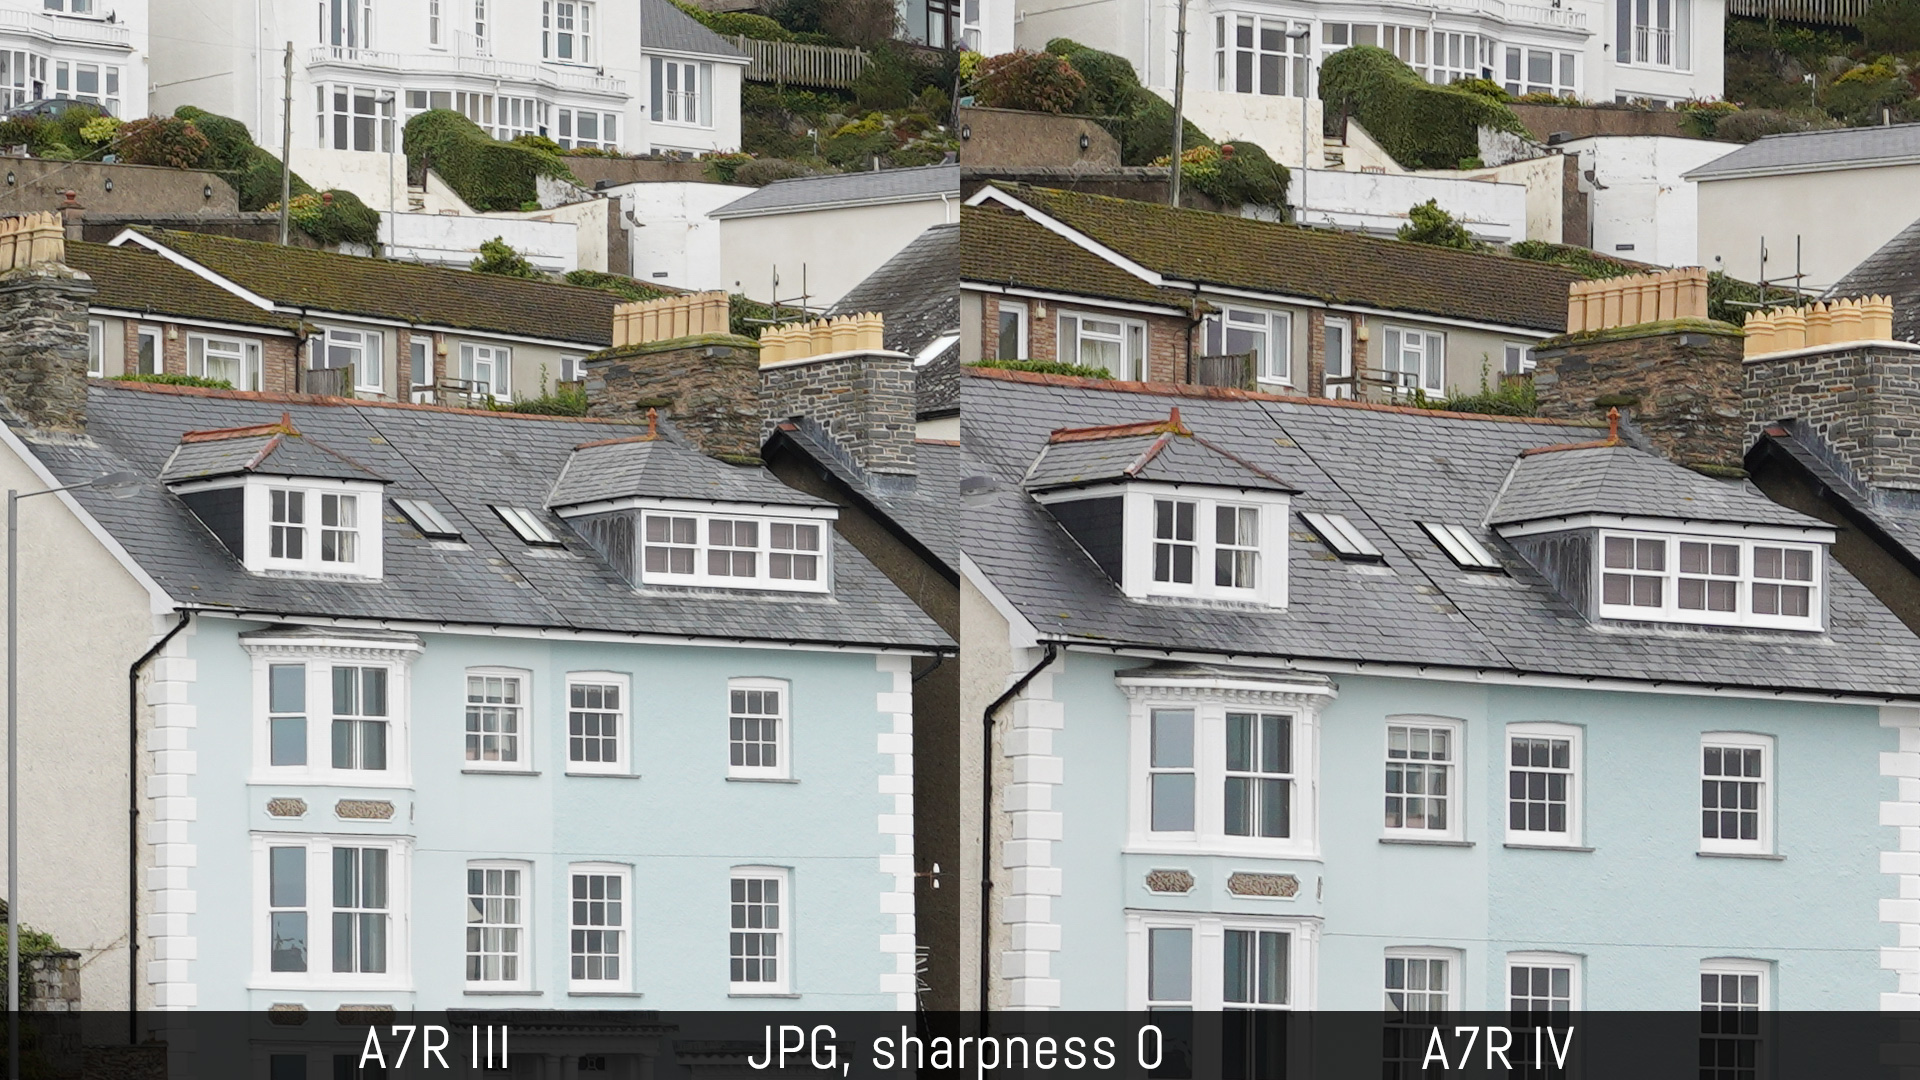
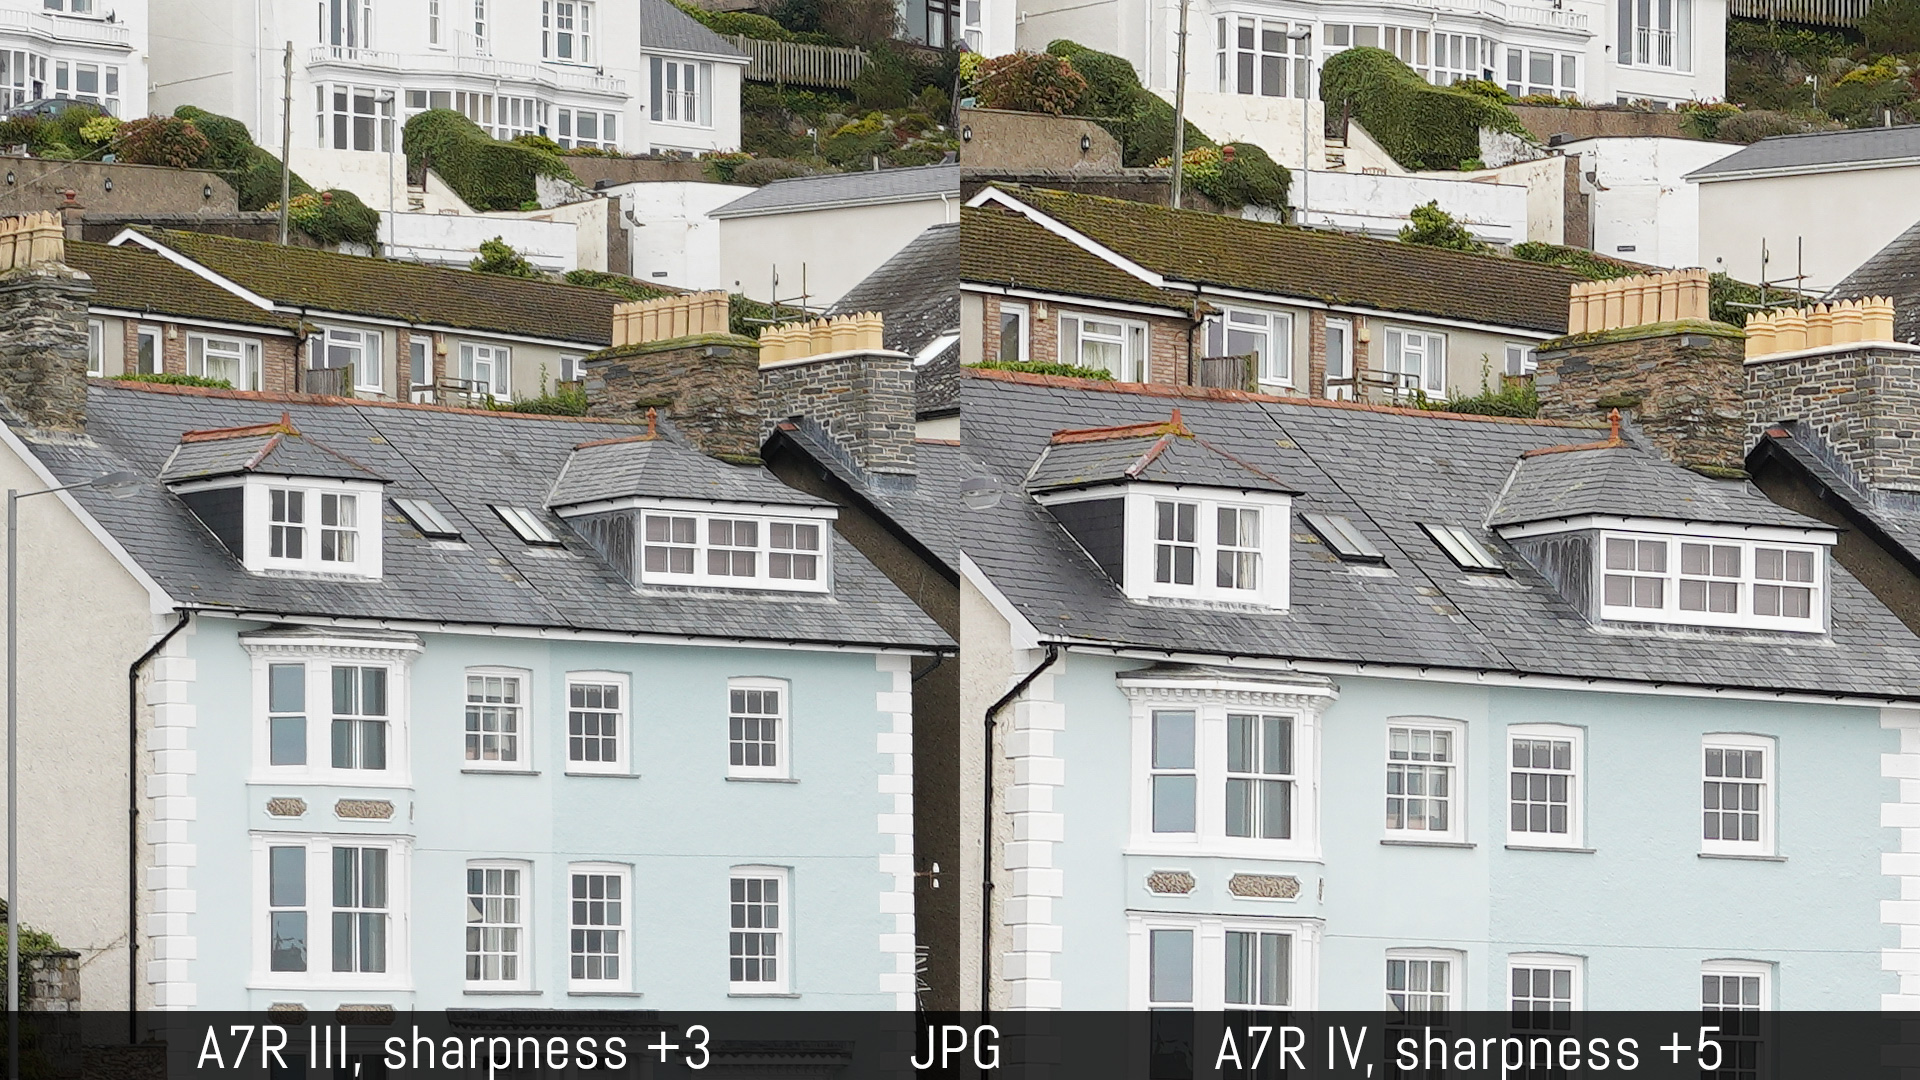
Sharpness
Obviously when comparing cameras with such a high megapixel count, the first thing everyone wants to know is how well the finest details can be rendered. Below you can see our first test. We used the Sigma 35mm 1.2 Art set at f/5.6.
Looking at the RAW files in Lightroom, the A7R IV appears ever so slightly sharper but both files needed some adjustments to bring out all the tiny details. With this modification, they look very similar despite the difference in megapixels.

Concerning the SOOC (Straight Out of Cameras) JPGs, the A7R IV appears a bit sharper with the default values. You can increase sharpness up to +3 on the mark III and up to +5 in the mark IV but the higher value starts to look a bit too strong. Personally I think that +2 on the A7R III and +3 on the A7R IV are the best parameters if you want to maximum sharpness.

Dynamic range
The A7R III sensor is known as one of the very best when it comes to dynamic range, so I was curious to see how the A7R IV’s new chip would compare. Overall, the results are quite similar.
With an extreme underexposure and a +5 stop recovery in post, the mark IV displays a bit more noise than the mark III.

With a +4Ev recovery, the noise is more contained on both cameras and with +3Ev, they both deliver clean results and we can reduce the amount of noise reduction.


As for highlights, both cameras behave in the same way.
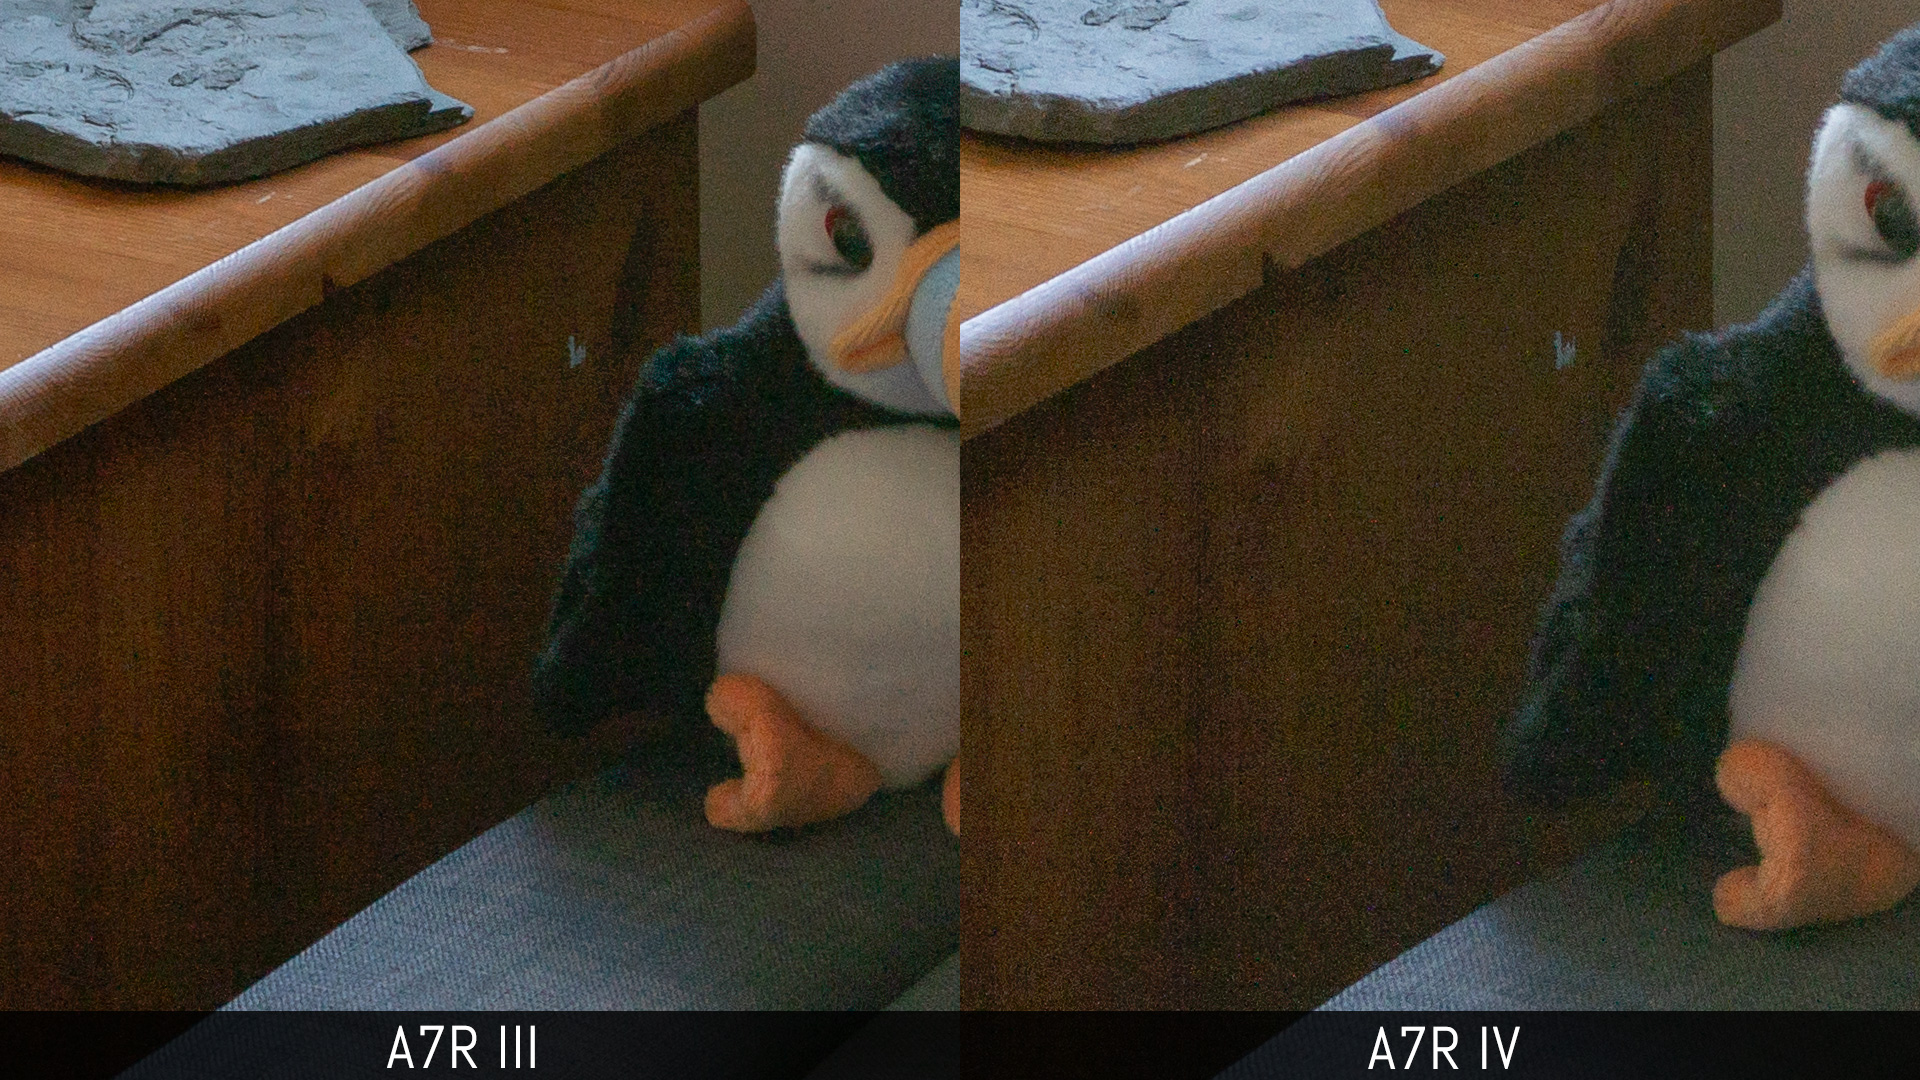
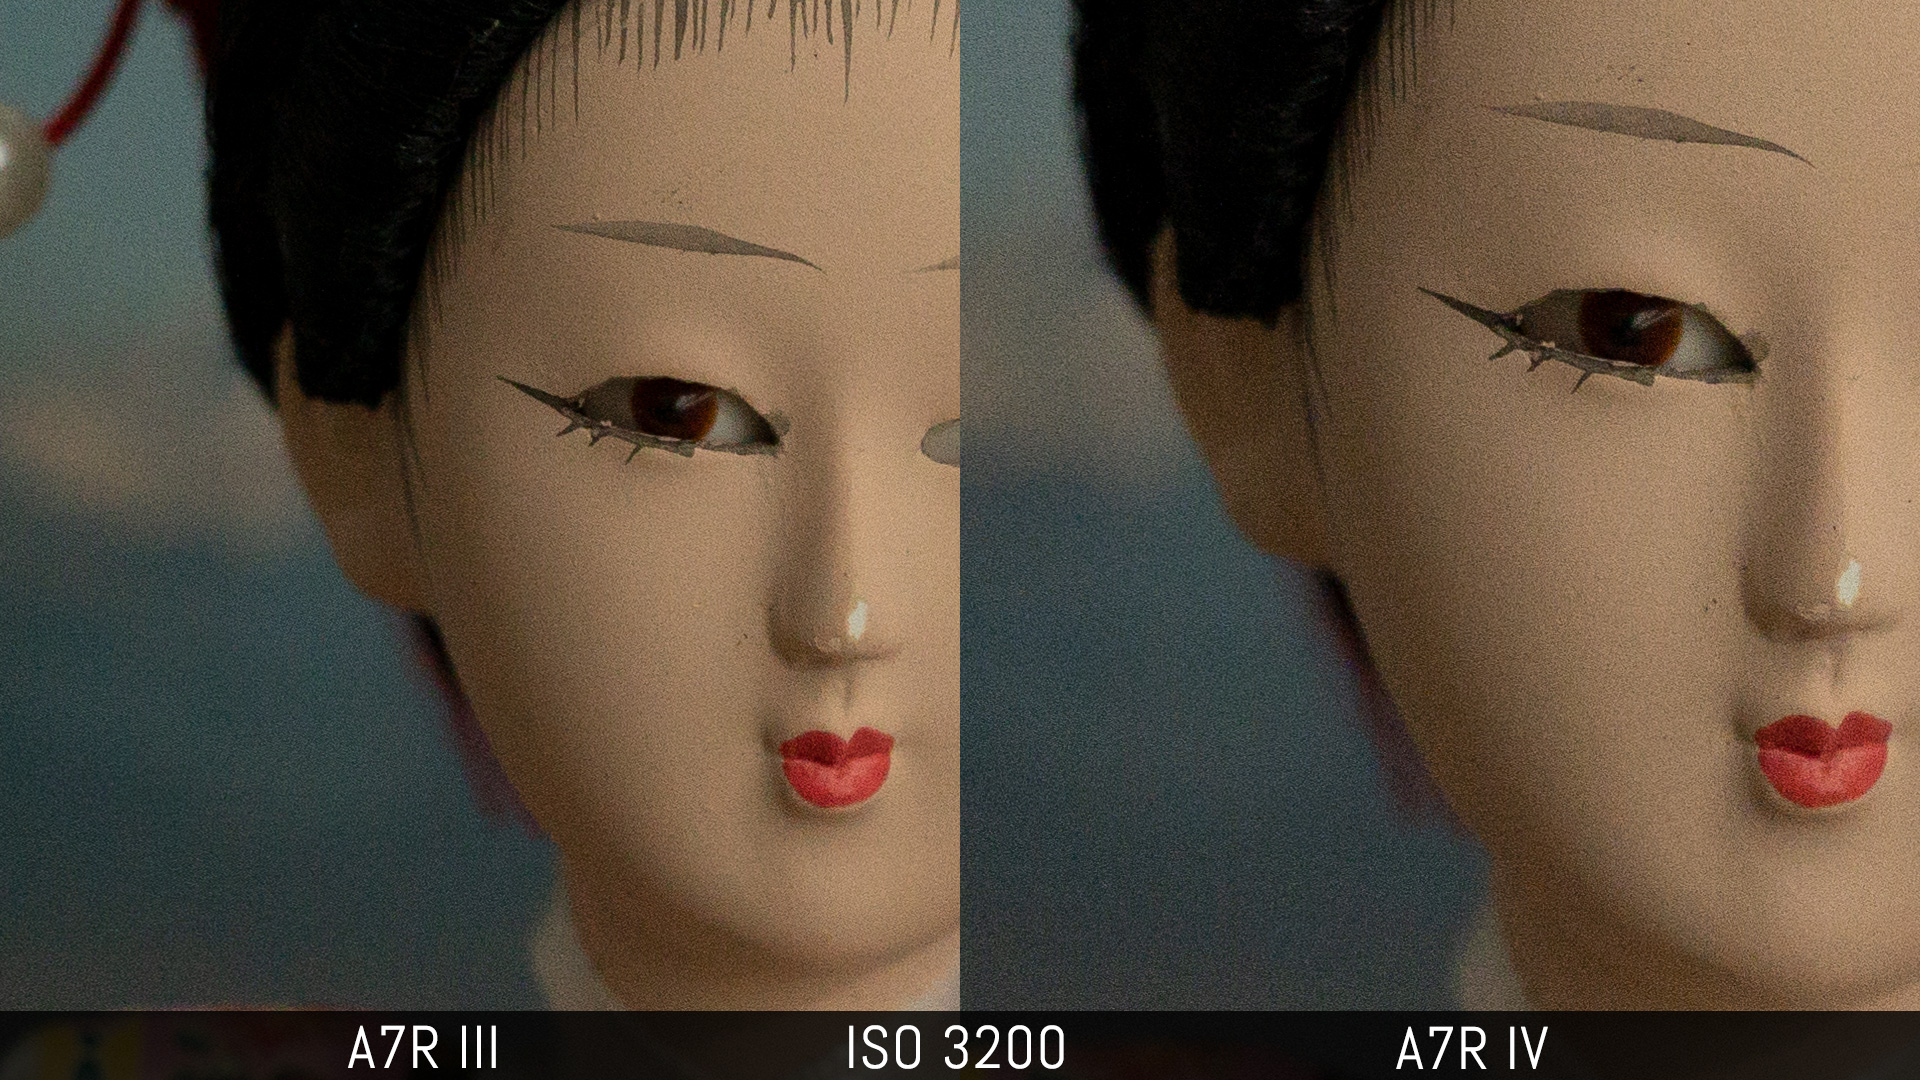
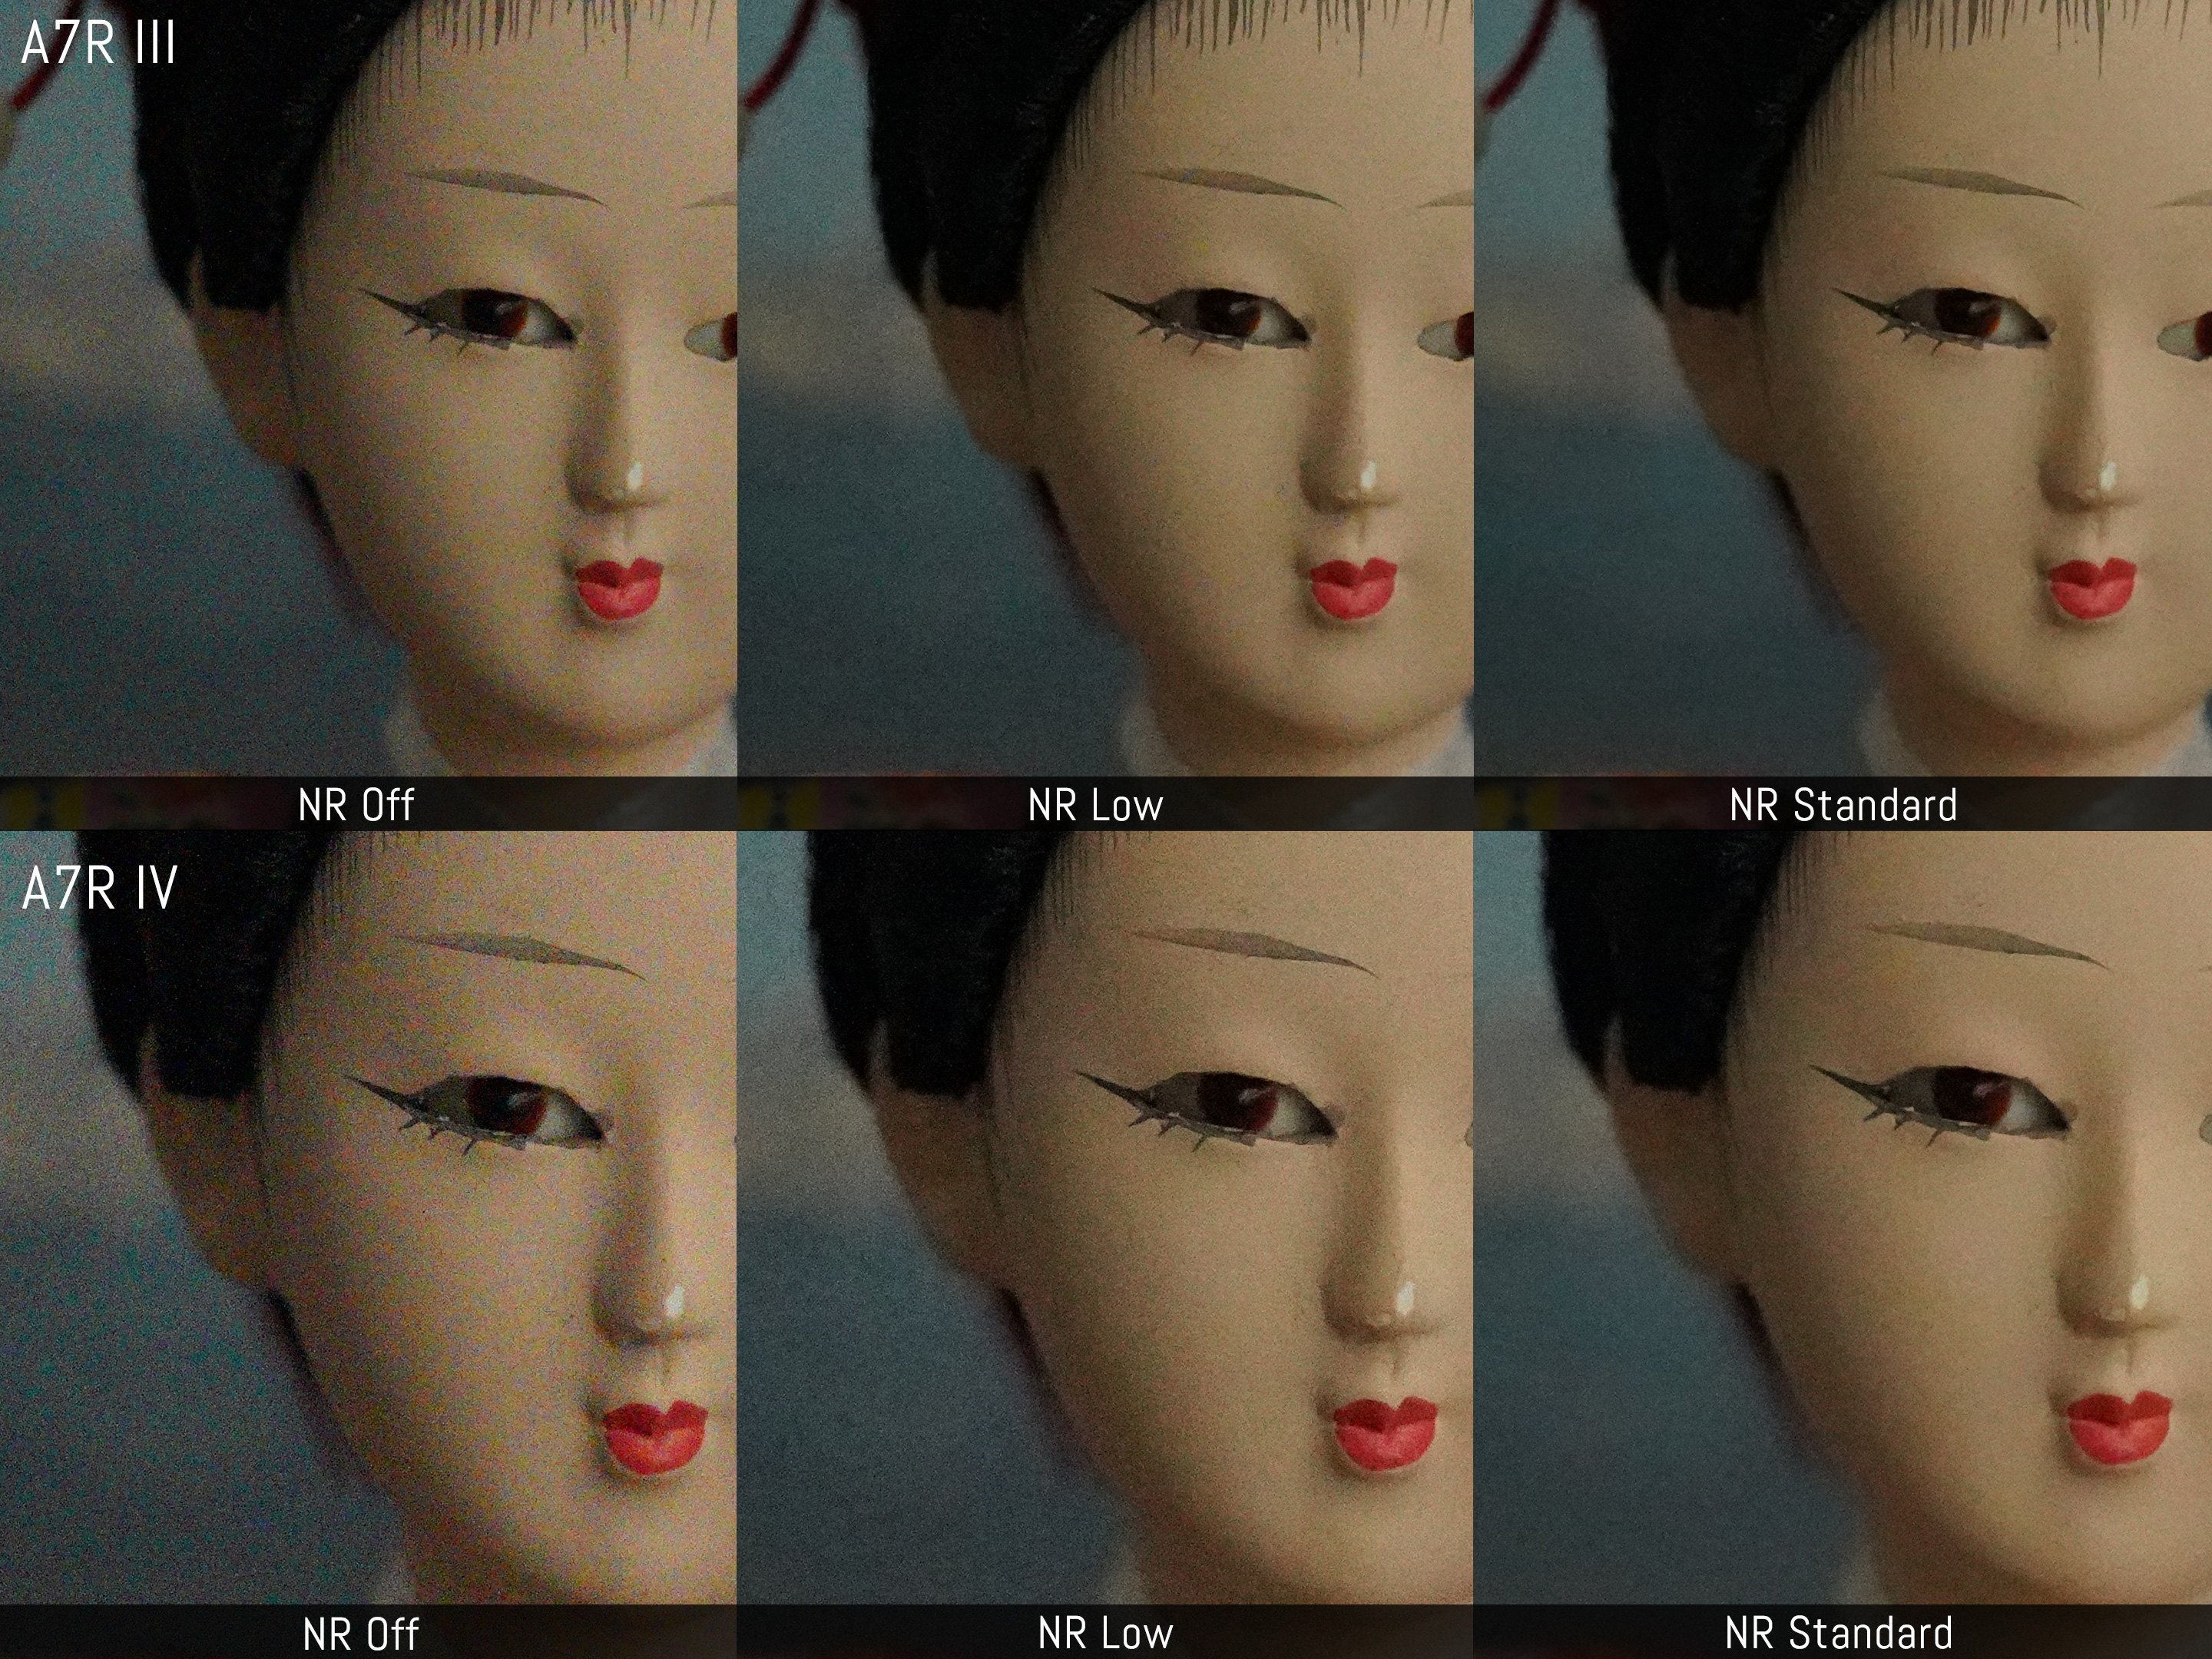
ISO sensitivity
The two models share the same sensitivity range: the normal values go from ISO 100 to ISO 32,000, while the extended values go down to ISO 50 and up to ISO 102,400.
Up to 3,200 ISO, the quality is nearly identical and noise is well-contained.


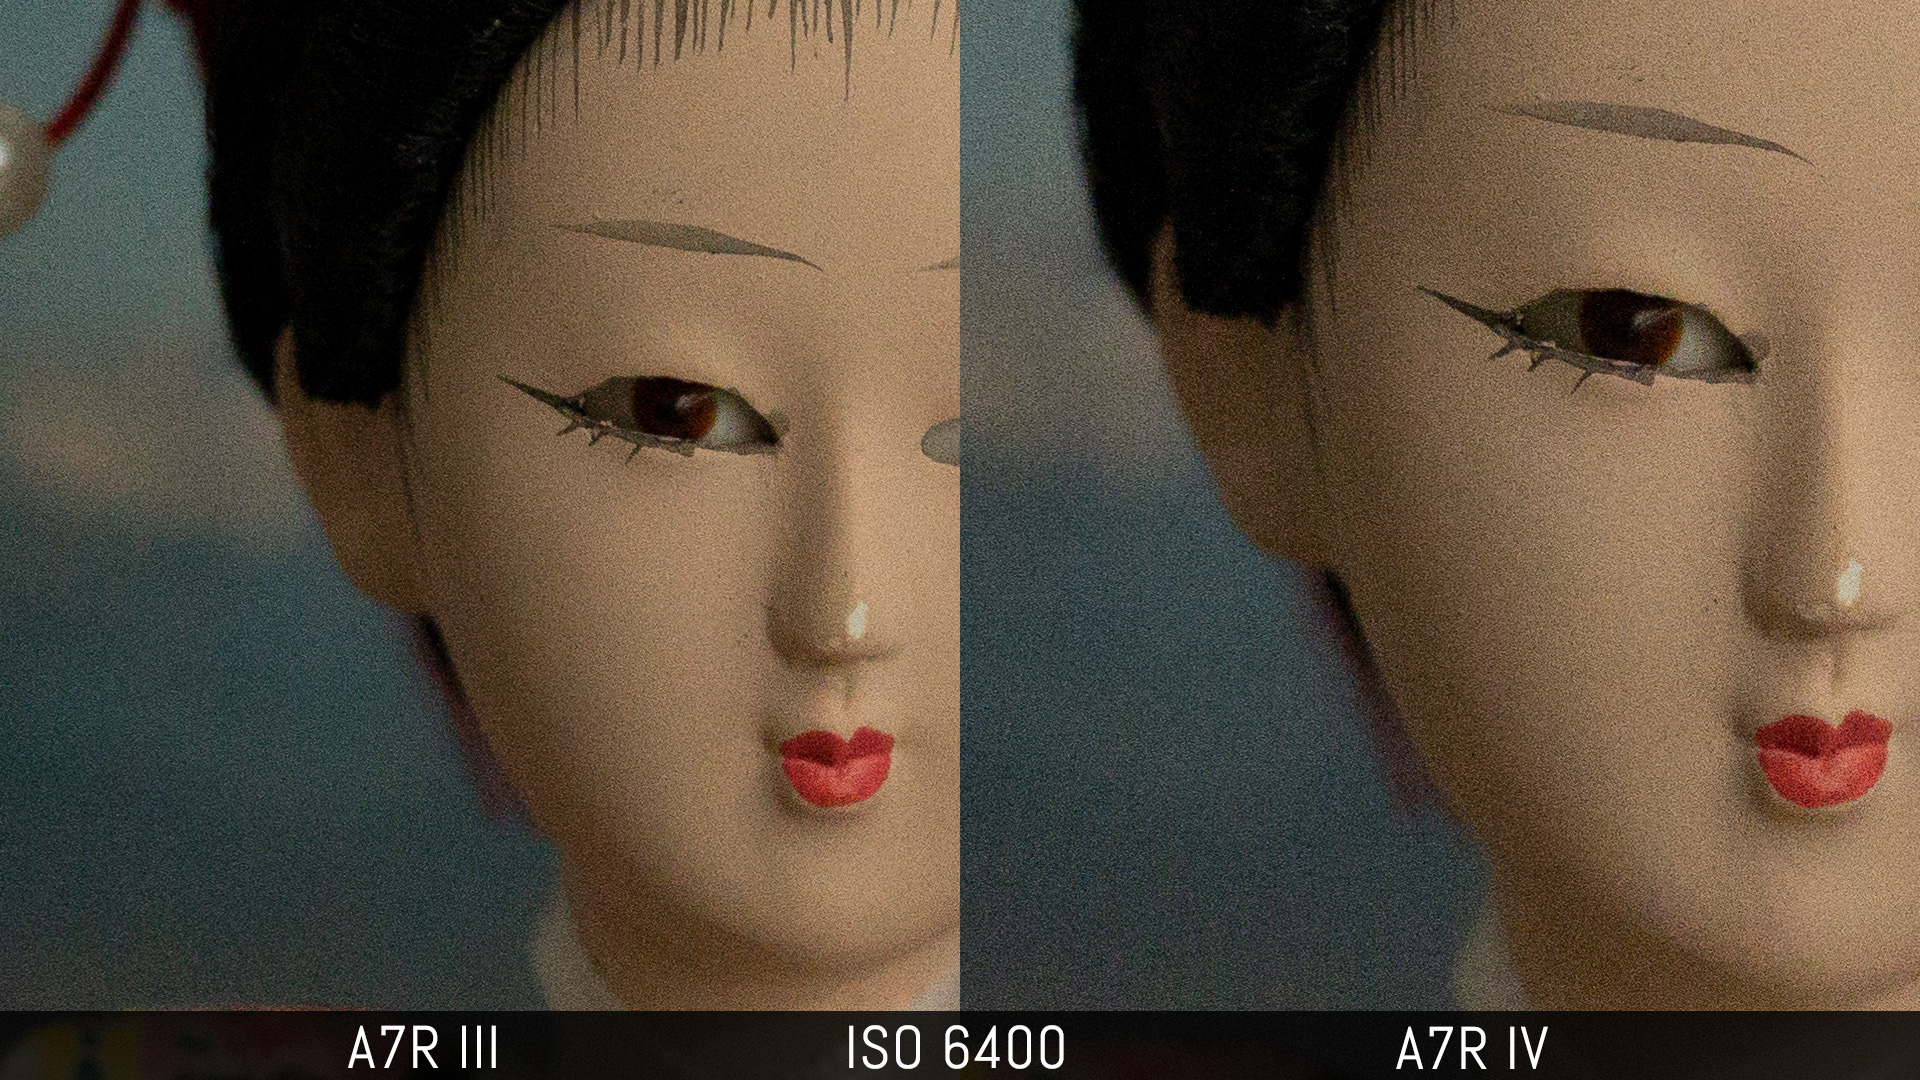
From 6400 ISO, we start to notice more noise from the A7R IV files.

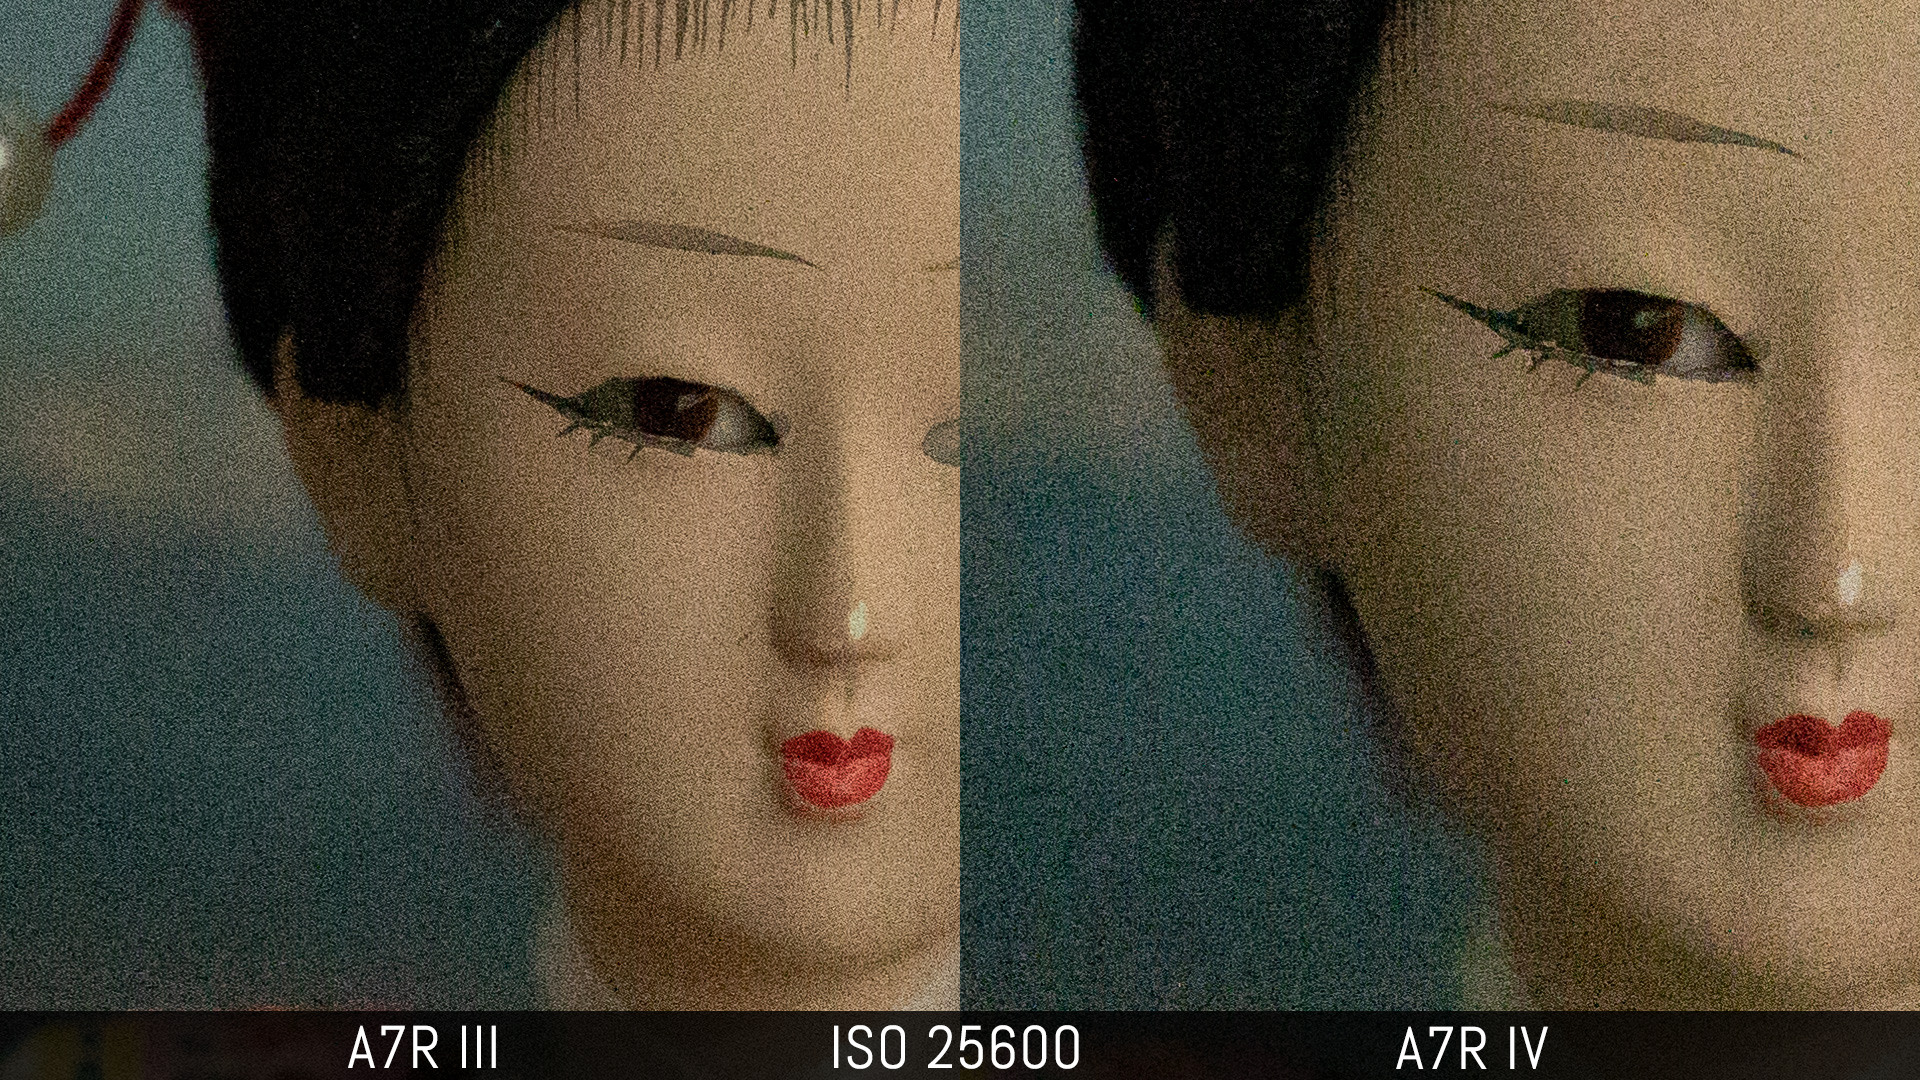
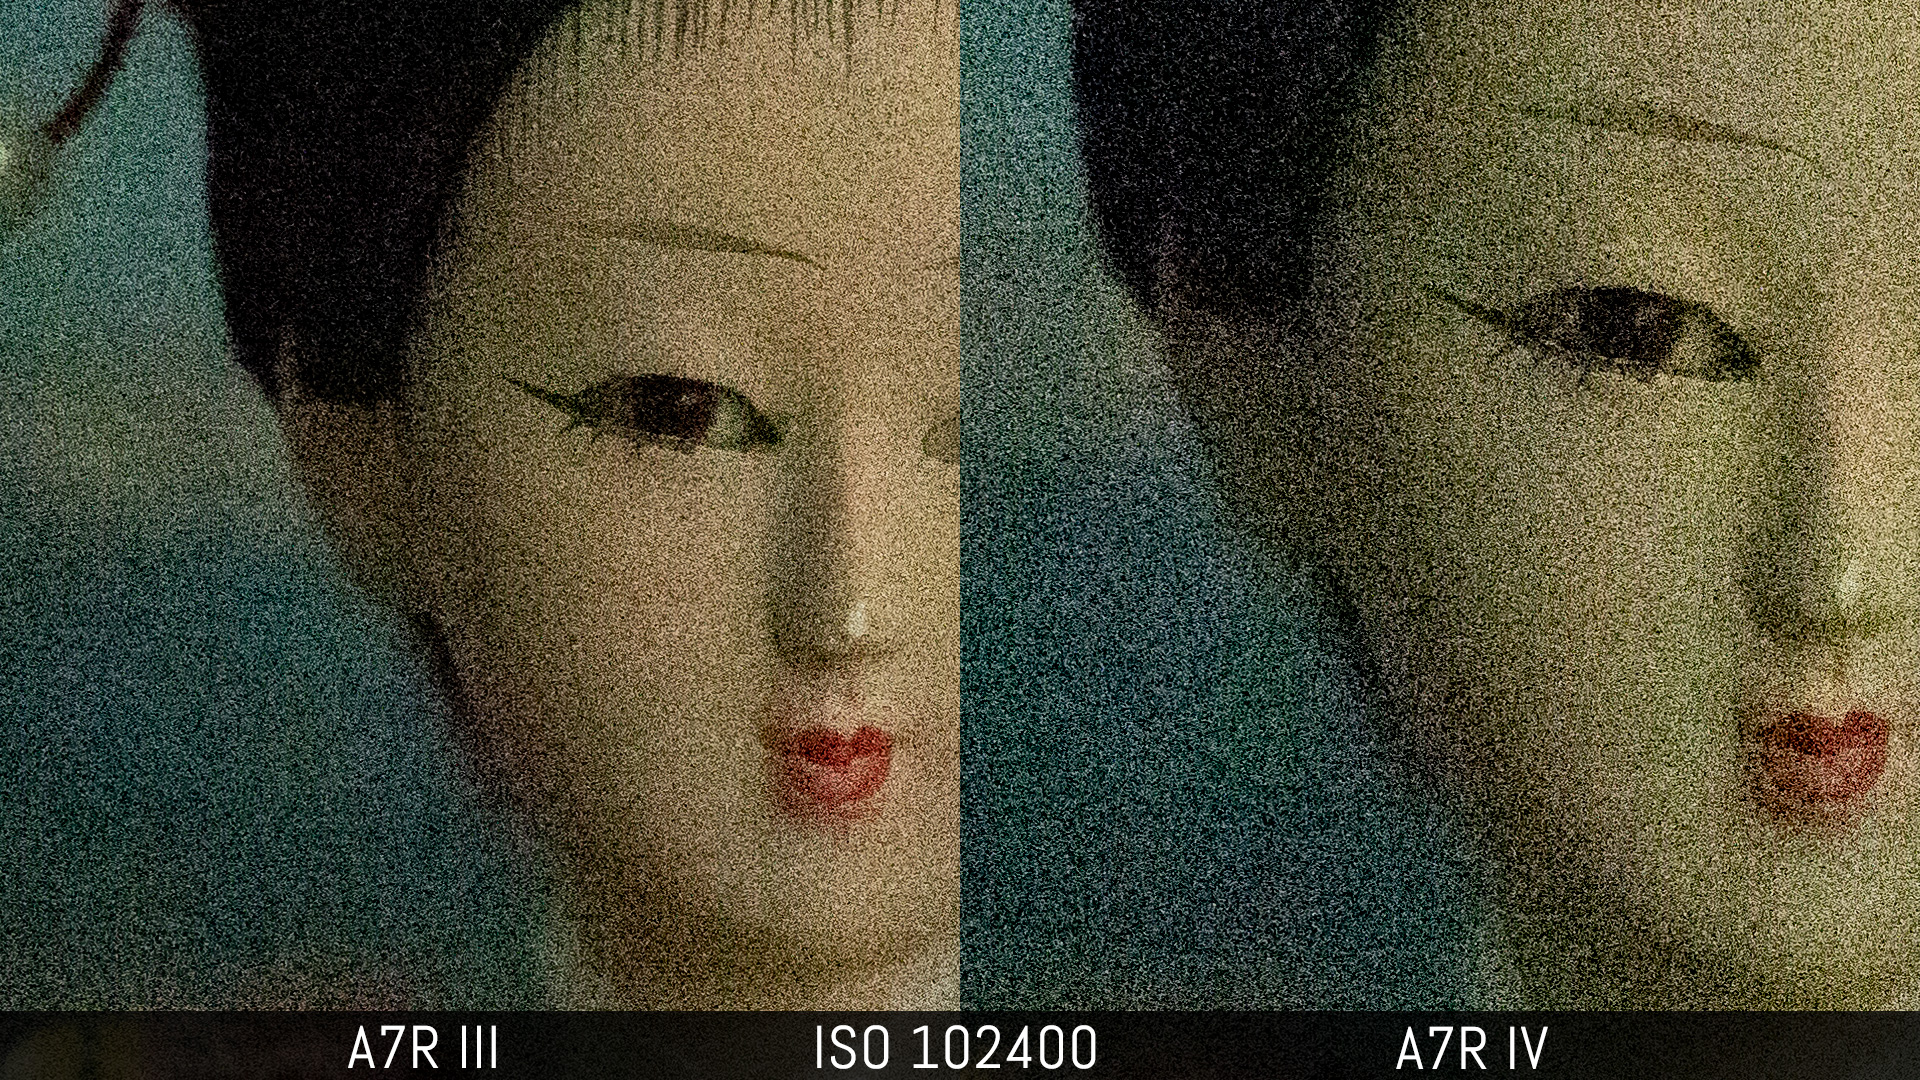
From 25,600 ISO, the quality on the mark IV files start to deteriorate and gets progressively worse. Overall, I think it’s best not to go past 12,800 ISO with either camera and in many cases this value is more than enough. The mark IV can still deliver a decent image up to 25,600 (but I wouldn’t go past that) whereas 51,200 is still somewhat useable on the mark III model.

Concerning the JPG files, there are three levels of noise reduction: off, low and standard, and the performance is very similar. With NR off, there is visible colour noise. The Low setting gets rid of colour noise and the Standard level softens the details slightly but appears cleaner.
Both sensors are ISO invariant and have two native ISO values. One is found at ISO 100 and the other at ISO 640. (I believe it is the same on both cameras although I haven’t found confirmation yet for the A7R IV.) ISO invariance allows you to underexpose your shot and have the same amount of noise when recovering the exposure as you would if you had taken the photo at a high ISO with the right exposure.
In real world use, there is a bit more noise in the post-processed version but they look similar overall. Once again the A7R IV has more noise than the A7R III.

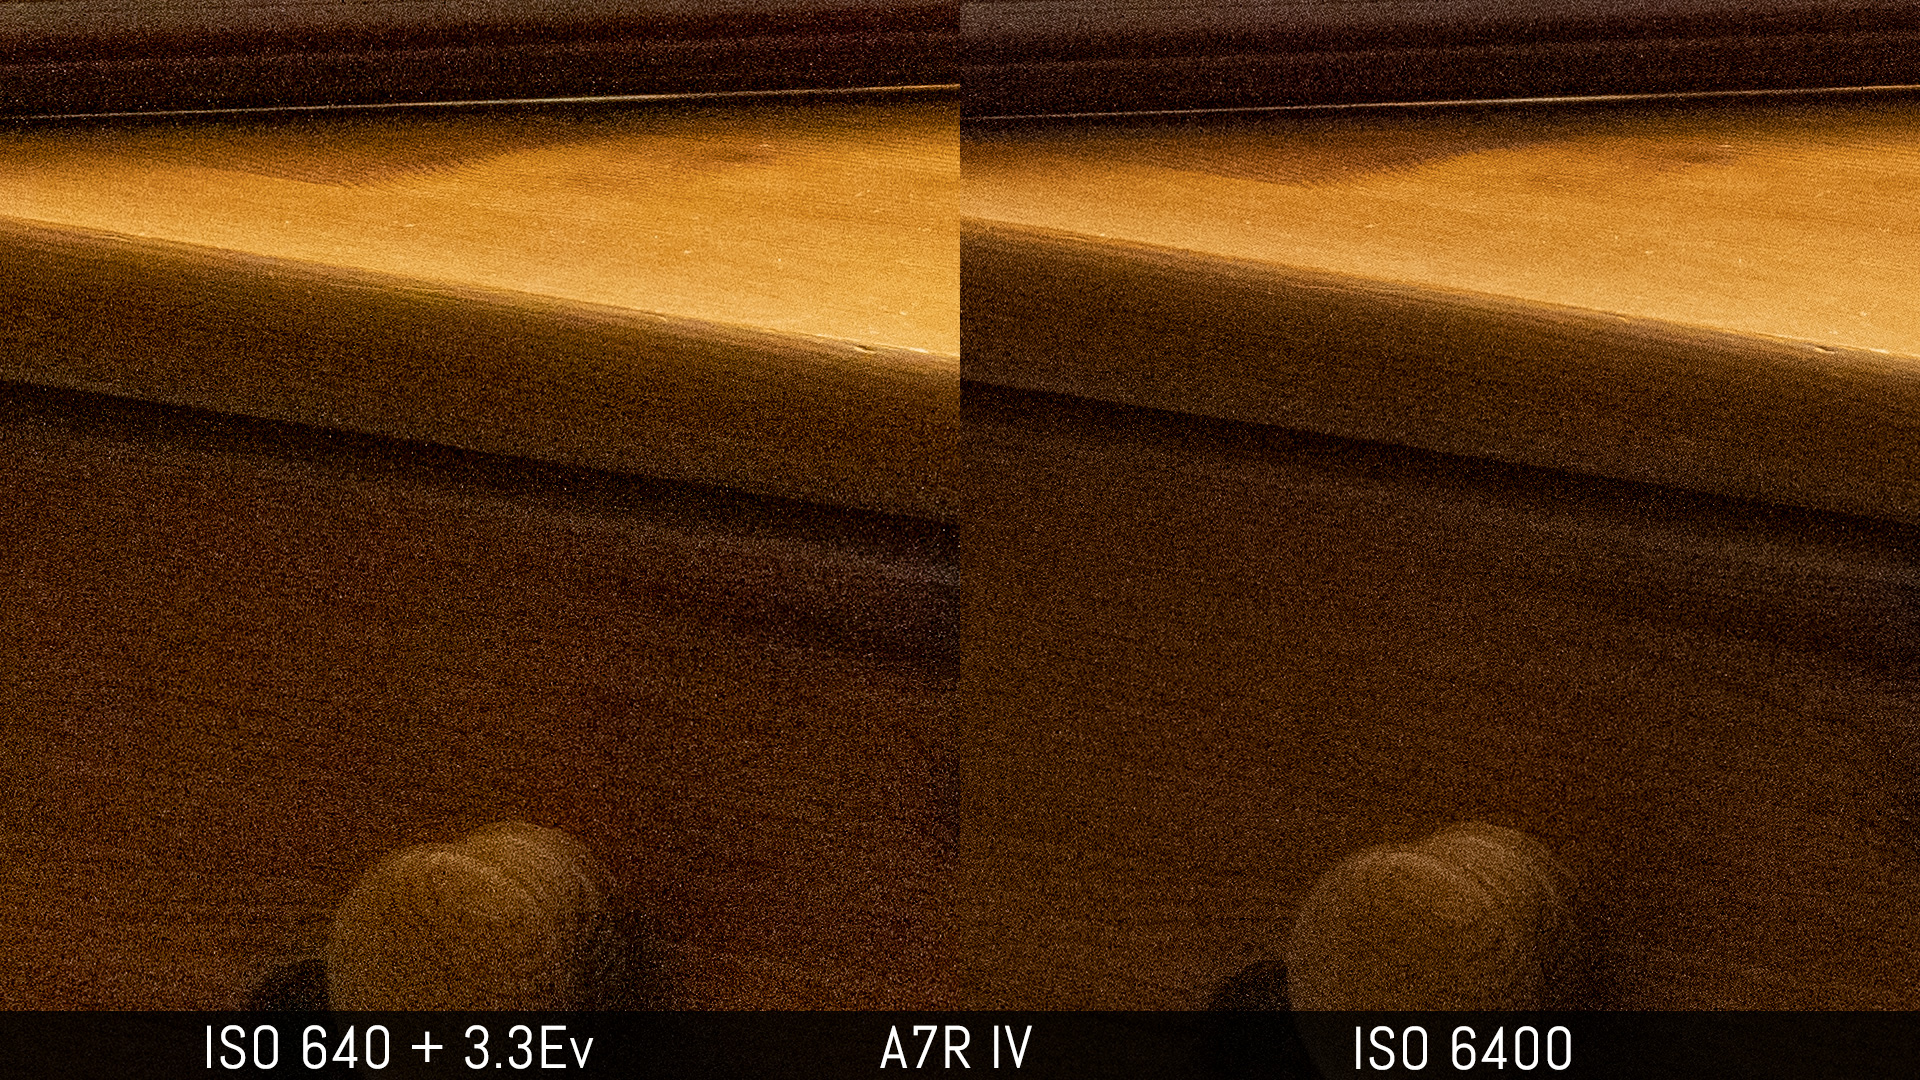
The advantage of this technique is that your highlights are totally preserved in the underexposed shot.

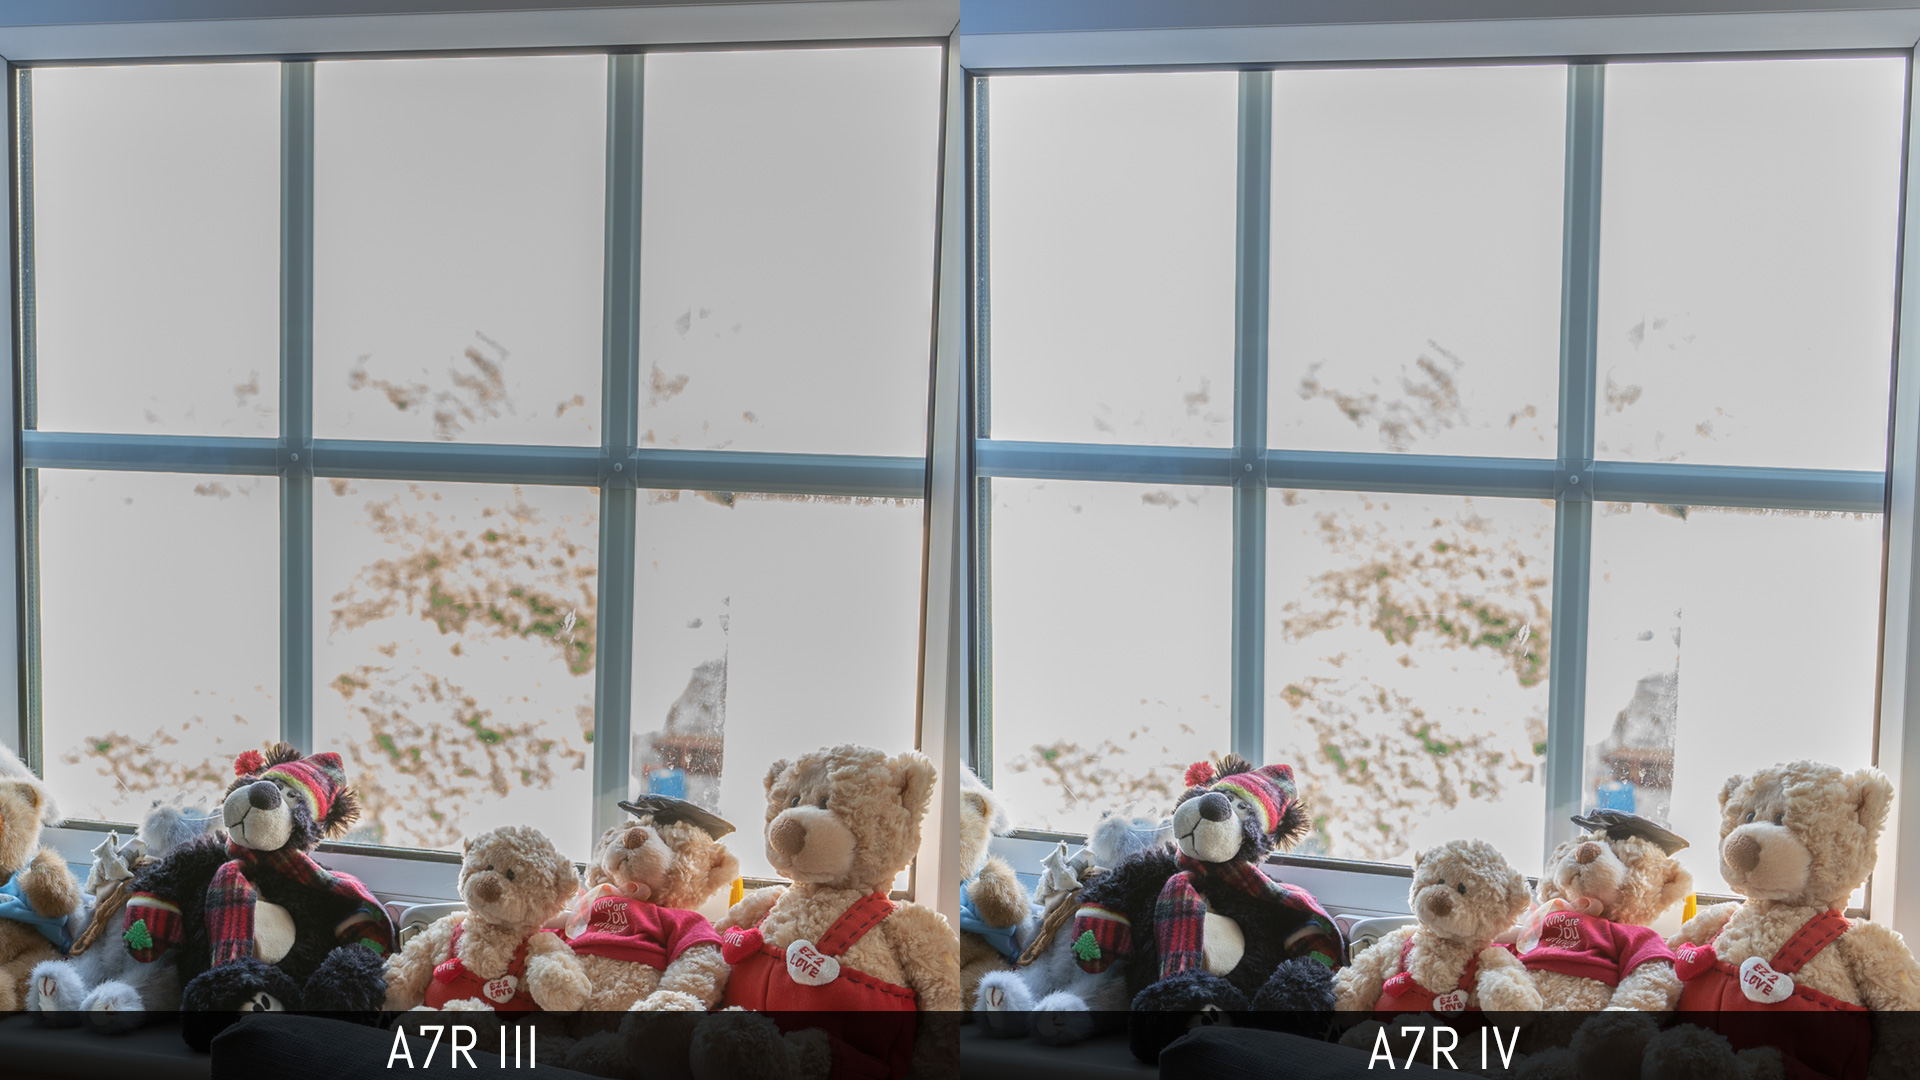
Colour profiles
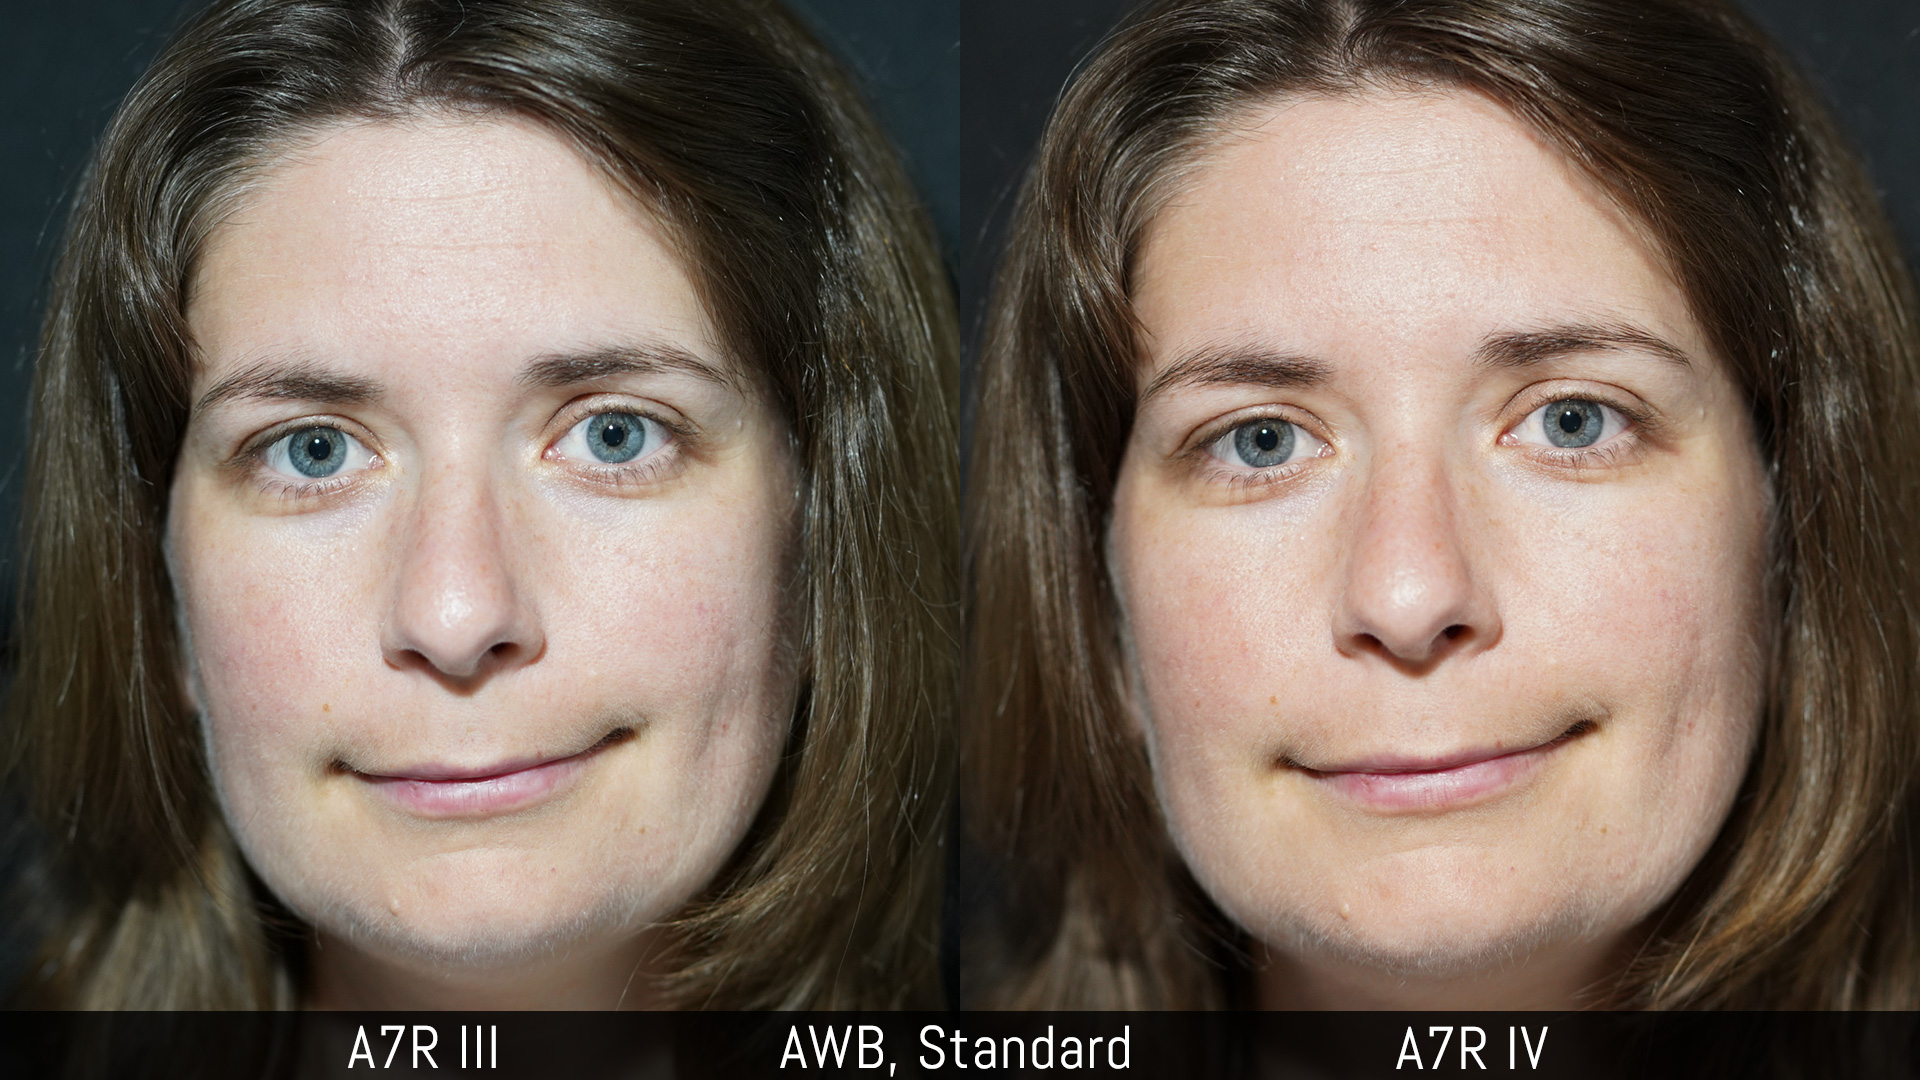
There isn’t a lot to say when it comes to colours. Looking at the RAW files, the A7R III appears a bit more saturated with more reds if I apply the same exact settings to both files, but it only takes a few adjustments to match them.
With the Creative Styles (Sony’s colour profiles for JPGs), the images are basically identical.
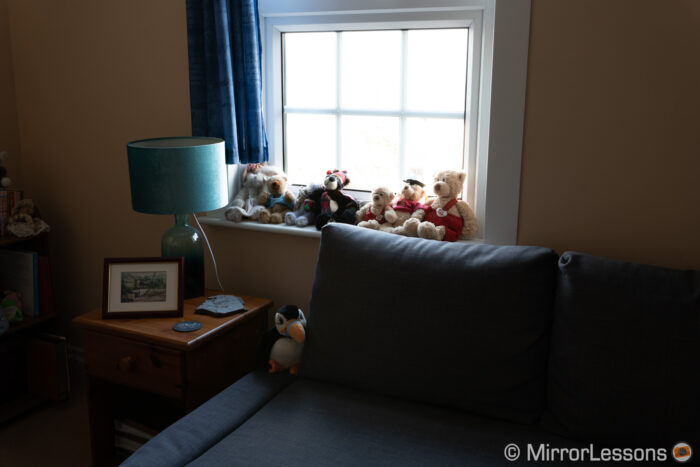
Note: I usually show more real world examples for colours, but the weather was dreadful during the week I had the A7R IV so I had to revert to something homemade (with a bit of childish nostalgia!)
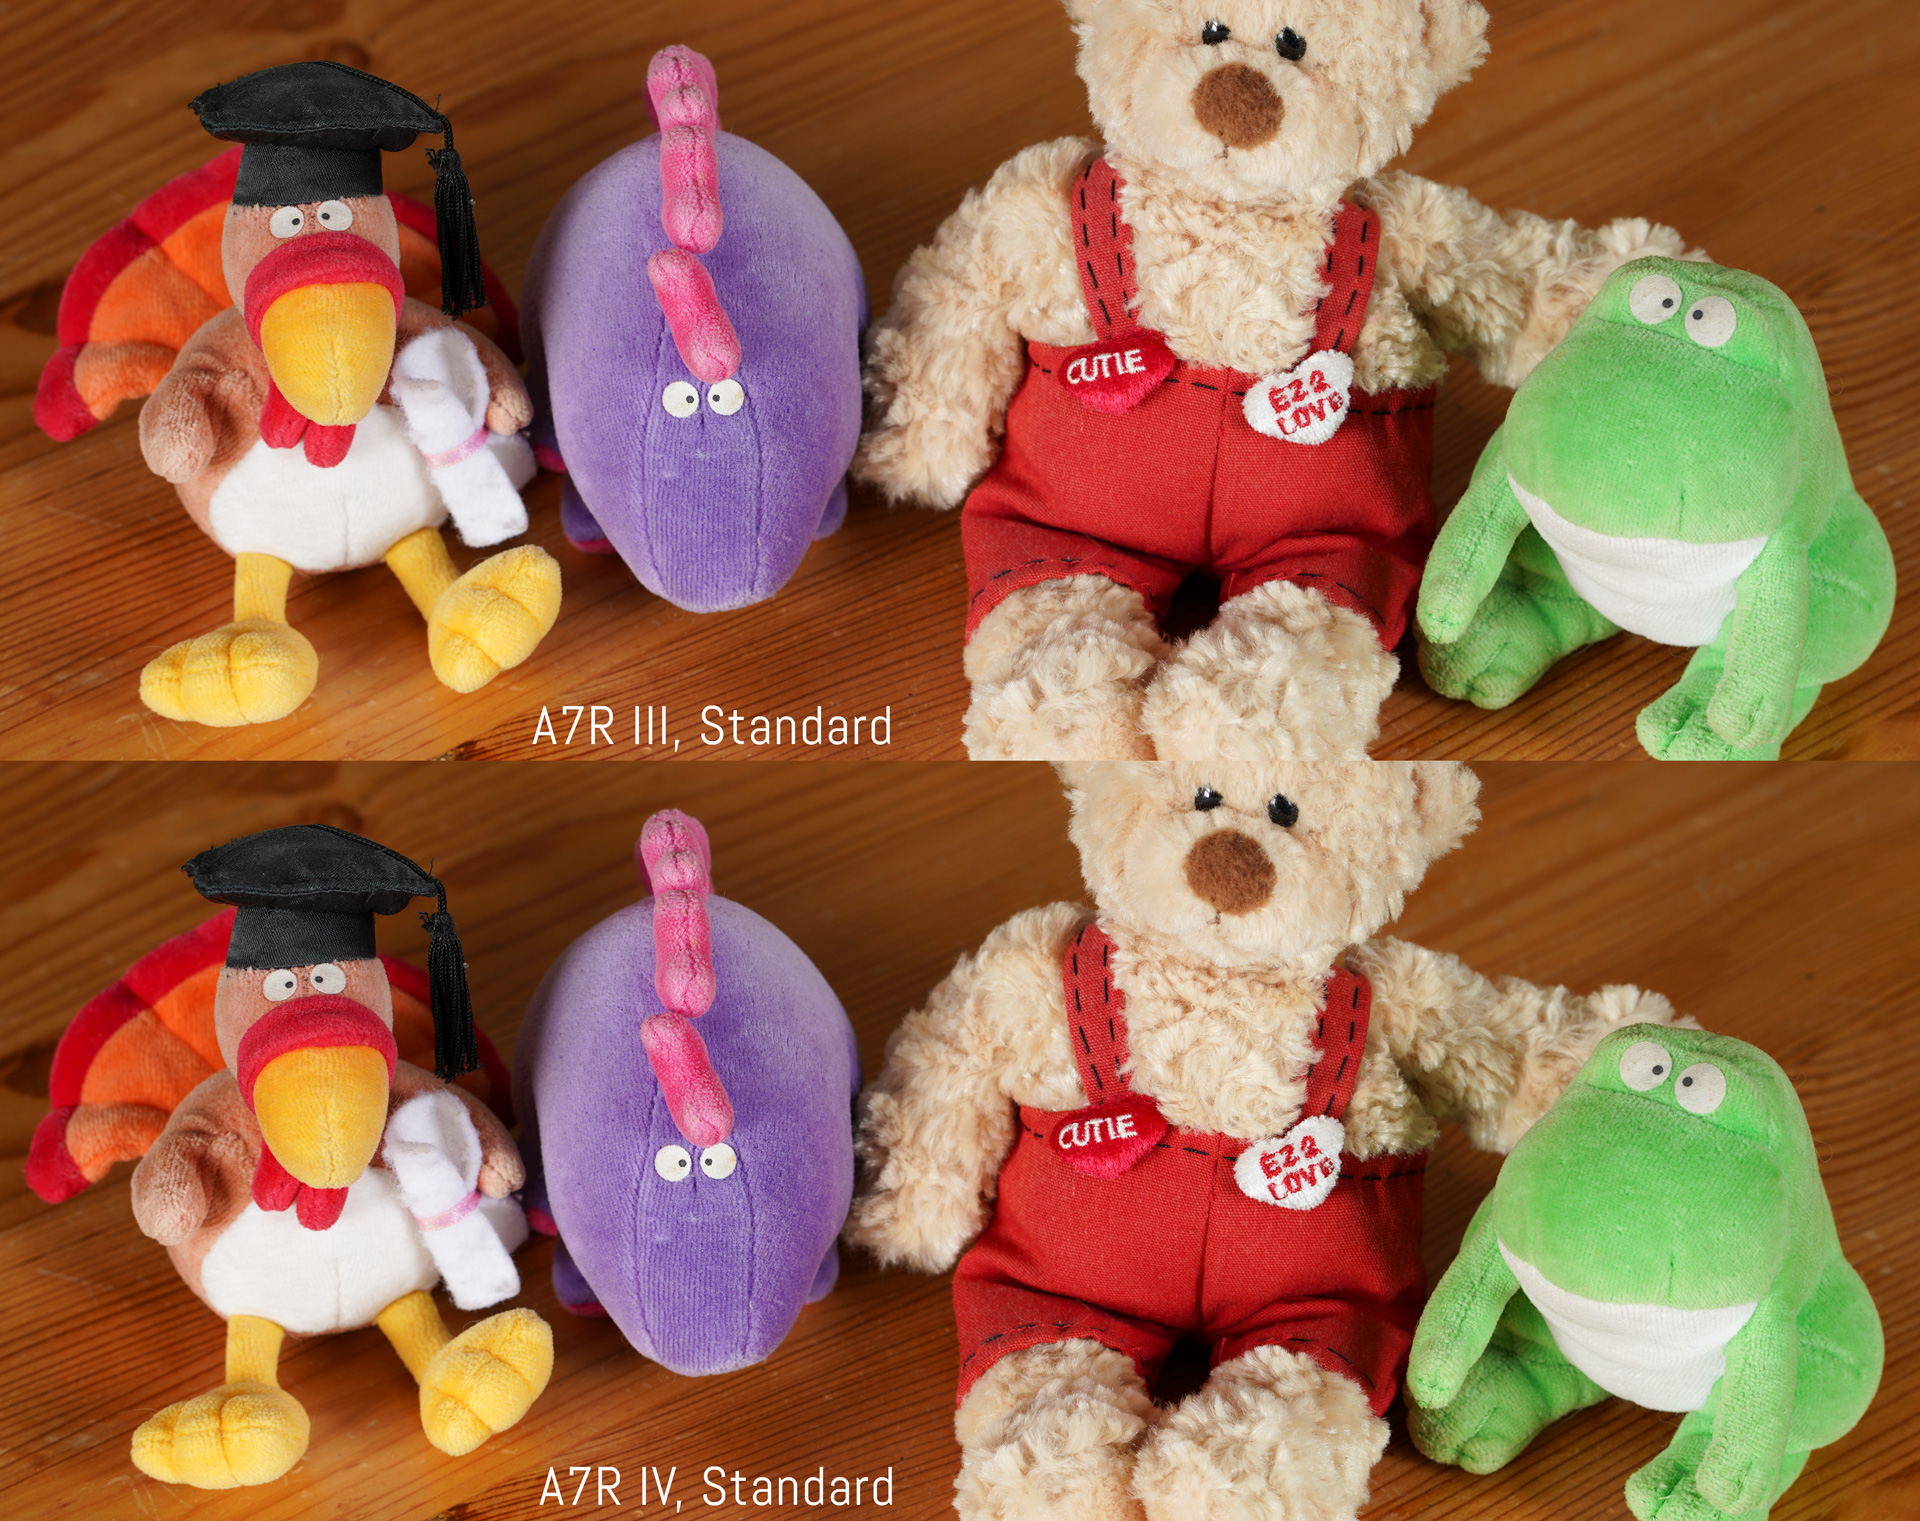

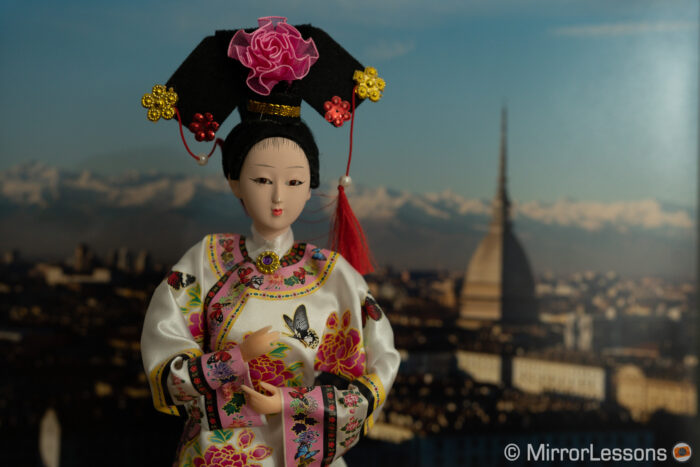
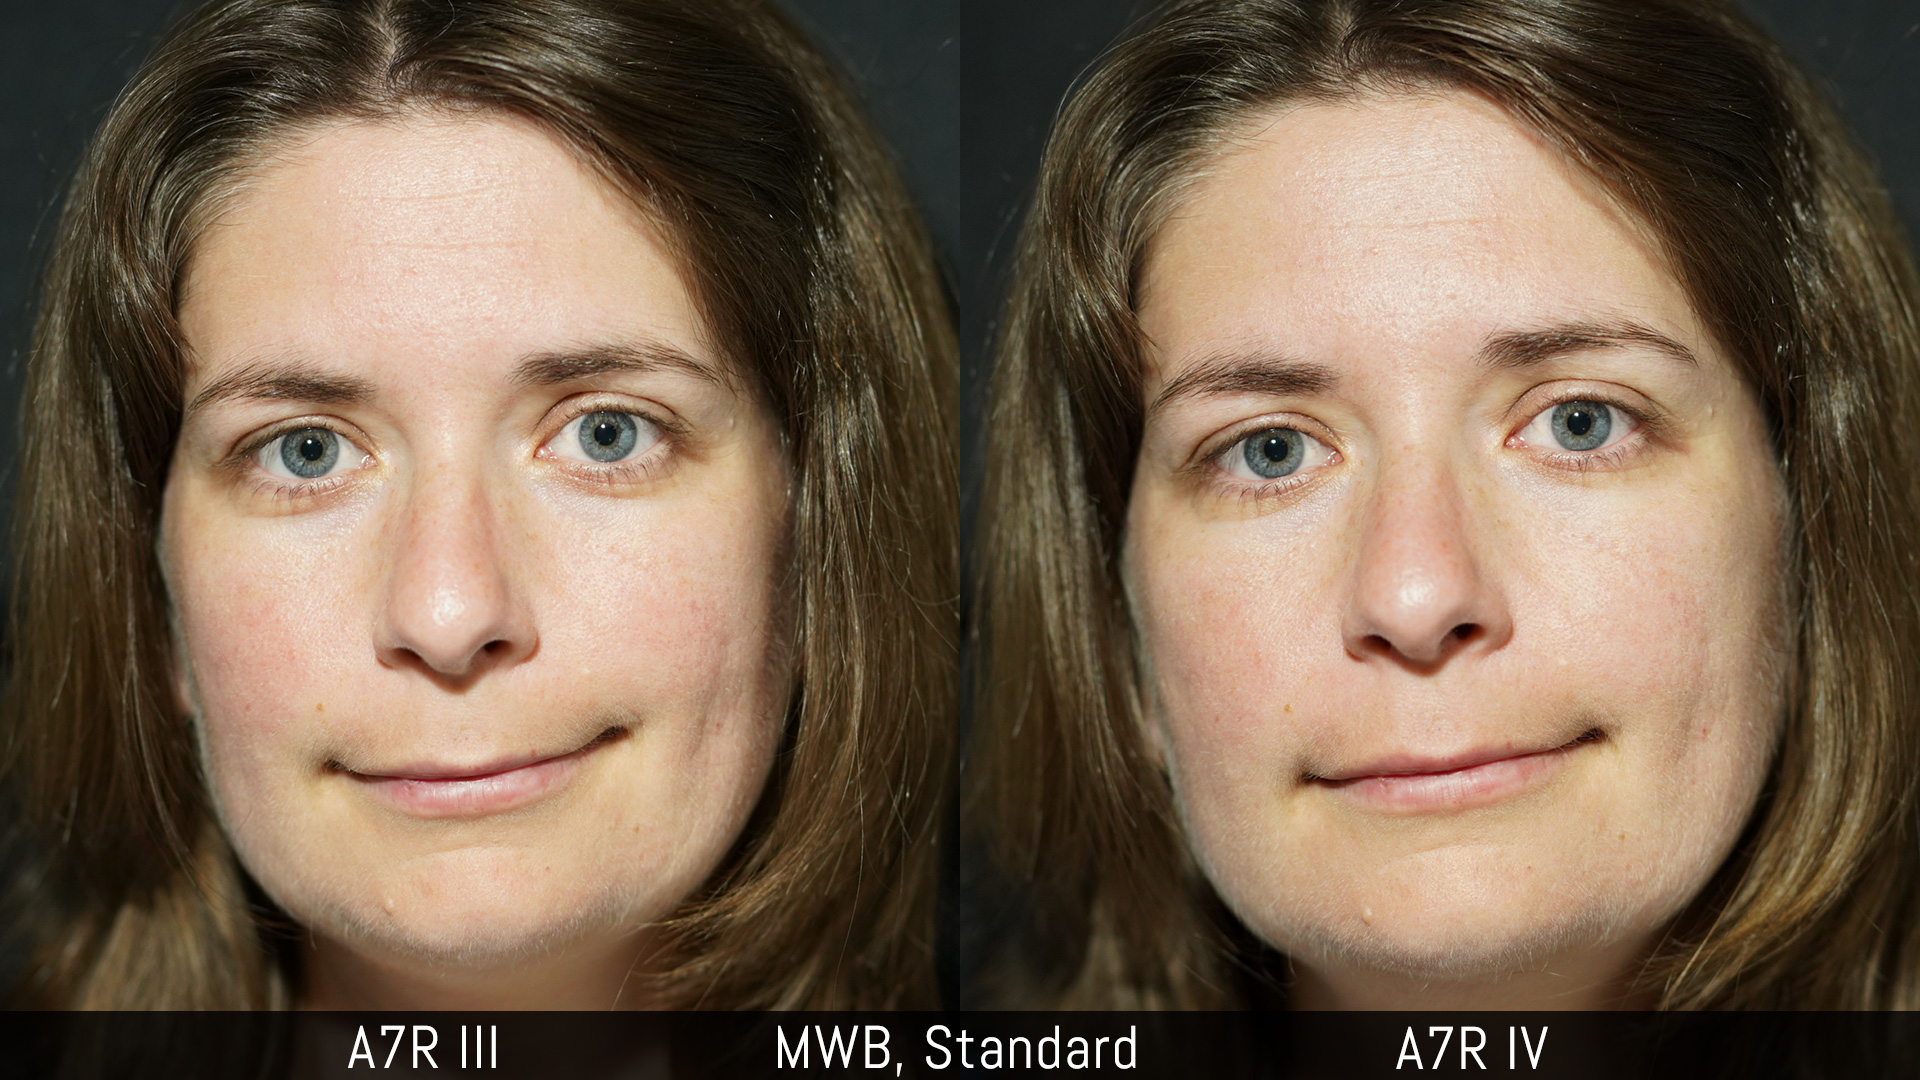
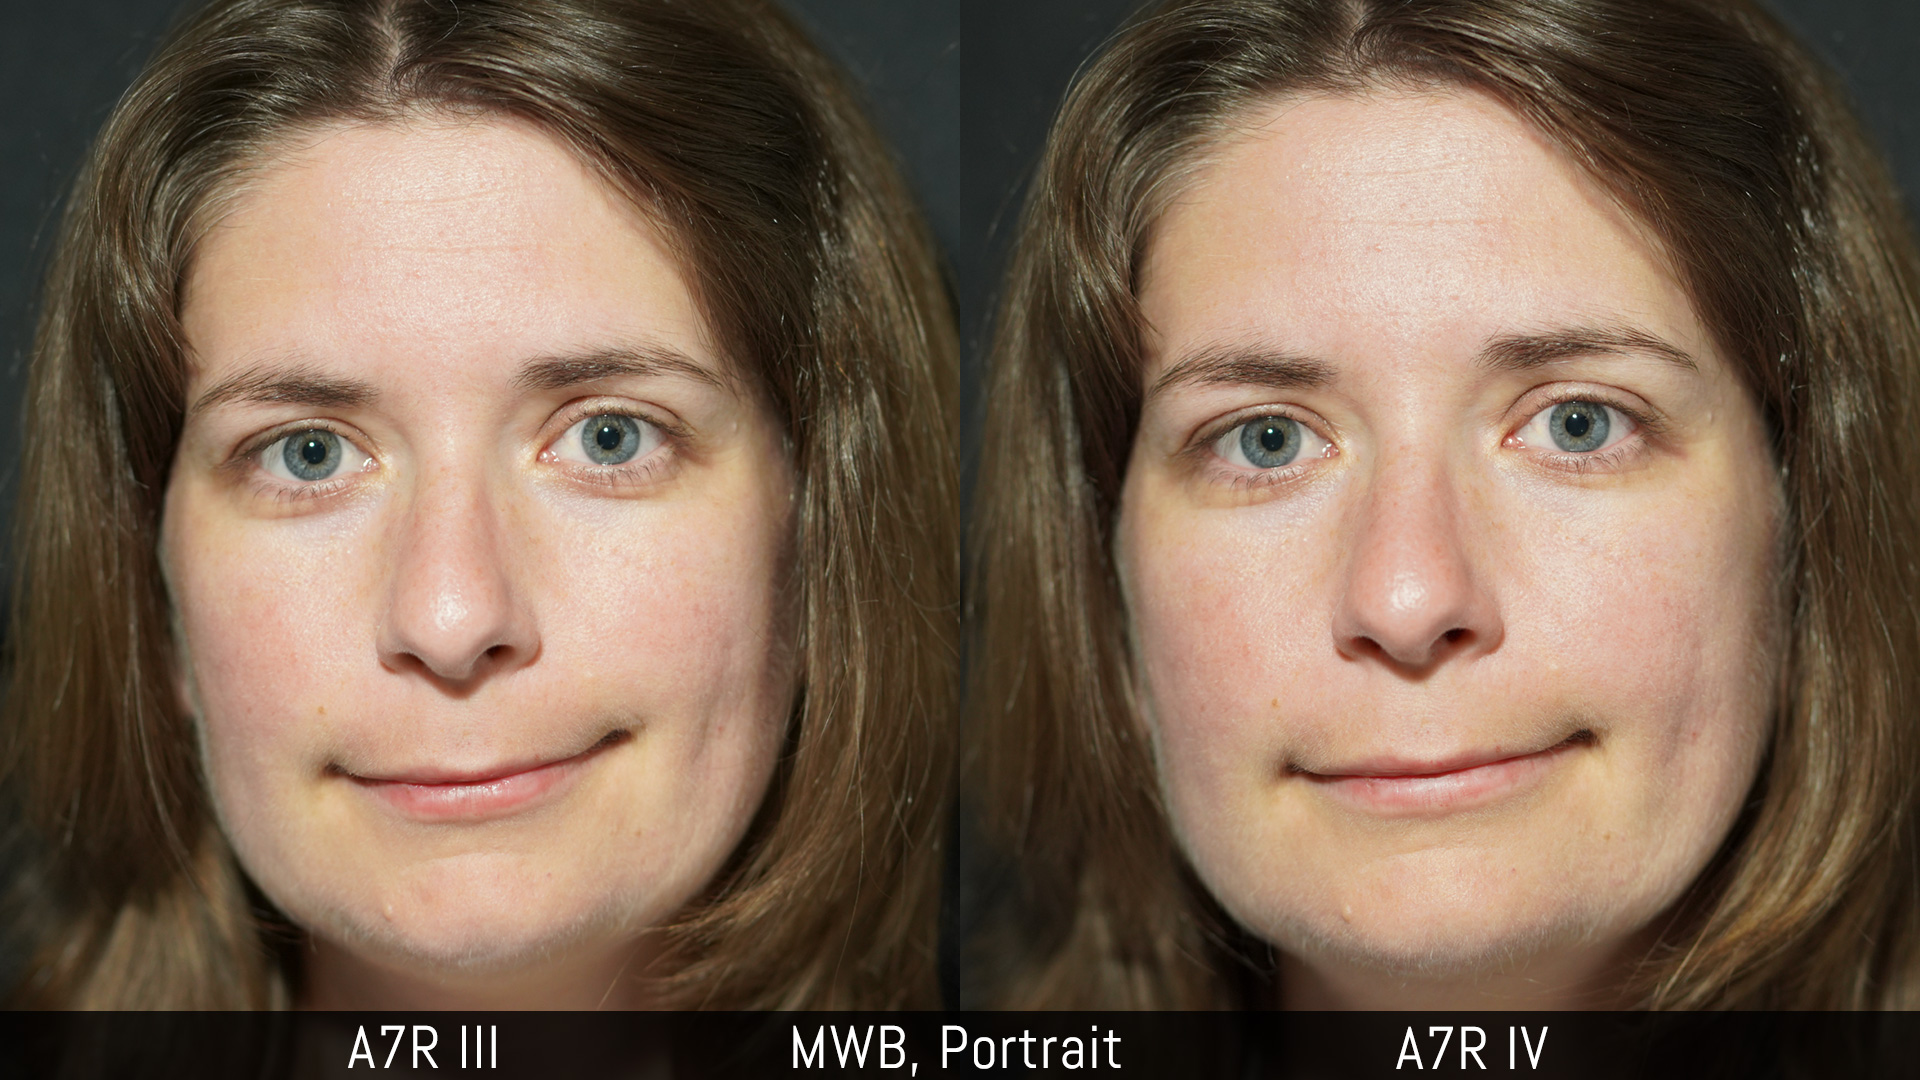
For skin tones, if I load the RAW files and apply the same settings and the same profile (in this case Adobe Portrait), the A7R III photo displays more red tones whereas the A7R IV appears more neutral. It doesn’t take too much work to match the two images properly once again.

The JPGs look fairly similar too and the only real difference I’ve noticed is that with Auto White Balance, the A7R IV has a warmer rendering.
Both cameras have the same metering behaviour and offer five settings: Multi, Center, Spot (two sizes), Entire Screen Average and Highlight Priority.
Finally, to conclude this chapter I can mention that the A7R IV has two extra settings:
- Shutter AWB Lock: it allows you to lock Auto White Balance when half pressing the shutter button or shooting in continuous mode to avoid changes between frames
- 4:3 and 1:1 aspect ratio (JPG only)
Pixel Shift Multi Shooting
The A7R III and A7R IV have a sensor shift mechanism that serves two purposes: image stabilisation, as we’ll see further down, and the Pixel Shift Multi Shooting mode. The latter is an extra option to increase the sharpness and resolution of your photograph.
This technology has been seen on other mirrorless models before and Sony introduced it with the A7R III. The camera takes four consecutive images and varies the sensor’s position by one pixel between each shot.
On other cameras this allows you to have more resolution than what the native sensor can offer once the images are composited together but in the case of the mark III model, the resolution remains the same (42.4MP). However colour resolution increases because each point on your image is captured by four different pixels, including at least one red, blue and green pixel.
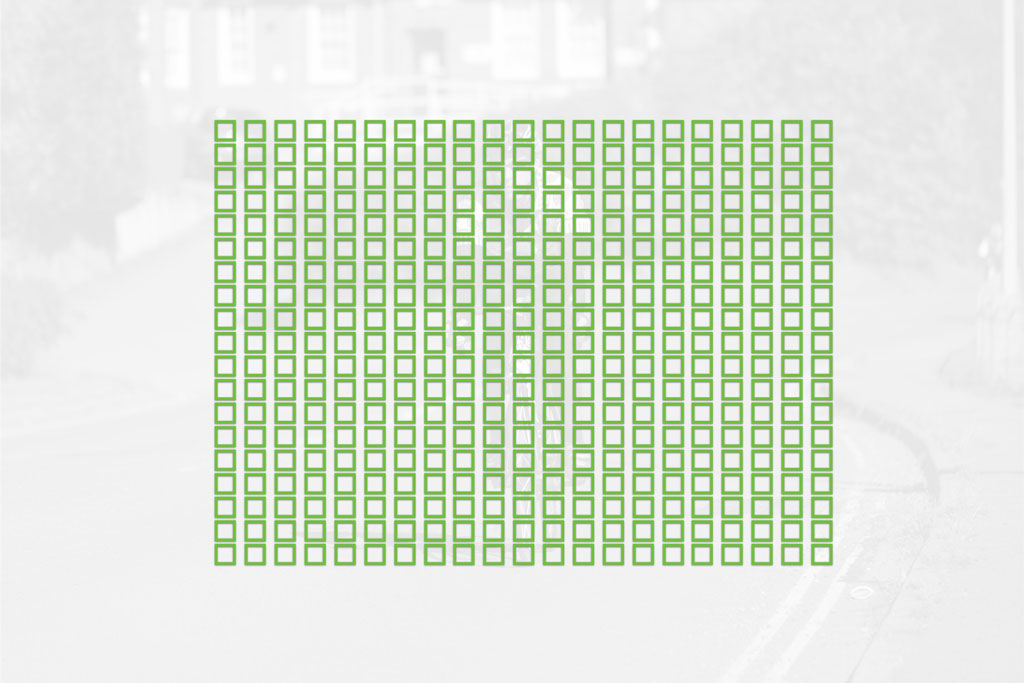
Below you can see an example where all the smallest details of the doll’s dress become crisper and more defined, without the moiré that is visible in the single shot. You can also push the sharpening tool more with the composited version.
The same thing can be achieved on the A7R IV with the advantage of more resolution by default. Also note that the single shot displays less moiré than the A7R III.
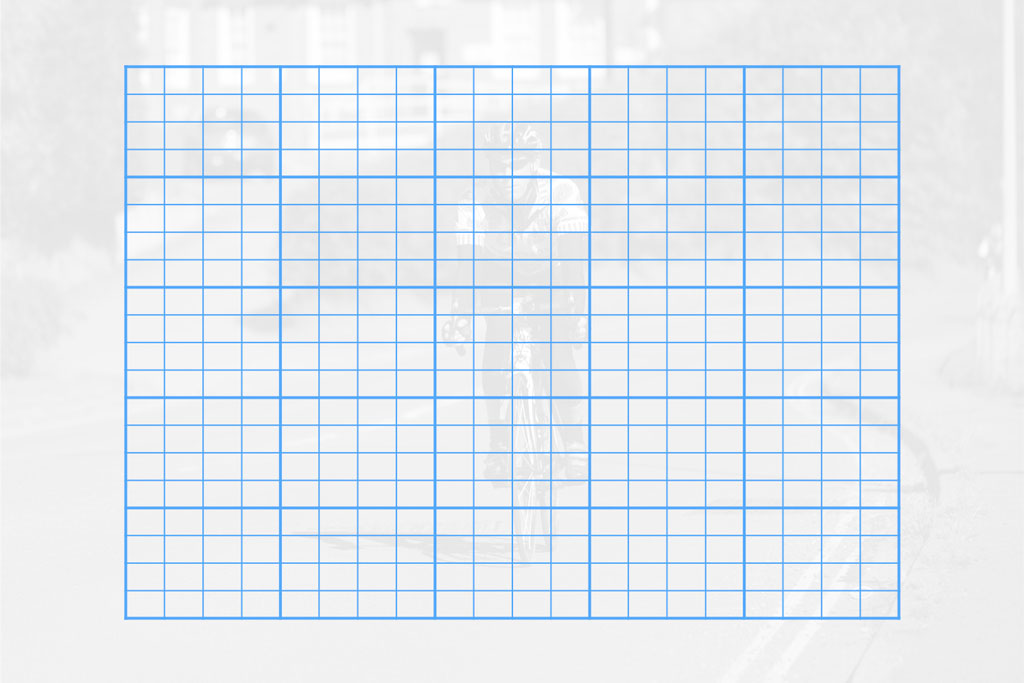
Furthermore, the mark IV has another option: the ability to take 16 frames and move the sensor by half a pixel between each shot. The final output gives you a massive resolution of 240MP!
I have to say though that the 240MP mode has not impressed me so far. I’ve tested it in a variety of situations and all the images seem to contain some kind of grid artefact. Granted, you need to enlarge the image beyond 100% to see it more clearly, but even when looking at a 1:1 view you can tell the image is not as sharp as you would expect it to be.
The final image cannot be merged in camera, so you need to do it with the Sony Imagine Edge software on your laptop or desktop computer. Hopefully a software update or camera firmware update with improve the result.
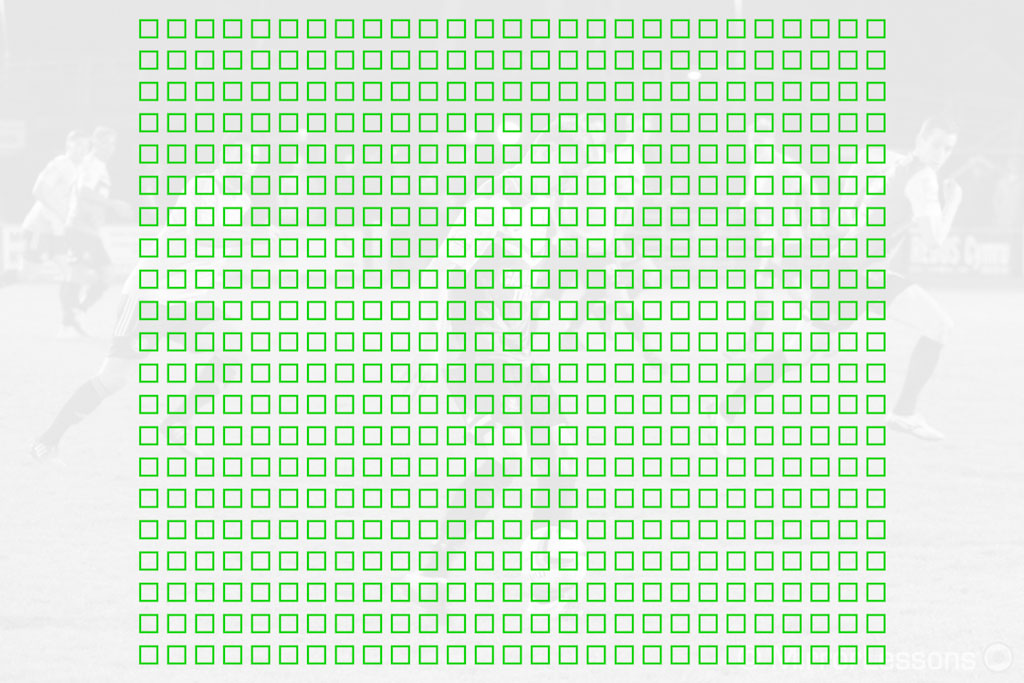
Keep in mind that with the Pixel Shift Multi Shoot mode, the camera must be on a tripod to avoid camera shake. Moving elements in your scene will create artefacts in the output, including water as you can see in the example below.
Sony A7R III vs A7R IV – Autofocus
The A7R III and A7R IV use an advanced hybrid autofocus system. The mark III model has 399 points that cover approximately 68% of the sensor surface, and 425 contrast detection areas.
The mark IV has more phase detection points, 567 to be precise, with a larger area of the sensor covered as a result (74% width and 99% height). The contrast detection points are the same as the A7R III.
Focusing in single AF mode didn’t feel that different to be honest. As always with Sony cameras, single areas such as Flexible Spot, Center or Expand Flexible Spot tend to use contrast detection only which results in a slower acquisition time and the classic back and forth movements of the lens elements while the cameras “scan” the contrast of your scene to acquire focus. If you choose Zone or Wide Area, the chance of seeing the phase detection points increases.
In Continuous autofocus, phase detection points are used at all times and this is where the two cameras give you the best performance. In fact I often leave them to C-AF even for scenes that don’t require it, just to acquire focus more quickly.
The minimum light sensitivity is -3 stops (measured with an f2 aperture) on both. If you find yourself in low light situations, reverting to S-AF mode will help. Contrast detection is slower but has a higher chance of locking on properly whereas with the phase detection points the camera can sometimes refuse to focus or mis-focus.
Most of the autofocus settings you can find are the same on both cameras:
- AF-Single, AF-Auto, AF-Continuous, Direct Manual Focus and Manual Focus modes
- Wide, Zone, Centre, Flexible Spot (3 sizes) and Expand Flexible Spot areas
My favourite settings are Expand Flexible Spot and Zone when shooting sports or birds in flight. I rarely use AF-A, although it doesn’t do a bad job at switching from single to continuous if the subject starts to move. That said, it can experience a small delay so I prefer to choose the best mode myself.
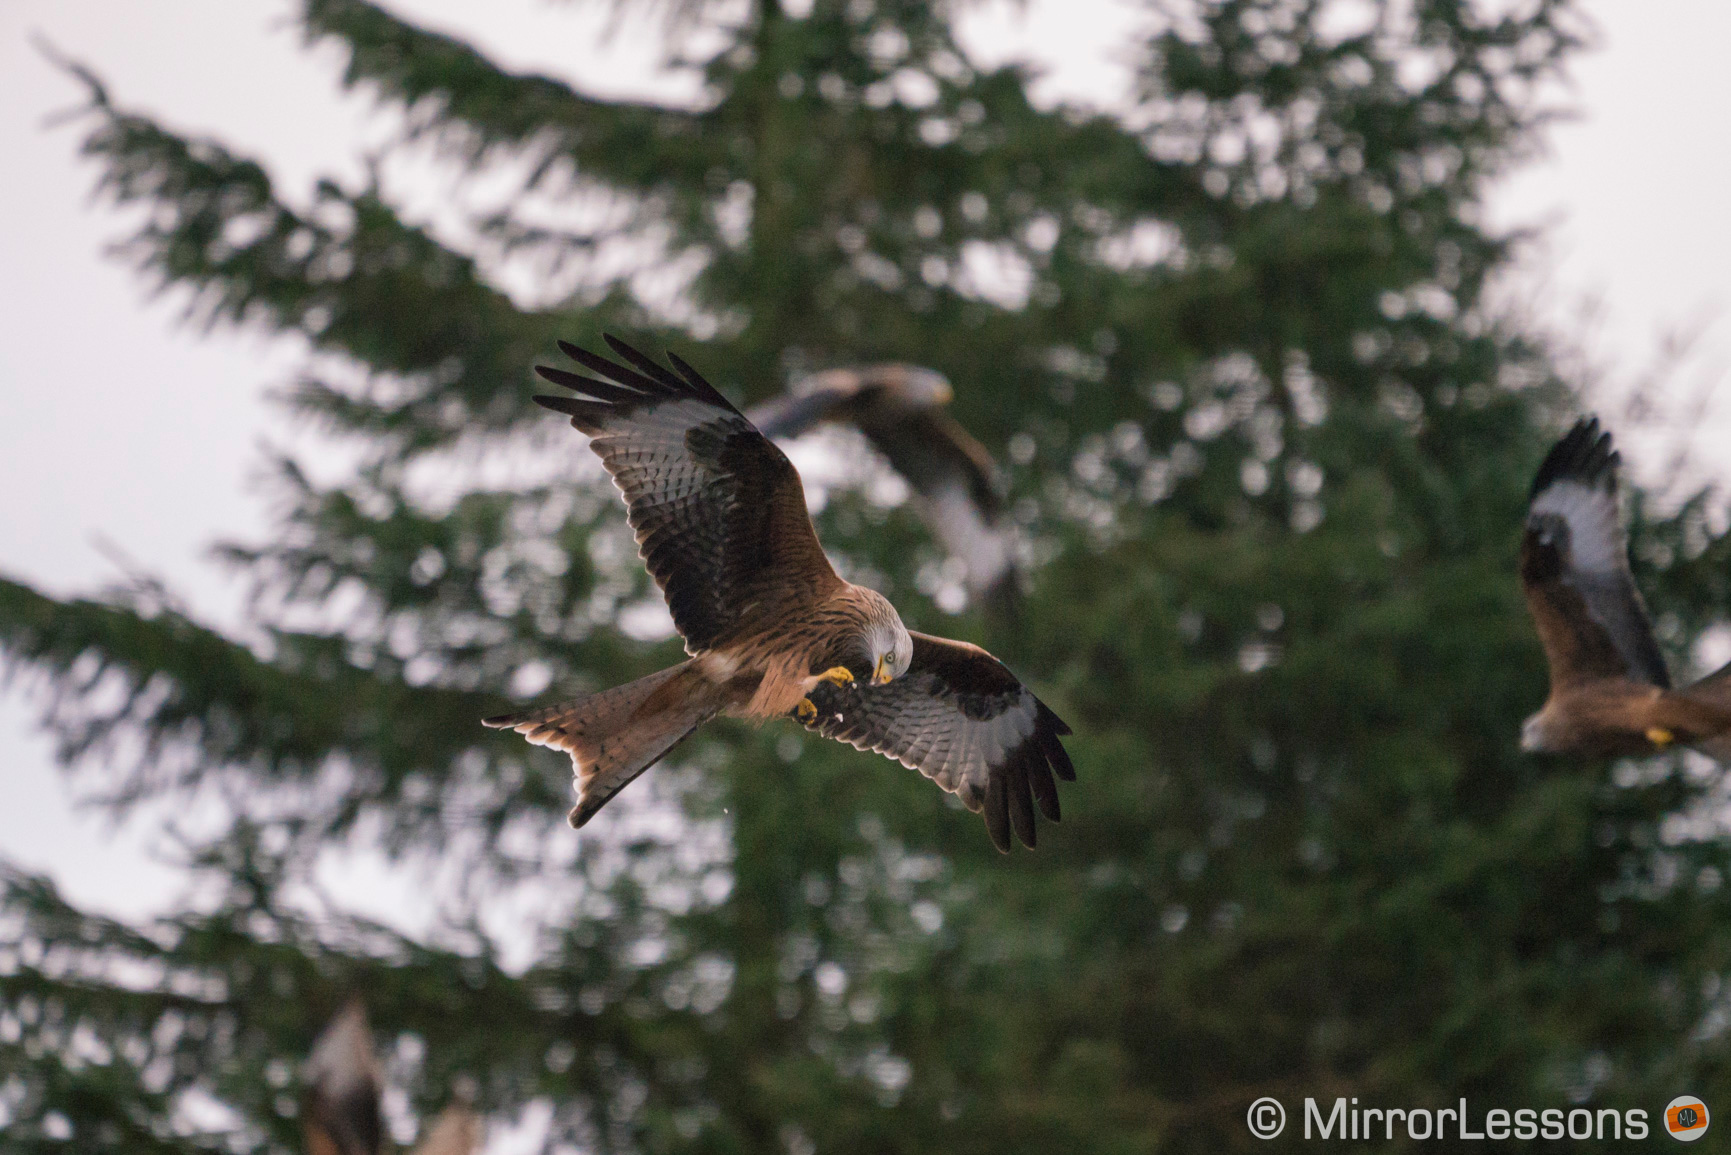
The biggest update on the A7R IV is the tracking mode, which is called Lock-On AF on the A7R III. The new camera has received the latest software algorithm which includes real time tracking. Once activated, the camera tracks the subject by analysing face, eyes, colour, brightness and distance. Tracking can be started with the touch screen on both cameras.
In real world use, this means that it is much more reliable, so much in fact that I’ve started to use this focusing mode frequently on recent Sony cameras. Whereas the A7R III Lock-ON AF can confuse the subject with the background more easily, or even stop tracking, the A7R IV stays on the subject most of the time. I was surprised to see how good it was for birds in flight too.

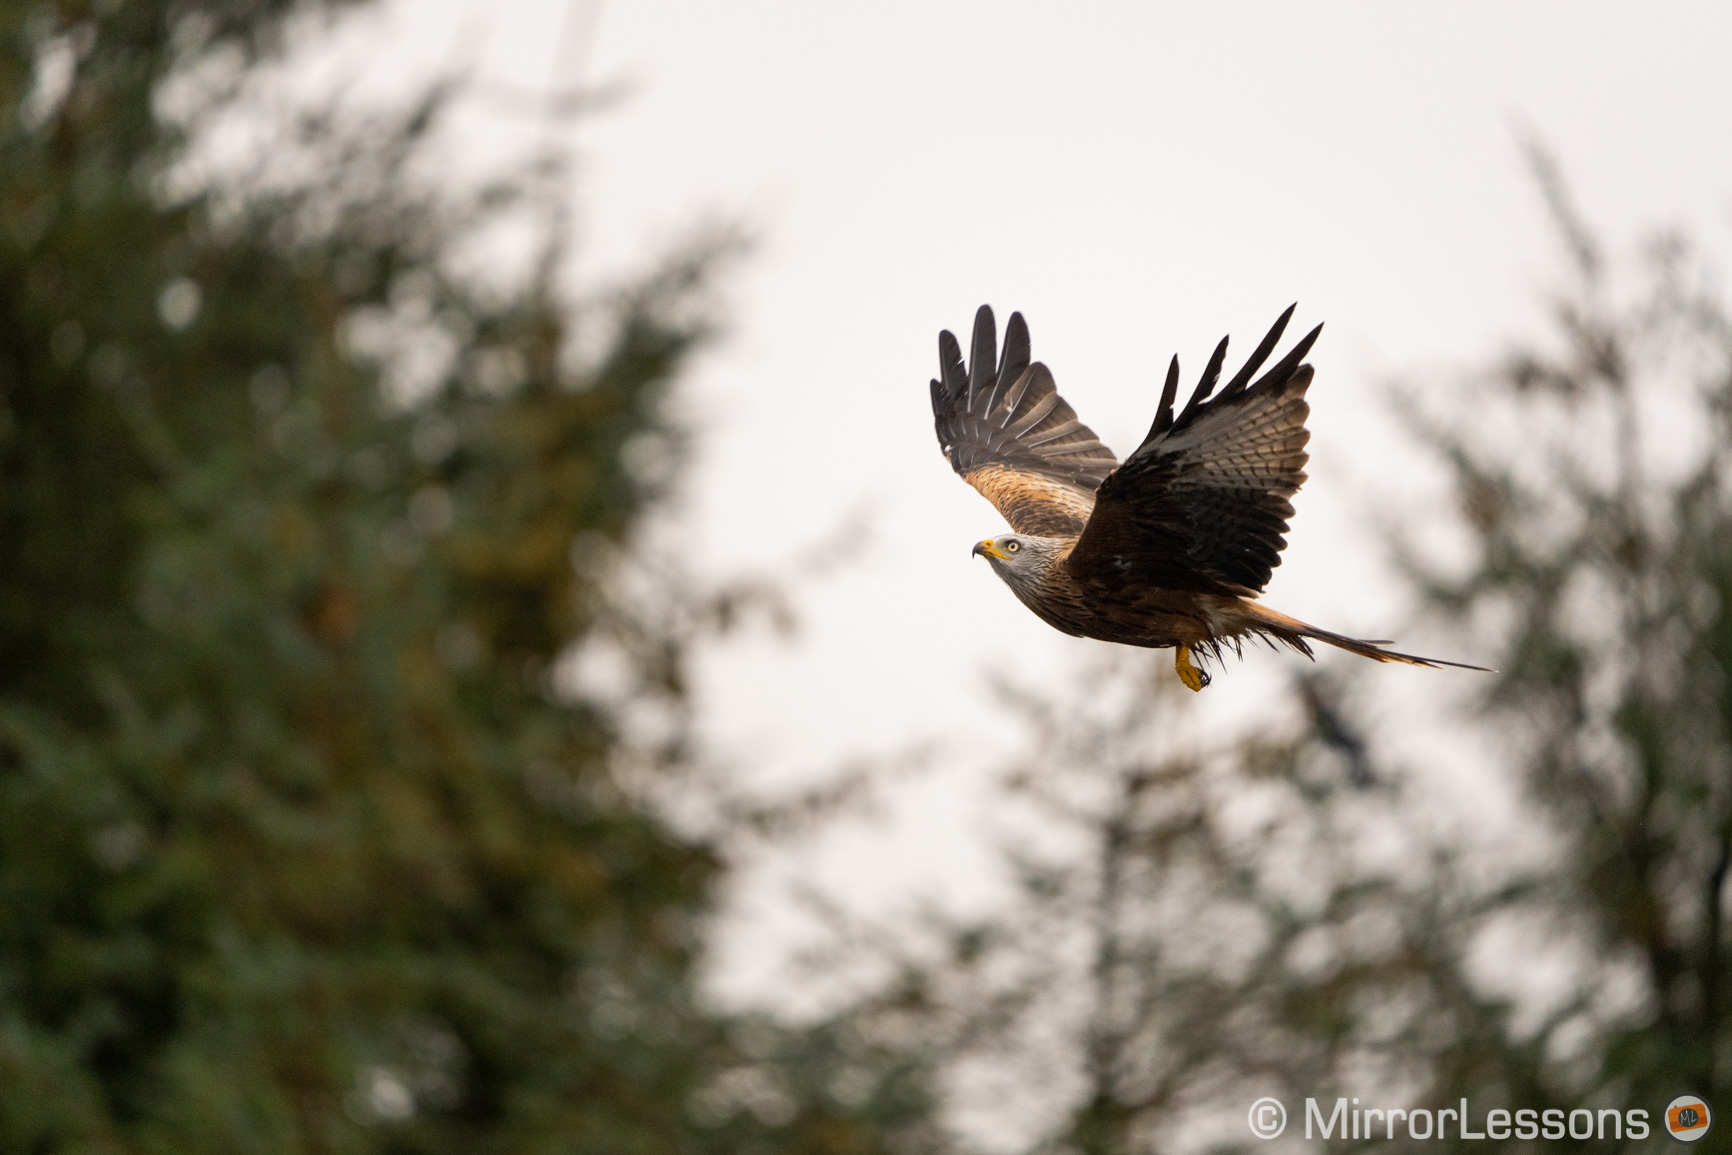
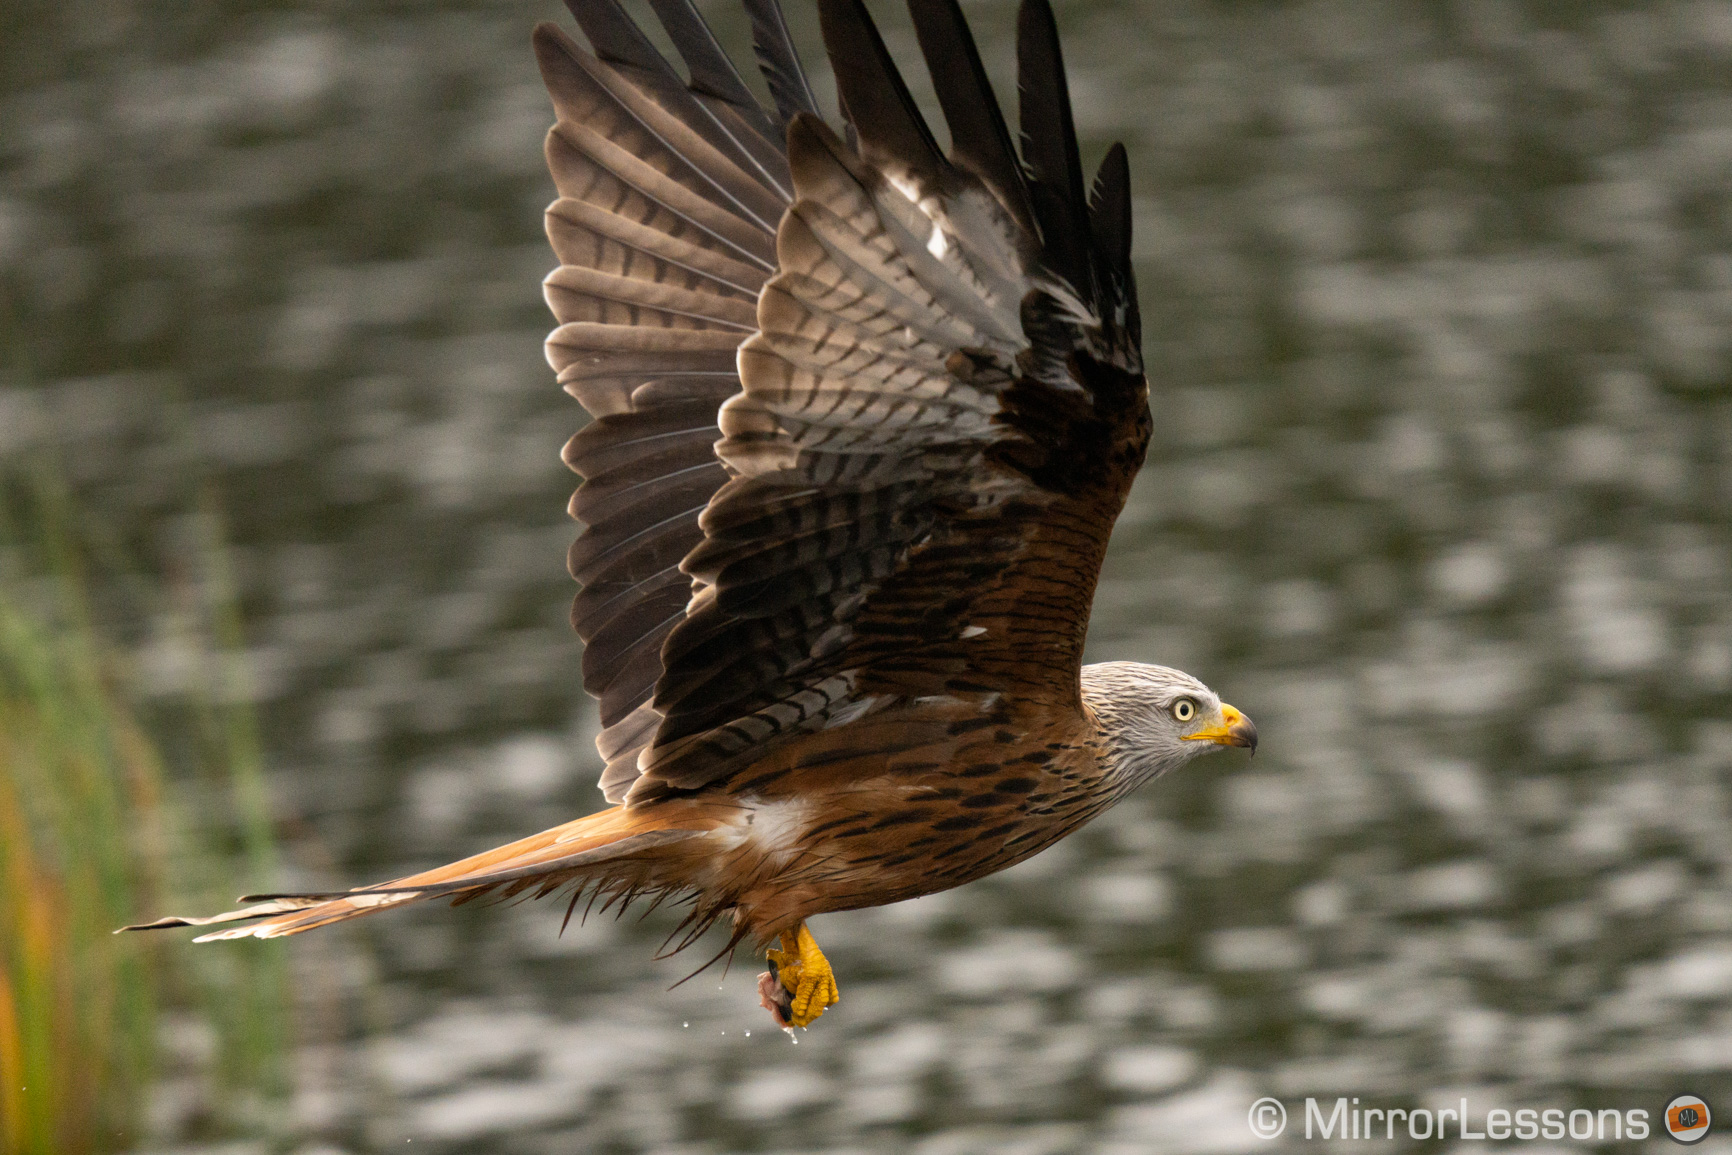
Speaking of birds, I brought the A7R IV to my favourite testing ground: the red kites. It was a cloudy miserable day but that didn’t bother me too much because I experienced similar weather conditions when I tested the A7R III a while ago. This time I had a difference lens however.
- Sony lenses used: FE 100-400mm f4.5-5.6 GM and 1.4x teleconverter on the A7R III, FE 200-600mm f5.6-6.3 on the A7R IV
- A7R III keeper rate: 64% (sharp shots only), 88% (including slightly soft images)
- A7R IV keeper rate: 62% (sharp shots only), 90% (including slightly soft images)

The A7R III gave me a better keeper rate but not by much. Again the feeling is that the mark IV has a better understanding of where the subject is at all times (judging by where it places the focus points in the live view). But all things considered, the two cameras deliver more or less the same performance.
One big advantage of using sensors with 42MP or 61MP is that there is a lot of room for cropping in post. The image below was taken with the A7R IV and after a big crop, I still had 29MP left.
Alternatively, you can take pictures in APS-C mode which gives you about 18MP on the A7R III and 25MP on the A7R IV, with the advantage of a much better buffer when shooting at 8fps or 10fps. Personally in this case I prefer to crop in post but it remains an interesting option to have.
Both models feature face and eye detection and the latter, called Eye AF, is the best eye detection system you can find. While not quite as fast as the A9, it is not far behind and can be trusted on both cameras.
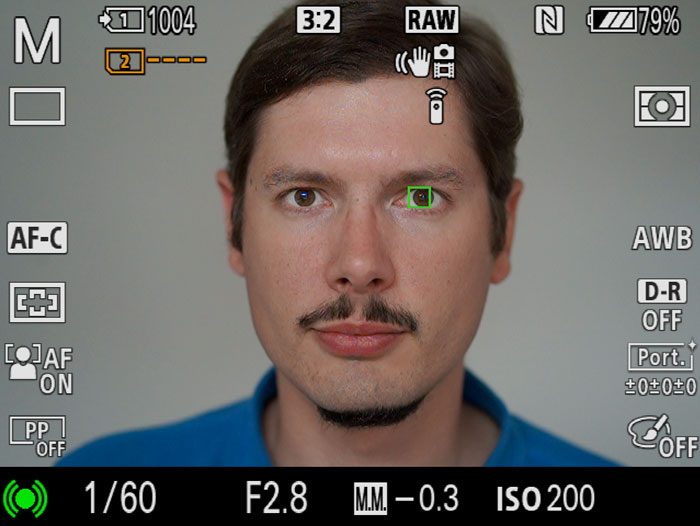
It can be used in real time when half pressing the shutter button (or back button focus) but make sure your focus area is large enough and that your subject is contained within it. Alternatively, you can assign Eye AF to a custom button and it will override any focus area used when pressed.
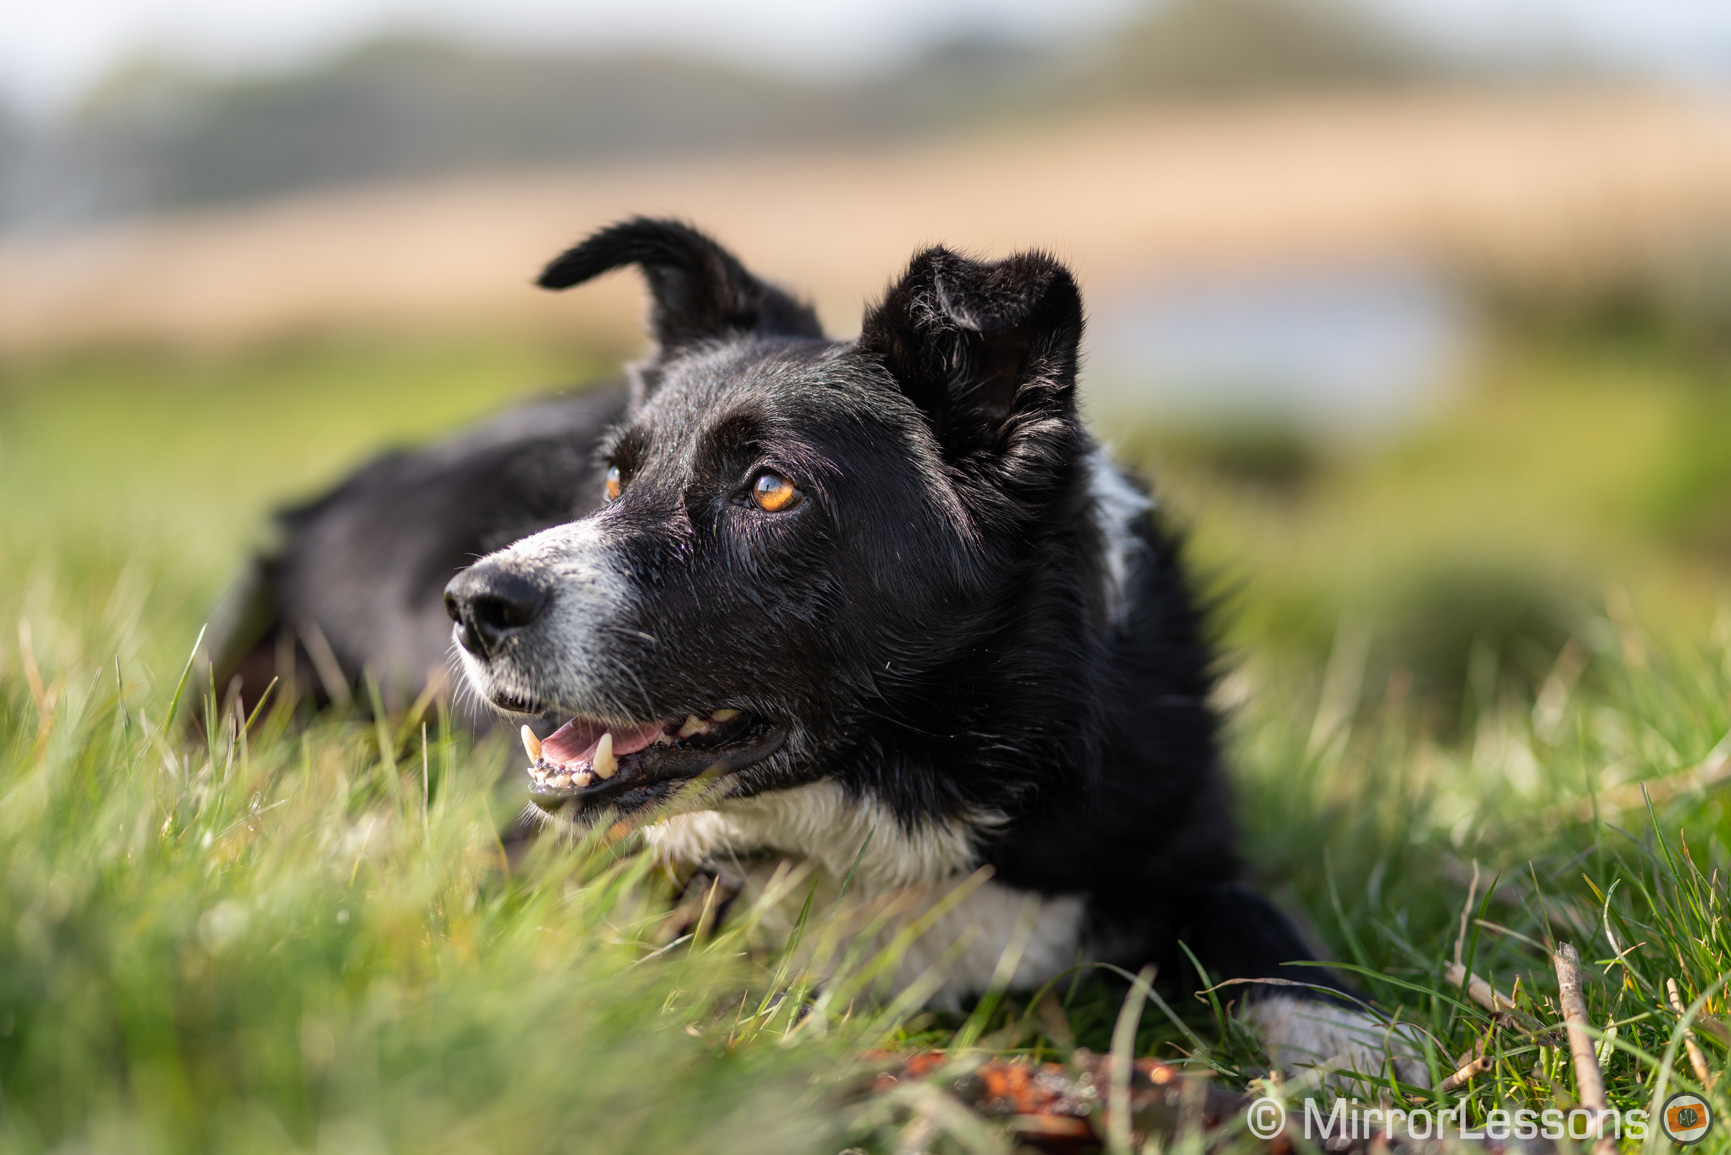
Only the A7R IV has the possibility to prioritise the left or right eye, which you can assign to a custom button as well. The cherry on top is that Eye AF works for animals too (check out our dedicated article to find out more).
The phase detection system of both cameras allows you to adapt DSLR lenses while maintaining a good focusing speed and a high acquisition rate. It is not as fast as with native lenses but is usable even for sports. There are lots of third party adapters available.
Finally, the A7R IV has two extra settings:
- Aperture Drive in AF: Focus Priority has been added to Standard and Silent
- Circ. of focus point: it allows you to go from one side of the screen to the other when moving the focus point
Shutter, Continuous shooting and Buffer
The two cameras can shoot up to 1/8000s or down to 30s, in addition to the Bulb mode.
The first thing that surprised me when I took my first picture with the A7R IV was how quiet the shutter sound is in comparison to the mark III model. Have a listen below:
You will find two settings on both products: electronic first curtain and silent shooting (full electronic mode). The former is useful to avoid motion blur which can appear when taking pictures at slow shutter speeds hand-held, or at critical shutter speeds where shutter-shock is likely to manifest itself (usually between 1/50s and 1/400s). The A7R IV seems a bit more sensitive to it, which is understandable given its high resolution, but when you want critical sharpness at those speeds, I would suggest to leave the electronic first curtain mode activated on the A7R III too.
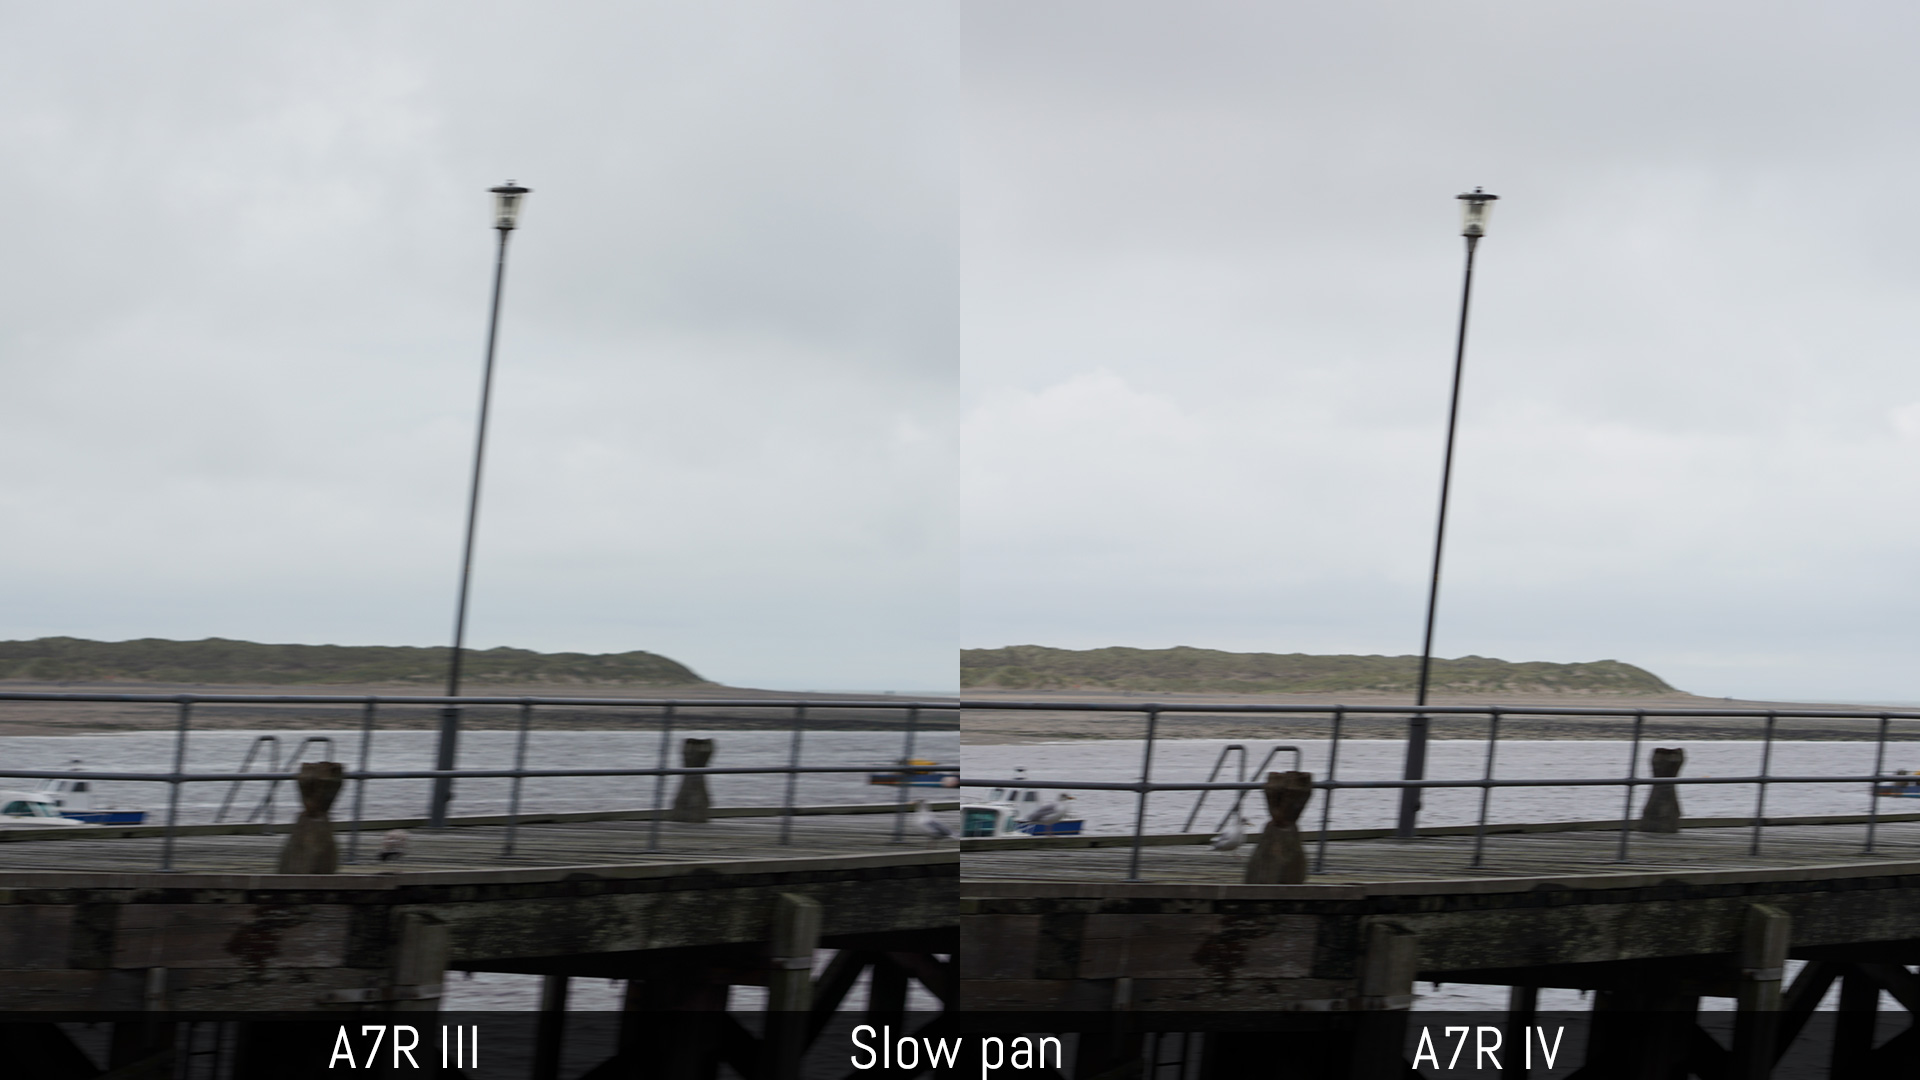
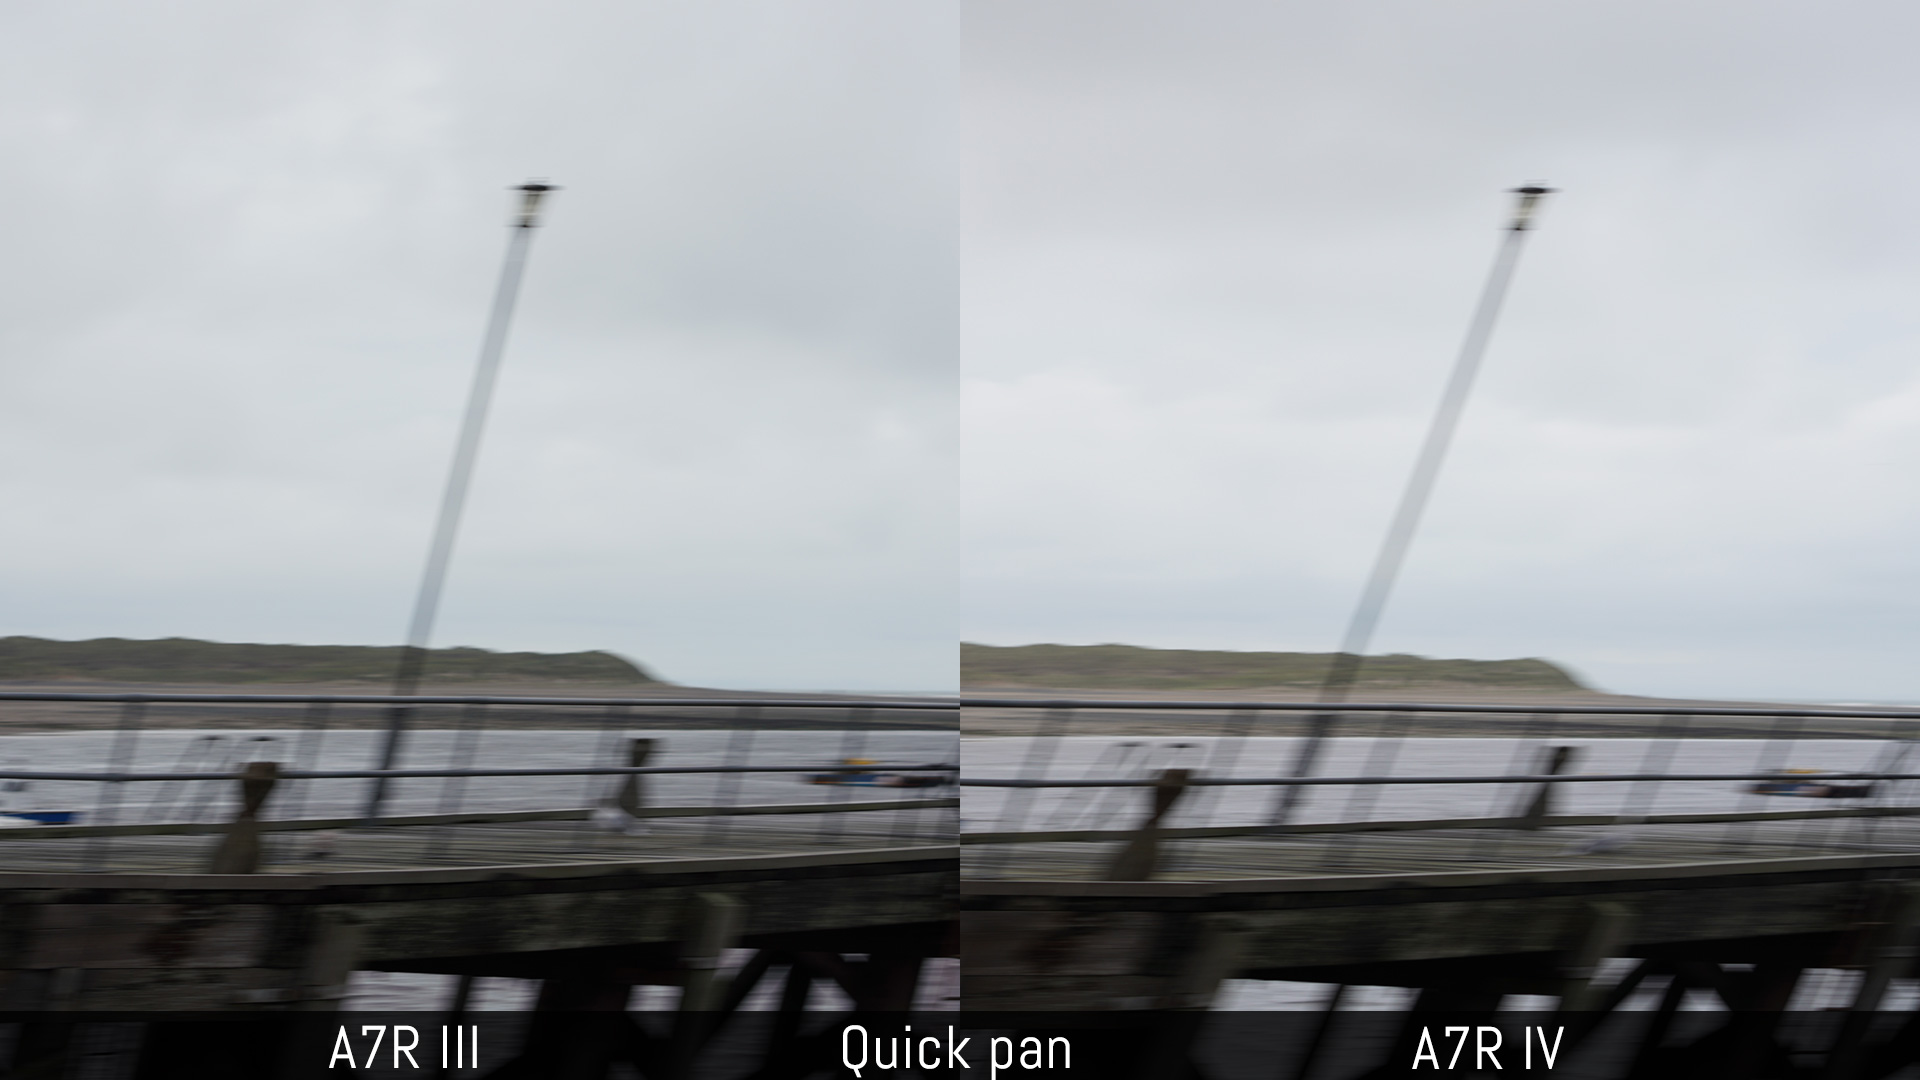
The silent shooting mode, as the name suggests, allows you to take pictures in complete silence by using the electronic shutter. Remember that this function is susceptible to distortion when panning quickly, as well as banding under fluorescent lights. Overall the A7R IV suffers more from it in comparison to the A7R III.
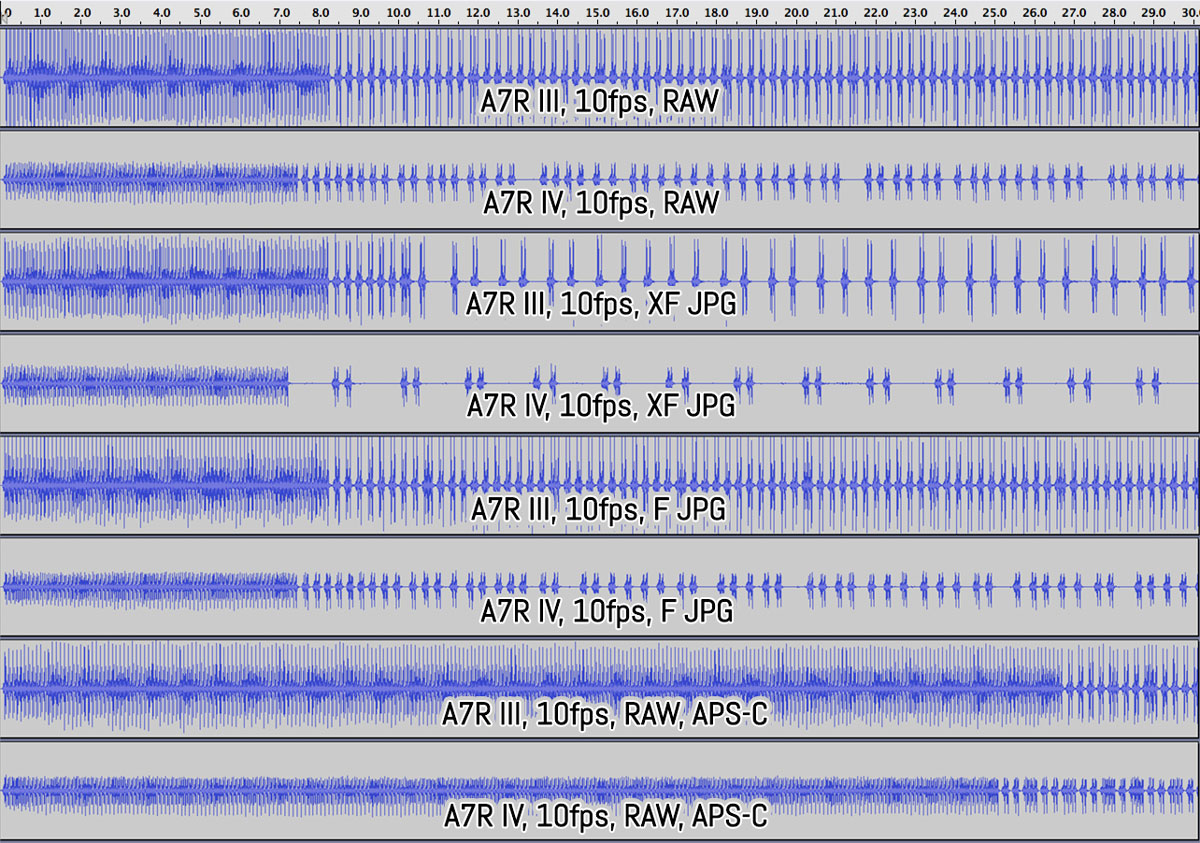
Both cameras can shoot in continuous mode at a maximum speed of 10fps with continuous AF and AE. Up to 8fps, they show you live view with blackouts, whereas at 10fps you see the last image taken.
I would have thought that the A7R IV would have a worse buffer given the higher megapixel count, but it turns out it isn’t too far behind the A7R III, which is quite impressive.
The mark III model lasts for about 8s at full speed (10fps) with compressed RAW files before slowing to 4fps. The mark IV does 7s and then slows down to 4fps as well, with the only difference being that it took a half a second break every 6s or so. Interestingly, the performance is the same with JPG Fine and worse with JPG Extra Fine where they both slow down to 2fps after the initial burst.
In APS-C mode, the lower megapixel count helps both cameras: the A7R III lasts for 26s and the A7R IV for 25s before slowing down.
The tests were made with a Sandisk Extreme Pro 300MB/S UHS II SD card.
Sony A7R III vs A7R IV – Image Stabilisation
Earlier we mentioned the Pixel Shift Multi-Shooting mode which takes advantage of the moving sensor inside the cameras, but this technology’s primary purpose is to stabilise your image when using slow shutter speeds hand-held.
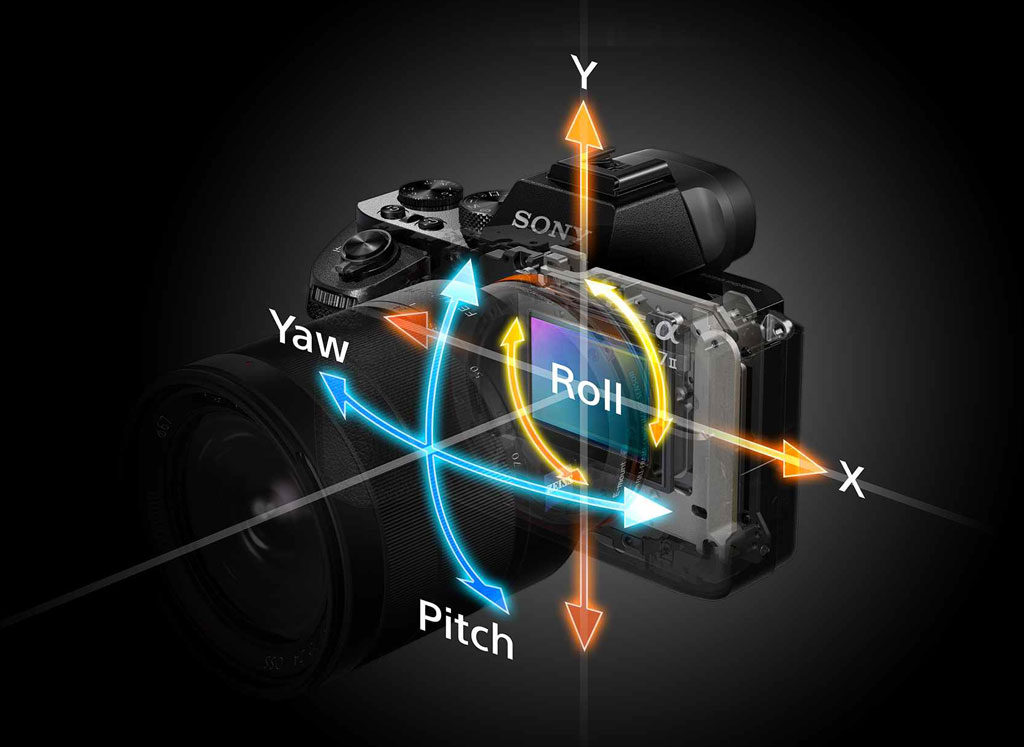
The sensor is attached to a moving mechanism and both cameras can compensate for shakes on 5 axes: Pitch, Yaw, Roll, X and Y. Their in-body image stabilisation system has an official rating of 5.5Ev (CIPA standards).
To test the performance, I took 10 pictures at different shutter speeds, not only to see how slow I could go but also to see how consistent the performance was.
The A7R III always showed mixed bag results in my tests and despite being successful with images taken around 1 second, the keeper rate is very poor, and it always struggled at 1/2s. The A7R IV does worse at 1s but with faster speeds (1/2, 1/4 and 1/8s), the new camera provides a better keeper rate.

In real world use, I would try to avoid going slower than 1/10s with the A7R III unless you’re using a very short focal length, or have time/will to capture the same moment multiple times. I would push the A7R IV a bit further but no slower than 1/4 or 1/5s to be safe. All this applies to focal lengths up to about 50mm. With longer lenses, I would double or even triple these speeds.
If you mount lenses with optical stabilisation (OSS), the cameras use 3 axes on the sensor (Roll, X and Y) and combines them with the Yaw / Pitch compensation on the lens. The performance is also dependant on the lens itself and the longer the focal length is, the more the optical stabilisation will make a difference.
If you adapt a lens that lacks electronic contacts (old vintage lenses for example), you can still use 3 axes on the sensor but you must input the correct focal length in the menu to get the optimal correction.
Sony A7R III vs A7R IV – Video
The A7R III and A7R IV can record 4K and 1080p video. There are many settings available and they both offer professional video quality.
Given the high megapixel count of each camera, the best quality is found when using the Super35 mode (1.5x) where full pixel readout without pixel binning is achieved. Recording with the full width of the sensor is possible but line-skipping is applied which reduces sharpness, although the results are better than you might think.
You can watch our full video comparison below, or check the quick summary further down.
Note on the recording limit for the A7R IV: in the video below, I mention that both cameras have the usual limit of 30 minutes per clip. I didn’t double check this on the A7R IV because I thought that the limit was the same. However multiple sources mention that the A7R IV can record for unlimited time (until the card is full). Videomaker.com tested the camera and was able to fill a 64GB card with a single file (around 1h15). European sources also mention no maximum recording time.
Big differences:
- there is less highlight clipping when using the Creative Styles on the A7R IV
- more pleasant skin tones on the A7R IV
- Eye AF is available for video on the A7R IV, and improves focus accuracy especially when focusing close with a fast aperture
- the A7R III has less rolling shutter in Super35 mode
- no 30 minutes recording limit on the A7R IV
Small differences:
- the A7R IV is a bit sharper in full frame and Super35 mode, especially when using the Creative Style
- the A7R IV retains more highlights with the log profiles, but has darker shadows and can display more colour artefacts after grading
- at high ISO, the A7R III has a more visible but thinner noise, whereas the A7R IV applies more noise reduction
- colours are very similar overall (except for skin tones), but with certain profiles the mark IV has more yellow
- the A7R IV has less jittering and is a bit smoother with in-body image stabilisation
- the initial value for focus magnification can be pre-set for video on the A7R IV
Things they have in common:
- 4K up to 30fps and 100Mbps (XAVC S codec)
- 1080p up to 120fps and 100Mbps, or 60/50fps and 50Mbps
- full frame mode (line skipping) and Super35 mode (full pixel readout)
- 3.5mm audio in and out
Note that if you select the PAL format, the maximum bitrate available in 4K is 25p and 50p or 100p in Full HD. The 24p frame rate is available in NTSC mode.
Flash and extra features
Both cameras have a maximum sync speed of 1/250s but of course this can be bypassed with compatible HSS speed-lights.
Other settings flash related are the same on the two models. You get flash compensation up to ±3Ev, flash bracketing (up to 3Ev/5 frames or 1Ev/9 frames), eye reduction, slow sync, and rear sync.
As for extra features, they share the same list which includes:
- interval-time shooting (for time-lapse)
- various bracketing options such as white balance, dynamic range (JPG only) and AE up to 3Ev/5 frames or 1Ev/9 frames
- magnification and peaking manual focus assists (3 colours for the A7R III, 4 colours for the A7R IV)
You’ll find wireless capabilities with Wifi, NFC and Bluetooth. The latter serves the purpose of geotagging your images with your smartphone, whereas with Wifi or NFC you can connect to your mobile device to transfer pictures or remotely control the cameras.
The A7R III and A7R IV allow you to connect to an FTP server to transfer your images. The mark IV can do this in the background while shooting, whereas with the mark III model you must be in playback mode.
Another option added to the A7R IV is wireless tethering. It supports 2.4GHz and 5.0GHz speed and all you need to do is to enable it in the Network menu page, connect to the camera’s network from your computer, start the Remote software (part of the Imaging Edge Suite) and you can begin tethering your images.
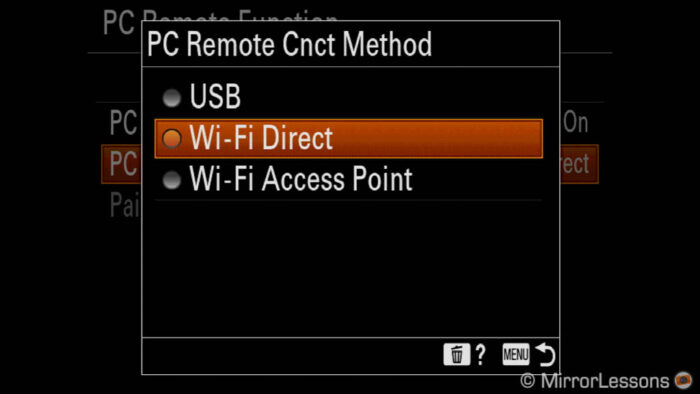
It’s quite straight-forward to use and the software gives you complete settings to work with. Obviously when shooting RAW it can take some time for the transfer to finish especially if you shoot uncompressed.
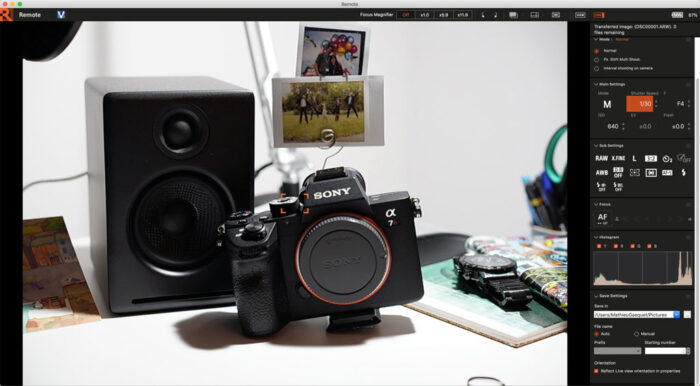
Tethering via USB is available on both products. Because the A7R IV has the USB Type C 3.2 port, it can transfer faster than the Type C 3.1 connection on the A7R III.
Battery life
The A7R III and A7R IV use the NP-FZ100 unit which means you get excellent battery life.
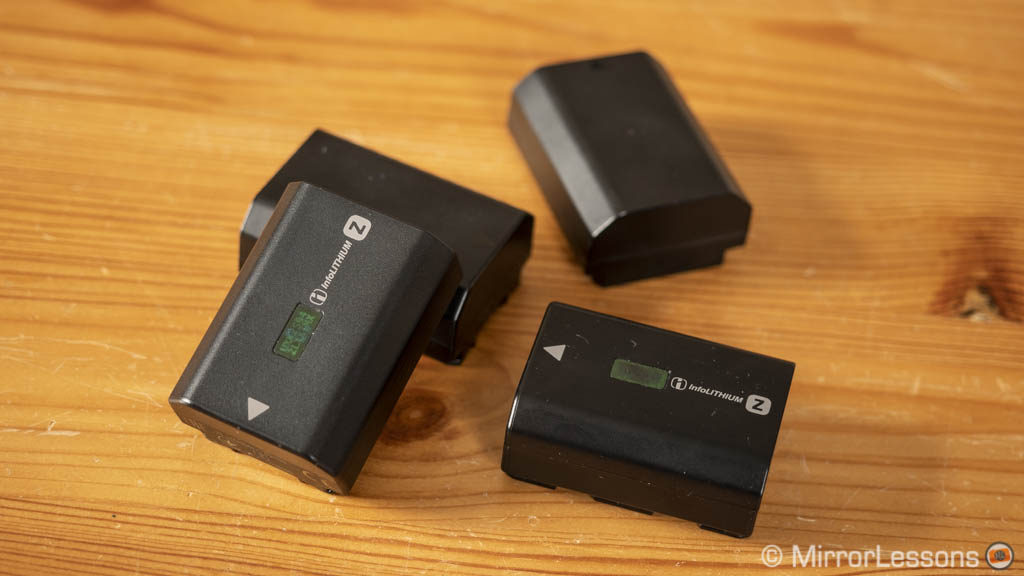
I’ve easily brought back home more than 2000 images with the A7R III, with a bit of battery life left to spare. I’ve noticed a similar performance with the A7R IV. For video, two consecutive clips of 30 minutes can consume about 35%. Of course keep in mind that these figures can vary depending on a number of things such as continuous AF and continuous shooting, viewfinder frame rate, and so on.
Both cameras can be charged via USB and a battery grip is available from Sony and third party manufactures. Note that because of the slightly different design, Sony has released a new version for the A7R IV (VG-C4EM). Hopefully third party brands will do the same soon.
Price
The A7R III has seen its price drop since its launch in 2017. You can now find it for around $2500, £2500 or €2550 (body only).
The A7R IV is more expensive. You can buy it for around $3500, £3500 or €4000 (body only).
Conclusion – Sony A7R III or A7R IV ?
The Sony A7R mark IV is nothing revolutionary in comparison to the A7R mark III, but that is perfectly fine because we didn’t need anything of the sort.
What I’m pleased to see is an upgrade to the design. It really looks like the fourth generation of Sony’s full frame mirrorless cameras is finally on the right track. The larger grip is much more comfortable and the small yet effective changes made to the buttons give it the feeling of a product that has reached maturity.

Under the surface, the various improvements represent the natural evolution of a series that is getting better and better at merging ultimate quality with speed and performance. 61 megapixels on a 35mm sensor is a lot, yet the camera focuses just as fast and with the same reliability as its predecessor. Actually, there are things the A7R IV does better like focus tracking. 61 megapixels don’t stop it from taking bursts at 10fps with a similar buffer to the A7R III. I would like to say that this is impressive, but it’s the sort of thing we’ve come to expect from Sony these days.
Resolution aside, the image quality is very similar when it comes to dynamic range. The A7R IV has a bit more noise if you engage in extreme post processing or use high ISOs, but this is to be expected, and is nothing to worry about. For video, I am pleased to see an improvement to skin tones, and I hope Sony will bring this to other cameras via firmware update. And the highly touted Eye AF now works for video, and it performs really well.
The A7R IV brings another update to the Pixel Shift Multi Shoot mode, allowing you to obtain a resolution of 240MP. I’ll reserve judgement on this because I wasn’t too impressed with the fine details. It could be a question of a simple firmware or software update.
There are of course some other negatives we can point out. The XAVC S codec is a bit old now, 10-bit recording is still missing, and the touch screen is not at its full potential. But when you have a camera like the A7R IV and you see first hand all the things it can do, complaining about what it doesn’t have rather than enjoying it for what it is doesn’t make much sense. It’s a superb machine. Period.
All that’s left to say is that the A7R III is ageing well and that its price has decreased to a point where it starts to become a bargain. I’m beginning to think that it’s not worth buying Sony cameras when they first come out. You pay less but still get what many other brands can’t match.
Strengths of the Sony A7R III:
- less expensive
- better high ISO performance
- slightly less noise with heavy post production
- less rolling shutter
- slightly better buffer
Strengths of the Sony A7R IV:
- design and grip
- more resolution in the viewfinder
- quieter shutter sound
- sensor resolution
- more reliable tracking mode for autofocus, Eye AF for video
- more pleasant skin tones in video mode
- slightly better image stabilisation
- Wifi Tethering
Strengths of both cameras:
- great battery life
- 10fps of burst shooting
- large range of native E-mount lenses
Choose the Sony A7R III if:
- you are on a budget, or want to save money for a good lens
Choose the Sony A7R IV if:
- you want the ultimate blend of image quality and fast performance
Reminder: the links below are affiliate links. If you decided to buy something after clicking the link, we will receive a small commission.
Check price of the Sony A7R III on
Amazon | Amazon UK | B&H Photo | eBay
Check price of the Sony A7R IV on
B&H Photo | eBay
Second-hand Sony gear on
MPB US | MPB UK
Sample images and additional links
You can check additional images taken with the two cameras and find original files to download by following the two links below:
To conclude, here is a list of other related articles:
Real World Comparisons
- Sony A7 III vs A7R III
- Sony A7R II vs A7R III
- Sony A7R III vs A9
- Sony A7R III vs Nikon Z7
- Sony A7R III vs Fujifilm GFX 50s
- Sony A7R III vs Panasonic S1R