When you turn on your Sony A7 camera for the first time, you’ll notice that there is an extensive and somewhat confusing menu system with multiple pages and some terminology that isn’t easy to understand at first. I sometimes find myself having to refer to the user manual even today, despite having owned and worked with Sony full-frame products for many years.
In this article, I’m going to guide you through some useful tips and explain how to customise the camera so that accessing your favourite functions becomes much less of a hassle.
A7/A9 series compatibility
To make this article easier to read, I’m not going to repeat all the model names in every paragraph. However you can consider this article valid for the A7 III, A7R III, A7R IV, A9 and A9 Mark II. The A7 mark II generation has an older menu system but most of the settings remain the same. Some functions might be located in a different part of the menu (or simply on the previous or next page) depending on the specific model.
Ethics statement: we own the A7 III and A7R III, and we have tested all the other A7 cameras. We were not asked to write anything about these products, nor were we provided with any sort of compensation. Within the article, there are affiliate links. If you buy something after clicking the link, we will receive a small commission. To know more about our ethics, you can visit our full disclosure page. Thank you!
Table of Contents
1. Menu and Buttons Breakdown
2. In-camera Guide
3. My Menu
4. Function Menu
5. Dial Settings
6. Custom Buttons
7. Memory Settings
8. Sony Alpha Mirrorless Cameras Resources
Reminder: the links below are affiliate links. If you decided to buy something after clicking the link, we will receive a small commission.
Check price of the Sony A7 III on:
Amazon | Amazon UK | B&H Photo | eBay
Check the price of the Sony A7R III on:
Amazon | Amazon UK | B&H Photo | eBay
Check price of the Sony A7R IV on
Amazon | Amazon UK | B&H Photo | eBay
Check price of the Sony A9 on
Amazon | Amazon UK | B&H Photo | eBay
Check price of the Sony A7 II on:
Amazon | Amazon UK | B&H Photo | eBay
Check price of the Sony A7R II on:
Amazon | Amazon UK | B&H Photo | eBay
Breakdown of Sony A7 III, A7R III, A9 Menu and Buttons
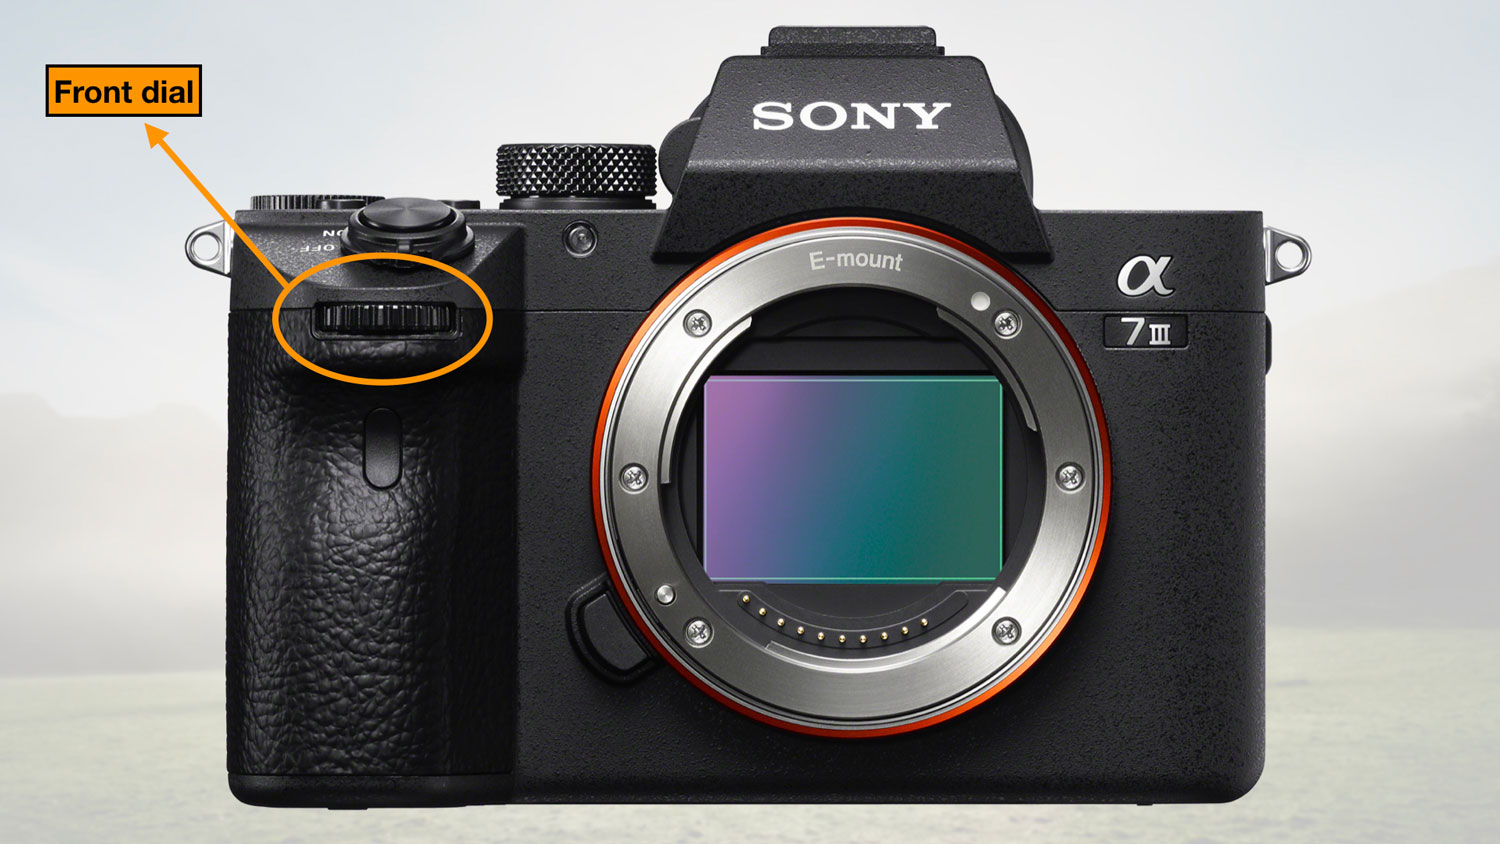
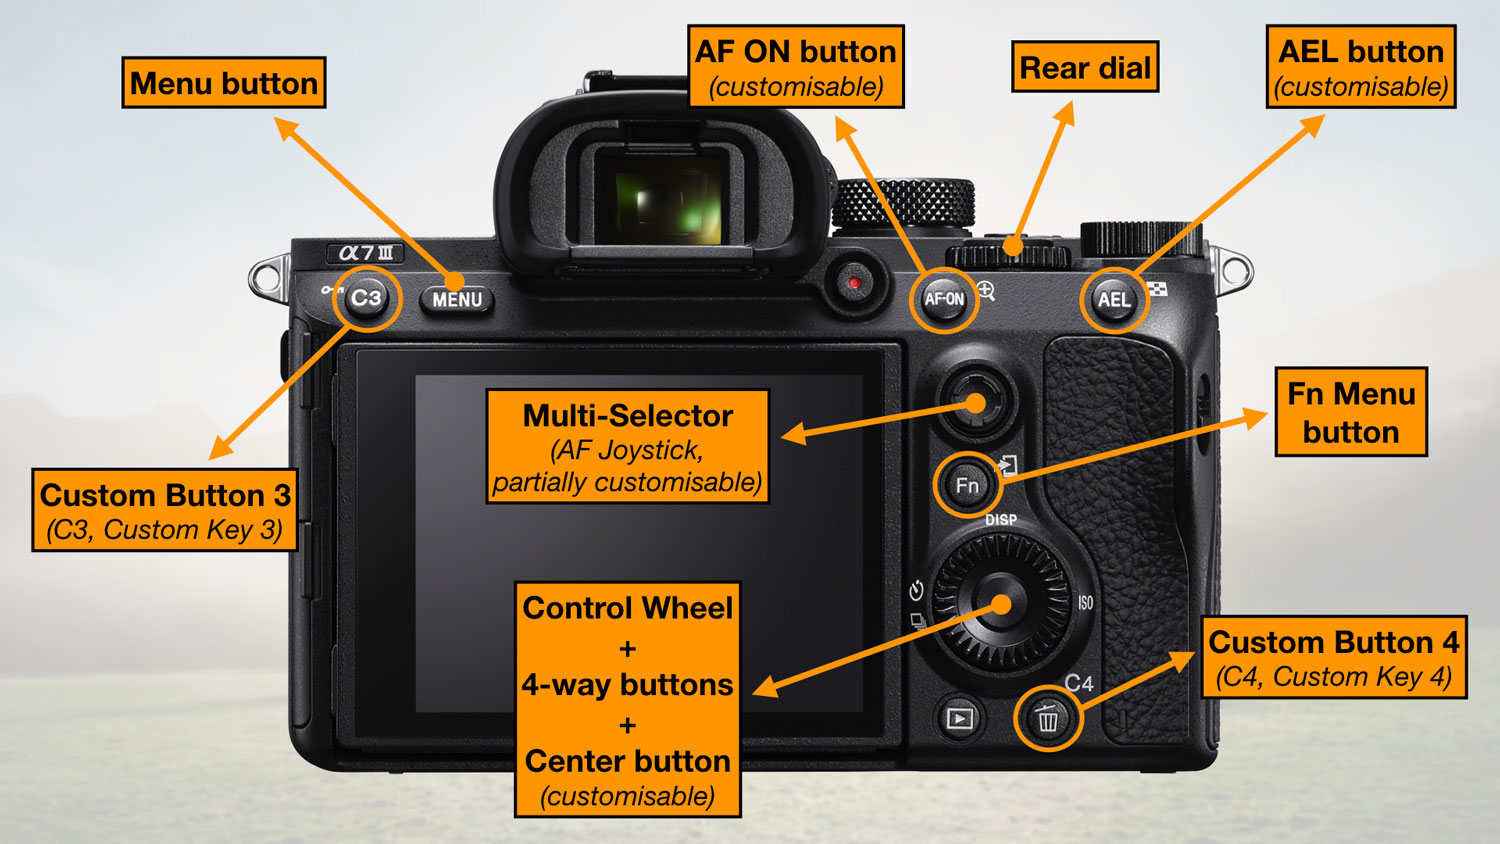
Throughout the article, I will mention different button names. Here is a breakdown of all the physical controls on A7 cameras.
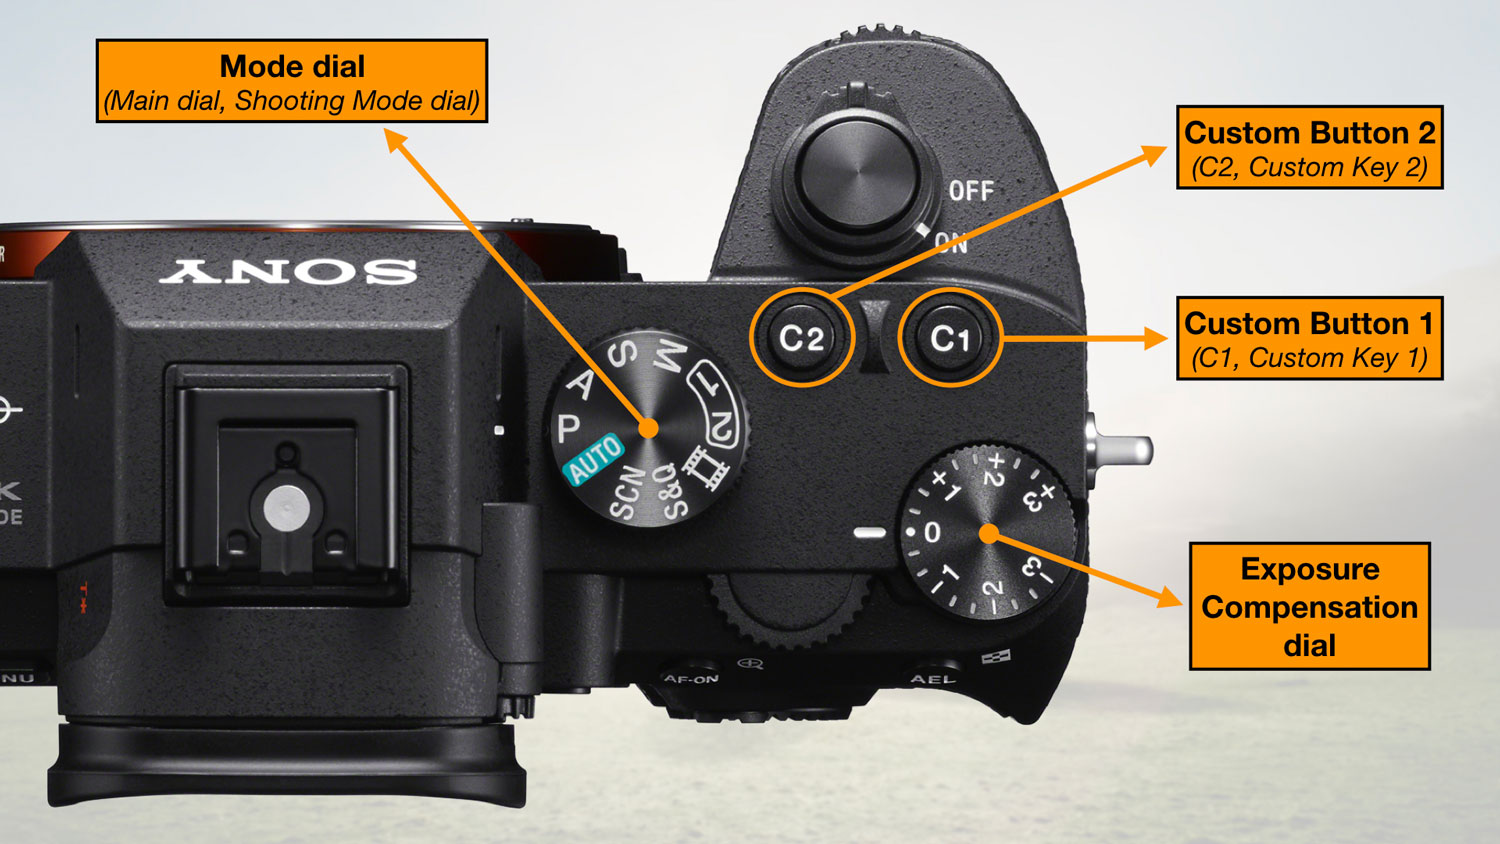
On the A9 series, there is an extra set of dials on top to control the drive and focus modes.
To open the menu, press the dedicated button on the rear next to the EVF on the left. The main menu is divided into six categories, which you can identify thanks to the icons along the top:
- Camera Settings 1
- Camera Settings 2
- Network
- Playback
- Setup
- My Menu
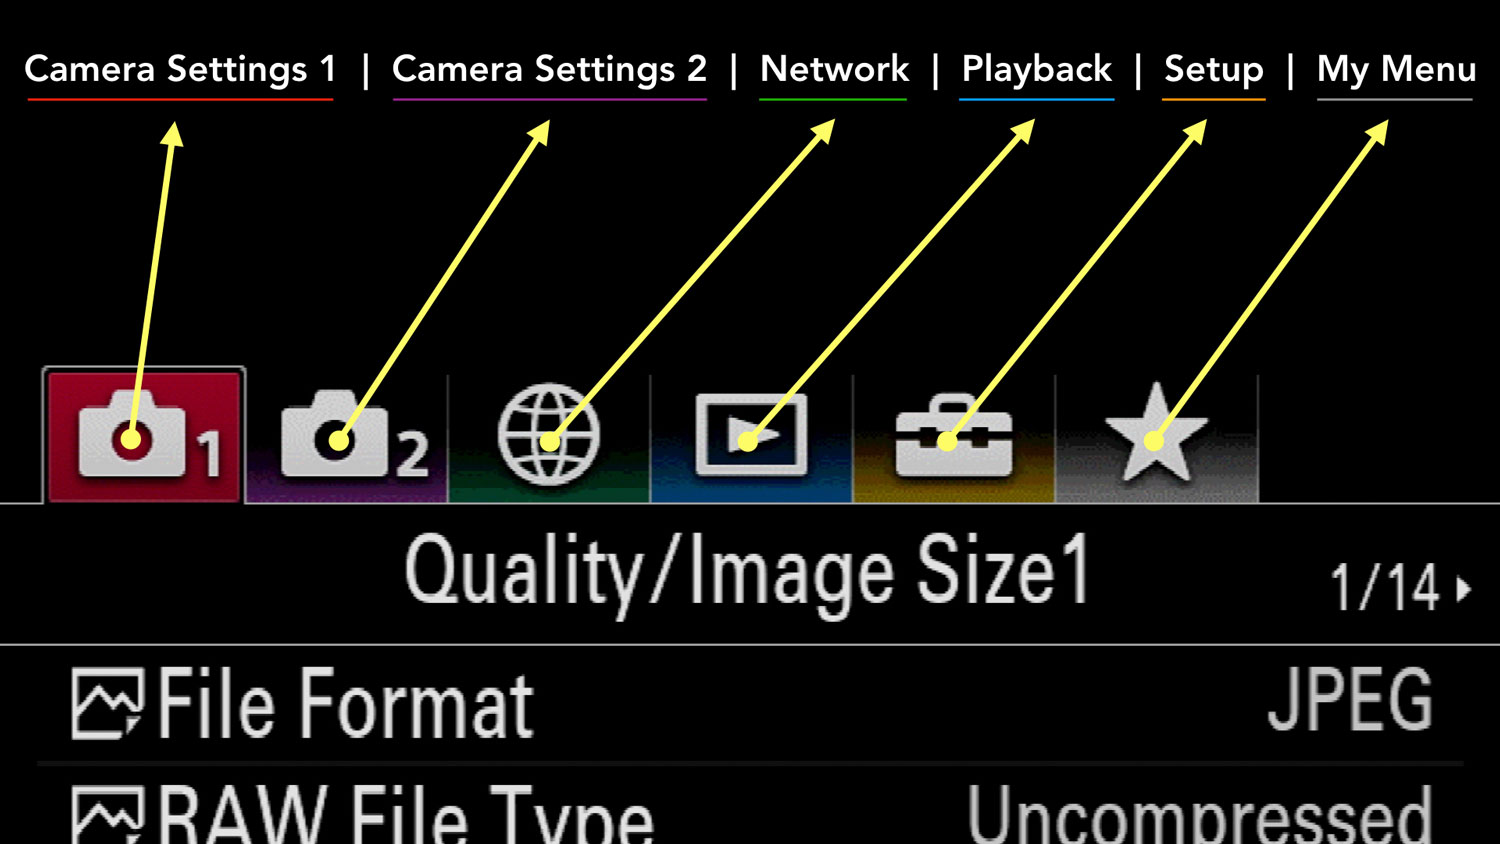
When you navigate these sections, you can see that each page is identified with a title and a number to help you navigate quicker. You can enter any setting by pressing the centre button or the joystick.
On older Sony models (I and II series), some icons are different, Camera Settings 2 is called Custom Settings and there are no page title / number.![]()
![]()
In the following sections, I’m going to explain how to customise the camera. It goes without saying that my solutions suit my way of working, and I encourage you to change things to suit your preferences. Consider this a starting point.
Sony A7 III, A7R III, A9 Menu Setup: In-camera Guide
You’ll come across setting names that are not easy to understand at first, partly because Sony tends to shorten many words so that everything fits.
A good solution for this is to activate the guide available on your camera. Once active, you can browse through the menu, highlight a setting and press a button to display what the setting does. The explanation is not always clear, but it will certainly give you a hint about what that specific function is for.
To activate the in-camera guide, you need to assign the option to a custom button. Follow these steps:
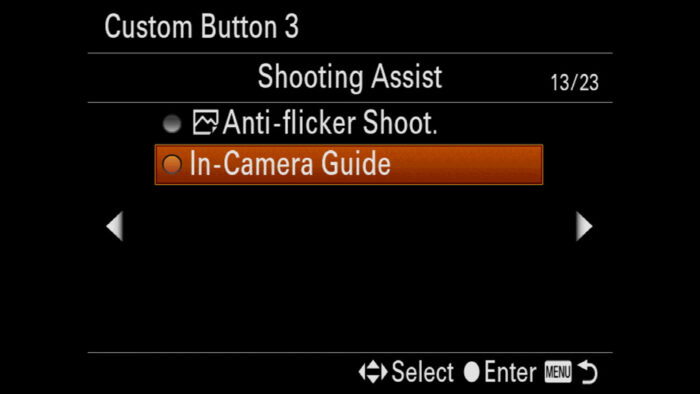
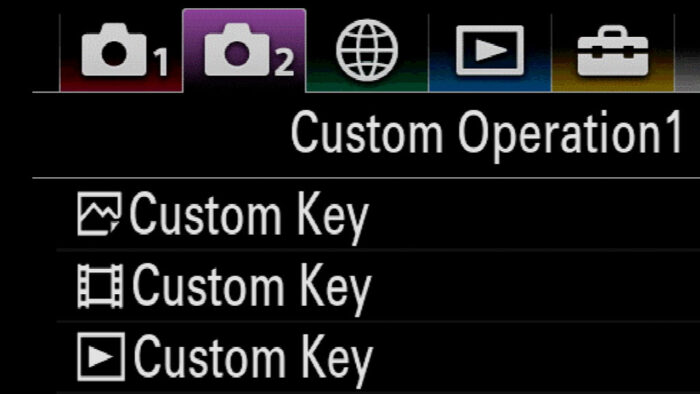
- Go to Camera Settings 2 / Custom Operation 1 (pages 8/9)
- You’ll see three Custom Key entries with different symbols (image, video and playback icons). Choose the first one (image icon) and press the Centre button.
- Once inside, you’ll see a list of all the customisable buttons available on the camera. The In-Camera Guide can only be assigned to Custom Buttons 1 to 4. Choose the one you prefer.
- There are no fewer than 23 pages of settings you can assign to this button. Go to 13/23 and choose In-Camera Guide. Once it is done, the camera goes back to the previous section.
- Press Menu to go back to the main menu page. Now you can highlight any of the settings, press the button you configured and a description should appear on the screen.

I’m not going to describe all the settings of the menu because it would take a huge amount of time and you probably don’t need all of them anyway.
If you want to know which settings you should play with first, please check out our Sony A7 III, A7R III Best Settings and Set-up Tips. (coming soon)
We also have set-up guides available for various genres and specific features. You can access the entire list with the link below.
How to Setup and Use your Sony camera

Sony A7 III, A7R III, A9 Custom Setting: My Menu
Not available on the A7 I and A7 II series.
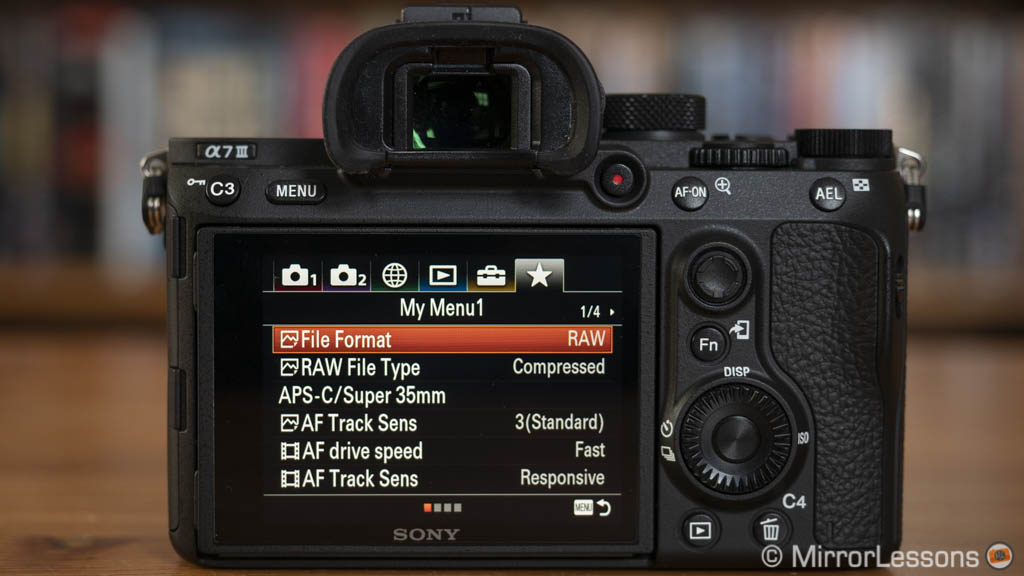
A really useful thing you can do as you learn to use your Sony camera is to add settings to the My Menu section, which is located on the far right and represented by the Star icon. You can add a list of settings you use the most, or that you simply want to access quickly. There is space for four pages.
Over time, you’ll probably update My Menu as you develop a clear idea of the functions you tend to use most. For now, a good way to start is to add a few things that you’ll likely need at your finger tips.
To add a setting to My Menu, follow these steps:
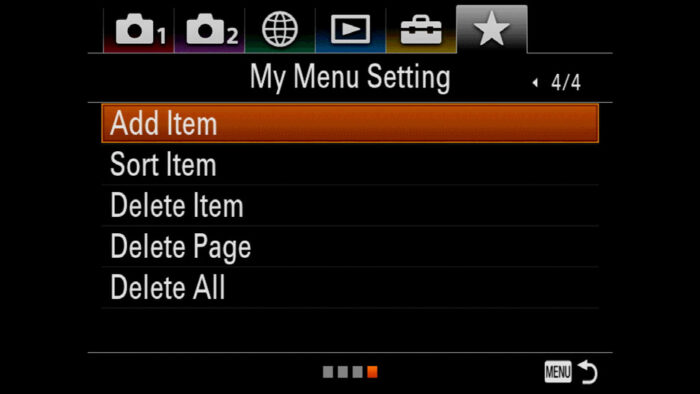
- Go to My Menu / My menu Settings and select Add Item
- A list divided into 33 pages and by category (Quality, AF etc.) will appear. The order is the same as the one found in the main menu. Use the left and right buttons of the rear wheel or joystick to navigate, then press the centre button to select the setting you want to add to My Menu.
- Next you need to choose which page you want the setting to appear on (My Menu 1 to My Menu 4). Then press OK again. The camera will confirm that the setting has been added.
- You can continue to add other settings, or press the Menu button to go back to My Menu. The setting you added will appear on the page.
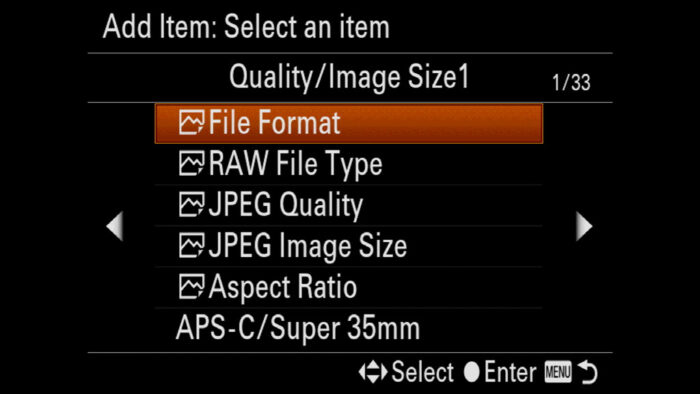
Note: when there are settings already registered in My Menu, you must add a new one at the end of the list. If you try to add it before, it will overwrite the setting highlighted in orange. You can reorder the settings afterwards.
On the My Menu Setting page, there are other options:
- Sort Item: it allows you to move one setting above or below another, or to another page
- Delete Item: it deletes a select setting from My Menu
- Delete Page: it removes an entire page from My Menu
- Delete All: it clears the entire My Menu (all the pages)
Below is a list of how I have configured My Menu on my A7 III and A7R III. The settings in bold are the ones that I recommend adding from the start, whereas the other ones are at your discretion. Feel free to copy everything if you like.
My Menu 1
- File Format: I often switch between RAW and JPG
- RAW File Type: likewise, I change the RAW compression depending on the type of shooting
- JPG Quality: to change the JPG compression
- APS-C / Super 35mm: to switch between full frame and APS-C crop mode
- Face/Eye AF Set.: I often use Face and Eye AF so I like to access the settings quickly without having to remember where they are in the menu
- AF Track Sens: to change the responsiveness of the autofocus

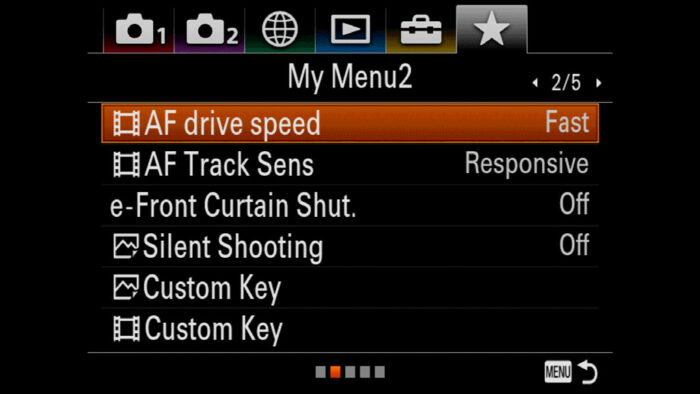
My Menu 2
- AF Drive Speed: set the AF speed in video mode
- AF Track Sens: set the AF reactivity in video mode
- e-Front Curtain Shut.: useful to activate when taking pictures at slow shutter speeds hand-held
- Silent Shooting: likewise, useful to have if you want to be discreet
- Custom Key (stills): even after years of use, I still update custom buttons from time to time
- Custom Key (video): same as for stills
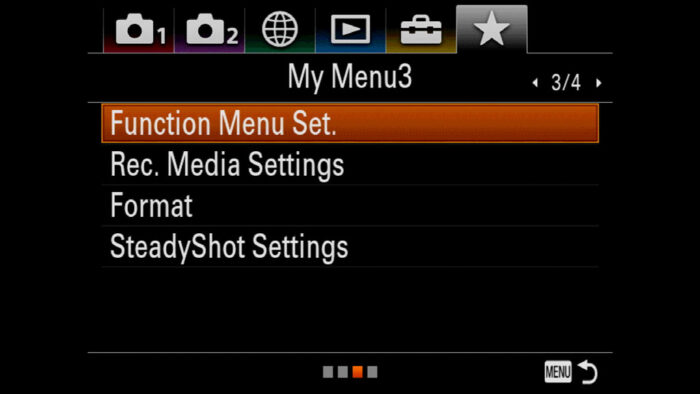
My Menu 3
- Function Menu Set: to update the Fn menu
- Rec. Media Settings: all the settings related to the dual SD card slot
- Format: one of the things I do most frequently is format SD cards!
- SteadyShot Settings: useful if you take pictures hand-held with manual focus lenses
Custom Settings for Sony A7 III, A7R III, A9: Function Menu
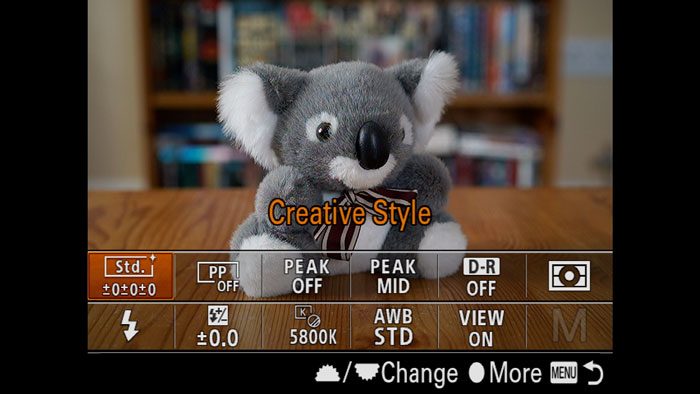
The Function Menu appears when you press the Fn button on the rear of the camera. It is a quick menu that overlays the live view of the screen, which means you can keep an eye on your composition.
By default, your Sony camera will have a factory selection of settings already assigned to the 12 available slots. You can of course change any of them. To do so:
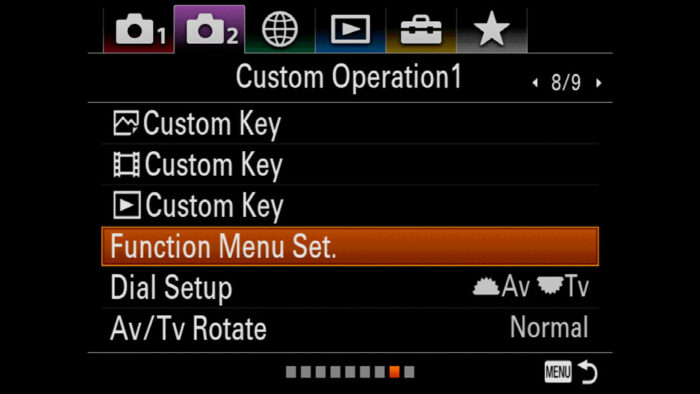
- Go to Camera Settings 2 / Custom Operation 1 (page 8/9)
- Scroll down to Function Menu Set. and press OK
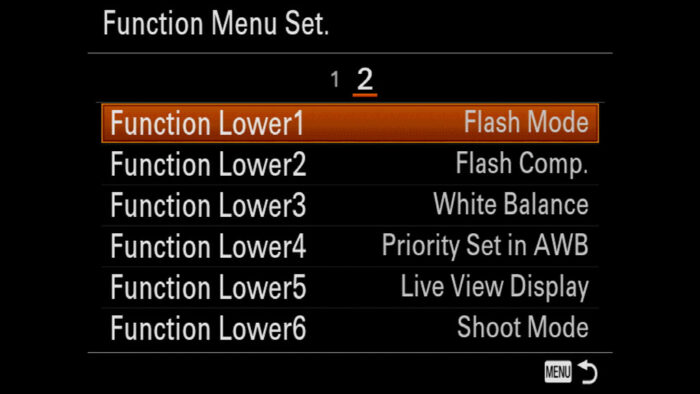
- You’ll see two pages with Function Upper and Function Lower, which are related to the top row and bottom row of the Fn Menu
- Choose one of the functions you want to update and press OK
- Scroll through the list, select a setting and press the centre button again.
- Repeat for the other functions or press Menu to exit
On the A7R IV and A9 II, the GUI is different and a bit more comprehensive.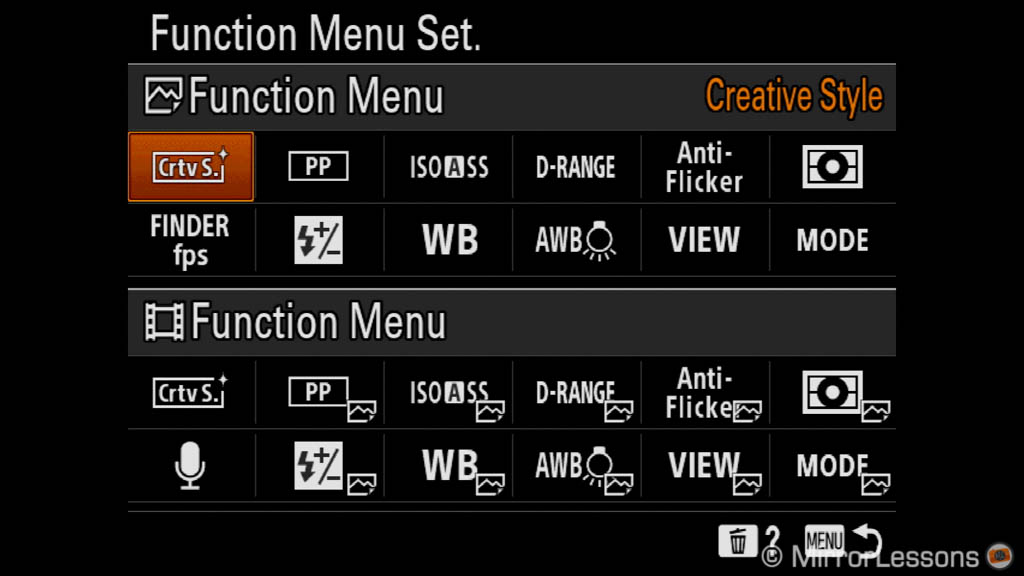
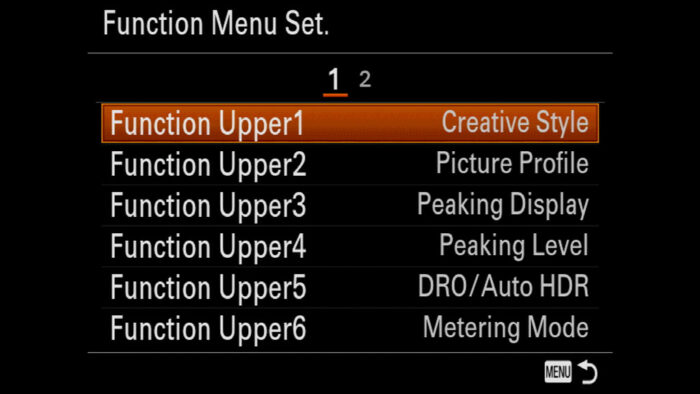
Here as well, I’ll give you the list I configured in my A7 III and A7R III Fn Menu. Once again I’ve highlighted in bold the must-have settings I would start with (some might be there already, just in a different position):
- Function Upper 1: Creative Style (I often change the picture profile if I shoot JPGs)
- Function Upper 2: Picture Profile (same reasoning for video)
- Function Upper 3: Peaking Display
- Function Upper 4: Peaking Level
- Function Upper 5: DRO / Auto HDR
- Function Upper 6: Metering Mode (useful to change depending on the scene)
- Function Lower 1: Flash Mode
- Function Lower 2: Flash Comp.
- Function Lower 3: White Balance (unless you shoot RAW, you’ll want to keep an eye on this setting)
- Function Lower 4: Priority Set in AWB
- Function Lower 5: Live View Display (useful to turn off the exposure preview in certain situations such as birds in flight, studio flash)
- Function Lower 6: Shoot Mode (this is useful to have in video mode to change shooting modes such as Manual or Aperture priority)
Sony A7 III, A7R III, A9 Dial Settings
There are four Sony A7 III custom dials you can configure on Alpha cameras: the front and rear dials, the rear control wheel and the Main Shooting mode dial on top.
The rear wheel is linked to the custom buttons so please check the chapter below for this. The Top dial set-up refers to the Memory Recalls, which we talk about further down in this article.
There aren’t a lot of options to configure for the front and rear dials: you can decide which one controls the shutter speed and which one to use for the aperture, as well as the rotation direction.
- Go to Camera Settings 2 / Custom Operation 1 (page 8/9)
- Scroll down to Dial Setup and press OK
- Choose Tv Av to set shutter speed (Tv) to the front dial, aperture (Av) to the rear dial
- Choose Av Tv to set aperture to the front dial, shutter speed to the rear dial
- Press OK

To change the rotation:
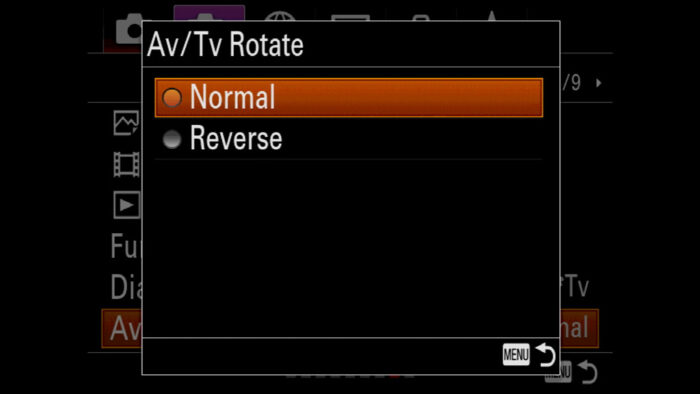
- In Camera Settings 2 / Custom Operation 1 (page 8/9), go a step down to Av/Tv Rotate
- if you choose Normal, the value will increase when rotating clockwise, and will decrease when rotating anti-clockwise
- if you choose Reverse, the opposite will happen: the value will decrease when rotating clockwise, and increase when rotating anti-clockwise
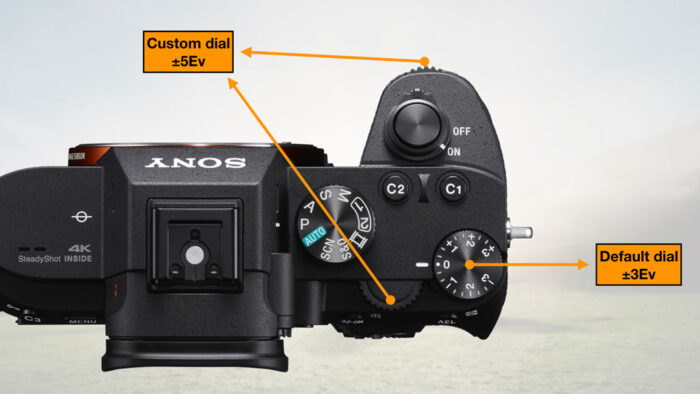
The third and last setting for the front/rear dials gives you control over exposure compensation. By default, you can do this with the dedicated dial on top of the camera, but if you choose the two other dials instead, you can increase the compensation from ±3 to ±5Ev.
If you’re fancy doing that:
- Go to Camera Settings 2 / Custom Operation 2 (page 9/9)
- Enter Dial Ev Comp
- Choose Front dial or Rear dial. If you change your mind and would rather stick with the default top dial, select Off.

Limitation: exposure compensation assigned to the front or rear dials doesn’t work in Manual Shooting mode.
Sony A7 III, A7R III, A9 Custom Buttons
The other important part of our A7 III custom settings journey, in addition to My Menu and the Fn Menu, is the custom buttons (also called Custom Keys, or more popularly Function Buttons).
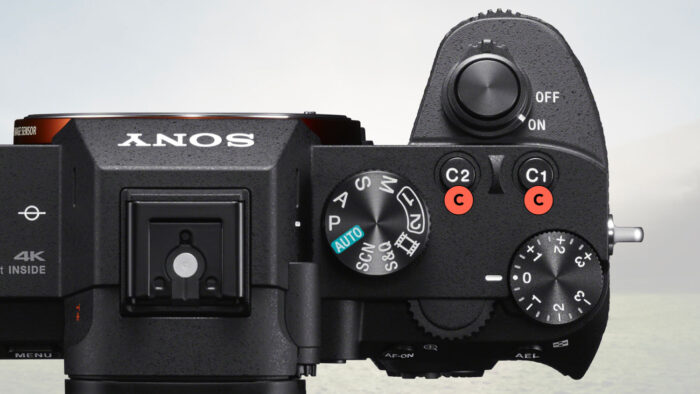
The recent A7 cameras have a total of 12 custom buttons. Some are labelled C1 to C4, white others have a default function that is marked on the button itself, but you can change it.
Note: there is a thirteenth button called Focus Hold Button which refers to the function button present on select Sony lenses.
Here is a visual of all the A7 III custom buttons you can personalise on the cameras.
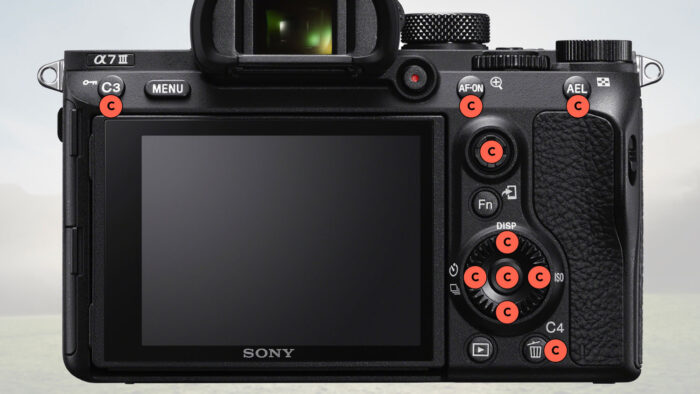
Note: the rotation of the rear control wheel can be customised too. The joystick can only be configured for when it is pressed at the centre.
To set or change custom buttons on the Sony A7 III, A7R III & co., start by going to: Camera Settings 2 / Custom Operation 1 (page 8/9).
There are three Custom Key entries in the menu. The first one with the image icon is for still image shooting, the second with the film icon is for the Movie mode and the third for the Playback mode.
On the A7 I and A7 II series, only one custom key entry is available.
My advice is to start with the first at the top, Custom Key for Stills (picture icon). The other two will automatically be configured in the same way. Once you’ve set all the buttons, you’ll have the chance to go to the Custom Key for Movie or Playback and change whatever is necessary according to your needs.
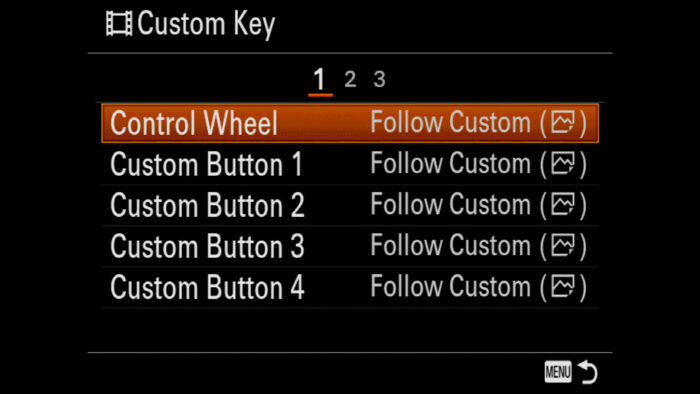
- Enter Custom Key
- Choose the button you want to customise and press OK
- Select the setting you want to assign to the button, then press OK
- Repeat the process for the other buttons or press Menu to exit
Limitation: not all the settings can be assigned to all function buttons. For example the control wheel has fewer options to choose from.
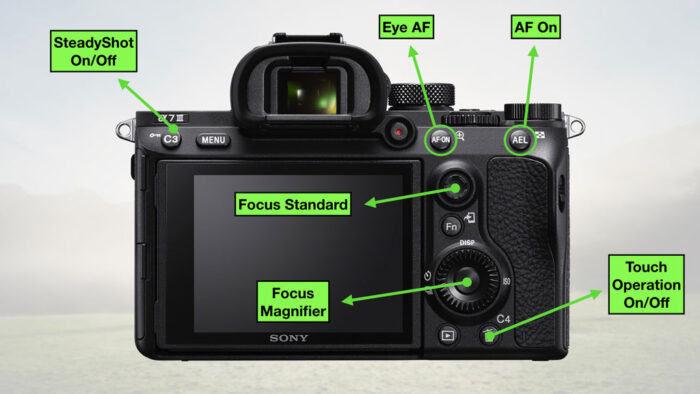
Below you can see how I usually configure the buttons of my Sony A7 III and A7R III.

On the A7R IV and A9 II, the graphic interface of the custom button setup menu is different and shows which button you’re changing visually.
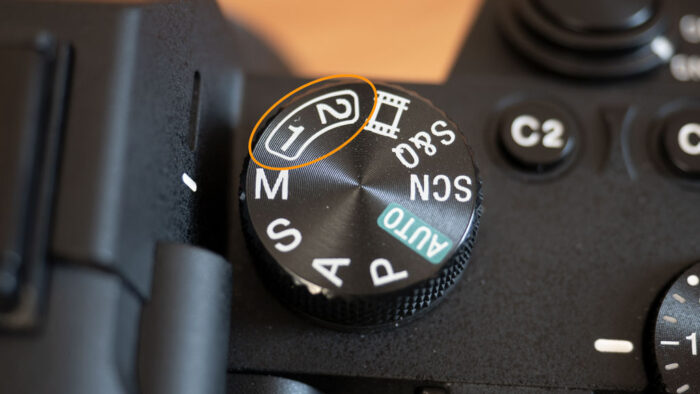
Sony A7 III, A7R III, A9 Memory Settings (Memory Recall)
The last step in our Menu / Customisation tutorial involves the 1 and 2 numbers you see on the main dial on top of your camera. These are called Memory Recall, but you can also refer to them as Custom Modes.
The Sony A7 III custom modes let you save settings that you can activate in an instant. For example, if you take picture of sports indoors, you’ll probably use settings similar to these:
- Auto ISO (max. 6400)
- 1/500 or faster shutter speed
- Continuous shooting mode Hi (8fps)
- Continuous AF
- AF Track Sens to +2
- Zone Focus Area
- JPG Fine
- Indoor White Balance
- Standard Creative Style
Memory Recall allows you to set the camera with all these settings in one go. Not only does this help you configure the camera quickly, but it is also a reassurance that everything is set up correctly and you haven’t missed anything.
Tip: How do I use the Memory Recalls?
A good example is birds in flight. I like to take picture of red kites and for that I use a fast shutter speed of at least 1/2000s, a large focus area, C-AF, drive at 8fps and Auto ISO. 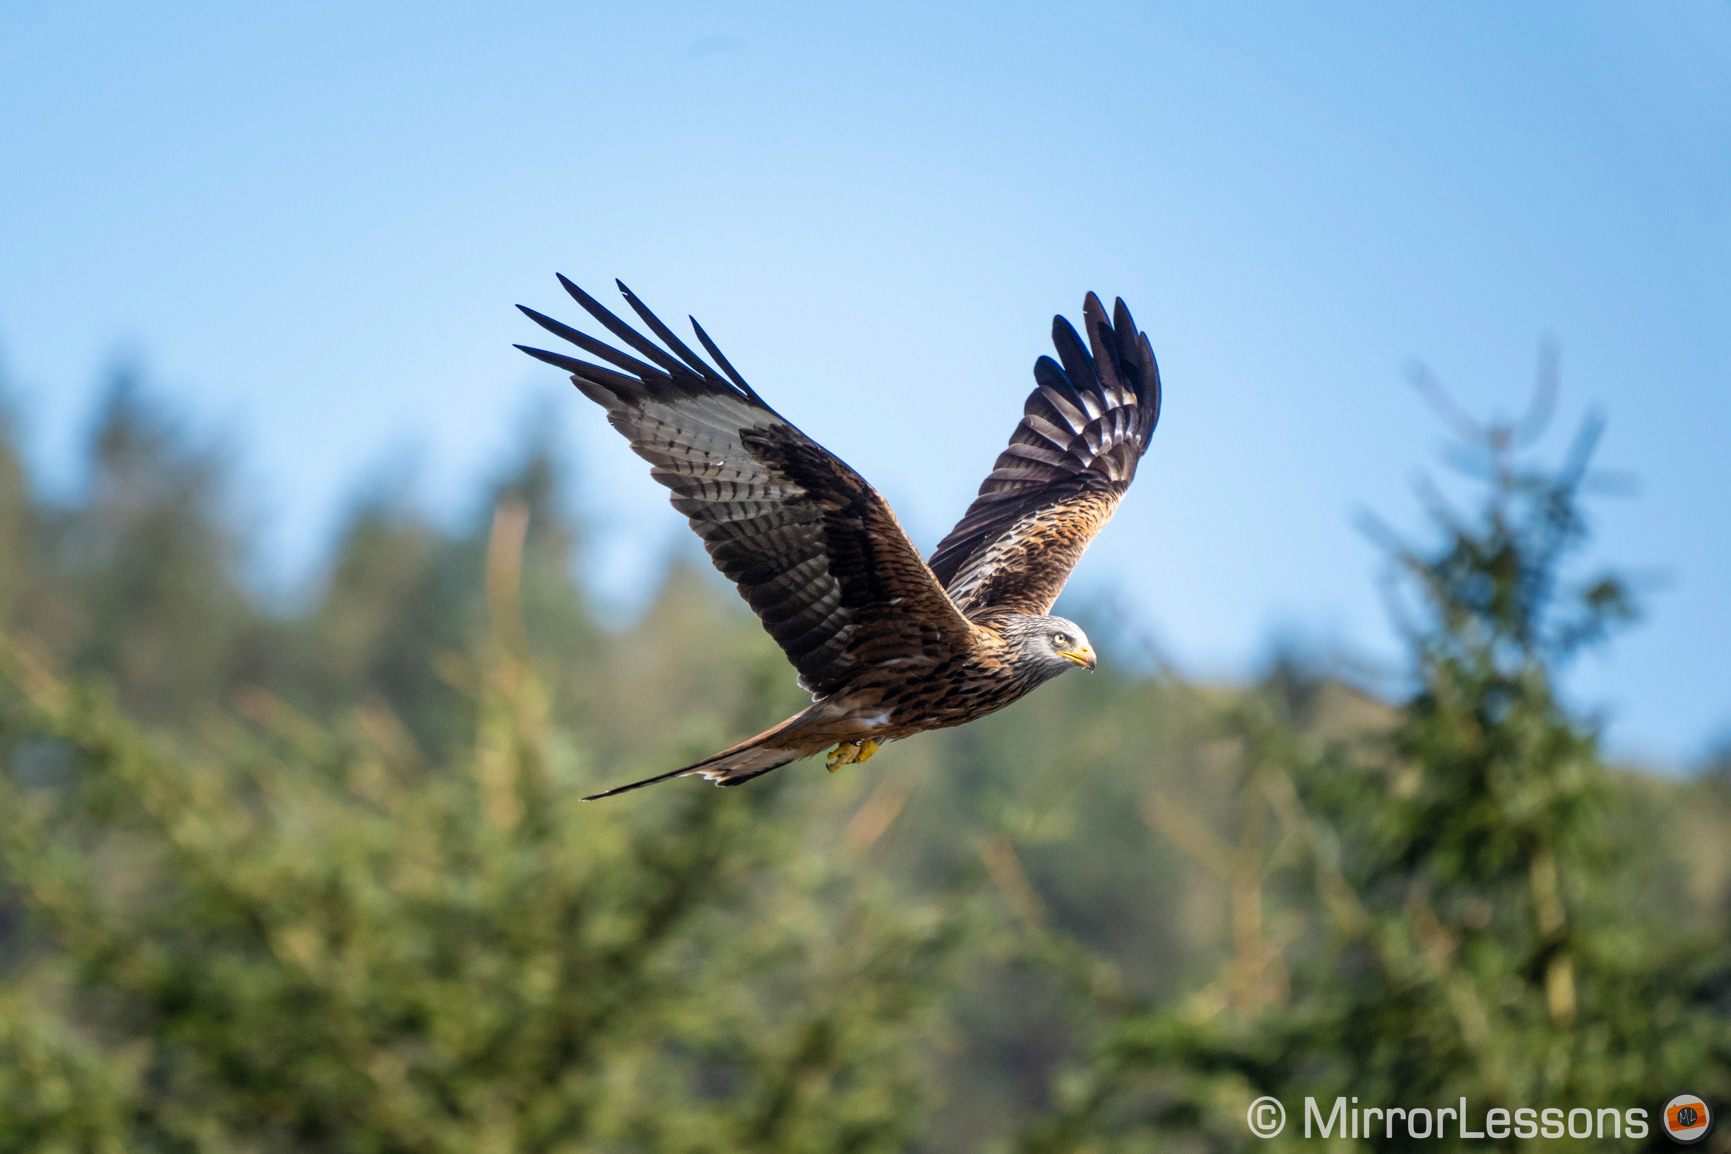
In my favourite location, red kites can take breaks from feeding. While I wait for them to come back, I might spot other birds resting on the water, in the grass or up a tree. In that case, I need to change to a smaller focus area to stop the camera from mis-focusing (especially if the bird is small). I can set a slower shutter speed because it won’t move a lot, and that will keep my ISO speed down as well. I can probably reduce the drive speed too.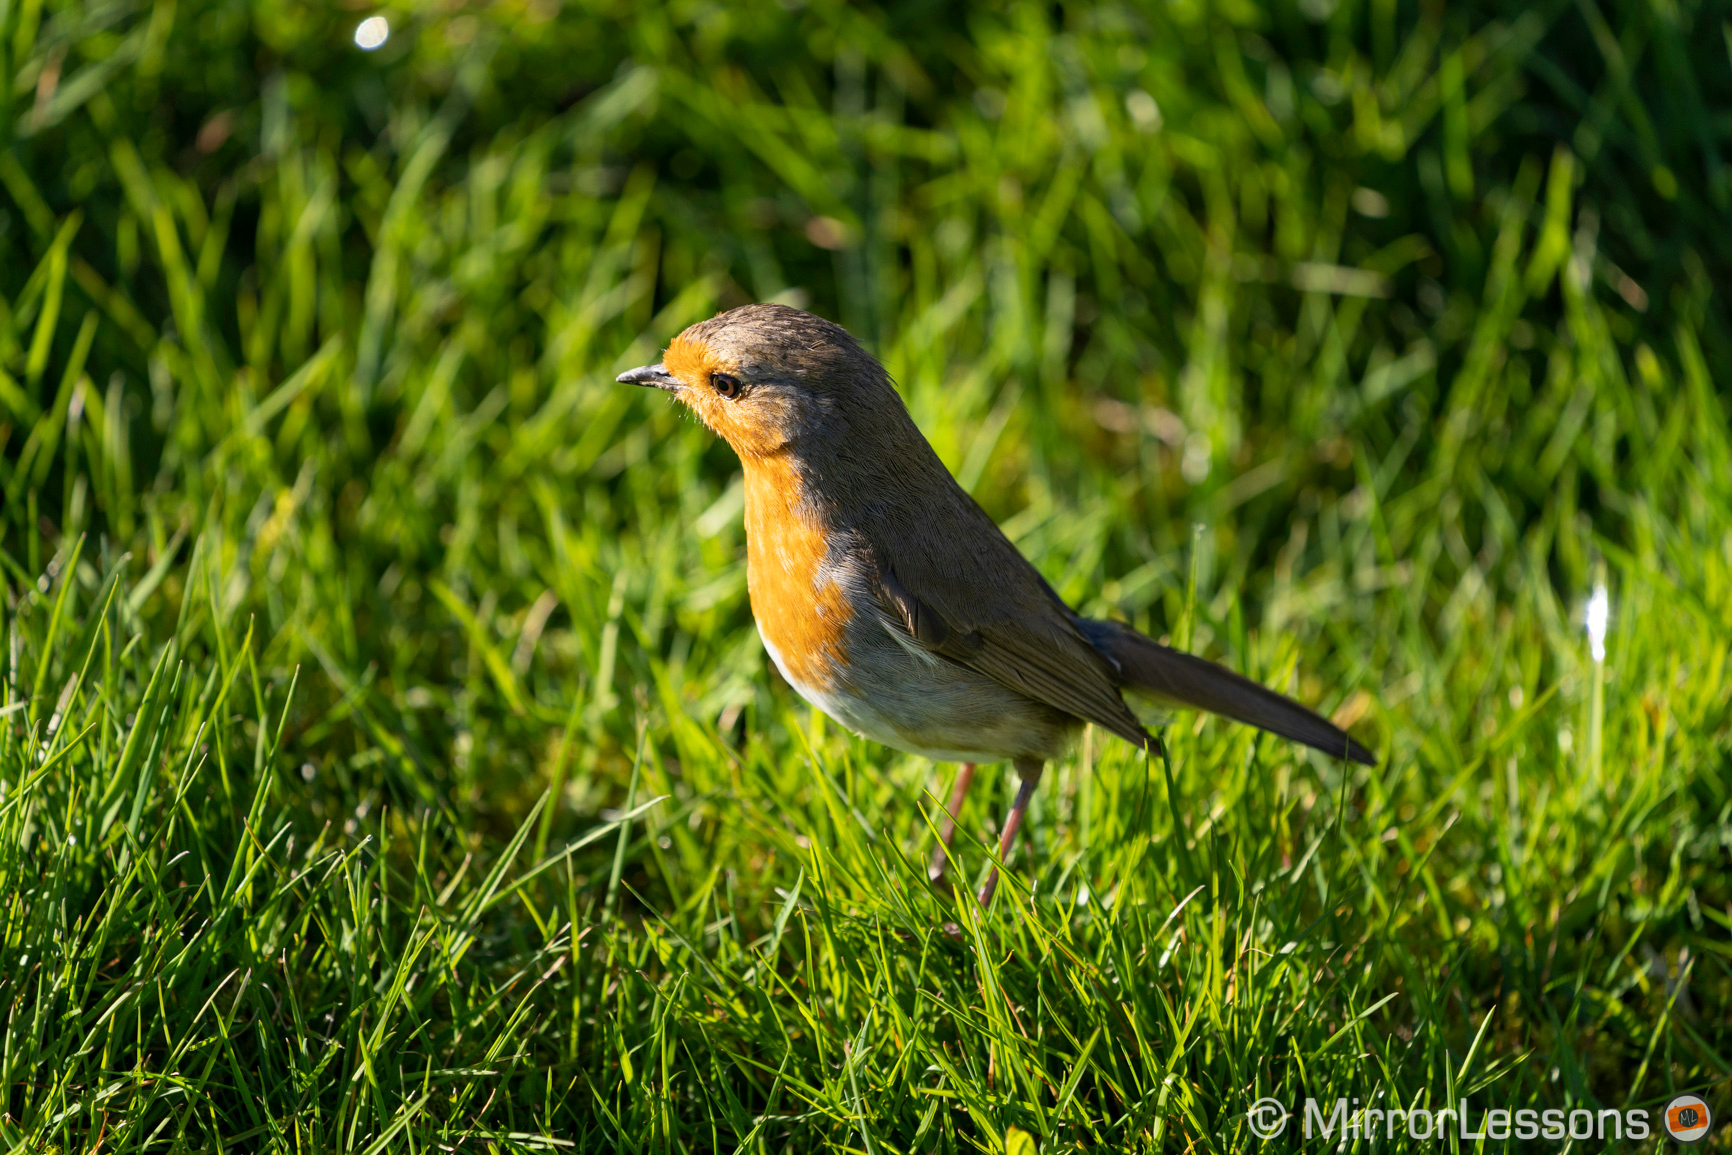
Now to change all these settings one after the other is time consuming, and I always want to be ready for when the kites come back, which can happen at any moment. Switching the top dial from position 1 to position 2 is certainly a quicker solution, also considering that a resting bird may not stay in one spot for a long time.
To configure Memory Recall 1 and 2:
- Set up the camera with the desired settings (image quality, autofocus, drive, white balance etc.)
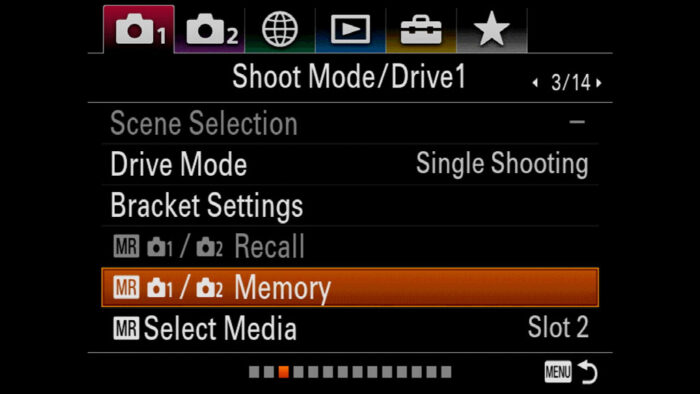
- Go to Camera Settings 1 / Shoot Mode Drive 1 (page 3/14)
- Scroll down to MR Memory
- Scroll left or right to choose 1 or 2. If you press down, you can scroll through a list of all the settings you plan to save.
- Press the Centre Button to confirm.
- Repeat the process to configure the other Memory.
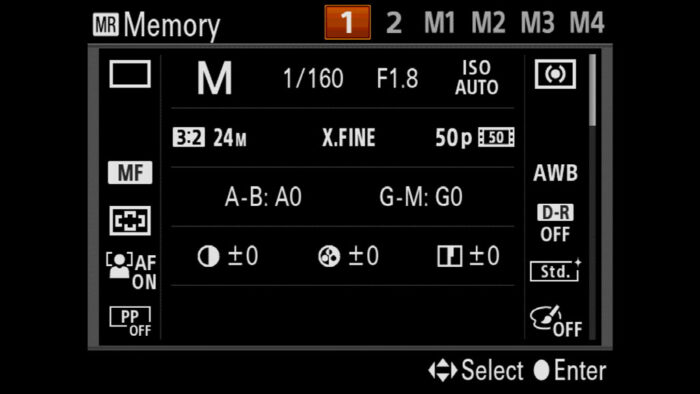
Note: if you want to update one of the two MR, repeat the process and overwrite MR1 or MR2.
In addition to the steps on the main dial, you can have four additional Memory presets (M1 to M4). These are recorded to the memory card, so you first need to choose which slot to save the memory settings to.
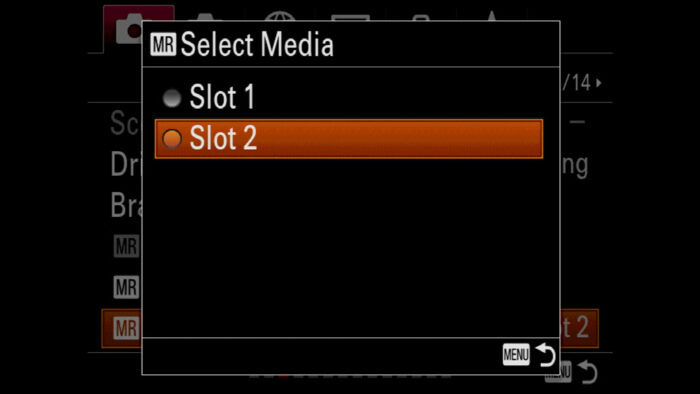
- Go to Camera Settings 1 / Shoot Mode Drive 1 (page 3/14)
- Scroll down to MR Select Media
- Choose Slot 1 or Slot 2
- Insert a memory card in the slot you selected (if it’s not already there)
- Set up the camera with the desired settings
- Go back to Camera Settings 1 / Shoot Mode Drive 1 (page 3/14)
- Scroll down to MR Memory
- Scroll left or right to choose M1, M2, M3 or M4
- Press the Centre Button to confirm
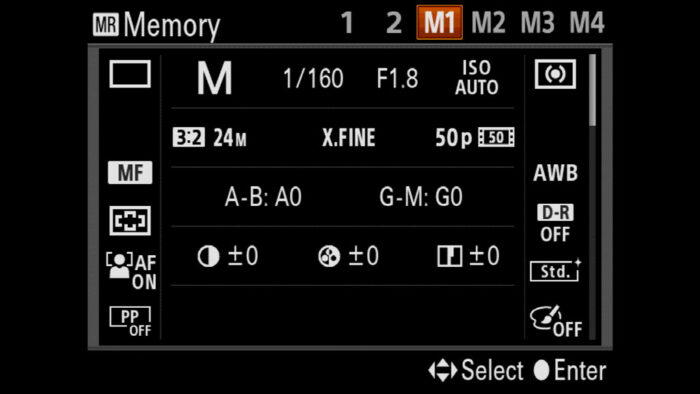
To recall a preset saved to the memory card, use the 1 or 2 positions of the top dial and then scroll left to select M1 to M4.
Note: using a memory card allows you to recall these presets on other A7 / A9 cameras. Keep in mind however that if you format the card, all the M1 to M4 settings will be lost.
Using Custom buttons with Memory Recall
An alternative to the top dial is to assign your Memory preset to a custom button. Pressing a key can be even faster than turning the dial.
The important thing to be aware of is that this method works by pressing and holding the custom button. You can’t just press it once to activate the memory preset and press it again to disable it. This can be a limitation if you need to operate other buttons at the same time (like the back button focus). Personally I prefer to use the dial.
To set memory recall to a custom button:

- Go to Camera Settings 1 / Shoot Mode Drive 2 (page 4/14)
- Enter in Reg Just Shoot Set
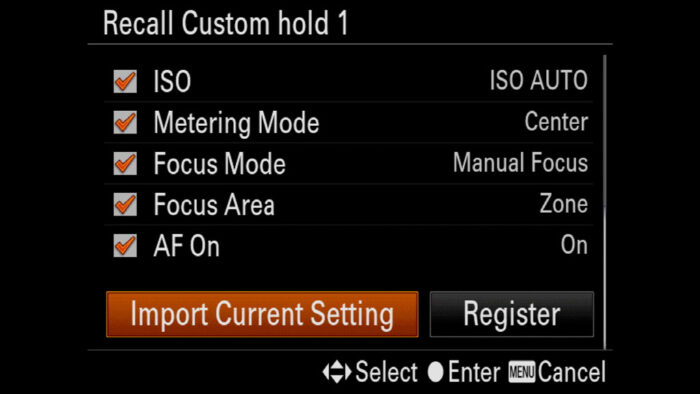
- Choose one of the three Recall Custom hold options
- A new page appears that allows you to check or uncheck the settings you want to save, as well as change them individually (press OK to do that).
- If you’ve already set up your camera before coming to this point (easier to do in my opinion), scroll all the way down and select Import Current Settings.
- Once you’re happy, click on Register.
- Repeat the process for the other two custom hold modes, or quit by pressing the Menu button
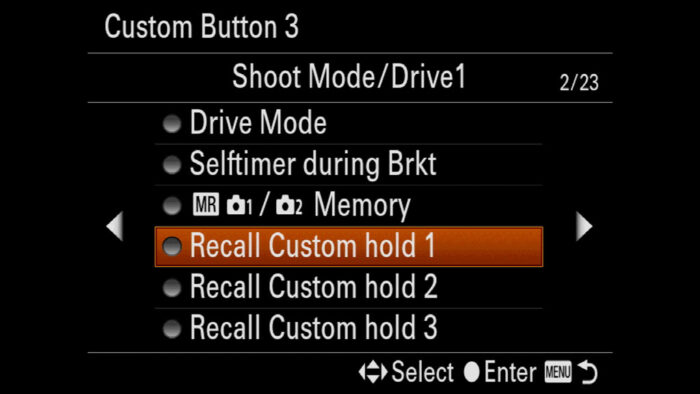
Now you need to assign the Recall Custom hold 1, 2 or 3 to a custom key:
- Go to Camera Settings 2 / Custom Operation 1 (page 8/9)
- Enter Custom Key
- Choose the button to which you want to assign the Memory
- Select Recall Custom hold 1,2 or 3 (page 2/23) and press OK
- Repeat the process for the other two buttons / custom hold presets if needed
Now you’re set and you can press and hold the custom button whenever you want to switch the settings all at once. There are three Recall Custom hold presets which means you can have three custom modes assigned to three custom buttons.
Reminder: the links below are affiliate links. If you decided to buy something after clicking the link, we will receive a small commission.
Check price of the Sony A7 III on:
Amazon | Amazon UK | B&H Photo | eBay
Check the price of the Sony A7R III on:
Amazon | Amazon UK | B&H Photo | eBay
Check price of the Sony A7R IV on
Amazon | Amazon UK | B&H Photo | eBay
Check price of the Sony A9 on
Amazon | Amazon UK | B&H Photo | eBay
Check price of the Sony A7 II on:
Amazon | Amazon UK | B&H Photo | eBay
Check price of the Sony A7R II on:
Amazon | Amazon UK | B&H Photo | eBay
Sony Alpha Mirrorless Cameras Resources on Mirrorless Comparison
Below you will find many other articles about the A7 III and other full frame E-mount mirrorless cameras.
Real World Comparisons
- Sony A7 III vs A7R III
- Sony A7R III vs A7R IV
- Sony A7R II vs A7R III
- Sony A7R III vs A9
- Sony A7 III vs Nikon Z6
- Sony A7R III vs Nikon Z7
- Sony A7R III vs Fujifilm GFX 50s
- Sony A7R III vs Panasonic S1R
- Sony A7 III vs Canon EOS R
- Sony A7 III vs Fujifilm X-T3
- Sony A7 II vs Canon EOS RP
Sample Photos
- Sony A7 III sample images
- Sony A7R III sample images
- Sony A7R IV sample images
- Sony A7 II sample images
- Sony A7R II sample images
- Sony A7S sample images