To take a good photograph, there are really only three settings you need to worry about: aperture, shutter speed and ISO, which are also known as the exposure triangle. Actually, we could be lazier then that by rotating the main dial to Auto, letting the camera pick all the settings and simply concentrating on the composition as we do with smartphones.
Dig a little deeper however, and you’ll see that your A7 camera has a plethora of settings, many of which are related to photography and image quality.
In this article, I’m going to explain how to set up your A7 photo modes and guide you through the best photography settings you can find on your A7 III and other A7 models.
A7/A9 series compatibility
This guide is valid for the most recent Sony full frame cameras such as the A7 III, A7R III, A7R IV, A9 and A9 II. Where there are differences concerning specifications and settings, I made sure to highlight them throughout the article. Owners of A7 I and A7 II series can consider this post valid for their cameras as well, although some settings and extra functionalities are missing.
Note: throughout the article, I am going to mention various sections of your camera menu system. Below you can see how the menu of recent Sony models is organised. To know more about Sony’s menu system, check out dedicated article here.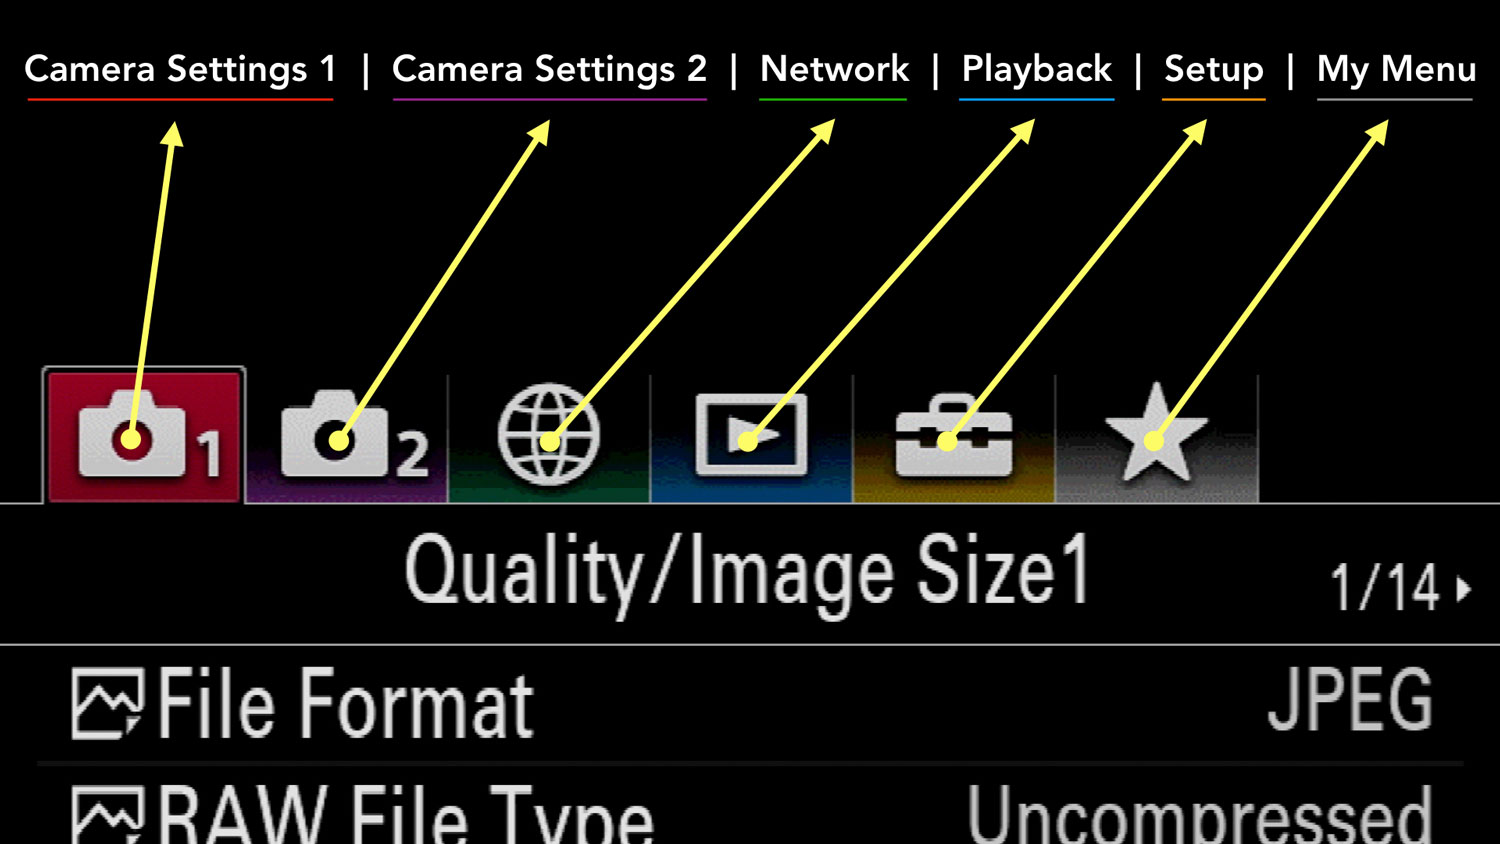
The precise location of a setting can vary slightly from one camera to another (it may be on the previous or following page).
On older models (mark I and mark II generation), Camera Settings 2 is called Custom Settings, the icons are different (see below), some settings are in a different location, and there is no title or page number.![]()
![]()
Ethics statement: we own the Sony A7 III and A7R III, we previously owned the A7, A7S and A7R II, and we’ve compared most of the E-mount cameras. We were not asked to write anything about these products, nor were we provided with any sort of compensation. Within the article, there are affiliate links. If you buy something after clicking the link, we will receive a small commission. To know more about our ethics, you can visit our full disclosure page. Thank you!
TABLE OF CONTENTS
1. Best Settings by Genre
2. RAW vs JPG
3. RAW Settings
4. JPG Settings
5. Colour Settings
6. Exposure Settings
7. Long Exposure Settings
8. Bracketing Settings
9. HDR mode
10. Multiple Exposure
11. Image Stabilisation Settings
12. Silent Shooting
13. Sony A7 and A9 Resources
Reminder: the links below are affiliate links. If you decided to buy something after clicking the link, we will receive a small commission.
Check price of the Sony A7 III on:
Amazon | Amazon UK | B&H Photo | eBay
Check the price of the Sony A7R III on:
Amazon | Amazon UK | B&H Photo | eBay
Check price of the Sony A7R IV on
Amazon | Amazon UK | B&H Photo | eBay
Check price of the Sony A9 on
Amazon | Amazon UK | B&H Photo | eBay
Check price of the Sony A7 II on:
Amazon | Amazon UK | B&H Photo | eBay
Check price of the Sony A7R II on:
Amazon | Amazon UK | B&H Photo | eBay
Second-hand Sony gear on
MPB US | MPB UK
Best Photography Settings by Genre
If you’re looking for settings related to a specific photography genre, or a specific situation, check out our separate articles below:
- Low Light Photography Settings
- Astrophotography Settings
- Portrait Photography Settings
- Sports Photography Settings
- Wildlife Photography Settings
- Best Settings for Video
Sony A7 III, A7R III, A9 – RAW vs JPG
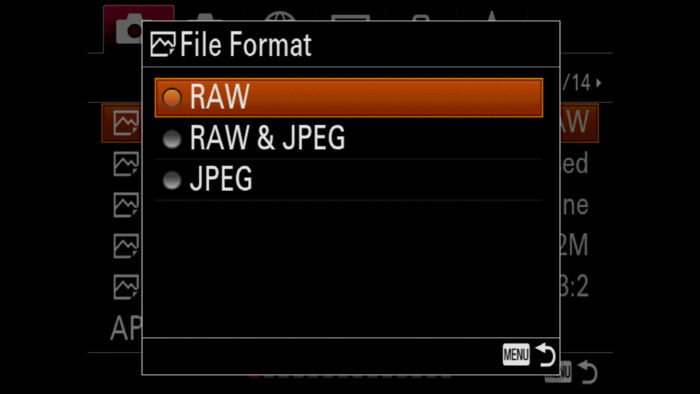
The first setting you want to look at is called File Format. You can choose between RAW and JPEG for your A7 III as well as all the other A7/A9 models. These are the same options you can find on all the interchangeable-lens cameras.
What is a RAW file?
A RAW file contains more information than the JPG file so we can consider it a high quality file format. You have more room to adjust highlights and shadows, correct the exposure and white balance and edit the colours precisely. You can get more out of your photo without reducing the quality. A RAW file needs to be post produced with a compatible software.
What is a JPG file?
JPG is the most common type of compressed image file. It is smaller in size and can be considered ready for print or sharing on the web. It is compatible with all sorts of devices and software types. Unlike the RAW file that needs to be post processed, the JPG faithfully represents the colour settings you selected on your camera. Small adjustments in post are possible but you won’t have the same freedom as with RAW.
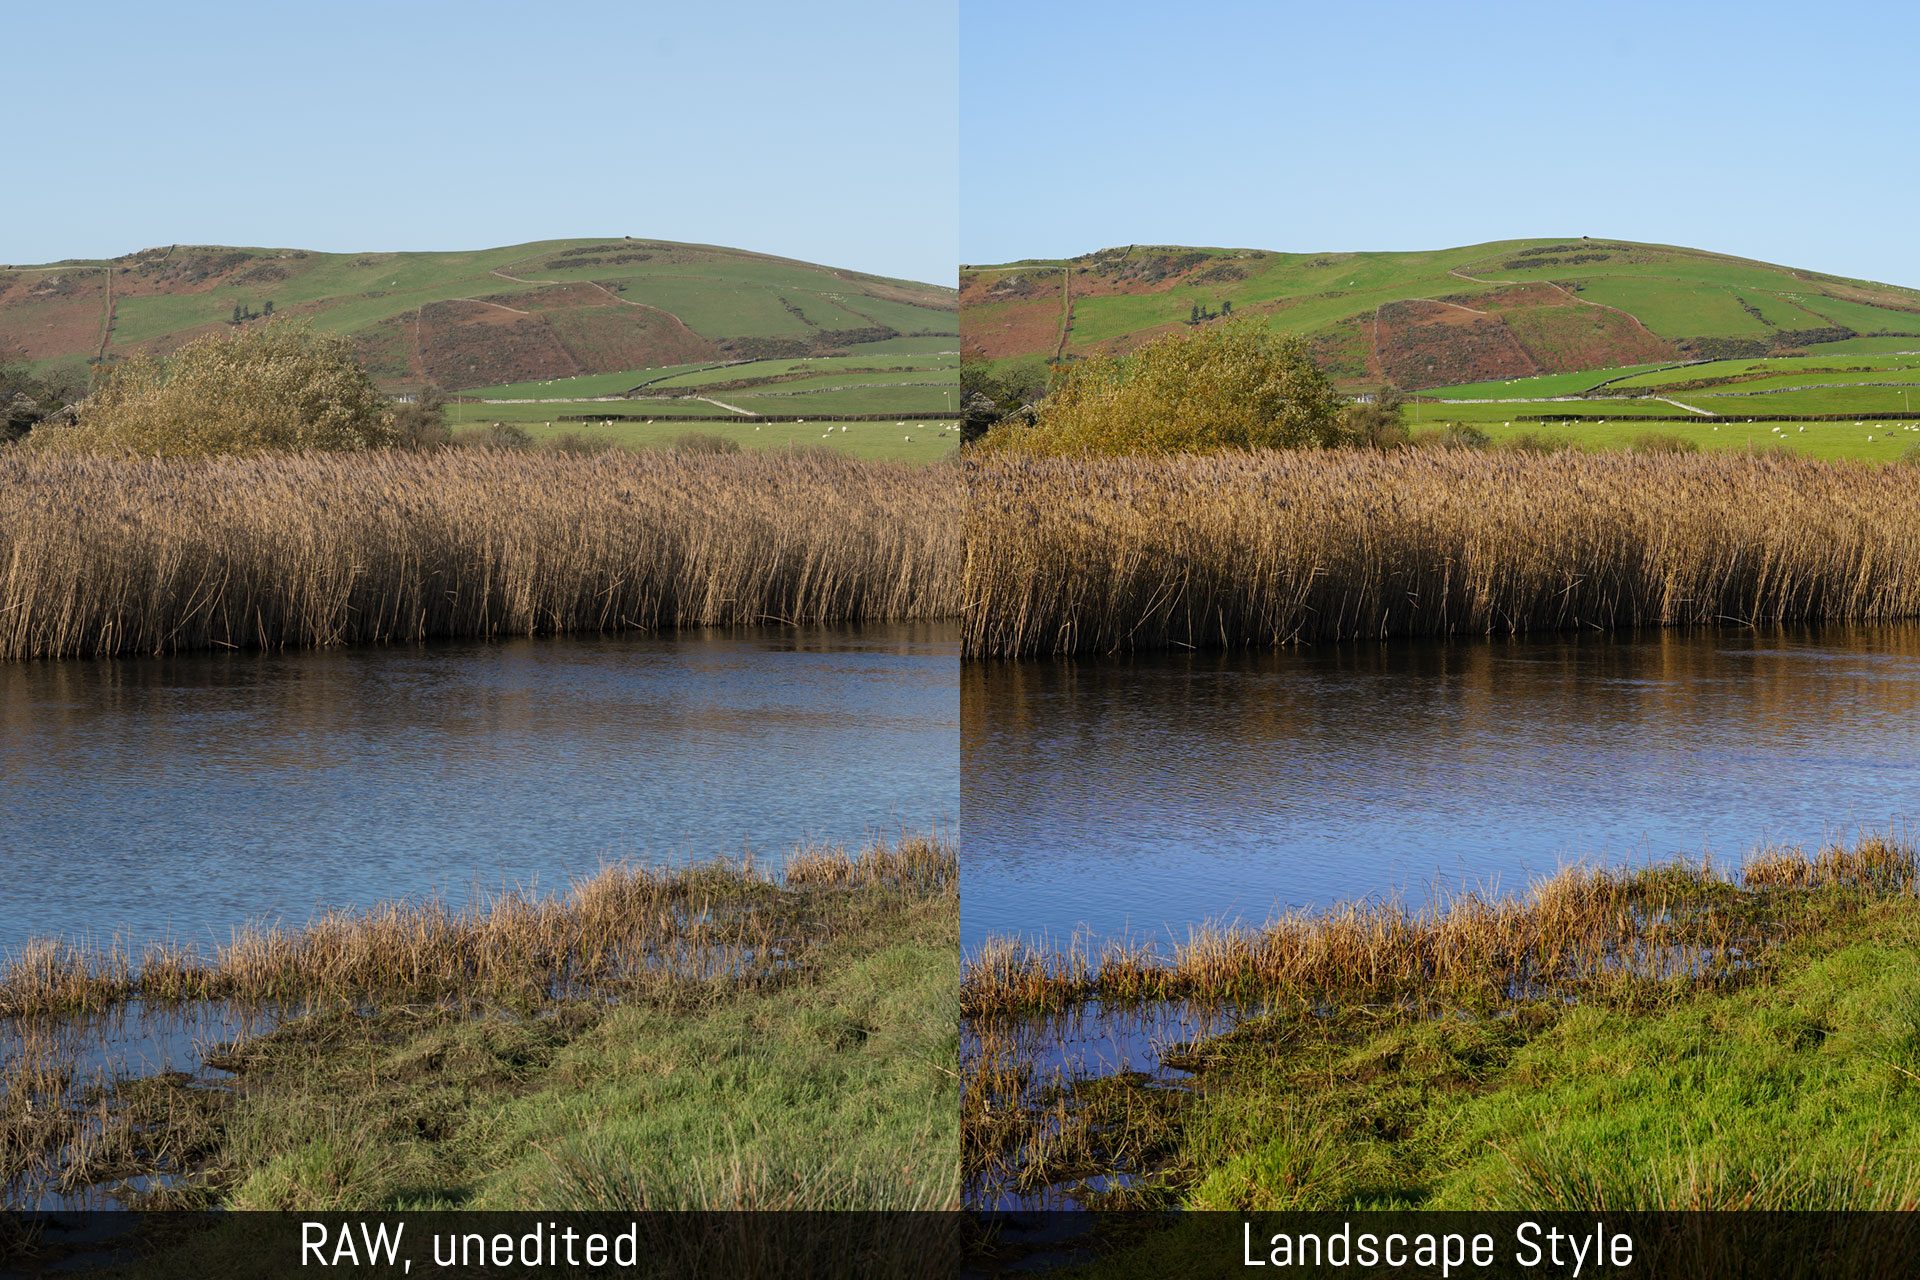
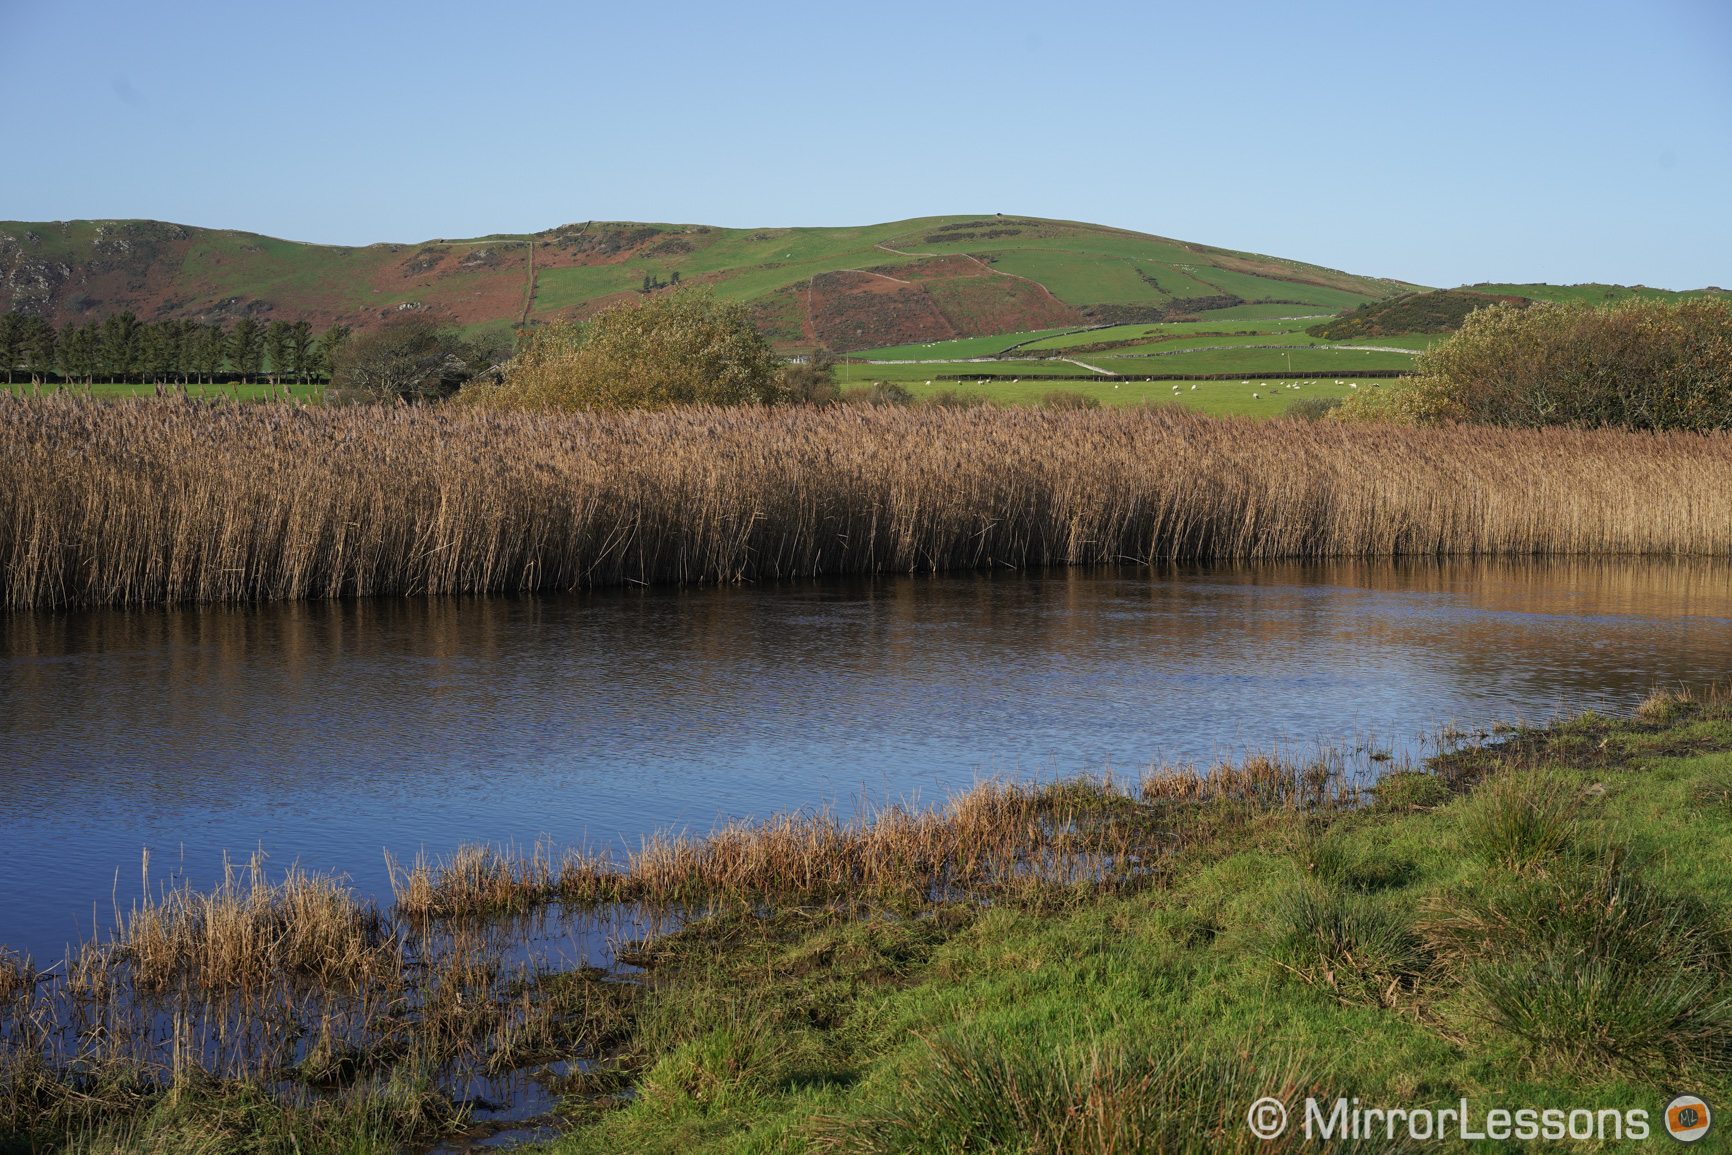
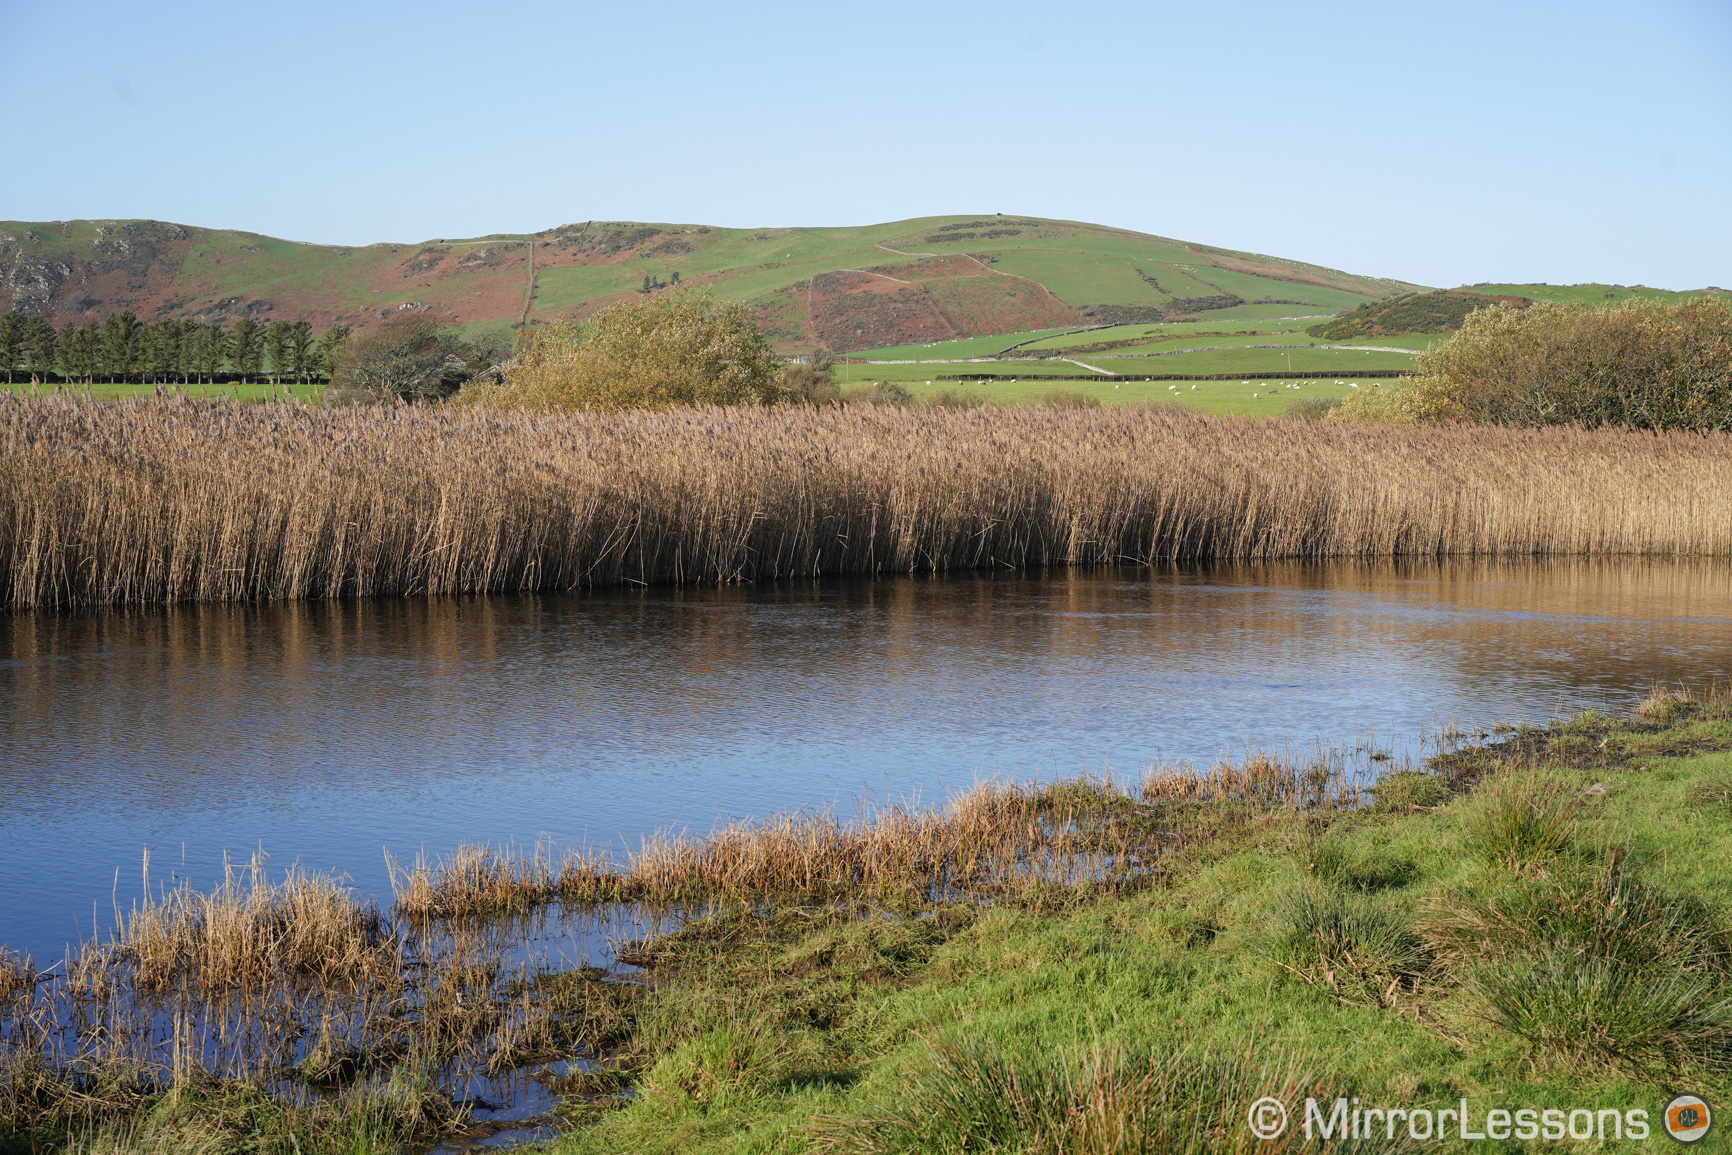
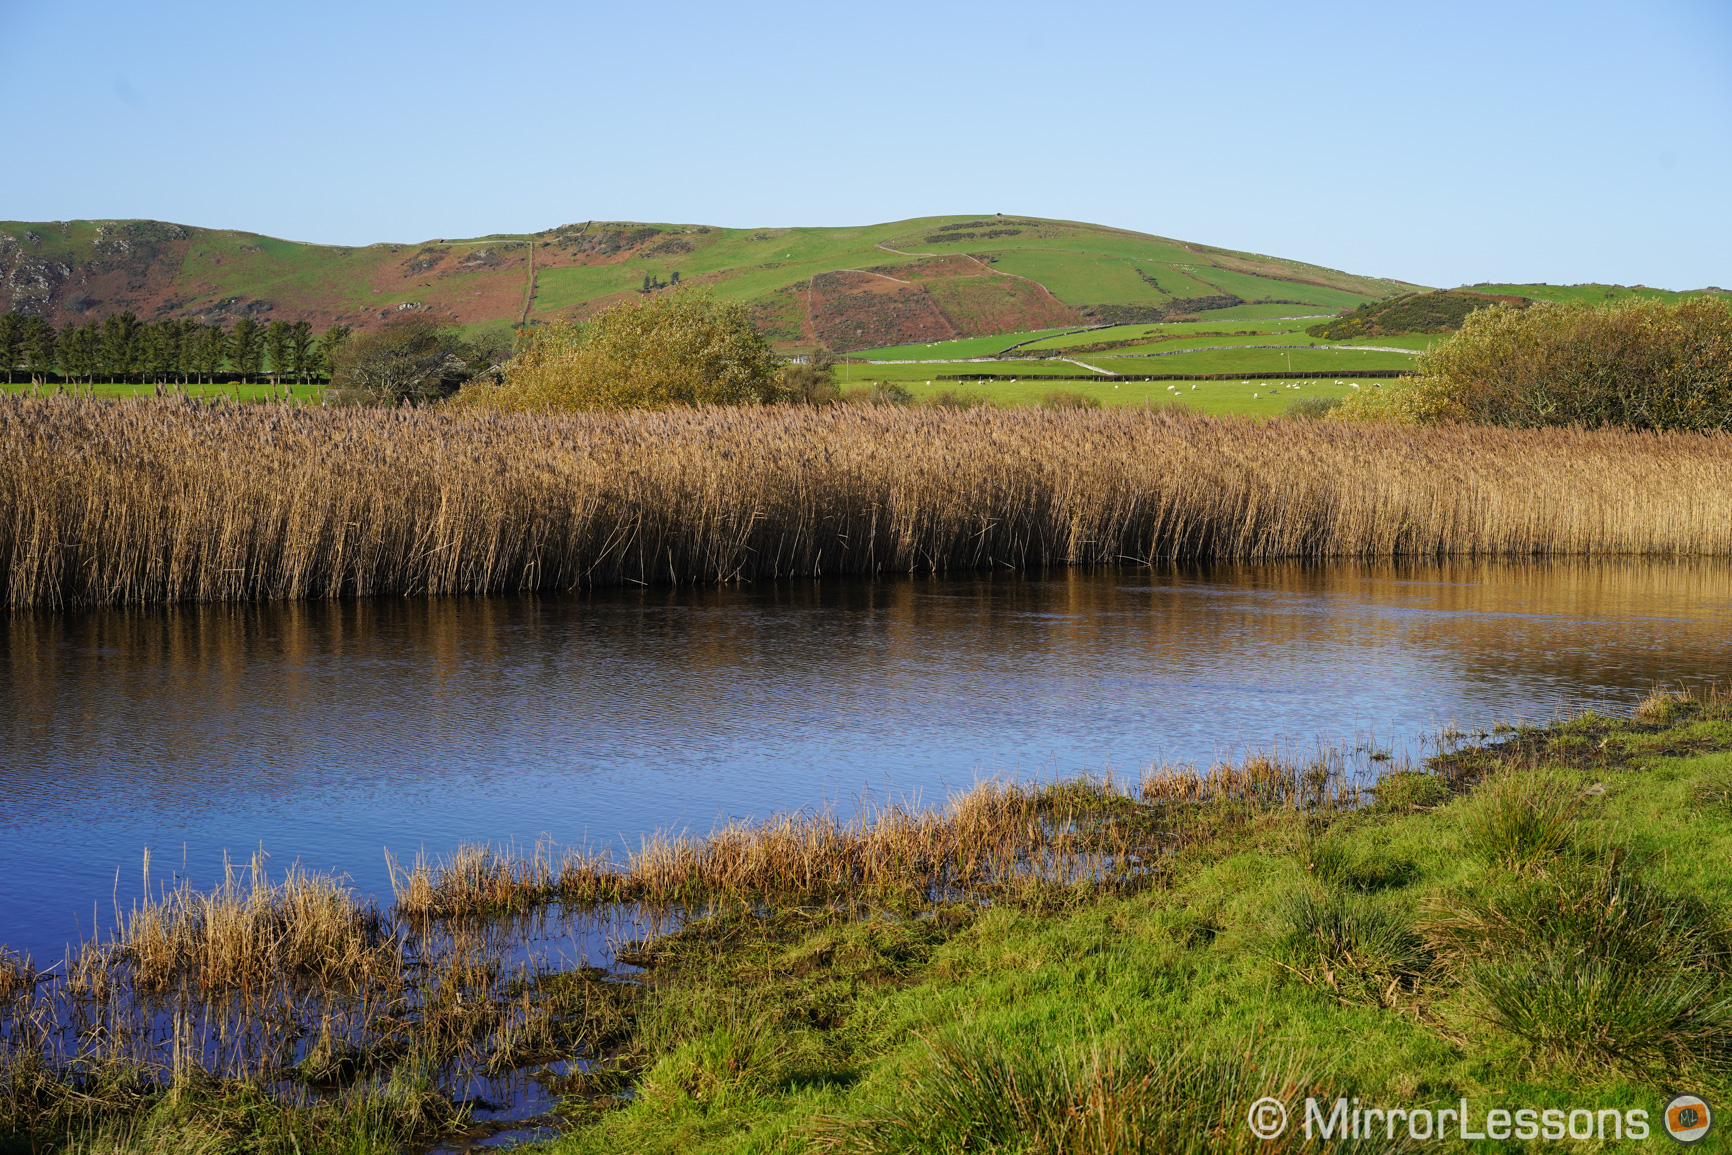
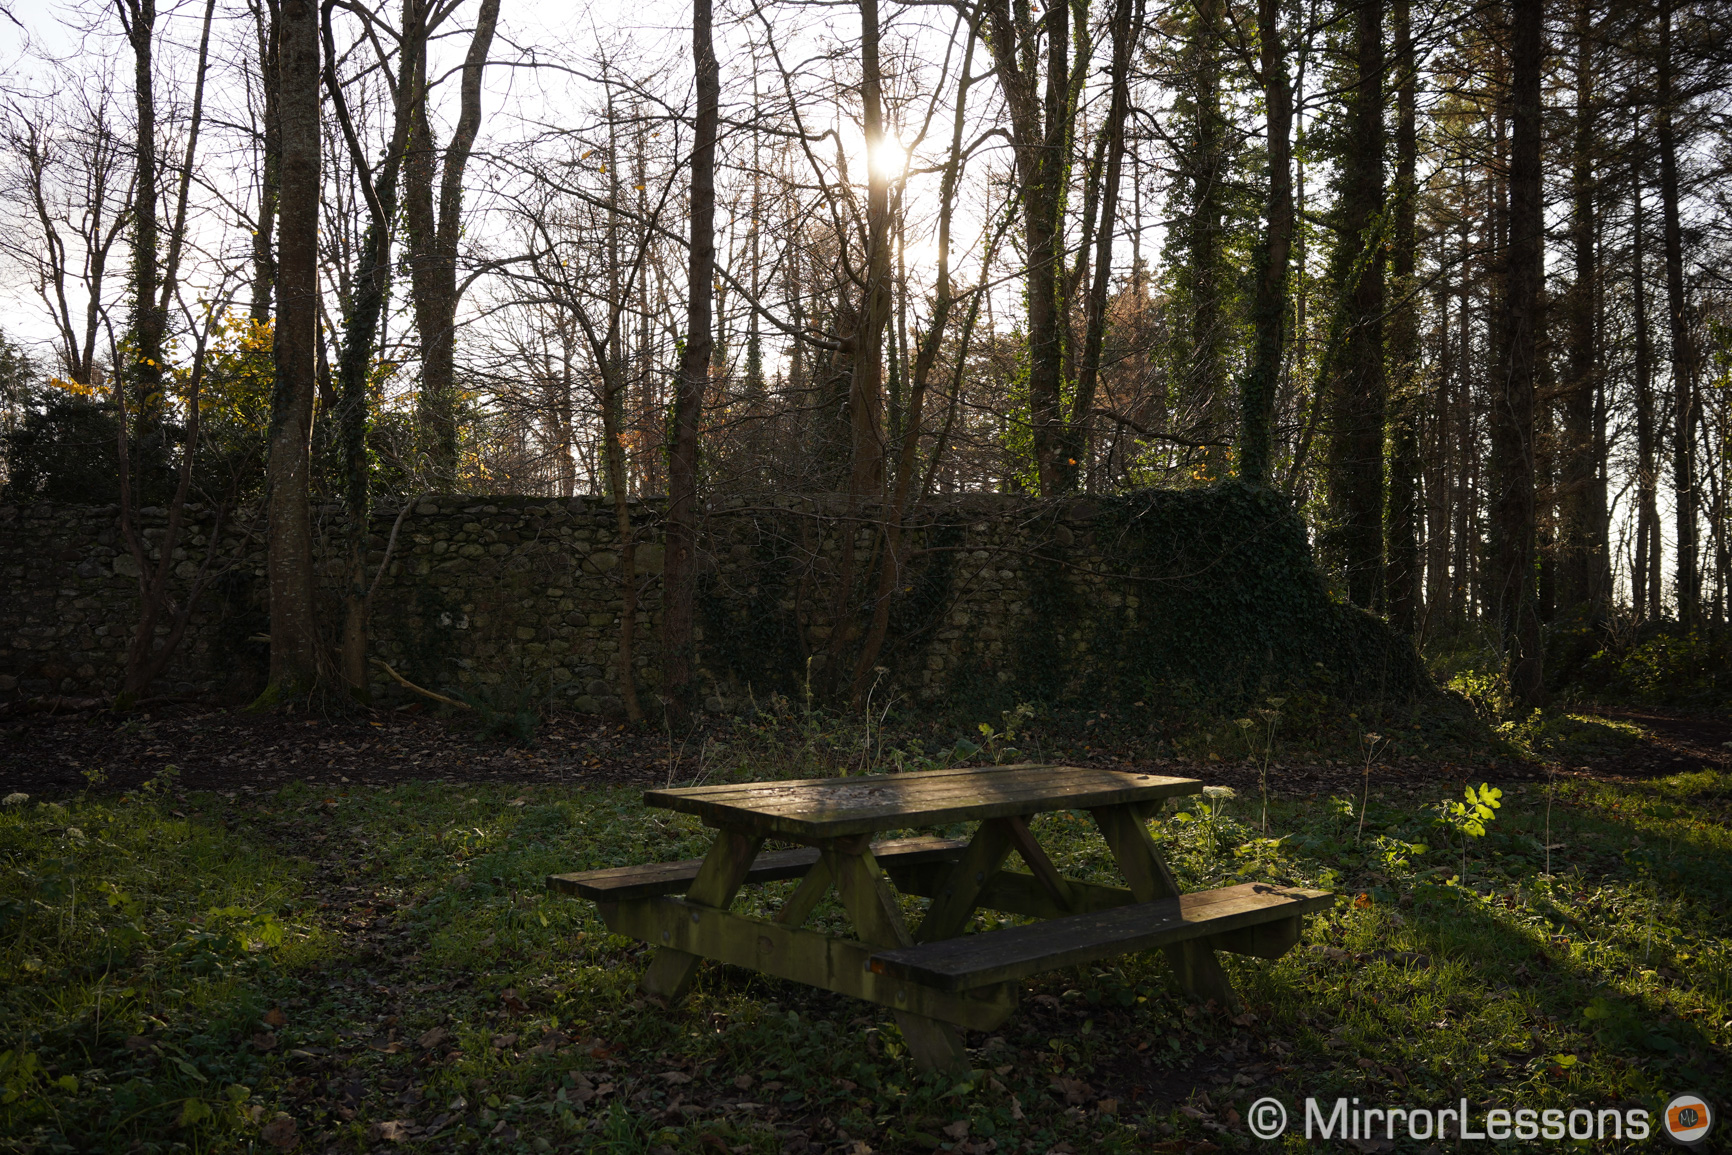
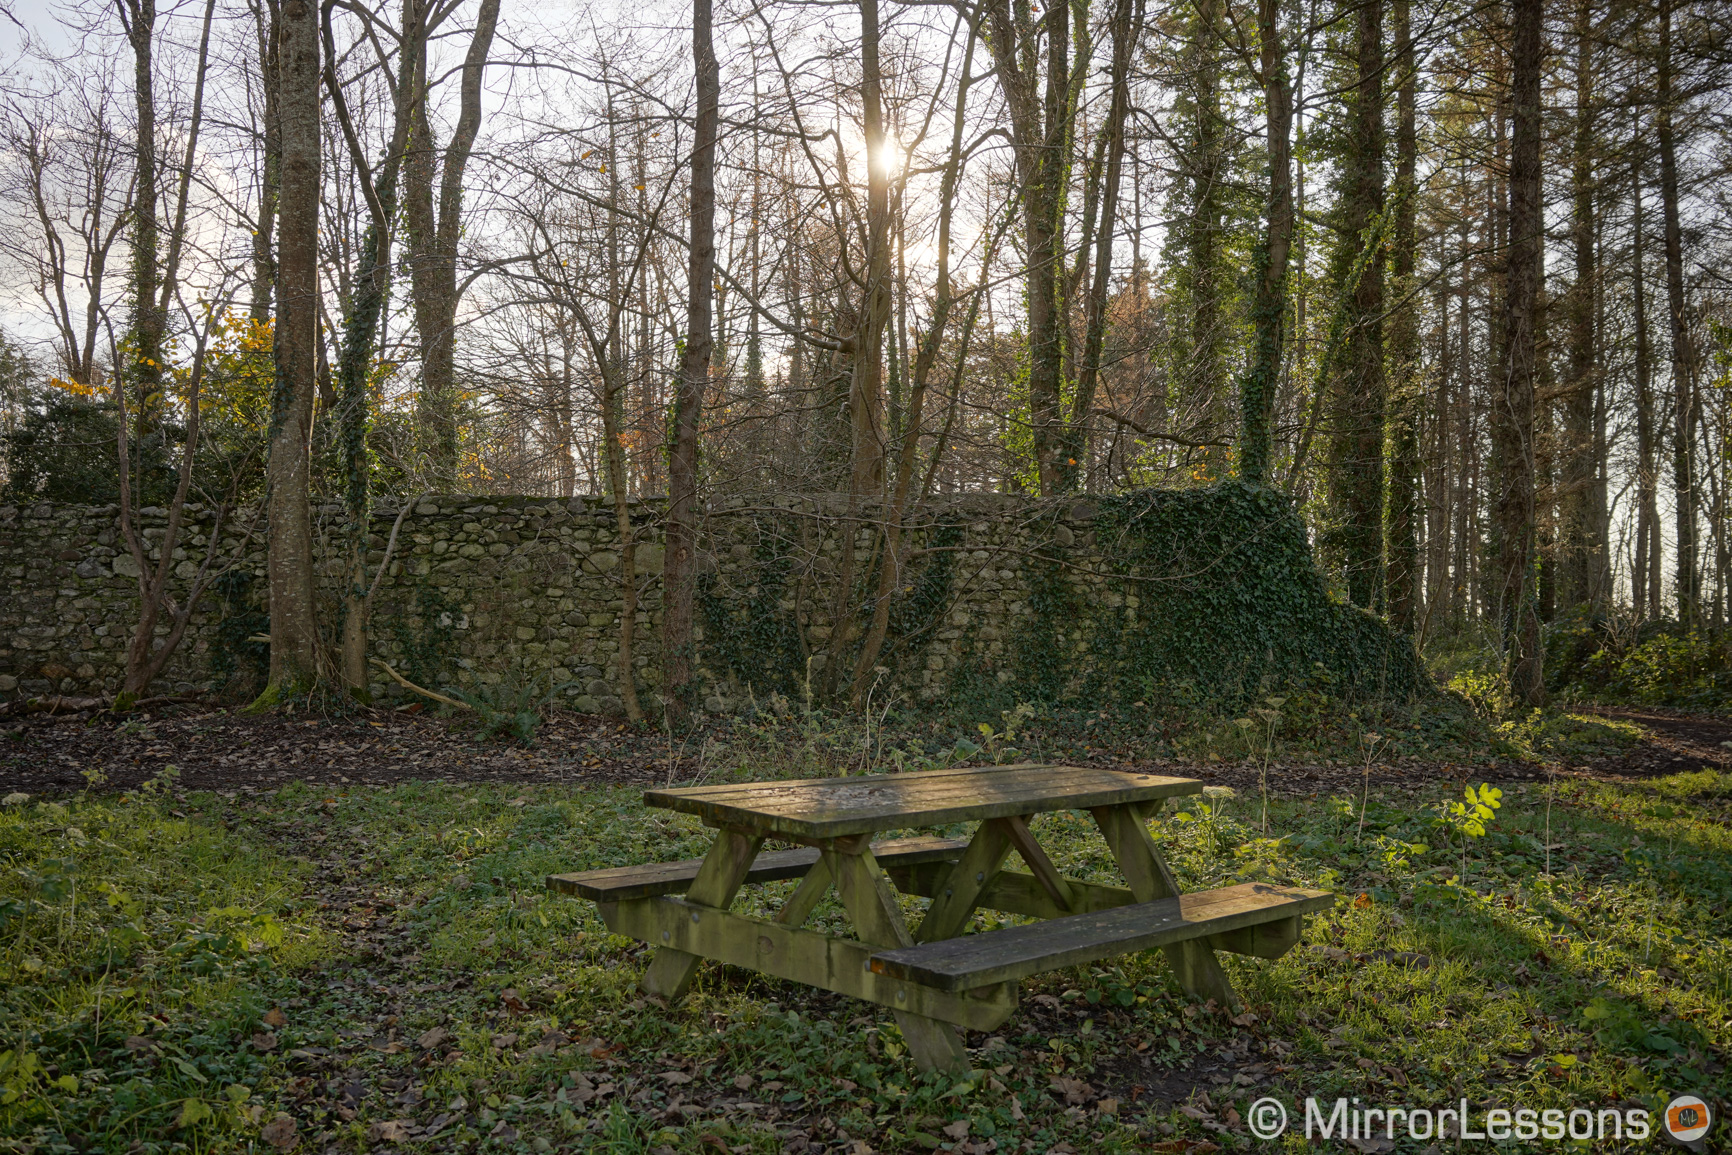
Below you can see the difference between a RAW file opened with a photo editor (in this case Lightroom) without any adjustments, and a JPG file Captured with the Landscape Creative Style.
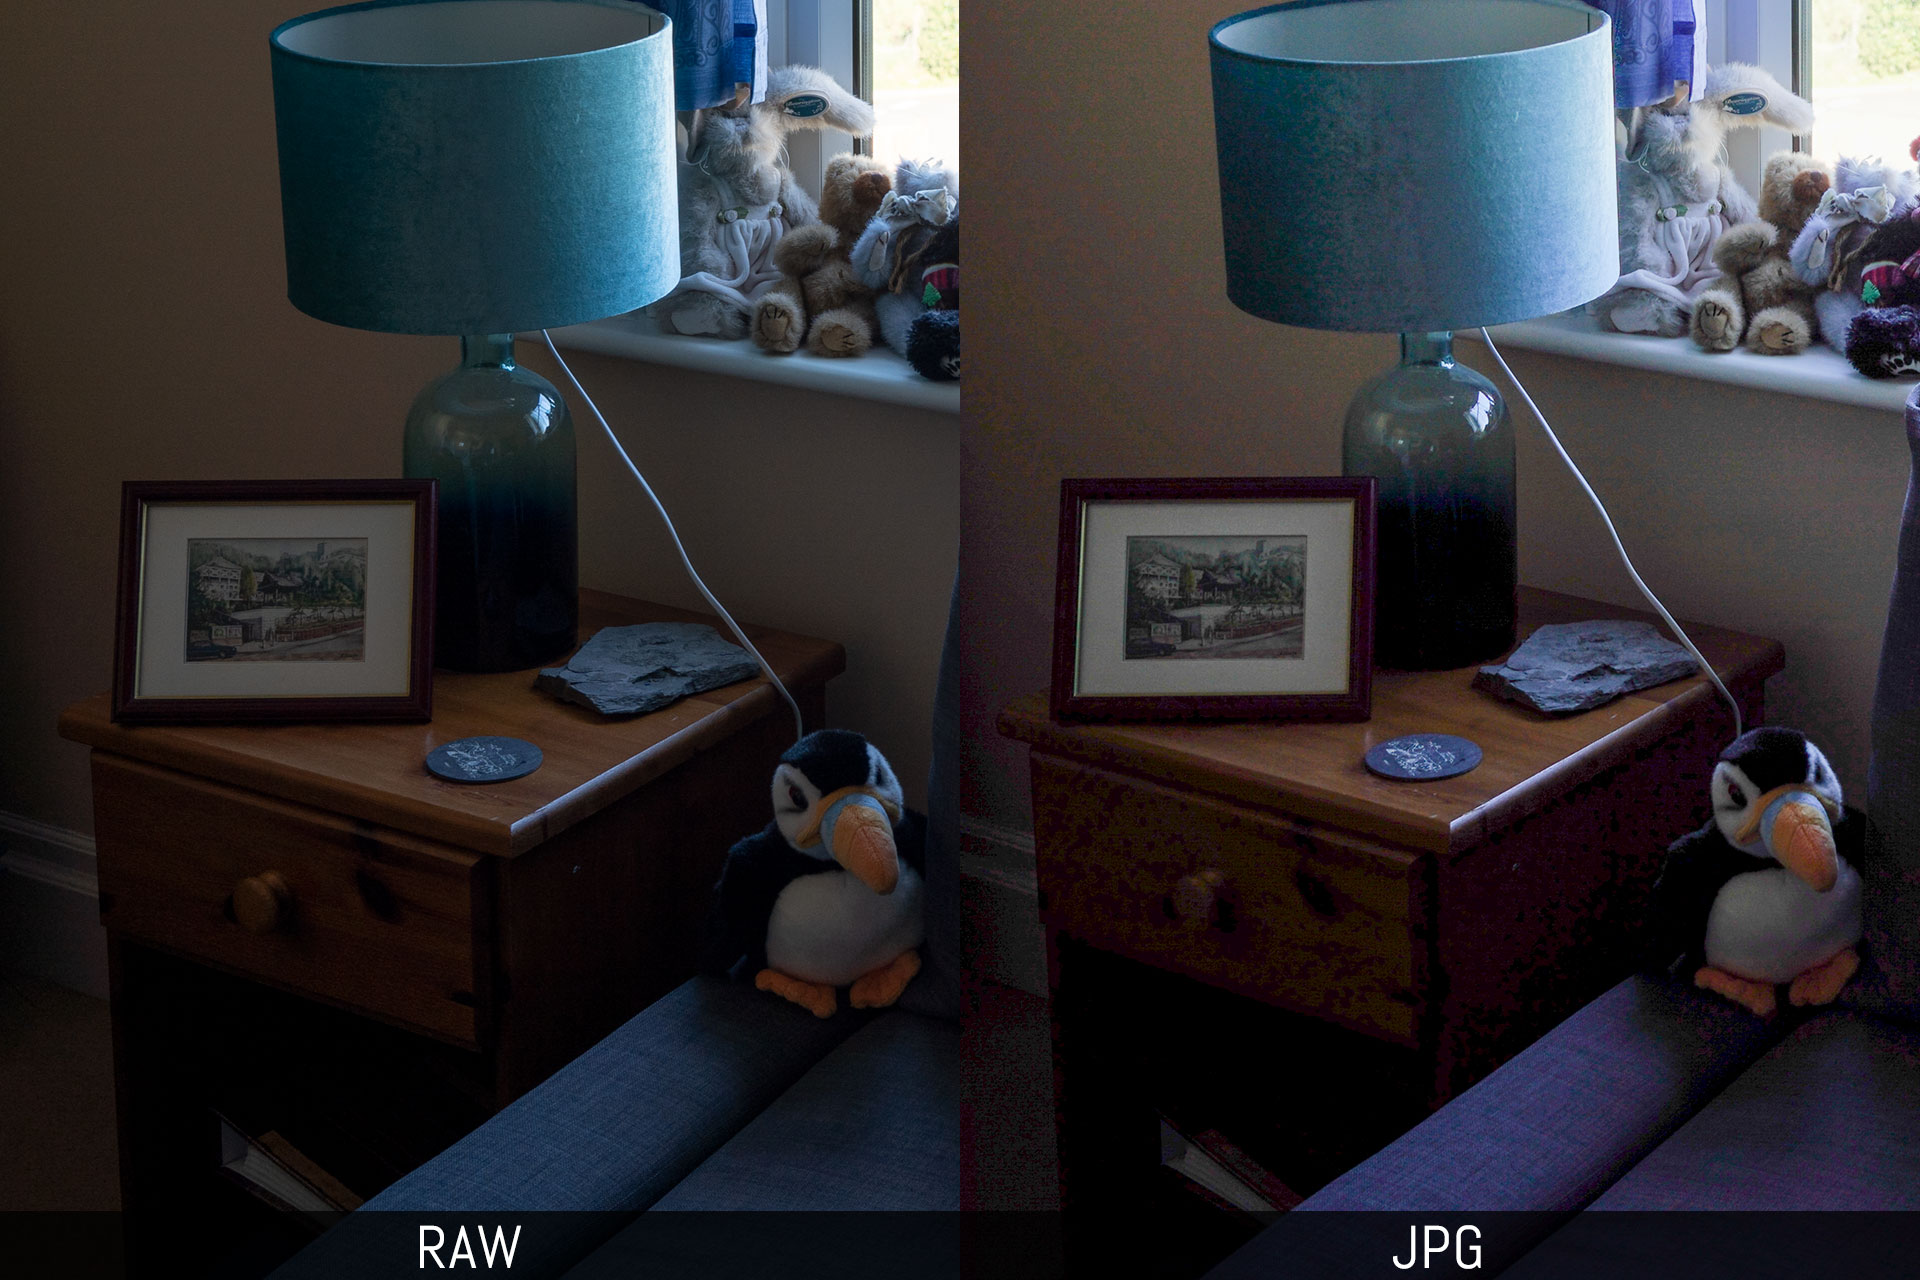
Our second example shows how an exposure and shadow recovery of approximately 2 stops reduces the quality of the JPG dramatically.
To choose JPG or RAW on your A7 III & co. :
- Go to Camera Settings 1 / Quality Image Size 1 (page 1/14)
- Select File Format
- Choose between RAW, JPG or RAW & JPG. If you are unsure which one to go for, select RAW & JPG.
Jpeg vs RAW: which one to choose on your A7 III, A7R III, A9?
The truth it that there isn’t an official rule. If you are interested in post production, RAW is the way to go. For example landscape photographers like to get the best dynamic range possible as well as fine tune colour and sharpness.
If you like the idea of having an image ready to use and share, then JPG is the easiest option. Sports photographers often shoot JPG because they capture a huge amount of images in one day, and need to send a selection straight away while working in the field.
Sony A7 III, A7R III, A9 RAW Settings
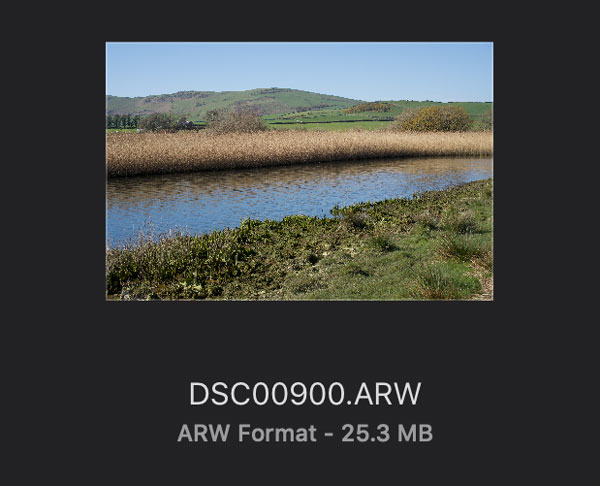
The A7 III and all the other Sony mirrorless cameras can shoot in RAW format. The files have the .arw extension and can be opened with all popular photo editing softwares.
The Sony A7 III RAW bit depth is 14-bit when taking pictures in single shooting mode, and this is also valid for the A7R IV, A7 II and A9 series. When shooting in continuous mode, the bit depth drops to 12-bit.
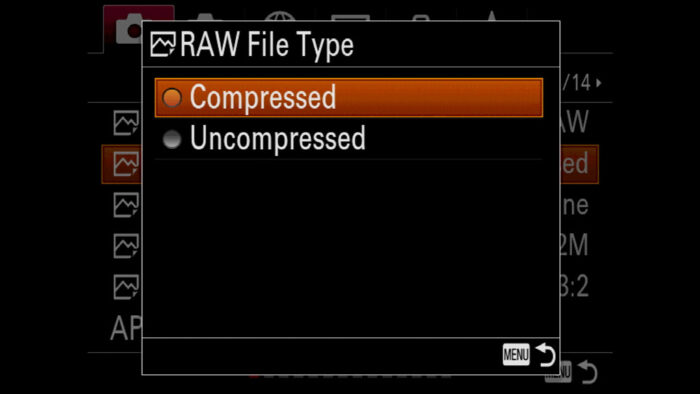
Then we have the RAW file type with two options: Compressed or Uncompressed RAW. Uncompressed RAW is found on your Sony A7 III and other A7 models down to the mark II generation.
The mark I series only works in compressed mode.
To select the RAW file type on your A7 III & co.:
- Go to Camera Settings 1 / Quality Image Size 1 (page 1/14)
- Select RAW File Type
- Choose Compressed or Uncompressed.
Uncompressed gives you the best quality the camera has to offer, but results in a larger file.
Compressed, as the word suggests, makes the file smaller but you also lose some information in the process because it is a lossy compression.
Below you can see the differences in file size between compressed and uncompressed RAW for each camera.
| Compressed | Uncompressed | |
|---|---|---|
| A7 II, A7 III A9, A9 II (24MP) | 25MB | 49MB |
| A7R II, A7R III (42MP) | 43MB | 85MB |
| A7R IV (60MP) | 62MB | 123MB |
| A7S II (12MP) | 13MB | 25MB |
Unfortunately, to this day Sony doesn’t offer a lossless compress option like the one found on Canon and Nikon DSLRs, which if often the optimal solution to save space without impacting quality.
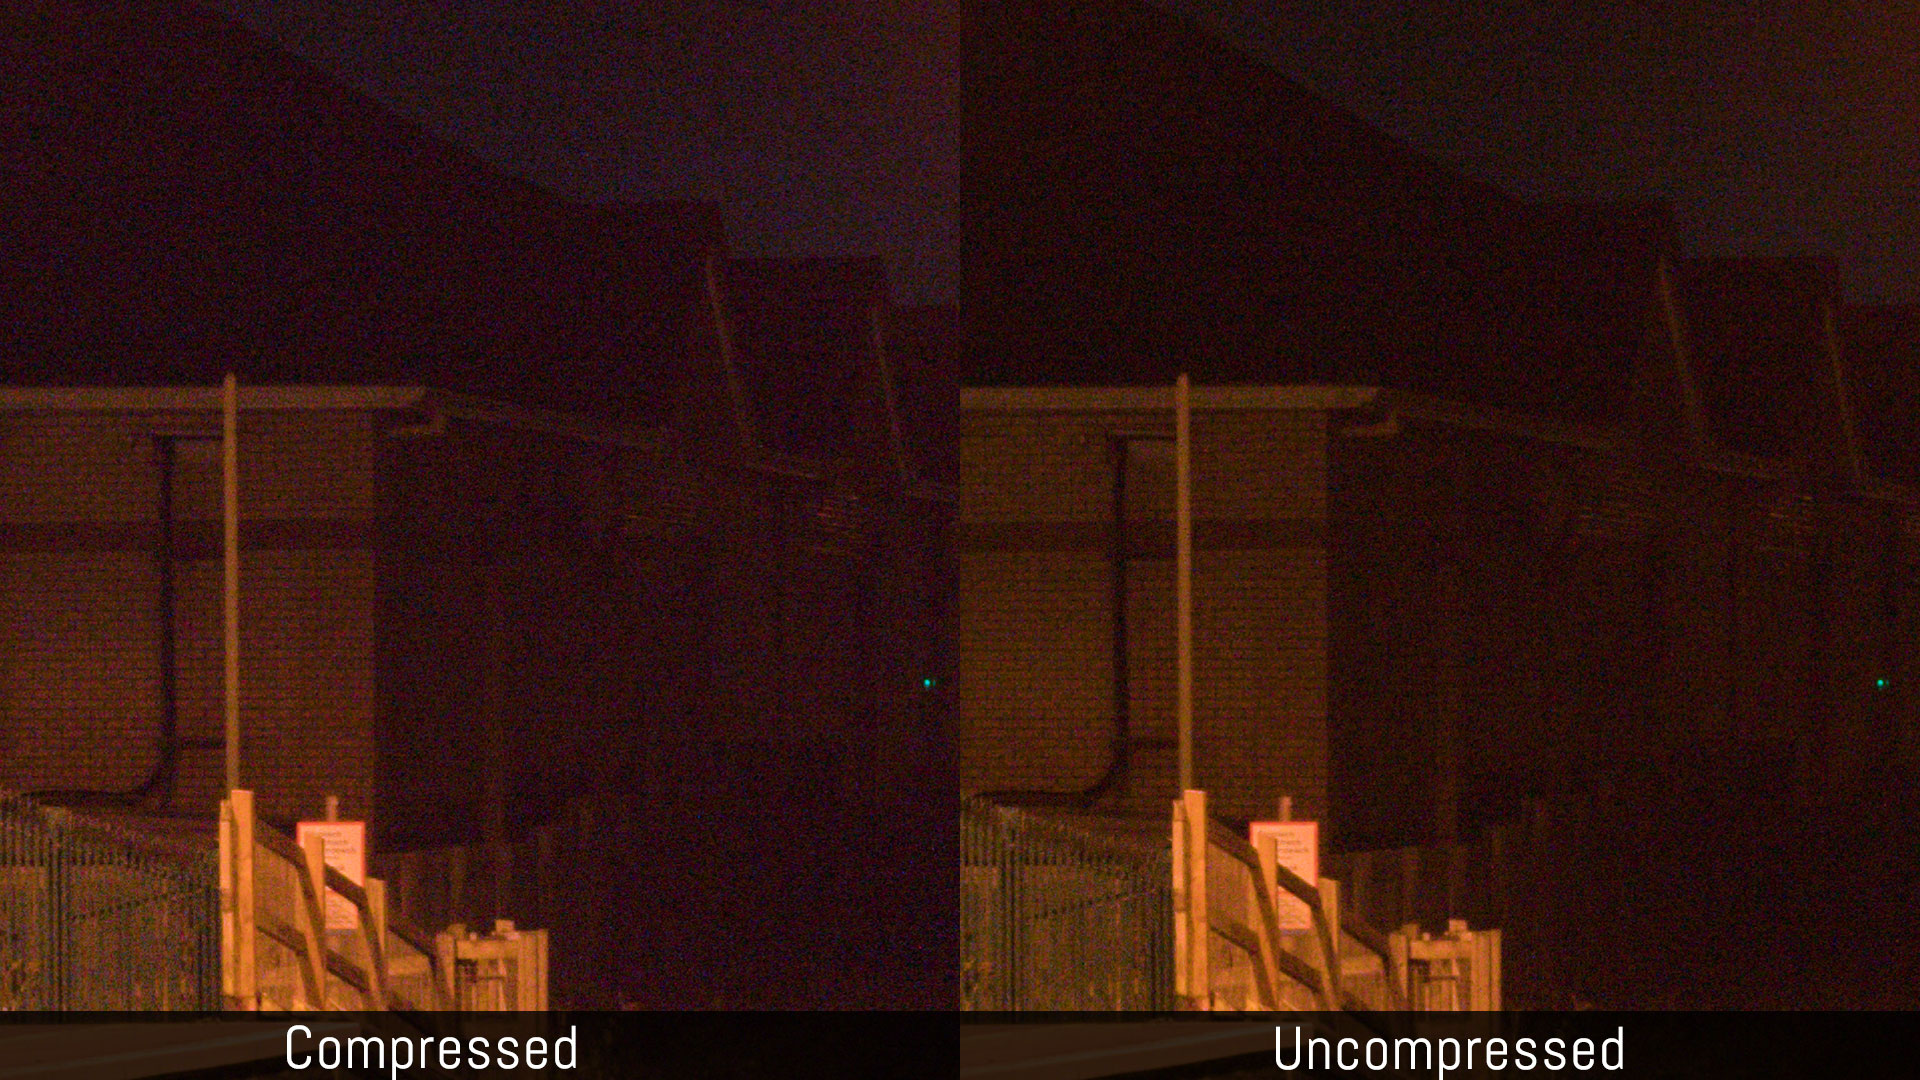
Below you can see the difference between Uncompressed and Compressed RAW when performing a heavy exposure recovery of 5 stops. The Compressed version shows more purple colour cast and has more colour noise.
Uncompressed or compressed RAW for your Sony A7, A9: which one to choose?
If you plan to do a lot of post production on your image, choose uncompressed. If you shoot action in continuous mode, compressed will help the buffer of your camera clear more quickly. Either way, the difference will be difficult to notice unless you do a drastic exposure recovery or very heavy processing.
Note: some websites have shown the disadvantage of shooting Compressed RAW in certain situations, where small artefacts can appear in areas with subtle tonal changes (the night sky for example). Personally, I have never encountered big issues with this, and the solution in this case is to choose Uncompressed. If you want to find out more, the web is full of articles on this topic.
Sony A7 III, A7R, A9 III JPG Settings
There are two types of OOC JPEG settings to look at when it comes to JPG Quality on the A7 III and A9 series.
The first refers to the compression and resolution of the file itself and are found in Camera Settings 1 / Quality Image Size 1 (page 1/14). The second concerns colours and effects, and we describe them in the next chapter.
The JPEG Quality setting has three levels of compression to choose from:
- Extra Fine
- Fine
- Standard
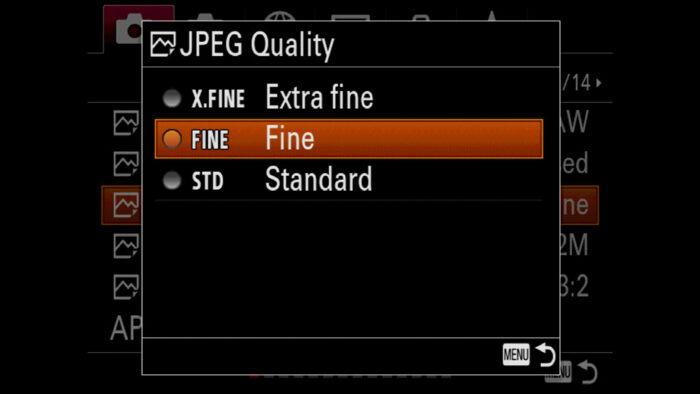
Extra Fine has less compression but the file size increases, whereas Standard has more compression but is smaller. I keep it to Fine most of the time as I find it to be an optimal compromise.
Then we have the JPEG Image Size setting. You can choose between Large, Medium and Small.
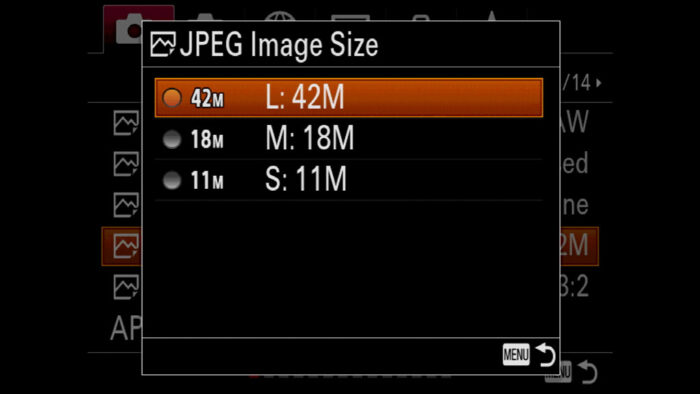
Large is the maximum available and corresponds to the native sensor of your camera. Medium and Small reduces the resolution by approximately 58% and 75% respectively.
| Large | Medium | Small | |
|---|---|---|---|
| A7, A7 II, A7 III, A9, A9 II | 24MP | 10MP | 6MP |
| A7R II, A7R III | 42MP | 18MP | 11MP |
| A7R IV | 60MP | 26MP | 15MP |
| A7S, A7S II | 12MP | 5MP | 3MP |
| A7R | 36MP | 15MP | 9MP |
Note: the dimensions above will vary if you set the camera to APS-C mode, or the Aspect Ratio to 16:9.
Having a smaller JPG is helpful if you need to use it as a preview, or need to share it right away over wifi and want to speed up the process (a smaller resolution means a smaller file size).
Another JPEG setting on your A7 III and other A7 cameras is called Aspect Ratio. By default, all Sony cameras record in the 3:2 format which reflects the native proportions of the sensor. If you prefer, you can choose the 16:9 aspect ratio which is the same used for video.
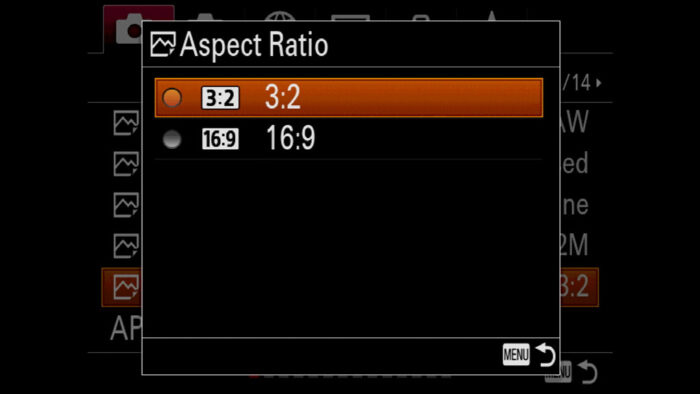
On the most recent models such as the A7R IV and A9 II, the 4:3 and 1:1 aspect ratios are also available.
Then we have a setting related to the lens called Lens Comp. You will find it in Camera Settings 1 / Quality Image Size 2 (page 2/14). This controls the in-camera correction for Shading (vignetting), Chromatic Aberration and Distortion. You can leave them to Auto or turn them Off. I always choose Auto. Depending on the lens mounted, Distortion can be grayed out (it stays on Auto).
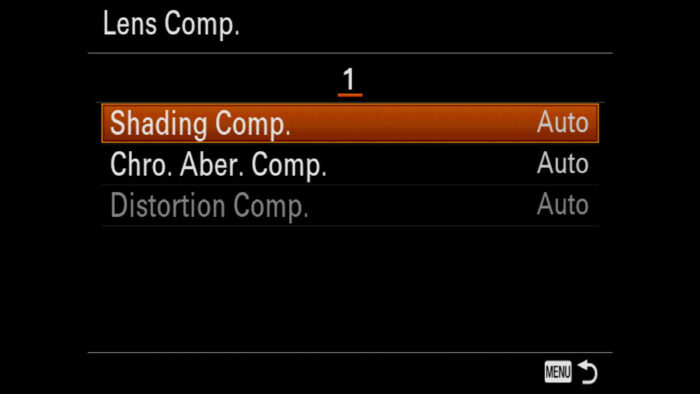
Note: Lens Comp. is valid for lenses with electronic contacts compatible with the E-mount system.
Sony A7 III, A7R III, A9 Color Settings
We often hear the words color science to describe the colour palette each brand designs for its cameras.
The Sony A7 III has different colour profiles as well as other colour settings to control your image. These settings are the same across most of the A7 and A9 series. Some of them just need to be configured occasionally, whereas others have a visual impact on the final look of your photos.
Important: the settings I’m illustrating here affect the JPG files only. With RAW, colours will be controlled by the photo editor software on your computer. This is because the RAW file doesn’t embed a colour profile nor is it affected by the Colour Space setting. To open it correctly, the software will apply its own. Some editors like Lightroom can replicate the color profiles found in camera.
Sony A7 III, A7R III, A9 Color Space
Camera Settings 1 / Quality Image Size 2 (page 2/14)
Color Space determines the range of colours (gamut) that are reproduced in your image. There are two options to choose from in the A7 III Color Space settings:
- sRGB: the standard colour space that guarantees the best cross compatibility among devices of various natures, as well as any web application
- AdobeRGB (also known as Adobe 1998): offers a wider colour gamut than sRGB of approximately 35%.
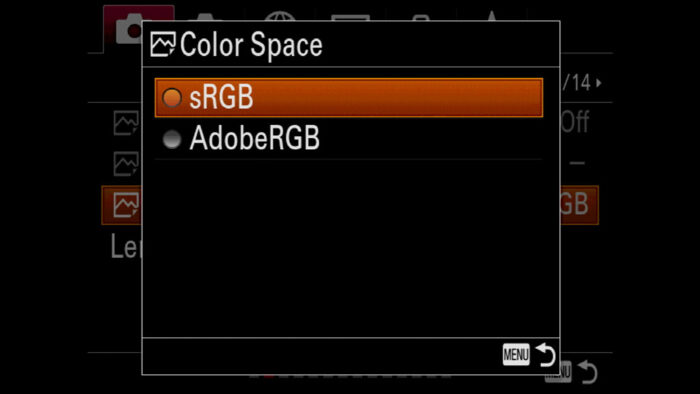
The simple rule that you’ll often come across is: choose Adobe RGB if you intend to print, otherwise stick to sRGB. I think it is a good base to start with. Although AdobeRGB has a wider colour gamut, you won’t see a perceptive difference unless you work with compatible monitors and printers.
If you have a printer that is compatible with the AdobeRGB colour space, or your print service accepts this setting, then it is worth shooting in Adobe 1998 to take advantage of that wider gamut.
Note: if you upload a JPG image to the web with an AdobeRGB colour space, it will be converted to sRGB automatically and may result in lower saturation in comparison to the original photo. To avoid this, convert the image to sRGB yourself with your photo editing software before the upload.
Sony A7 III, A7R III, A9 Color Profile
Camera Settings 1 / Color WB Img. Processing (page 12/14)
The Color Profile determines the look of your image. For example you can have saturated colours and a high contrast, or choose a profile that gives more neutral tones. Sony calls these settings Creative Style and there are 13 of them.
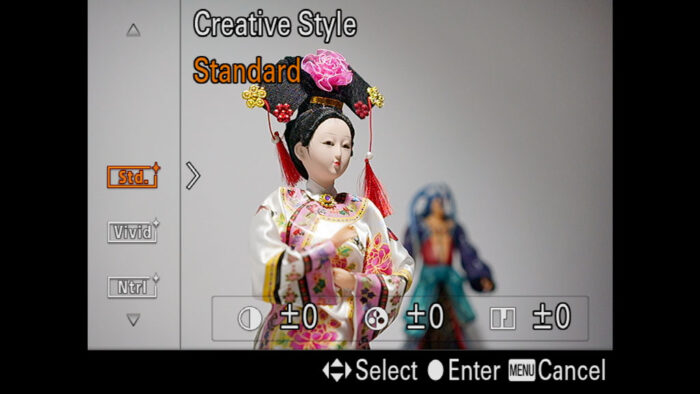
Each Creative Style has saturation, contrast and sharpness parameters that you can adjust manually if you wish to fine tune the look of your picture. Furthermore, five additional styles can be changed so that you can have two different settings for Black & White for example.
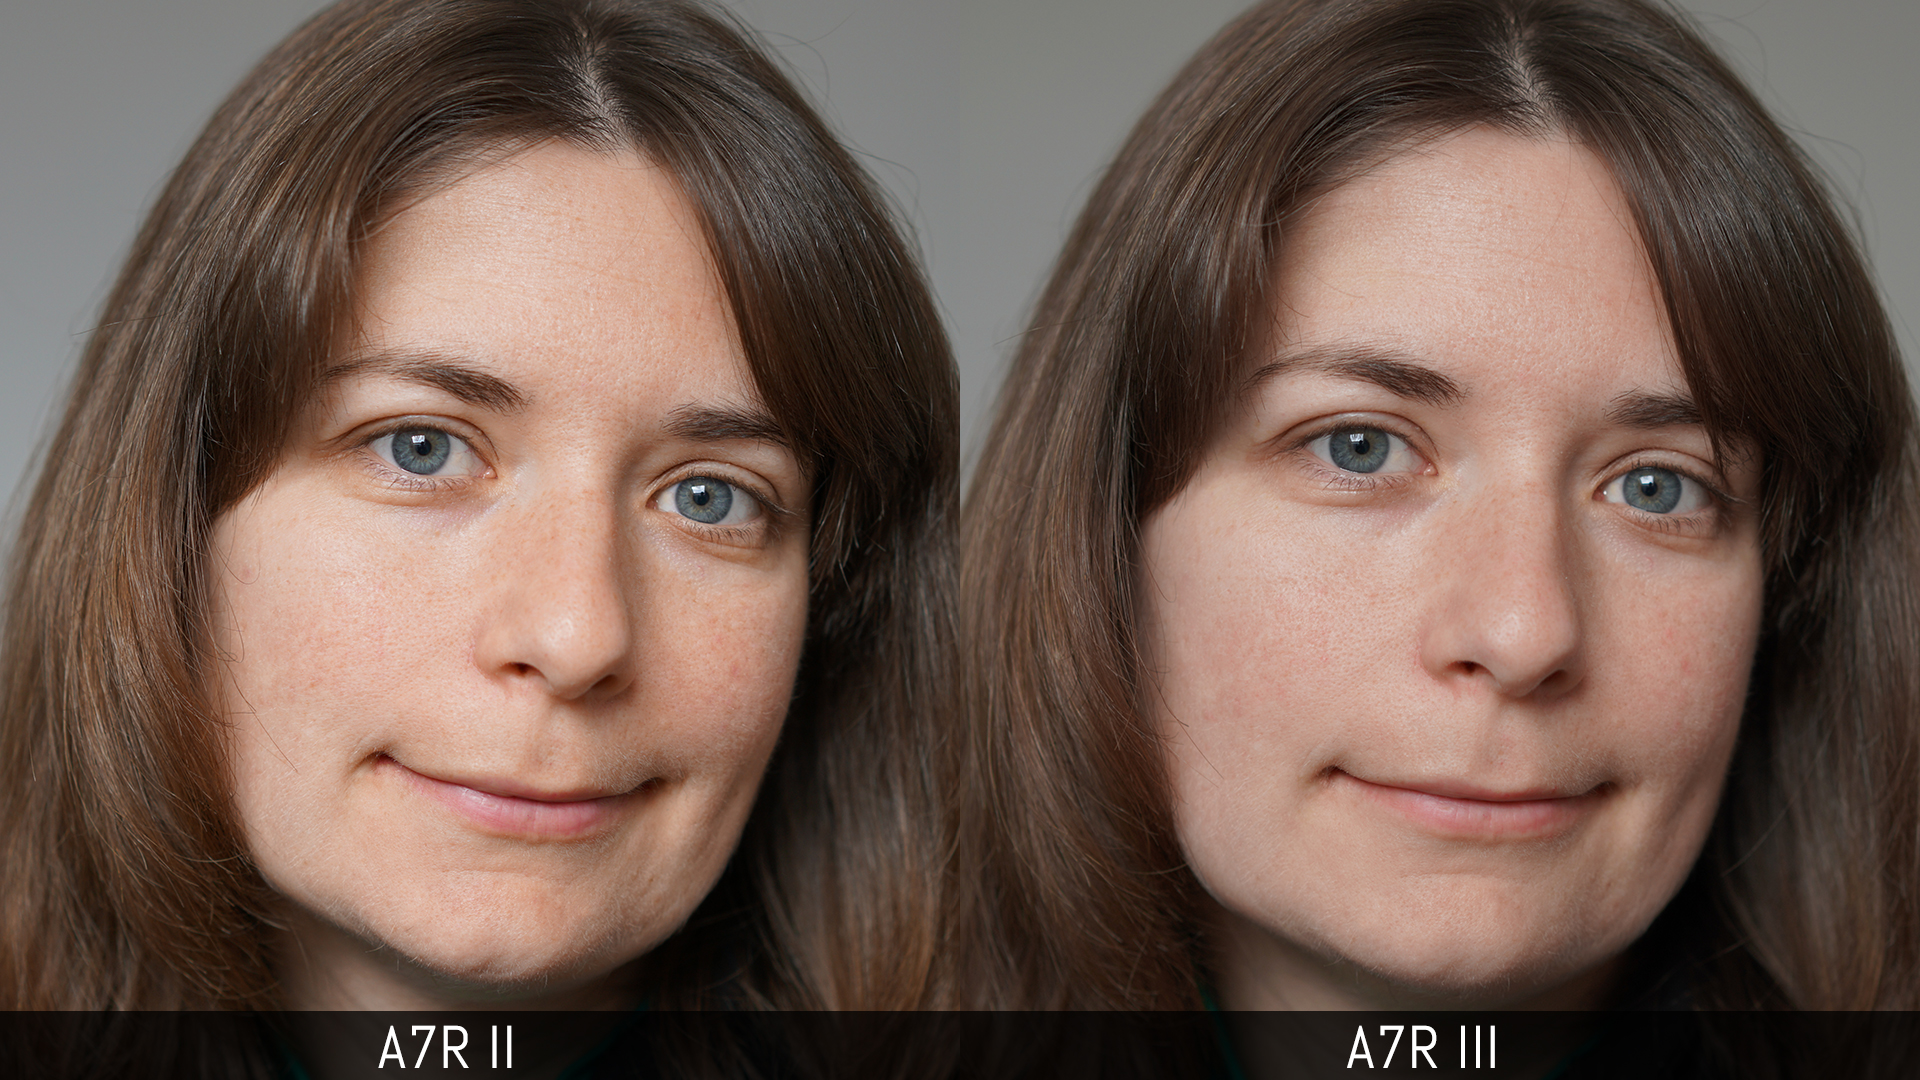
The A7 III color profiles are the same for all Sony cameras but over the years, Sony has tweaked and – to my eyes – improved the colour rendering on the latest models. This means that the same profile, for example the Portrait style, will give you a different result from the mark II to the mark III series as you can see below.
Choosing a Creative Style will be highly influenced by your personal taste and the subject you’re photographing. For example the Landscape profile is designed to give good contrast and saturation with warm colours, whereas Portrait will soften the image and tweak the skin color and tone.
Tip: to access the Creative Styles more quickly, consider assigning the setting to a custom button, adding it to My Menu or the Function Menu (click here to read how to customise your Sony camera).
Below you can see how different Creative Style settings affect the look of the image.


Sony A7 III, A7R III, A9 White Balance
Camera Settings 1 / Color WB Img. Processing (page 12/14)
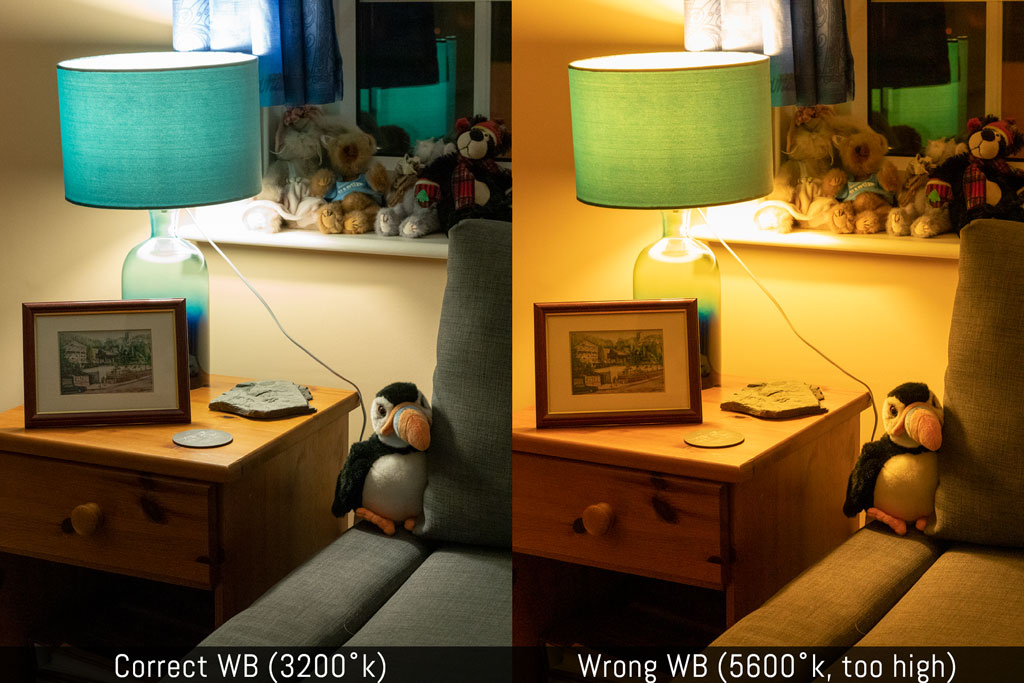
Light sources have a color temperature which is measured in kelvin. Measuring the correct colour temperature in relation to the light source is important to display natural looking colours.
For example, the daylight temperature of the sun is around 5600˚k, whereas your typical incandescent bulb is around 3200˚k. If I were to set 3200˚k outside during the day, my image would have a severe blue tint. On the other hand, 5600˚k with an incandescent bulb would result in too much orange.

Each type of light has a different temperature and nowadays, popular LED lights can replicate many different temperatures including that of natural light.
The A7 III and other A7/A9 models offer different settings to control the white balance.
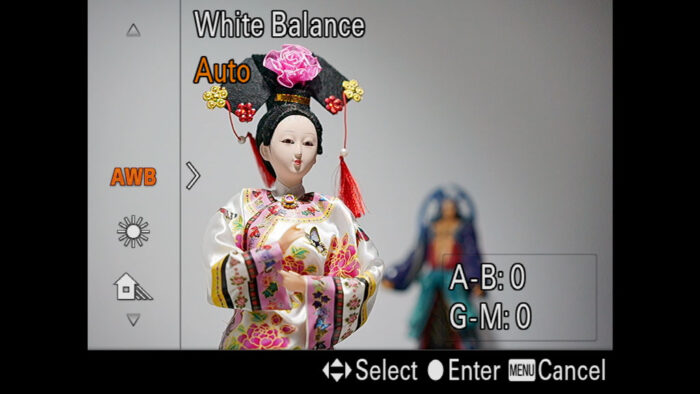
The easiest one to begin with is Auto: the camera measures the correct colour temperature automatically based on the light of your scene. Linked to Auto is Priority Set in AWB which allows you to control the tone warmth under artificial light such as incandescent light.
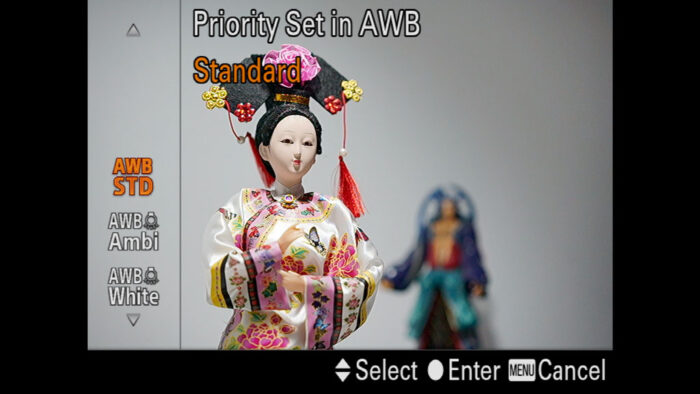
Priority Set in AWB is not available in the A7 I and A7 II series.
Standard won’t alter anything, whereas Ambience will warm the atmosphere and White will prioritise faithful white colour when the source of light is low. Depending on the type of light source, Standard and White can give very similar results.

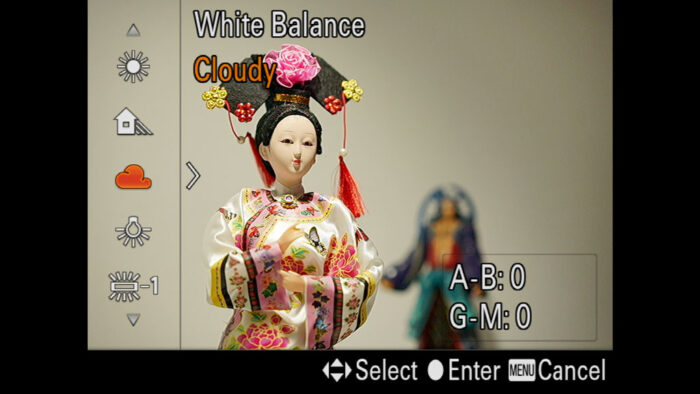
To have a bit more control, you can choose one of the many presets such as Daylight, Shade, Cloudy, Incandescent etc. which are designed for the situation their names describe. These can be useful to make sure the camera stays in the appropriate color temperature range, or when Auto produces an overly cool image.
Once you have more experience, you can choose the colour temperature manually with C.Temp./Filter. (from 2500K to 9000K).
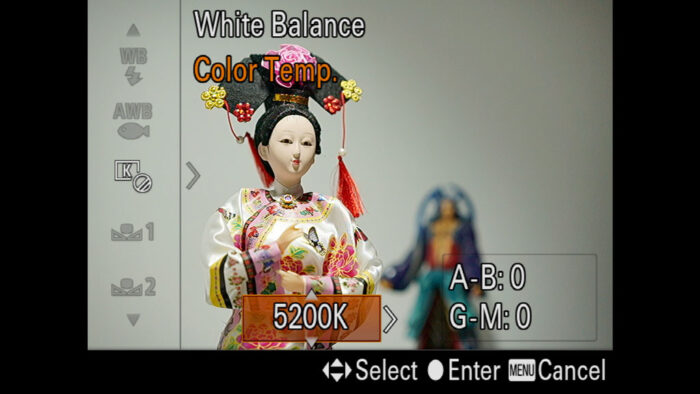
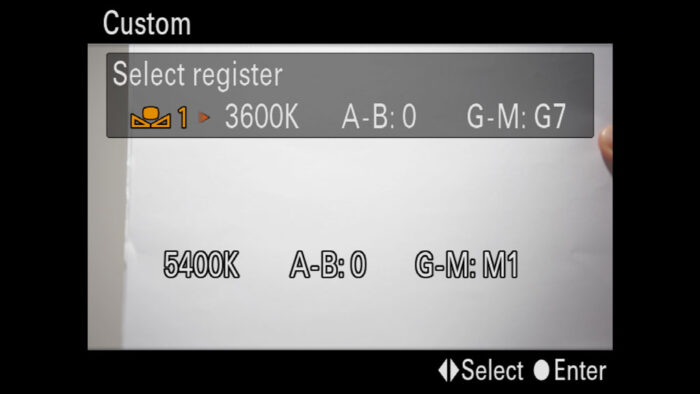
Finally, you have three Custom settings that you can configure for precise use in a specific lighting situation. To measure the ambient light:
- Use a white piece of paper (A4 or similar) or a grey card
- Place the paper in the spot where your subject will be. Make sure that it fills a large portion of the frame
- Select White Balance and scroll down to Custom Set
- When you’re ready, press the Centre button to measure the light
- The camera will display the temperature measured
- Choose one of the three Custom settings to save the measurement to
- Repeat for the other two Custom modes if necessary.
White Balance Adjustment
For every white balance setting, you can fine tune colours with the White Balance Adjustment. Select the option that you want, then press the right button. A colour table appears with the possibility to move the cursor on the Amber-Blue and Green-Magenta axes.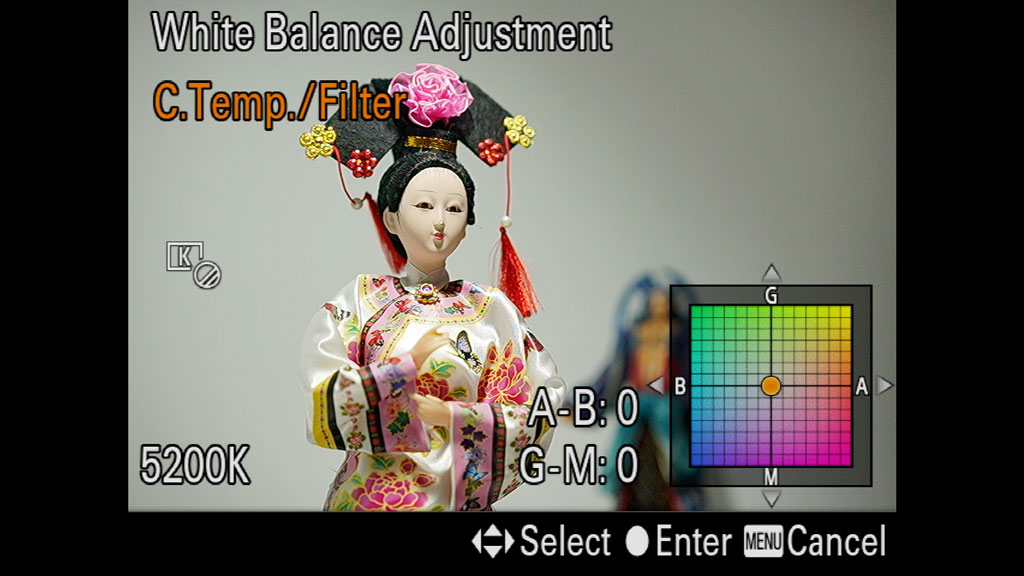
If you plan to work with JPGs, choosing the right white balance setting is crucial because you won’t be able to correct it if it is wrong. If you shoot RAW, it matters less because white balance can be adjusted seamlessly in post. I often use Auto when shooting RAW, and sometimes I choose one of the presets to have a better preview of my images on the LCD screen.
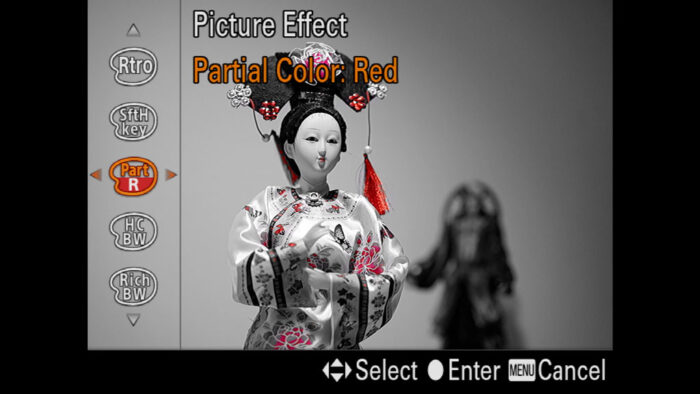
Sony A7 III, A7R III, A9 Picture Effect
The Picture Effect setting must not be confused with Creative Style or Picture Profile. It adds an artistic filter to your image such as Toy Camera, Partial Color, Retro Photo etc. They are not dissimilar to the effects you can find on smartphone apps. They are only available when shooting JPG. I personally never use them.
Sony A7 III, A7R III Picture Profile for Photography
The Picture Profile setting sounds like the most appropriate name for the job, but in fact it is designed for video. There are ten presets, all customisable, that contain advanced parameters taken from Sony’s Professional camcorders and Cine-Alta series. But can you use the picture profiles for photos on your Sony A7 III & co.?
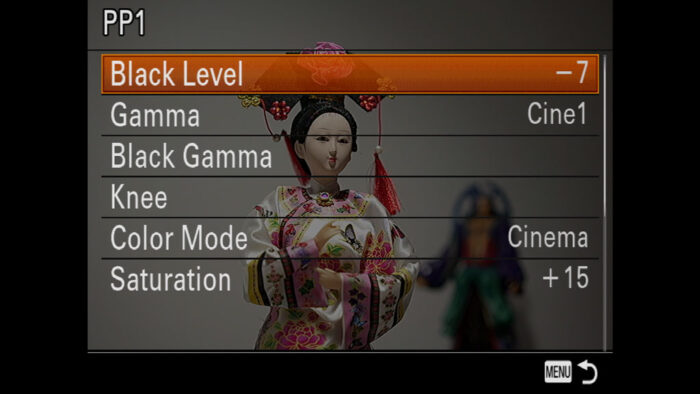
The answer is: yes you can! Once again they will only affect the JPG files, and it takes some trial and error to figure out which combination of settings works best, also because many of these parameters are designed with video color grading in mind. But if you’re looking for a style that is a bit different than usual and you’re willing to experiment, why not give it a try?!
(Gamma: Cine 4, Color Mode: Pro, Saturation: +15, Color Phase: +2)
Picture Profile is not available in the A7, A7R and A9.
Sony A7 III, A7R III, A9 Exposure Settings
The basic exposure settings of your A7 III or any A7 model are the same found in every other digital camera: Aperture, Shutter Speed and ISO (exposure triangle). Aperture controls the amount of light passing through your lens, Shutter Speed determines the amount of time it takes for the camera to capture an image, and ISO controls the sensitivity of the sensor.
On your A7 camera, you control the aperture and shutter speed with the front/real dials, whereas ISO can be changed with the dedicated button on the rear or a custom button of your choice.
I’m not going to dig into a long explanation of what these three settings are and how to use them. The web is full of articles, tutorials and videos about it.
Note: we talk more about ISO settings in our dedicated low light photography article.
On your A7/A9 camera, the exposure can be controlled with various modes. You can change these settings with the main dial on top.
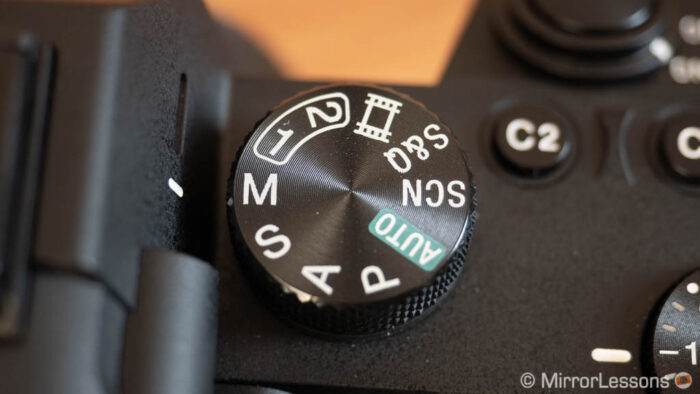
- Manual (M): every settings must be configured by you
- Aperture priority (A): you control aperture and ISO, the camera adjusts the shutter speed automatically
- Shutter Speed priority (S): you control shutter speed and ISO, the camera adjusts the aperture automatically
- Program (P): you control ISO, the camera adjusts the aperture and shutter speed automatically. If you rotate the front/rear dial, you can shift the aperture/shutter speed values up to a certain point.
- Auto: the camera controls ISO, aperture and shutter speed, as well as Creative Style and other settings.
In addition to the basic exposure settings, there are other parameters you’ll want to know about if you’re planning specific shots or artistic effects.
Sony A7 III, A7R III, A9 Metering Settings
Camera Settings 1 / Exposure1 (page 9/14)
Metering is a function that allow your camera to measure the correct exposure based on the amount of light that is coming through the lens.
With the Metering Mode setting, you specify which area of the frame the camera should work on.
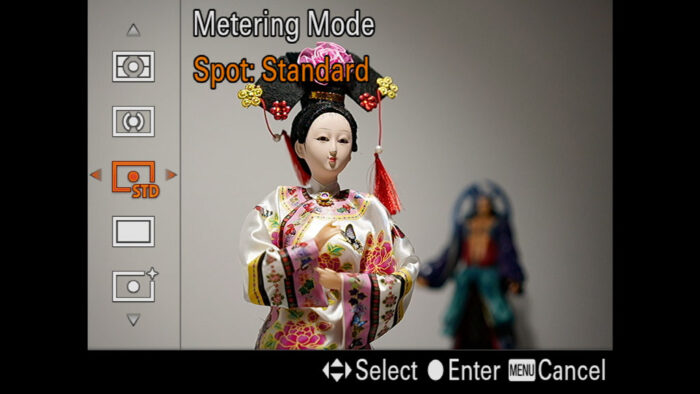
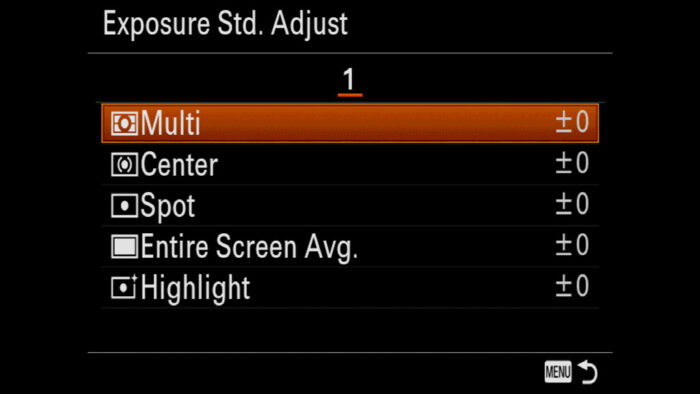
There are five settings to choose from:
- Multi: measures the light at the centre and in four areas around the centre to have a proper exposure across the entire screen
- Centre: measures the light across the entire screen but emphasises the central area
- Spot: measures the centre of the frame only. Two sizes are available (Standard and Large)
- Entire Screen Avg.: similar to Multi, but the entire frame is measured and it is designed to be more stable if the composition changes
- Highlight: measures the light by keeping the bright zones of the scene correctly exposed.

Highlight and Entire Screen Avg. are not present in the A7 I and A7 II series.
When working in automatic or semi-automatic mode, the Metering setting is important because it determines how the camera will behave when it comes to exposure.
If you find that your subject is too dark or too bright, chances are that the camera is not measuring correctly. This especially true when there is a lot of contrast in your scene.
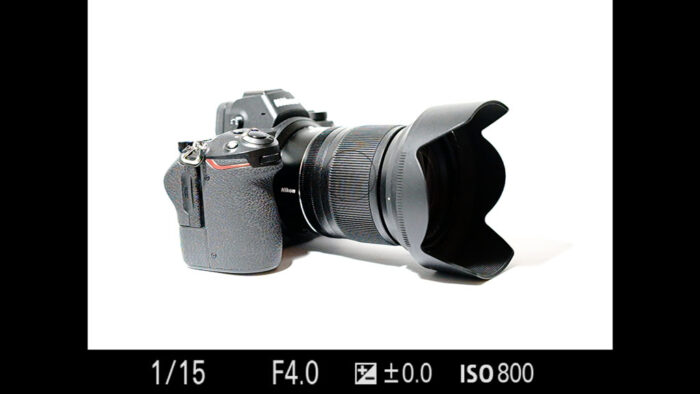
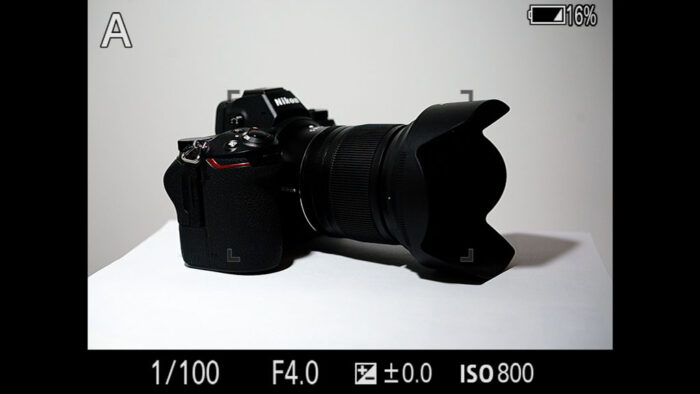
In the example below, we have a dark subject (a black camera) and a white background. With Spot Standard, the camera measures a small portion of the subject and, because it is black, the camera will think that the image is too dark and will overexpose your picture as a result. With Multi, the white background is also measured and the image is more balanced.
The A7 III and A9 series have additional settings to control metering. Let’s see what they are.
The first is Exposure Std. Adjust. For each metering setting, you can adjust the exposure shift by ±1 Ev. This is useful if, for example, you find that the camera always underexposes a little when using Spot or another metering setting. You will find this in: Camera Settings 2 / Exposure2 (page 10/14).
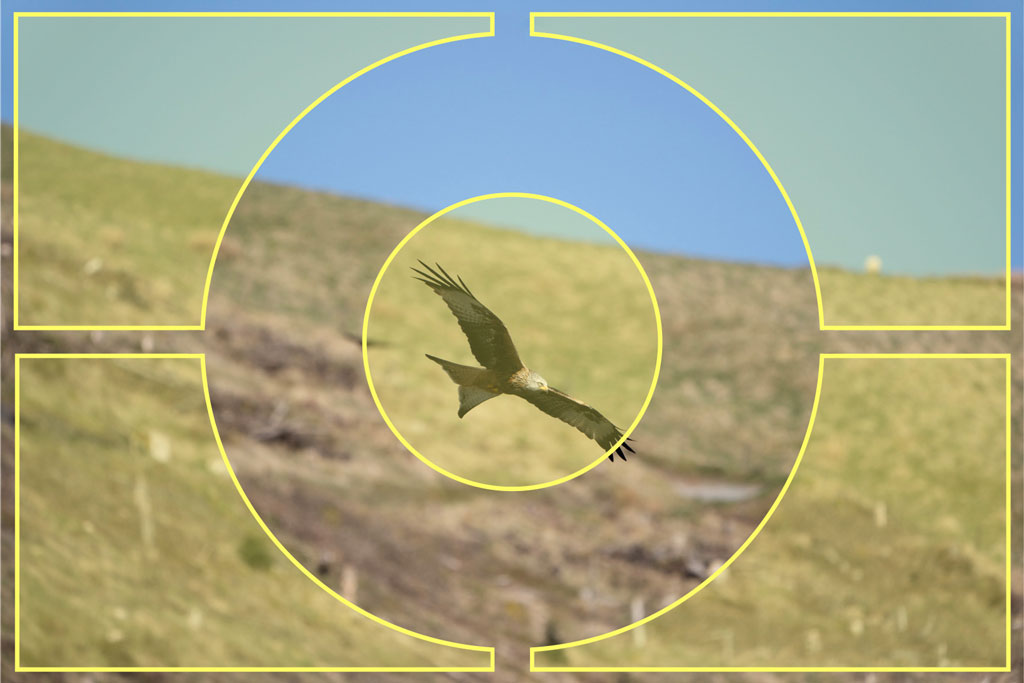
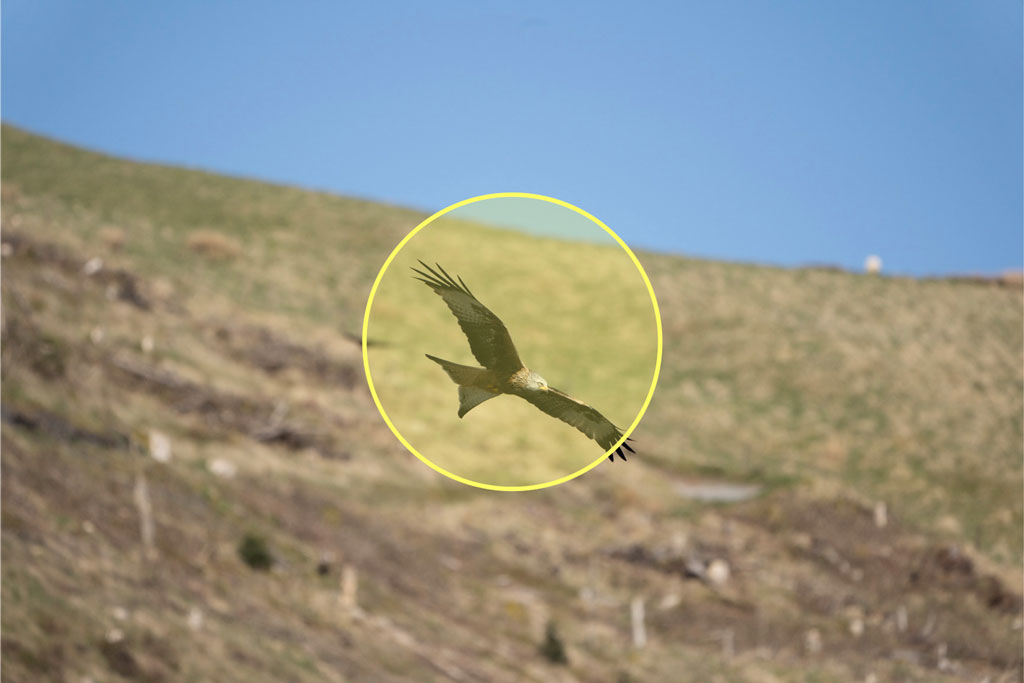
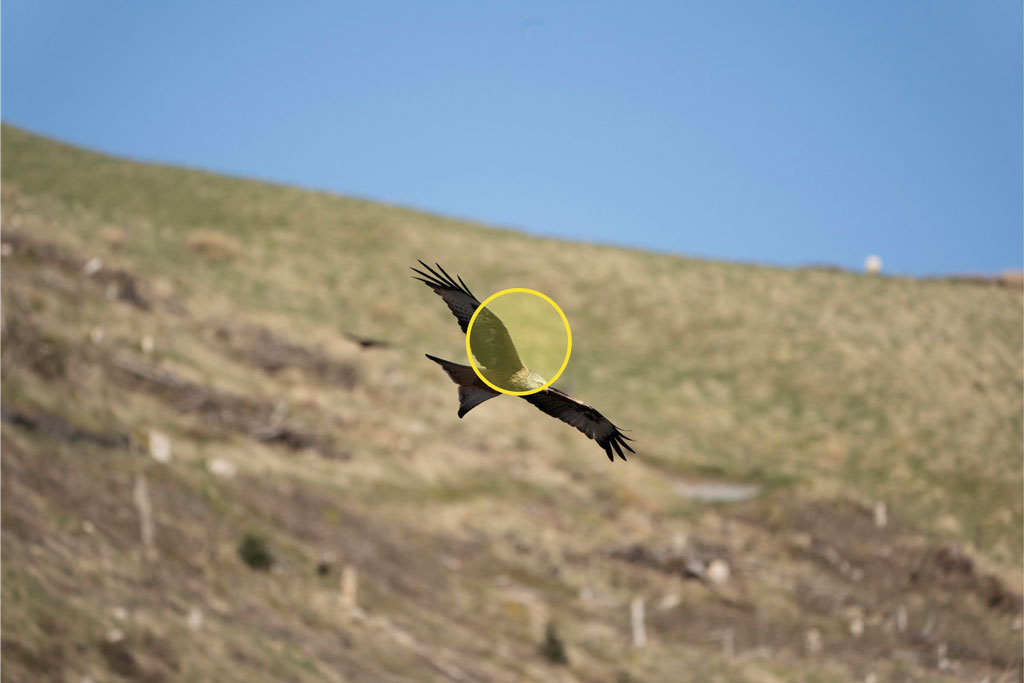
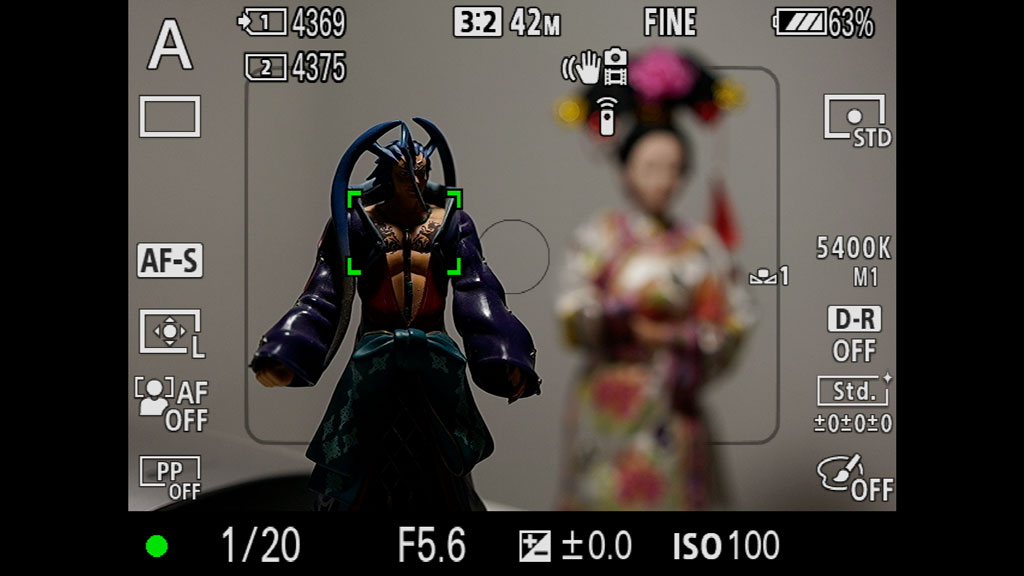
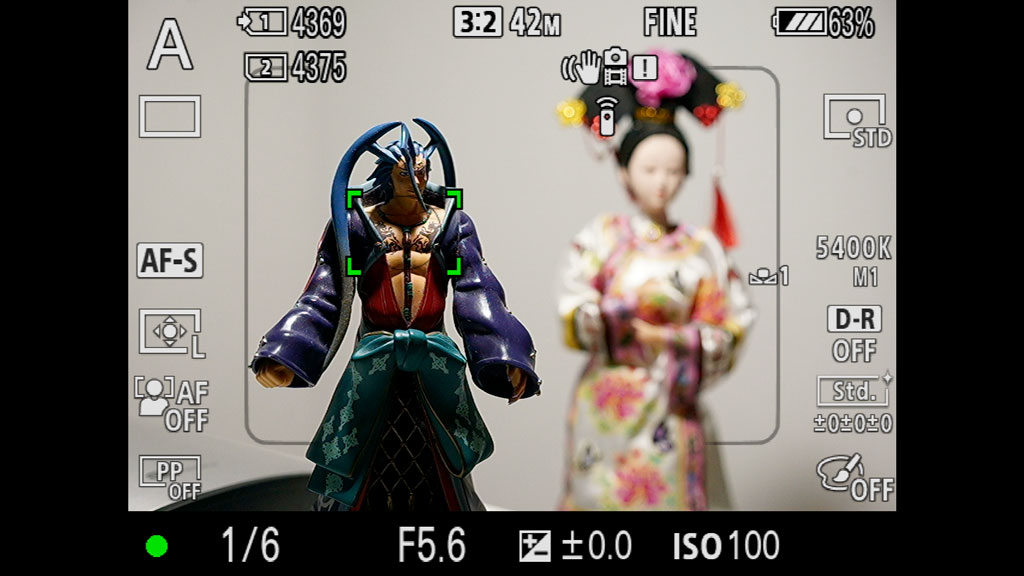
One very useful setting is called Spot Metering Point which allows you to link Spot metering to the focus area (Focus Point Link). This way, rather than having the camera always measure from the centre, you can force it to measure from where you have set your focus point. You will find this setting in Camera Settings 2 / Exposure2 (page 10/14).
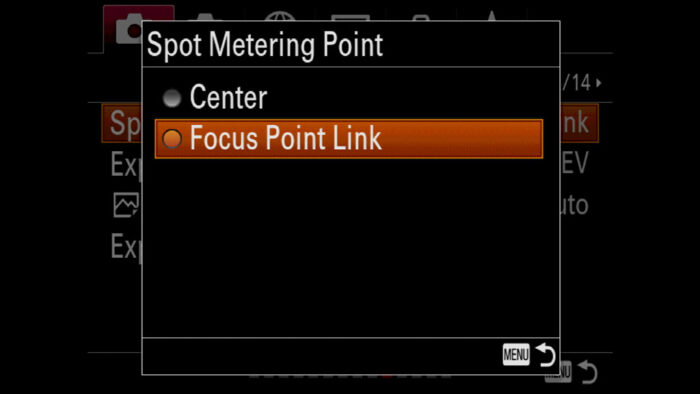
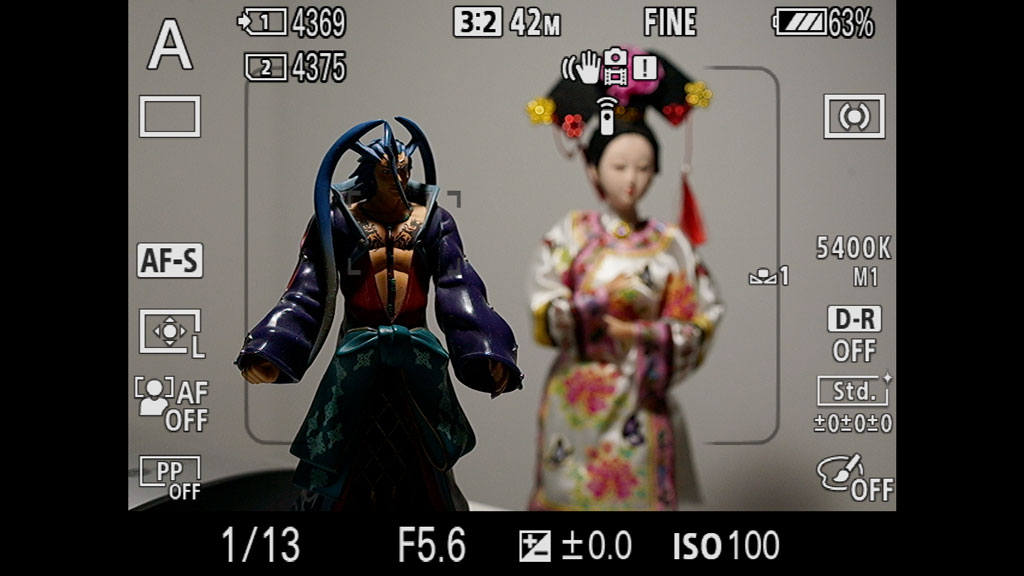
If we look at the example below, my focus point (green) is on the action figure in the foreground but Spot metering is set to the centre so the camera’s exposure makes my subject too dark. In the second image, Spot metering was measured where my focus point is and now my subject and image are better exposed.
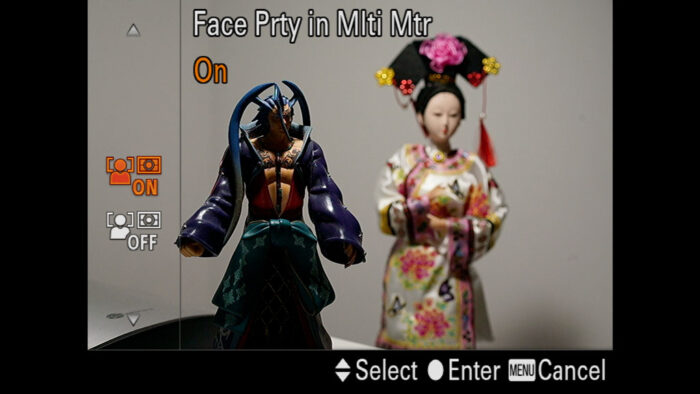
Following the same concept is another setting called Face Prty in Mlti Mtr which means Face Priority in Multi Metering. If you use face detection a lot to focus on your subjects, having the camera measure the exposure on the face it focuses on rather than the entire scene can give you more precise results. You can change this in Camera Settings 1 / Exposure1 (page 9/14).
Note: even when working in full manual mode, the camera keeps measuring the light and indicates if you are over or under exposing at the bottom of the LCD screen or EVF. It is a good exercise to aways keep an eye on these numbers to understand how the camera reacts in various situations, even if you’re previewing your exposure in the live view.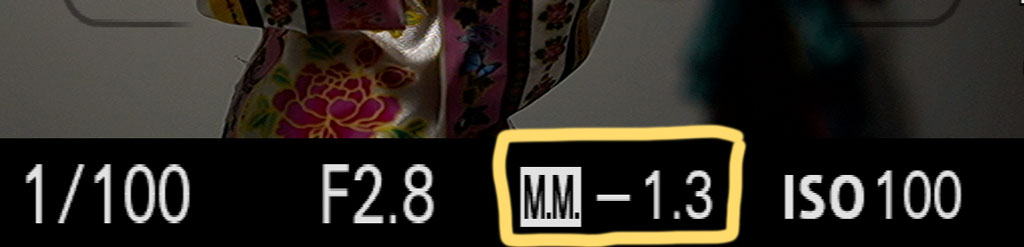
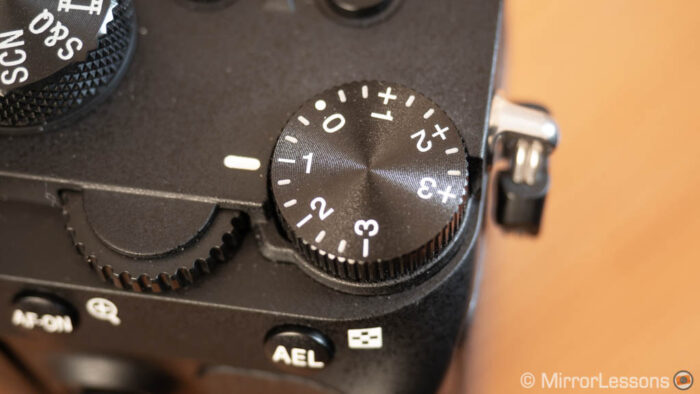
Exposure Compensation on your Sony A7 III, A7R III, A9
For further control over metering, you can use exposure compensation. There is a dedicated dial on top of your Sony A7 camera, located on the far right area next to the rear exposure dial. If you rotate it to plus or minus values, it will increase or decrease your exposure.
For it to be effective, you need to be in one of the following configurations:
- Manual Mode (M) with Auto ISO: exposure compensation dial will affect the ISO setting
- Aperture Priority mode (A): exposure compensation will intervene on the shutter speed
- Shutter Speed Priority (S): exposure compensation will work on the aperture
- Program (P): exposure compensation will work on aperture and shutter speed.
Exposure Compensation at ±5Ev
The physical dial works at ±3 stops. If you want a larger range, you can assign exposure compensation to the front or rear dial when working in Program, Aperture or Shutter Speed priority. Go to Camera Settings 2 / Custom Operation 2 (page 9/9), select Dial Ev Comp and choose Front dial or Rear dial.
Exposure compensation is useful when you see that the automatic or semi automatic measurements of the camera are not giving you the result that you want. In a high contrast situation, the camera might over exposure or under expose too much. The compensation dial helps you restore the balance.

For example I use this a lot when taking pictures of birds in flight because depending on their position (up in the sky, against the sun or in front of trees) the camera can under or overexpose a little. The dial allows me to correct that quickly.
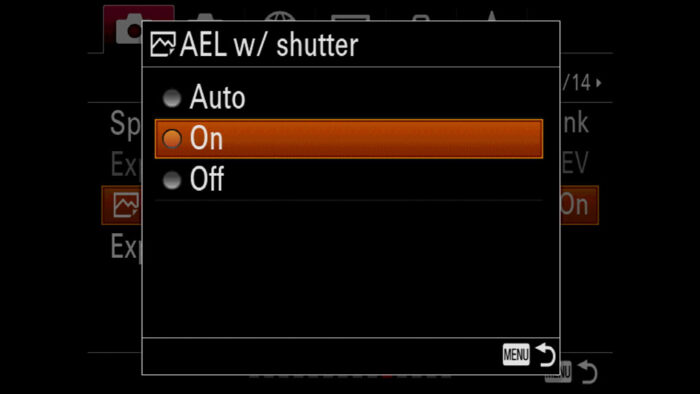
Auto Exposure Lock (AEL) on Sony A7 III, A7R III, A9
Another method to control metering is AEL, or Auto Exposure Lock. When you see that the camera is exposing your image correctly, you can press a button to lock the exposure. Then you are free to recompose your frame without worrying about the exposure changing again.
AEL can work by half pressing the shutter button.
- Go to Camera Settings 1 / Exposure2 (page 10/14)
- Highlight AEL w/ shutter and make sure it is set to On.
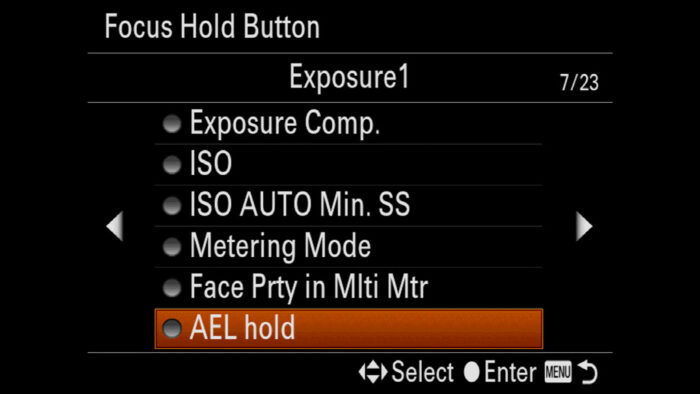
Alternatively, you can activate AEL with a custom button. By default, it is assigned to the AEL button on the rear of your camera, but you can change that if you want.
- Head over Camera Settings 2 / Custom Operation1 (page 8/9)
- Enter Custom Key (the fist on top)
- Choose a button
- Navigate to Exposure1 (page 7/23) and choose AEL hold (press and hold the button) or AEL toggle (press once to lock the exposure, twice to unlock it)
Sony A7 III, A7R III, A9 Long Exposure Settings
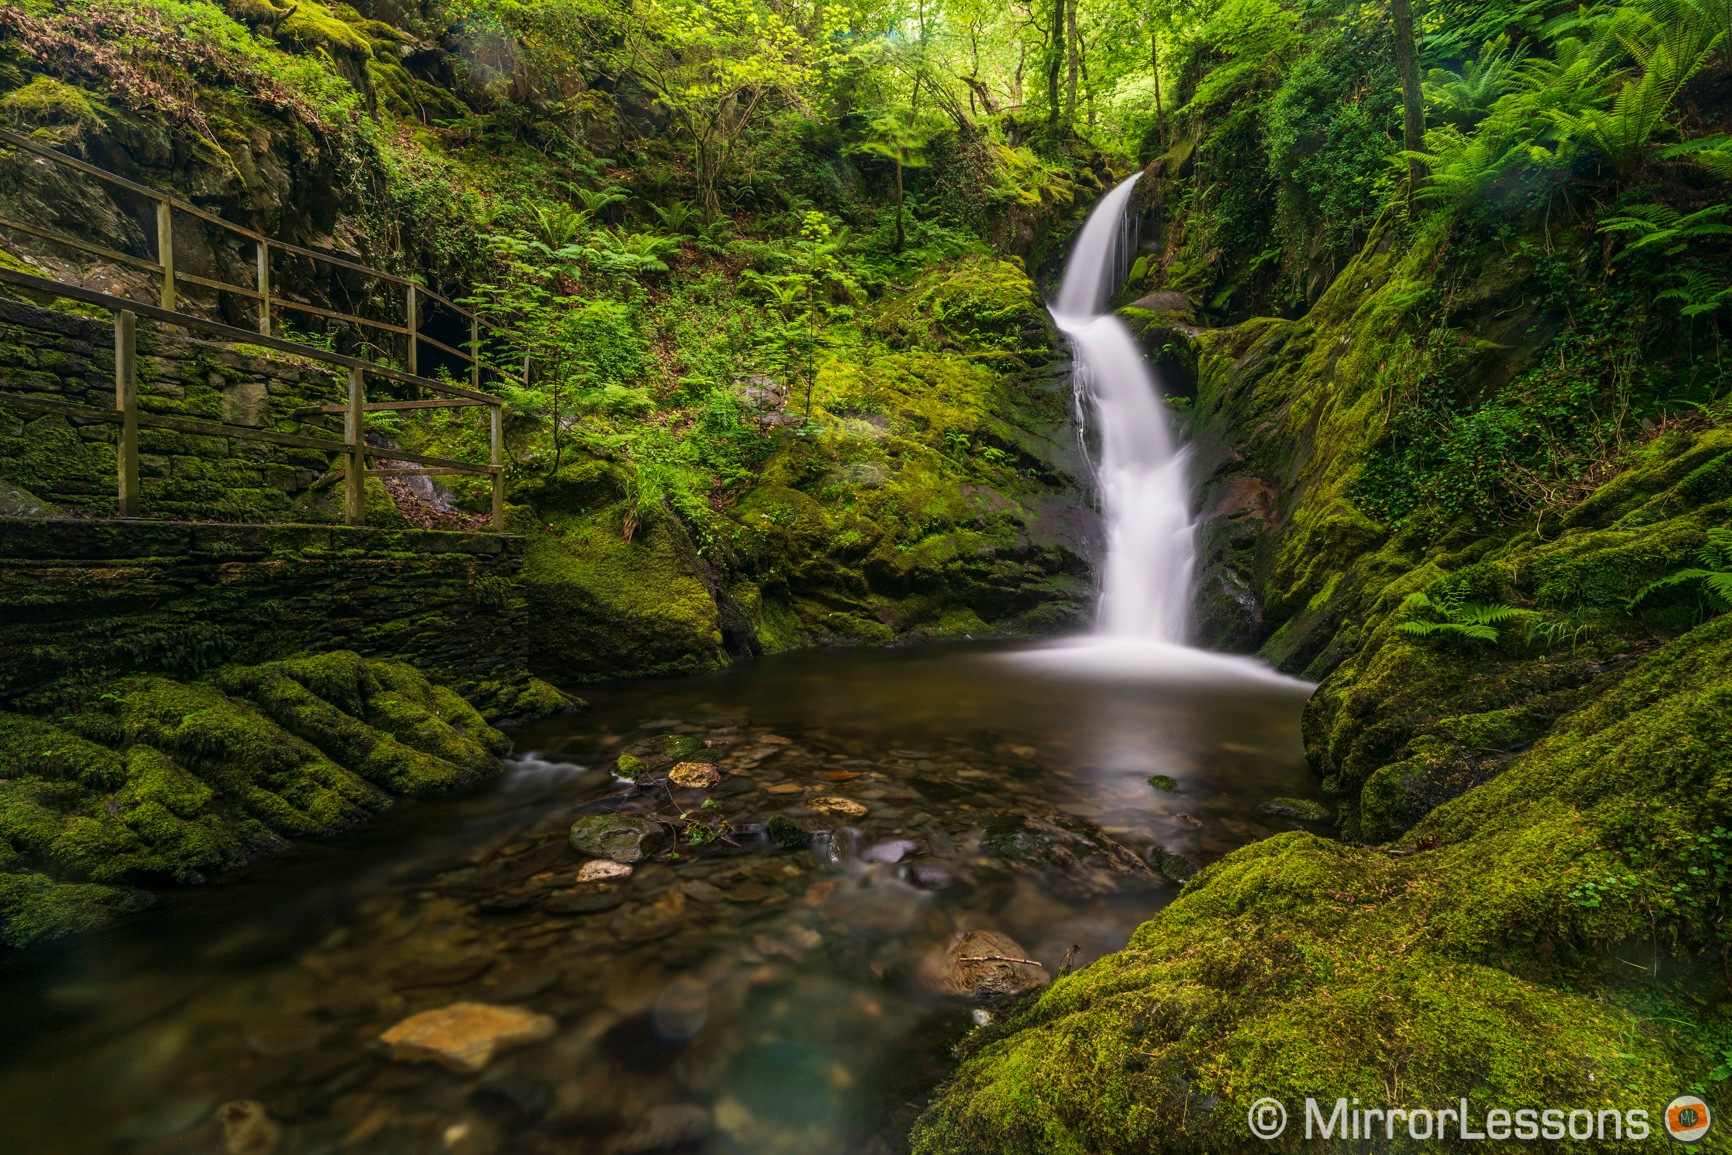
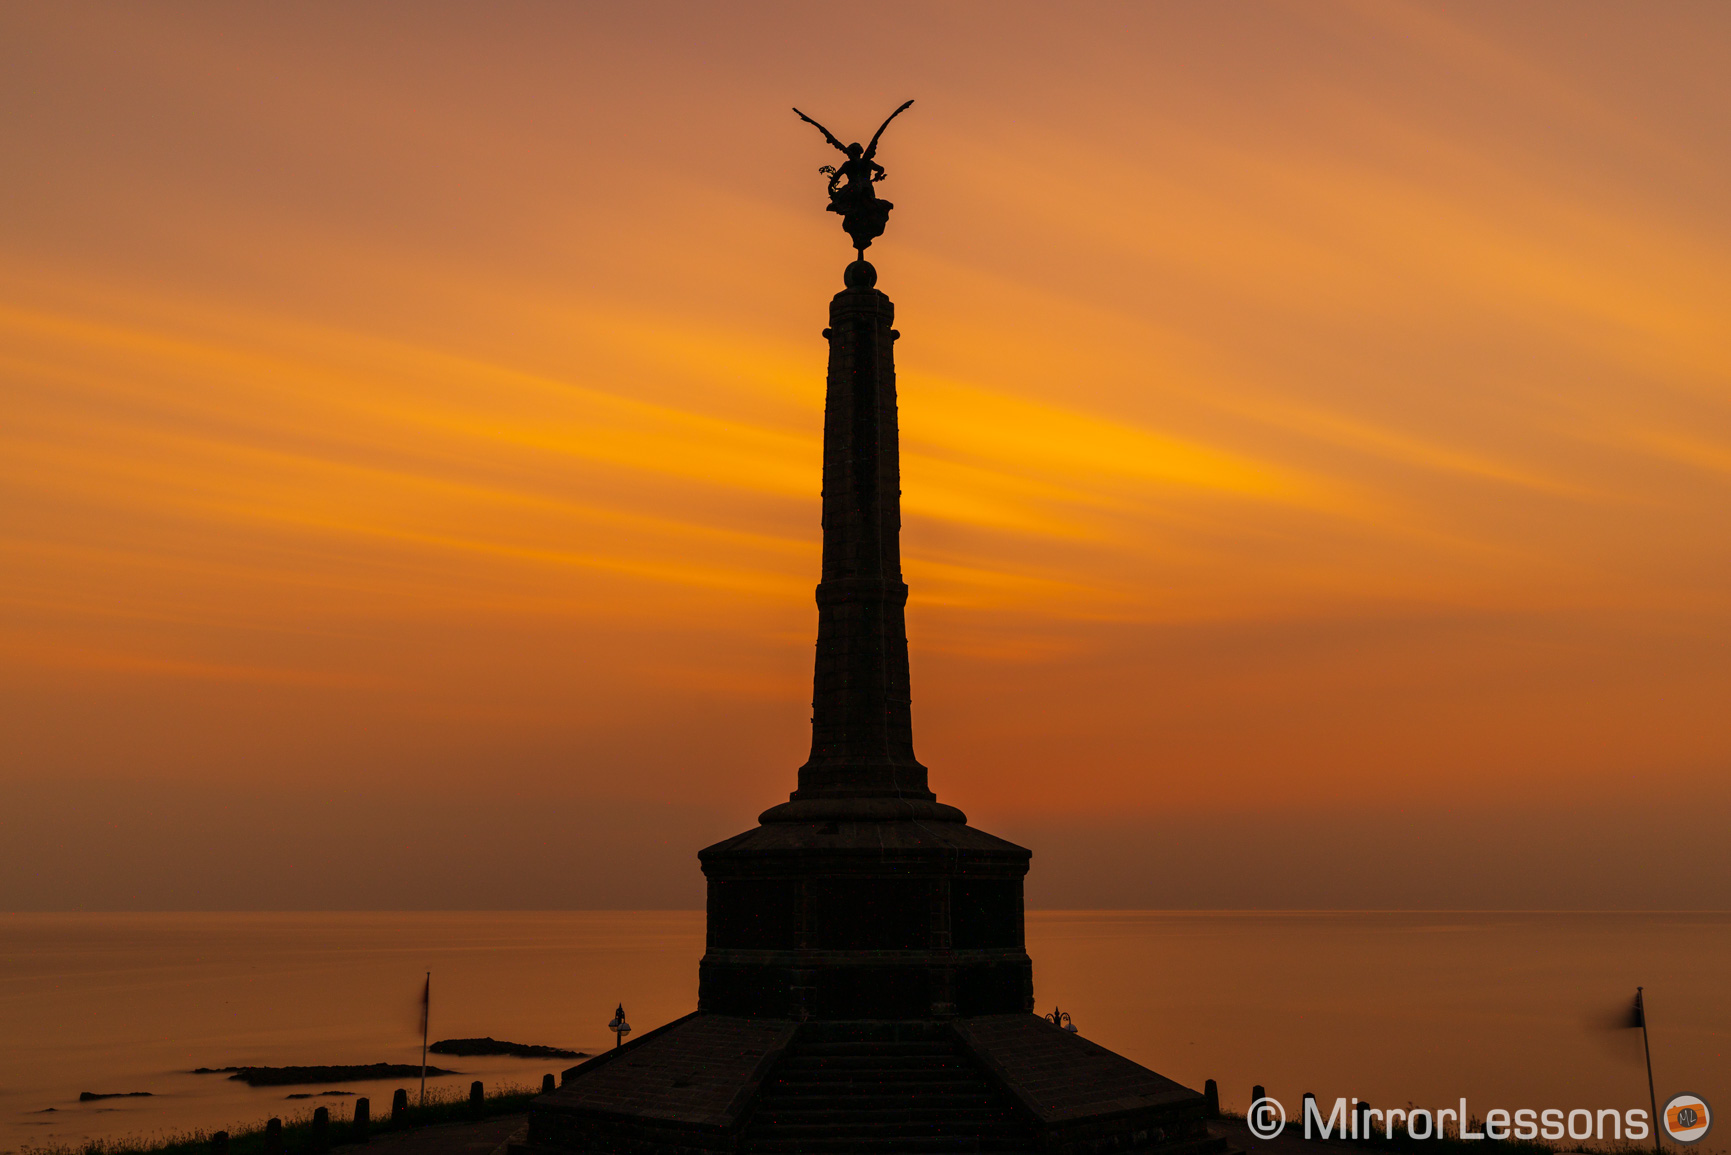
A long exposure is a photograph taken with a shutter speed of 1 second or longer. A typical example of long exposure on your Sony A7 III is an image of a river with flowing water that is completely blurred as a result of the slow shutter speed. Other applications include astro-photography (check out our dedicated article here).
To take long exposure images with your Sony Alpha A7 or A9:
- Set the camera to Manual (M) mode
- Rotate the shutter speed dial until you reach the desired speed. If the desired speed is longer than 30 seconds, turn the dial once more to go in Bulb mode

Note: in Bulb mode, the camera automatically turns off the Setting Effect (exposure preview) for the Live View Display.
Tip 1: long exposures down to 30 seconds
To avoid micro vibrations when pressing the shutter button, set the Drive Mode to Self-Timer 5s with the left button on the rear control wheel. The exposure will start 5 seconds after you press the button. This way you ensure that the camera is perfectly still when capturing the shot.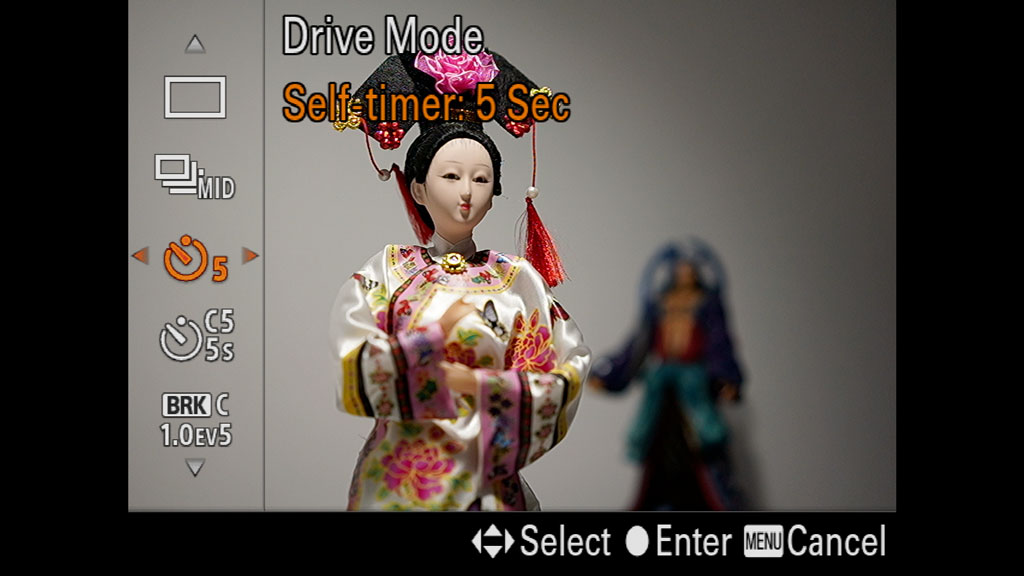
Tip 2: Bulb mode
In Bulb mode, you need to keep your finger on the shutter button for the duration of the entire exposure. This means that if you’re taking a 4 minute exposure, you need to press and hold the button for 4 min. Not only is this a bit annoying, but you might also create vibrations on your camera. To avoid this, consider using a remote controller or smartphone to pilot the camera wirelessly. Find out more in our dedicated articles (coming soon):
– Remote Controller Setup
– Smartphone Remote Control
Filters
To take very long exposures during the day, you will need to attach ND filters, which are designed to cut out a certain amount of light going into the lens. You can read more about it in our accessory article.
Long Exposure NR on your Sony A7 III, A7R III, A9
When taking very long exposures (five minutes or more), hot pixels and thermal noise can be visible in your photograph because the camera takes a considerable amount of time to capture the exposure, and the sensor gets warmer as it does so.

To prevent this, you will find in the menu of your A7 III / A7R III a setting called Long Exposure NR. When active, the camera takes two pictures: the first is your normal shot, the second is a black image (also known as dark frame). The camera will analyse the noise and hot pixels in the dark image and subtract them from your normal shot. The drawback is that it takes twice as long to capture one photograph, but you will have a cleaner file.
To activate Long Exposure NR:
- Go to Camera Settings 1 / Quality Image Size2 (page 2/14)
- Select Long Exposure NR and turn it On
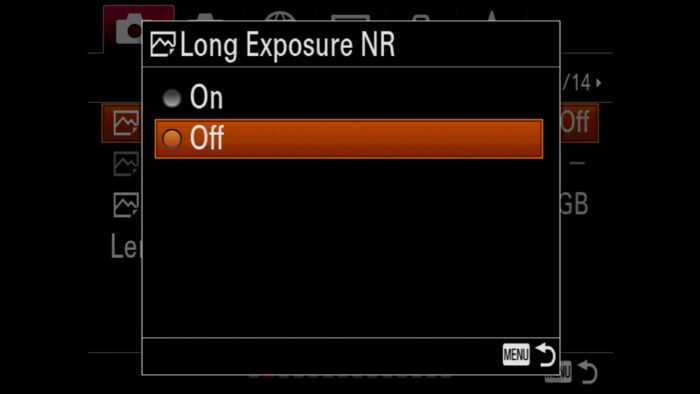
Note: noise can increase with cameras that have a higher pixel count such as the A7R III and A7R IV.
Sony A7 III, A7R III, A9 Exposure Bracketing
The A7 III and other models have an HDR mode built-in (see next chapter below), but it only works on JPEG files. If you want better quality and more dynamic range, you want to work with RAW files. You won’t be able to merge them in camera, but you can set the exposure bracketing on your A7 III to take consecutive shots at various exposure levels.
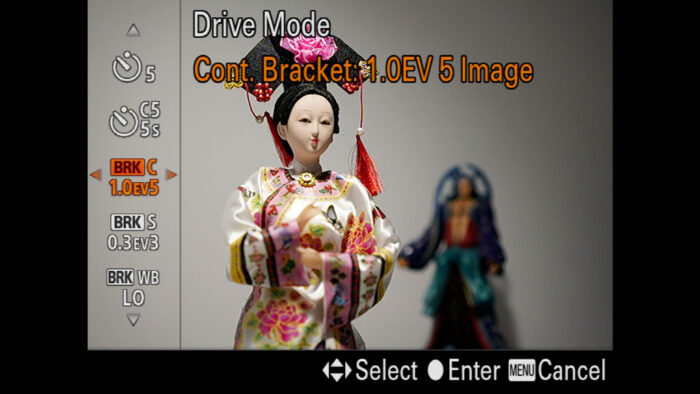
To set up the exposure bracketing:
- Make sure that File Format is set to RAW. Rotate the top dial to M.
- Press the left button on the rear control wheel (Drive)
- Scroll down until you see Cont. Bracket and Single Bracket. Select one or the other. Continuous means that the camera will take the required shots automatically one after the other when you press and hold the shutter button. Single Bracket means that you have to press the shutter button for each exposure.
- Use the left and right buttons to select the number of frames to capture and the exposure difference. You can go from a minimum of 3 to a maximum of 9 shots, and from 0.3Ev to 1Ev exposure shift. With 2Ev and 3Ev, the maximum is 5 shots. These values might be different on older cameras.
- Set your exposure reference (aperture, shutter speed and ISO). Ideally you want the ISO to be as low as possible, and the aperture to be closed enough to have a decent depth of field. You want your exposure to be as balanced as possible (with the metering indicator close to 0.0). Once the bracketing starts, the camera will take the first shot following your exposure settings, then it will underexpose and overexpose the other frames.
- Set your focus point and (optional) switch to manual focus so that the camera doesn’t refocus when you start the bracket sequence.
- Press the shutter button to start the sequence. Press and hold if you chose Cont. Bracket.
Below you can see how it works with Cont. Bracket set to 1.0Ev and 5 shots:

If you wish, the order of the exposures can be changed in Camera Settings 1 / Shoot Mode Drive 1 (page 3/14). Look for Bracket Settings and Bracket order.
Note: once you’ve set your exposure reference (the one the camera will start with), you can see indicators at the bottom of the screen that will show you by how much the other shots will be over and under exposed.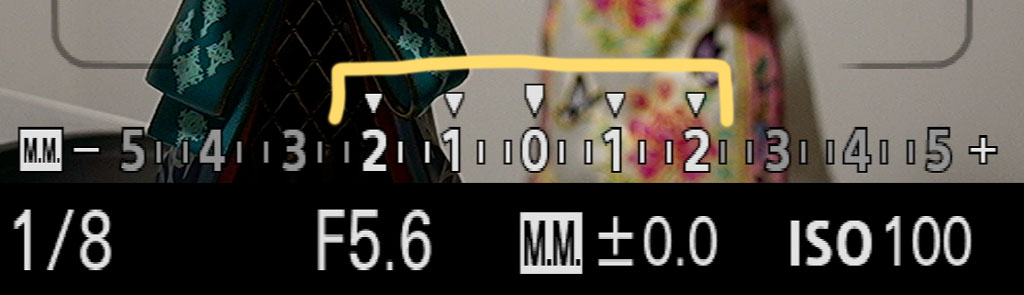
Tip: setting the camera on a tripod is advised, but I have managed successful HDR merges hand-held too. Modern HDR software are capable of aligning the images correctly. Make sure to have image stabilisation enabled, try to be as still as possible and be aware of shots that have a slower shutter speed than 1/10s. If that is the case, check your images in Playback mode and make sure they are sharp.
Once you’re happy with the results, you need to merge the RAW files in post with a compatible photo editor software.

Bracketing is a great tool for landscape photography. Find out more about the best settings for this genre in our article below.
Sony A7 III, A7R III, A9 HDR Mode
If you want to take HDR photos in camera with your A7 III or any other A7/A9 model, you need to look for the DRO/Auto HDR setting. It will give you some HDR bracketing control (1Ev to 6Ev) but the number of shots it takes is limited to 3. This function only works with JPGs.
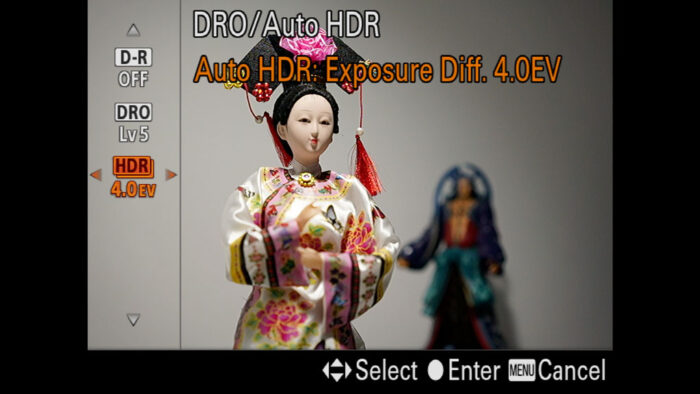
To take in camera HDR with your A7 III or A7 series camera:
- Go to Camera Settings 1 / Quality Image Size 1 (1/14)
- Set File Format to JPG
- Set JPG Quality to Extra Fine
- Go to Camera Settings 1 / Color WB Img. Processing (12/14)
- Select DRO/Auto HDR
- Scroll down to HDR Auto
- Use the left and right keys to select the amount of exposure difference (1Ev to 6Ev), or Auto to let the camera decide.
- Set your exposure reference, then press the shutter button. The camera will take three pictures and marge them automatically.
To get the best results, set the camera to a tripod and avoid moving subjects in your frame. You can also take images hand-held but try to be as still as possible. If the camera can’t merge the images correctly, an exclamation sign will appear on the image in Playback mode.
Sony A7 III, A7R III, A9 DRO setting
Where you find the HDR mode, you also have a setting called DRO, which stands for Dynamic Range Optimiser.
The DRO setting on your A7 III and A9 camera increases the dynamic range of your JPG image, mainly by giving more brightness to the shadows. If the contrast is not too strong, it can give you good results, but in other situations it can render a less natural look, especially if you use it at the highest level.
- Go to Camera Settings 1 / Colour WB Img. Processing (page 12-14)
- Scroll down to DRO / Auto HDR
- Select DRO and choose the Level from 1 to 5, or set it to Auto.
- Press OK and take your shot when ready.


Multiple Exposure on Sony A7 III, A7R III, A9
By default, the A7 and A9 series don’t have a multiple exposure or double exposure in camera available. You can plan to do it manually and merge the shots in post production with Photoshop or similar software, but you won’t be able to preview the result in camera nor save it there directly.
With the mark II generation or lower, you can buy the Multiple Exposure app from the PlayMemories app store. Once installed on your camera, you can access the Multiple Exposure mode with different options and settings. Refer to the official page for more information.
Sony A7 III, A7R III, A9 Image Stabilization Settings
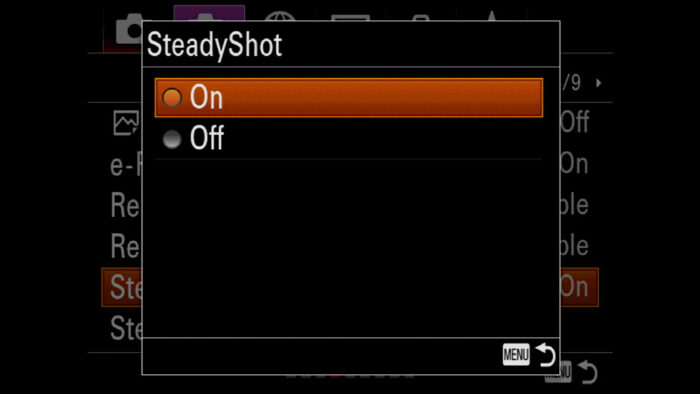
Sony introduced image stabilisation on a full frame camera for the first time in 2014 with the A7 mark II. Since then, all A7 and A9 models have featured 5-axis stabilisation. Sony calls this function SteadyShot Inside as opposed to Optical SteadyShot for OSS lenses.
The in-body image stabilisation can be enabled in Camera Settings 2 / Shutter Steadyshot (page 4/9).
SteadyShot can be useful for many situations including landscape photography. It allows you to set a slower shutter speed that the one you would normally use to ensure a sharp image. A7 and A9 cameras are rated between 5 stops and 5.5 stops of compensation (CIPA standard).
One of the most common uses of image stabilisation is low light photography. This is why we decided to explain all the settings related to IBIS in our Low light Photography Guide below.
You’ll also find tips about this technology in other genre-related articles such as Landscape and Wildlife Photography.
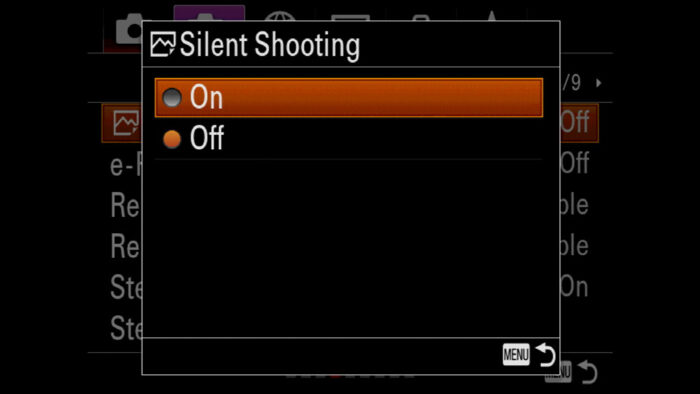
Sony A7 III, A7R III, A9 Silent Shutter Mode
If you want to take pictures while being as discreet as possible, you can turn on Silent Shooting (electronic shutter). Instead of using the mechanical curtains that cover and uncover the sensor when taking a picture, the camera will “scan” the sensor and read all the pixels from top to bottom.
The silent shutter is not available on the A7, A7R and A7 II.
Keep in mind that the silent shutter setting has some limitations: if you’re moving quickly with the camera, it can create distortion in your image because the pixels are not read simultaneously but rather one after the other. This can result for example in the vertical lines of a structure appearing oblique.
Under artificial light sources (fluorescent light in particular but not only), the silent shutter can create banding in your image, meaning that there are darker and lighter stripes on your photo. This can be partially adjusted by changing the shutter speed, but it doesn’t always solve the problem. Banding can be subtle sometimes and you may not always notice it in the live view.
Silent Shooting / Electronic shutter on the A9 and A9 II
The A9 series use a special Stacked CMOS sensor that can process data much faster than the A7 series. This not only reduces banding and rolling shutter (distortion), but the silent shutter speed of these cameras works at an impressive 20fps of continuous shooting and shutter speeds up to 1/32000s. Furthermore, images can be recorded with uninterrupted live view and no blackouts. (Read more about this here.)
How to make the Sony A7 III, A7R III, A9 Completely Silent
To ensure that you are as discreet as possible when taking pictures with your A7 camera:
- Go to Camera Settings 2 / Shutter SteadyShot (page 4/9)
- Set Silent Shooting to On
- Go to Camera Settings 2 / Custom Operation 2 (page 9/9)
- Set Audio Signal to Off
- Go to Camera Settings 1 / AF2 (page 6/14)
- Set AF Illuminator to Off
Tip: to quickly activate the settings listed above all at once, consider saving them in a Memory Recall. Learn more about this in our Menu Setup article.
Reminder: the links below are affiliate links. If you decided to buy something after clicking the link, we will receive a small commission.
Check price of the Sony A7 III on:
Amazon | Amazon UK | B&H Photo | eBay
Check the price of the Sony A7R III on:
Amazon | Amazon UK | B&H Photo | eBay
Check price of the Sony A7R IV on
Amazon | Amazon UK | B&H Photo | eBay
Check price of the Sony A9 on
Amazon | Amazon UK | B&H Photo | eBay
Check price of the Sony A7 II on:
Amazon | Amazon UK | B&H Photo | eBay
Check price of the Sony A7R II on:
Amazon | Amazon UK | B&H Photo | eBay
Second-hand Sony gear on
MPB US | MPB UK
Sony A7 / A9 Mirrorless Cameras Resources on Mirrorless Comparison
We have more tutorials for your A7 camera, many comparisons and much more. Check the list below!
Real World Comparisons
- Sony A7 III vs A7R III
- Sony A7R III vs A7R IV
- Sony A7R II vs A7R III
- Sony A7R III vs A9
- Sony A7 III vs Nikon Z6
- Sony A7R III vs Nikon Z7
- Sony A7R III vs Fujifilm GFX 50s
- Sony A7R III vs Panasonic S1R
- Sony A7 III vs Canon EOS R
- Sony A7 III vs Fujifilm X-T3
- Sony A7 II vs Canon EOS RP
Sample Photos
- Sony A7 III sample images
- Sony A7R III sample images
- Sony A7R IV sample images
- Sony A7 II sample images
- Sony A7R II sample images
- Sony A7S sample images