Slow motion video can be a lot of fun. It can turn an ordinary action into a fascinating sequence or add an emotional facet to a shot.
If you own a Sony E-mount camera from the A7 III, A7 IV or A9 generation, you will find dedicated settings to produce slow motion footage.
In this article, we highlight the slow motion specifications, give you some ideas about what you can do with them and recommend a few tips to help you get the most out of your Sony camera.
A7/A9 series compatibility
The content found here refers to the A7 III, A7 IV and A9 series. Information about older products is mentioned throughout the post.
This article is part of our in-depth guide on how to use the Sony A7 and A9 series. Head over here to read more about the video capabilities of these products.
Ethics statement: the following is based on our personal experience with Sony A7 and A9 cameras. We were not asked to write anything about these products, nor were we provided with any sort of compensation. Within the article, there are affiliate links. If you buy something after clicking the link, we will receive a small commission. To know more about our ethics, you can visit our full disclosure page. Thank you!
TABLE OF CONTENTS
1. What is Slow Motion video and how it works
2. 4K or Full HD?
3. How to record slow motion video
4. S&Q Settings
5. Additional information
6. Additional tips
Reminder: the links below are affiliate links. If you decided to buy something after clicking the link, we will receive a small commission.
Check price of the Sony A7 III on:
Amazon | Amazon UK | B&H Photo | eBay
Check the price of the Sony A7R III on:
Amazon | Amazon UK | B&H Photo | eBay
Check price of the Sony A7R IV on
Amazon | Amazon UK | B&H Photo | eBay
Check price of the Sony A7 II on:
Amazon | Amazon UK | B&H Photo | eBay
Check price of the Sony A7R II on:
Amazon | Amazon UK | B&H Photo | eBay
Check price of the Sony A7S II on:
Amazon | Amazon UK | B&H Photo | eBay
Second-hand Sony gear on
MPB US | MPB UK
Introduction: What is Slow Motion in video and how does it work?
To make movement appear natural when recording video, you need to capture a minimum number of frames per second to ensure that the speed appears as realistic as in real life. The standard for cinema is 24fps, while 25fps and 30fps are the default frame rates for PAL and NTSC regions.
Faster frames rates such as 50fps and 60fps have become common nowadays. As long as the videos are played back at the same frame rate at which they were recorded, you’ll perceive natural movements. The advantage of the faster frame rate is that these movements will appear sharper and more fluid because you’re seeing more images per second.
However, if you play a 50fps clip at 25fps, the movement will be two times slower. This happens because you are stretching the length of your video.
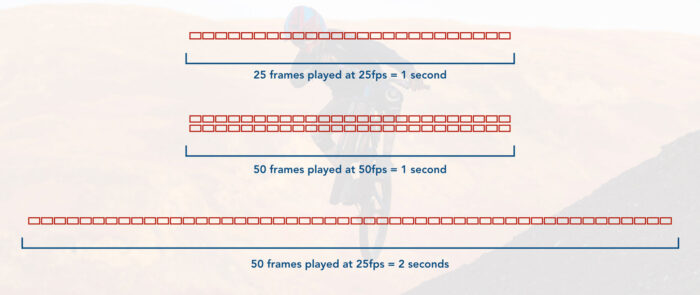
50 frames played at 50fps = 1 second
50 frames played at 25fps = 2 seconds
Let’s take for example a 4 second clip recorded at 50fps which gives you a total of 200 frames (50 x 4). If you play these 200 frames at 25fps, you’ll need 8 seconds to play them all (200/25), which gives you a 2x slow motion effect.
The more frames you are able to record every second, the more you can slow down the action. Coming back to our 4s clip, if you record at 500fps, you’ll get 2000 frames that equal a duration of 80s when played at 25fps (20x slow motion effect). Below you can see a video I made with the Sony RX10 II, which has a special HFR mode capable of recording up to 1000fps.
Unfortunately Sony E-mount cameras don’t have the same super fast slow motion capability, but they offer a decent speed that allows you to come up with nice ideas.
Sony A7 III, A7R III, A9 Slow Motion: 4K or Full HD?
Capturing more frames per second demands more processing power, and for that you need to take into account the size of the image being recorded.
The first important thing to understand with your Sony camera is which frame rate is available with each format.
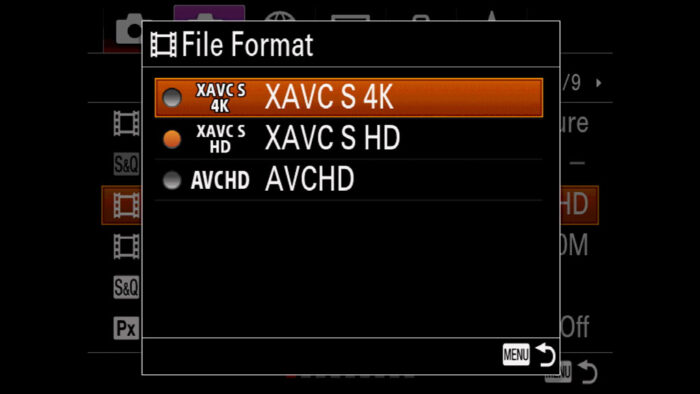
For instance, you cannot produce slow motion footage when recording 4K video. The reason is that the maximum frame rate available is 30fps, which is not enough. Even if you film at 30p and conform the footage to 24p in post production, you’ll get an underwhelming 1.25x slow effect.
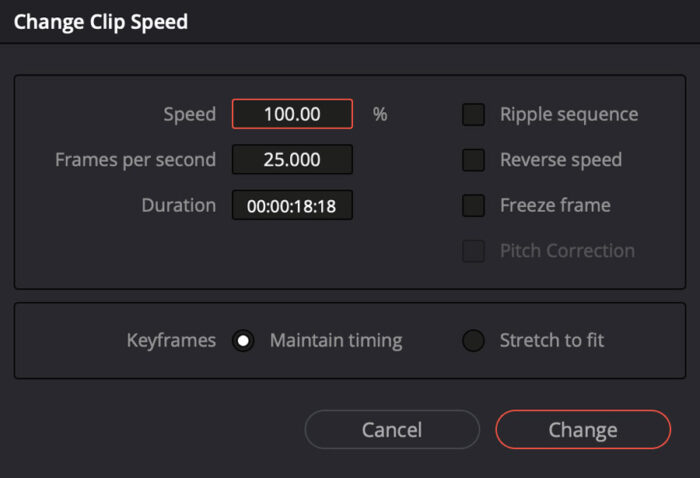
If 4K is an absolute requirement for you, your only option is to slow down the footage in post with your editing software. You can do this by lowering the percentage in the speed setting, but the result won’t be very smooth because the software just doubles the frame to extend the clip length.
Another option is to use advanced plugins such as Twixtor that have a more elaborate and intelligent algorithm. It can deliver impressive results, but this “hack” comes with limitations, and Twixtor itself recommends recording at high frame rates to get better results.
Sony A7 III, A7R III, A9 120fps in 1080p
If you want to record a high number of frames per second, you need to set your Sony camera to Full HD.
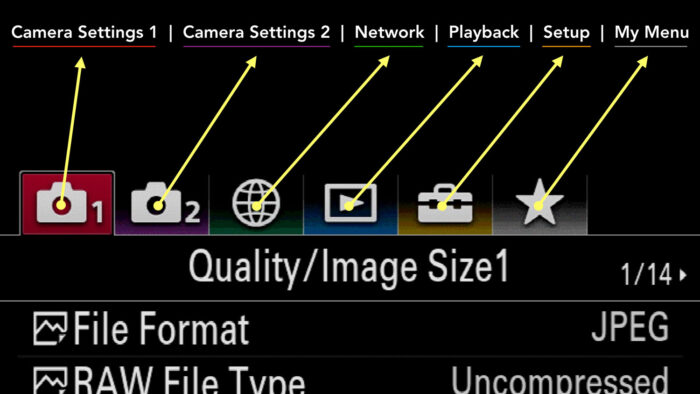
- Go to Camera Settings 2 / Movie 1 (page 1/9)
- Scroll down to File Format
- Choose XAVC S HD
- Go back and enter Record Setting: here you’ll be able to select various frame rates, with the highest being 120p.
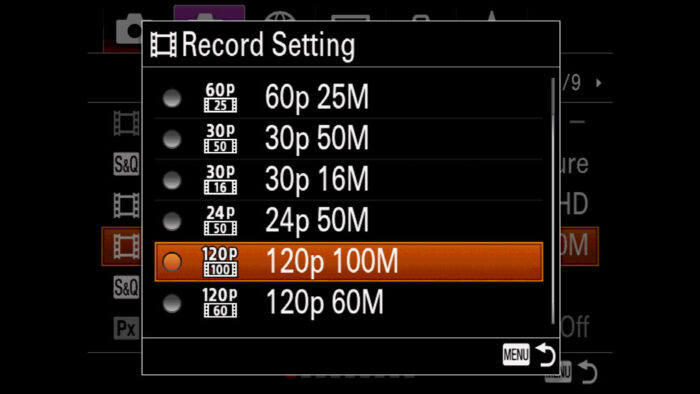
The A7, A7R, A7 II and A7S have a maximum frame rate of 60p. In the case of the A7 and A7R, the XAVC S codec is not available, so you need to choose AVCHD. The A7R II can record 120p in HD Ready (1280×720).
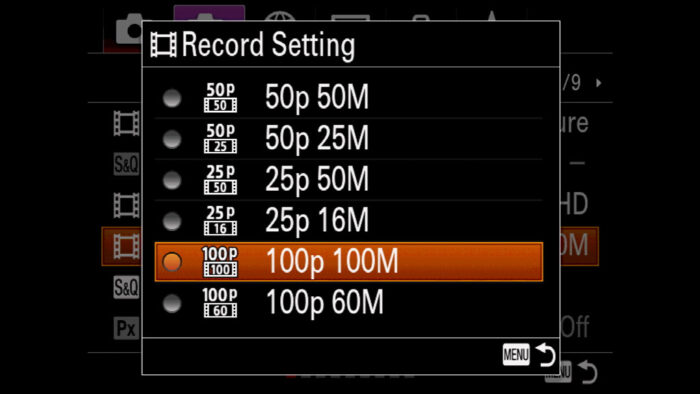
It is important to mention that the frame rate available in Record Setting is influenced by the PAL/NTSC setting. If you are in PAL mode, the maximum is 100fps (or 50fps for early models), whereas in NTSC mode you can go up to 120fps (or 60fps on older cameras). To switch between the two:
- Go to Menu Setup2 (page 2/7)
- Select NTSC/PAL Selector and switch to either PAL or NTSC
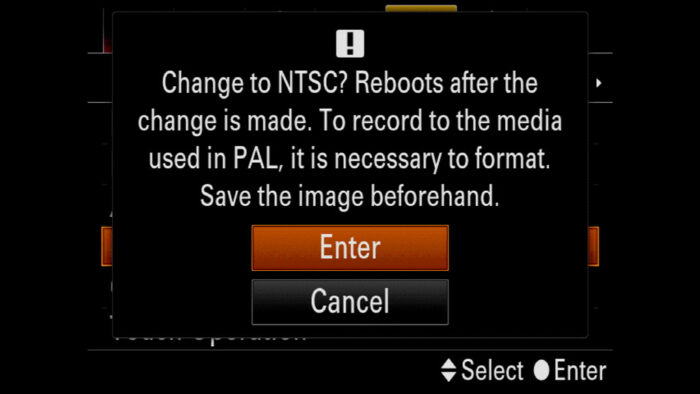
Important: changing the NTS/PAL setting can introduce some complications. First, you may not be able to play back files recorded with the other system, or you might need to format the memory card in order to continue. If you need to work with both, it’s better to use two separate cards. Second, it can produce unwanted flickering if you’re not using the recommended setting for your region (example PAL for Europe, NTSC for North America). You can read more about this in our main video guide.
How to record Slow Motion video on the Sony A7 III, A7R III, A9
There are two ways to produce slow motion footage with your A7 III: the normal movie mode and the S&Q mode.
With the first, you record at high frame rate (100fps or 120fps) with the default movie mode, just as you would record 4K or Full HD at 25p or 50p. These are the settings we’ve just seen above.
The main advantage of this first method is that sound is recorded. However, the footage won’t play in slow motion automatically. The camera, as well as your computer, will play the clips at the frame rate at which they have been recorded (for example 120fps to 120fps), so the speed will appear normal.
To get the slow motion effect, you need to change the frame rate of your clip in post. To do that, import your files into a video editing software and conform the footage to the desired frame rate (for example 24fps) before inserting them into the timeline.
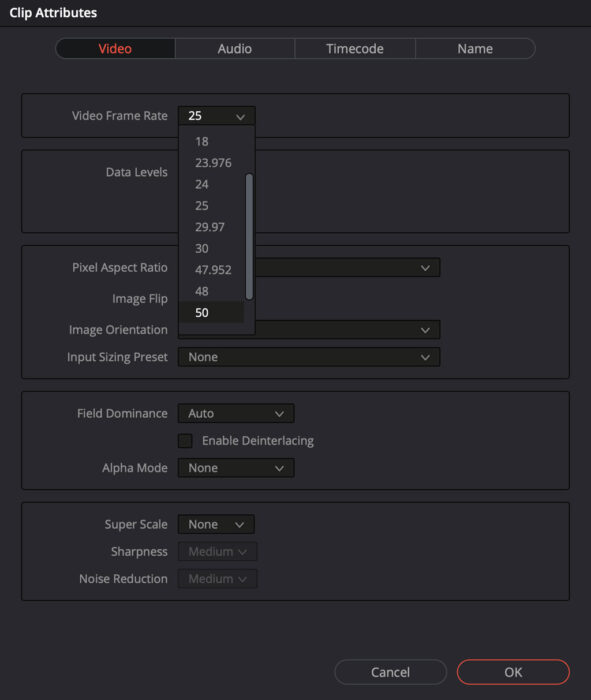
Remember that the exact slow motion speed you can obtain not only depends on the frame rate recorded, but also on the frame rate output, a.k.a. the frame rate of your final clip, which is the frame rate your video is played back to.
For example, 120fps played at 30fps will be 4 times slower (120/30), whereas it will be 5 times slower if you play it back at 24fps (120/24). The table below highlights all the possible combinations.
| FPS Recorded | FPS Output | Slow Motion |
|---|---|---|
| 120 | 30 | x4 |
| 120 | 24 | x5 |
| 100 | 25 | x4 |
| 60 | 30 | x2 |
| 60 | 24 | x2.5 |
| 50 | 25 | x2 |
Depending on the software used, the audio track of your video will either be slowed down, which will create an awkward effect, or will remain at the normal speed and be shorter than the video track. The best thing is to unlink image and sound on your timeline, so that you can move the audio where you need it.
If you want to get the slow motion effect already in camera so that you don’t have to fuss with frame rates in post, you need to use the second method, which is the S&Q mode.
Sony A7 III, A7R III, A9 S&Q Settings
You may have stumbled across this setting in the menu before, or you might have noticed it on the top dial and wondered what S&Q is on your Sony A7 III.
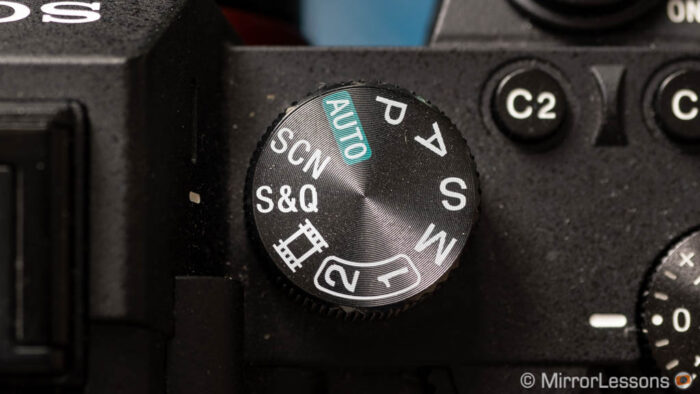
The S&Q mode is not available on the A7 I and A7 II series.
S&Q stands for Slow and Quick, and it allows you to create slow or quick motion videos. A quick motion video is, simply put, the the opposite of a slow motion video, where the movement is accelerated.
Below you can see the difference between a video recorded at 100fps, 25fps and 3fps, and played back at 25fps.
Note: remember that sound is not recorded with the S&Q mode.
To enable the S&Q mode:
- Rotate the main dial on top to S&Q
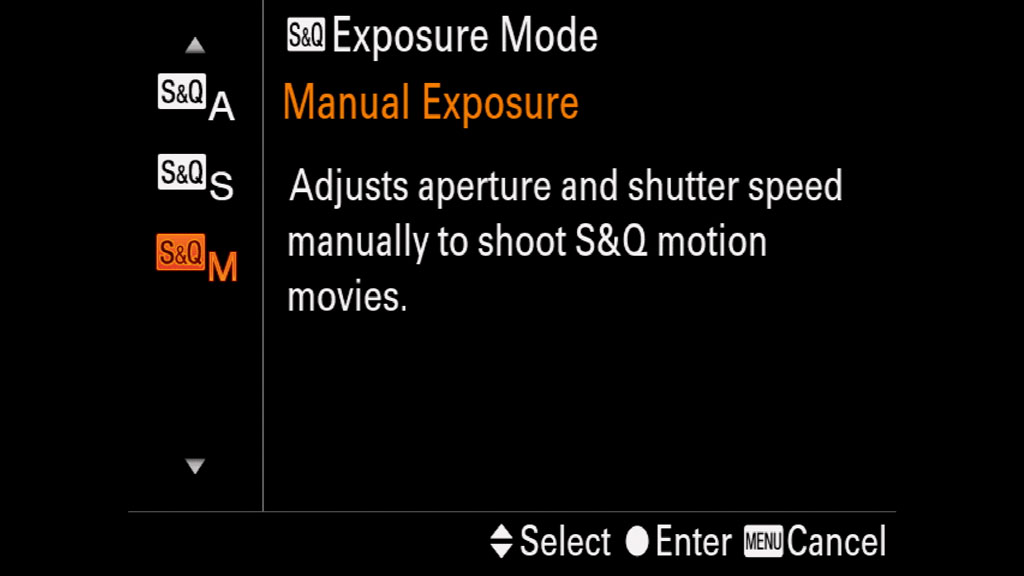
- Go to Camera Settings 2 / Movie 1 (page 1/9) and select S&Q Exposure Mode

- Choose the type of exposure mode. I recommend working in Manual
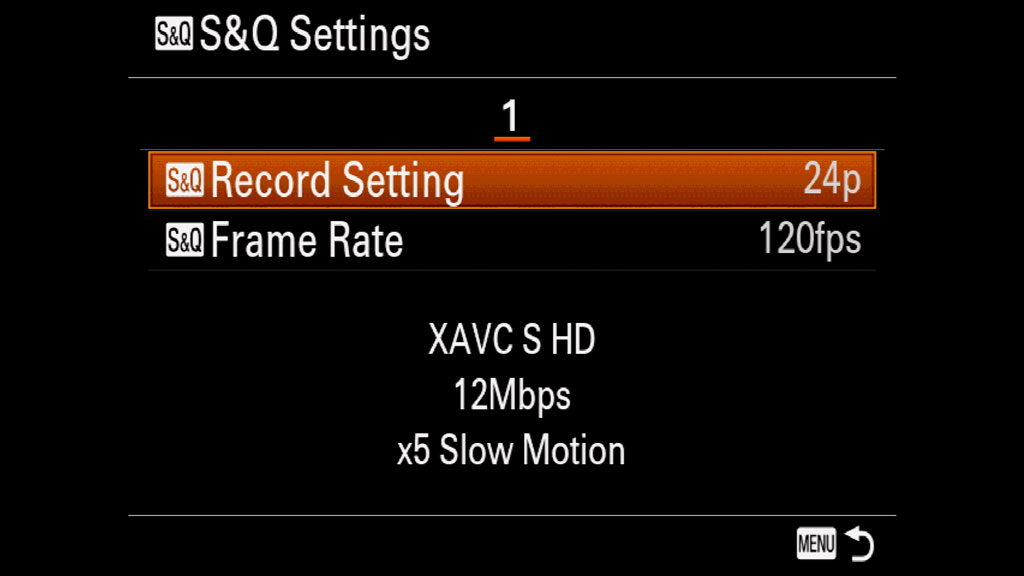
- Go to S&Q Settings

Here we have two important parameters:
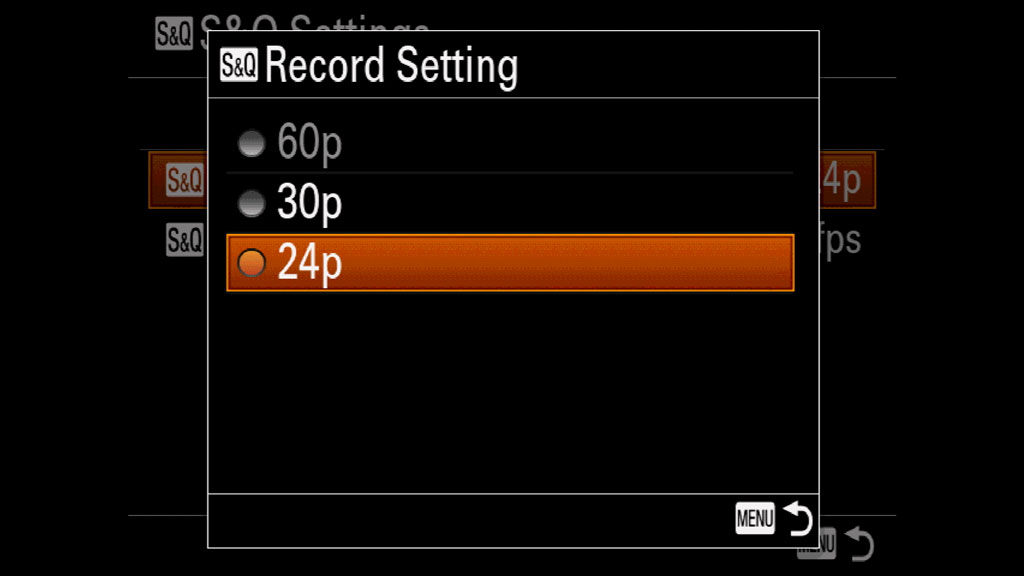
- Record Setting is the frame rate output, meaning the frame rate of the final slow motion clip. If you choose 25p, the clip saved on the memory card will play at 25p.

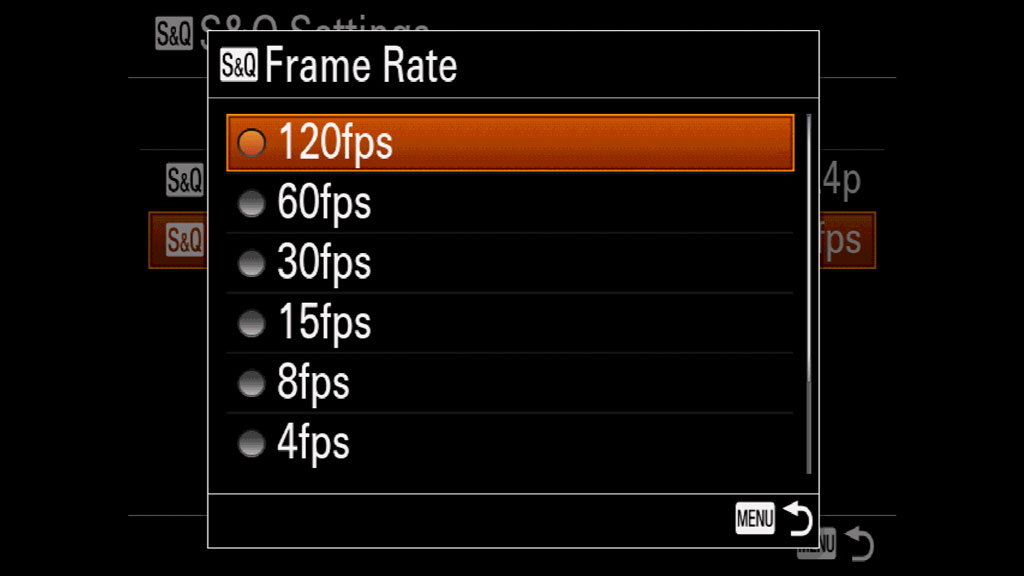
- The Frame Rate setting is the speed at which the images are captured. It is here that you choose anything between 1fps and 120fps. Any value below 24 will result in a quick effect, any value above 30 will result is a slower effect. For the slowest effect, choose 120fps.

So to recap with an example, if you choose 25p in Record Setting and 100fps in Frame Rate, you’ll have a slow motion result of 4 times (100/25=4) played back at 25 frames per second.
The options in Record Setting can be limited depending on the value selected in Frame Rate. For example when 100fps or 120fps are set in Frame Rate, 50p and 60p are not available.
Note: if you are working in PAL mode, only 25p is available in Record Setting. If you are in NTSC mode, you can choose between 24 and 30p. For the slowest result, choose 24p.
Sony A7 III, A7R III, A9 Slow Motion: Additional information
Are all the settings available?
Yes, most of the settings are available when recording slow motion video (normal and S&Q modes), including the Picture Profiles (HLG, S-Log) and continuous autofocus.
The only thing to know when using the S&Q mode is that some of the time-code settings are not available.
Concerning the autofocus, the performance is good and on par with the normal videos recorded at 25p or 50p. The only thing I’ve noticed is that C-AF can be slower when recording quick motions (1fps or 3fps).
For how long can I record slow motion video?
If you use the normal movie mode, you can choose various bitrates such as for example 60Mbps or 100Mbps for the 100/120p setting, or 50Mbps and 25Mbps with 50p/60p.
With the S&Q mode, you work at 100Mbps with 100p and 120p, and 50Mbps with the other frame rates.
If we use a 64GB SD card as an example, here is how much video you can save:
| Frame Rate / Bitrate | Duration |
|---|---|
| 100/120p at 100Mbps (normal + S&Q) | 1h 15min |
| 100/120p at 60Mbps (normal only) | 2h 5min |
| 50/60p at 50Mbps (normal + S&Q) | 2h 30min |
| 50/60p at 25Mbps (normal only) | 5h |
Note: with most setting combinations, the maximum duration per clip is 30 minutes. However if you chose 50/60p in Record Setting and 30/25p in Frame Rate (2x quick motion), the recording will stop after 15 minutes.
Sony Alpha A7 III, A7R III, A9 Slow Motion: additional tips
Now that you understand how to set up the camera, I’ll conclude with additional tips to improve the quality of your footage.
Light
When you record at a high frame rate such as 100fps or 120fps, the minimum shutter speed is 1/100s. If you are in a situation where there isn’t a lot of light available, you might need to raise your ISO or use a fast aperture.
Also keep in mind that a faster shutter speed can produce unwanted effects with some artificial light sources and they might start to flicker (cheap LED lights for example). So make sure to do some tests if there are such lights in your scene. You may not see it right away but the flicker will become more pronounced when the video is slowed down.
Moving with the camera
If you plan to do camera movements while recording in slow motion, you have to think carefully about the end result.
There are two different speeds involved in your scene: the action itself, for example a person running, and your movement with the camera.
Because you’re recording in slow motion, not only will the action inside the frame will be slower, but so will your camera movement. If you want a normal camera movement with a slow motion scene inside, you’ll need to move you camera more quickly.
Let’s imagine that you’re doing a pan left to right while somebody is jumping. If you’re recording at 120fps to have a final clip at 24fps, you’re slowing it down by 5 times. This means that both the person jumping and your pan left to right will be 5 times slower. If you want the camera movement to be quick, you’ll need to pan faster than you normally would if you record with a normal frame rate.
This is something you’ll need to practice a few times to understand how fast you need to move in comparison to your scene.
Stabilising the footage
Recording at high frame rates can help you when working hand-held.
Normally when recording without support (tripod or gimbal) at 25 or 30fps, your footage will contain a lot of shakes and abrupt movements. The frequency and intensity can vary depending on how fast you move, if you’re walking on uneven terrain, etc. These shakes can often be 1 second or two seconds apart, which makes it difficult to have a portion of smooth footage that is long enough to be used in the editing (three to five seconds at least).
As I’ve explained above, recording in slow motion extends the duration of the clip, which means that the 1 second or 2 seconds of the non-shaky portion can become 4 seconds or more, an acceptable length for a final cut editing.
Reminder: the links below are affiliate links. If you decided to buy something after clicking the link, we will receive a small commission.
Check price of the Sony A7 III on:
Amazon | Amazon UK | B&H Photo | eBay
Check the price of the Sony A7R III on:
Amazon | Amazon UK | B&H Photo | eBay
Check price of the Sony A7R IV on
Amazon | Amazon UK | B&H Photo | eBay
Check price of the Sony A7 II on:
Amazon | Amazon UK | B&H Photo | eBay
Check price of the Sony A7R II on:
Amazon | Amazon UK | B&H Photo | eBay
Check price of the Sony A7S II on:
Amazon | Amazon UK | B&H Photo | eBay
Second-hand Sony gear on
MPB US | MPB UK
Sony A7 / A9 Resources on Mirrorless Comparison
Real World Comparisons
- Sony A7 III vs A7R III
- Sony A7R III vs A7R IV
- Sony A7R II vs A7R III
- Sony A7R III vs A9
- Sony A7 III vs Nikon Z6
- Sony A7R III vs Nikon Z7
- Sony A7R III vs Fujifilm GFX 50s
- Sony A7R III vs Panasonic S1R
- Sony A7 III vs Canon EOS R
- Sony A7 III vs Fujifilm X-T3
- Sony A7 II vs Canon EOS RP
Sample Photos
- Sony A7 III sample images
- Sony A7R III sample images
- Sony A7R IV sample images
- Sony A7 II sample images
- Sony A7R II sample images
- Sony A7S sample images

