- Page 1: design, functionality and image quality
- You are on page 2: autofocus, speed, video, other features and conclusion
[toc heading_levels=”2″ label=”Table of contents – Page 2″]
Autofocus system and settings
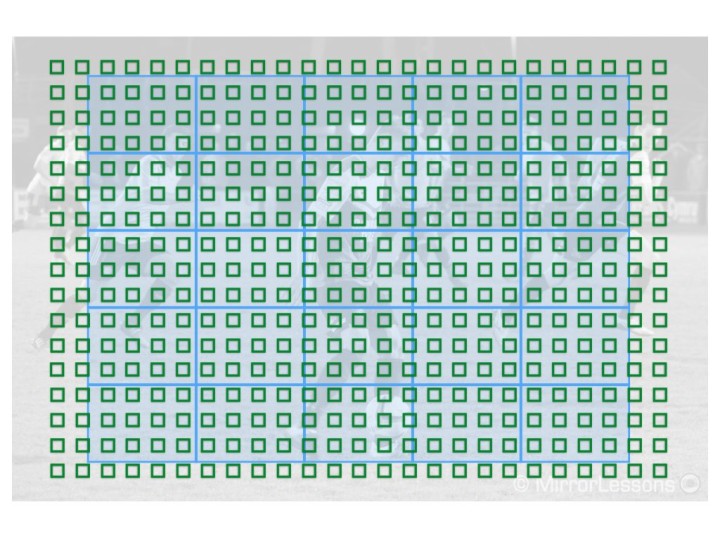
The a6500 has a hybrid autofocus system with 425 phase and 169 contrast detection points. The phase detection points cover almost the entire surface of the sensor which allows the camera to give you accurate results regardless of where the AF point/subject is. With larger group of AF points, the camera uses the High-Density Tracking AF technology to concentrate as many AF points as needed on the subject.
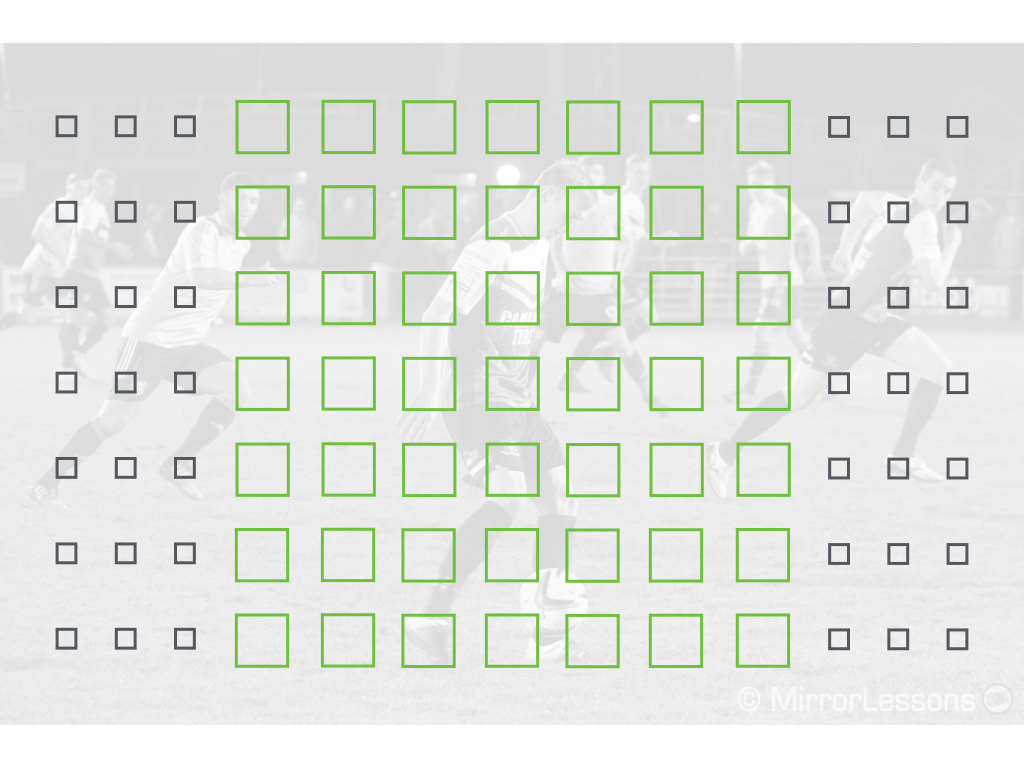
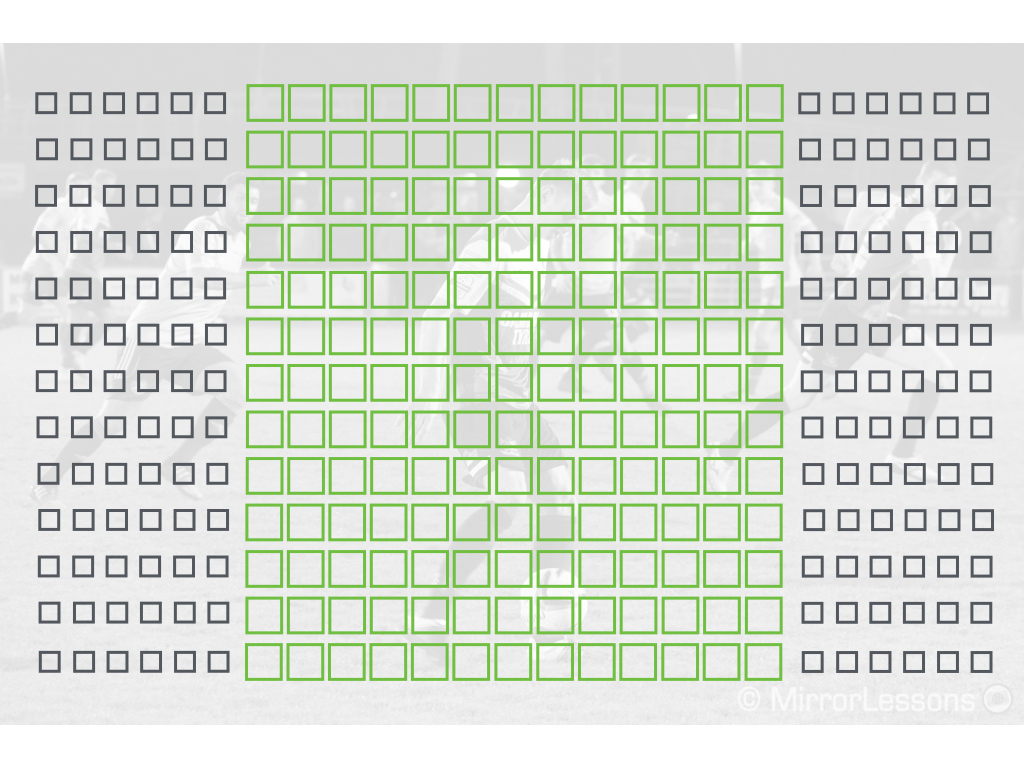
The X-T2 features 91 native points: 49 of them, located in the central area of the sensor, are phase detection. You can choose between these 91 points (7×13 grid) or a denser grid with 325 points (13×25). With the latter the 91 points are subdivided to allow you to pinpoint your subject more accurately. Note that the 13×25 grid is available with the single area mode only.
Both cameras feature the default AF-Single, AF-Continous and Manual Focus modes. The a6500 has an additional mode called AF-A: it automatically switches from single to continuous if it detects that the subject is moving.
Both allow you to fine-tune the focus point manually after autofocusing first. On the Sony camera you need to select the DMF mode. On the X-T2 you have to turn on the AF+MF setting found in the AF menu and it only works with the shutter button half-pressed.
Concerning the AF areas, the a6500 features five options:
- Wide: all the points are used
- Zone: the camera uses a 9-group grid (my favourite for birds in flight)
- Centre: a single central point that can’t be moved
- Flexible Spot: a single point with three sizes that can be moved anywhere on the screen.
- Expand Flexible Spot: the camera uses phase detection points around the single area if it is not enough to achieve correct focus on its own.
In addition to the options described above, the a6500 has Lock-On AF which is similar to 3D Tracking: once you lock onto the subject using the control wheel centre button, the camera starts to track the subject automatically no matter where he is positioned on the screen. It varies the size of the AF area according to the size of the subject. It can be used in conjunction with Wide, Centre and Expand Flexible Spot and is useful for birds in flight and various sports.
On the X-T2, the single focus point can be adjusted in 6 sizes (with firmware 2.0). Then we have Zone AF with three grids of AF points: 3×3, 5×5 and 7×7. It is my favourite setting on the X-T2 when dealing with action from sports to birds in flight. The “ALL” AF mode allows you to switch between all the area settings by using the Command Dial.


The equivalent of Lock-On AF on the Fuji camera is called Wide/Tracking but sometimes only the central area of the sensor is available depending on the settings used (C-AF and CH burst). It is less versatile, which is why I prefer Zone AF to it.
Both cameras have additional options to control the autofocus behaviour such as eye/face detection or AF-C Custom Settings that I will mention in the next chapters. Below is some additional information:
- Focus or Release priority: the a6500 has a third option called Balanced Emphasis where it decides automatically where the priority goes. It is useful for fast subjects closing in on your position like a rally car on a dirty road. With AF priority the camera might stop shooting occasionally while trying to acquire focus again which slows down the performance and prevents you from capturing more frames of the action.
- AF-Lock and back-button focusing: on both cameras you can disconnect autofocus from the shutter release button and assign it to a function button instead. AF-Lock (AF Hold on the a6500) can be configured as well. Note that some Sony lenses have a Focus Hold button on the barrel.
- AF in magnification mode: both cameras can autofocus while using focus magnification (useful for macro photography for example).
- Touch AF: as already explained in the EVF/LCD chapter, it is available on the a6500 only.
- Horizontal or vertical orientation: on the X-T2 you can separate the focus points and areas used for landscape or portrait orientations. Every time you rotate the camera, it will automatically switch to the AF point and areas you last used in that position.
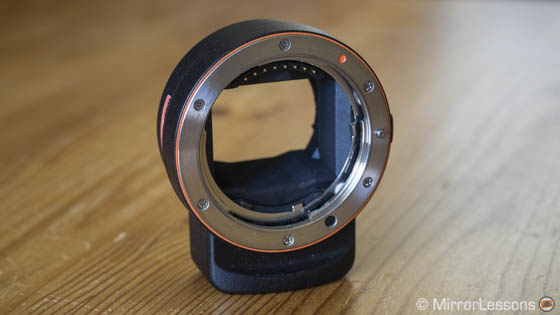
As a final note, the a6500 phase detection system is compatible with third-party DSLR lenses. You can use Sony’s LA-EA3 adapter for A-mount products or many third-party adapters for Canon EOS lenses (a few are available for Nikon glass too but I’ve never tested them).
I didn’t use the a6500 with DSLR lenses but I did with the a6300 and the latter has the exact same AF system. With the most recent lenses, the results aren’t bad and I got good images even in continuous AF. The performance is not as fast and reliable as with native E-mount lenses however. Also consider than many of these DSLR products are large, heavy and don’t really suit the smaller Sony body.

Single AF, Eye and Face Detection
Now that we have the main specs and settings out of the way, let’s dig into the performance. Note that my feedback extends beyond these two models: I used the a6300 and X-Pro2 extensively as well and they share the same autofocus system.
In Single AF mode, there isn’t a lot to say: both cameras focus fast in good light.


In low-light the X-T2 has an advantage: the minimum sensitivity is -3Ev while the a6500 starts from -1Ev and that makes a difference. The Sony a6500 can misfocus more easily, while with the X-T2, I rarely had any issues. You can switch to C-AF on the Sony to use phase detection which improves the performance. Of course using fast lenses helps as well.


The other thing worth mentioning is that the performance of the X-T2 can vary depending on the lens used: an older piece of glass like the XF 35mm f/1.4 is slower than the more recent 35mm f/2.
With Sony E-mount lenses, I didn’t come across any substantial difference when using the 4/5 years old 35mm 1.8, 50mm 1.8 or 18-105mm f4. However some third party lenses like the Sigma 30mm f2.8 or 30mm f1.4 are not compatible with the entire PDAF zone (more information here).
Both cameras feature face and eye detection, and its implementation on the a6500 (as well as previous Sony cameras) is the best we’ve come across.
Face detection works well and the camera can record faces and remember when you shoot the same person time and time again. There is also a smile shutter option which is not always reliable. Really, it is EyeAF that makes a difference for stills: the camera uses a single phase detection point on the eye of the subject and it rarely fails. It’s a great ally when shooting portraits or people in general. A mask or make up don’t seem to be a problem!


With firmware 2.0, the X-T2 now uses phase detection AF when selecting face detection which improves the accuracy. It isn’t reliable for very fast subjects but it definitely gives you better results than before (for a child moving around indoors for example). Eye detection is good but sometimes it confuses the eye with other parts of the person’s face such as the nose. You can’t use it separately from face detection either.

Continuous autofocus and tracking
Finally we can talk about some action. As usual we begin with a basic test to see if we can observe any relevant differences from the start. I made sure to test the Fuji camera with its recent firmware update (2.0) but I didn’t find a relevant difference in comparison to the previous firmware. Since then the camera has received further updates concerning the AF algorithm (3.0 and 4.10) but again, the performance remains very similar overall.
As you can notice from the first run below, both cameras deliver a few imperfect shots and have slightly more trouble when the subject gets close and stops.

Thumbnail key:
- Normal thumbnail: subject is perfectly sharp
- Red thumbnail: subject is out of focus
- Yellow thumbnail: subject is slightly out of focus but details are still easy to detect


The X-T2 result seems slightly worse but if I redo it with a different AF-C Custom Setting (from Set 1 /Multi-Purpose to Set 3 / accelerating-decelerating subject), it improves a little.

This gives me the chance to talk about Fuji’s C-AF Custom Settings. You can control three autofocus behaviours: Tracking Sensitivity, Speed Tracking Sensitivity and Zone Area Switching. They allow you to make the AF more or less responsive to unwanted obstacles, changes in speed/direction and the subject’s position in the Zone AF area.
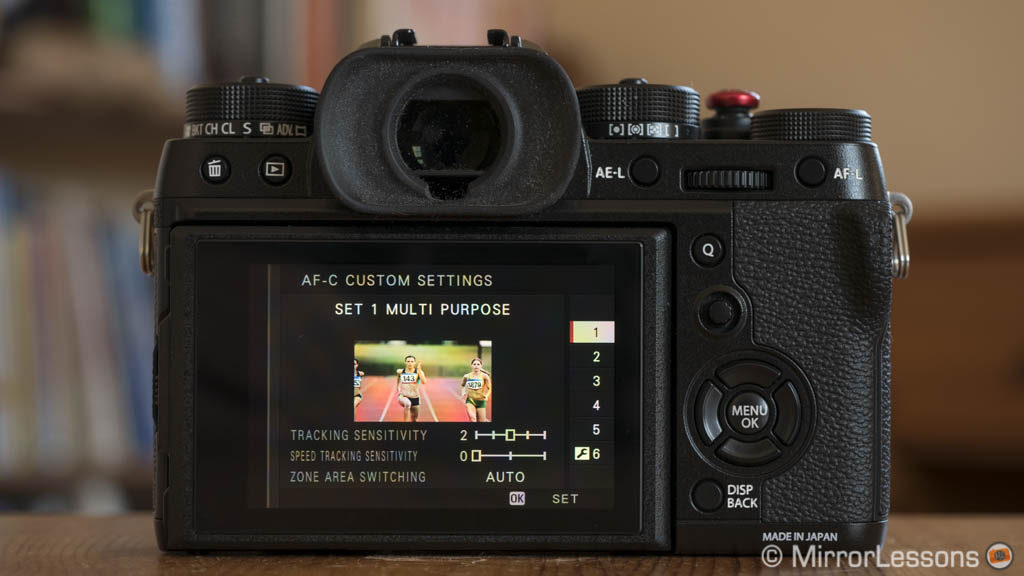
There are 5 presets based on different types of subjects or situations and a sixth option that can be customised manually (a more in-depth explanation can be found in our X-T2 vs X-Pro2 comparison).
Moving to real world examples, I found that Set 1 or Set 5 gave me an 80% keeper rate (95% if I don’t consider the slightly soft results) during a football game.


For a Rally practice, Set 3 (accelerating/decelerating subject) was the most logical choice but the performance wasn’t as good as I’d expected (60% or 80% without counting the slightly soft images). Set 2 worked very well even when the car passed momentarily behind a bush or other kind of obstacle which shows how the right setting can make a difference in specific situations (75/90%).


The sixth set can be useful for more difficult subjects like birds in flight. I customised it after different tests and my optimal setting (1,1,Front) – which is close to Set 4 – gave me an excellent 80-90% keeper rate overall.
Note: the X-T2 received a software update (firmware 3.0) that improves AF Tracking with subjects twice as fast and 50% smaller than before. I haven’t noticed a real difference with simple tests but it may prove beneficial with difficult subjects such as birds in flight.


The a6500 doesn’t have advanced settings to control the AF behaviour for stills but I have to say that I rarely felt the need for it.
The camera performs well most of the time for a range of genres including mountain bike practices, rally races and birds in flight. It is more a matter of choosing the correct AF Area.
Zone works best for birds in flight and the camera managed an excellent 75/90% hit rate.


In other cases, the Expand Flexible Spot is the preferred choice, such as when the trajectory of the subject is easier to predict and follow. I choose it when Zone AF starts to switch more randomly between my subject and elements around it. Lock-On AF is a great solution too.
During a mountain bike practice, I got a 70-90% keeper rate. At the North Wales Rally, the results were similar with a 75-90% keeper rate.


It is interesting to note that despite not having specific options like the AF-C Custom Settings of the Fuji camera, the a6500 behaves really well in all sorts of situation, even when there are elements in the foreground that partially or totally cover the subject for a few instants and that could normally confuse an AF system. This shows how well it has been designed and calibrated by Sony’s engineers.


What about continuous AF in low light? Here I admit I am lacking some experience with the a6500. I used C-AF at the Comic Con and got excellent results but the subjects weren’t really fast and the light wasn’t so bad. With the X-T2, I already shared my experience from a evening lantern parade and it did extremely well. It rarely hesitated or hunted back and forth. Given its higher sensitivity, I can see the X-T2 having a minor advantage as I mentioned in the S-AF chapter.

Shutter, continuous shooting speed and buffer
The Sony a6500 has a maximum mechanical shutter speed of 1/4000s which is one stop slower than the 1/8000s maximum speed found on the X-T2. For long exposures, you can go down to 30s or choose the Bulb option for the Sony. The X-T2 has a handy T step on the shutter speed dial that allows you to set the duration up to 15 minutes (firmware 2.0 required). This is useful because the T mode can be combined with self timer and be a good alternative to an external shutter control. I also find the shutter sound of the Fuji more discreet and pleasant in comparison to the a6500.
If you switch to the electronic shutter, the Fuji can go as fast as 1/32,000s while the Sony doesn’t increase the speed despite having an e-shutter as well. Both offer a silent mode but can suffer from rolling shutter. As such, the electronic option is not advised with fast moving situations.
The Sony has an extra option: the electronic first curtain shutter. It can be helpful to reduce shutter shock and is useful at slow shutter speed for example.
When it comes to the continuous shooting speed, both cameras can go as fast as 11fps (with C-AF) when using the mechanical shutter but there is a catch with the Fuji: you need the optional battery grip, otherwise the maximum speed is 8fps. With the electronic shutter, the X-T2 can go up to 14fps while the Sony once again remains the same. The Fuji also has a Flicker Reduction setting when shooting in burst mode (firmware 4.10).
The a6500 can offer continuous live view with almost no dark blackouts up to 8fps. At 11fps you see the last picture taken. On the X-T2, the faster CH mode (8fps or 11fps) doesn’t show a live view. For that you need to switch to the CL mode (5fps max.).
When it comes to buffer capabilities, the a6500 has an advantage. Thanks to the LSI chip in front of the sensor, the camera can process more data simultaneously.
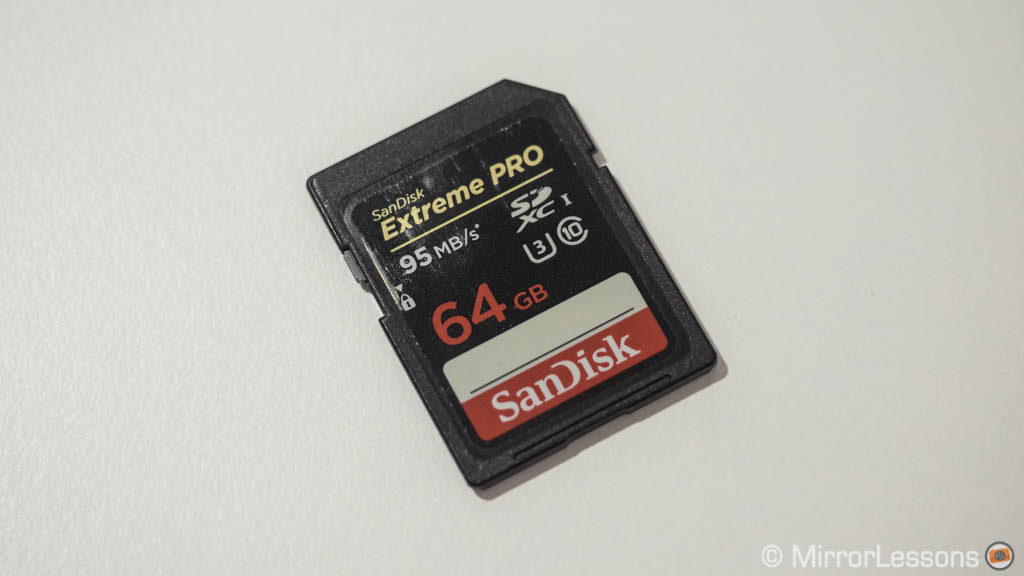
Since I don’t have the battery grip for the X-T2, I performed a side-by-side comparison at 8fps with RAW and JPGs using the same SD cards.
Our first test compares the performance with a UHS-I card and we can clearly see that the Sony outperforms the X-T2 in RAW mode: it lasts for almost 30 seconds at full speed before slowing down drastically to 2fps approximately. The X-T2 lasts for 5s before slowing down to 5fps. With JPGs they both shoot at full speed for more than one minute.
Now if I use an UHS-II card on the X-T2 (the a6500 is not compatible so the result doesn’t really change), the performance of the Fuji increases. The faster writing speed of the memory card allows the camera to clear its buffer more rapidly and therefore last at full speed for a longer period of time: 15s before it slows down to 5fps again. That being said, the a6500 remains superior thanks to its larger virtual memory.
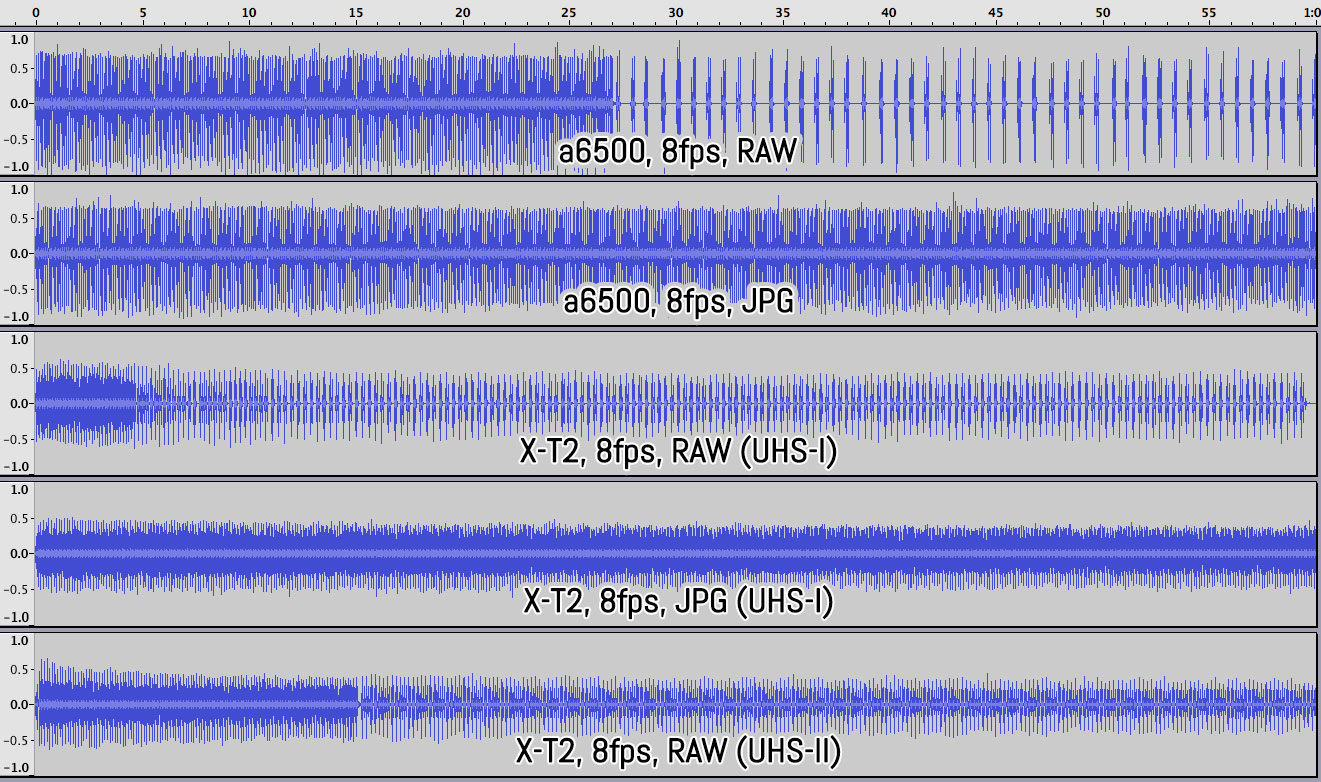
Image Stabilisation
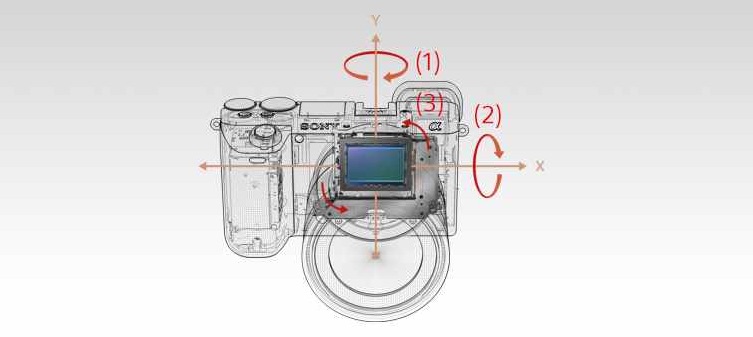
The Sony a6500 features in-body 5-axis stabilisation and the system can work in conjunction with the optical stabilisation of OSS lenses. It can also work with manual focus lenses. Here is a more precise overview:
- 5 axes on the sensor are used with native E-mount lenses and adapted DSLR lenses with electronic contacts and no optical stabilisation
- 3 axes on the sensor + OSS are used with native E-mount lenses and adapted lenses with electronic contacts and optical stabilisation
- 3 axes on the sensor are used with native or adapted lenses that lack electronic contacts. The focal length must be set manually
The Fujifilm X-T2 lacks sensor stabilisation but can take advantage of the OIS of select zoom lenses.
You would naturally think that the a6500 has a big advantage in terms of image stabilisation but this isn’t necessarily the case.
If we talk about prime or zoom lenses that lack optical stabilisation, of course the 5 axes or 3 axes used by the Sony camera will allow you to use slower shutter speeds. For example with the FE 55mm f1.8 I managed an almost perfect shot at 1/5s – which isn’t very impressive compared to other camera systems – but gives a 4 stop advantage in comparison to the lowest I could go with the X-T2 at the same focal length without OIS.


If include optical stabilisation, things change. With the a6500 at 18mm, I can’t go past 1/2s and even there the result isn’t 100% perfect. At 105mm, the best image I got was at 1/10s.
With the X-T2 and the 18-135mm that has excellent OIS (5Ev by CIPA standards), I matched the same result at 18mm and managed a better result than the Sony at 105mm.


These findings are similar to those in my a6300 vs a6500 comparison: it looks like sensor stabilisation doesn’t make a difference when paired with optical stabilisation. It probably gives priority to the lens and it’s likely that the OSS performance of the 18-105mm is inferior to the OIS found on the Fuji 18-135mm. Of course the results can vary from Fujinon to Fujinon lens but luckily many of them have very capable stabilisation. Perhaps a firmware update will improve the performance of the Sony later on. For now, the only relevant difference concerns non-OIS lenses.
Video
The latest generation of Sony mirrorless cameras, including the a6500, are well-known for their excellent video capabilities, with image quality that can satisfy both enthusiasts and professional filmmakers. Not only is the X-T2 the first 4K capable camera from Fujifilm, but it is also the first to target the filmmaking world more seriously.
Both products can record in 4K Ultra HD at 24, 25 or 30fps and a bitrate of 100mbps (the a6500 uses Sony’s XAVC S codec). Below you can watch a quick video that shows all the main differences in terms of 4K quality. Keep reading for more information.
Note: the video below was recorded before F-Log became available for internal recording on the X-T2.
The first note is the duration: the a6500 can record 4K or 1080p for up to 30 minutes per single clip while the X-T2 stops after 10min (15min in 1080p) to avoid overheating. Both cameras can become quite warm after 30 minutes of 4K recording (3 clips for the X-T2). The a6500 has a setting that allows the camera to keep recording despite the overheating warning on the display, which fixes a problem found on the previous a6300. With the optional battery grip, you can extend the length to 30 minutes on the X-T2.
Then we have the crop factor: the a6500 uses the entire width of the sensor – the equivalent of 20MP (6K) – which is then downsized to 4K. This ensures great sharpness and it is done with full pixel readout so there is no aliasing or moiré. The X-T2 does full pixel readout as well but crops the sensor by approximately 1.17x which results in a slightly narrower angle of view with the same focal length.
The footage looks very sharp from both cameras but I find the a6500 to have something extra thanks to the 6K > 4K downscaling process. The colour differences are the same as those found for stills but Sony cameras have dedicated picture profiles for video which were inherited from Sony’ Cine Alta camcorders.
The Picture Profiles on the a6500 give you more control over colour and better dynamic range.
You can control individual RGB channels and colour depth, as well as highlights (knee) and shadows (blacks and black pedestal).
With the X-T2, you can control shadows and highlights with the same settings used for the SOOC JPGs. In some cases they give you more details but note that the -2 values can create unnatural tone transitions in scenarios with less contrast.
Both cameras have a Log gamma option: on the a6500 there are two (S-Log2 and S-Log3) while the X-T2 has the F-Log is only. They can be used with internal recording or via HDMI output.
High ISO performance is similar but the a6500 has an extra stop (25600) while the X-T2 goes up at 12800 ISO. To conduct a similar ISO comparison, I had to use 1/25s instead of 1/50s on the X-T2 to match same exposure. (The Sony is more sensitive than the Fuji for video.)
In Full HD (1080p) the a6500 can record up to 120fps and the Quick & Slow motion mode allows you to take fast or slow motion videos in-camera. The X-T2 can go as fast as 120fps as well thanks the latest firmware (4.10). Both products deliver good 1080p footage but lack some sharpness. Needless to say, you get the best performance in 4K on both. Below you can watch a video at 120fps made with the a6300 which has the same video capabilities as its twin brother.

Just as with stills, the a6500 can take advantage of 5-axis stabilisation using the same options seen in the previous chapter. For video, the difference in optical stabilisation is once again minimal when recording static shots. When moving with the camera, you do get better results but the difference isn’t huge.
Note: Sony released two firmware updates (1.03 and 1.04) that claim to improve the image stabilisation with movie recording. Unfortunately since I’ve sold the camera before they came out, I didn’t get the chance to test them.
Concerning autofocus, both cameras are excellent for video in single and continuous modes: they are fast and very reactive. On the a6500 you can set three different speeds and control the responsiveness (AF Track Sens) which is very useful combined with Touch AF. On the X-T2, you can use the AF-C Custom Settings although I don’t find them relevant in all situations. For example, they are less effective when trying to stop the camera from refocusing on a momentary obstacle but they help it lock onto a suddenly appearing subject more quickly.
Concerning audio, Rec levels can be controlled in 31 steps on the a6500 and 20 steps on the X-T2. Both cameras have a microphone input but lack a headphone output. In the case of the X-T2, you gain access to a headphone output via the optional VPB-XT2 battery grip once again.
Flash
The a6500 has a built-in flash (GN6) and the maximum sync is 1/160s. You will find most of the common flash modes including TTL, Autoflash, Fill-flash, Slow Sync, Rear Sync and Red Eye reduction. The camera is compatible with a wide range of external flashes from Sony and third-party manufacturers. Some of the optional units include high speed sync and wireless capabilities. Flash compensation goes up to ±3Ev and you can use Flash Bracketing up to 9 frames and 3Ev increments.
The X-T2 lacks a built-in flash but the external EF-X8 is provided. The default sync is 1/250s. The camera can work in TTL, Commander and Manual modes with slow TTL, Front or Rear Sync curtain and 3 Red-Eye removal options. Flash compensation is up to ±2Ev. There is also a TTL-Lock mode where you can lock TTL metering based on the last image recorded.
If you want wireless control, the best option is the new Fuji EF-X500 flash that supports optical wireless shooting and HSS. It is the only flash designed for the X series that currently matches the same features you can find on several Sony flashes. You can find compatible products from third-party manufacturers but some features (wireless or HSS) are not compatible or require a firmware upgrade. Firmware 3.0 brought HSS and TTL compatibility with certain products such as ProFoto.
Other settings and extra features
Neither camera is particularly rich in extra features in comparison to the Micro Four Thirds system (Olympus and Panasonic). Among the things they share are:
- Manual focus assist: you get Magnification and Peaking (3 colours and brightnesses) on the Sony. The X-T2 has Magnification, Peaking (3 colours and 2 intensities) and two additional modes. With Digital Split Image you need to align four central bars in order to achieve correct focus. Dual View divides the screen with live view on the left and focus magnification on the right.
- Bracketing: the a6500 lets you choose between AE (max. 3Ev/5 frames and 1Ev/9frames), WB and DRO bracket. You have AE (up to 9 frames/3Ev), ISO, Film Simulation, WB and DR bracketing on the X-T2.
- Panorama mode: JPG only
- Picture Effects / Advanced Filters: many choices including Toy Camera, partial colour, etc.
- Wifi: remote control the cameras and transfer images to your mobile device.
- Tethering: for the a6500 you need Sony’s freeware Remote Camera Control software (Windows & Mac). You can use a Lightroom plugin for the X-T2.
- Copyright information: you can save your copyright info for the EXIF data.
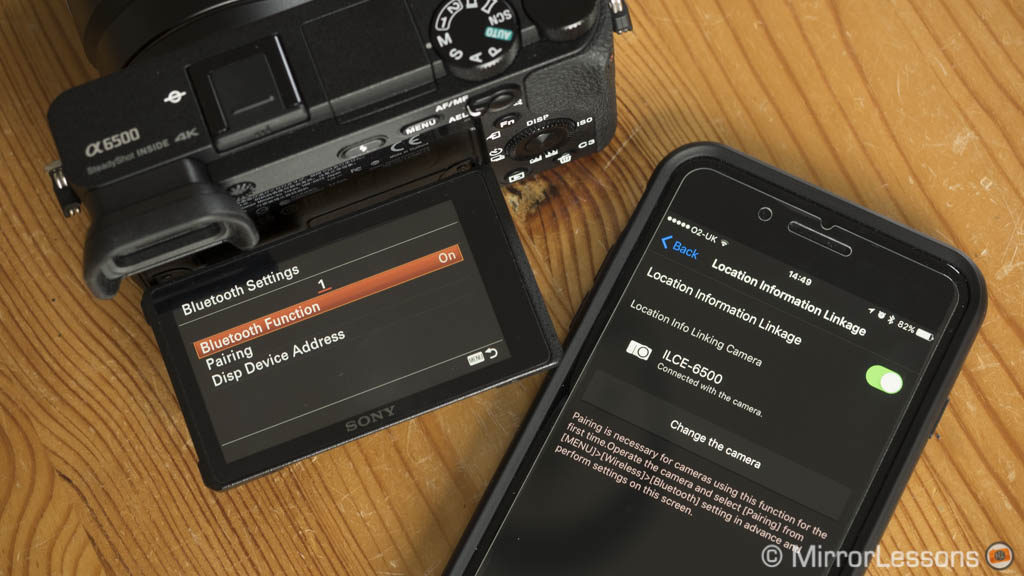
Now let’s see two additional wireless connectivity options that only the a6500 has:
- NFC: it allows you to connect the camera to your smartphone with tap technology
- Bluetooth: you can pair your mobile device to your camera and maintain the connection in the background to geotag your images.
The X-T2 has a few additional features like:
- Intervalometer (time-lapse): up to 999 shots
- Multiple exposure: 2 frames maxmimum
- Focus Bracketing: added with firmware 4.10, it allows you to shoot a select number of images and vary the focus distance between each shot
- RAW processing: convert a RAW file into a JPG by editing exposure, white balance, colour profile and many other things in camera. You can also use the new Fujifilm X RAW Studio app on your mac to post process your images using the camera’s built-in image processor (firmware 3.0 required).
- Voice Memo: you can record a 30 second memo in Playback mode.
- Camera settings backup: via the Fujifilm X Acquire software, you can save and restore your camera settings or transfer them between one body and another.
For the a6500, there are many features including time-lapse that you can download via the PlayMemories App store. Some are very interesting like Digital Filter but unfortunately many of them come at a cost.
Battery life
The Sony a6500 is a power-hungry little mirrorless camera. You can save up to 500/600 images and a couple of short video clips when working in continuous mode before the battery runs out. Recording 4K video can drain the battery much faster.
To give you a more precise idea: a 30min clip in 4K – without C-AF or image stabilisation – drains the battery from 100% to 50% on average. During my two-hour morning at the Rally North Wales, I recorded 550 images, 13 short clips in 4K (10s each) and 4 in slow motion at 100fps and the battery was down to 10%. I recommend having at least two spares with you if you are planning to shoot all day.
Some settings can boost the battery life a little: for example you can turn off the Sunny Weather option for the LCD screen (useful when shooting in daylight outside but doesn’t work with 4K video) or set the EVF refresh rate to 50/60fps. There isn’t an official battery grip from Sony but you can find third party products from Meike.
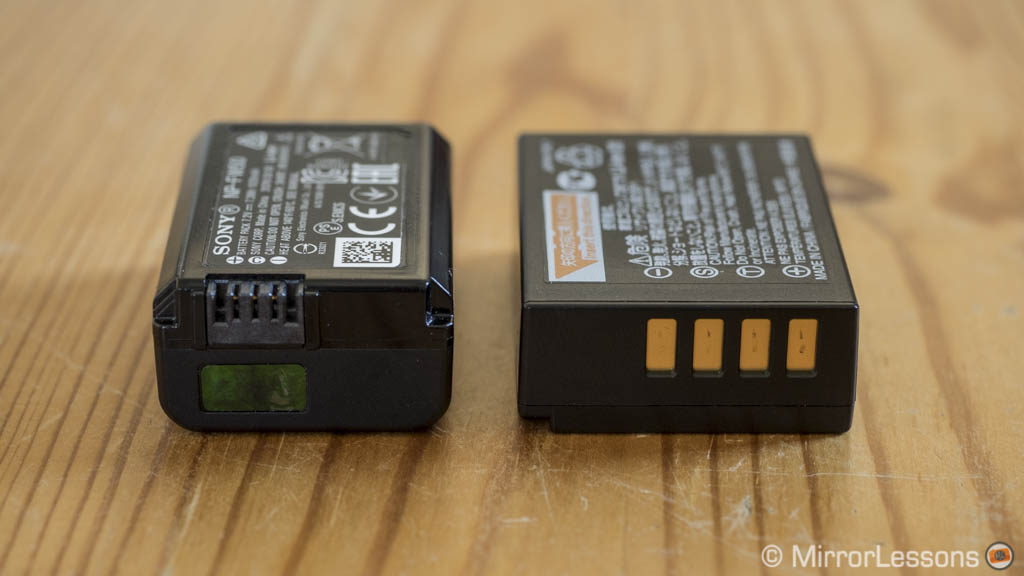
The X-T2 uses the same battery found on the X-Pro and X-T series. There is new version called NP-W126S that improves the performance a little. Overall it lasts longer than the Sony – I managed 800 shots on a single charge. If I shoot a mix of stills and 4K video, it will drain faster and I’ll need at least one spare. Recording 4K for 30 minutes (3 clips) drains the battery from 100% to 62%.
As mentioned already, there is an official battery grip from Fujifilm that also increases the continuous shooting speed and the 4K recording time.
Usefully, both cameras can be charged via USB.
E-mount and X-series systems: lenses and firmware updates
When comparing two cameras of two different brands, it is important to take some time to talk about the systems they fit into. One of the most important aspects is the lens line-up.
For the a6500, there are – at the time of publishing this article – 16 native APS-C and 20 native full frame (35mm format) lenses for the E-mount system. You can add to the total four lenses from Sigma, 9 from Zeiss and some additional options from Samyang and other brands. That’s more than 50 lenses to choose from, never mind the adapted DSLR lenses that are fully compatible thanks to the on-chip PDAF.
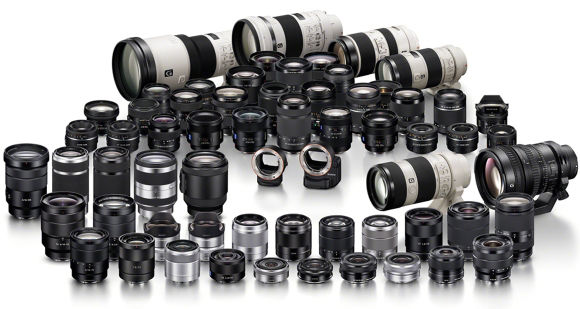
Many of these lenses look great on paper but we need to look more closely: several are designed for full frame cameras (A7 series), and are too large and expensive to fit a product like the a6500.
Certainly some of these full frame lenses can be used with great results on APS-C cameras: think about telephoto lenses such as the two 70-200mm zooms or the 70-300mm. Their size doesn’t overwhelm the camera and the crop factor can be an advantage to gain some extra reach. However if I look at the APS-C selection on its own, there is less variety: no constant 2.8 zooms, not the best range of primes and many zooms have very slow apertures. Sony hasn’t released a new APS-C lens for more than three years now. It is obvious that it is concentrating its efforts on full frame glass but for someone primarily interested at the APS-C system, the choice is definitely less exciting.
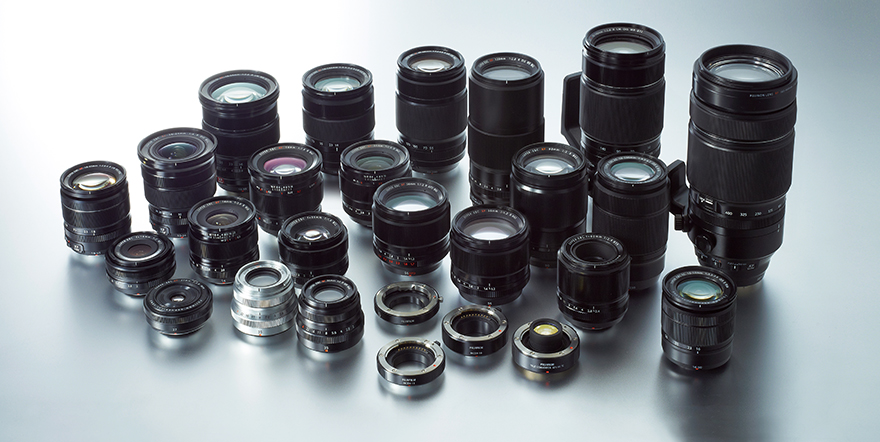
For the X-T2, on the other hand, there is a more balanced selection of primes and zooms. There is a total of 22 lenses from Fujifilm, three Touit lenses from Zeiss and several Samyang APS-C products. Sure, there aren’t nearly as many as for the Sony system but you have a more attractive selection of fast primes, 2.8 constant zooms and a 100-400mm for wildlife that is currently missing from the Sony line-up (but rumours say it’s coming soon).
Then we can talk about firmware updates and here Fujifilm wins hands down.
The brand has been working hard to deliver big firmware updates with lots of new features to not only the most recent cameras but also the older ones. The X-T2 has already received big upgrades that brought no fewer than 30 improvements and some new options too, many of which are based on customer feedback. Fujifilm listens, which is a very important point today as the software of these digital cameras is as important as the sensor itself. Providing firmware updates on a regular basis keeps your camera up-to-date and makes customers happier because they feel that their requests are being answered and that their camera has a longer lifespan.
Sony has been less generous with its firmware updates. There have been some good ones but they pale in comparison to the ones Fujifilm offers. For example many of the new features of the a6500 (new menu system, metering options) could easily be implemented onto the a6300 but it hasn’t happened yet. For this reason, it is hard to predict whether the a6500 will receive relevant improvements over the following months or years (but please Sony, prove me wrong!).
Price and bonus thought about the Sony a6300
The a6500 body can be found for around $1400 in North America, £1500 in the UK and €1600 in European countries. Different kits are available with the 16-50mm 3.5-5.6 or the 16-70mm f4.
The X-T2 is more expensive in the US ($1600) while its price is comparable elsewhere (£1400 or €1600). (The graphite silver edition is more expensive at $1800/£1650/€1900.) The camera can be found with the 18-55mm 2.8-4 kit lens.
Before reaching the conclusion, I’d also like to make mention of the a6300. In my recent complete comparison between the two Sony cameras, I showed that the difference between them is minimal, with the biggest improvements being the overheating fix when recording 4K, and 5-axis stabilisation. However, because the latter isn’t as impressive as expected (especially when using OSS lenses), it could make just as much sense to choose the a6300 if you are on a budget. After all, its price is by far the lowest out of the three cameras: $1000/£850/€950 for the body.
Conclusion
This comparison between the Sony a6500 and the Fujifilm X-T2 can be summarised in another way: feeling vs. technology.
Feeling tells us that the X-T2, despite being slightly larger, wins in terms of overall build quality and ease of use. Not only does the camera have better weather sealing but its numerous dials, larger EVF, dual SD slot and friendly menu system also make it one of the most straightforward mirrorless products on the market. And even more importantly, it’s a pleasure to use.
The a6500 has a good level of customisation and once you find the optimal configuration, the user experience certainly improves. But there are a few things I still can’t get my head around like some of its loose controls. Every time I go back to the X-T2, even just for a quick side-by-side comparison, I immediately feel more connected to the Fuji camera.
The only real advantage of the Sony concerning ease of use is Touch AF: it is well-designed and very effective for stills and video. I think it’s time for Fujifilm to understand that touch screens are useful on all cameras regardless of the target market. (And you can always turn it off if you don’t like it!)

Technology tells us that both cameras produce excellent image quality for stills with very little differences concerning dynamic range or high ISO performance. There are the usual X-Trans sensor criticisms such as the need for more specialised software if you want the sharpest results possible and the annoying purple flare (24MP generation only) but otherwise the performance is basically identical.
Their respective autofocus systems are the best you can find as far as mirrorless systems are concerned. Each has its own settings, options and focus areas but in the end, you get great results either way. The AF-C Custom Settings on the X-T2 can be a plus in specific situations, while the speed settings on the a6500 are an advantage for video. The only thing to note is the Sony’s slightly worse performance in low-light but it compensates with its larger buffer.
Talking about video, the two cameras have excellent 4K capabilities but the Sony remains superior in my opinion. While the colour science of Fuji’s film simulation modes can give you stunning colours, the dedicated picture profiles (the Log profiles available with internal recording), slow motion capabilities, longer recording time and Sony’s expertise when it comes to professional video make the a6500 the better overall choice for filmmakers.
The 5-axis in-body sensor shift of the Sony gives you an advantage with lenses that lack optical stabilisation. With OSS lenses, however, that advantage disappears, which shows that Sony’s IBIS is still in an early stage of evolution, especially in the case of APS-C cameras.

Then we have extra features, battery life and the lens system: Sony has more lenses but many are expensive, larger and designed for full frame cameras. Fujifilm gives you a more balanced choice. Finally let’s not forget the considerable number of firmware updates Fuji users get on a regular basis.
Choose the Sony a6500 if:
- you want better video features (picture profiles, 120fps in Full HD, etc.)
- you want to take advantage of 5-axis stabilisation with lenses that lack OSS
- you can’t live without a touch screen (works for the AF only)
- you want a more compact body
Choose the Fujifilm X-T2 if:
- you want better usability thanks to the numerous dials and dual SD card slot
- you want a larger EVF (it’s one of the best on the market)
- you want a better selection of APS-C lenses
- you like the idea of “downloading” a new camera every now and then
Check the price of the Fujifilm X-T2 on
Amazon | Amazon UK | B&H Photo | eBay
Check price of the Sony a6500 on
Amazon | Amazon UK | B&H Photo | eBay
Second-hand Sony cameras on
Second-hand Fujifilm cameras on
You may also like the following articles:
- Sony a6300 vs Fujifilm X-Pro2 – IQ and AF comparison
- Sony a6300 vs a6500 – The complete comparison
- Olympus OM-D E-M1 II vs Fujifilm X-T2 – The complete comparison
- Fujifilm X-T2 vs X-Pro2 – The complete comparison
- Fujifilm X-T2 vs X-T3 – The complete comparison
Additional images
a6500


X-T2


