Updated on: July 3rd, 2019
The Olympus OM-D E-M1 II and the Fujifilm X-T2 are two of the most advanced performers you can find on the market today, not only in terms of pure image quality, but also autofocus, video and many other aspects. An important upgrade to their respective systems, they further reduce the gap between mirrorless technology and DSLRs, and greatly contribute to the perception of mirrorless cameras as a viable and serious offer, designed not only for amateurs but professional photographers as well.
Of course, a proper comparison isn’t just a matter of evaluating the performance or ease of use of the individual models. It is also an opportunity to observe how the two systems have evolved. So grab a cup of coffee (or tea), get your popcorn ready and let’s get started!
Ethics statements: We purchased the X-T2 for personal and review purposes. The E-M1 II was loaned to us by Olympus. We were not asked to write anything about these cameras, nor were we provided with any sort of compensation. Within the article, there are affiliate links. If you buy something after clicking the link, we will receive a small commission. To know more about our ethics, you can visit our full disclosure page. Thank you!
Given its length, this article has been divided into two parts:
- Page 1: design, functionality and image quality
- Page 2: autofocus, speed, stabilisation, video, other features and conclusion
Table of Contents – Page 1
1. Article updates
2. Main Specs
3. Design, build quality and interface
4. External controls and configuration
5. Custom modes and menu system
6. Viewfinder and rear monitor
7. Sensor, resolution and flare
8. Dynamic range and metering
9. Colours, white balance and JPG settings
10. ISO performance
Article updates
- July 2019: feedback about firmware 3.0 for the E-M1 II
- July 2018: information about firmware 4.10 for the X-T2 added
- March 2018: information concerning the E-M1 II and firmware 2.0
- December 2017: information and feedback concerning the X-T2 and firmware 3.0
- June 2017: added a few extra information following the released of the X-T2’s firmware 2.10
- May 2017: added an extra information concerning flash compatibility with the E-M1 II (Profoto Air Remote TTL-O with firmware 1.2)
- April 2017: the article has been updated to include information and feedback about the latest firmware available for the X-T2 (version 2.0), which added more than 25 improvements on the camera.
Main Specs
- OM-D E-M1 mark II
- Sensor: 20 MP 4/3 Live Mos
- Lens system: Micro Four Thirds
- Weatherproof: Complete (splash, dust and freeze proof)
- Internal Stabilisation: Yes
- Autofocus: Hybrid with 121 cross-type points
- Continuous shooting: 15fps (AF-S), 10fps (AF-C), 60fps (AF-S) and 18fps (C-AF) with electronic shutter
- ISO Sensitivity: 200 – 25600 (Pull 64)
- Shutter Speeds: 1/8000 to 60 seconds, 1/16000s with electronic shutter
- Viewfinder: 2,360K dots, 1.48x (0.74x) magnification, 120fps
- Rear monitor: Multi-Angle 3″ LCD monitor (1,040K dots)
- Movie recording: 4K up to 30fps, C4K at 24fps, Full HD up to 60fps
- Built-in Flash: No but external FL-LM3 supplied
- Extra Features: WiFi, Timelapse, HDR, Multiple exposure, Live Time, Live Composite, Focus Stacking, Keystone compensation, High Res Shot, Pro Capture
- Dimensions: 134.1 x 90.9 x 68.9mm
- Weight: 574g (including battery and memory card)
- Firmware version: 3.0
- X-T2
- Sensor: 24 MP APS-C X-Trans III CMOS
- Lens system: X-mount
- Weatherproof: Complete (Splash, dust and freeze proof)
- Internal Stabilisation: None
- Autofocus: up to 325 points (7×13 and 13×25 grids)
- Continuous shooting: 8 fps and 5 fps, up to 11fps with battery grip, 14fps with electronic shutter (AF-C)
- ISO Sensitivity: 200-12800 (pull 100, push up to 51200)
- Shutter Speeds: 1/8000 to 15 minutes (T mode), 1/32000s with electronic shutter
- Viewfinder: 2,360k dots, 23mm eyepoint, 0.77x magnification, 100fps
- Rear monitor: 3-way 3″ LCD (1.62M dots)
- Movie recording: 4K up to 30fps, Full HD up to 60fps
- Built-in Flash: No but EF-X8 unit is included
- Extra Features: WiFi, Panorama, Timelapse, Bracketing, Multiple exposure, Advanced filters, silent mode
- Dimensions: 132.5 x 91.8 x 49.2mm
- Weight: 507g (including battery and memory card)
- Firmware version: 4.30
Design, build quality and interface
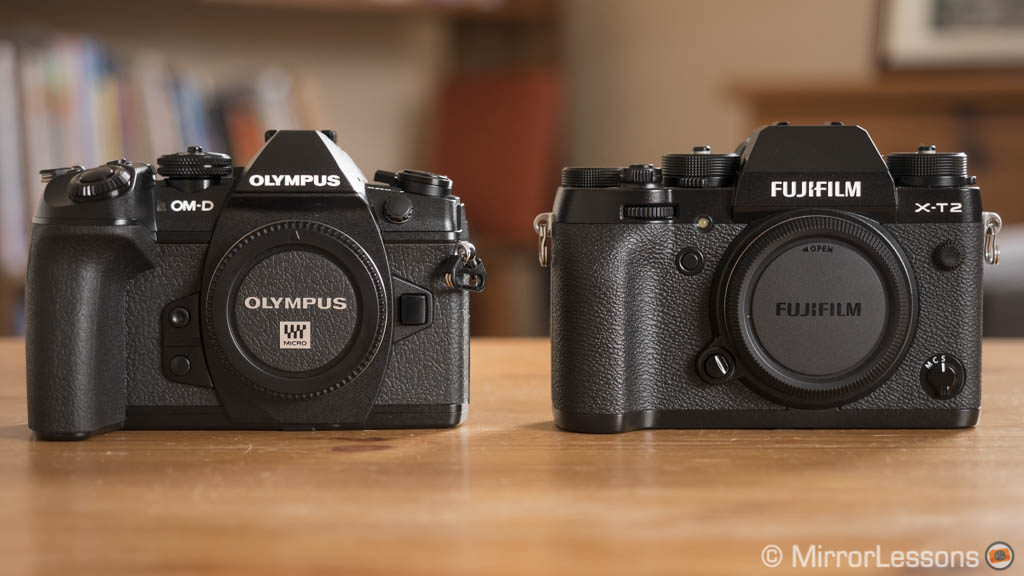
The two flagships are completely protected against rain, dust and cold temperatures (-10°C). I’ve used them both in adverse weather conditions and they stood up very well. The X-T2 is available in graphite silver as well as black.
Check price of Fujifilm X-T2 on Amazon and B&H Photo.
The E-M1 II feels a little heavier, though the difference isn’t significant if we compare the specifications (less than 70g). Both cameras feel really solid and well-made as far as the body design, buttons and dials are concerned.
The Olympus camera is slightly larger while the X-T2 is a little taller but we are talking about a difference of roughly 1mm. However, the E-M1 II can appear bigger from the side because of its grip, which is clearly bulkier than the one found on the Fujifilm camera.
The larger grip of the OM-D becomes an advantage with big tele-zooms: you can easily carry the combo one-handed without worrying about losing your hold on the body.

The front grip of the X-T2 is good and works well with small to medium-sized lenses. With larger lenses such as the XF 100-400mm, I find that a landscape grip or thumb rest, such as the one from Lensmate, bring additional comfort.
At the bottom, both cameras feature a tripod screw attachment aligned with the lens axis. Neither prevents you from opening the battery compartment. The one on the E-M1 II is closer to the lens mount but using a small tripod plate doesn’t interfere with the lens barrel.
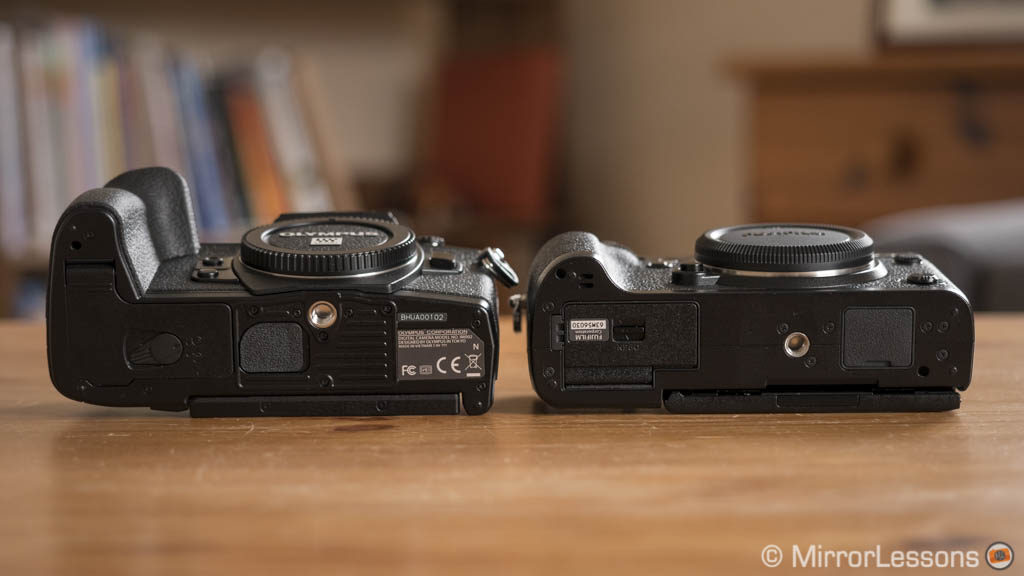
Both cameras feature a dual SD card slot: the one on the X-T2 opens with an unlock button while on the E-M1 II, you have to slide the door backwards. Despite having different mechanisms, I found both slots solid and reliable. On the Fujifilm camera the two slots are UHS-II compatible while only the first is on the Olympus.
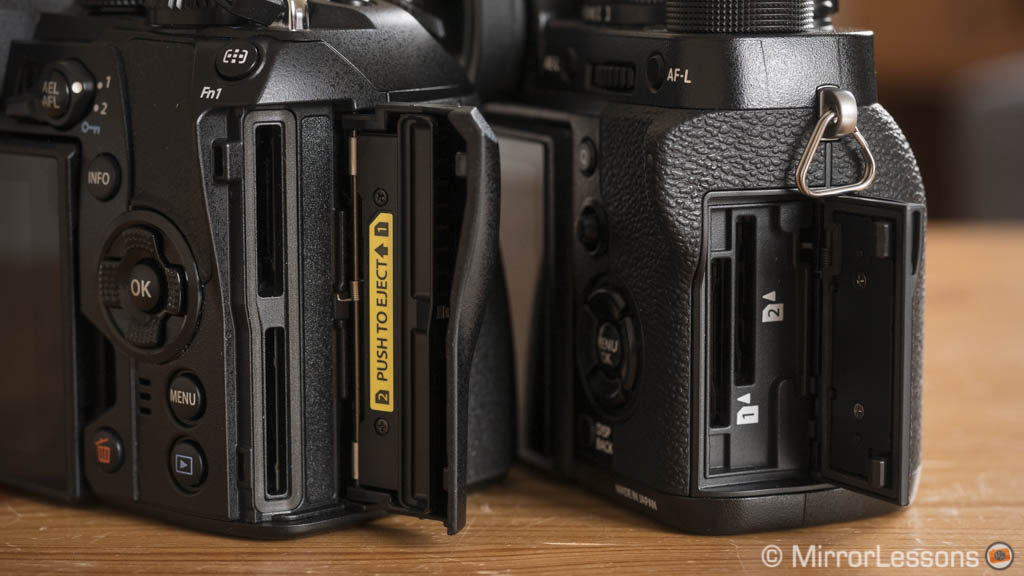
The two cameras offer the same options for the two memory slots:
- you can save the files on both cards at the same time (back-up mode)
- you can record continuously to the second slot once the first card becomes full
- you can save RAW files to one slot and JPGs to the other
- you can save video files to one slot, stills to the other (my favourite)
- you can copy images and video from one slot to the other.
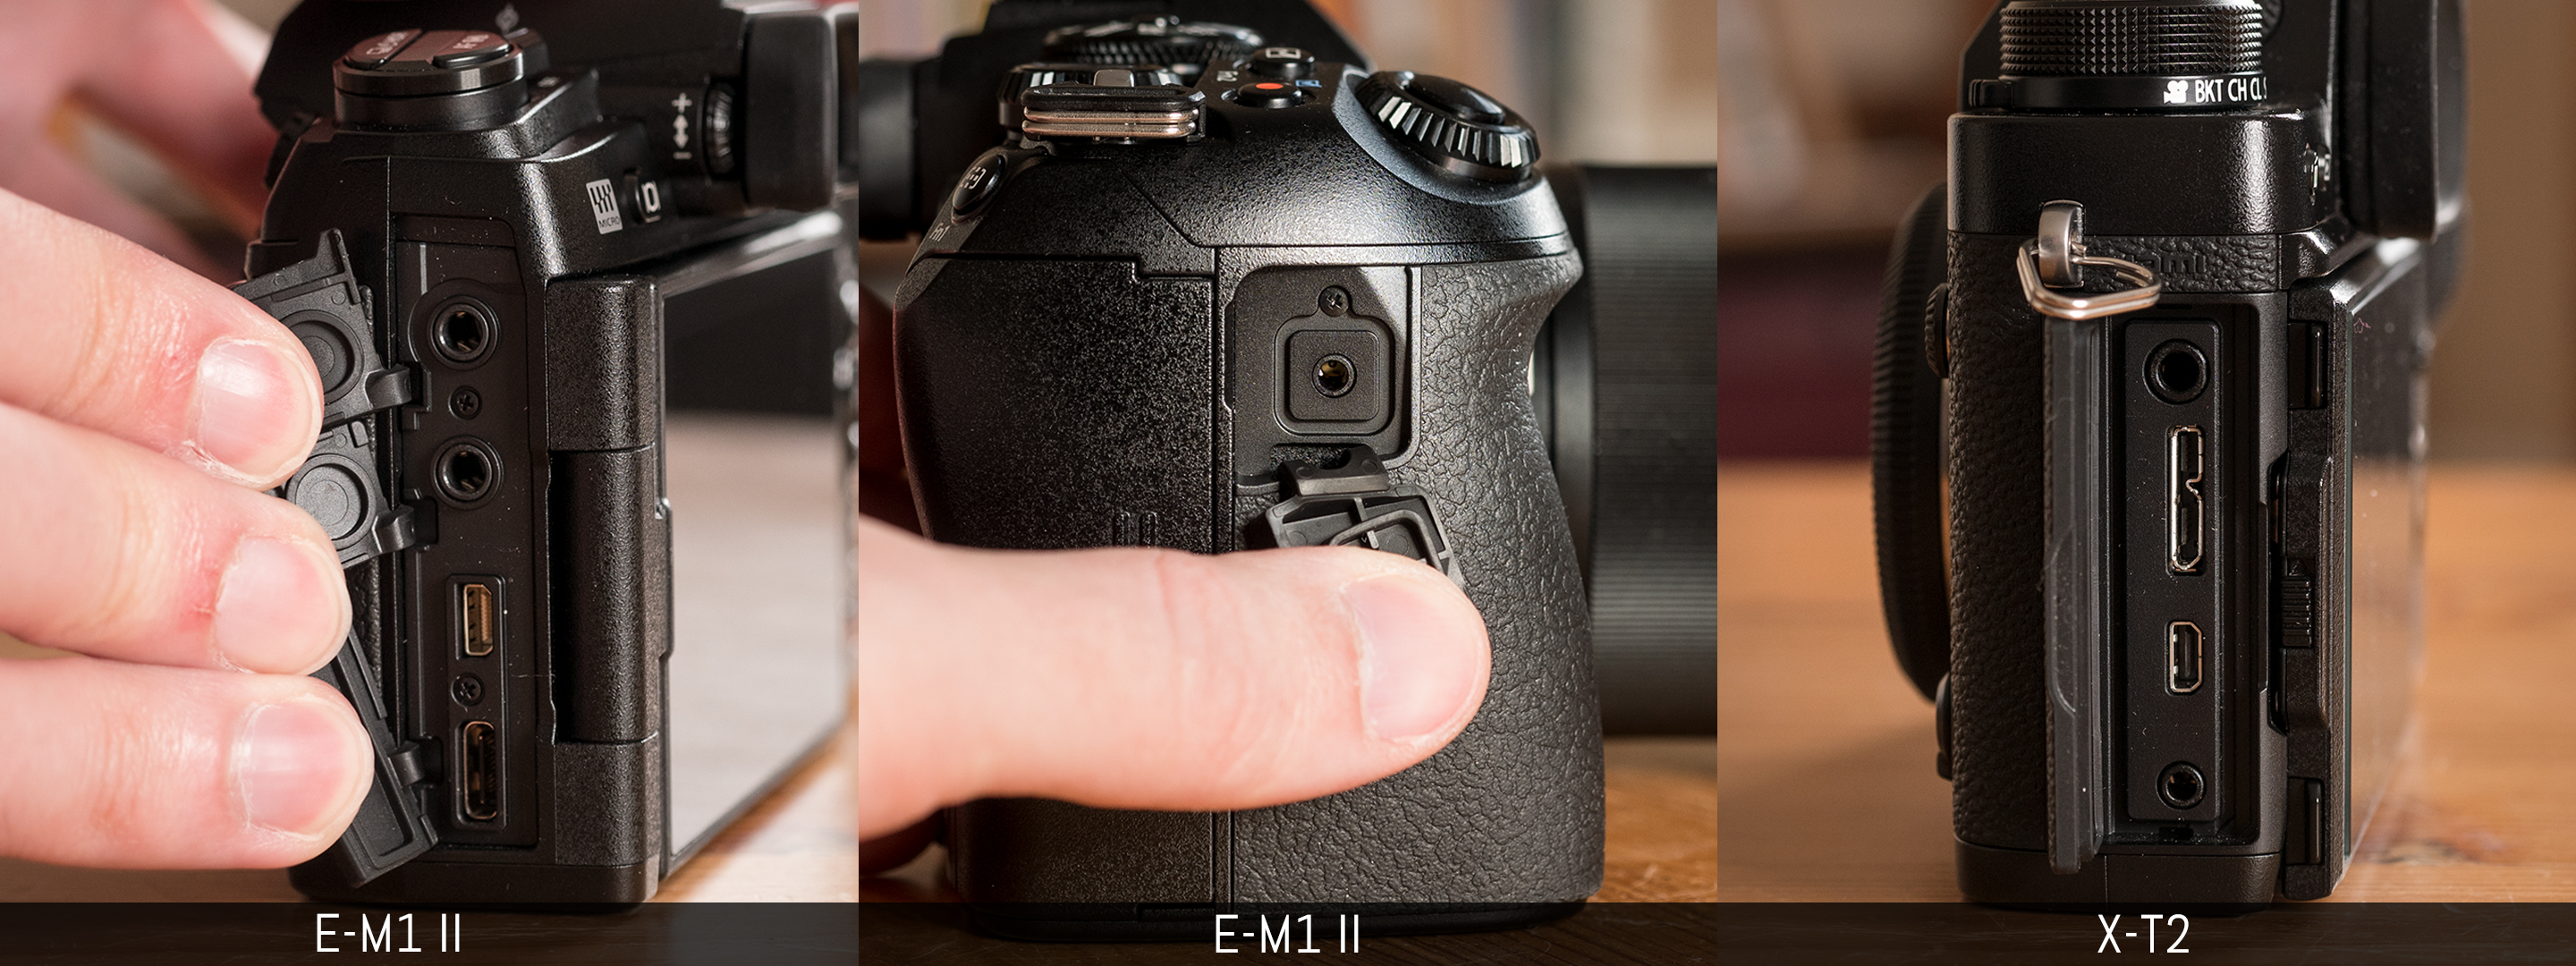
Regarding the interface and connectivity, both products offer a microphone input (3.5mm), a micro HDMI output and a 2.5mm remote cable connector. The E-M1 II has a headphone output (3.5mm) and a USB (Type C) port while Fujifilm opted for a USB 3 port. The headphone socket is only available on the optional VPB-XT2 battery grip, not on the X-T2 body itself.
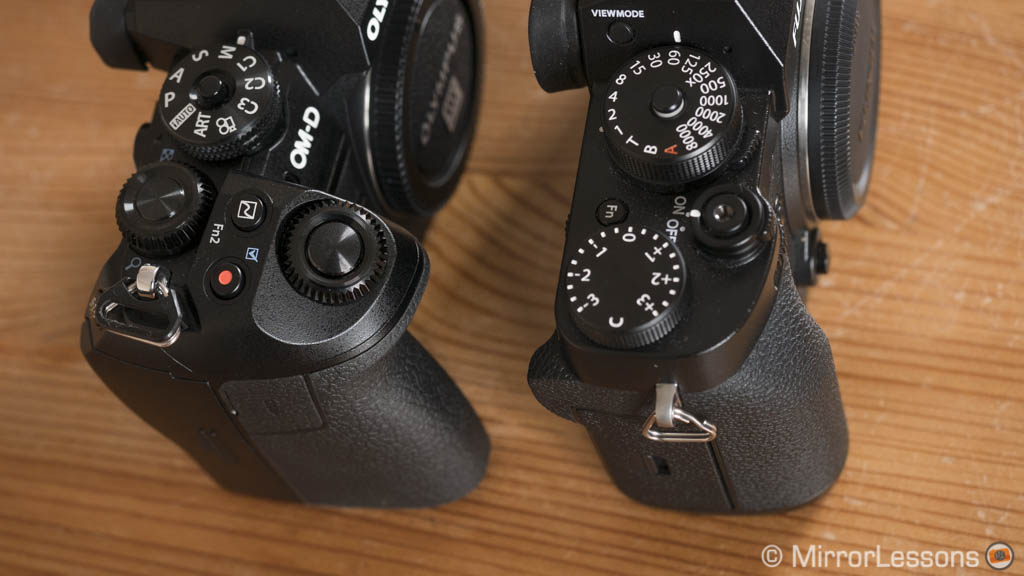
External controls and configuration
When we dig into the various controls and customisation options on offer, we get a sense of the diverse philosophies behind the two models.
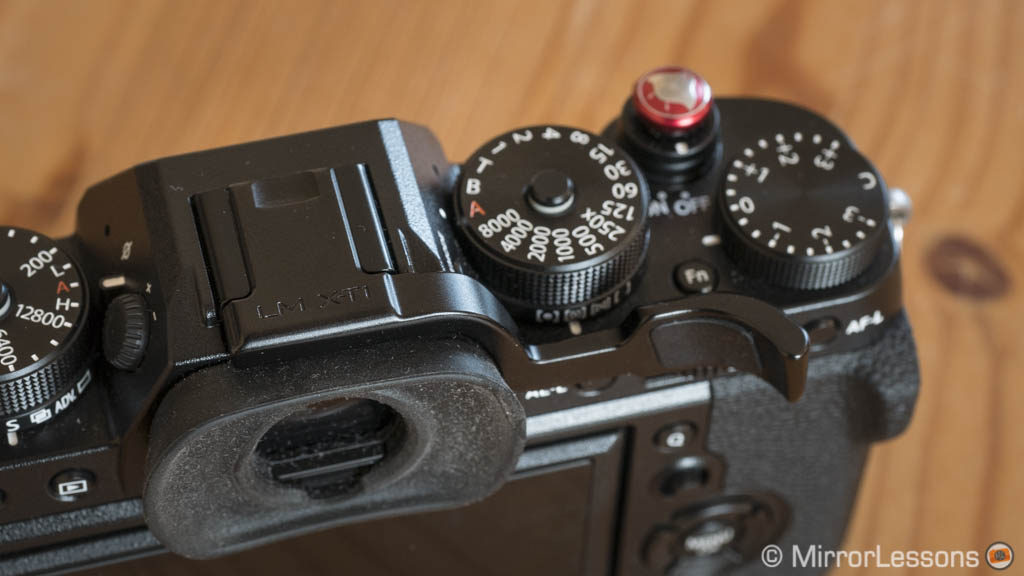
The Fujifilm X-T2 has a traditional design that will immediately recall analog cameras of old. The exposure dials are the more obvious homage to film cameras, but there are also a number of less obvious yet relevant examples such as the threaded shutter release to which you can attach a soft button. (Our favourite is from Lensmate.)

The E-M1 II, while retaining some semblance of older products within the Olympus film range, definitely has smoother edges and a more modern design.
The X-T2 is the company’s biggest achievement so far when it comes to ease of use, while the E-M1 II is more sophisticated and allows you to personalise (almost) everything.
The Fujifilm camera doesn’t force you to spend too much time leafing through the user manual to figure out how it works.
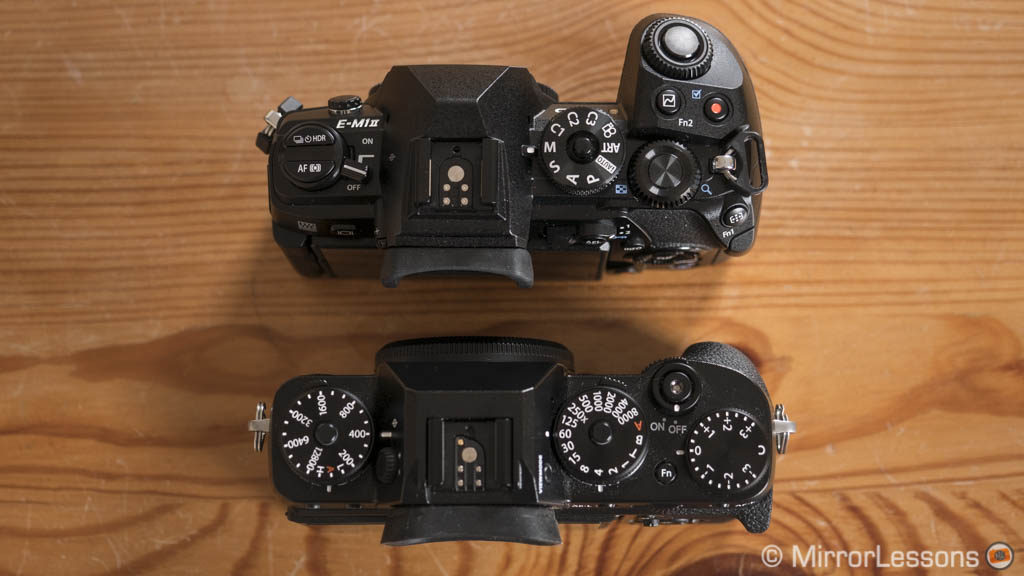
The two exposure dials (with lock and unlock buttons), the exposure compensation dial and the sub-dials underneath (drive and metering) allow you to change most settings on the fly without having to check the display. Now if for some reasons you don’t fancy the ISO dial, you can use the front command dial instead after activating the option in the menu (firmware 2.0 required).
On top of the E-M1 II, you will find the default shooting mode dial (with lock/unlock button), two front and rear dials for exposure and other settings, and AF and Drive mode buttons.
Because the X-T2 doesn’t have a traditional mode dial, to shoot in Aperture priority you simply rotate the shutter speed dial to the A position. To work in Program mode, you put the three exposure dials (including the aperture ring on the lens) to the A position.
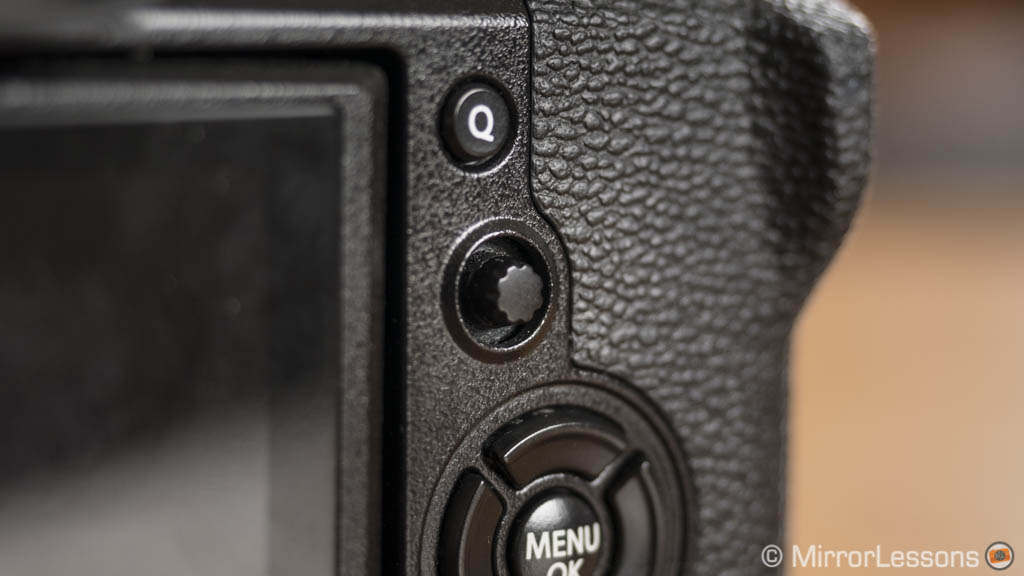
The X-T2 has 9 function buttons (including the rear command dial) with more than 30 settings to choose from. There is an AF mode selector on the front of the camera and a comfortable AF Joystick on the rear to move the focus point.
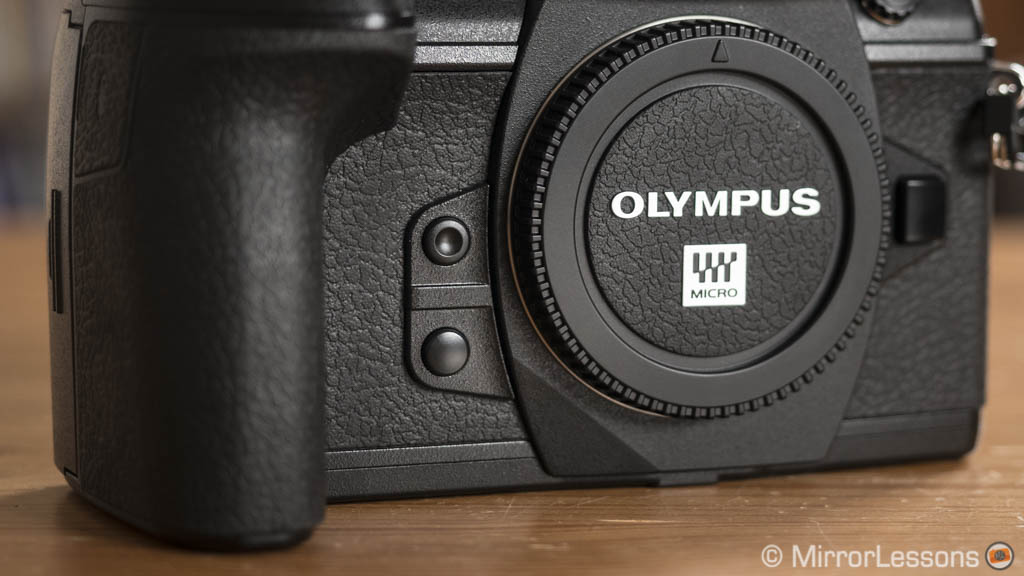
The E-M1 II stands out for its level of customisation. It has 9 function buttons, including the two at the front that I particularly enjoy. To each Fn button you can assign 26 different settings. These settings can be changed when working in Movie mode.
Some Fn buttons can reset the value when pressed and held for a few seconds. You can hide certain options from appearing in specific setting lists such AF area mode, continuous shooting modes or even the picture profiles. On the rear, the arrow pad can serve as an AF joystick or can be used to select additional settings.
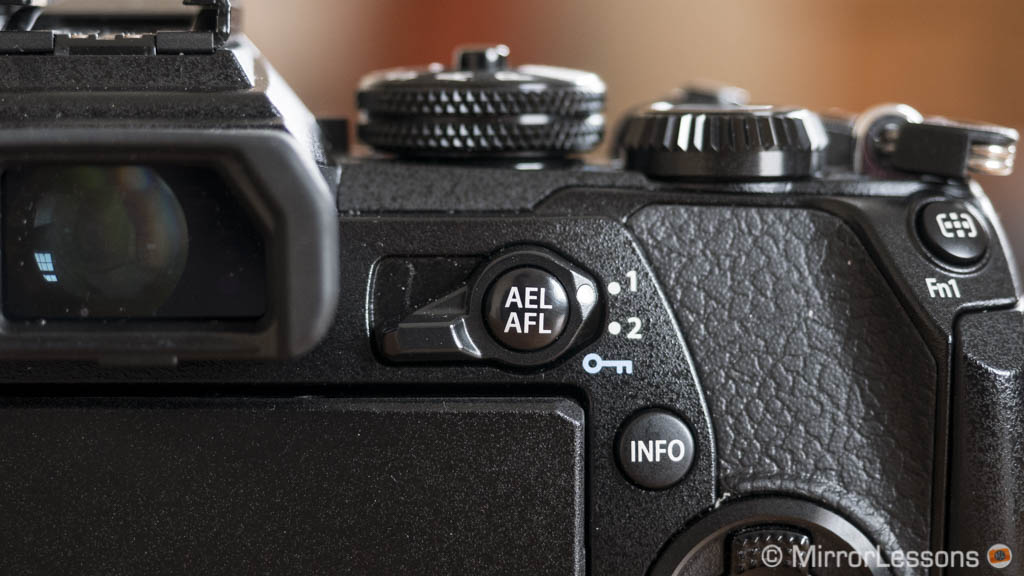
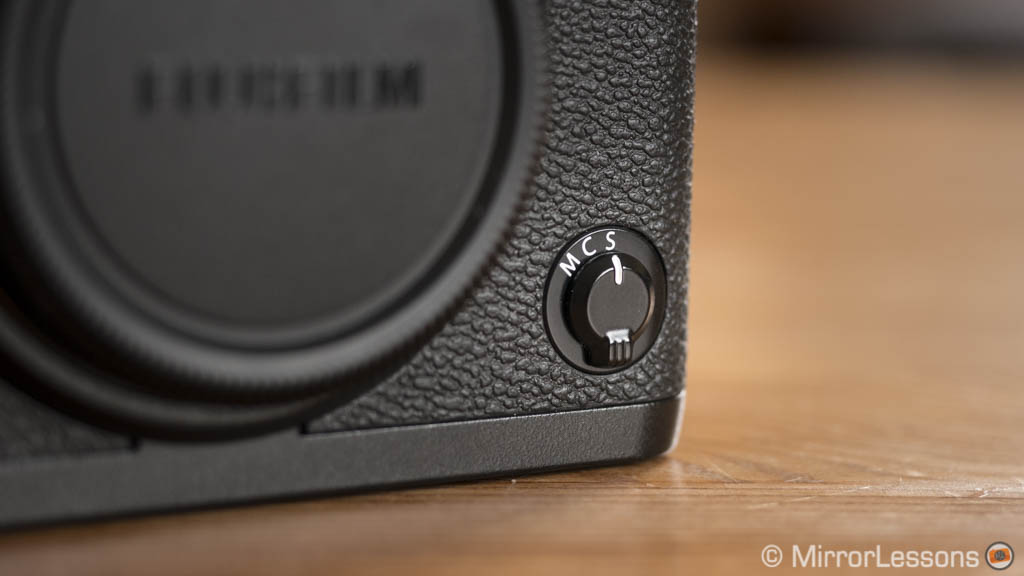
Then we have the lever function that plays a very important role on the E-M1 II. Depending on the position selected and the configuration set in the menu, the lever can change the function of the twin dials on top. (For example, it is useful to move the focus point.) It can change the function of certain buttons or allow you to switch between two different focus modes. It can even become an alternative to the default power switch or to the main mode dial when in movie mode.
Custom modes and menu system
Continuing in the vein of personalisation, the Fuji camera has a Q (Quick) Menu, where each of its 16 blocks can be configured with the settings you prefer. You will find 7 custom modes related to image quality that can display your favourite setting at a glance (their names can be edited as well). The My Menu page offers shortcuts to your favourite entries so that you don’t have to browse the various pages of the menu all the time.
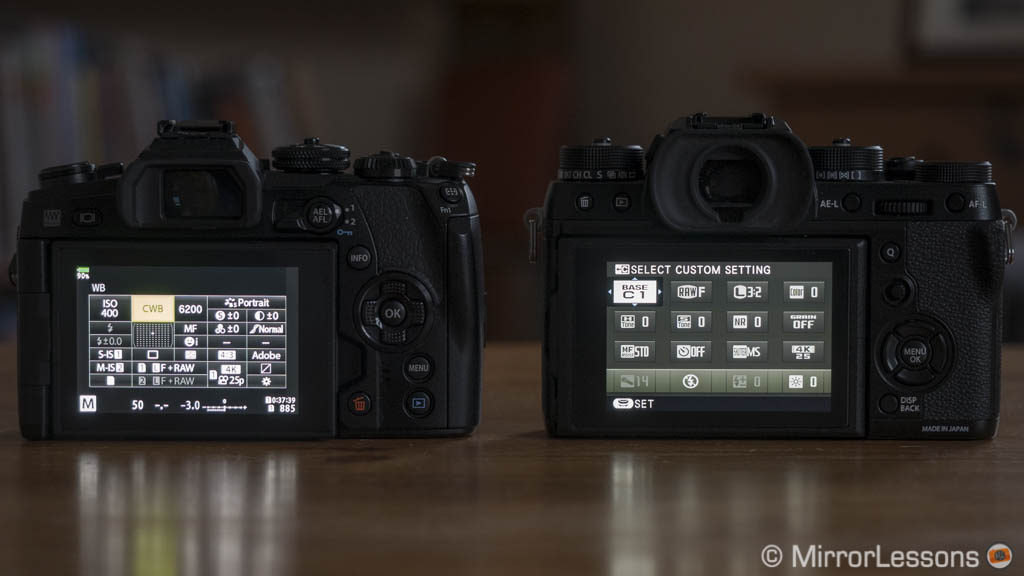
The Super Control Panel (Q menu equivalent) on the E-M1 II can’t be customised but offers a rich layout of settings. Then we have the three Custom modes accessible from the mode dial on top that unlike the X-T2, allow you to save whichever settings you want (image quality, autofocus, continuous shooting speed etc.).
Menu systems are an important part of digital cameras. We may try to avoid them as much as possible (and certain cameras are definitely designed more to that end), but there will always be a reason to enter one at some point. In other words, you can’t escape them. This is why a well-designed and user-friendly interface can have a positive influence on your experience with the camera.
Here, I have to give the prize to the X-T2: the new menu – first introduced on the X-Pro2 – is the best I’ve used to date on a mirrorless camera.
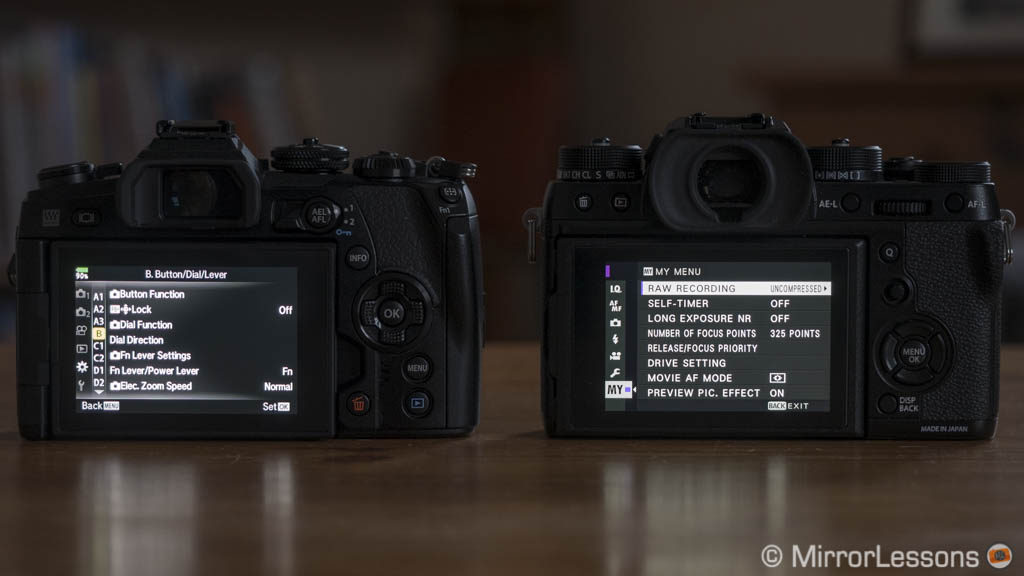
It is clear, simple and really well-organised. Except for a few settings that are less conspicuous (I can count them on one hand), it is fast and easy to navigate.
The E-M1 II also has a re-designed menu system and while some categories are now better organised, I still find it takes more time to locate the various settings. It has more pages and categories, but it would be unfair not to remind you that the camera also has many more options and features in comparison to the X-T2.
Viewfinder and rear monitor
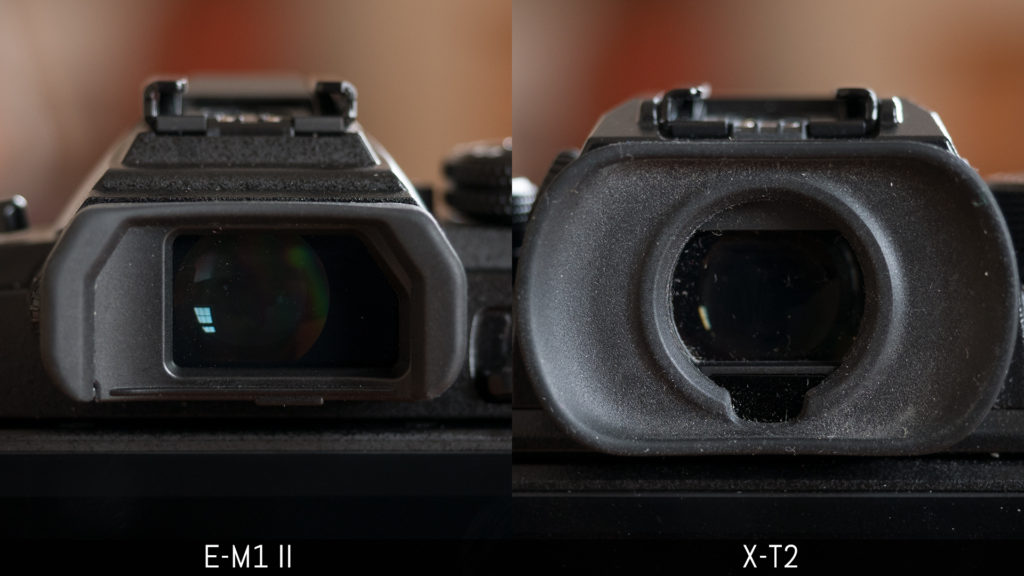
The E-M1 II and X-T2 have excellent viewfinders with same size (0.5 inches), field coverage (100%) and resolution (2.36 million dots). Each also has its own set of specifications that set them apart. In this case, my personal preference goes to the X-T2.
The magnification on the Fujifilm camera is superior (0.77x vs 0.74x on the E-M1 II) and the Eyepoint slightly longer (23mm vs 21mm). It uses an OLED panel which I found to be brighter with better contrast than the LCD panel of the E-M1 II. The display lag is 0.005s on the X-T2 and only slightly slower on the E-M1 II (0.006s).
Both EVFs have a default refresh rate of 60fps but the E-M1 II can go as fast as 120fps when the Frame Rate setting is set to high. The X-T2 goes as high as 100fps when Boost mode is activated. Between 100fps and 120fps I didn’t find a relevant difference: both are nice to use in low-light or with fast-moving subjects.
Both cameras have a series of similar settings for the EVF and live view.
You can choose to enable or disable the real-time preview of exposure, white balance and colour profiles to make the EVF behave more similarly to an optical viewfinder (S-OVF option on the E-M1 II, Preview Picture Effect on the X-T2). The Boost mode on the E-M1 II, which shows you a bright image regardless of the exposure settings, has more options such as being enabled only when using magnification assist or when previewing the real depth of field.
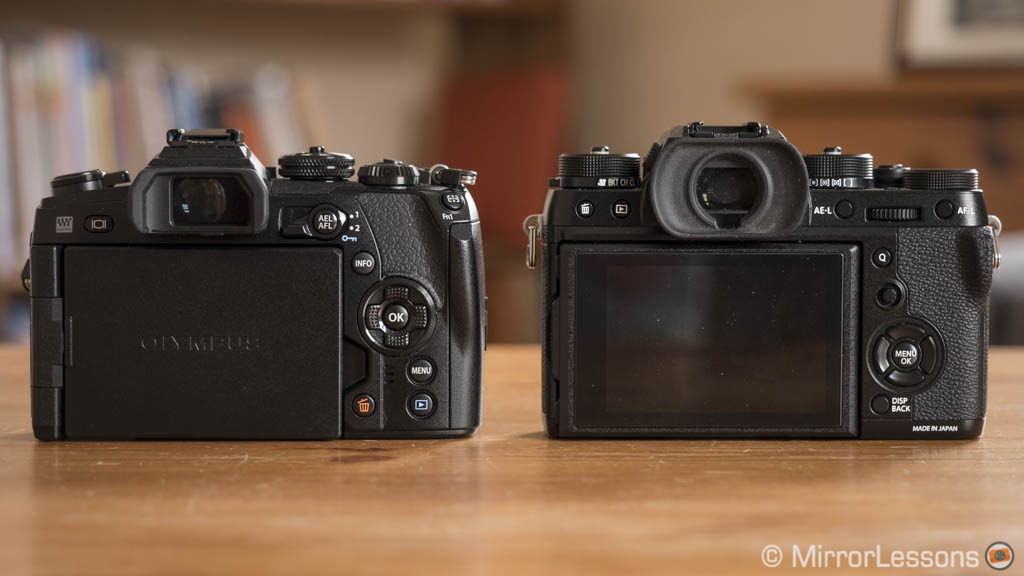
The X-T2 rear screen has more resolution (1.62 million dots vs 1.04M dots) but is not touch sensitive.
On the E-M1 II, you can move the focus point with your finger or take a picture, which by the way is an excellent way of avoiding any micro vibrations at slow shutter speeds. Then there is the AF Targeting Pad that allows you to move the focus point while composing with the EVF.
The back monitors differ first of all by their tilting capabilities. The E-M1 II has a traditional multi-angle screen that can be flipped to the side and rotated up to 180°. It is a solution often appreciated by filmmakers.
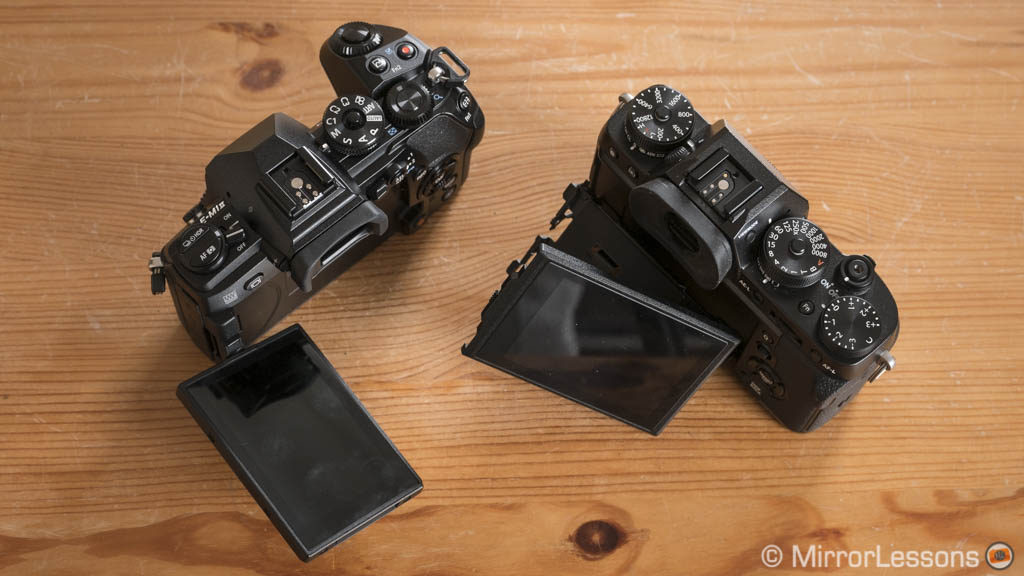
The X-T2 monitor can be tilted up 90°, down 45° and opened by approximately 60° to the right. This three-way solution adopted by Fujifilm is really nice and comfortable 90% of the time. It means I don’t have to flip my monitor to the side if I want to tilt the screen, a solution that I prefer for still shooting.
The screen of the E-M1 II is more flexible, however, if you need to flip the screen to the left while recording video for example.
Previous firmwares have added interesting options to the X-T2: you can keep the rear LCD activated to display the last image taken while using the viewfinder. It’s a nice trick to quickly check the image you just shot without going in playback mode. The latest version (4.10) allows you to customised the information displayed on the rear screen and electronic viewfinder.
Firmware 3.0 for the X-T2 added the option to display blinking highlight warning when using live view with the LCD or EVF. The E-M1 II has a similar option in playback mode only.
Sensor, resolution and flare
Moving on to the internal hardware, we have the first and most obvious difference between the two cameras: the E-M1 II has a Four Thirds sensor while the X-T2 has an APS-C chip.
Though the sensor of the Fujifilm camera is indeed larger, the difference between the two cameras is not as big as one might think. The native aspect ratio is also different: 4:3 vs 3:2. I am so used to working with both systems now that this difference doesn’t affect me one way or the other but you may have a different opinion.

The E-M1 II uses a 20MP Live Mos sensor while the X-T2 features 20% more resolution thanks to its 24MP X-Trans III CMOS chip. In the real world, the difference in resolution isn’t very relevant.


There are a few things to understand about the architecture of these two sensors. Olympus uses a traditional Bayer array while Fujifilm, with its X-Trans solution, ensures the presence of at least one Red, Green and Blue pixel in each horizontal and vertical line.
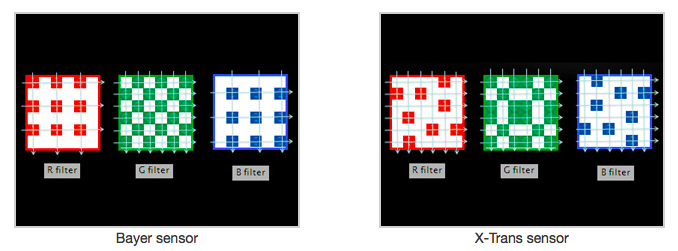
The X-Trans technology has been praised for many things including better colour accuracy, a more “filmic or organic” look and no moiré artefacts. Concerning moiré, most recent image processors are capable of minimising it and if small traces do remain, you can easily get rid of it in post production. I never encountered such an issue with my E-M1 II files but I did see a couple of examples from other users, especially on very fine bird plumage.
Concerning the other aspects such as colour and noise, we will have the chance to see direct comparisons in the following chapters. One thing left to highlight is how the RAW files of the two cameras behave when post-processed with different software programs.
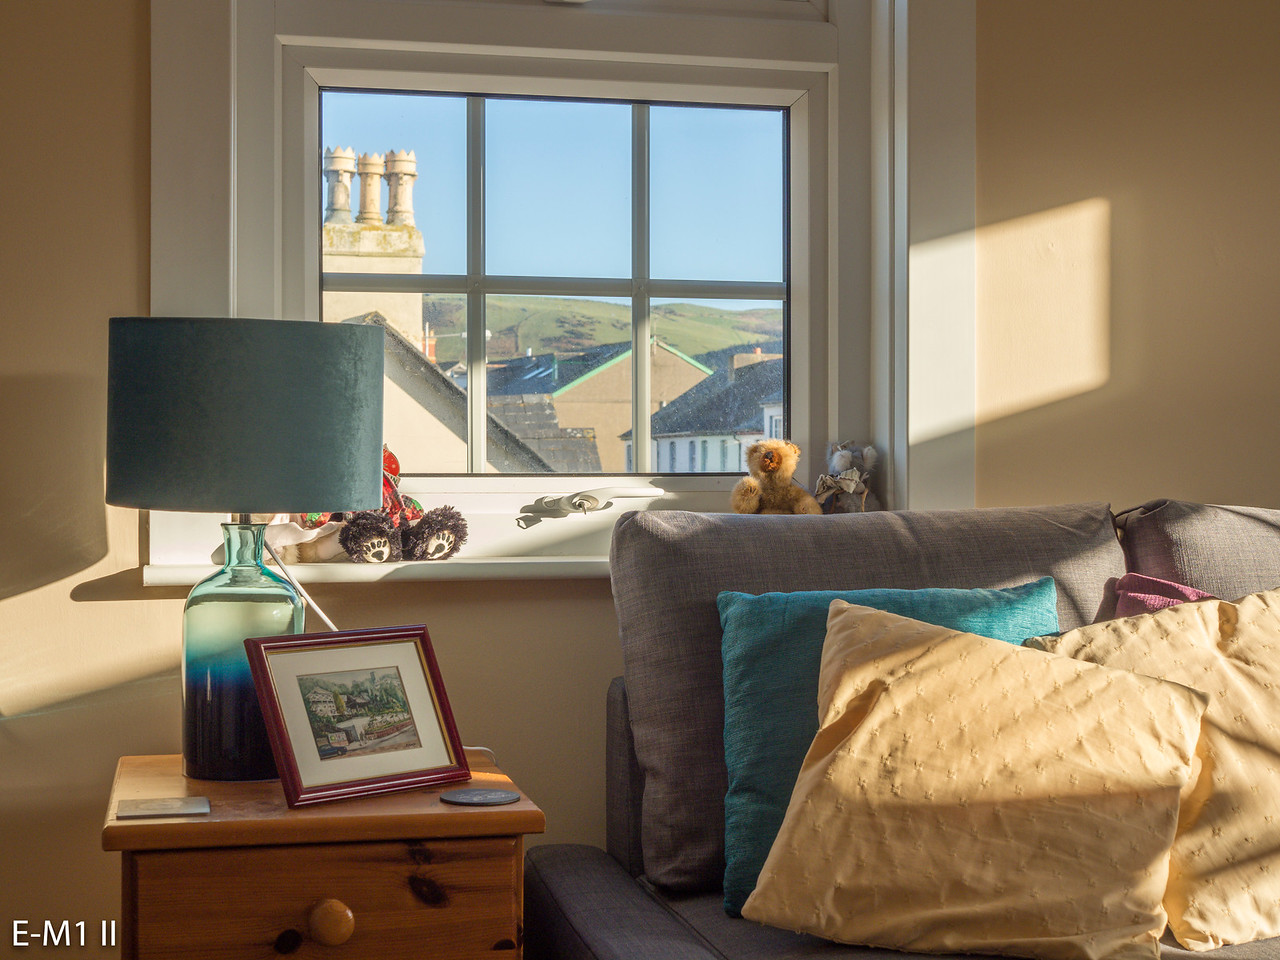
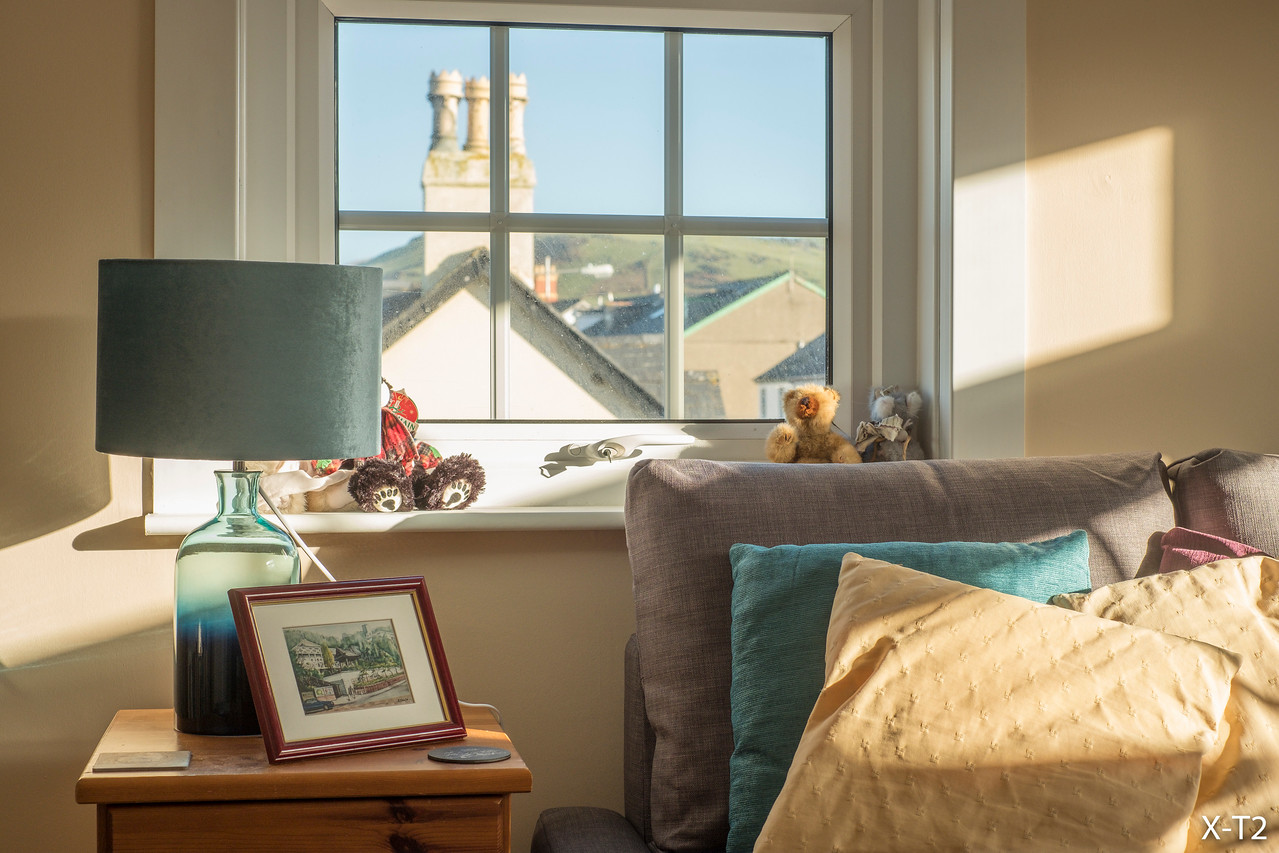
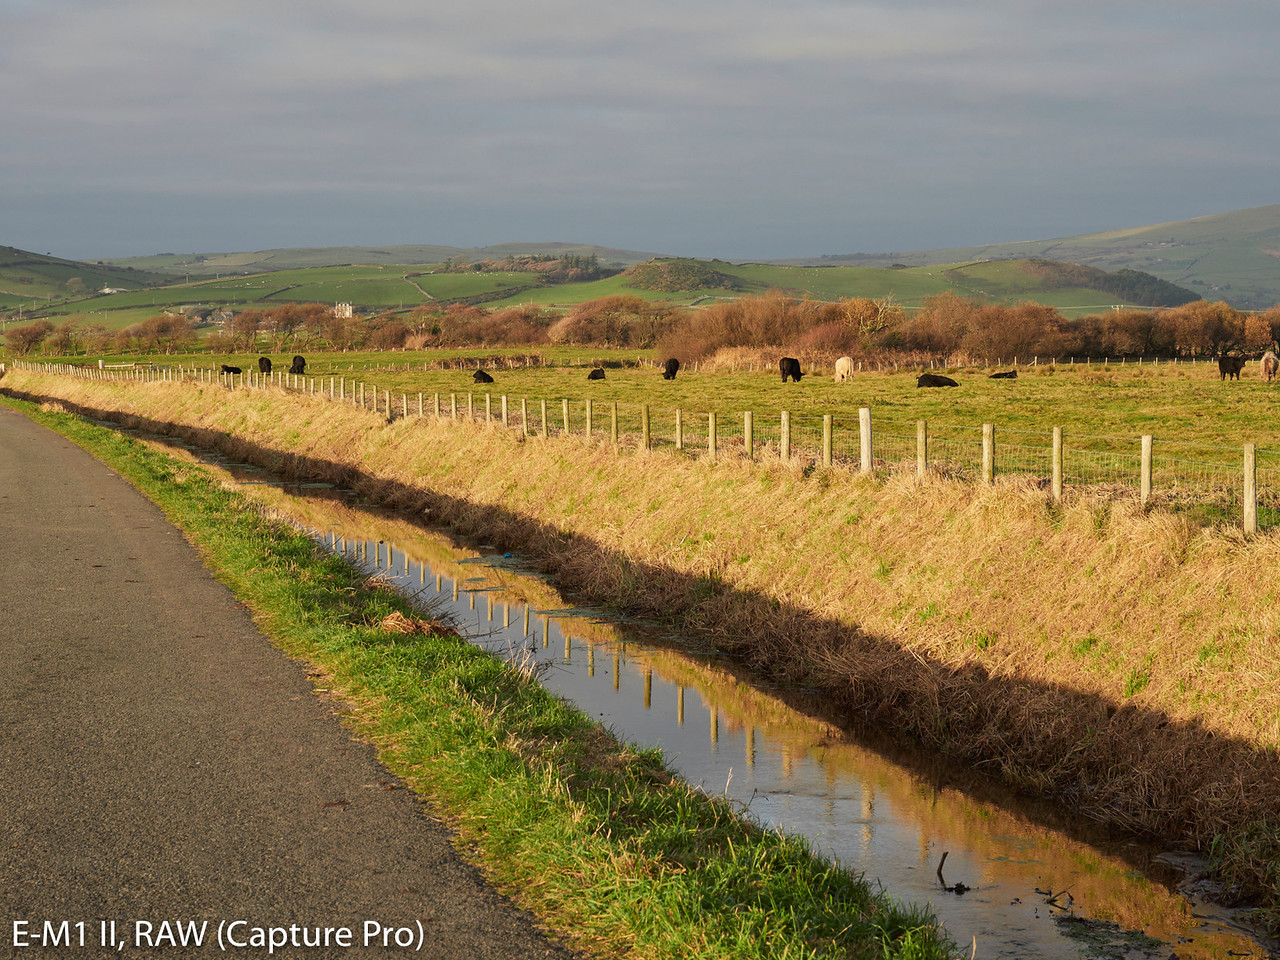
In the example below, you can see the same image post-processed with Adobe Lightroom, Capture Pro 10 and Iridient Developer. Lightroom* is the weakest software when it comes to fine details, Capture Pro gives more micro contrast while Iridient is more capable of pulling out the finest details from a scene.
For the E-M1 II files, I found that Capture Pro gave the best results while Iridient is the best option for the Fuji RAF files. Note that I post-processed each file differently to get the best quality possible with each software. Of course these results are partially influenced by the lenses I used.
*Note: the Enhance Details option in Lightroom Classic 8.2 improves details rendering with Fuji RAW files. It doesn’t make a relevant difference with the E-M1 II images however.

E-M1 II with 12-100mm Pro, X-T2 with XF 18-135mm

One small flaw that I’ve seen on many Micro Four Thirds camera is purple sensor flare. It can be particularly invasive on some models but less so on others. With the E-M1 II, I didn’t encounter any relevant examples even when performing a side-by-side comparison with the older E-M1.
Purple flare is an issue with the X-T2 such as in the example below. Note that in most cases, this kind of flare can be avoided simply by tilting the camera up or down a few millimetres.

Dynamic range and metering
During my multiple years of experience with mirrorless cameras, I’ve always found dynamic range to be a weakness of Micro Four Thirds cameras. It is easier to find noise in the shadows or have less room to recover the highlights. The progress in sensor technology, however, has reduced the gap and the E-M1 II is an excellent example of this.
In the first image below, the same exposure was used on both cameras. I then recovered details in the shadows and highlights as much as possible (-100 and +100 in Lightroom). You can notice how – surprisingly – the Olympus OM-D retains more information in the brightest areas than the X-T2.

Looking at a more extreme example such as the backlit sunset below where I used a darker exposure to better preserve the highlights, the X-T2 has less noise in the shadows but the E-M1 II – once again – saves more information in the brighter zones.


Because the E-M1 II preserves the highlights so well, I took a second shot with the Olympus camera but this time I increased the exposure by one stop (1/2000s instead of 1/4000s). Doing so allowed me to expose more for the shadows.
Then I compared the second exposure taken with the E-M1 II (1/2000s) to the first exposure taken with the X-T2 (1/4000s). Thanks to the 1 stop difference between the two images, highlight and shadow recovery was more or less equal.
This real world test shows us that there isn’t a clear winner here: I can overexpose by 1 stop with the Olympus, knowing that I will still get a great amount of detail in the highlights and render shadows better too. Conversely, I can underexpose more with the X-T2 to preserve the highlights, knowing that the shadows will still look strong. In the end, I get the same result, but with two different ways of exposing.

Additional note: although the E-M1 II retains more light around the sun, you may have noticed a more visible magenta halo around it. It is present in the X-T2 image as well but it is less noticeable. This would suggest that pushing the Olympus files too much also destroys some of the natural tone transition of the photograph. However with a quick brush adjustment in Lightroom (playing mainly with temperature, tint and shadows), you can get rid of it and obtain a more natural transition.

There is one technical note in favour of the X-T2 concerning the RAW files: they are 14-bit, and you have lossless compressed and uncompressed options. The E-M1 II uses 12-bit and only offers lossless compression.
If we try to recover an exposure by 4 stops, we can see that the X-T2 retains more detail, and has less noise and colour cast.
Both files have been post-processed so as to reduce noise as much as possible without compromising too many details (I tried this with different software programs and found similar results).


Concerning the metering system, both cameras do well with balanced and precise results most of the time when used individually. When compared side-by-side, I didn’t notice any drastic difference in behaviour. Both cameras offer up to ±5 Ev of exposure compensation and can link the spot measurement to the single AF point.
The E-M1 II has a metering system with 324 areas and Multi, Centre-Weight, Spot, Spot HI and Spot SH options (the last two over or underexpose the spot metering).
The X-T2 has a TTL 256 zone with Average, Spot, Centre-Weight and Multi. Metering can be selected with the dedicated sub-dial under the shutter speed dial.
One additional setting for the E-M1 II is the possibility to customise metering compensation in the menu (Exposure shift metering): for example if you find that the camera is over or underexposing regularly in certain conditions, you can set a ±0.3, 0.7 or 1Ev default compensation to make sure the image is exposed correctly even without using exposure compensation.
Colours, white balance and JPG settings
If we compare two straight out-of-camera RAW files, the difference between the models can be less easy to detect especially if the same generic profile is applied (for example Adobe Standard for Lightroom). Of course, colours can change depending on the software used.
For example, Capture Pro, which applies a different profile to each camera, tends to saturate the Olympus files less but gives them a richer colour palette and more contrast. Long story short, the combinations are endless but after trying three different programs, the general tendency is that the Fujifilm RAF files deliver a slightly more yellowish/greenish tint. Below is an example post-processed with Capture Pro 10, which I found gives the most interesting colours for both cameras.

If we analyse the colour profiles included with each product, it is a different story. Olympus calls them Picture Modes, while Fujifilm calls them Film Simulation Modes as a tribute to its film rolls. Usually these profiles only affect the JPG files but some RAW software programs such as Lightroom can contain replicas of these camera profiles.
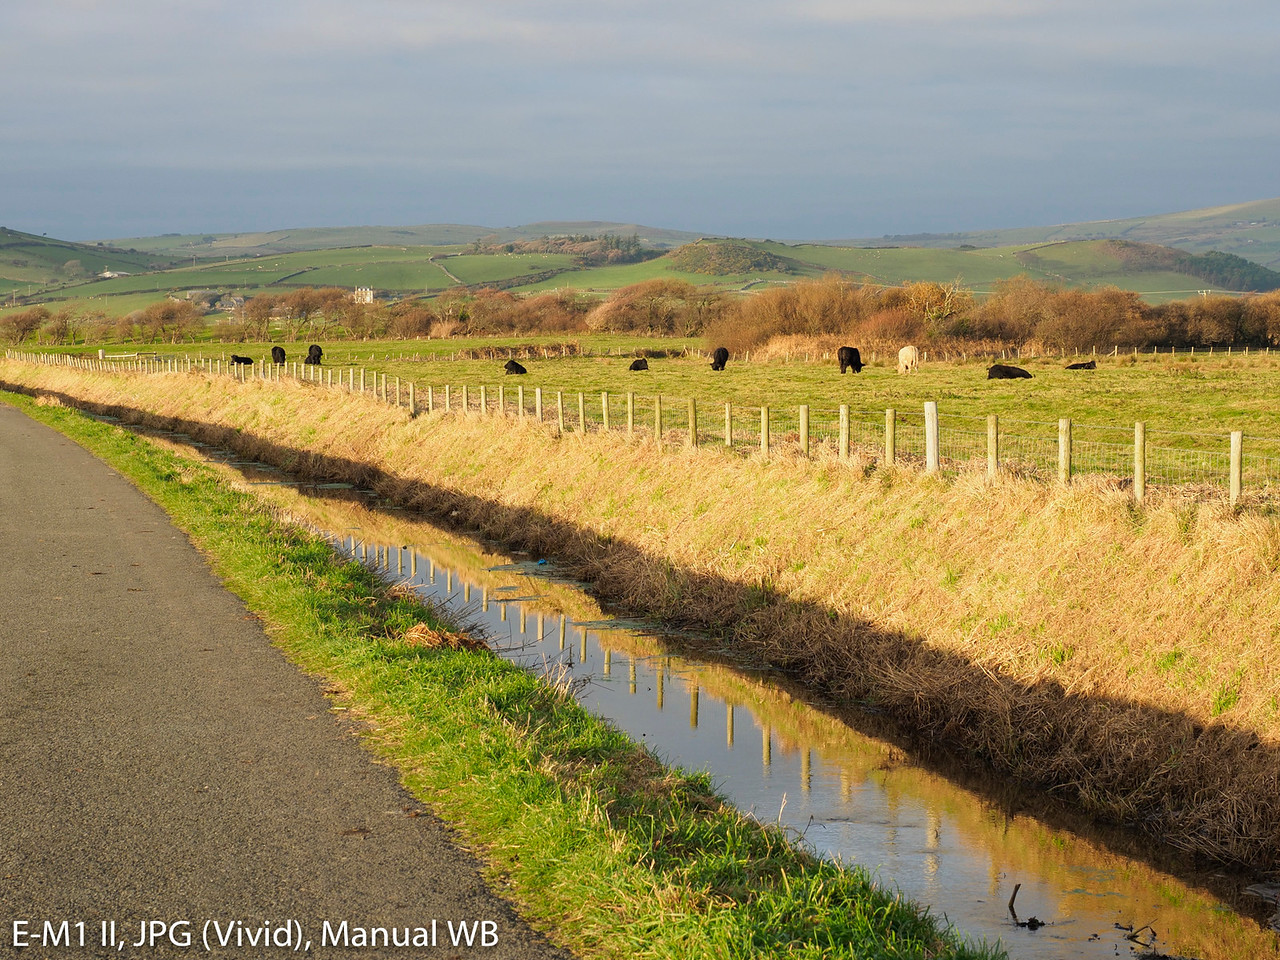
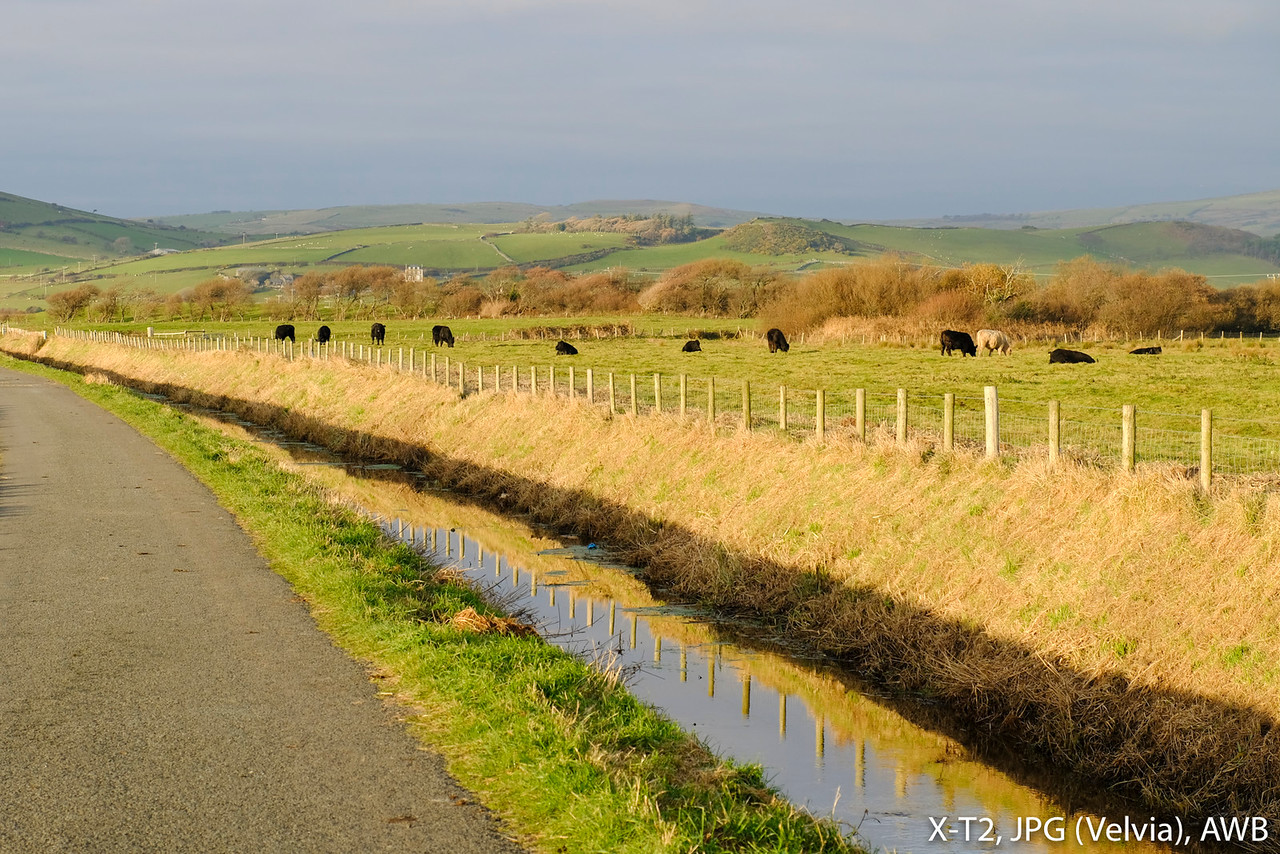
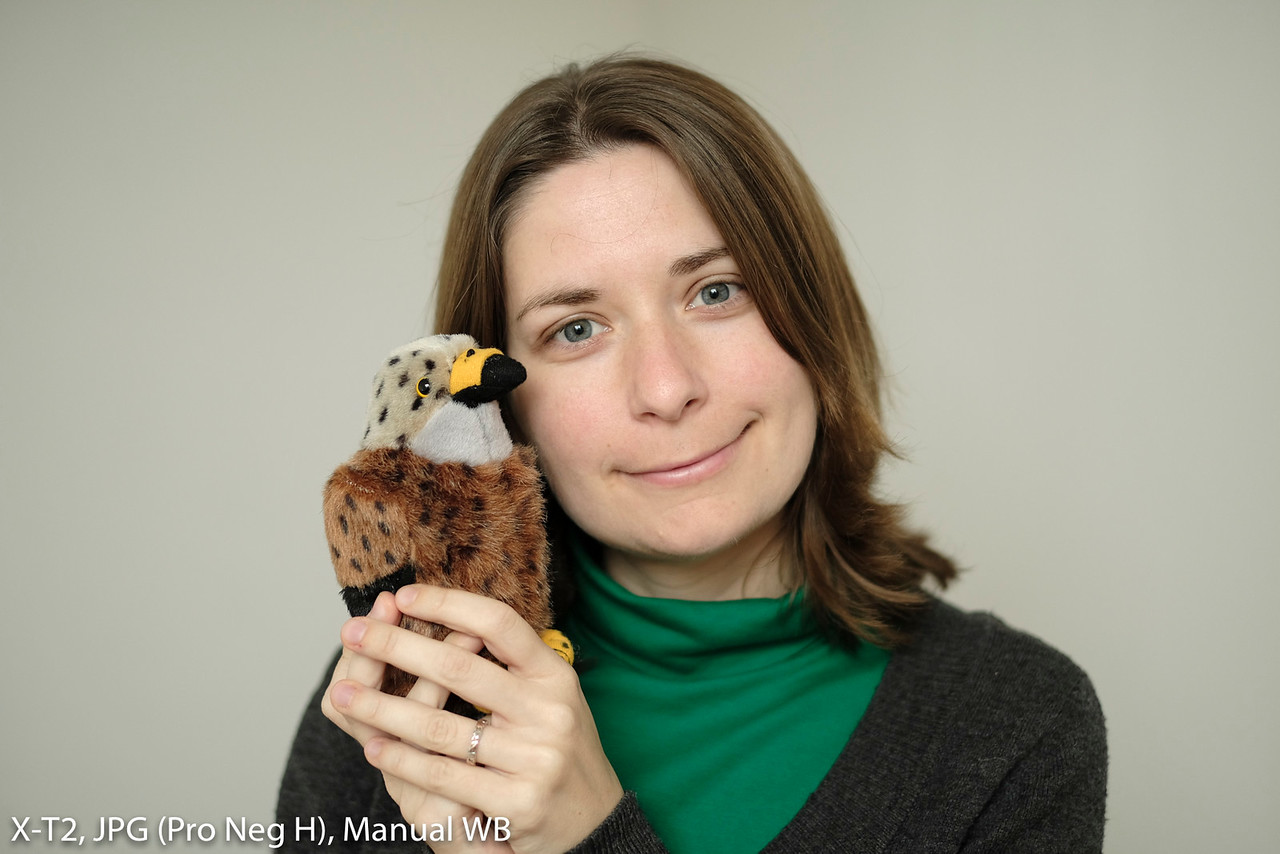
The example below is with the vivid setting (Velvia for Fujifilm) and shows one important difference between these two cameras when using manual white balance: the X-T2 definitely has at a warmer tint in comparison to the E-M1 II.

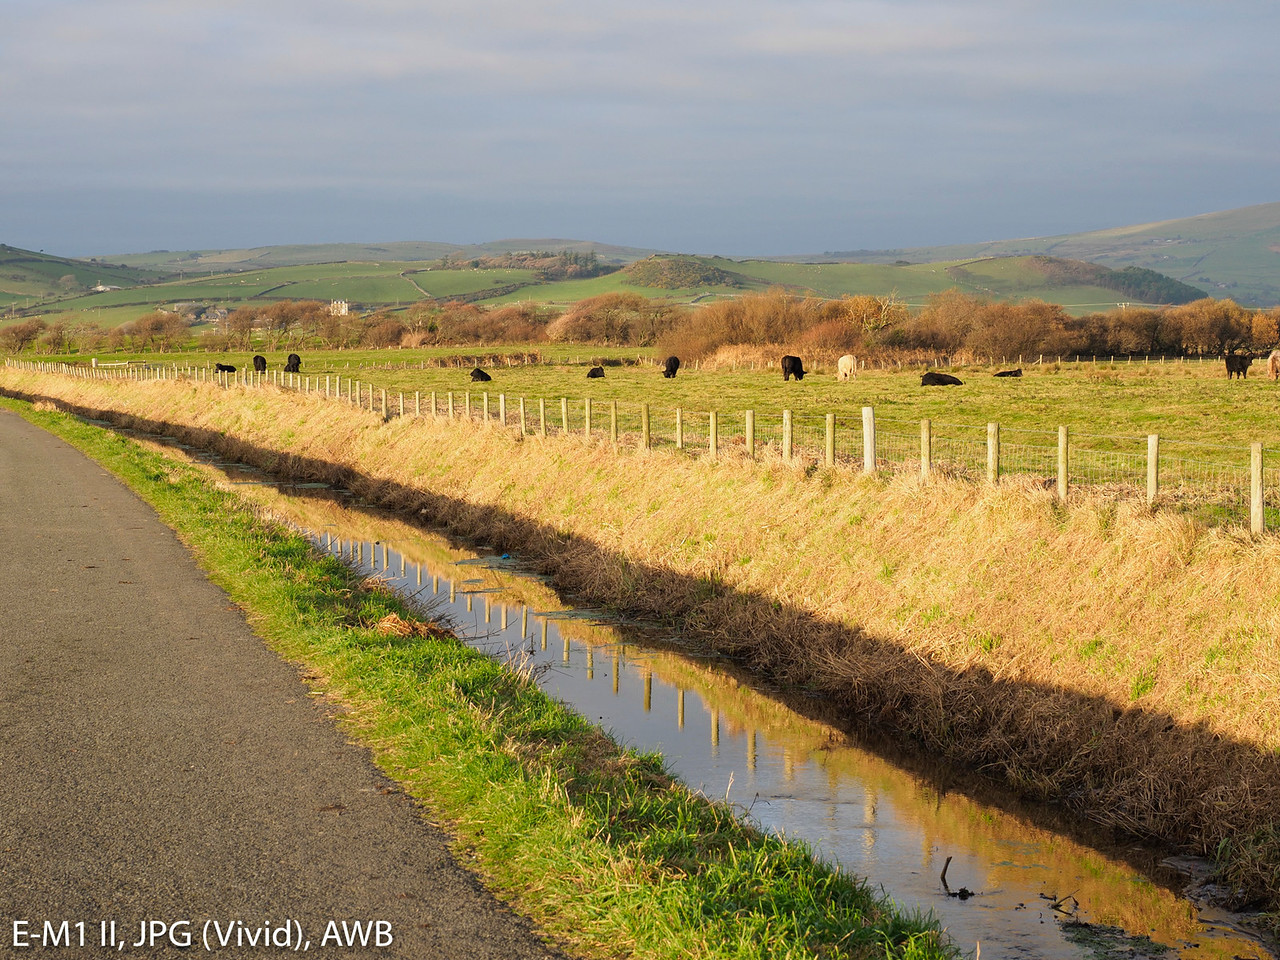
If we take a look at the auto white balance results, the E-M1 II is almost identical to the previous image. However the X-T2 has a more balanced result than before, tending slightly towards a greenish/cooler look. The warmer look we saw before has vanished.
The difference in the X-T2 colours is not only due to the different profiles but also the white balance calibration. This difference becomes even more relevant for skin tones in a neutral environment.
With AWB, we can see that the E-M1 II retains a more natural rendering while the X-T2 has a cooler tint. This is valid for both RAW files and JPGs.
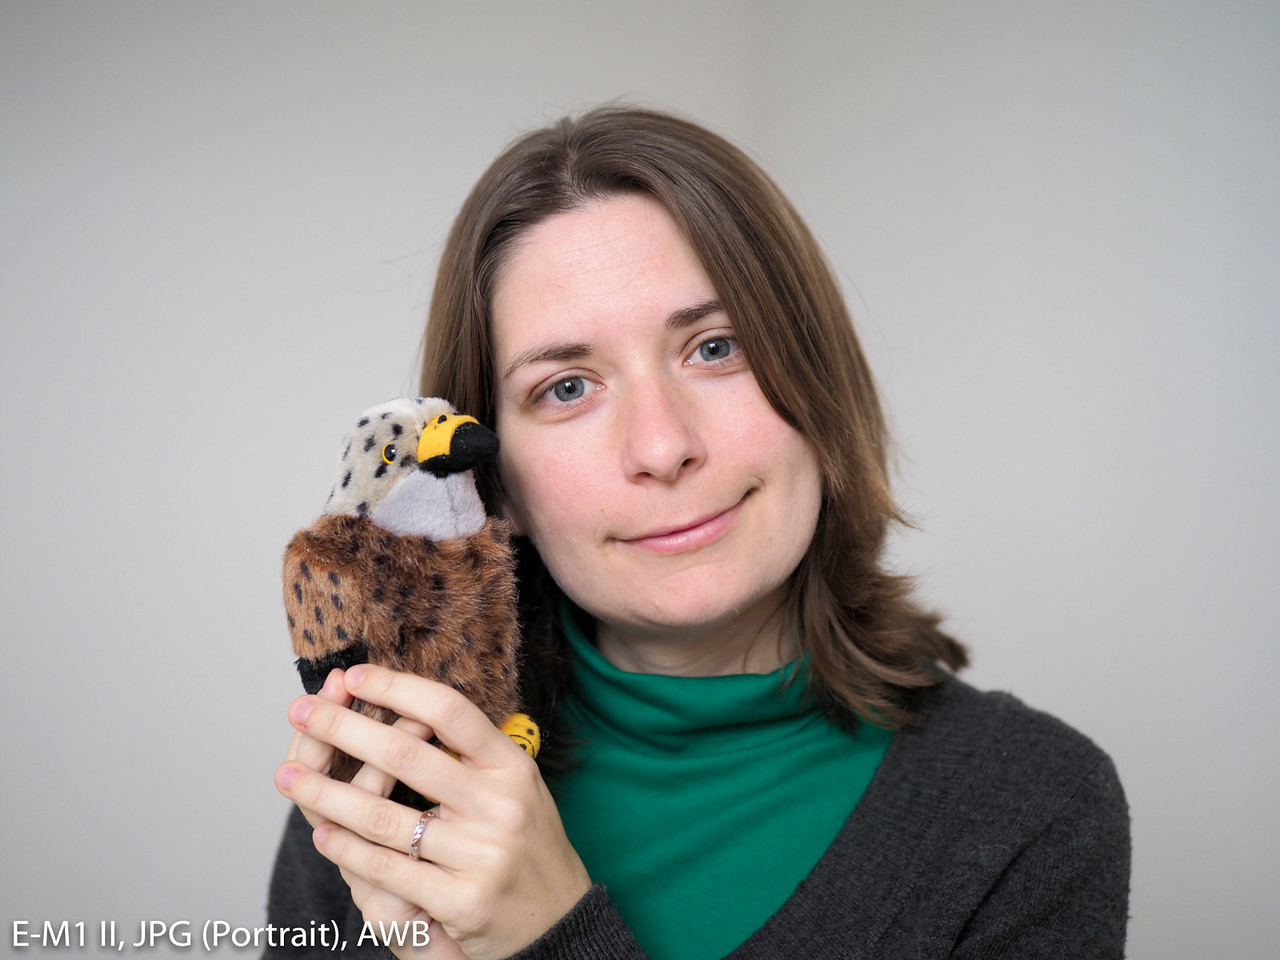
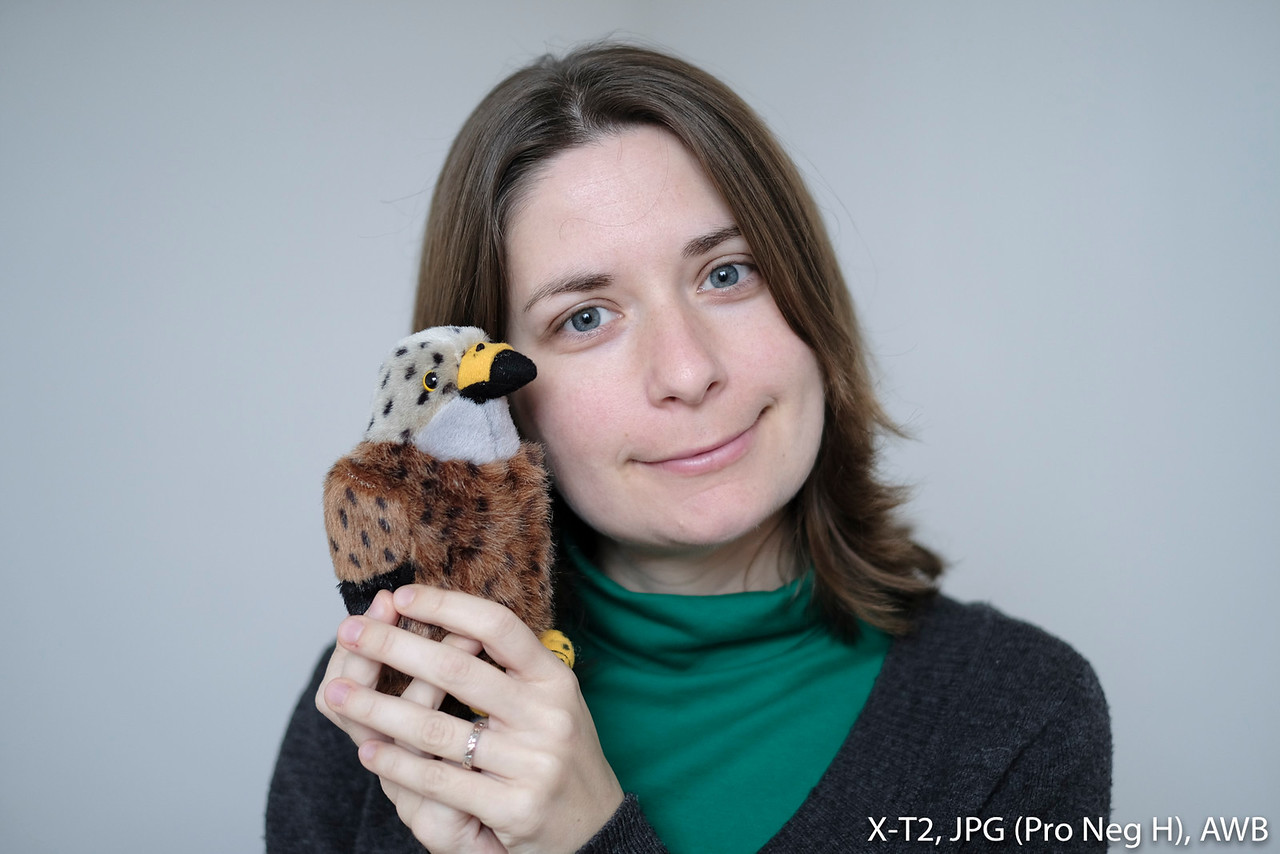
With manual white balance – here set at 6200°K – the difference is even more pronounced but this time the Fuji image develops a green/yellow tint.
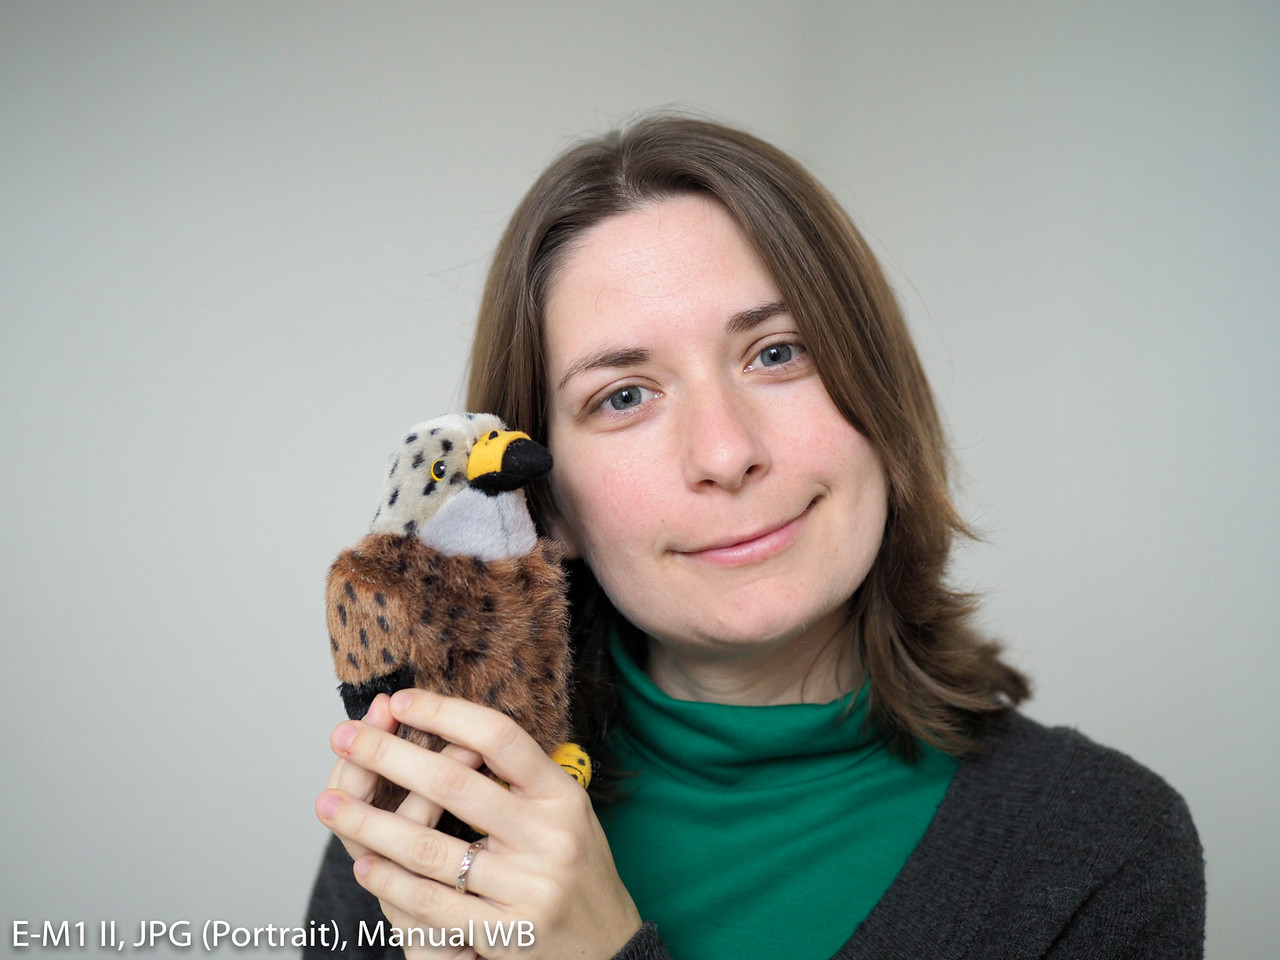

Now of course this doesn’t mean that you can’t obtain good natural colours for portraits with the X-T2. It is just a matter of tweaking the white balance shift on the Fuji camera to get rid of that colour dominance. Again, with the RAW files, you have much more freedom in post.

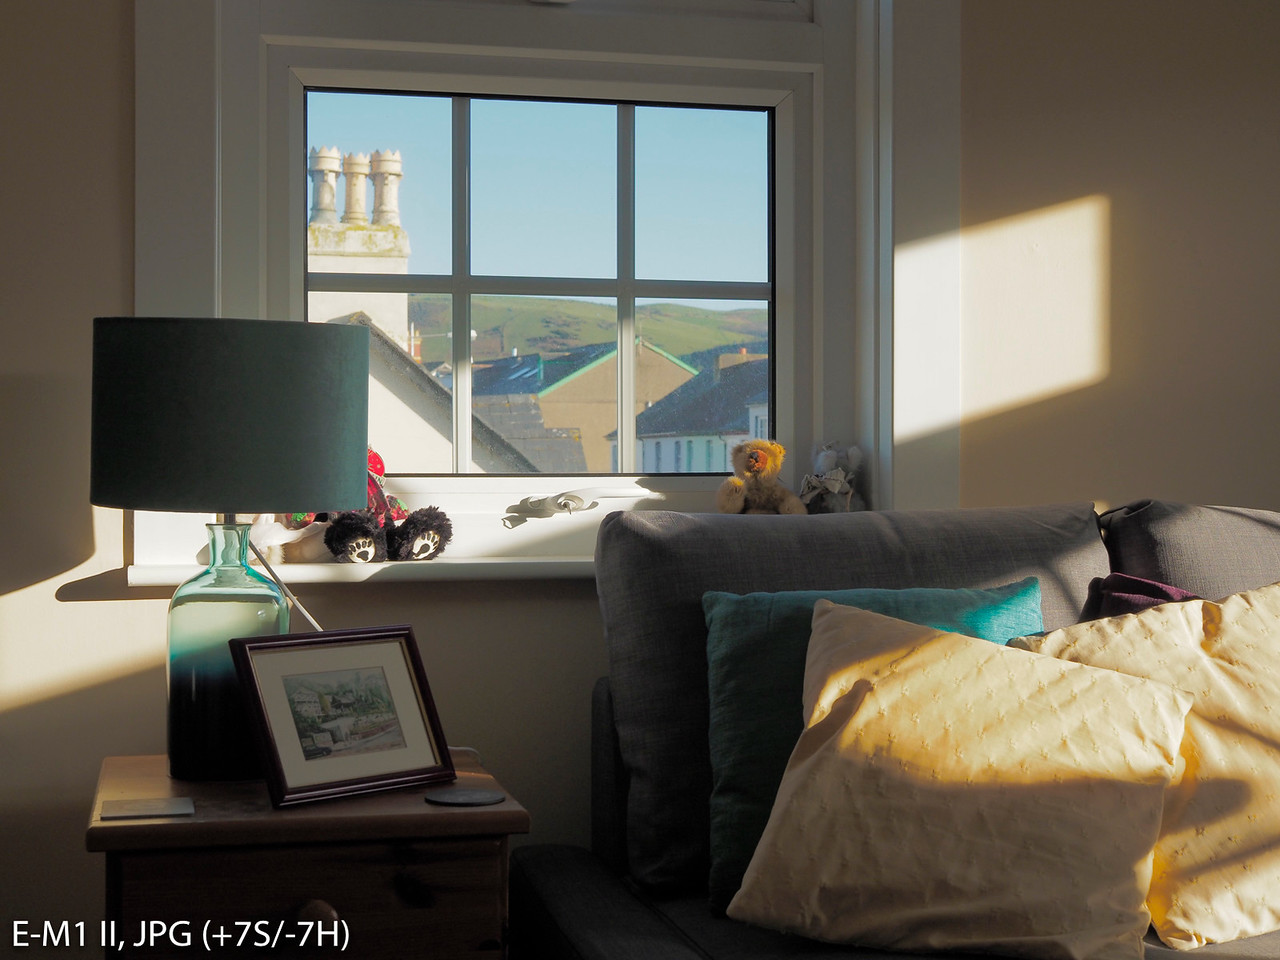
The E-M1 II has settings to customise the WB as well. You can also find options for contrast, saturation, sharpness, curves, highlights and shadows. The X-T2 has highlights/shadows, contrast, saturation and sharpness settings.
If we try to optimise these settings to give more dynamic range to the JPG file, the E-M1 II has an advantage because it has more steps to choose from for each setting. However if you push the values too much, you can wind up with less natural transitions between the lighter and darker areas (check out the yellow cushions at the bottom right especially).
Finally, both cameras include good monochrome profiles. I won’t dig too much into the black and white capabilities as the results depend on the light conditions, low and high ISO settings, and so on. What I can say is that both cameras have different options concerning the tones and filters. With the E-M1 II and the proprietary Olympus Viewer 3 software, you can also apply the same monochrome profile found on the Pen F.

ISO performance
The E-M1 II has a native ISO range of 200 to 25600. It also has an extended option (pull) that goes to 64 ISO. The X-T2 has a 200-12800 default range with Pull 100, 125, 160, Push 25600 and 51200 extended values. Both cameras can record any of these sensitivities in RAW or JPG.
Micro Four Thirds cameras are usually weaker at high ISOs in comparison to larger sensors. This is true in the case of the E-M1 II and the X-T2 as well, although it is only at 6400 and above that we really start to notice a relevant difference. The noise in the Olympus image becomes more invasive while it remains finer and more pleasant looking on the X-T2.


The advantage becomes clear at 25600. Note that the X-T2 can also go 1 step higher (51200) but with the RAW file, the image remains underexposed by 1 stop (it is boosted for the JPG).

For JPG files, both cameras have noise reduction. If set to the highest values, both can wash out the details too much, with the Fujifilm actually being the worst offender. I usually keep it to Off or Low on the E-M1 II and between -1 and 0 on the Fuji.

Check the price of the Fujifilm X-T2 on
Amazon | Amazon UK | B&H Photo | eBay
Check price of the Olympus OM-D E-M1 II on
Amazon | Amazon UK | eBay | B&H Photo
Second-hand Olympus cameras on
Second-hand Fujifilm cameras on