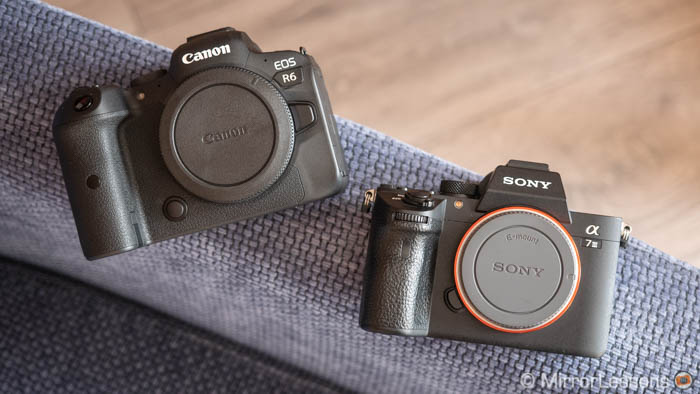
After years of slow evolution, Canon’s full frame mirrorless system has come to fruition with the release of two very interesting cameras. One of them, the EOS R6, challenges the likes of the Sony A7 III, Nikon Z6 II and Panasonic S5 in the prosumer segment.
It’s difficult not to compare this new camera to the A7 III given its popularity. Despite the age and price difference, the EOS R6 is a direct competitor for the E-mount camera and its future successor. So let’s see what these two products have to offer.
Editor’s note: this article has been updated with our real word tests and comparisons.
Ethics statement: the following is based on our real world experience with the EOS R6 and A7 III, both of which we own. We were not asked to write anything about these products, nor were we provided with any kind of compensation. Within the article, there are affiliate links. If you buy something after clicking one of these links, we will receive a small commission. To know more about our ethics, you can visit our full disclosure page. Thank you!
TABLE OF CONTENTS
Main Specs
—
1. Sensor and image quality
2. Autofocus
3. Continuous shooting speed
4. Image stabilisation
5. Video
6. Design
7. Viewfinder and LCD
8. Battery life
9. Lenses
10. Price
—
Extra feedback
Video Review
Conclusion
Main Specs
EOS R6
- Sensor: 20.1MP 35mm format CMOS
- Lens system: RF-mount
- Weatherproof: Yes
- Internal Stabilisation: Yes (5-axis)
- Autofocus: Dual Pixel CMOS AF with 6,072 points
- Continuous shooting: 12fps or 20fps with e-shutter
- ISO Sensitivity: 100 – 102400 ISO (pull 50, push up to 204800)
- Shutter Speeds: 1/8000s to 30s, Bulb
- Viewfinder: 0.5-in OLED with 3,690k dots, 23mm eye point, 0.76x magnification
- Rear monitor: Multi-angle 3.0″ LCD (1.62M dots) with touch sensitivity
- Movie recording: 4K up to 60fps and 340Mbps, Full HD up to 120fps, 10-bit C-Log and HDR PQ
- Built-in Flash: No
- Extra Features: WiFi, Bluetooth, Bracketing, Tethering, Time-lapse, Dual SD slots
- Dimensions: 138.4 x 97.5 x 88.4mm
- Weight: 680g (including battery and memory card)
- Firmware version: 1.2.0
- Release: 2020
A7 III
- Sensor: 24.2MP 35mm format BSI Exmor CMOS
- Lens system: E-mount
- Weatherproof: Yes
- Internal Stabilisation: Yes (5-axis)
- Autofocus: Hybrid with 693 phase and 425 contrast points
- Continuous shooting: 3fps to 10fps
- ISO Sensitivity: 100 – 51200 ISO (pull 50, push up to 204800)
- Shutter Speeds: 1/8000s to 30s, Bulb
- Viewfinder: 0.5in OLED with 2,360k dots, 23mm eye point, 0.78x magnification
- Rear monitor: Tilting 3.0″ LCD (0.92k dots) with touch sensitivity
- Movie recording: 4K up to 30fps and 100Mbps, Full HD up to 120fps, S-Log and HLG
- Built-in Flash: No
- Extra Features: WiFi, Bluetooth, Bracketing, Tethering, FTP Transfer, Dual SD slots
- Dimensions: 126.9 x 95.6 x 73.7mm
- Weight: 650g (including battery and memory card)
- Firmware version: 3.10
- Release: 2018
1. Sensor and image quality
Both cameras use a full frame (35mm format) sensor. The EOS R6 has 20.1MP, whereas the A7 III has 24.2MP. Both cameras have a low pass filter to reduce aliasing and moiré.
Resolution and sharpness
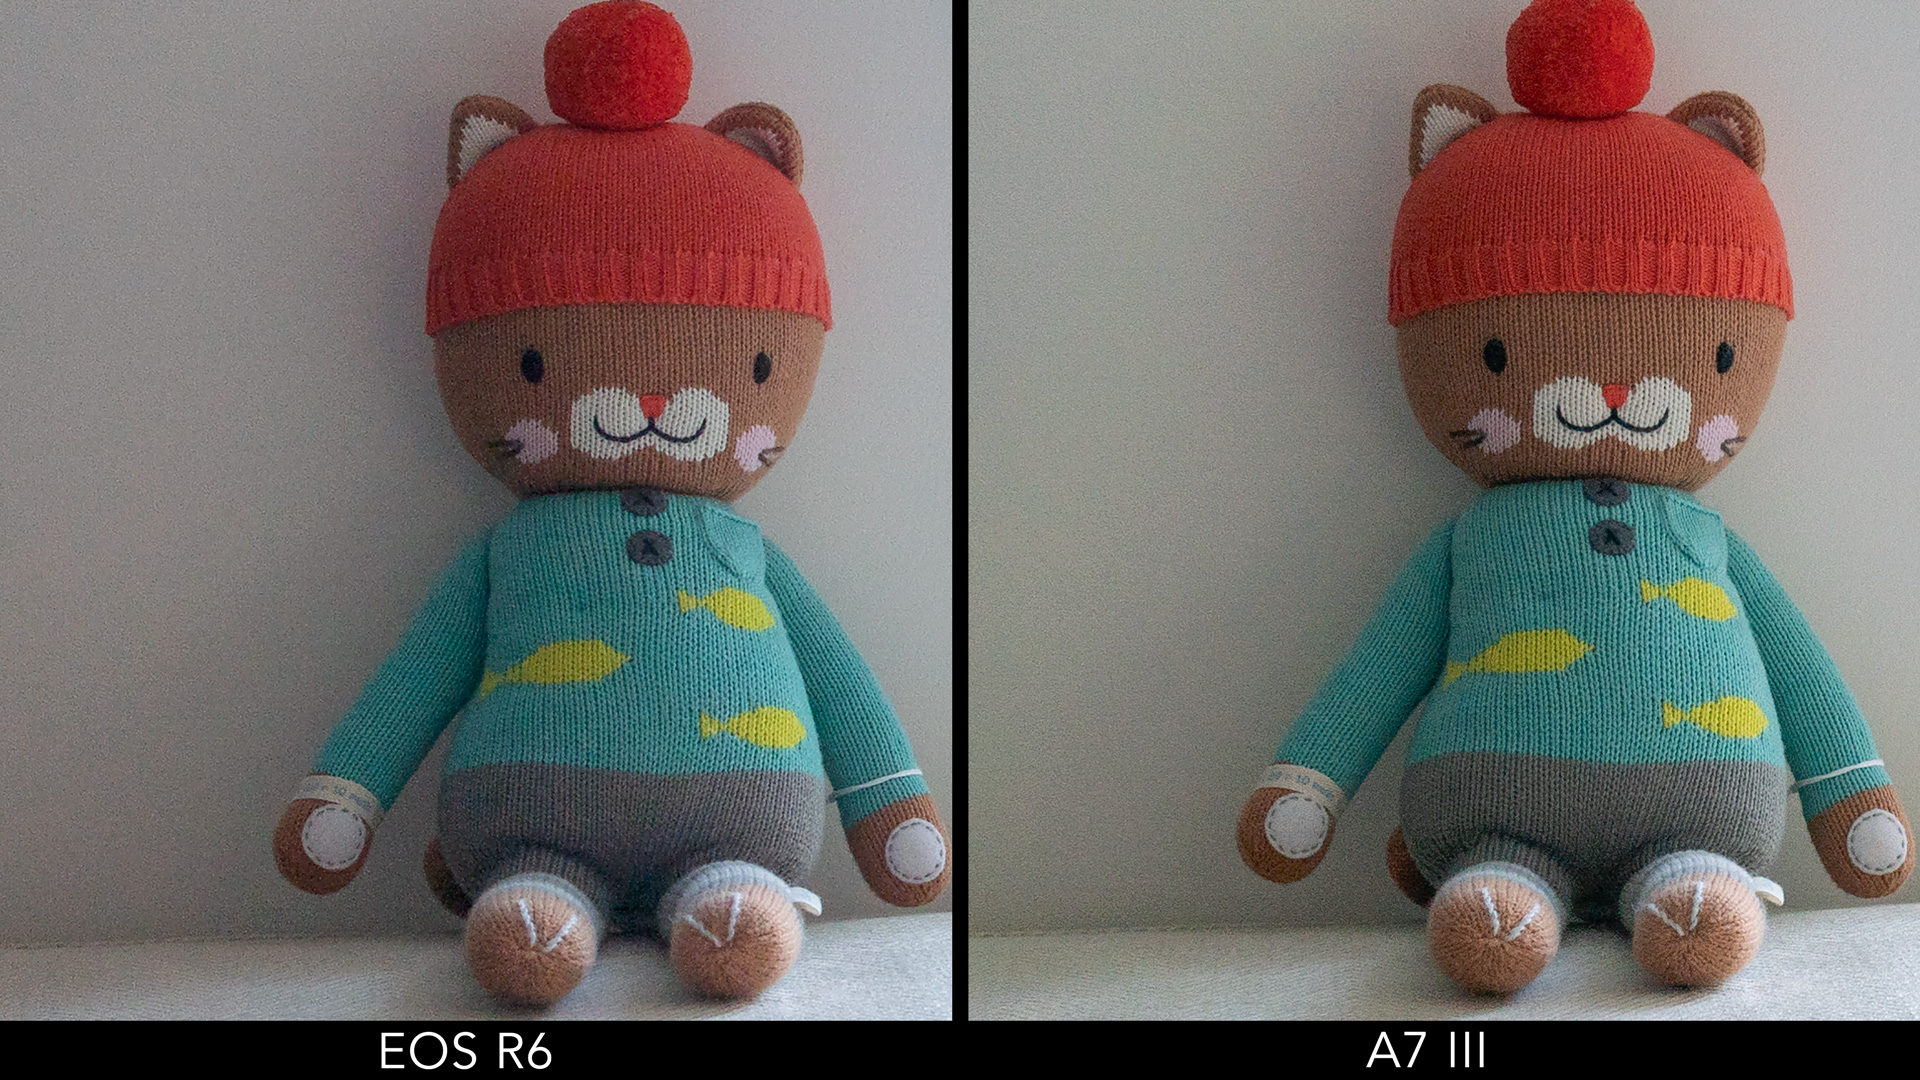
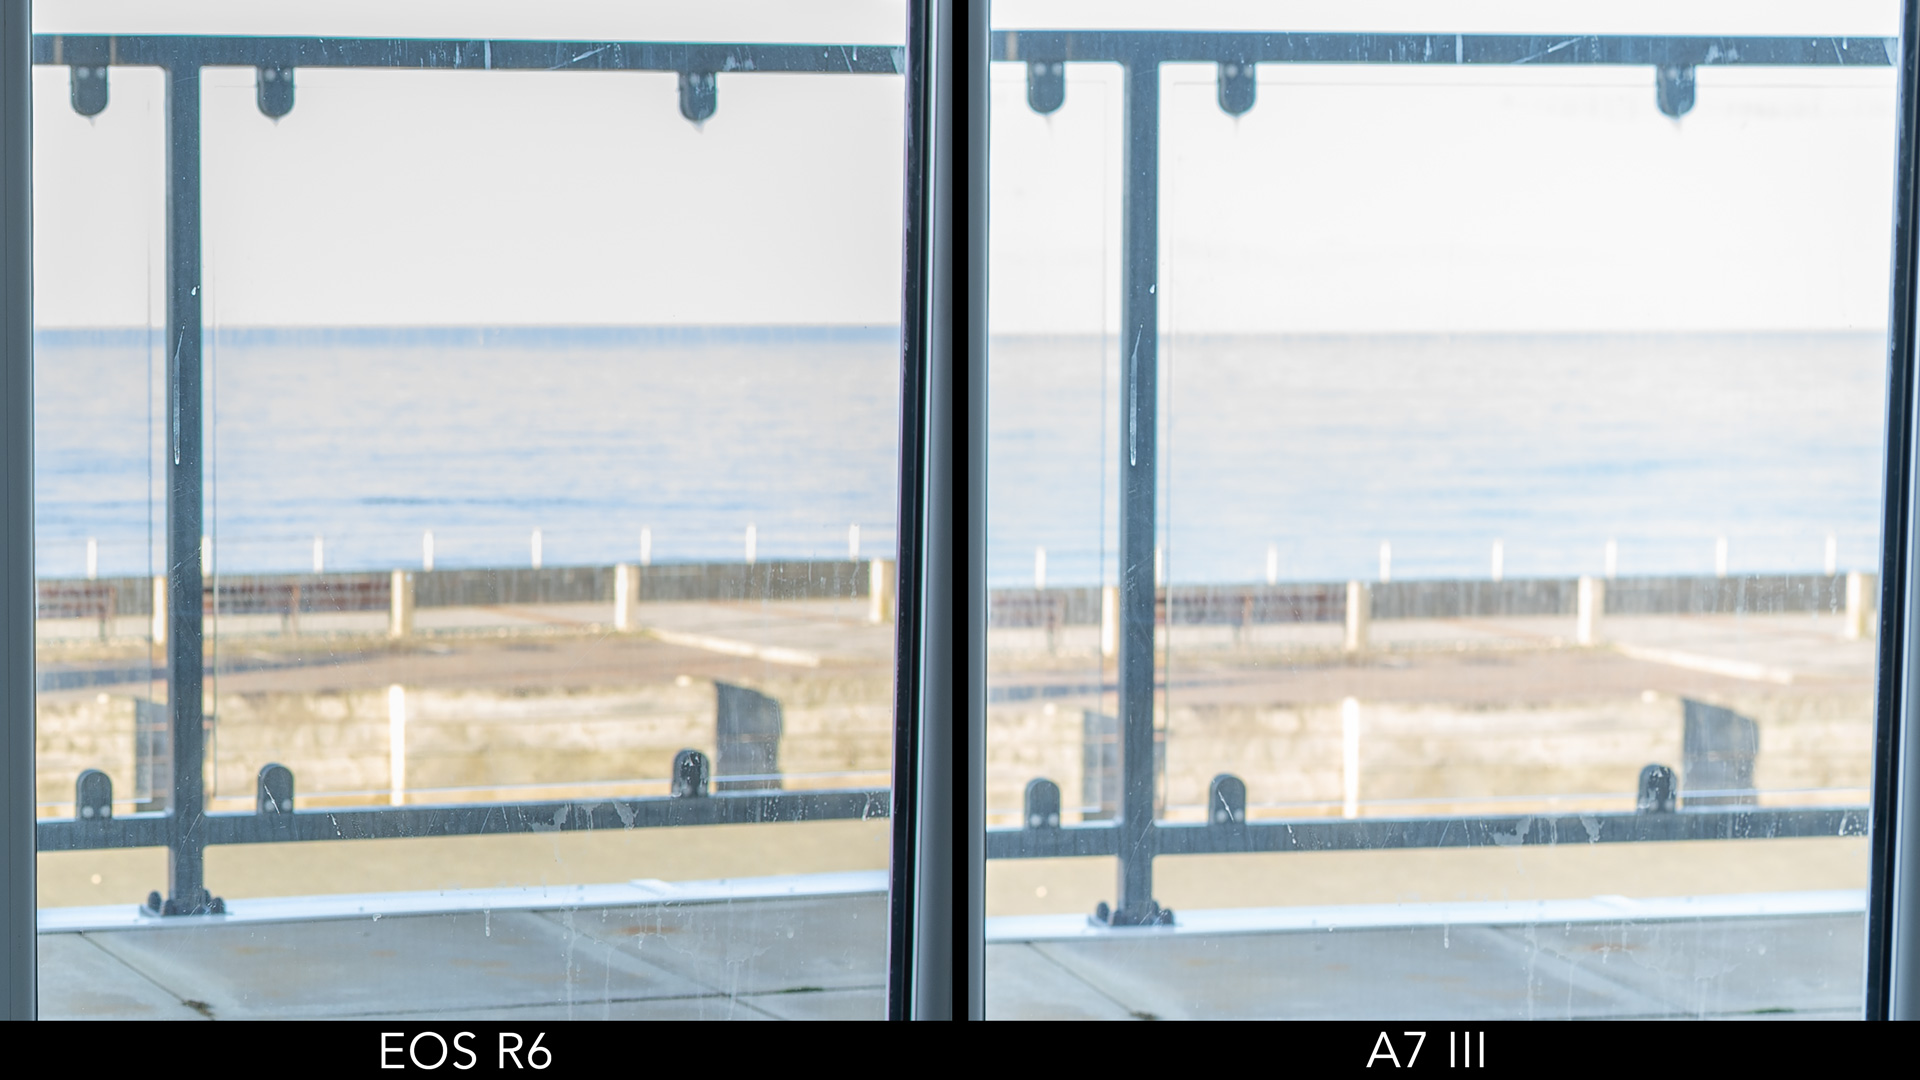
24MP has been the standard of prosumer full frame cameras for some time now, so you may find the 20MP of the R6 a bit disappointing. We’re talking about 20% less resolution so the difference is not as big as one may think. Below you can see how close you get when the following image is viewed at 100%.

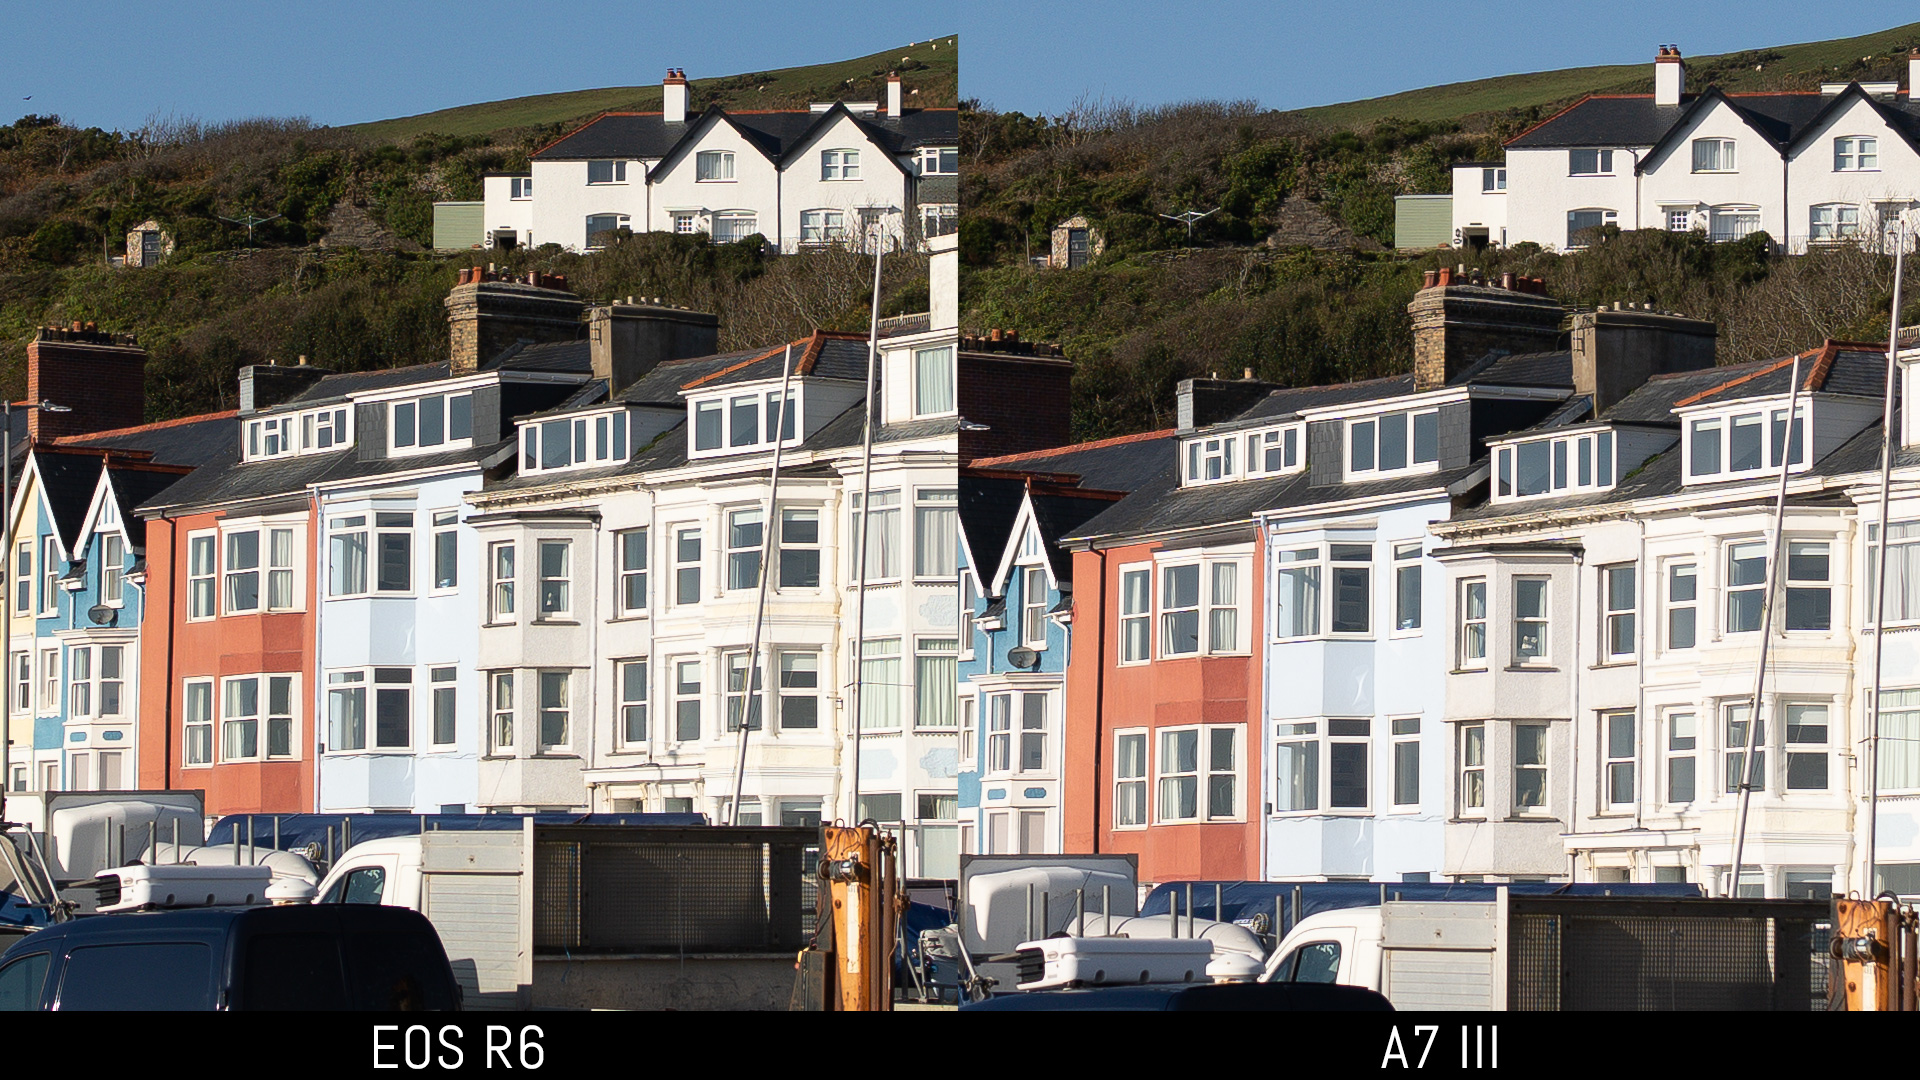
From RAW (+50 sharpness, +50 Detail on Lightroom Classic)
You can increase the sharpness of the out-of-camera JPGs. The Canon offers three settings (sharpness strength, sharpness fineness and sharpness threshold) but the single setting found on the A7 III is enough to get crisper details. (Note: for convenience, I’ve conformed the two images to the same size.)
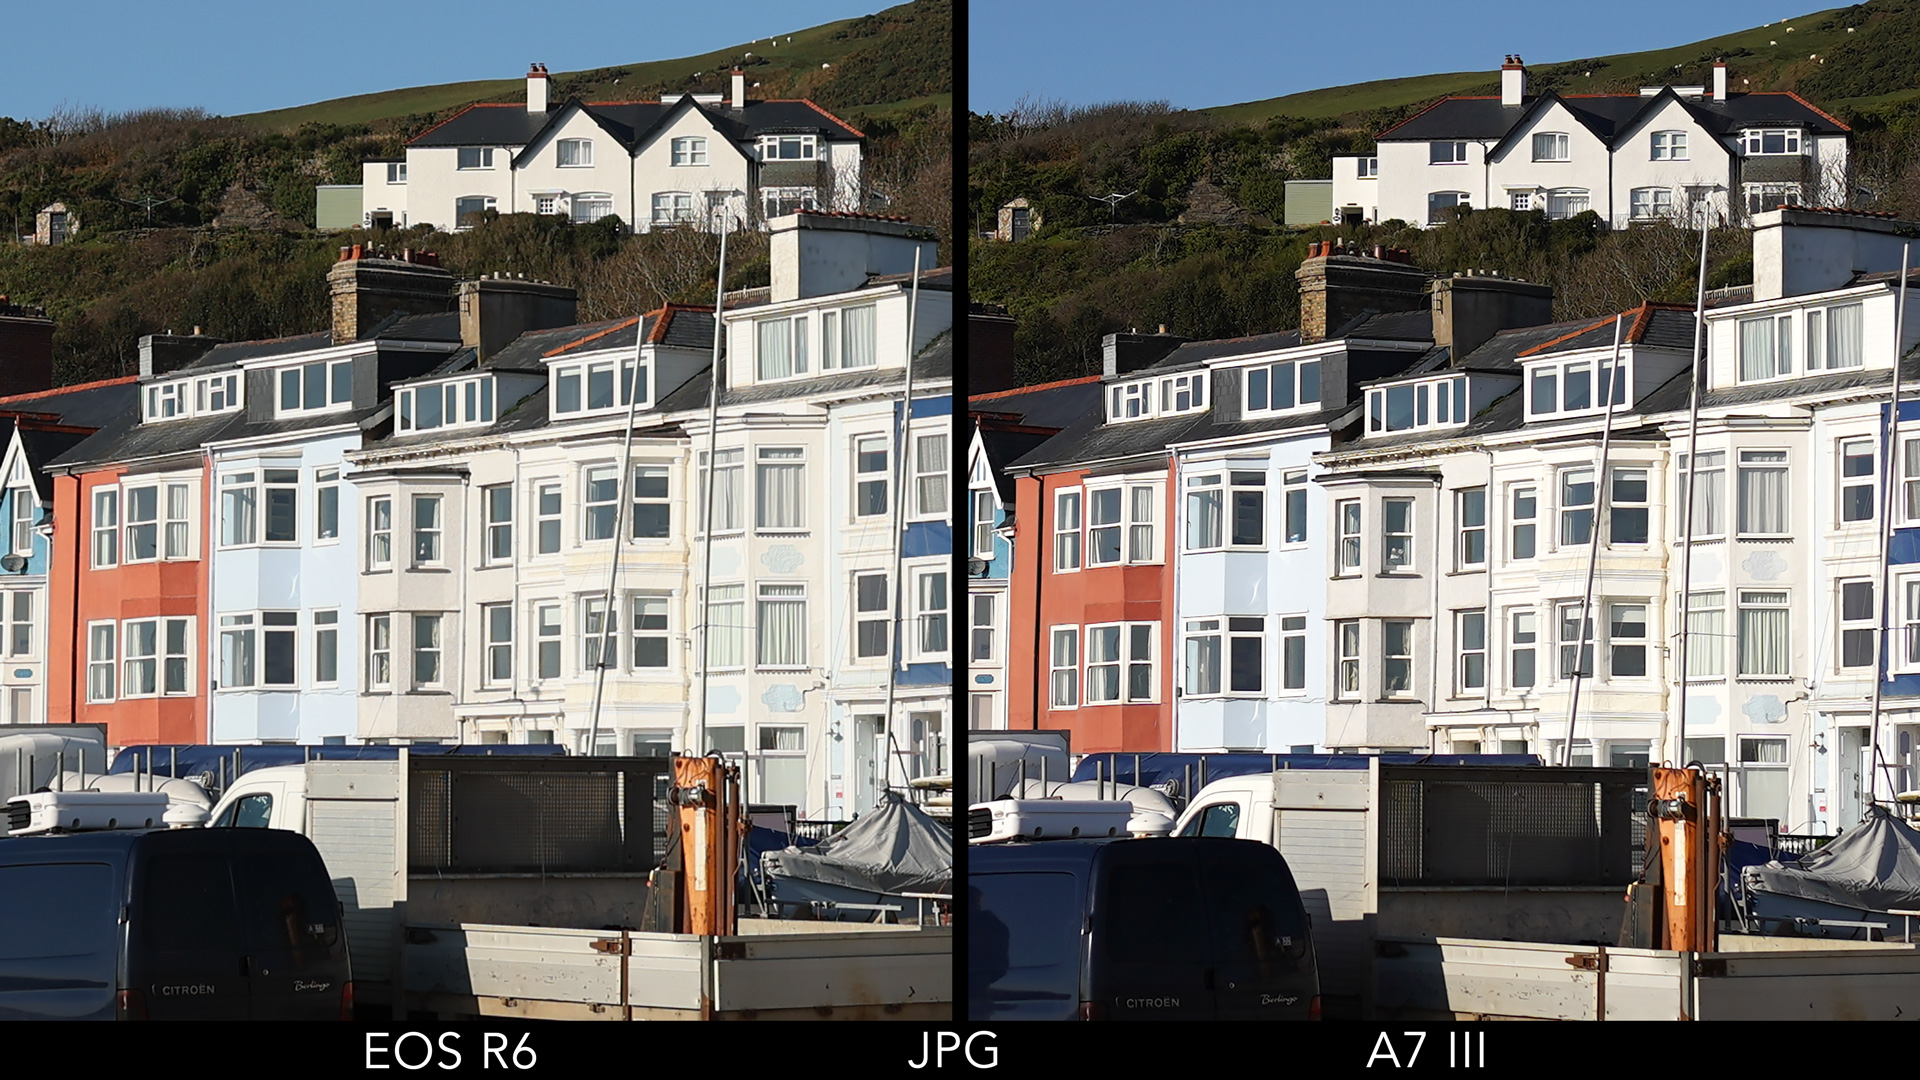
A7 III: sharpness 0
R6: sharpness strength 4, sharpness fineness 2 and sharpness threshold 3
The A7 III already looks sharper with the default settings whereas it’s difficult to play with the parameters on the R6 without making the image look over-sharpened and less realistic.

A7 III: sharpness +2
R6: sharpness strength 6, sharpness fineness 3 and sharpness threshold 3
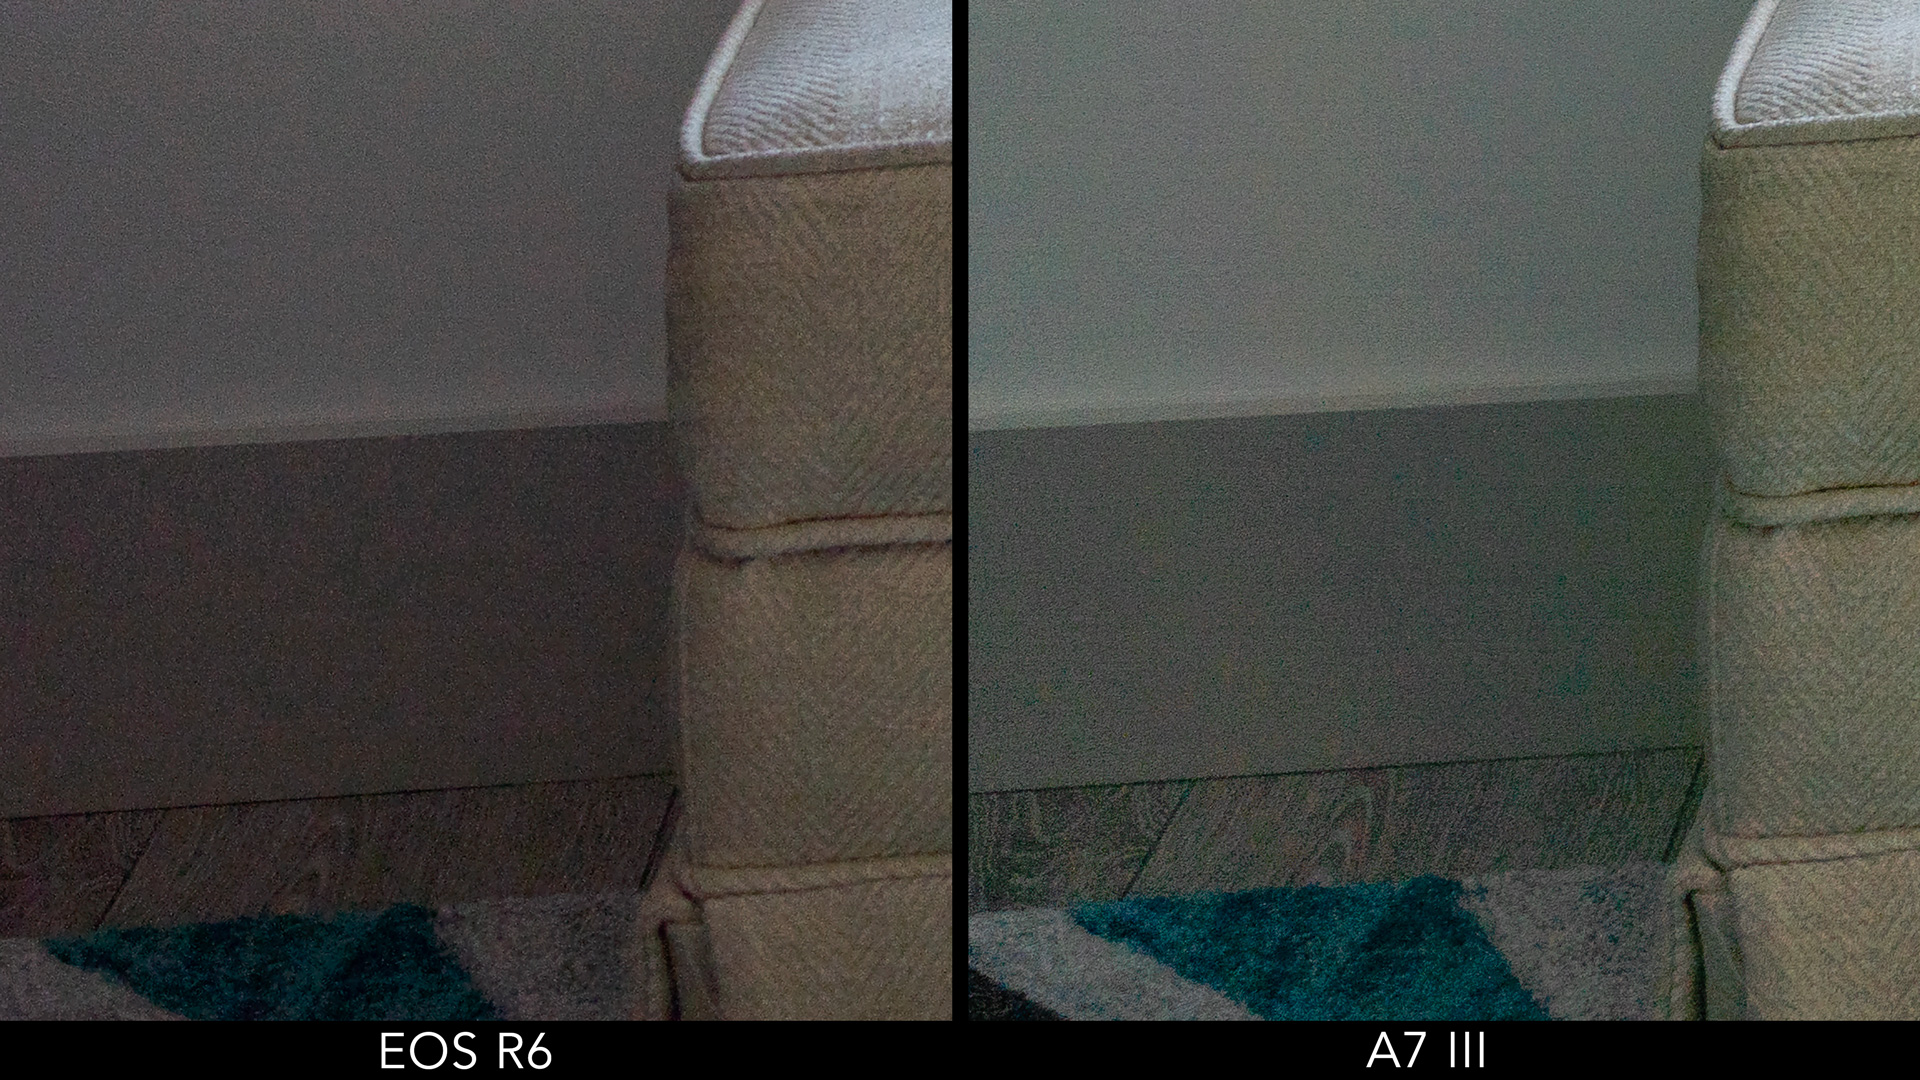
Dynamic range
The sensor structure is different: the Sony chip is a BSI type (back-illuminated) which collects light more efficiently than the traditional structure.
This should, on paper, give an advantage to the A7 III in terms of dynamic range and high sensitivities. However the Canon sensor is more recent and as you can see below, the results are close.
Here is how the photos taken with each model look after a 4 stop exposure recovery in post production. The amount of noise is similar but the Sony retains sharper details and is a bit brighter.
If we look at the darker areas of the photo (in this case the bottom corner), they both show some colour artefacts.
In our second example, we attempt to recover the highlights. Both cameras preserve a similar amount of details, with the R6 having the edge by a hair’s breadth.
If you are interested in the out-of-camera JPGs, the R6 has more settings to control dynamic range:
- Highlight Tone Priority protects more details in the bright areas (the minimum ISO value becomes 200)
- Auto Lighting Optimiser boost the shadows but it is less efficient than the DR Optimiser setting found on the A7 III

Another tool available on the EOS R6 is the HDR PQ format which saves 10-bit HEIF files (JPG is 8-bit). In my tests, I found it to be effective at retaining more highlights (with the Highlight Tone Priority setting enabled).
However not many software are compatible with this new format, including Lightroom and Photoshop (they can open HDR photos from an iPhone so it’s probably just a matter of widening the compatibility of the various versions).
The workaround is to either use the HEIF to JPG conversion built-in in camera (but there is no batch processing) or the Canon Digital Professional 4 software. In both cases, there is a loss of saturation when converting the files. I guess we’re not quite at the point where HEIF will become the new JPG.
ISO sensitivity
The R6 has a normal sensitivity range of 100 to 102400 ISO. There is a Low mode (ISO 50 equivalent) and one High value of 204800 ISO.
The A7 III ISO range goes from 100 to 51200 ISO. A low ISO 50 value is available too, and the maximum level with the extended setting is 204800 ISO.
The first thing I noticed while doing my tests is that there is a difference in brightness when using the same exposure settings with the two camera. The Canon image is approximately 1/2 a stop darker than the Sony.


To make the side-by-side images easier to look at, I tried to even out the exposure as much as possible.
The results are very similar up to 6400 ISO, at which point the R6 shows a bit less noise than the A7 III.

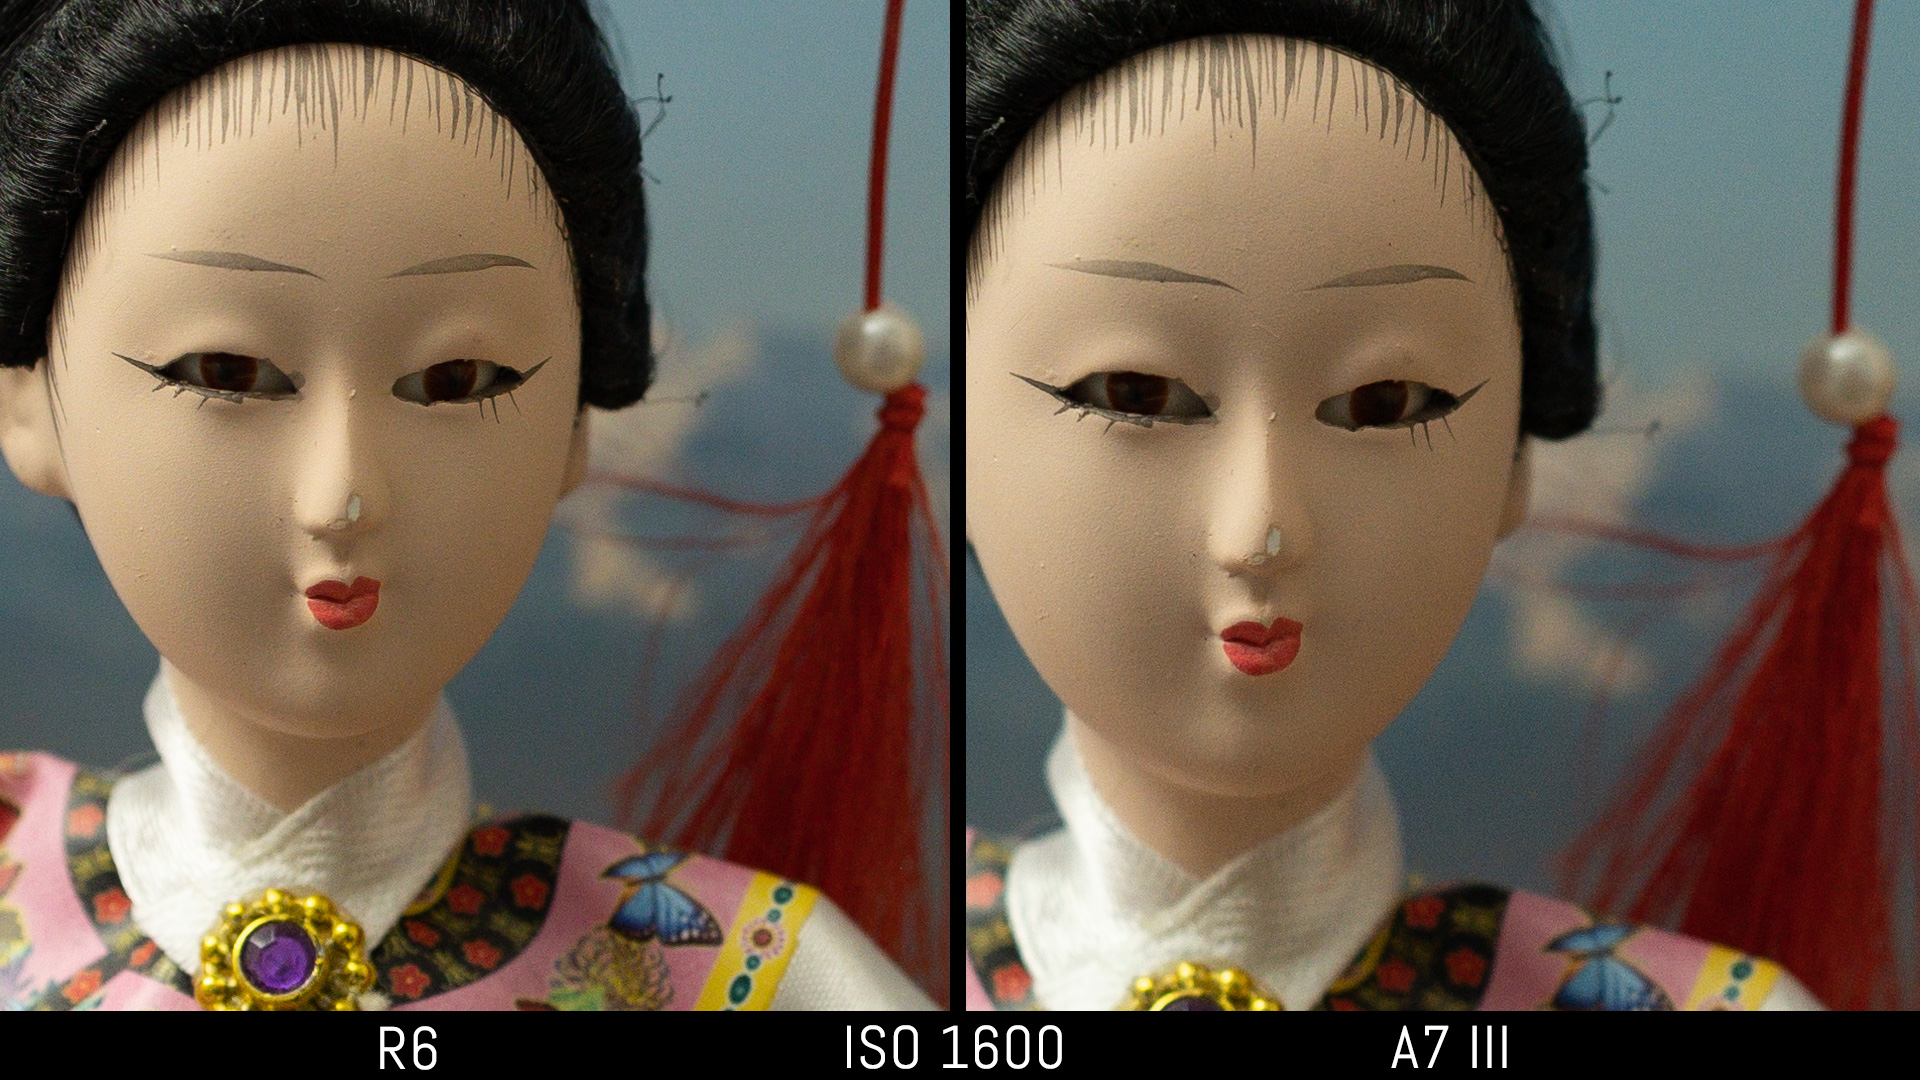
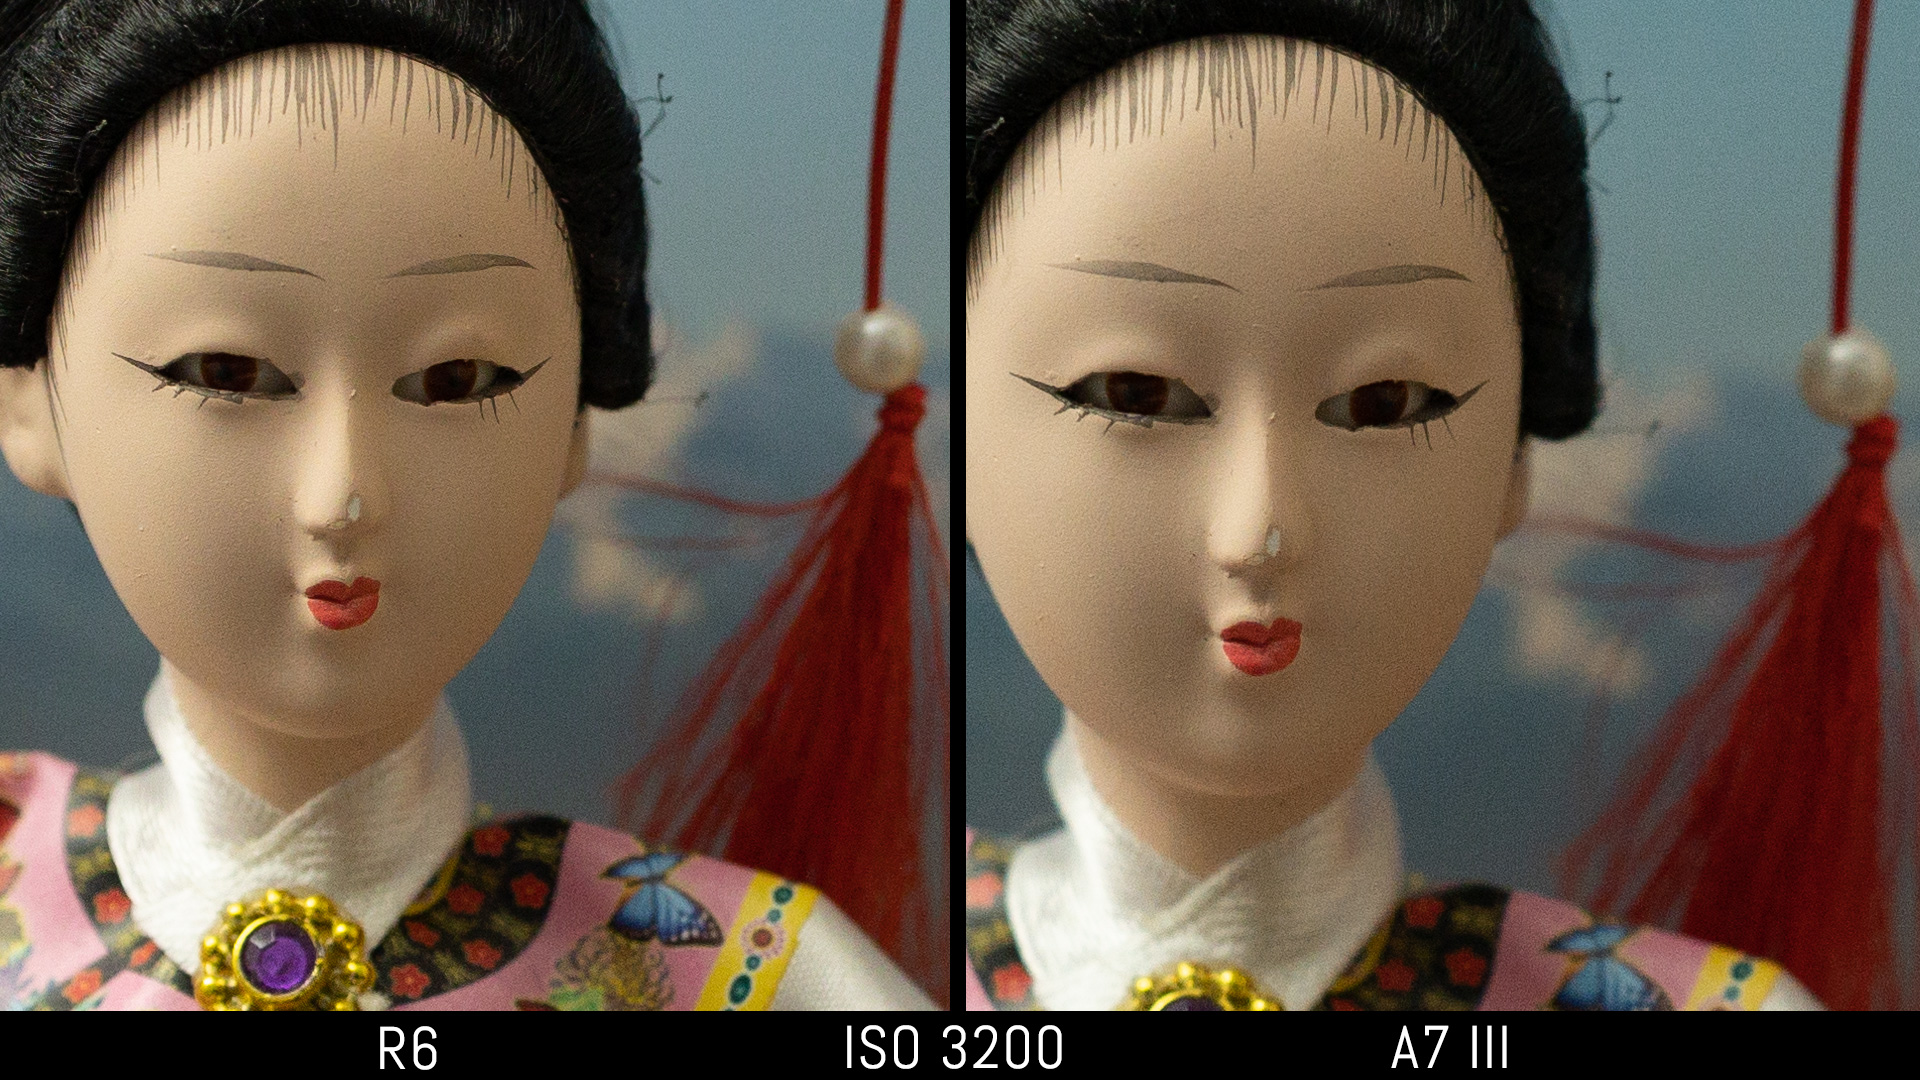

Noise increase from 12800 ISO on both cameras.


The highest values become pretty useless: the A7 III shows a green cast whereas the R6 has magenta colour artefacts. The Canon has more noise as well.
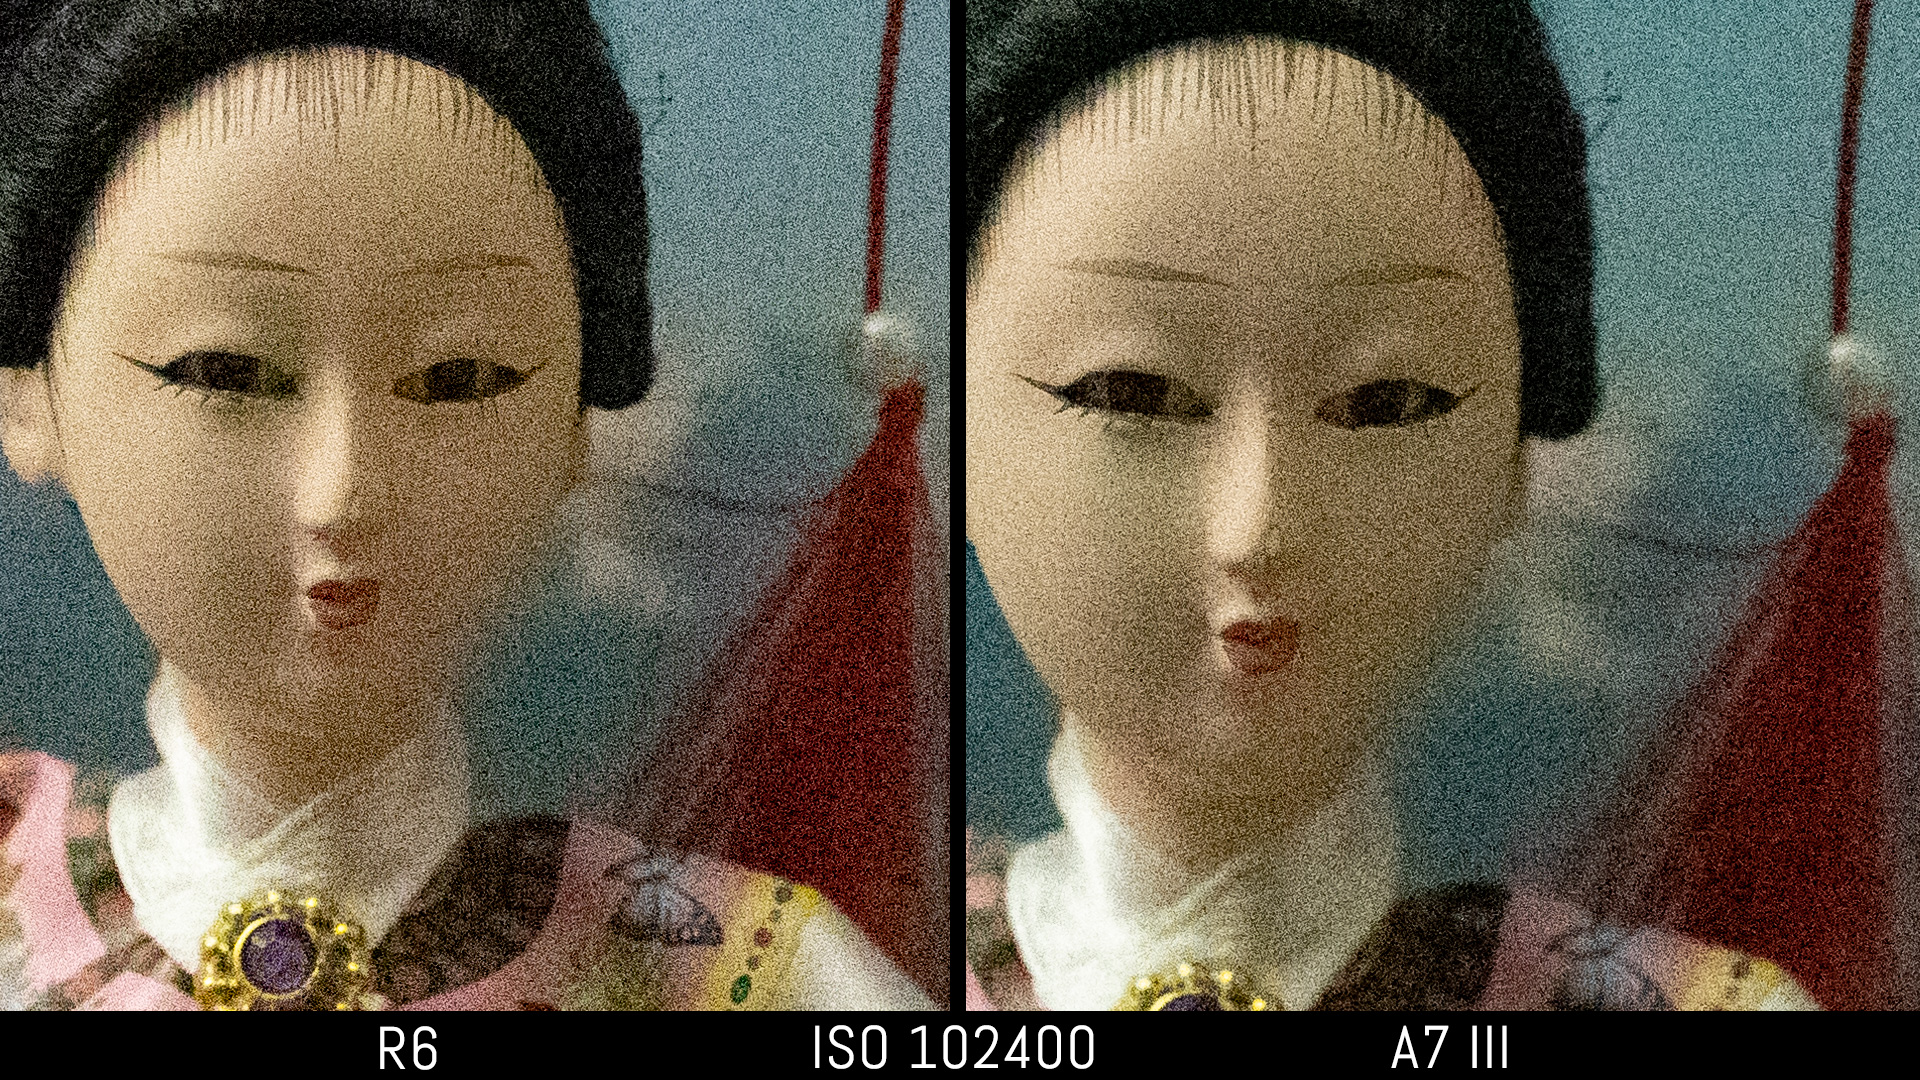

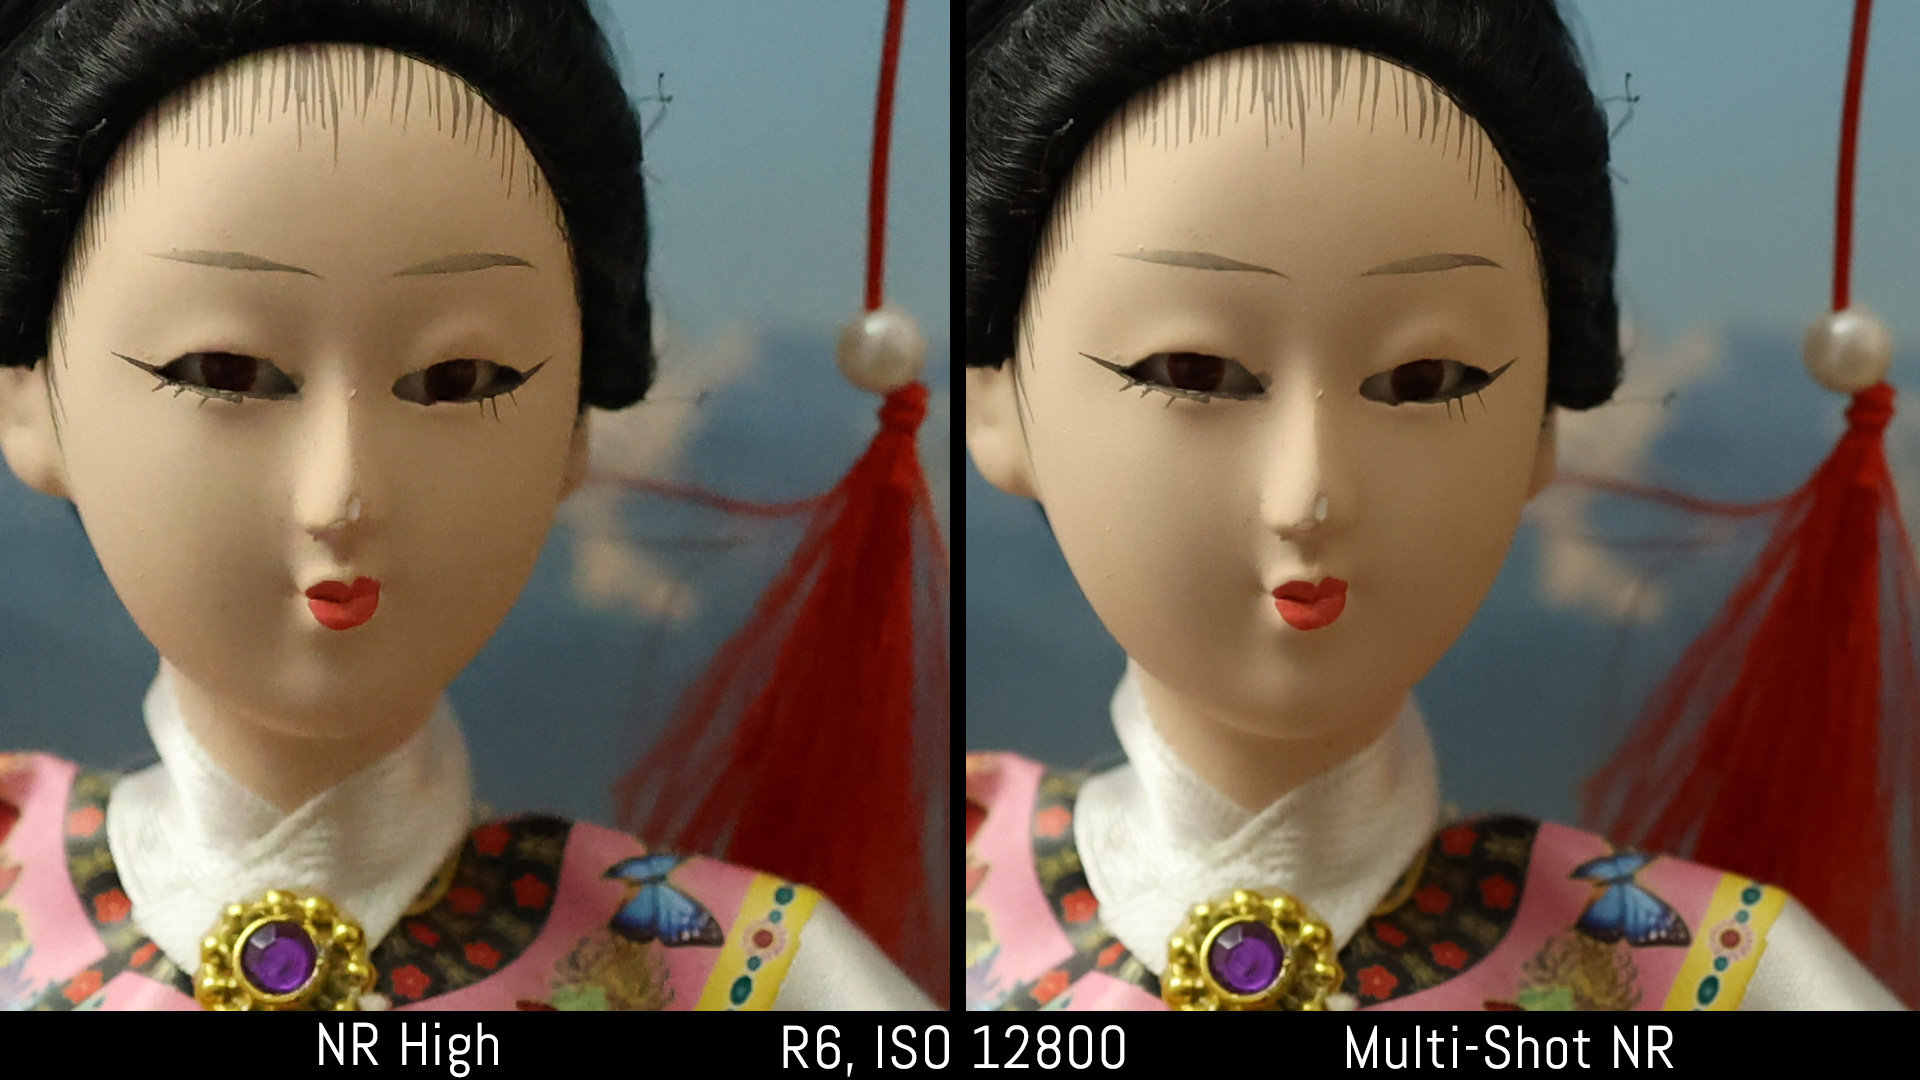
With the SOOC JPGs, the A7 III shows more colour noise when Noise Reduction is turned off. The R6 image is cleaner with NR set to Low or Standard. The Canon also has a High level and a Multi NR mode that merges three images to reduce noise further.


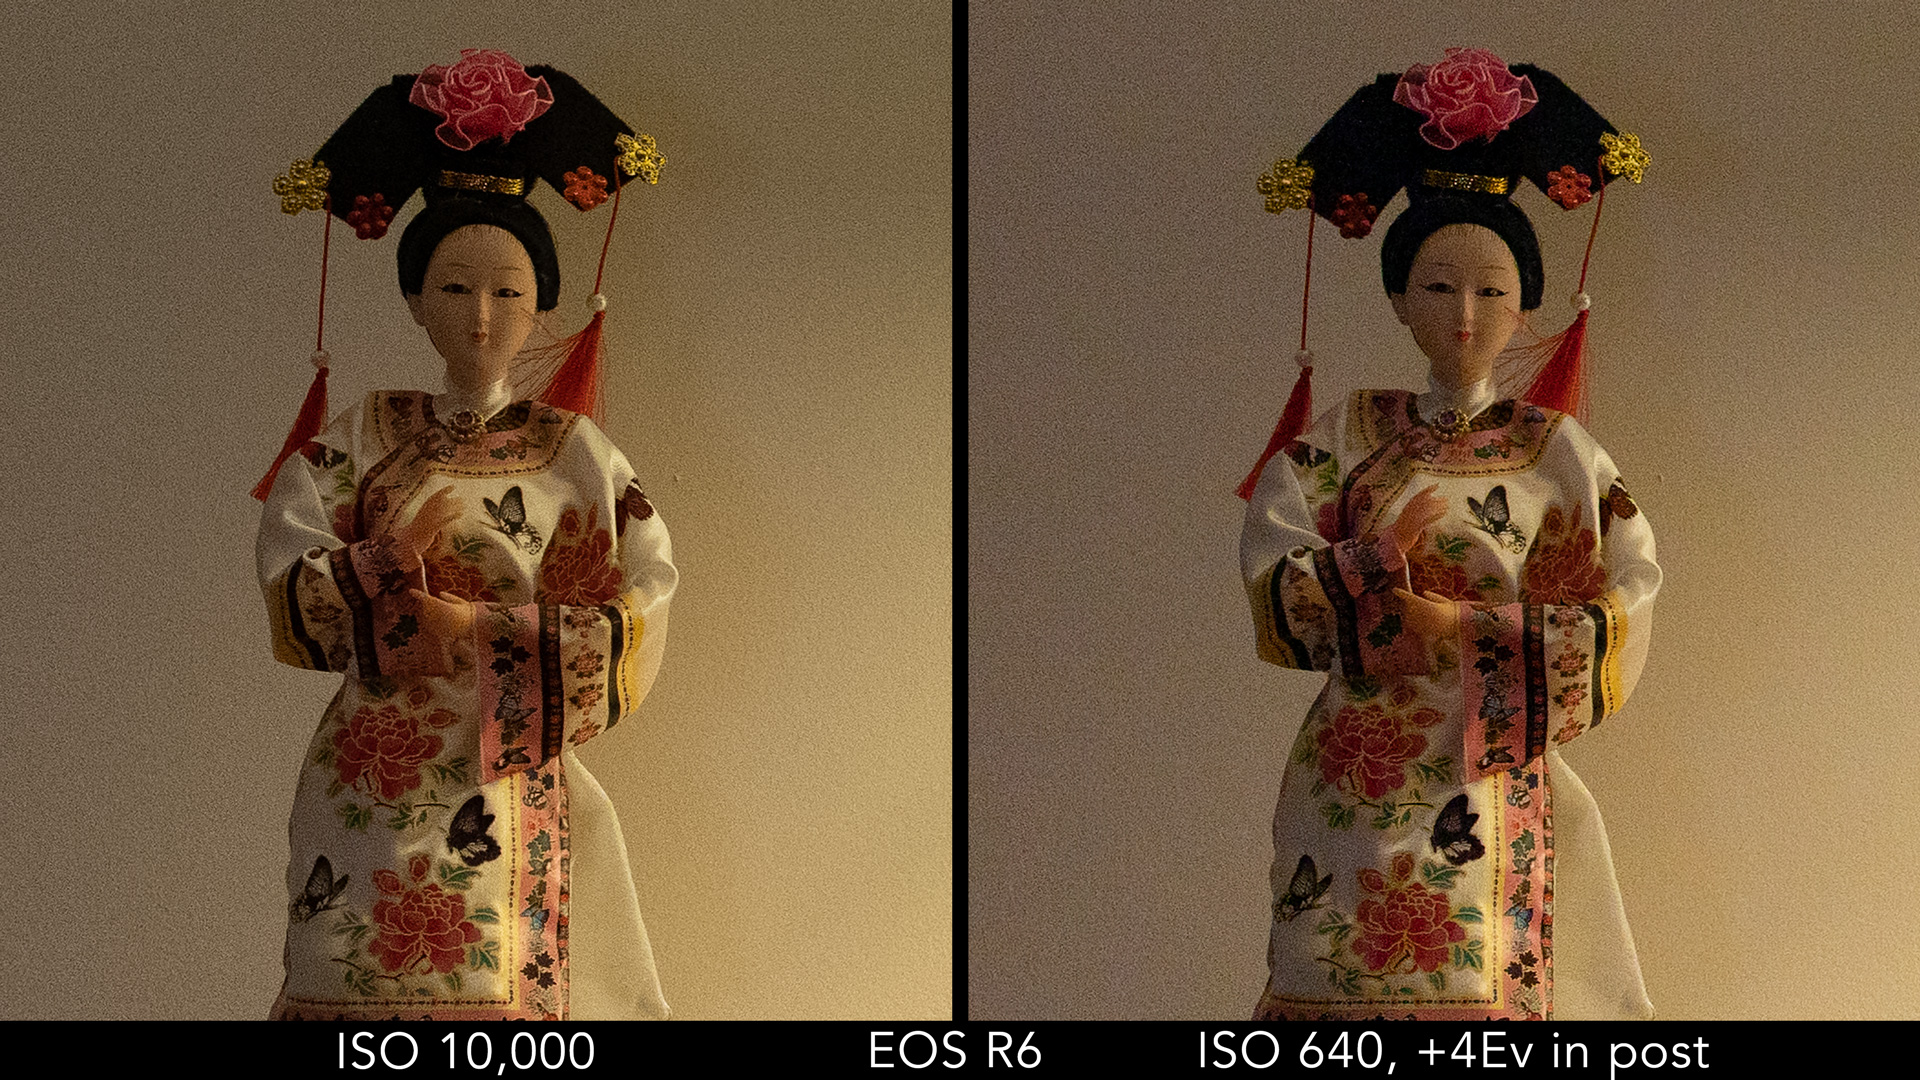
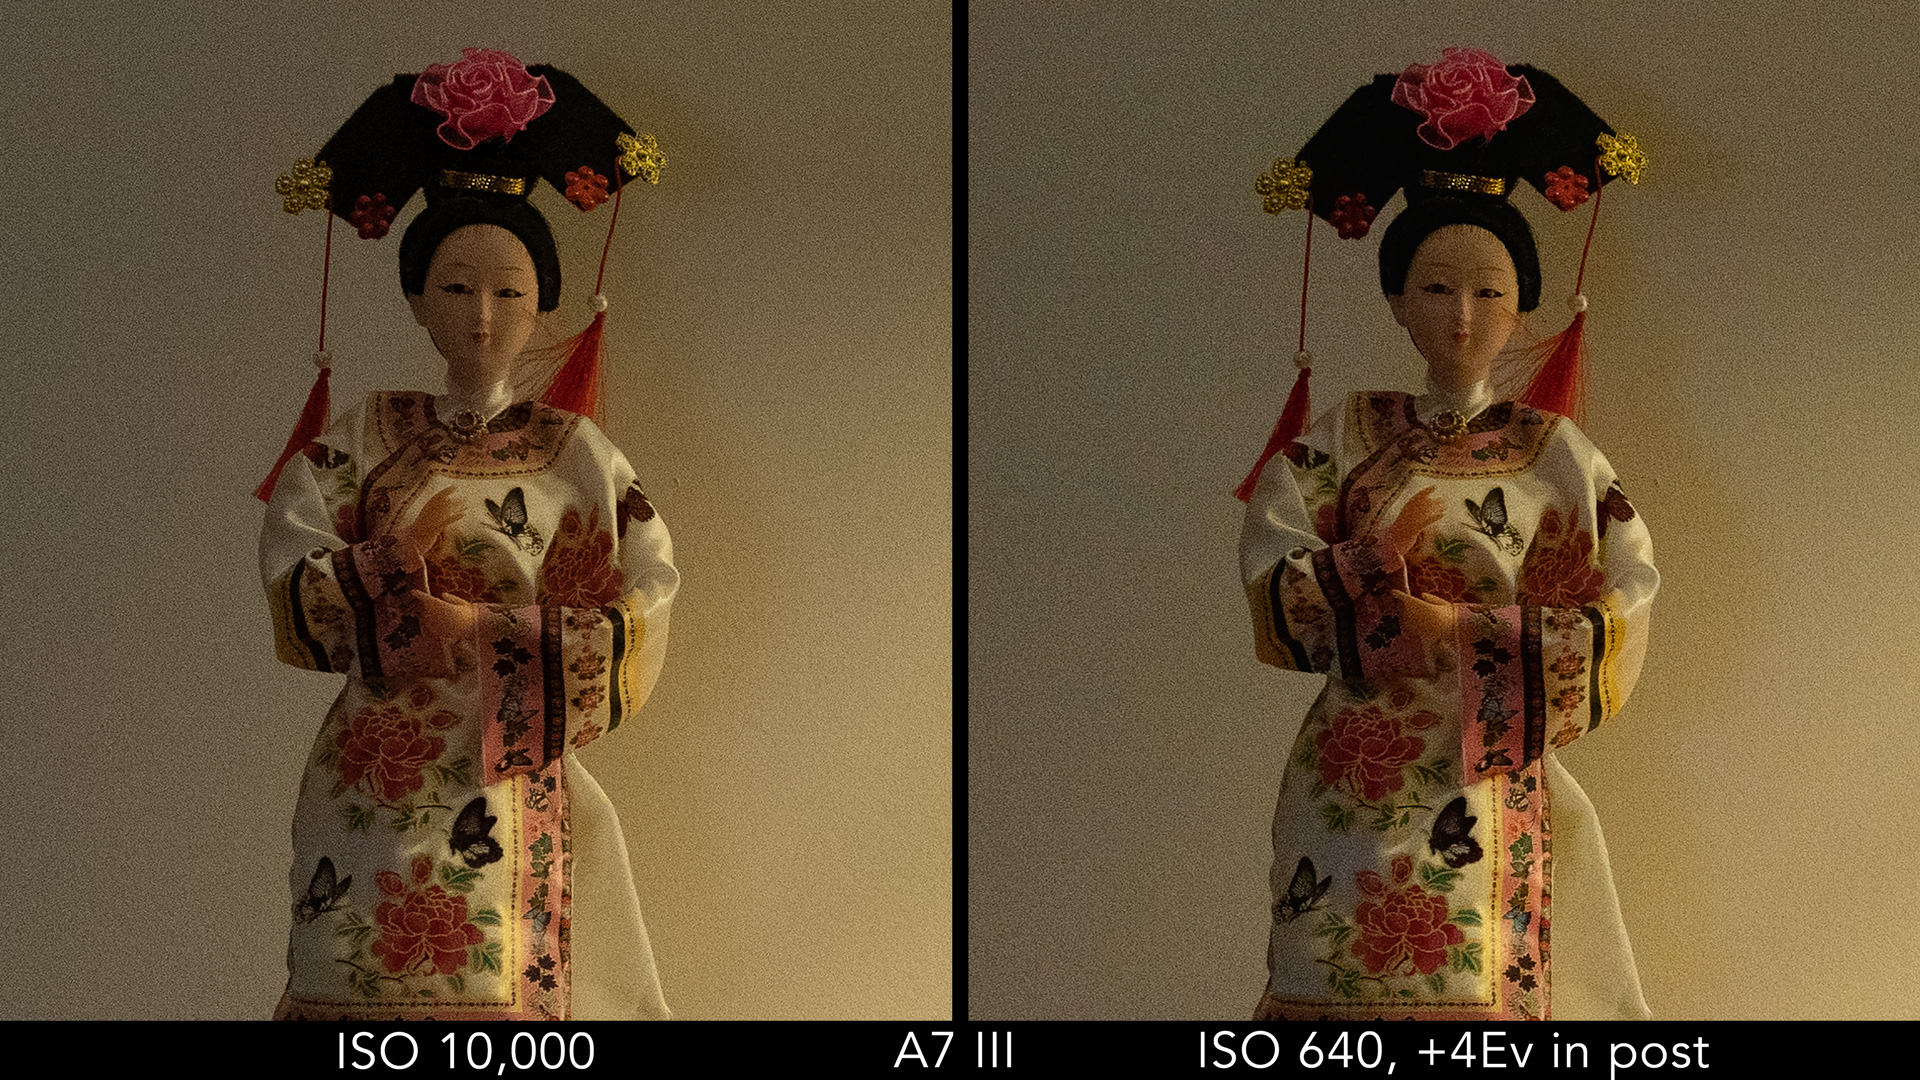
Another interesting test to perform with the two sensors is to see if they are ISOless, also known as ISO invariance.
The idea is that, if a sensor is ISOless, you can take a shot at a lower ISO value (underexpose the image) and recover the exposure in post with the same quality you would get when shooting at a higher ISO value (correct exposure), but with more highlights preserved (because you underexposed).

The R6 shows a similar amount of noise in the underexposed image taken at ISO 640 and recovered in post, and the image shot at the higher ISO level. On the A7 III, the post processed image looks worse and overall the Sony shows more noise than the Canon in this test. Note that I started from ISO 640 because this is the value where the second gain of Sony’s dual gain architecture kicks in. (I couldn’t find any information about this for the Canon model).
Colours
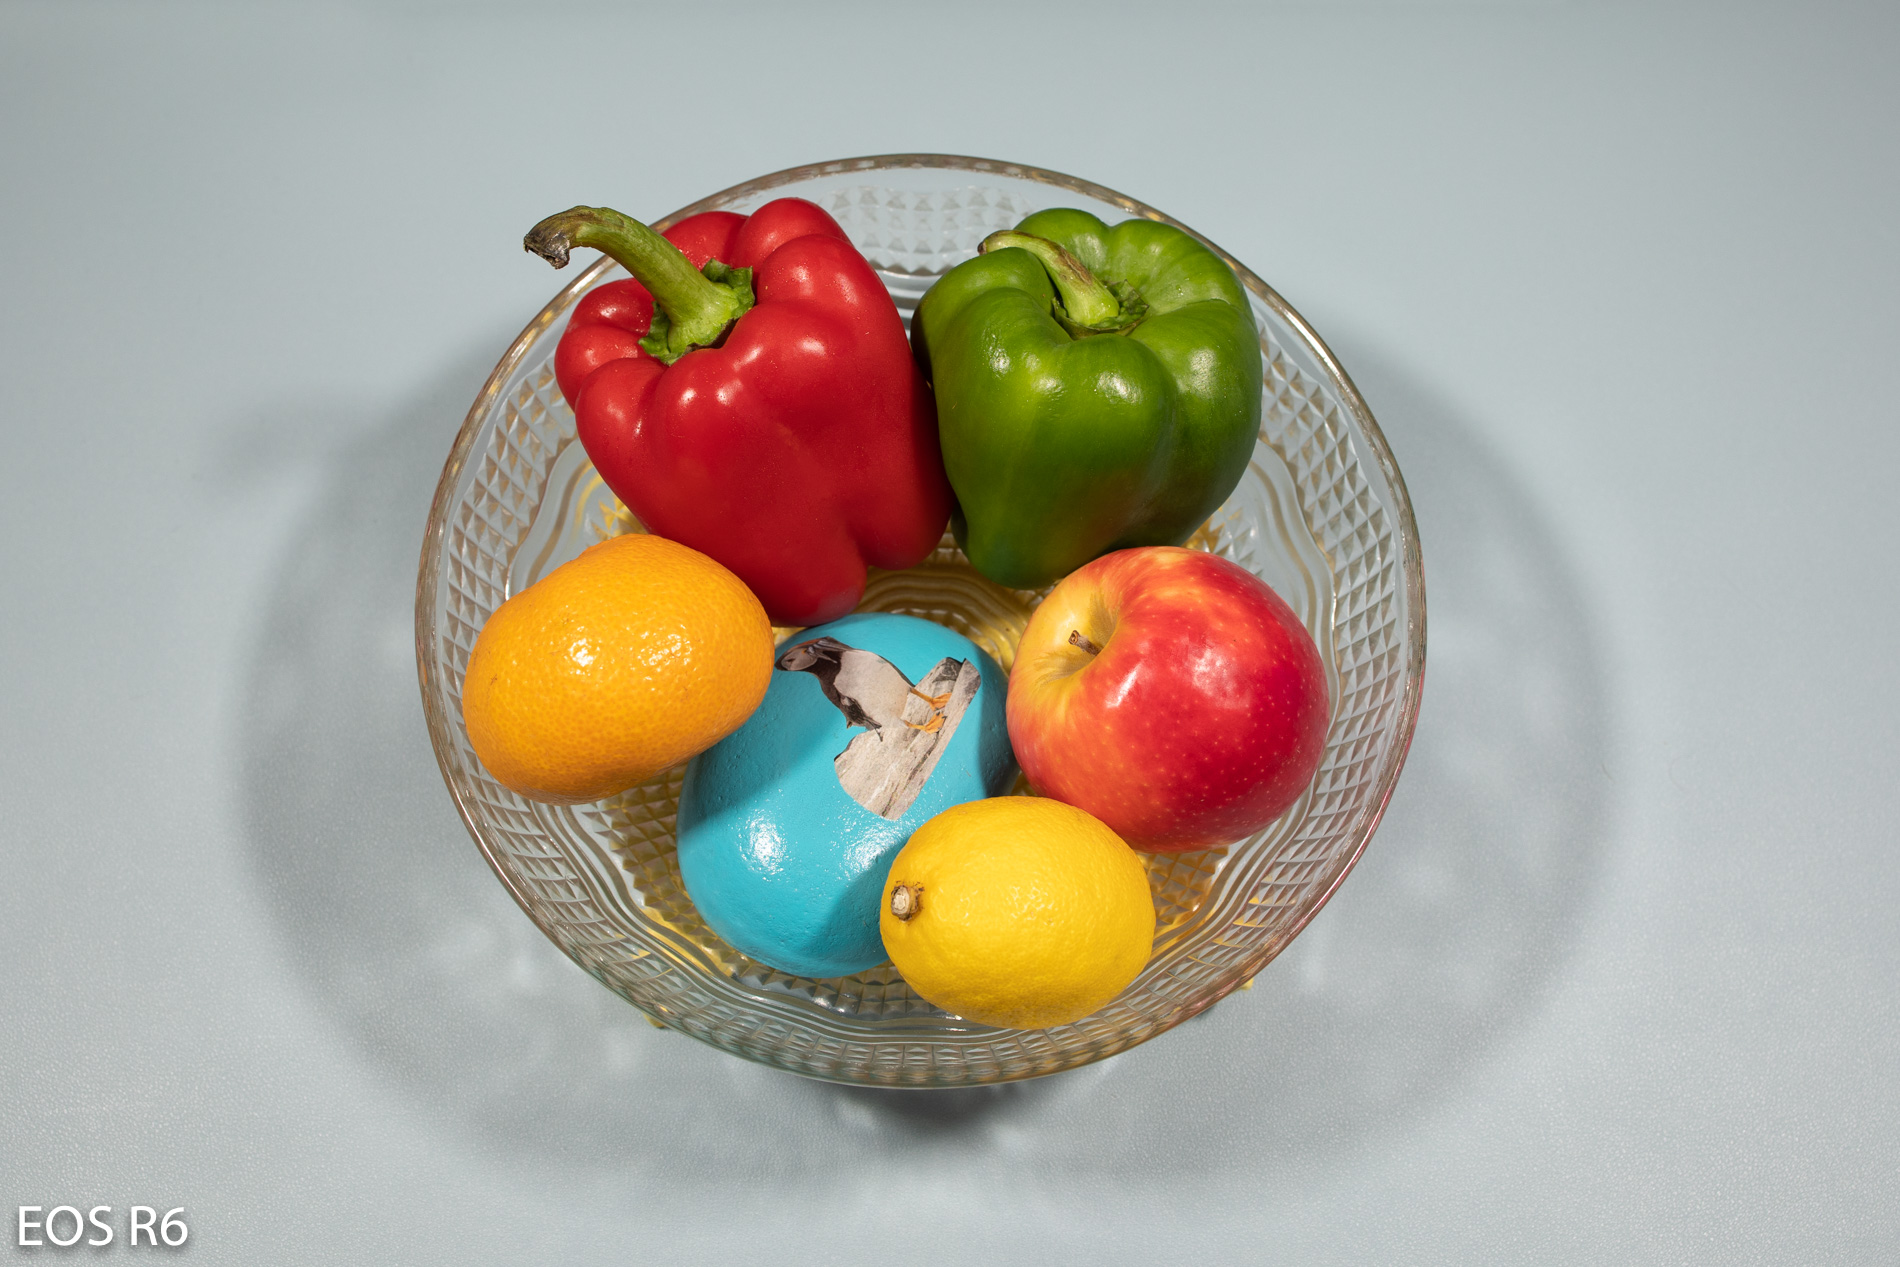
The first scene below was lit with LED lights and the cameras were set to the same colour temperature.
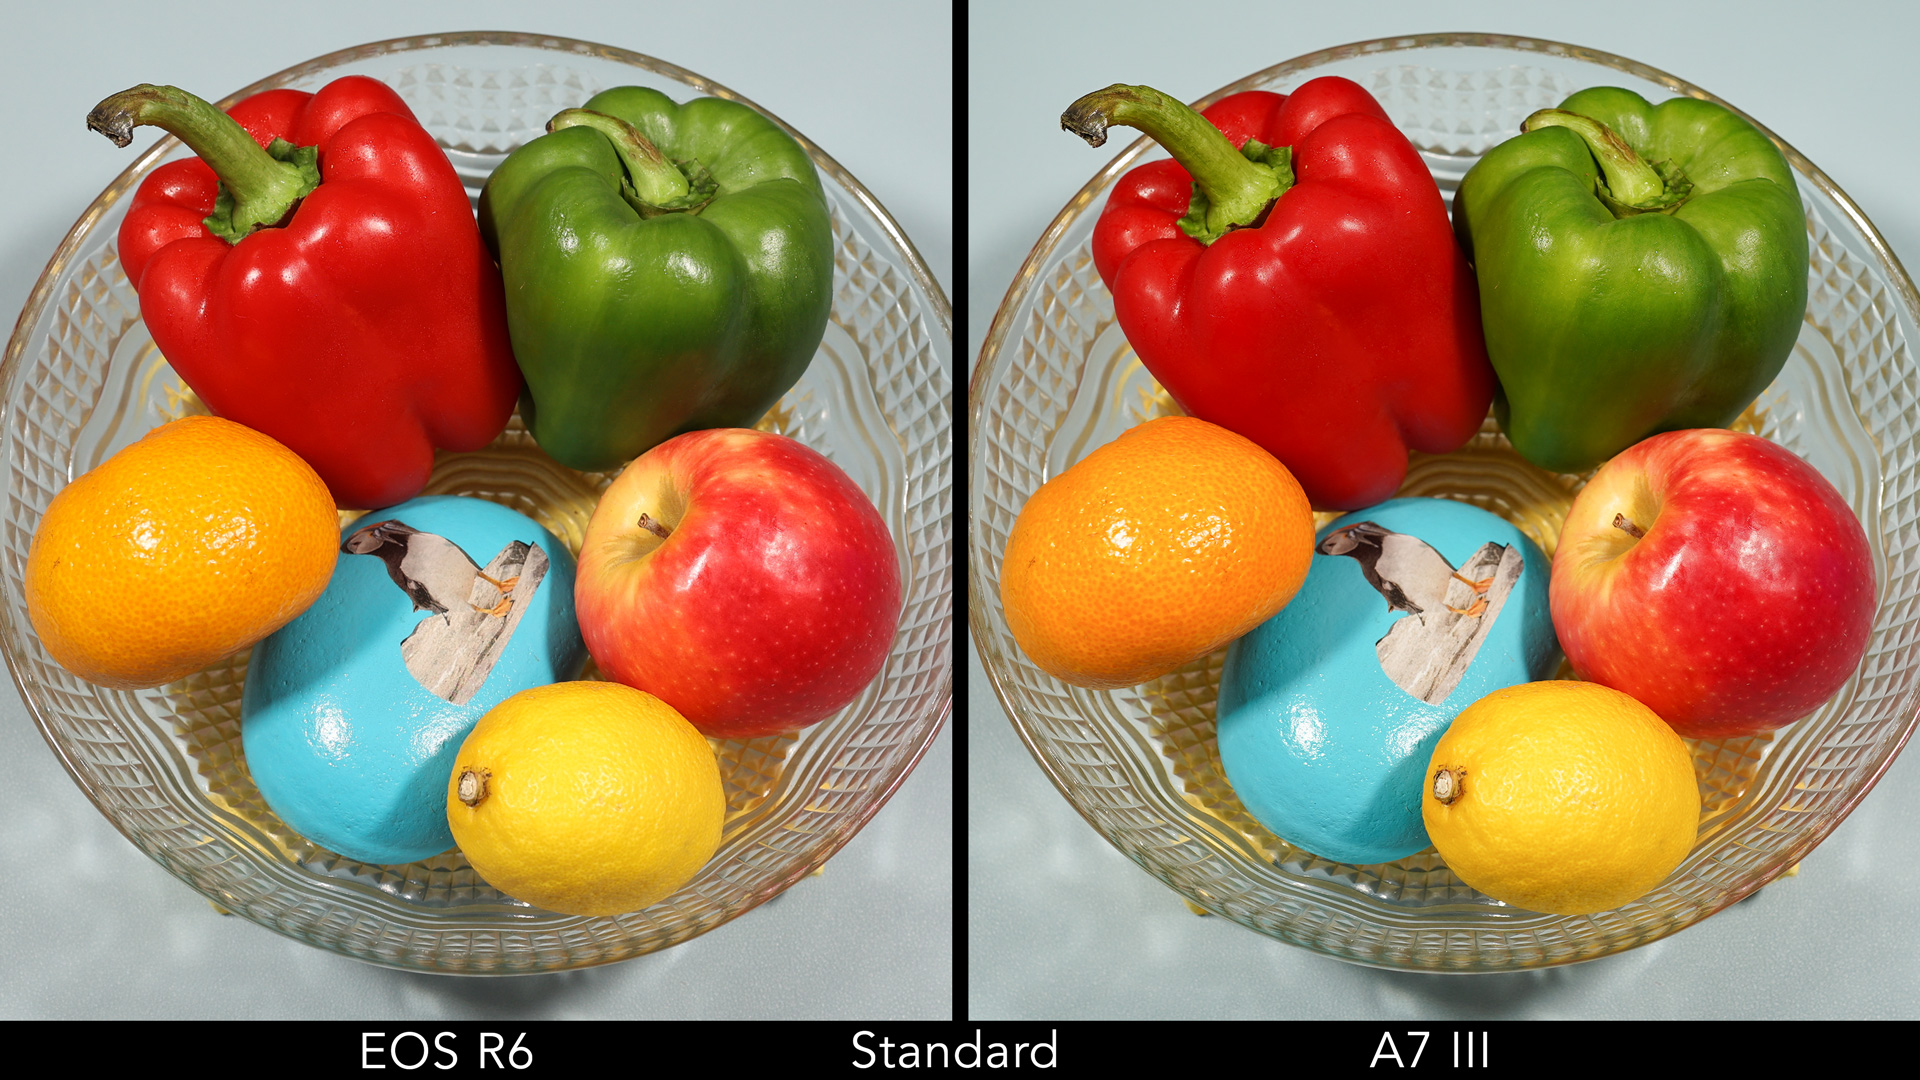
If I open the two RAW files with Lightroom Classic, they look very similar with the default colour profile applied by the software which is Adobe Color (remember that different programmes will apply different profiles). The A7 III image looks a bit greener if we concentrate on the blue desk mat in the background, but otherwise the colours on the fruit and vegetables are harder to distinguish.

If we turn to the picture profiles found on each camera (called Creative Styles on the A7 III), there are a few more things to talk about.
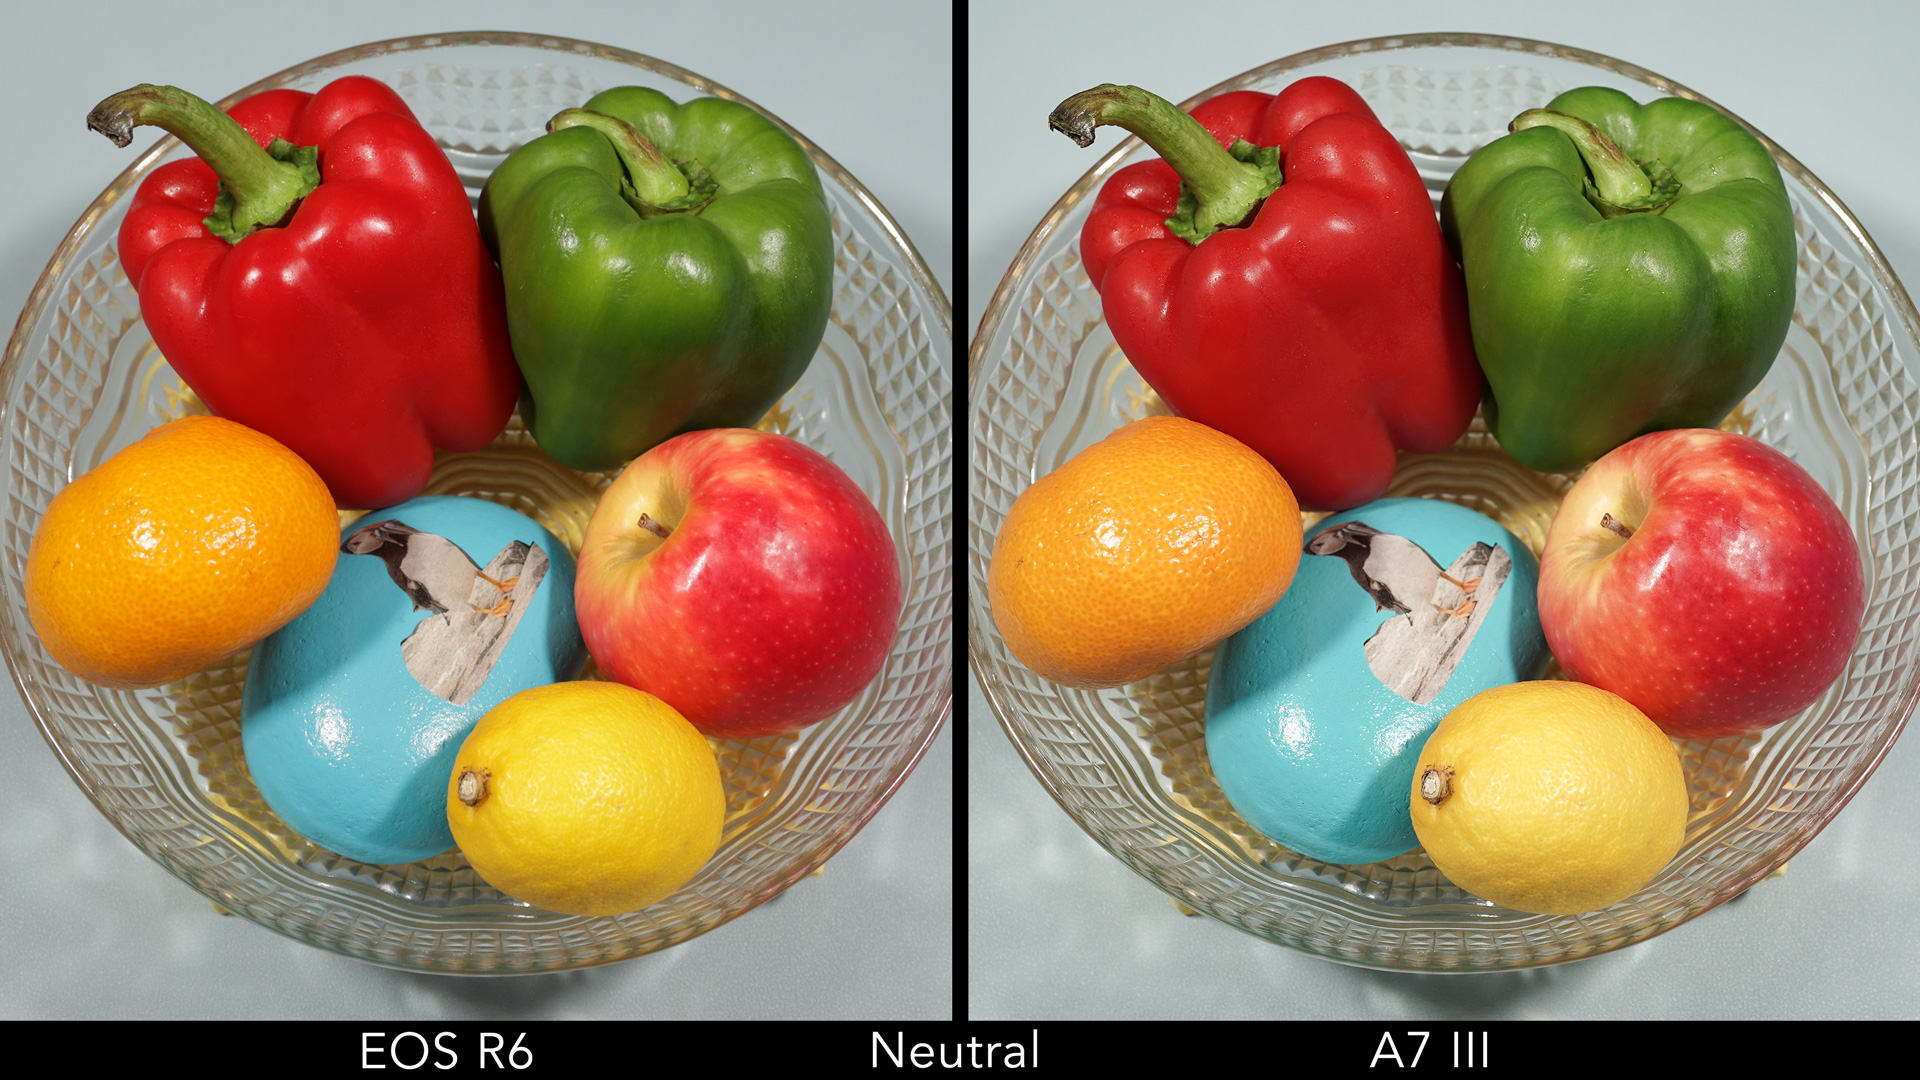
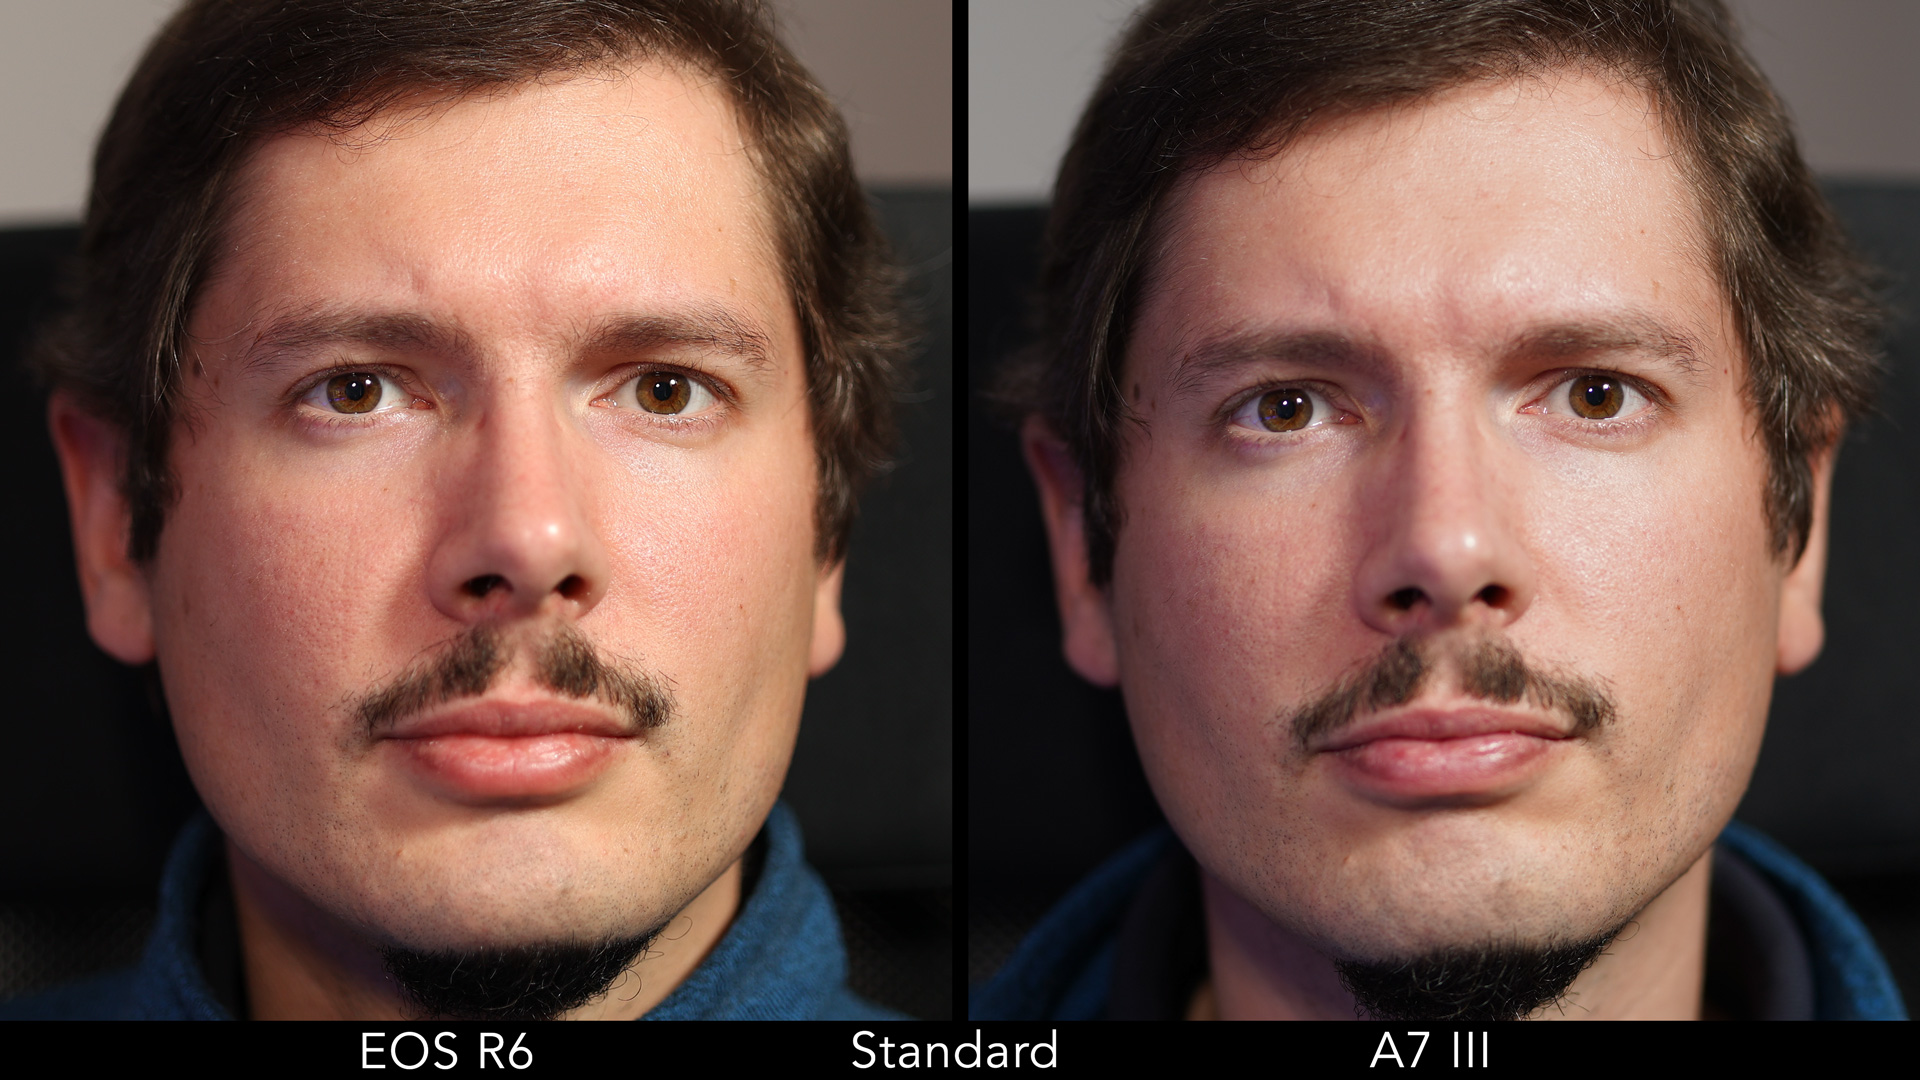
With the standard profile, the red pepper has a bit more richness in shade and texture in the Canon file. The green pepper has a bit more contrast and darker shades as well, whereas the orange is a bit more saturated in the Sony file.
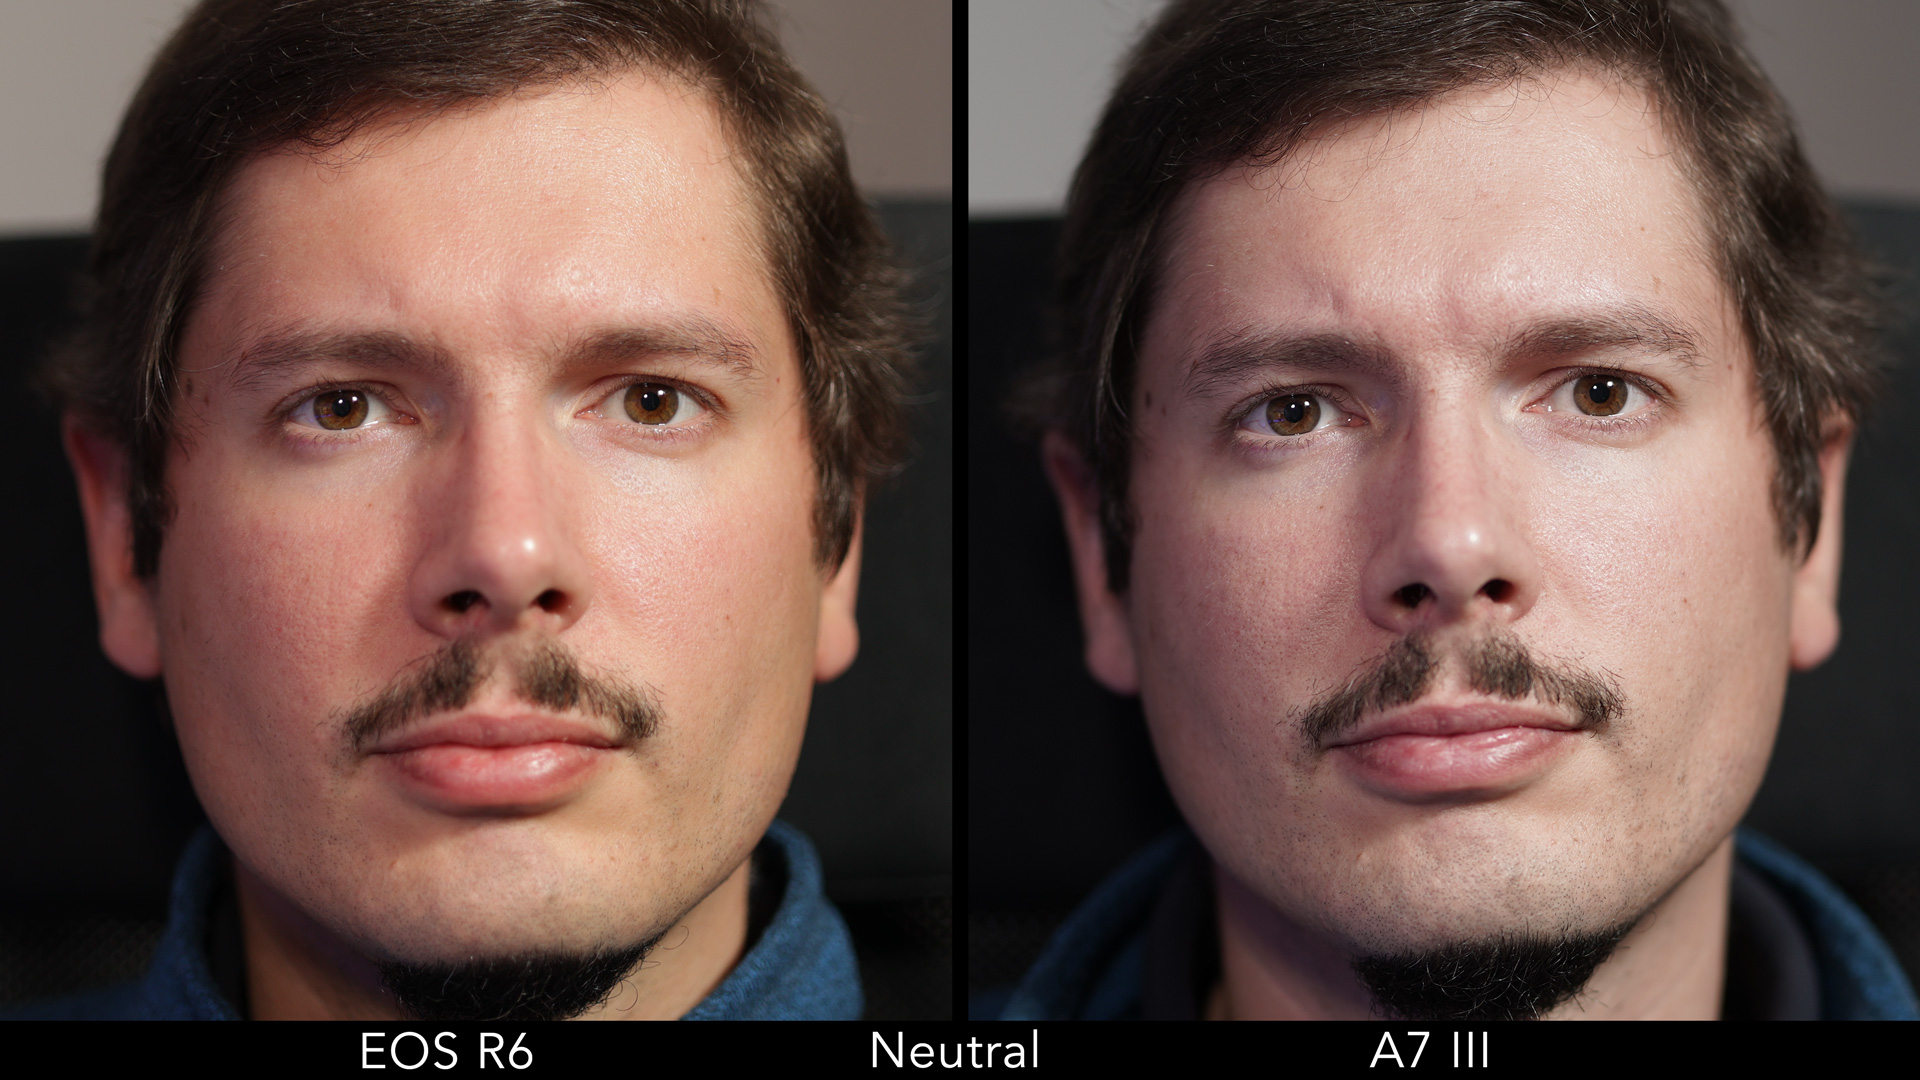
With the Neutral profile, the colours are more vibrant on the EOS R6.
Both cameras have additional profiles, each with their own distinctive characteristics, but I’m not going to describe all of them here. Keep in mind that some of the Canon profiles like Neutral or Faithful have less sharpness assigned by default. The A7 III has more profiles in total (13 vs 7, including the monochrome profiles and excluding the custom ones).
Below is another example with the landscape profile. Here the Sony is more saturated whereas the Canon is brighter with less contrast.
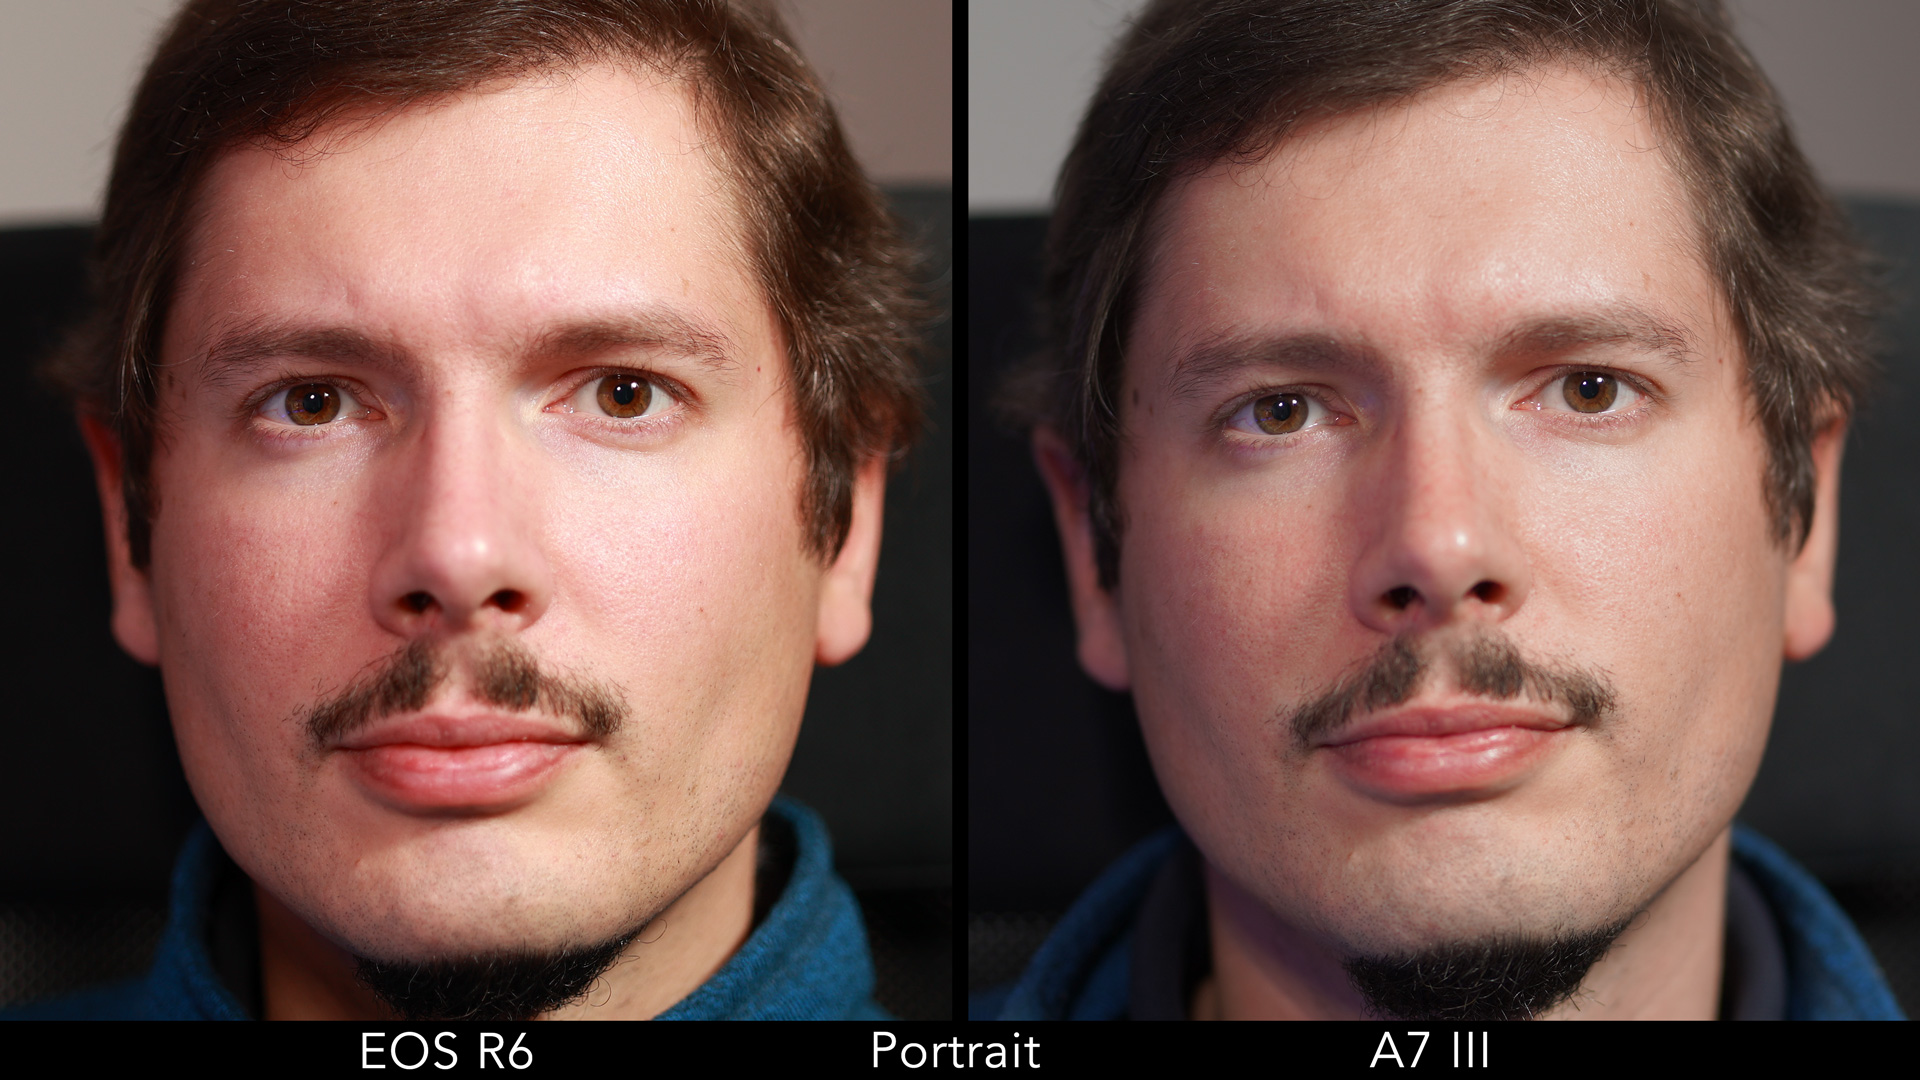
Regarding skin tones, there are more relevant differences. Looking at the RAW files, with the same colour temperature and tint values, the R6 image is warmer and softer overall especially when it comes to the yellows and oranges, whereas the Sony has a reddish/magenta dominance.
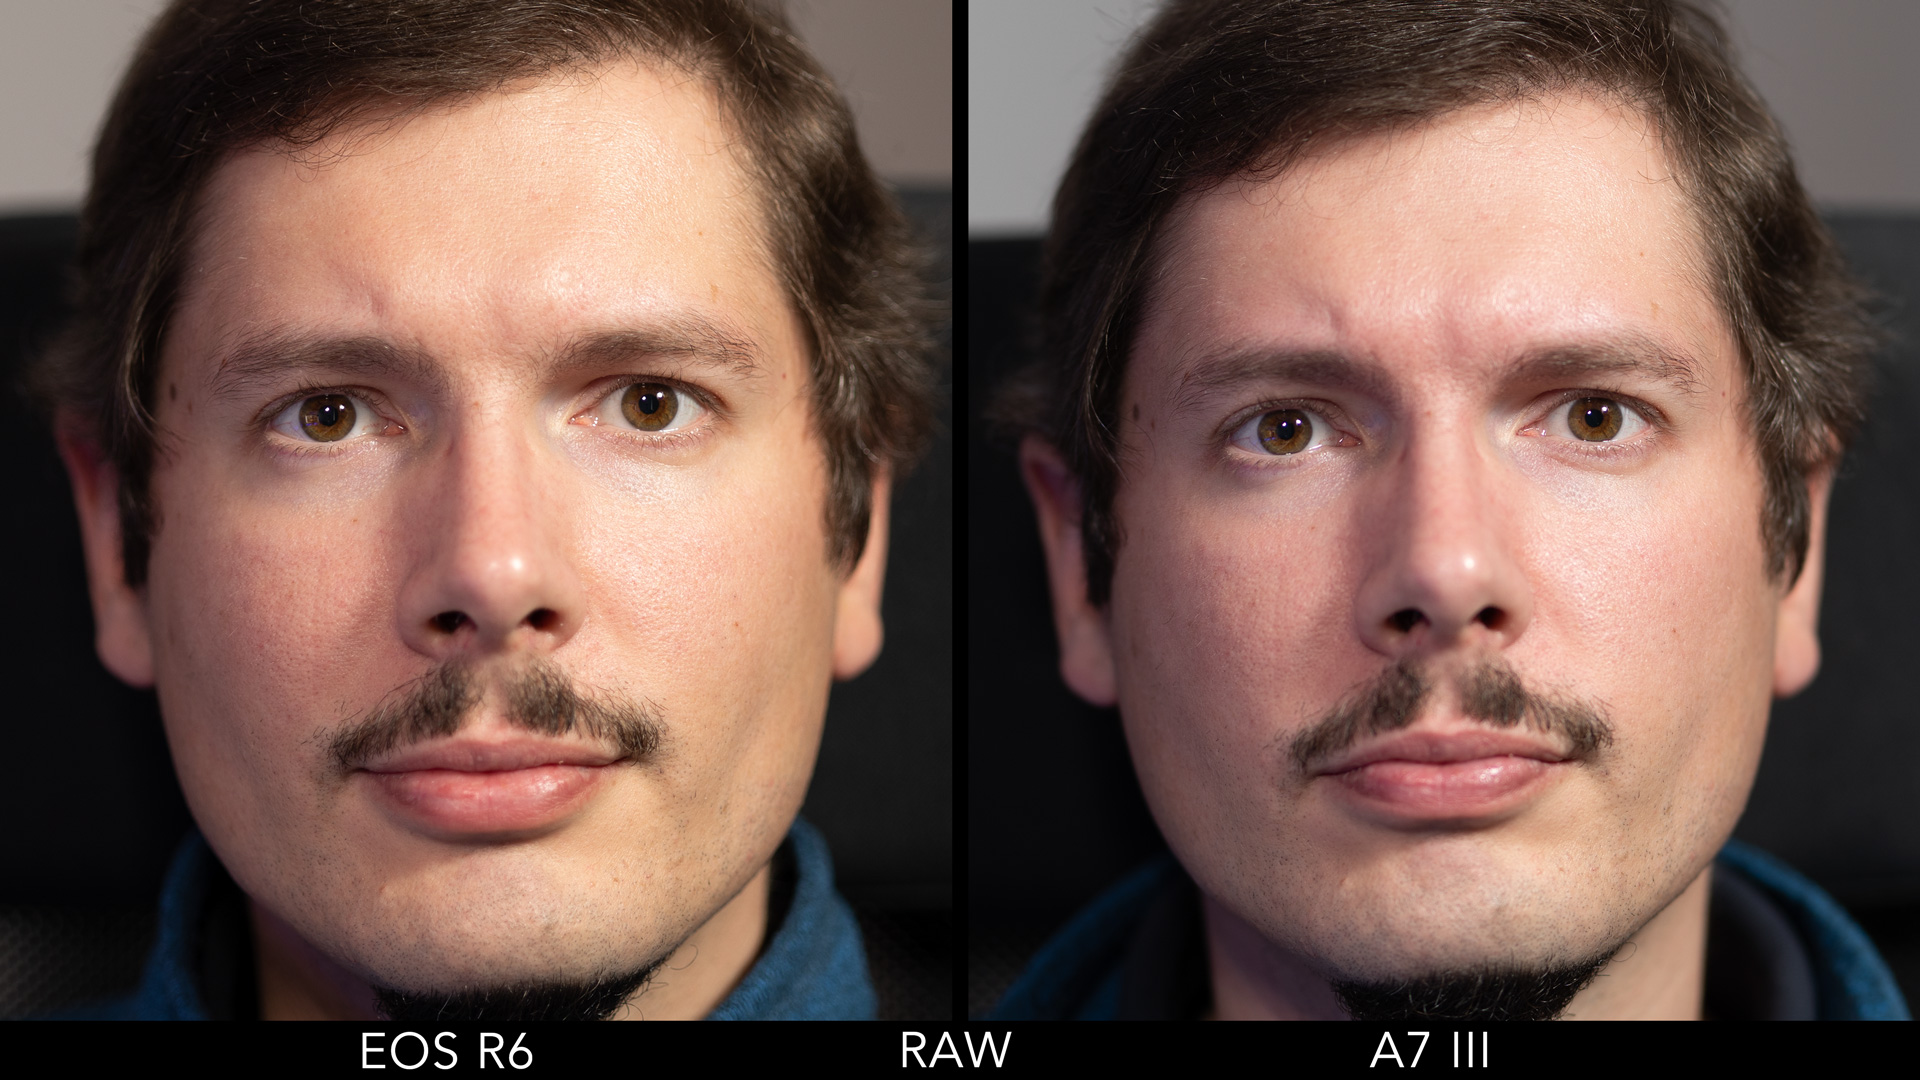
The same difference, accentuated with more contrast on each, is valid for the SOOC JPG and standard profile.
The Canon portrait style is brighter but has lots of reds in the medium tints. The Sony has less contrast and a smoother, more subtle look.
On the R6, I prefer the Neutral profile which has less contrast and shows more uniformity while maintaining all the different shades of the skin. Neutral gives the A7 III portrait less saturation.
Extra feedback about image quality
To conclude this first chapter, let me share some additional findings quickly:
- Although the RAW files present some differences, they are both very flexible, allowing you to fine-tune colours and other aspects with ease
- With auto white balance, the R6 files tend to look a bit cooler overall
- Under artificial light, the Sony is warmer than the Canon when both are set to Ambient priority
- If you set the white balance manually, the Sony can exhibit more yellow with in a low light situation
- Both cameras allow you to fine-tune any white balance setting when it comes to colour tint
- The R6 metering tends to overexpose by 2/3Ev in comparison to the A7 III when using the same settings (multi, centre weight or spot). The Sony also has a large size for Spot and a Preserve Highlight option.
2. Autofocus
The two cameras feature an advanced autofocus system with phase detection, which means that each focus point is driven by two small sensors that read the incoming light. The phase difference between the two sensors tells the camera how much correction is needed to have the subject in focus.
The way the two companies have developed this technology is different however.
On the Canon sensor, each pixel is composed of two photodiodes. The camera uses them together to create the image, and separately to evaluate the phase difference and acquire focus. Canon calls this Dual Pixel CMOS AF II, where II stands for the new version introduced with the R6 (and R5).
On the Sony sensor, the pixels are made up of a single photodiode, but a certain number of them embed the phase difference sensor that the camera uses to analyse and acquire focus. Phase detection points are used solely for autofocus, not to create the photo.
The Canon solution gives the R6 a distinct advantage: AF tracking can work across the entire sensor surface, and in fact Canon says that there is 100% coverage when face/eye detection and the Tracking AF mode are enabled. (It’s 90% horizontal and 100% vertical with the other AF area settings). When using the single AF point, you can move it across more than 6000 positions!
The A7 III phase detection coverage on the sensor is 93% which is not bad at all. There are 693 phase detection points and 425 contrast detection points that can help in low light situations.

In Single AF mode (called One Shot AF on the R6), both cameras focus fast. The Canon feels a bit quicker but it’s a small difference. With some older lenses like the FE 55mm 1.8, the A7 III can be a bit slower at moving the lens elements back and forth. This doesn’t happen in C-AF mode.
Autofocus in low light
The minimum sensitivity for the EOS R6 autofocus is -6.5Ev with an f/1.2 lens or -5Ev at f/2. The A7 III works down to -3Ev with a f/2 lens. This means that the Canon is 2 stops more sensitive in low light.
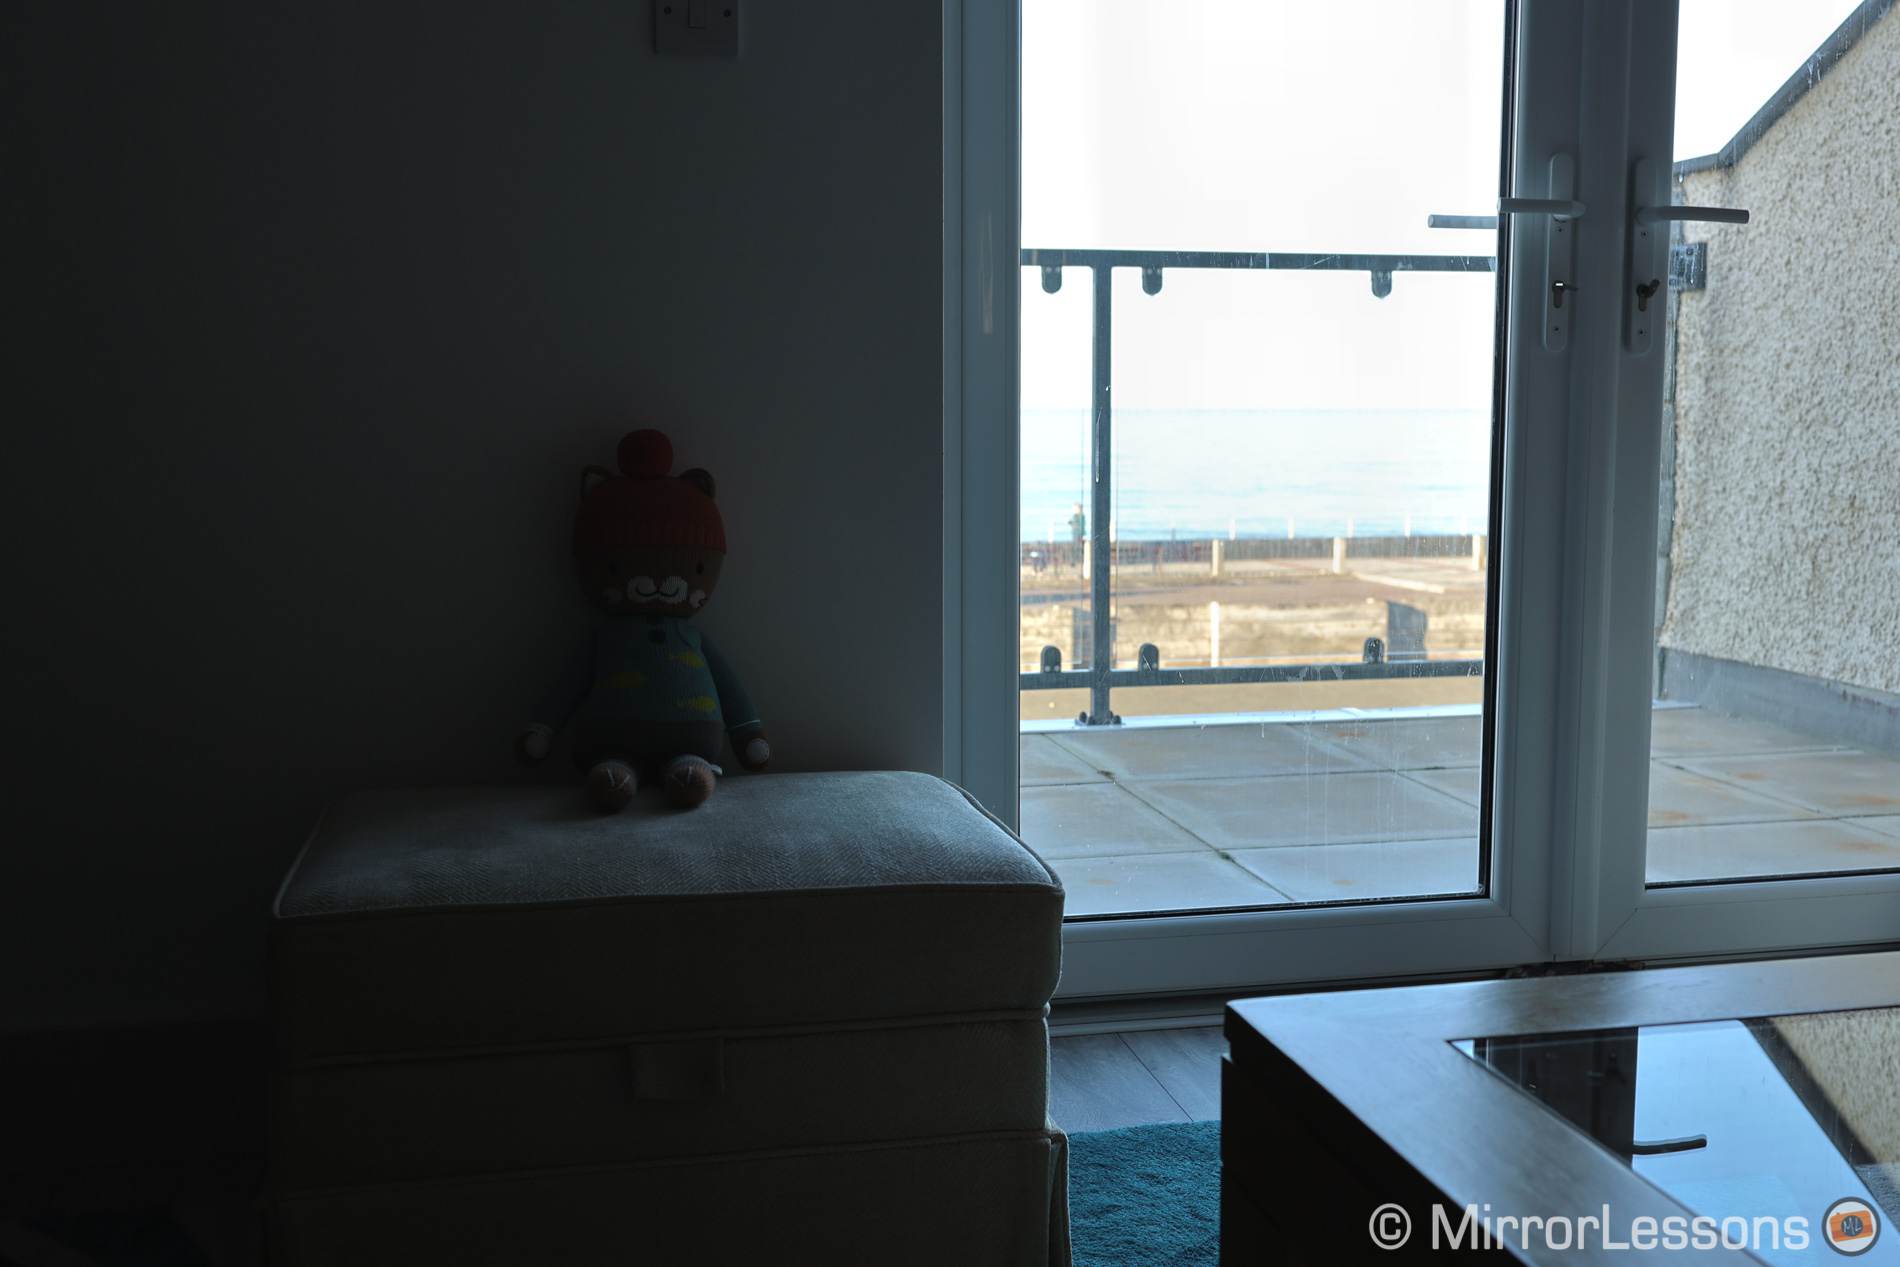
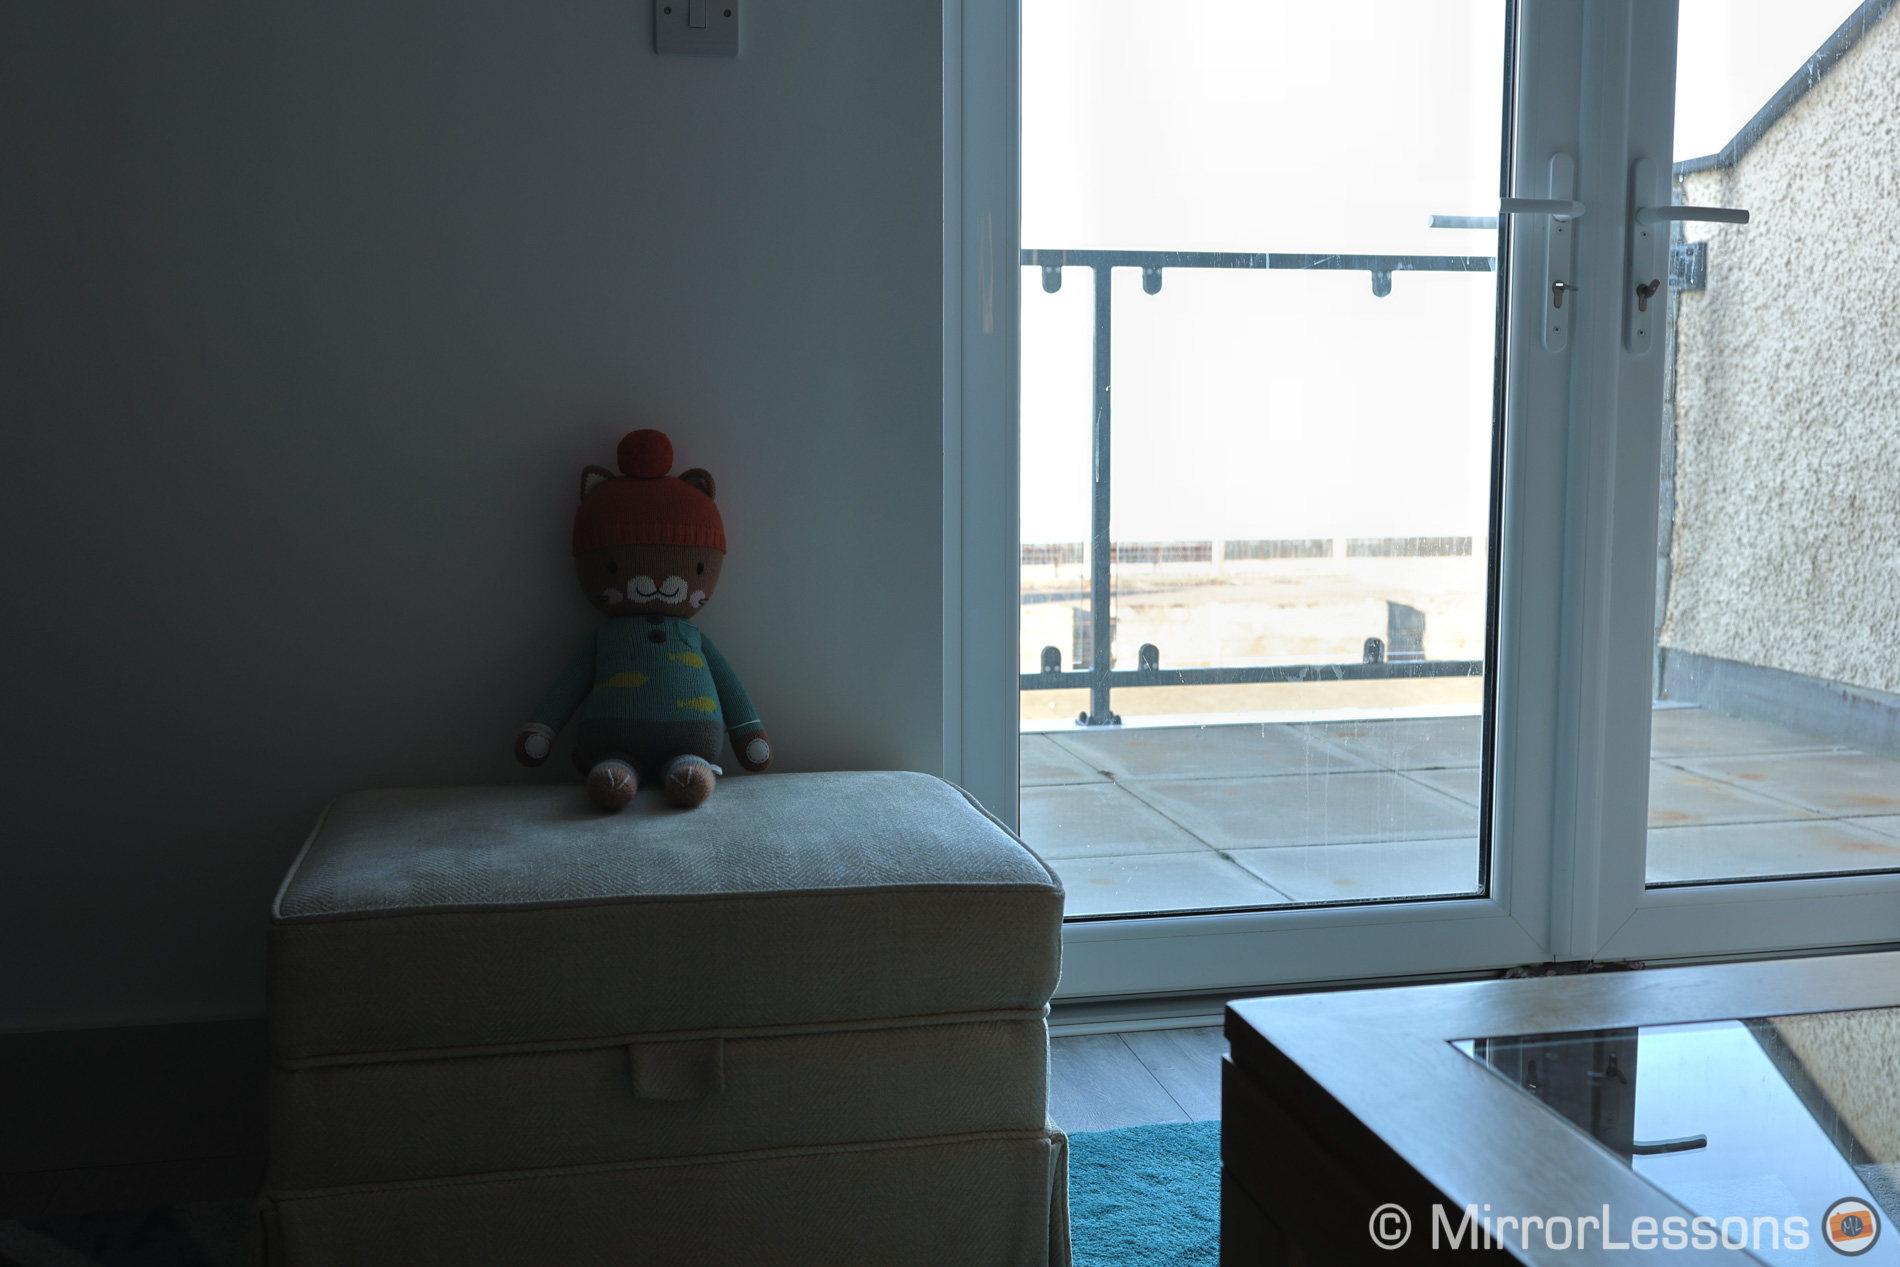
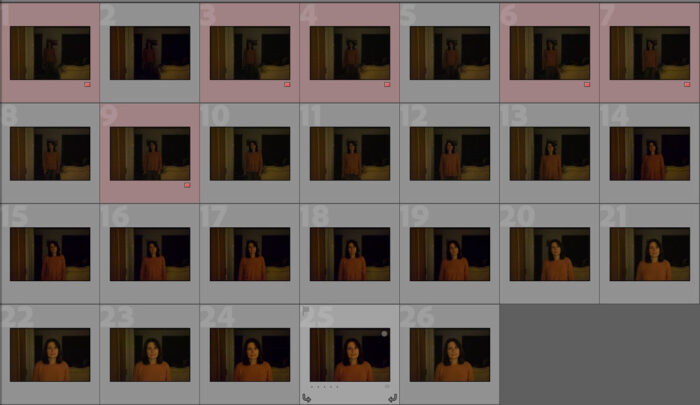
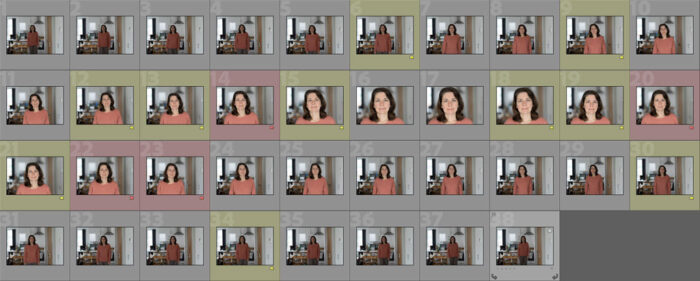
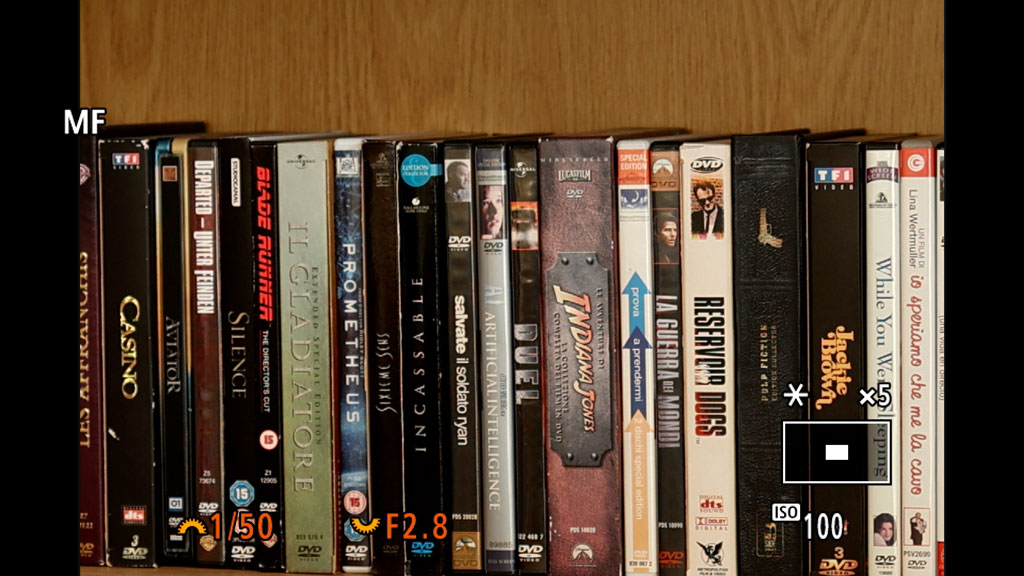
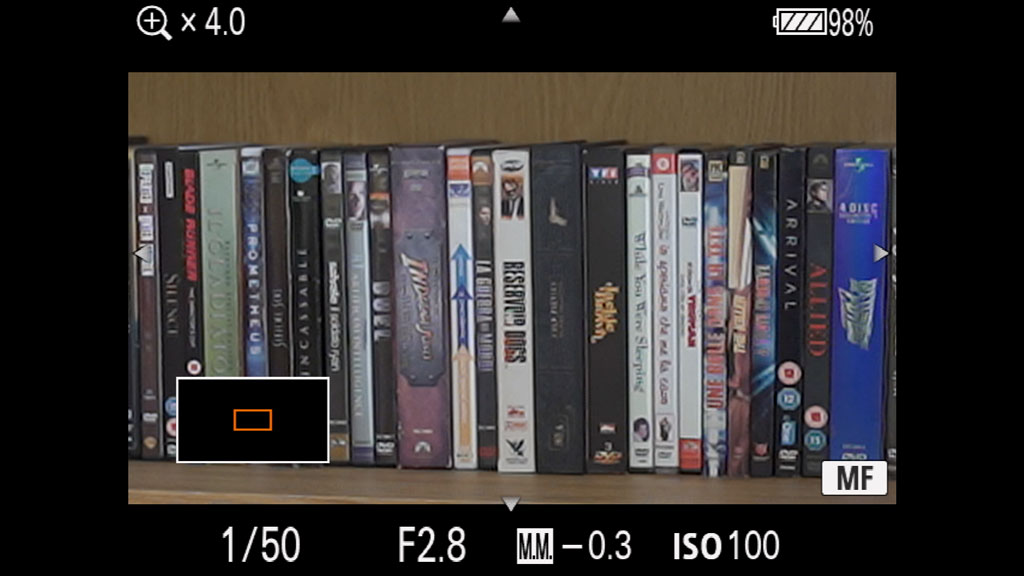
This advantage became noticeable in my low light test, where the subject walked towards the camera in a near pitch dark living room. What is impressive is that the EOS R6 can focus on the eye of the subject even when she is completely in the dark.
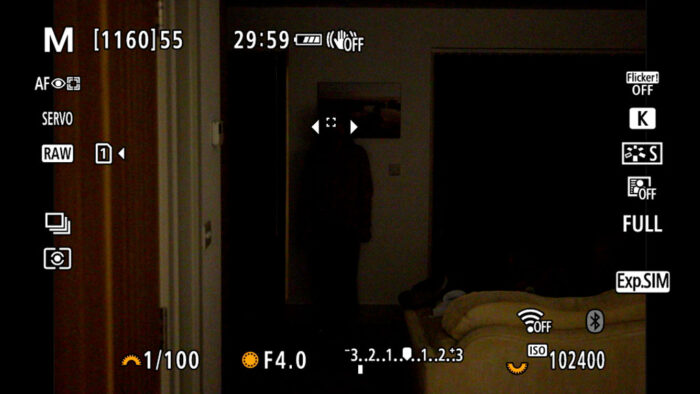
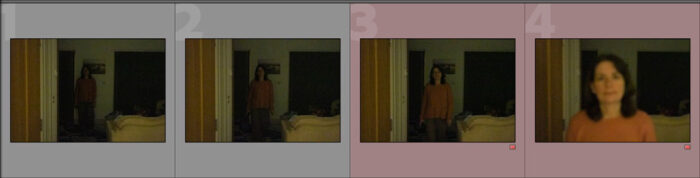
I used two 24-105mm f4 zooms to make the test even harder. In the sequence, the Sony was able to capture only 4 shots, and 3 of them were out of focus. The R6 took 26 shots meaning it was able to change focus more quickly and follow the subject better. It gave a hit rate of about 75%.
Of course it is worth stressing that this was an extreme test and you’ll won’t likely find yourself in such a tricky situation. With a bit more light the A7 III can give you decent performance, but this test was the most appropriate to show the difference.
Face and eye detection
Both cameras feature face and eye detection. The Sony Eye AF mode is known to be the benchmark when it comes this kind of technology. Indeed the one on the A7 III is fast and reliable.

Canon has improved its face and eye detection with firmware updates on the original EOS R. For the R6, it introduces a new algorithm that should make the camera faster and more precise, as well as detect smaller faces in the frame when the subject is further away from the camera.
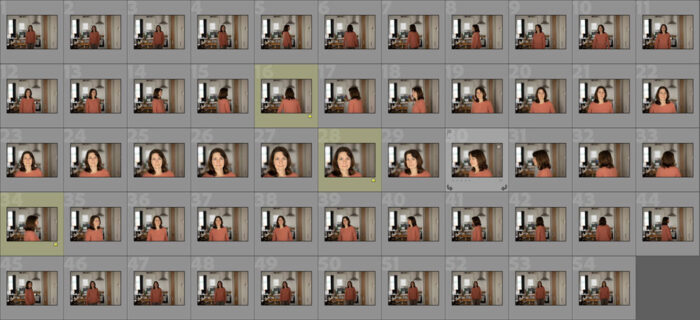
In my second test, the subject walked back and forth, then walked while turning 360˚. The aim of the latter was to see how well the cameras would keep tracking the person once the face was no longer visible.
The R6 gave a splendid 95% keeper rate (60 shots in total for each walk) with only 1 shot out of focus and two slightly soft. When the subject turned around, the performance was the same. The only thing I noticed is that sometimes, the camera focused on the furthest eye rather than the nearest eye while the subject was facing about 45˚ away from the camera.
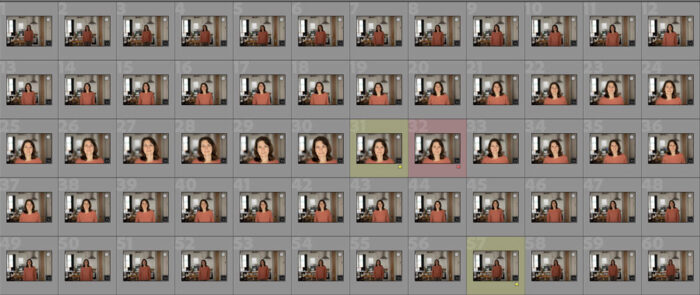
(red = out of focus, yellow = sligthly soft)
(yellow = sligthly soft)
The A7 III took fewer shots once again because it struggled more to change focus quickly and had a lower keeper rate of 63%.
(red = out of focus, yellow = sligthly soft)
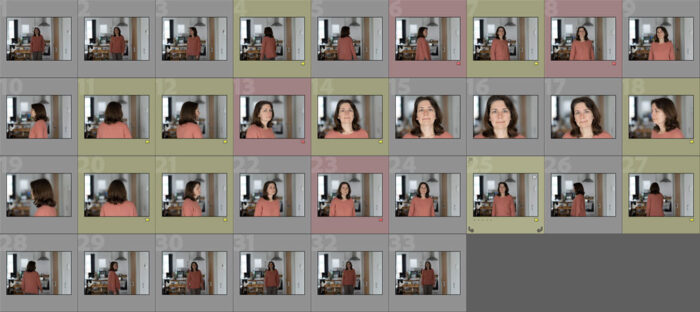
(red = out of focus, yellow = sligthly soft)
Note: If you’re wondering why the A7 III took fewer shots, it is because I set it to focus priority and since it was a bit slower at keeping track of the subject, it captured fewer images as a result. I set the medium burst speed for both cameras which is 6fps.
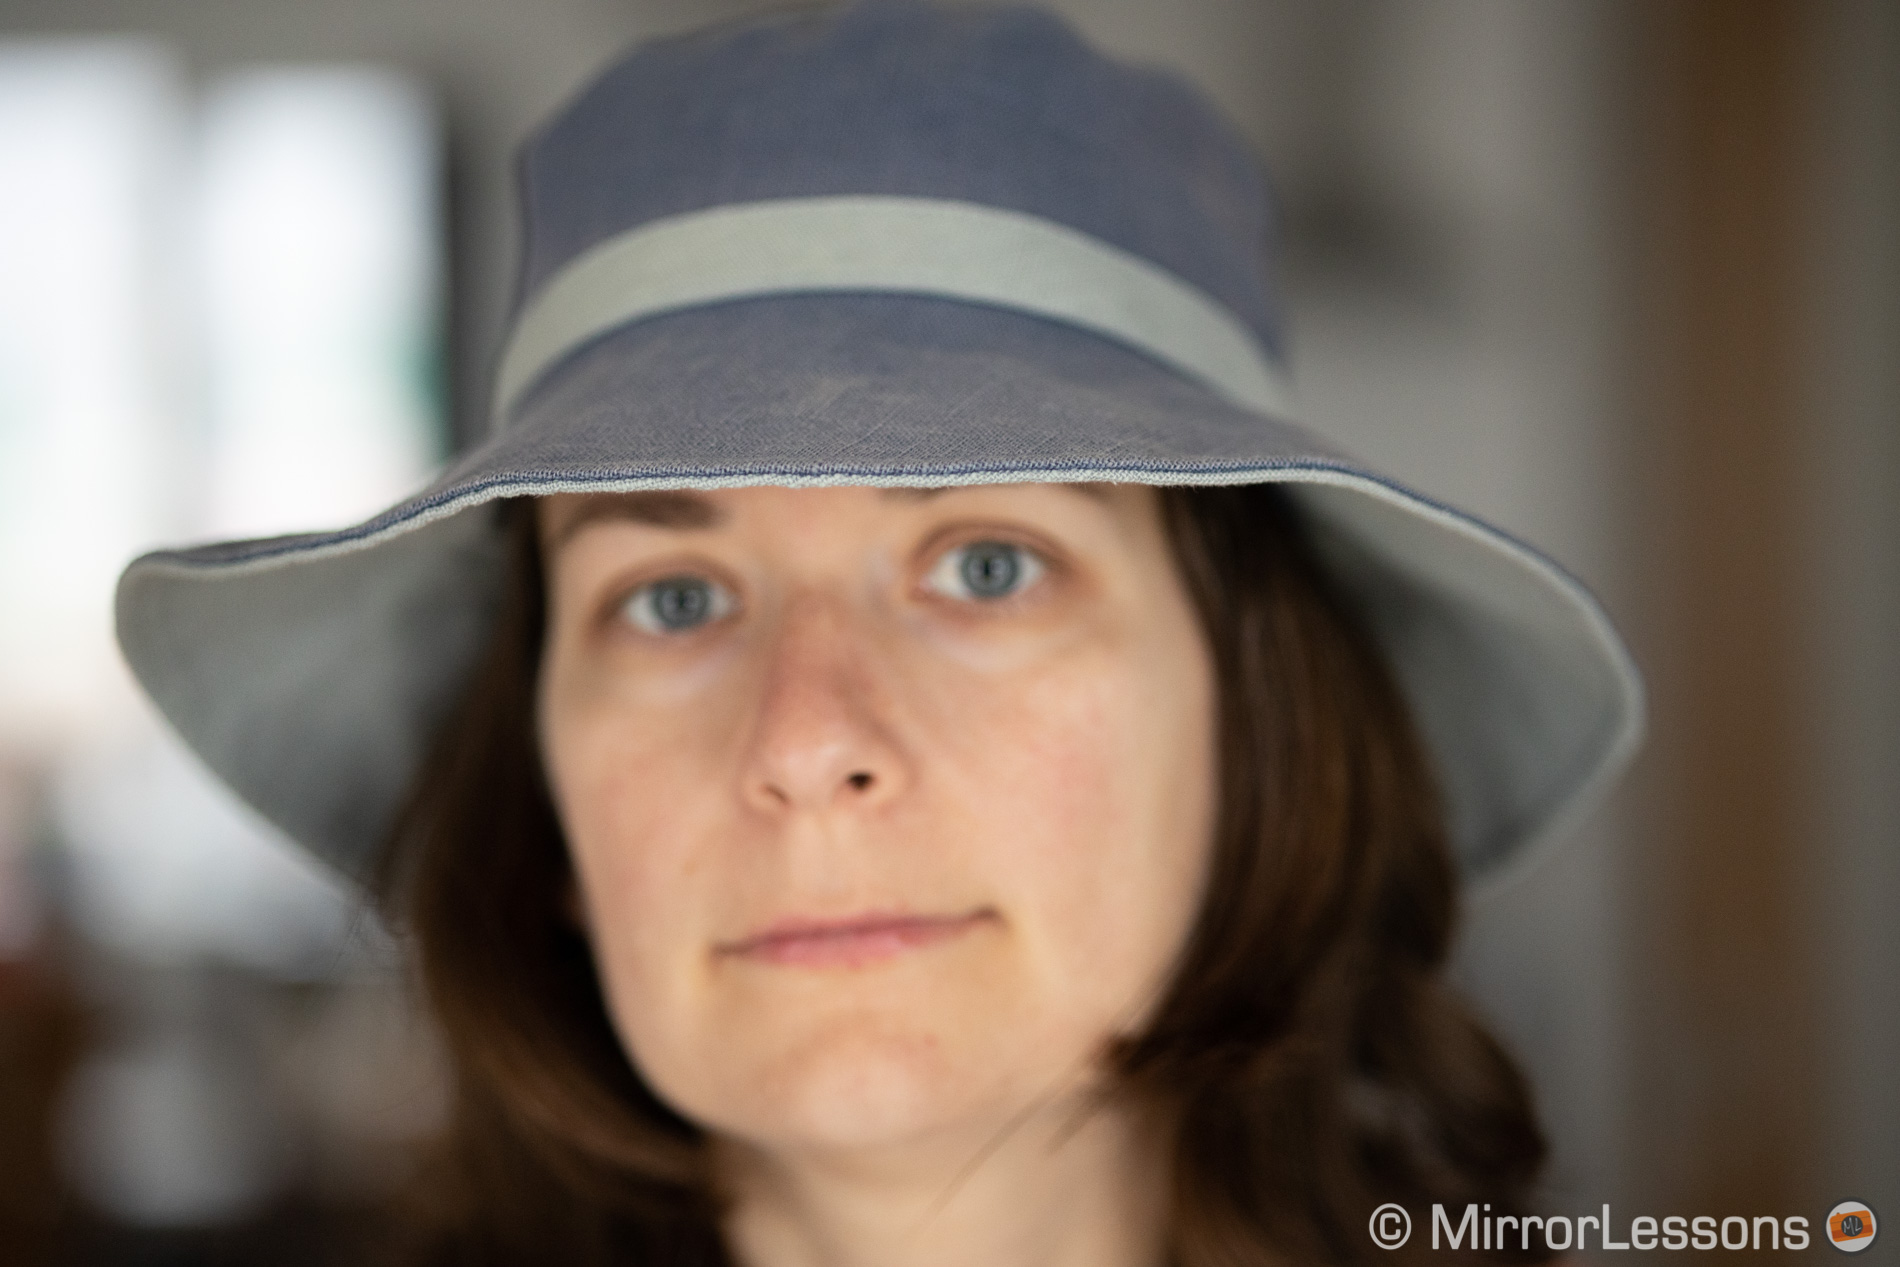
This second test shows a clear advantage for the Canon, but in conditions where the subject doesn’t move a lot (classic portrait situation), they both deliver when it comes to speed and accuracy. Interestingly, if the subject wears a hat, the Canon can get confused more easily and mis-focus on the brim rather than the eyes.
The way you set and use the face/eye AF technology is different on the two cameras. On the Canon, you have to select the Tracking AF method and the camera will focus on the eyes automatically when they are detected (if the option is enabled). You can prioritise the left or right eye, or a face when multiple people are in the frame with the AF joystick.
On the A7 III, you have two options: you can activate Face/Eye AF and the camera detects face and eyes at all times when engaging focus. Or, you can keep Face/Eye AF off but assign Eye AF to a function button and focus on the eyes only when you need it (I prefer the second option). You can’t however specify a left or right eye which is annoying.
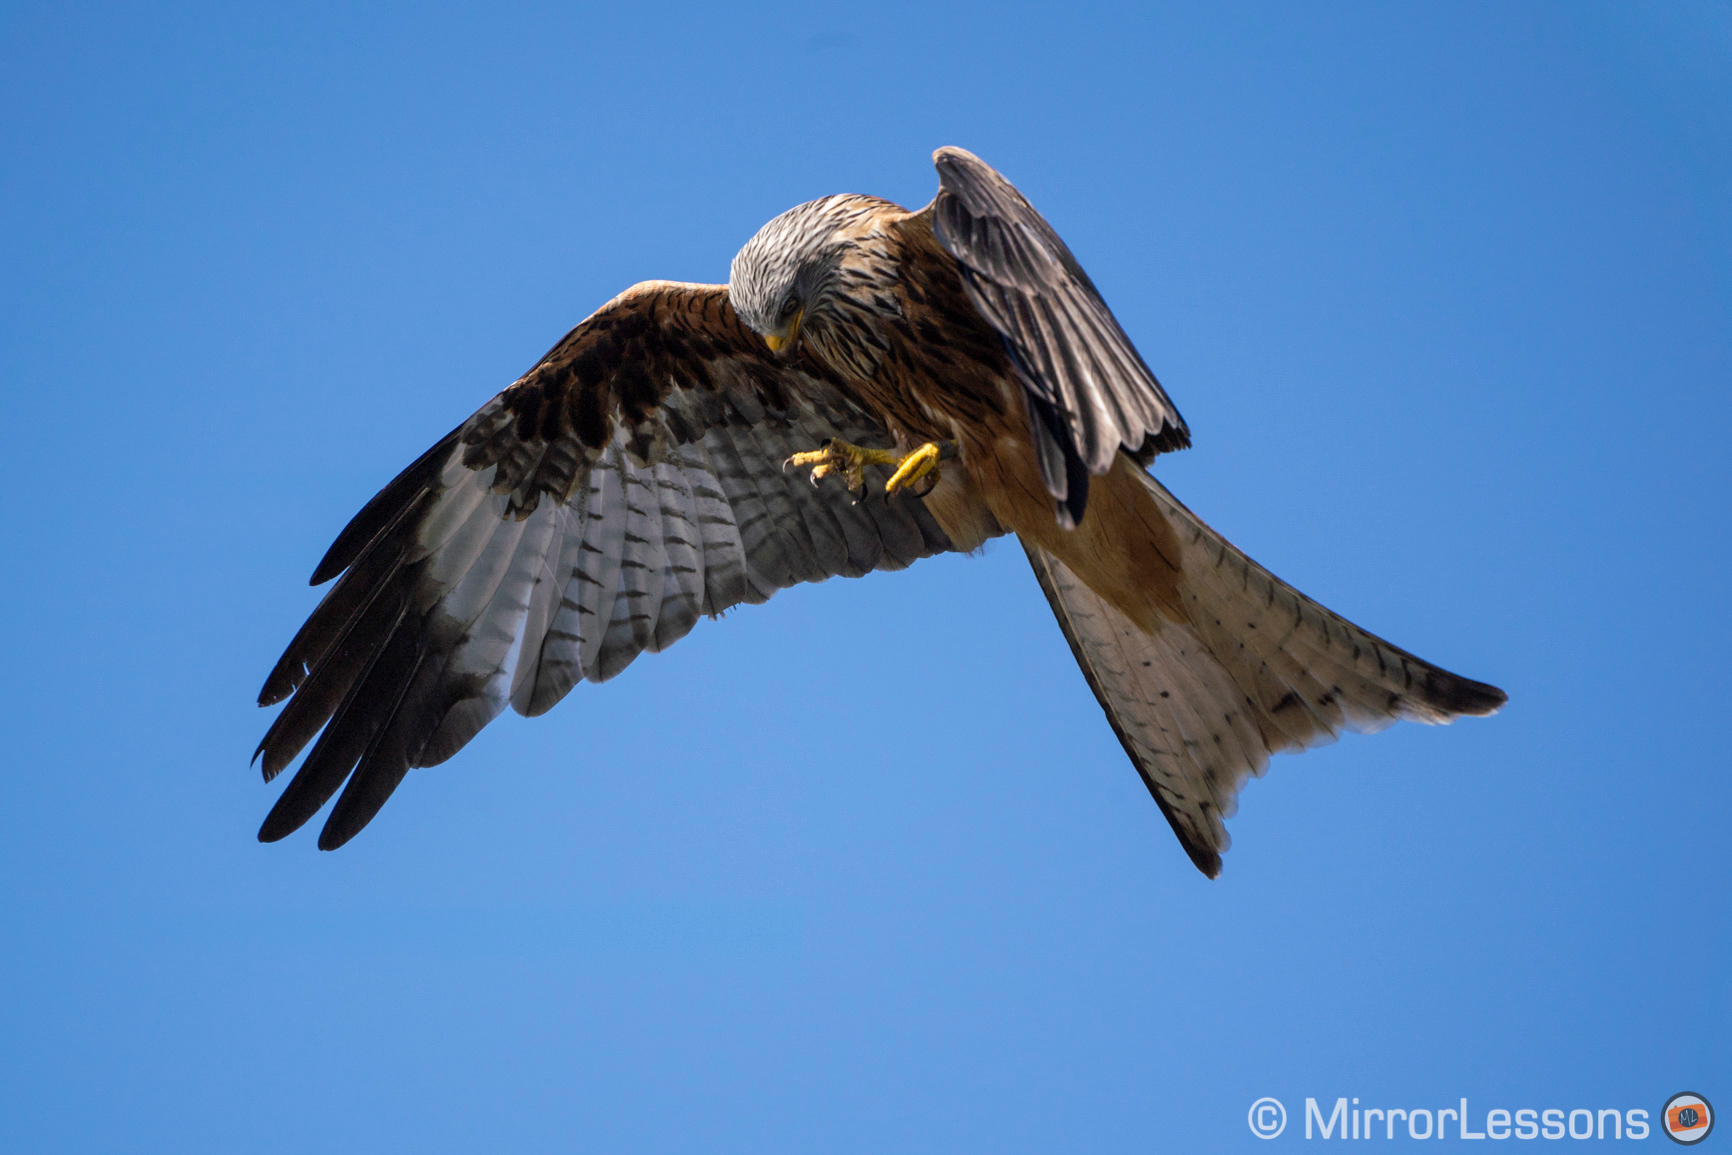
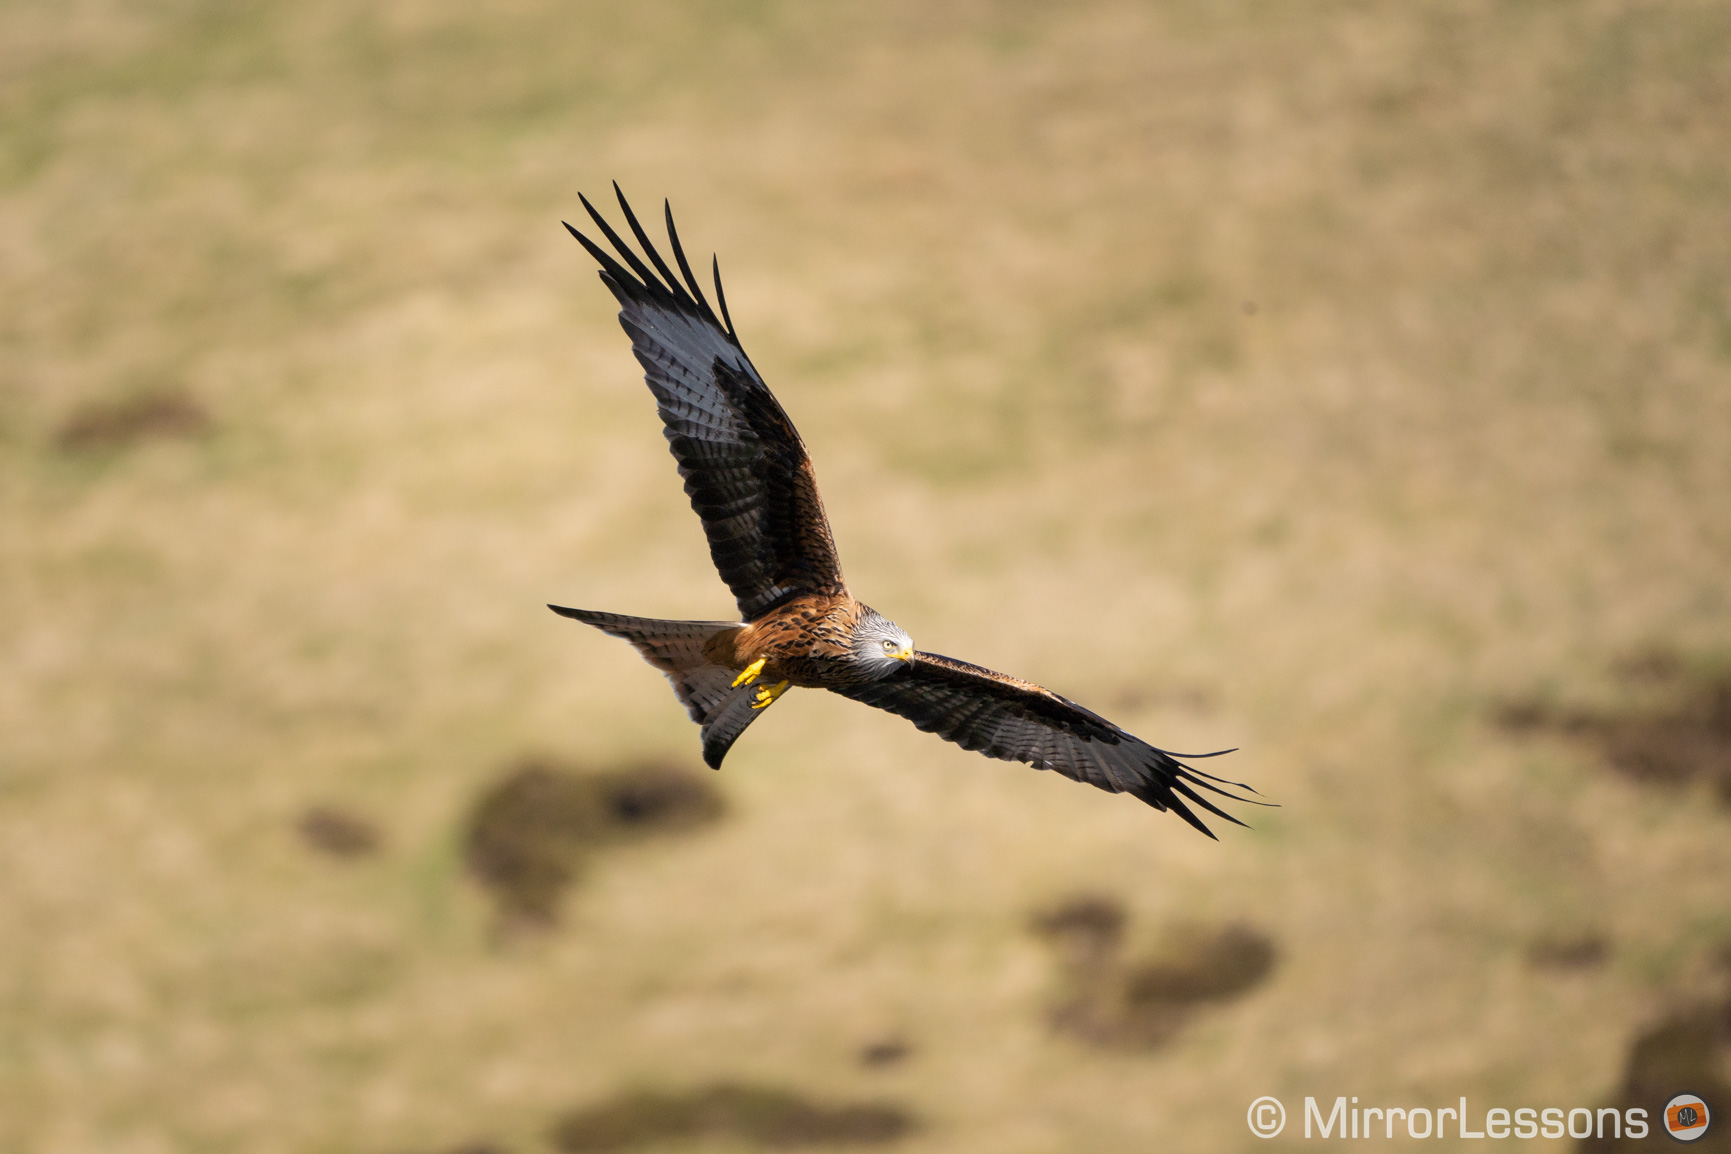
Birds in flight
Usually I try to use both cameras at different events including sports events like a football game. Unfortunately this was not possible with the EOS R6 at the time. Fortunately, my beloved red kite feeding stations re-opened, allowing me to put the R6 through its paces. (I’d already done this with the A7 III on a different occasion.)
The R6 has deep learning technology to detect the bodies, faces and eyes of animals such as dogs, cats and birds (even when they’re flying).
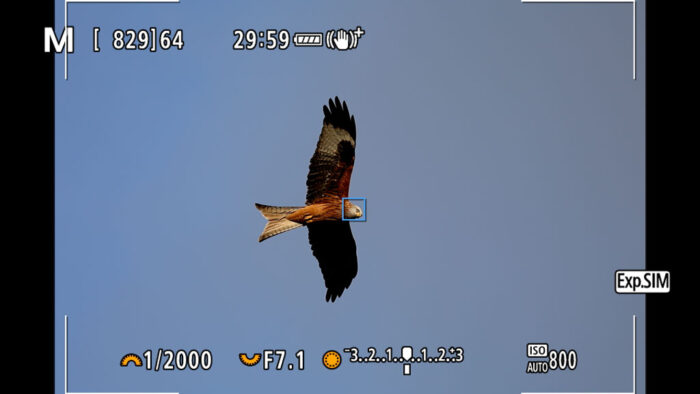
I was really curious to test this feature with birds and it didn’t disappoint. I got an excellent score of 93% / 97% and Animal Detection is among the settings I recommend using. It recognises the bird right away and can focus on the eye even when it is small in the frame.
With a bird flying erratically, it may not always detect the eye but it always stays on the body and very often the head, which is enough to get the focus where you want it. If the animal is not detected for some reason, the camera uses the normal tracking mode which is also very effective.
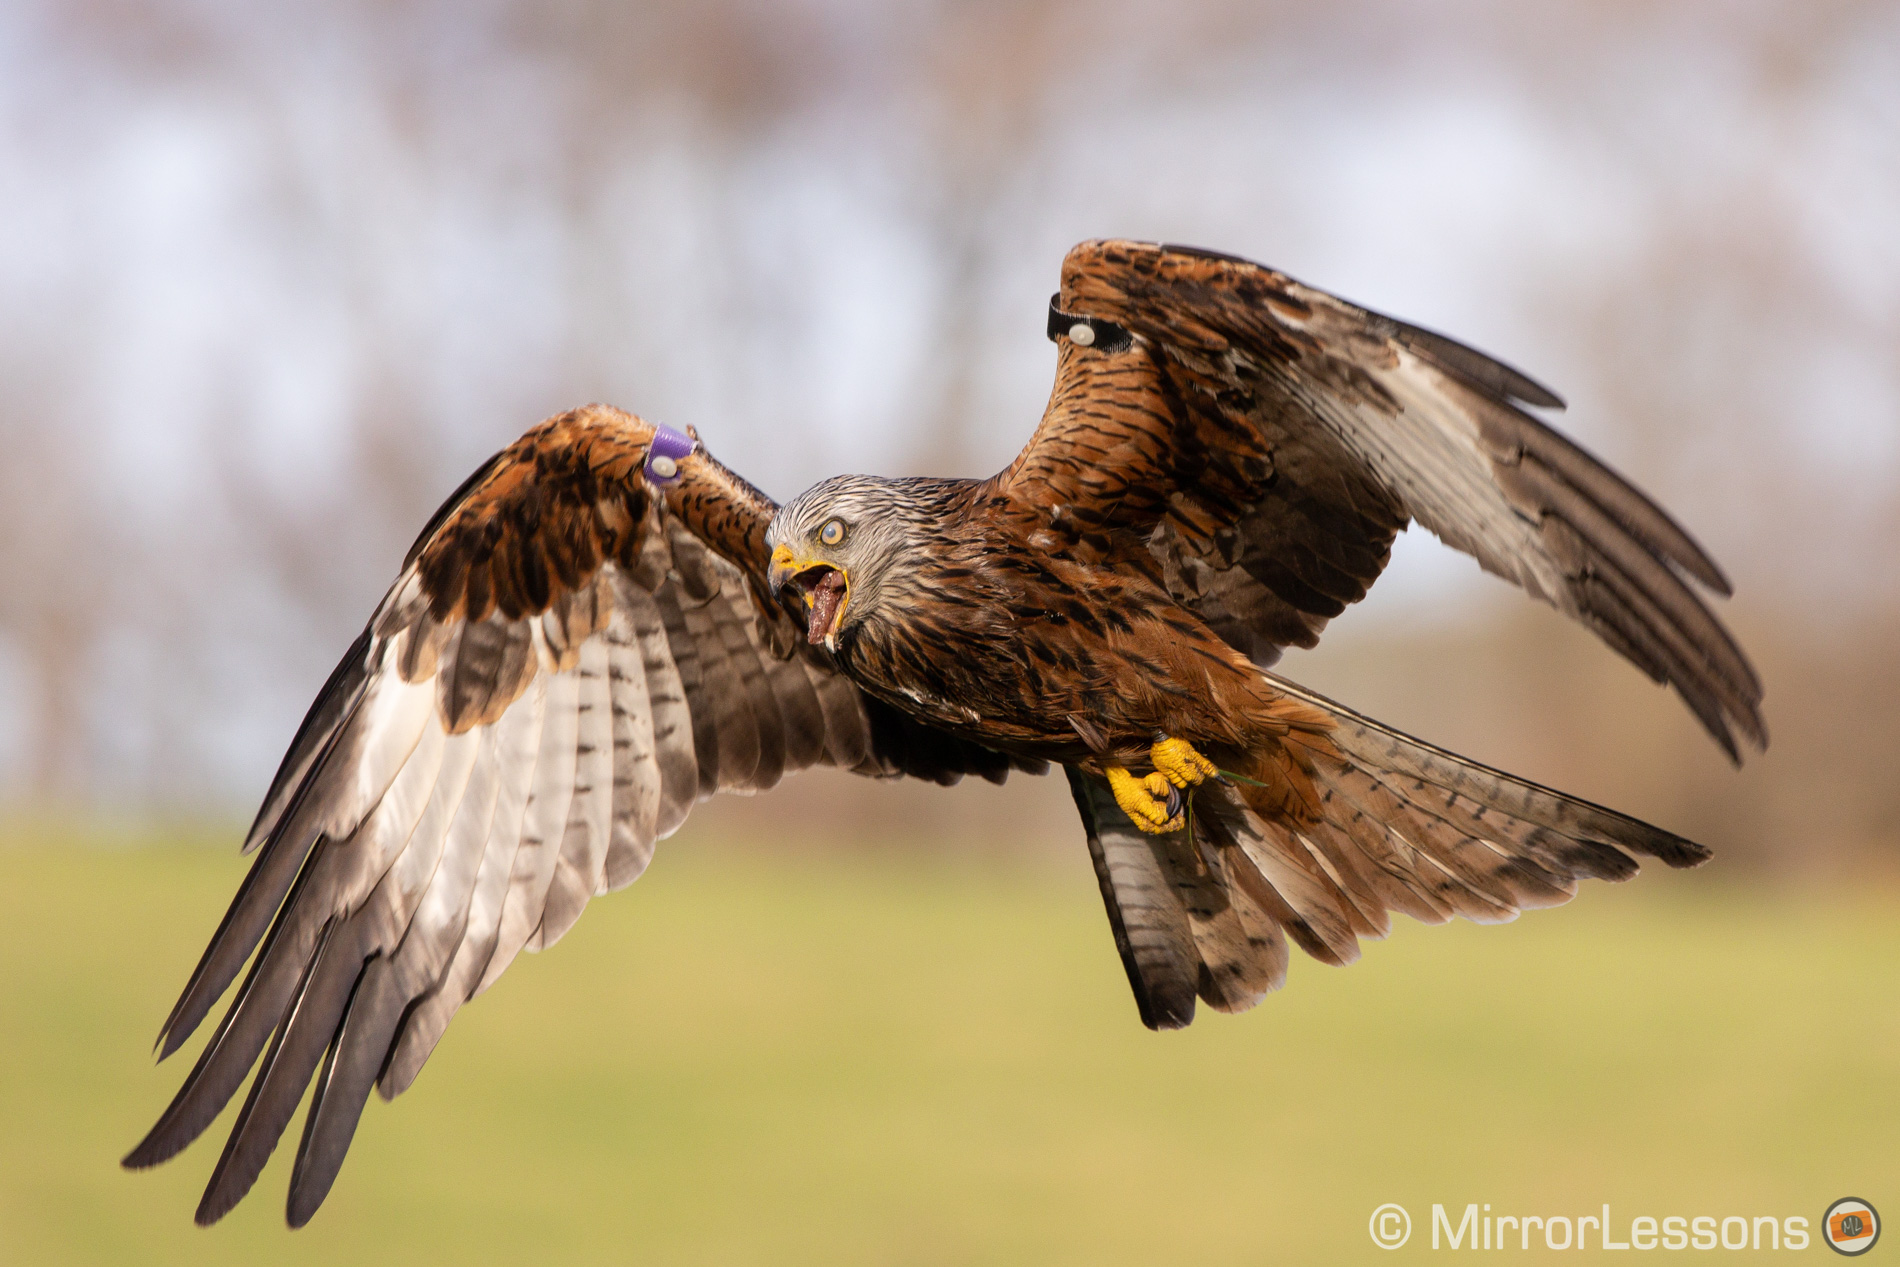
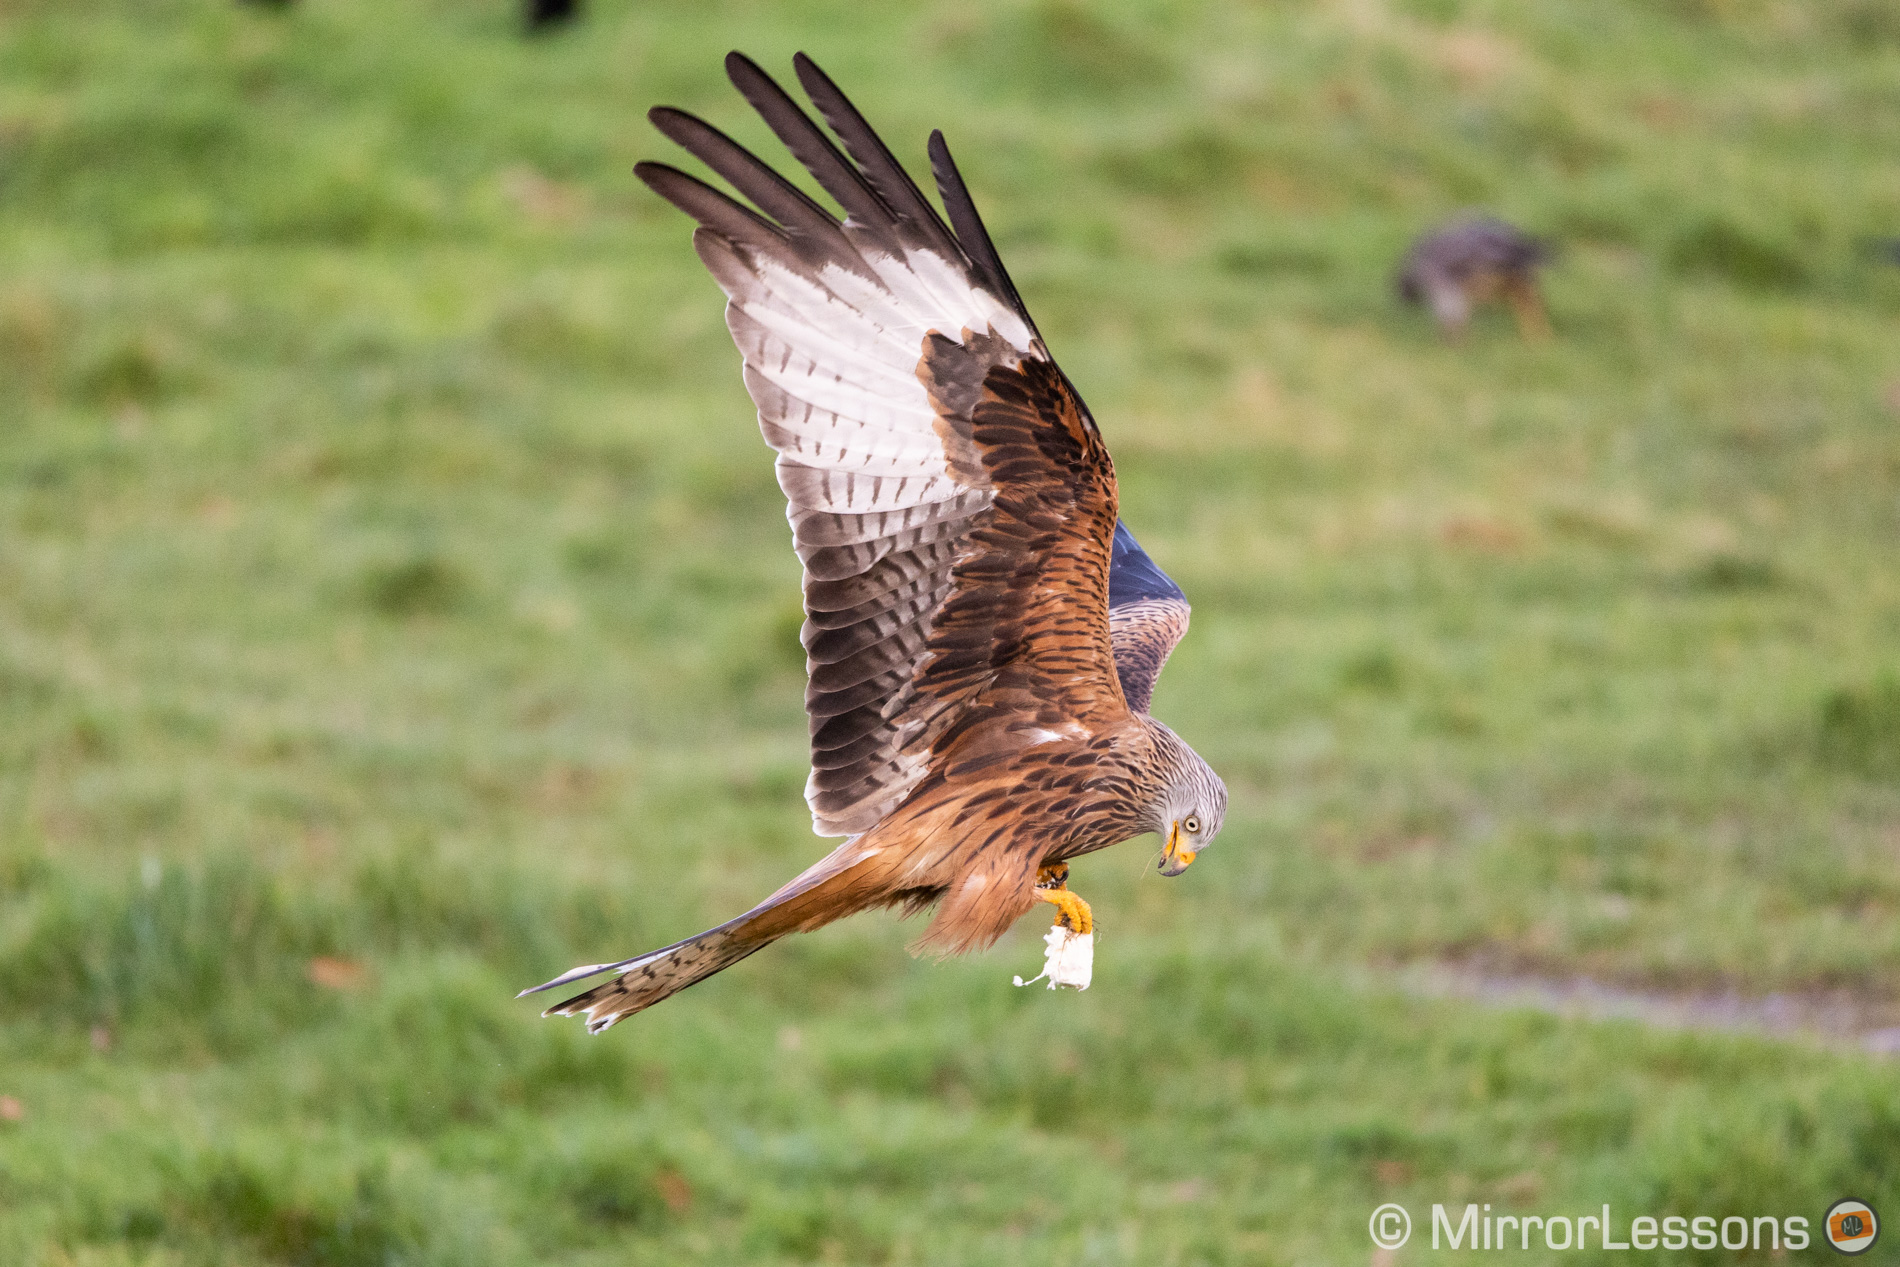
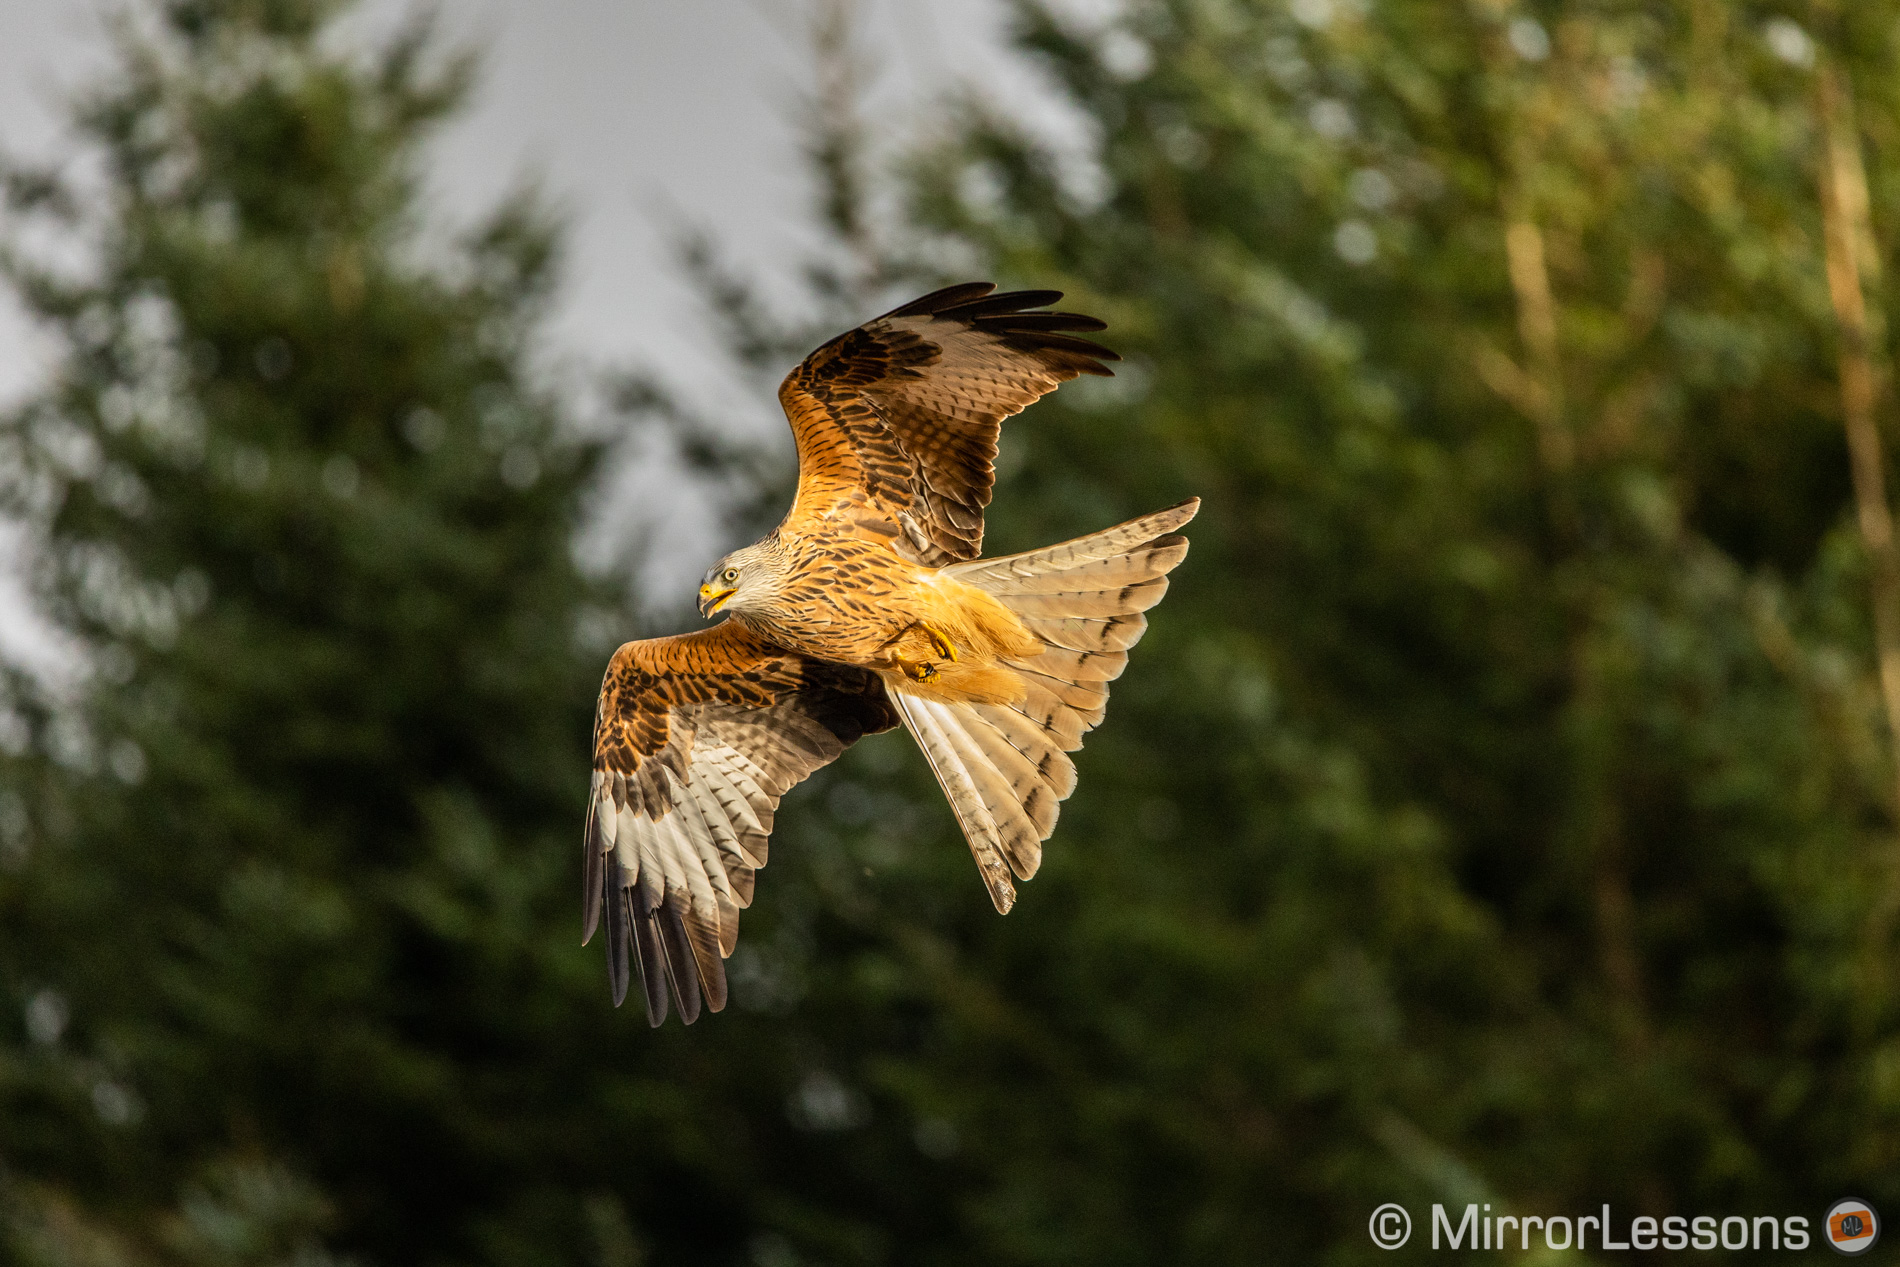
The Canon has a lot of settings to control the autofocus behaviour, and some of them are not easy to understand at first. So fine-tuning the camera for the maximum performance is not an easy task, but even with less than optimal settings, the hit rate remains high at around 85%. Last but not least, the R6 gave me the same performance and high score when using the 12 years old Canon EF 800mm 5.6 with adapter.
The A7 III Eye AF mode can work for various animals but it doesn’t detect faces or bodies, and it doesn’t work for birds yet. (Read our report about Sony Eye AF for Animals.)
The Sony does well with birds in flight but doesn’t reach the same level as the R6, with my score being 77% / 96%. Its autofocus system is easier to configure however because there are fewer settings to worry about.
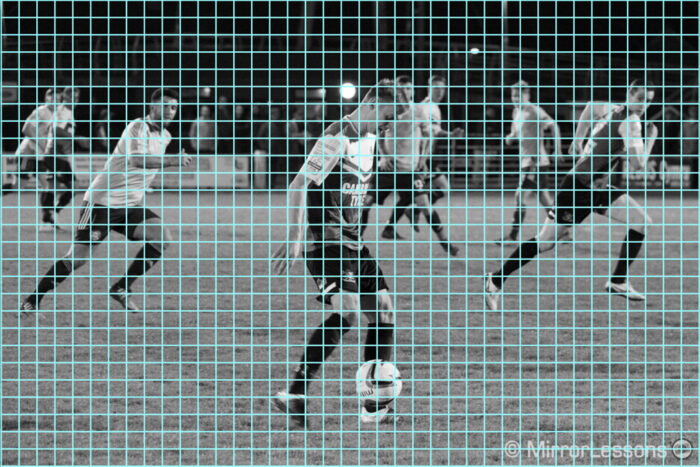
If you are curious to understand how I measure the score for birds in flight, and to see how other cameras performed, check our article below.

3. Continuous shooting speeds
The Canon EOS R6 can shoot up to 12fps, or 20fps if you use the electronic shutter. Continuous Autofocus and Exposure tracking remain active even at 20fps.
The Sony A7 III can’t match these specifications, with the highest frame rate being 10fps (with AF and AE tracking).
Curiously, when the e-shutter is enabled, the R6 always shoots at 20fps even if you select the Medium or Low burst speed. With the mechanical shutter, you can go down to 8fps, 6fps or 3fps just like with the Sony.
At the maximum speed of 12fps or 20fps, the EOS R6 shows you the last images taken in rapid succession instead of live view (the A7 III does the same at 10fps.). This means that what you see just happened an instant ago rather than in real time. That said, when working at 20fps, the sequence is so fast that this rarely posed an issue, even with birds in flight. Plus, the shutter lag of the camera is really short.
With slower speeds, both cameras show you live view with blackouts. The latter is an option you can enable on the R6 with firmware 1.2.0. If disabled, the camera mixes live view with the image just captured (basically “covering” the blackout with the recorded image). The idea is to create a smoother sequence in the LCD or viewfinder instead of having the black frame interrupting the flow all the time but I never liked this concept (the EOS R does the same). It introduces a weird lag effect where the sequence constantly freezes, then resumes motion. It can be very distracting so I’m glad Canon gave us the option of real blackout with the firmware update.
When using the electronic shutter, both cameras can produce distortion when panning quickly. The quicker you move, the more visible it is (this phenomenon is known as rolling shutter). The R6 has a faster sensor readout and suffers less from it, as you can see below.
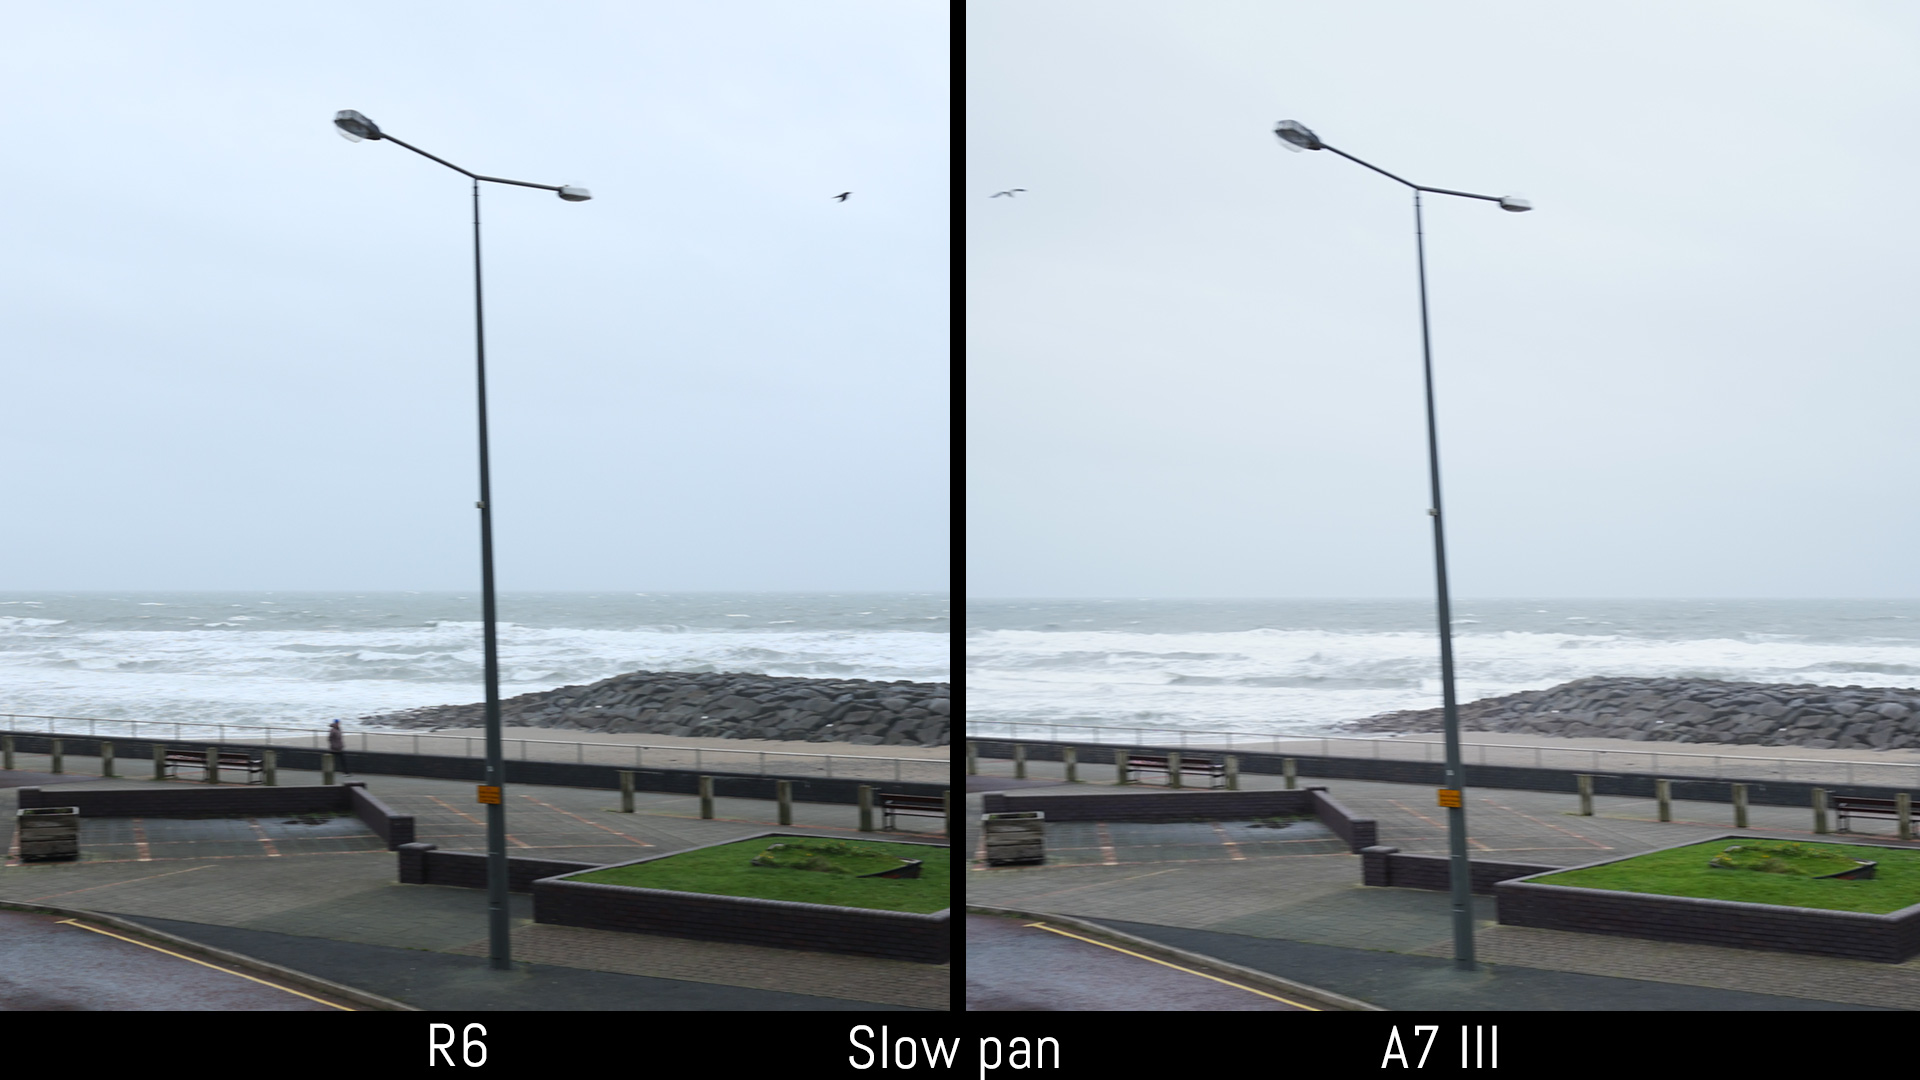
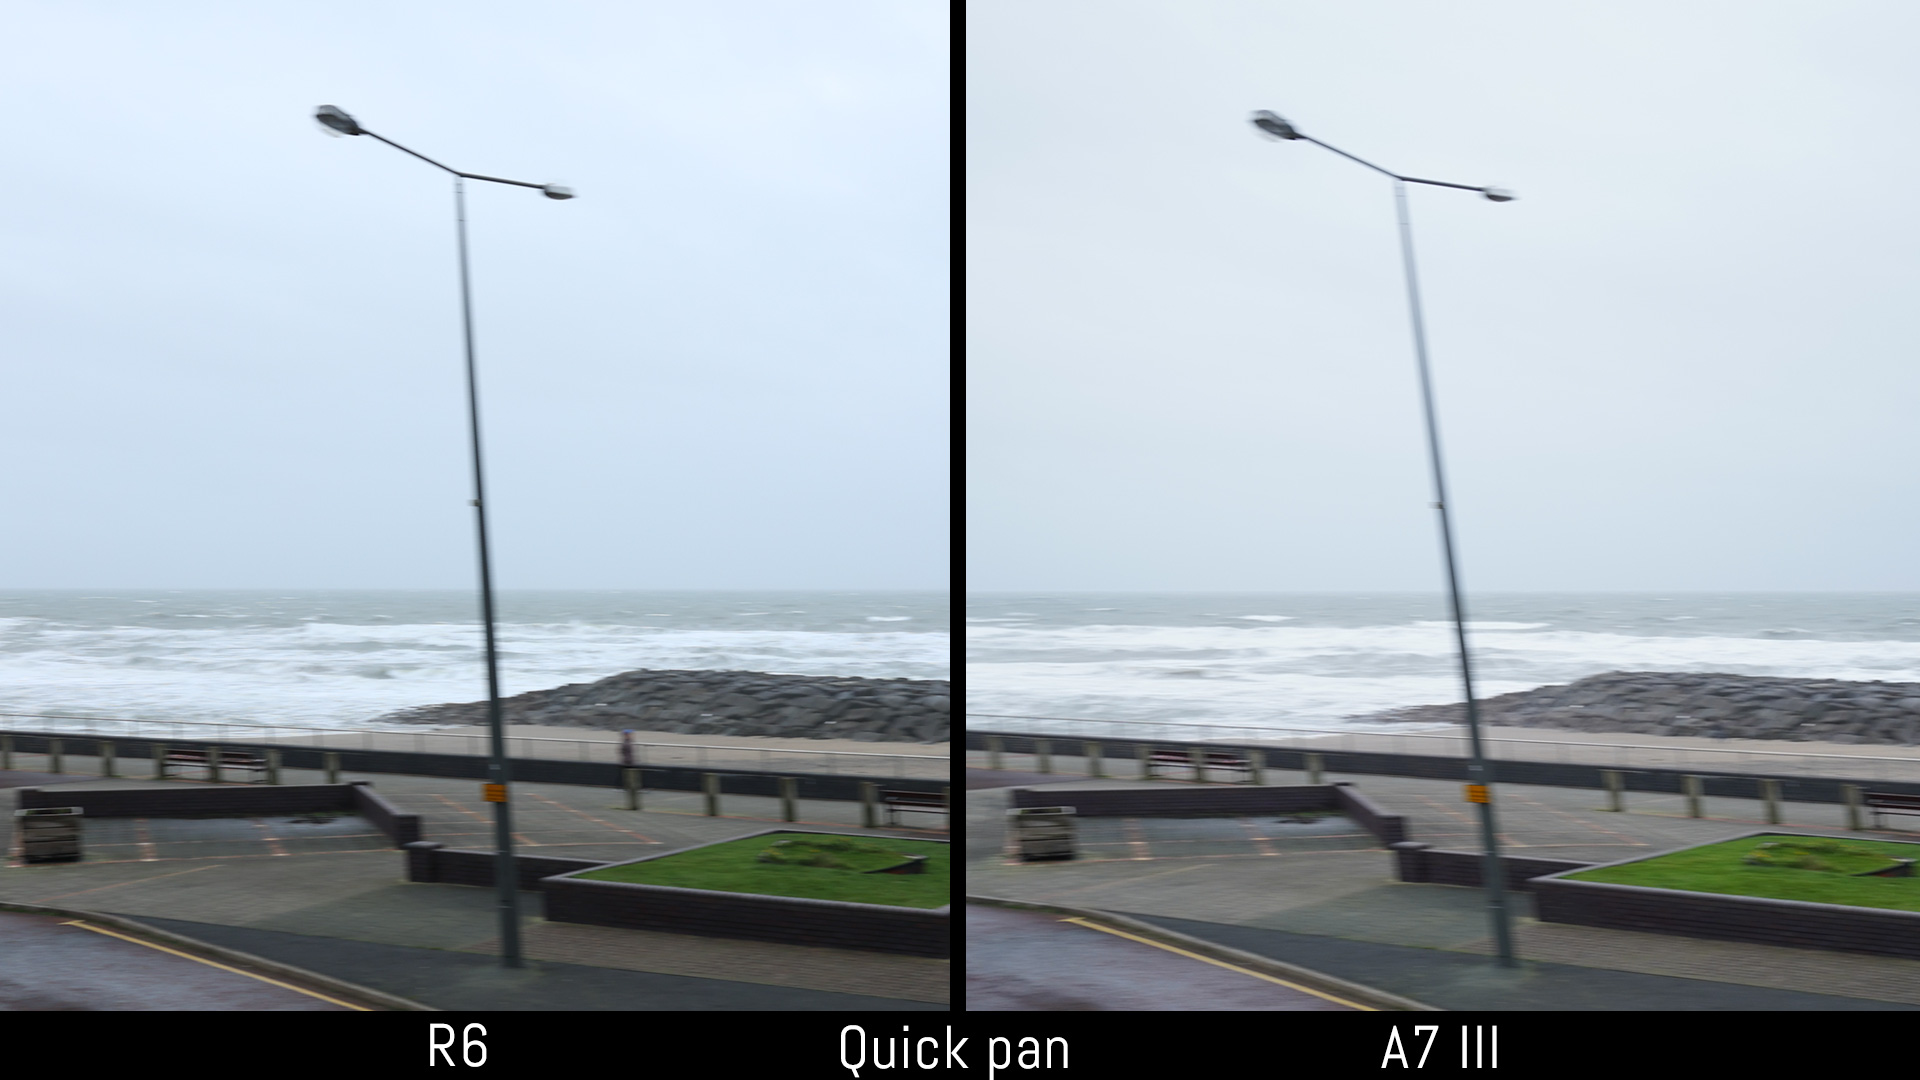
I’ve used the electronic shutter for birds in flight on the Canon and these distortions were not too visible, also thanks to the more complex shape of the animal itself. However, keep in mind that for both cameras, the bit-depth drops from 14 to 12-bit when shooting RAW.
The buffer is better on the Canon too: it can shoot at 12ps at full speed for about 20s with RAW files (that’s about 240 files) or more than 60s with JPGs (about 1000 files) before taking short intervals to clear the buffer.
At 20fps with the electronic shutter, the R6 lasts for about 5s at full speed with RAW files (100 frames), or more than 30 seconds with JPGs (600 frames).
The A7 III can shoot RAW images at 10fps for about 9 seconds (90 frames) before slowing down. With JPGs, it lasts up to 17 seconds (170 frames).
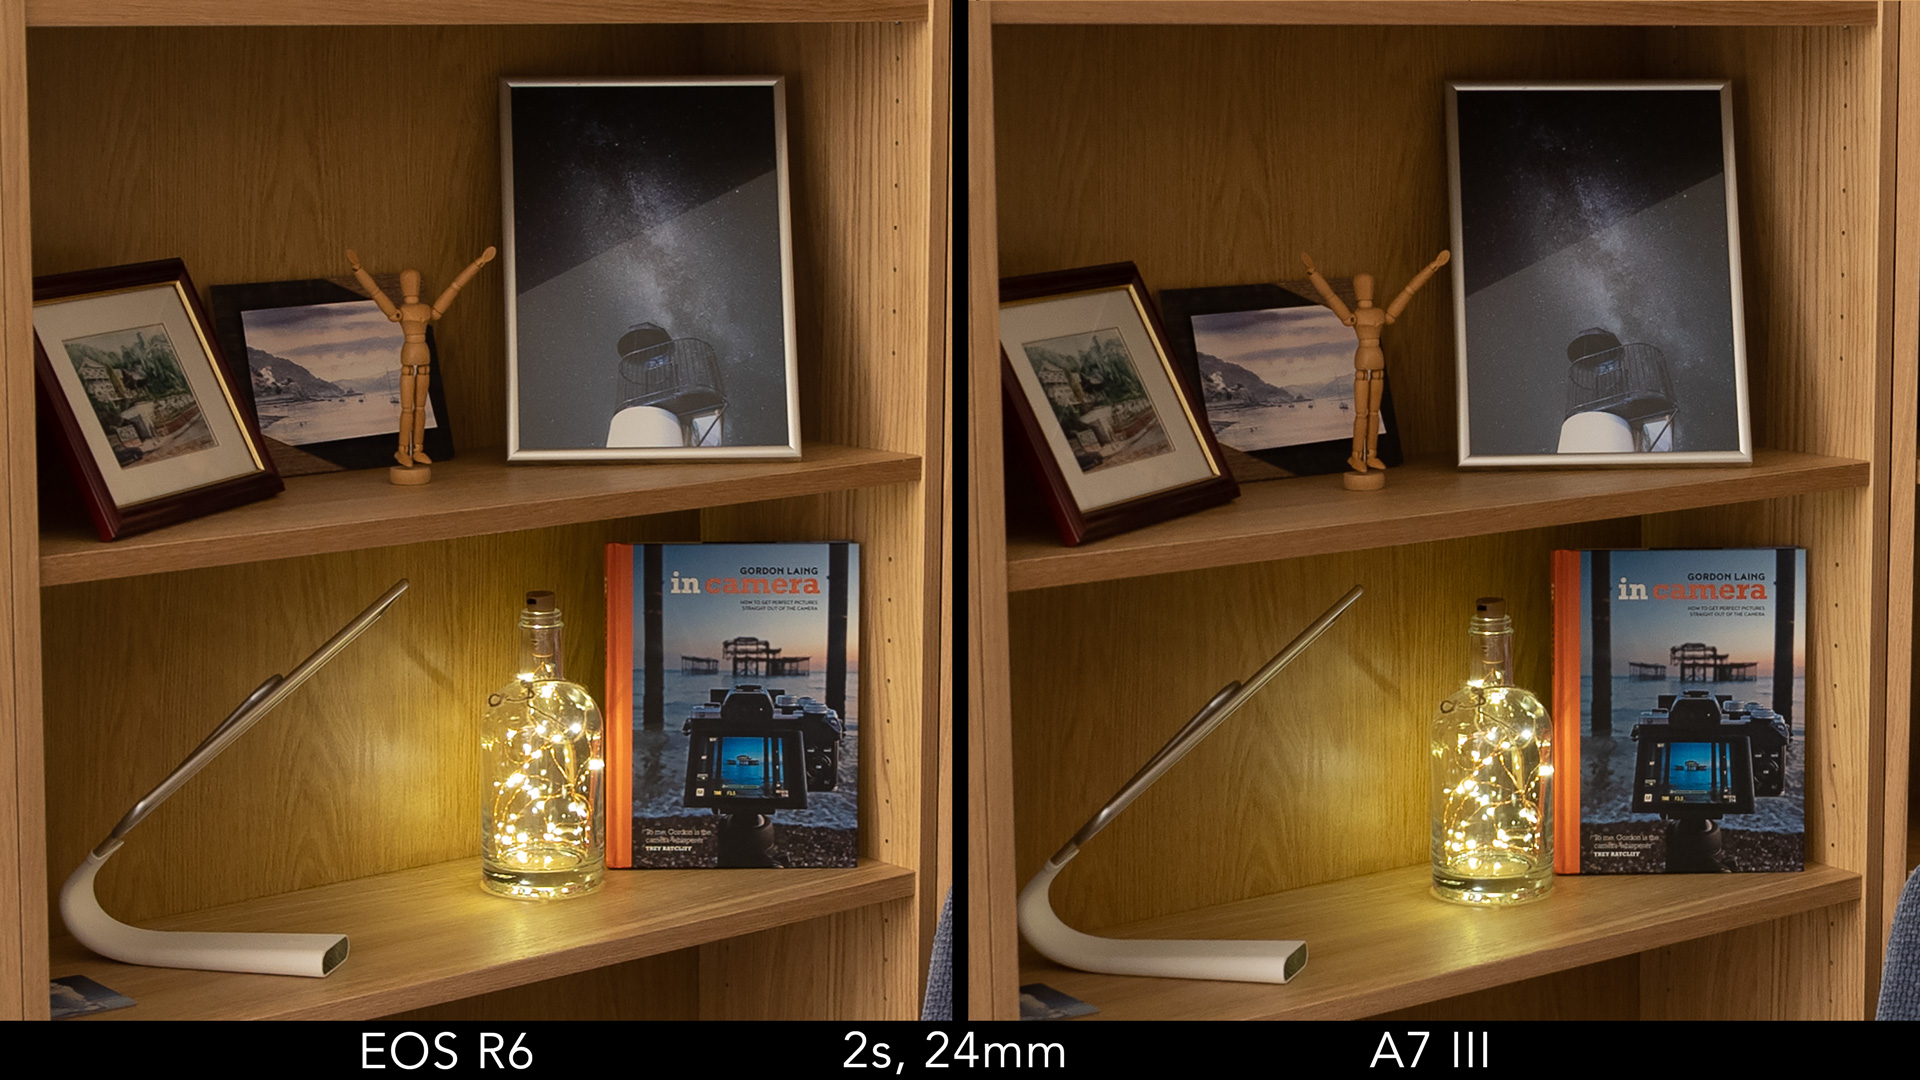
4. Image stabilisation
The EOS R6 is the first camera from Canon to receive 5-axis in-body stabilisation (along with the R5). Canon was the last company to incorporate this technology (Sony was the first to utilise it on a full frame camera with the A7 II in 2014) but the specifications are the best on the market at the time of publishing.
The R6 offers up to 8 stops of compensation which is the highest rating of any camera given by the CIPA association (even better than high-end Olympus products). This rating can drop down to a minimum of 6.5Ev depending on the lens used, so not every lens will give you 8 stops of compensation. (See the full list in our R5 vs R6 article.)
The A7 III also has 5-axis stabilisation on the sensor but the rating is lower at 5 stops. Sony hasn’t specified different ratings depending on the lens used, so one must assume it is the same for all its E-mount lenses.
First I tested how the two cameras perform with a lens that has optical stabilisation, where 3 axes on the sensor (roll, x and y) are combined with the lens IS (pitch and yaw). I used the Canon RF 24-105mm f4 and and the Sony FE 24-105mm f4 OSS.
The test was conducted as follows: I tried different shutter speeds and for each I took 10 shots, not only measure how slow you can go but also to see how consistent the performance is.
Given Canon’s claim of 8 stops of compensation, I started with a super slow speed of 8 seconds at 24mm but none of the images were sharp. At 4s, three images were not far off, but it was at 2s that the R6 delivered the first acceptable results. The Sony delivered one good shot at 2s and three good ones at 1s which is more than I was expecting.
Below you can see the keeper rate for each shutter speed. It is interesting to note that despite the good performance with slow shutter speeds, you don’t get a 50% or higher hit rate before 1/2s or 1/4s. This means that at 1s or 2s, you need to be patient, try to be as still as possible and take multiple shots to increase the chance of bringing home at least one good photo.
| Shutter speed IBIS + OIS | EOS R6 24mm | A7 III 24mm |
|---|---|---|
| 8s | 0% | – |
| 4s | 0% | 0% |
| 2s | 30% | 10% |
| 1s | 30% | 30% |
| 1/2s | 50% | 40% |
| 1/4s | 90% | 70% |
| 1/8s | 100% | 100% |
Tip for sharper images taken hand-held at slow shutter speeds
You can increase the success rate by using the electronic front curtain shutter and shoot in continuous burst mode (you don’t need the fastest fps).
At 50mm, both cameras deliver something good at 1s, but the keeper rate increases from 1/4s, especially with the Canon model.
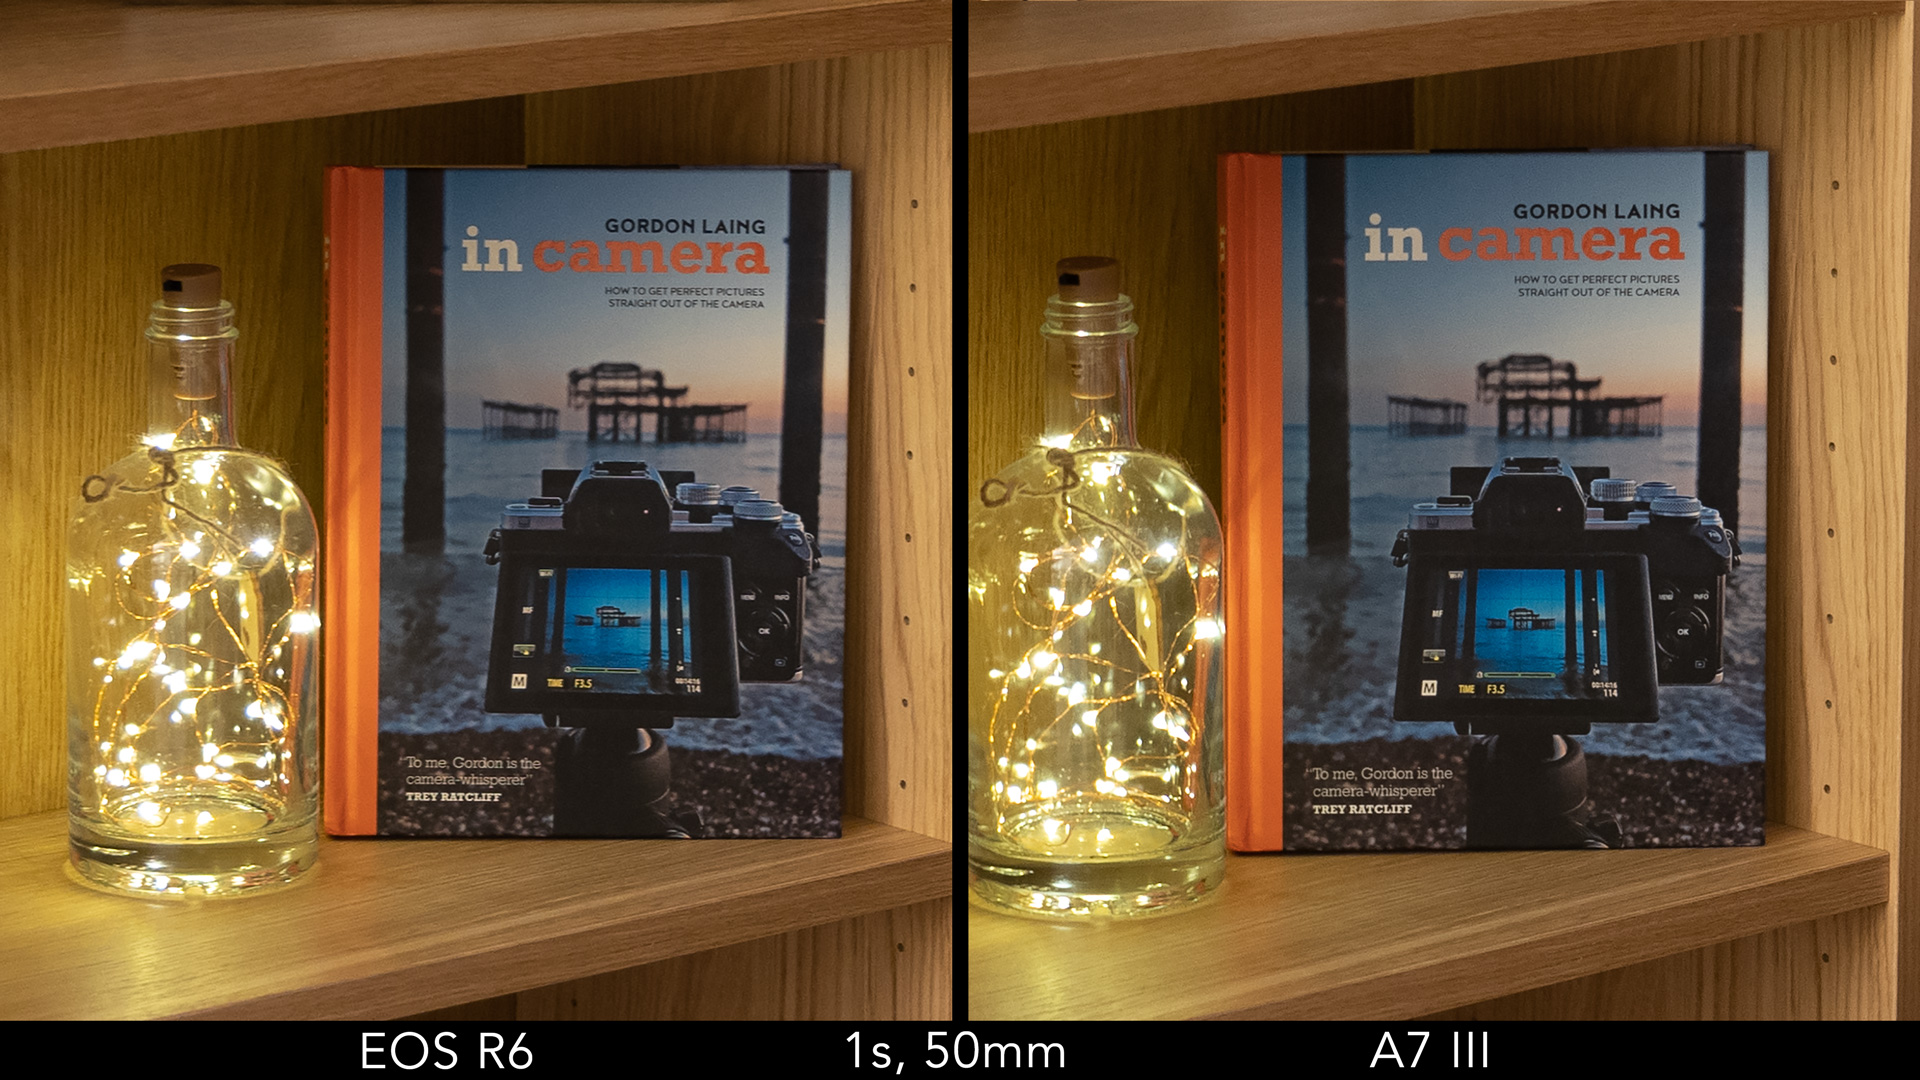
| Shutter speed IBIS + OIS | EOS R6 50mm | A7 III 50mm |
|---|---|---|
| 4s | 0% | – |
| 2s | 0% | 0% |
| 1s | 20% | 10% |
| 1/2s | 20% | 10% |
| 1/4s | 70% | 20% |
| 1/8s | 80% | 50% |
| 1/15s | 90% | 60% |
At 105mm, the R6 doesn’t do miracles but 40% at 1/4s is still very good performance overall. With the Sony, you need a value faster than 1/8s to reach the same hit rate.
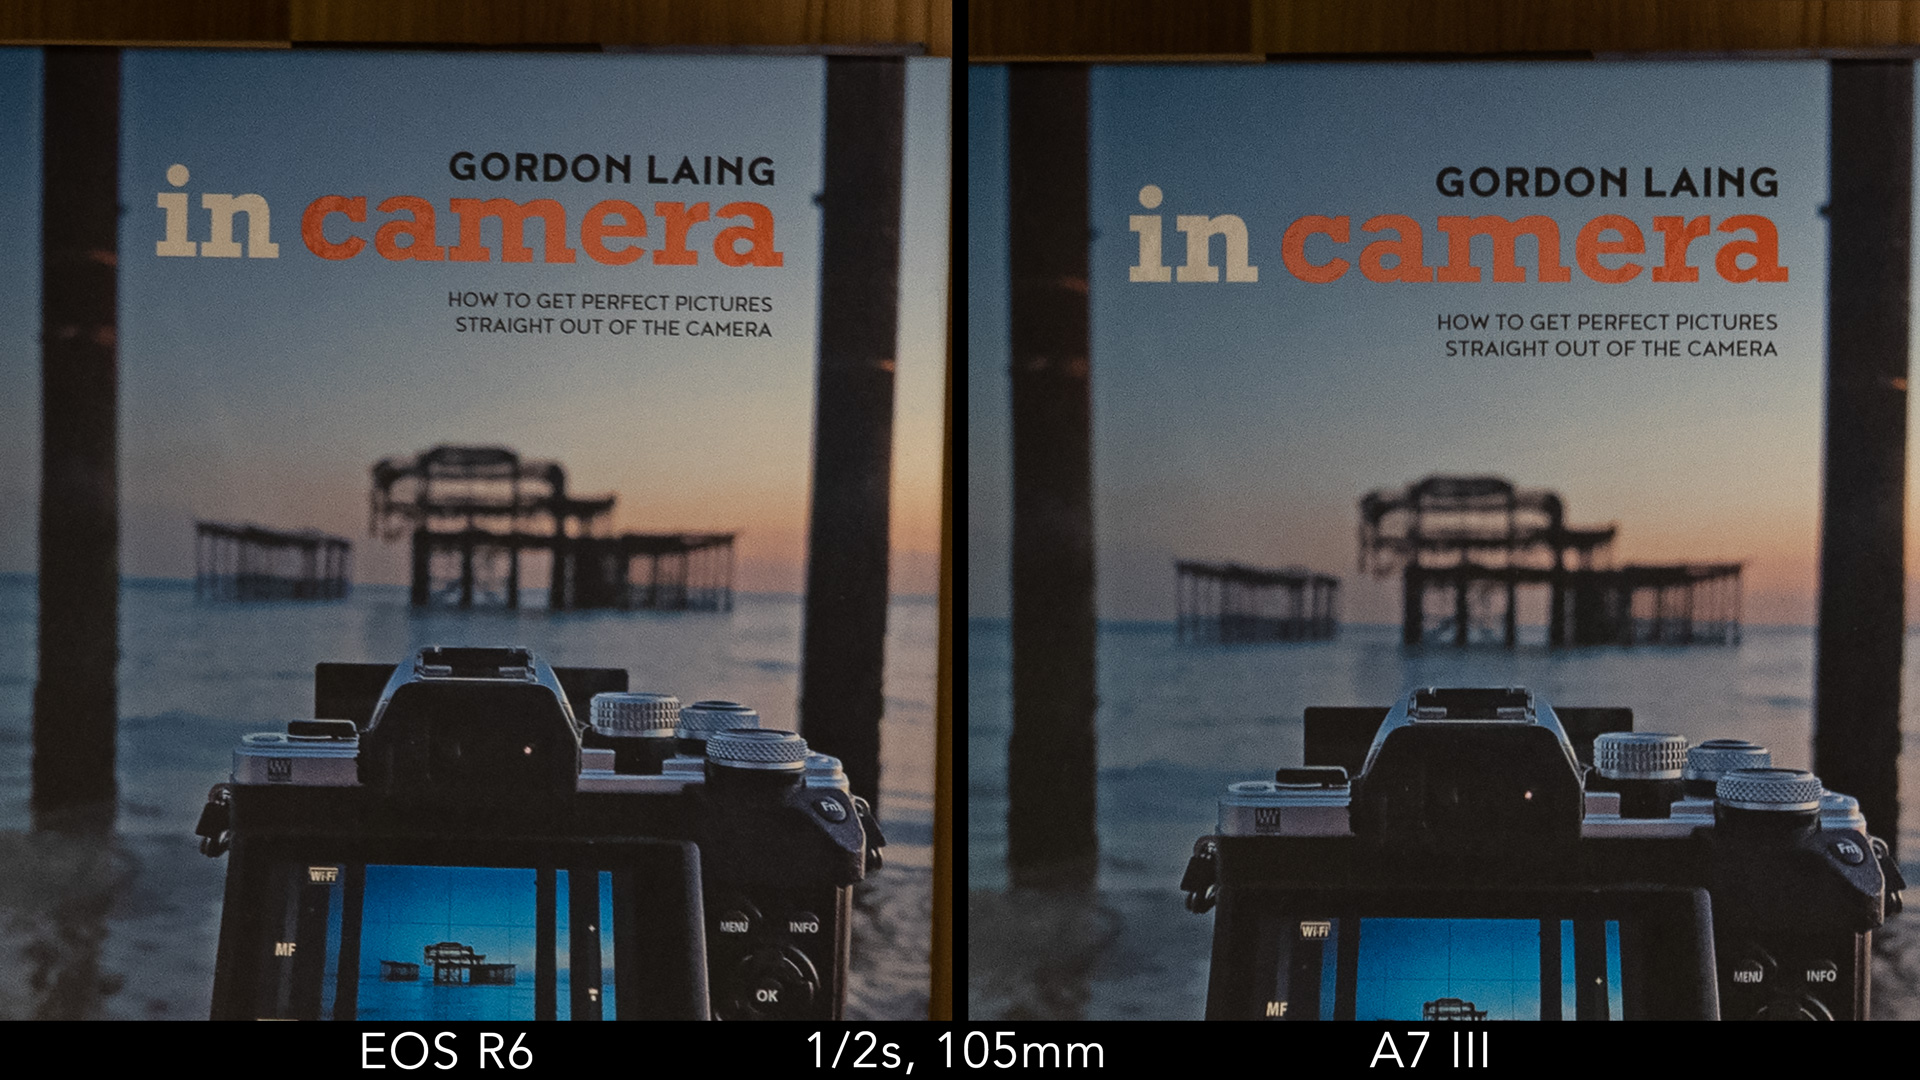
| Shutter speed IBIS + OIS | EOS R6 105mm | A7 III 105mm |
|---|---|---|
| 2s | 0% | 0% |
| 1s | 0% | 0% |
| 1/2s | 10% | 10% |
| 1/4s | 40% | 20% |
| 1/8s | 70% | 30% |
| 1/15s | 100% | 70% |
The second part of my test involved using two lenses without optical stabilisation, with each camera using the five axes on the sensor (roll, x, y, pitch and yaw). In this case, I had the RF 50mm f1.2 and the FE 55mm 1.8.
The performance is not as good as with the zoom lenses above, but the A7 III is not far from the R6’s performance past the half a second mark.
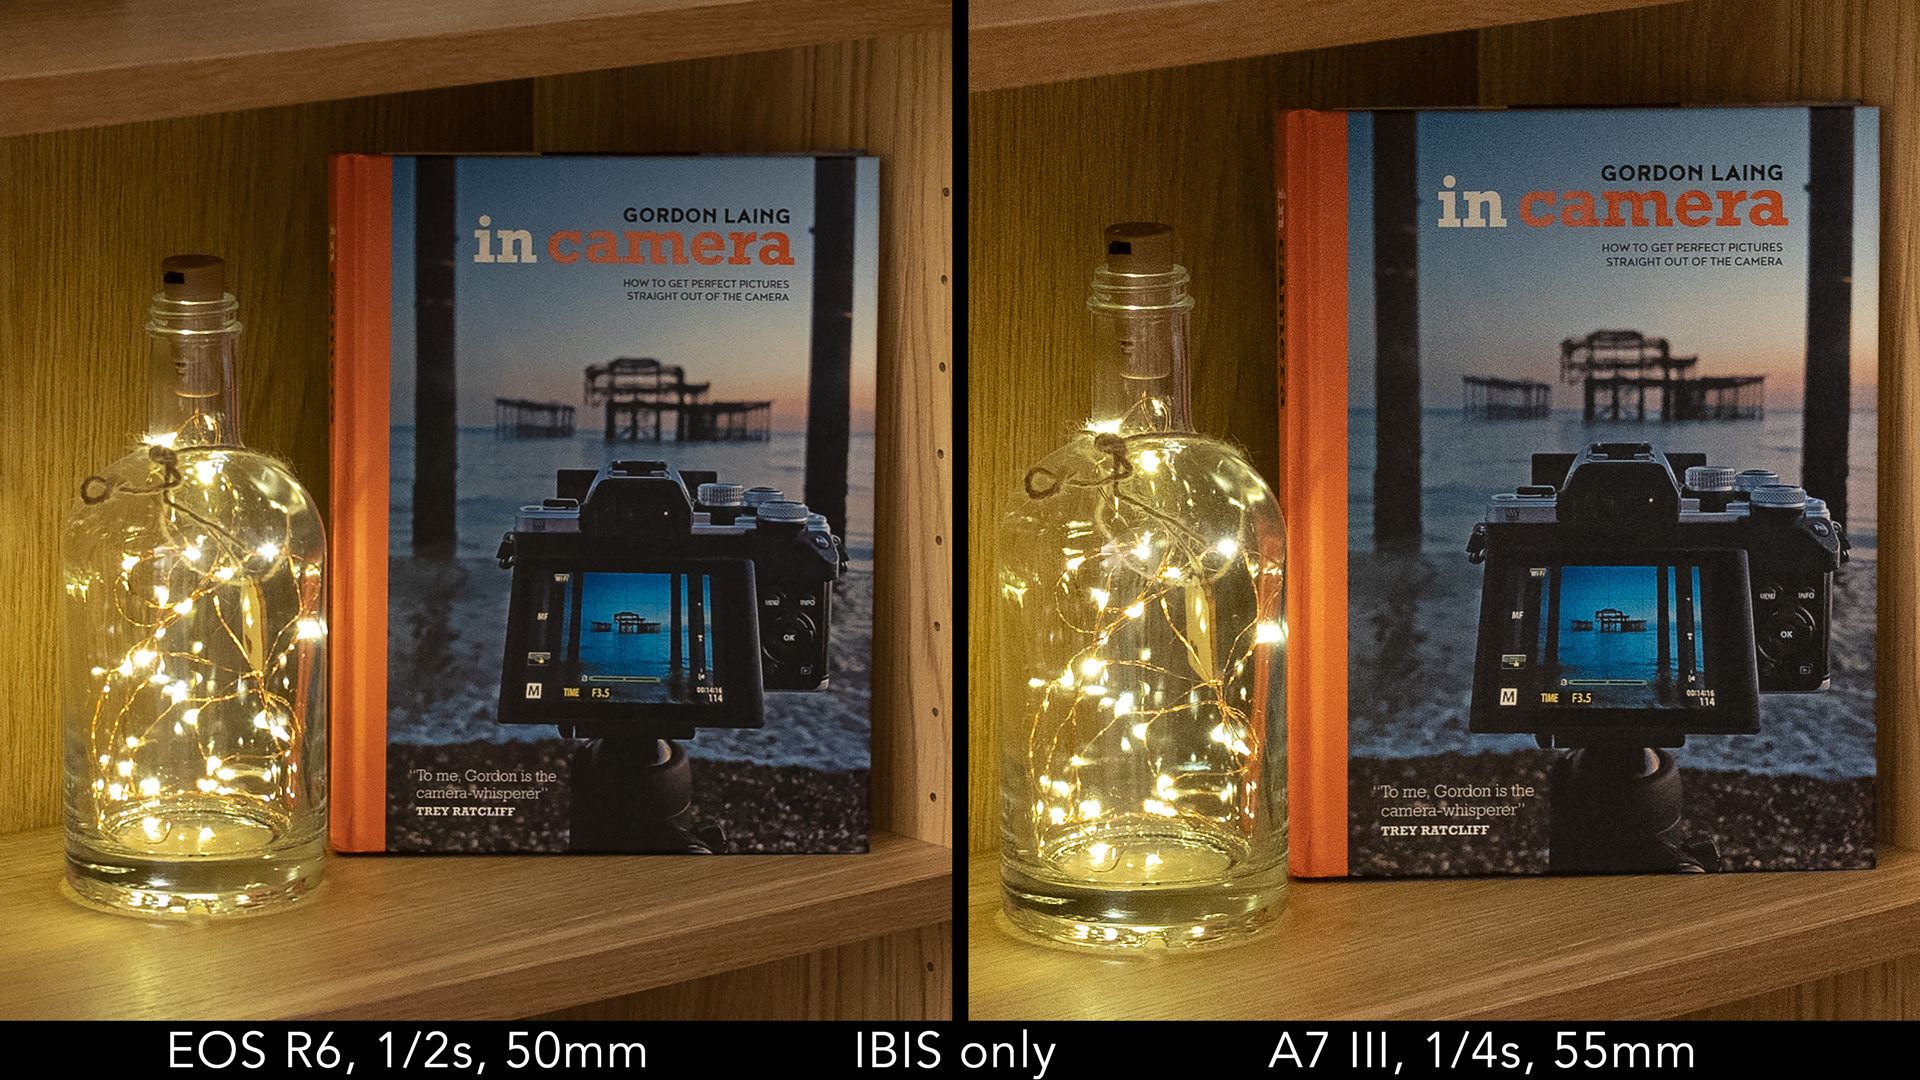
| Shutter speed IBIS | EOS R6 50mm | A7 III 55mm |
|---|---|---|
| 2s | 0% | 0% |
| 1s | 0% | 0% |
| 1/2s | 30% | 0% |
| 1/4s | 40% | 40% |
| 1/8s | 90% | 80% |
| 1/15s | 100% | 90% |
As always, remember that there are other factors that can influence the results:
- how steady you are capable of being with the camera
- how comfortable you are with your position and the environment around you (ex. if you’re cold or tired, you’ll shake more)
In my experience, you don’t always get the same performance every time, but knowing how far you can push the shutter speed and, more important, at which shutter speed the camera gives you a decent keeper rate is useful.
What is interesting to note in the tests above is that between 1s and 1/8s (the shutter speeds you most likely use the most), the R6 has a better keeper rate for the most part, but you don’t feel the 3 stop gap between them as the official ratings suggest.
Stabilisation works for video too. See our video section further down for more details.
5. Video
The EOS R6 marks a relevant step forward for Canon by including specifications that filmmakers have been waiting for.
The Canon camera can record 4K video up to 60p with full pixel readout (oversampling) and just a minor sensor crop of 1.07x. In Full HD, you can record up to 120fps with the High Speed mode.
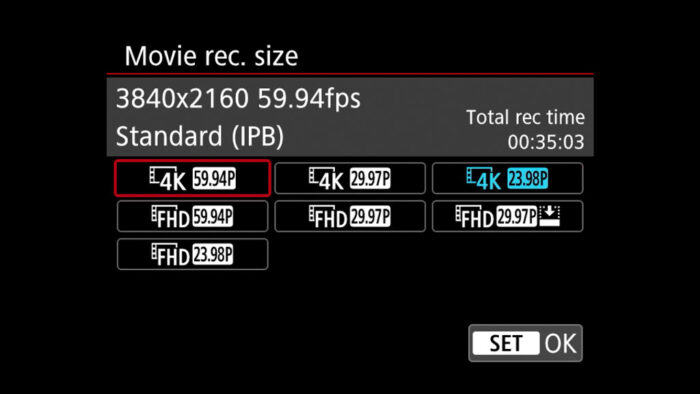
The A7 III also records in 4K but the maximum frame rate is 30p with a 1.2x crop (24p and 25p use the full width of the sensor however). It too can record 120fps in Full HD, and you can choose whether to use the Q&S mode (slow motion effect directly in camera like the R6) or record in normal mode with sound (the slow motion effect needs to be done in post).
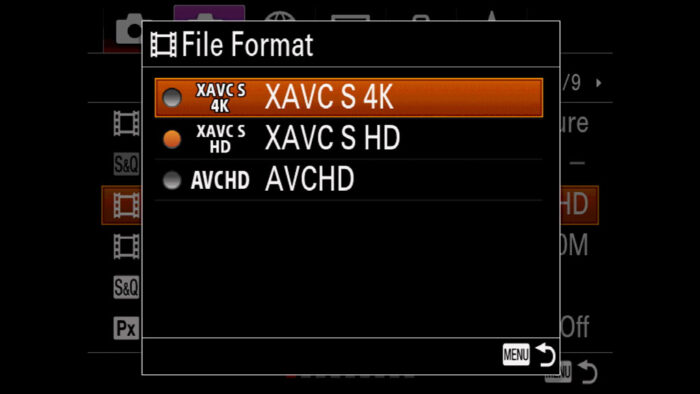
One clear advantage of the EOS R6 is that it can record 10-bit 4:2:2 internally (H.265 codec) with either the Canon Log gamma or the HDR PQ profile. The A7 III has two log profiles, HLG and several other settings designed to customise the image, but it is limited to 8-bit internally and externally (HDMI output).
The R6 has higher bitrate too. It goes to a maximum of 120Mbps in 4K up to 30p, or 230Mbps at 50/60p. If you record with C-Log or HDR PQ, the bitrate goes up 170 and 340Mbps respectively. The maximum bitrate of the A7 III in 4K is 100Mbps.
Both cameras can record a maximum of 30 minutes per clip. The High Speed mode on the EOS R6 (1080p/120p) is limited to 7 minutes.
Another difference is the ISO sensitivity: the EOS R6 has a smaller normal range than for stills (100 to 25600) but the extended values go up to 204800 ISO. The A7 III has the same exact range for photography and video: 100 to 51200 ISO and extended values up to 102400.
Both cameras have a microphone input and headphone output.
Concerning stabilisation, in addition to sensor and optical IS, the EOS R6 has an extra setting called Digital IS which adds electronic stabilisation to further improve the result. It crops the sensor as a result however.
Below you can find a quick summery of all my findings. Check the video above for the full comparison.
- The A7 III is a bit sharper with the default values. If you tweak the parameters on the R6, you can achieve a similar result
- 1080p is a bit sharper on the Canon
- Colour differences are similar to what I describe with the SOOC JPGs (although the Picture Styles have a bit less contrast in video mode on the R6)
- The Picture Profiles on the A7 III have more advanced settings to fine-tune colours and other image parameters
- The Canon Log profile has more saturation with the default values
- Canon’s 10-bit recording saves more colour information but the H265 format can be computer heavy depending on your setup
- Just like for JPG stills, the R6 has more settings to control dynamic range (highlights especially), but the A7 III has more DR when used with S-Log3
- Similar performance up to 12800 ISO, then the R6 shows more noise, but you can control Noise Reduction in four steps unlike the Sony
- C-AF performance in extreme low light is similar (unlike for stills where the R6 is superior)
- The Canon is a bit faster and more precise with C-AF and Face/Eye detection
- The A7 III has no Eye AF for video, just face detection, which can sometimes mis-focus such as, for example, when the subject wears a hat
- The R6 has better stabilisation for fixed shots or when panning, but walking produces abrupt vertical movements
- The A7 III has less rolling shutter for video (unlike for stills, where the R6 does better with the electronic shutter)
- In my side by side test, the R6 overheated twice while recording for an hour and half, with a room temperature of 20˚C
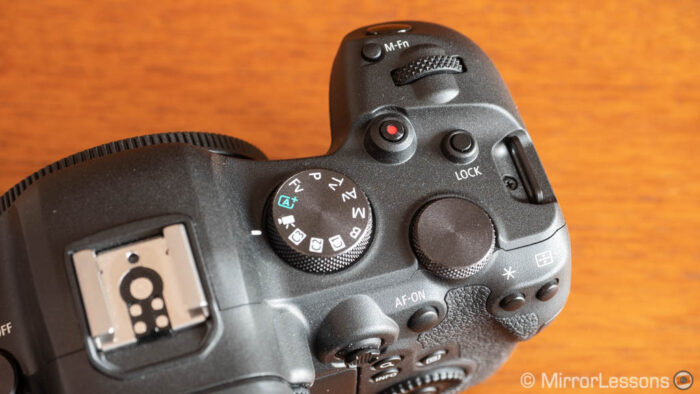
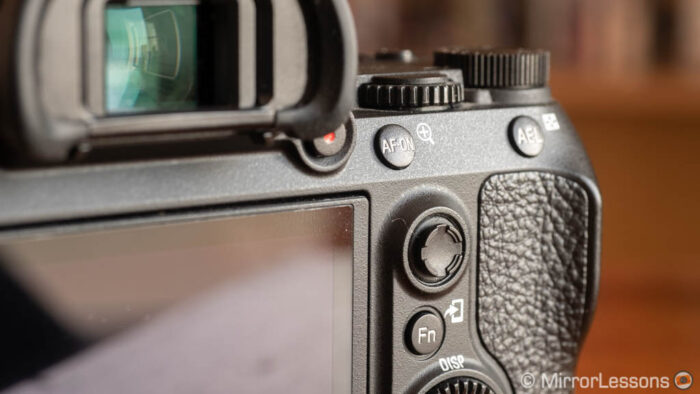
6. Design and interface
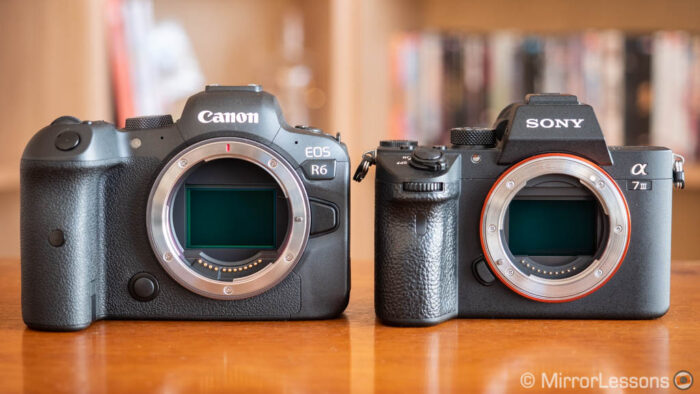
The EOS R6 is the larger camera and it is a bit heavier too.
- EOS R6: 138 x 97.5 x 88.4mm, 680g
- A7 III: 126.9 x 95.6 x 73.7mm, 650g
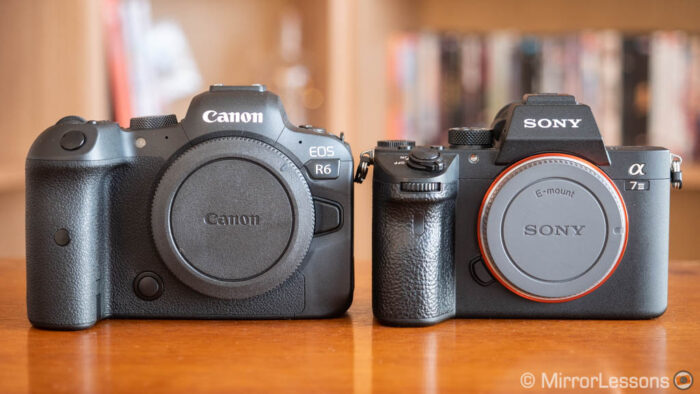
The Canon has a larger and more rounded front grip. I can rest all my fingers comfortably enough, whereas with the A7 III I struggle to keep my little finger on the surface unless I really squeeze all my fingers together. I also prefer the position of the shutter button, which is higher and more sloped towards the front. Of course this can change depending on whether you have larger or smaller hands than mine.
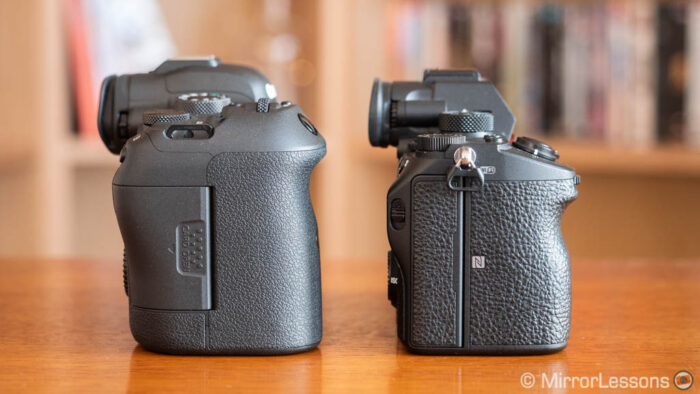
Both cameras are built around a magnesium alloy chassis and offer weather-sealing.
They offer a good number of controls with an AF joystick and various dials and buttons around the body, and most of them can be customised. The A7 III has an exposure compensation dial on top that the R6 is missing.
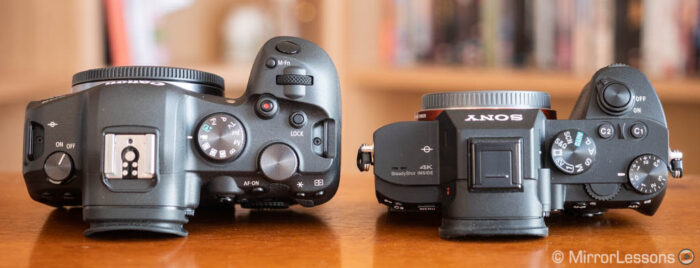
Unique to the RF system however is the function ring of the lenses that can be used for different settings.
I found the default configuration of the R6 good to use out of the box. I only had to change the function of the three dials (mainly to move the aperture from the rear wheel to the top one). Most of its buttons are located at the right place. They are easy to reach and softer to press but with an excellent tactile feel and response. The only one I don’t like is the M-Fn button: it is a bit too small and I keep mistaking it for the Rec button when composing with the EVF.
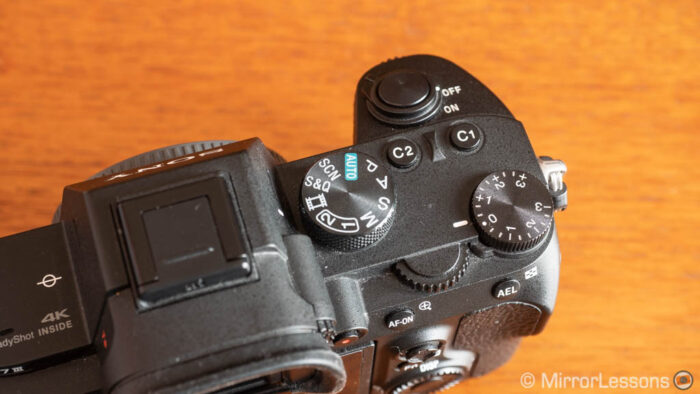
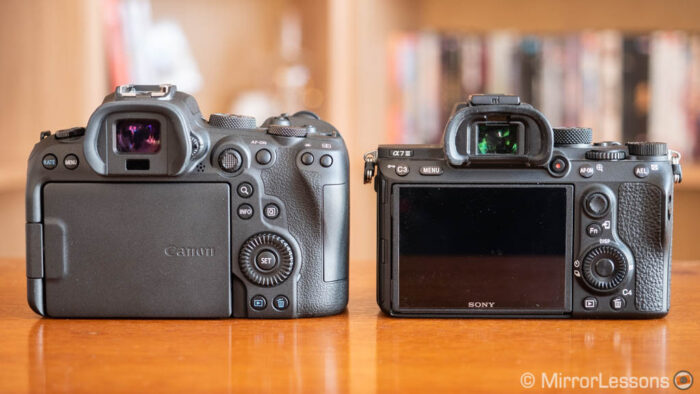
The A7 III has more customisable buttons (10 vs 8, plus the AF Joystick). The rear wheel can be used in four directions in addition to being rotated, whereas on the Canon only the rotation is possible. That said, the one on the R6 is more precise when turned, and that is also valid for the other two exposure dials.
The AF Joystick on the Canon can’t be customised for other functions (only enabled or disabled) but it feels quicker and more precise, and you can also change its sensitivity.
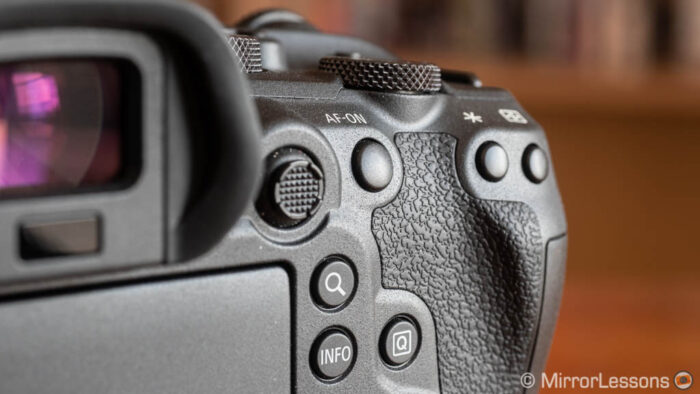
I find the Canon menu system better organised concerning the main sections, and it automatically adapts to the stills or video shooting mode. You get used to it easily but some areas are a bit messy like many of the AF settings that are not easy to understand straight away (that said, Sony also has weird names for some of its parameters).
Both cameras have a My Menu page where you can save your favourite settings, as well as a Quick Menu (called Fn Menu on the Sony). However the Q menu on the Canon can’t be customised.
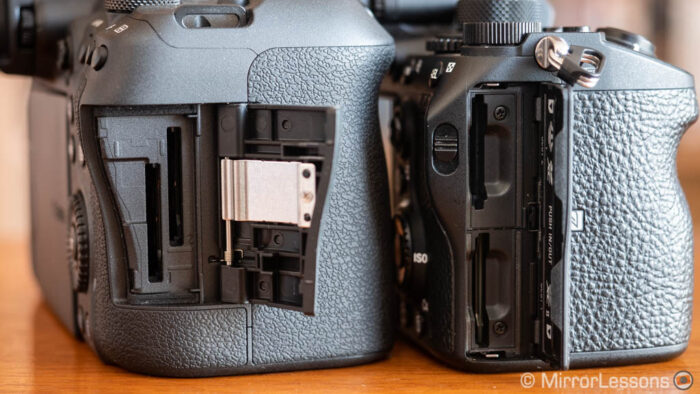
They have two SD card slots with the difference being that both slots are UHS-II compliant on the R6, whereas on the Sony only slot 1 is.
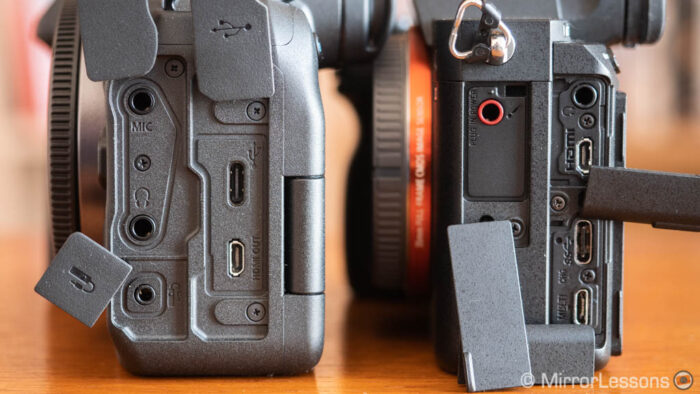
Finally, you’ll find a USB C and Micro HDMI port on both products, in addition to the audio input and output we already mentioned in the previous chapter. The A7 model also has a Micro USB 2.0 port.
7. Viewfinder and LCD screen
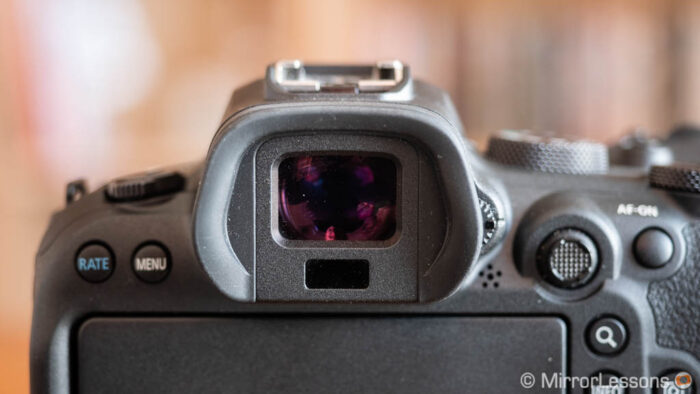
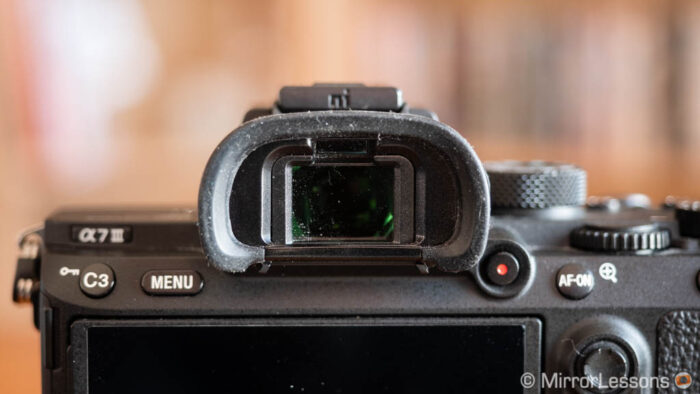
The EOS R6 has a better viewfinder with more resolution (3.69M dots vs 2.36M dots) and a faster refresh rate (120Hz vs 60Hz). The magnification is slightly larger on the A7 III (0.78x vs 0.76x) and the eyepoint is the same (23mm). Because of the smaller magnification, I can see the extreme corners a bit better on the R6 when wearing glasses.
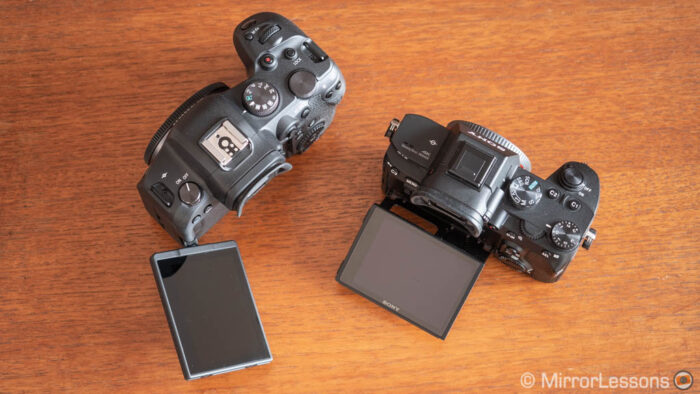
Another difference concerns the rear screen: the Canon has a multi-angle solution where you can open it to the side and rotate it 180˚, whereas the one on the Sony tilts up and down.
The resolution is higher on the EOS (1.62M vs 0.9M dots) and the R6 offers a more complete touch screen experience including navigating the menu and start movie recording, whereas on the A7 III you can only move the focus point or double-tap to activate magnification. The touch screen is more precise and reactive on the Canon. On both cameras you can use the LCD screen to move the AF point while using the viewfinder.
Another thing is the quality of the display when focus magnification is activated in video mode. On the A7 III, the live view resolution drops drastically and is almost unusable, whereas on the R6 it remains much sharper.
8. Battery life
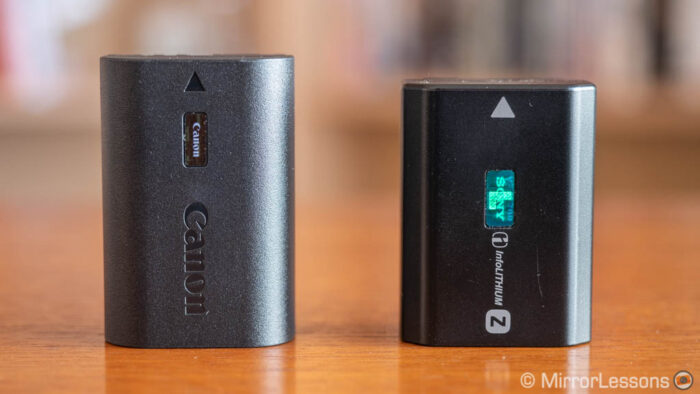
The EOS R6 has a newly developed battery that increases the power by 14% while maintaining the same form factor as the previous one. The official rating is 380 frames (EVF) or 510 photos (LCD) per charge, although you will be able to take more in real life. It has an amperage of 2130mAh.
The A7 III has a rating of 610 (EVF) or 710 shots (LCD) and its battery has a similar amperage of 2280mAh.
In real world conditions I can easily double the specs of both cameras, if not more. For example after taking nearly 2,600 pictures of the red kites with the R6, the battery charge went from 100% to about 64%. The A7 III can do a bit better than that (around 70%).
For video, the R6 recorded about 113 minutes in 4K 25p (four separated clips plus intervals to cool the camera) before the battery ran out. The A7 III managed to do almost an extra half an hour.
Both cameras can be charged via USB but you will need a high current charger for the Canon. A battery grip is available for both product.
One small annoyance with the A7 III is that it comes without a battery charger (the camera must be plugged straight into the wall socket with the USB adapter). You can of course buy one separately.
9. Lenses
The Canon RF system was launched two years ago, and Canon started from scratch without even including compatibility with its EOS M APS-C mirrorless system. (The mount is different, unlike its EF DSLR system that shares the same mount for APS-C and full frame cameras.)
I have to admit that in this short amount of time, Canon has worked hard to release a lot of high quality lenses, from the 2.8 zoom trinity to fast 1.2 primes to super telephotos. There are now no fewer than 17 native lenses and two teleconverters, including some affordable options. Rumours suggest 17 other lenses in the works for 2021! Of course with the EF to RF adapter, you have access to all the EF DSLR lenses while maintaining excellent autofocus performance.
The Sony full frame E-mount system debuted in 2013, and in seven years the company has built an impressive number of native lenses. The same mount is used for its APS-C series as well which increases the versatility of the system. Third party brands such as Sigma, Tamron, Samyang and Zeiss are actively releasing new lenses for E-mount, so users are now spoiled for choice.
I’m pretty sure that we will start to see more third party RF lenses at some point, and once again you have access to the DSLR equivalents, although it is fair to say that EF lenses work on the A7 III too and there are many adapters available. (the AF performance is not always as fast however)
10. Price
The EOS R6 can be found at the retail price of $2500 / £2500 / €2700 for the body only.
The A7 III being older can be found for less ($1700 / £1750 / €1850).
Note: prices are as of December 2020.
Extra feedback and information
The maximum shutter speed of both cameras is 1/8000s. With flash, the EOS R6 goes up to 1/250s when using the electronic first curtain mode (1/200s with the mechanical shutter). The A7 III does 1/250s with either the mechanical or electronic first curtain shutter.
The EOS R6 has a few extra features that you won’t find in the A7 III such as:
- Multiple exposure which works up to 9 frames and various blending methods (additive, average, bright or dark)
- RAW image processing to process and convert RAW files into JPGs
- Time-lapse Movie to create a 1080p or 4K video out of frames captured at a set interval
- Flexible-priority AE mode (Fv) that lets you set the exposure to full auto, semi-auto or fully manual without the need to change shooting modes
The two cameras have others things in common including:
- Exposure and White Balance Bracketing
- USB tethering to a computer
Then we have the wireless capabilities which allow you to do a number of different things like transfer images to a smartphone, or control the cameras remotely from your mobile device. I find the Canon app more complete, and you can switch between photo and video mode without the need to turn the physical dial on the camera.
Both cameras allow you to use a bluetooth remote controller, and connect to a FTP server. With the R6 you can also connect to the Canon Cloud Web Service and upload images while shooting (it works rather well!).
Concerning the manual focus assists, in addition to magnification and peaking, the R6 has the excellent Focus Guide mode that shows you in which direction and how much you need to adjust focus using the Dual Pixel CMOS AF technology on the sensor. It’s very precise and reliable, and my favourite MF assist to date. If eye detection is enabled, it will automatically show you the adjustment for any eye detected.
One last curiosity: when the R6 is turned off, the shutter closes to protect the sensor while changing the lens, just like the EOS R. This function can be disabled in the menu if you prefer.
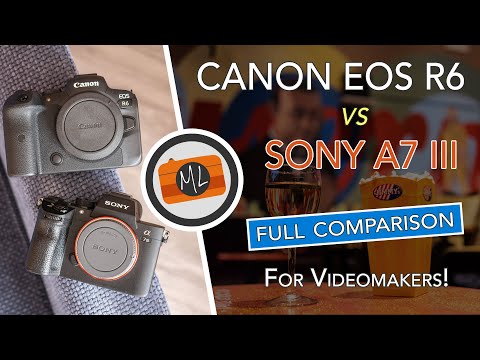
Video Review
Below you can watch the full comparison in video format. Don’t forget to subscribe to our YouTube channel!
Conclusion
The A7 III has been the benchmark in the full frame mirrorless category since it was released thanks to its excellent balance of cost, features and quality. It rightfully became one of the most popular full frame cameras ever. Today, it remains a very competitive package thanks to its excellent full frame sensor and accessible price.
That said, the Sony camera is more than two years old now (it was announced in early 2018) and in the meantime, the competition has worked hard to close the gap. In my view, Canon has succeeded with the EOS R6. It represents an important step forward for the RF system after the disappointing EOS R released two years ago, and in many ways it feels like a superior product to the A7 III.
The autofocus system and burst speeds are impressive, and Canon has out-classed Sony in its own territory with features like Animal Detection. The image quality is on par, if not slightly better, albeit with 20% less resolution. The image stabilisation is also superior (although not as much as the official specifications suggest) and I personally prefer the ergonomics, button layout and dials response on the EOS body.
As nice as the R6 sounds, there are some strong points in favour of the A7 III to keep in mind. It may not have 4K/60p or 10-bit internal recording for video, but it doesn’t suffer from overheating as severely as the Canon. There is a plethora of native lenses to choose between for the E-mount system, not just from Sony but also third-party brands, and that also means a better choice of affordable glass. Last but not least, the Sony is less expensive.
The last point to mention is of course the A7 III successor. We don’t know when it will arrive yet, but it is likely than when it does, Sony will improve many features on the camera to make it more competitive specs wise, so what now looks like an inferior product could push its way back to the front whenever the A7 IV makes its appearance.
Choose the Canon EOS R6 if:
- you want better autofocus performance in all situations
- you want better ergonomics and precise controls
- you want better image stabilisation for stills
Choose the Sony A7 III if:
- you want to spend less
- you want more choice among the native E-mount lenses
- you need a reliable A cam for video
Reminder: the links below are affiliate links. If you decided to buy something after clicking the link, we will receive a small commission.
Check price of the Canon EOS R6 on:
Amazon | Amazon UK | B&H Photo | eBay
Check price of the Sony A7 III on:
Amazon | Amazon UK | B&H Photo | eBay