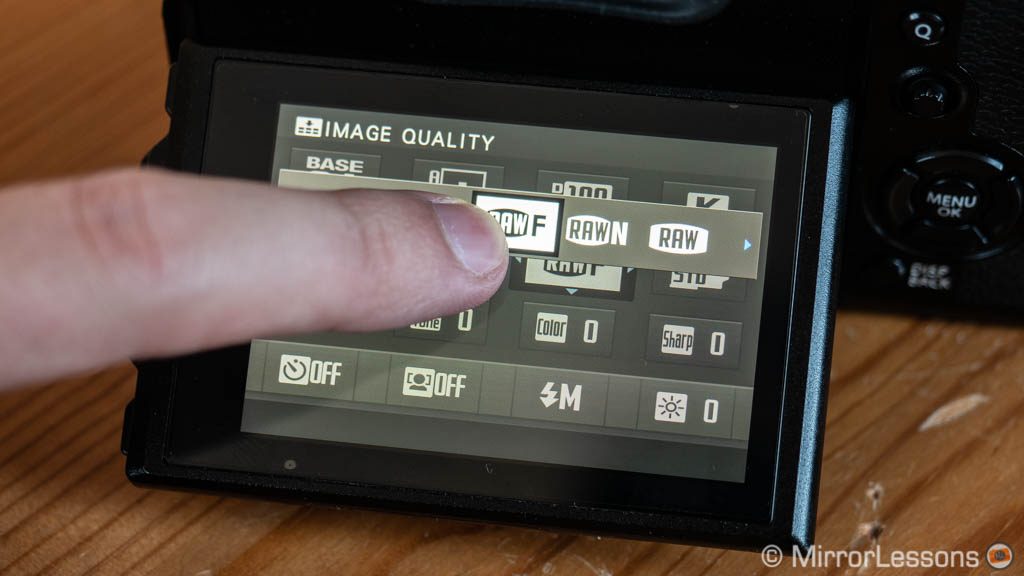
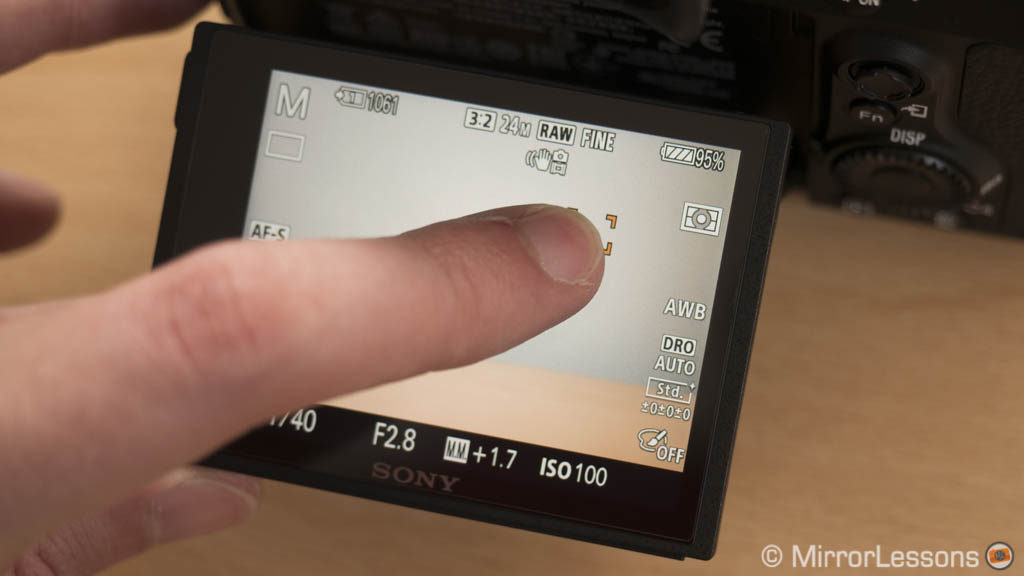
Updated on: March 4th 2020
Among all the exciting products we reviewed and compared in 2018, two really stood out from the crowd: the Fujifilm X-T3 and the Sony A7 III. The former replaces the already excellent X-T2 with improved autofocus and impressive video capabilities, whereas the latter is a well-priced camera that doesn’t force you to compromise when it comes to image quality and performance – a true synthesis of the best features Sony has developed over the past three years.
Although they sit within different price brackets, many of our readers have found themselves torn between these two popular models, which is why we felt it was important to conduct a comparison between them. Instead of a full comparison, we opted to analyse five of the most important key aspects. We hope you find it useful!
Ethics statement: We purchased the X-T3 and A7 III to conduct our tests. We were not asked to write anything about these products, nor were we provided any other compensation of any kind. Within the article, there are affiliate links. If you buy something after clicking one of these links, we will receive a small commission. To know more about our ethics, you can visit our full disclosure page. Thank you!
TABLE OF CONTENTS
Article Updates
Main Specs
1. Design and Functionality
2. Image Quality
3. Autofocus and Speed
4. Video Capabilities
5. Image Stabilisation
Conclusion
Sample images and Additional Content
Article updates
- March 2020: latest firmware updates
- May 2019: feedback about firmware 3.0 (improved face and eye detection) for the X-T3 and firmware 3.0 for the A7 III (EyeAF for animals)
- March 2019: added feedback and example about the Enhance Details function of Lightroom Classic CC
- January 2019: information added concerning X-T3 firmware 2.0 and A7 III firmware 2.10
Main Specs
X-T3
- Sensor: 26.1 MP APS-C X-Trans IV CMOS
- Lens system: X-mount
- Weatherproof: Yes (moisture, dust, freeze proof)
- Internal Stabilisation: None
- Autofocus: Hybrid with up to 425 points (13×9 and 25×17 grids)
- Continuous shooting: up to 30fps (AF-S and AF-C)
- ISO Sensitivity: 160 – 12800 ISO (pull 80, push 25600 to 51200)
- Shutter Speeds: 1/32000s to 15min, Bulb
- Viewfinder: 0.5in OLED with 3,690k dots, 23mm eyepoint, 0.75x magnification, 100fps refresh rate
- Rear monitor: 3-ways 3″ LCD (1.04M dots) with touch sensitivity
- Movie recording: 4K 10-bit up to 60fps, Full HD up to 120fps, F-Log
- Built-in Flash: No but EF-X8 included
- Extra Features: WiFi, Panorama, Timelapse, Bracketing, Multiple exposure, Advanced filters, Tethering, Dual SD slots
- Dimensions: 132.5 x 92.8 x 58.8mm
- Weight: 539g (including battery and memory card)
- Firmware version: 3.20
A7 mark III
- Sensor: 24.2MP 35mm format BSI Exmor CMOS
- Lens system: E-mount
- Weatherproof: Yes (dust and moisture)
- Internal Stabilisation: Yes (5-axis)
- Autofocus: Hybrid with 693 phase and 425 contrast detection points
- Continuous shooting: 3fps to 10fps with AE/AF Tracking
- ISO Sensitivity: 100 – 51200 ISO (pull 50, push up to 204800)
- Shutter Speeds: 1/8000s to 30s, Bulb
- Viewfinder: 0.5in OLED with 2,360k dots, 23mm eye point, 0.78x magnification, 60fps refresh rate
- Rear monitor: Tilting 3″ LCD (922k dots) with touch sensitivity
- Movie recording: 4K up to 30fps, Full HD up to 120fps, S-Log
- Built-in Flash: No
- Extra Features: WiFi, Bluetooth, Bracketing, Tethering, FTP Transfer, Dual SD slots
- Dimensions: 126.9 x 95.6 x 73.7mm
- Weight: 650g (including battery and memory card)
- Firmware version: 3.10
1. Design and functionality
Since the beginning of their respective mirrorless journeys, Fujifilm and Sony have pursued two different approaches to design and ease of use, and this is once again reflected in these most recent iterations.
Two design philosophies
The X-T3 inherits the successful design that was first used for the X-T1. Not a lot has changed when it comes to form factor, but many small details has been improved to make this Fujifilm camera as user-friendly as possible. And for the most part, they have succeeded.
First we have the exposure control dials (ISO and shutter speed), a distinctive signature of the X-series. They may seem like an old fashioned gimmick but the truth is that they are the most straight-forward controls you can find on a mirrorless camera, even in 2018.
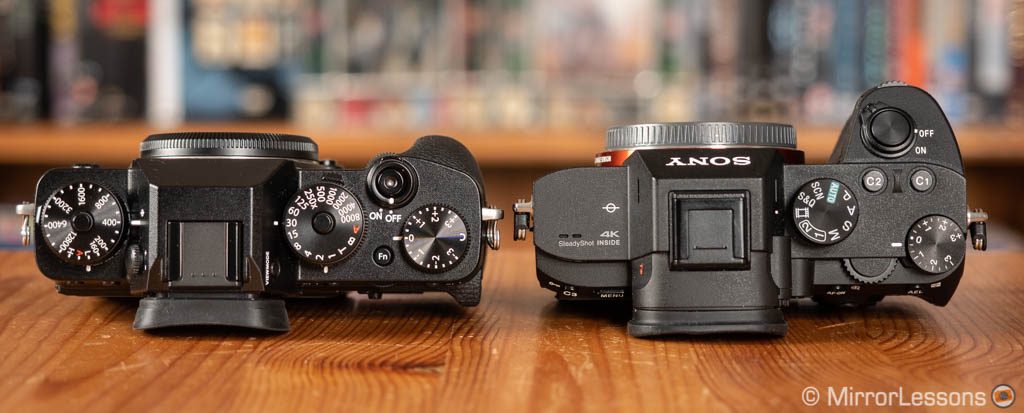
The successful design of the X-T3 doesn’t end here: the entire button layout is very well organised. There is a precise focus joystick on the rear, lots of secondary dials to control various settings and 9 function buttons. My only criticism is that some of these buttons could be a bit larger in order to improve tactile feedback, especially when you use one constantly such as the back button focus.
The A7 III design appears more modern by comparison, but there is no lack of controls: there are 13 custom buttons, an ergonomic AF joystick, two twin dials for the exposure, the classic shooting mode dial on top, an exposure compensation dial and a control wheel on the rear.
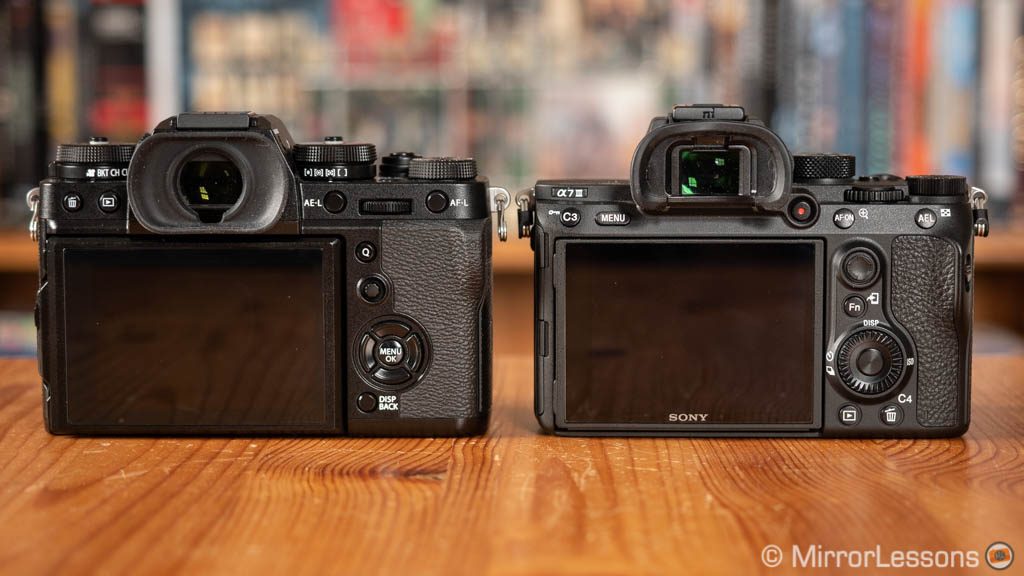
As for customisation, you’ll find a quick menu and My Menu page on both models. The A7 III has three memory recalls that can be programmed with your favourite shooting settings. The Fuji menu is easier to learn, but once you’ve spent time configuring the Sony, the user experience improves a lot.
Compactness at the expense of extra comfort
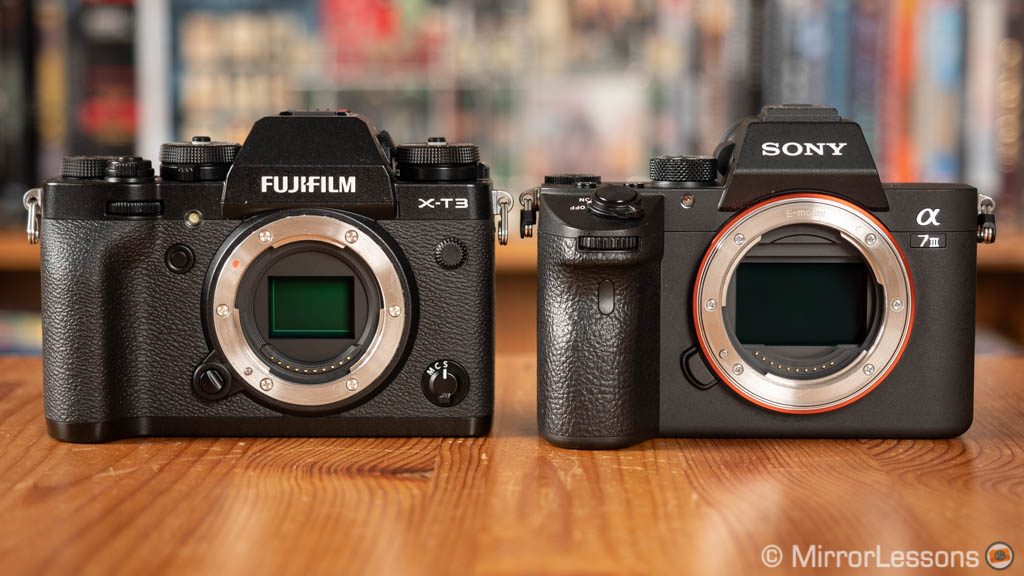
The X-T3 and A7 III are both compact and their dimensions quite similar, despite the Sony housing a larger stabilised sensor. One important difference is the front grip, neither of which is perfect.
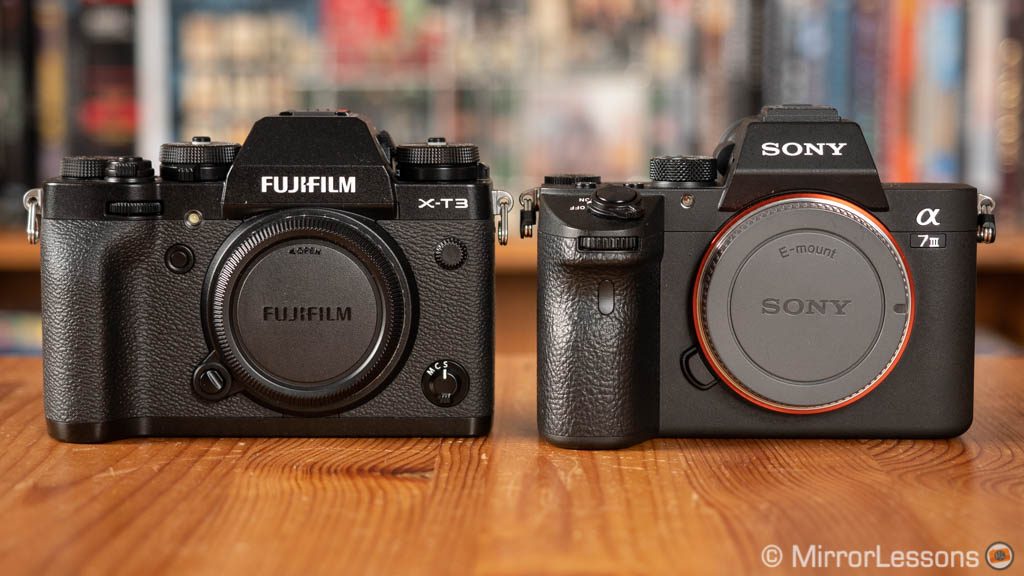
The X-T3 is flatter out front and the grip is quite small. Photographers with large hands will struggle to wrap all their fingers around the camera. The A7 III version is deeper but its design is less comfortable.
In both cases, you’ll feel like something is missing when using large lenses. The X-T3 can be a bit slippery when working in wet conditions, whereas with the Sony, the grip becomes tiring to hold with heavy lenses. There is also less space for your fingers between the grip and the lens barrel.
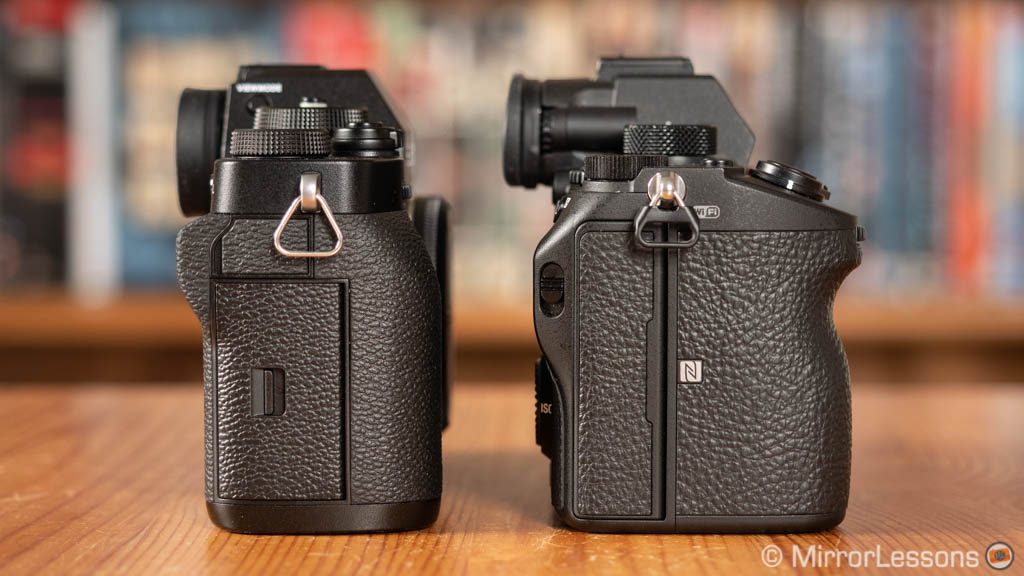
Optional accessories can improve comfort on both cameras. For the X-T3, a thumb grip mounted on the hot-shoe can be enough whereas with the Sony, I would advise buying a grip extender to attach to the bottom of the camera (see a few examples here).
Good touch screen capabilities but there is room for improvement on the A7 III
The X-T3 isn’t just about old-fashioned controls: it features a touch screen LCD on the rear that can be used for various things such as moving the focus point, selecting a setting in the quick menu or taking a shot. You can use it to access four functions of your choice by flicking left, right, up or down. Touch sensitivity has been improved when it comes to speed and reactivity thanks to firmware 3.0.
The A7 III has a touch screen but it can only be used for two things: moving the focus point and browsing through your pictures in playback mode. It is very reactive and precise, and I hope Sony will make more use of it on future models.
There is a difference in how the tilting mechanism works as well: the Fuji screen tilts in three directions, whereas the Sony screen only moves up and down.
If you prefer to compose in a more classic way, both cameras feature good electronic viewfinders.
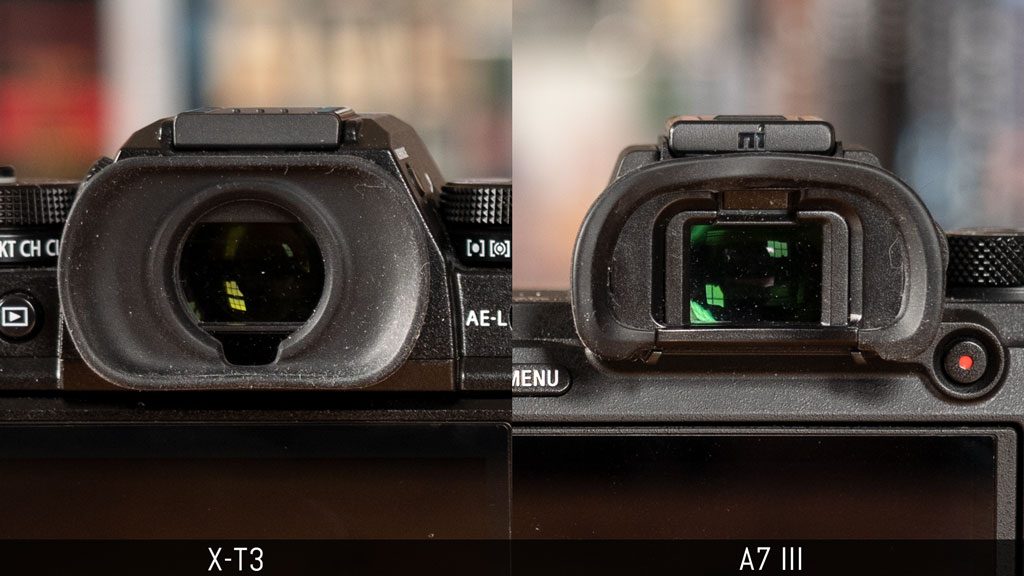
The X-T3 has an EVF with 3,690k dots of resolution, a magnification of 0.75x and an eye point of 23mm. The refresh rate goes up to 100fps when Boost mode is activated.
The A7 III viewfinder has a lower resolution of 2,360k dots, the same eye point length, a slightly higher magnification of 0.78x and a slower refresh rate of about 60fps.
Despite the higher resolution of the X-T3 version, I haven’t noticed a big difference between the two finders, especially when the Sony’s Display Quality is set to High. I can see the corners a bit better in the Sony EVF when wearing glasses, whereas the higher frame rate of the X-T3 gives you a smoother live view when following fast subjects.
Battery life: the A7 III is class-leading
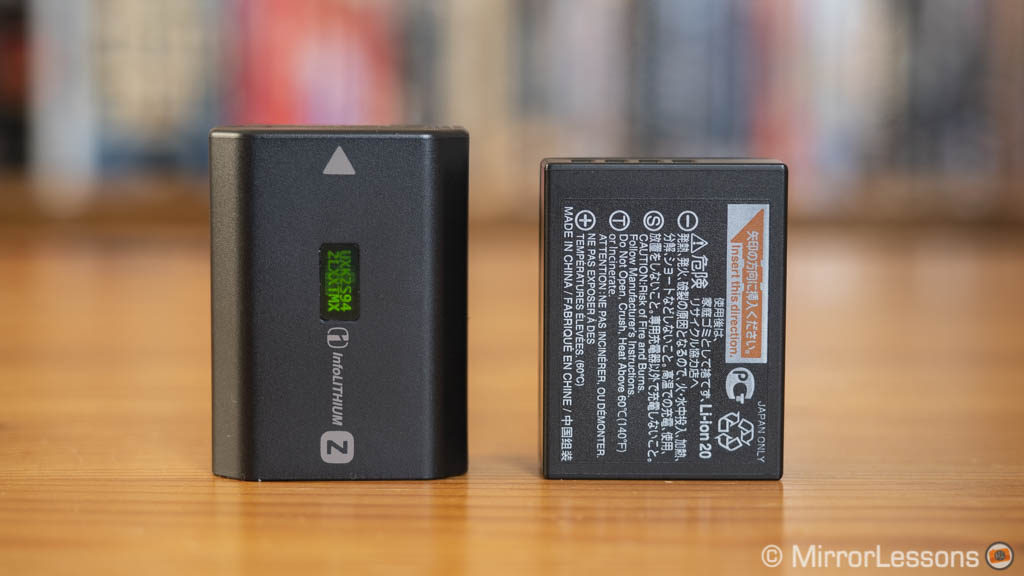
One aspect where the Sony A7 III has a clear advantage over the X-T3 is battery life. Thanks to the new NP-FZ100, the third-generation of A7 cameras has seen a significant boost in performance and the A7 III has the best score yet. I can easily bring home more than 1500 photos with 35% of the battery life left over.
The X-T3 uses the same battery as its predecessor, and one charge wasn’t enough for a 90 minute football game (around 630 shots taken), whereas with the Sony I could have added another event on top of that before having to change batteries.
The A7 III has more endurance for video recording as well.
Additional info about design and functionality
- Weather-sealing: the X-T3 is splash, dust and freeze proof down to -10°C. We used it for 90 minutes straight in heavy rain and didn’t experience any issues. I haven’t yet experienced the same bad weather conditions with the A7 III but so far it has been flawless. Sony only mentions dust and moisture resistance however.
- Memory cards: you can use two SD cards on each camera. The X-T3 accepts the faster UHS-II type in both slots, whereas only slot 1 is compatible on the A7 III. (Note: firmware 2.10 fixes a compatibility issue with third party memory cards on the Sony model and we strongly recommend to install the update)
- Connections: 3.5mm mic and headphone, USB 3 Type C and Micro HDMI Type D on both cameras. The X-T3 has a 2.5mm remote input and a flash sync socket. The A7 III has a second USB / Multi Terminal connection.
- Wireless: Wifi and Bluetooth are available on both, allowing you to remotely control or transfer images to a mobile device, as well as record GPS data. For the X-T3, you can also use your phone as a remote shutter with Bluetooth.
2. Image quality
The X-T3 and A7 III share a comparable resolution (26.1MP for the Fuji, 24.2MP for the Sony) and their image sensors have a back-illuminated design (BSI) that improves light gathering, but the similarities end here.
The most obvious difference is the sensor size: the X-T3 utilises an APS-C format sensor whereas the A7 III has a 35mm format chip (full frame) that is 2.3x larger.
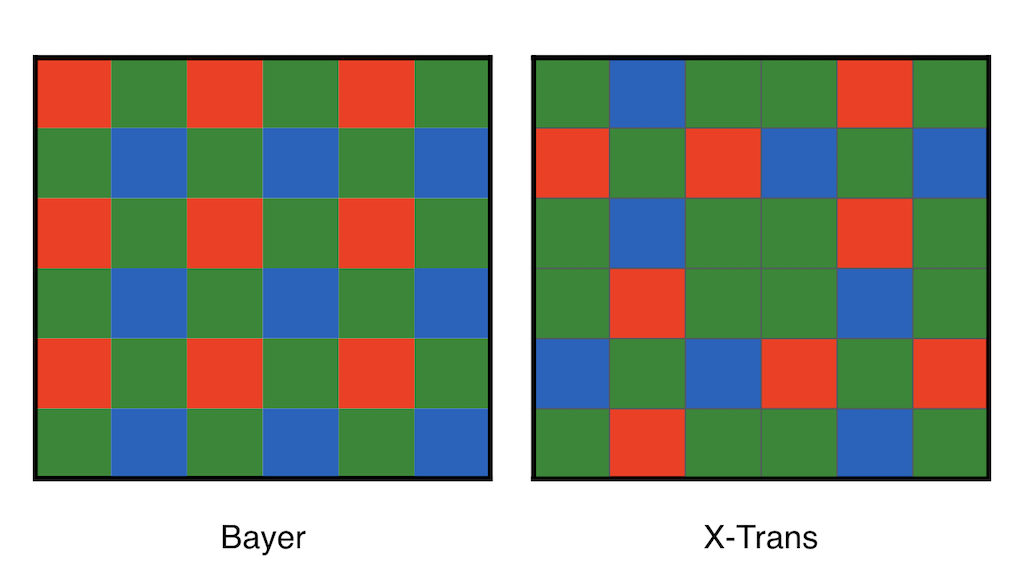
The A7 III sensor features a Bayer design with a weak low pass filter, whereas the X-T3 uses the proprietary X-Trans array that ensures the presence of red, green and blue pixels on every line (horizontal and vertical). No AA filter is needed.
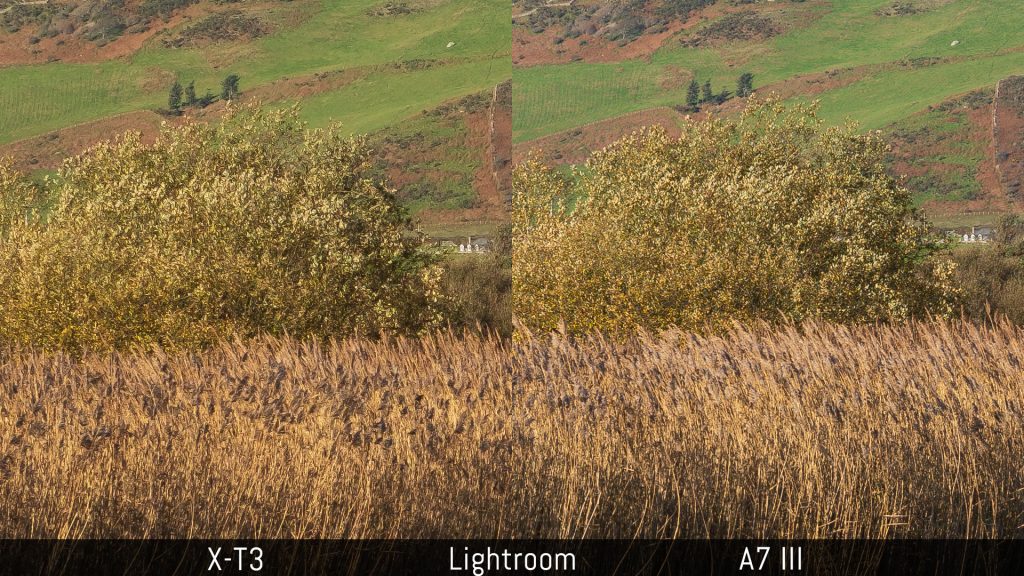
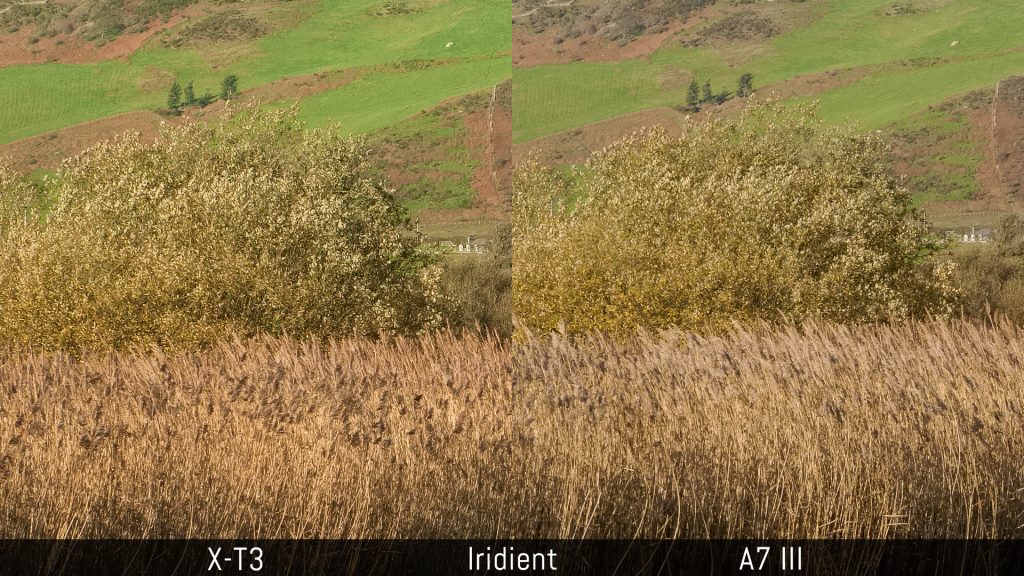
The Fujifilm RAW files can be more tricky to process in post because some software are more capable than others of bringing back all the details in the X-Trans RAW files. The Sony files by comparison are handled well by most applications.
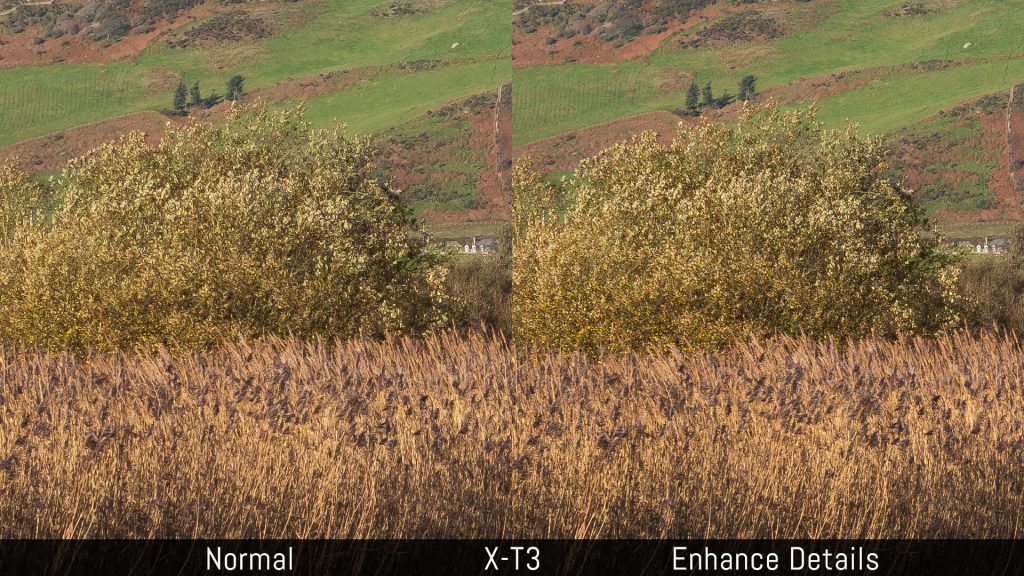
The update 8.2 for Lightroom Classic CC has introduced a new function called Enhance Details. The software uses machine learning to improve details and reduce artefacts in the RAW files. I didn’t find a significant difference for the A7 III but the improvement is definitely there on the X-T3 RAF files: the watercolour effect is gone. Note that it can take a few minutes for the image to be processed depending on how powerful your computer is, and a new DNG file is created as a result.
Another thing to point out is that with the same exact exposure settings (shutter speed, aperture and ISO), the X-T3 is approximately 2/3Ev darker than the Sony. This is apparently due to the fact that the two companies use different ISO standards (REI for Sony, SOS for Fujifilm).
Given that this difference can influence the results in some cases, I specified for each test how I dealt with the disparity in exposure.
Dynamic range and ISO: the A7 III has the upper hand
The X-T3 starts from ISO 160 whereas the A7 III starts from 100 (normal range), so there is a difference of 2/3 stop at the base ISO. The same aperture was used on both cameras, whereas the shutter speed was set with two goals in mind: to have the same exposure settings, or to have the same brightness in the scene.*
*Of course in a real world situation, you’ll either use the Fuji or the Sony and set your exposure without worrying about how it compares to another camera. The only reason I’ve decided to show you two versions is to be as complete as possible.
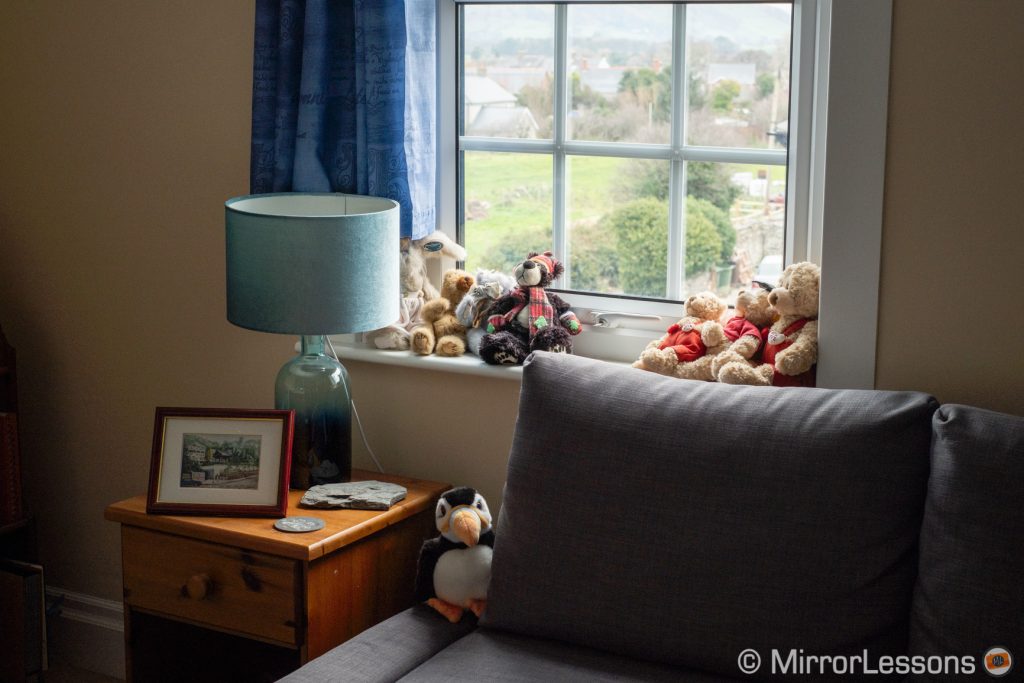
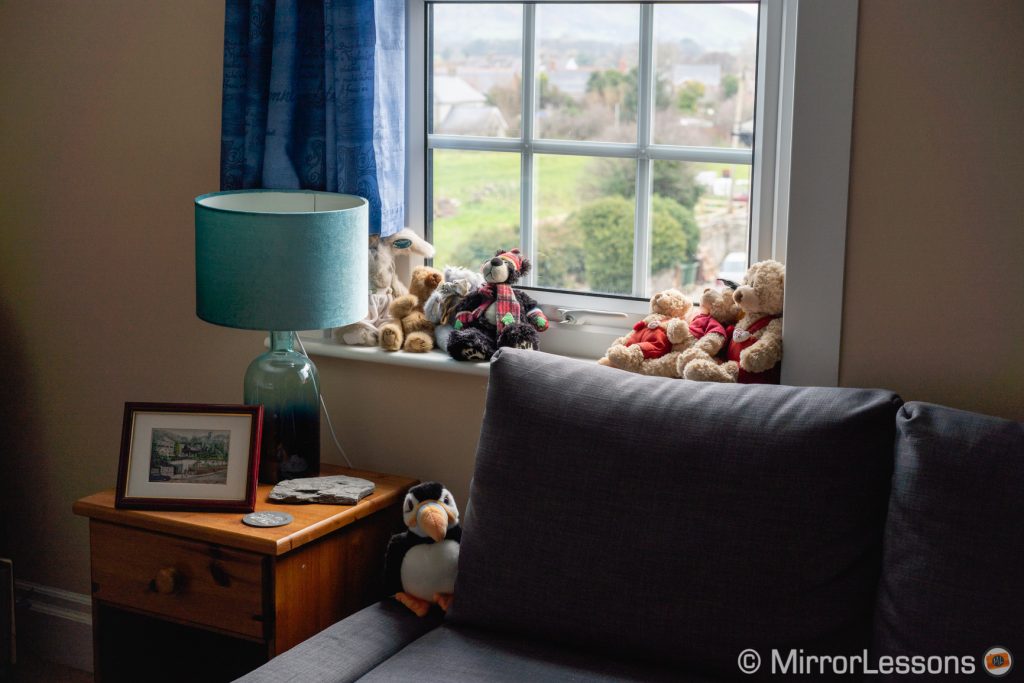
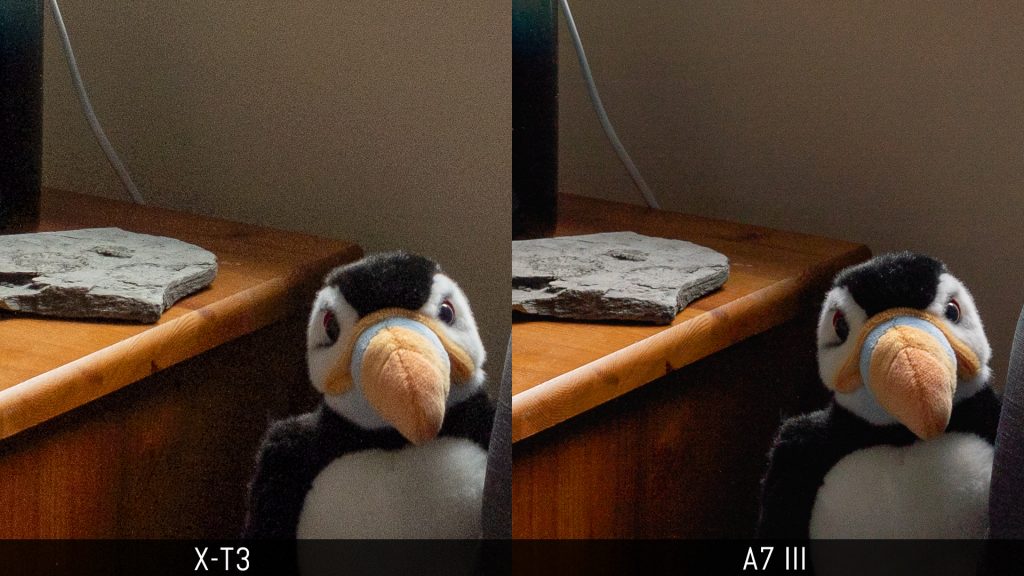
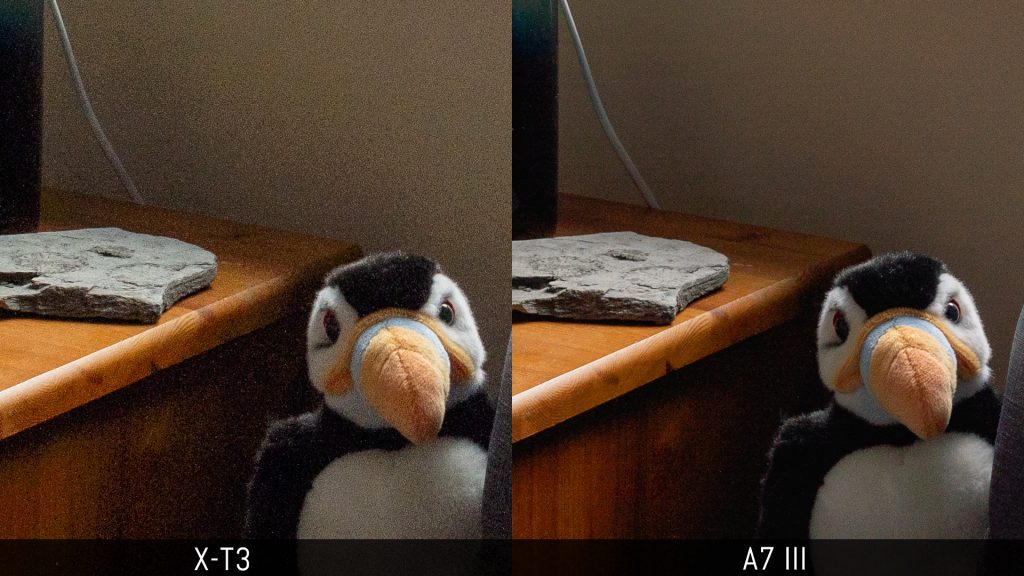
Let’s begin with an under-exposed shot to see how much noise the two files produce when recovering exposure in post.
First I chose to have the same brightness, meaning that I used the same shutter speed and aperture values on both cameras rather than compensating for the higher base ISO of the X-T3. As you can see, the X-T3 opens the shadows a bit more but the A7 III has less noise.
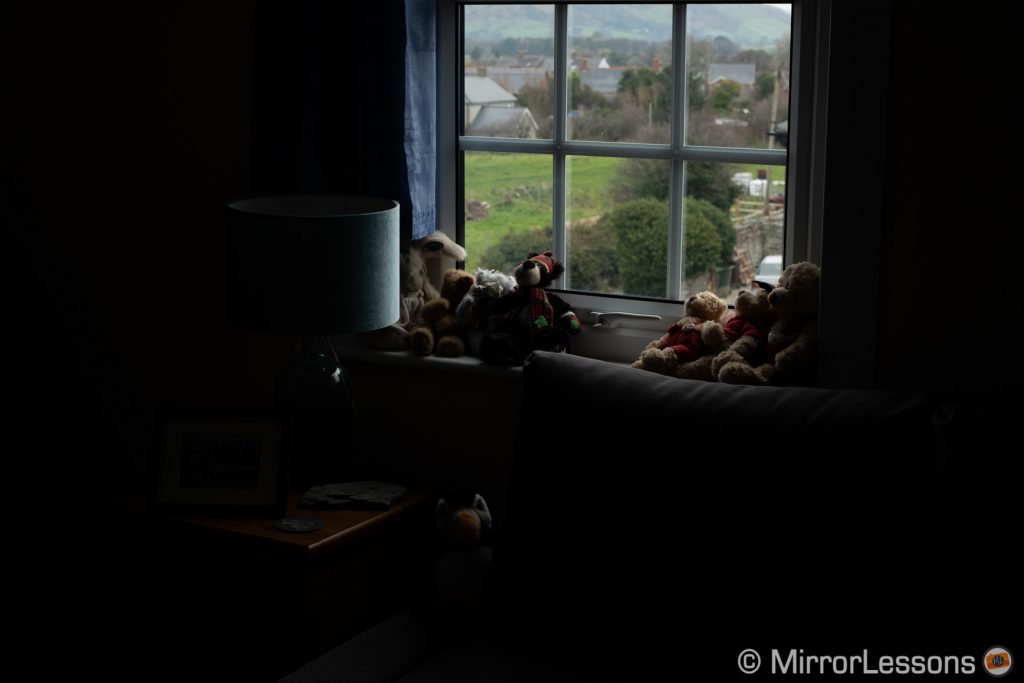
Note that for these tests, I kept noise reduction to a minimum to make the side-by-side images easier to read. I also applied some colour noise reduction, just to get rid of invasive colour noise. (The A7 III file needs a bit more of it than the Fuji.)
Then I compared the same scene but with equivalent exposure settings, meaning that I compensated the shutter speed by 2/3Ev (since the Fuji base ISO is 2/3 higher than the Sony). Due to the darker result from the X-T3, I had to push the exposure recovery more to match the A7 III brightness, which resulted in more invasive noise.
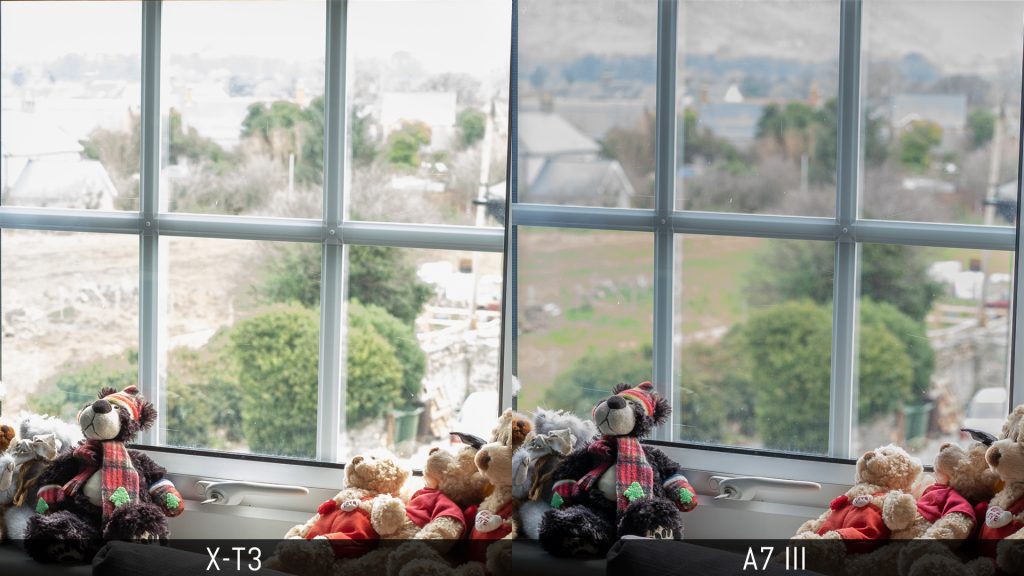
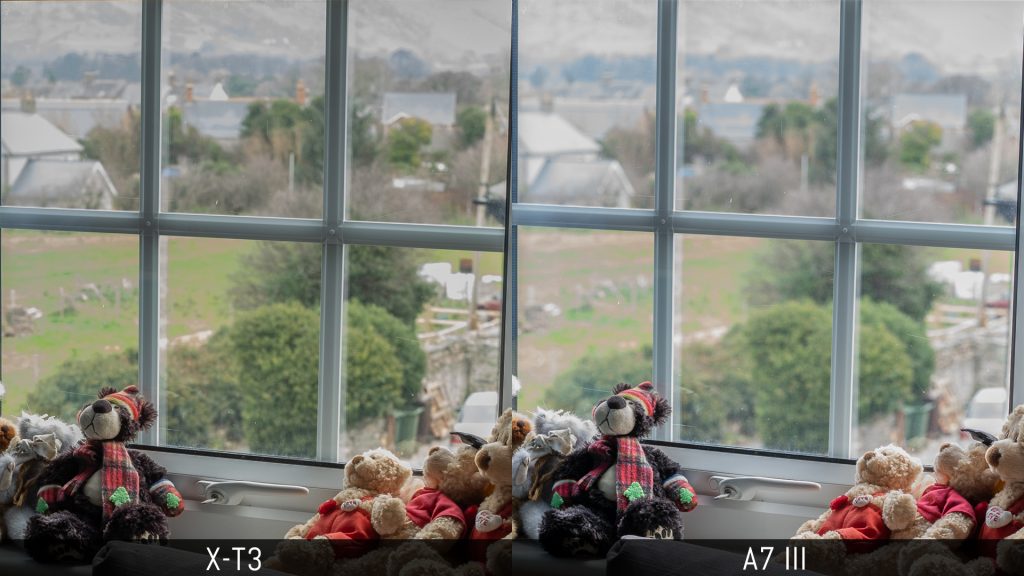
Now let’s analyse the same scene but with a focus on the outdoor zone behind the window. I purposefully over-exposed this area of the image to see how much detail we could recover from the highlights.
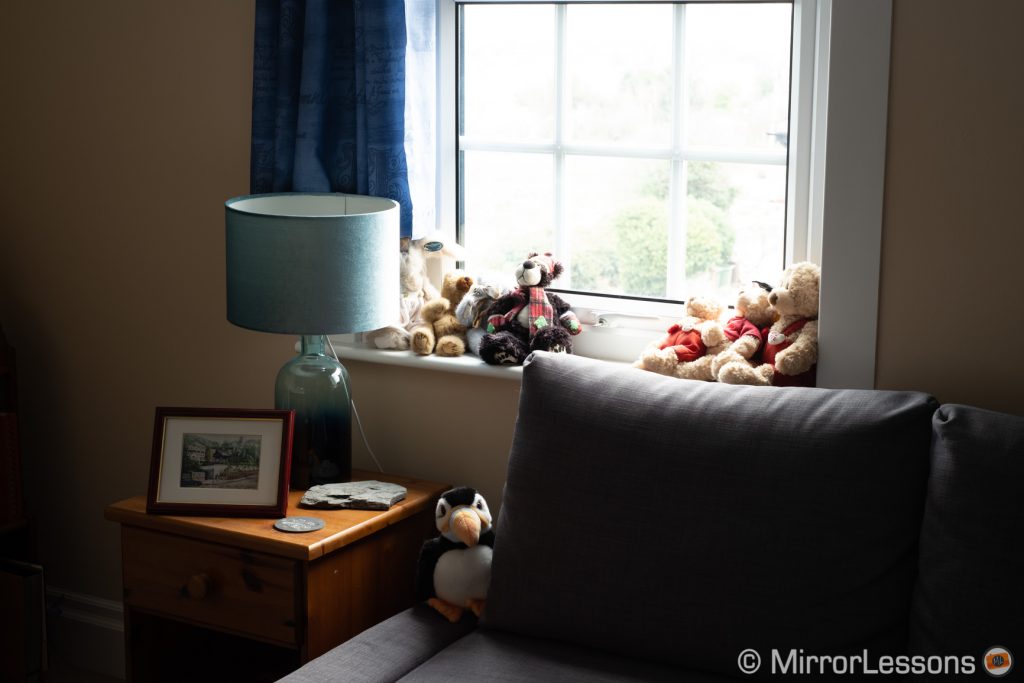
With the same brightness, the A7 III does better and recovers most of the colours, unlike the X-T3.
With the equivalent exposure settings, the X-T3 image is darker and recovers more details.
What we have determined from this comparison is that the A7 III has the same highlight preservation but better shadow recovery than the X-T3, and therefore gives you something extra.
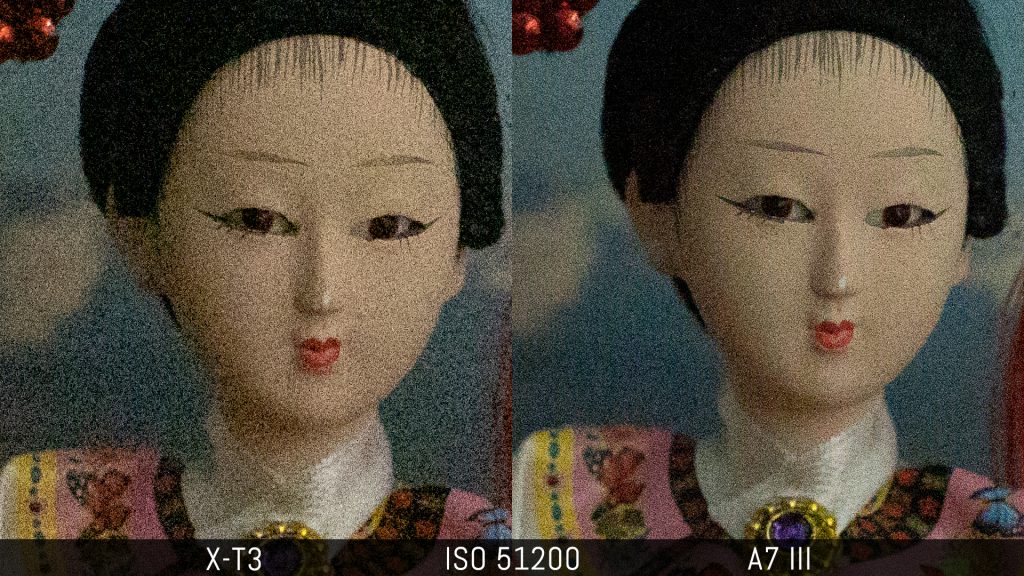
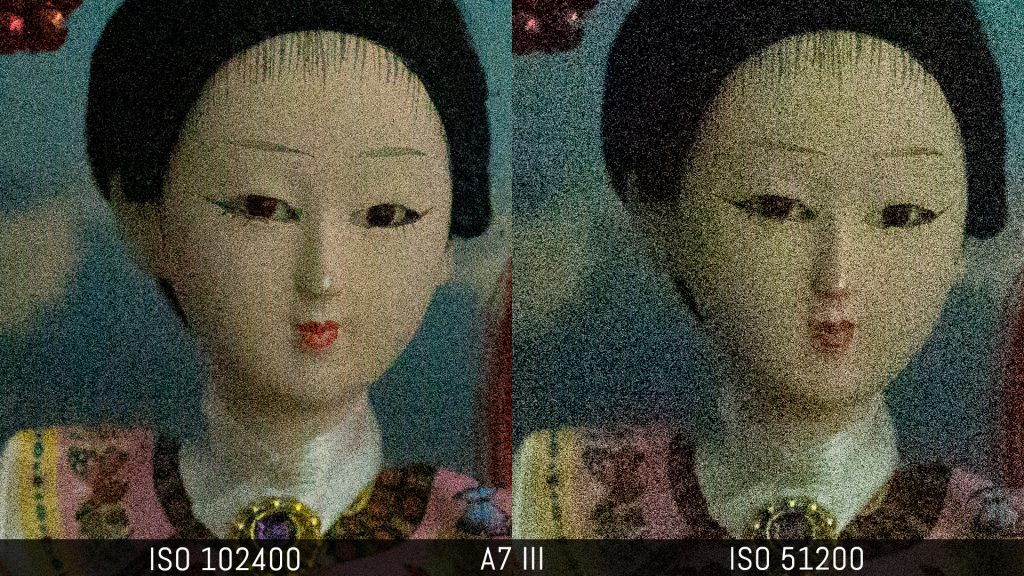
Continuing within the sensitivity vein, the X-T3 normal range goes from ISO 160 to 12800, and you can expand these values down to ISO 80 and up to ISO 51200 (the image is darkened or brightened by the image processor). The A7 III goes from 100 to 51200, with pull values down to ISO 50 and push values up to ISO 204800.
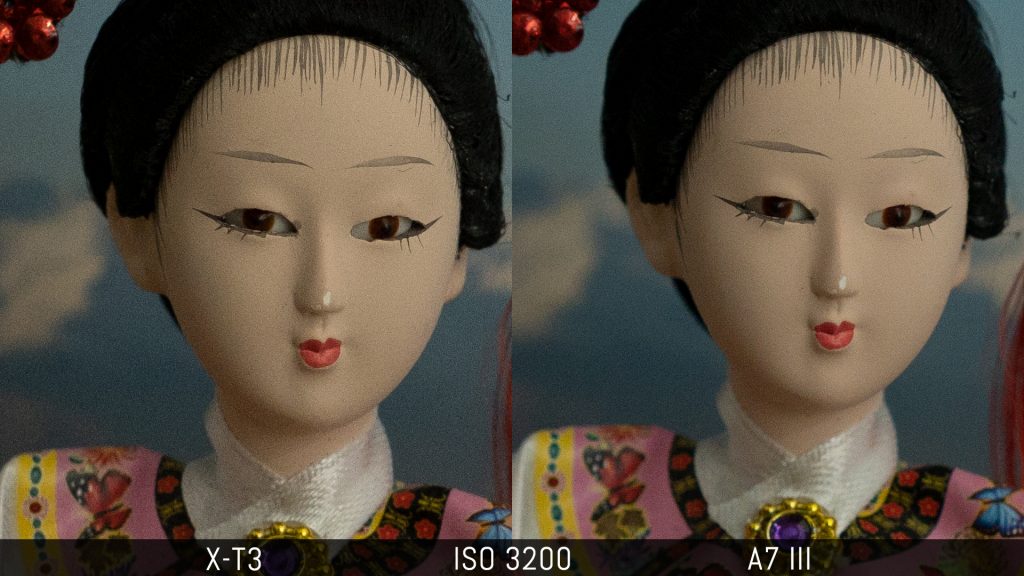
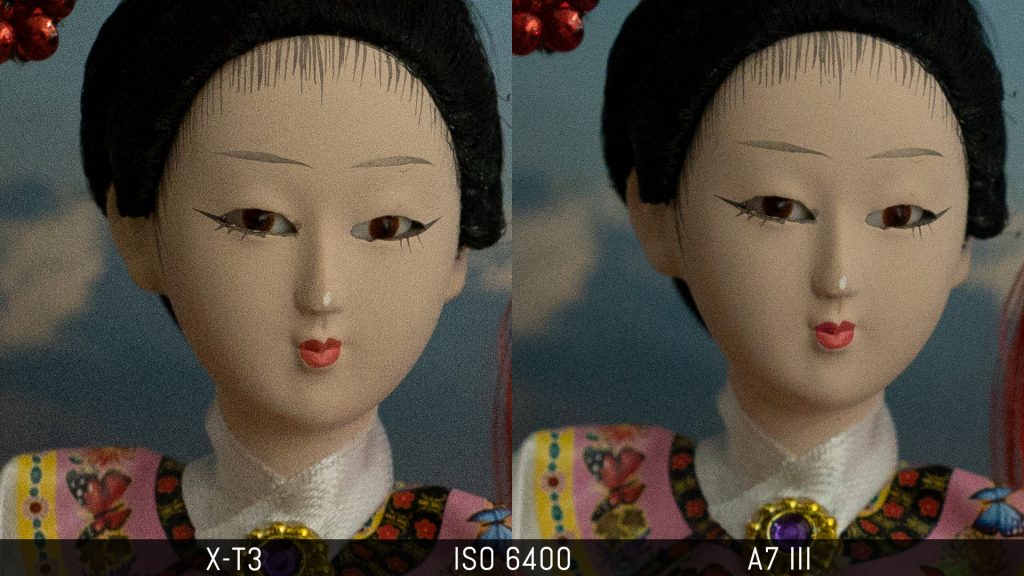
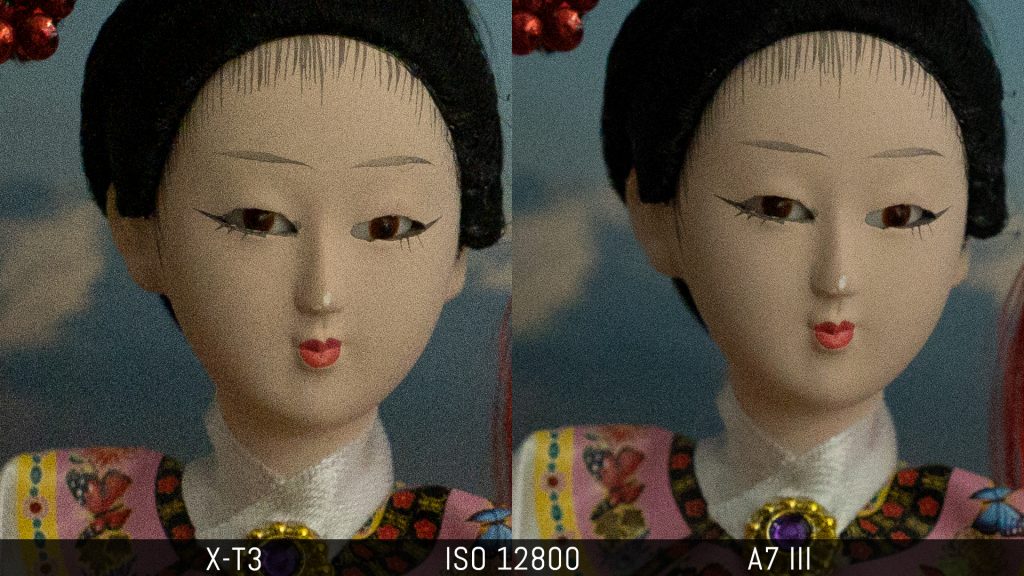
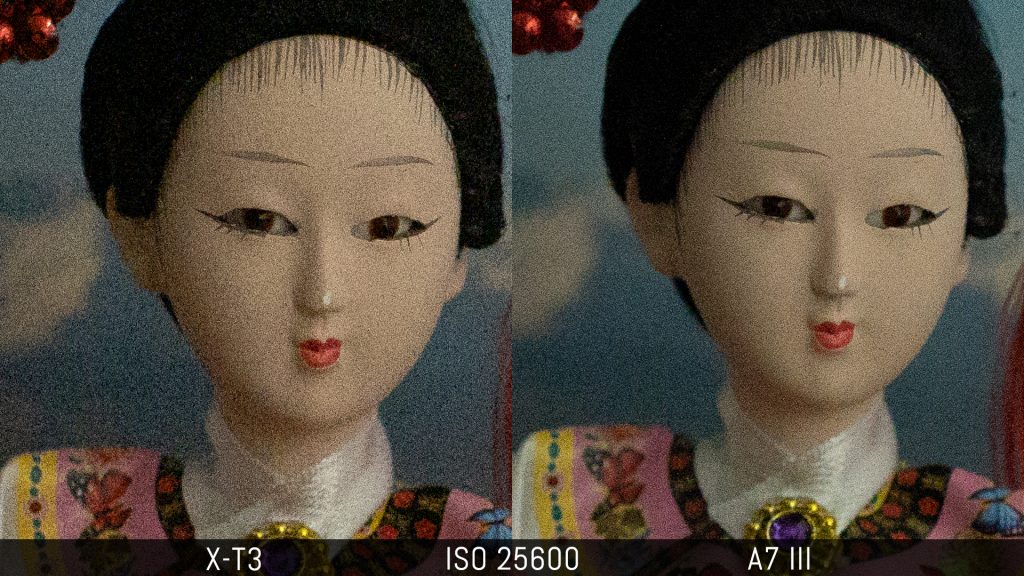
Up to 1600 ISO, both cameras perform in a similar way with very contained noise. From ISO 3200, the A7 III files start to show a small advantage. The difference becomes more relevant as you raise the sensitivity value.
With the extended values, the X-T3 becomes noisier and the highest value of ISO 51200 is almost unusable.
The A7 III has two extra push values but the highest one definitely displays too much noise.
Colours and Monochrome: the distinctive look of Fujifilm’s Film Simulation modes
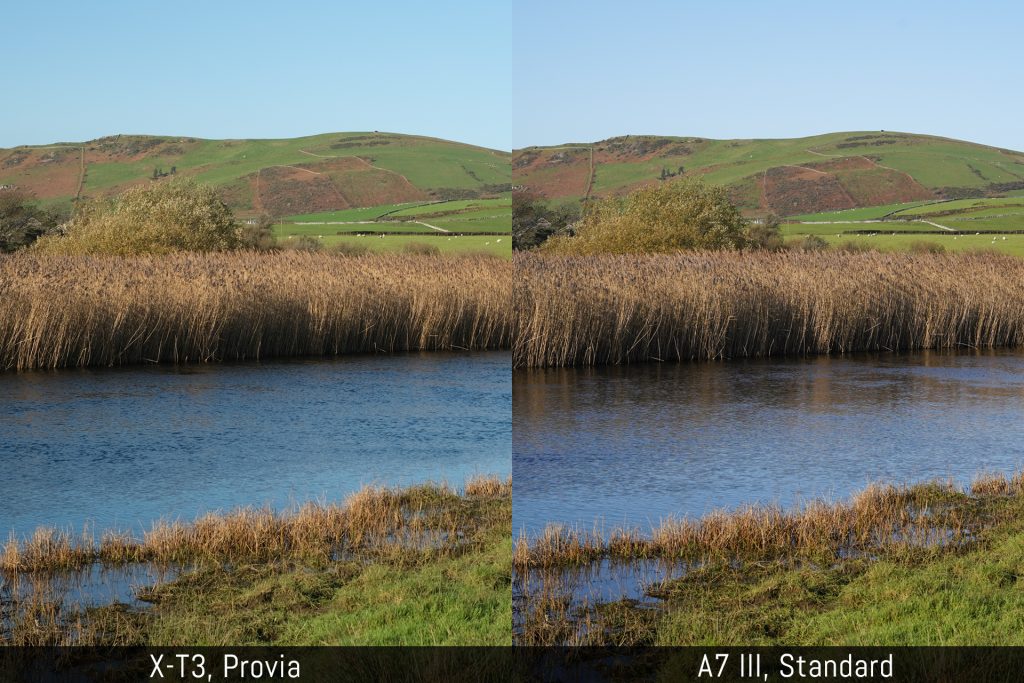
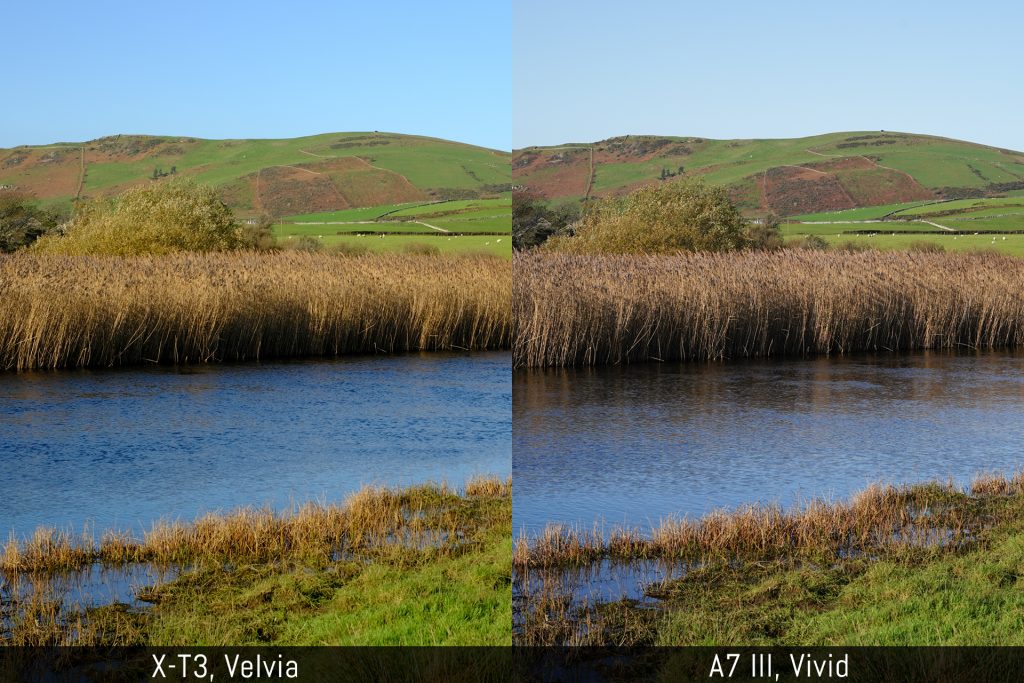
Each RAW format behaves differently depending on the program you open it with, but with a bit of work and patience it is possible to achieve a similar colour rendering.
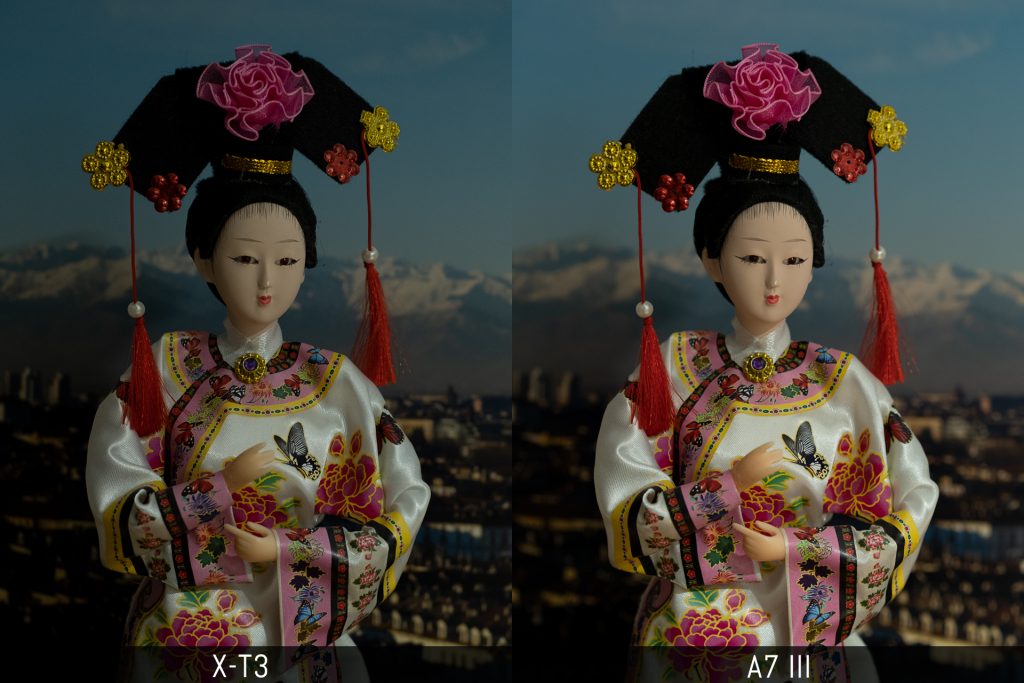
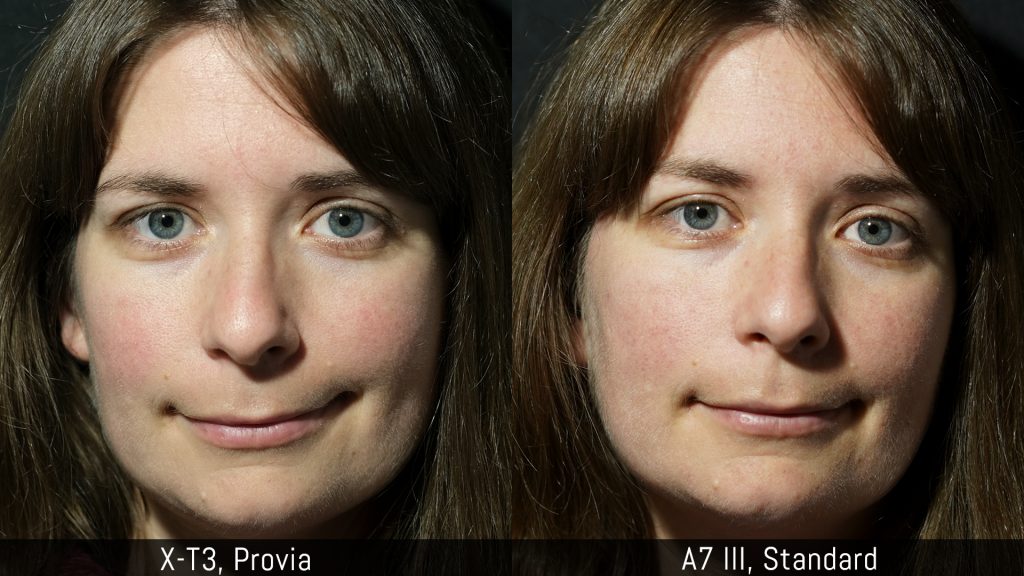
If we look at the in-camera colour profiles however (Film Simulation modes for Fujifilm, Creative Styles for Sony), we can notice that the X-T3 adds more saturation to the Provia and Velvia profiles, especially to the yellows and greens, whereas the A7 III has more of a reddish hue.
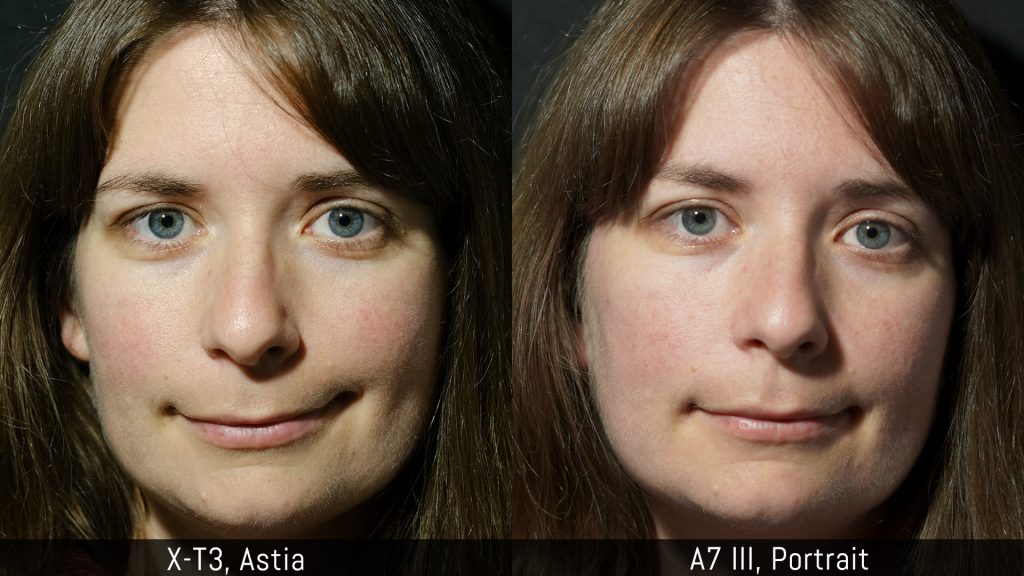
The X-T3 has a total of 9 colour profiles. Some of them produce more balanced results (Astia) or add less saturation (Pro Neg Hi). Classic Chrome adds more contrast but decreases the saturation, giving it a different look to the other Film Simulation modes.
The A7 III has 13 profiles in total, and some of them change the tones of the image significantly. For example the Landscape profile shifts more toward yellow, Clear adds more contrast and Autumn Leaves offers a nice balance of colours and saturation.
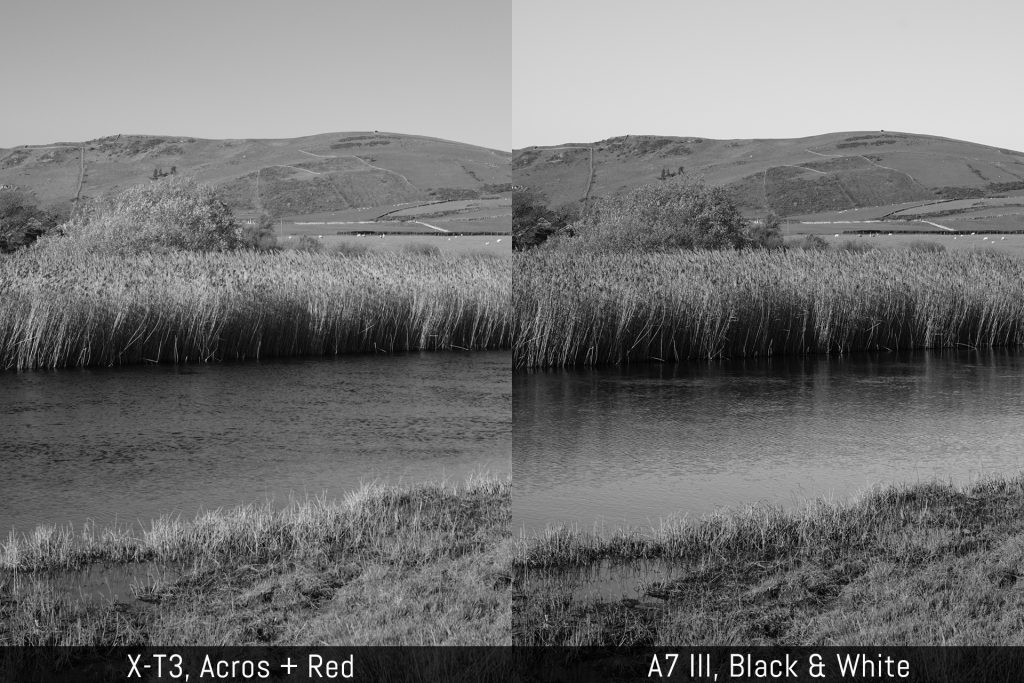
The X-T3 gives you more choice for Black and White: there is Monochrome and Acros with three different colour filter effects to choose between, and an option to warm or cool the image. The A7 III has just one Black and White profile.
For skin tones, the X-T3 has more of a green/yellow hue, and this becomes more noticeable with profiles such as Astia. The Sony preserves more reds once again but maintains a good balance overall.
If you don’t like the greenish tint of the Fuji, you can correct it by adjusting the WB Shift, an option that is available on the Sony camera as well.
Additional information about image quality
- RAW compression: uncompressed or lossless compressed for the X-T3, uncompressed or compressed for the A7 III. Output is 14-bit on both but drops to 12-bit on the Sony when shooting in continuous mode with the electronic shutter (I couldn’t find confirmation about the same happening on the X-mount camera)
- JPG settings: the X-T3 offers more steps to control noise reduction (±4 vs off, low and normal on the A7 III) as well as dynamic range, DR200 and DR400 in particular make a relevant difference in comparison to the DR Optimiser setting for the Sony (more shadow and highlight preservation)
- Auto White Balance: the X-T3 can shift too far towards either red or green under certain artificial light sources, and will require more WB shift adjustment. The A7 III has more convenient settings to prioritise the whites or the ambient light of the scene.
3. Autofocus and speed
The X-T3 and A7 III are two of the best mirrorless cameras you can buy as far as their autofocus performance is concerned. They represent the years of hard work both brands invested to reach the level they are at today.
Fantastic points and how to use them
The X-T3 features the most advanced hybrid system to date from Fujifilm. It has 117 points that can be subdivided into 425 with certain setting combinations. The A7 III has 693 phase detection points and 425 contrast detection areas.
Phase detection sensors cover more than 90% of the sensor surface in both cases, and the two models share the same minimum sensitivity of -3Ev.
In single autofocus, both cameras perform well, delivering fast and accurate focusing in most situations. The A7 III can be a bit slower at times because the camera often prioritises contrast over phase detection in S-AF mode, especially when a small AF area is used.
The X-T3 has also improved the focus speed and accuracy of older XF lenses, and I’ve been amazed at how well my old XF 35mm f/1.4 focuses now, even when recording video.
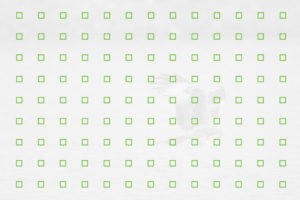
That said, we feel the Sony makes better use of the large number of focus points. With Wide or Zone Area, the camera “glues” as many phase detection points as needed onto the subject (4D Tracking). The camera has the surprising ability to understand who the subject is and what it is doing, even in low light or in strong backlit situations. These “dancing” green dots very rarely lose track of what’s important in the composition, and having so many phase detection points guarantees more accuracy.
On the X-T3, you can only take advantage of the highest number of points with certain settings. If you want to use large areas such as Zone, there are fewer focus points available and the whole tracking process sometimes feels a bit slower, especially when Wide/Tracking is selected. That doesn’t mean the AF performance itself is slower, as I’ll describe further down, but it’s an extra thought I wanted to share since we often talk about the number of focus points and to what extent they actually make a difference.
Face and eye detection: Sony is still the reference but the X-T3 is a good step forward
Both cameras have face and eye detection. The X-T3 is a good improvement and is the first camera from the brand I am really able to trust: it is faster and much more accurate than before. You can choose to prioritise the left or right eye which is quite helpful for portraits.
Firmware 3.0 and 3.20 have introduced further enhancements: the camera can detect a smaller face in the frame and you can now prioritise which face to track if more than one person is in the frame. The algorithm also works faster. I tested the 3.0 update with the X-T30 which has the same exact software as the X-T3, and the firmware brings Fuji cameras one step closer to Sony. You still encounter the occasional odd behaviour of the camera seeing a face where there isn’t one however!
On the A7 III, face detection works well but if you want the best possible results, you want to use EyeAF where one single phase detection point follows the eye of the subject. It is easily the most reliable eye detection system I’ve ever tested and it proved a remarkable ally when taking portraits of cosplayers, even when they were wearing masks or make-up.
Thanks to firmware 3.0, EyeAF can work in real time when half-pressing the shutter button (or pressing the back button focus) which means that you don’t have to assign it to a custom button anymore. Keep in mind however that when used in real time, EyeAF only activates inside the focus area selected, whereas if you assign it to a custom button, it will work everywhere regardless of the area used and its position. The only thing missing is the possibility to prioritise the left or right eye which is something you can do with the a6400.
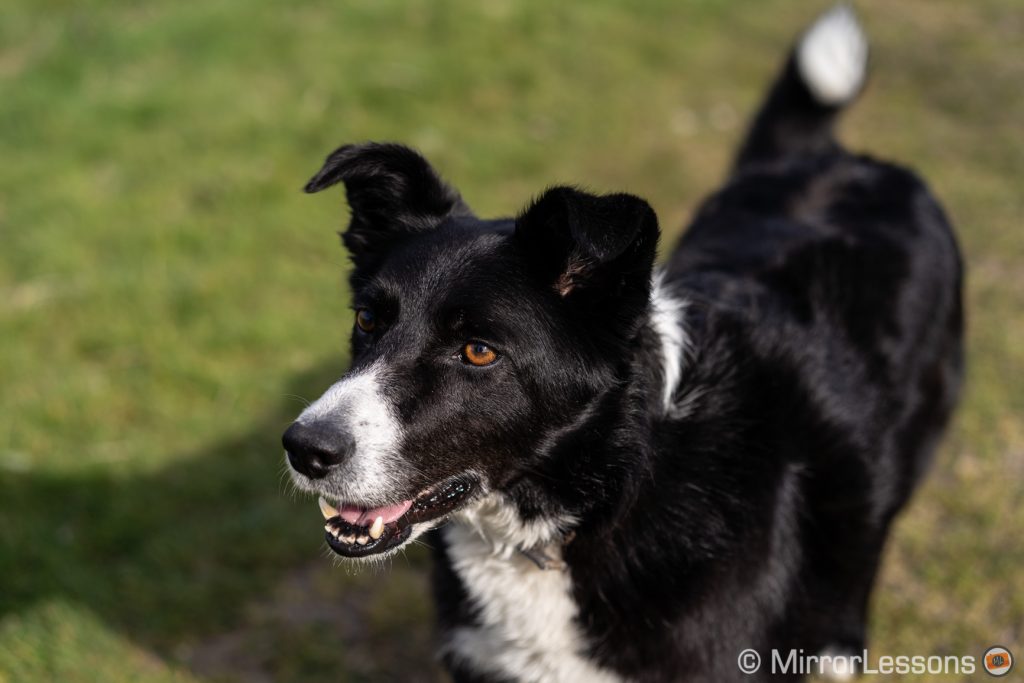
Firmware 3.0 brings another update, and one I was eager to try: eye tracking for animals. It works just as well as it does for people when it comes to speed, responsiveness and accuracy. The little green square overlays the animal’s eye in your screen’s live view just like it happens on a person’s face. In the menu you have to select between human and animals; the two can’t be combined.
For dogs and cats, the A7 III focused correctly most of the time, except when there was a lot of contrast. You need to be close enough so that the animal fills a relatively large portion of the frame, otherwise the eye detection won’t activate. It was able to detect sheep as well but not birds. Perhaps future firmware updates will widen the range of animals the camera can recognise.
Sports and Wildlife: two of the best on the mirrorless market
It is with continuous AF and challenging subjects that these two cameras unleash their full potential.
The X-T3 features an improved algorithm and more processing speed in comparison to the X-T2, whereas the A7 III autofocus is inherited from the A9. While it doesn’t share the same processing speed as the flagship, we found it to be very close in terms of performance and accuracy.
I try to go to the same type of events as much as possible with the cameras I test so that I can gather more accurate feedback and impressions. With the X-T3 and A7 III I can present two case studies.
Case study 1: Football
- Fujinon lens used: XF 50-140mm f/2.8
- Sony lens used: FE 70-200mm f/2.8 GM
- X-T3 keeper rate: 75% (sharp shots only), 92% (including slightly soft results)
- A7 III keeper rate: 80% (sharp shots only), 92% (including slightly soft images)
In this scenario the X-T3 didn’t impress me much in comparison to its predecessor, which is not a bad thing at all since the X-T2 was already excellent. However it does provide a bit more reactivity when the camera needs to re-adjust focus once the burst has started, which is definitely a welcome improvement.
The A7 III is a bit more accurate in this situation, although it can occasionally exhibit odd behaviour such as being slow to react or choosing the background instead of the subject. Fortunately I can count the number of times it happened on one hand.
Case study 2: Birds in flight (Red kites)
- Fujinon lens used: XF 100-400mm f/4.5-5.6
- Sony lens used: FE 100-400mm f/4.5-5.6 GM with TC 1.4x
- X-T3 keeper rate: 62% (sharp shots only), 88% (including slightly soft results)
- A7 III keeper rate: 77% (sharp shots only), 96% (including slightly soft images)
When photographing my beloved kites, I witnessed more interesting changes in the X-T3. Although my keeper rate didn’t increase a lot, the camera was definitely more reactive and capable of keeping an entire sequence in focus.
It surprised me most of all when the birds flew close to me, a situation that challenges many other cameras I’ve tested due to the rapid change in speed and distance. It didn’t nail it every time, but it got closer than any other Fuji camera I’ve tested so far.
The A7 III’s performance is excellent. My keeper rate wasn’t far from what I got with the Sony A9, which is the best mirrorless I’ve tested for this genre so far. Only a few shots ended up completely out of focus and the camera is very reactive at all times.
Electronic shutter: Fuji goes into Sony territory
The X-T3 and A7 III share similar speeds in continuous shooting mode with the mechanical shutter (11fps and 10fps). When you activate the electronic shutter, there is a clear difference in performance between the two cameras.
Not only can the X-T3 increase the shutter speed up to 1/32000s, but it can also increase the burst speed to 20fps, or 30fps with the 1.25x crop.
What’s more, the Fuji camera offers live view with no blackouts when shooting in continuous mode with the electronic shutter. A clear view with no interruptions or lag gives you an advantage when tracking fast subjects such as as birds because you can react more quickly to their unpredictable movements, as well as track them more precisely and keep them at the centre of your frame. This is a feature that, until the X-T3 announcement, was exclusive to the flagship Sony A9.
Although the sensor readout is fast on the X-T3, distortion caused by rolling shutter when panning quickly can still be visible when using the electronic shutter. With birds or football, I only noticed it a few times, especially when moving the camera more quickly to adjust the composition.
As for buffer, the A7 III performs better overall. It can record RAW files for more than 30 seconds at 8fps before slowing down, whereas the X-T3 slows down much quicker with RAW files (after 5s). With JPGs, they both do well.


Additional information about autofocus and speed
- AF Custom Settings: the X-T3 has 5 presets plus a sixth that can be customised to control the AF behaviour, whereas the A7 III only offers one option (AF Track Sens)
- Pre-shot: the X-T3 can record frames before you fully press the shutter button when the electronic shutter is activated, which helps you capture very fast action that you can’t easily predict.
- 1/8000s is the maximum speed for both cameras with the mechanical shutter
- Electronic first curtain mode is available on the two models
- Anti-flickr: reduces the flickering from artificial light sources (can decrease the burst speed at which the shot is taken)
4. Video capabilities
For those interested in video making, the choice between the two cameras is more difficult to make. Fujifilm has taken a surprising step forward with the X-T3, introducing specifications that elevate the camera to the same level as the very best on the market.
Here is a summary of the main specifications and differences between the X-T3 and A7 III when it comes to video, followed by our 4K comparison and a few thoughts about the results.
X-T3
- 4K and DCI up to 60fps
- 10-bit 4:2:0 (SD card)
- 10-bit 4:2:2 (HDMI)
- 400Mbps/ALL-I/H.265 (10-bit)
- 400Mbps/IPB/H.264 (8-bit)
- 1080p up to 120fps
- 1080p up 200Mbps
- 1.18x sensor crop in 4K 50/60p
A7 III
- 4K up to 30fps
- 8-bit 4:2:0 (SD card)
- 8-bit 4:2:2 (HDMI)
- 100Mbps/IPB/H.264 (8-bit)
- 1080p up to 120fps
- 1080p up 100Mbps
- 1.2x sensor crop in 4K 30p
- 1.5x sensor crop in Super35 mode
The X-T3 is an unexpected competitor
Both cameras produce high quality footage but I was surprised to see slightly better details from the X-T3, although we’re talking about a minor difference.
Those who like to record with Log profiles may find an advantage in the X-T3 and its 10-bit/higher bitrate recording. There is a lower chance of colour artefacts appearing, something the Sony is more prone to after colour grading. The H.265 files are not easy to work with however. I had to use Davinci Resolve because Premiere Pro doesn’t display the correct exposure.
In addition to Log gammas, the X-T3 has one profile designed for video called Eterna, which requires a bit of work in post production. The A7 III has more picture profiles that can be customised with dedicated parameters (knee, black pedestal etc.) and you can choose to create the final look in-camera or a flat-alike footage to grade in post. If you’re not an experienced video maker, these Sony settings require a bit of a learning curve. Both cameras include a HDR profile (HLG) to use with compatible devices such as modern TVs (firmware 2.10 required for the X-T3).
Just as with stills, each brand has a distinctive colour signature. The X-T3 tends towards yellow hues whereas the Sony leans towards more reddish results. For portraits, the X-T3 WB shift can require some additional tweaking to get rid of the green dominance when using manual white balance. When working with the Log profiles, the difference in colours is more evident especially if you apply the Lut from each brand.
Note that the Sony Creative Styles, although capable of giving punchier colours for video, have less dynamic range and can clip highlights more easily. On the X-T3, the settings available for stills are also valid for video and that includes the DR200 and DR400 options that can increase your dynamic range significantly, albeit with a slight increase in noise in the shadow areas.
At high ISOs, the two cameras have a very different noise pattern. The A7 III’s noise is finer and organic, and while it increases the more you raise the sensitivity, it remains discreet up to 12800. The X-T3 seems to apply some degree of noise reduction even when the NR setting is at -4.
If you need autofocus, both cameras deliver great performance for moving subjects and face detection. You can also configure dedicated AF Custom settings to make the AF slower or faster. This becomes useful when recording smooth transitions between two points using the touch screen.
Rolling shutter is more severe on the Sony in full frame mode, but the performance improves in Super35/APS-C mode.
In 1080p, the quality isn’t as good as in 4K but remains acceptable. You can record up to 120fps to get slow motion footage, although the X-T3 has the advantage of 60fps in 4K too.
Ease of use: the A7 III is part of a larger system
What I appreciated about the X-T3 is that the camera keeps all the stills and video settings separate. You can change things such as white balance or colour profiles for video knowing that it won’t overwrite the same settings you have for stills and vice versa. It even works for aperture, ISO and shutter speed if you activate the Movie Silent Control option and do everything with the touch screen.
On the A7 III, I like how you have to option to set the custom buttons separately for stills and video. The APS-C crop (Super35) delivers excellent quality in 4K and can be of help on many occasions.
Another advantage of the A7 III is that it is easier to match the look of your image with other Sony cameras and camcorders since the Picture Profiles are the same across most products. With the X-T3, you can only match settings with the X-H1 or the X-T2 as of now.
Additional information about video
- Gamma Display Assist: on the A7 III you can display realistic contrast and colour on the screen when recording with S-Log2 or S-log3, rather than visualising a flat look.
- Tally light: the X-T3 allows you to control the AF illuminator on the front and the status indicator on the rear to signal when the camera is recording (continuous or intermittent)
- Audio: both cameras have a mic input and headphone output (3.5mm) and volume recording control
- Zebra and other tools: Zebra and time-code settings are available on both cameras, the A7 III has an additional Proxy recording mode.
5. Image stabilisation
In this chapter I won’t be drawing direct comparisons because only the A7 III features in-body stabilisation.
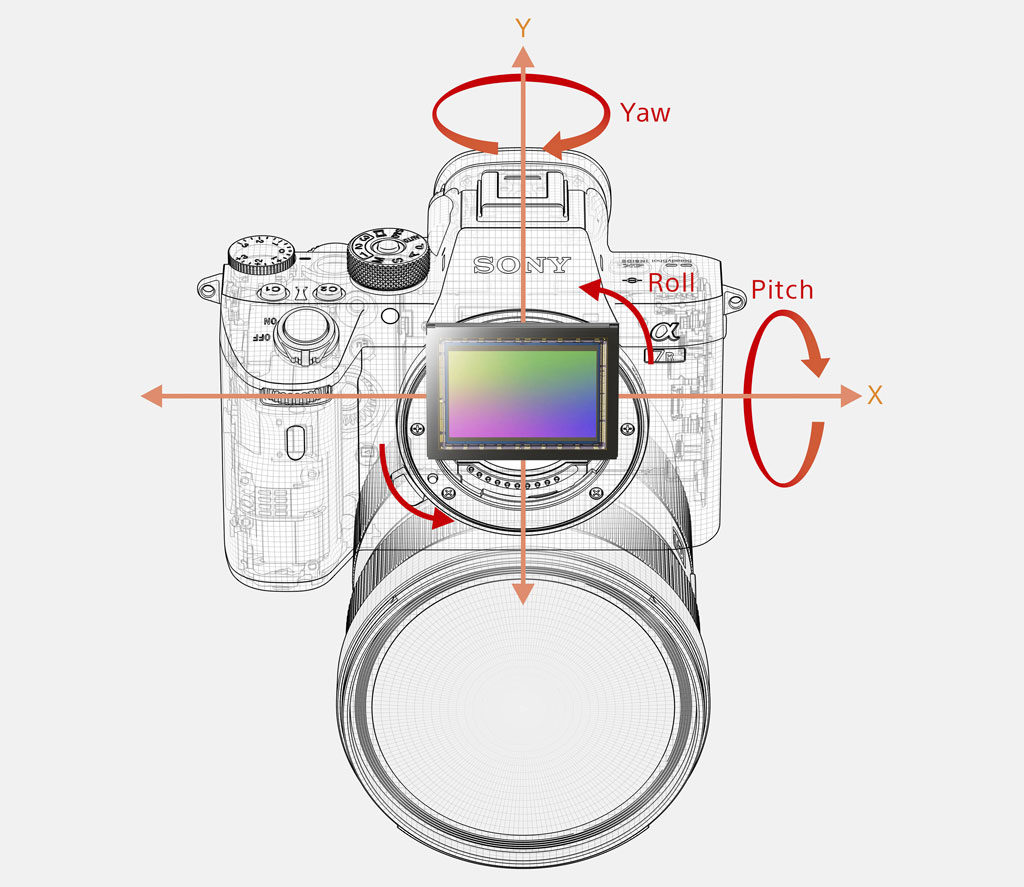
The sensor shift mechanism works on 5 axes and gives you good results down to 1/5s, although the keeper rate is higher if you stay at 1/10s or above. You can push the camera down to around half a second or even a second if you’re patient, but the results aren’t consistent and it’s much more difficult to get a sharp shot every time.
If you mount a lens that features optical stabilisation, the A7 III uses three axes on the sensor (Roll, Z and X) and two axes on the lens (Pitch and Yaw). The slowest I could go was around 1/10s with the 70-200mm GM at 200mm.
You can use image stabilisation with adapted lenses too. If they lack electronic contacts, only three axes will be used and you need to input the focal length manually. You lose more or less one stop of compensation in comparison to 5 axis.
For video, the Sony does well but the stabilisation system isn’t perfect. There can be some mild jittering for static shots, while movements (panning or walking) are anything but smooth.
The X-T3 lacks in-body stabilisation so the only option is to use stabilised lenses. Fujifilm has done a cracking job with some of them. We’ve managed sharp shots down to 1 second with the XF 18-135mm, or 1/4s with the XF 80mm Macro. So the only time you’ll really feel at a disadvantage is when using lenses that lack optical stabilisation, such as the XF 16-55mm f/2.8.
Conclusion: X-T3 vs A7 III, which one to get?
There is no denying that some of the key characteristics of each camera will be enough to help you make a decision. You may be attracted to the retro design and more intuitive interface of the X-T3, or you may prefer the 35mm format and all the benefits it has to offer. There is also a significant difference in price, with the Fujifilm camera being the less expensive option.
If we scratch under the surface though, there is more to consider than meets the eye. It is true that the A7 III offers better image quality, but the difference isn’t as big as you might think.
Overall the autofocus performance is very similar. The A7 model is a little more accurate and will give you a better keeper rate, but not to the point that we can state that one camera is clearly superior to the other. They both performed well in challenging conditions and I can easily label their respective autofocus systems as two of the best of the market.
The X-T3 has a few cards up its sleeve when it comes to continuous shooting speeds. The fast sensor readout coupled with the electronic shutter performance makes it better for fast action or birds in flight, and the blackout-free live view is the cherry on top.
If you’re mainly interested in video, the battle intensifies even more. The A7 III is an excellent choice and has everything you could possibly need, including great high ISO performance, but the X-T3 pushes the limits of the APS-C format further than ever before. It matches the Sony in many areas, and even offers something the Sony doesn’t have: 10-bit internal recording for improved colour grading.
Deciding between the Fujifilm X-T3 and the Sony A7 III also means deciding between two systems. Both brands now have a complete set of native lenses, but in many cases, the E-mount system requires a bigger investment and more space in your bag. But at the same time, it is also more versatile thanks to a growing choice of lenses from third-party brands.
Strengths of the Fujifilm X-T3:
- simple and intuitive to use
- faster continuous shooting speeds
- blackout-free live view with bursts
- distinctive colour palette
- stunning video quality with 10-bit internal recording
- more extra features built-in including focus bracketing, time-lapse etc.
- makes better use of the touch screen
- less expensive
Strengths of the Sony A7 III:
- extra dynamic range to play with
- better high ISO performance
- continuous autofocus is a little more accurate
- eye detection for people and animals
- better buffer memory when shooting RAW
- advanced video settings to control image quality
- 5 axis stabilisation
- longer battery life
To consider:
- neither grip is perfect with large lenses
- the E-mount system offers lots of versatility when it comes to lens choice (Sony and third parties) but can easily become expensive if you’re after the best products
- the X-mount system (cameras plus lenses) remains more compact and lightweight in most cases. Third-party offerings are more limited however, especially when it comes to AF lenses.
Choose the Fujifilm X-T3 if:
- you’d rather have a more compact system
- you shoot lots of action and difficult subjects such as birds in flight
- you do lots of video colour grading and can benefit from 10-bit internal recording
Choose the Sony A7 III if:
- you want the very best image quality and autofocus performance for stills
- you plan to take advantage of the in-body stabilisation
- you want to invest in a larger eco-system for stills and video
Check price of the Fujifilm X-T3 on
Amazon | Amazon UK | B&H Photo | eBay
Check price of the Sony A7 III on
Amazon | Amazon UK | B&H Photo | eBay
Sample images and additional content
Below you can browse through various shots taken with the X-T3 and A7 III and download native RAW and JPG files:
You may also be interested in the following comparisons:

