Over the years, Olympus has built a very interesting system for wildlife and bird photographers, with reduced size and weight being the primary appeal for those tired of carrying heavy gear around.
But despite the excellent portability, the unrivalled stabilisation and the impressive shooting speed that attracted wildlife enthusiasts to the system, OM-D cameras failed to bring relevant improvements to key areas such as image quality and autofocus.
After all that has happened in the last two years, including the sale of Olympus’ Imaging Business and the birth of the new company OM Digital Solutions, the OM-1 arrives in 2022 amid a flurry of great expectations. Is it a game changer? Or just a good upgrade?
I spent a number of weeks using the camera in various conditions, trying many different settings and testing several telephoto lenses, in order to give you the most complete answer possible.
Note: in June and December 2022, firmware 1.2 was released, followed by firmware 1.3 with improved C-AF performance (according to OM Digital Solutions). I’ve tested the camera again with these updates, but I haven’t found any relevant differences, at least for birds. Therefore, all my feedback described in this article remains the same.

Ethics statement: we bought the OM-1 for personal and review purposes. Some of the lenses mentioned throughout the article were loaned to us by OM Digital Solutions UK, whereas other were rented. We were not asked to write anything about this product, nor were we provided any compensation of any kind. Within the article, there are affiliate links. If you buy something after clicking one of these links, we will receive a small commission. To know more about our ethics, you can visit our full disclosure page. Thank you!
Table of Contents
1. Preface
2. Static and Slow Moving Subjects
3. Continuous Shooting
4. Birds in Flight
5. Image Quality
6. Video and Stabilisation
7. Design
8. Video Review
9. Settings Guide
10. Conclusion
Preface: new sensor and two promises
During its presentation back in February, OM Digital Solutions made two important claims. The first was that the autofocus is much better and more advanced, and the second is that the image quality has improved, closing the gap with 35mm format (full frame).
At the heart of these claims is the new sensor. It may sound the same in terms of resolution (still 20.4MP), but the design is completely different from the previous generation (E-M1 III and E-M1X).
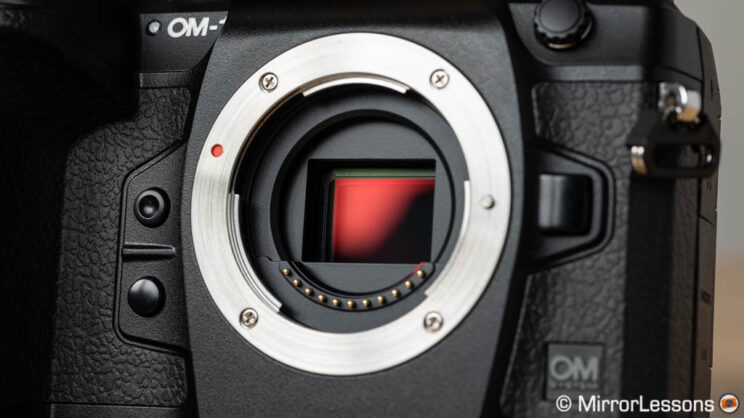
It is stacked (meaning more processing speed) and BSI (back-illuminated, meaning better light gathering), but these are specs we’ve known for some time. The second especially (BSI) doesn’t always translate into night and day differences concerning image quality.
What I find more interesting is the Quad Pixel design. Traditionally, each pixel on a sensor is composed of a micro lens on the surface, a colour filter and a photodiode, the latter being responsible for converting the incoming light into an electrical signal. The OM-1 sensor has four photodiodes below a single micro lens, or if you prefer one photodiode divided into four.
One would hope this division could give you more image resolution, but that is not possible because of the design that differs from a Quad Bayer sensor (DPreview explains this very well). Instead, Quad Pixel allows phase detection AF to work in an ‘x’ pattern on every single pixel across the entire sensor surface. The OM-1 uses a total of 1,053 points, almost 10 times more than previous models.
On paper, the OM-1 looks sounds like a great improvement. Let’s see how the new camera performs in a real-world shooting environment.
Static and Slow Moving Birds
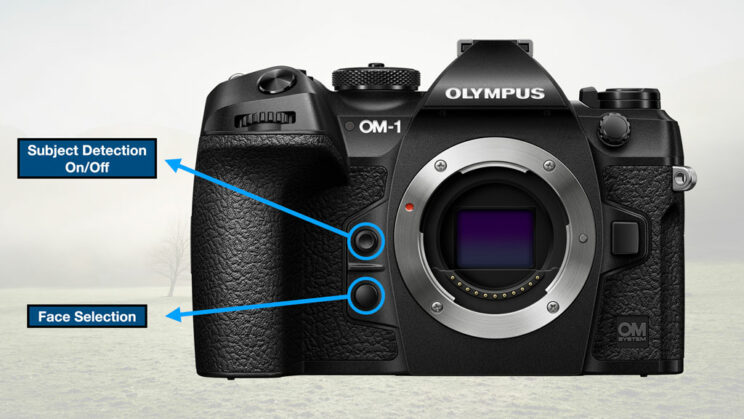
In addition to the sensor and phase detection system, much emphasises in the OM presentation was put on the software algorithm and the A.I. Subject Detection. The camera analyses contrast and colours in addition to the phase difference, and is capable of recognising a variety of subjects including race cars and motorbikes, dogs, cats and birds, the last being of special interest to us in this article.
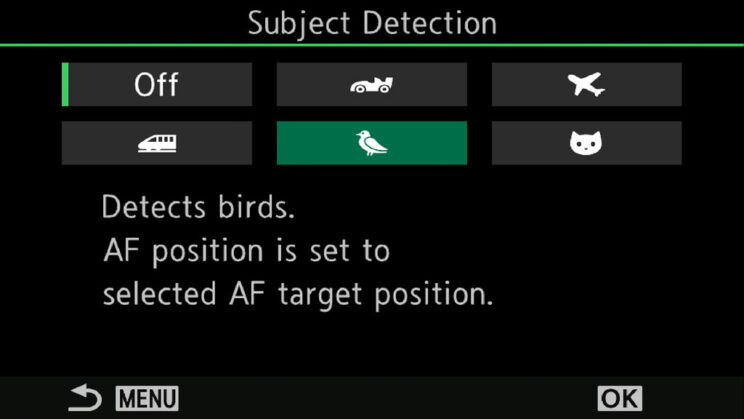
Animal Subject Detection is not new. Other brands have been implementing it for a few years now, some with impressive results (Sony and Canon). Olympus introduced Bird A.I. on the E-M1X via firmware with good results, but it wasn’t the most impressive setting of its kind that I’ve tested. It didn’t improve the keeper rate and, at times, it could easily mistake a bird for something else.
Bird A.I. Subject Detection
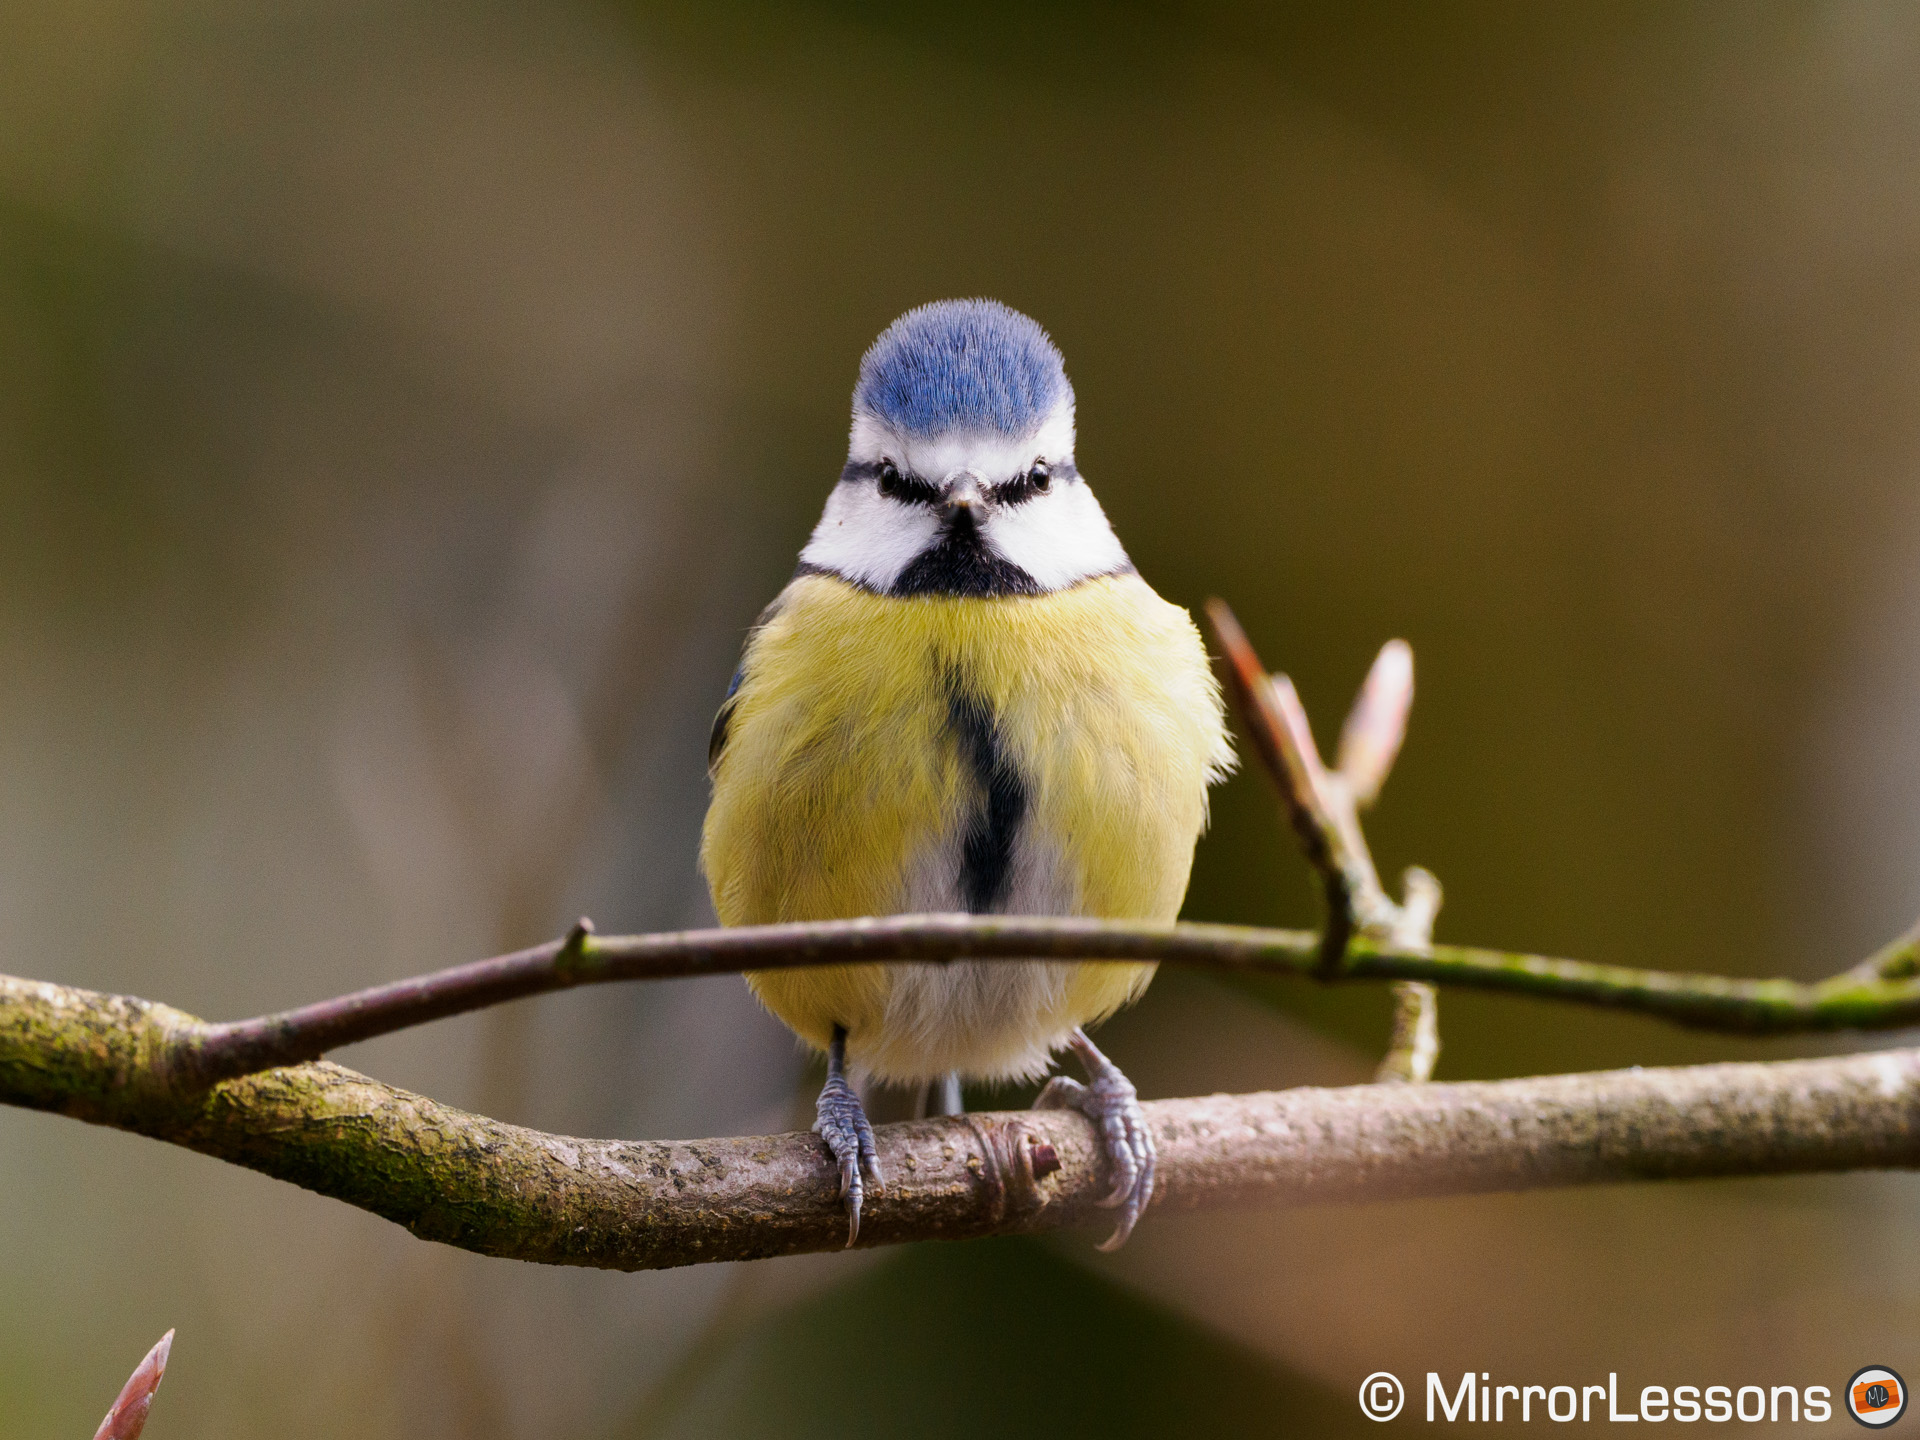
The improvement brought to the OM-1 is immediately visible: it is much faster and more reactive, and the camera not only detects the bird but it recognises different parts of it: body, head and eye. Which part is prioritised depends on how large the animal is in the frame. Move closer, and it will focus on the head, or the eye if the latter is clearly visible. For comparison, the E-M1X is less capable of making a distinction between head and eye.
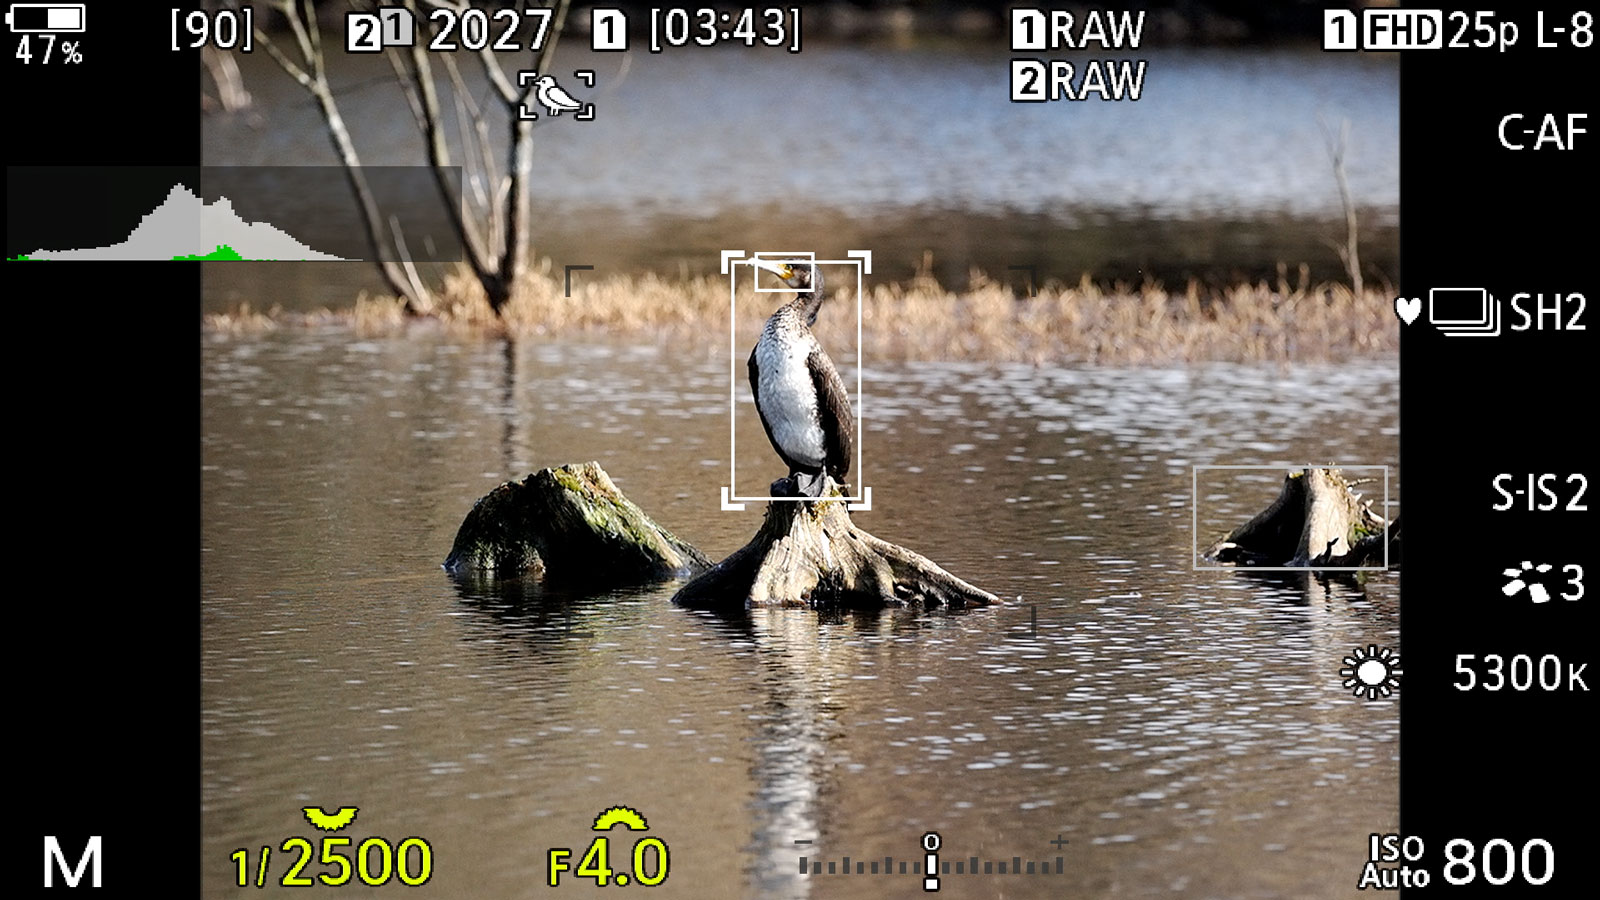
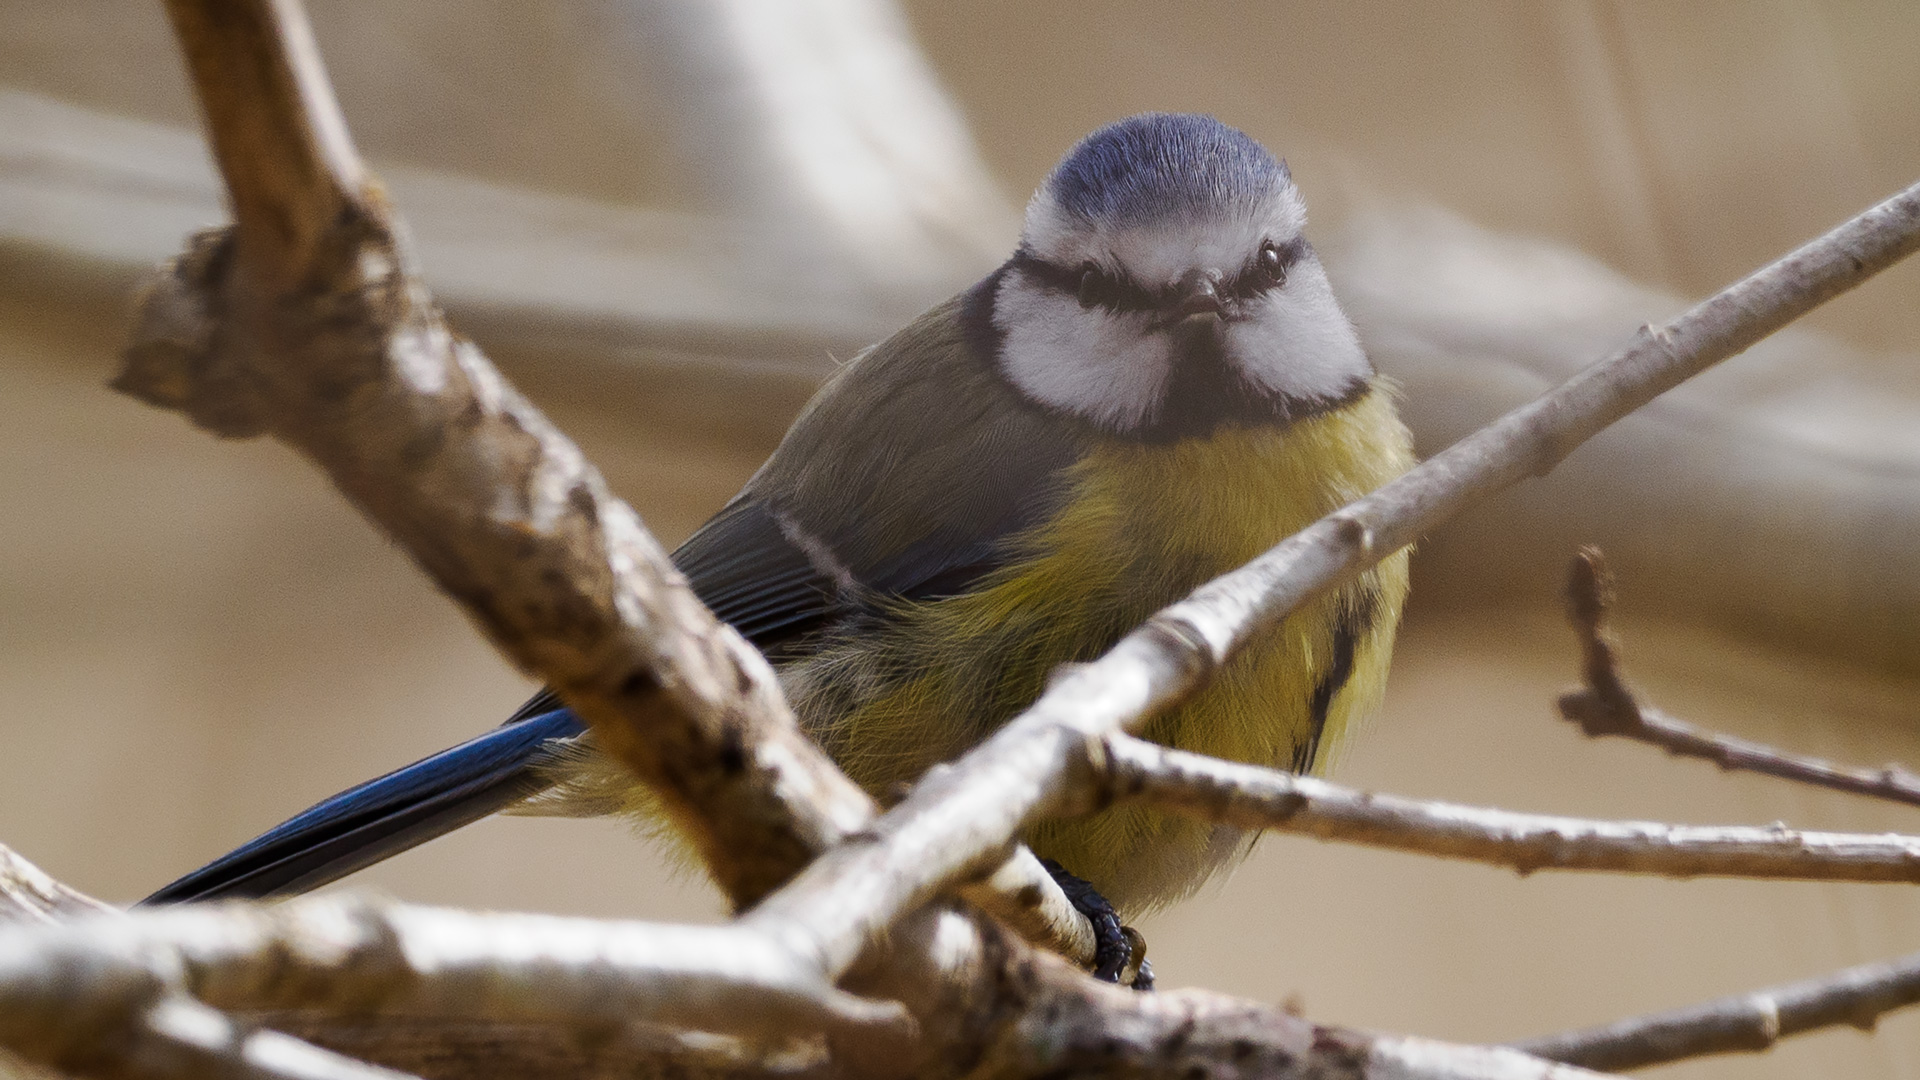
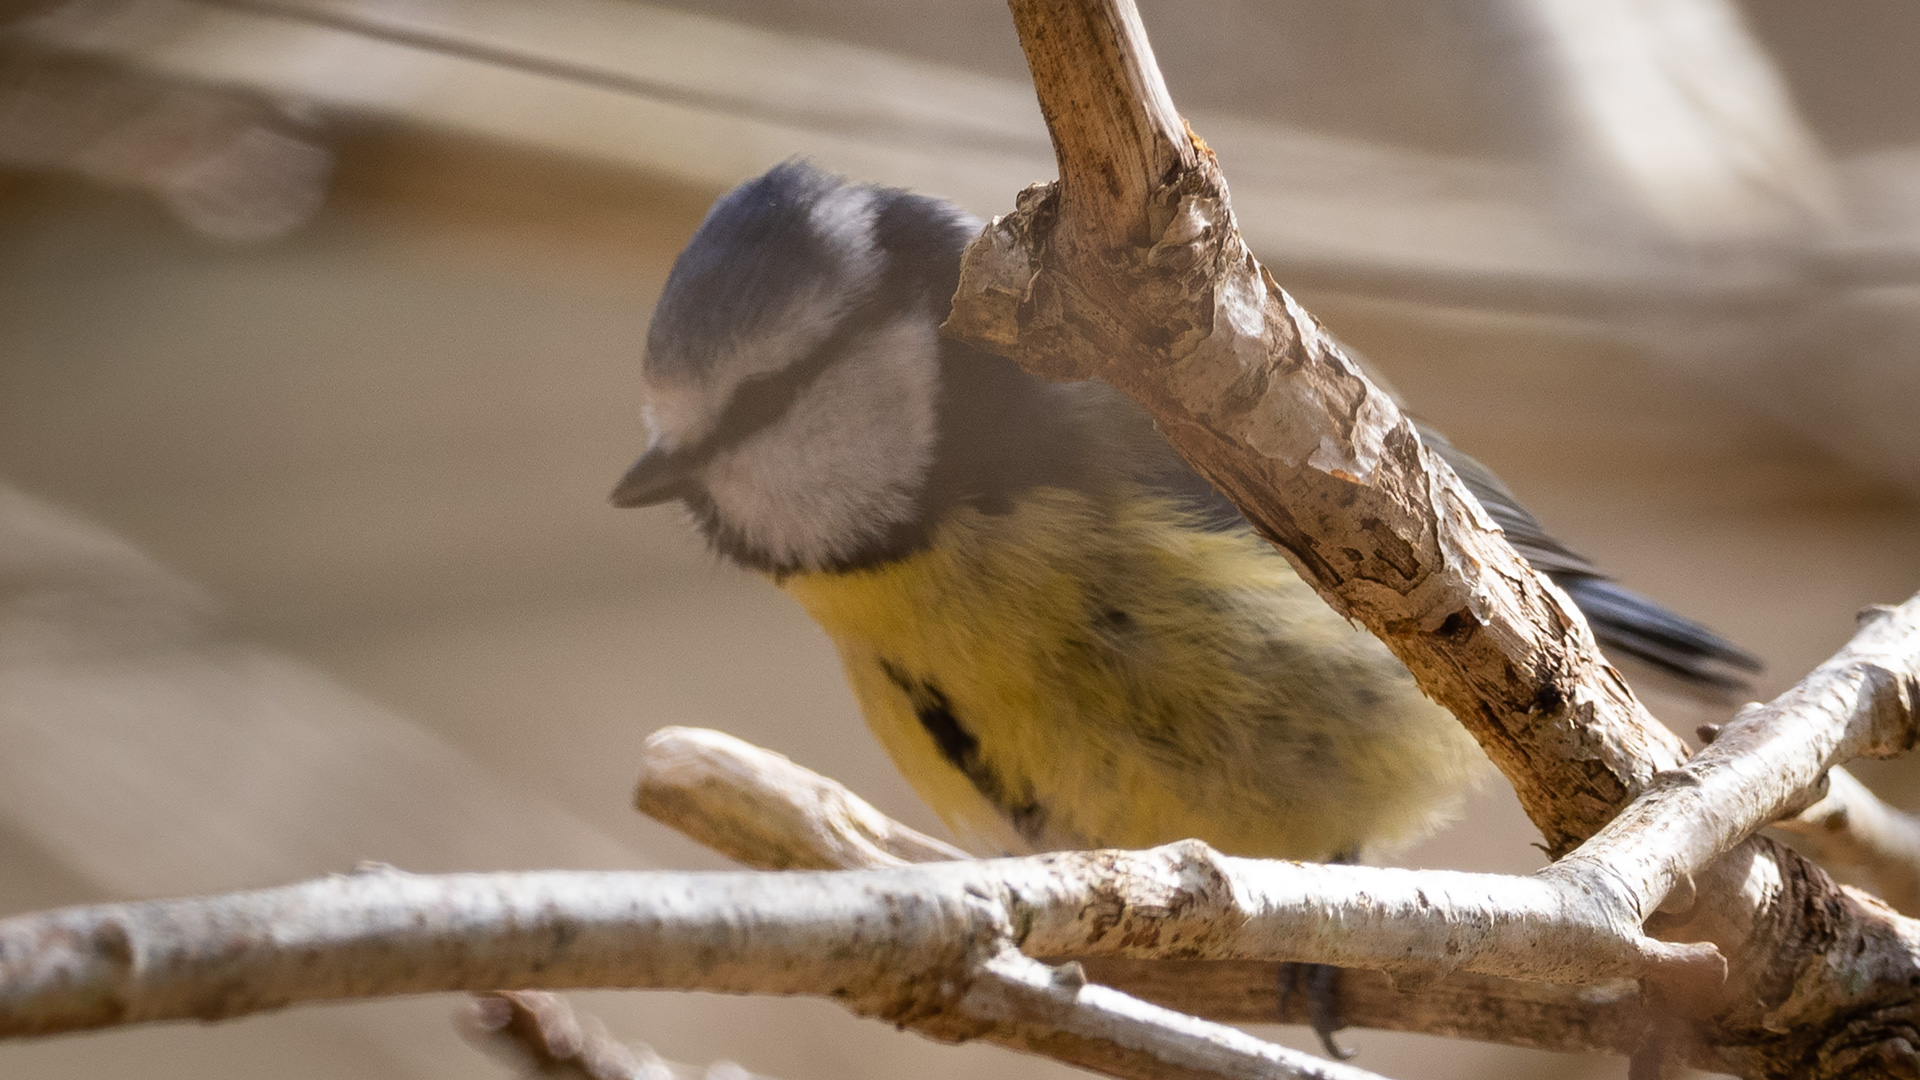
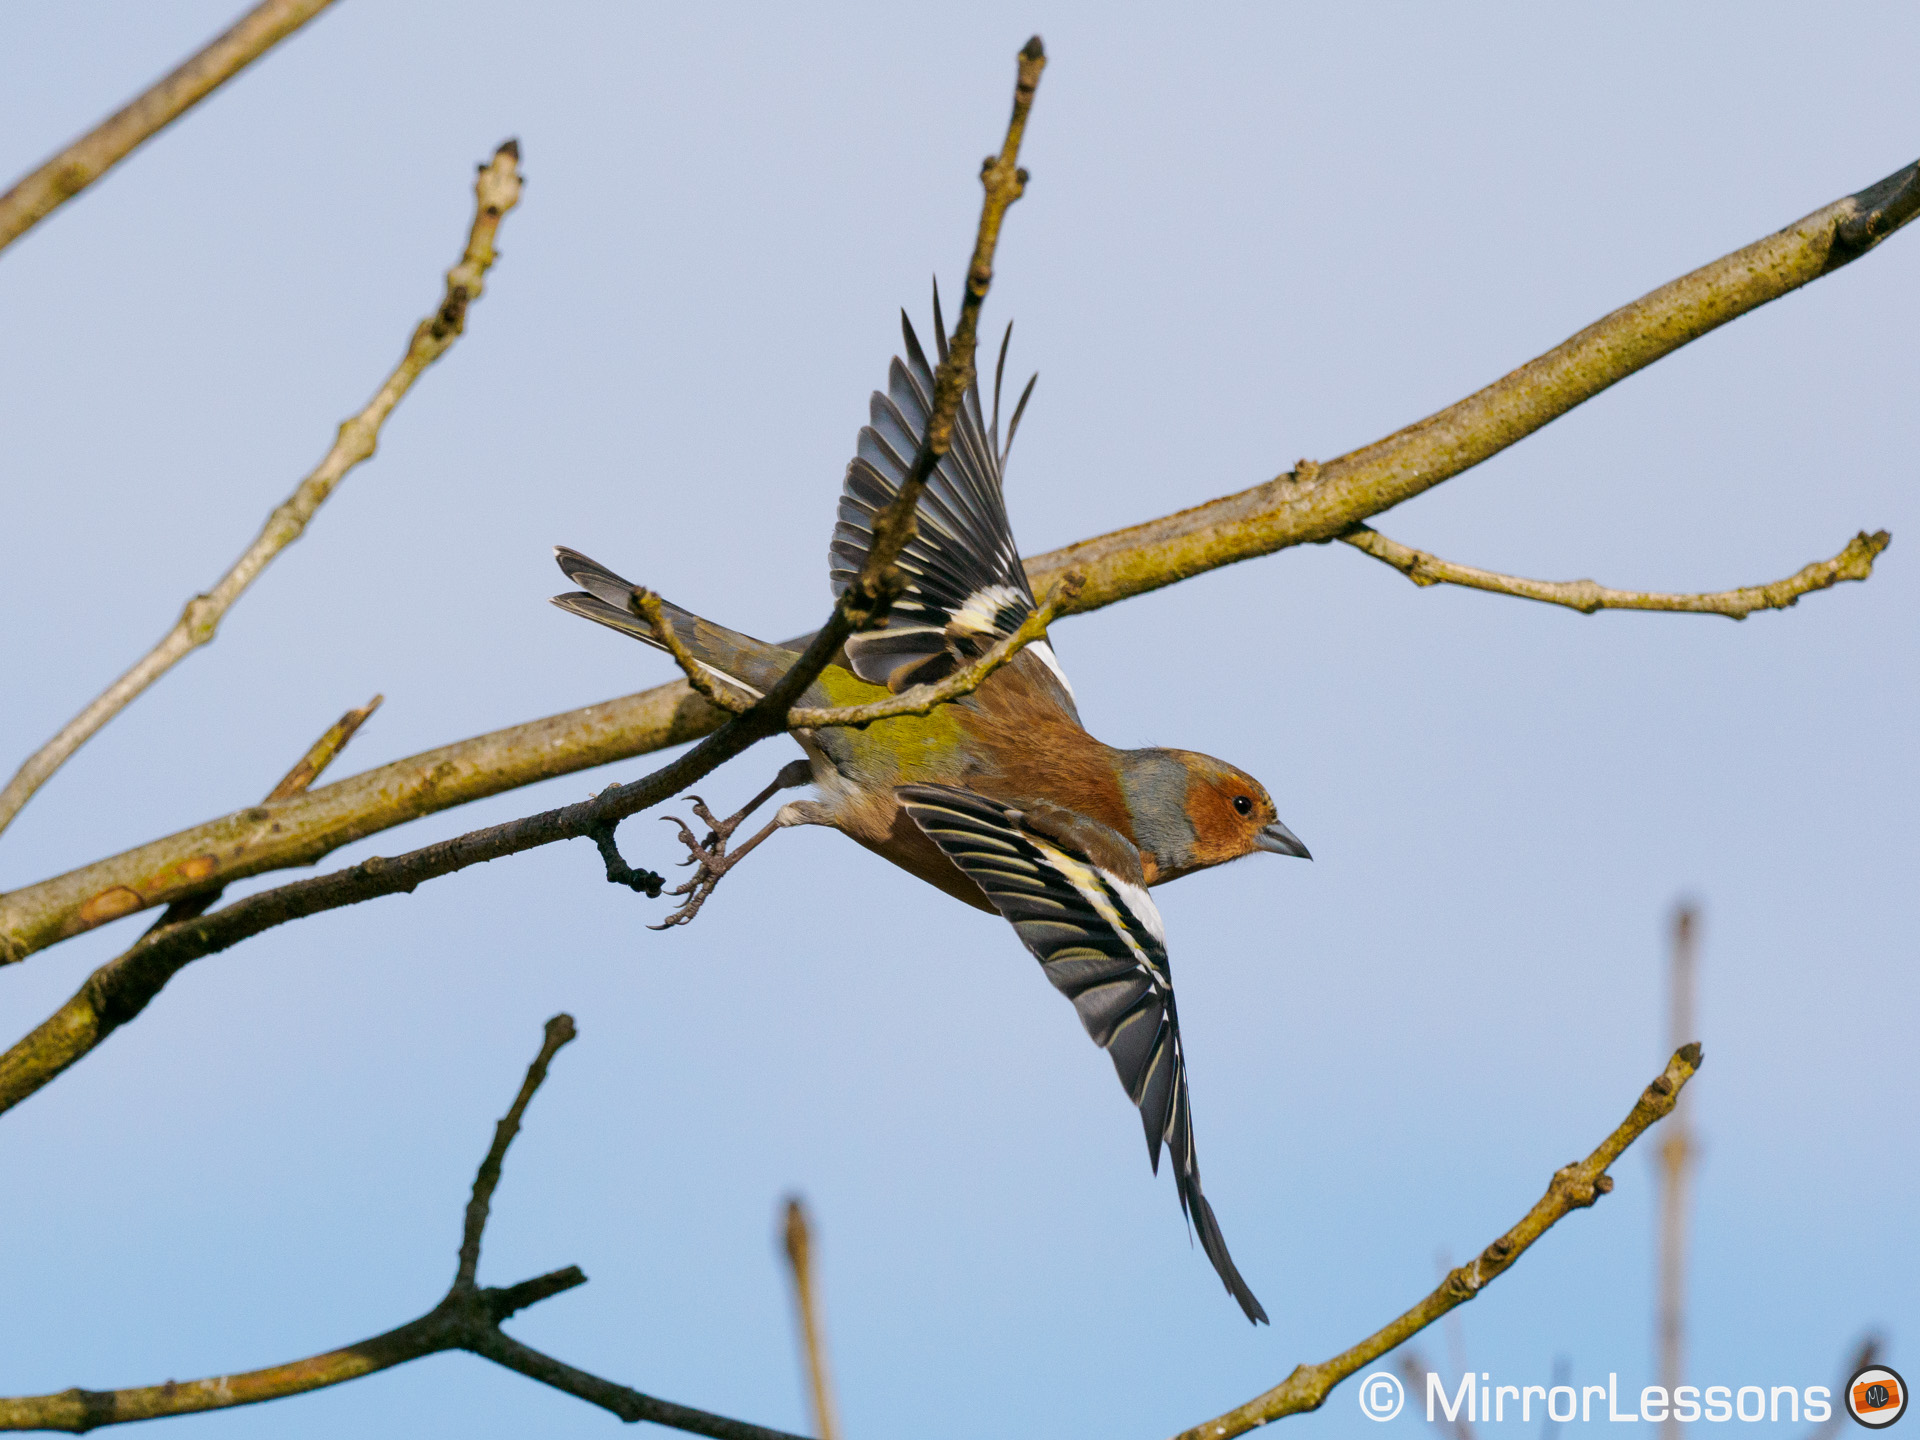
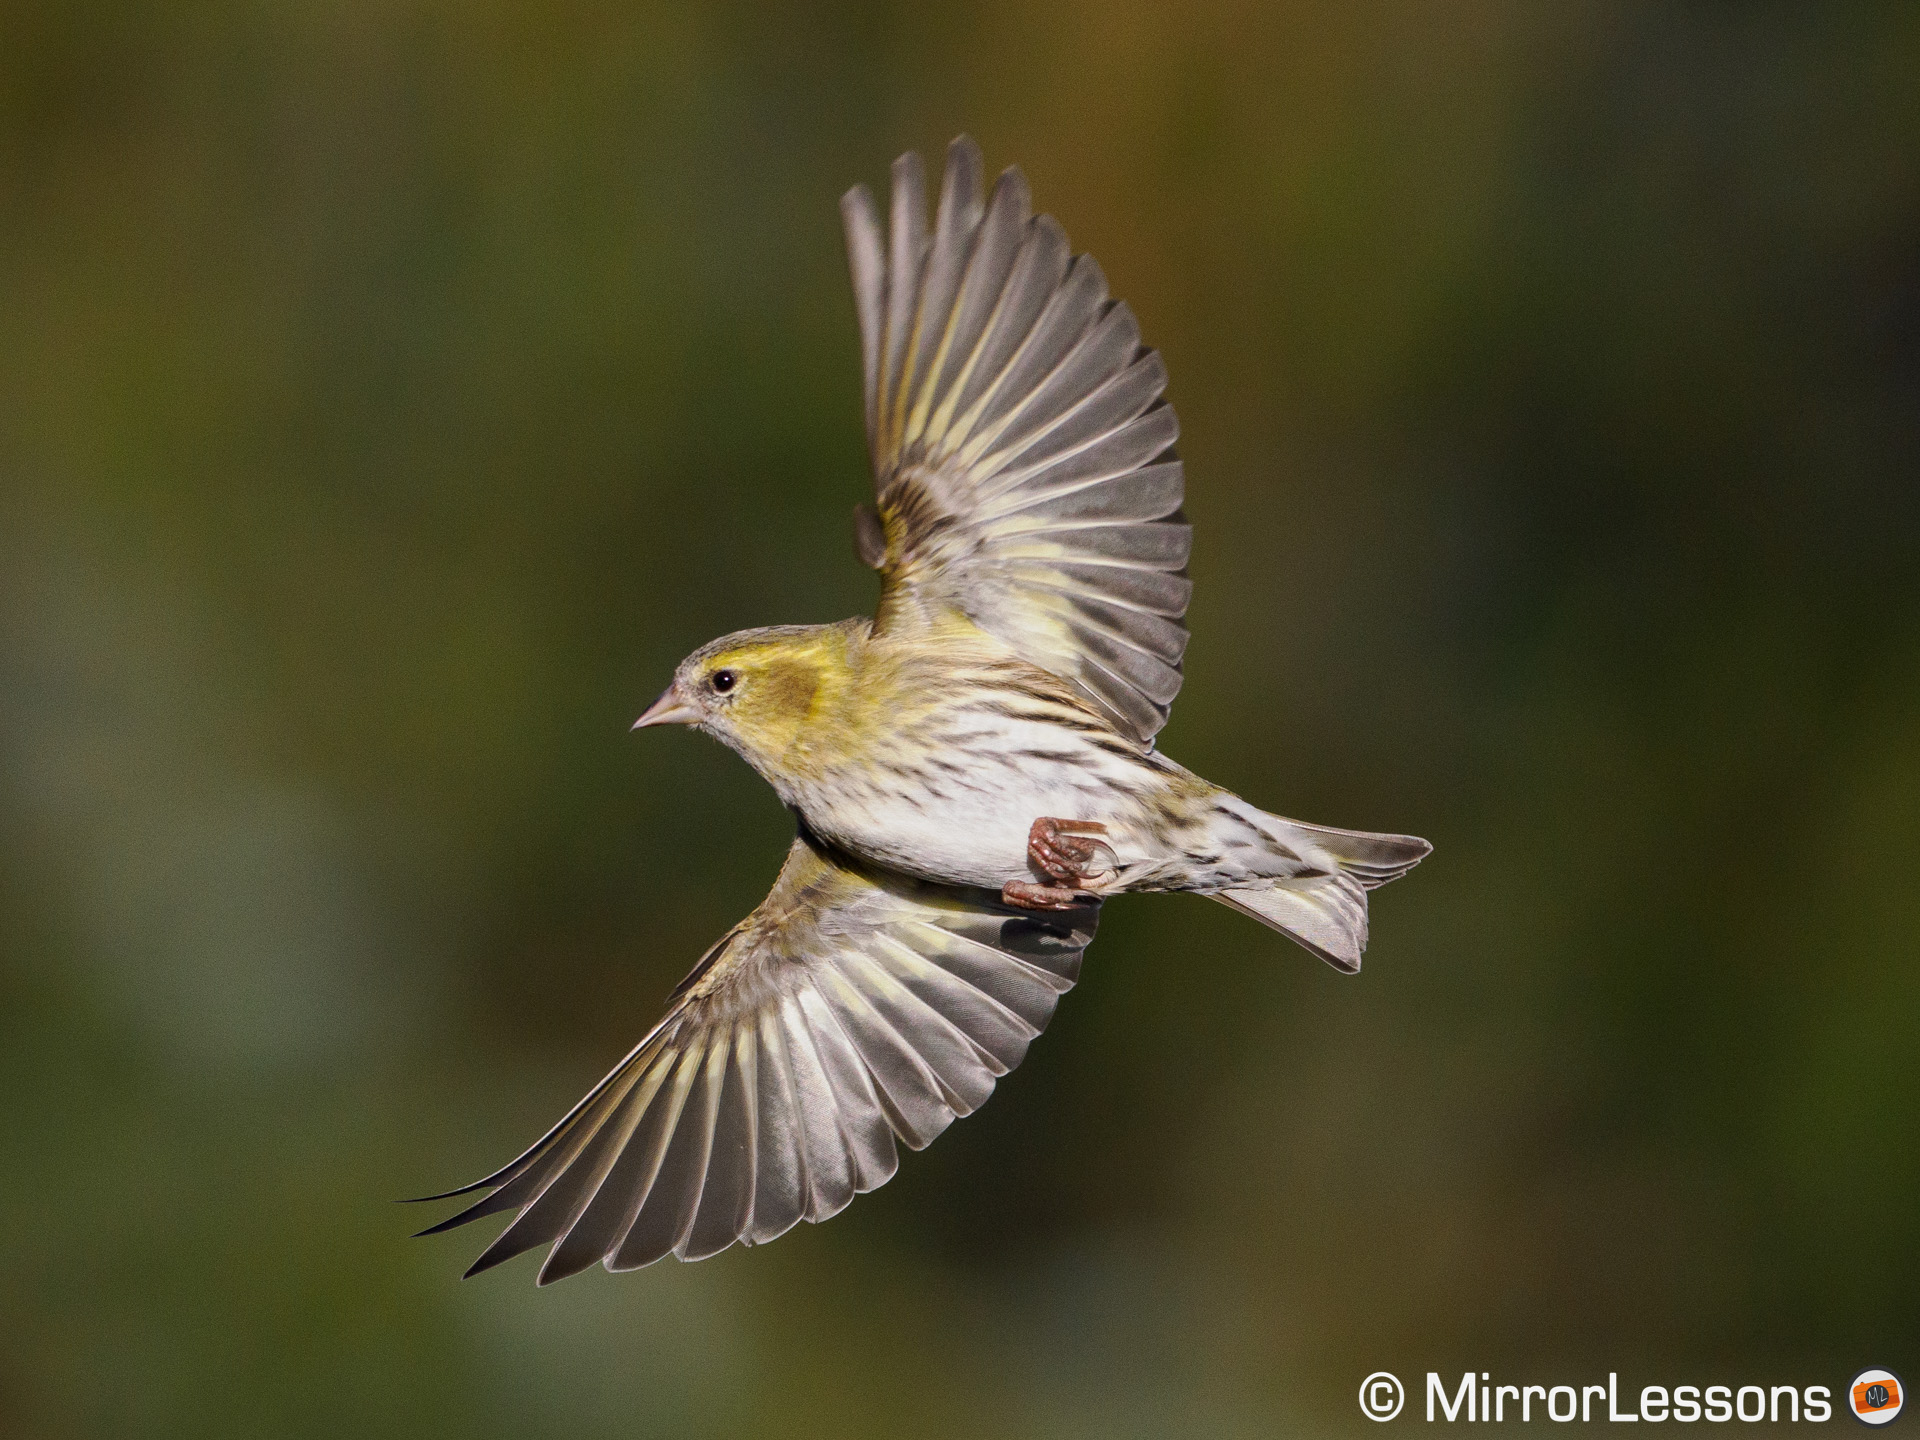
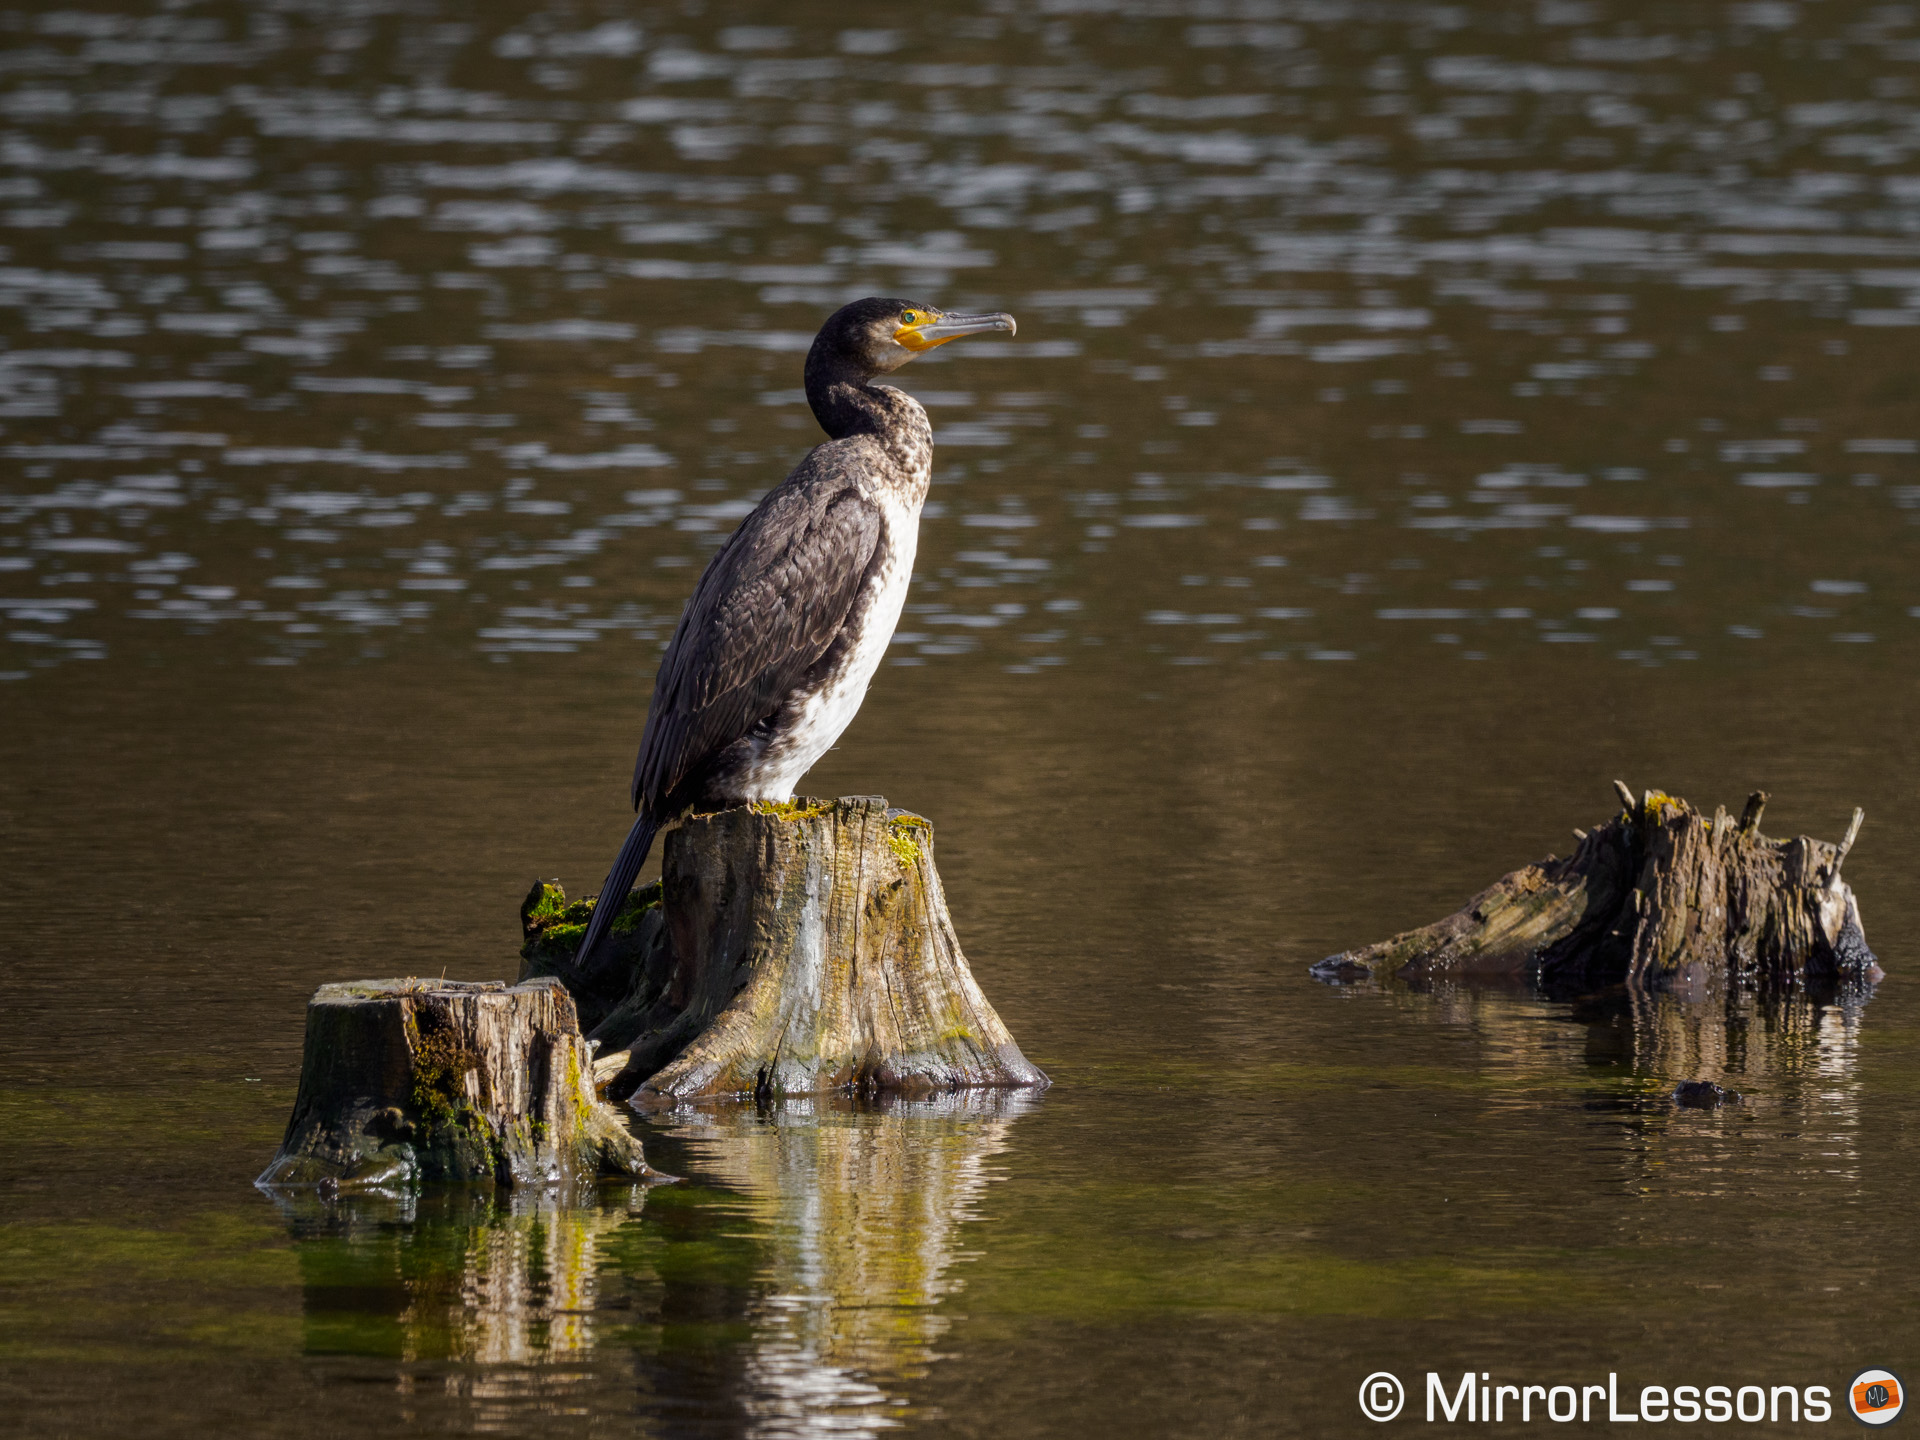
Focus is precise and rarely fails. The subject can be detected even when it is very small in the frame (at a longer distance), when it is in the shade or when partially covered by a branch or other natural elements.
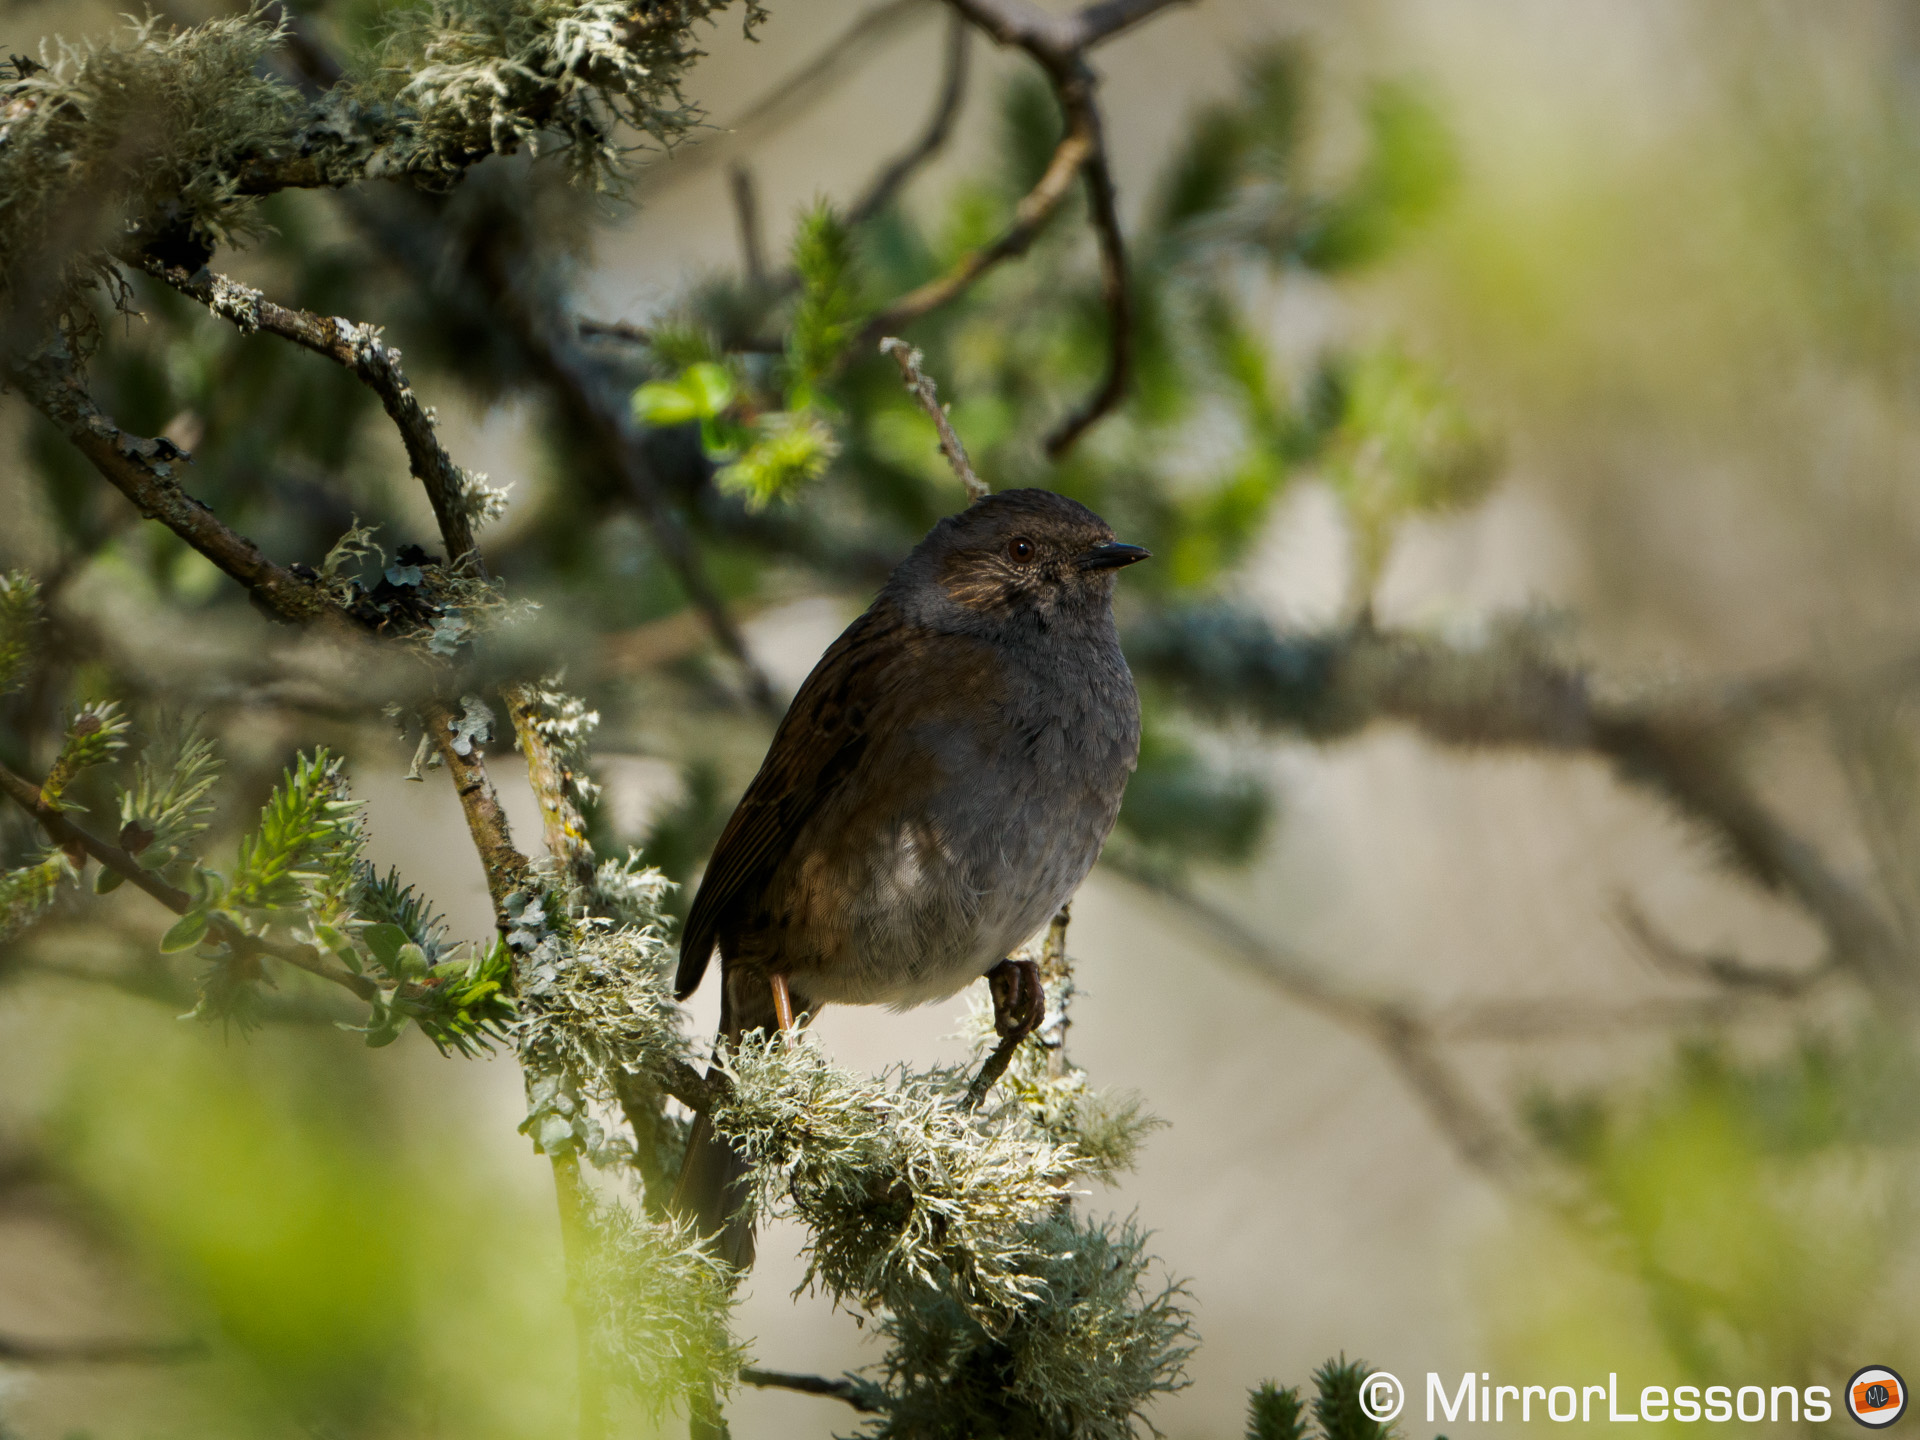
The image below surprised me not because focus was difficult to obtain (there was enough depth of field to focus on the grass and still get the bird in focus), but because the camera had no problem detecting the subject hiding in the grass.
The camera had no problem detecting the bird hiding in the grass.
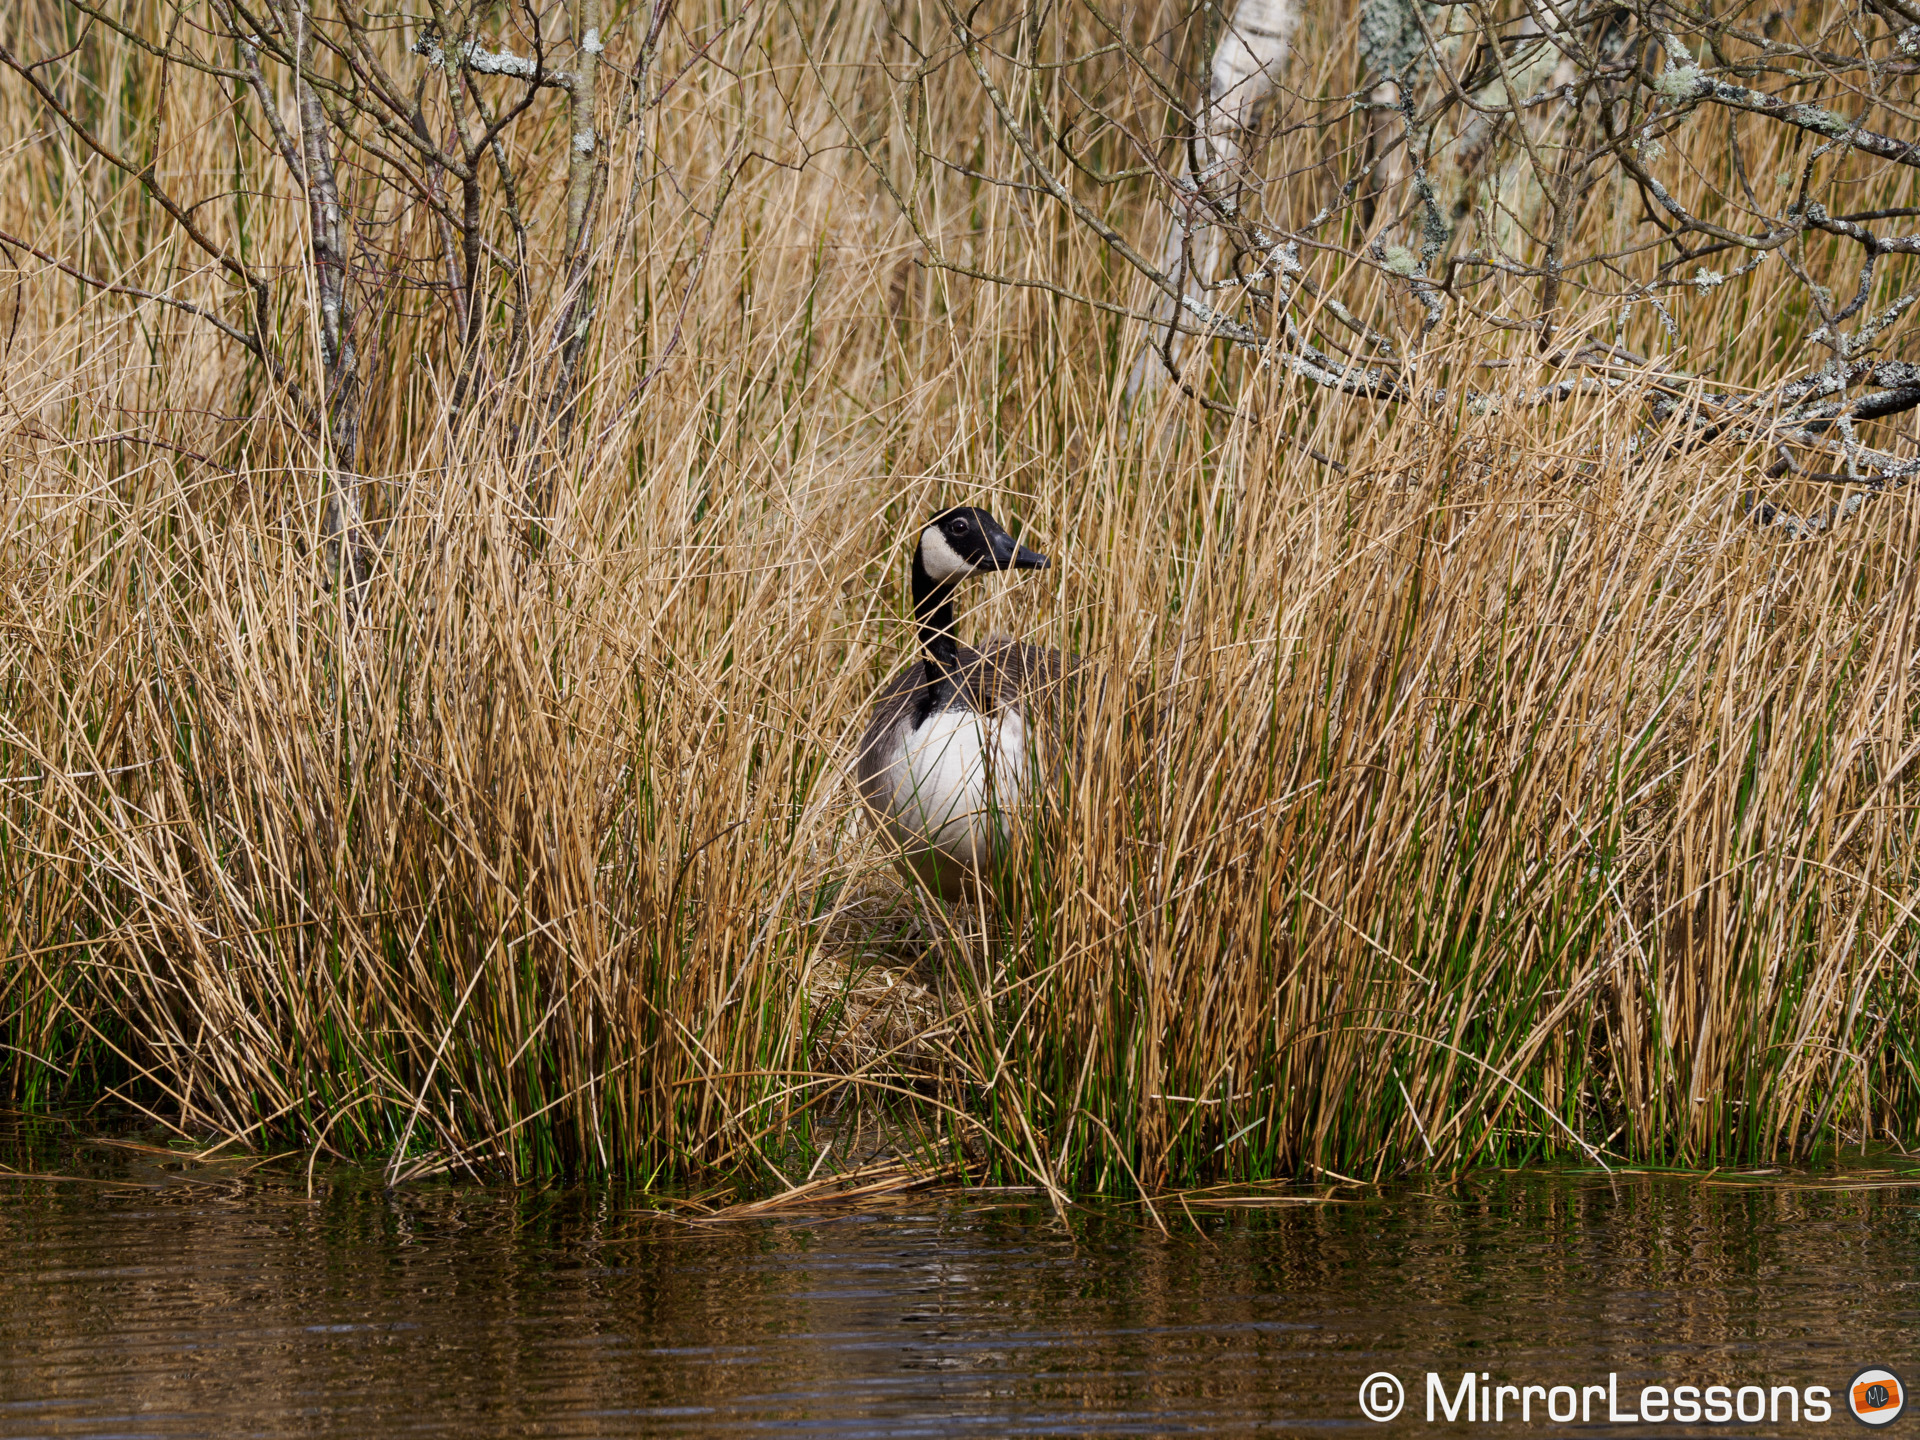
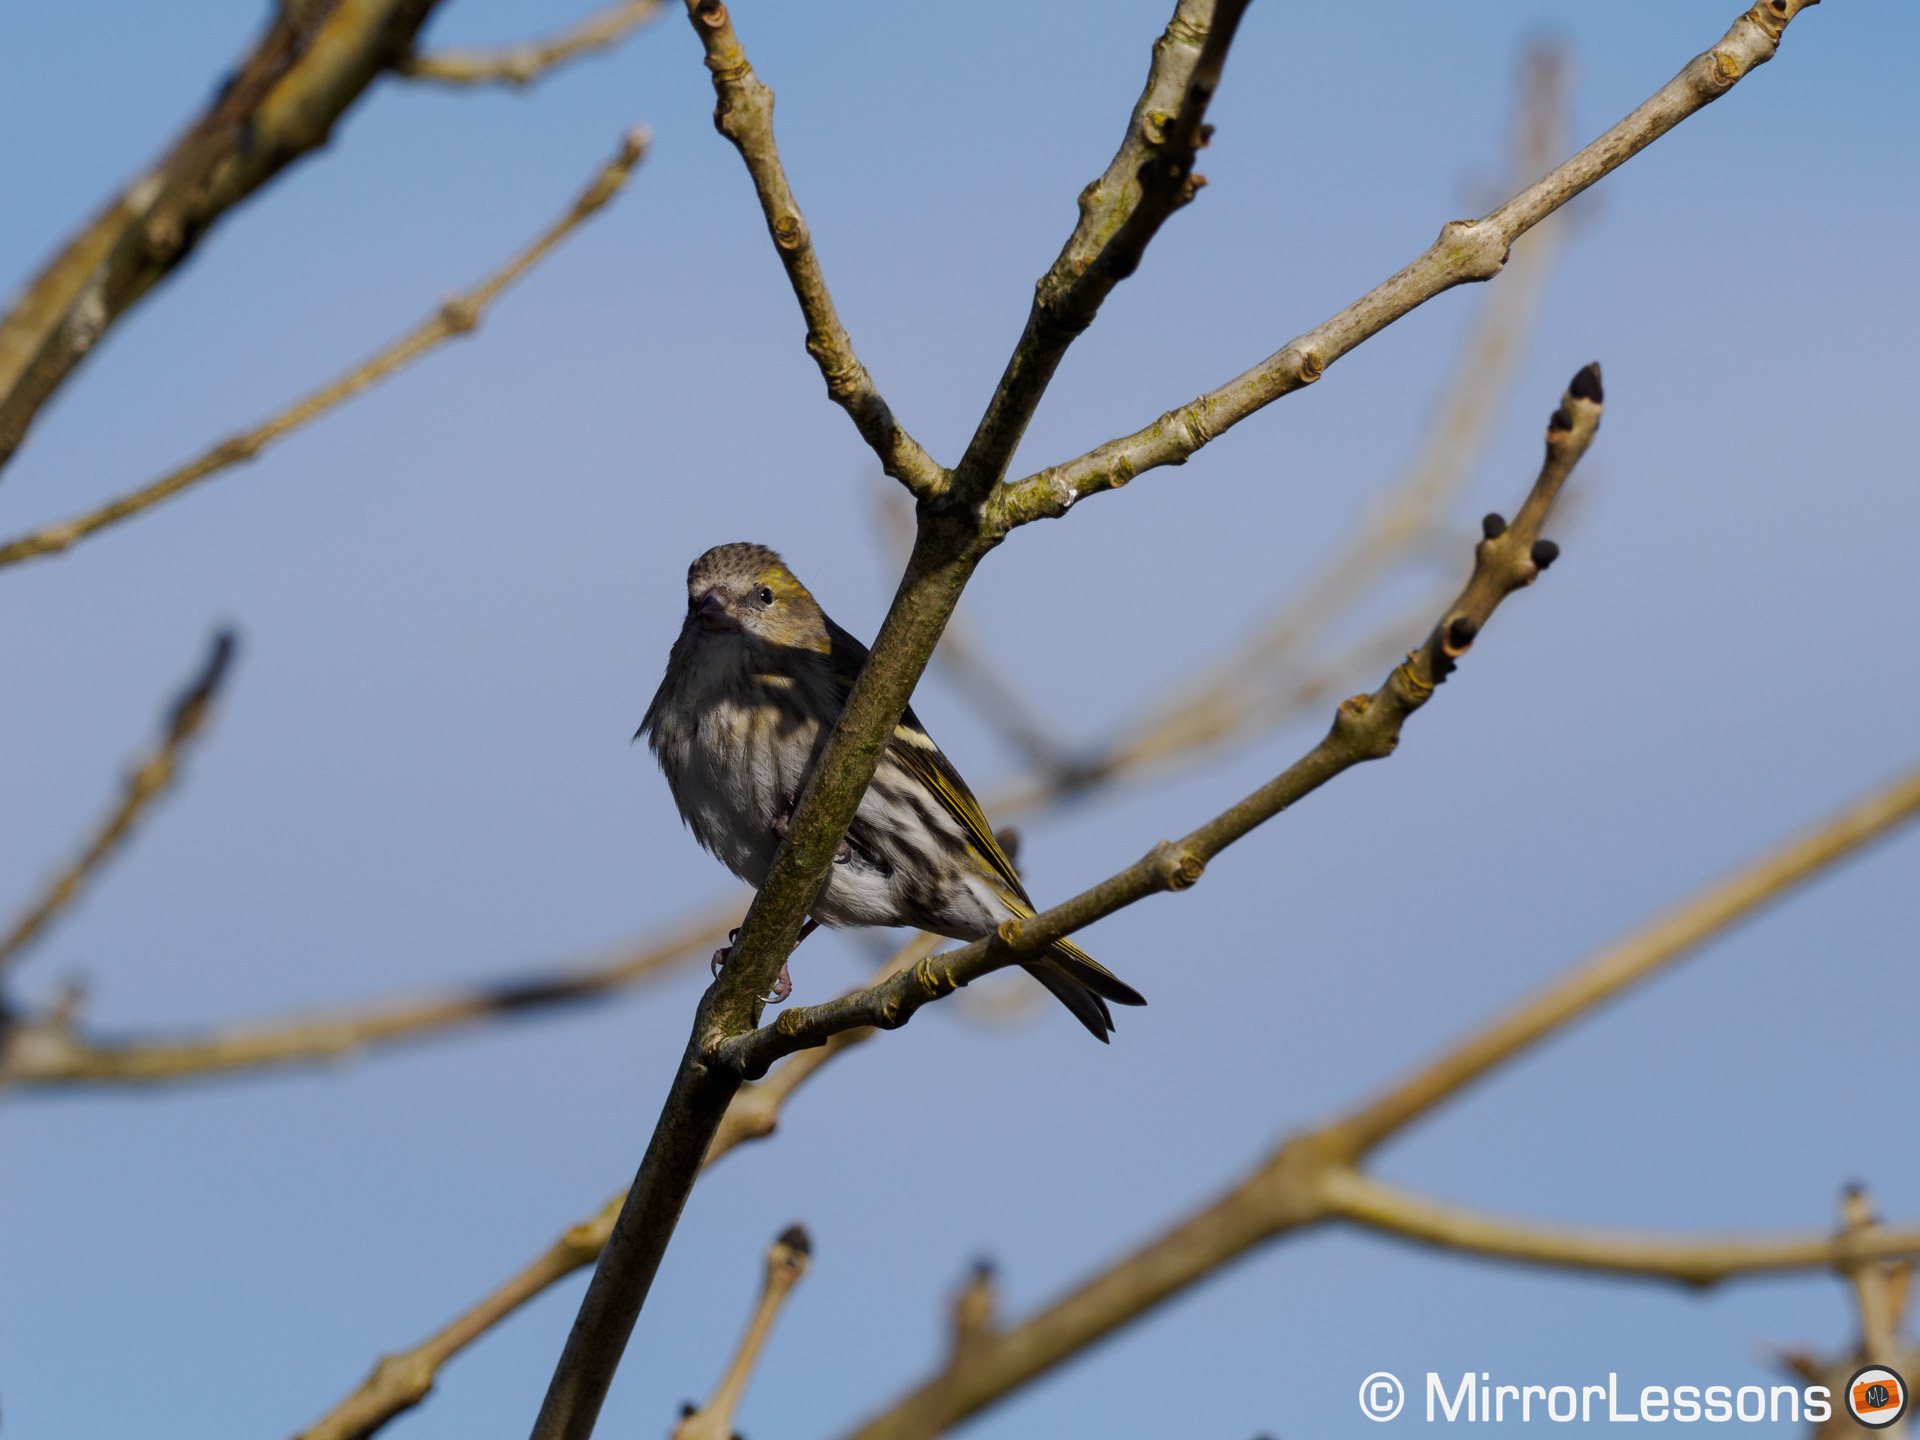
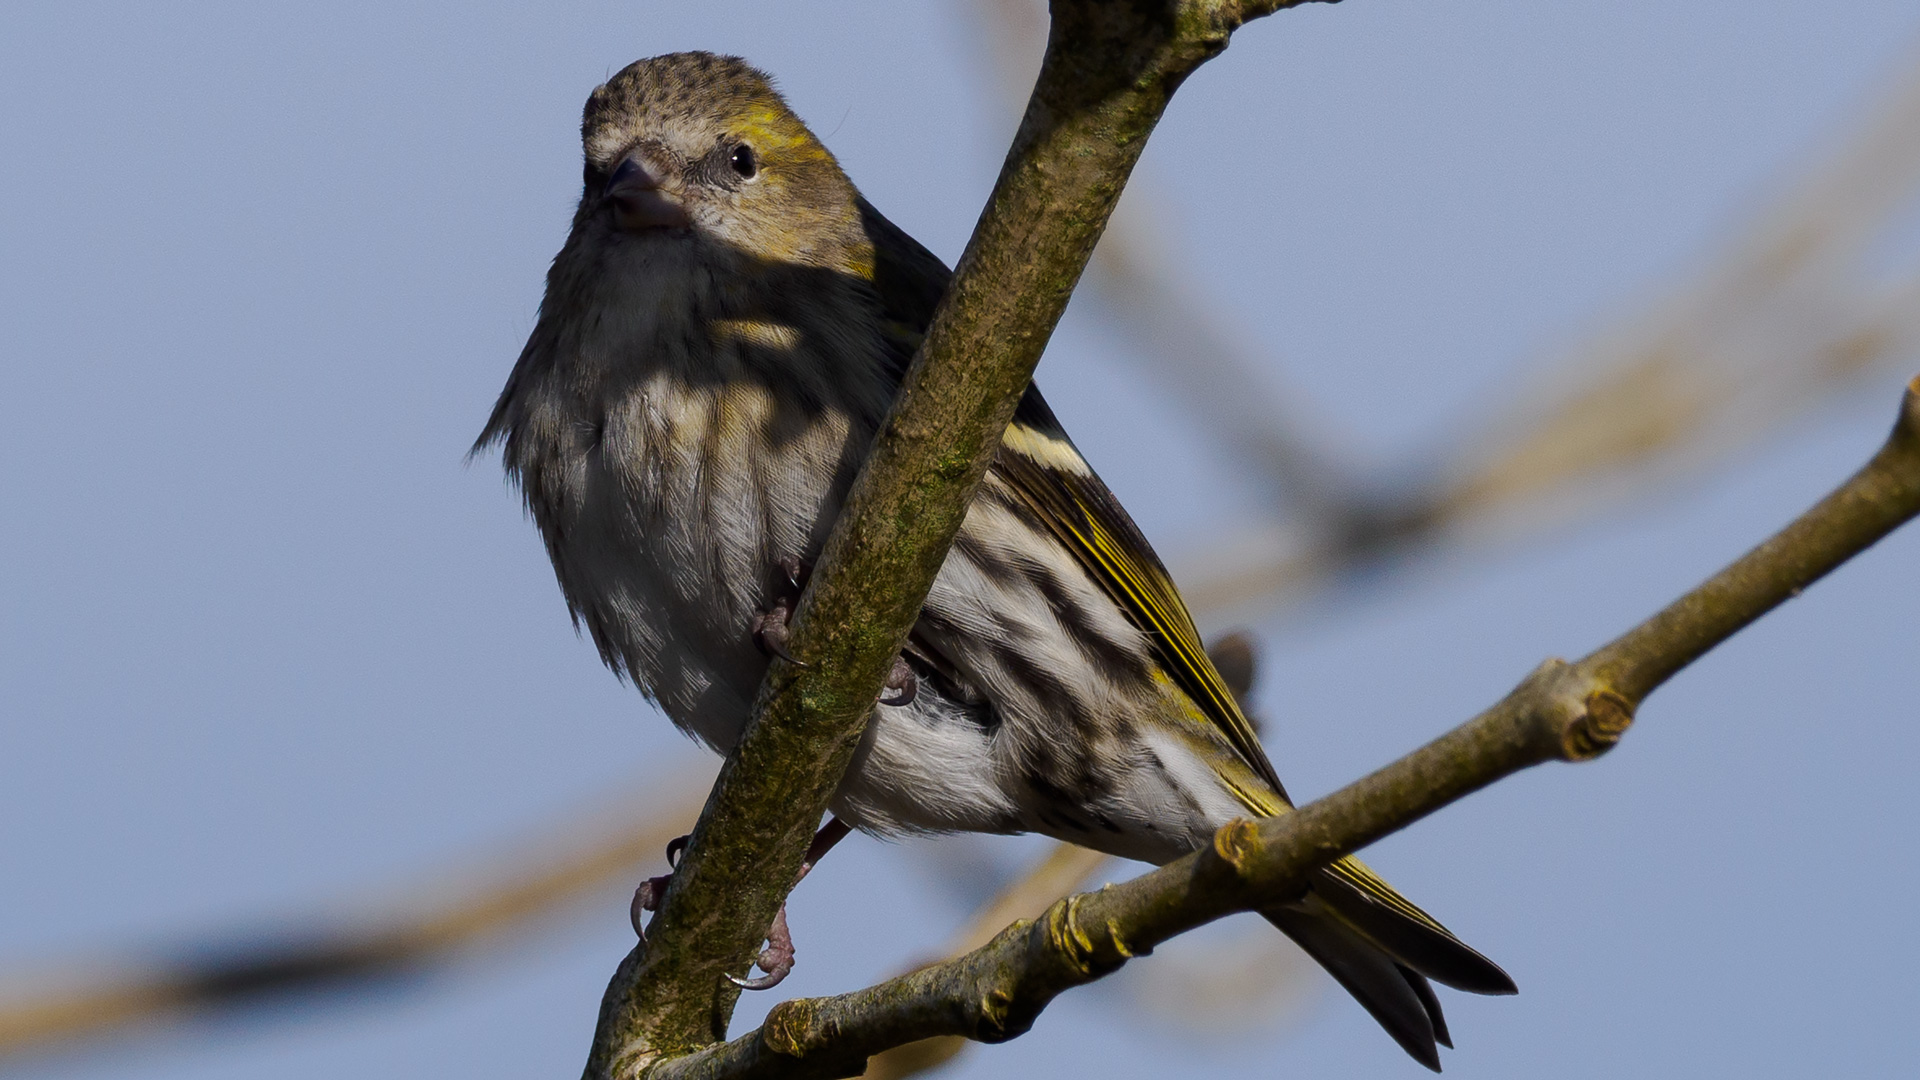
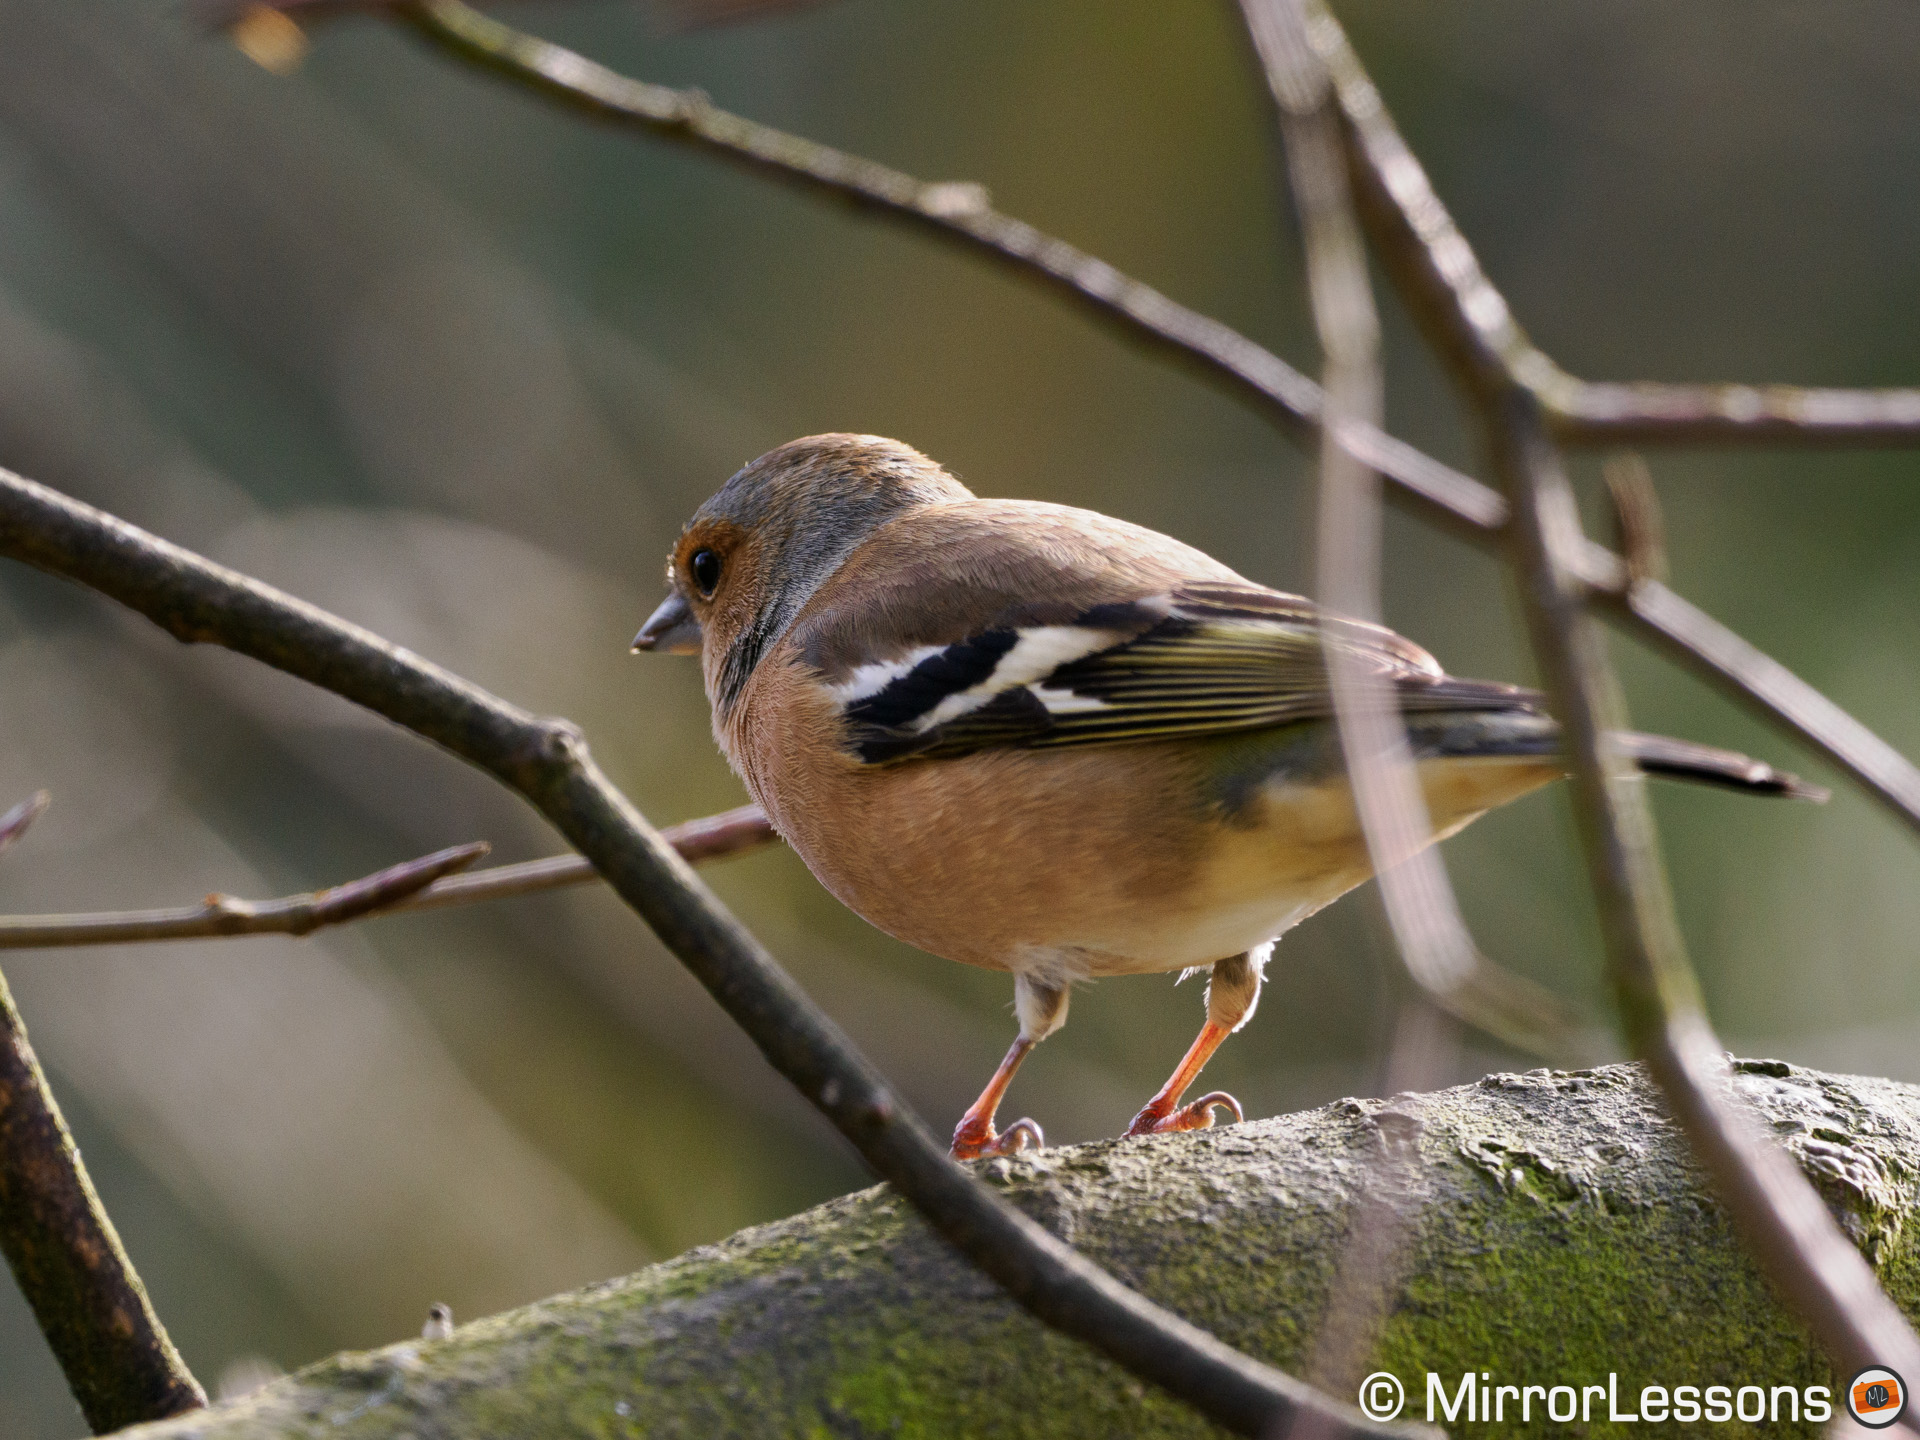
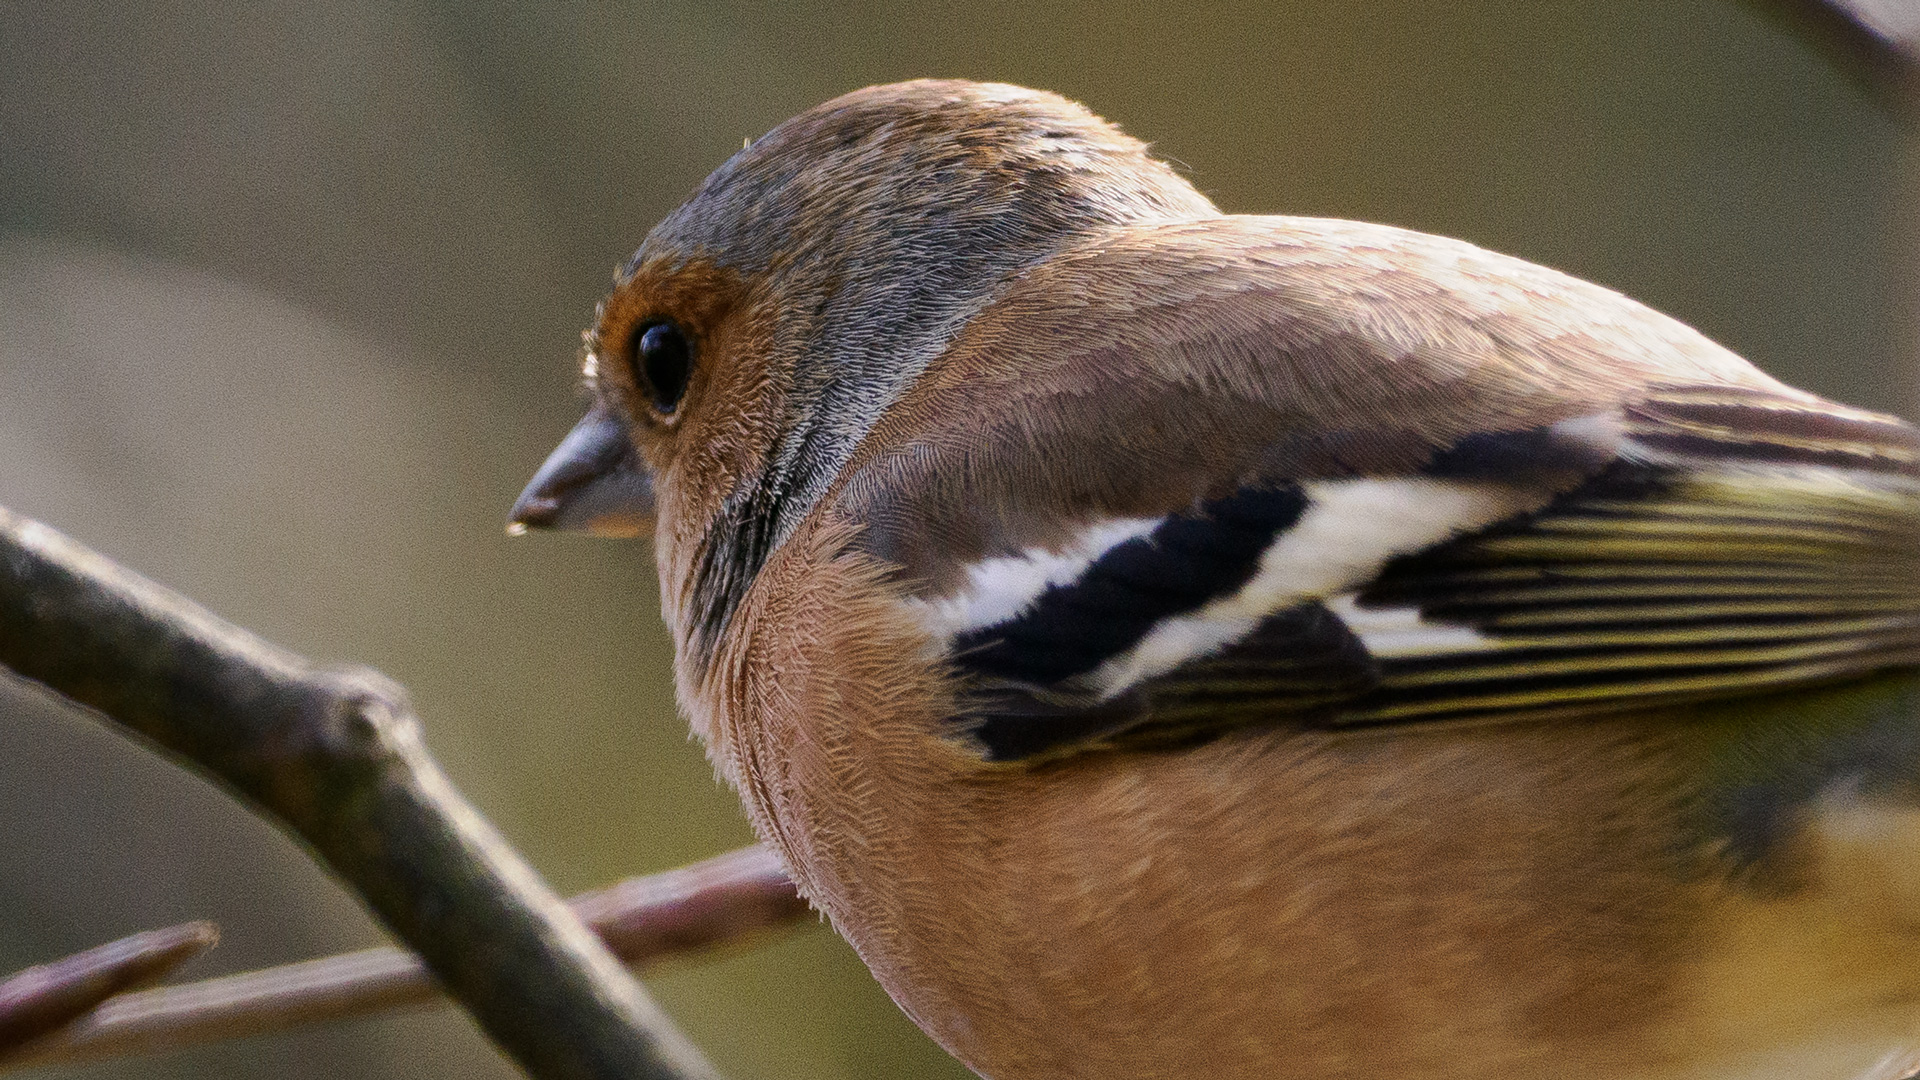
Below are other examples of foreground elements covering parts of the subject’s body, with the camera still capable of detecting the bird and focusing successfully.
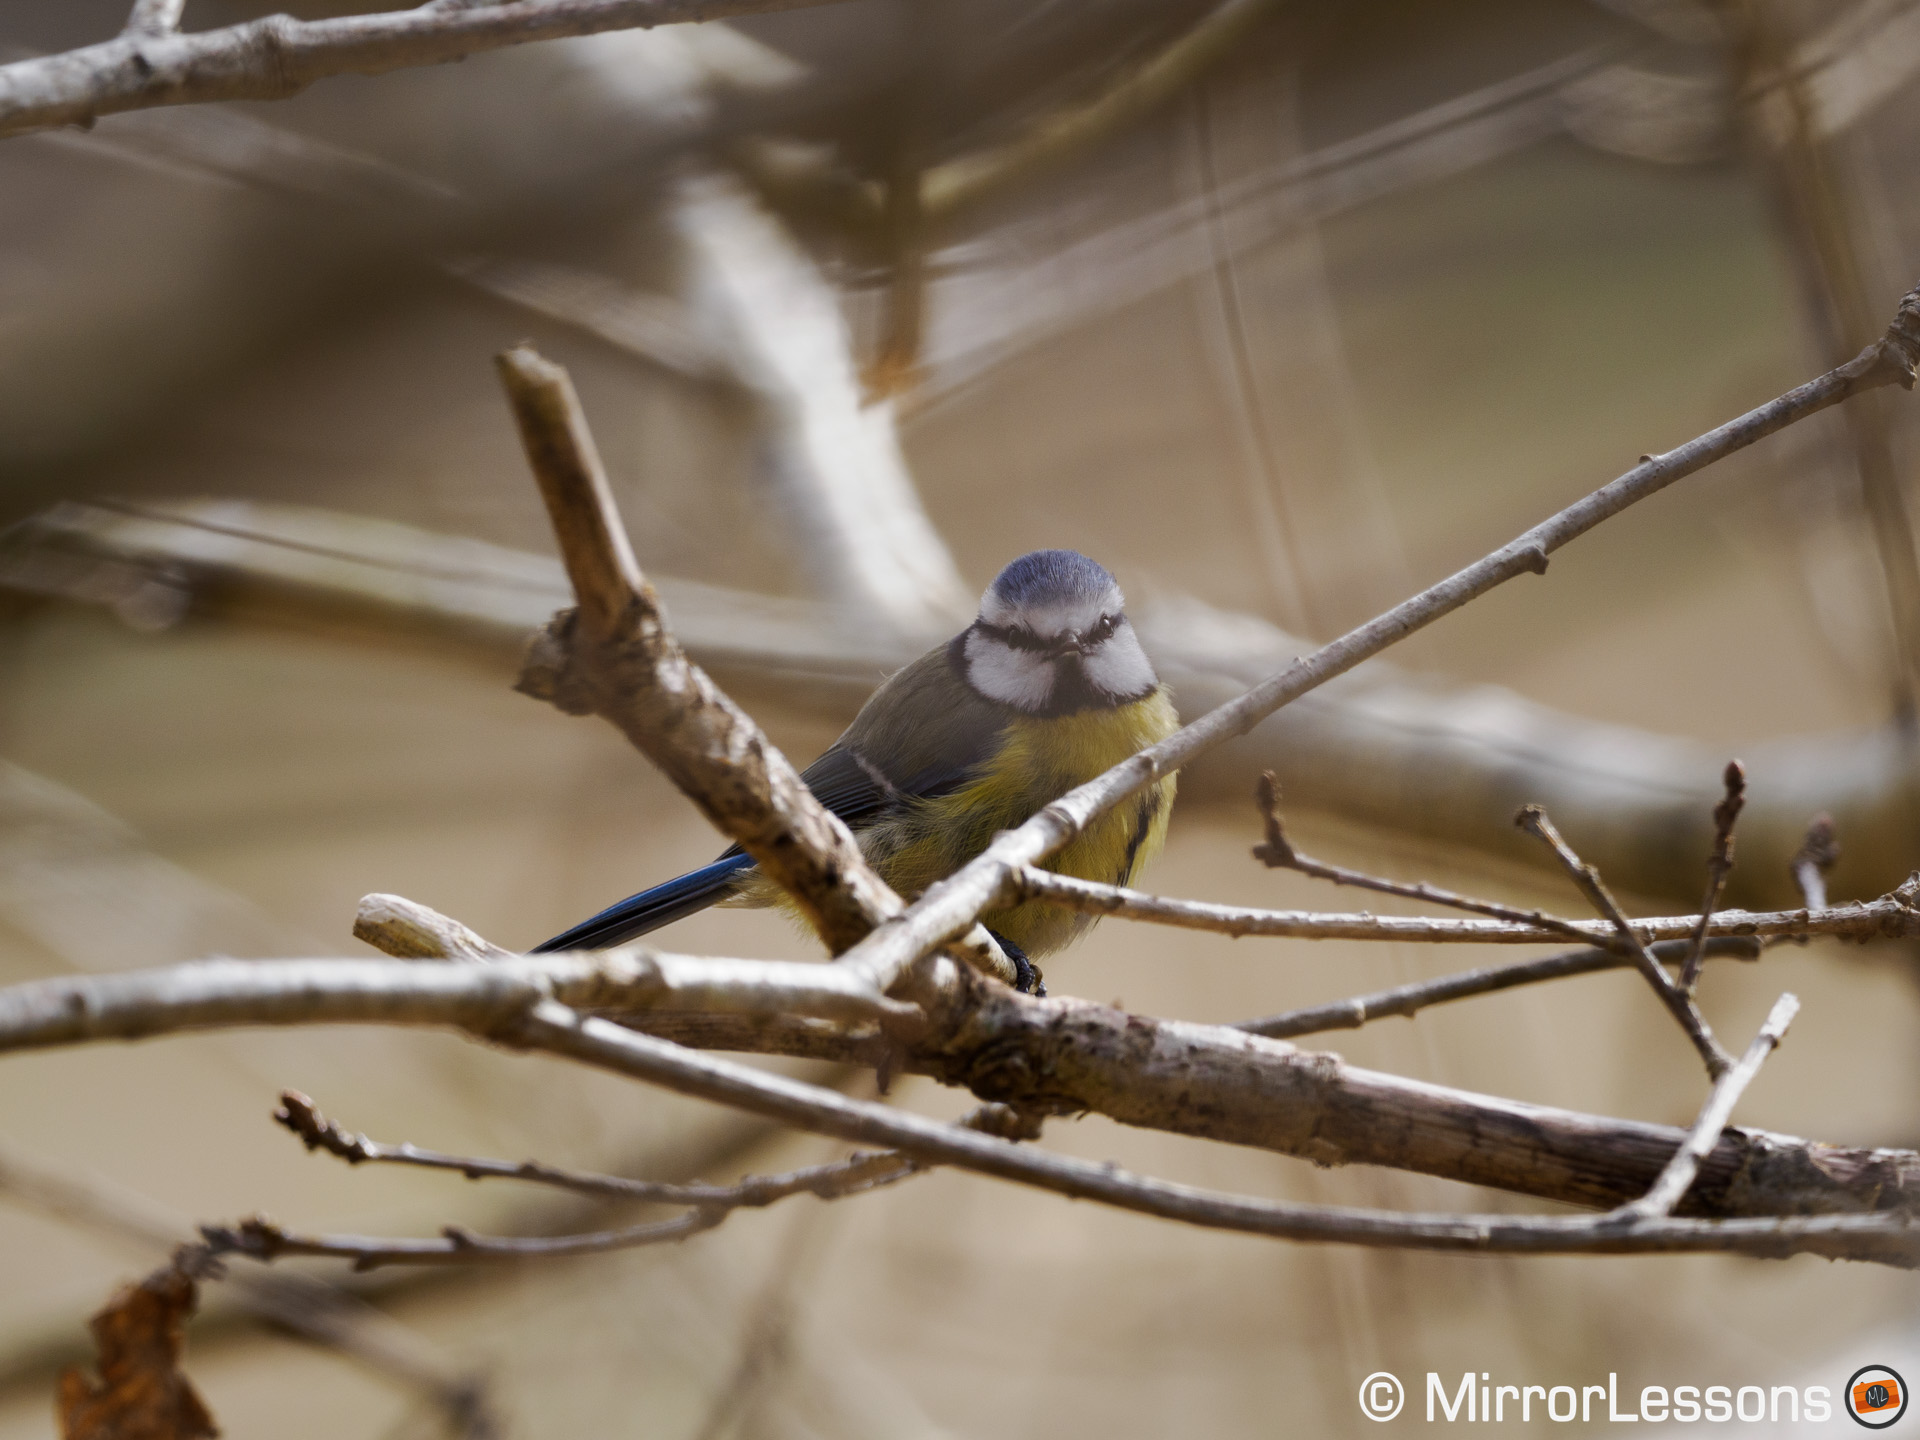
Now it’s fair to say elements in front of your subject will mislead the camera at times, which is understandable. In the next images, you can see that focus is inaccurate. A bird facing backwards can be another challenge.
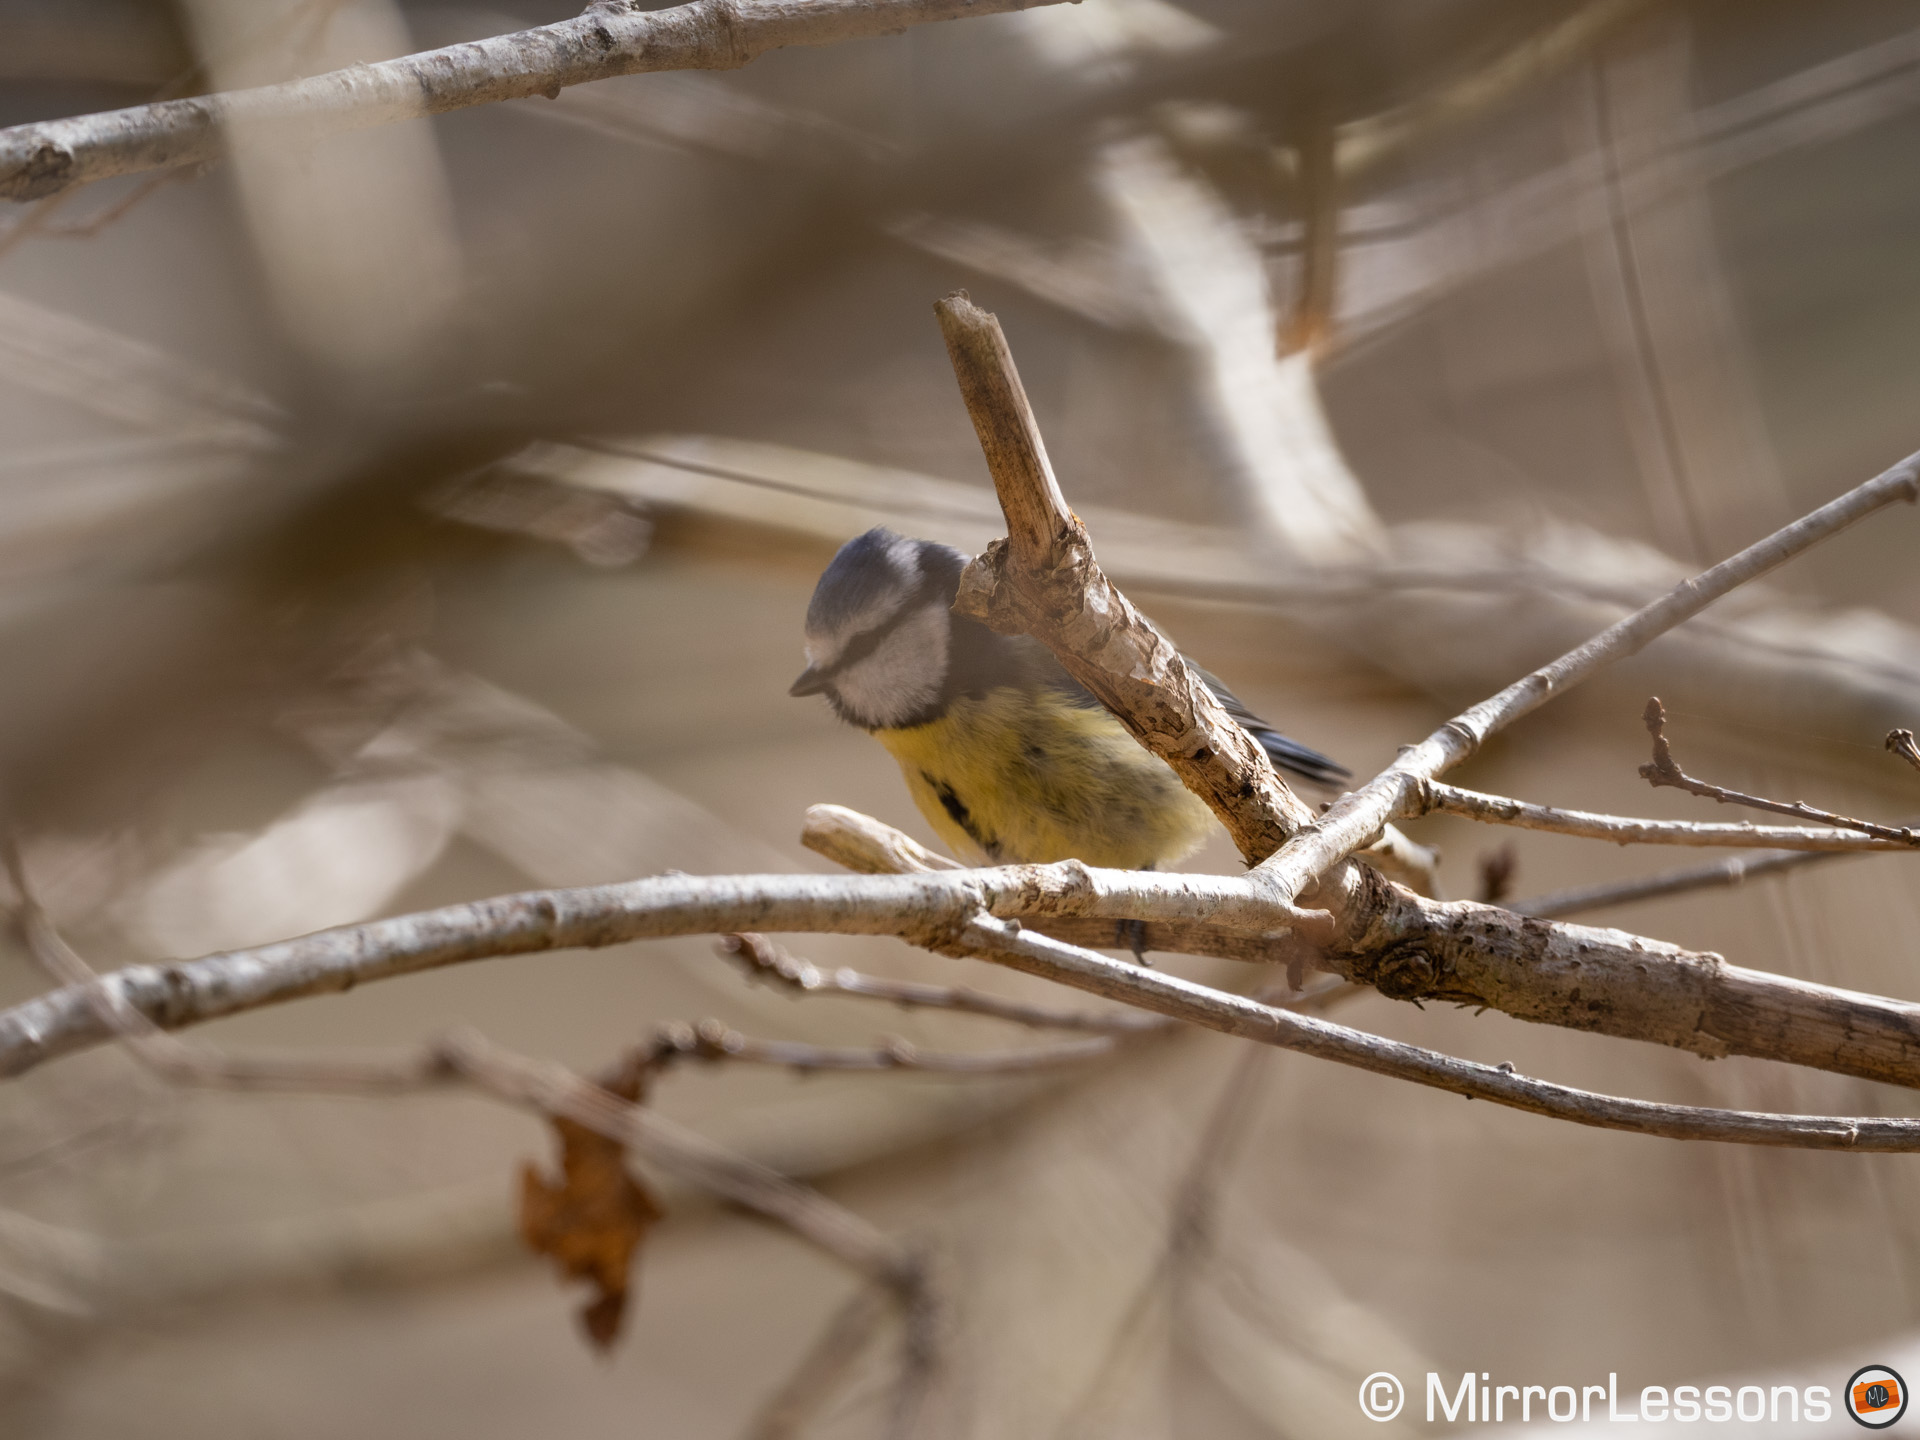
The good thing is that even if the camera struggles momentarily, bird detection remains active on the subject. As soon as you have a clear composition, it will focus correctly.
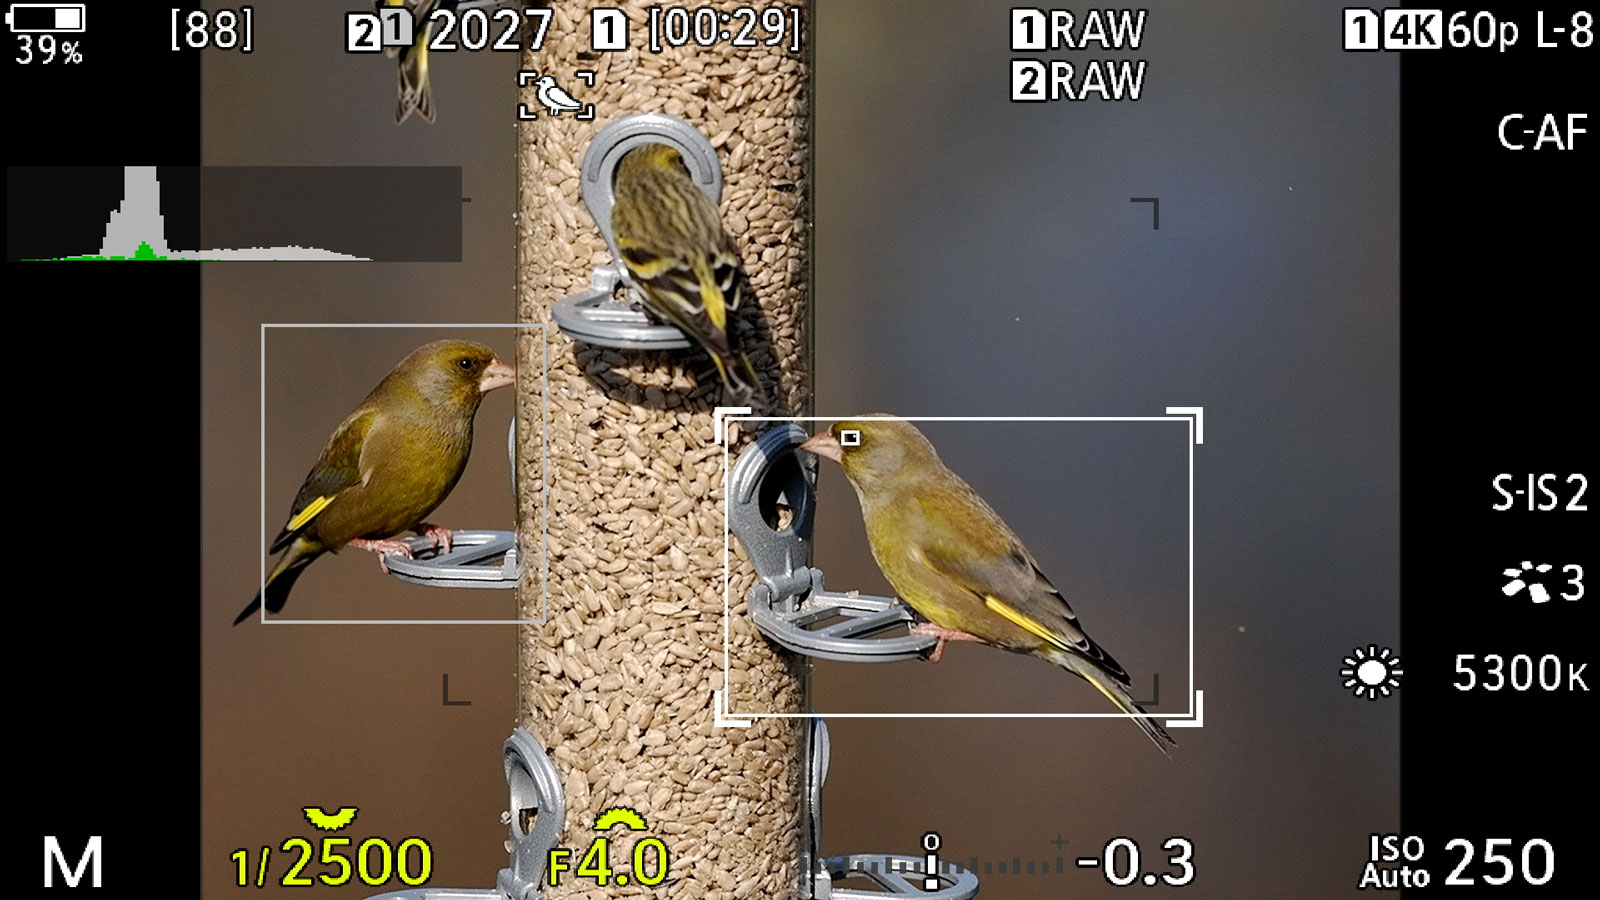
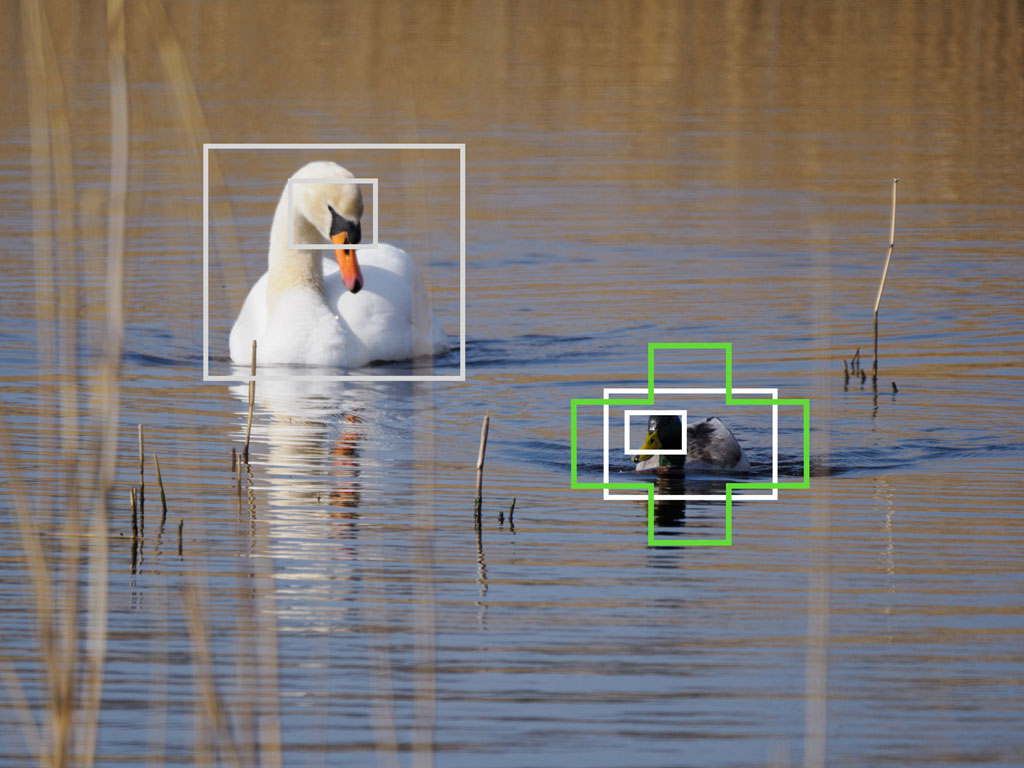
Bird Detection and AF Target
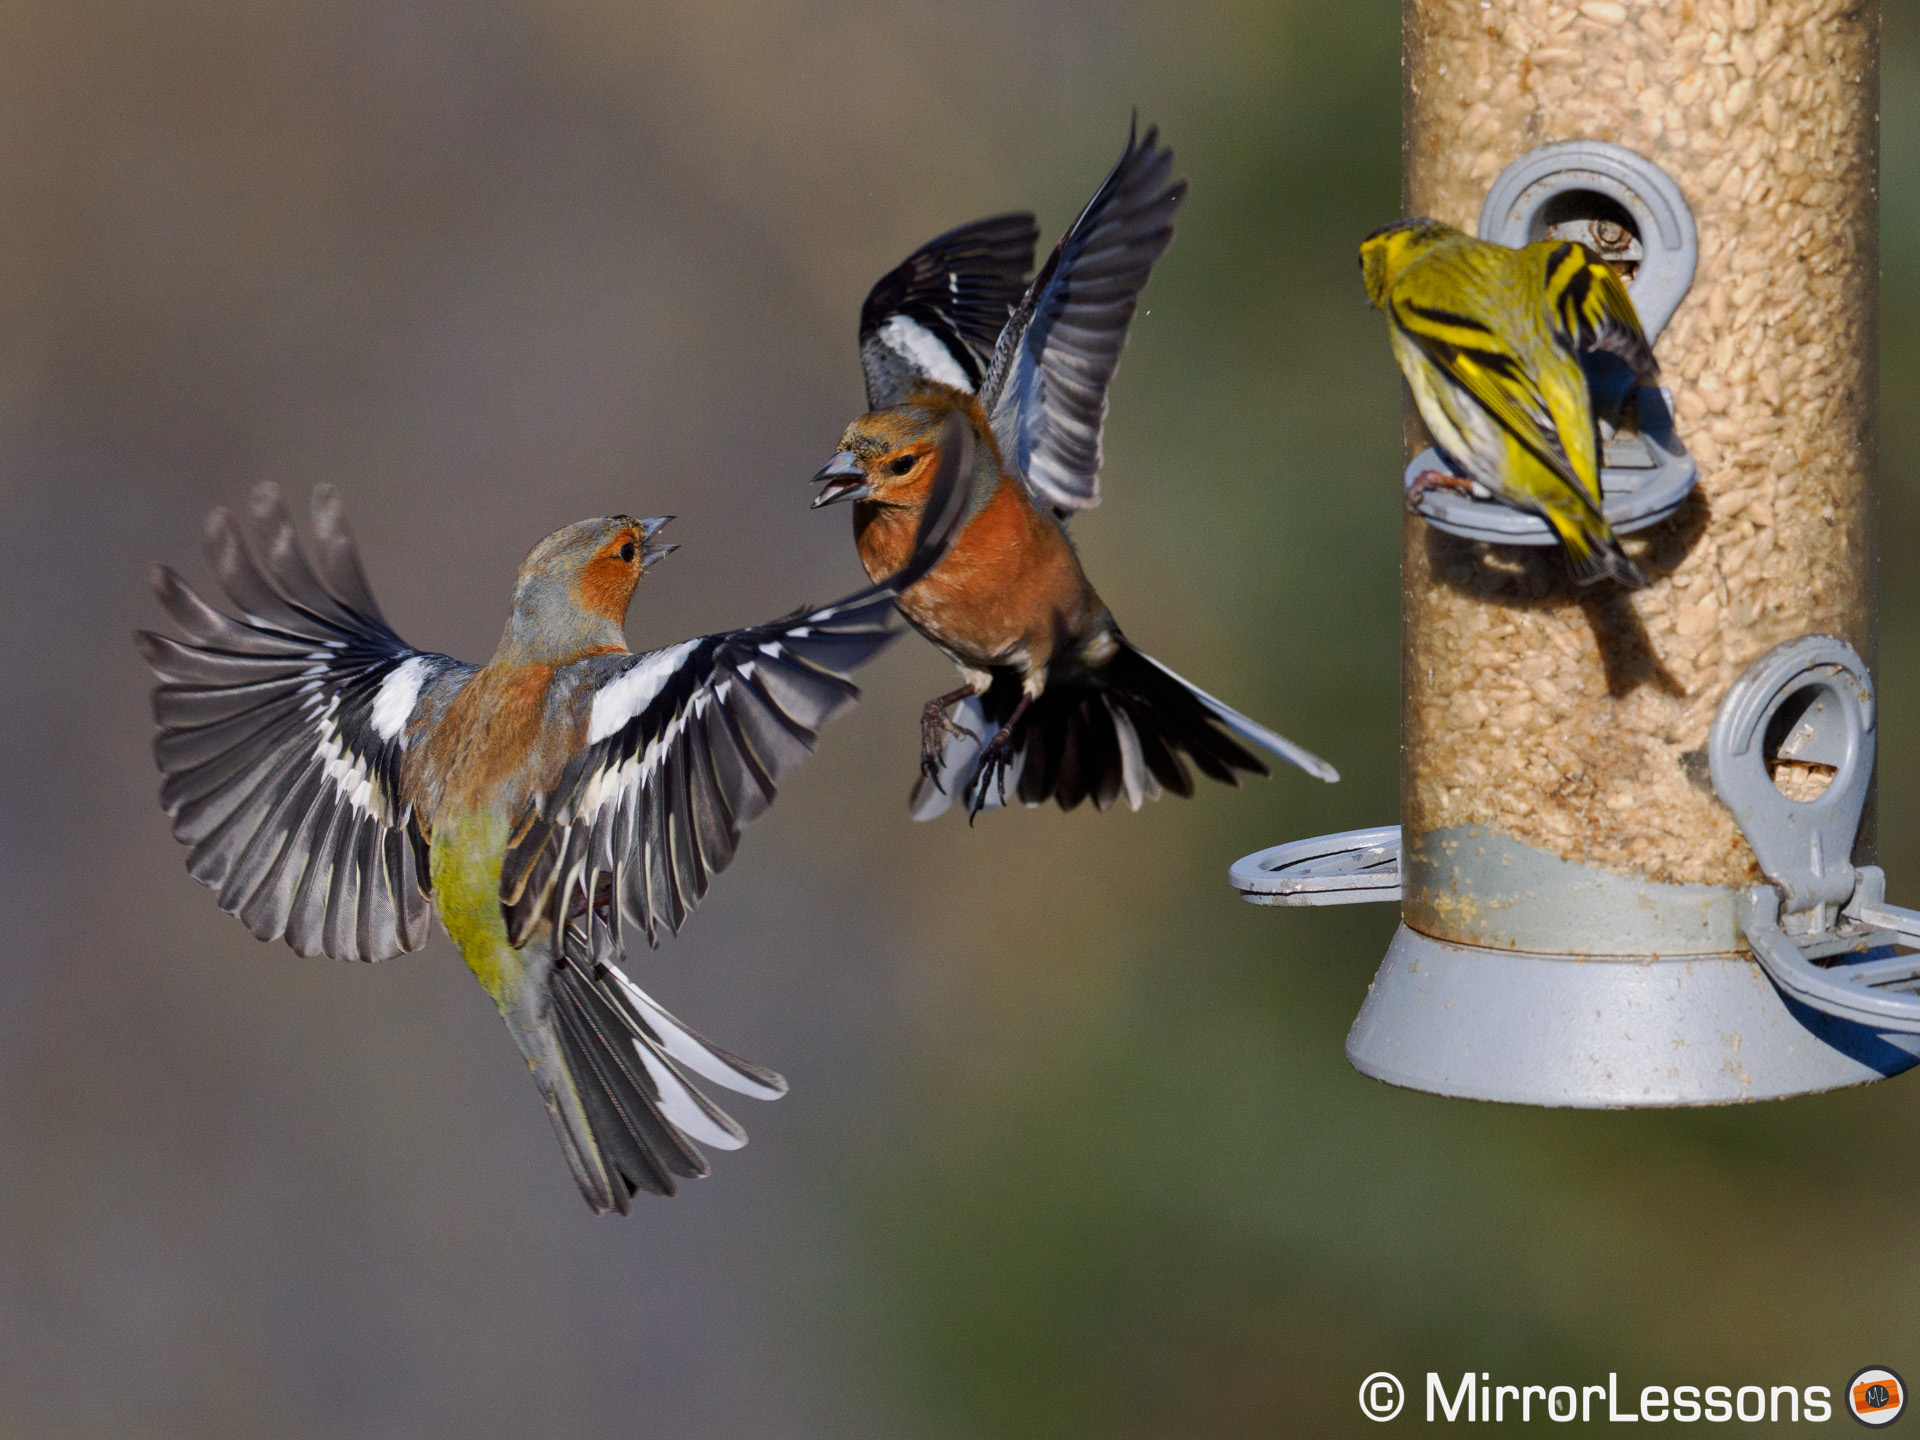
If you have more than one bird in the frame, you can use the AF Target (aka AF area) to tell the camera which one to prioritise. I recommend using a small Target, and positioning it on the bird that you want to focus on.
The camera will still detect all the birds it can “see” in the frame, even those outside the AF Target, but will prioritise the one that is inside the AF area. If you decide to use the All Target mode, then the camera will give priority to the centre of the frame.
One small improvement I hope to see via firmware update
Although the AF Target is a good way to prioritise a specific animal in your scene, I wish there could be a quicker way to go from one to the other. For example, on the Canon R6 you can use the AF Joystick to jump from one subject to the other. It is a much quicker solution than moving the AF point step by step.
What about other animals?
The other setting you’ll find on the OM-1 is for Cats and Dogs, but that extends beyond just domestic pets. The camera can recognise lions, tigers and other animals that resemble, or come from the same family.
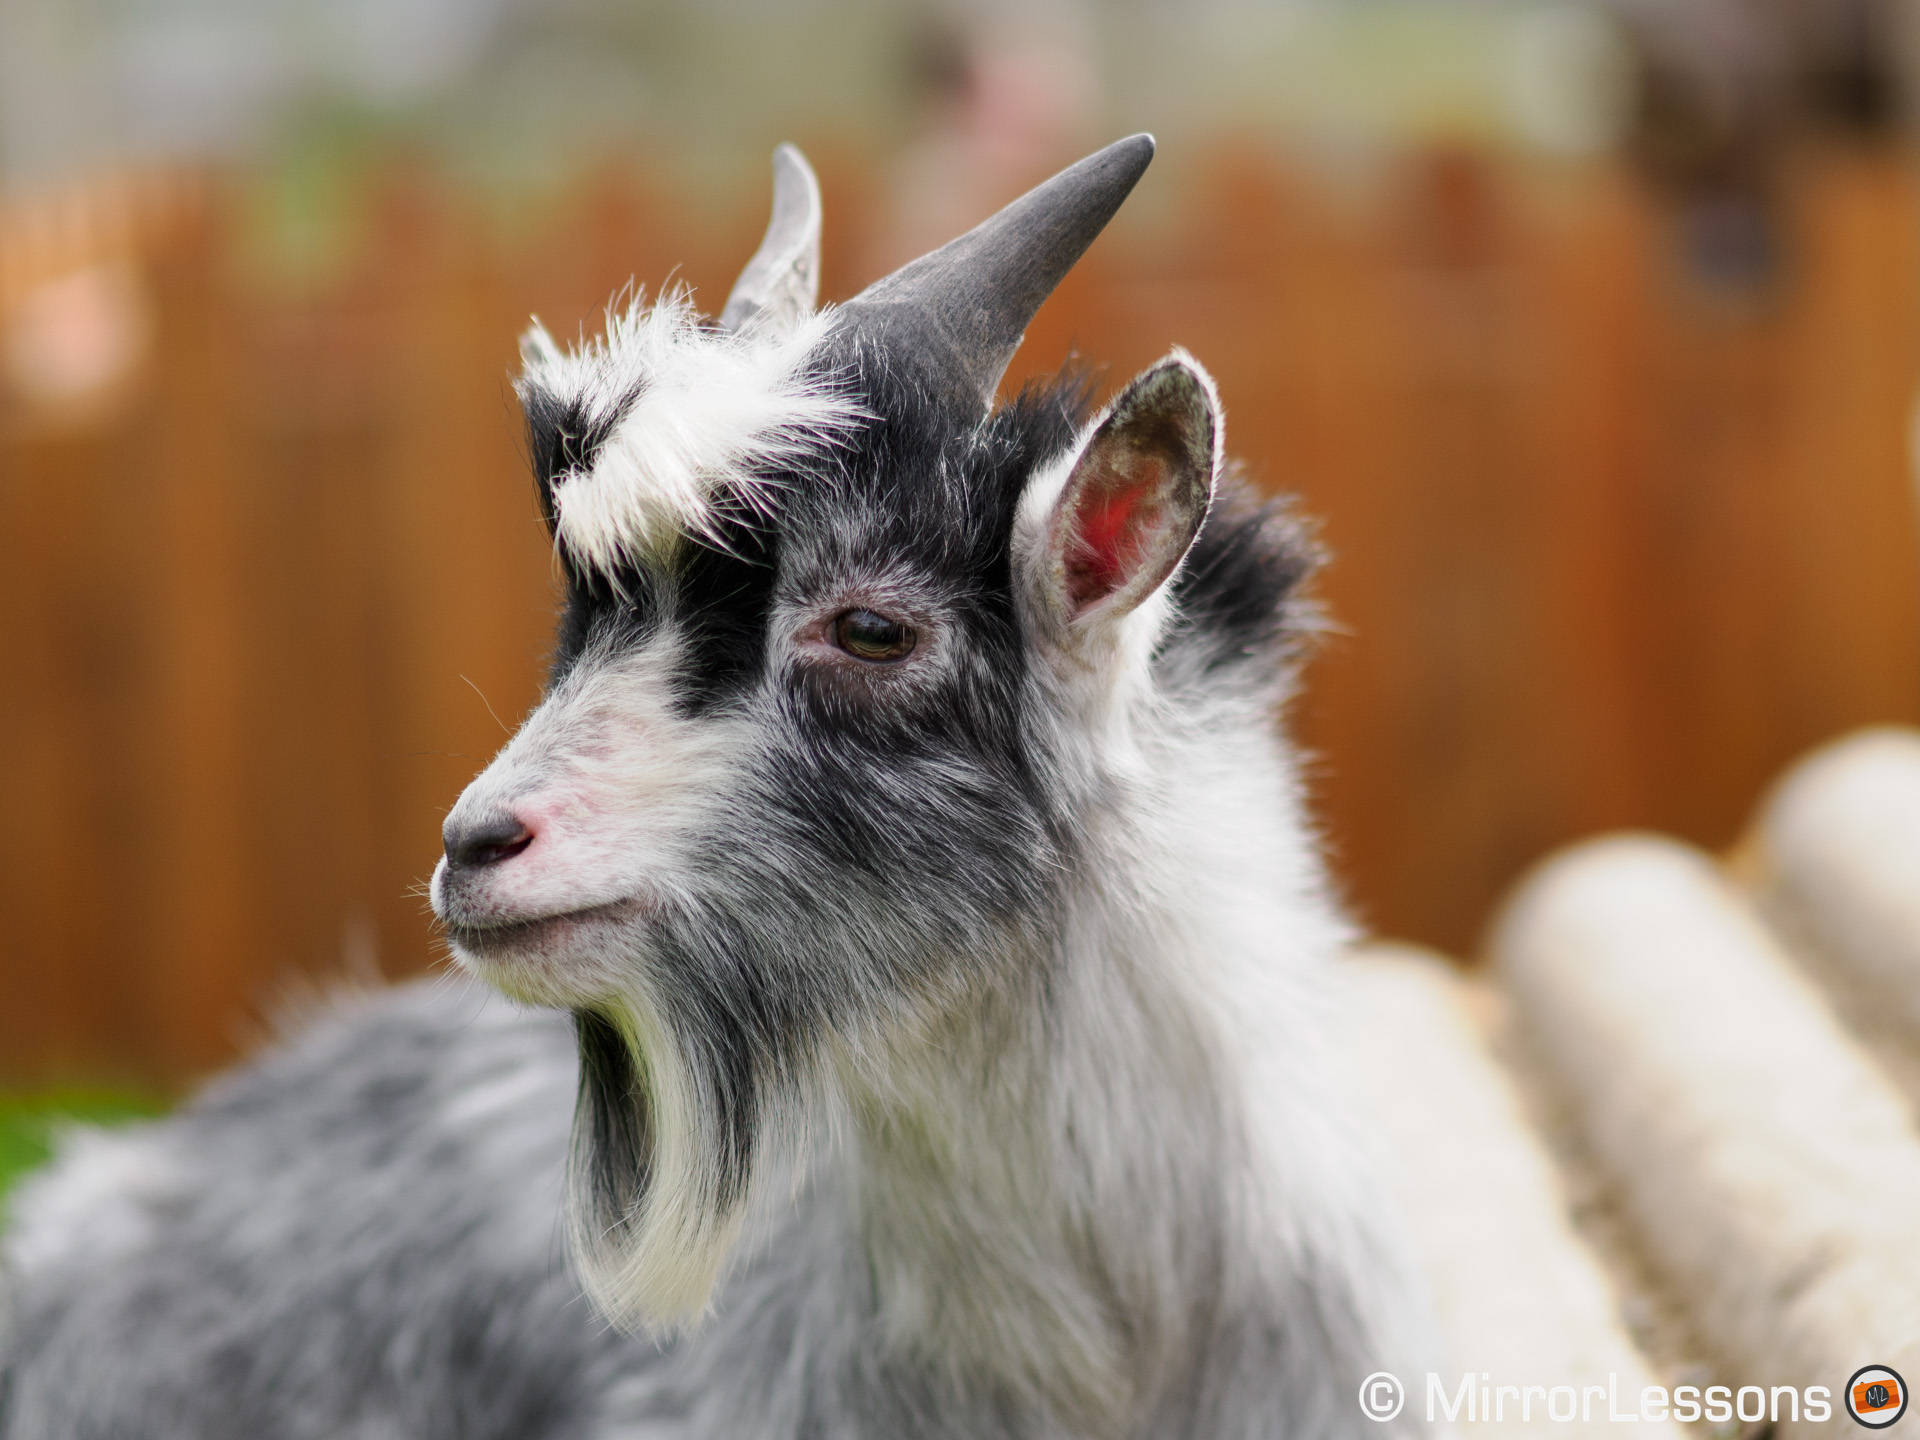
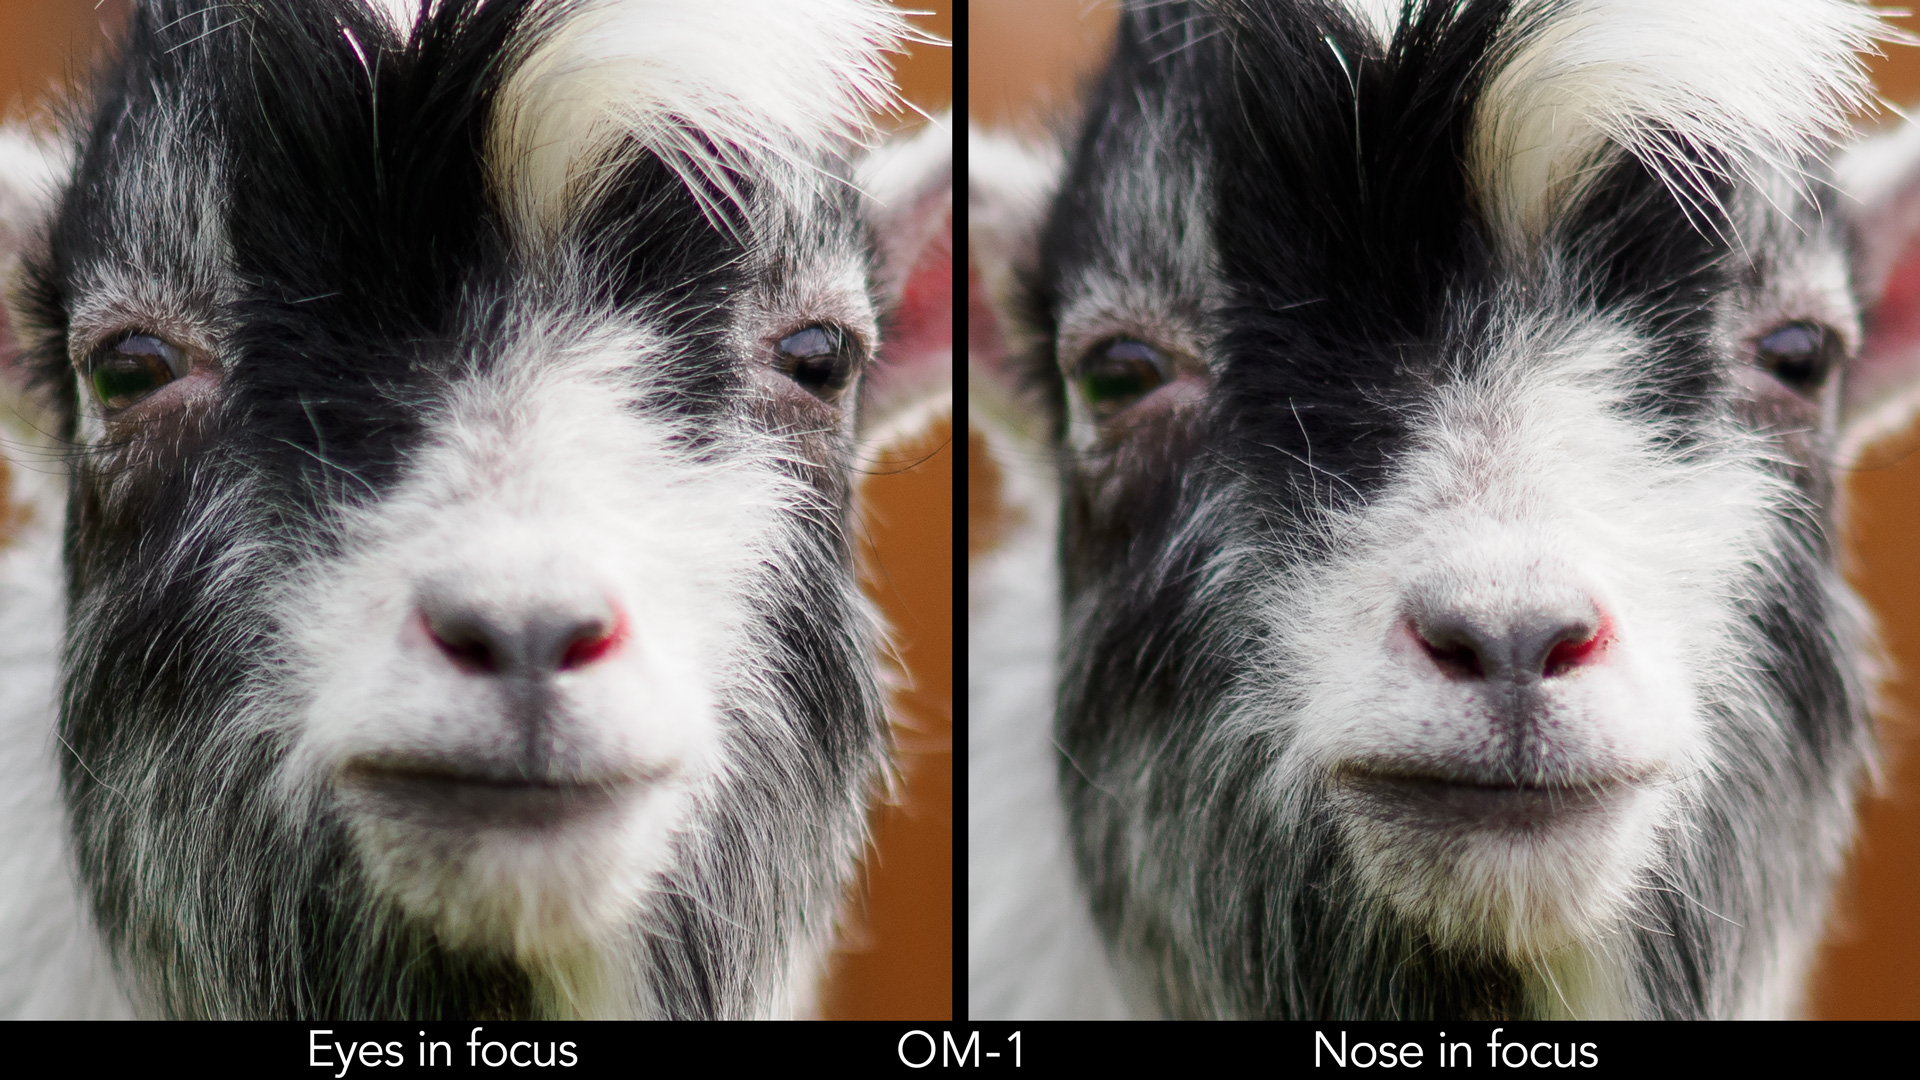
During a visit to a local farm, the OM-1 was capable of detecting the eye of goats and lambs. However, depending on their position, if often focused on the nose rather than staying on the eye. This happened especially when the goat was facing me directly.
The OM camera can also recognise a completely different subject such as an elephant, although I only tested this at home with images on my computer screen, so I can’t tell you how accurate this function is for all types of animals.
I do hope OM will be able to implement more data, possibly under one setting (animals), so we don’t need to switch between different types.
Continuous Shooting
The OM-1 is capable of shooting at 10fps in continuous mode when the mechanical or anti-shock shutter (electronic first curtain) is selected.
With the electronic shutter (silent mode), the speed is much more impressive with a maximum of 50fps with C-AF and AE Tracking, or 120fps with focus and exposure locked on the first frame. All the speeds work with RAW files at the maximum resolution.
Here is a summary of the settings available, along with important characteristics that I’m going to explain in the next paragraphs.
Mechanical Shutter
1 to 10fps
Continuous
AF/AE
Live View with Blackouts
Electronic Shutter
5 to 20fps
Continuous
AF/AE
Live View with Blackouts
Electronic Shutter (SH2)
25 / 50 fps
Continuous
AF/AE
Live View with No Blackouts
Electronic Shutter (SH1)
60 / 100 /
120 fps
Fixed AF/AE (first frame)
Live View with No Blackouts
If you choose the SH1 or SH2 modes, you get live view with no blackouts: you see what the sensor is seeing with no interruptions or lag. (Like the Sony A1 and A9 series, but also the Nikon Z9 and several Fujifilm cameras). These settings, SH2 especially, are the best to follow difficult subjects that move erratically.
Pro Capture
Another function that is very useful for bird photographers is Pro Capture. It allows you to save images before pressing the shutter button all the way down. This isn’t new to Olympus camera users, and the difference with the OM-1 is simply that you have these faster drive speeds up to 50fps or 120fps. The maximum number of frames you can save before pressing the shutter button is 70.
This is a very cool feature to capture moments that are difficult to predict, such as a small bird flying off a tree.
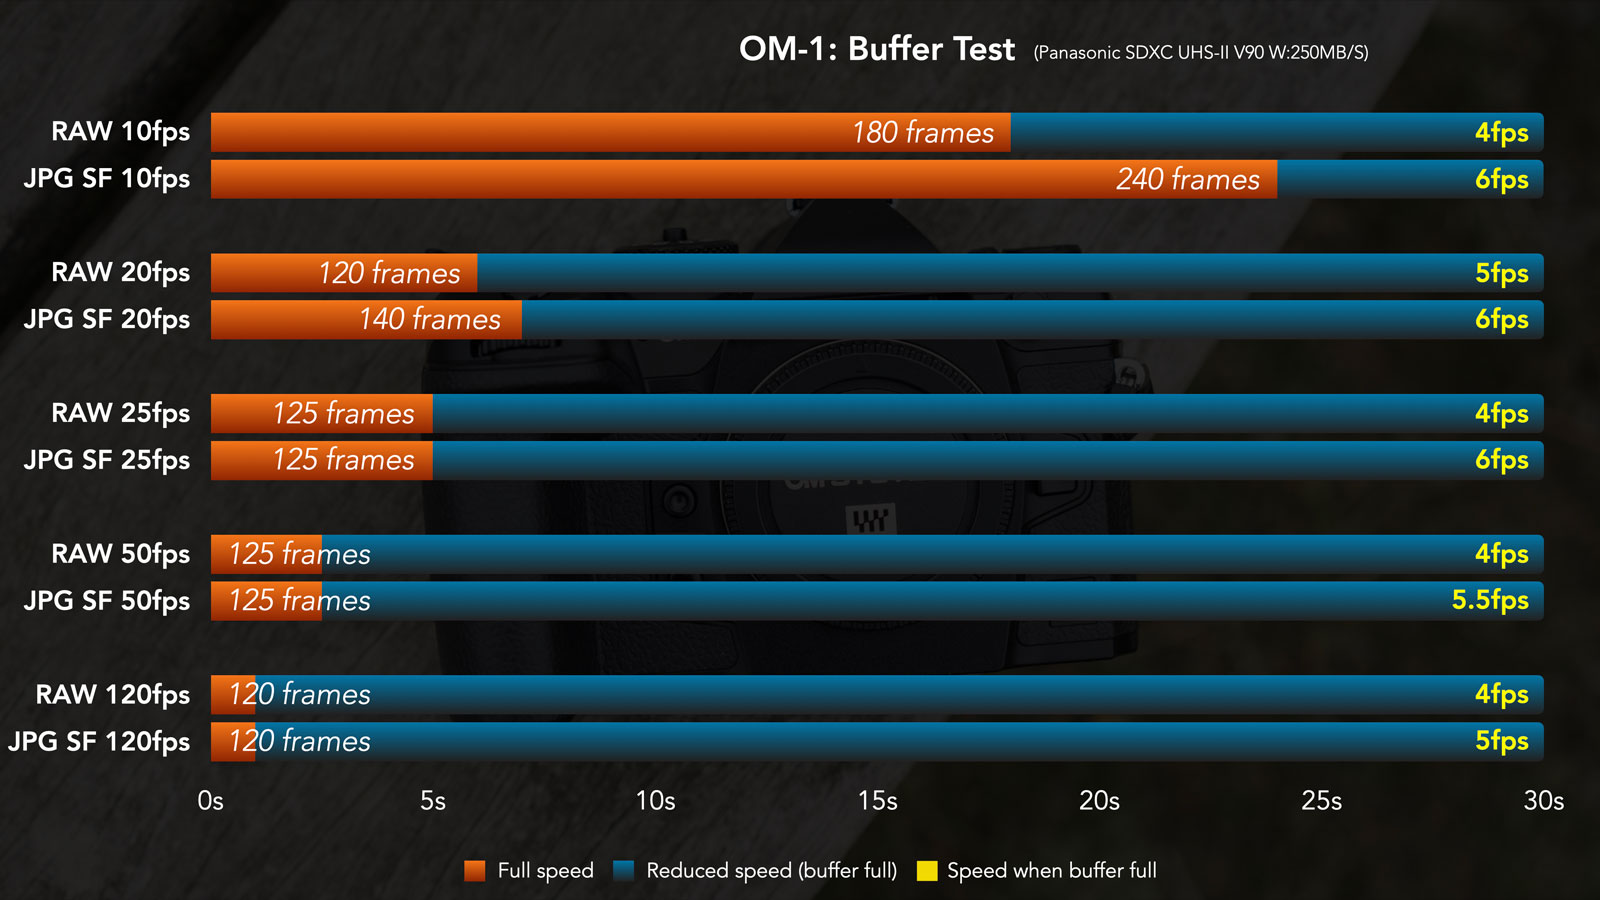
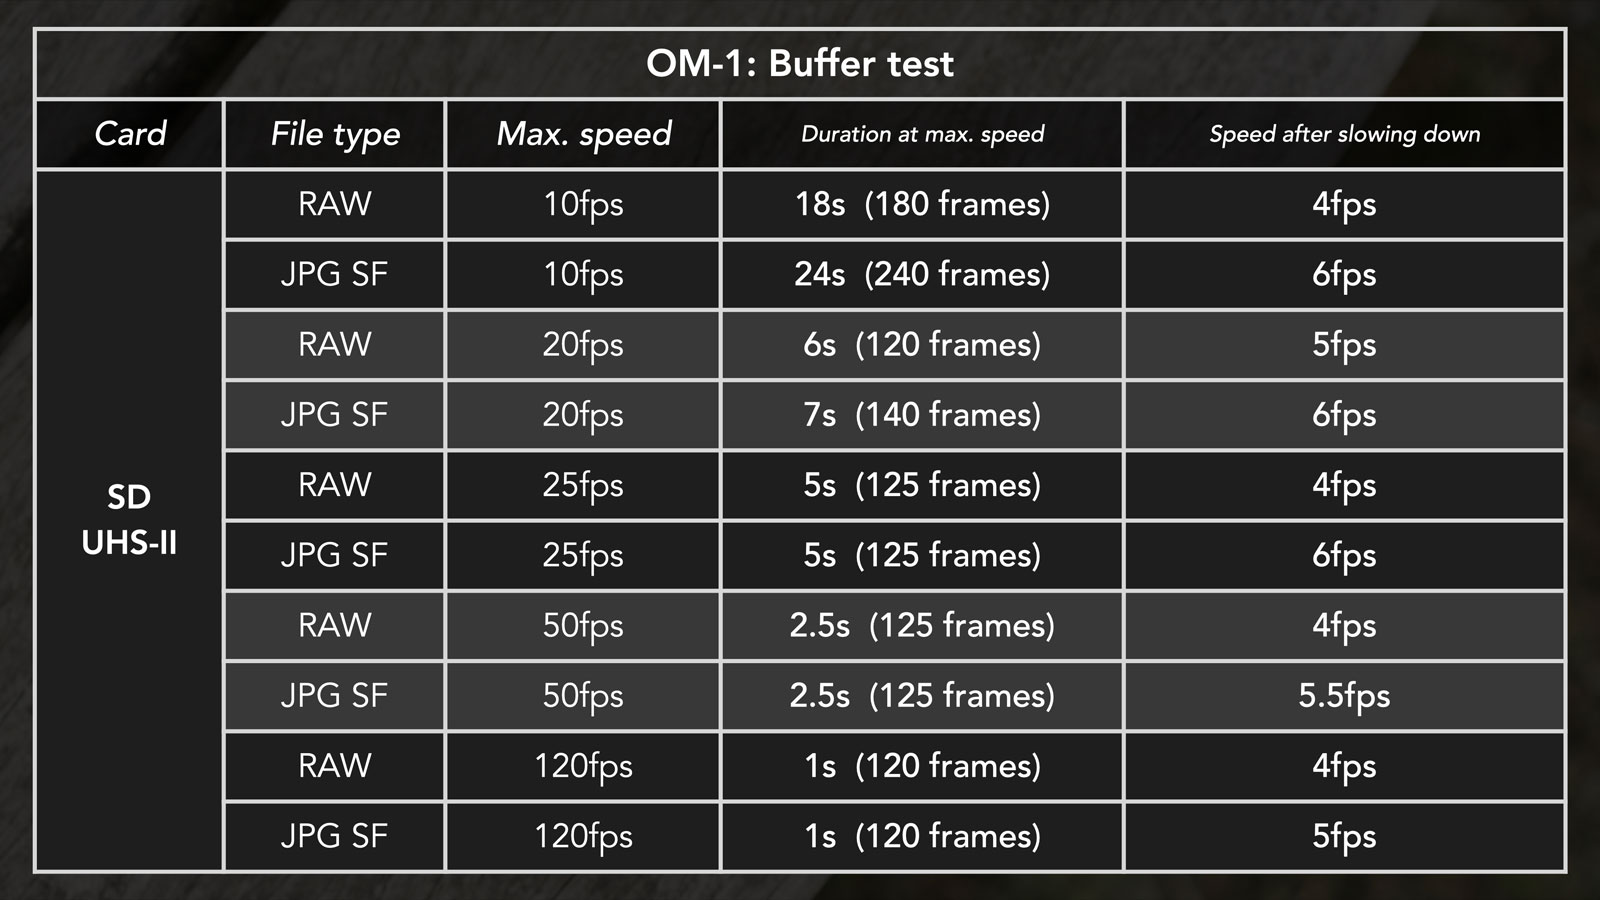
Buffer
Unsurprisingly, the higher the burst rate is, the lower the buffer capabilities become. If, with 10fps, you can maintain that speed for almost 20s (with RAW), switch to 50fps and you won’t even manage three seconds at full speed. Here are all the results.
Note about the ‘Low ISO Processing’ settings
Menu Shooting 1 / Page 3
When working in continuous shooting mode, you can choose to give priority to the drive speed (to ensure the maximum amount of recordable images), or to prioritise details on your images. I’ve made some tests and I didn’t notice any loss in quality by choosing Drive Priority (at least with RAW files).
Some of you asked me about this after I published my OM-1 review, and specifically which setting I used for my buffer test. Because I honestly don’t remember, I did the test again and found inconsistent results where sometimes there was a clear difference, sometimes there wasn’t. There are other factors at play (battery charge, IBIS, memory card) and I quickly realised it would take ages to try all sorts of combinations. So I decided to spend my time on other, more useful things.
In short, I think Drive Priority makes sense when working at the fastest speeds of 50fps or 120fps. Otherwise, either option you choose will be fine.
Compatibility and limitations
The staggering burst speeds of the OM-1 come with a few limitations to be aware of.
But let me start with the good news first: Panasonic micro four thirds lenses work with Pro Capture and C-AF. On older cameras, you could only select the H option that fixes the AF on the first frame.
That said, the fastest burst of 50fps in the SH2 mode (with C-AF) is available with a restricted selection of Olympus lenses (as of April 2022):
- 12-40mm F2.8 PRO
- 12-40mm F2.8 PRO Ⅱ
- 12-100mm F4.0 IS PRO
- 40-150mm F2.8 PRO
- 150-400mm F4.5 TC 1.25x IS PRO
- 300mm F4.0 IS PRO
When using another Olympus lens, or any Panasonic lens, the fastest speed with SH2 is 25fps. You still get the benefit of live view and no blackouts.
Other limitations to be aware of:
- focus accuracy decreases with aperture smaller than f/8 when selecting the SH2 speed. This is something to keep in mind when using a lens like the 100-400mm F5-6.3 and the teleconverters.
- Minimum shutter speed is limited to 1/15s with SH1, 1/320s with SH2 at 25fps, and 1/640s with SH2 at 50fps
- the frame rate decreases with ISO 16,000 or higher
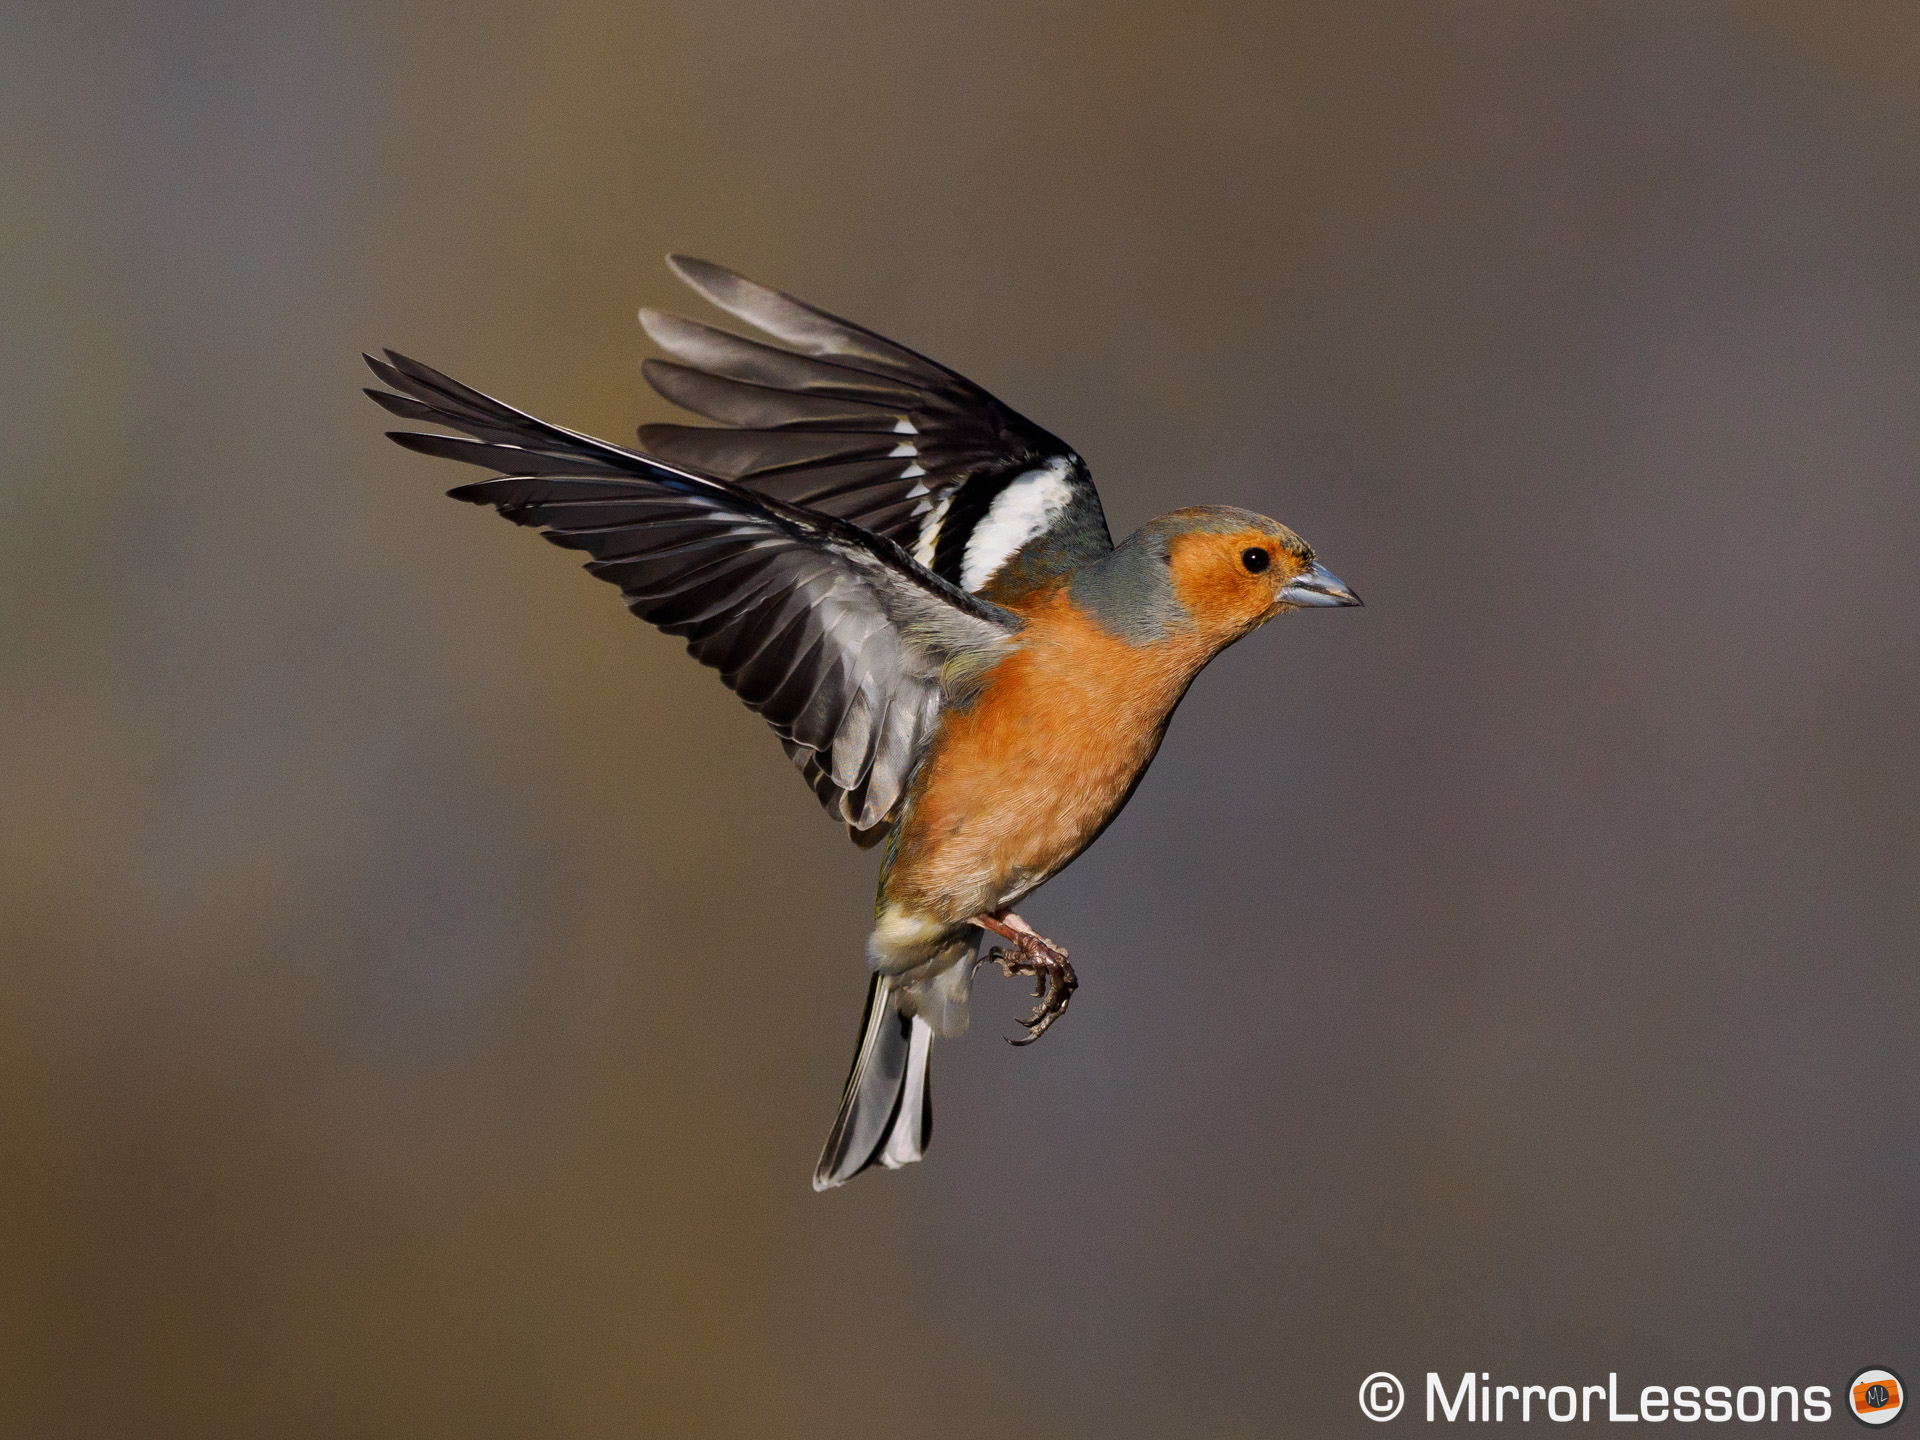
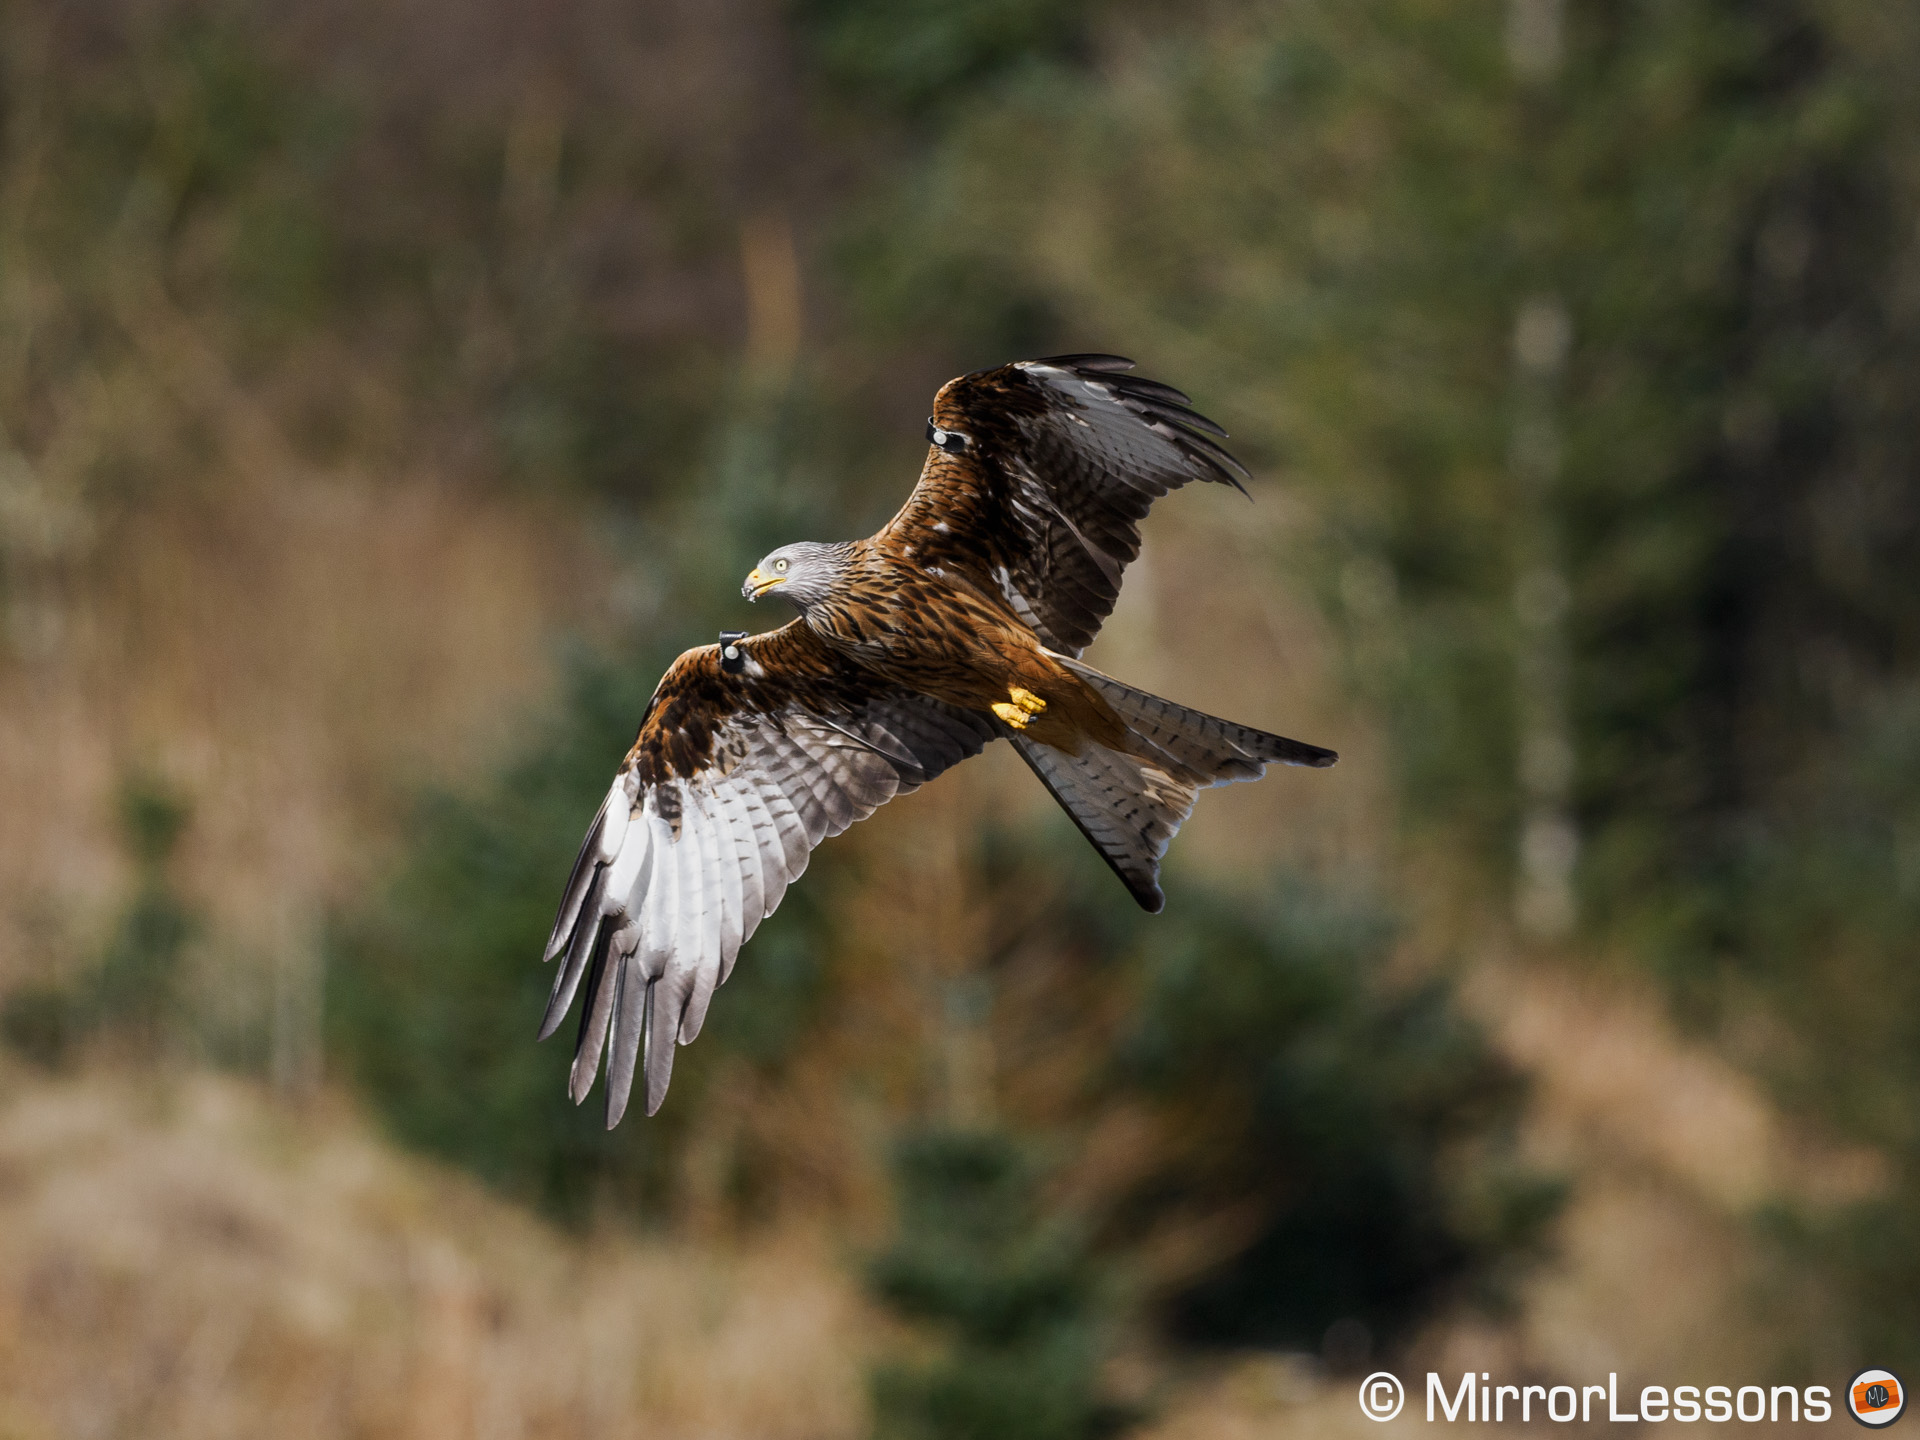
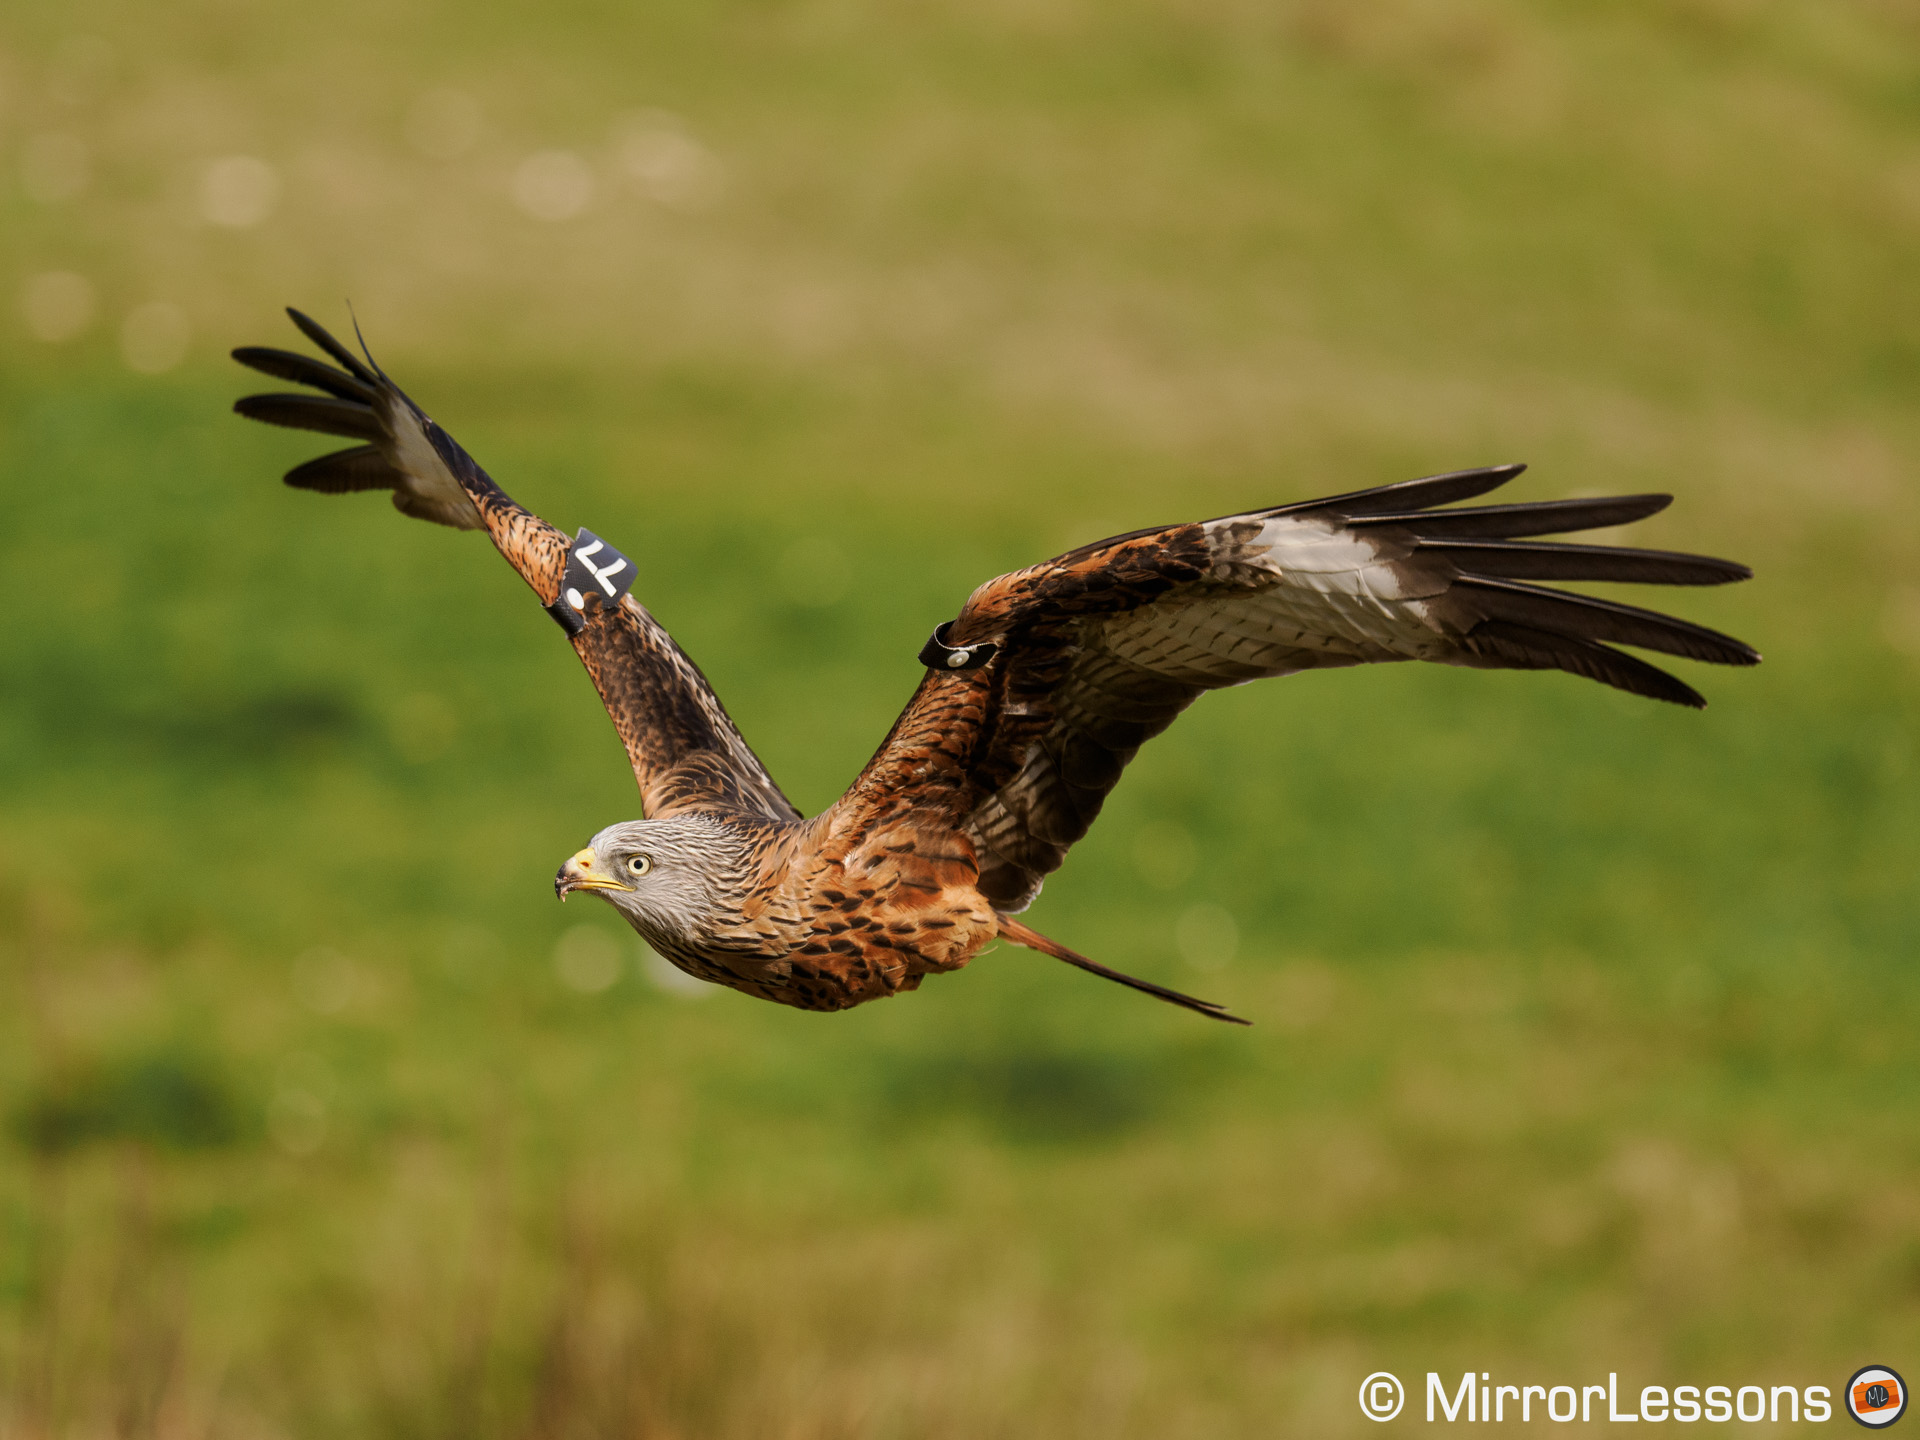
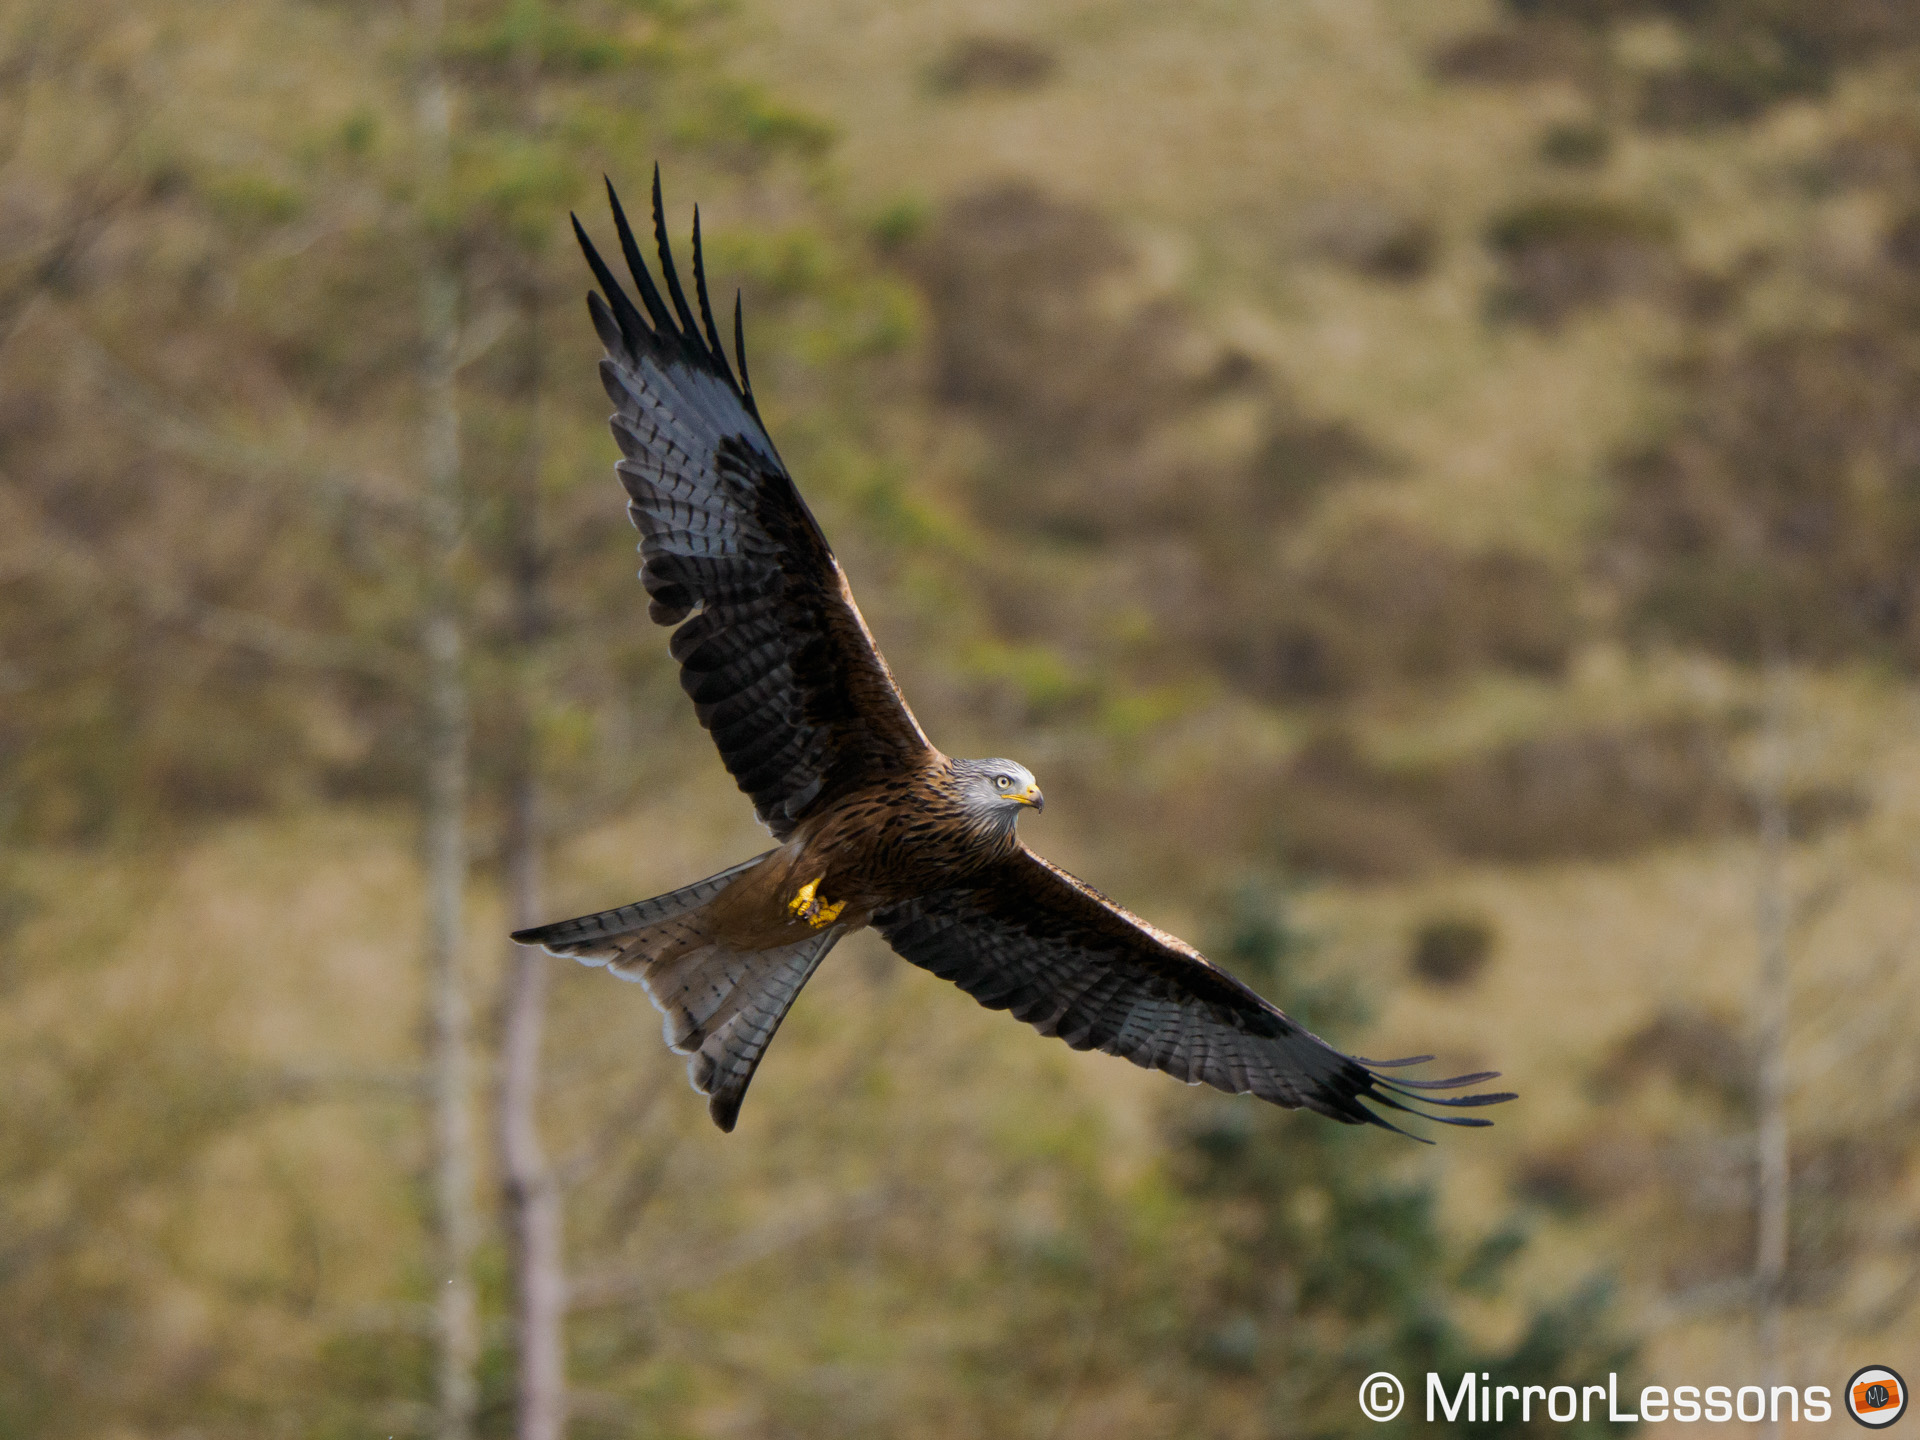
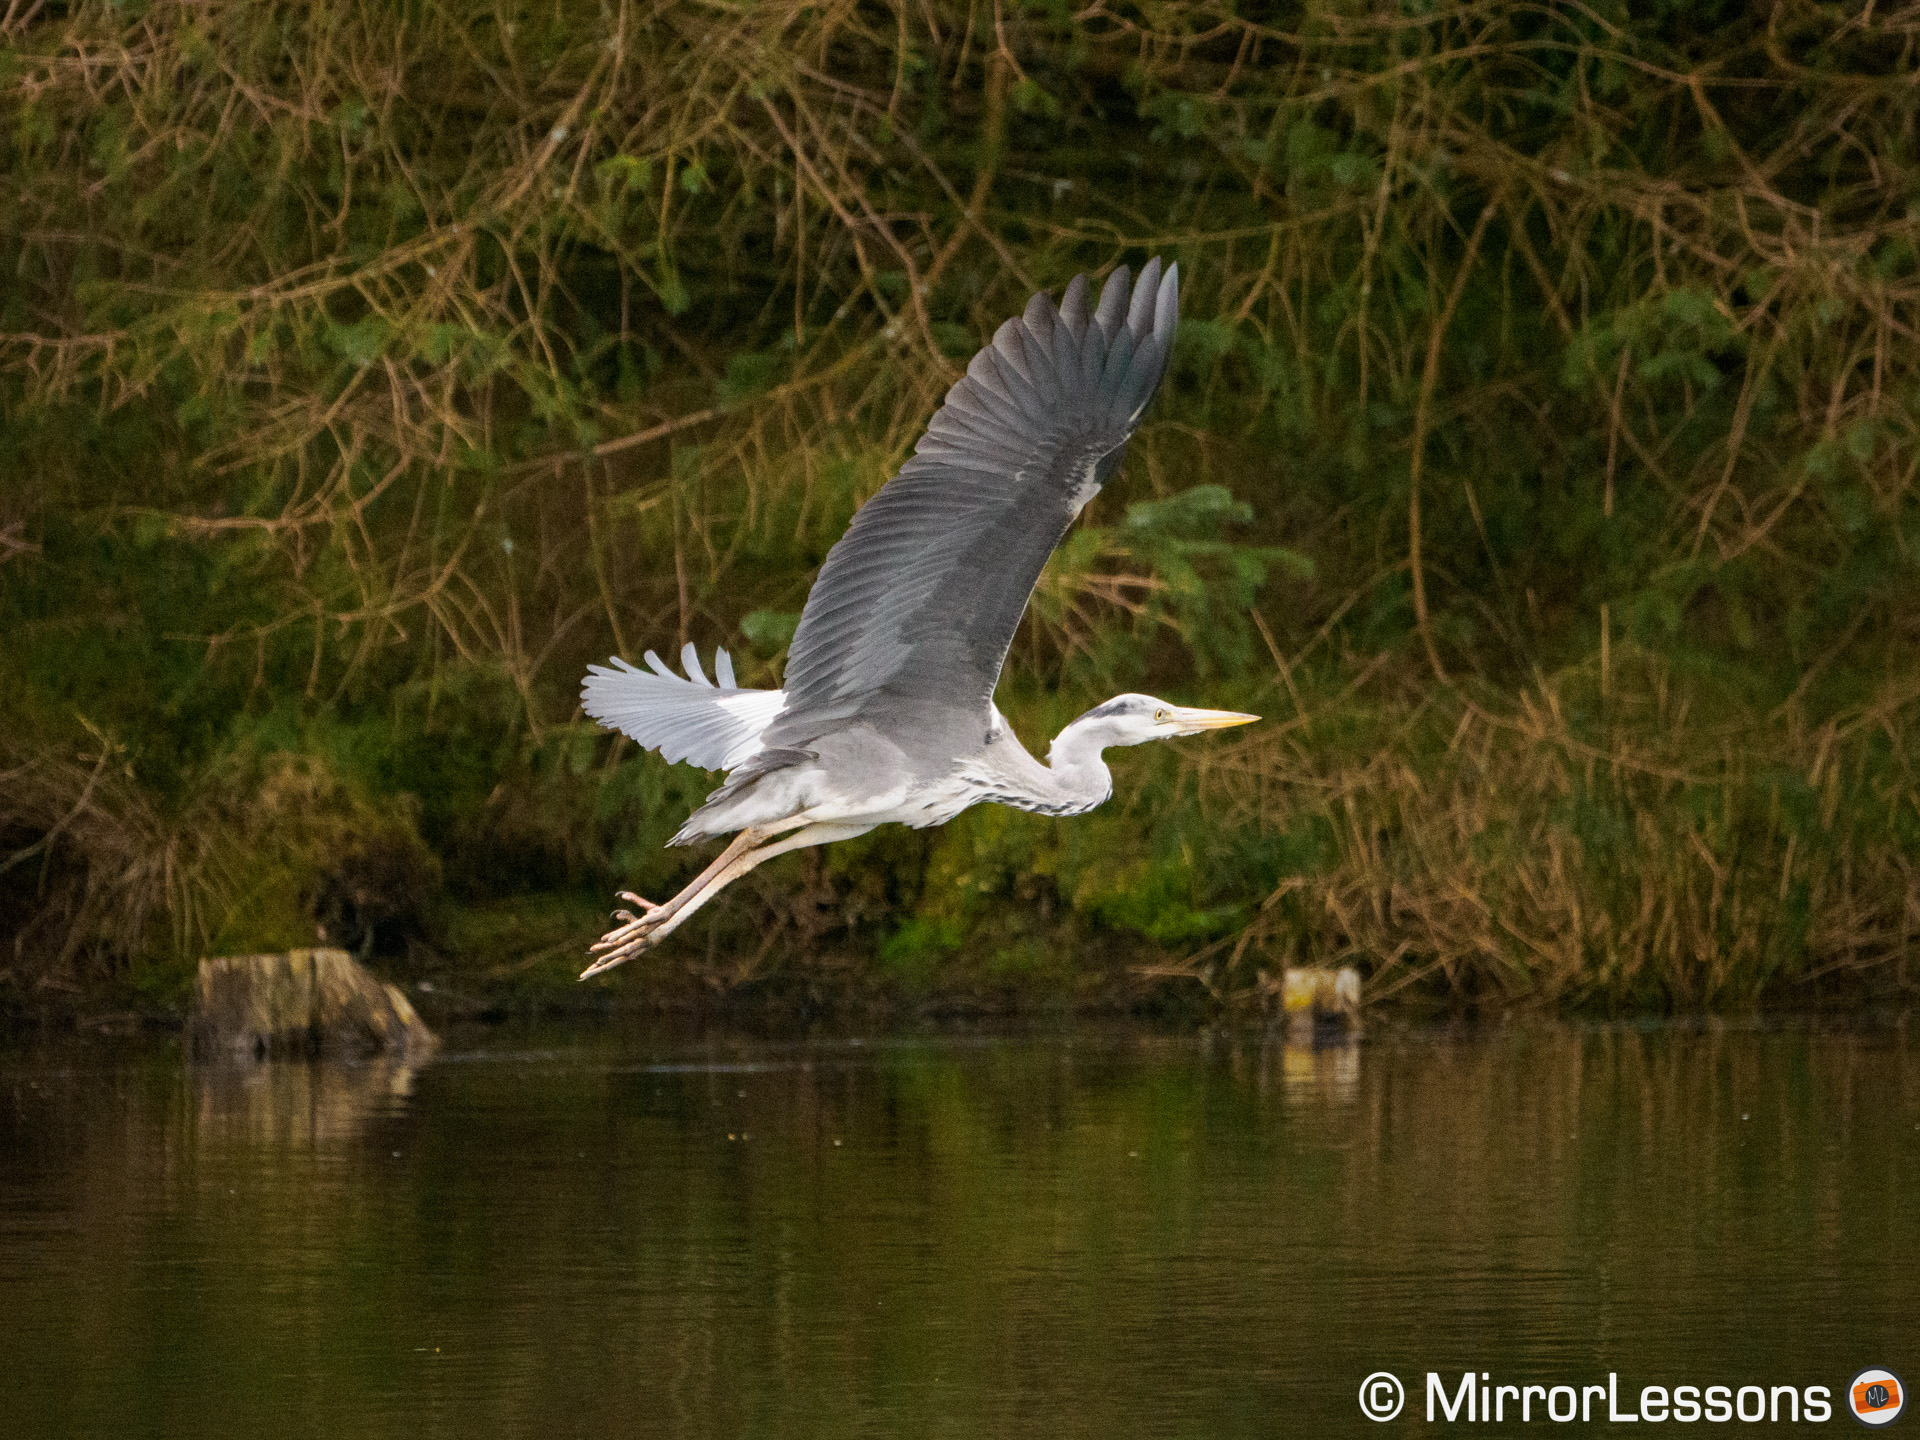
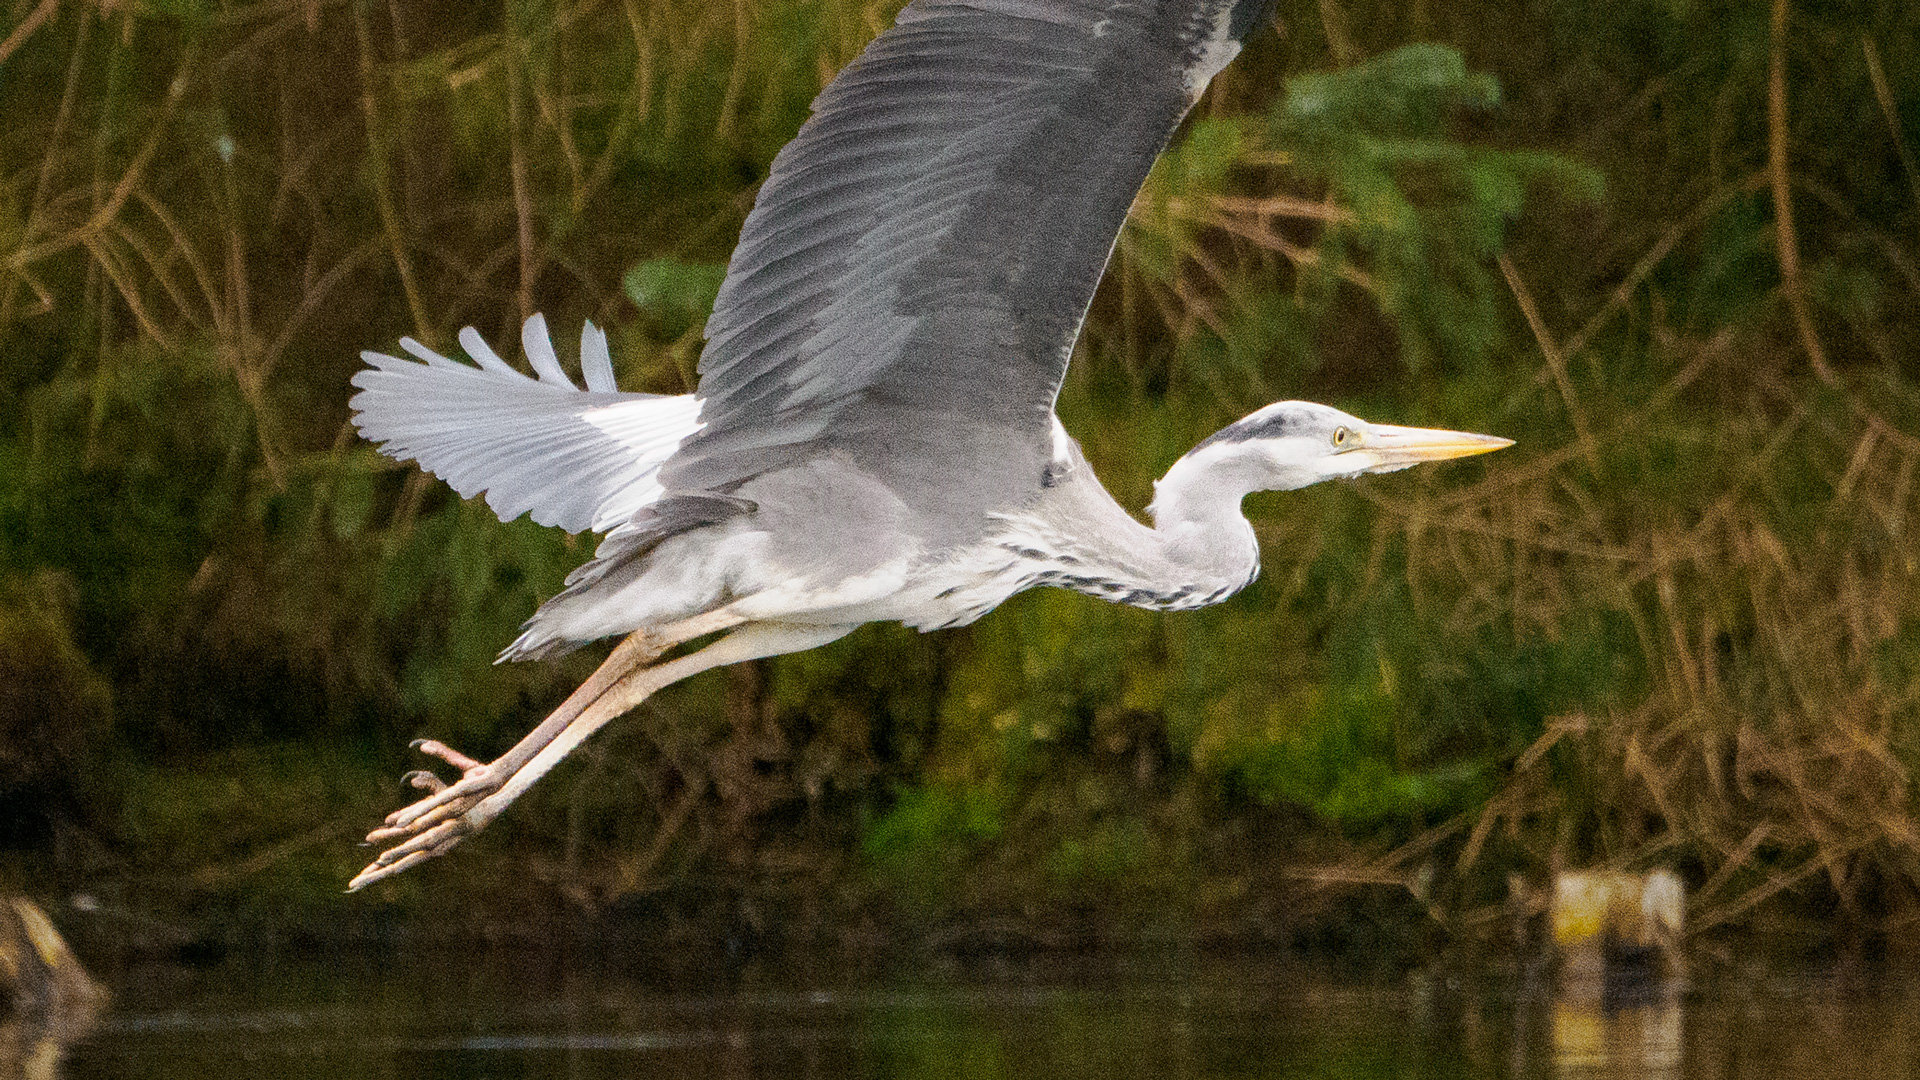
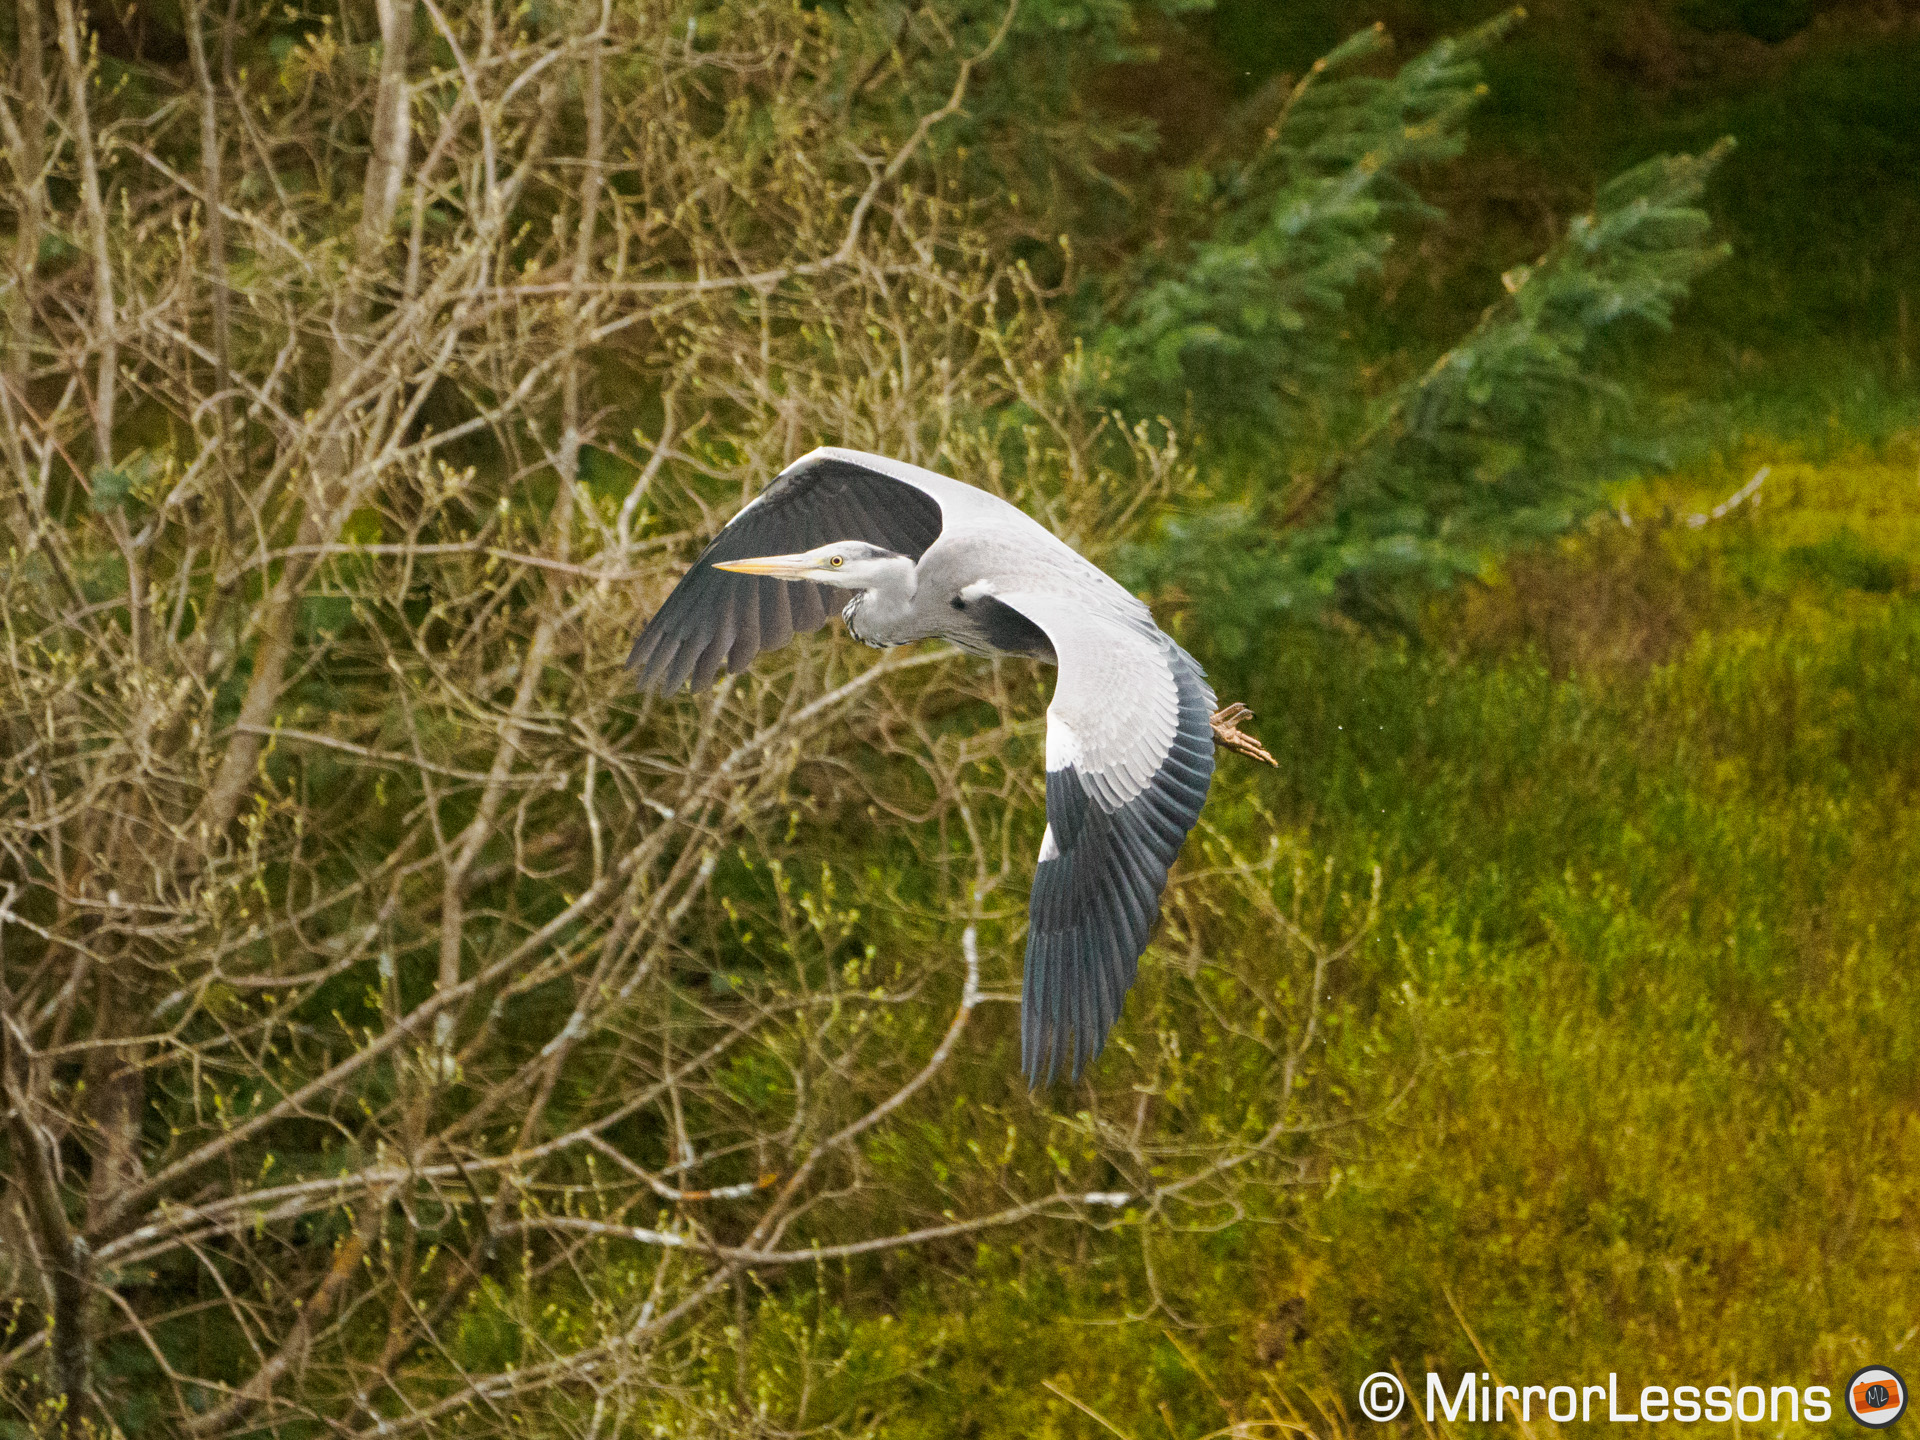
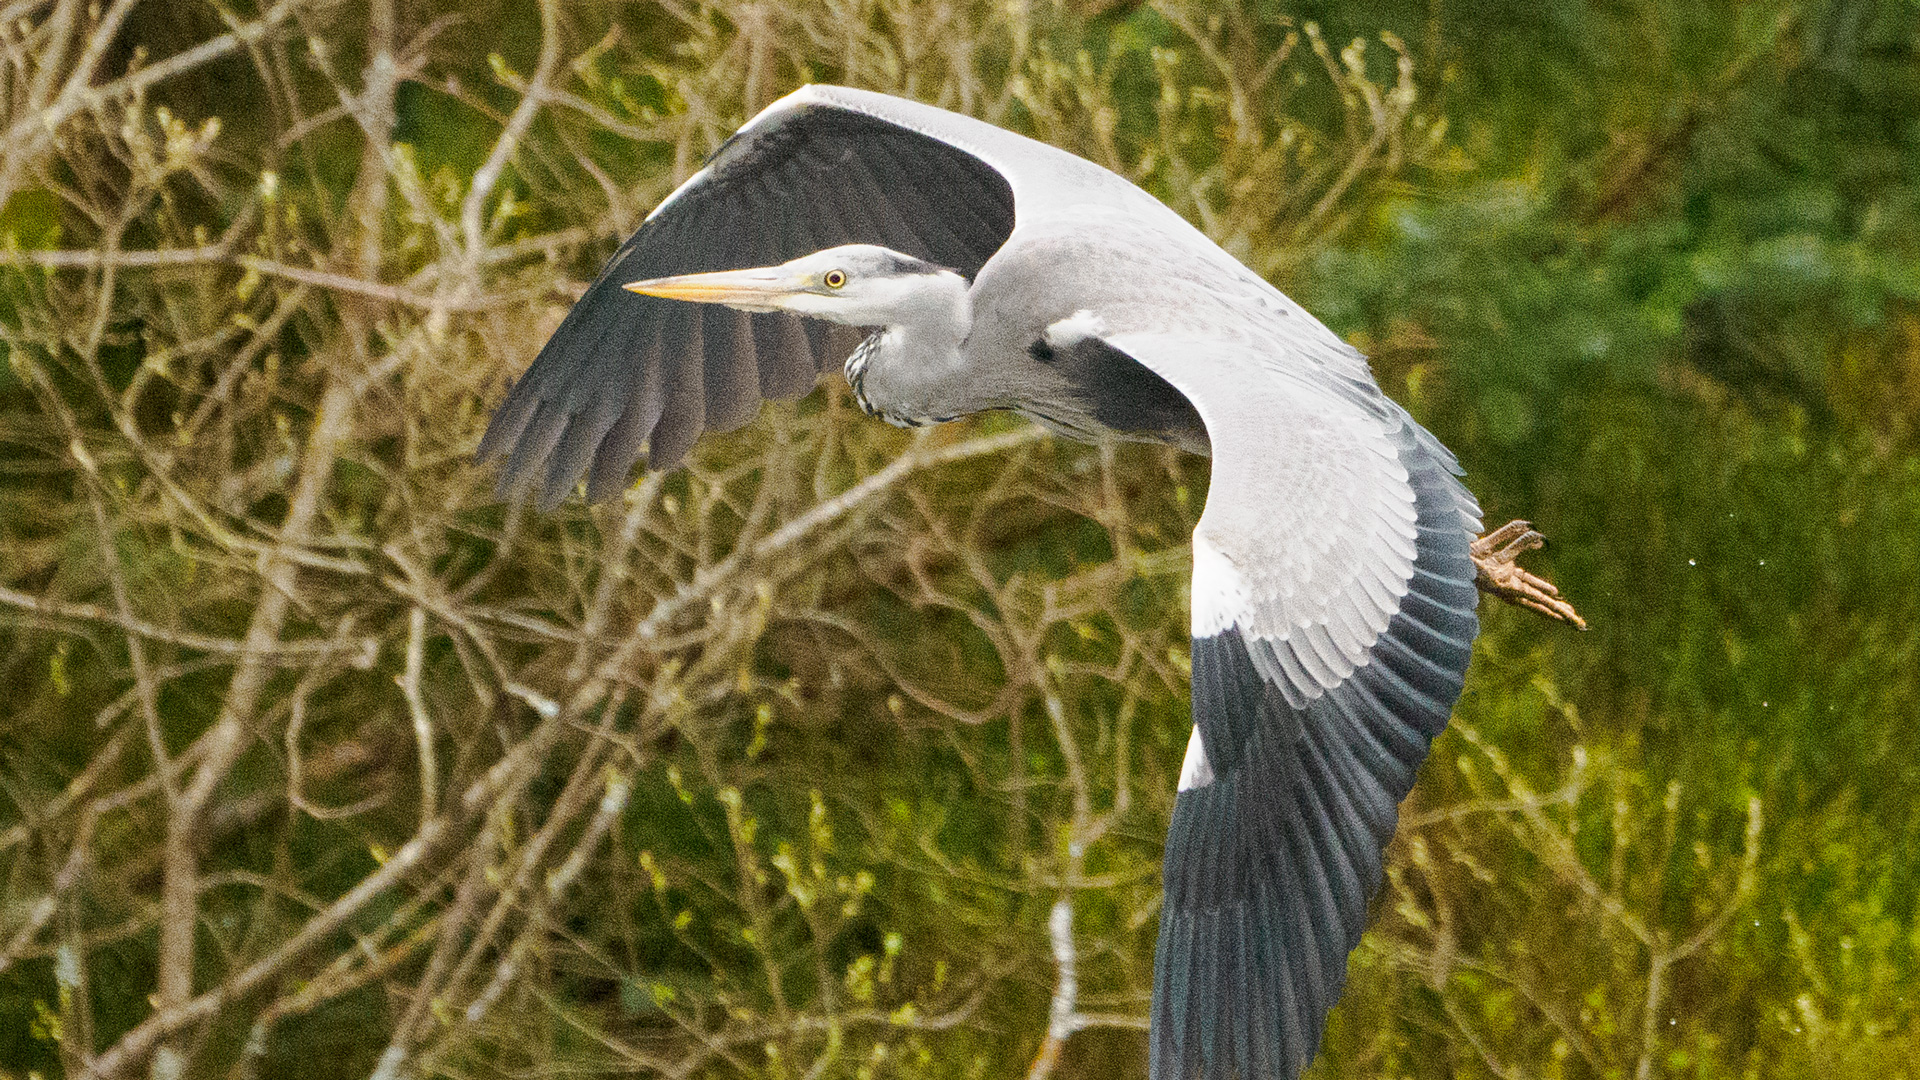
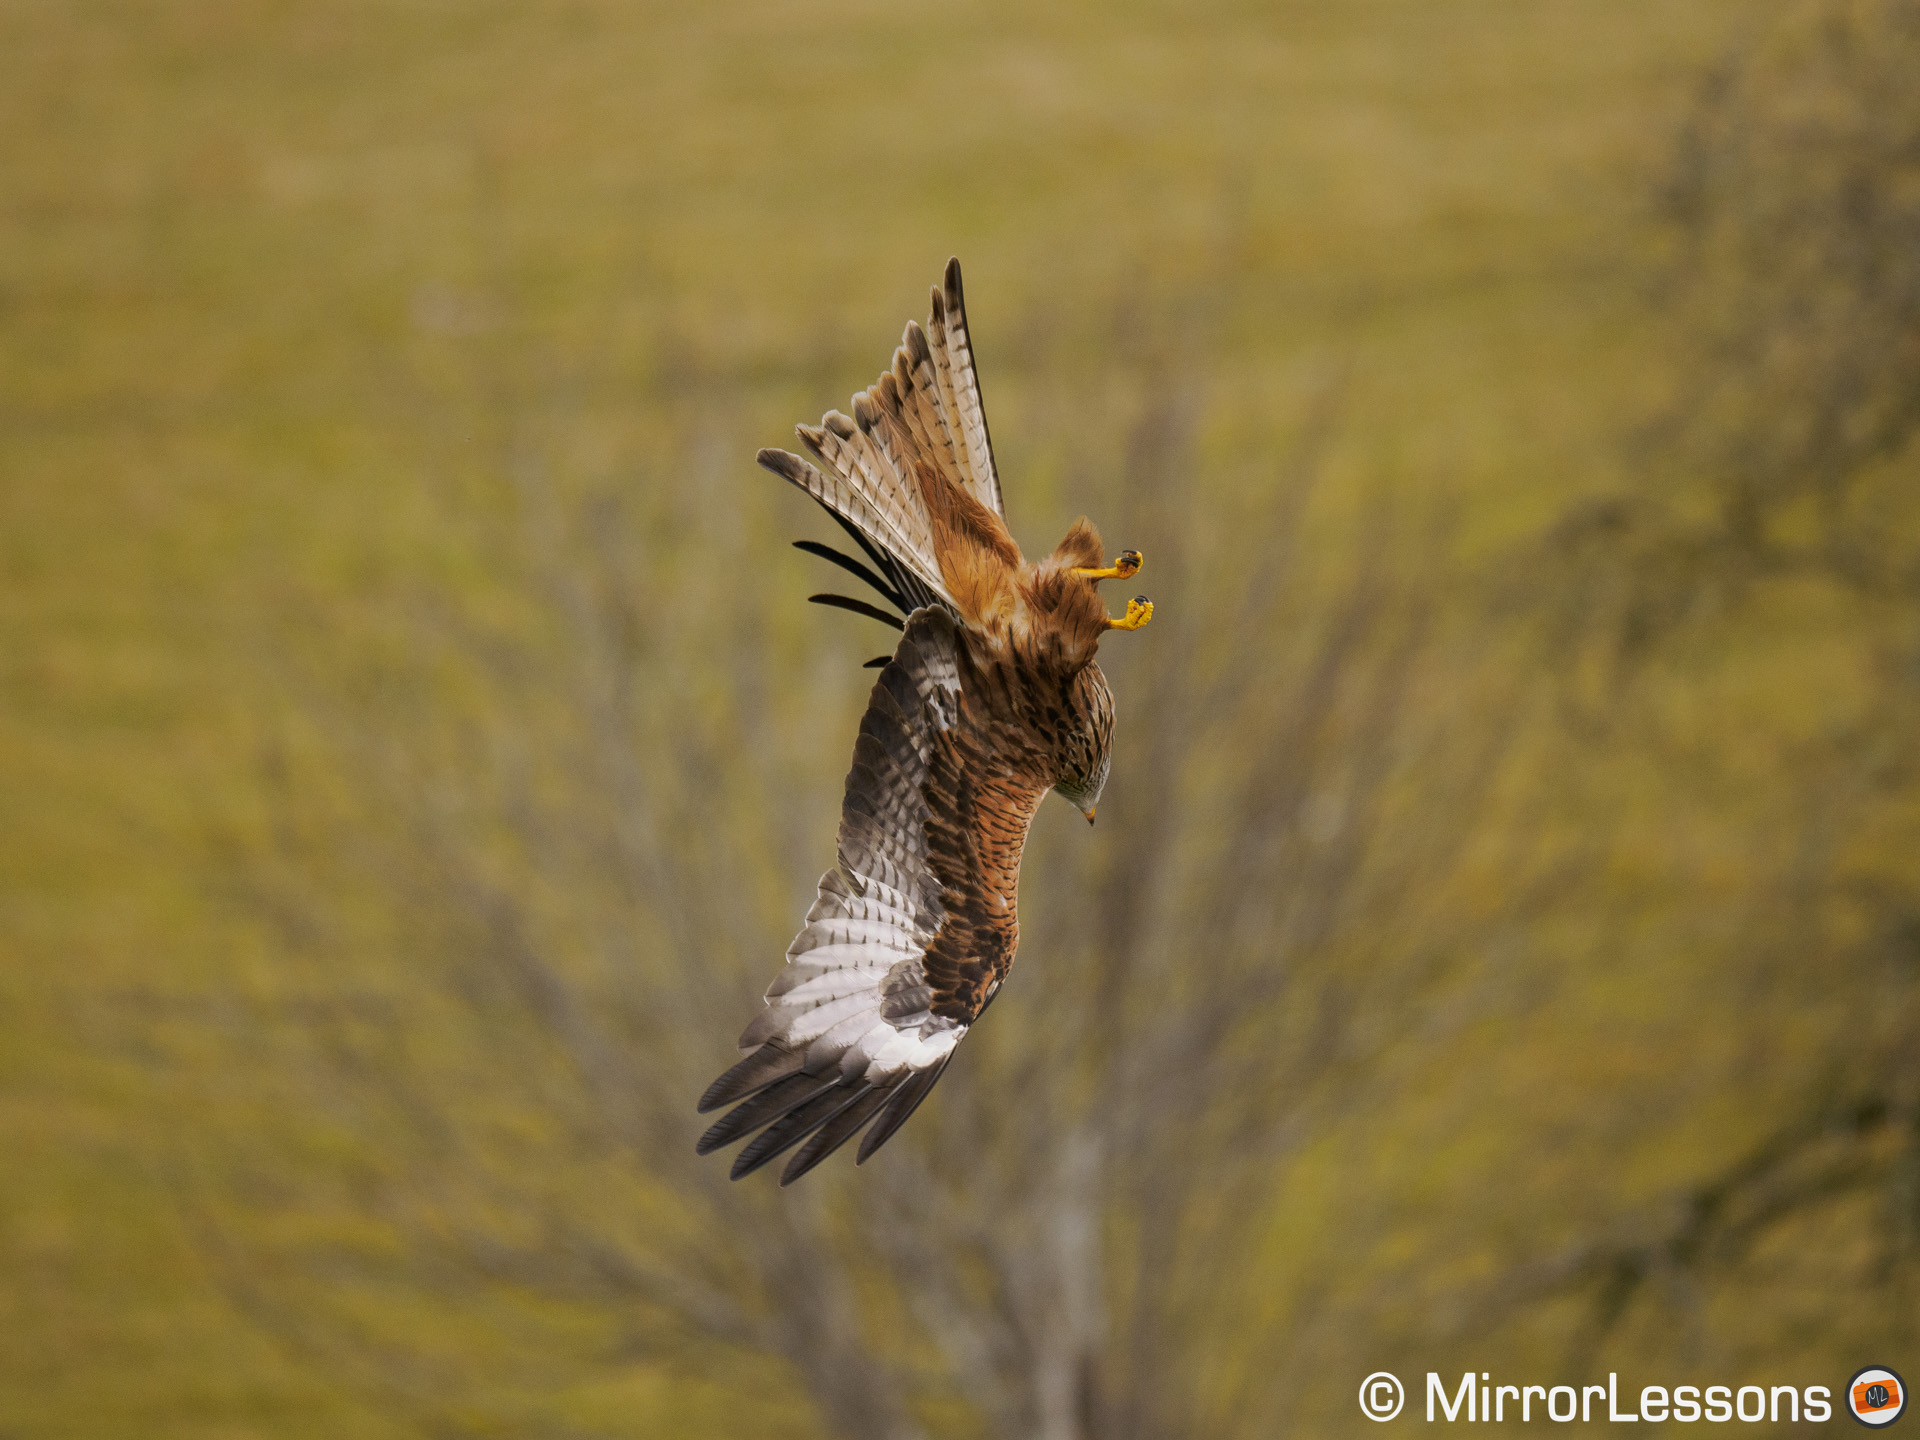
Birds in Flight
I have spend a great amount of time at my two favourite red kite feeding stations, trying all sorts of setting combinations as well as different lenses.
The good news is that the OM-1 is an excellent improvement in comparison to its predecessors. It is much faster and more reactive, and the performance is very close to that of a Canon EOS R5 or R6. Personally, this is the update I was hoping to see, more than any other.
The absolute best keeper rate I got was with the following lens and settings.
89%
98%
- M.Zuiko 300mm F4 Pro
- C-AF
- Large Target
- Subject Detection: Birds
- Release Priority: Off
- AF Sensitivity +2
- AF Scanner: On
- 10fps with mechanical shutter
How the score is calculated and why there are two of them.
I divide all the images that I captured in three categories:
– 100% focus (sharpness is excellent, details are crisp)
– slightly soft focus (the image looks ok at first, but zooming in reveals focus is not perfect. You can still see the details, but they are not as sharp as they could be.)
– out of focus (details are too soft even without enlarging the image, or focus is completely off)
From that, I calculate two keeper rates:
– the green score includes 100% focus only. It’s the most severe score out of the two.
– the blue score is a more forgiving evaluation and also includes slightly soft results.
You can read more about my birds in flight test in the dedicated article.
For reference, here is how the OM-1 compares to other cameras that I’ve tested in the same conditions (the full list can be found in my birds in flight article).
A7 IV
94%
99%
R6
93%
97%
OM-1
89%
98%
X-T4
81%
96%
E-M1X
74%
91%
E-M1 III
72%
94%
Although the best score was made with a slow burst rate, the electronic shutter and the fast drive speeds of 20fps, 25fps and 50fps gave me similar results.
20fps
85%
95%
25fps (SH2)
87%
95%
50fps (SH2)
85%
95%
Remember that a difference of a few points is irrelevant. The takeaway is that the burst speed doesn’t affect the AF performance.
Concerning the lenses, I tested the following and the keeper rate remains similar overall. It decreased when using teleconverters, or when working at 400mm with the two zooms. The M.Zuiko 100-400mm has a lower score also at 300mm, but that day was much cloudier than the others.
M.Zuiko 300mm F4 Pro
87%
95%
M.Zuiko 300mm F4 Pro + MC-14
77%
93%
M.Zuiko 100-400mm F5-6.3 at 300mm
80%
95%
M.Zuiko 100-400mm F5-6.3 at 400mm
78%
94%
Leica DG 100-400mm F4-6.3 at 300mm
87%
97%
Leica DG 100-400mm F4-6.3 at 400mm
81%
98%
Leica DG 200mm F2.8
87%
96%
Leica DG 200mm F2.8 + TC 1.4x
76%
92%
Average score
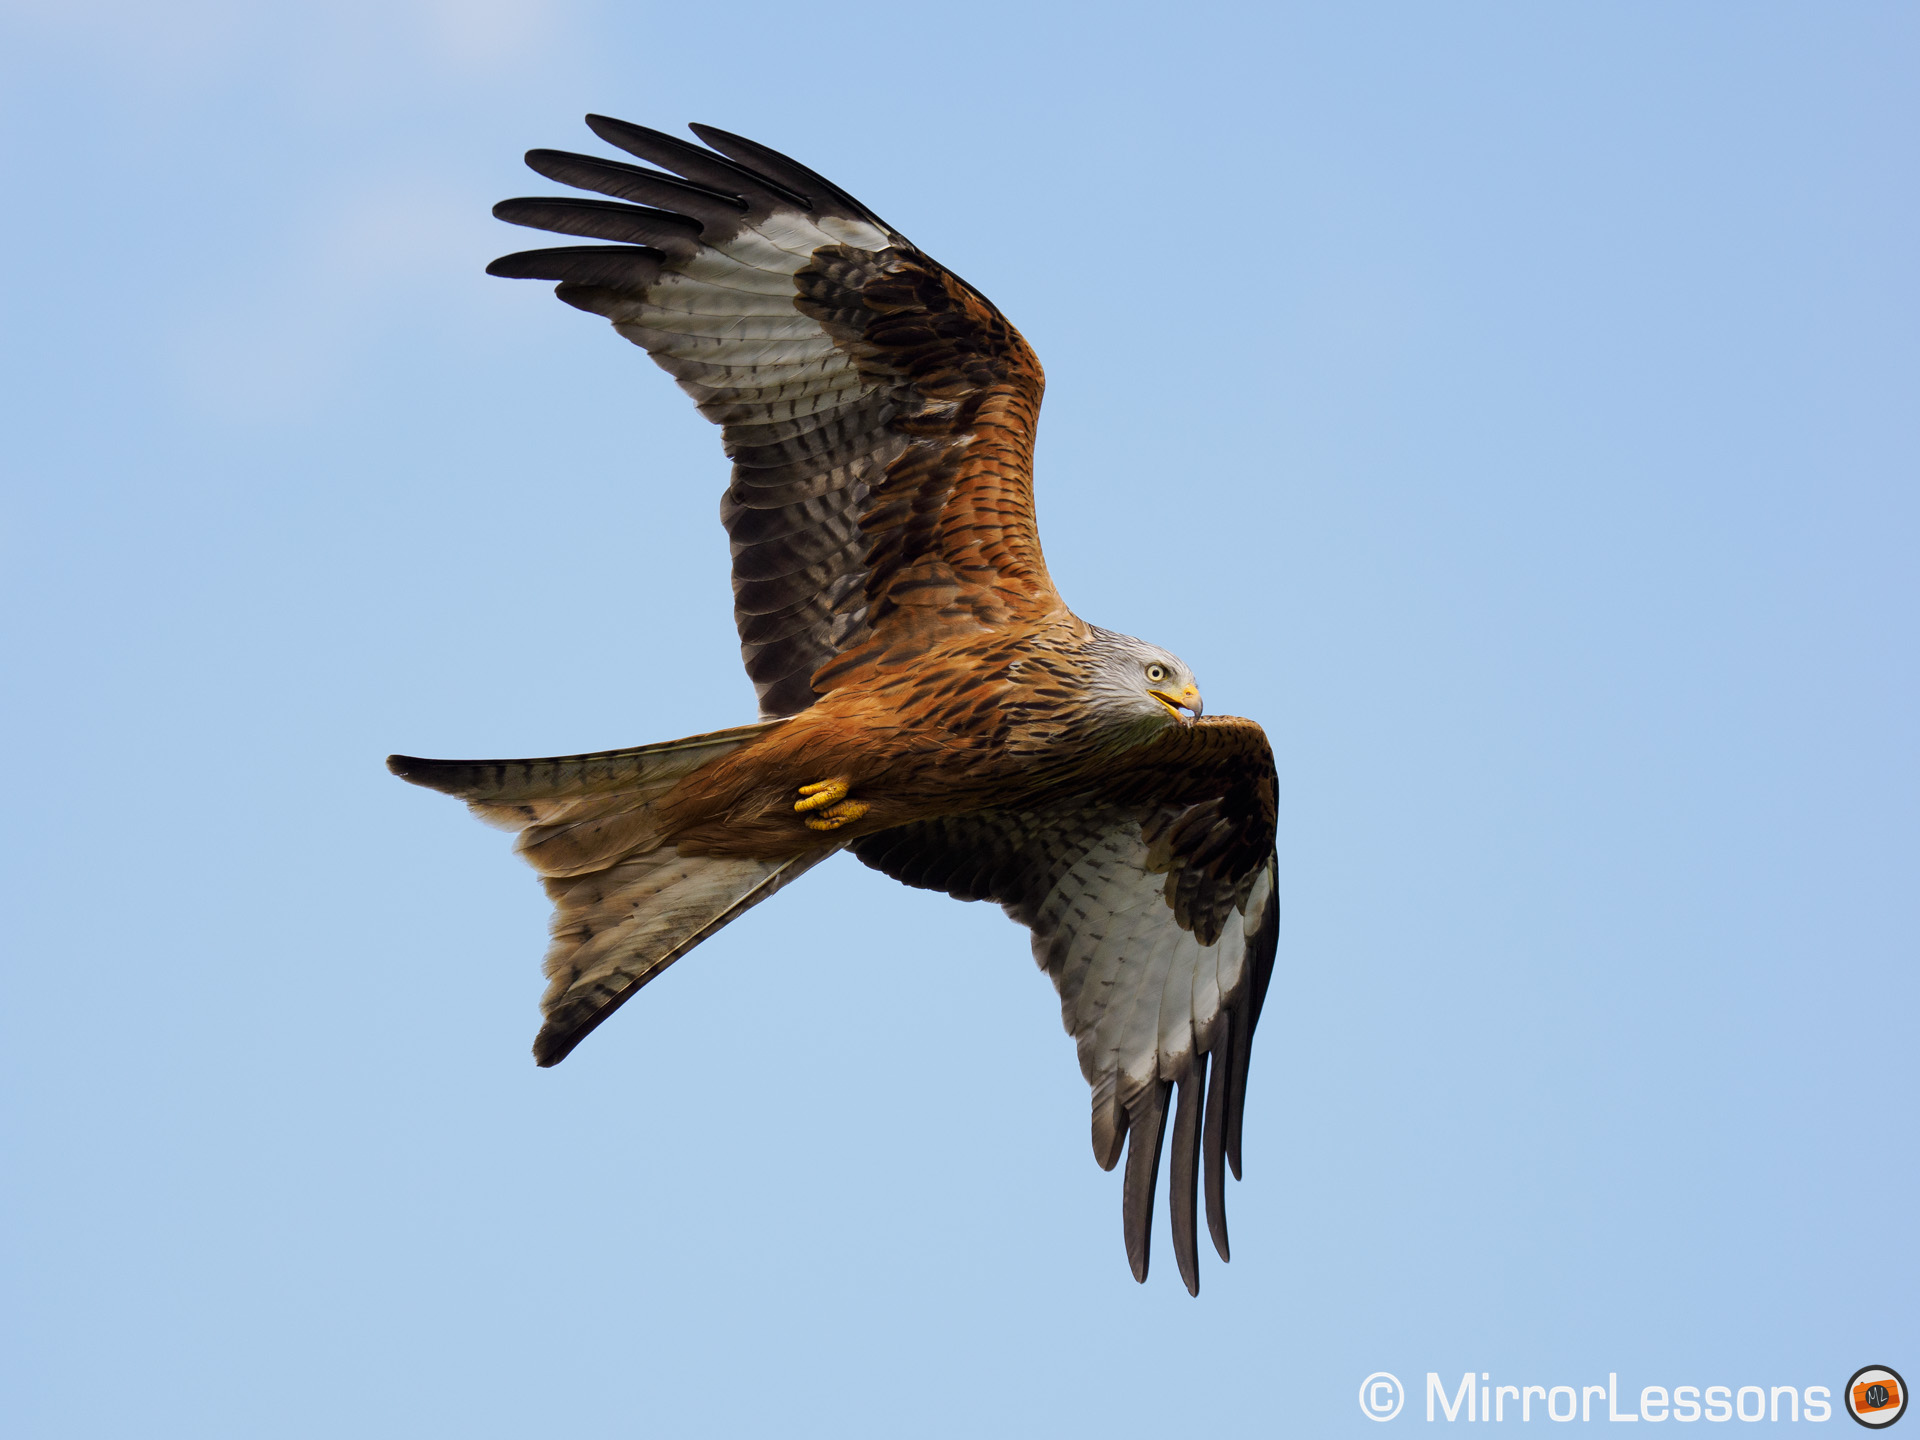
Another distinction I made is when the bird was against the sky (clear background) or against trees and other natural elements that make the background busier.
As you can see below, the score increases when there is a clear and uniform background behind the subject (blue or cloudy sky).
Average score with busy background
84%
95%
Average score with sky background
92%
98%
With a busy background, the camera can struggle when the kite is small in the frame and close to trees or hills, whose colours and contrast can more easily be confused with the animal.
It’s fair to say that it doesn’t happen all the time and I got sequences that are nearly perfect, so you can achieve a close to 100% score with a single burst. However, spending many hours with the kites showed that the performance is not always perfect.
The Importance of Subject Detection (again)
I’ve tried a lot of settings, such as choosing different AF Targets (including custom ones), varying the AF sensitivity, turning off the AF Scanner and other things, but the average score remained around 86% / 96%. (you can read more about extra AF settings and when to change them in the next chapter).
The key parameter you always want to have enabled is the most obvious one: Bird Subject Detection.
Out of curiosity, I tried to turn it off to see how the camera would behave without it, also because I wanted to see how much better the AF and the sensor technology were by themselves.
As long as I used the Large Target, the keeper rate was not bad. It was better than any previous OM-D cameras I’ve tested, and many of them don’t have subject detection, so it shows that the AF in itself has improved.
However, change the AF Target or worse, select C-AF + Tracking, and the results are dramatically lower.
C-AF, Large Target (Bird Detection off)
80%
95%
C-AF + Tracking (Bird Detection off)
48%
51%
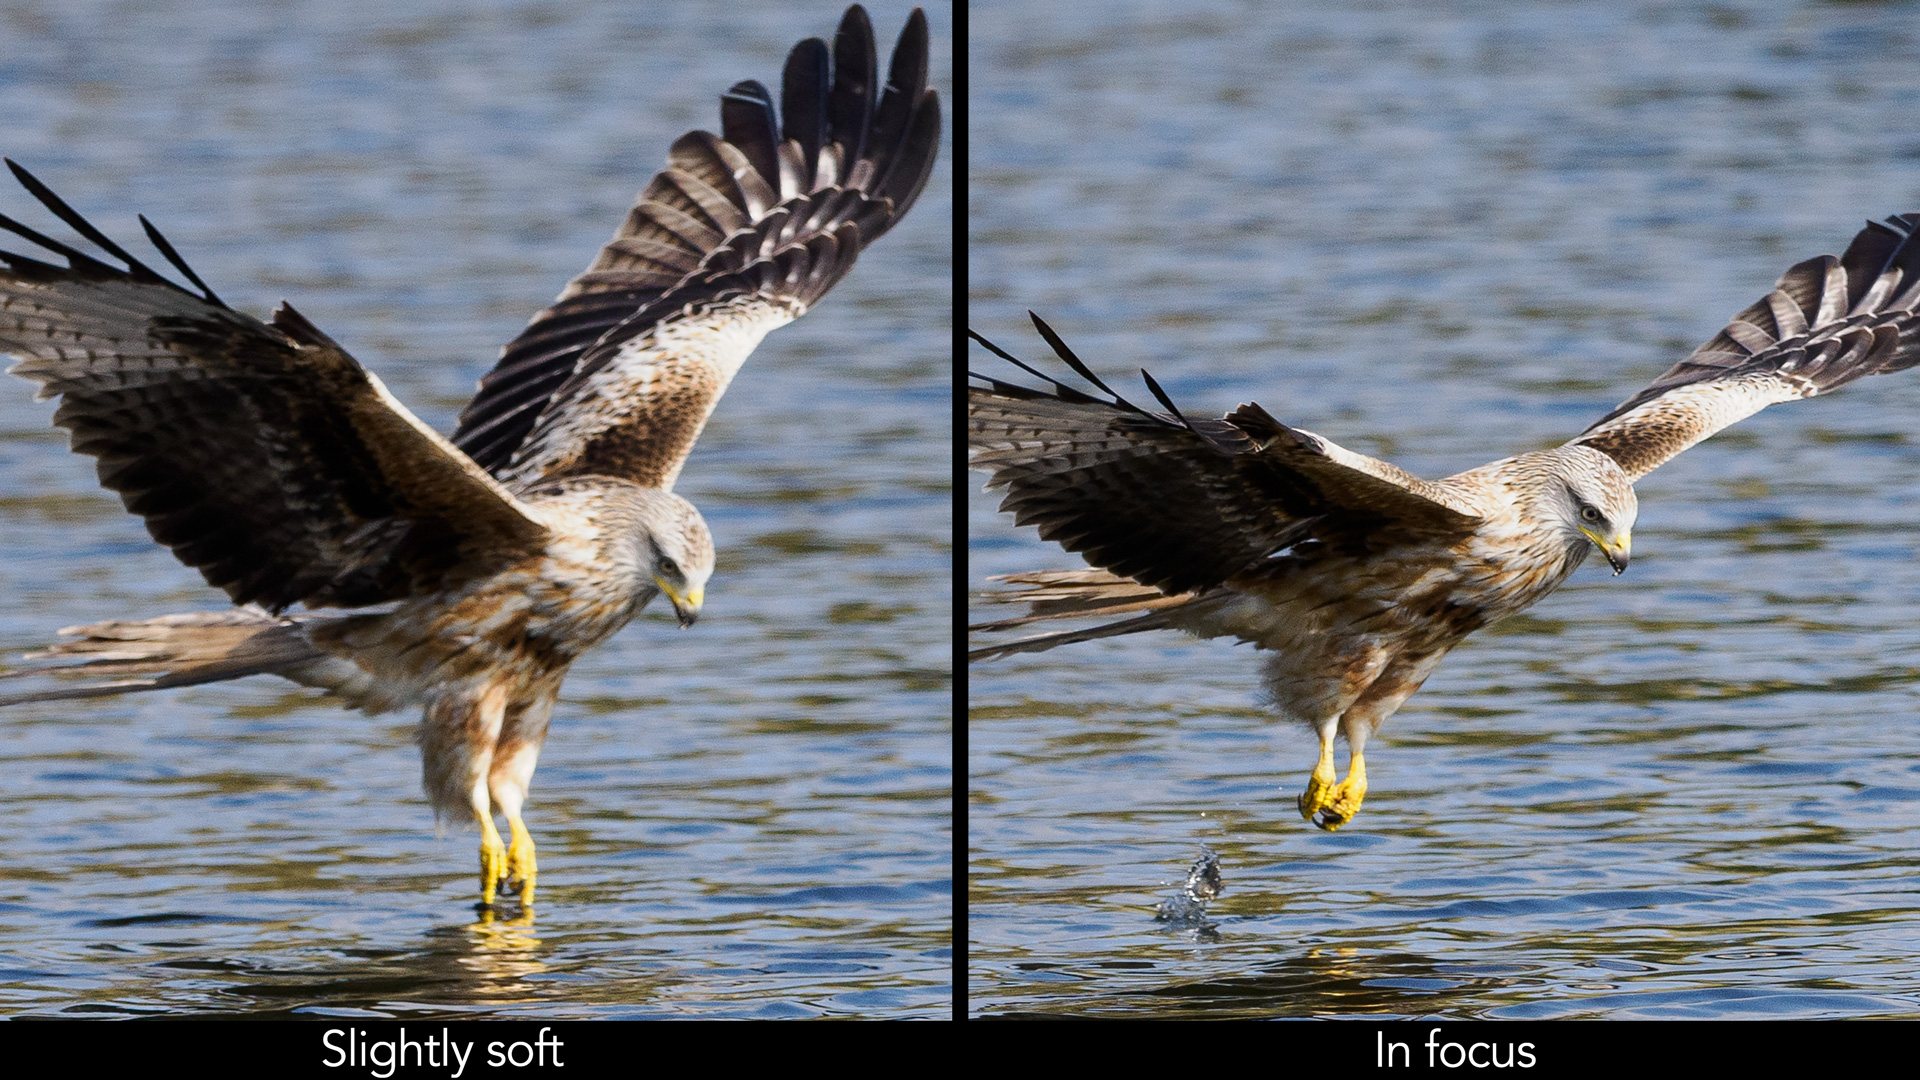
What bird detection does is that it helps the camera correct focus faster when the bird is out of focus or when focus is on the background rather than the subject. Sometimes, it only takes a few frames for focus to be corrected, other times it will take 5 or 6 frames.
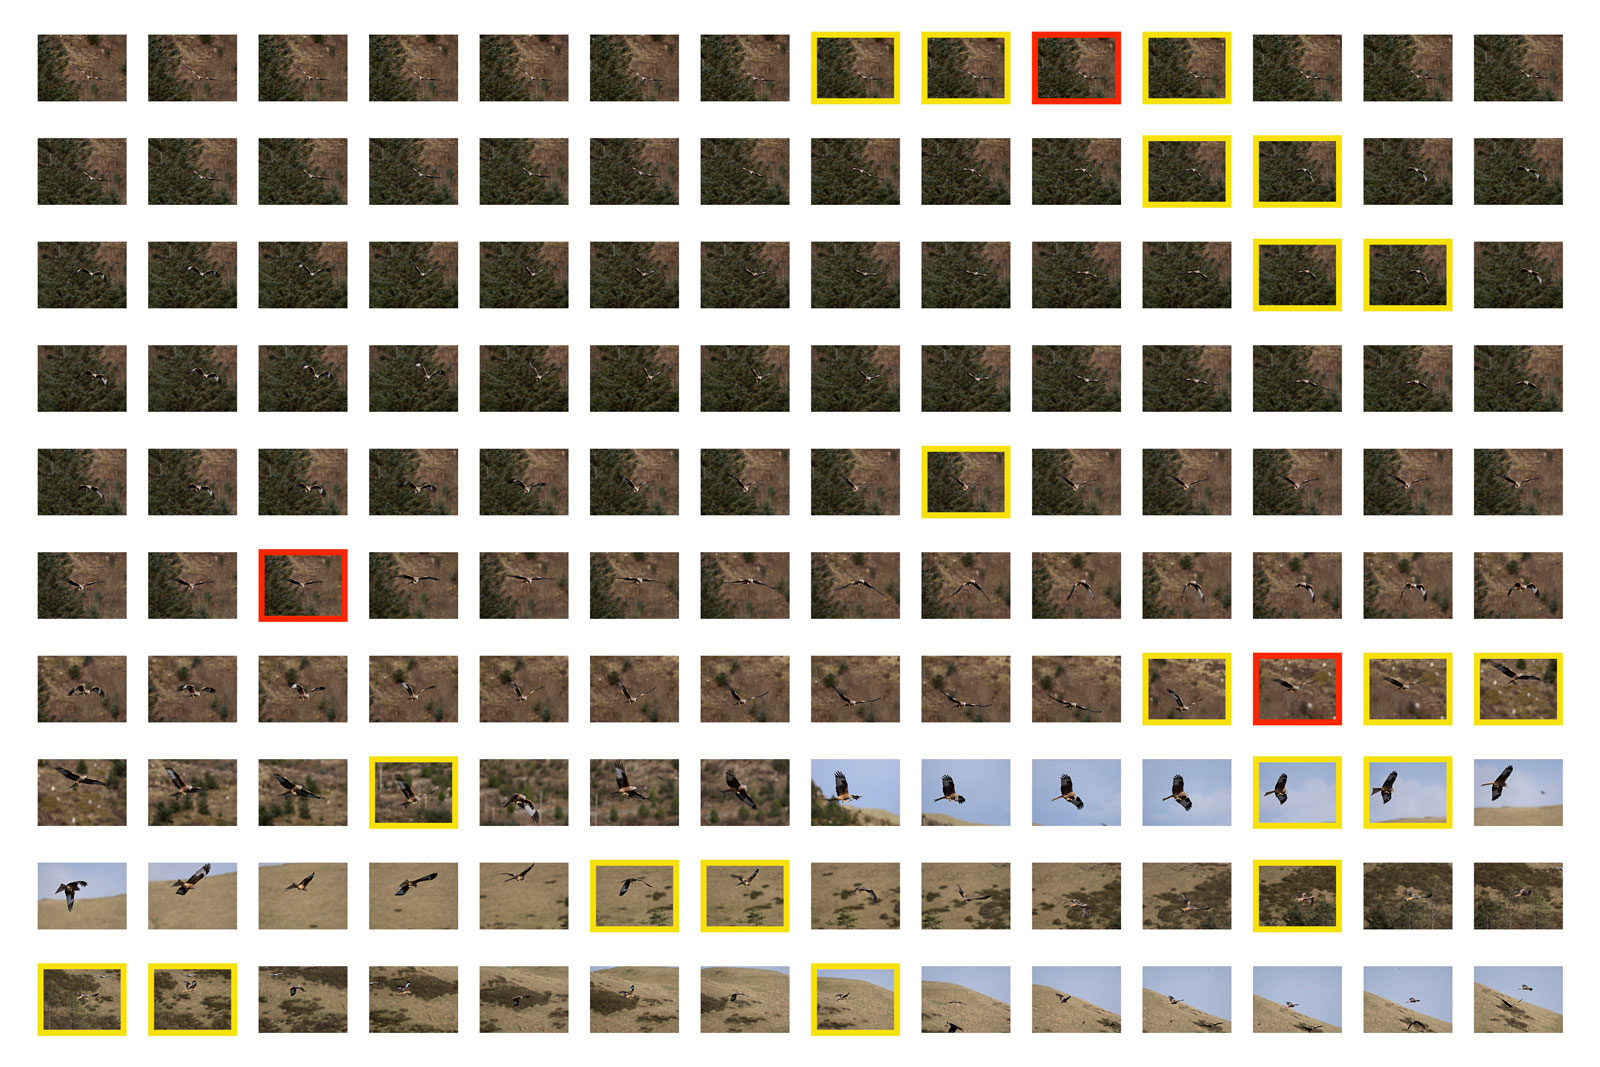
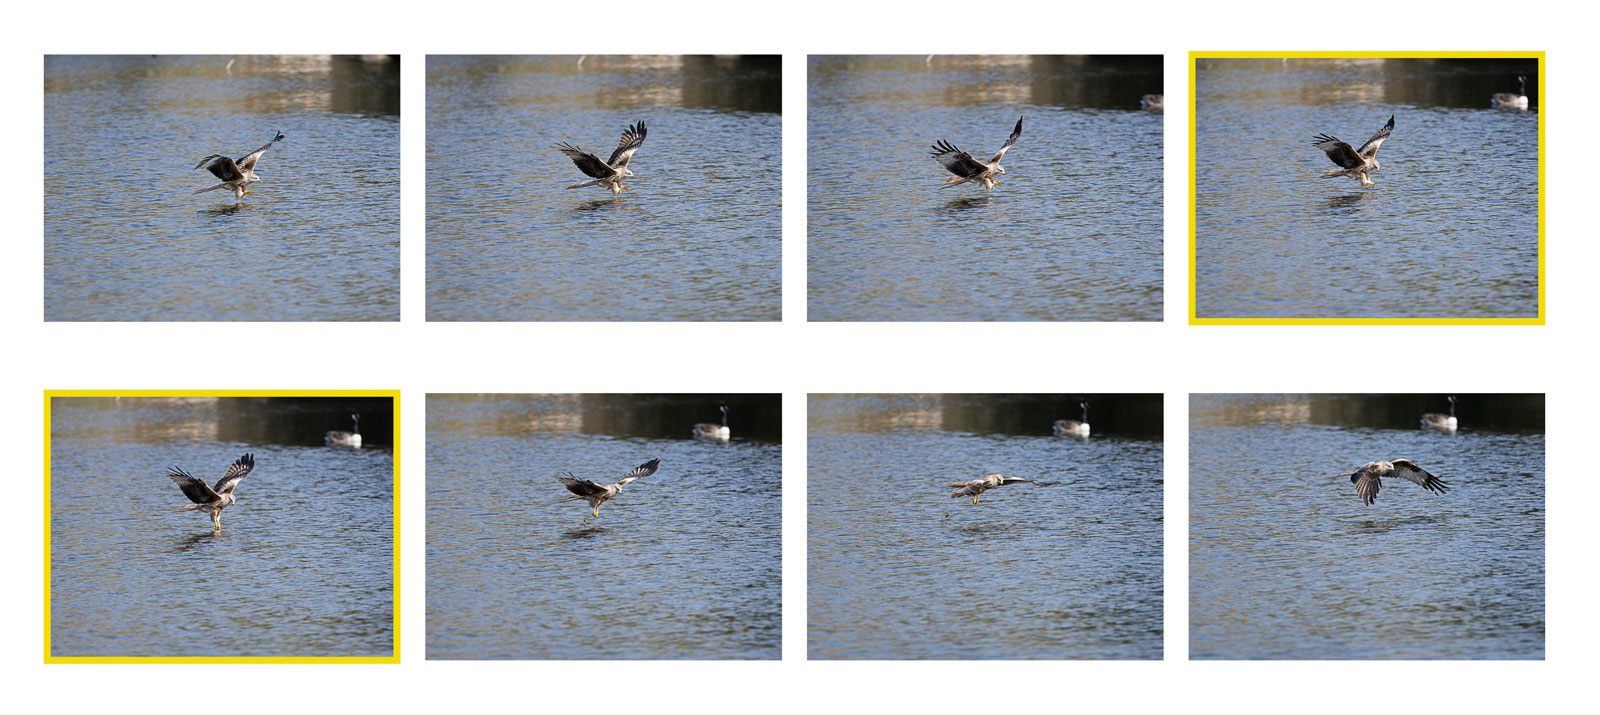
Red means out of focus, yellow means slightly soft focus.
Only three images are out of focus, and in each case it only took a few frames to go back to perfect focus.
Without bird detection, and with C-AF + Tracking especially, you can expect 20 or more out of focus shots in the same sequence. The camera just can’t re-focus properly if something goes wrong. It’s fine with a plain background (sky), but unreliable as soon as the surroundings become more complex.
There’s room for improvement
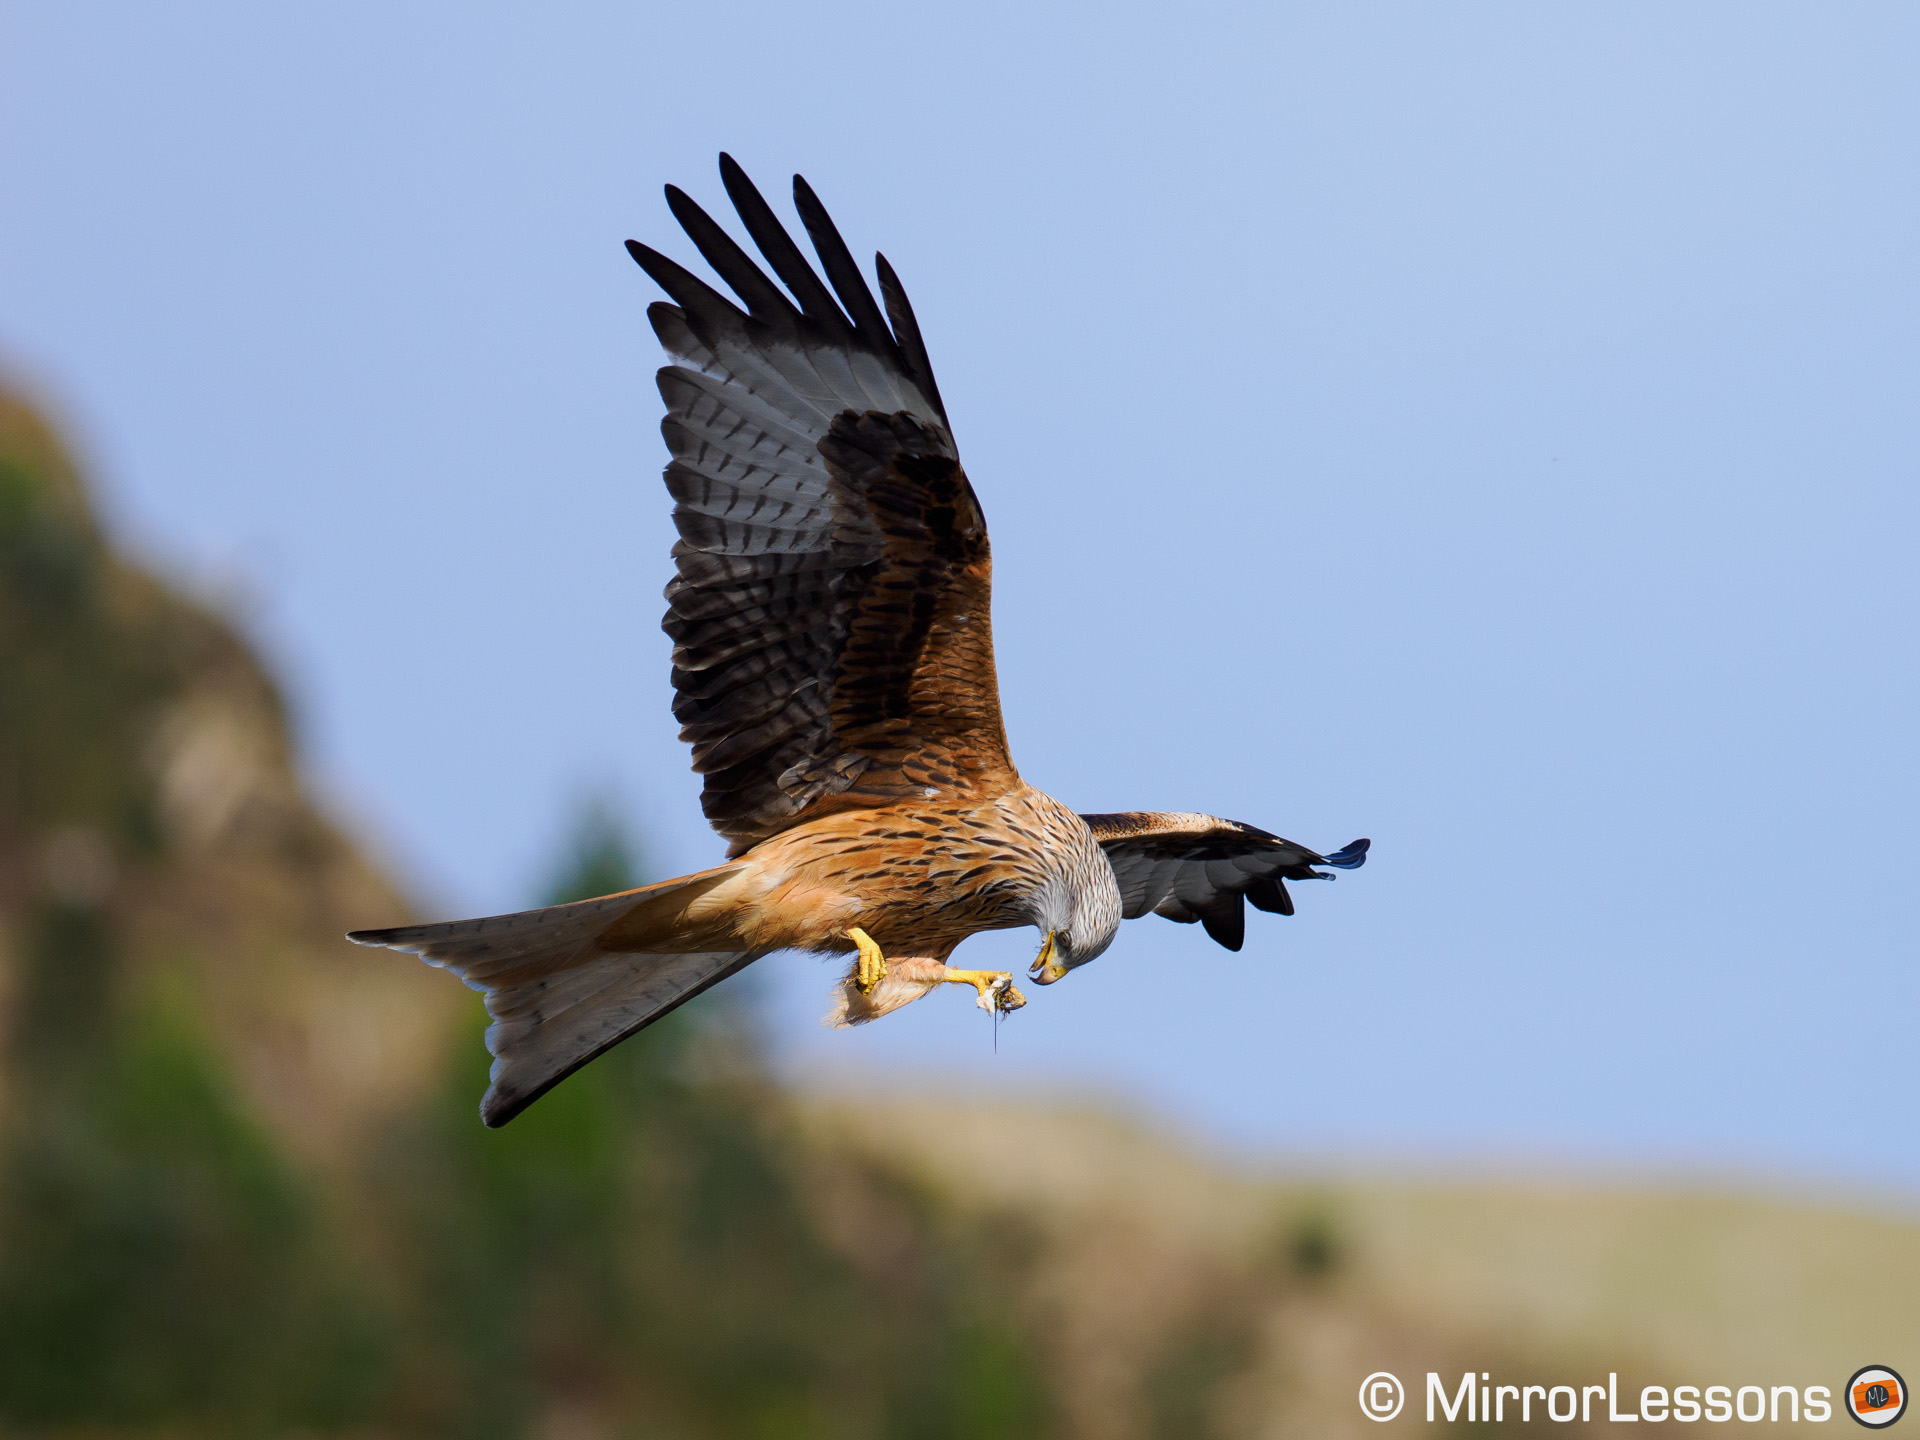
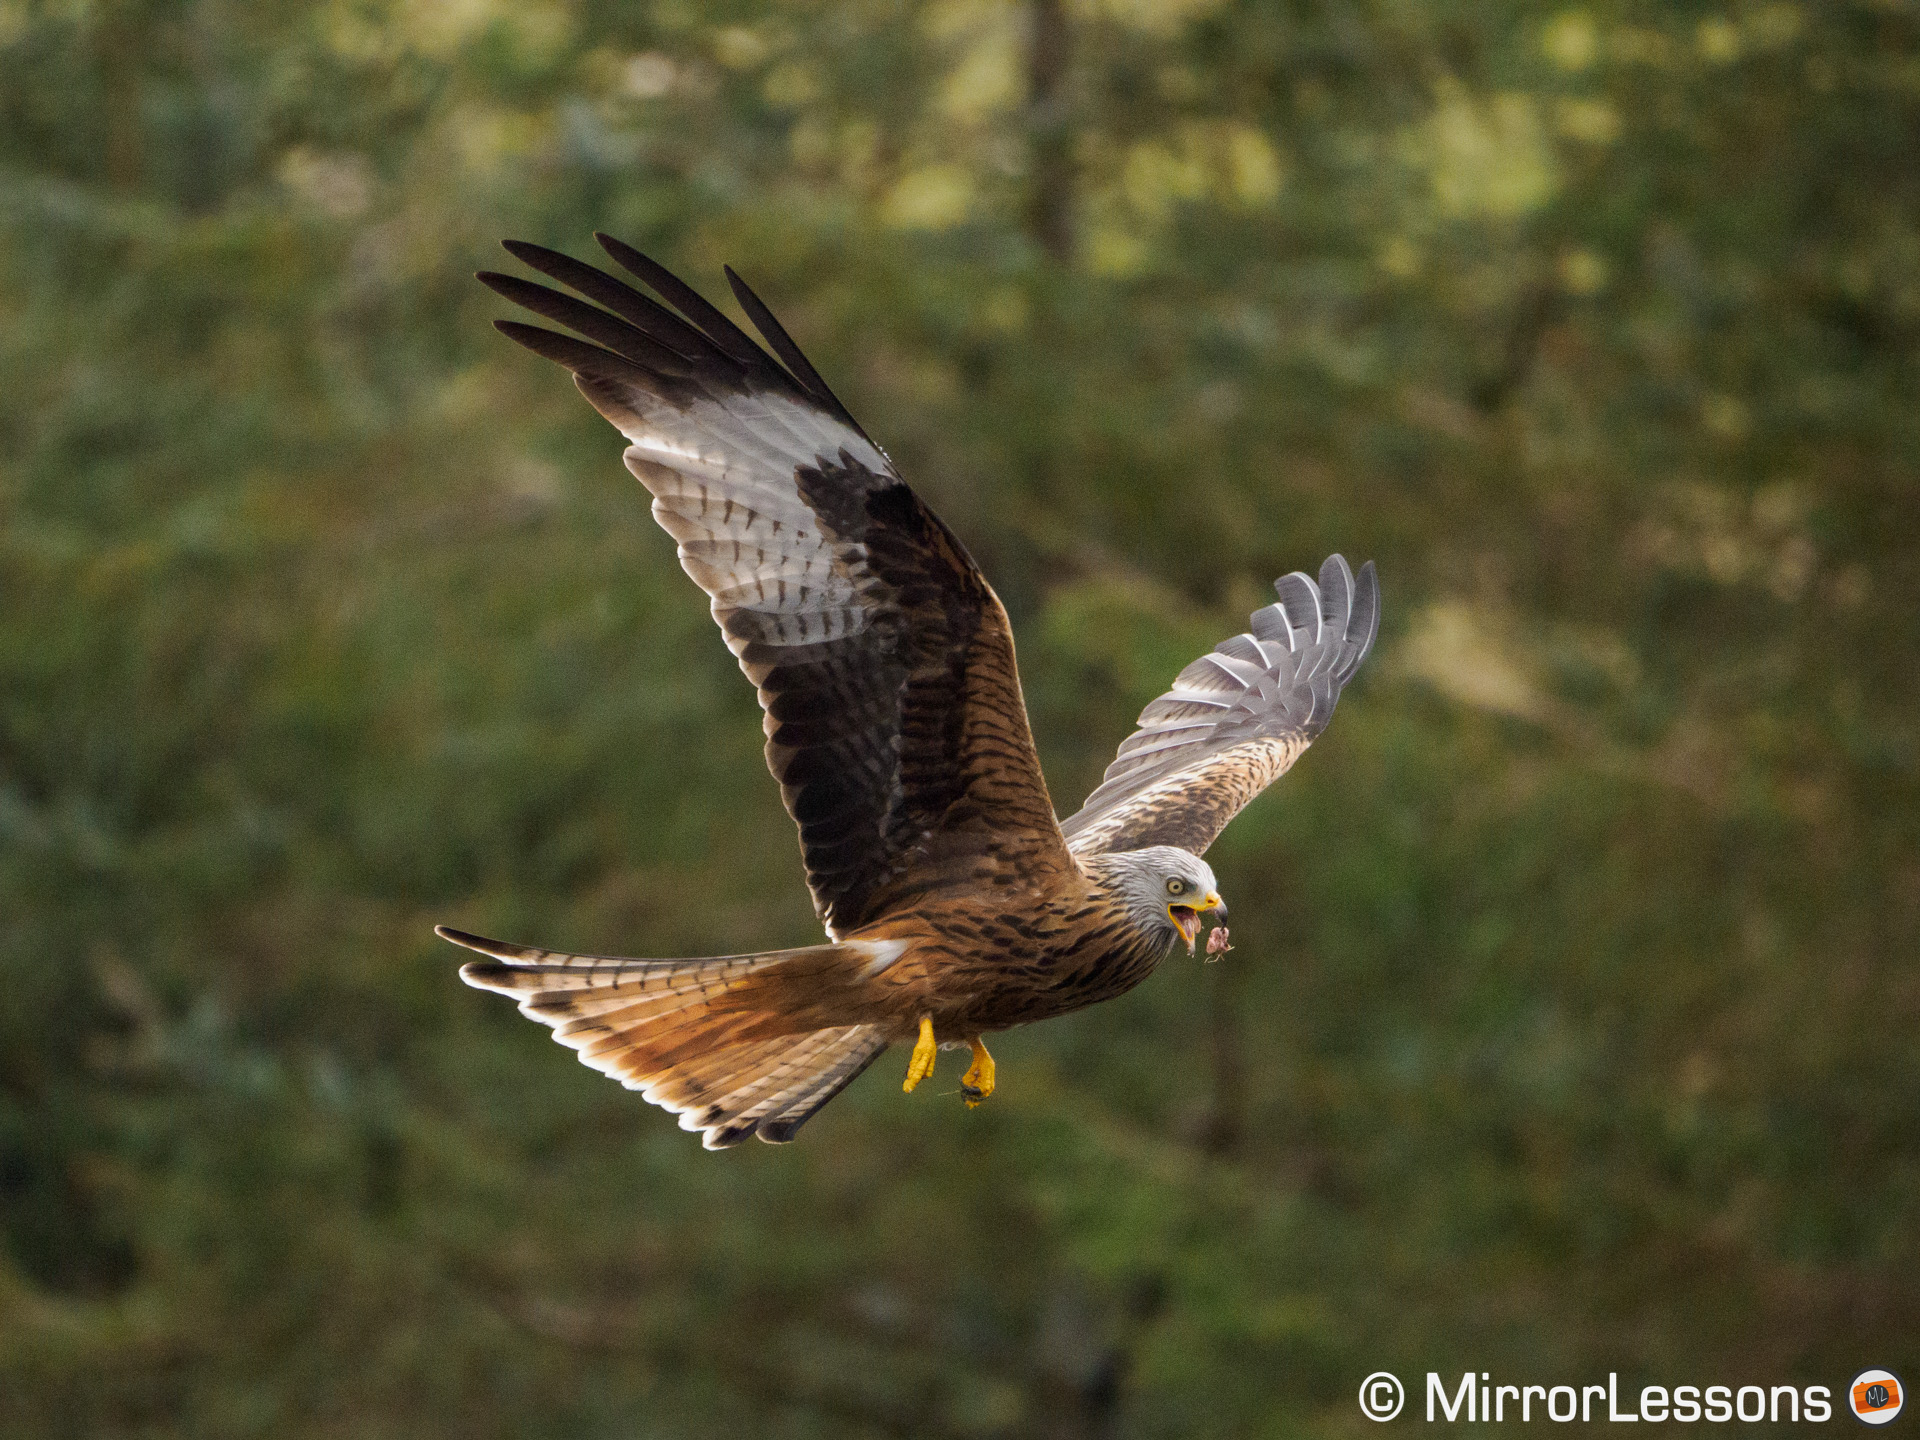
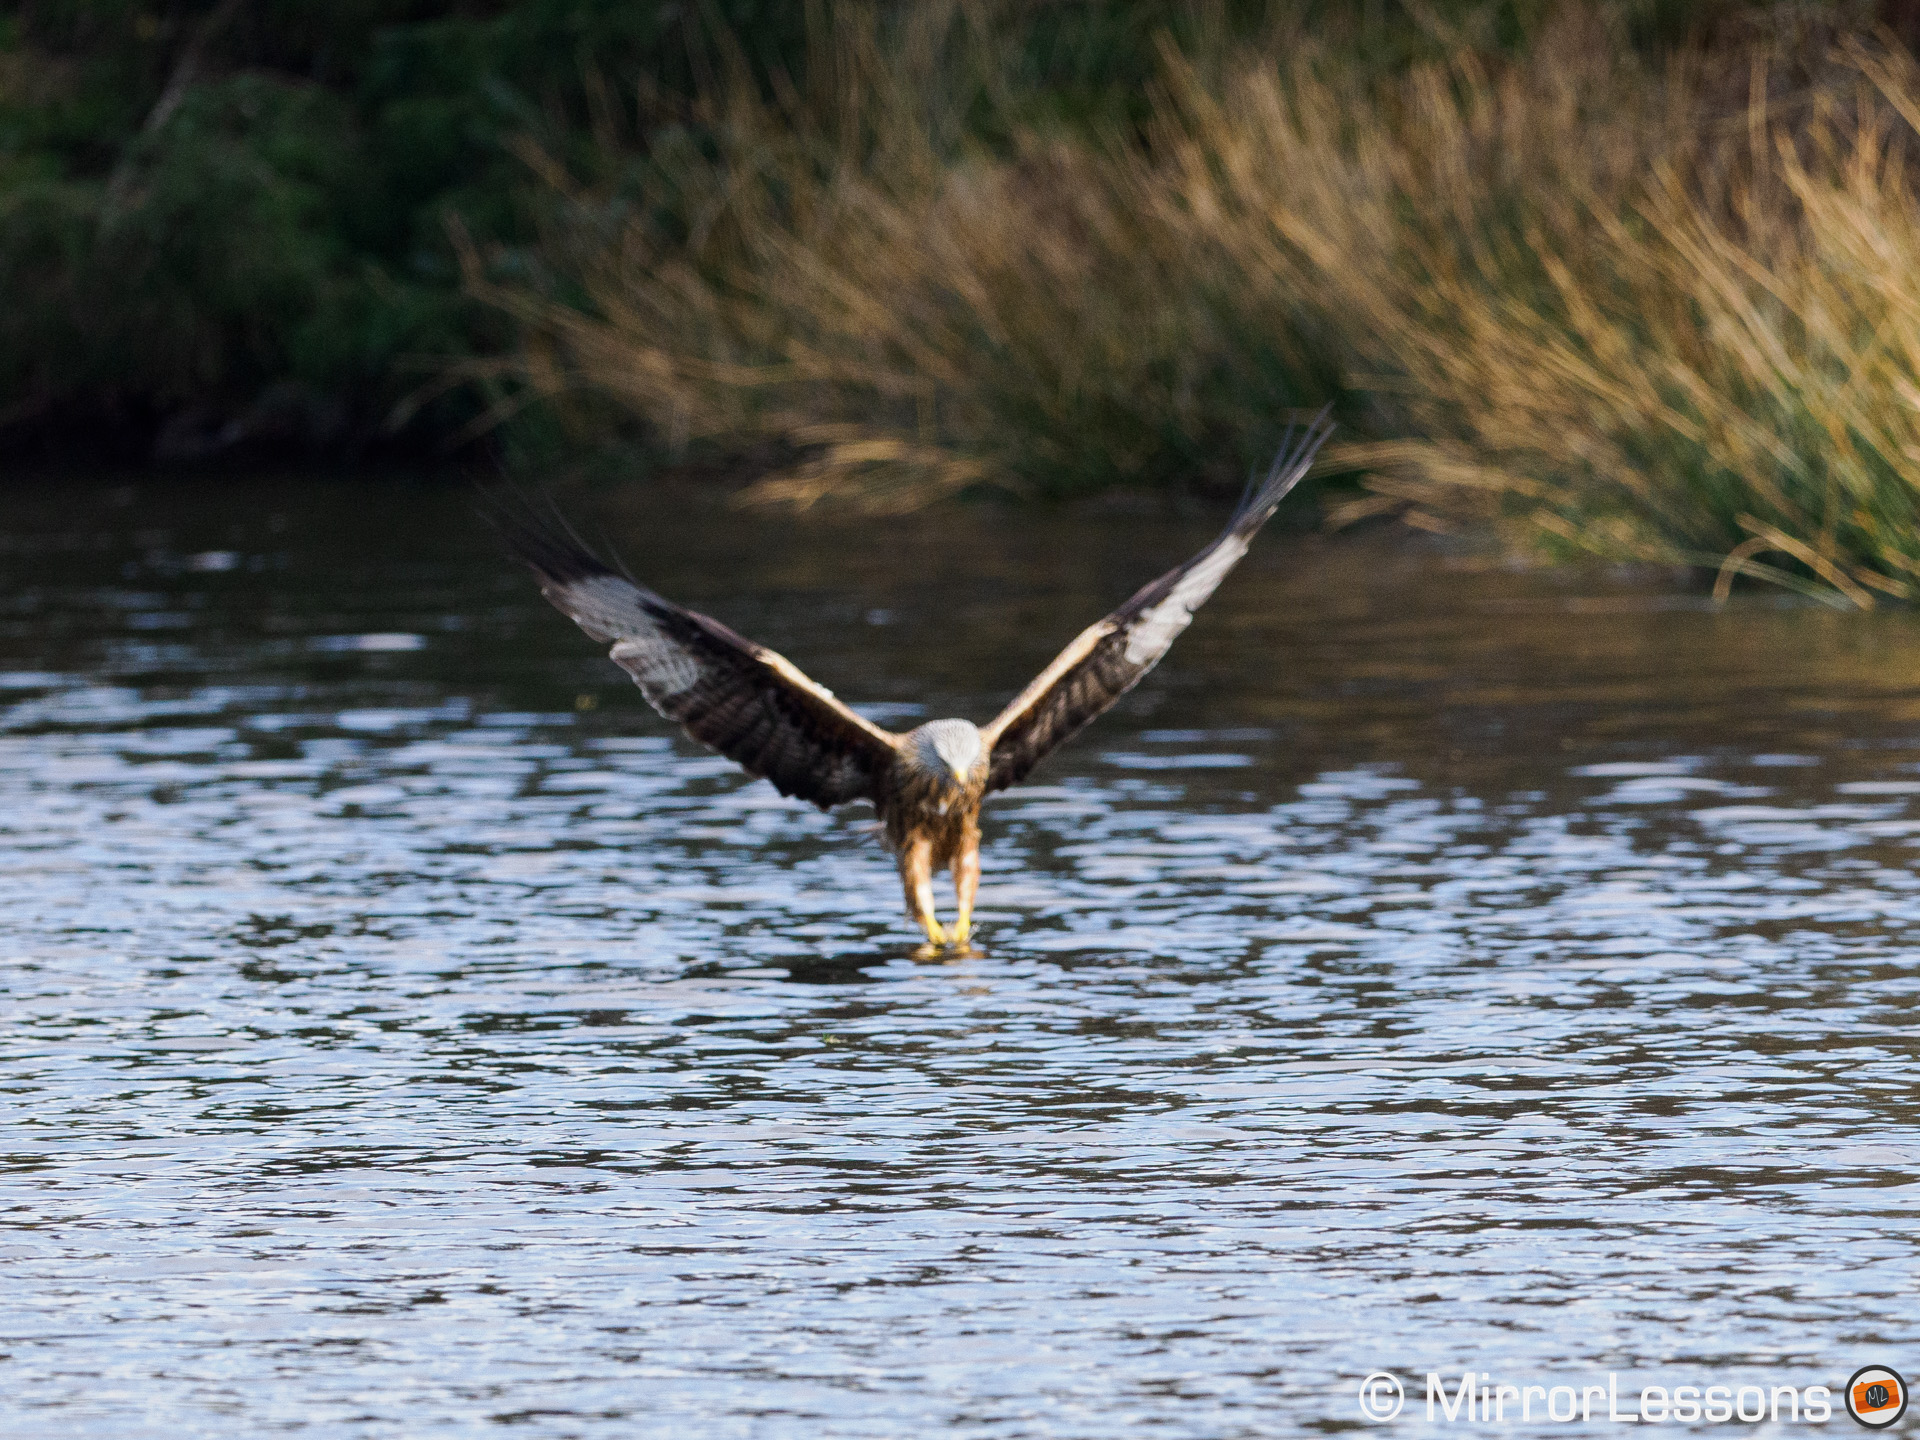
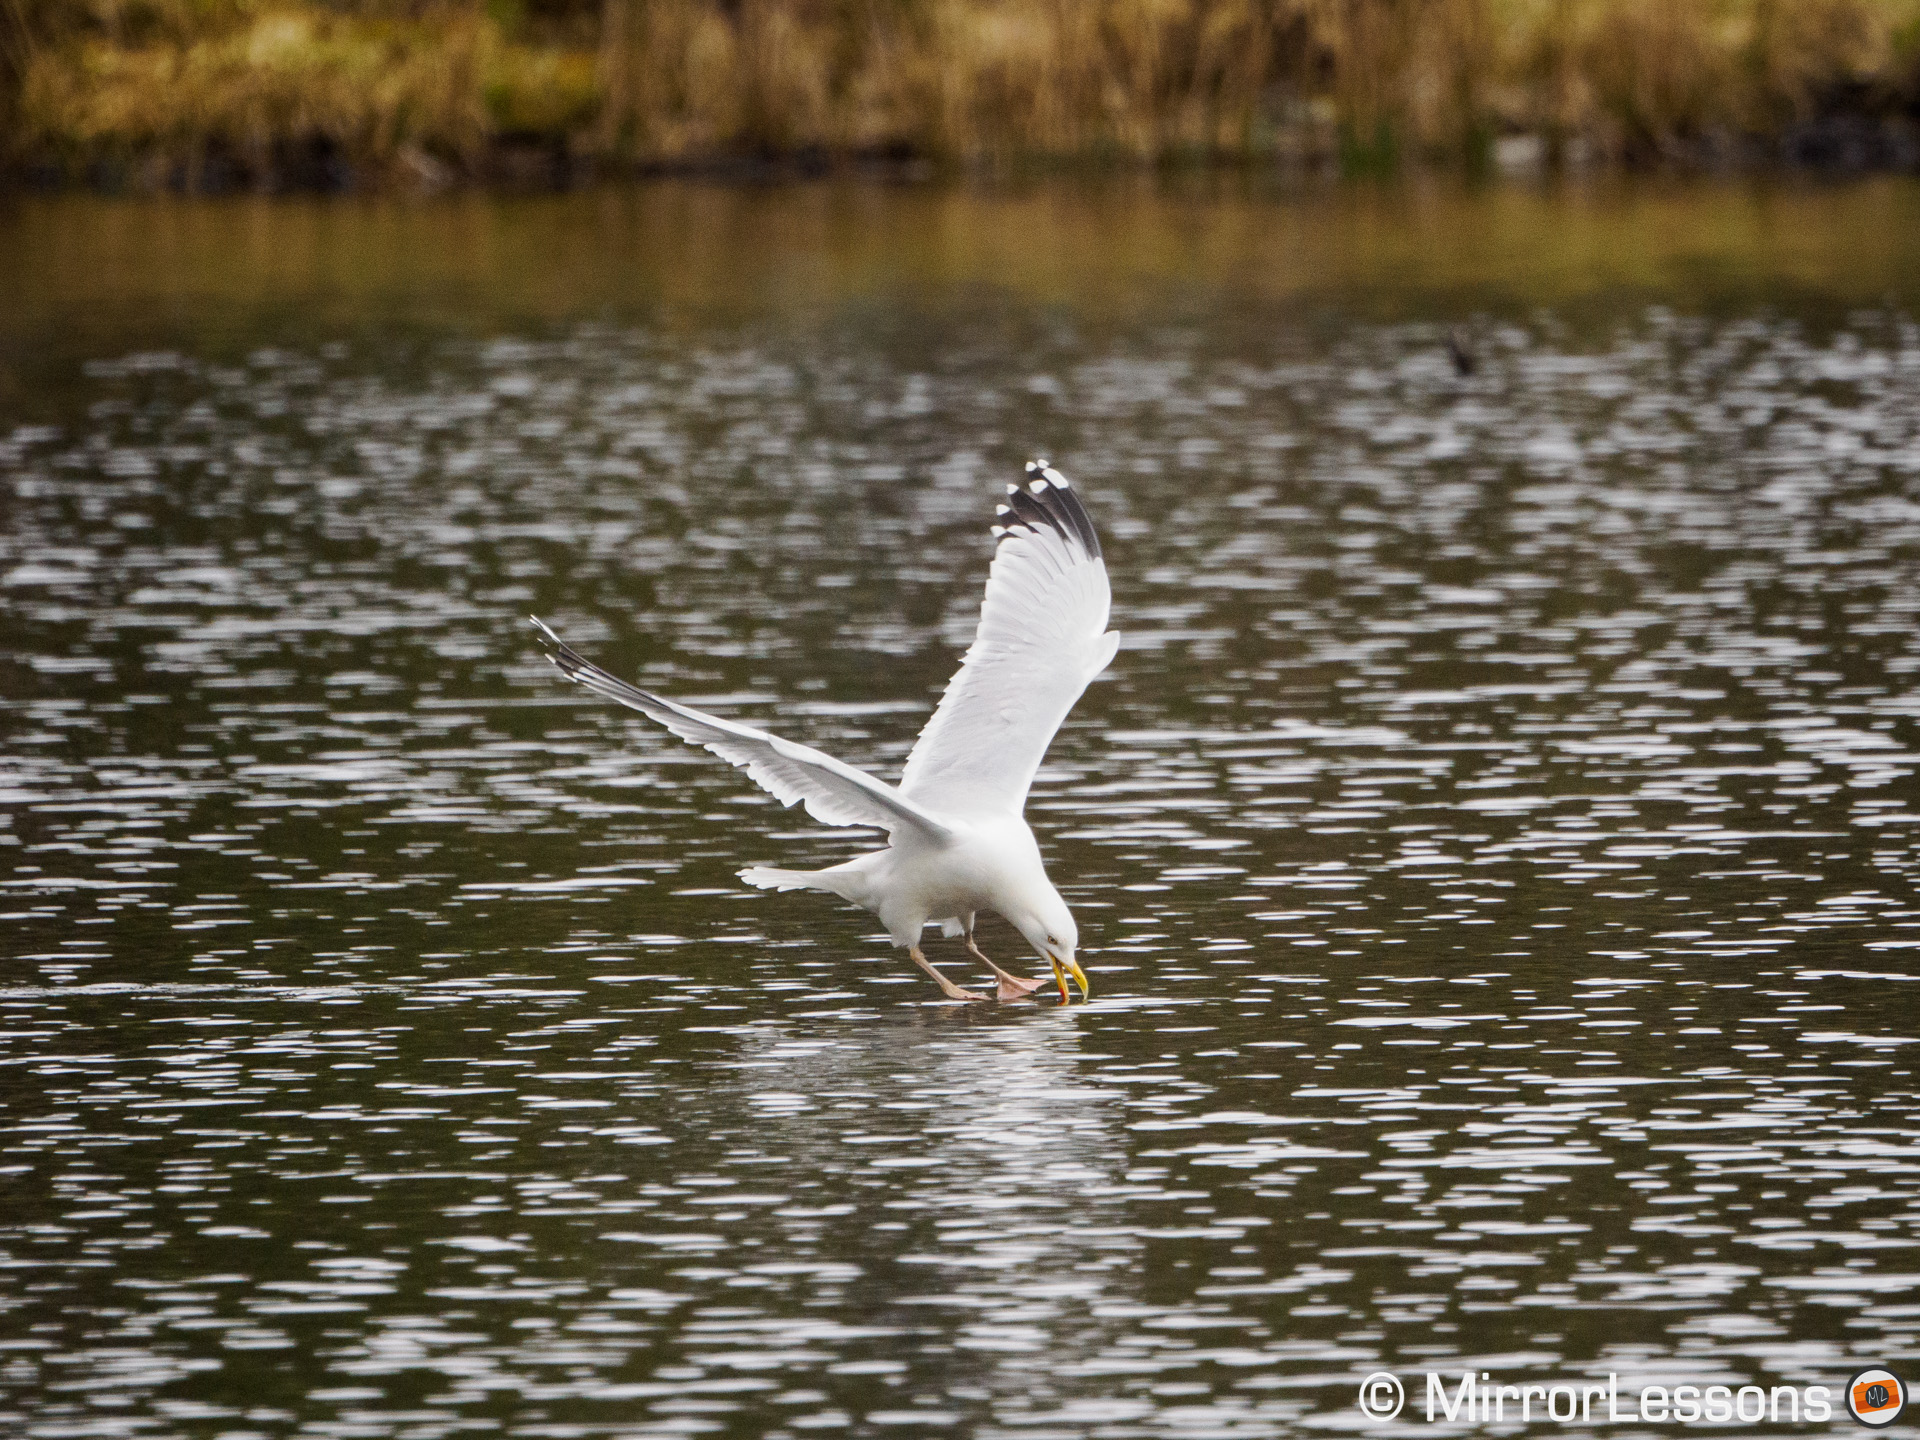
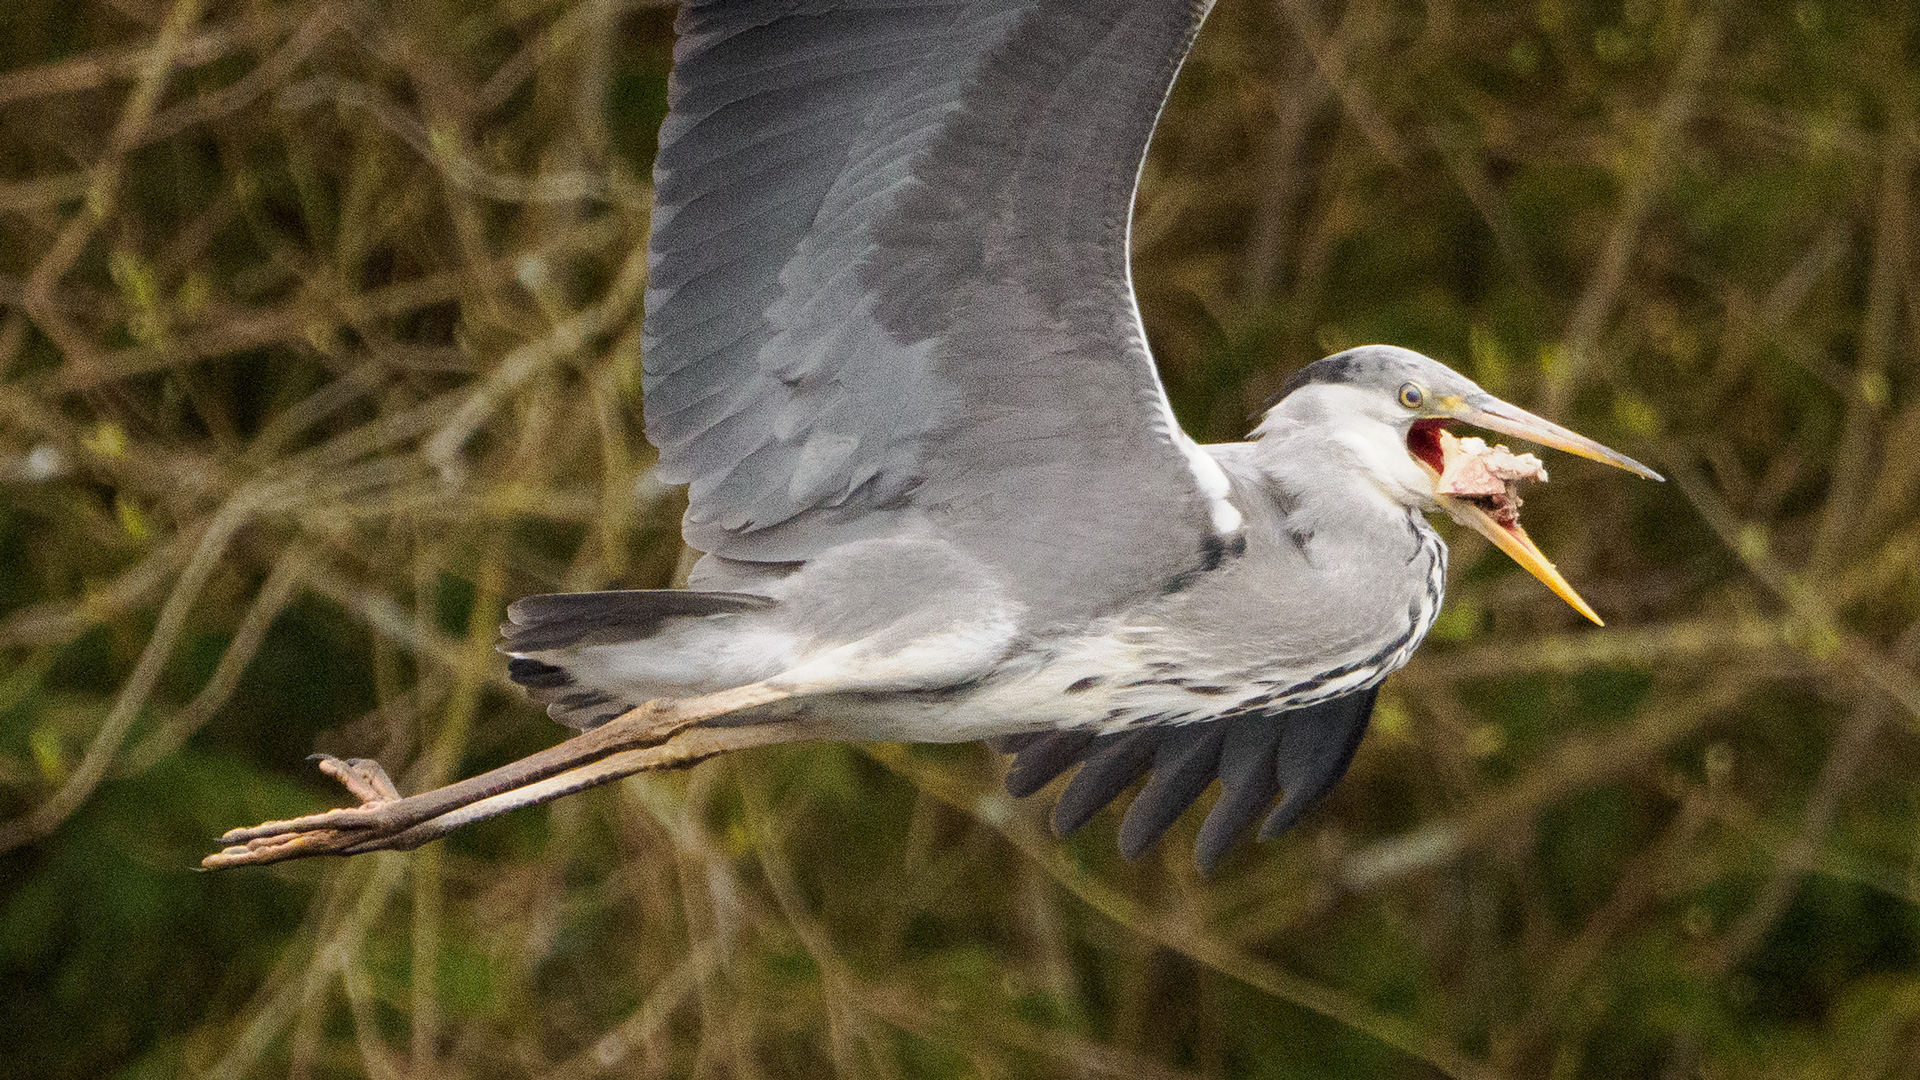
Overall, the OM-1 is a great upgrade but there are still a few occasions when the camera doesn’t behave properly. For example, I struggled to get a perfect sequence when the bird came down to the water or grass to grab a piece of meat.
What’s annoying is that it mis-focused at the most important moment, when the bird was grabbing the food with its claws. I have several sequences with five or more images out of focus around that precise instant.
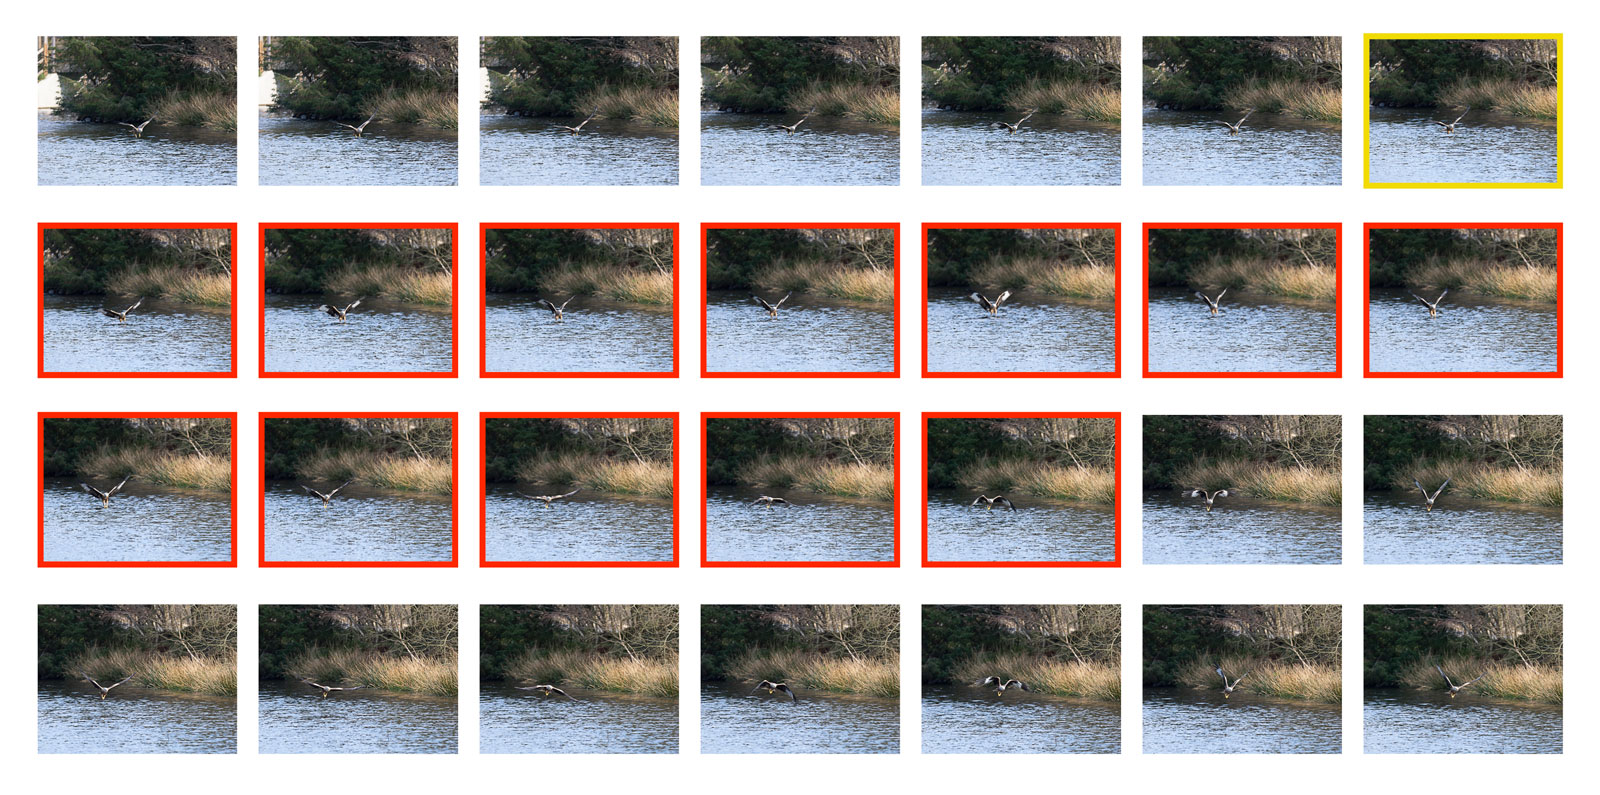
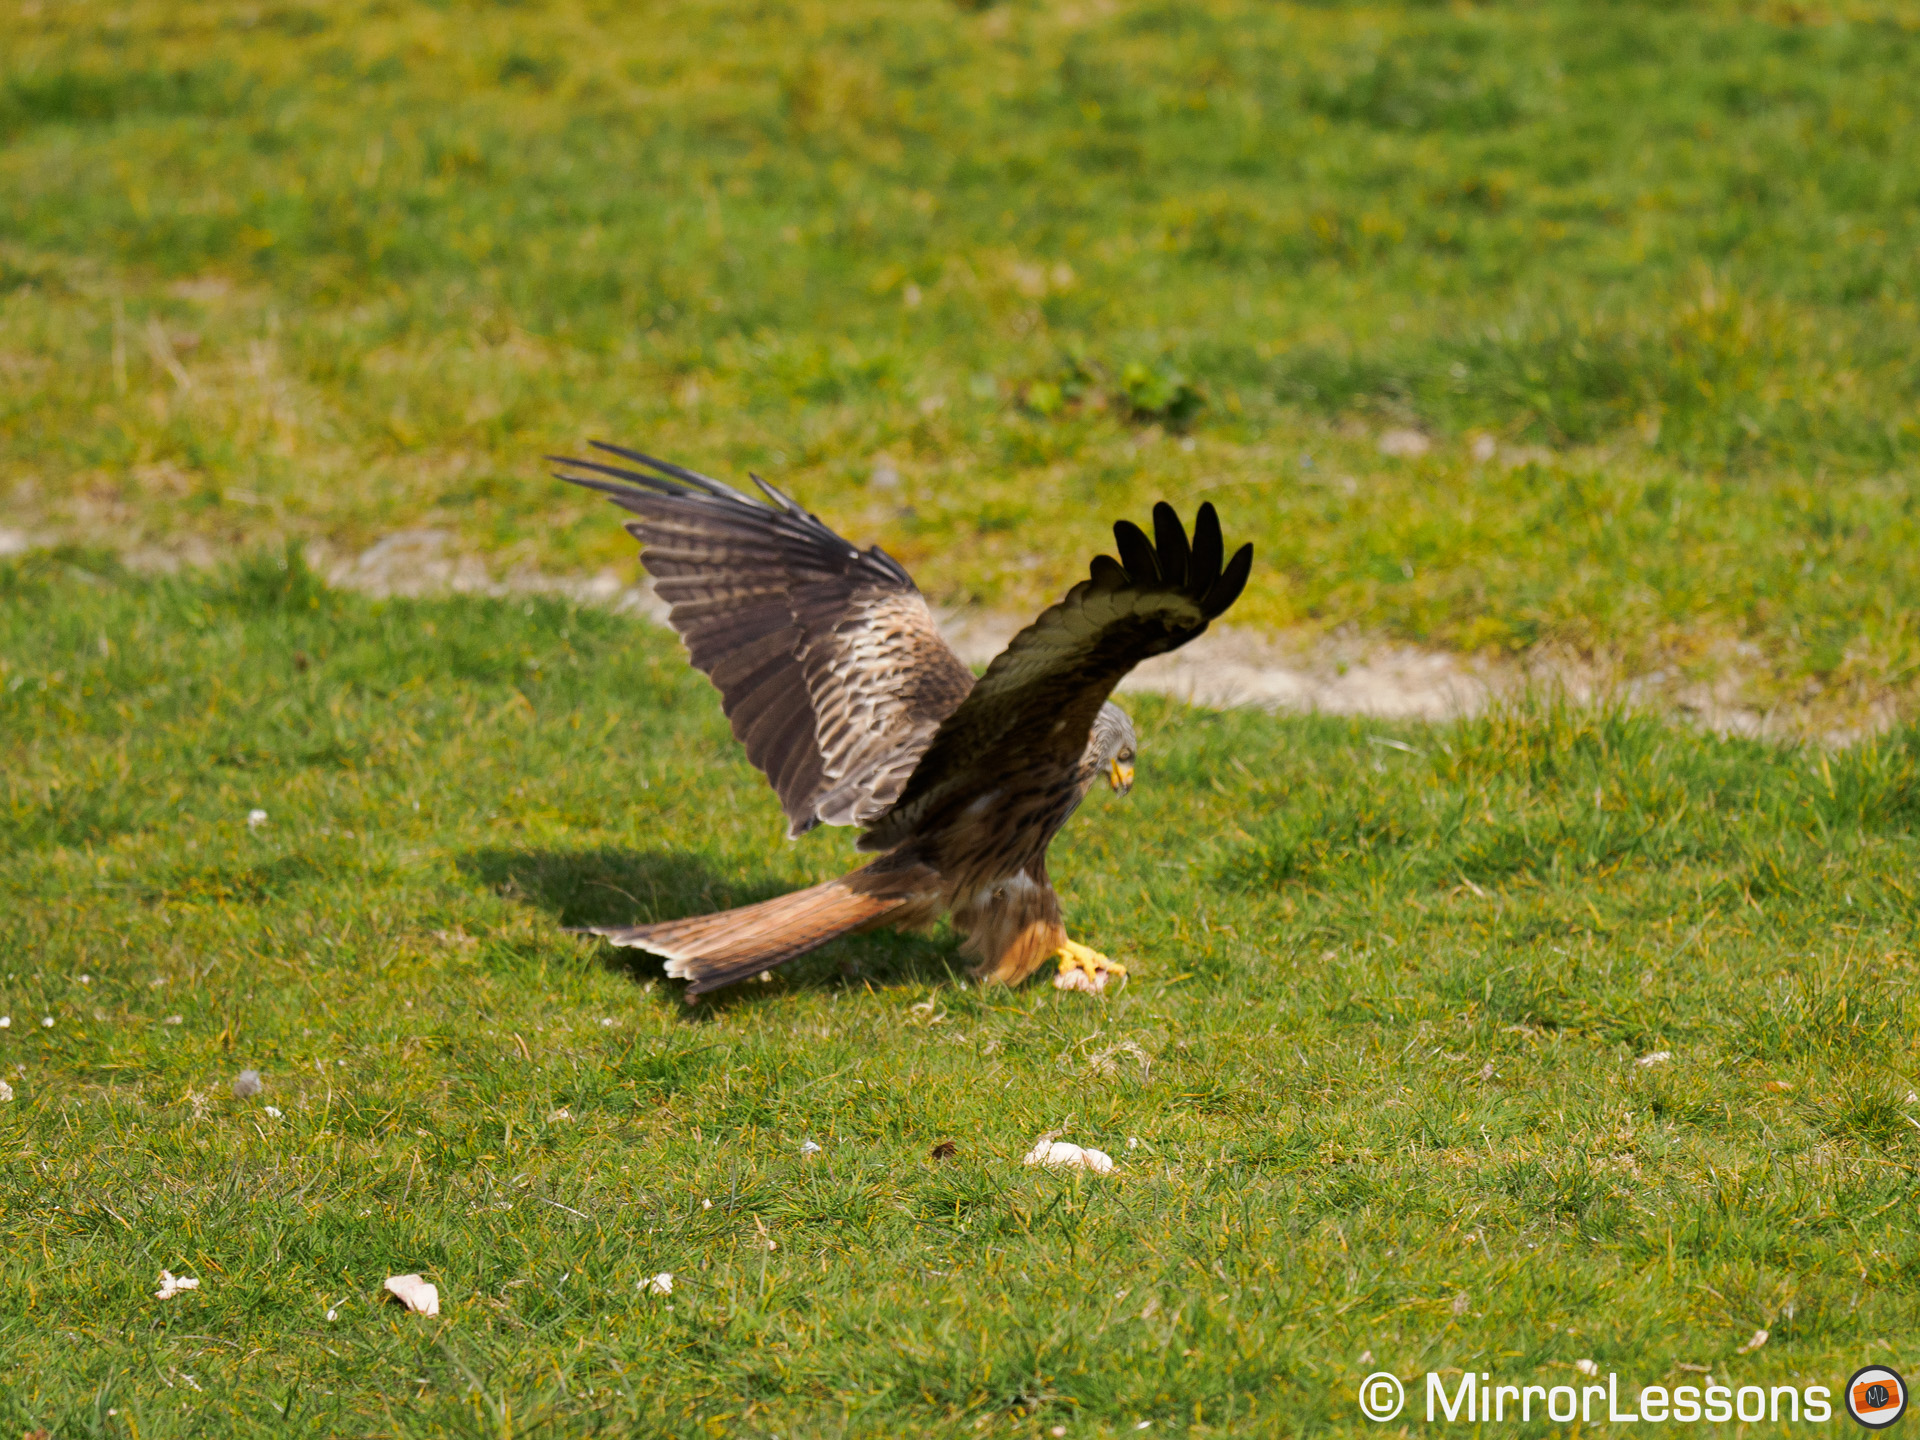
Other sequences are better but still, the frame that matters the most is the one that is blurred or slightly soft most of the time.
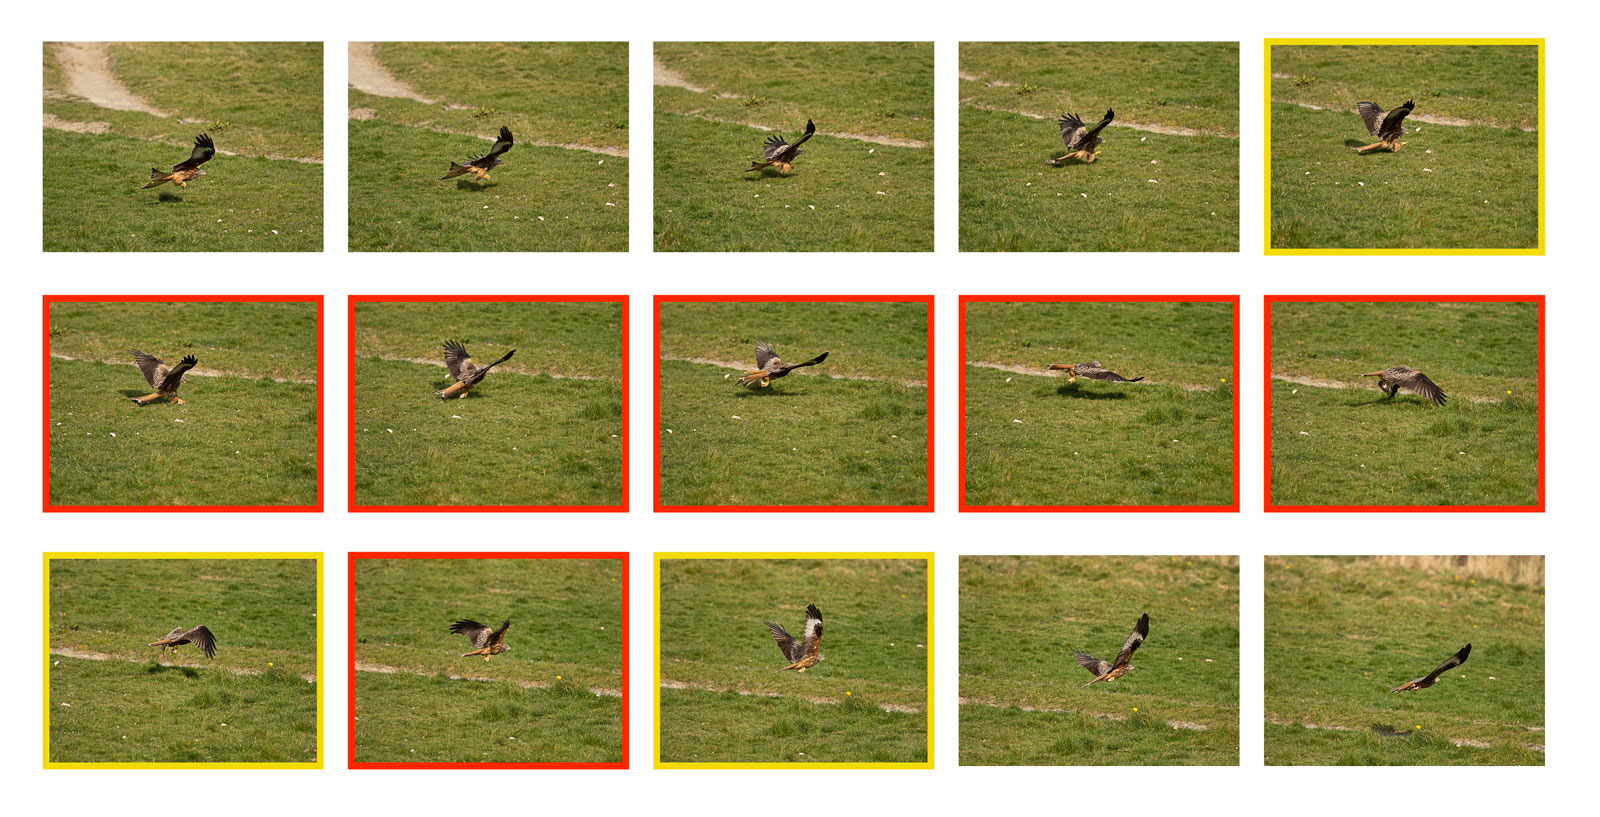
While finishing this article, I went to photograph a local road race and again the OM-1 liked to prioritised the tarmac in the foreground rather than biker making the turn. This was with Motorsport Subject Detection activated.
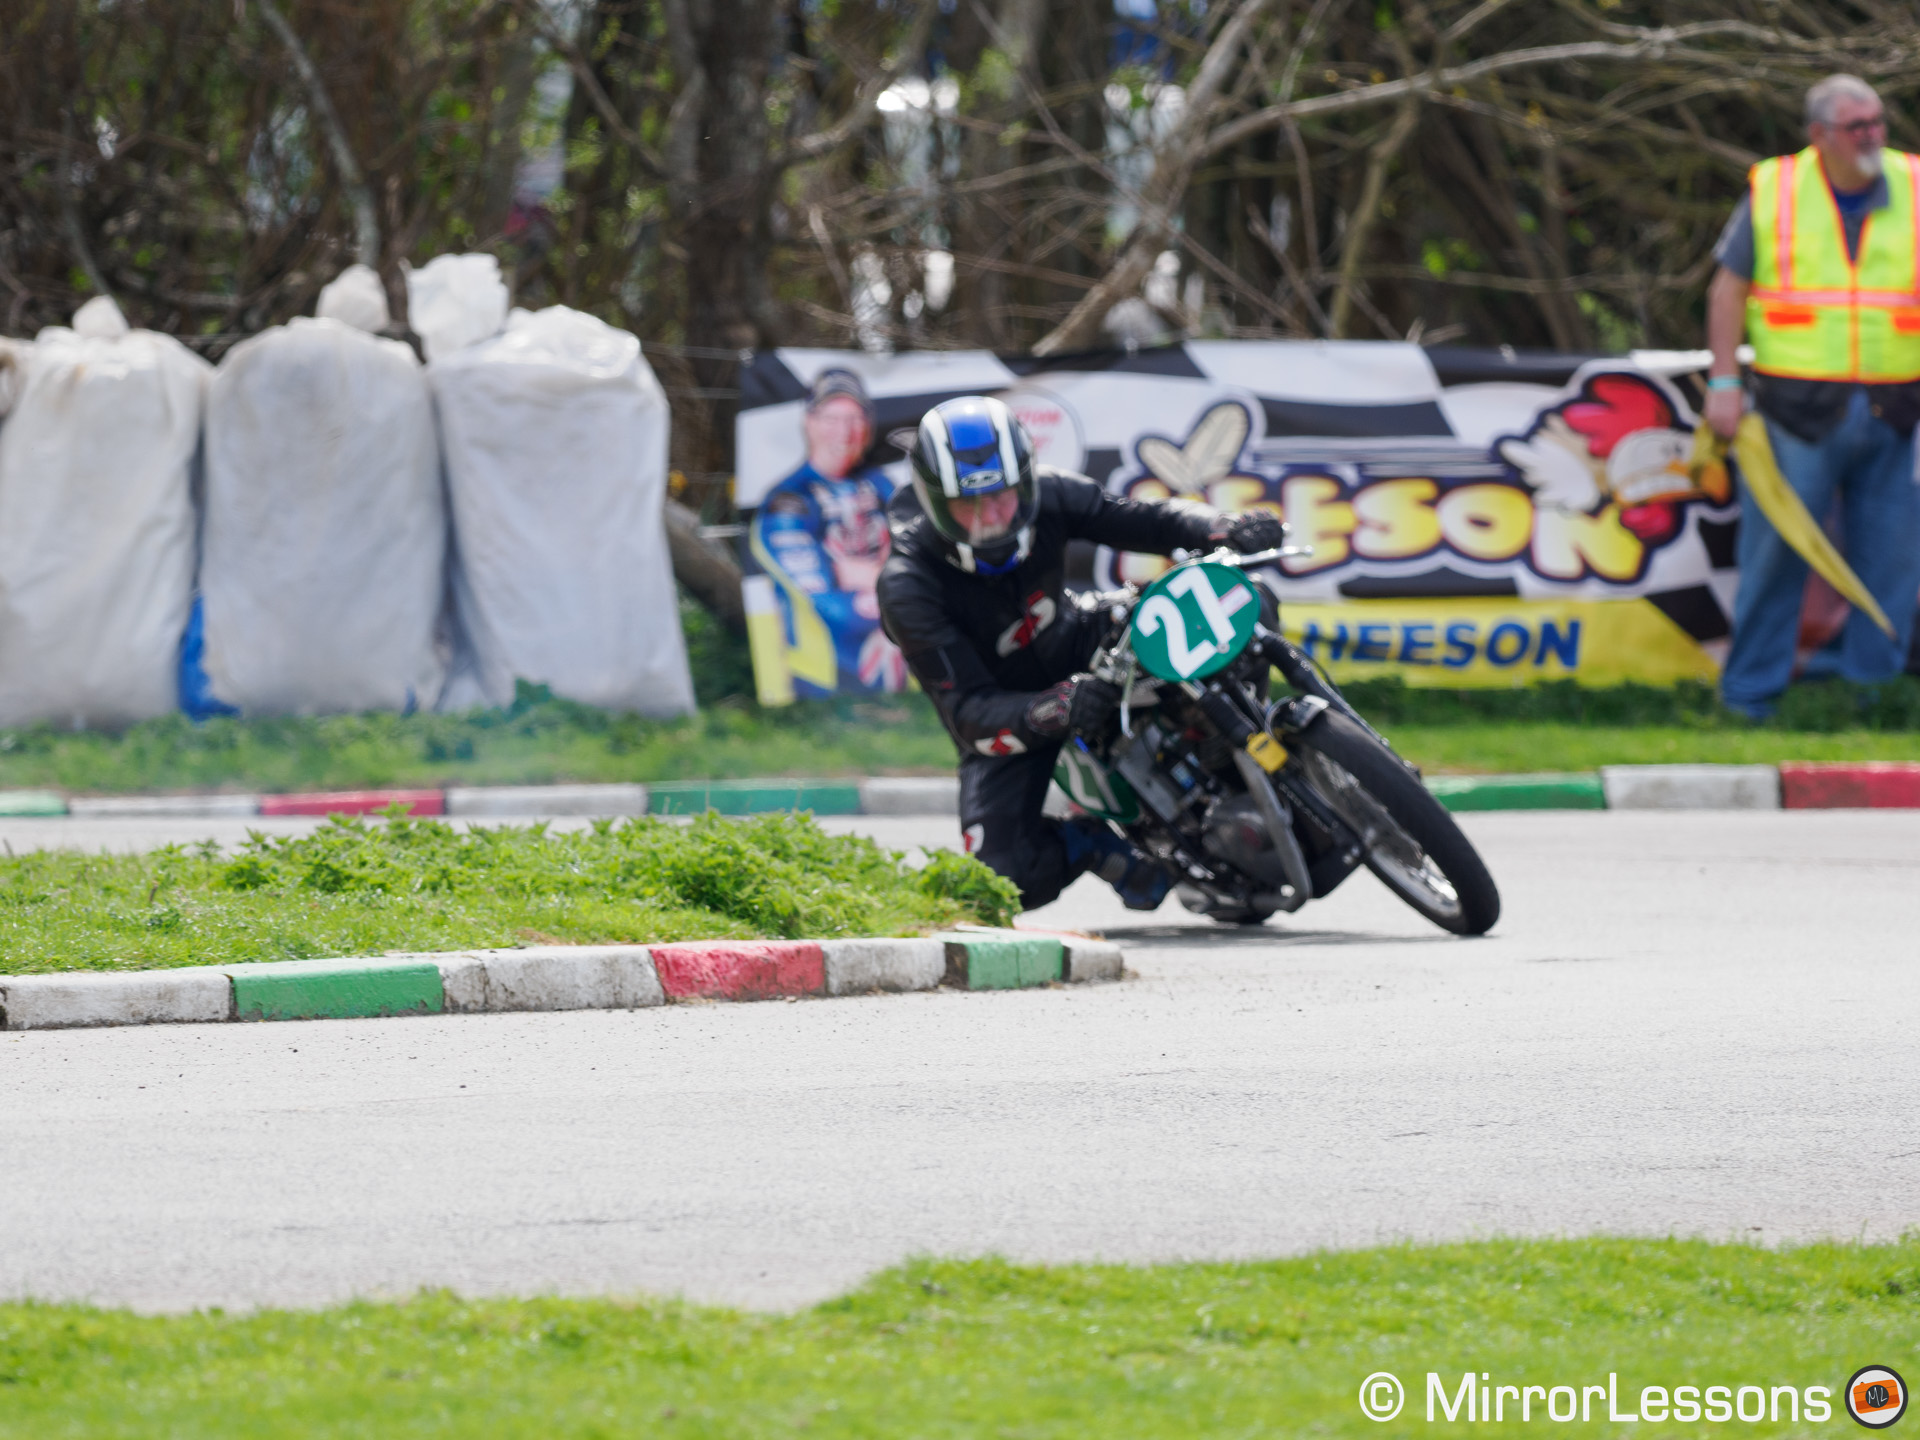
Tarmac in focus, biker out ot focus.
Two workarounds to avoid this (or reduce the chances at least) is to use the Small AF Target. That solved the problem with the bike race. With the birds, I also tried a Custom Target with an horizontal shape, offset by a few steps from the centre. It worked with some sequences, but not all of them.
Hopefully, with the processing speed of the camera and the advanced algorithm the camera has, OM will be able to release firmware updates to boost the performance further and correct the imperfections.
Image Quality
OM Digital Solution talked about a one stop improvement in dynamic range, and a two stop improvement to the ISO. Furthermore, they said that the difference with 35mm format sensors was greatly reduced.
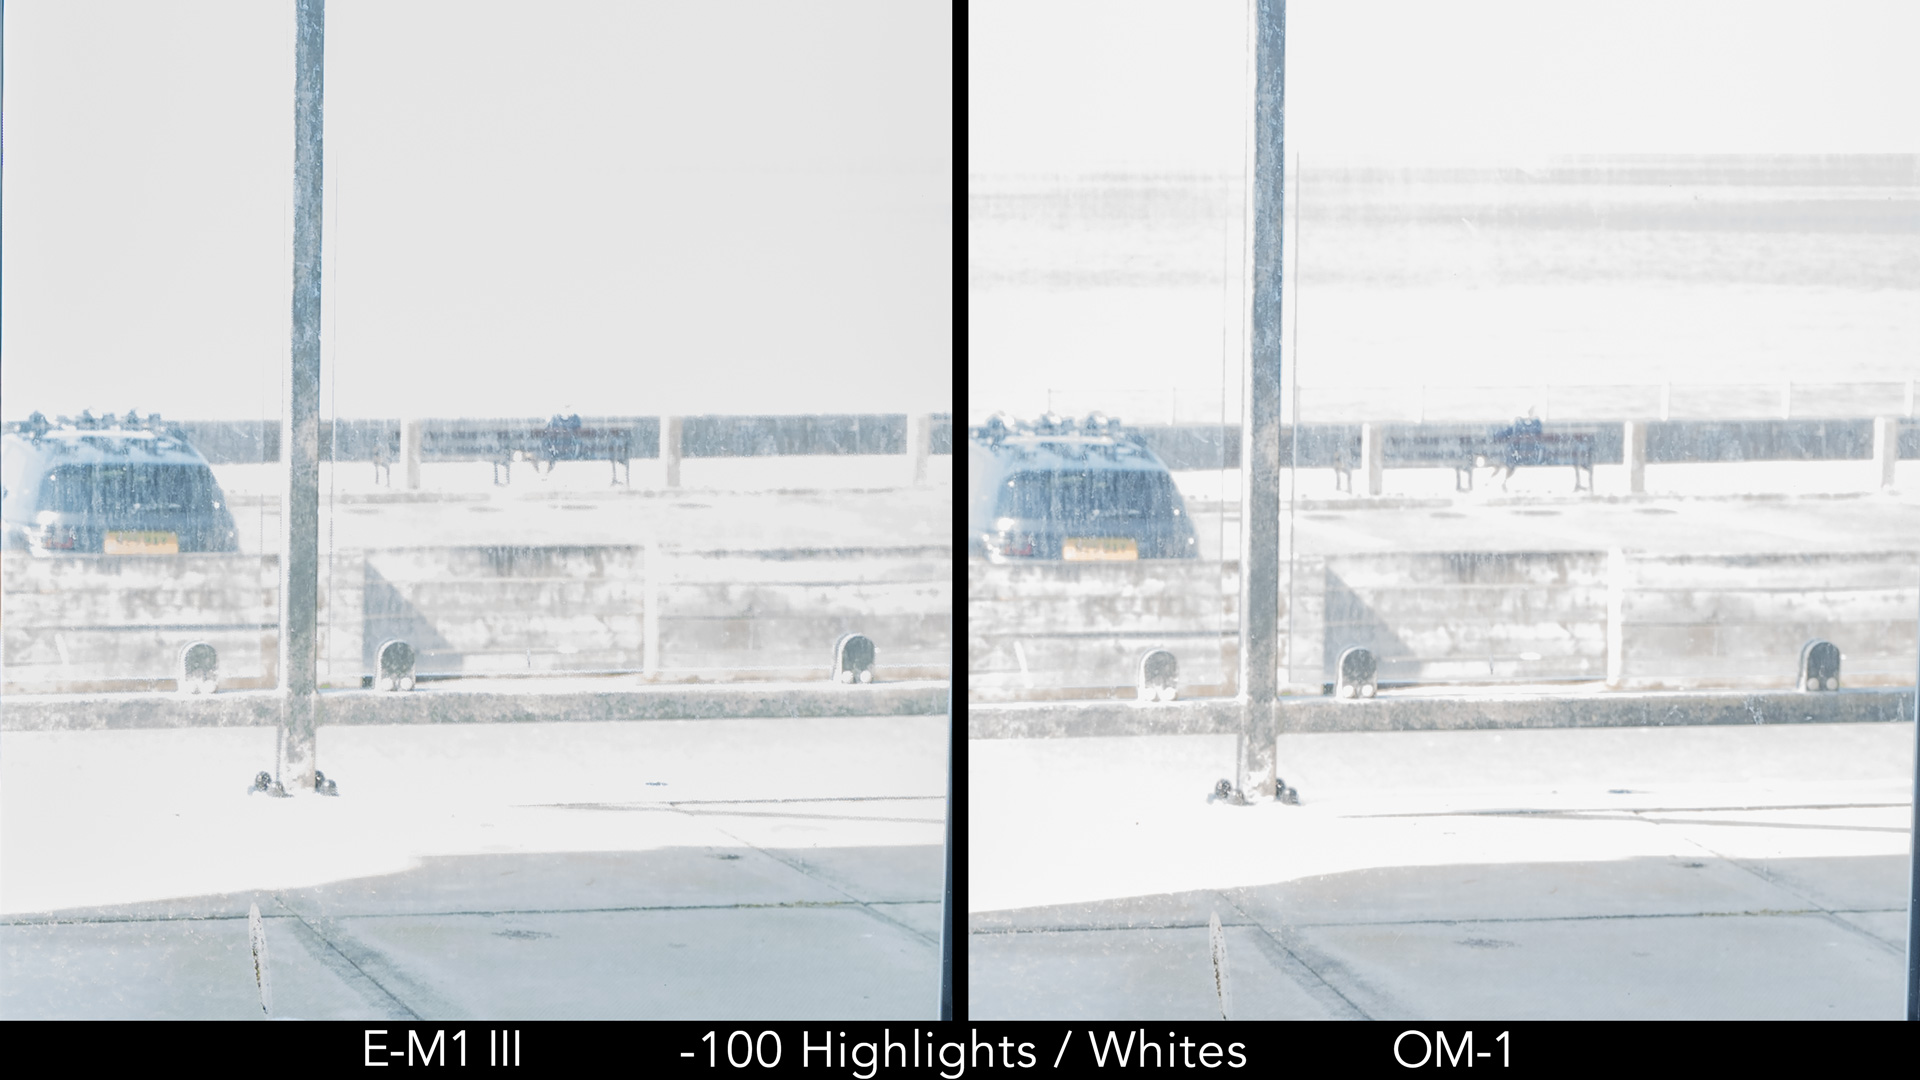
My dynamic range test below doesn’t back up these claims unfortunately. As you can see, the amount of shadow recovery is roughly the same between the OM-1 and its predecessor, the E-M1 III, and so is the amount of noise generated as a consequence. The OM-1 also shows a bit of purple colour cast.

In the highlight however, the OM-1 does a bit better and you can see in the example below, the camera managed to preserve a small amount of details of the sea outside, unlike the mark III model.
The OM-1 has a wider normal range than the E-M1 III, and higher values with the extended ISO.
Camera
Normal range
Extended range
E-M1 III
200 – 6,400
64 – 25,600
OM-1
200 – 25,600
80 – 102,400
The two stop improvements is easily backed up by the official specs, however real world images don’t show exactly what one might expect.
At high ISO, the OM-1 noise is thinner and lower in quantity, but it is a small difference. More noticeable is the warmer look and the more vibrant colours produced by the new camera.
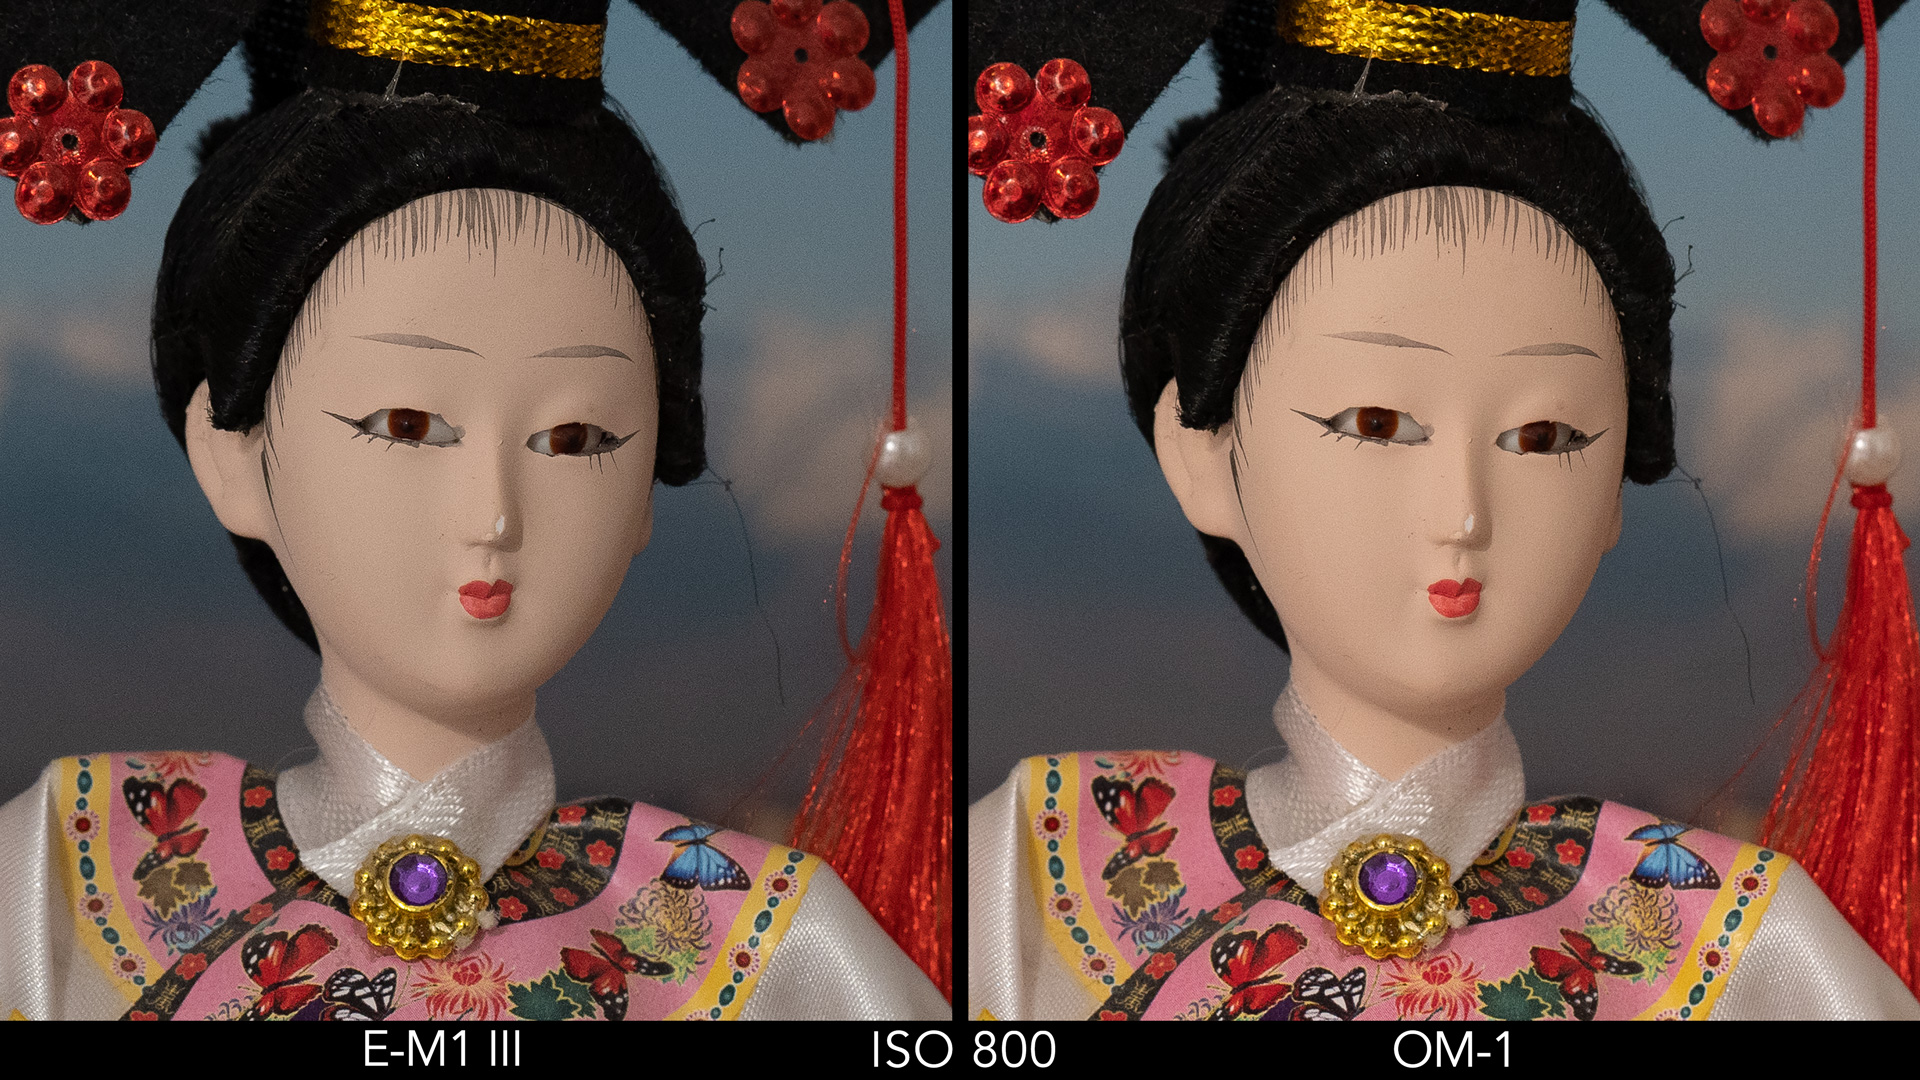


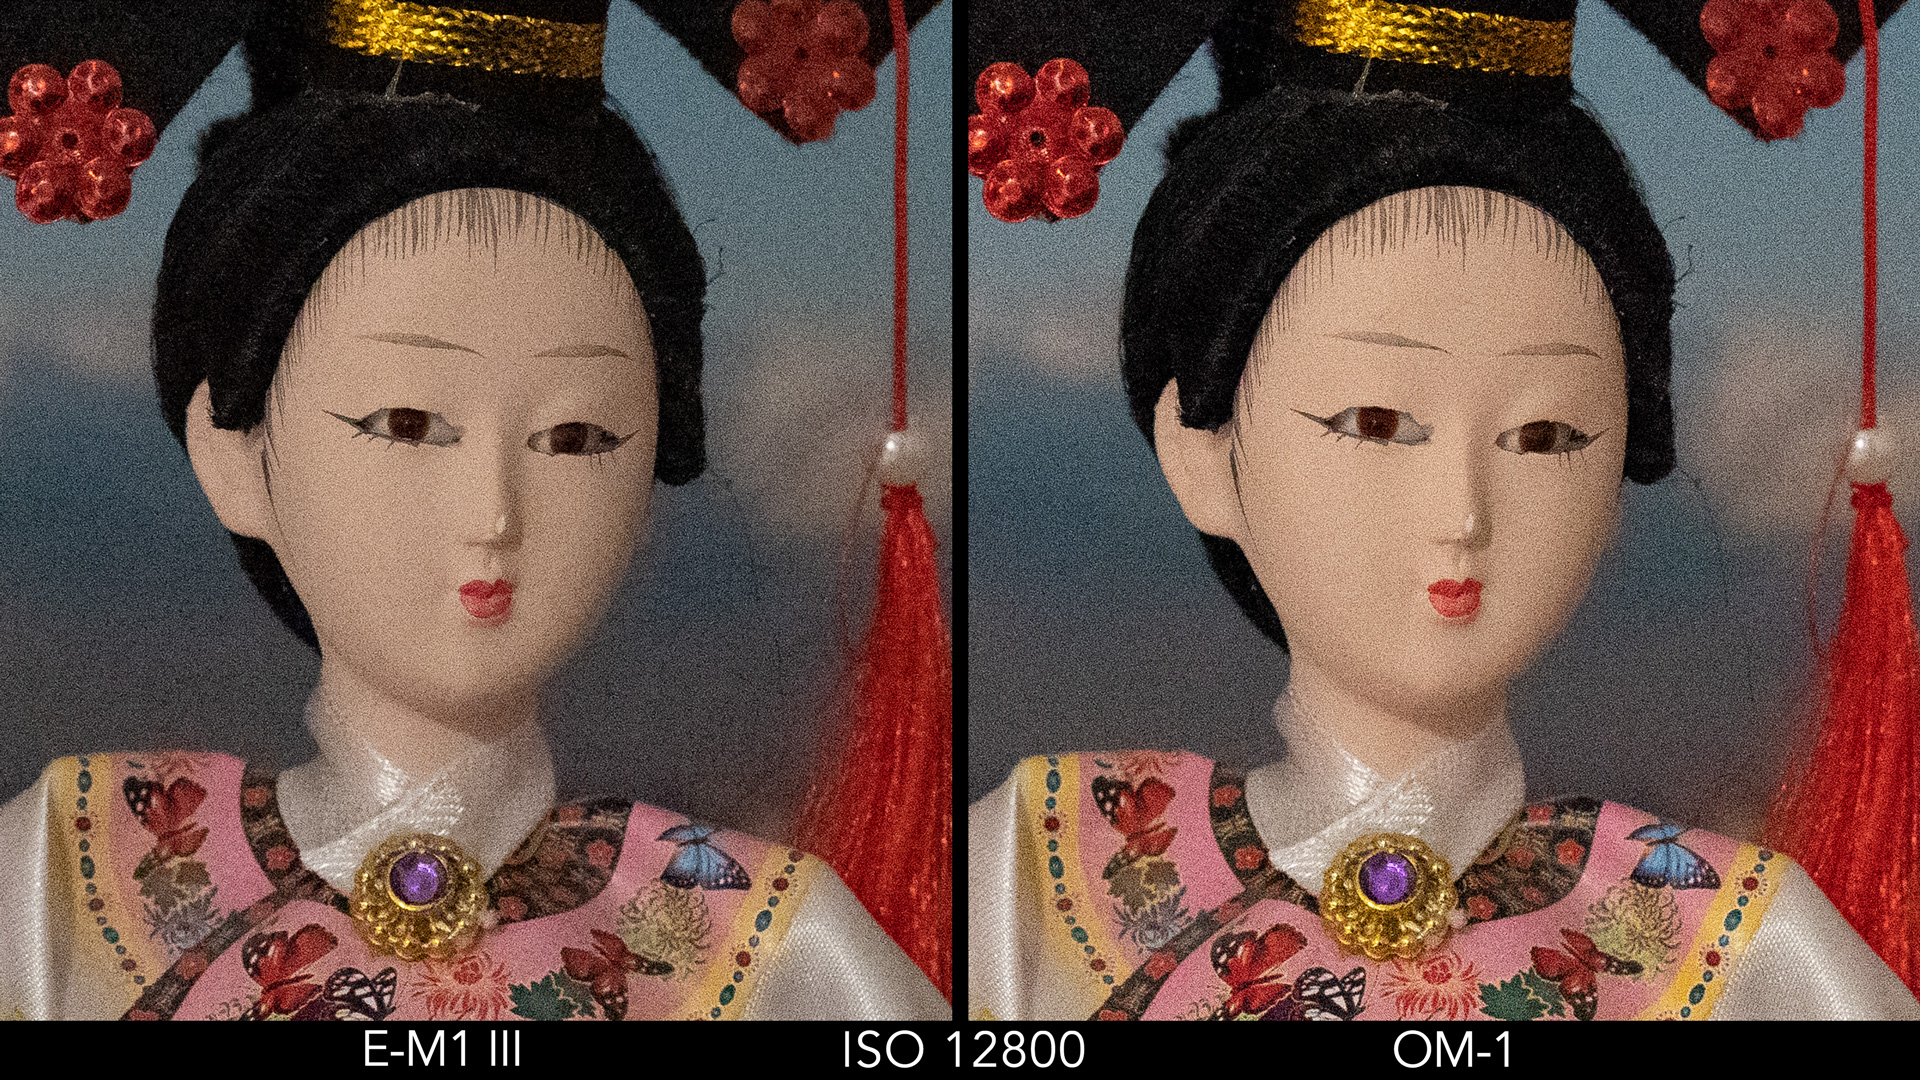
The improvement to details and colour accuracy becomes more important from ISO 6400. The E-M1 III starts to lose colour vibrance and fidelity, and is at its worse at ISO 25,600, whereas the OM-1 preserves the tones much better.
Furthermore, from 12,800 the E-M1 III is using extended levels, unlike the OM-1, which means the old camera produces more noise than the new camera.

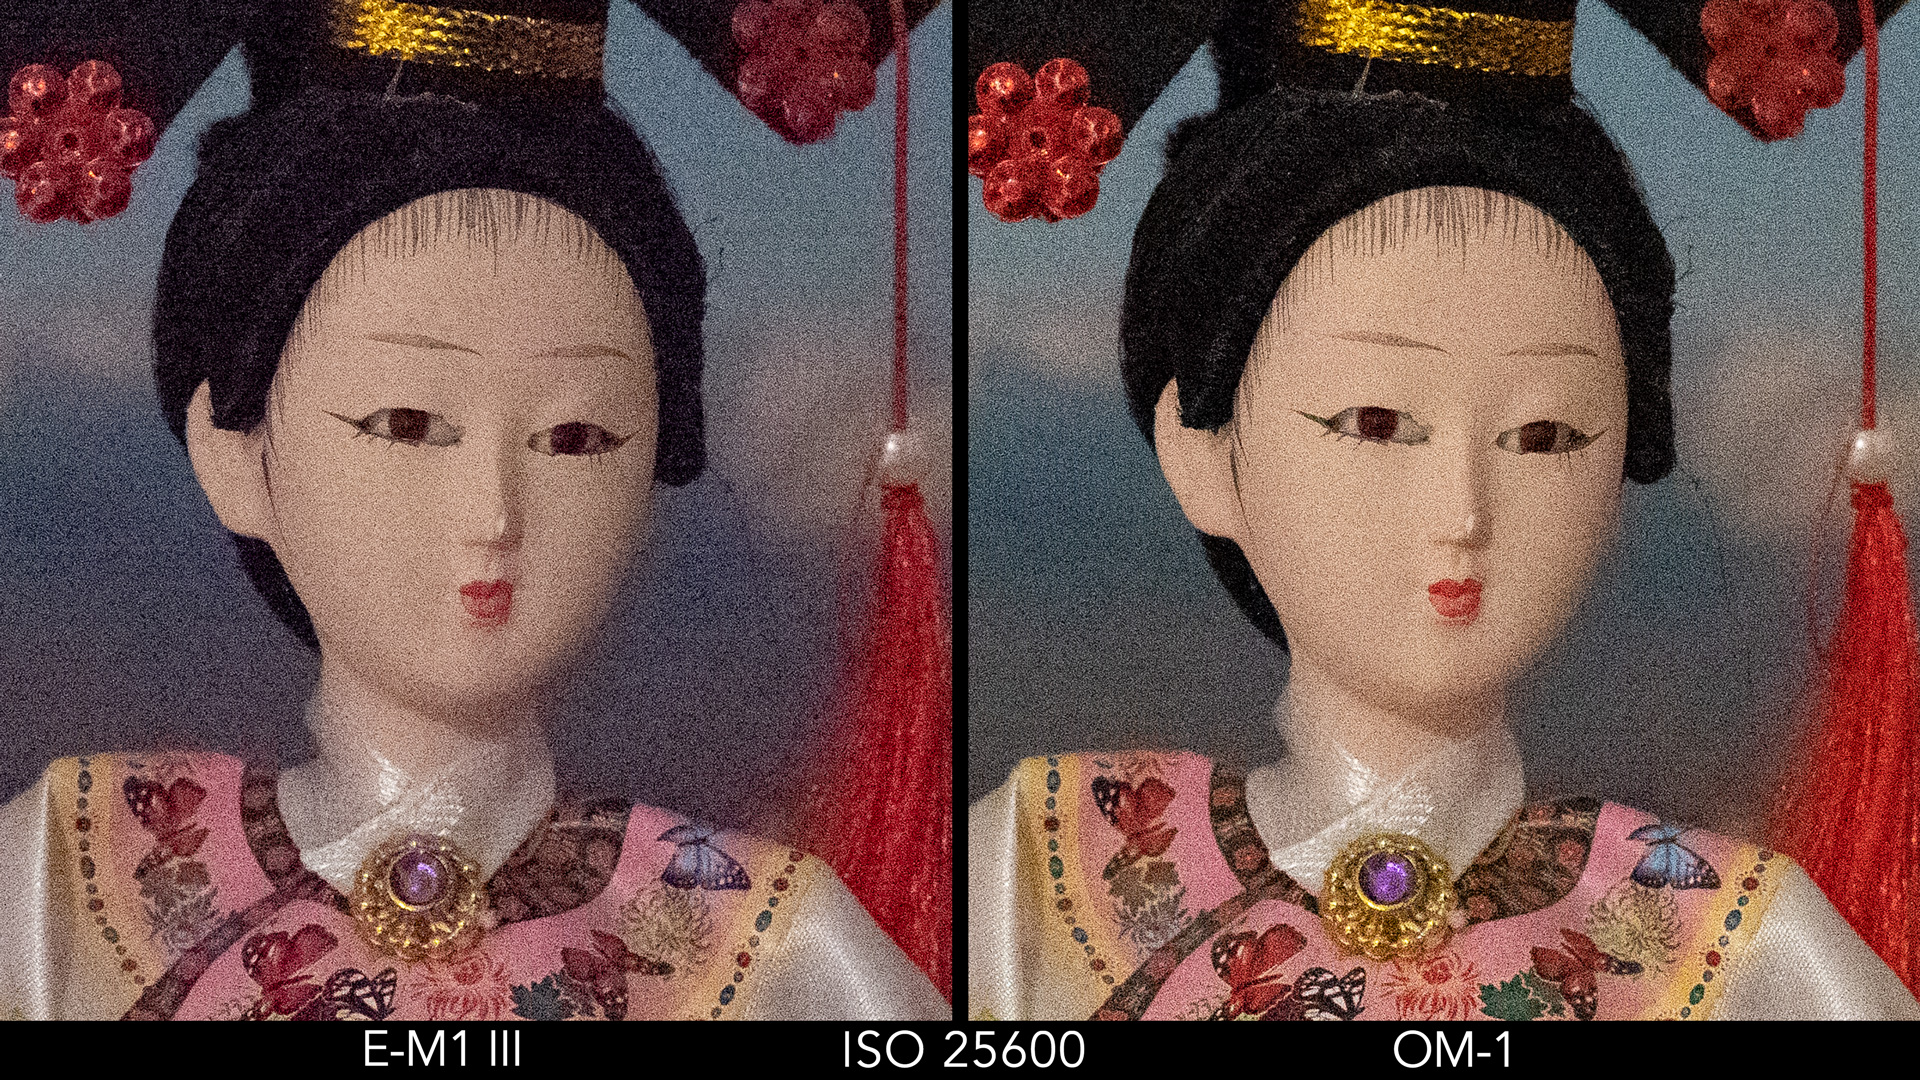
The OM-1 has two extra steps, but these are extended ISO, and the loss in detail becomes more severe. The highest value shows a visible colour cast.
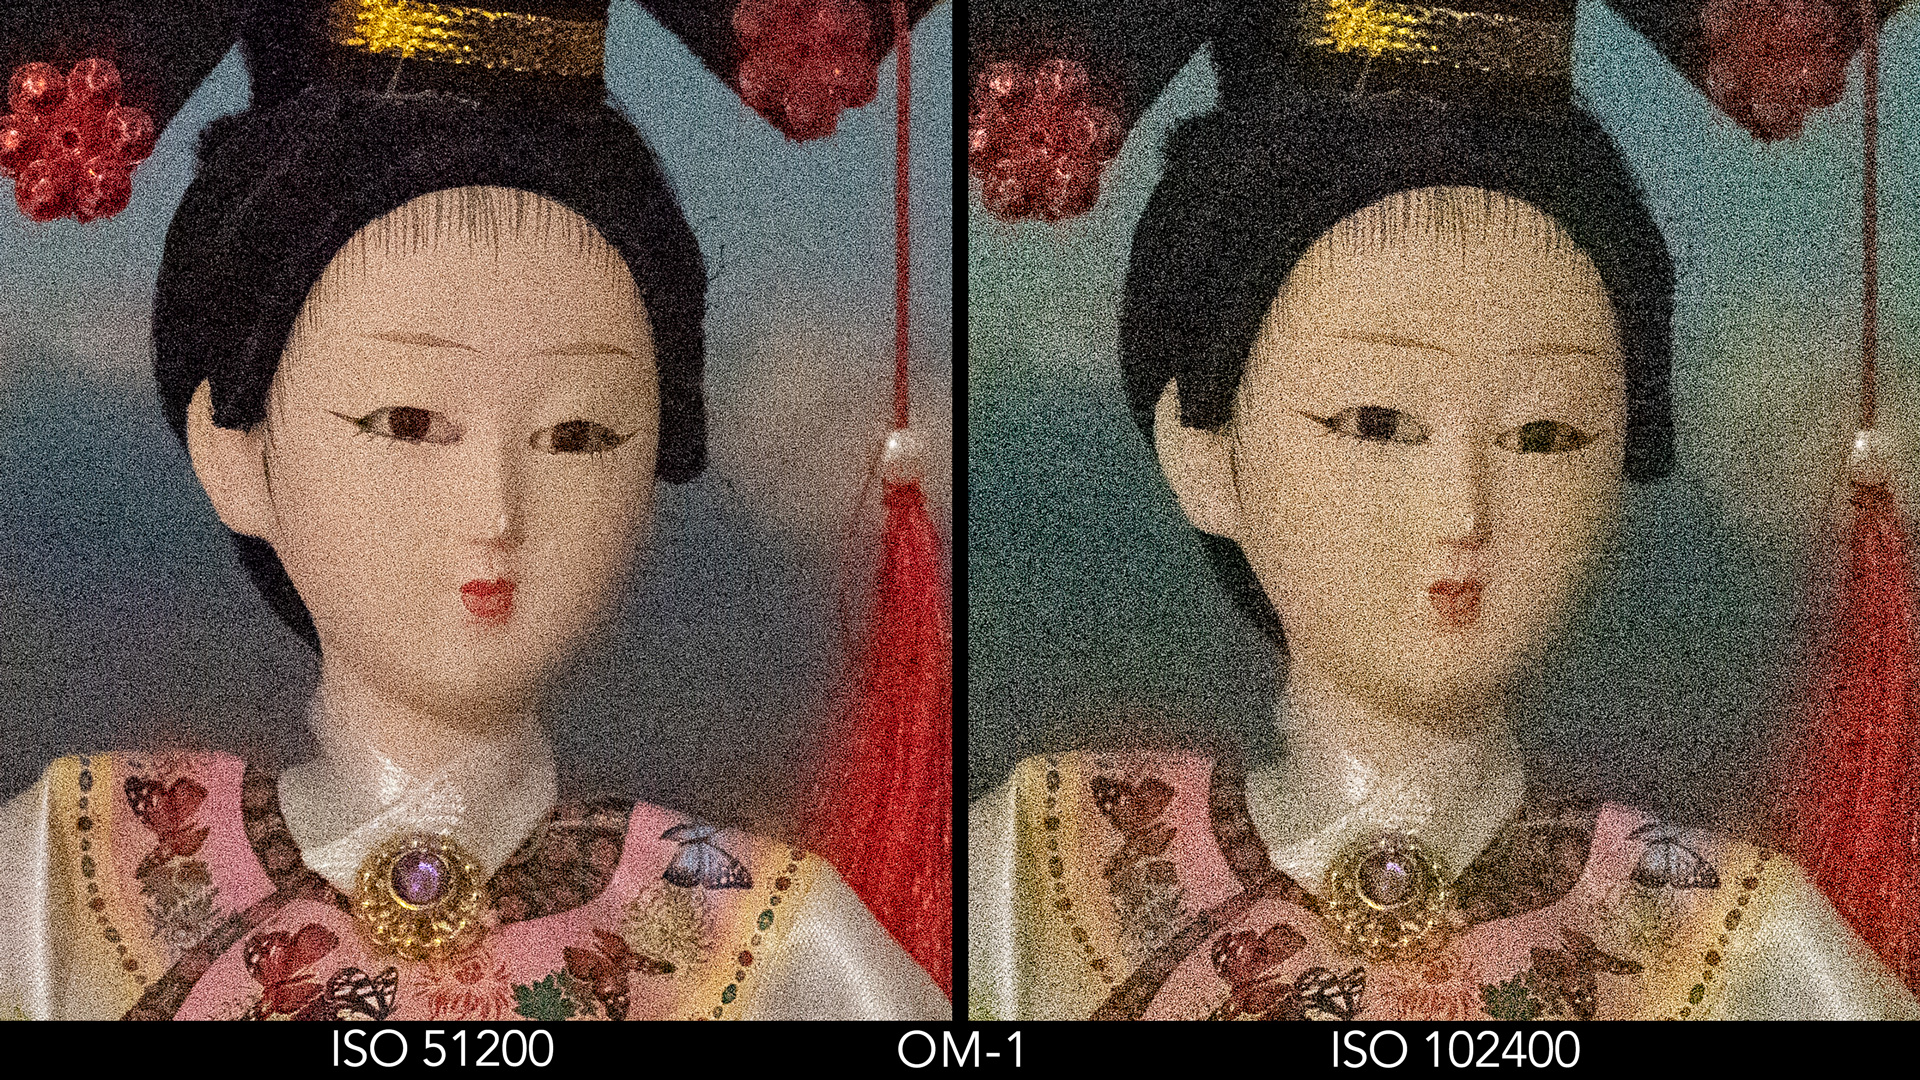
So, if you were hoping that the two stop improvement meant “ISO 6400 on the OM-1 looks like ISO 1600 on the E-M1 III”, you’re probably disappointed right now.
There is an improvement though, mainly regarding colour accuracy and the fact that the OM-1 has a wider normal ISO range. It makes 12,800 and 25,600 ISO more usable if you really need that extra stop of sensitivity. But in terms of image noise, the difference is much more contained.
Of course the test above was done indoors with a reduced amount of light. When you’re out photographing in nature, you’ll have more light available most of the time, so part of that noise will be less invasive.
Below you can see a few images that show you more relevant examples of which corrections you may need to apply if something goes wrong.
With the first image, the camera underexposed, choosing to go down to ISO 100 (using Auto ISO). I noticed with the OM-1 that metering can go wrong sometimes when shooting with the SH2 mode. Recovering the exposure in Lightroom is a no-brainer in this case, despite the extended low ISO value.
The second example is a typical situation where there is a lot of contrast and the camera tends to overexpose, leaving some of the bird near the clipping zone. I managed to recover most of the details, only a few parts remain clipped.

Then we have another typical scenario: cloudy day, slow aperture lens and bird in flight, when the ISO will inevitably go up.
Note that all the photos above were processed using Lightroom Classic, with noise reduction and sharpness left at their default value.
Micro Four Thirds vs Full Frame
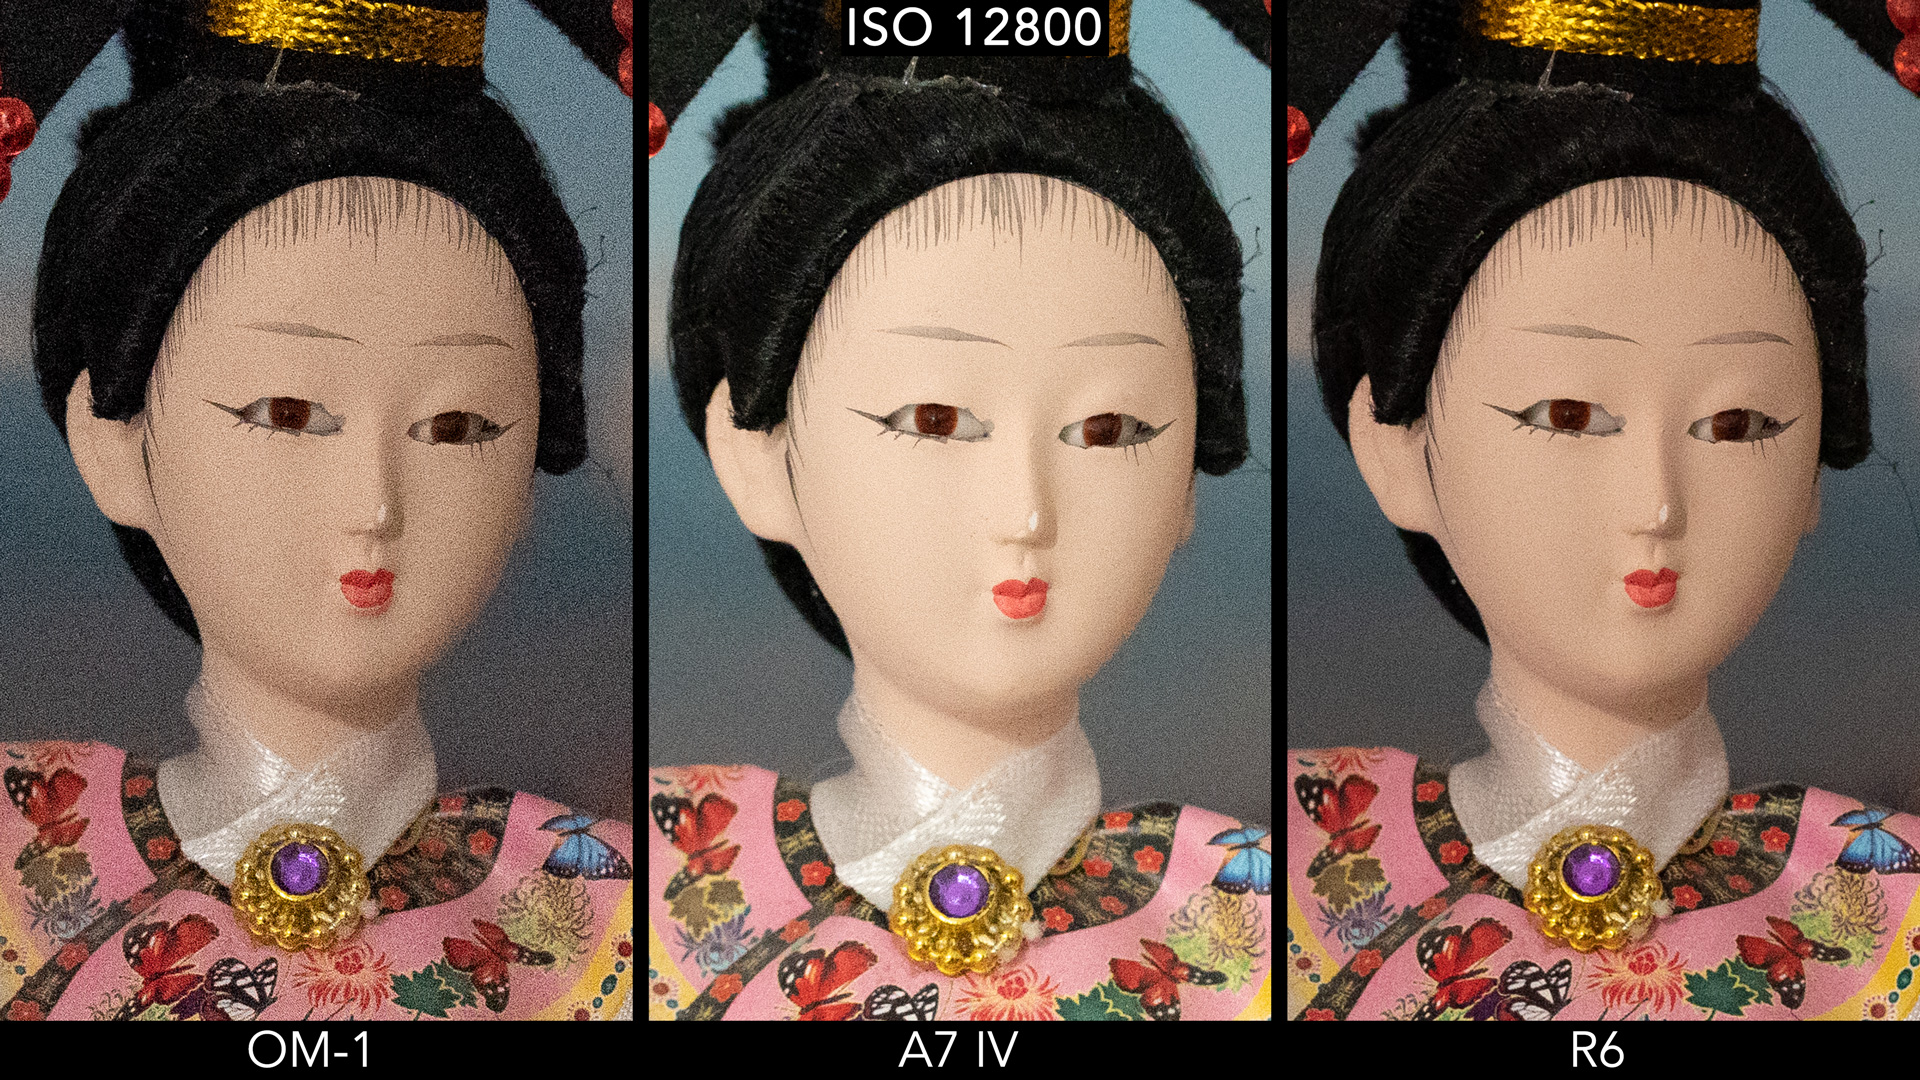
Then we have the inevitable comparison with a full frame sensor. I put the OM-1 side by side with the Canon R6, which has the same megapixel count (but with a different aspect ratio), and the A7 IV which has more resolution (33MP).
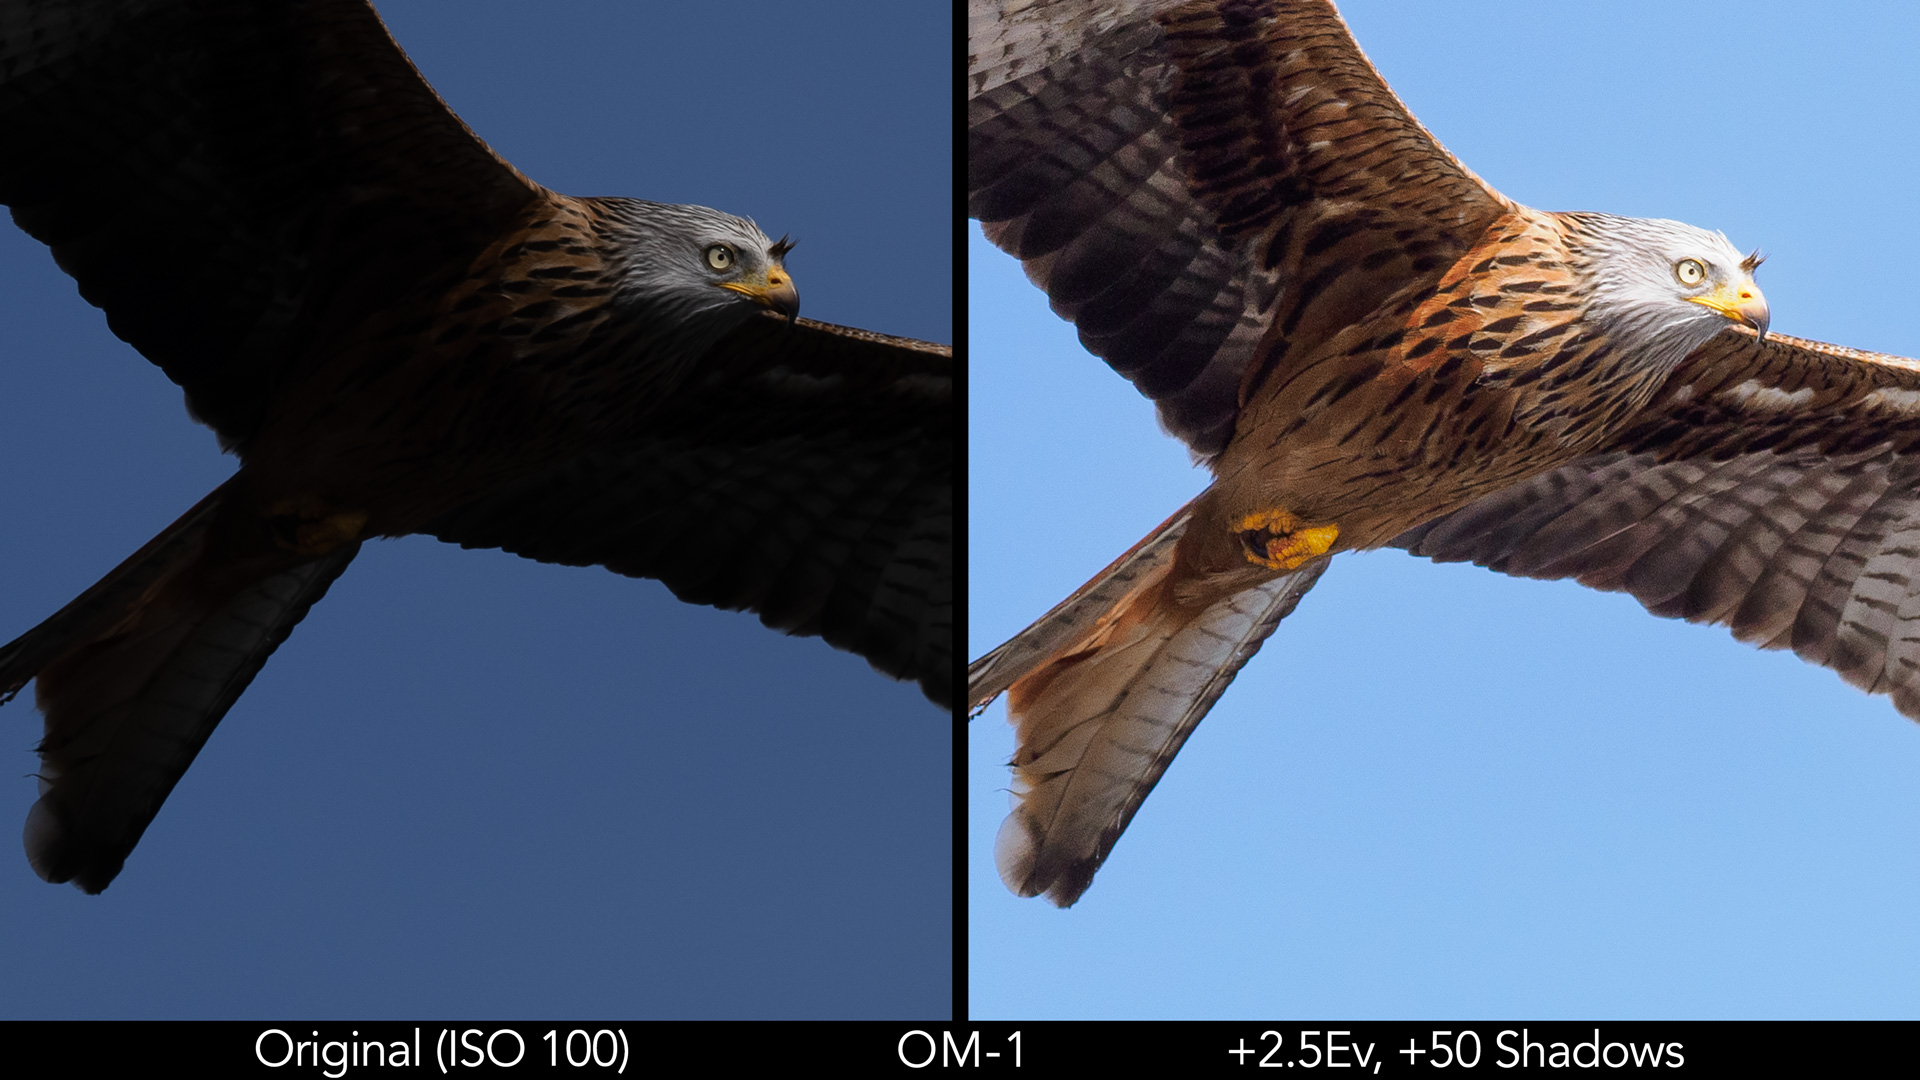
Unsurprisingly, the OM file shows more noise in the dynamic range test when performing a strong 3EV and +50 shadow recovery.
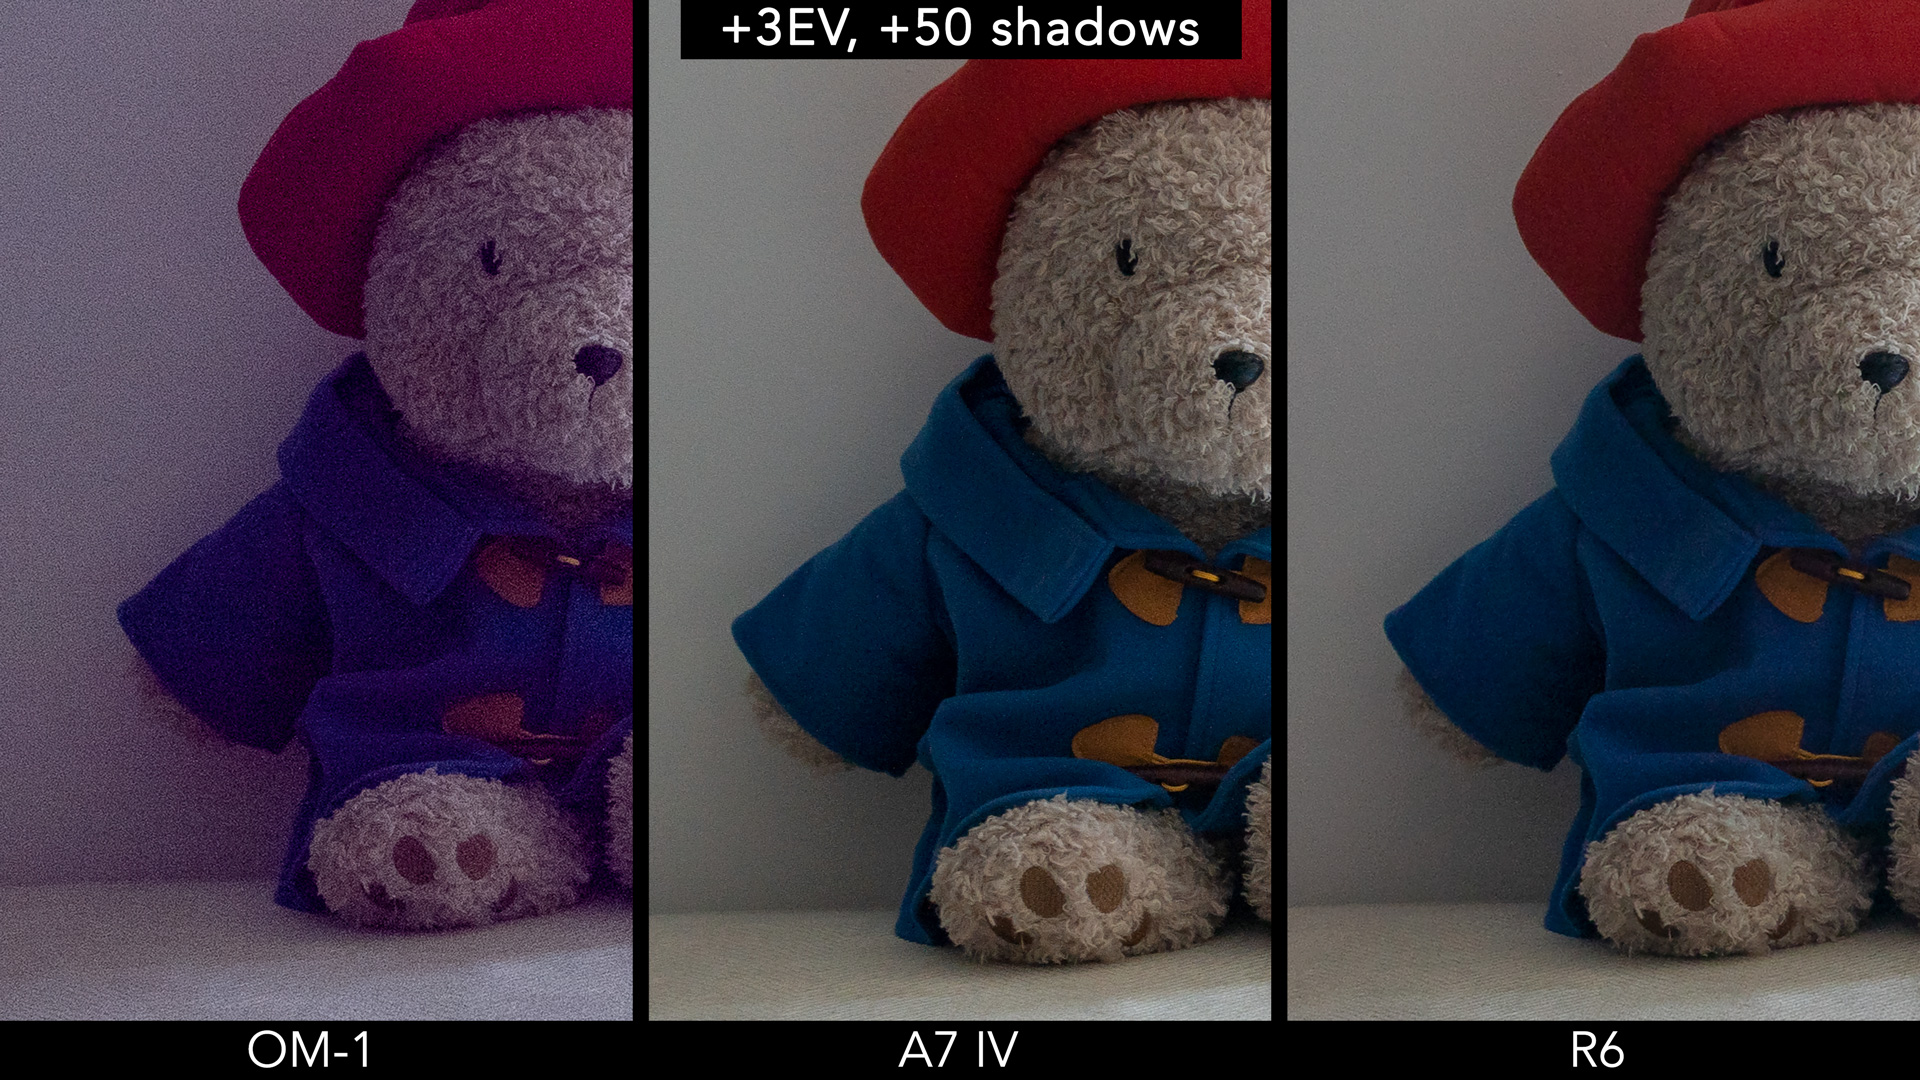
In the highlights however, the micro four thirds camera is able to retain more details. I’m not entirely surprised by this, because I came across similar findings in my Olympus 150-400mm Pro review.
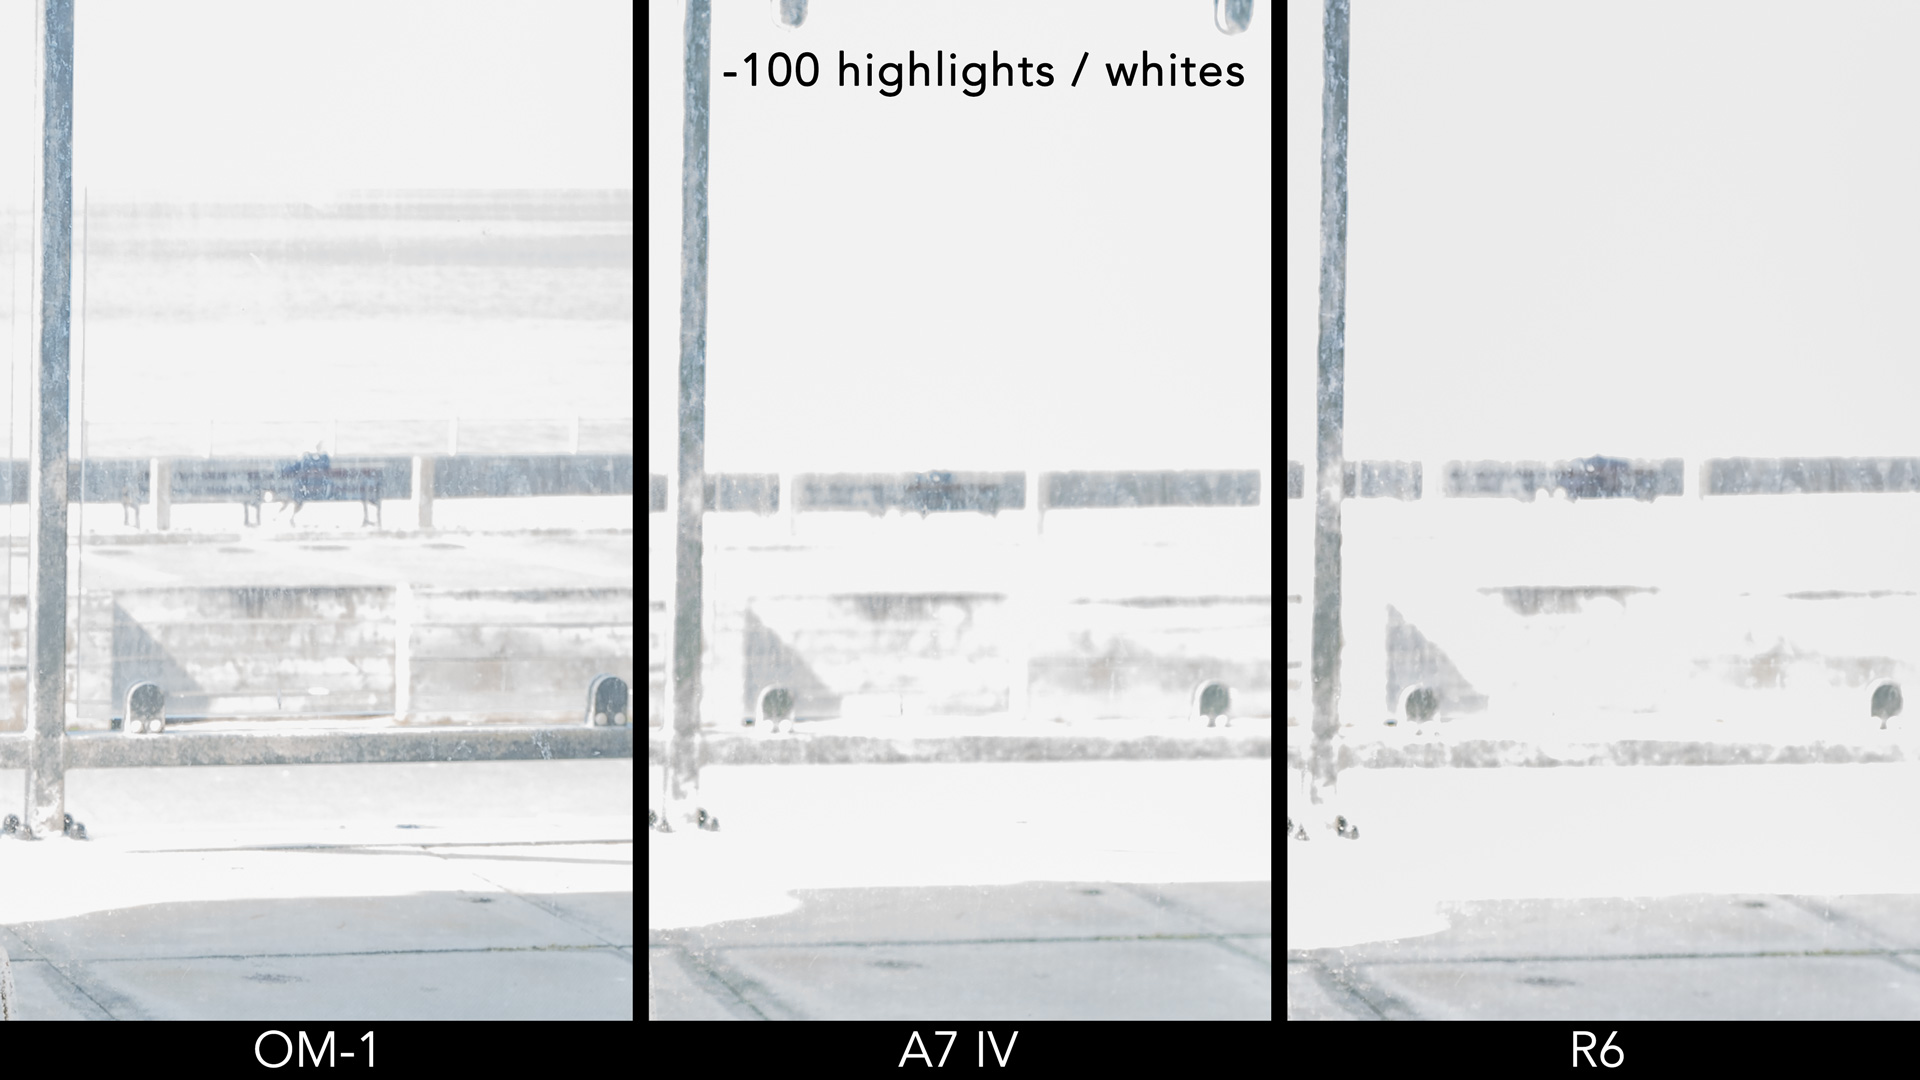
What is interesting to note here is that if I overexpose the OM-1 image by one stop, I get a similar amount of details in the highlights as the two full frame cameras.

Now if I take this advantage and apply it to the other side of the histogram, I’ll get brighter shadows in the micro four thirds image, and suddenly the result looks much better when compared to the Sony and Canon.
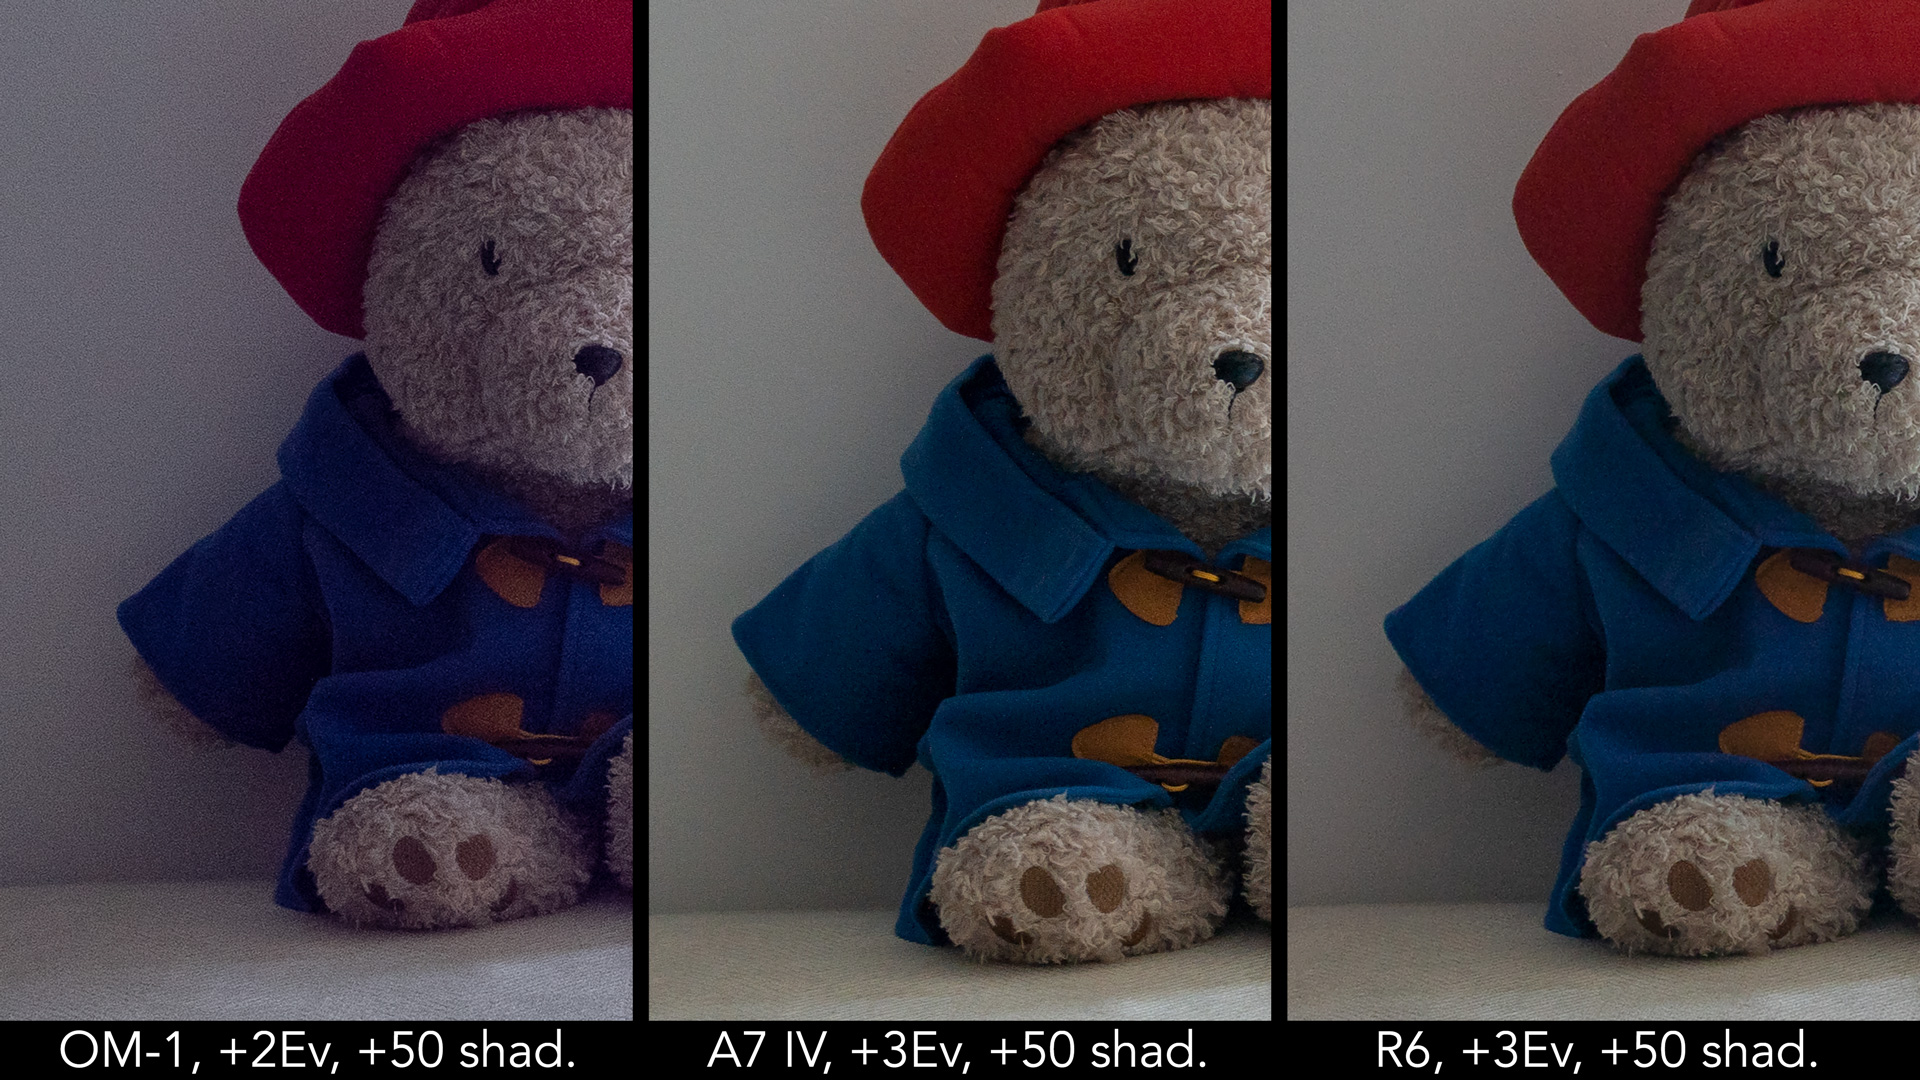
That isn’t to say that the quality is the same. The A7 and R6 still have less noise, but it shows that the difference between the two formats is not as huge as one may think at first.
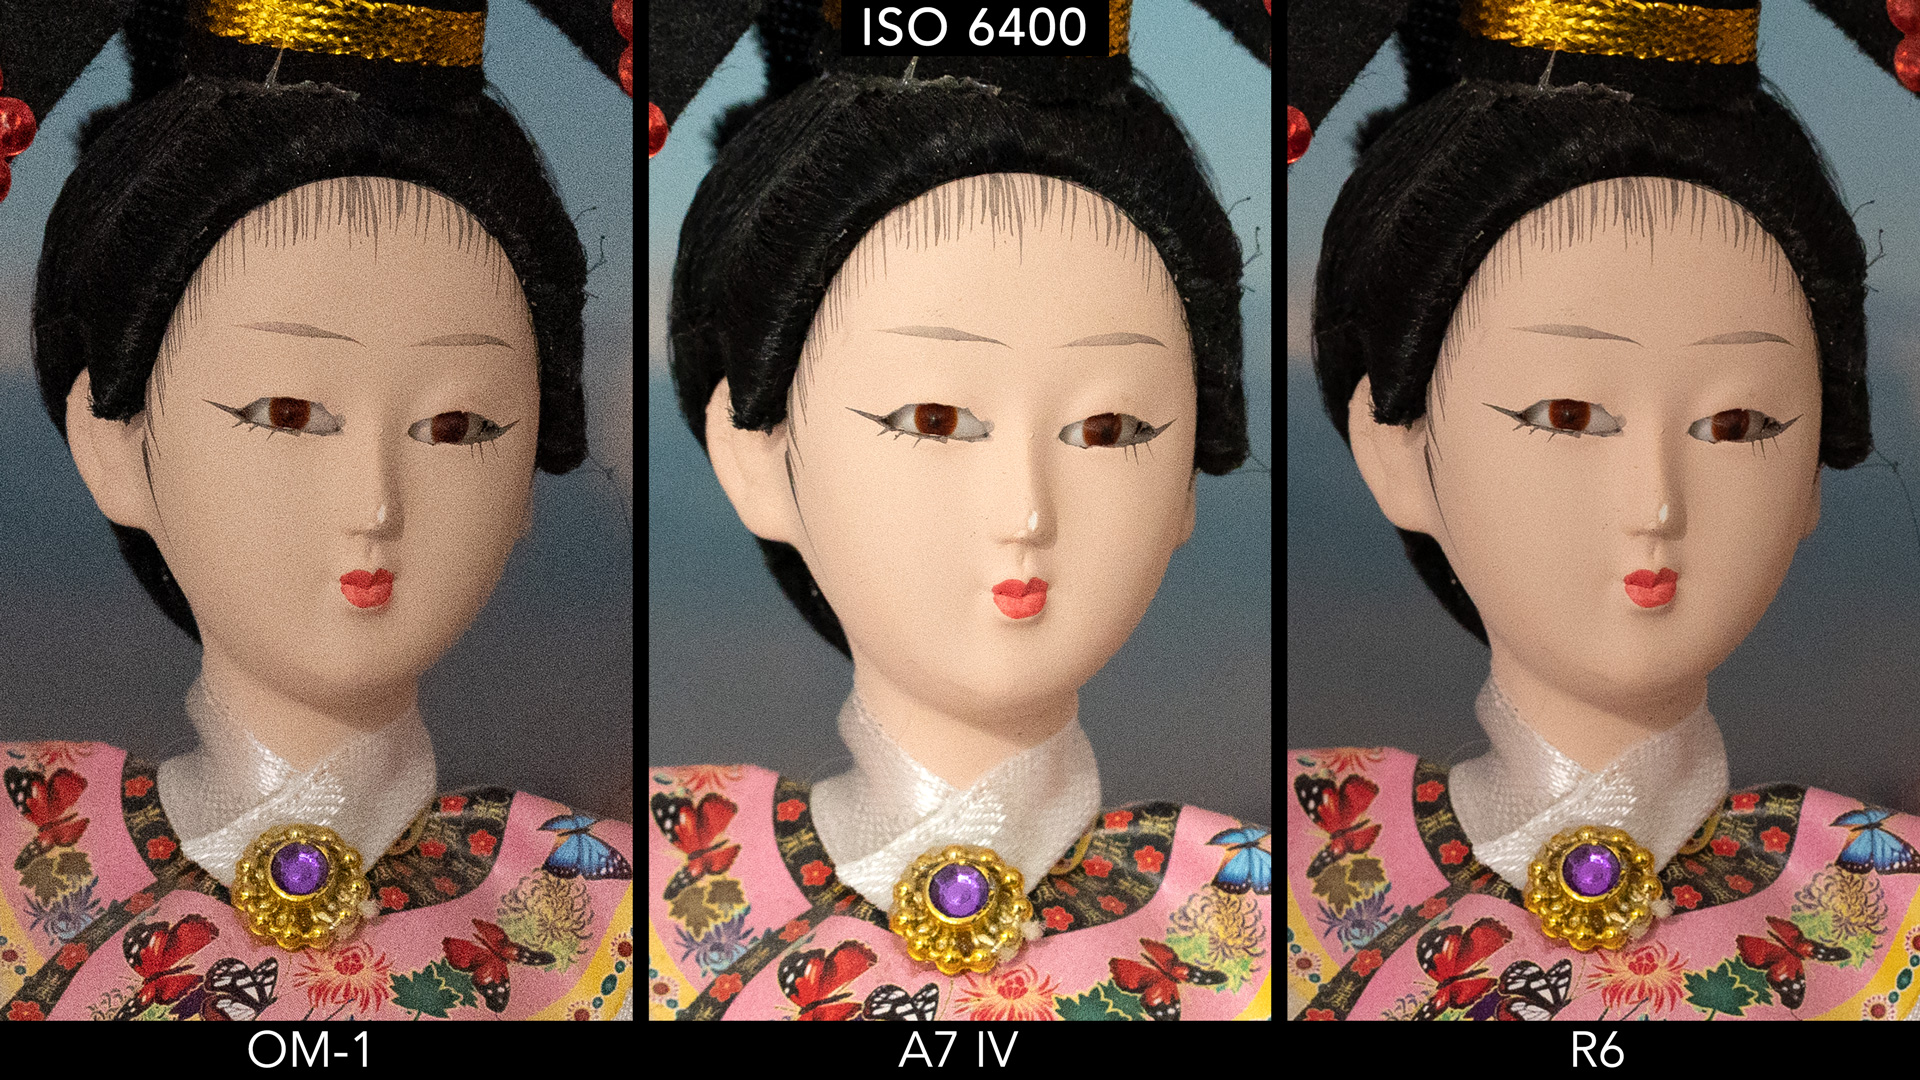
At high ISO however, there is less to talk about: the OM-1 displays more noise. Also note that the Sony has more brightness by default with the same exposure settings (something I’ve already highlighted in my A7 IV vs R6 full comparison).
Video and Stabilisation
The OM-1 can record 4K up to 60p, in H.264 (8-bit) or H.265 (10-bit). These specs, coupled with the excellent stabilisation system of the camera and lenses, make it an interesting tool for wildlife videos.
It is possible to record hand-held with a 300mm lens (600mm equivalent), provided that you find a comfortable position to hold the camera, possibly by resting your arms somewhere to be more stable. Of course it’s not ideal for long recording sessions, but for quick recordings while walking around or stopping at hides, it can work surprisingly well.
With any other system, I would need a sturdy heavy-duty tripod designed for video-makers to get usable footage at 600mm equivalent.

A.I. Subject Detection is available for movie recording, but you need to select C-AF + Tracking (and not just C-AF) in order to activate it.
With static subjects, it does a great job. The AF is precise and stable in remaining on the subject, without hesitations. Even when a duck put its head underwater, the focus remained firmly on its body.
If the subject is moving, there is more hesitation and moments where it focuses a bit too far or too close. There are two settings (AF Speed and AF Sensitivity) to fine tune the performance depending on how fast and predictable the subject is.
Note that autofocus is not available in video mode if you adapt a four thirds lens.
In Full HD, you can record up to 240fps, but keep in mind that with these high frame rates, C-AF is not available. In situations where you can pre-focus, it can be a fun mode to use to capture birds flying off or landing. The quality of the footage is acceptable but there is a 1.28x crop on the sensor.
The excellent stabilisation system is also very reliable for still photography. With long focal lengths such as 300mm, it is not impossible to achieve sharp shots at 1/10s, but most likely this shutter speed is too slow to ensure sharpness on your subject, unless the animal is dead still. But nonetheless, this kind of performance means you can easily achieve good results at 1/50s, 1/100s or 1/200s.
Results can vary depending on the specific lens. Those compatible with Sync IS like the 300mm Pro (sensor and optical stabilisation working together) are the best solution. Note that Sync IS doesn’t work with Panasonic lenses. You either prioritise the sensor or the optical stabilisation.
Design
If you own an E-M1 II or E-M1 III, you’ll be at home with the OM-1. The design is very similar, and so is the button layout. Both cameras are fully weather sealed.
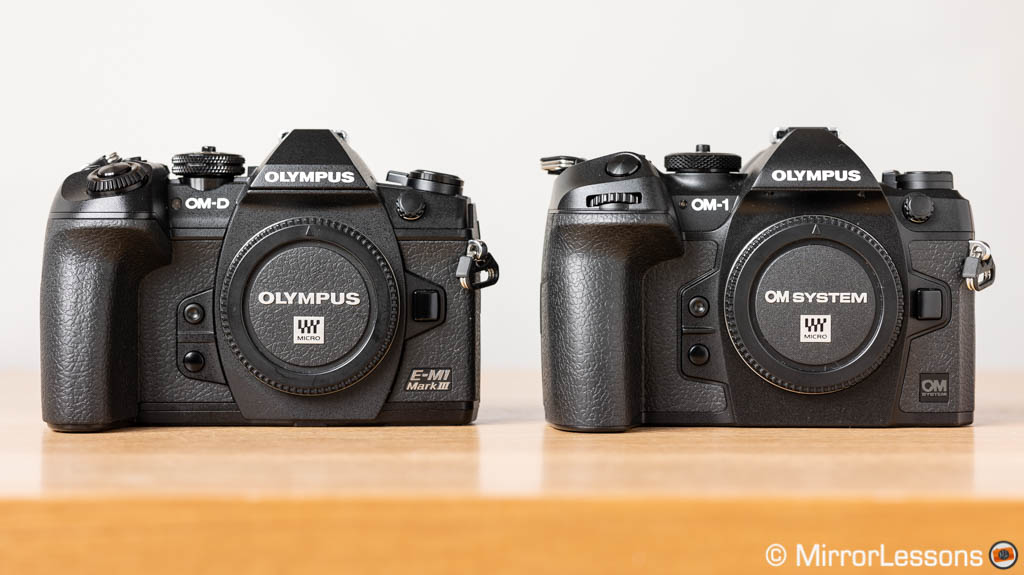
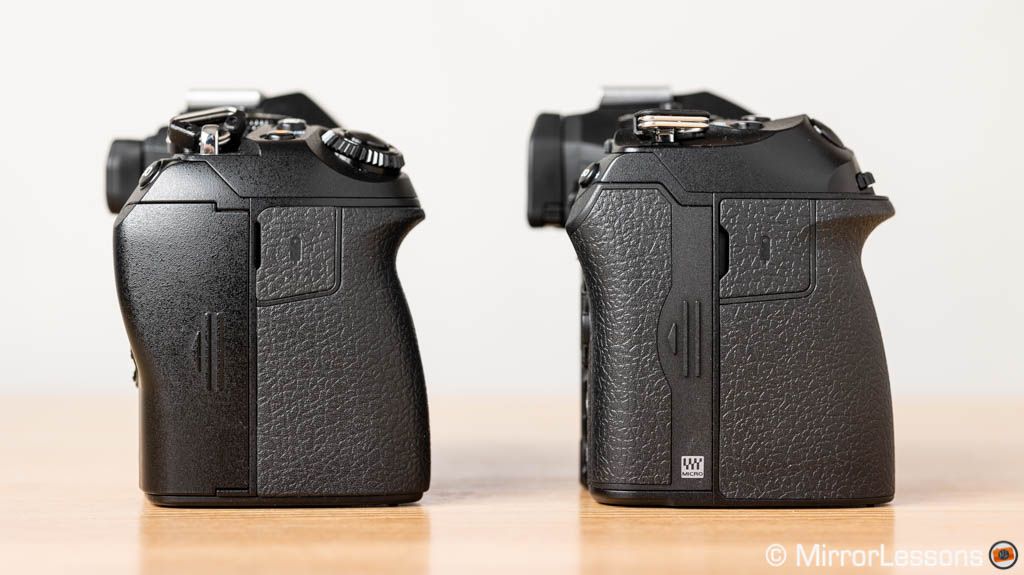
One of the ‘major’ differences is the grip on the new model, which is a bit deeper and taller. To be honest, I didn’t feel the need for any change in this department. I’ve always found the E-M1 series to be one of the most comfortable to hold, even with large lenses such as the 300mm Pro. That said, I quickly got used to it and I can even go as far as saying I prefer it now.
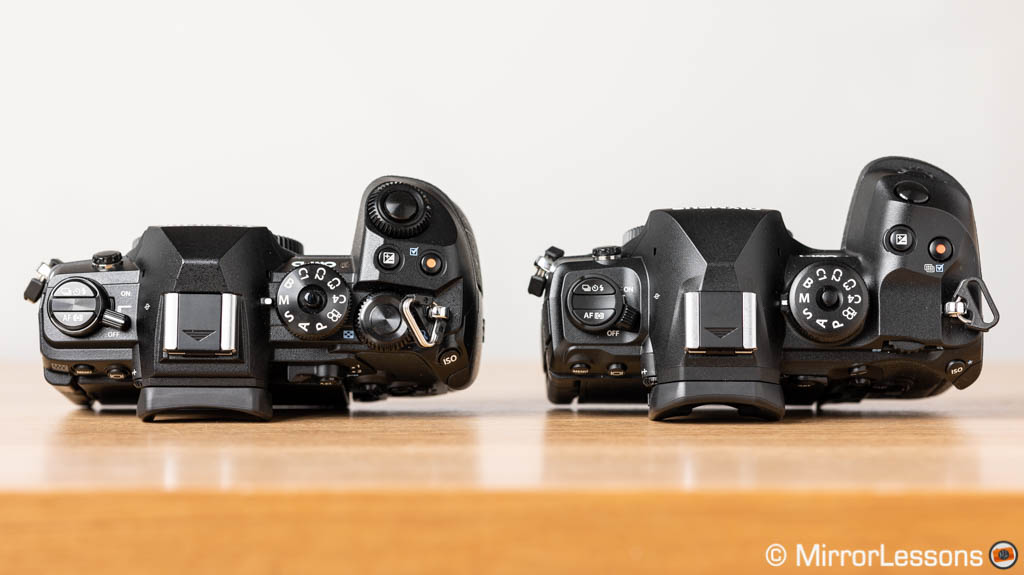
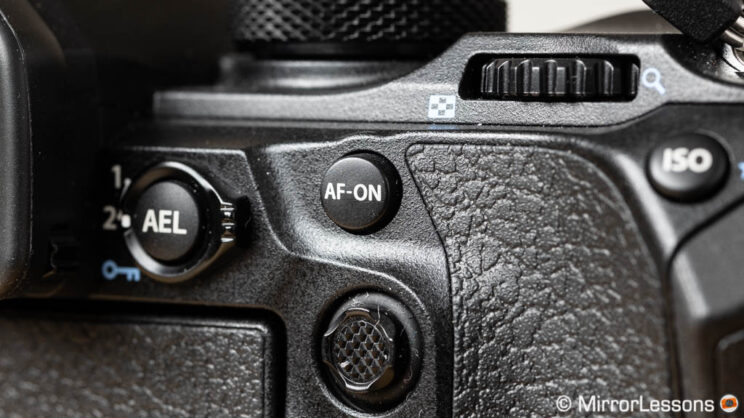
Concerning the buttons, there is the extra AF-ON key on the rear on the new camera. Also, the front dial is no longer built around the shutter button, but placed underneath inside the grip. Similarly, the rear dial is embedded in the body rather than being on top.
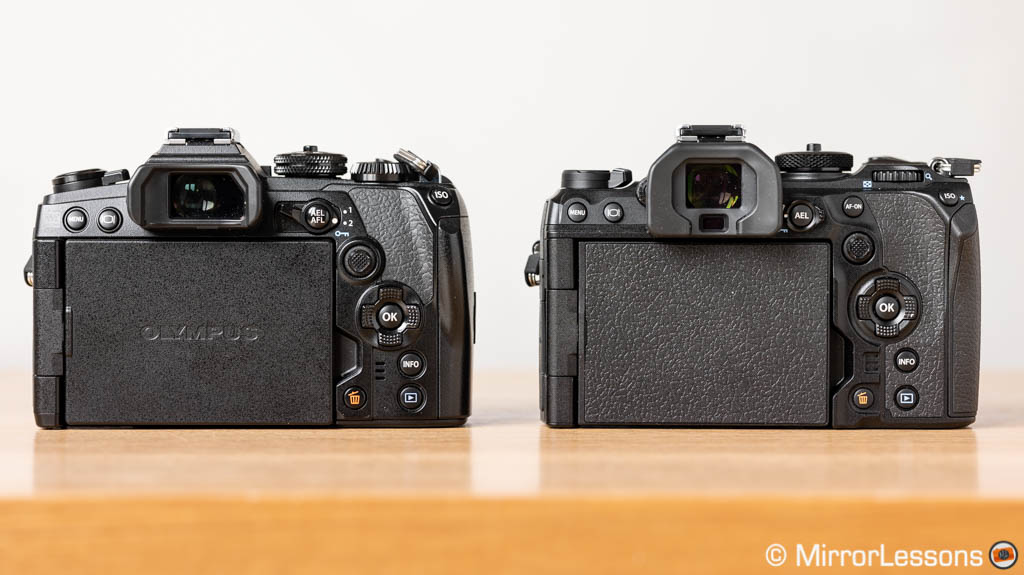
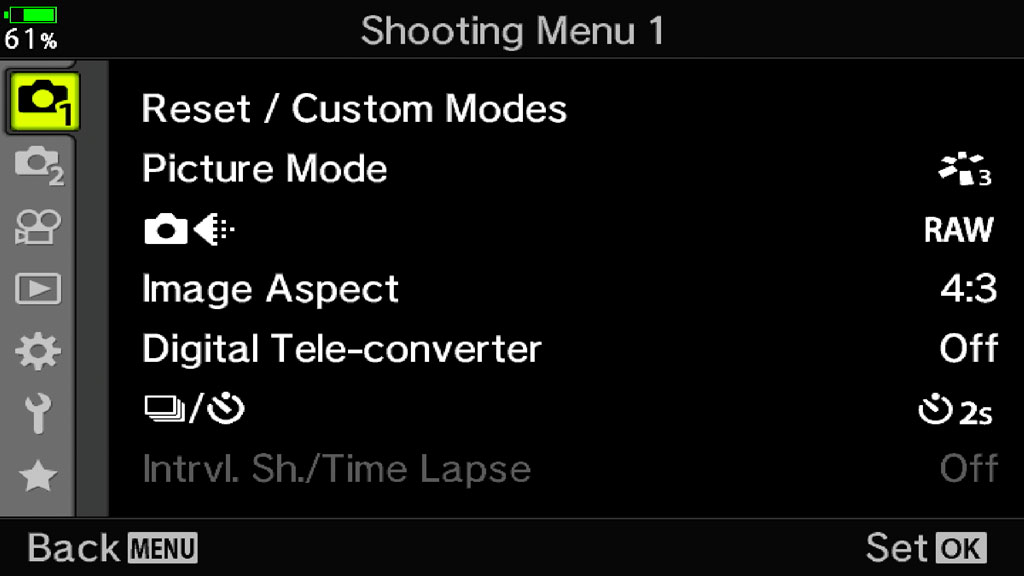
The OM-1 has a brand new menu system, re-designed from the ground up with a GUI interface that resembles that of Canon EOS cameras. Each section has its own colour, and the navigation works horizontally rather than vertically. It’s much better than the old menu and everything is easier to find. My only criticism is that you can’t use it with the touch screen.

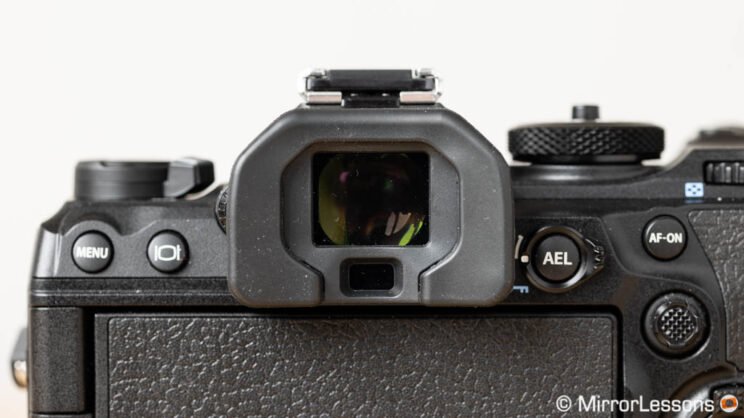
The viewfinder is another welcome improvement, now featuring a 5.76M dots OLED panel (up from previous 2.36M) and a slightly larger magnification. The refresh rate goes up to 120fps and the lag is 5ms. When working at 120Hz, I didn’t notice a substantial drop in resolution, which is good. It’s comfortable to use if you wear glasses.
The OM-1 takes two UHS-II SD cards with the usual options concerning relay, backup or file separation. You can’t record video on the two cards at the same time however.
Finally, we have the battery life. In my first day out, I spent three hours in a nature reserve, capturing around 400 photos and recording 20 4K clips at 60p with stabilisation and C-AF. The battery drained down to 55% before leaving.
I charged it in the car with a power bank to 88% before arriving at the red kite feeding station. There, I took almost 6,000 images, including burst at 120fps and 50fps (with and without Pro Capture). There was 17% of battery juice left when I drove home.
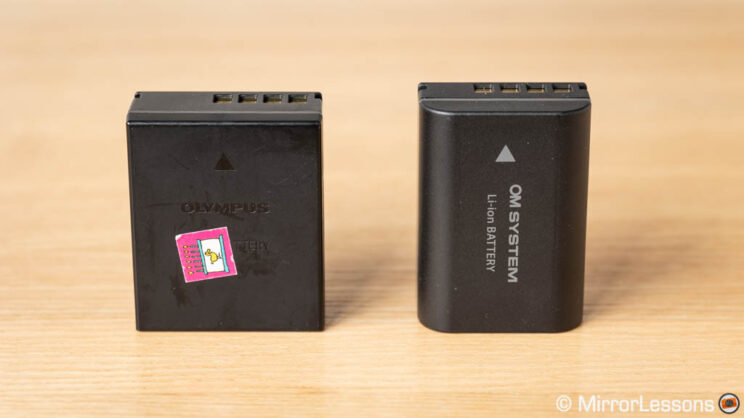
Overall, the performance is not bad at all, but clearly recording 4K video, or using the Pro Capture modes drain the battery faster. For an intense day of shooting, a second battery is essential if you don’t have time to recharge.
Last but not least, the OM-1 has a lot to offer when it comes to customisation, with function buttons, custom modes and the My Menu section.
Video Review
This article is also available in video form on our MirrorLessons YouTube channel. Don’t foget to subscribe there too!
Guide to the OM-1 Settings (In-depth tutorial)
If you want to know more about the OM-1 settings (autofocus, stabilisation, customisation) then make sure to check out my dedicated article about that. I explain how the settings work and what are the best to use for various genres including birds in flight and motorsports.
Conclusion
Two months of work and almost 20,000 images sitting on my hard drive, I think it’s time to wrap it up! Do I like the OM-1? Am I keeping it? Let’s begin with the positive.
The autofocus is without a doubt the main improvement, and I’m happy because that was my number one priority. The camera can be very close to the performance of a Canon R5 or R6. It’s not at the same level of the Sony A1 or A9 II, but not far off either. I’ll take that!
It’s worth noting that the AF improvements seem to be limited to certain settings. I don’t see any improvements to the normal tracking mode, and disabling the A.I. Subject Detection reduces the performance. While there isn’t any reason to do that for birds, I do wonder how the camera performs in other situations, like football or portraits for example. I’ll develop this topic further with another article.
The continuous shooting speed is better than ever, and I can’t really imagine any of us wanting more. The AF performance is consistent, whether you work at 10fps or 50fps, and the only thing you need to be aware of is that with the fastest speeds, the buffer is limited. There will be cases when you want to choose 20fps or 25fps and be able to work at that speed for longer. But really, the point is that we’re spoiled for choice, including the possibility of working with live view and no blackouts.
The video improvements are welcome but this is an area where the camera still feels inferior to other products. That said, the possibility of recording 4K 60p or Full HD 240p, combined with the unrivalled stabilisation system, makes the OM-1 a better proposition than before when it comes to wildlife filmmaking.
Then we have the elephant in the room: image quality. The claims made in the announcement led us to believe the difference would be substantial but, on the surface, it’s hard to find a ‘wow’ improvement with the OM-1.
That isn’t to say that there is nothing at all: dynamic range is a bit better in the highlights, and colour accuracy and details at high sensitivities have improved. In fact, colours in general seems to be much better on the new camera, and there is also a more substantial improvement on the JPG rendering which is something I have skipped in this article but that I’ll mention another time.
This might be enough for some of us, but at the same time I can understand why other photographers were waiting for a more important step forward in this direction, also considering the 6 years gap between this new sensor and the previous one.
With that said, my opinion about the OM-1 remains very positive. On many fronts, it is an excellent upgrade over its predecessor, and a much needed one to prove that micro four thirds is still a contender. It certainly isn’t revolutionary for the system, and we could argue that it could have made more of an impact if it had arrived a few years earlier, but the important thing is that it is here now.
I’m also curious to see if and how the camera will continue to receive firmware updates to address the minor issues I found, not to mention to boost the performance further and introduce new features. For now, it’s a keeper!
Reminder: the links below are affiliate links. If you decided to buy something after clicking the link, we will receive a small commission.
Check price of the OM-System OM-1 on
Amazon | B&H Photo | eBay