This article is a follow-up to my OM-1 Review. In this post, I go in-depth about the autofocus and stabilisation settings, while giving you examples and tips on how to customise the camera.
Please note that, although the following is based around my work with bird photography, I’ve also included feedback for other types of subjects including face and eye detection for humans, and motorsports.
Note: I’ve tested the camera again with firmware 1.2, then with firmware 1.3, but I haven’t found substancial differences concerning the autofocus performance. Therefore, all that I wrote below remains valid.

Ethics statement: we bought the OM-1 for personal and review purposes. We were not asked to write anything about this product, nor were we provided any compensation of any kind. Within the article, there are affiliate links. If you buy something after clicking one of these links, we will receive a small commission. To know more about our ethics, you can visit our full disclosure page. Thank you!
Table of Contents
1. A.I. Subject Detection
2. Other Autofocus Settings
3. AF Settings for Video
4. Stabilisation Settings
5. Customisation
6. Recommended Settings per Genre
7. Video version
Quick things I won’t cover in this article
Below is a series of settings that I always use with every camera when it comes to sports, wildlife or portraits.
- RAW file format: it gives you the best versatility in post, especially if you work in difficult shooting conditions. The OM-1 ORF files are small (20MB average) so they won’t fill up your SD card quickly.
- ISO: I use Auto with a maximum of either 6,400 or 12,800 for wildlife. I prefer to not have to worry about these settings in environments where light changes often, or when I change the shutter speed on the fly. For portraits, I’ll use manual ISO at 200 or around that value.
- ESP metering (multi) works for most scenes, and I can use exposure compensation to increase or decrease the brightness according to the histogram or exposure preview in the EVF. Centre-Weighted can be useful for small birds perched on a tree. Don’t use ‘Spot’ as it can easily confuse the camera if the plumage or fur is white or dark. For portraits, the camera will meter the centre of the face when Face & Eye Detection is active.
- Drive speed: please refer to my OM-1 review for an explanation on all the options available and which ones to use.
A.I. Subject Detection
In the main review of this camera, I explained how the Bird Subject Detection mode is crucial to maximise your keeper rate for static and moving birds. I also wrote that the AF Target setting can be useful to prioritise one bird over another, but there are a few extra things I wanted to add on this topic.
Bird Detection and AF Target
The AF Target is designed to restrict the area where the camera focuses. There are 9 options to choose from, including four Custom Target modes where you can create any size to suit your needs.

These settings are useful to ‘tell’ the camera which subject you want to focus on. The OM-1 detects any birds it can “see” in the entire frame, but the Target’s position and size determines which one it prioritises.
With that said, there is a very important thing to understand:
The OM-1 can focus on a subject that is either inside or around the Target area, provided that it is close enough.
This is a crucial thing to know because it can affect the camera’s behaviour and consequentially, the results. Let’s see a few examples.
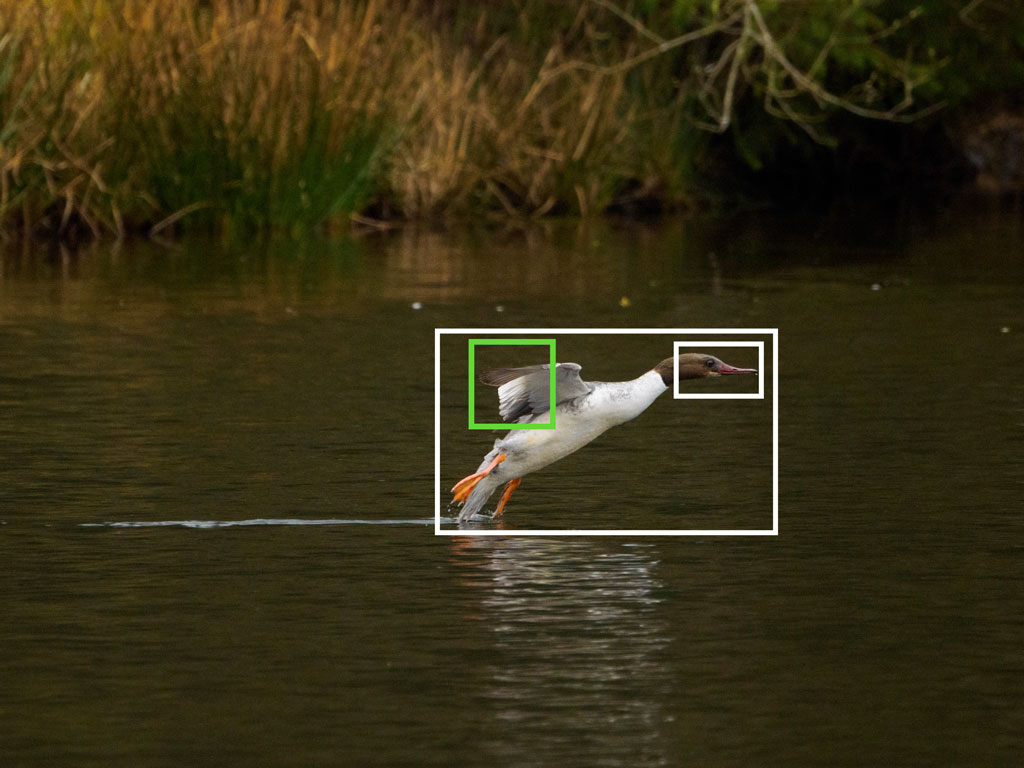
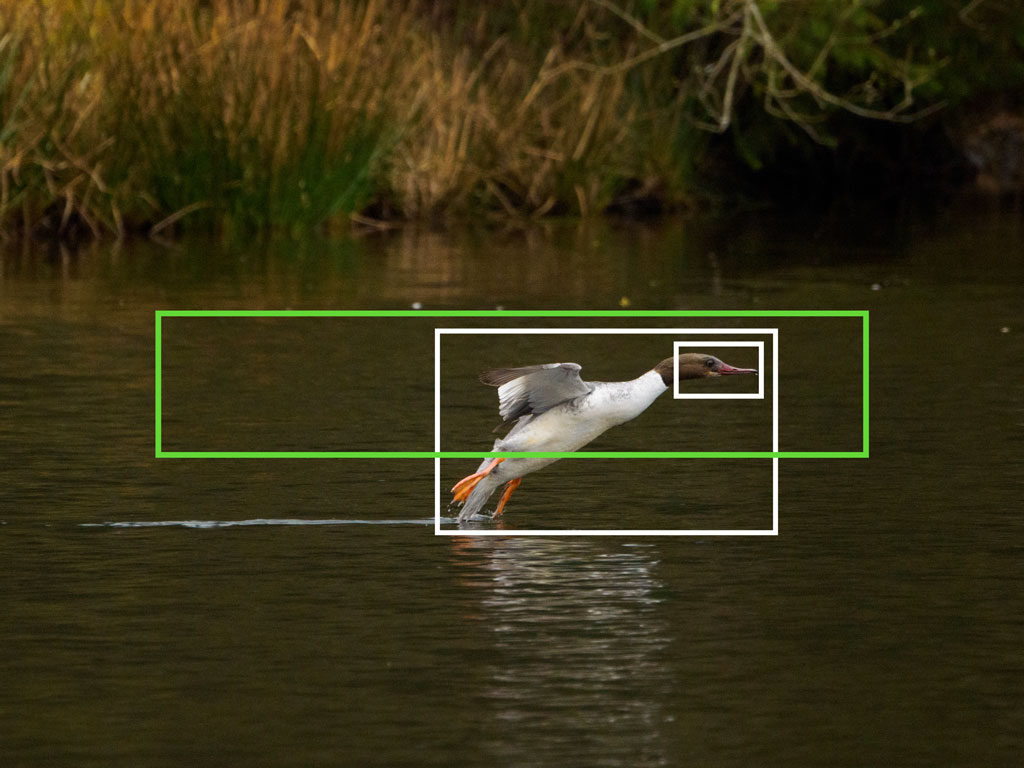
Below we have the Large Target (green) and the white frames around the two birds detected by the camera. The green and white areas overlap, so in a situation like this, the OM-1 will choose the swan or the duck automatically. You don’t have an immediate control over who gets priority.
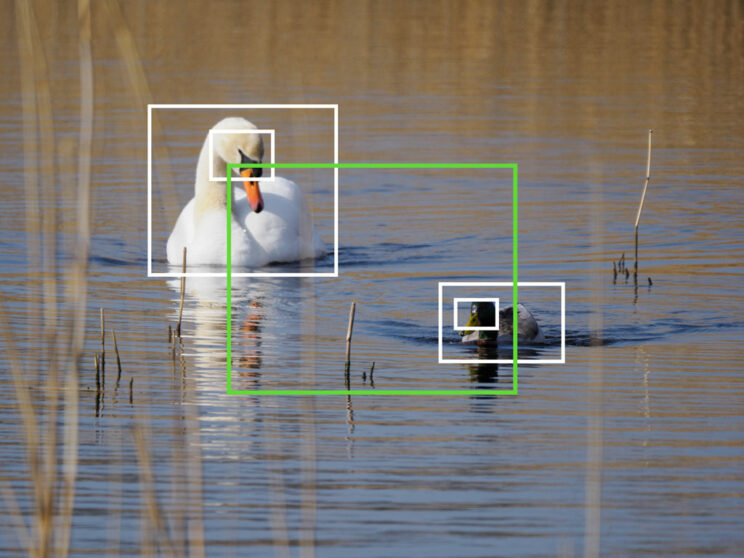
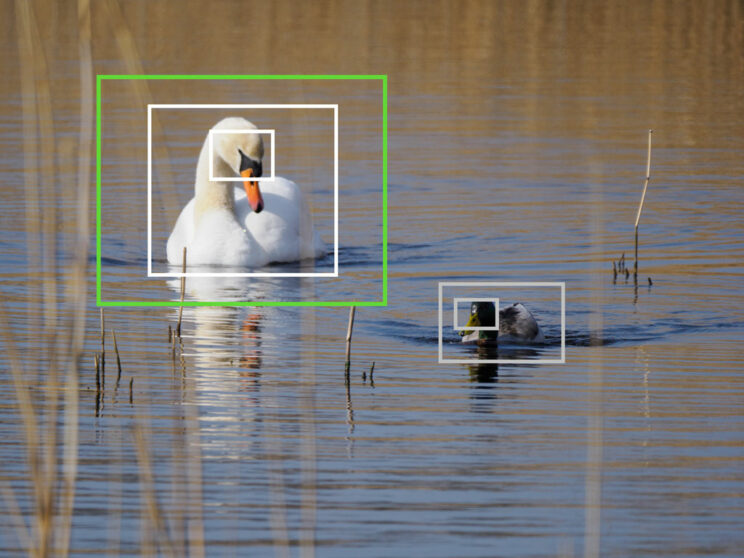
Let’s say you want the swan in focus. The quickest solution is to move the Large Target over it. There is enough distance between the two subjects, so the Target won’t overlap with the white area on the right, and the camera will only concentrate on the swan.
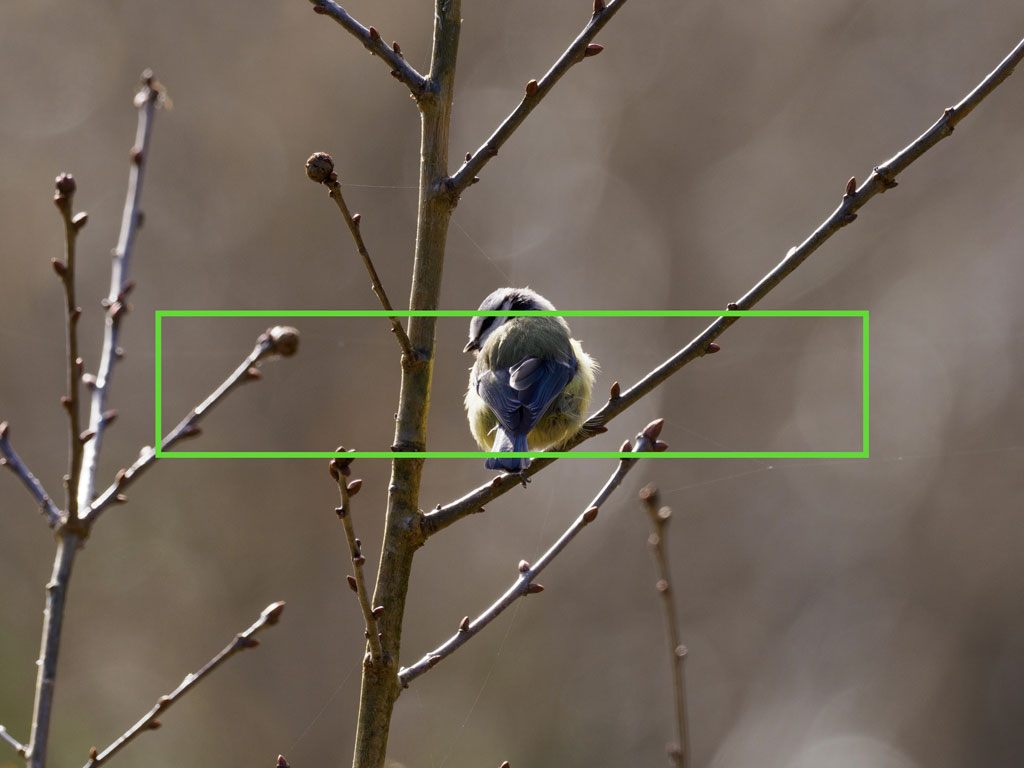
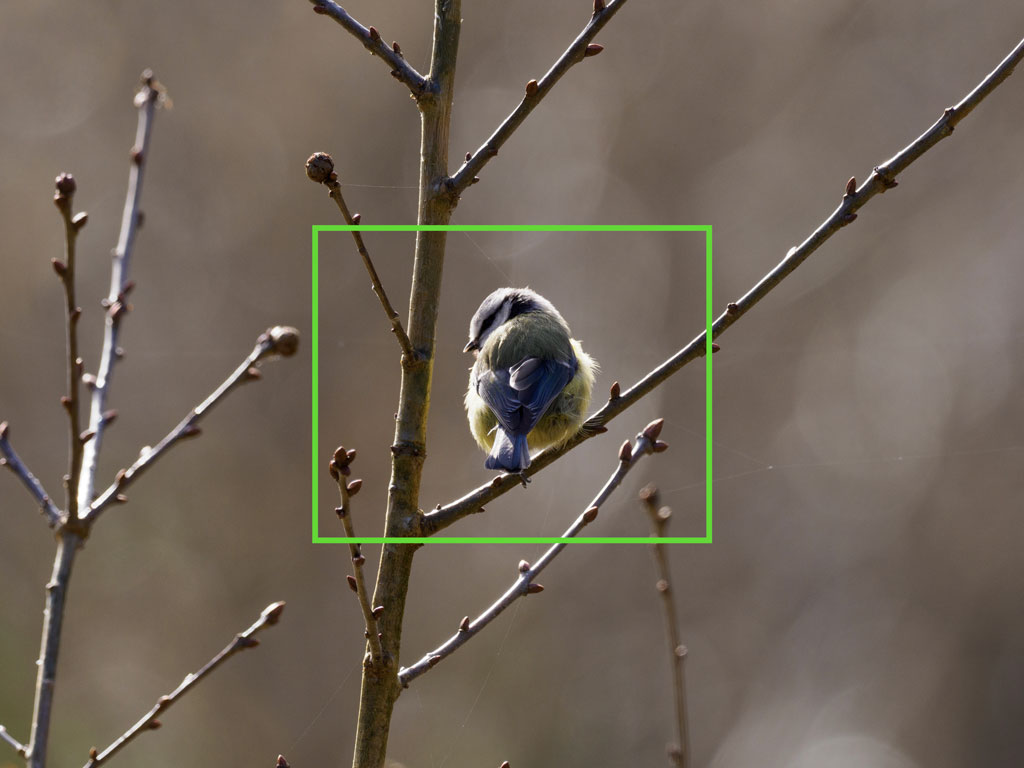
In the second situation, the cormorant and the gull are much closer to one another. Here, the Large Target won’t work well. Even if I position it on the cormorant, part of it will still overlap with the gull’s area.
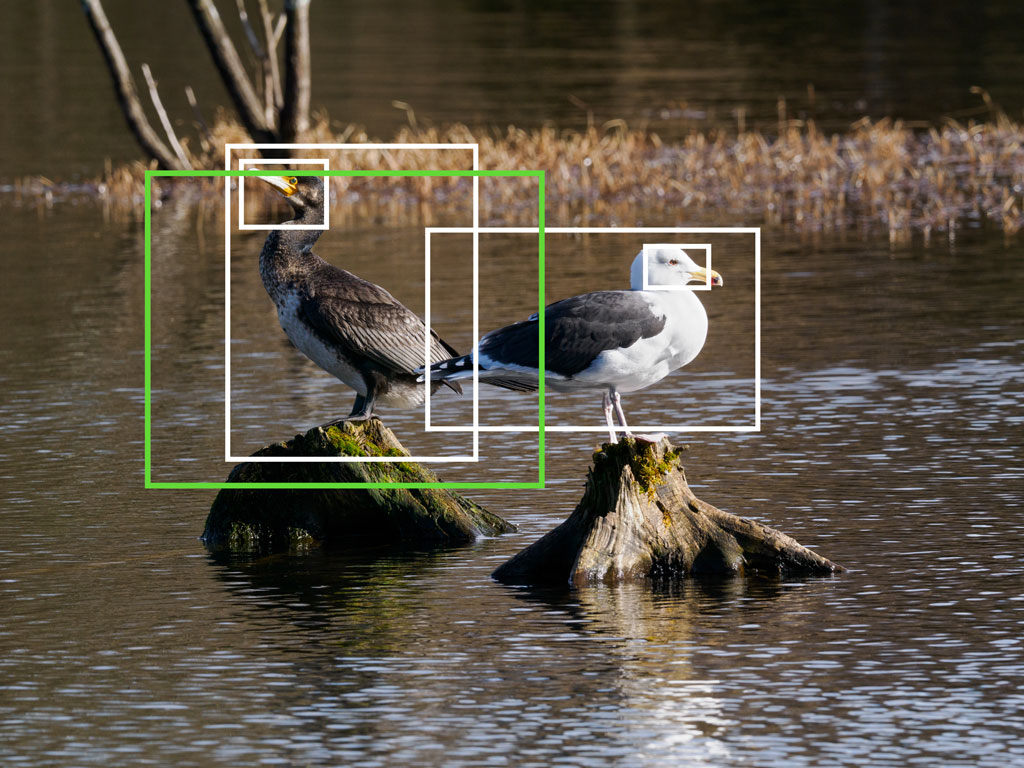
You would think that the camera is smart enough to understand that the cormorant is the subject I want, but in my experience the OM-1 can hesitate. It can focus on the less obvious subject depending on the light situation or the position of the bird, or it can constantly switch from one to the other.
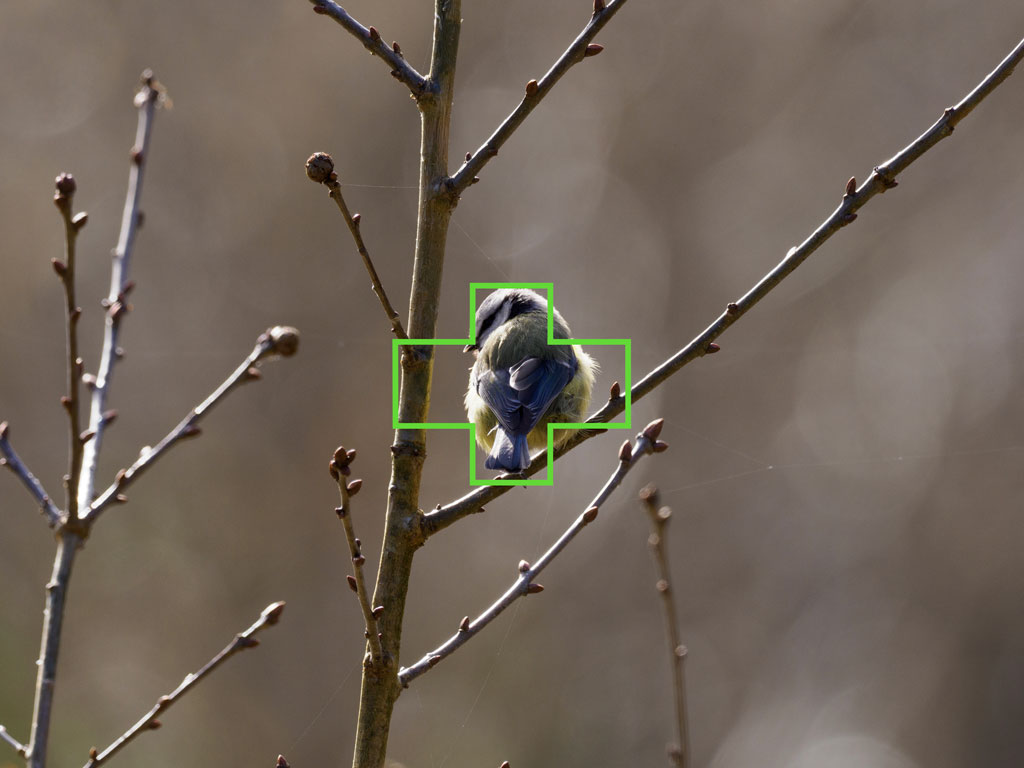
A smaller Target like Cross could work, but as you can see there is still a small part of it that overlays with the gull’s focus area, and unfortunately that can be enough to trigger some confusion for the camera.
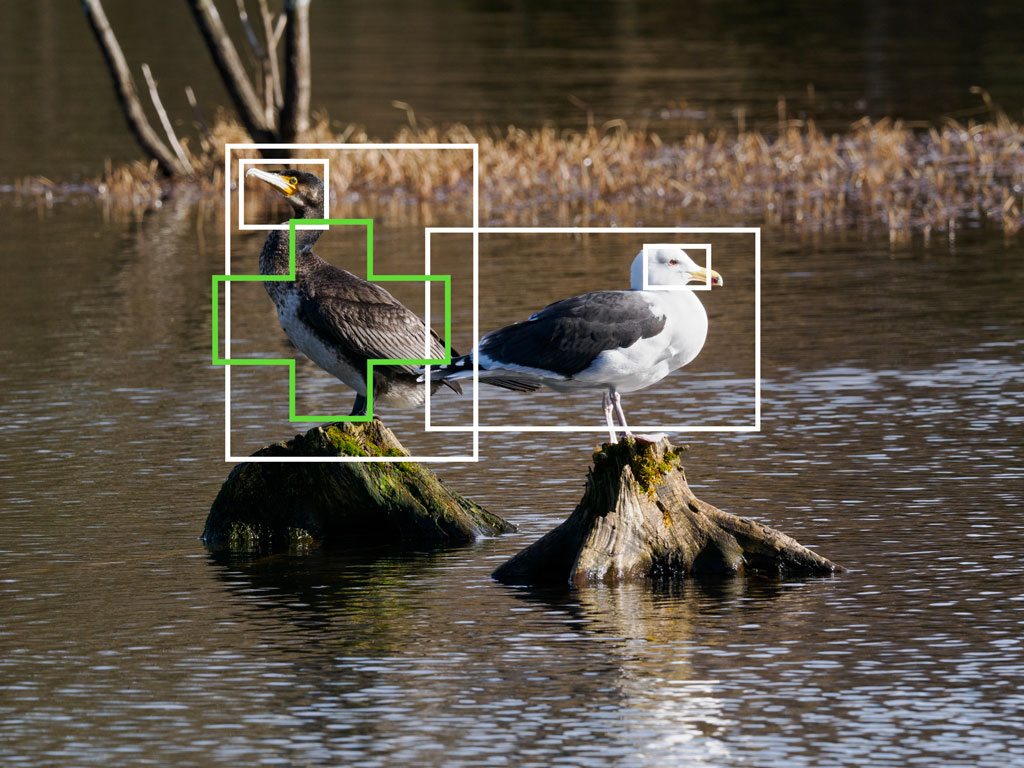
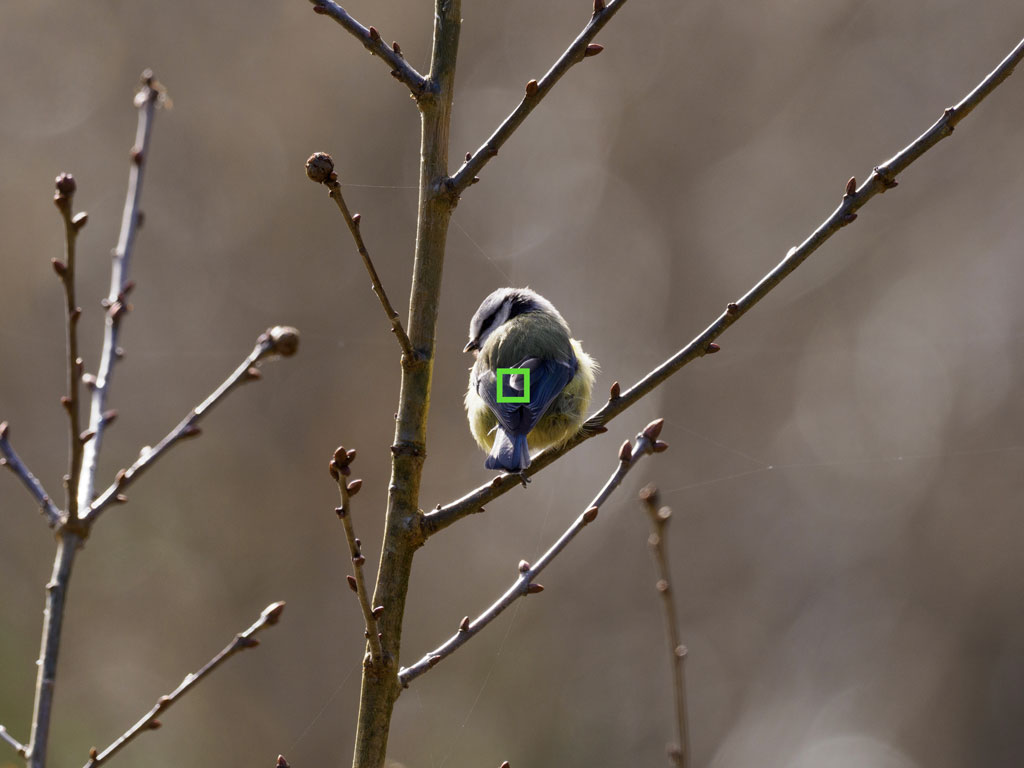
The safest solution in this case is to use the Small AF Target. That way, there is no risk of that Target ‘touching’ the gull’s detected area, and the OM-1 will only focus on the cormorant. Note that you don’t need to place the Target precisely on the head of the bird. The camera will take care of that automatically.
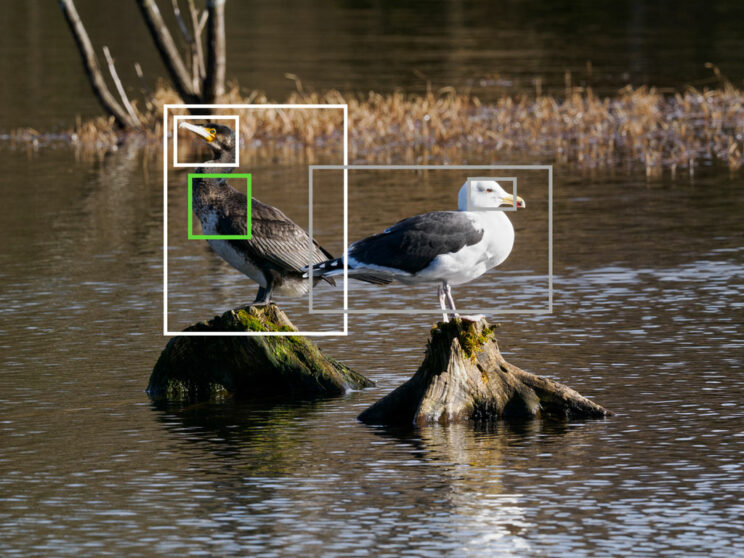
The takeaway is that with two or more subjects in your frame, a small AF Target will give the camera a better clue of who’s the important subject to focus on.
This relationship between Subject detection and the AF Target may appear to lack precision, but there are situations where it becomes very useful.
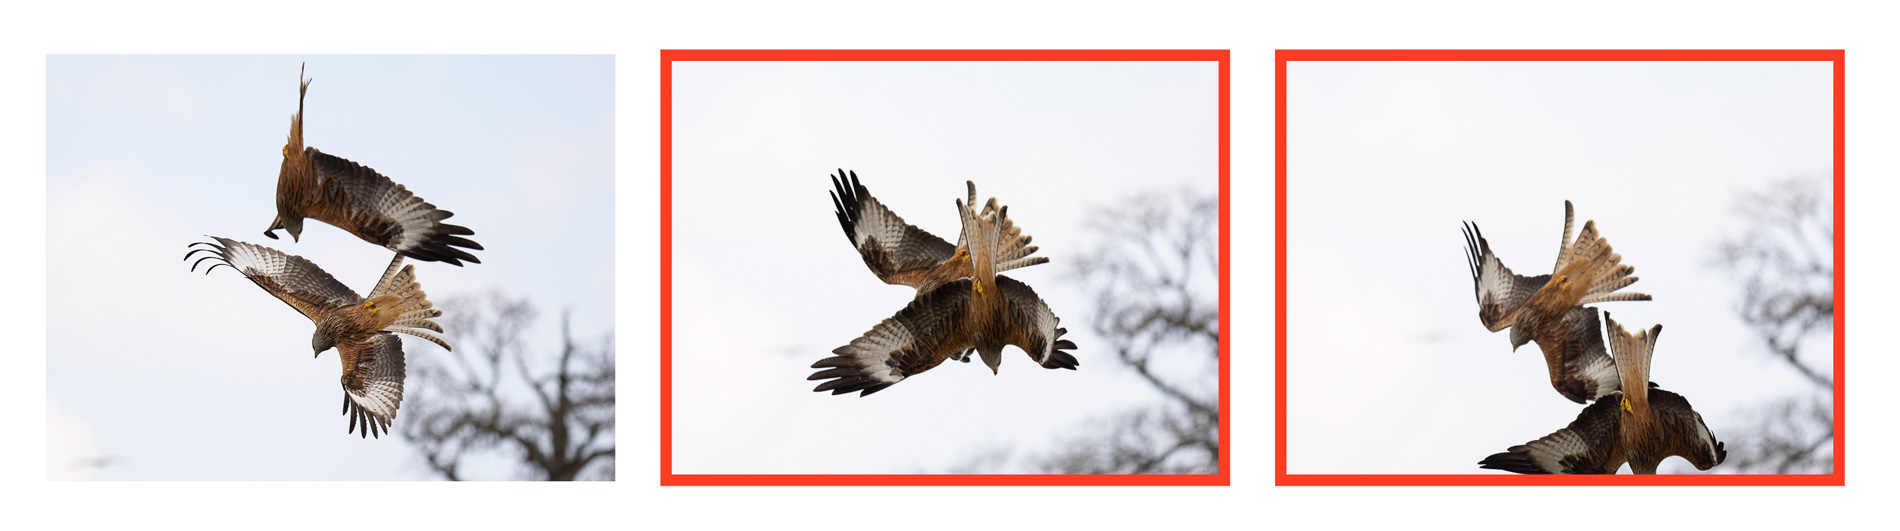
The following images are an example of bad tracking on my part, where I couldn’t keep the red kite inside the Large Target (green). However, because the bird detected area was overlapping with the Target area, the camera was able to maintain focus. Evan a small overlap, like the one shown below, is enough for the camera to keep focus on the subject.
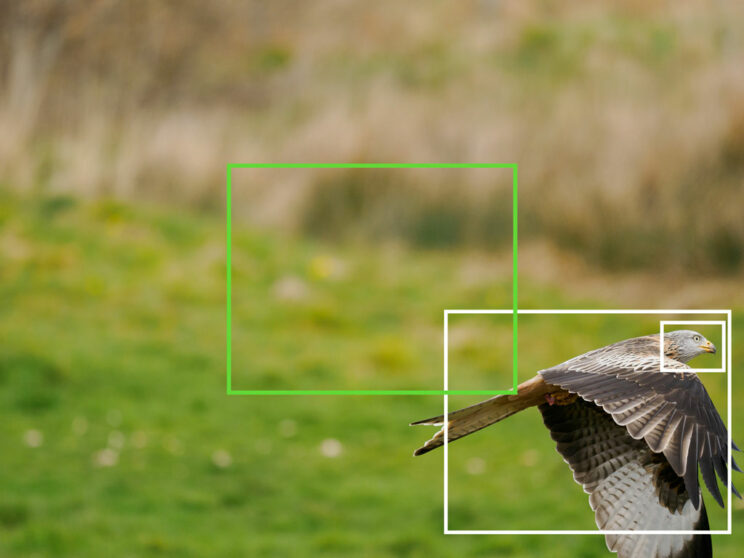
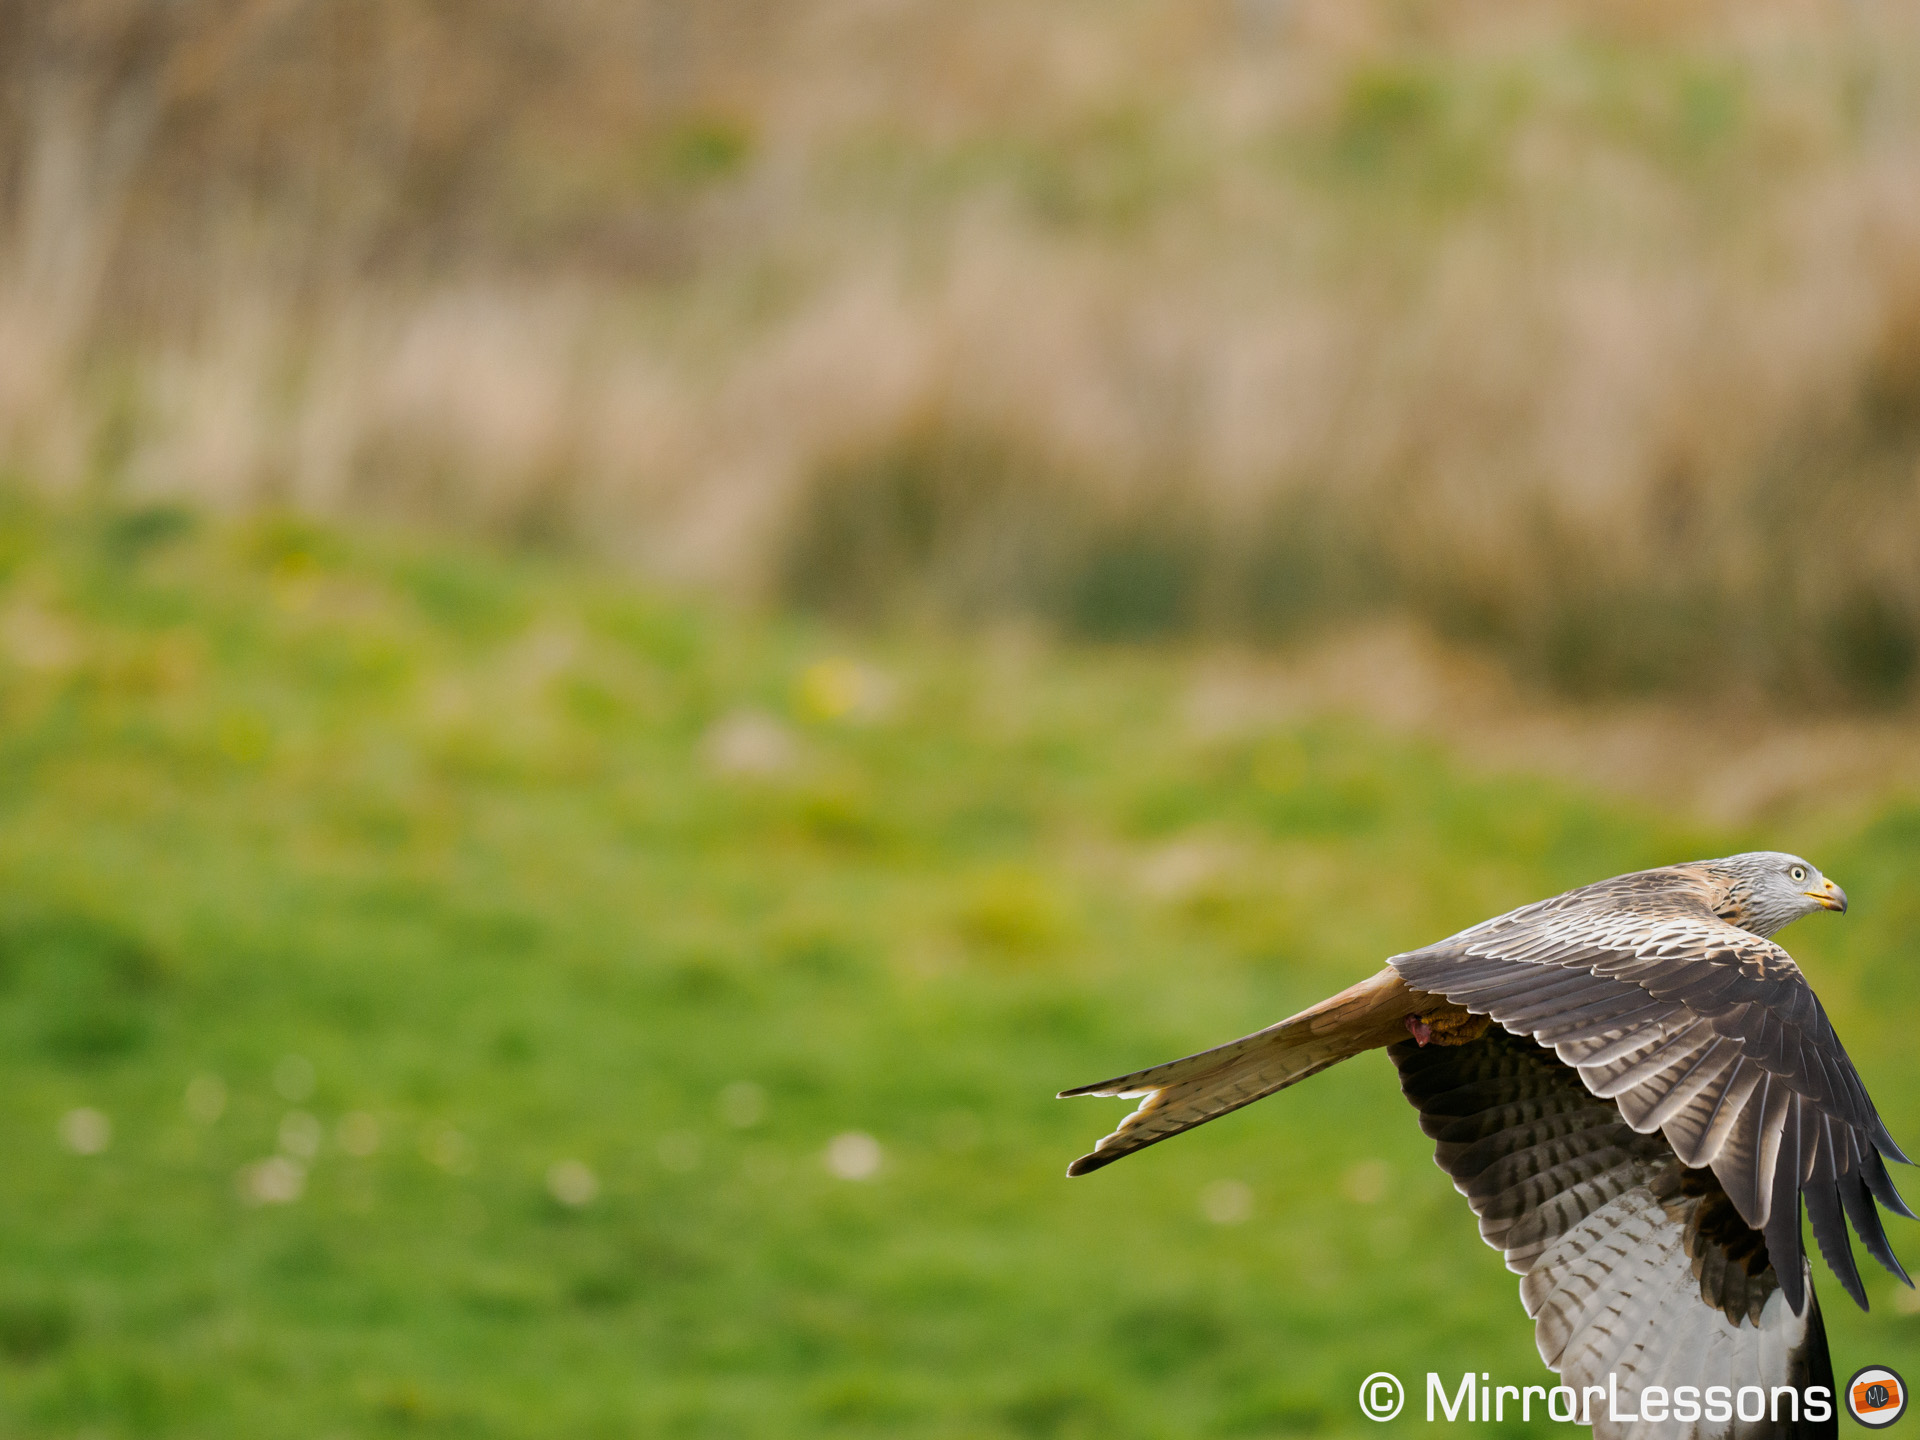
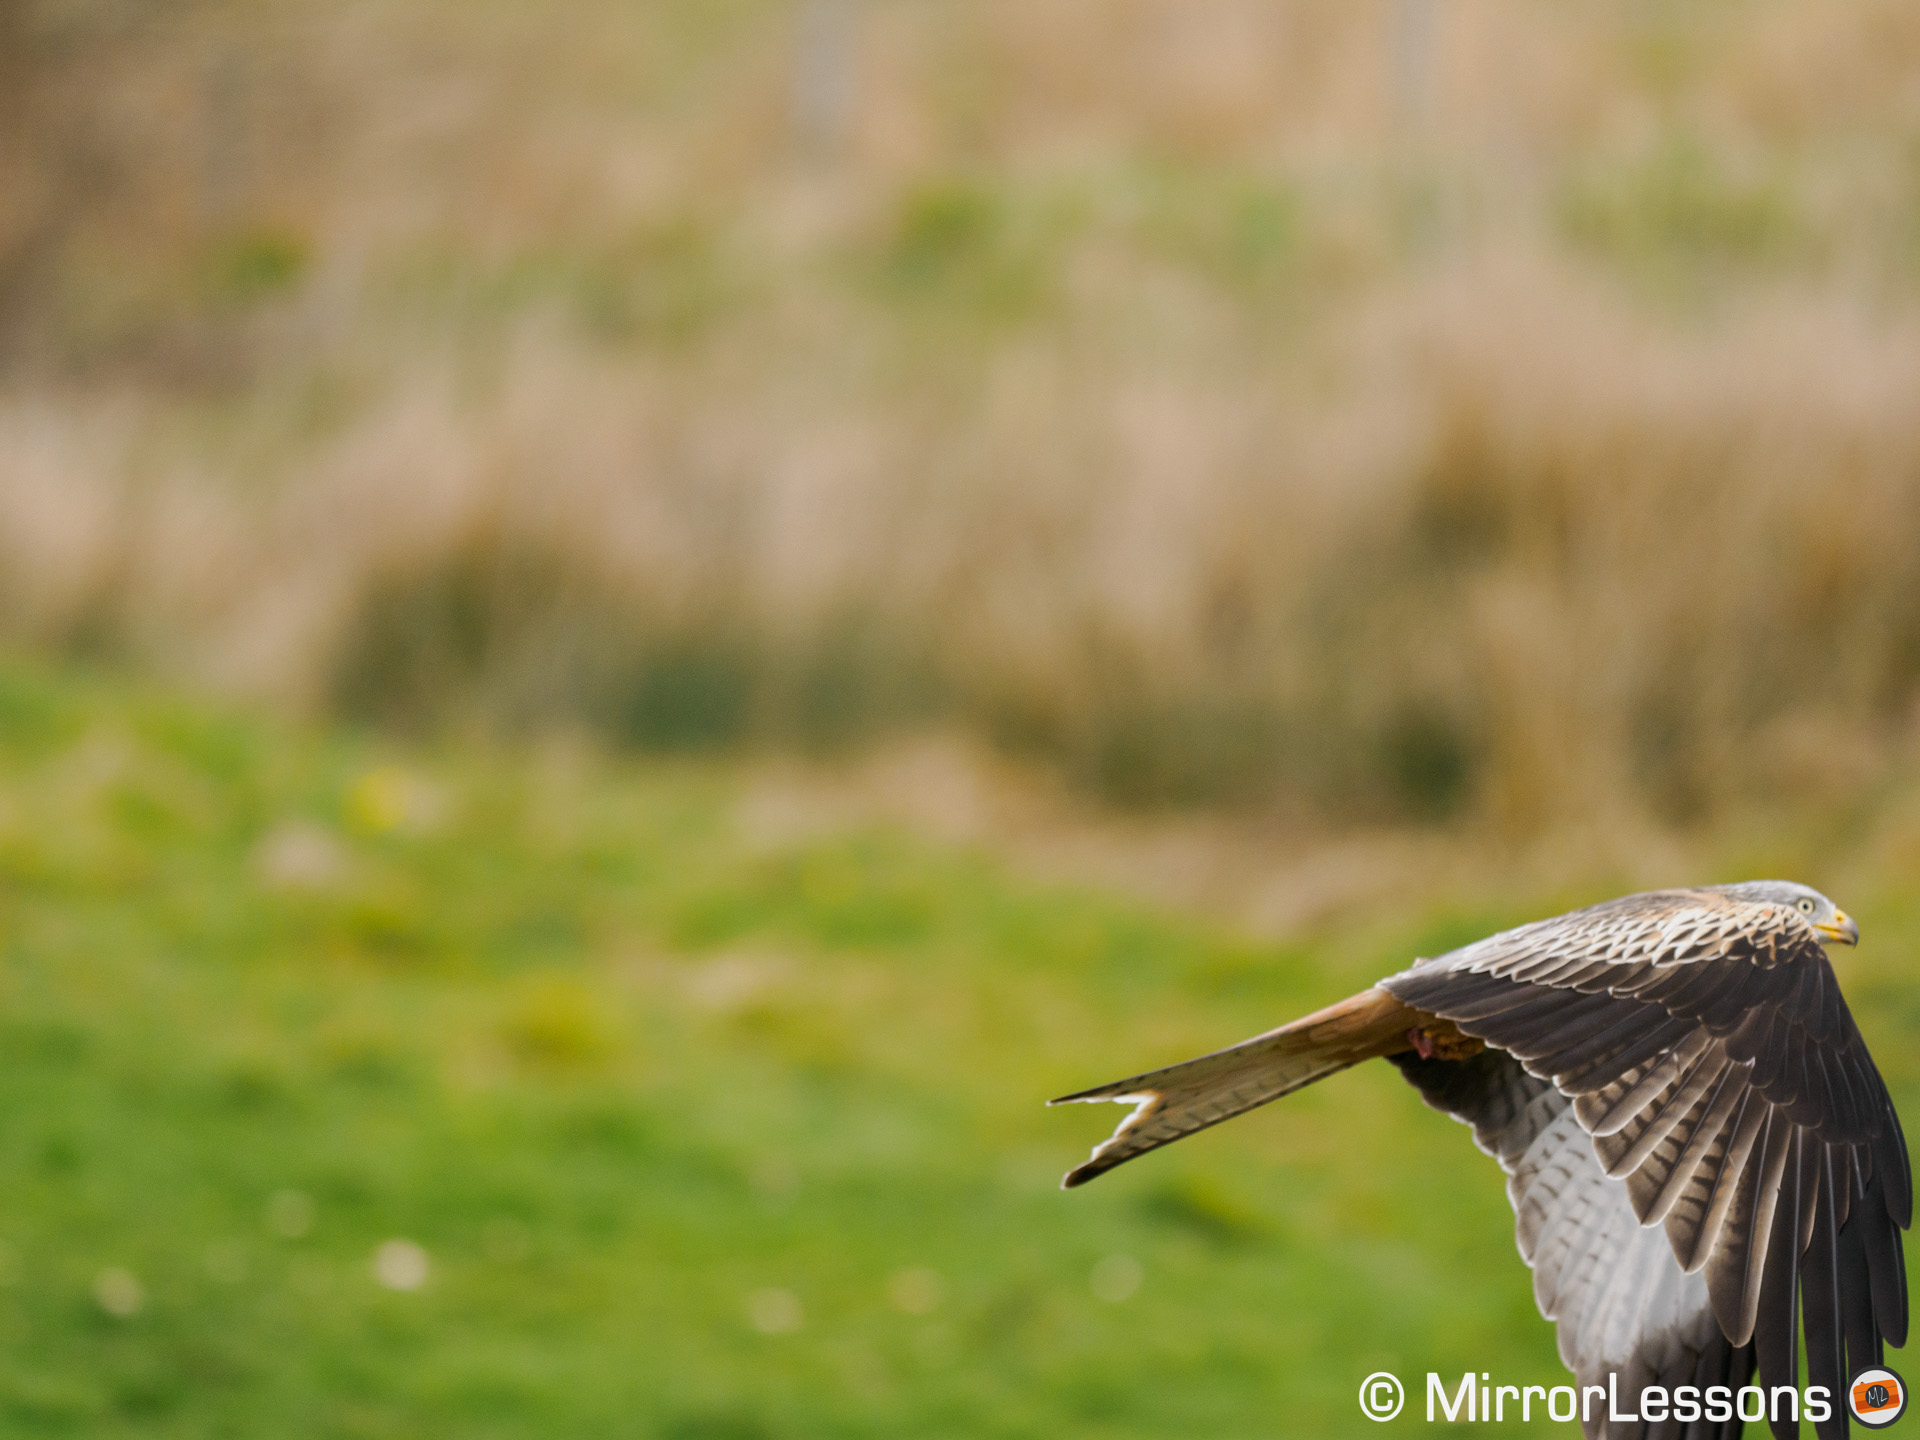
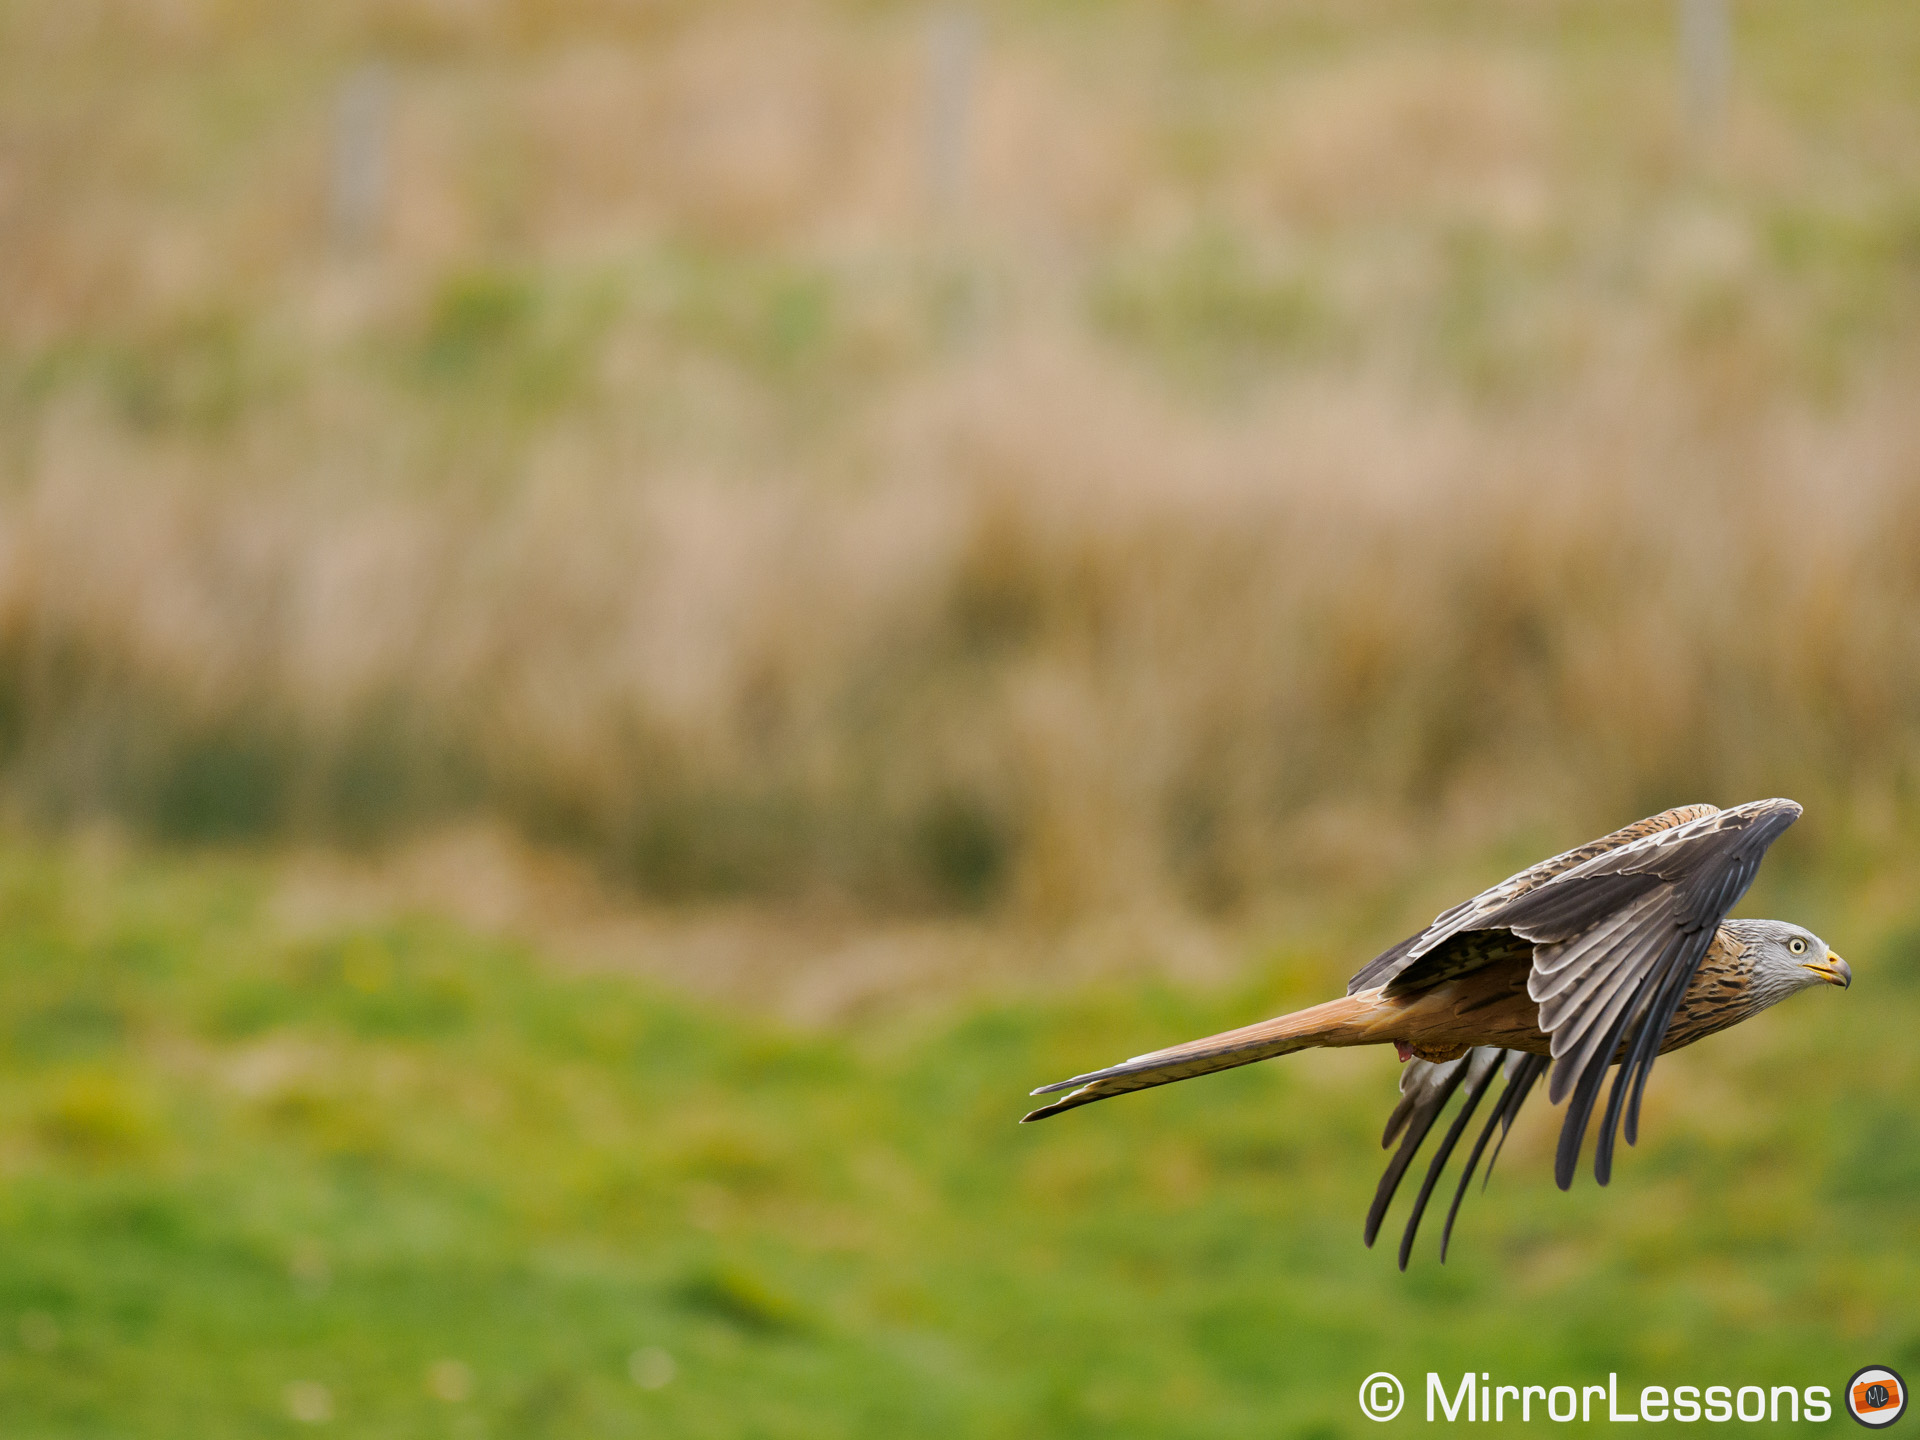
This means you don’t need the largest Target available, even when you’re struggling to keep the subject at the centre of the frame. In my experience, most of the time the camera was able to maintain focus on the bird in flight even when it was at the edge of the frame.
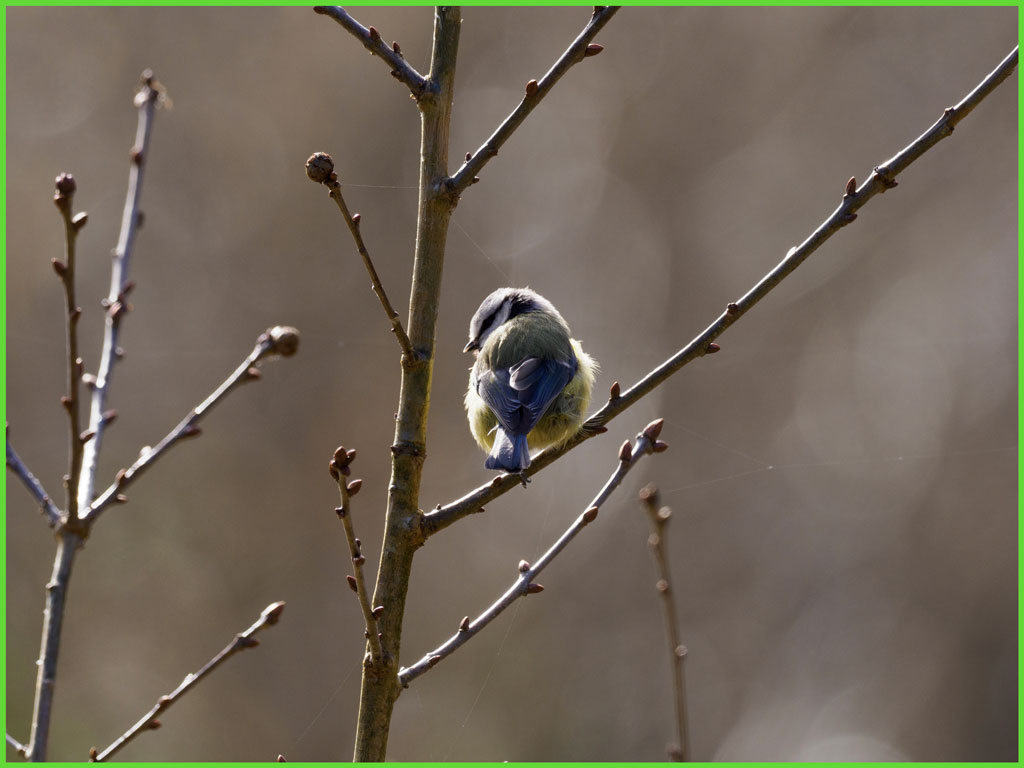
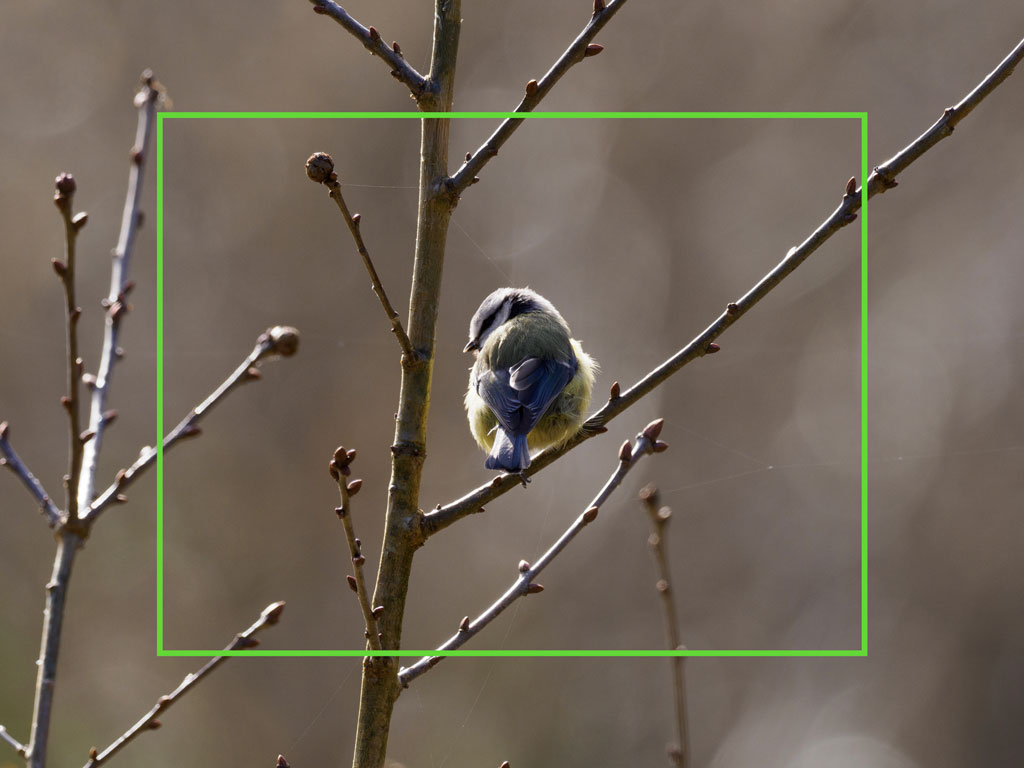
Another tip I can give you is in a situation where you find the camera focuses on the foreground rather than the bird itself. Try reducing the size of the AF Target. The fact that the OM-1 will still track the bird even if it is not precisely under the Target area gives you a bit of leeway with your movement.
Another option you can try is to create a custom Target with a horizontal shape, and position it slightly upwards so that it excludes the area at the bottom of the image (water or grass for example) as much as possible.
Examples with AF Target and Motorsport Subject Detection
What I described above works with other type of subjects. I noticed the same behaviour when I photographed a local bike race. Here is another set of examples.
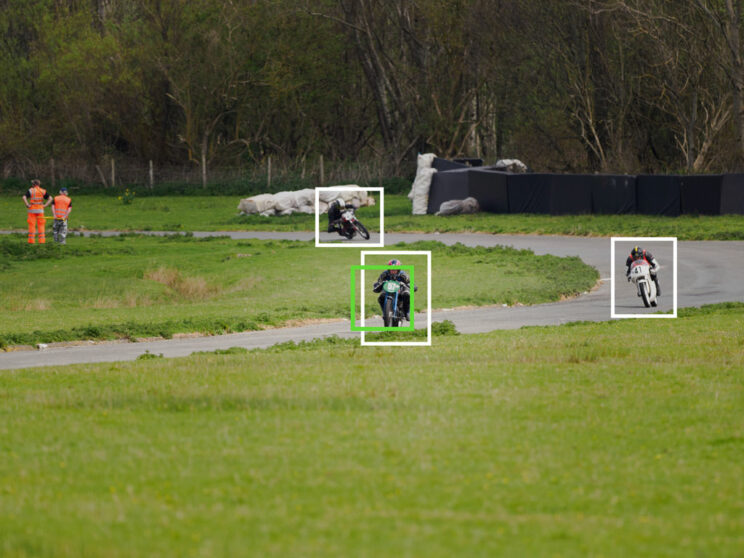
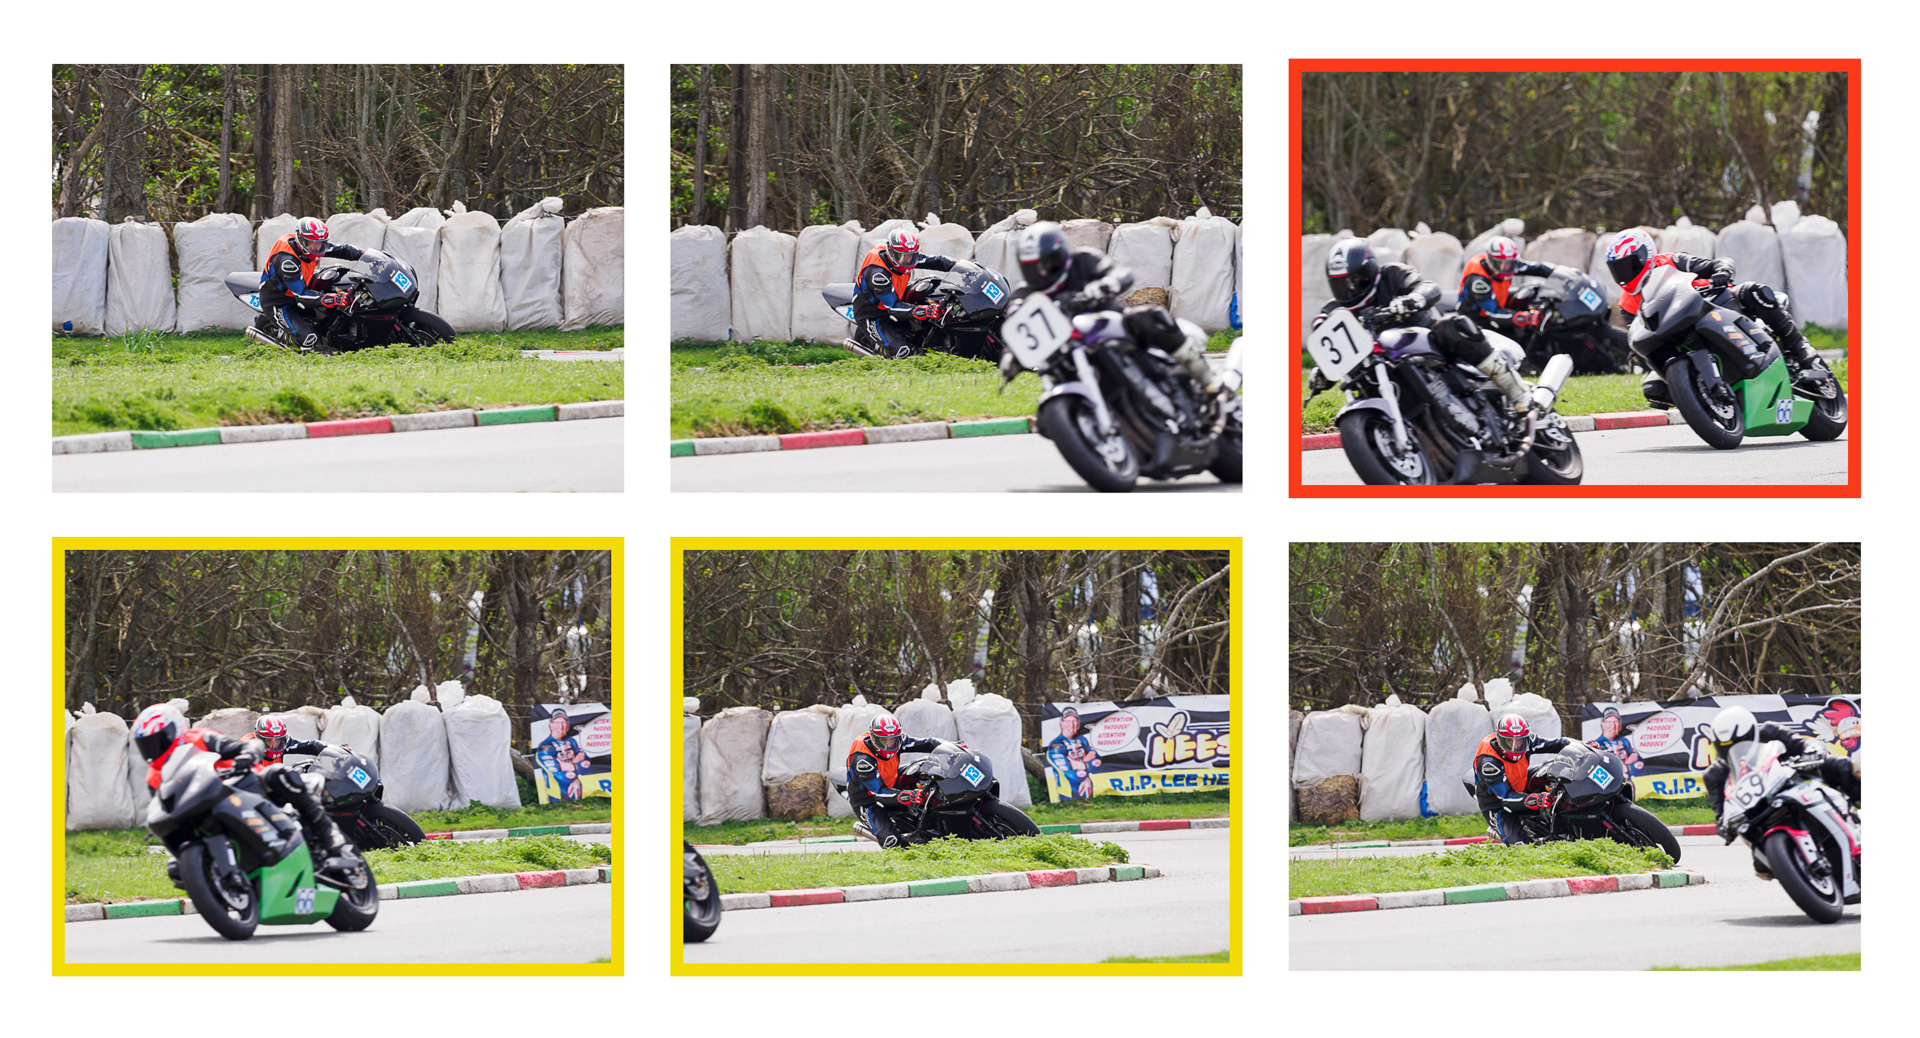
With the biker far in the distance, I initially used the Cross Target, but I noticed the camera would often switch to the rider behind him because its area of focus and the Cross Target briefly ‘touched’. I’m not sure why the camera would want to prioritise the subject in the background rather than the one in the foreground, but unfortunately it can happen.
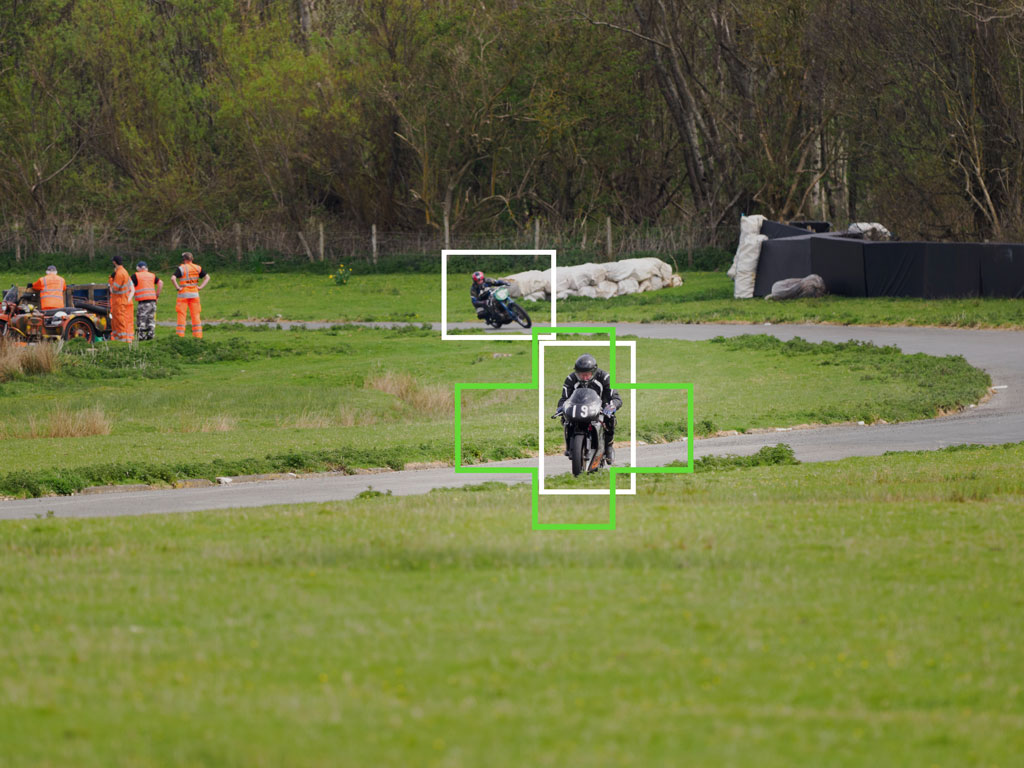
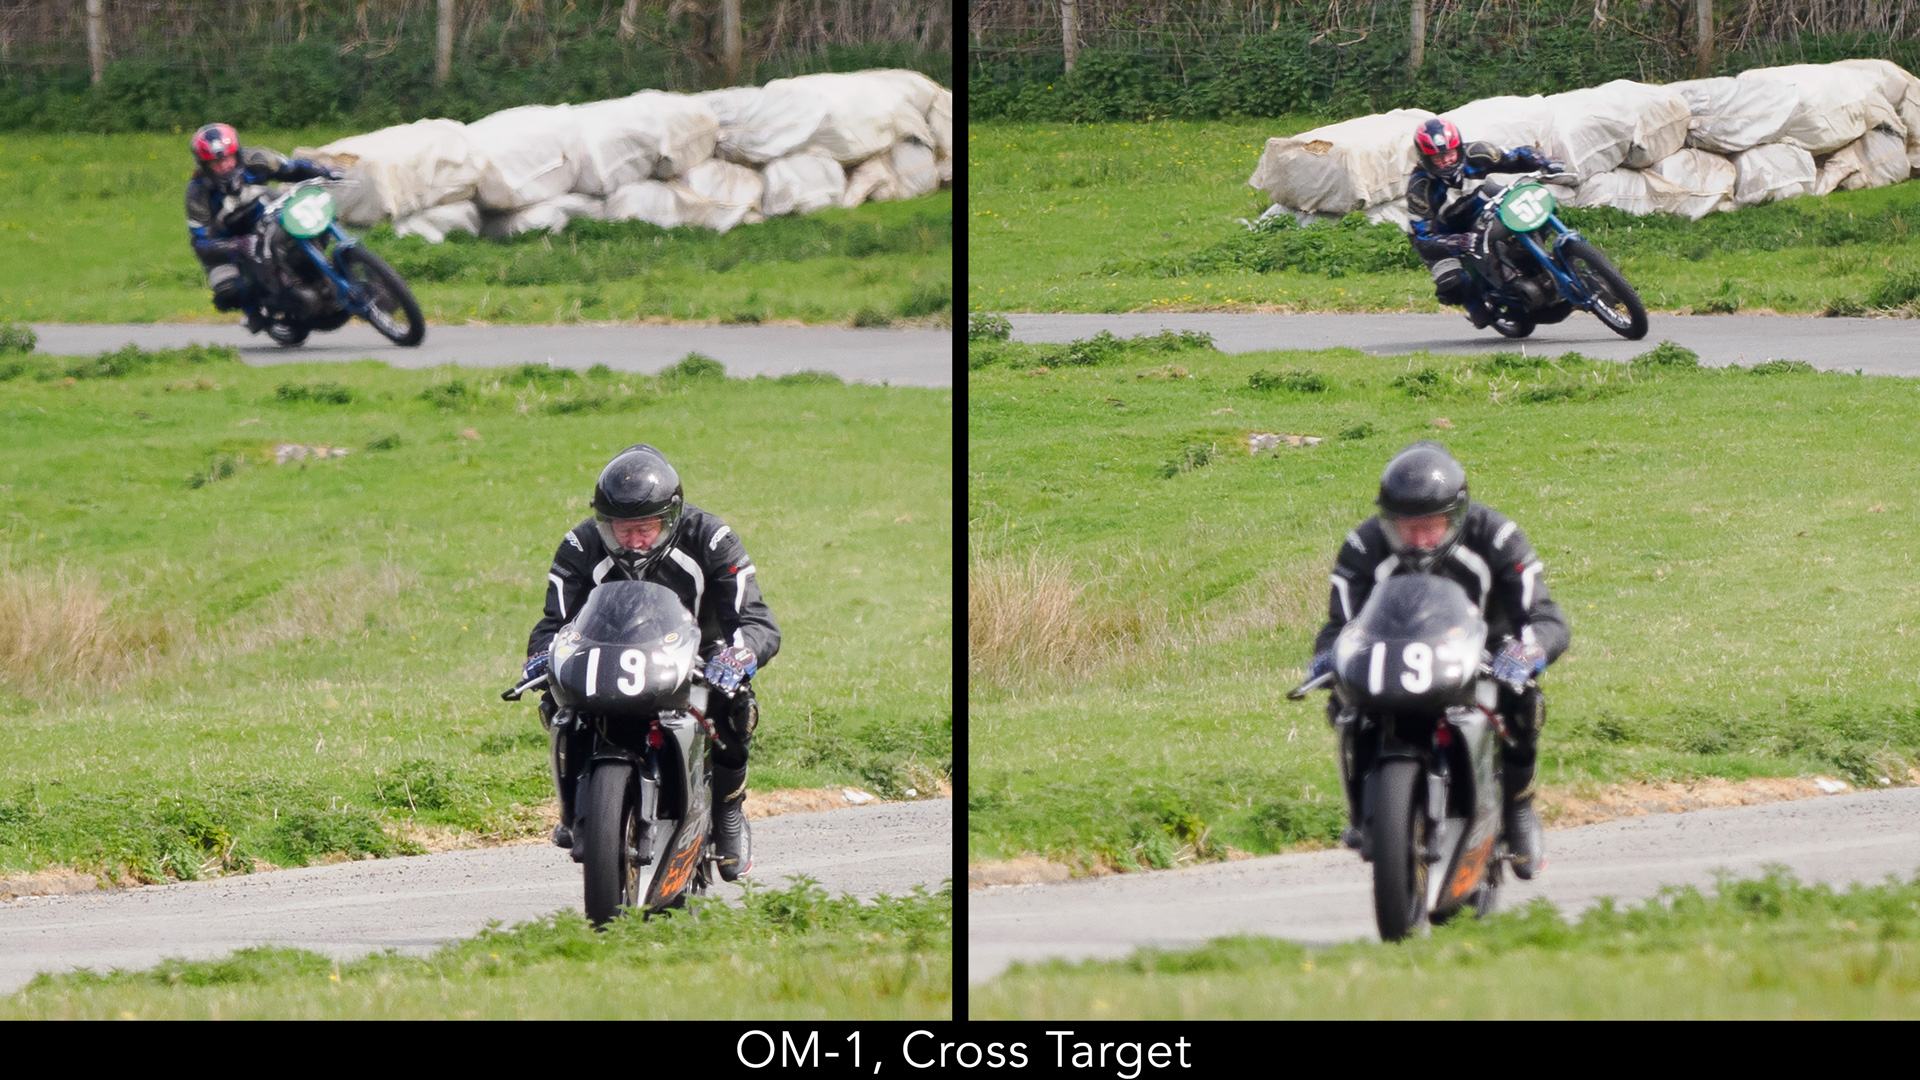
Chaging to the Small Target solved the problem. Perhaps a future firmware update will improve the camera’s behaviour, but in the meantime, choosing the right Target can help you a lot.

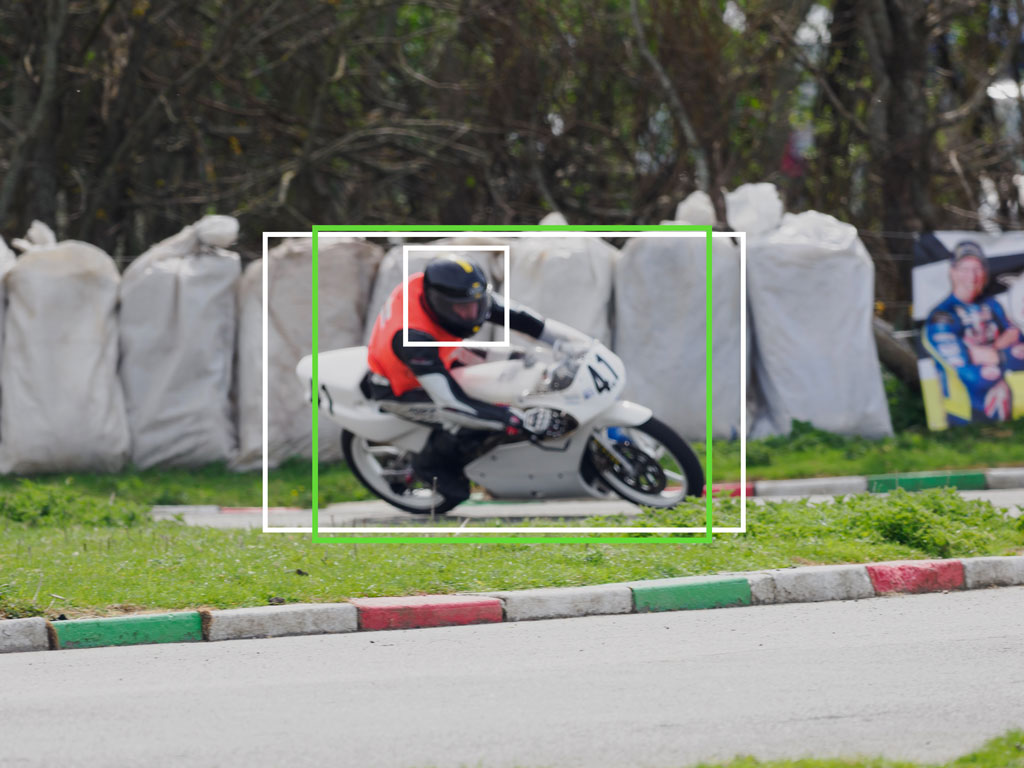
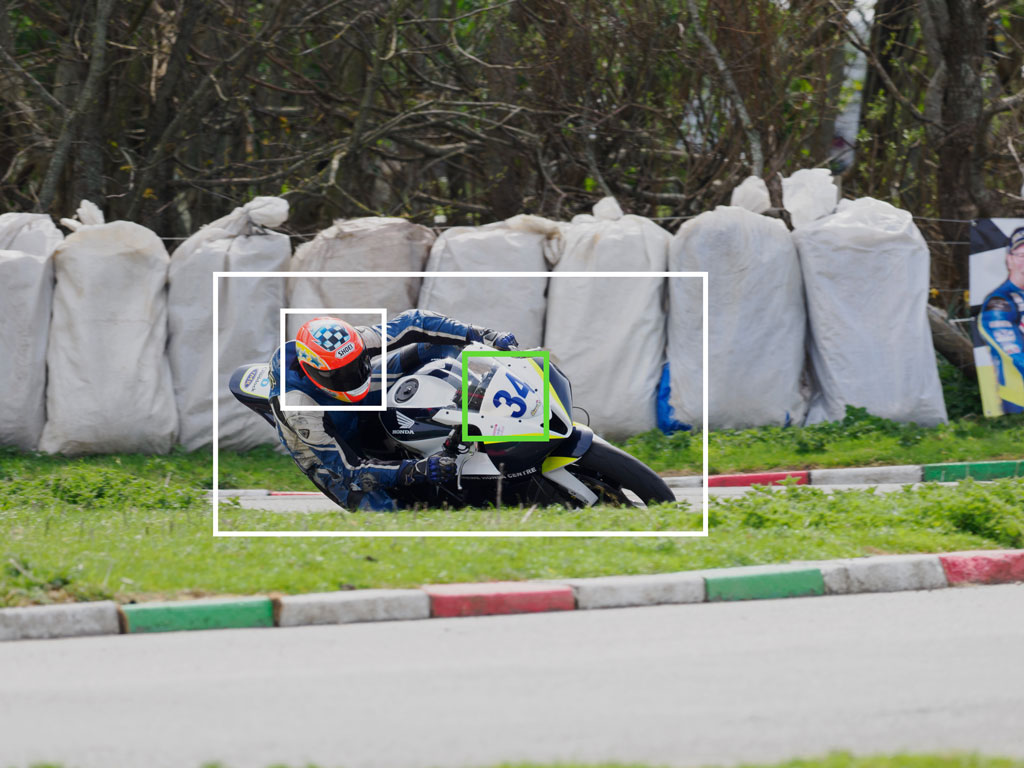
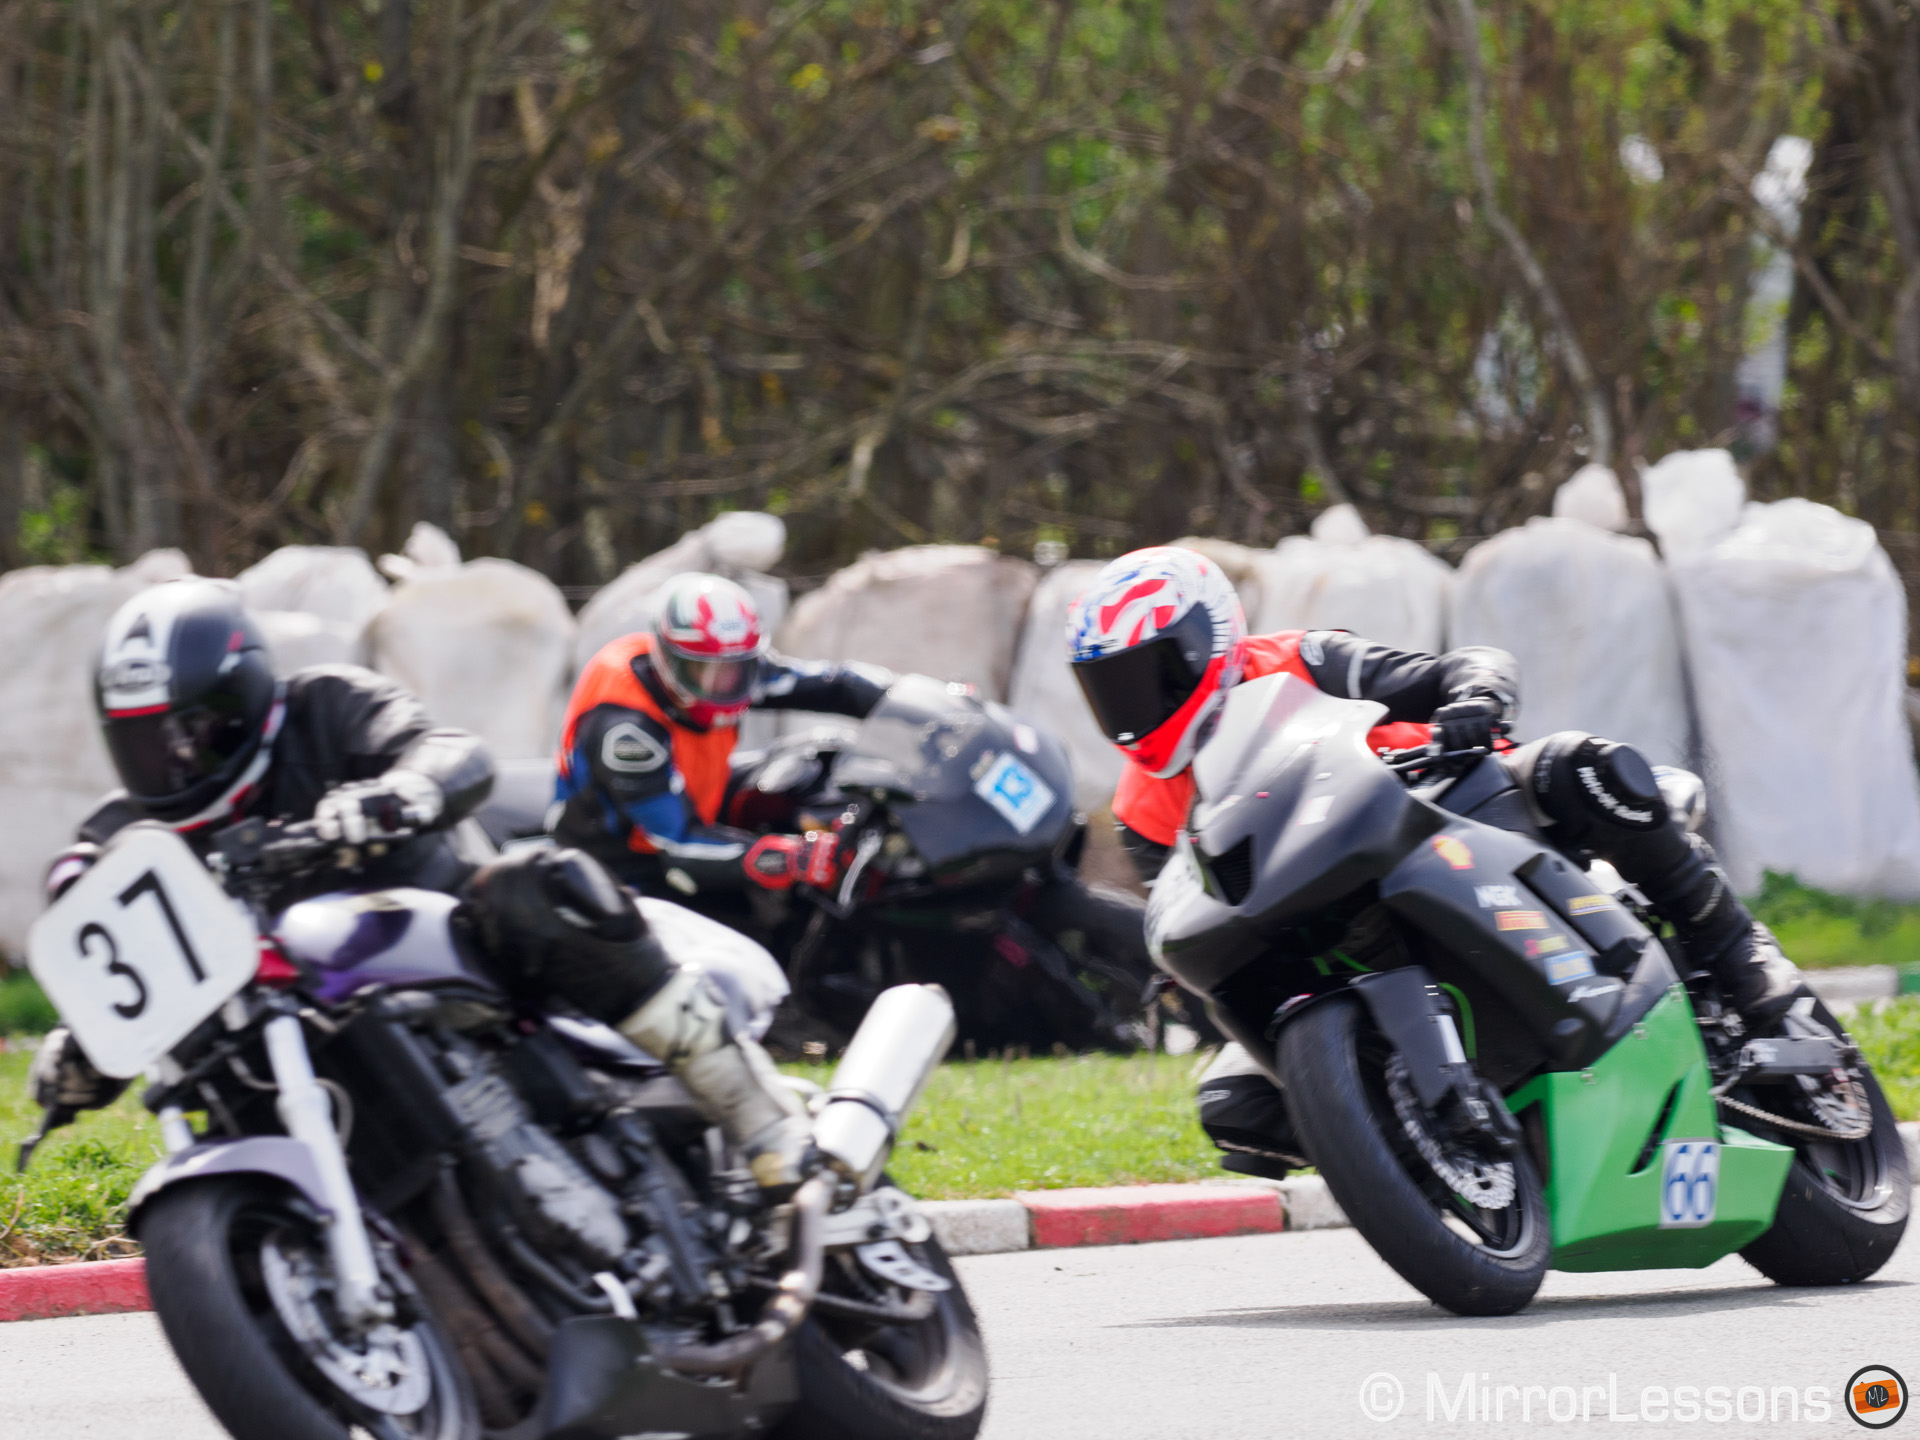
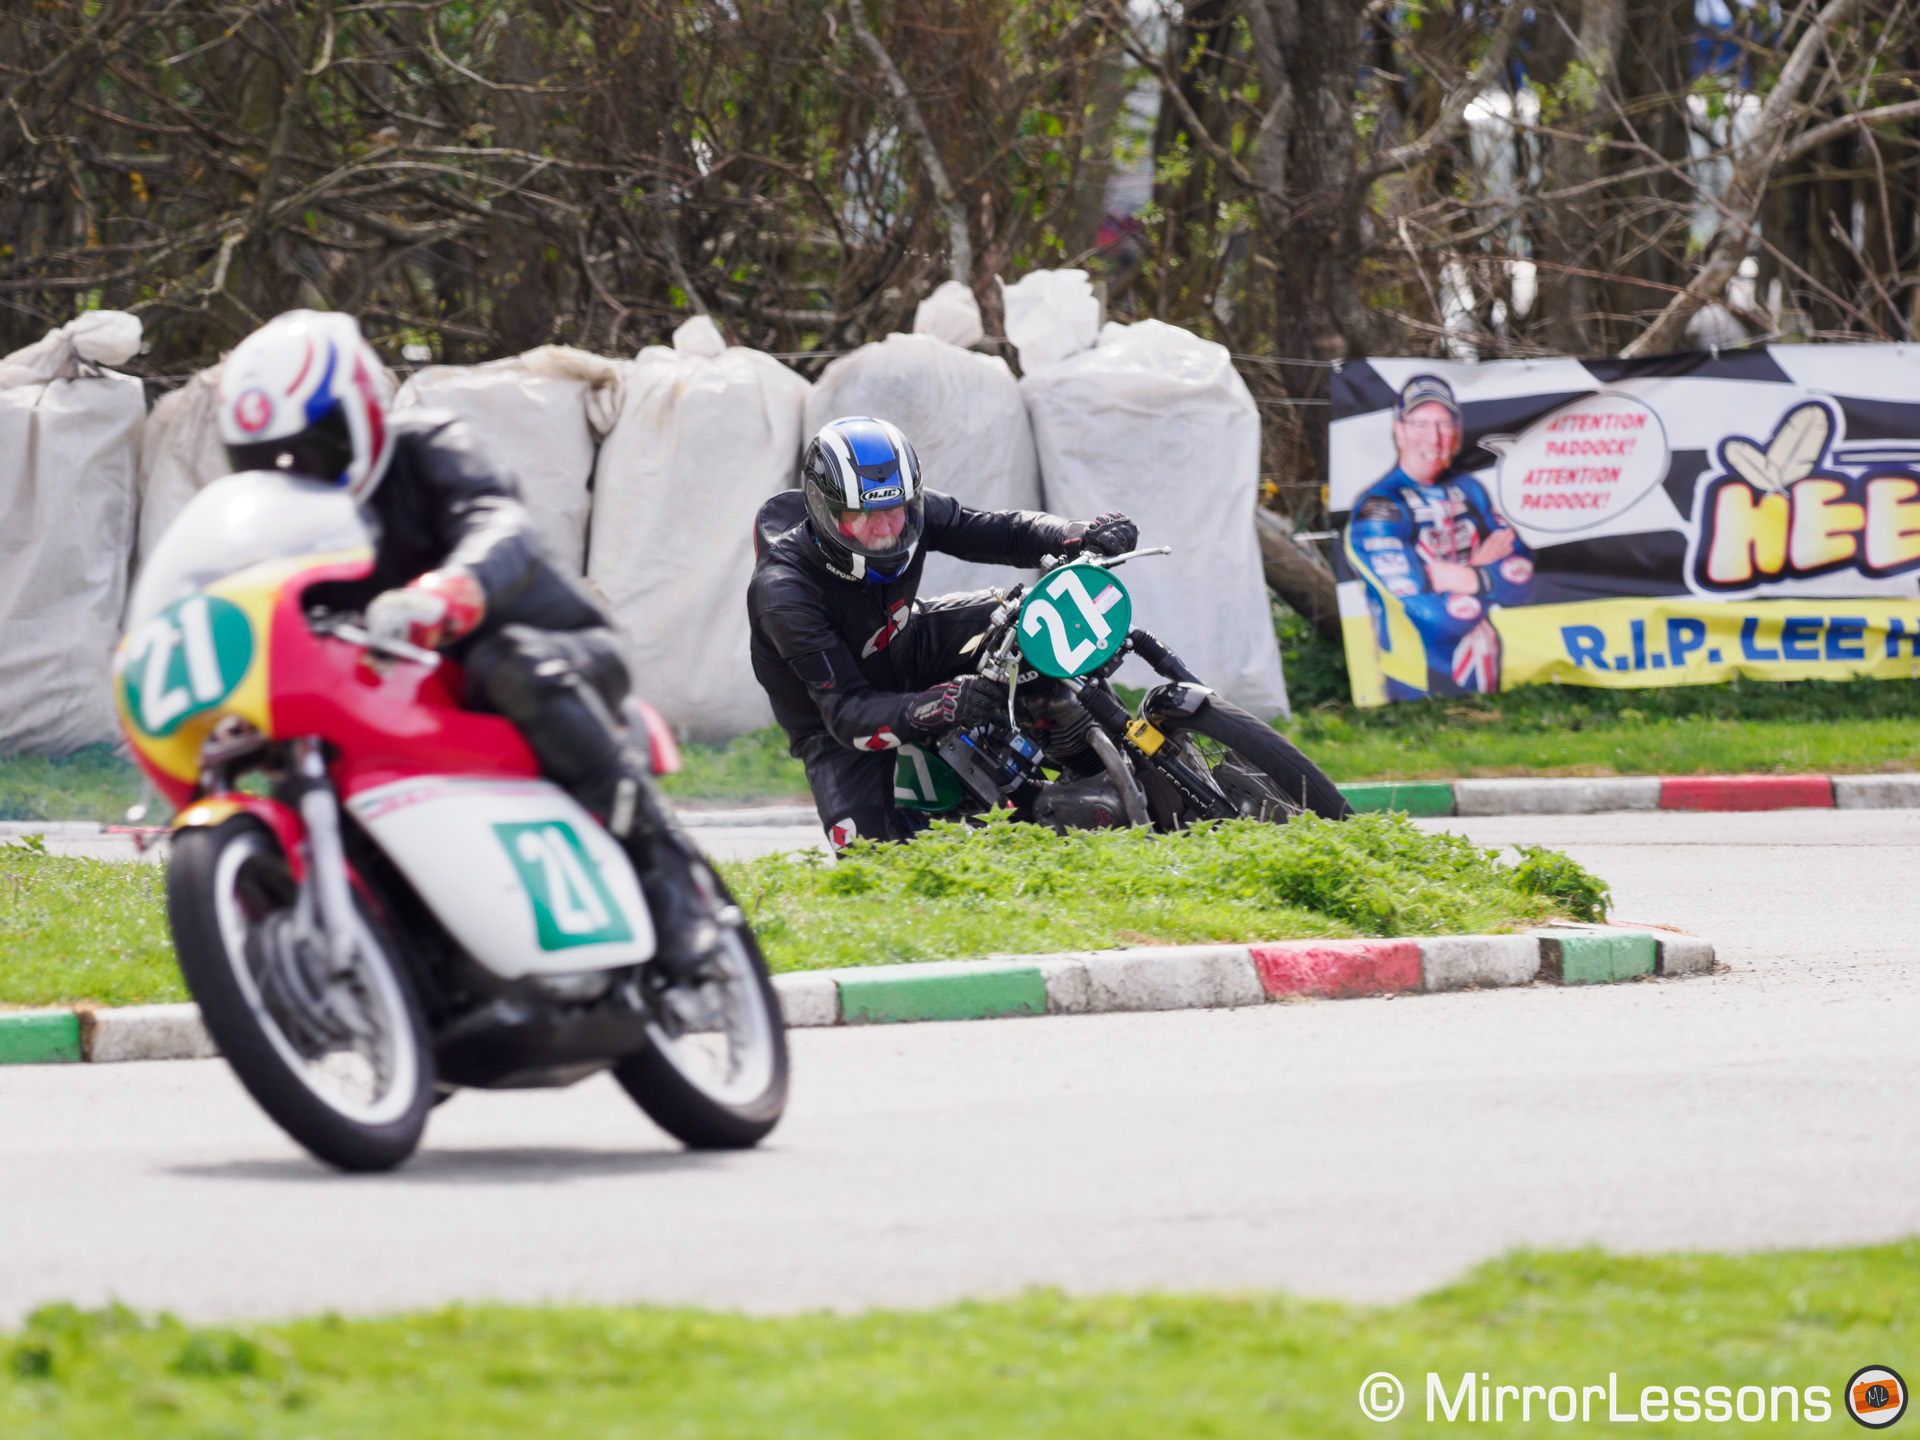
The second example is something I’ve already mentioned in my review. In this particular corner, the OM-1 had a bad habit of choosing the tarmac in the foreground rather than the biker turning around the corner. Here as well, the Small Target solved the problem.
What about face and eye detection for humans?
Face and Eye detection for people works differently. It is not part of the A.I. Subject Detection mode, but is another setting altogether. Furthermore, the camera behaviour is a bit different.
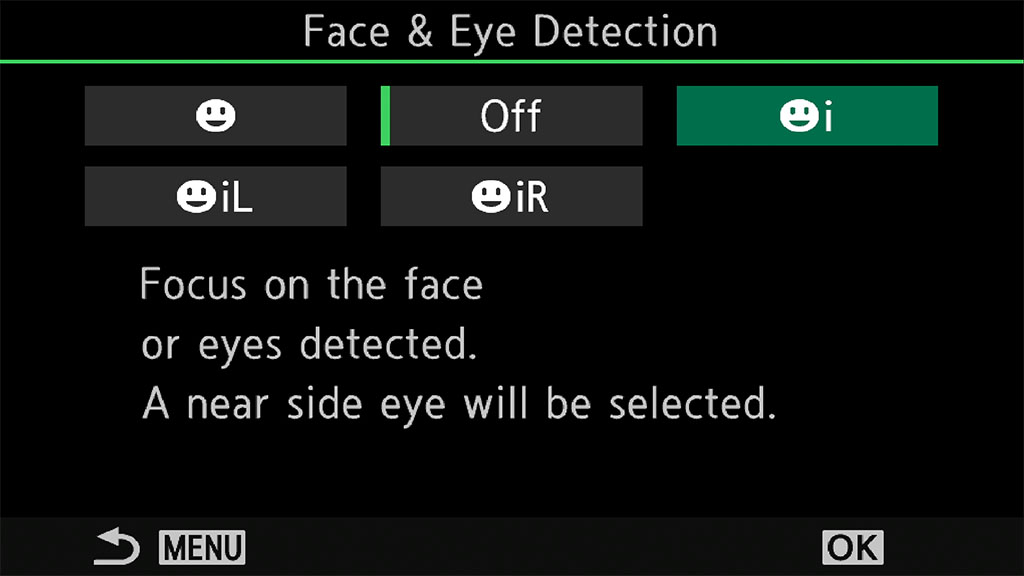
You can activate Face and Eye detection in the menu (AF Menu / Page 2) or super control panel, and you have different options like prioritising the left or right eye. Avoid the face only option, as you may end up with the eyes slightly soft.
In the AF Menu / Page 2, there is also a second setting called Face & Eye AF Button, where you can choose to prioritise the detected person, or the AF Target.
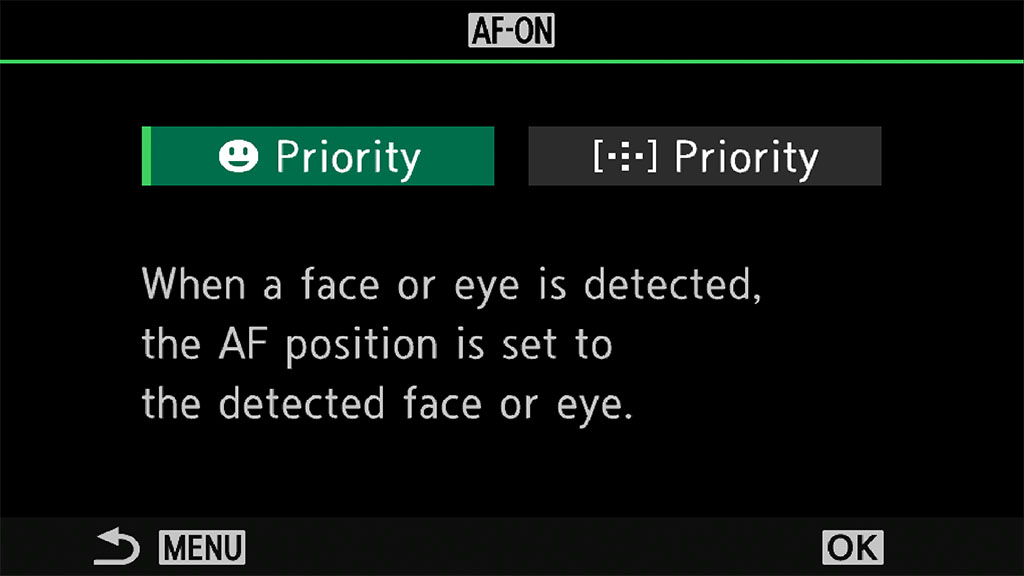
If you choose Face Priority, the camera overrides all AF Target sizes and positions. For example, if the person is on the right and the AF Target is on the left, the camera will ignore the Target and focus on the person. This specific behaviour is not available with the A.I. Subject Detection mode.

If you choose Target priority, the opposite happens: the camera will focus on the left and ignore the person on the right. The same happens when using A.I. Subject Detection.
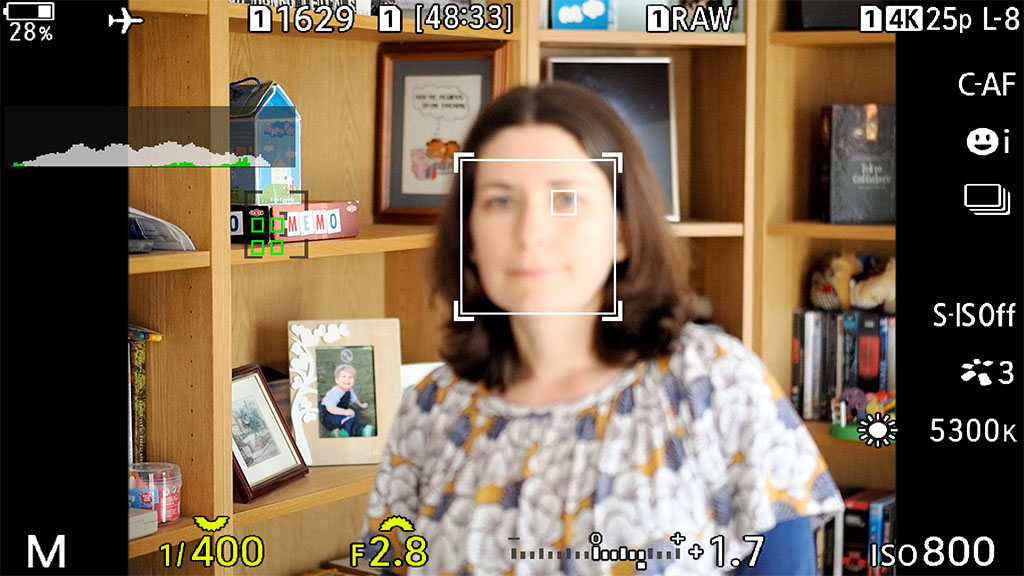
Note that the camera will skip the eye of the person even if the AF Target is on the subject. For example, if the Small Target is on the mouth, that’s where the camera will focus even if the face and eyes of the subject are detected, effectively taking away the advantage of this function in the first place. I recommend using Face Priority.
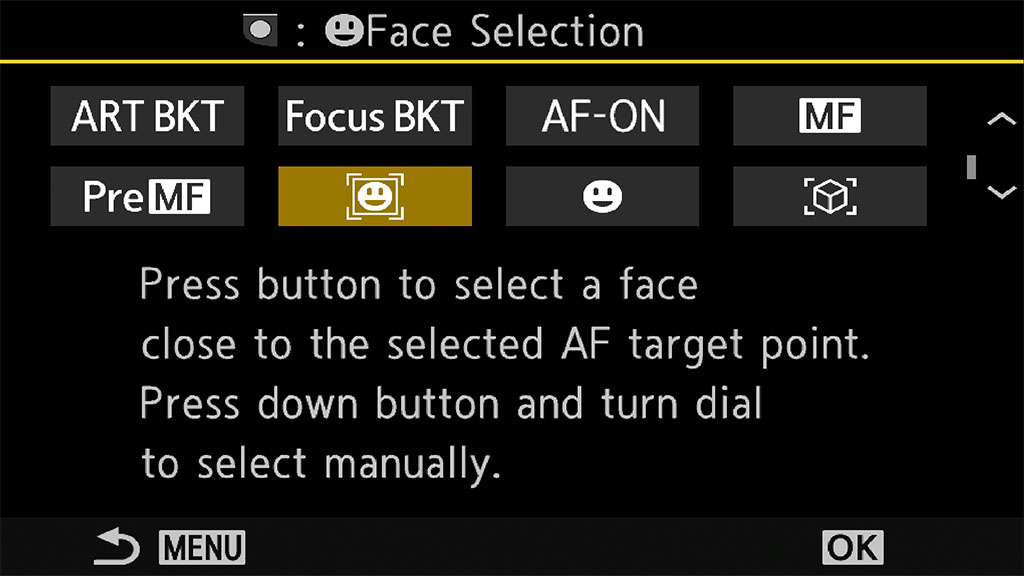
If there is more than one person in your scene, and you want to prioritise one subject specifically, there is another setting you can use called Face Selection:
- Assign Face Selection to a function button
- Press and hold that button and use one of the two dials to quickly switch between the various faces.
This is something that would be nice to have for animals as well, as it is a quicker way to jump from one subject to the other, rather than moving the AF point.
Alternatively, you can also select a person’s face with the touch screen.
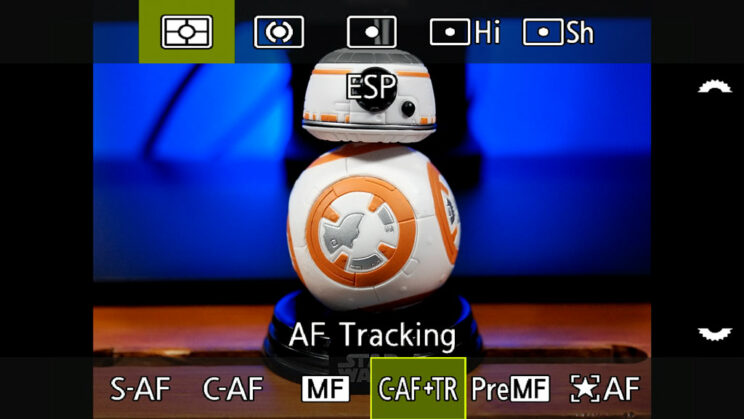
C-AF vs C-AF + Tracking
Like most Olympus cameras, the OM-1 has two settings for continuous autofocus:
- C-AF (Continuous AF): it tracks the subject within the AF Target you selected (if you choose All Target, it prioritises the centre)
- C-AF + Tracking (AF Tracking): after the initial acquisition, it tracks the subject across the entire frame, regardless of the AF Target size and position
In my tests with birds in flight, I didn’t find a substantial difference in keeper rate between the two modes, as long as Bird Subject Detection is active.
AF Tracking can be useful for subjects that move very erratically, and you want the camera to be able to follow it no matter where it is in the frame. Remember that initially, you need to lock focus on the bird for the camera to track it correctly.
Personally, I prefer the normal Continuous AF mode when working with Subject Detection because, as explained above, the camera is able to follow a bird not only when it is inside the AF Target, but also when it is around it. I find Large Target + C-AF to be the best compromise for birds in flight. Also, being able to control the focus area reduces the chance of the camera focusing elsewhere, something that is not possible when using the AF Tracking mode.
Other Autofocus Settings
Throughout the article, I’ve mentioned several AF settings, so here is a description of what they do, and when it can be useful to change them. Many of these are the same as those found on previous OM-D cameras.
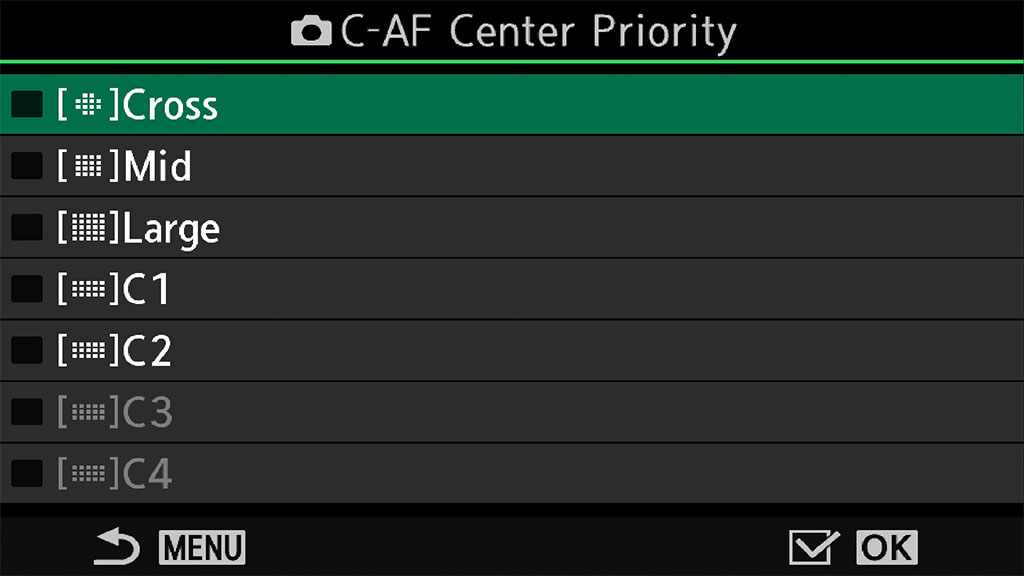
C-AF Centre Priority
Menu AF / Page 3
You can enable it for most of the Group Targets (except ALL and the Single point). It forces the camera to prioritise the centre of the Target area. The OM-1 will look elsewhere only if it can’t focus on the centre.
This is a good setting to have when following multiple subjects whose movements are easy to predict, or if you notice that the camera is prioritising subjects at the edge of the frame rather than centre (which happened to me a couple of times). That said, overall, enabling it with the Large Target didn’t make a difference to the keeper rate in my birds in flight test.
You could also think this setting helps mitigate some of the unwanted behaviour I mentioned in the previous chapter (the camera misfocusing in the foreground for example). However, I find reducing the Target size to be more effective.
Note: the C-AF Center Start setting found on previous OM-D cameras is no longer available.
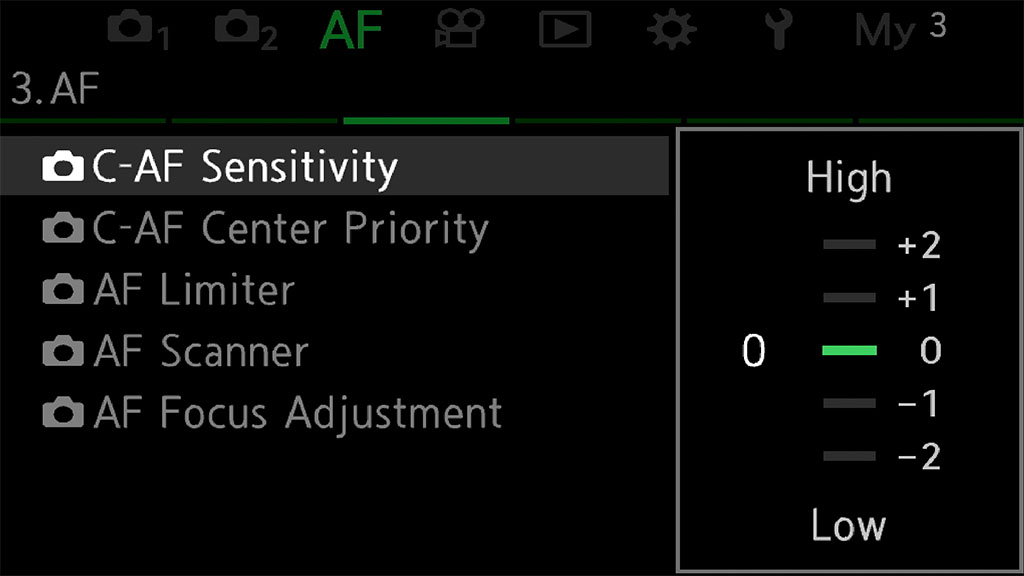
AF Sensitivity
Menu AF / Page 3
It works on ±2 steps. Positive values increase the sensitivity, making the camera more reactive to rapid changes in distance or speed.
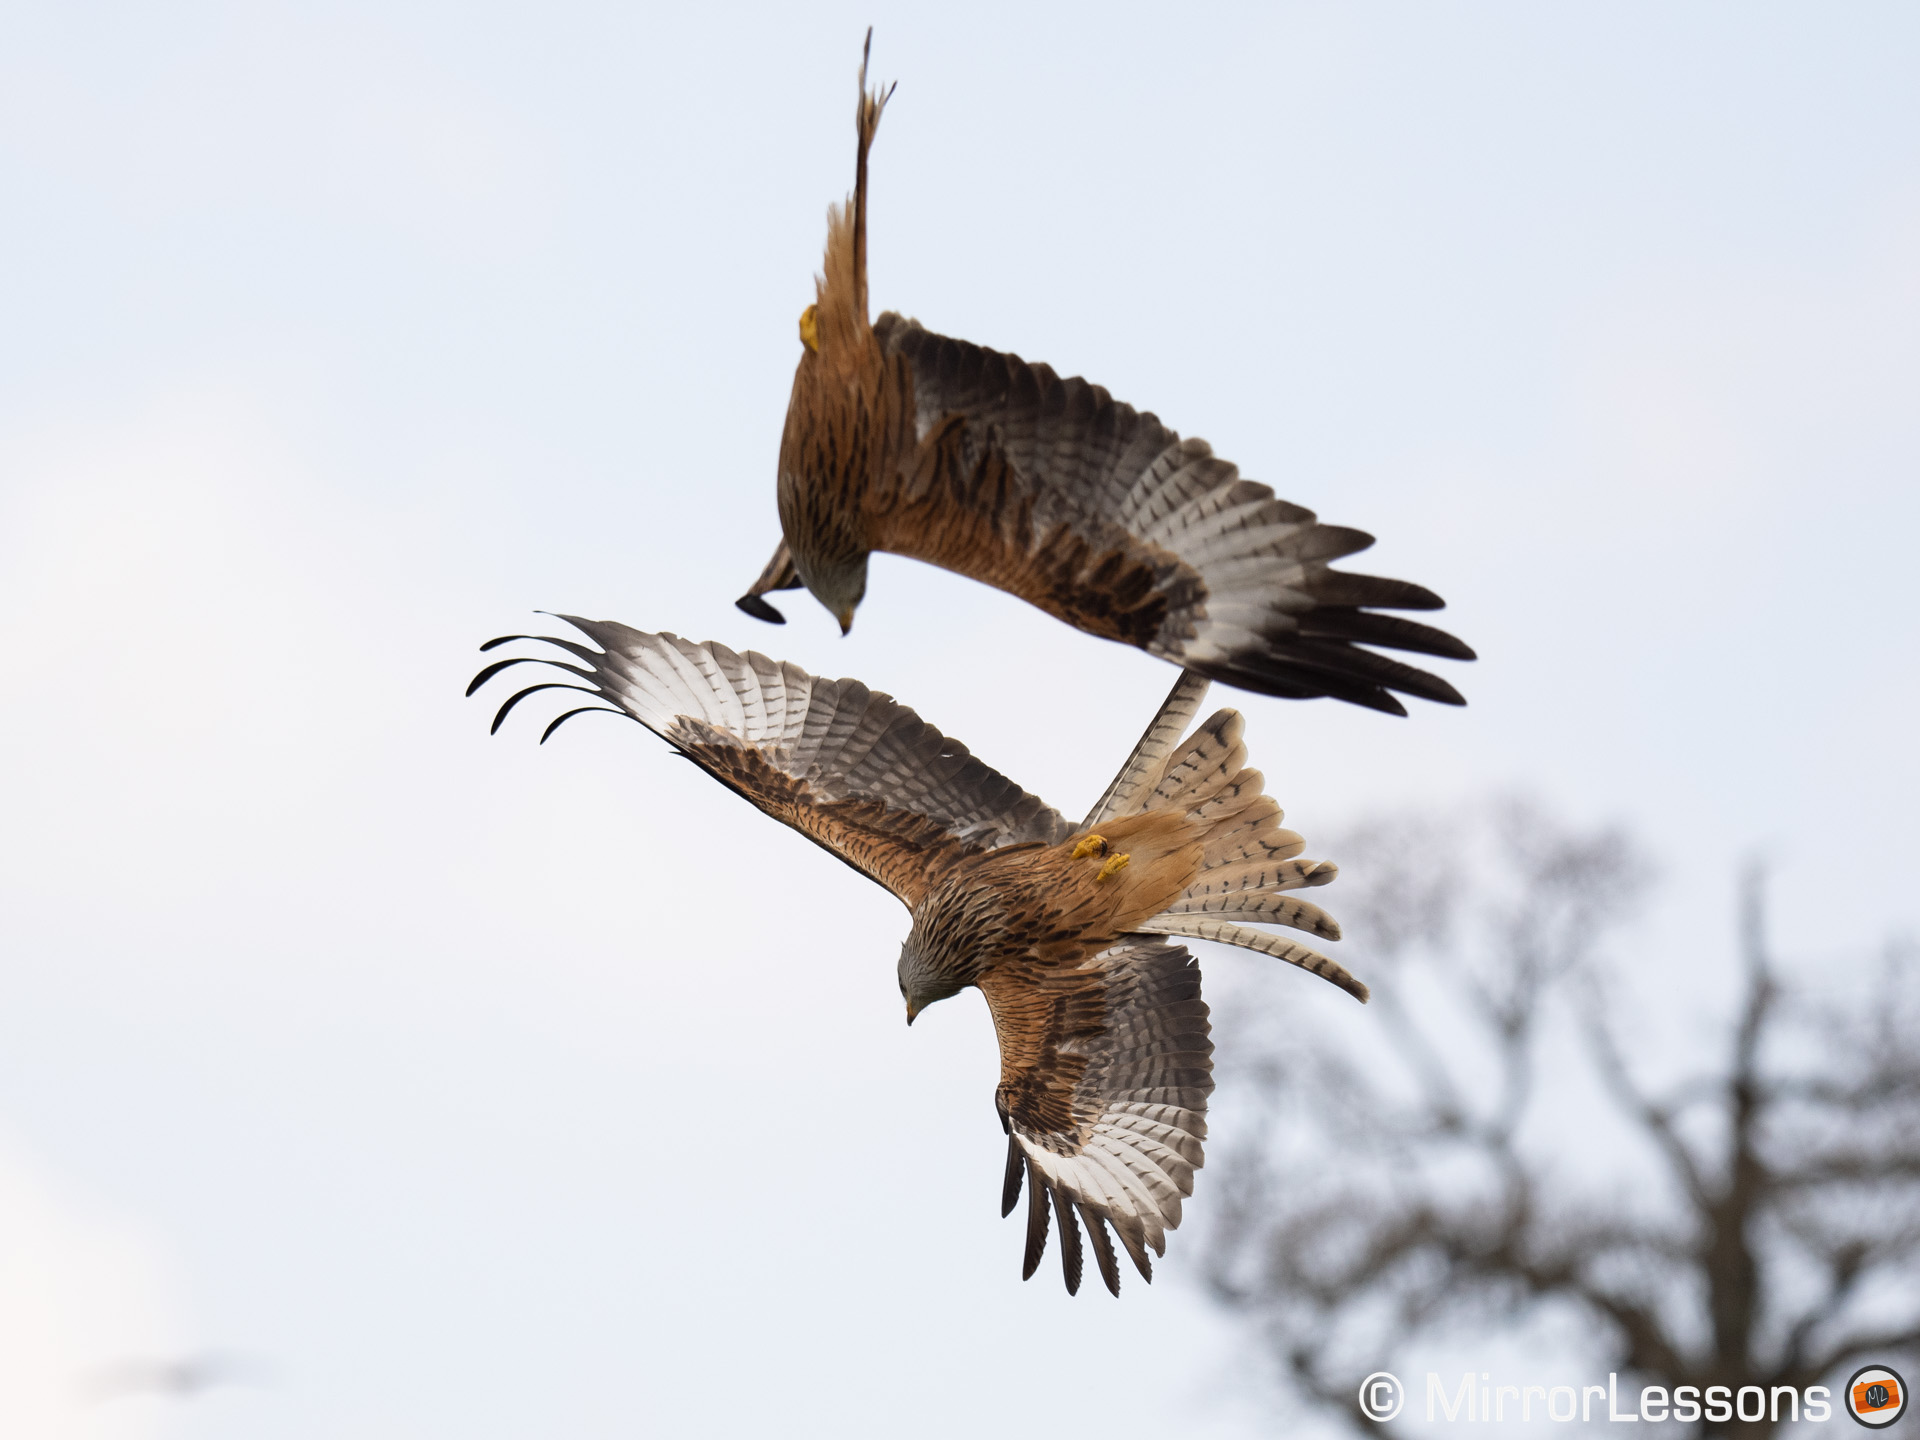
A more reactive AF works better for fast moving subjects. If you have a young toddler that never stops moving, a positive value (+1 or +2) will help. The same reasoning applies to the red kites, but it also means that the camera will switch focus more easily if a second bird enters the frame in the foreground, as you can see below. If this happens a lot, you can try setting it to 0.
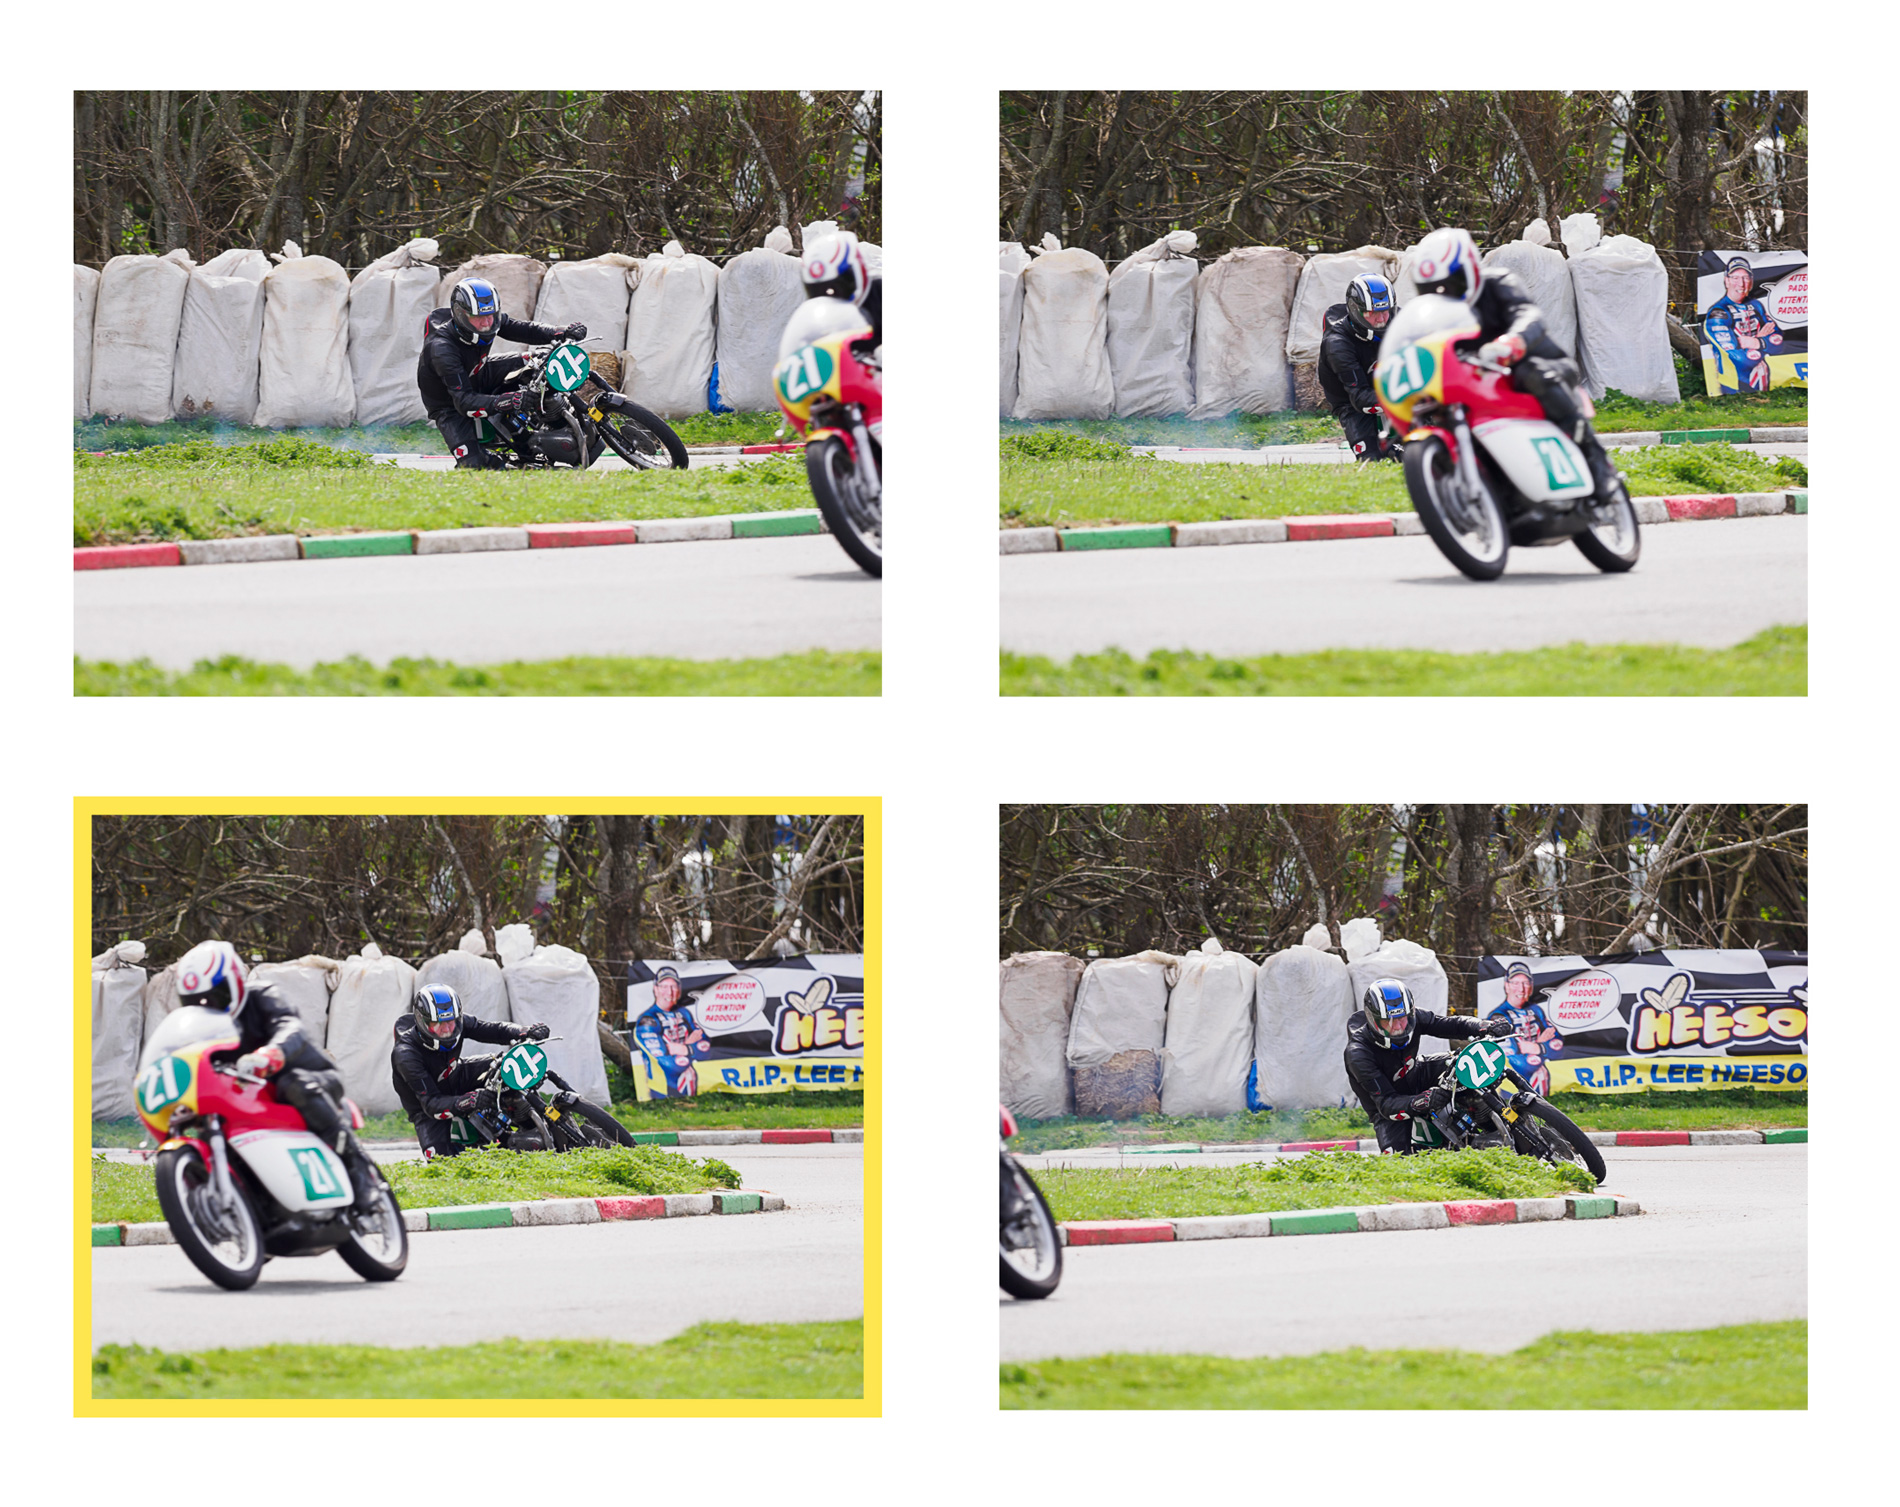
This setting is very useful for a multitude of applications. For the bike race for example, your subject can be covered momentarily by other bikes preceding him and exiting the corner.
In the first set, I had the AF Sensitivity set to +1: the camera changed focus as soon as the bikes passed in front of my subject.
Red: out of focus – Yellow: slightly soft
A bit later, I reduced the AF Sensitivity to -1 and the camera didn’t ‘jump’ on the bikes in the foreground again.
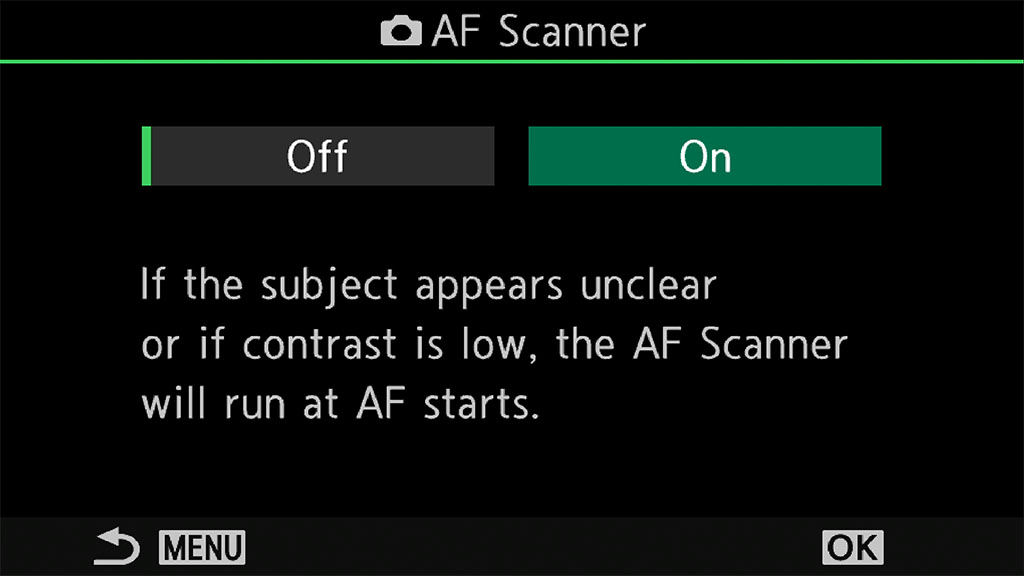
AF Scanner
Menu AF / Page 3
Sometimes, with a long focal length and a small subject surrounded by a busy background (or in a backlit situation), the camera can struggle to acquire focus.
If that happens, the OM-1 will “scan” once from the minimum focus distance to infinity in order to attempt acquiring focus again. Disabling this option prevents the camera from doing so, where there is a risk of your image going completely out of focus if the operation is unsuccessful.
I never found myself in need of this setting with the OM-1. Turning it on or off didn’t make a difference to my BIF score either. Perhaps it is more useful with older lenses that have a slower AF motor.
There is also an alternative way to help the camera correct focus with the PreMF mode described below.
Note: AF Scanner doesn’t work in S-AF. Also, the option that forces the camera to scan continuously (as found in previous OM-D models) is no longer available.
PreMF
With PreMF, you save a precise focus distance that you can recall at any time. There are two ways to configure this function.
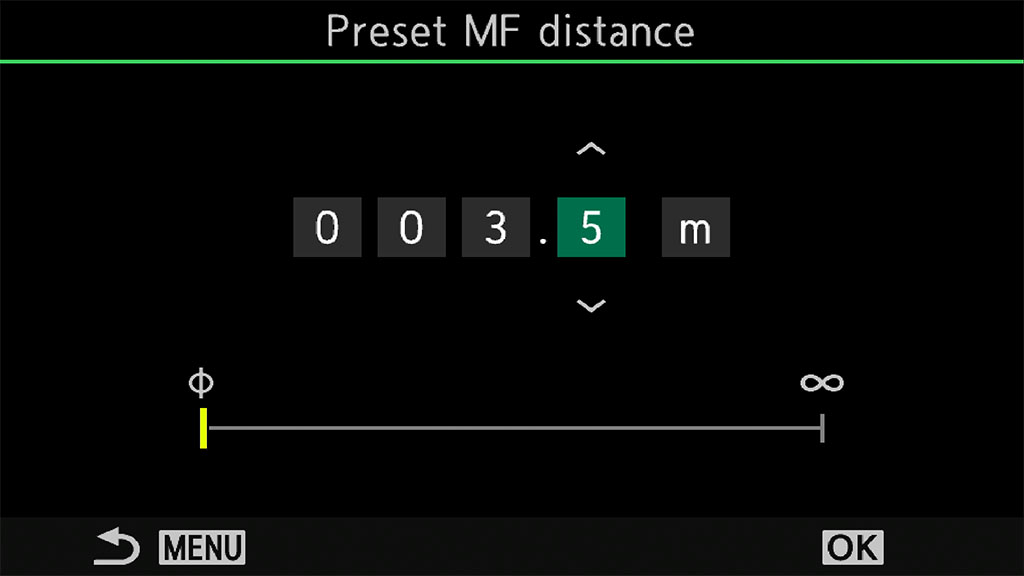
Method 1 (Manual mode) works if you already know which distance to set:
- Go to Menu (AF section, page 6) and choose Preset MF distance
- Input the desired distance
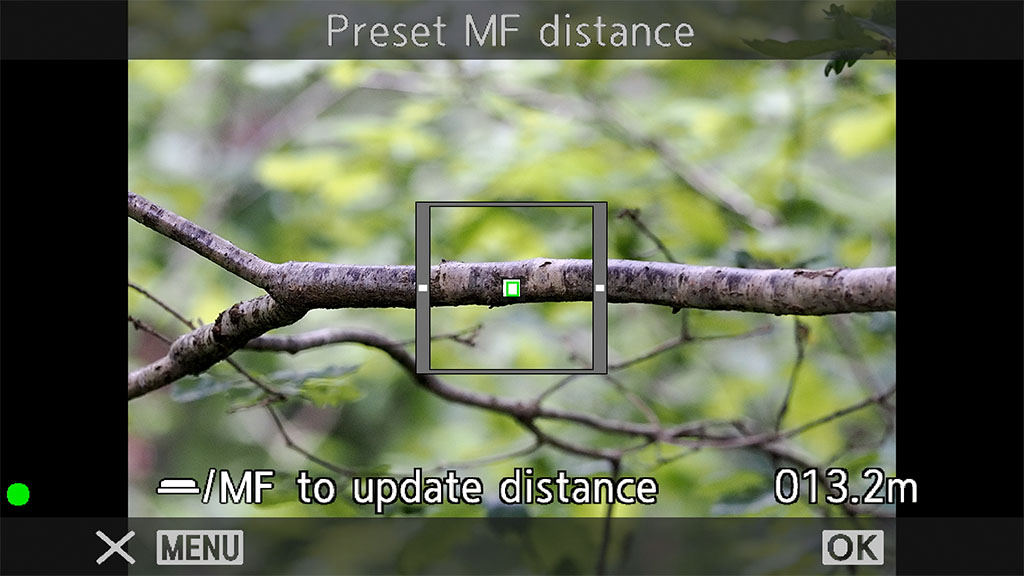
Method 2 (Auto mode) helps you determine that distance with the use of autofocus:
- Press the AF/Metering button on top of the camera
- Scroll to PreMF
- Press the INFO button
- Half-Press the shutter release button to focus on the desired point in your scene (alternatively, you can move the focus ring and set it manually)
- Press OK
What is interesting with the latter method is that it shows you the exact distance on the display.
If you’re taking pictures in the same location, and perhaps in the same spot where the bird comes and go, you can set the distance to a particular tree branch or perch for example. If the camera suddenly mis-focuses and goes too short or too far, you can quickly recall that saved distance and help the camera focus properly again.
PreAF can be assigned to a function button, making the recall instantaneous.
If your lens has a Focus Limit switch on the barrel, make sure that it doesn’t conflict with the distance you just saved.
Limitations and Tips
PreMF is a manual focus mode. Once activated, you can no longer focus automatically.
One workaround is to turn on the ‘AF-ON in MF mode’ option, which allows you to use the AF-ON button to focus (single mode) while working with PreMF. If you want C-AF however, you’ll have to go back to it manually with the AF/Metering button.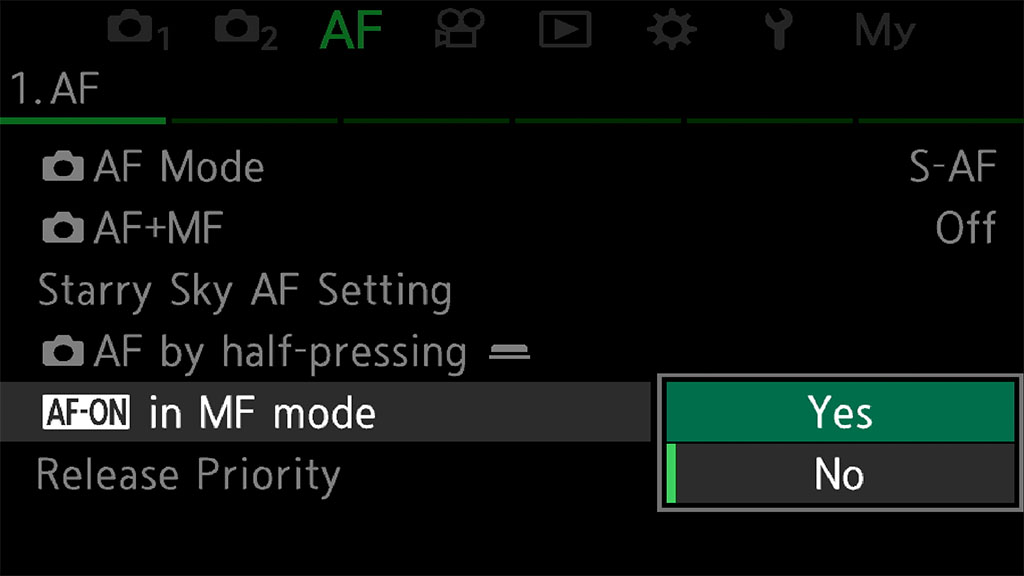
If you want to revert to C-AF more quickly, a second workaround is to use the rear Fn lever. Choose mode 2 in Operations Menu / Page 1 / Fn Lever Settings, then set C-AF for both positions 1 and 2. When you switch to PreMF, you only need to move the lever to position 1 or 2 to go back to the C-AF mode.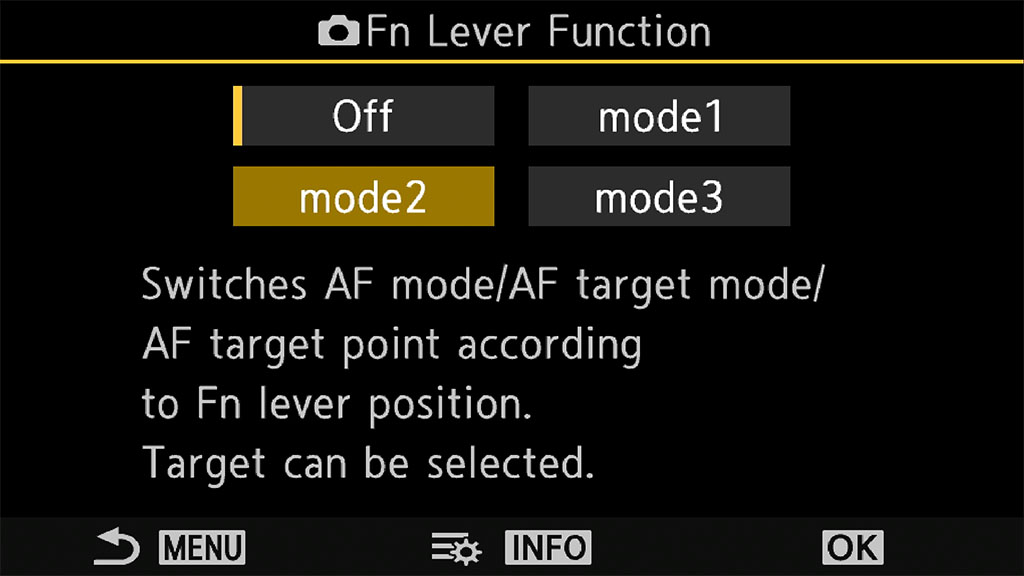
While these workarounds are ok, it would be easier if the simple press of a button could let you toggle between the current focus mode and PreMF.
AF Limiter
Menu AF / Page 3
AF Limiter is traditionally found in the form of a physical button on the barrel of long telephoto lenses. For a while now, Olympus/OM has given us the option to customise this in camera.
You can create up to three presets with any minimum and maximum distance that you wish. This can be very helpful to use when you can’t avoid elements in the foreground (a fence at a car race for example). Many readers also suggested this setting to prevent the camera from focusing on the background.
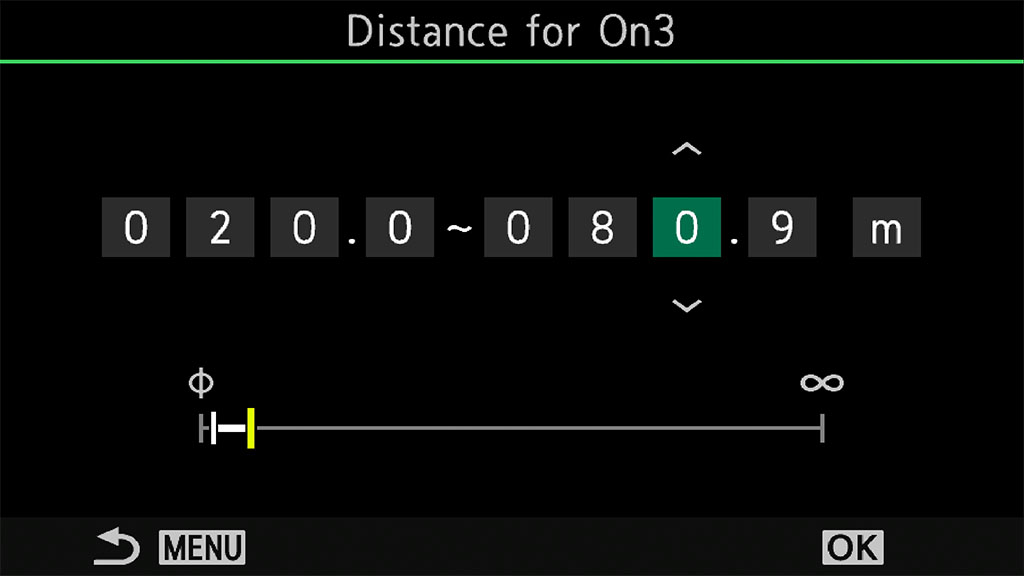
Unfortunately, you can only input the distances manually, there isn’t an option to set the range using the autofocus, like you can with the PreMF mode described above. (Here is another thing that could be improved via firmware)
That said, you can use PreMF to determine which distances to set:
- Select PreMF with the AF/metering button
- Press the INFO button
- Focus on the area you want to exclude (trees for example) and take note of the distance displayed
- Go to the the AF Menu / Page 3 and choose AF Limiter
- Set the maximum focus distance about 10 meters or 20 meters shorter than what PreMF showed you (or even more if you know the animal won’t go near that area)
- Once the distances are set, activate AF Limiter and switch to C-AF


Alternatively, you can guess the distance and try the AF to see if the camera still focuses on the background or not. If it does, you reduce the distance until it can no longer focus on the trees or other elements that you want to ignore.
In the AF Limiter setting, you also find a Release Priority option. I would advise leaving this off (at least initially) so that you can assess if the AF range is working. If the camera refuses to take images because they are out of focus, you’ll know that the distances are too short.
AF Limiter can be very helpful, but it’s important to keep in mind a few things.
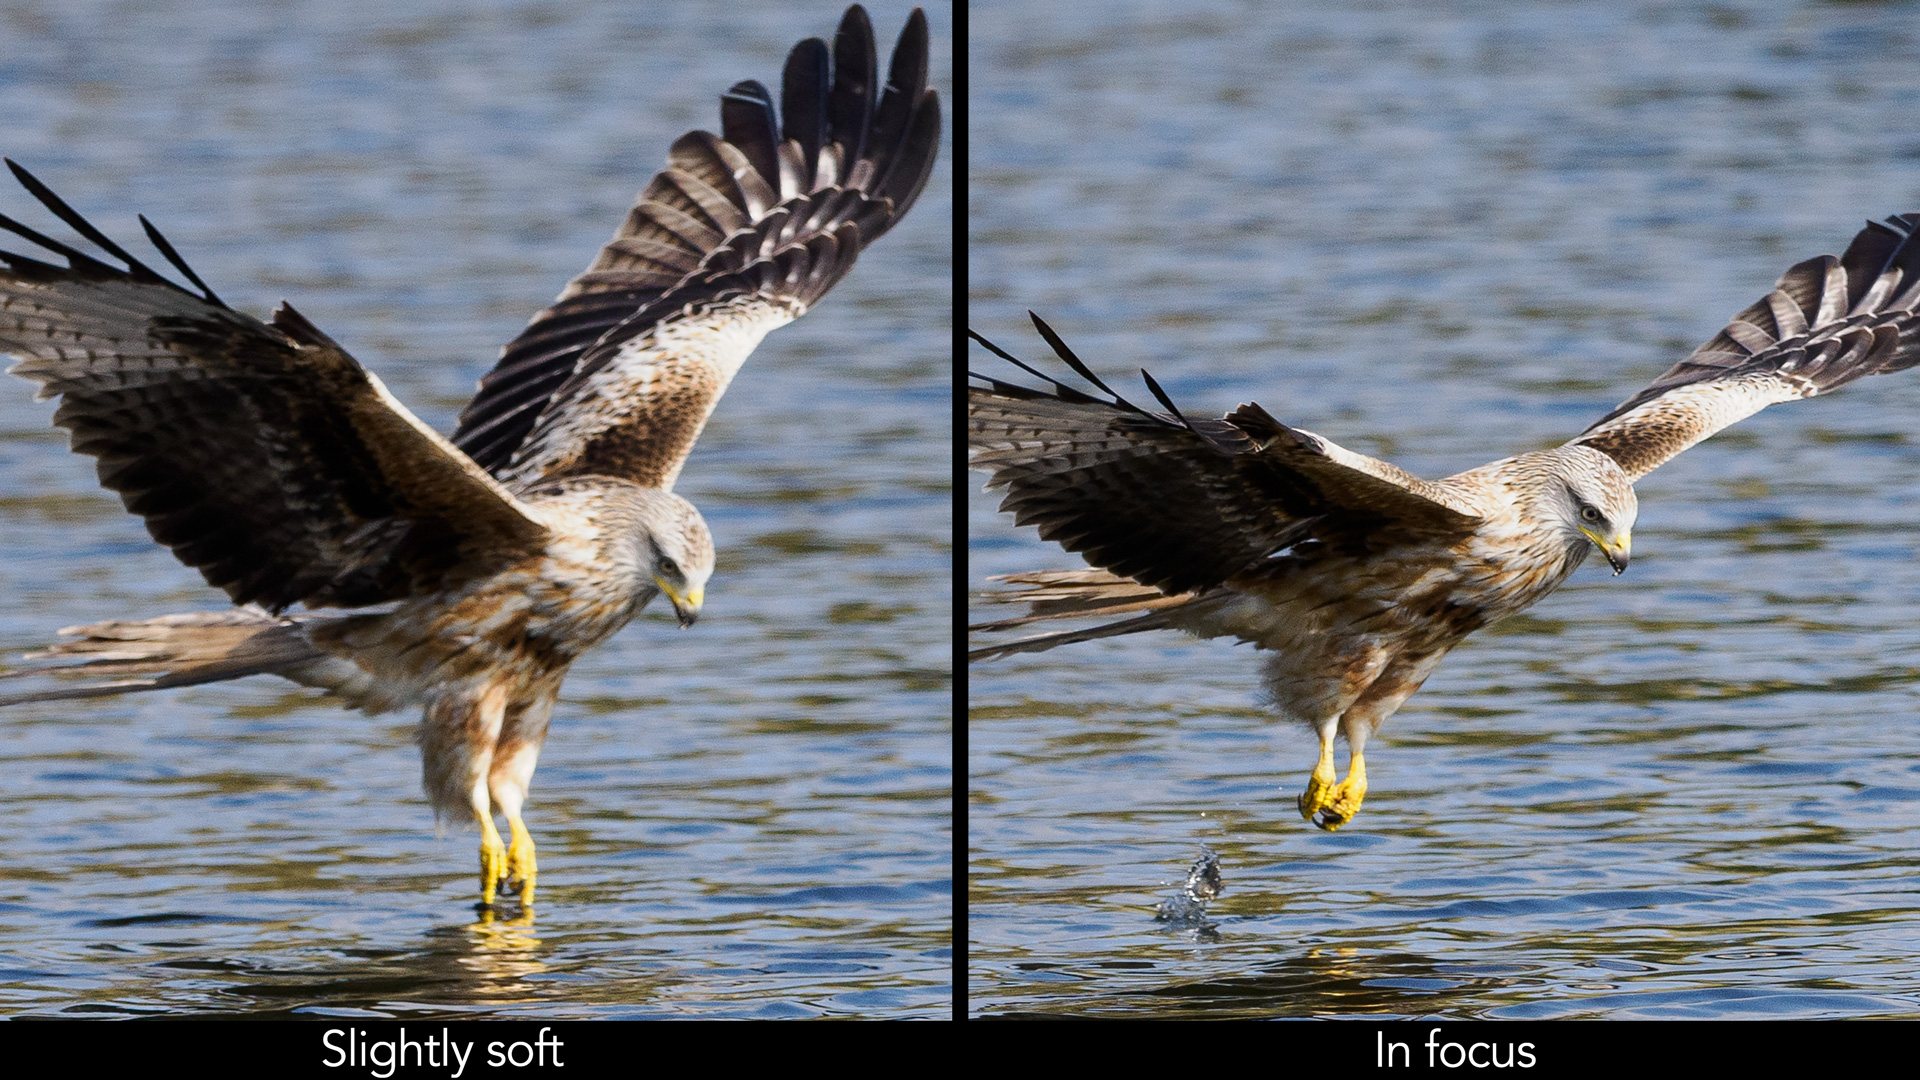
First of all, it didn’t make a big difference in my tests with the red kites. Although the camera didn’t focus on the background as much, out of focus shots (distance too short) and slightly soft images remained. The latter are more frequent than completely blurred pictures, and AF Limiter can’t help you with that.
Second, when setting AF Limiter, consider all the possible areas where the bird might fly, in order to have enough range to cover every spot.
Third, don’t forget AF Limiter is engaged! If suddenly, you see a different bird up in the sky and it is out of your AF range, you’ll end up with an entire sequence out of focus if you don’t turn the setting off. The best thing is to assign AF Limiter to a function button so that you can quickly enable or disable it.
Last but not least, remember to set the AF Limiter switch on your lens to Full, if there is one.
Release Priority
Menu AF / Page 1
This setting determines whether the camera should capture a photo even when it is out of focus. You can configure it for S-AF and C-AF (which also includes AF Tracking).
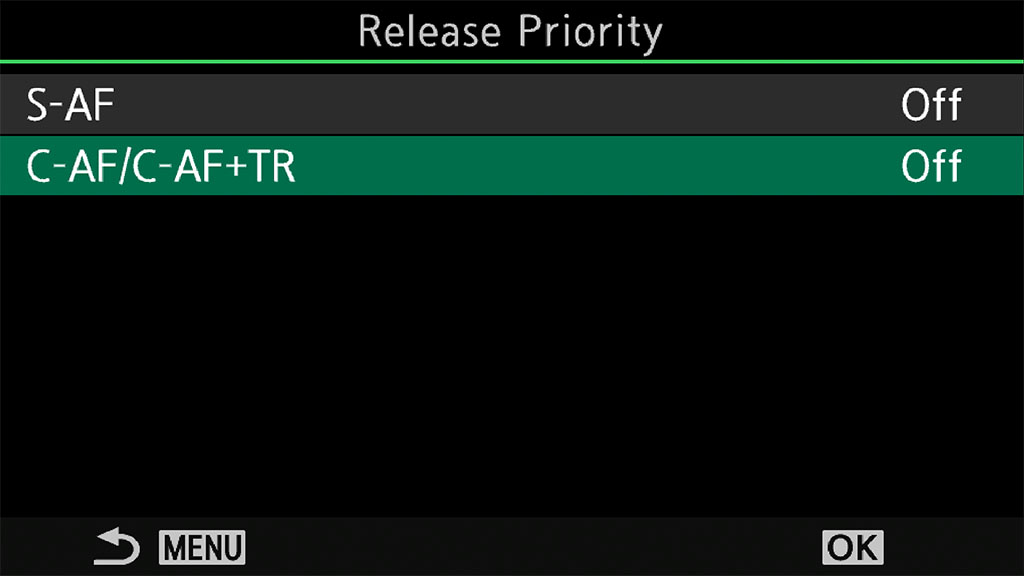
Which option you choose really comes down to how much you trust the autofocus on your camera. If I had a Sony A9 II, I could easily set release priority and forget about it because the AF of that camera will deliver.
A product like the OM-1 is also really good, but there are moments, as I showed you already, when the autofocus can struggle. So I prefer to keep this option off and have focus priority. You will still get out of focus images, but there is less risk of having a higher percentage of them, because the camera gives more importance to focus accuracy rather than releasing the shutter.
One argument against using focus priority is that drive speed can slow down when the camera is struggling with the autofocus, but to be fair, I never experienced something drastic with the OM-1. Plus, for my work on this blog where I evaluate the autofocus of many cameras, focus priority just gives me a more precise idea of what each camera is capable of.
That said, there can be situations where it is more important for you to capture the highest number of images possible, maybe it’s a one time opportunity that you won’t witness again, in that case you would rather have release priority on, and hope that the AF will cope.
AF Area Pointer
This is another setting that gets mentioned to me from time to time, and I often have the impression that not everybody understands what is it really about.
Basically, you can choose whether or not to display the green AF points that show where the camera is focusing:
- On1 will display one focus point briefly where the camera is focusing
- On2 will show multiple points for all the areas that are in focus on the subject, and this is also called cluster mode. This is the setting I use personally because I like to see how the AF behaves on screen.

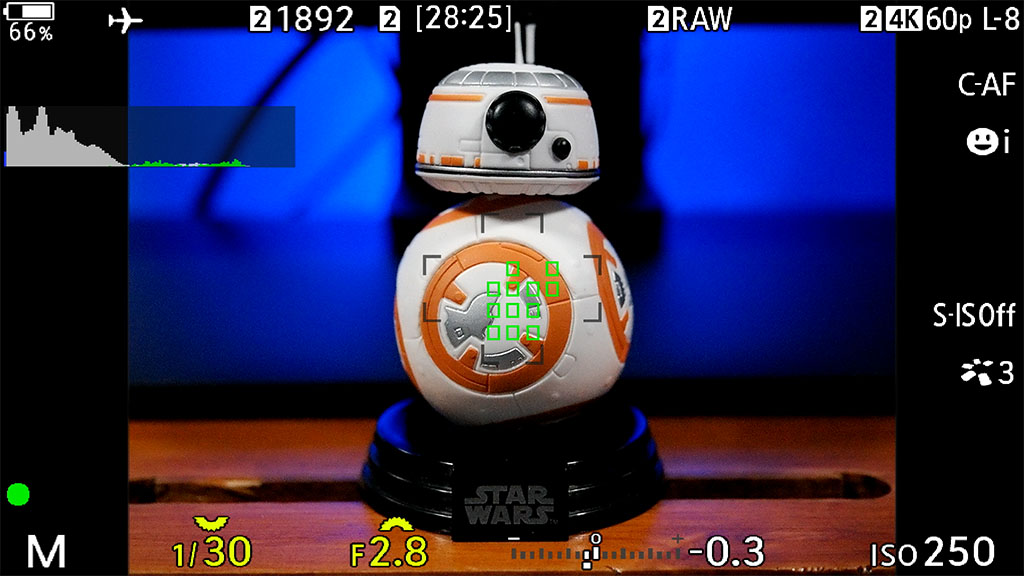
To avoid any confusion, if there is some, understand that this setting is only a visualisation aid, if we can call it that, on the EVF or LCD monitor. It does not affect the AF performance. Whether you decide to keep the green points on screen or not, the camera behaves in the same way.
AF+MF
It allows you to correct focus manually after focusing automatically. It works in S-AF and C-AF/C-AF+Tracking.
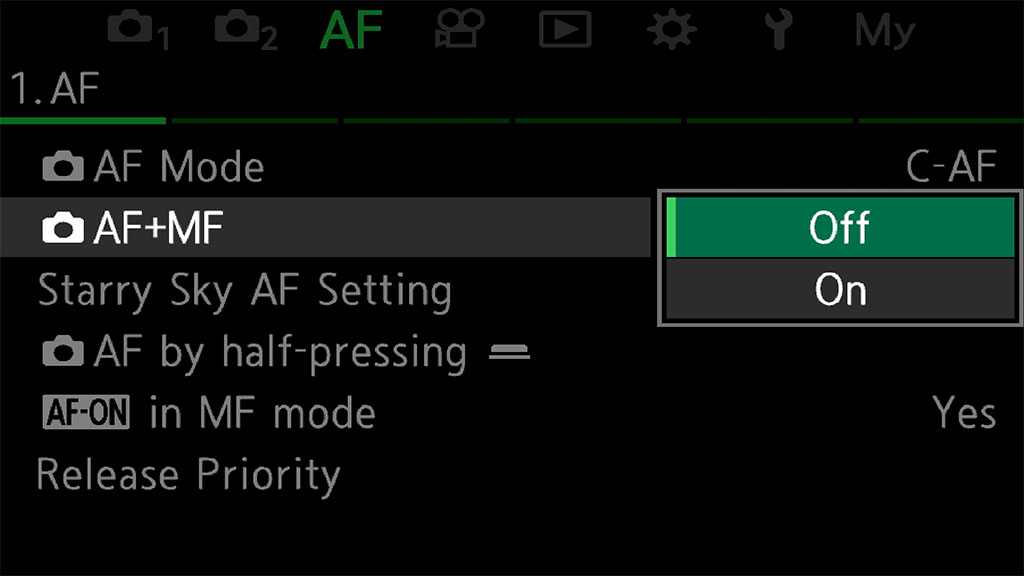
This can be useful in a situation with a static subject, where the camera can’t focus properly and you’ve tried everything. Keep the shutter button half-pressed, or the AF-ON button pressed, and rotate the focus ring to make the required adjustment. Personally, I’ve never found myself in need of using this, but it’s worth keeping in mind.
AF Focus Adjustment
Menu AF / Page 3
This setting allows you to fine tune phase-detection autofocus in ±20 steps. It has been carried over from Olympus DSLRs, where these adjustments were more needed because phase detection was separate from the image sensor. With mirrorless cameras, you should not need to use it.
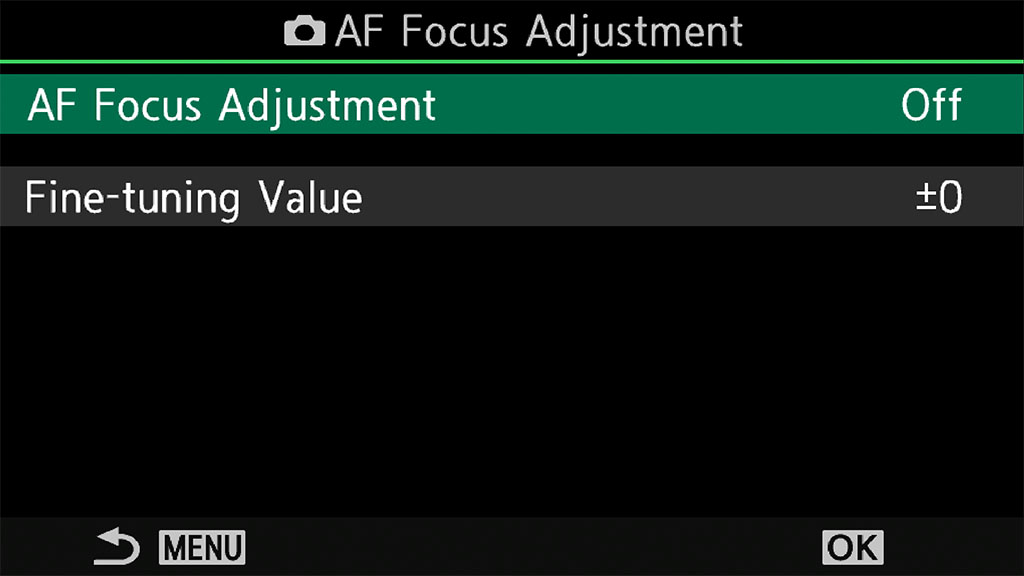
Some of you might suggest that if a lens is not focusing properly, you can try to correct it with this function before sending it for repair. I have never experienced such a problem with my m4/3 lenses, so I can’t share any feedback about whether it works or not.
What is important to understand is that it is a very advanced setting that could prevent your camera from focusing correctly. I would not start playing with it in the hope of improving the keeper rate with birds in flight, or anything like that.
AF Settings for Video
AF Menu, page 4
The various AF modes such as Single, Continuous, Tracking, Face/Eye Detection and Subject Detection are available for video. Note that you need to work with C-AF + Tracking in order to activate the A.I. Subject Detection mode, unlike for still photos.
C-AF Speed
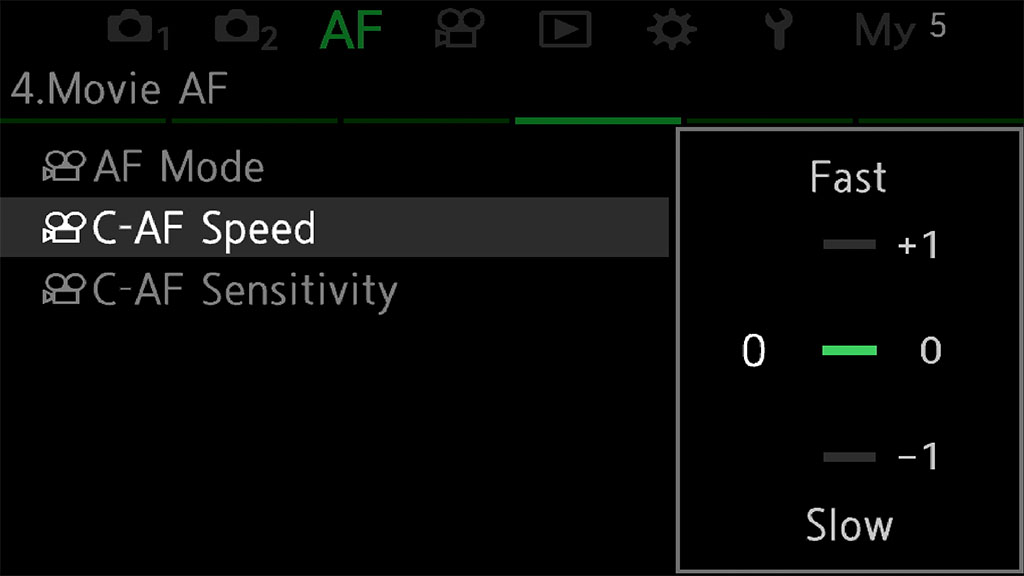
This setting determines how fast the camera changes focus. Choose Fast (+1) and it will change focus more rapidly, choose Slow (-1) and it will shift focus less rapidly, which can also gives you a smoother and more pleasant transition between two points in your image.
Unfortunately, it only works in ±1 steps, which is not a lot to fine tune the speed. For wildlife work, I would keep it either to 0 or +1 if the subject is moving fast.
C-AF Sensitivity
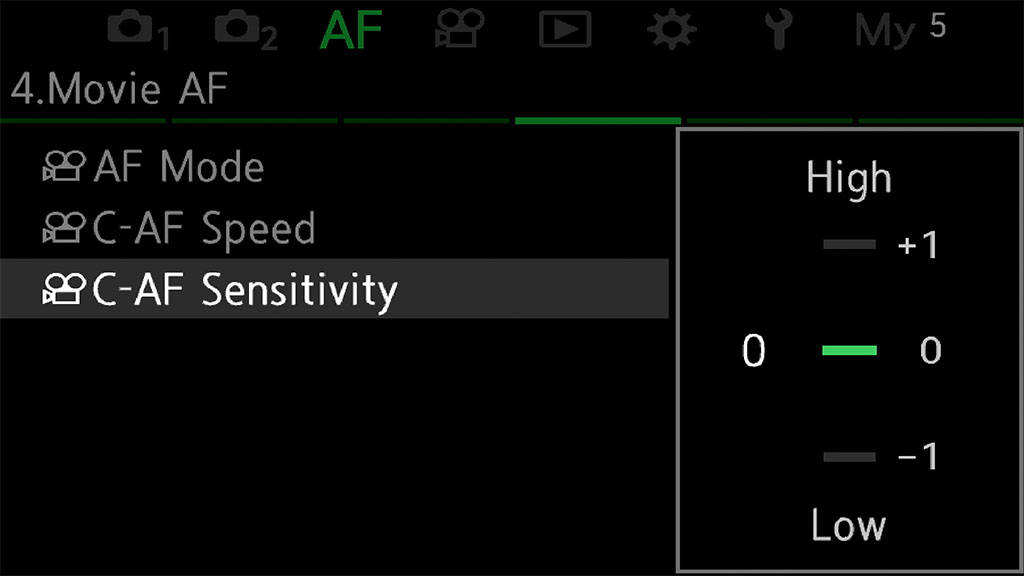
Like the equivalent setting for stills, C-AF Sensitivity determines how quickly the camera reacts when the distance to the subject changes. A high value will make the OM-1 more reactive with fast moving subjects, whereas 0 or -1 will make the AF more stable if the subject is not moving a lot, or if it is briefly obscured by other elements.
Stabilisation Settings
In photo mode, there are four different settings, accessible from the Menu (Section 1, page 8) or the Super Control Panel:
- S-IS Auto: the camera compensates in all directions, or vertically/horizontally depending on the movement it detects
- S-IS1: the camera compensates in all directions
- S-IS2: the camera compensates vertical motion only
- S-IS3: the camera compensates horizontal motion only
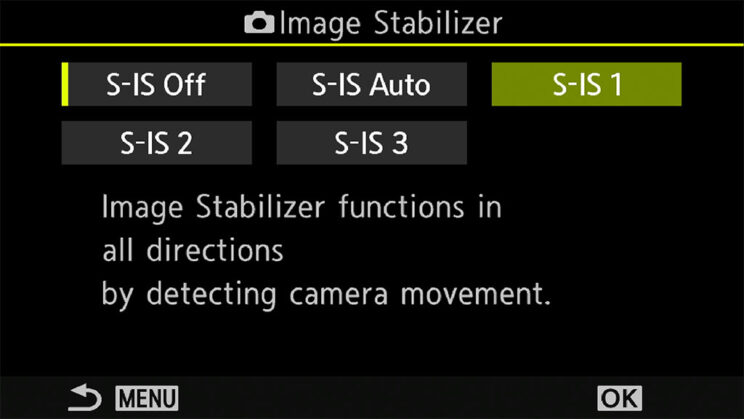
For normal use, I always leave this setting to S-IS1. For the motorbike race or any motorsport event, I would choose S-IS2.
For birds in flight, there are a few options. You can leave it to Auto and let the camera do the work, but I’m not sure how good it is at switching automatically between vertical direction or all direction for example, so I’d rather have more input on what the camera does. I would prefer IS2 or IS3 depending on the direction of the flight, that is, if you can predict the direction easily.
Also keep in mind that if you’re using a fast shutter speed (1/2000s or faster), you can turn stabilisation off. The exposure time should be safe to ensure sharpness, so stabilisation is not essential.
The only reason to keep it on is to have the stabilisation effect in the viewfinder, which is something that can help you compose your photos better, if the subject is not moving too fast. For animals or birds that move really fast, or that move very erratically, I would keep stabilisation off, also because you may notice sudden shifts or jerks in the EVF, and that can make you less precise when composing.
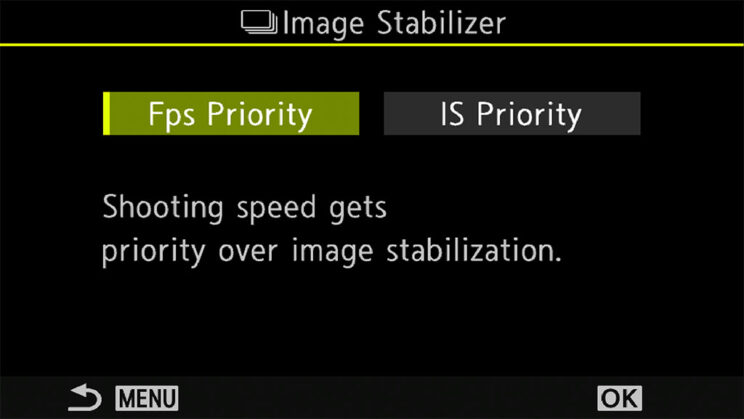
Burst Mode Image Stabilisation
Shooting Menu 1, page 8
With this setting, you can choose to give priority to the drive speed or the image stabilisation during continuous shooting:
- IS Priority: the camera re-centres the sensor for each frame, which reduces the drive speed a little. If you’re using a slower-than-normal shutter speed and don’t need a super fast continuous shooting, you can choose this option to ensure better results.
- FPS Priority: the sensor is not re-centered each time, so the drive speed is not affected, but stabilisation can be less effective. This is the one I tend to use because most of the time, I don’t see a relevant drop in stabilisation performance.
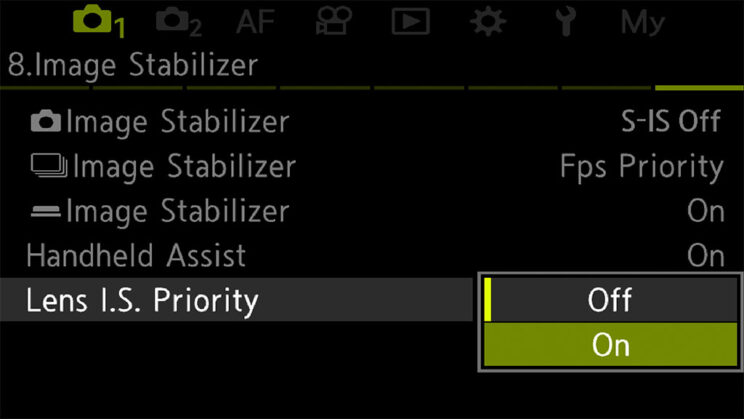
Lens I.S. Priority
Shooting Menu 1, page 8
If you’re using a Panasonic lens with O.I.S., you can choose to prioritise sensor or optical stabilisation (they are not compatible with Sync IS).
With long focal lenghts, I would choose optical over sensor stabilisation. Note that this option has no effect if the lens has a OIS switch on the barrel. You can do the same with the physical button instead.
Note about the Olympus 100-400mm
This lens has optical stabilisation but is not compatible with Sync IS. The IBIS on the camera and the IS on the lens can be used independently (unlike Sync IS where you activate everything or nothing). If both are enabled, the roll axis on the sensor is combined with pitch and yaw on the lens.
Some of you might suggest that the same happens with Panasonic lenses, but I never had a chance to verify this myself.
Settings for Video
Movie menu, page 4
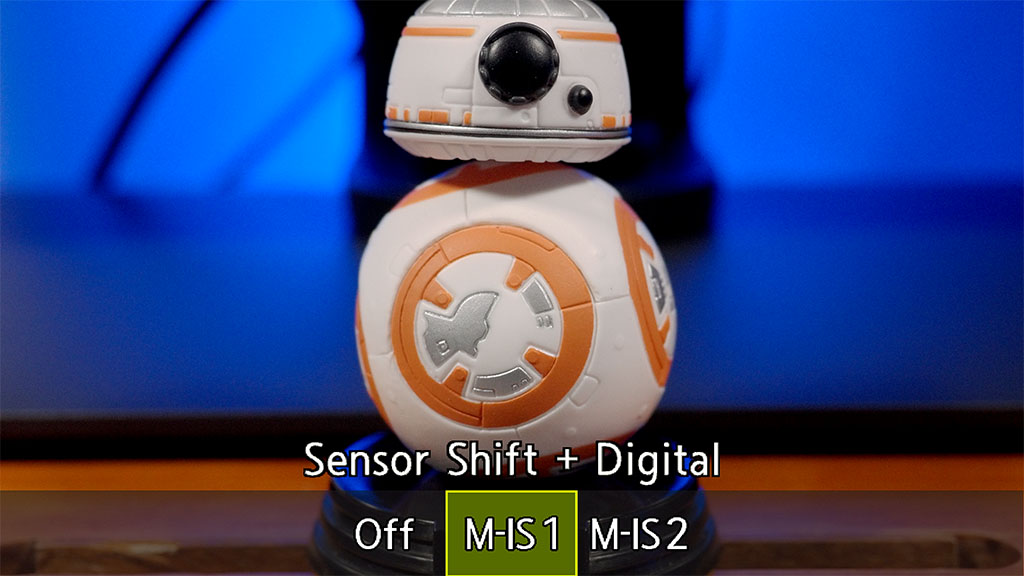
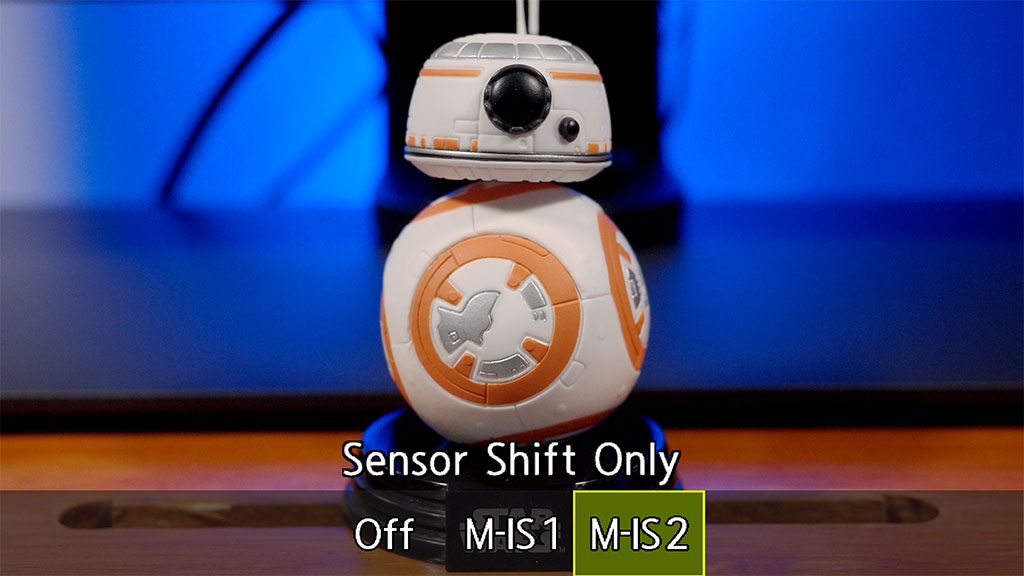
There are two main settings for movie recording:
- M-IS1: sensor plus electronic stabilisation. It improves the result with static shots, but crops the field of view a little as a result (1.2x crop, which can be useful for wildlife).
- M-IS2: sensor stabilisation only, which is best for fast movements, or if you don’t want to lose the original field of view of your lens
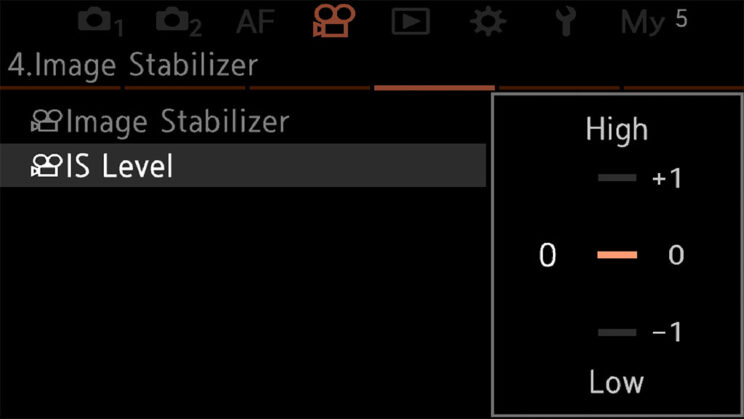
Finally, there is the IS Level (Movie menu, page 4) setting which works in three steps:
- -1 makes the stabilisation more forgiving of movements, and is recommended when panning or tracking
- +1 increases the stability for static shots, however be careful because even the slightest movement of your hand or body can translate into big jerks in your footage. Personally, I prefer to leave it to 0.
Customisation
Operations / Page 1
The OM-1 offers a great level of customisation. You can even go as far as changing which lever powers the camera on and off.
Customising a camera takes time. If this is your first, my advice is to start with the default setup and gradually change things as you learn which settings you use more than others.
For reference, you can see in the images below how I configured mine so far, based on my personal needs. It’s not a definitive configuration: I might tweak it further as I learn the camera inside and out. See it as starting point if you don’t like the default setup but are not sure what to change first.
Front buttons
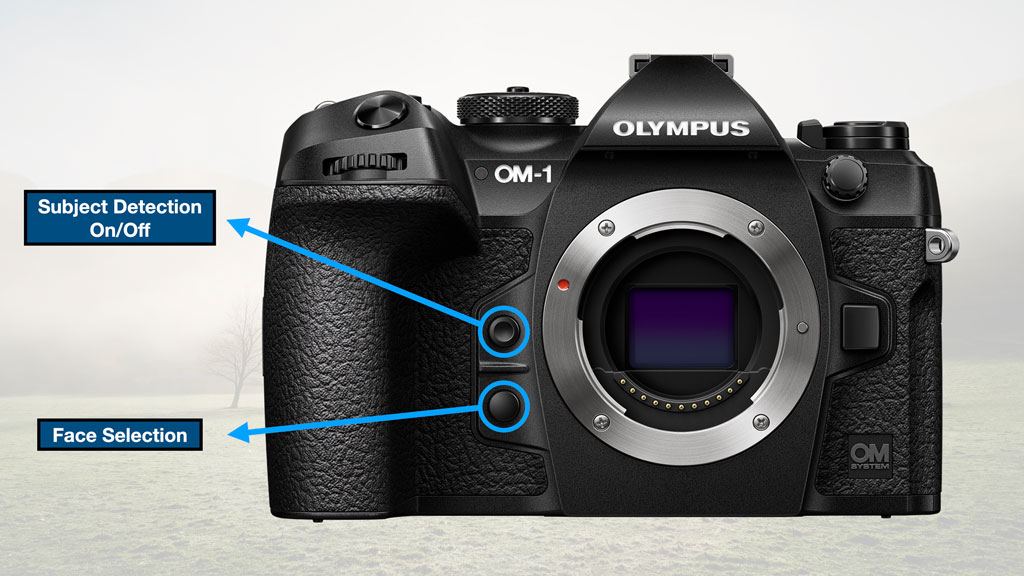
I always liked the two function buttons near the mount because your fingers reach them naturally, so I though it was useful to assign two of the settings I use the most.
A quick press of the top button and you turn Subject Detection on or off. If you press and hold, you can change the type of subject with the front or rear dial.
Tip: if you need to switch quickly between human and animal detection, make sure to keep face and eye detection (for humans) enabled. When you press the button, it will activate animal AF and deactivate human detection. Press it again, and the opposite happens.
On the second button below, I assigned Face Selection to quickly switch from one person to the other when using Face/Eye AF. Just press and hold, and use one of the dials to go from one to the other.
Top buttons
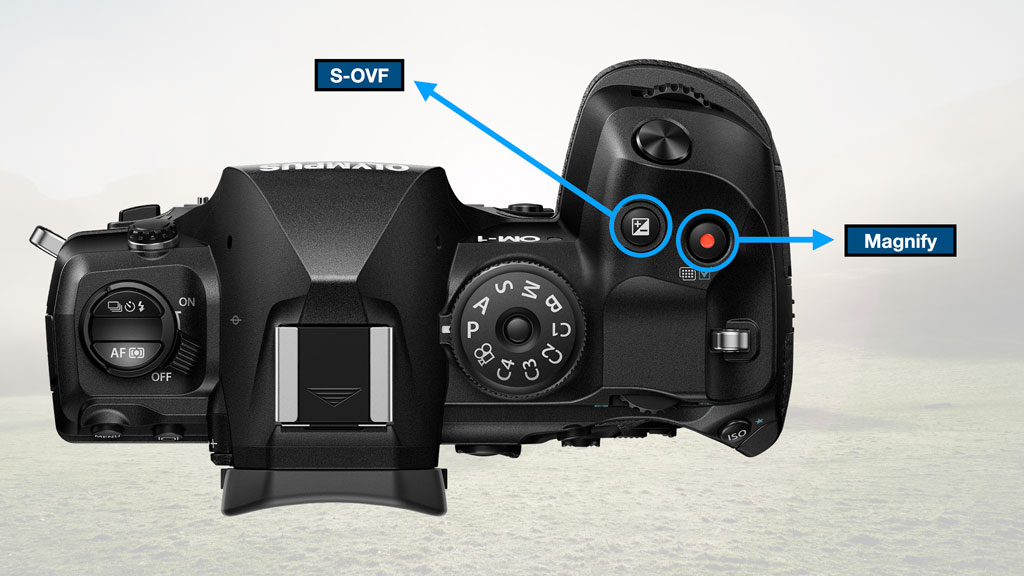
The S-OVF option disables the exposure, picture mode and white balance preview, giving you a more natural and brighter view in the EVF or LCD. I find this useful when following fast subjects in difficult light situations (backlight for example), where the exposure preview might change too often while shooting, or become too dark. Unfortunately, S-OVF doesn’t work with the SH1 and SH2 drive speed.
Magnification is a setting that is useful to me when I test cameras, especially to check focus with side by site tests such as sharpness, so I like to have it at my fingertips at all time. Note that you can also activate magnification automatically by rotating the focus ring when working in MF mode.
Rear buttons
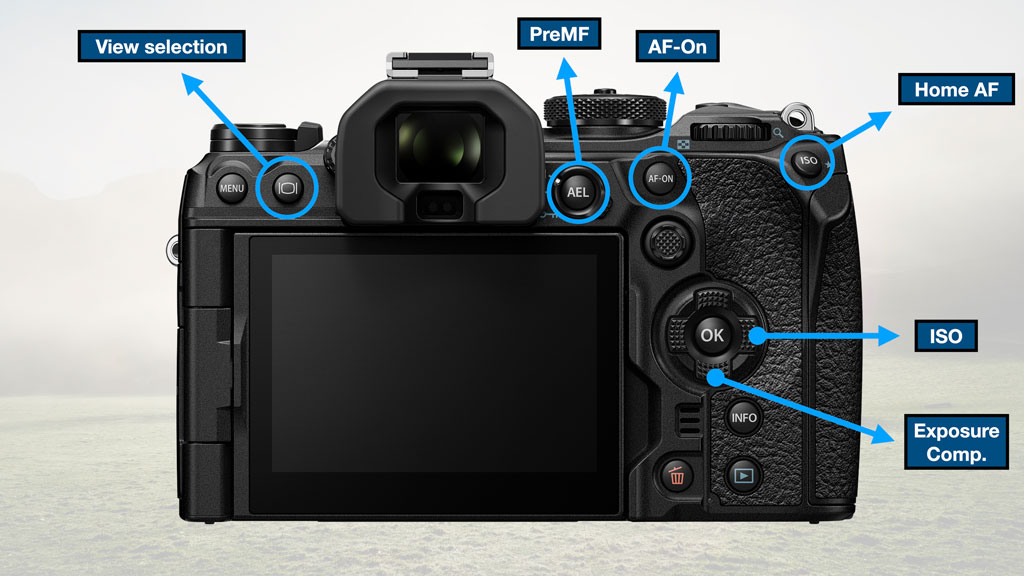
View selection is the default setting for that button, and allows you to disable live view on the monitor, or deactivate the Eye sensor on the EVF. I find it useful to be able to control this when, occasionally, the Eye sensor might be too sensitive while I’m working with the LCD screen (strong sunlight for example).
AF-ON starts the autofocus. This is the back button focus method, where you engage focus with the rear button rather than half pressing the shutter release button. This is the first thing I set with any camera I test.
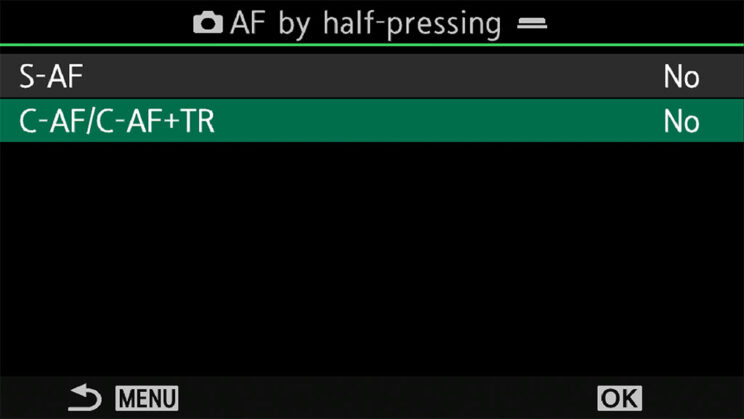
Note that you have to disable the option ‘AF by half-pressing the shutter button‘ in the menu (AF section / Page 1). What I like about this solution is that I hardly need to switch to S-AF. Press quickly to focus once, press and hold to focus continuously. I find this method works really well for any type of subject, whether it is static or moving.
AEL is set to PreMF, which is a function I explained earlier on. I use the lever around the button to switch between PreMF and C-AF.
Alternatively, you can use the lever to switch between two sets of focus modes, focus target and target position. For example, position 1 can have S-AF and Small Target, whereas position 2 can use Large Target and C-AF. Note that any change you make in either of these positions at any time will overwrite the previous one.
You can limit the number of settings that can be changed with the Fn lever, if you wish. For example in my configuration, I only selected the AF mode and de-selected the Target size and Target position.
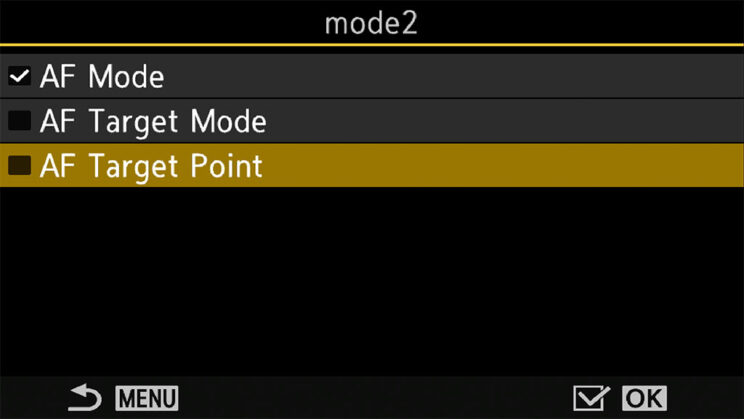
Home AF allows you to quickly recall a specific AF Target (Area) and position. For now, I’ve assigned the Single Target (smallest point), which is useful if you suddenly need to focus on a precise area.
One thing I’d like to see improved is the possibility of going back to the previous Target with the same button. Basically, one press would activate Home AF, a second press would go back to the previous Target I was using.
I moved ISO and Exp. Compensation from their default locations because the list of settings you can assign on the 4-way arrow pad is limited (8 instead of 47 on the other buttons). Not sure why I can’t have the same list of options everywhere.
Lens button
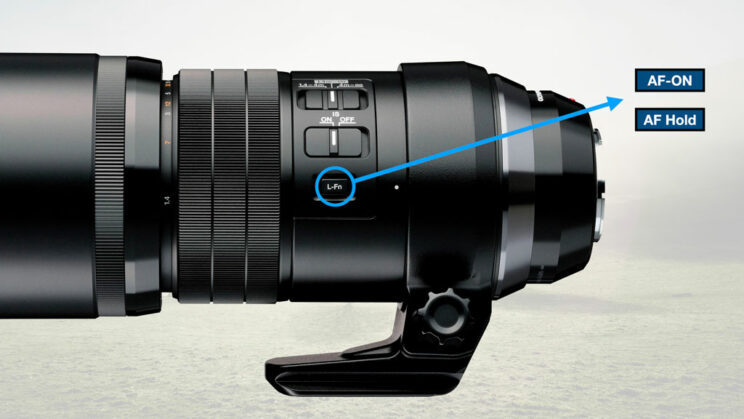
If your lens has an Fn button, you can assign a custom setting there as well. With a prime lens such as the 300mm Pro, you may want to try to use it to engage autofocus (AF-ON). If you find the position comfortable, it can be an interesting configuration where you control focus with your left hand, and take pictures and change other settings with your right.
I found this especially useful with Pro Capture when I was trying to photograph small birds in flight near a feeder. The action was so fast and brief that I had to time very precisely when to engage the autofocus. Being able to do that with my left thumb on the lens made it so that my right hand’s only job was to activate Pro Capture, and then press the shutter button fully once the moment was right.
This method works best with primes. With zooms, you need to change the focal length, meaning you would have to constantly switch between zoom ring and Fn button, so it won’t work as well.
For video, I prefer to have Focus Hold enabled on the lens button, so that I can briefly halt the AF while recording.
My Menu and Custom Modes
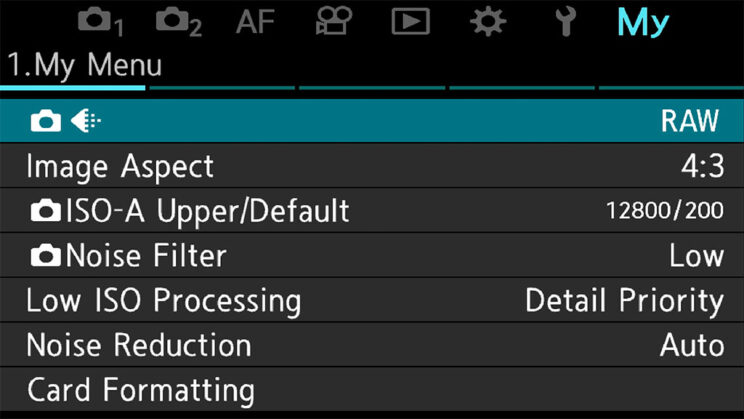
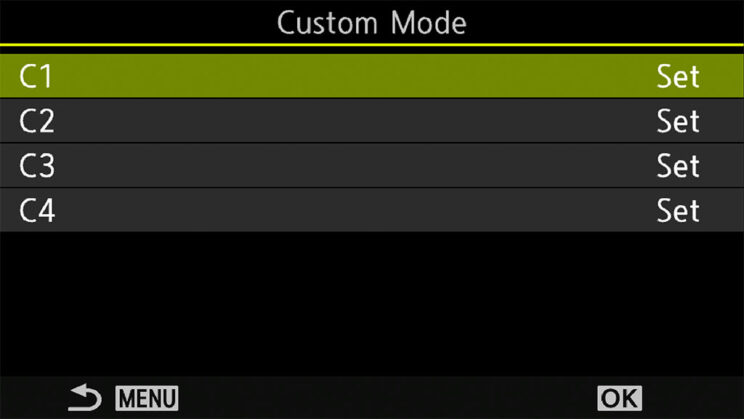
Two other tools that allow you to customise further are My Menu and the Custom modes (C1 to C4).
My Menu offers five pages with 7 slots each. You can save a setting in it at any time while navigating the menu by pressing and the REC button.
The Custom modes allow you to save a lot of different parameters, from image quality to AF settings and function buttons. You can create different setup for different shooting needs. For example, I configured C1 for static birds, and C2 for birds in flight, whereas C3 is for portraits of my toddler!
You can recall the custom modes with function buttons too, if you prefer, and that is actually the quickest to recall all your favourite settings at once.
Recommended Settings per Genre
I’ll finish this article with a list of recommended settings for various situations. As always, these are just a suggestion. Feel free to modify them as you wish, and tell us in the comments which setting works best for you! Thanks for reading!
Reminder: the links below are affiliate links. If you decided to buy something after clicking the link, we will receive a small commission.
Check price of the OM-System OM-1 on
Amazon | Amazon UK | B&H Photo | eBay
OM-1 Settings for Perched Birds
- Back Button Focus (AF-ON button, ‘AF with shutter’ disabled)
- C-AF
- Small Target
- Subject Detection: Birds
- PreMF (if you always focus on the same area)
- C-AF Centre Target: disabled
- Release Priority: Off
- AF Sensitivity: 0
- AF Scanner: Off
- Drive: Continuous (10fps or higher)
- Low ISO Processing: Detail Priority
- Shutter speed: 1/200s or higher
- ISO: Auto (max. 6400)
- Stabilisation: S-IS1, IS Priority
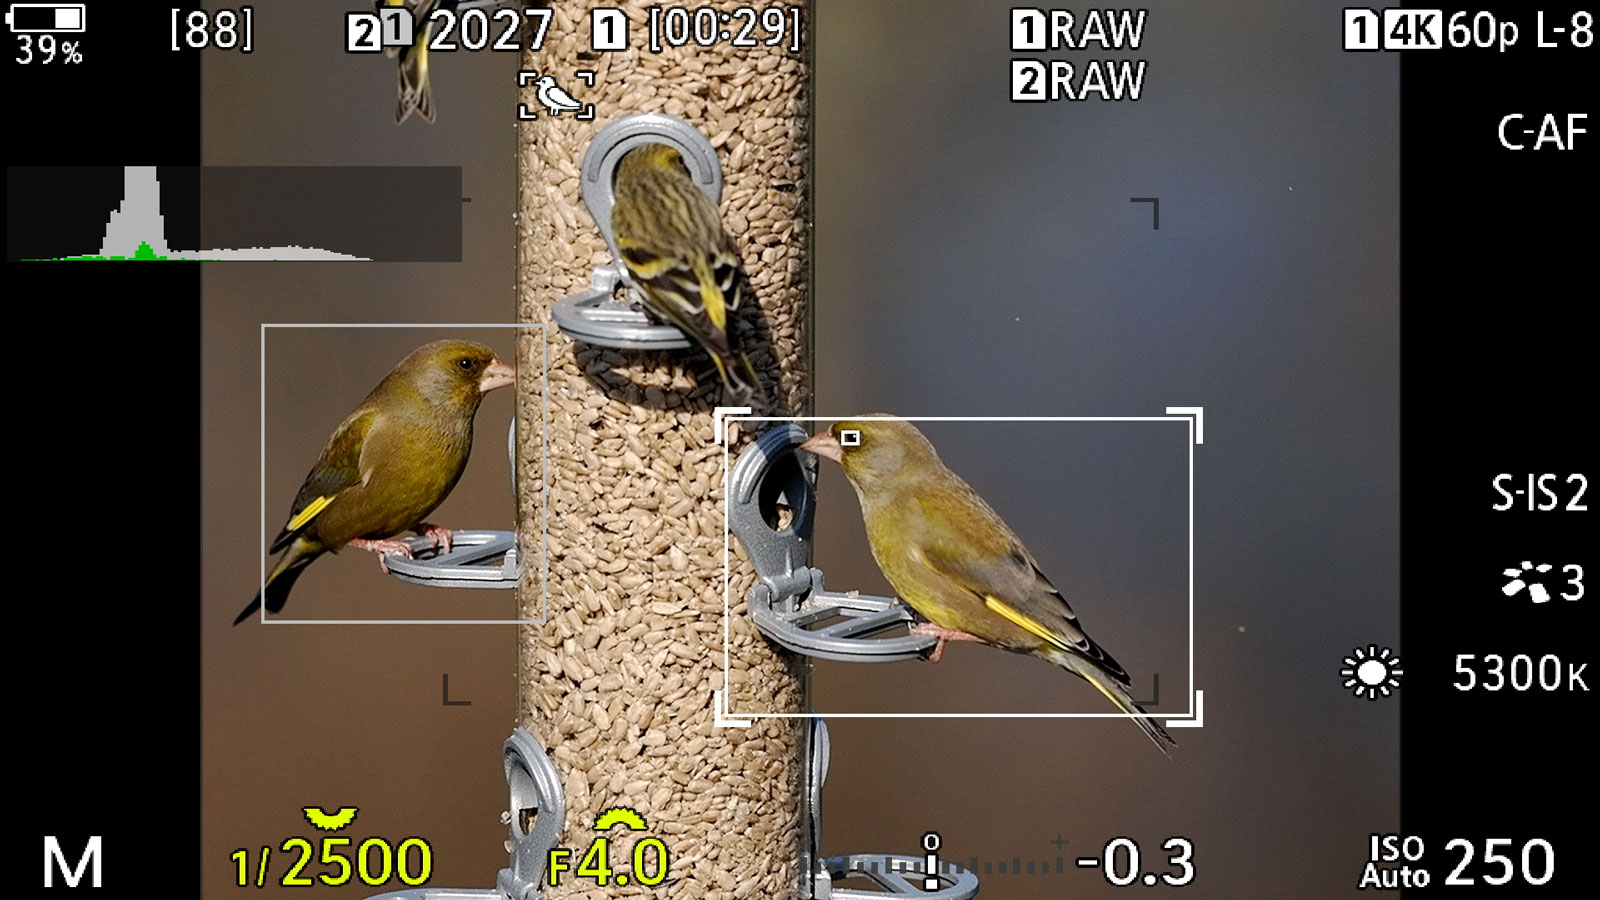
OM-1 Settings for Birds Near a Feeder
- Back Button Focus (AF-ON button, ‘AF with shutter’ disabled)
- C-AF
- Large Target
- Subject Detection: Birds
- C-AF Centre Target: disabled
- Release Priority: Off
- AF Sensitivity: +2
- AF Scanner: On
- Drive: Pro Capture SH2 (25fps or 50fps)
- Low ISO Processing: Drive Priority
- Shutter speed: 1/4000s or 1/8000s
- ISO: Auto (max. 12800)
- Stabilisation: S-IS1, FPS Priority
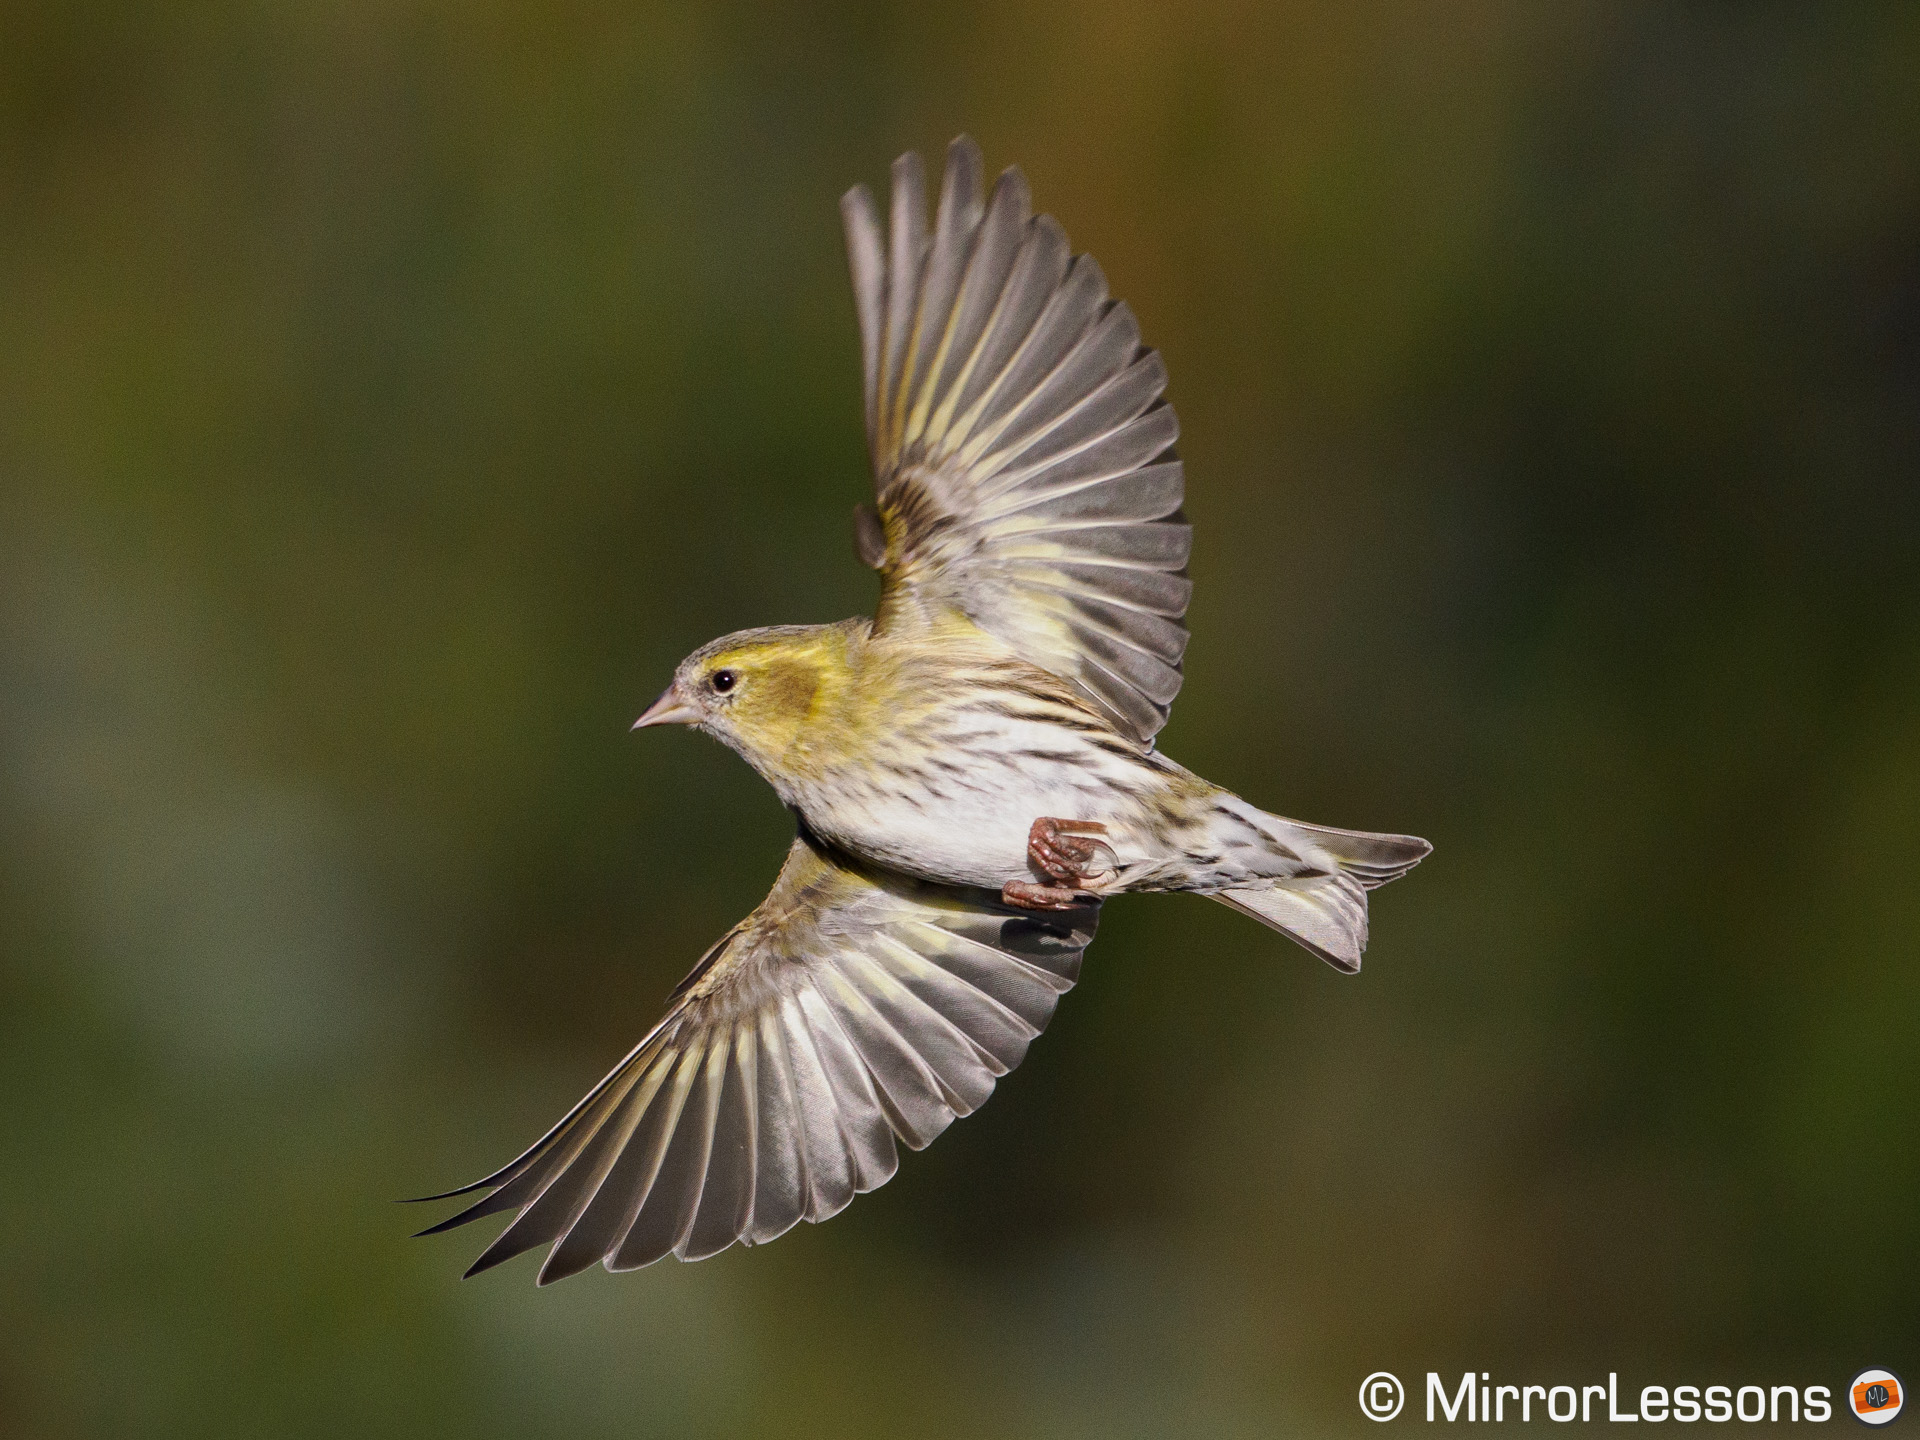
OM-1 Settings for Birds in Flight
- Back Button Focus (AF-ON button, ‘AF with shutter’ disabled)
- C-AF
- Large Target
- Subject Detection: Birds
- C-AF Centre Target: disabled
- Release Priority: Off
- AF Sensitivity: +2
- AF Scanner: On
- Drive: SH2 (25fps or 50fps)
- Low ISO Processing: Drive Priority
- Shutter speed: around 1/2500s
- ISO: Auto (max. 12800)
- Stabilisation: S-IS2 (FPS Priority), or Off if the bird is very fast and erratic
OM-1 Settings for Motorsports
- Back Button Focus (AF-ON button, ‘AF with shutter’ disabled)
- C-AF
- Small Target
- Subject Detection: Motorsport
- C-AF Centre Target: disabled
- Release Priority: Off
- AF Sensitivity: -1
- AF Scanner: Off
- Drive: 10fps or faster
- Low ISO Processing: Drive Priority
- Shutter speed: around 1/1000s (1/200s or 1/400s for panning effect)
- ISO: 200, or higher depending on the light
- Stabilisation: S-IS2, FPS Priority
OM-1 Settings for Portraits
- Back Button Focus (AF-ON button, ‘AF with shutter’ disabled)
- C-AF
- Middle Target
- Subject Detection: Off
- Face & Eye Detection (with Face Priority)
- C-AF Centre Target: disabled
- Release Priority: Off
- AF Sensitivity: 0
- AF Scanner: Off
- Drive: single
- Shutter speed: 1/50s or faster
- ISO: 200
- Stabilisation: S-IS1, IS Priority
OM-1 Settings for Toddlers
- Back Button Focus (AF-ON button, ‘AF with shutter’ disabled)
- C-AF
- Middle Target
- Subject Detection: Off
- Face & Eye Detection (with Face Priority)
- C-AF Centre Target: disabled
- Release Priority: Off
- AF Sensitivity: +1
- AF Scanner: Off
- Drive: continuous (5fps to 10fps)
- Low ISO Processing: Detail Priority
- Shutter speed: 1/200s or faster
- ISO: Auto (max. 6400)
- Stabilisation: S-IS1, IS Priority
Video version
This article is also available in video format on our YouTube channel. Please note that the video version doesn’t contain all the settings described here.