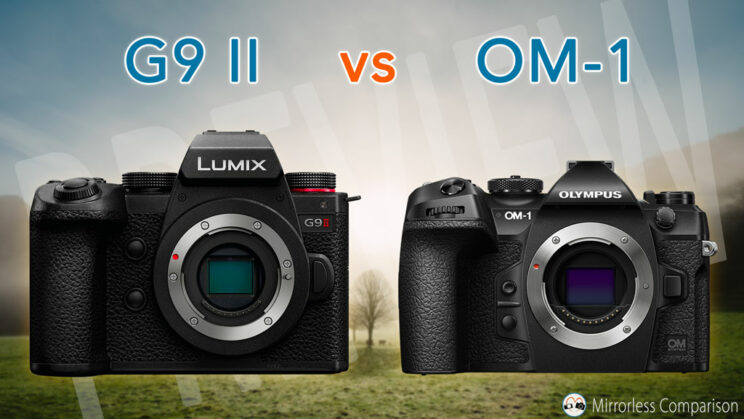
The Lumix G9 II arrived six years after the unveiling of its predecessor. Panasonic says it’s a camera tailored for photographers, although its video capabilities are nothing short of impressive. But whether your interest leans more towards photos or movies, the main highlight with the G9 mark II is that it (finally) gets phase detection autofocus!
The new Lumix model directly competes with the OM System OM-1, and these two products are undoubtedly the two most advanced micro four thirds cameras on the market, at the time of writing of course.
I hope this comparison can be of interest to many photographers, especially those passionate about nature and wildlife, given the superb features and variety of lenses available for the system. Let’s begin!
Editor’s Note: I’ve updated this article to provide you with a thorough article, which includes side-by-side tests, real-world feedback, and sample images.
Ethics statement: the following is based on our personal experience with the OM-1 and G9 II. We were not asked to write anything about this product, nor were we provided any compensation of any kind. Within the article, there are affiliate links. If you buy something after clicking one of these links, we will receive a small commission. To know more about our ethics, you can visit our full disclosure page. Thank you!
Table Of Contents
Main Specs
1. Image Quality
2. Video
3. Autofocus
4. Continuous Shooting
5. Sensor Shift
6. Viewfinder and Monitor
7. Design
8. SSD Recording
9. Battery Life
10. Price
Extra Features
Conclusion
Main Specs
G9 II
- Sensor: 25.2MP CMOS
- Format: Four Thirds
- Lens system: Micro Four Thirds
- Weather resistant: Yes
- Stabilisation: 5-axis and Dual IS2 (8 stops)
- Autofocus: phase/contrast detection with 779 points, subject detection (humans, animals, vehicles)
- Continuous shooting: 60 fps with C-AF, 75 fps with S-AF
- ISO Sensitivity: 100 – 25,600 ISO (50 extended)
- Shutter Speeds: 1/32,000s to 60s, Bulb
- Viewfinder: 0.5-in OLED with 3.69M dots, 21mm eye point, 0.8x magnification, 120fps
- Rear monitor: Vari-angle 3.0″ LCD (1.84M dots) with touch sensitivity
- Movie recording: 5.8K 30p ‘open gate’, 5.7K up to 60p, 4K up to 120p, 10-bit 4:2:2, All-Intra, Prores HQ, HLG and V-Log
- Built-in Flash: No
- Features: WiFi, Bluetooth, Focus Bracketing, Pre-Burst, Tethering, Time-lapse, Stop-Motion, Live composition, High Resolution mode, Dual card slots (SD UHS-II)
- Dimensions: 134.3 x 102.3 x 90.1 mm
- Weight: 658g (including battery and memory card)
- Firmware version when tested: 1.00
- Release: September 2023
OM-1
- Sensor: 20.4MP BSI Stacked CMOS
- Format: Four Thirds
- Lens system: Micro Four Thirds
- Weather resistant: Yes
- Stabilisation: 5-axis and Sync IS (8 stops)
- Autofocus: phase/contrast detection with 1053 cross-type points, face/eye detection for humans, subject detection (birds, cats/dogs, cars, planes, trains, helicopters)
- Continuous shooting: 50 fps with C-AF, 120 fps with S-AF
- ISO Sensitivity: 200 – 25,600 ISO (80 – 102,400 extended)
- Shutter Speeds: 1/32,000s to 60s, Bulb
- Viewfinder: 0.5-in OLED with 5.76M dots, 21mm eye point, 0.83x magnification, 120fps
- Rear monitor: Vari-angle 3.0″ LCD (1.62M dots) with touch sensitivity
- Movie recording: 4K up to 60p, 10-bit 4:2:0, HLG and OM-Log400
- Built-in Flash: No
- Features: WiFi, Bluetooth, Focus Stacking, Live ND, Pro Capture, Tethering, Time-lapse, Live composite, Live Bulb, High Resolution mode, Dual card slots (SD UHS-II)
- Dimensions: 134.8 x 91.6 x 72.7 mm
- Weight: 599g (including battery and memory card)
- Firmware version when tested: 1.5
- Release: February 2022
1. Sensor
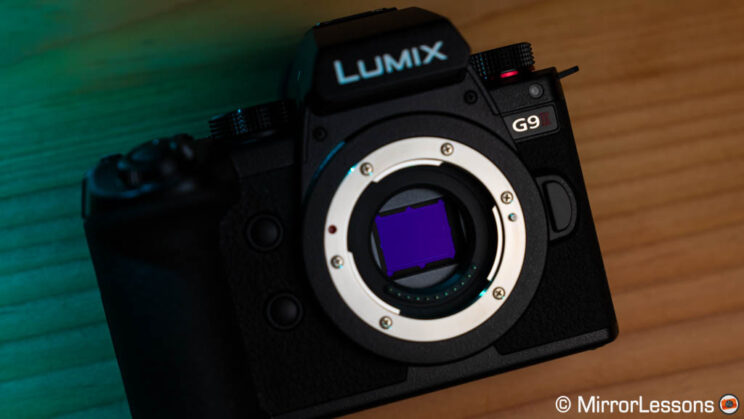
The G9 II is equipped with a 25.2MP sensor, the same one found on the GH6 but tweaked at a hardware and software level, according to Panasonic.
The OM-1 features a 20.4MP sensor. Although this resolution sounds familiar from previous-generation cameras, the chip is newly developed, with a stacked BSI design and a Quad Pixel Bayer pattern.
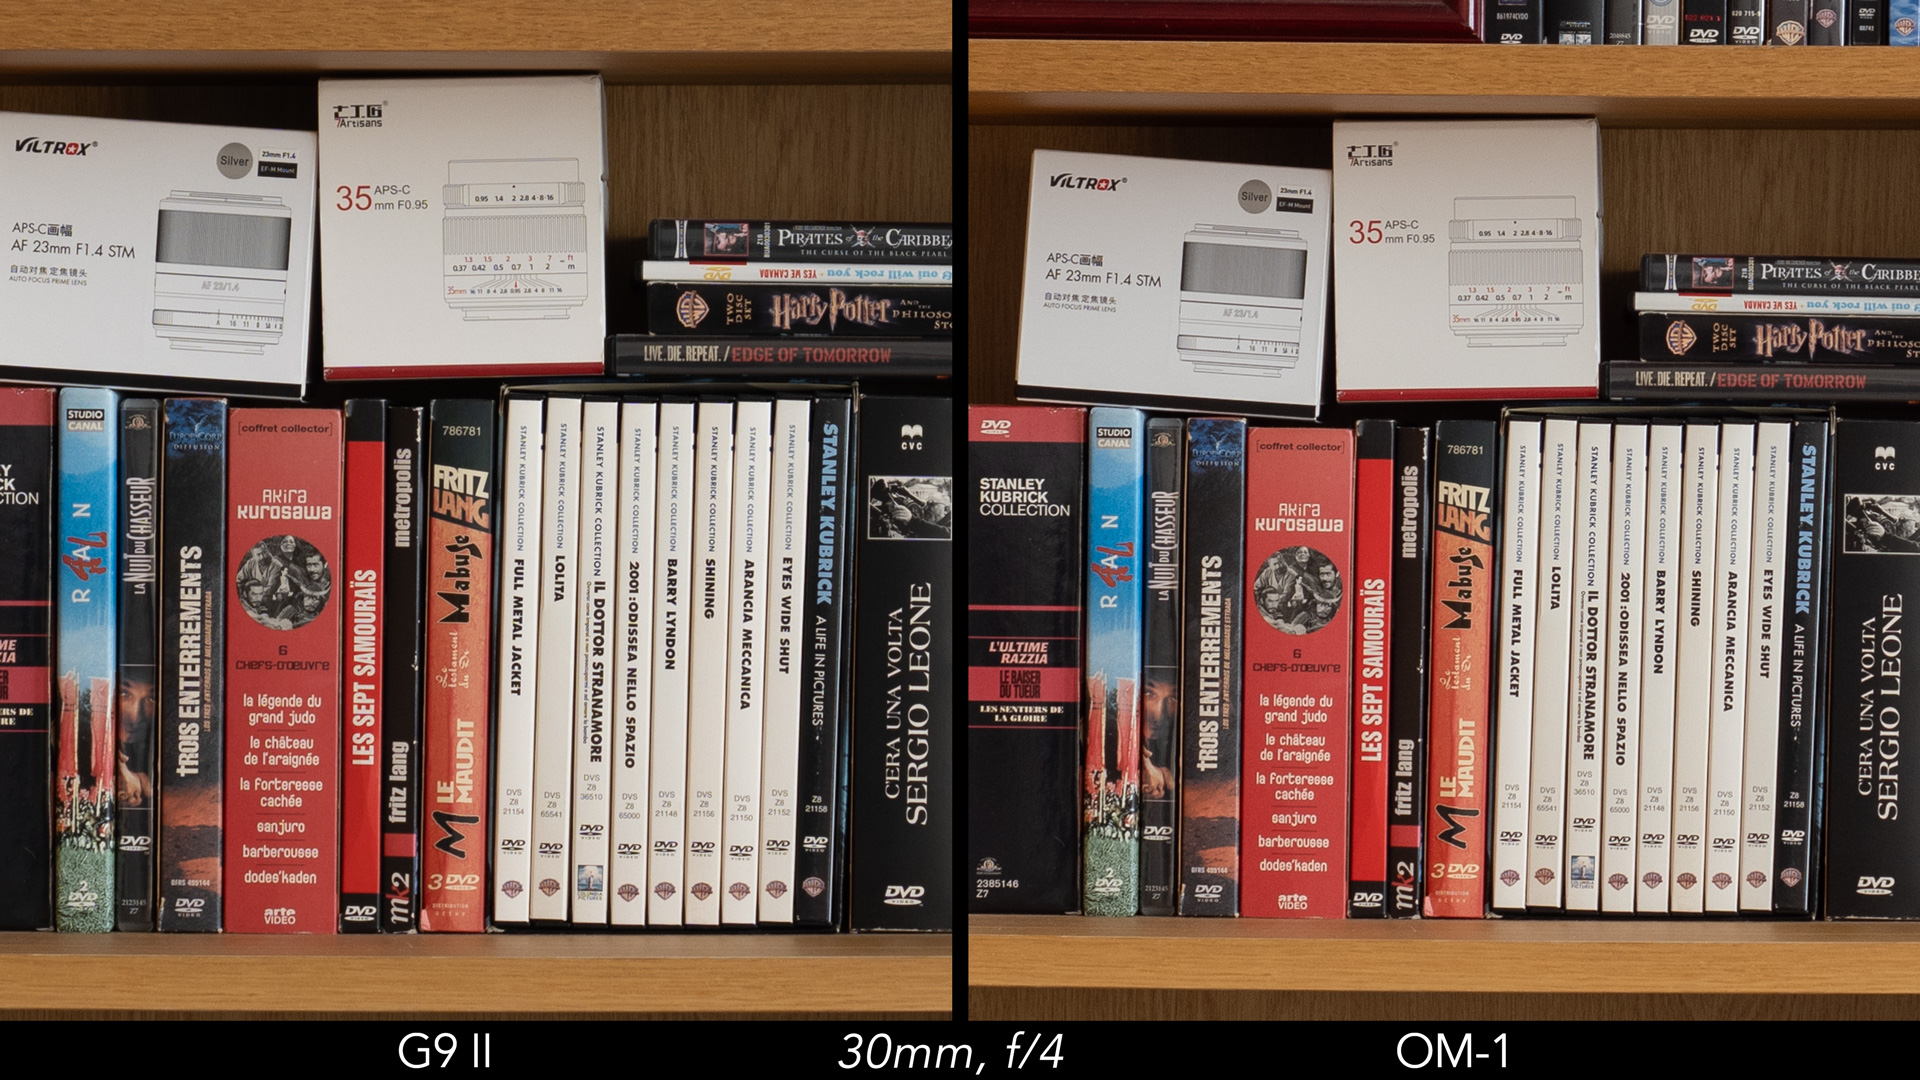
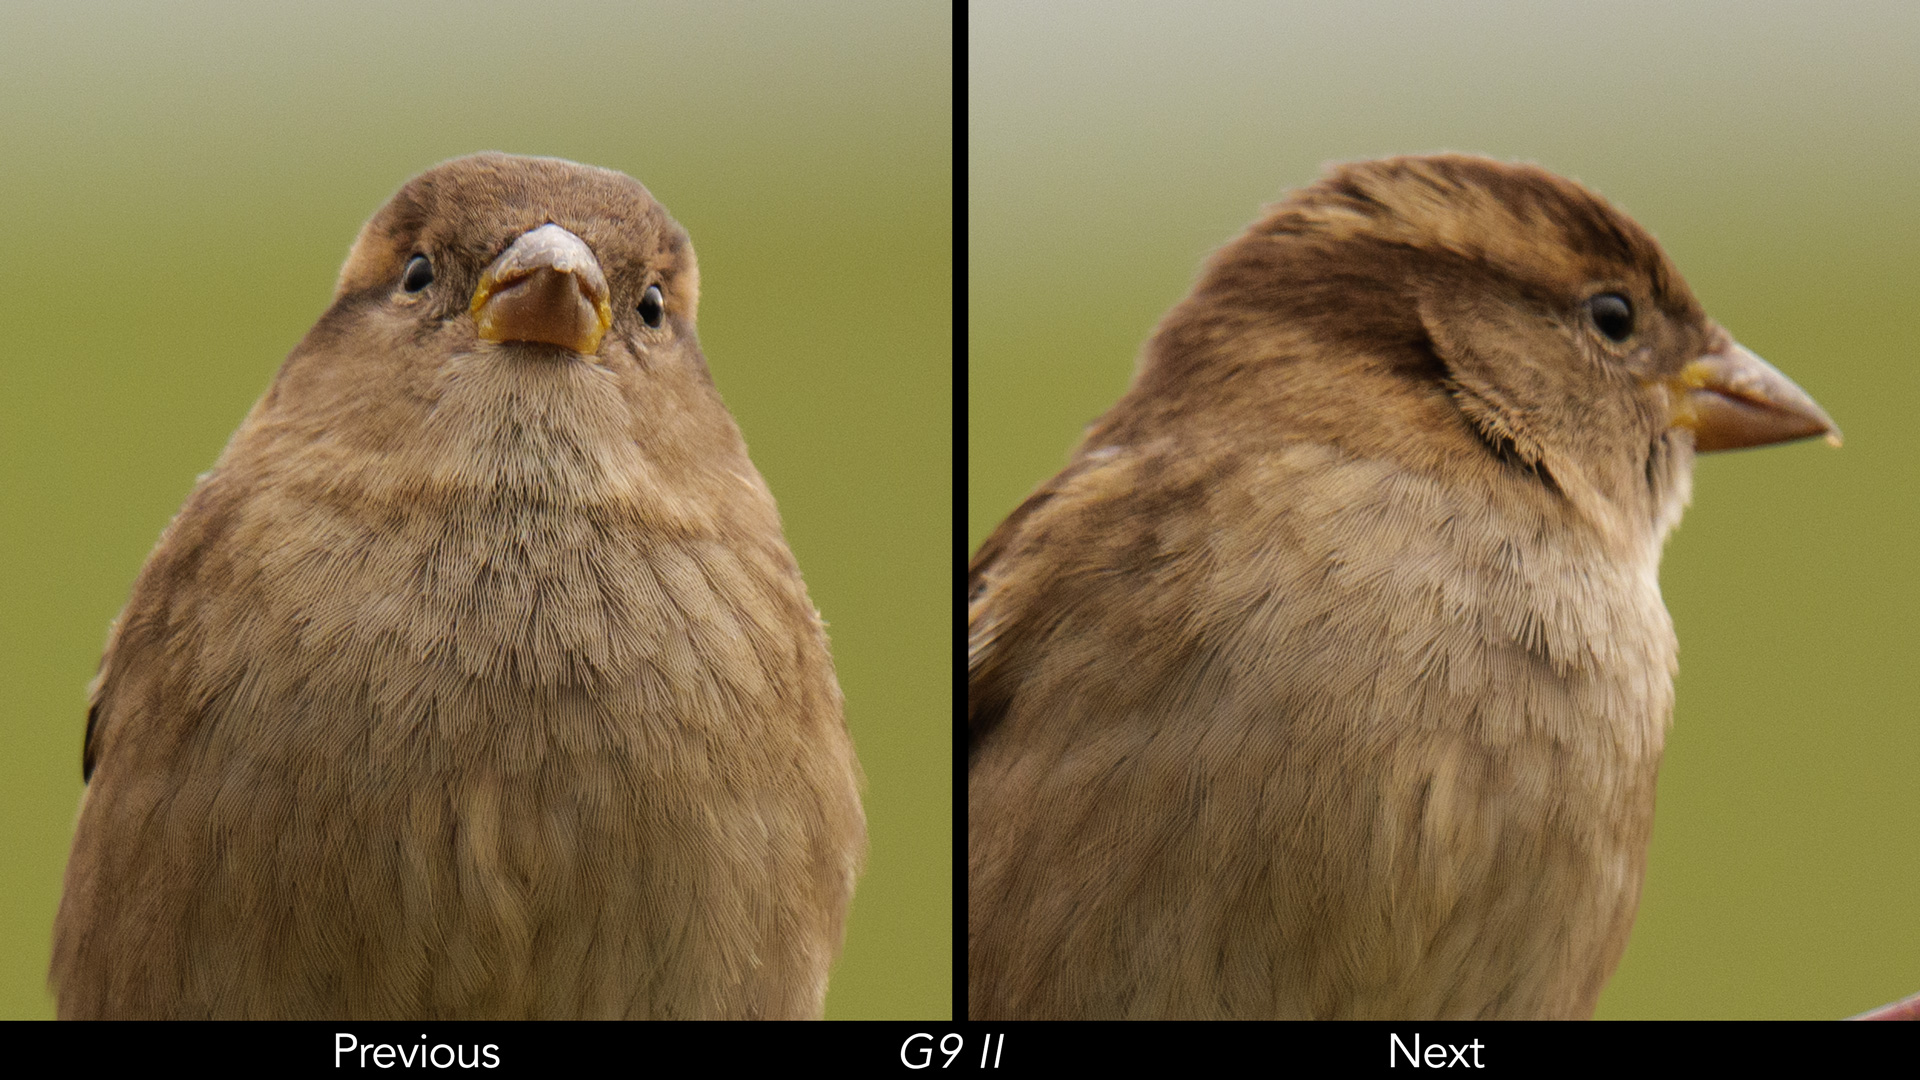
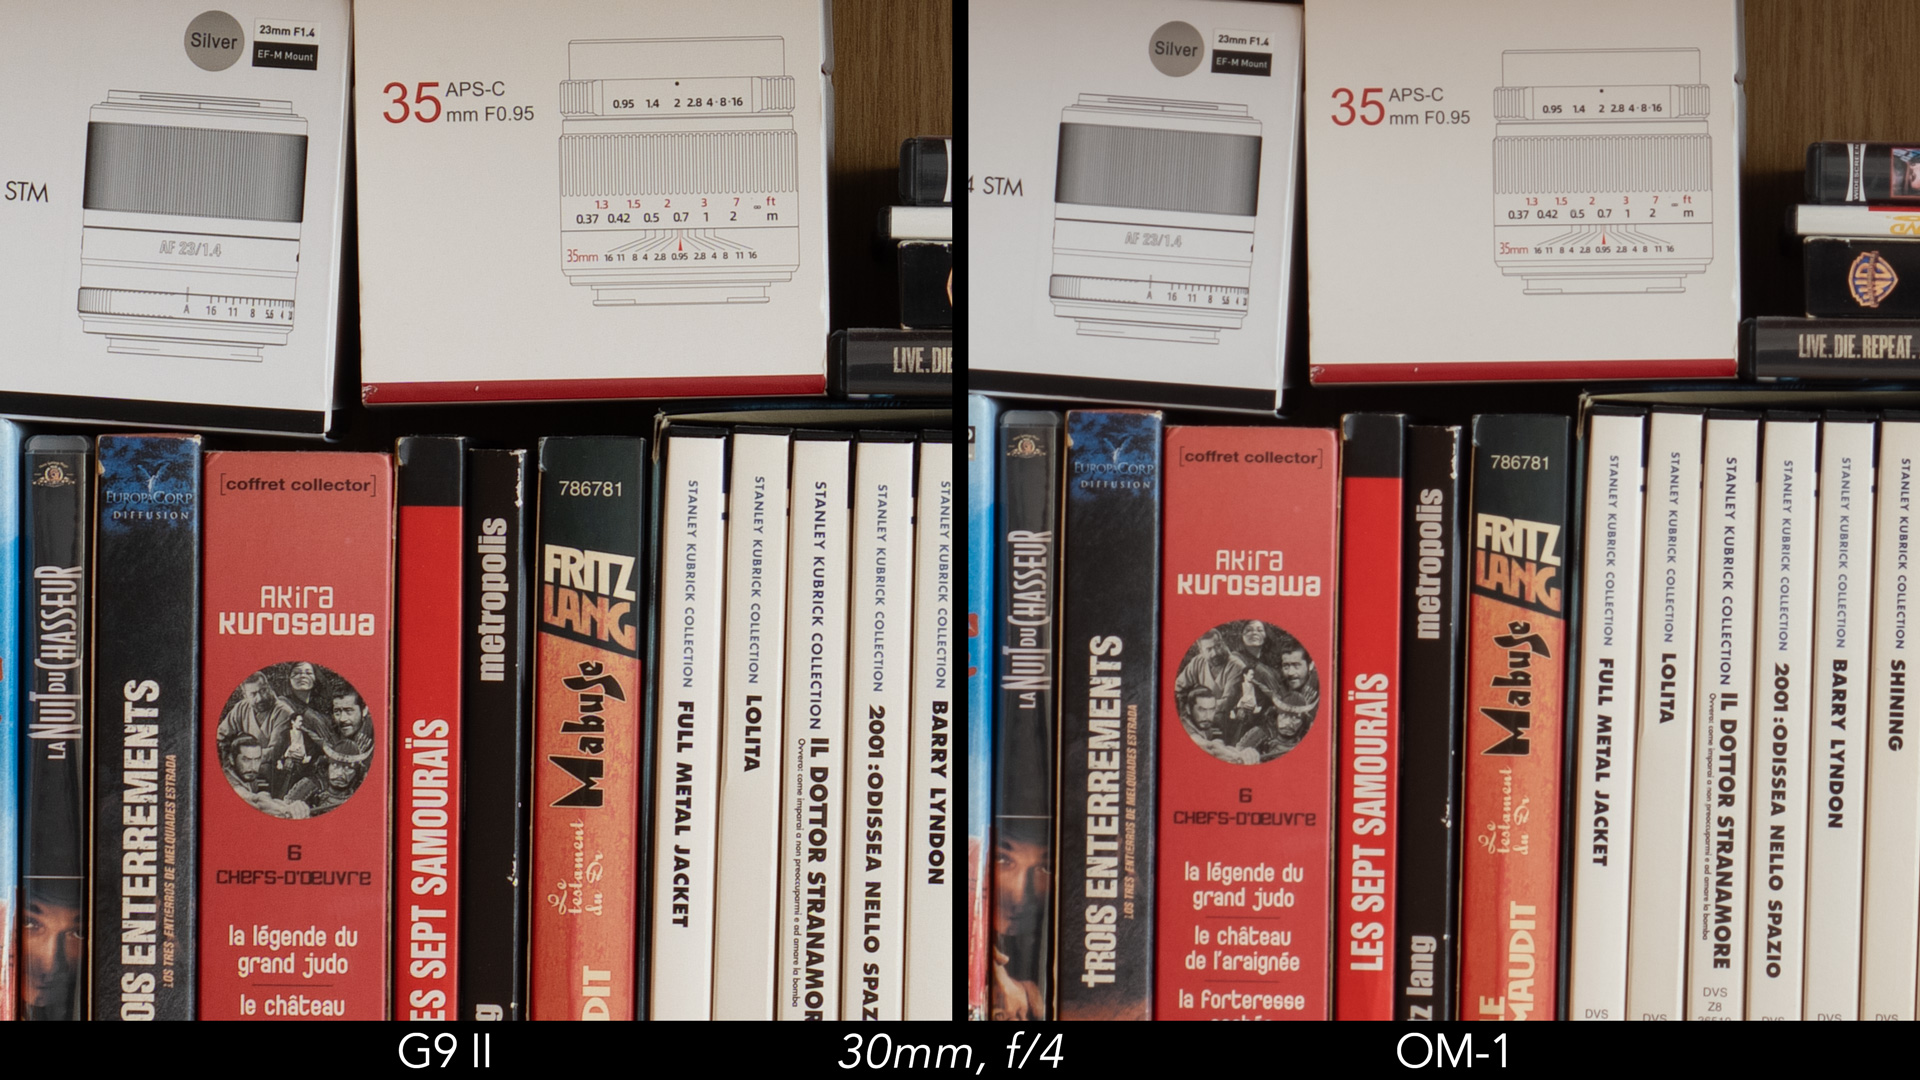
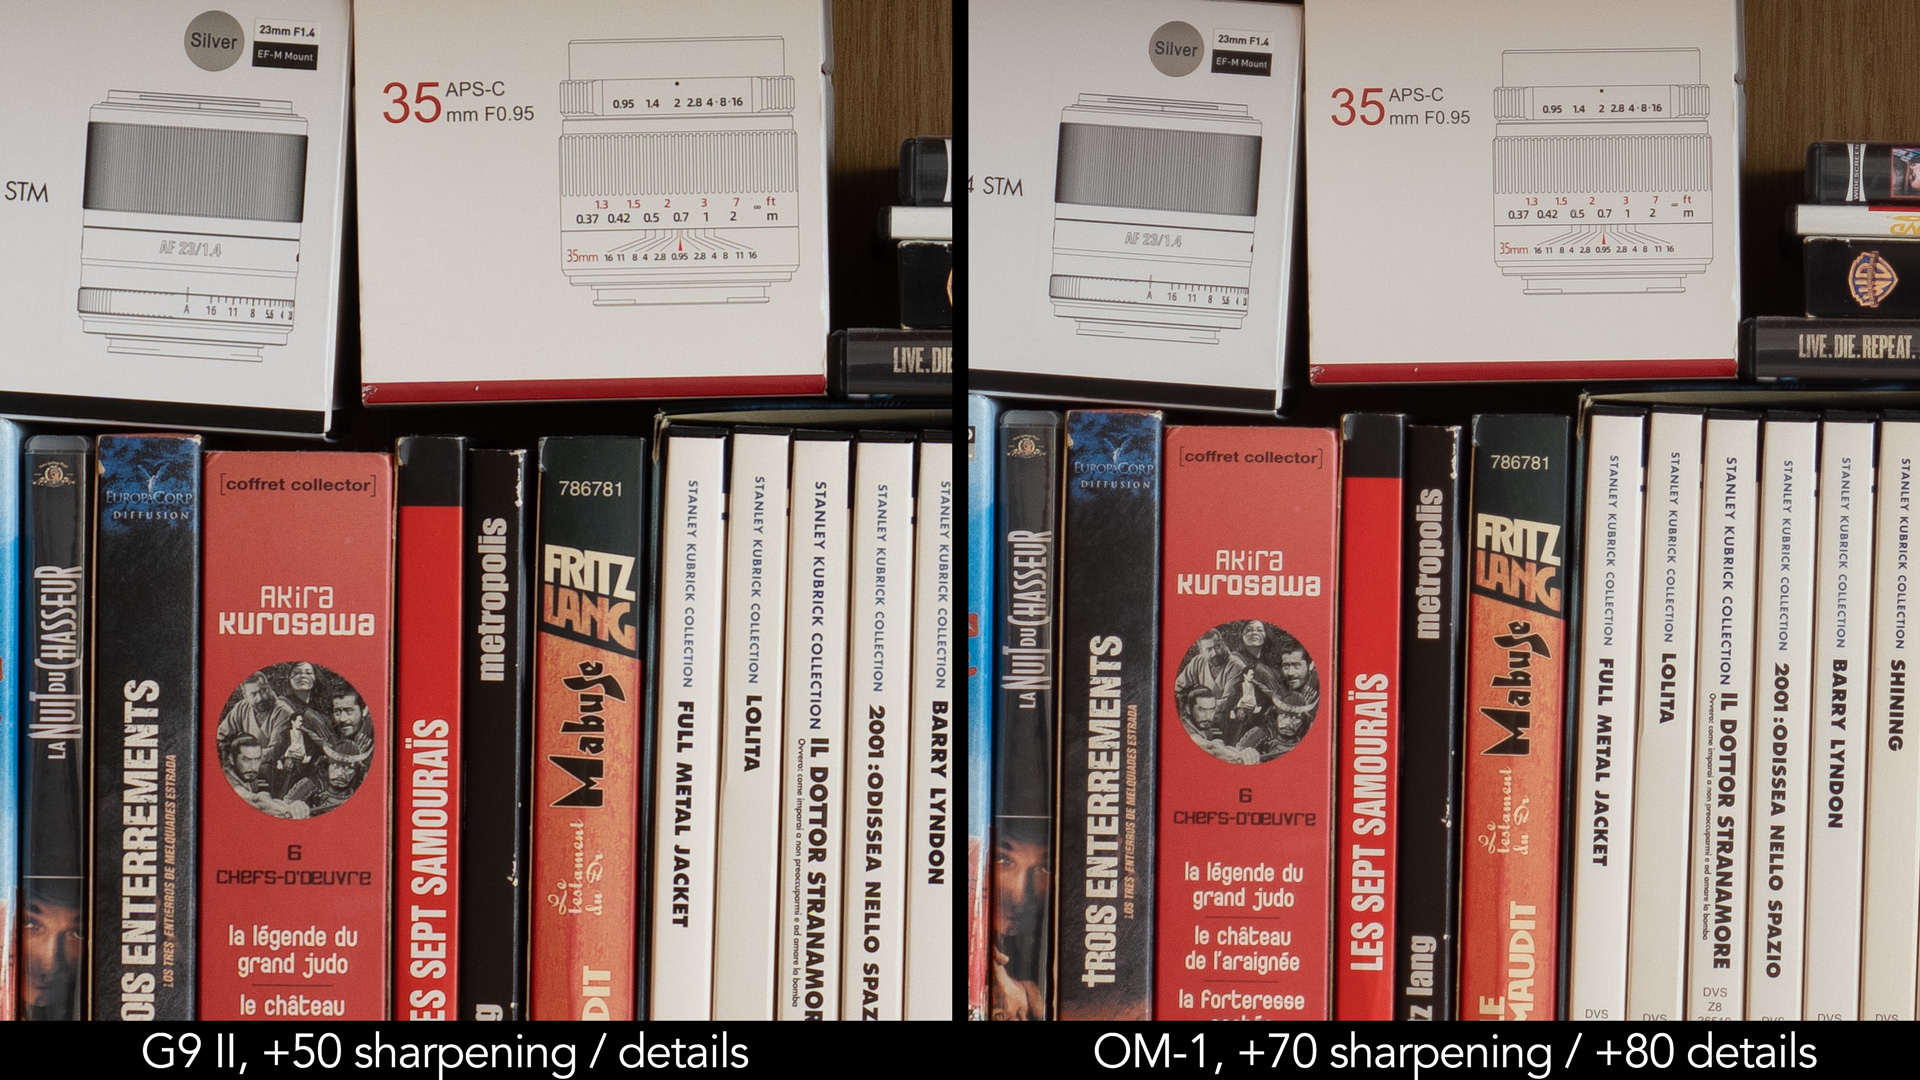
There isn’t much to distinguish in terms of sharpness and details rendering between the two cameras when paired with the same lens. Both perform equally well. The G9 II does offer a slight edge with the extra 5MP, but the difference is small. Neither camera includes a low-pass filter.
Moving on to the dynamic range test: the G9 II starts at a base ISO of 100, whereas the OM-1 begins at 200. I adjusted the shutter speed accordingly to ensure both cameras had the same exposure.
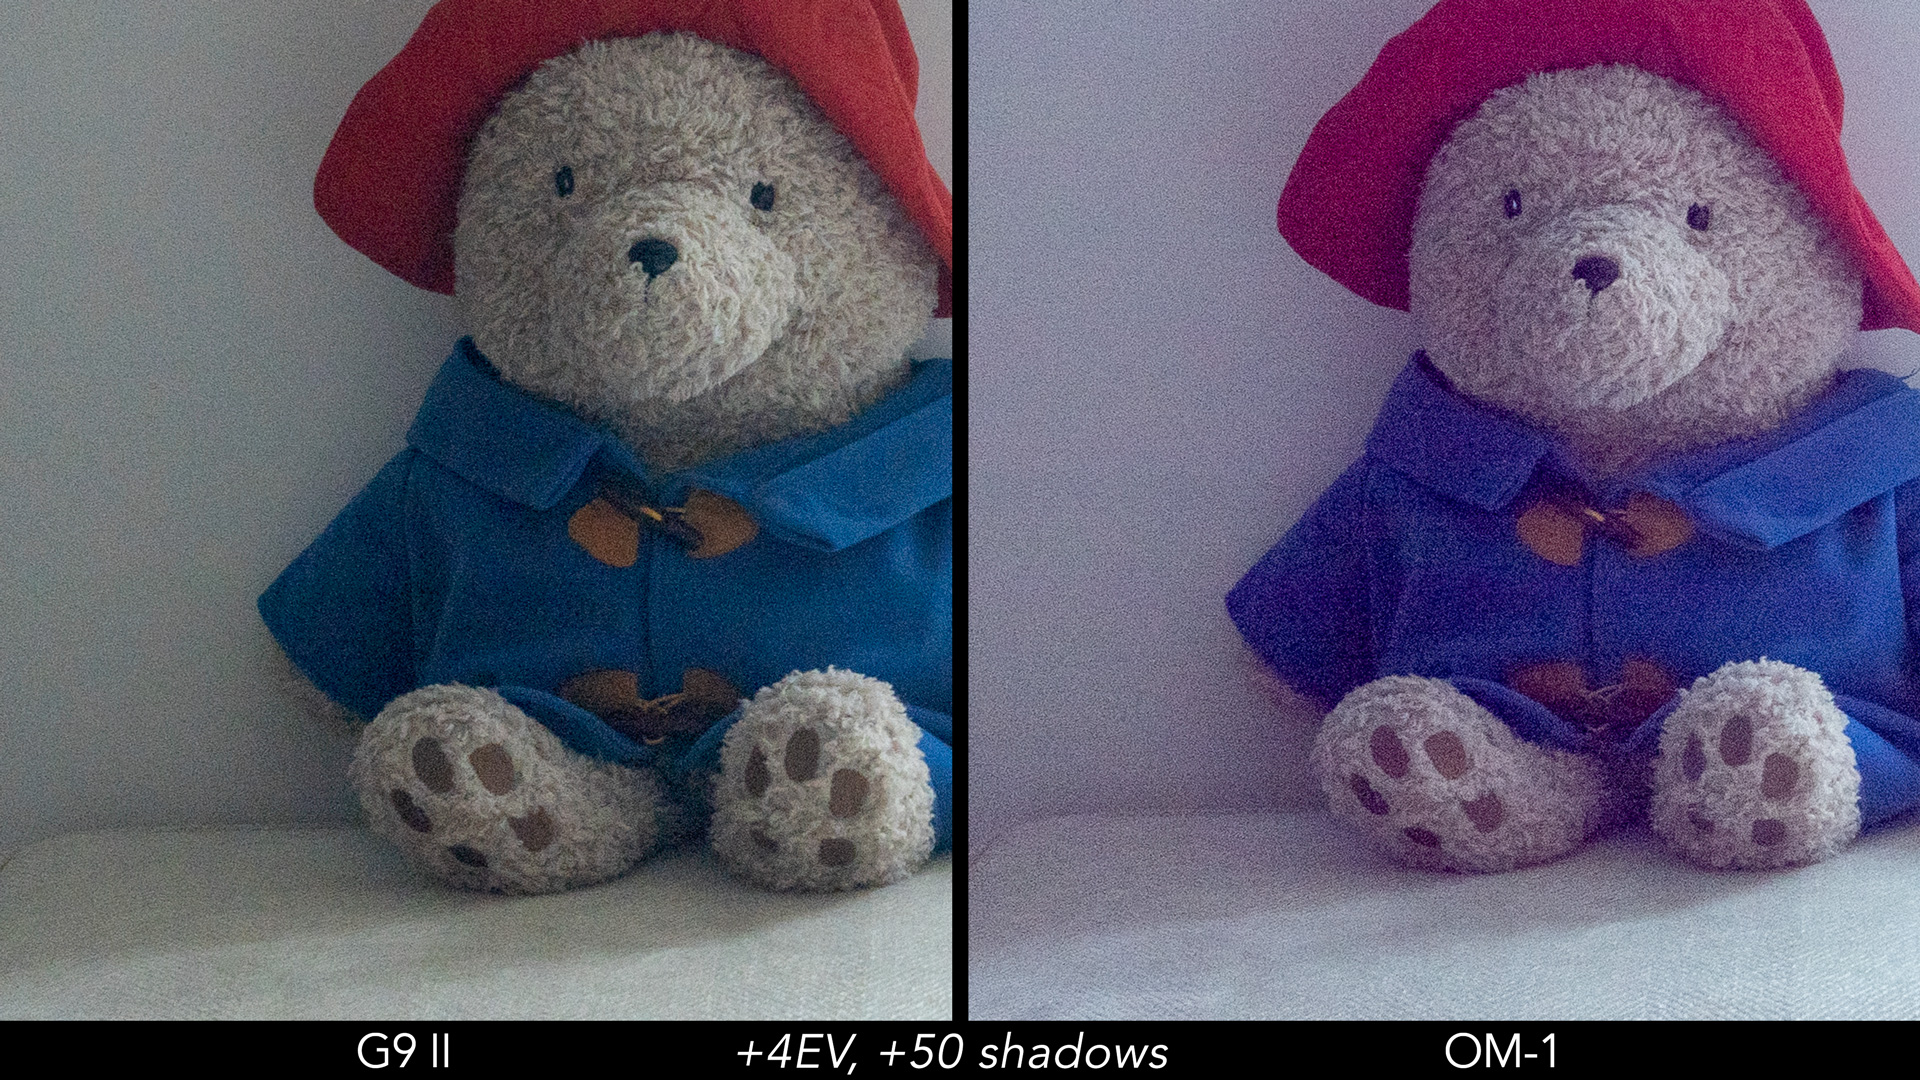
Starting with a challenging 4-stop recovery, which certainly pushes micro four thirds cameras to their limits, the G9 II does a better job. While there is noticeable noise in the shadows, it is less invasive and the degradation is less pronounced compared to the file from the OM-1. The latter, in contrast, exhibits a discernible colour shift towards magenta/purple.
OM-1: 1/200s, f/4, ISO 200
With a 3-stop recovery, the G9 II maintains an advantage in producing less noise compared to the OM model. However, the OM-1’s output appears notably better and more usable than the previous test.
OM-1: 1/100s, f/4, ISO 200

I hear you: these are extreme tests, and hopefully, you won’t need to make these kinds of adjustments on a regular basis, but it’s interesting to see how Panasonic managed to improve dynamic range on the new sensor.
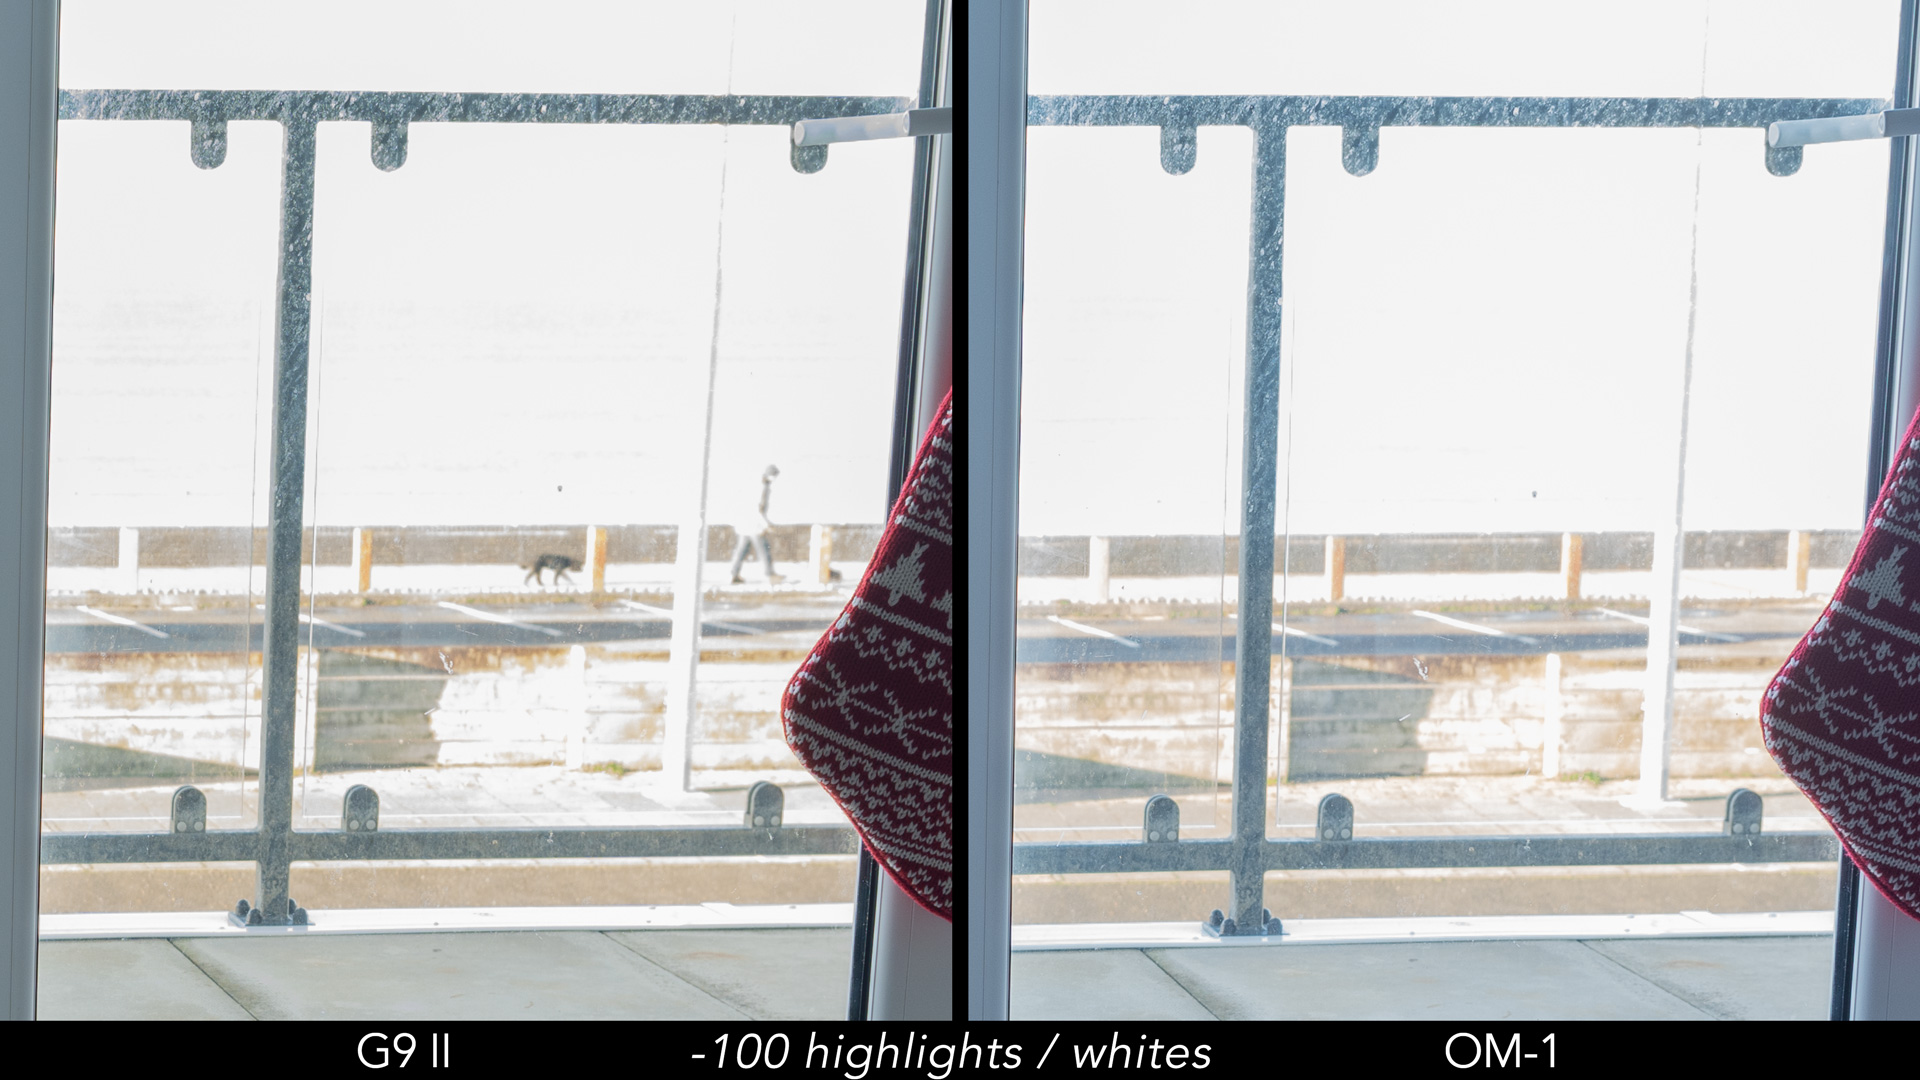
Turning our attention to highlight recovery, this time it’s the OM-1 that gains the upper hand, preserving more detail, albeit by a very low margin (examine the wooden panels in the background).

OM-1: 1/25s, f/4, ISO 200
Note: The Panasonic sensor operates with a dual output gain, employing two native ISO circuits on each pixel simultaneously to enhance dynamic range (referred to as DR Boost), a feature applicable to both photos and videos. This technology was first introduced with the 25.2MP sensor in the GH6. However, the G9 II automatically applies DR Boost, unlike the GH6 that requires manual activation in the menu. Several reviews, including one from DPreview, revealed underwhelming results for still images below ISO 800 with the GH6, but Panasonic seems to have addressed this issue in the G9 II. I conducted a similar DR test at various levels, and ISO 100 produces the best result with the least amount of noise.
Regarding ISO capabilities, the Lumix G9 II reaches a maximum of 25,600, whereas the OM-1 provides higher values (extended).
Photos
Normal range
Extended range
G9 II
100 – 25,600
50
OM-1
200 – 25,600
80 – 102,400
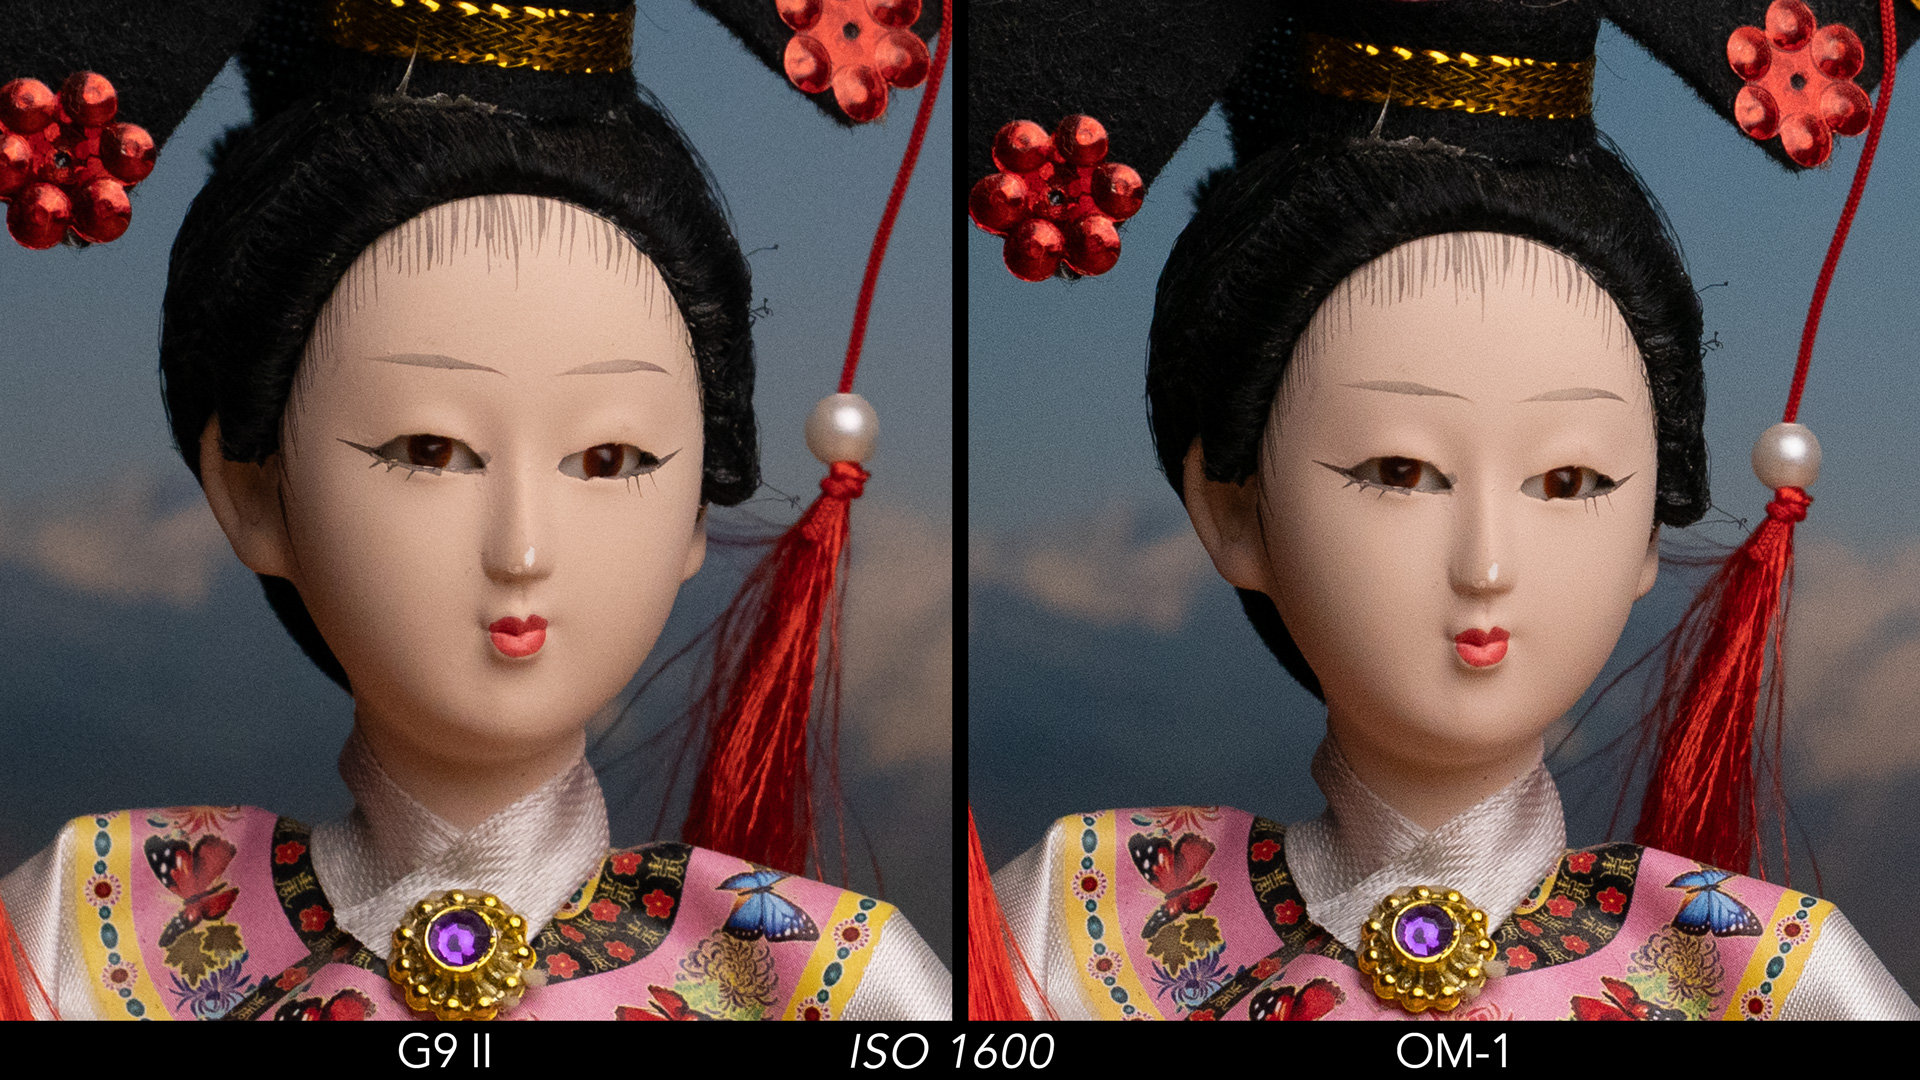
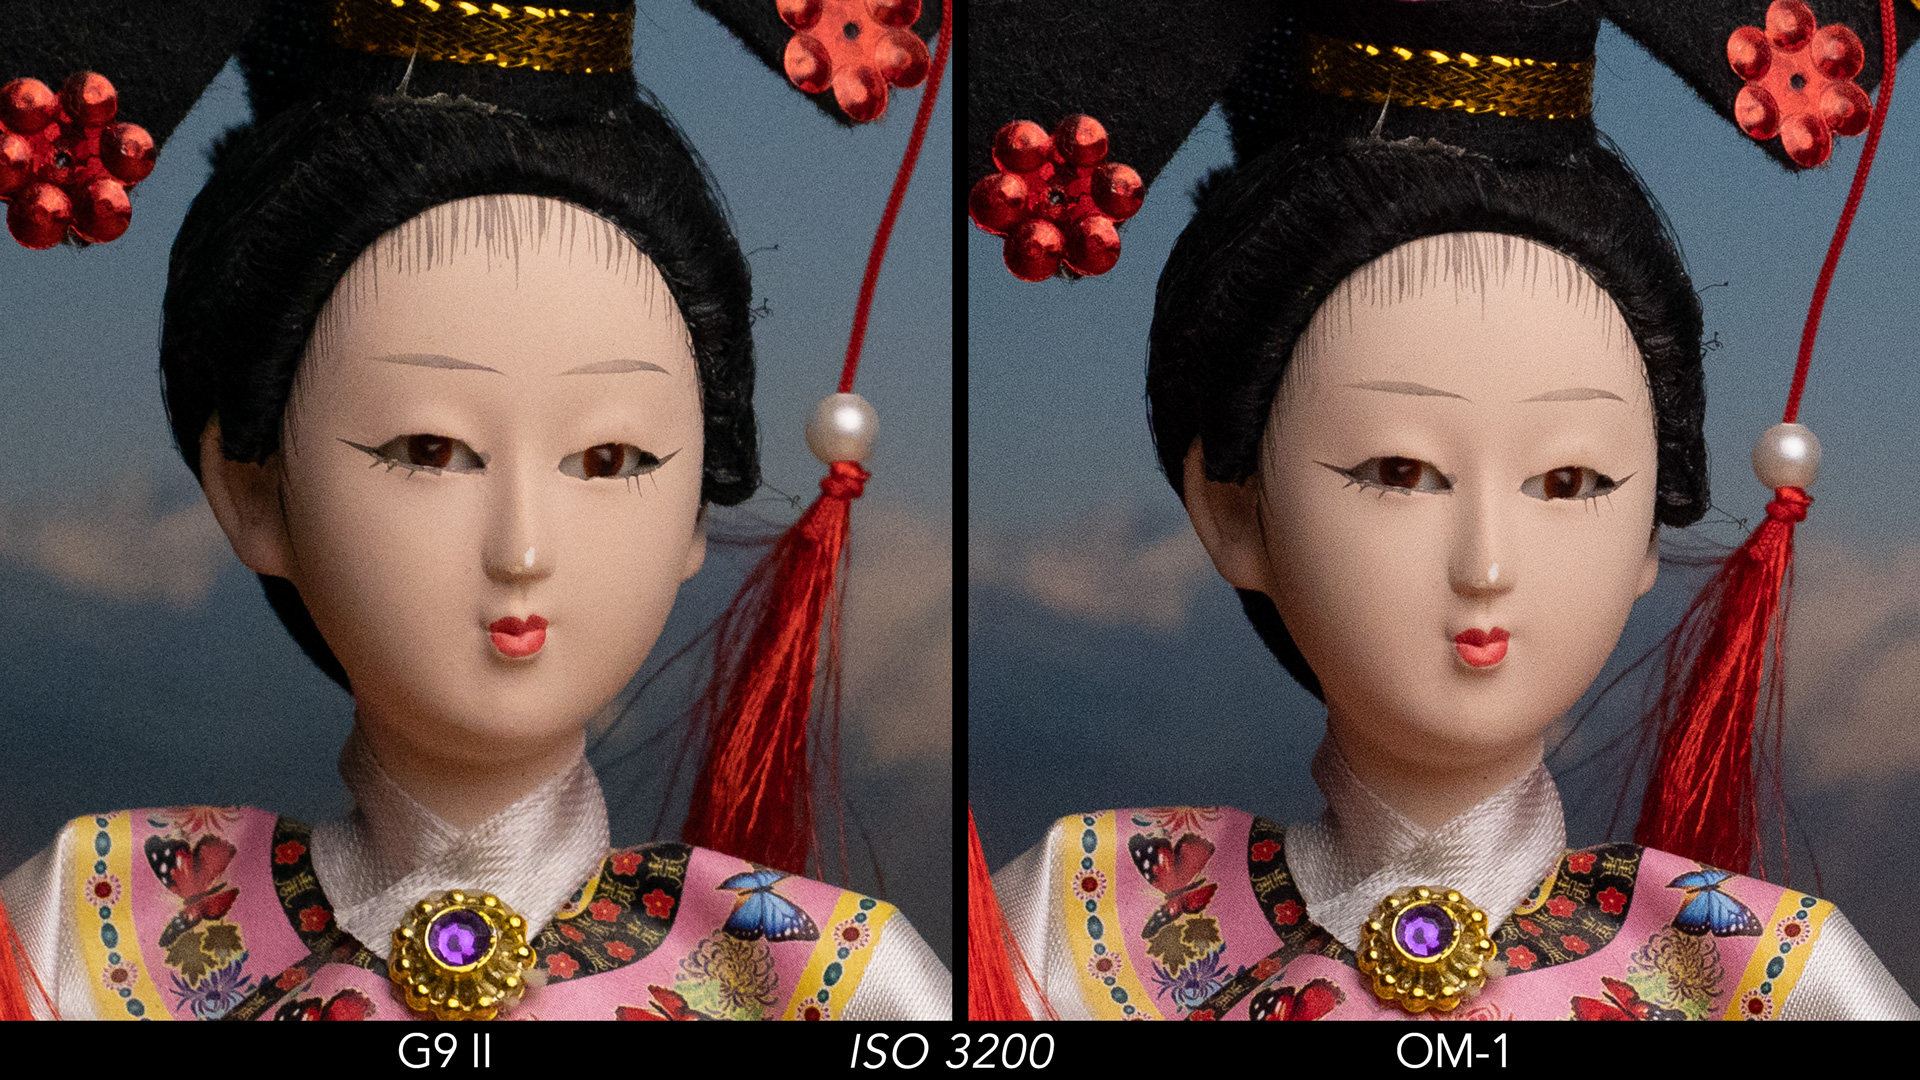
Both cameras deliver satisfactory results up to 6,400 ISO. However, the OM-1 displays a finer noise pattern and retains better color accuracy as the ISO level increases, particularly noticeable at 12,800 and 25,600.


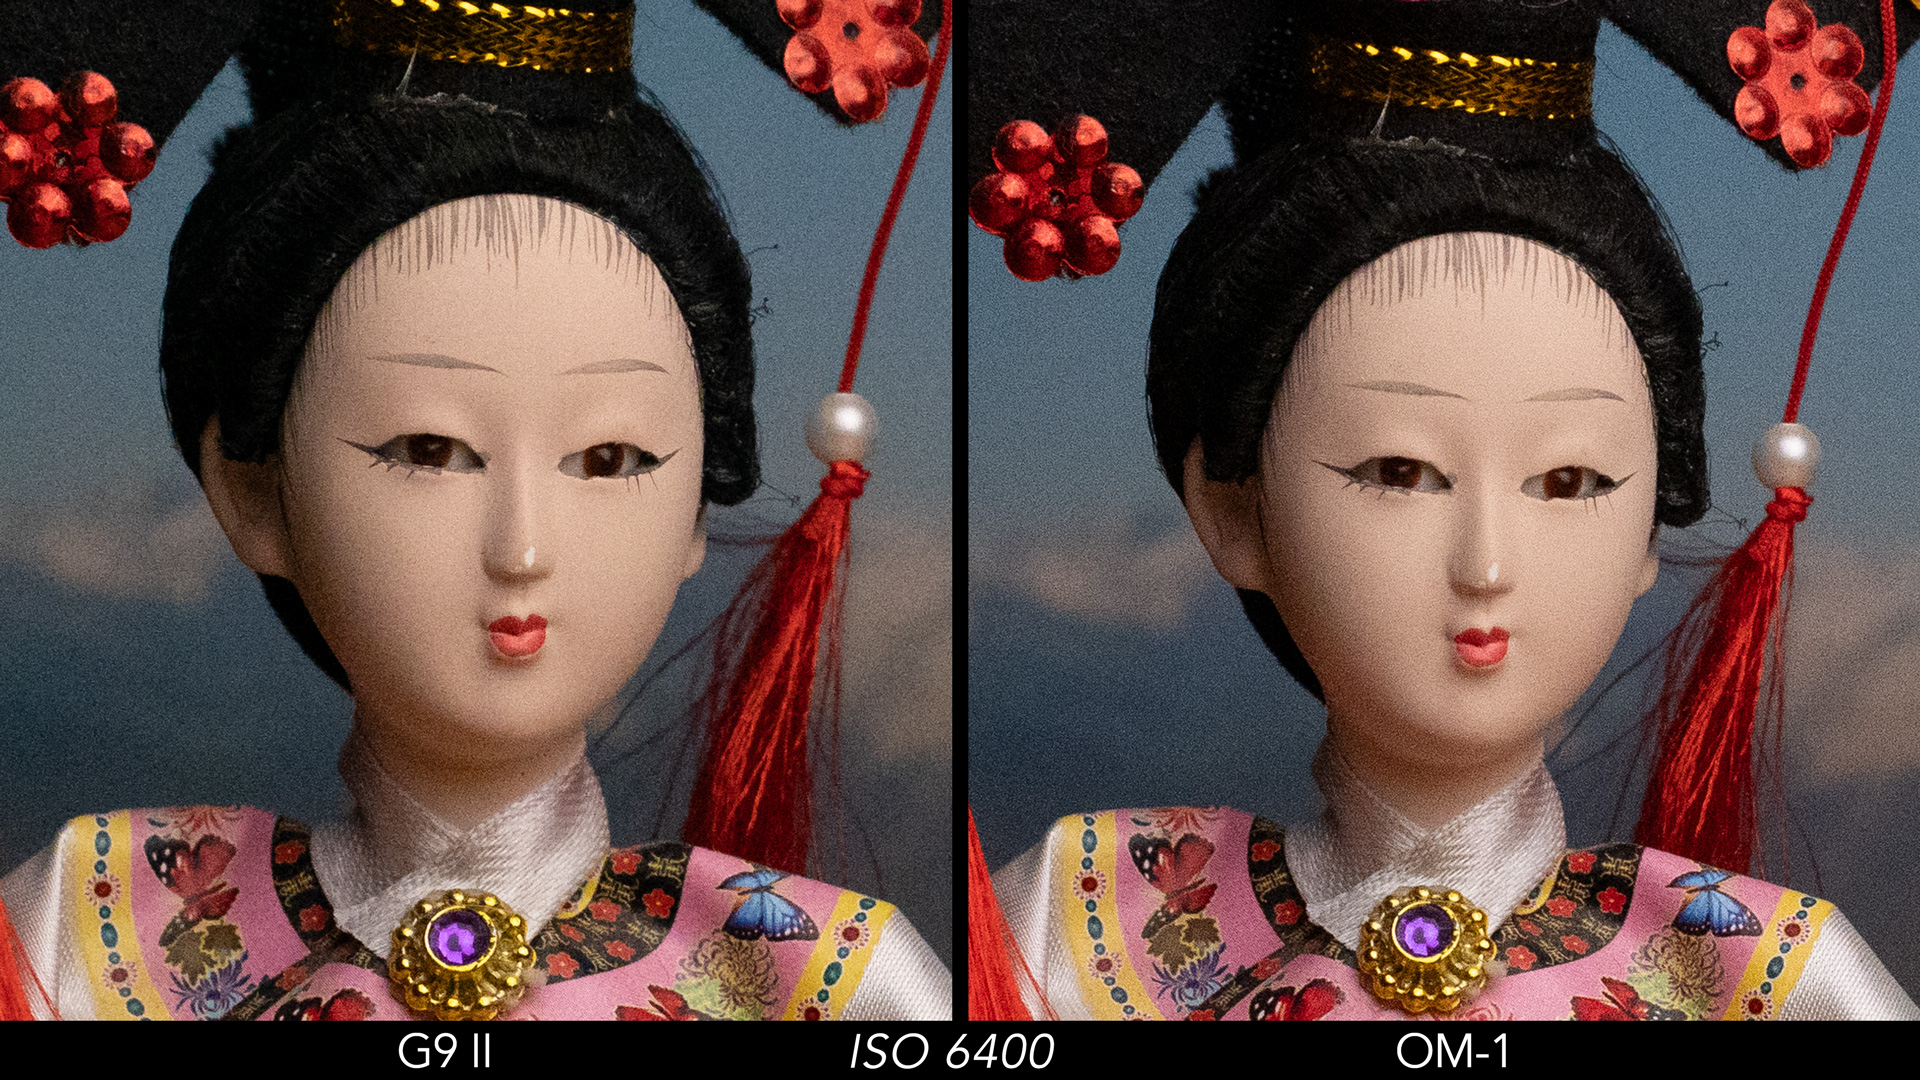
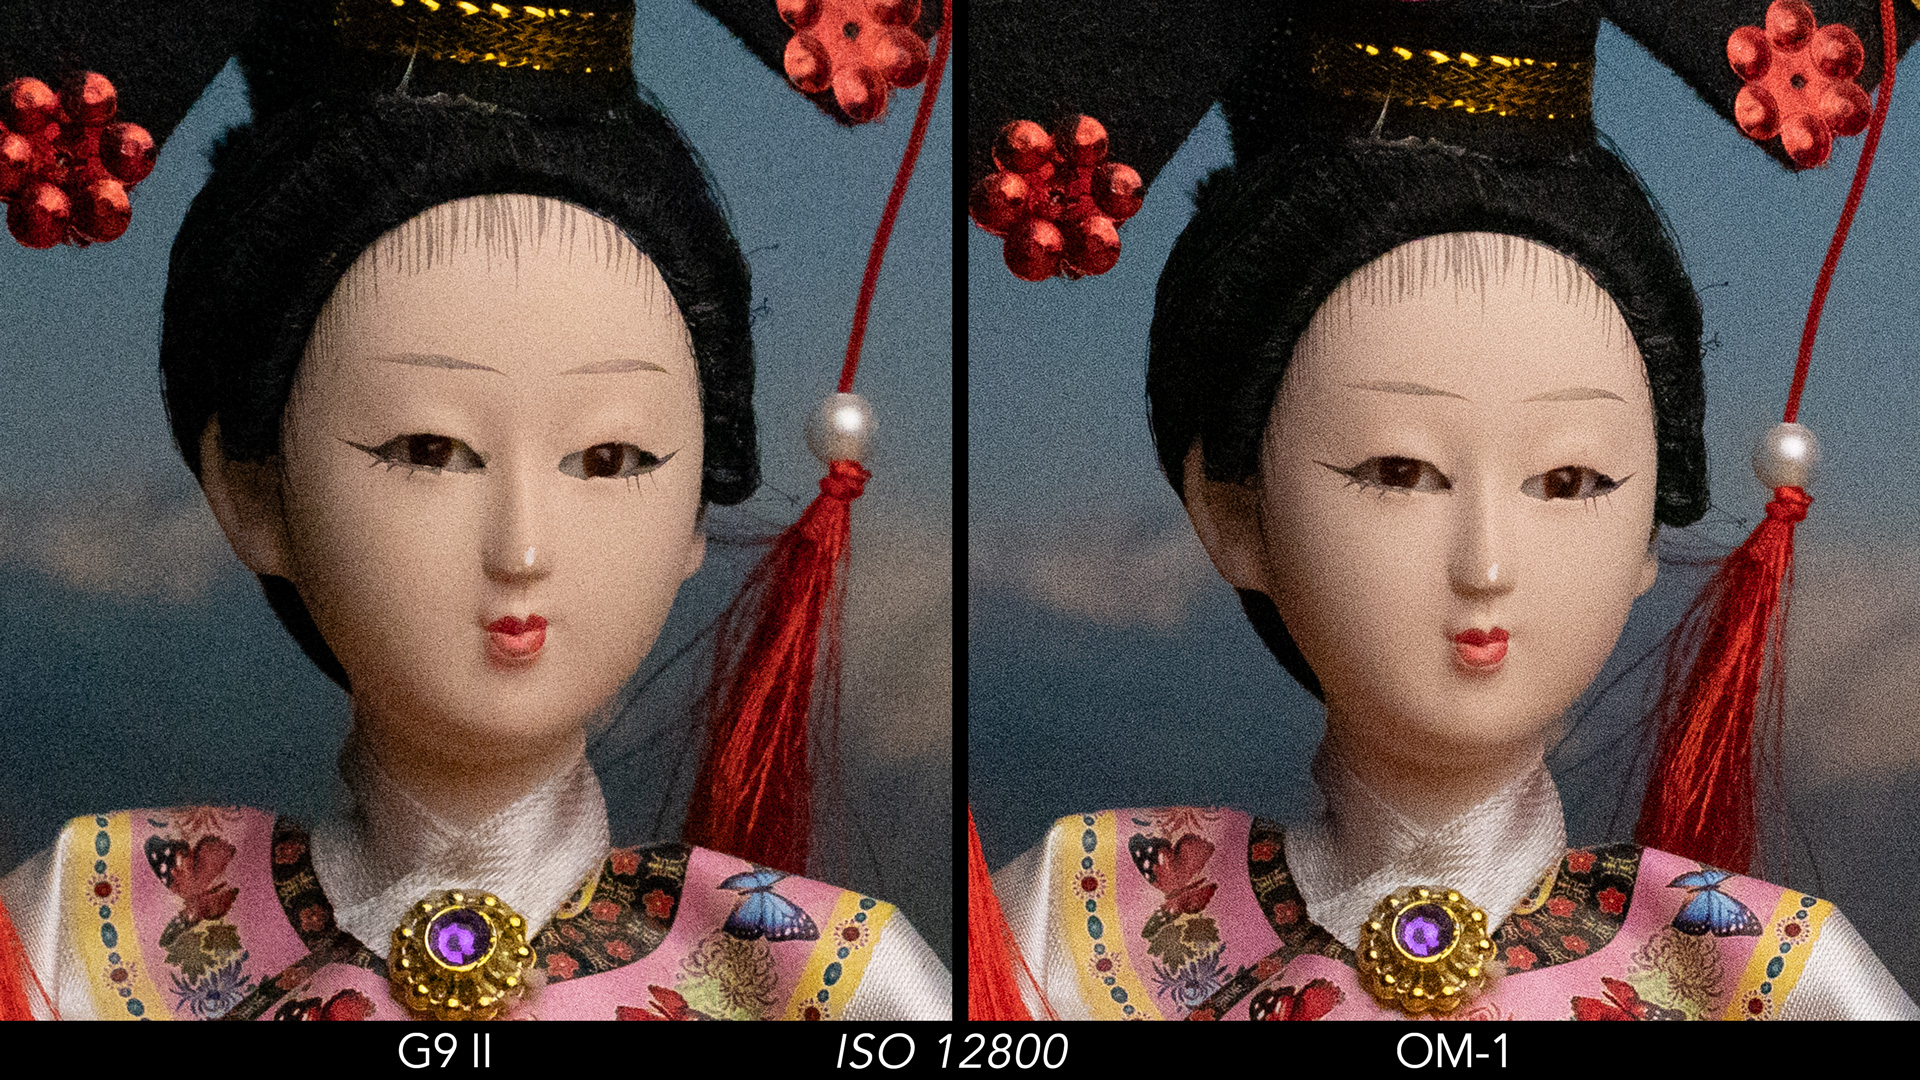
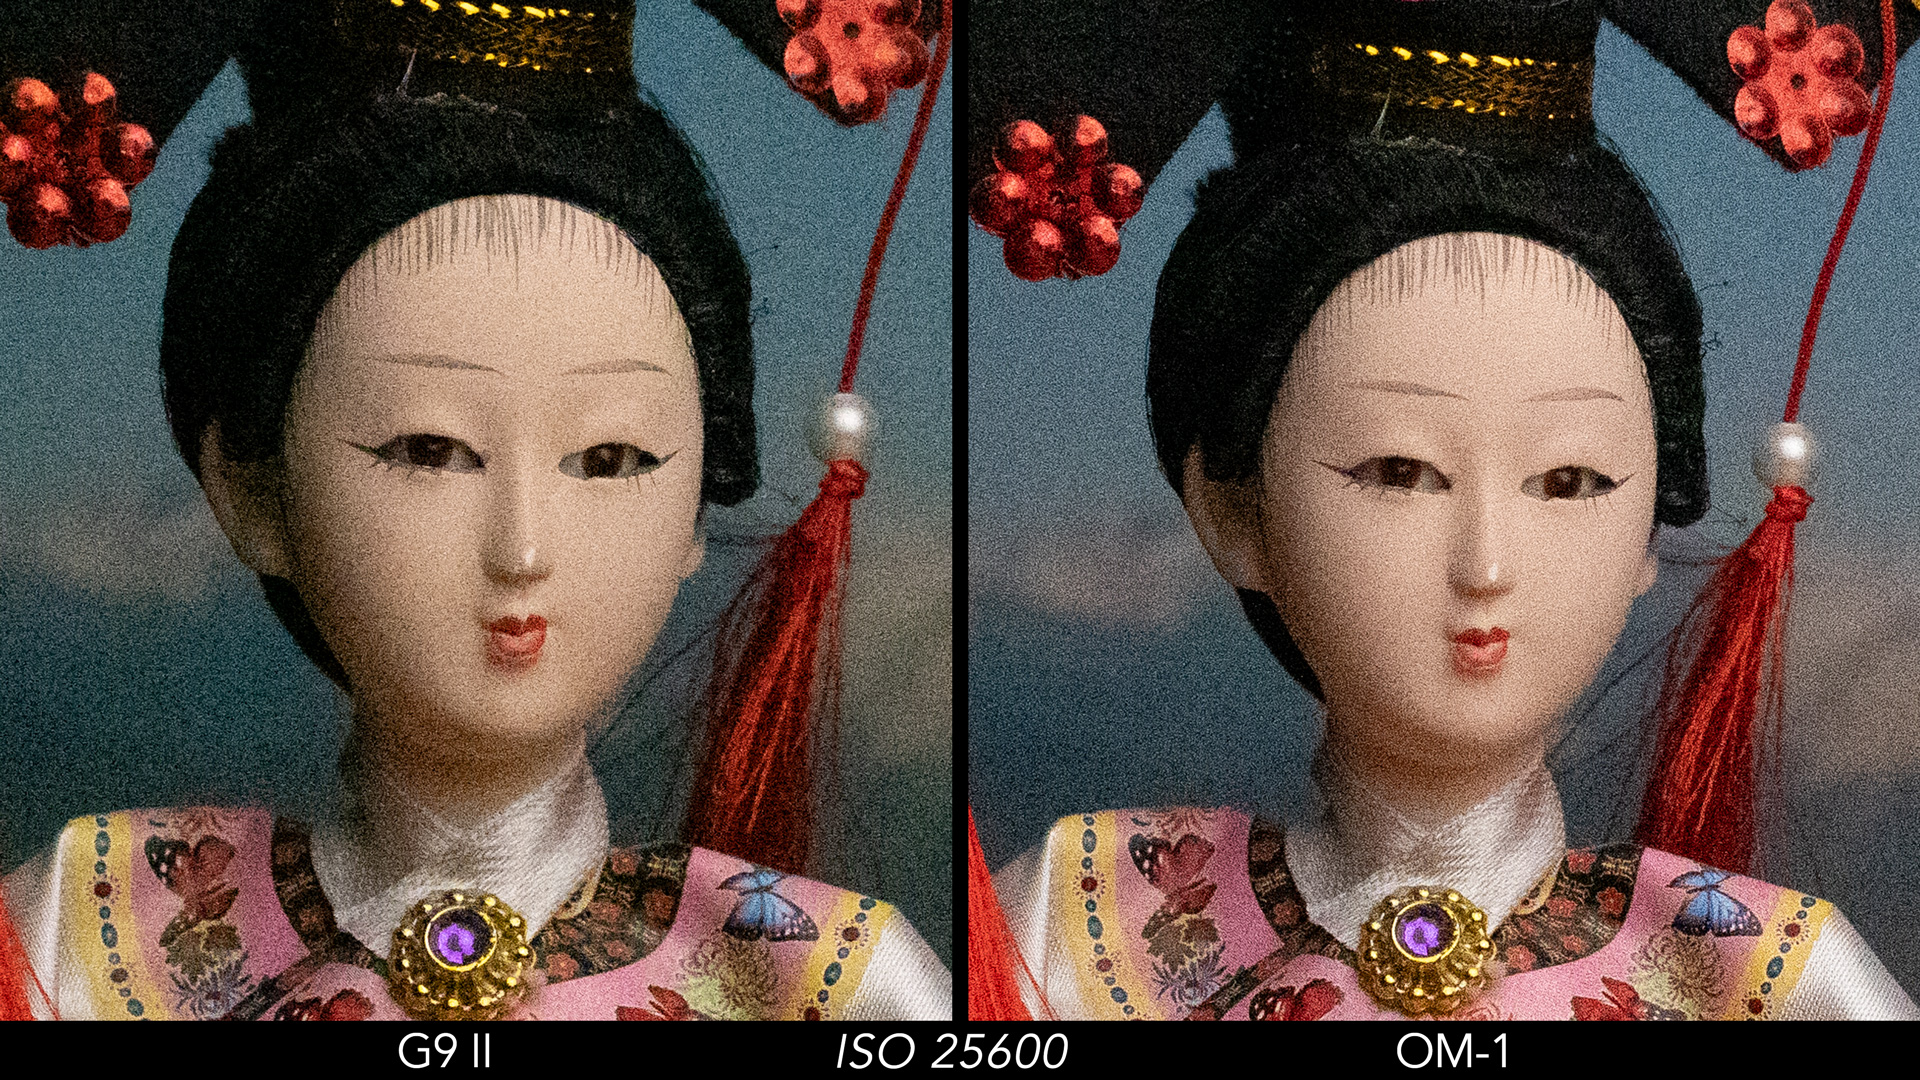
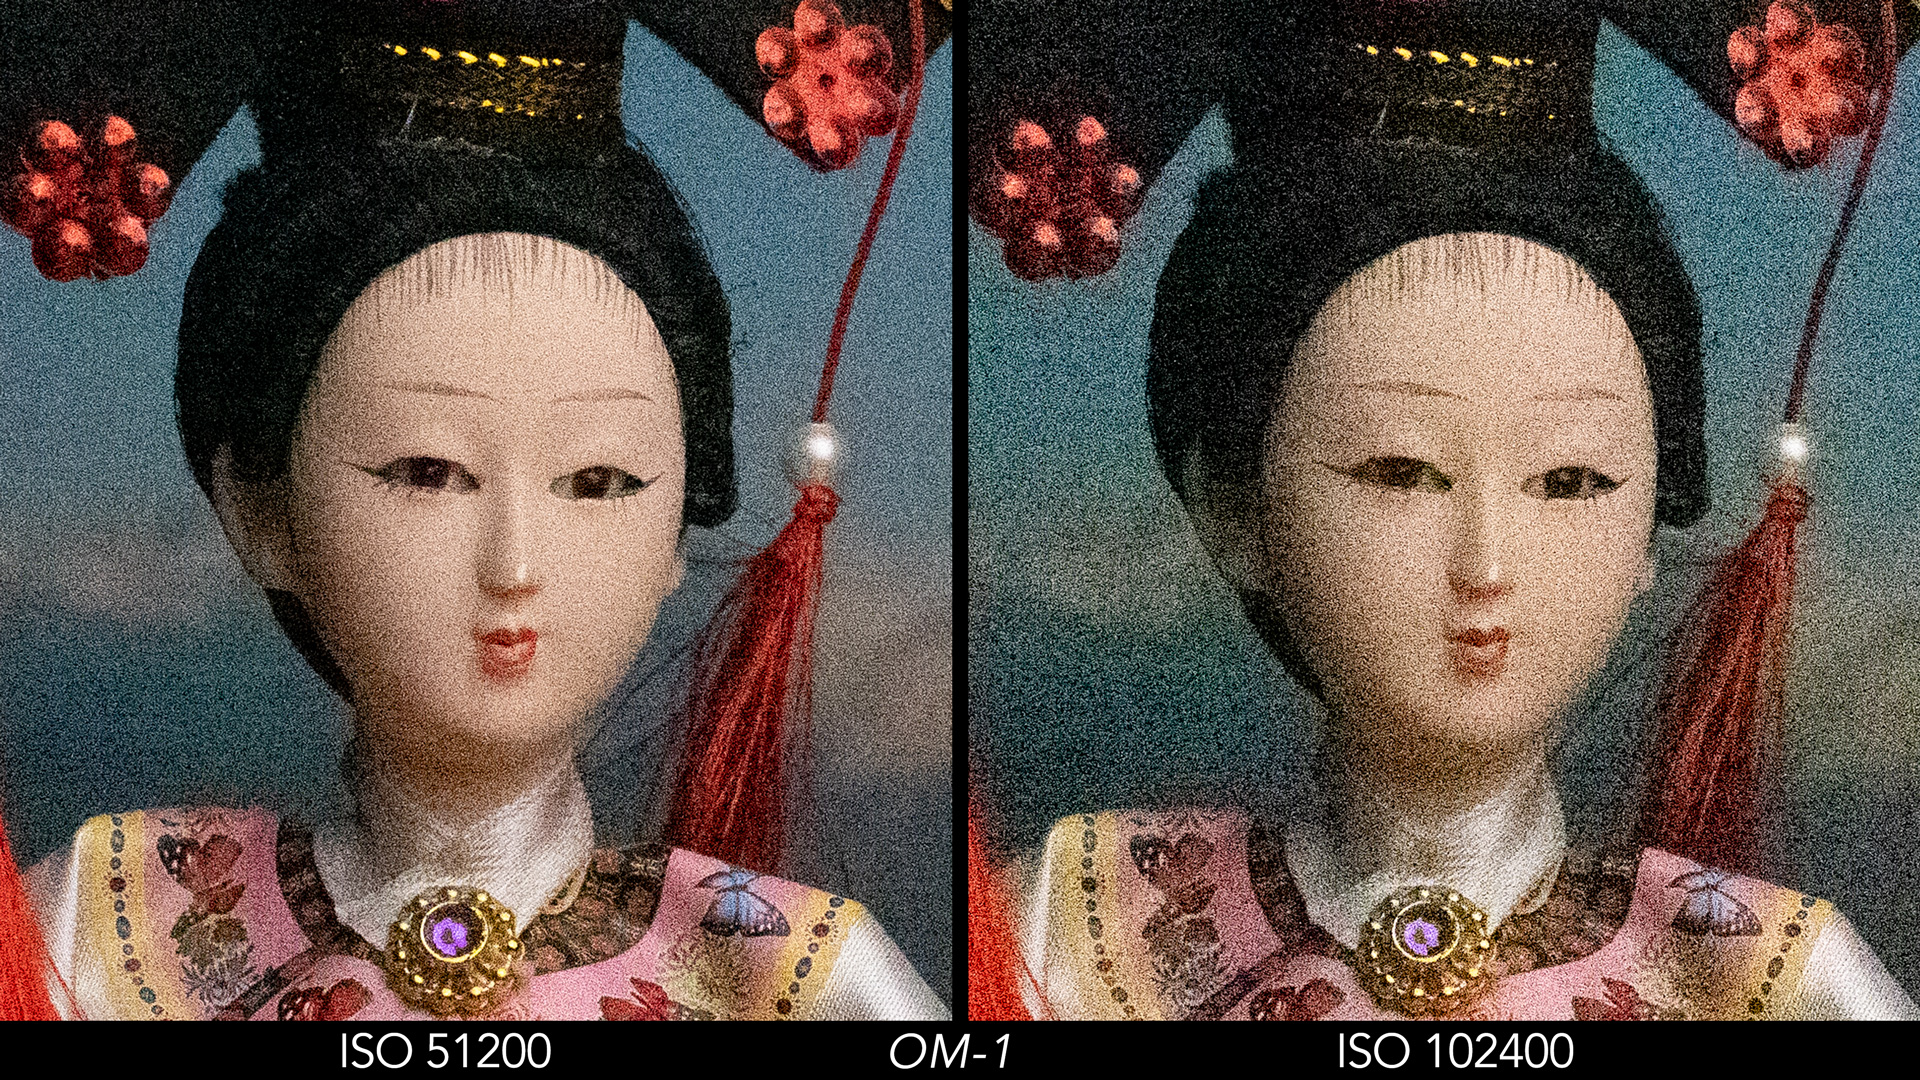
When using the extended values on the OM camera, noise becomes significantly more intrusive.
It’s important to note that nowadays, several softwares can effectively reduce noise without compromising details on your image. This holds true for any camera system and sensor size of course, but notably, micro four thirds users have been leveraging these tools for some years now, with popular choices including DXO Pure Raw and Topaz Denoise AI.
You can see an example below where I used Lightroom’s built-in Denoise AI feature. I chose a moderate amount of 25% and that was enough to make the image captured at ISO 12,800 look much better on both cameras.

Tip: it’s important to exercise caution and thoroughly inspect your image after applying noise reduction. At times, these AI softwares can introduce artifacts, particularly in areas where there is movement.
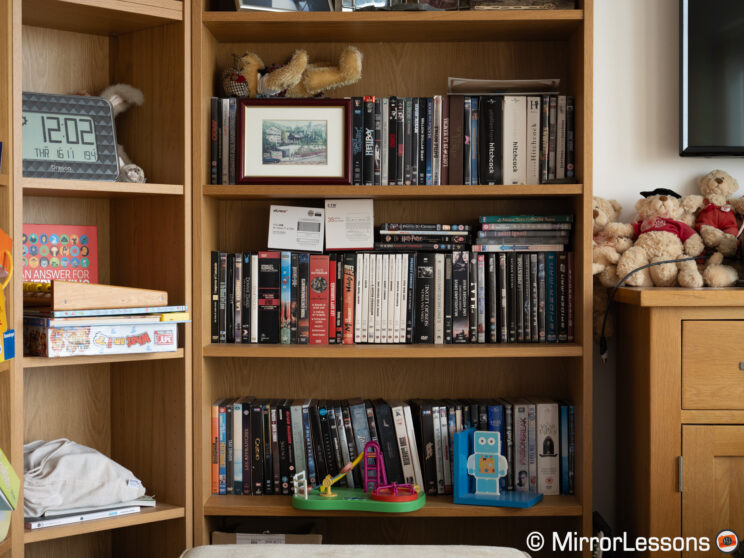
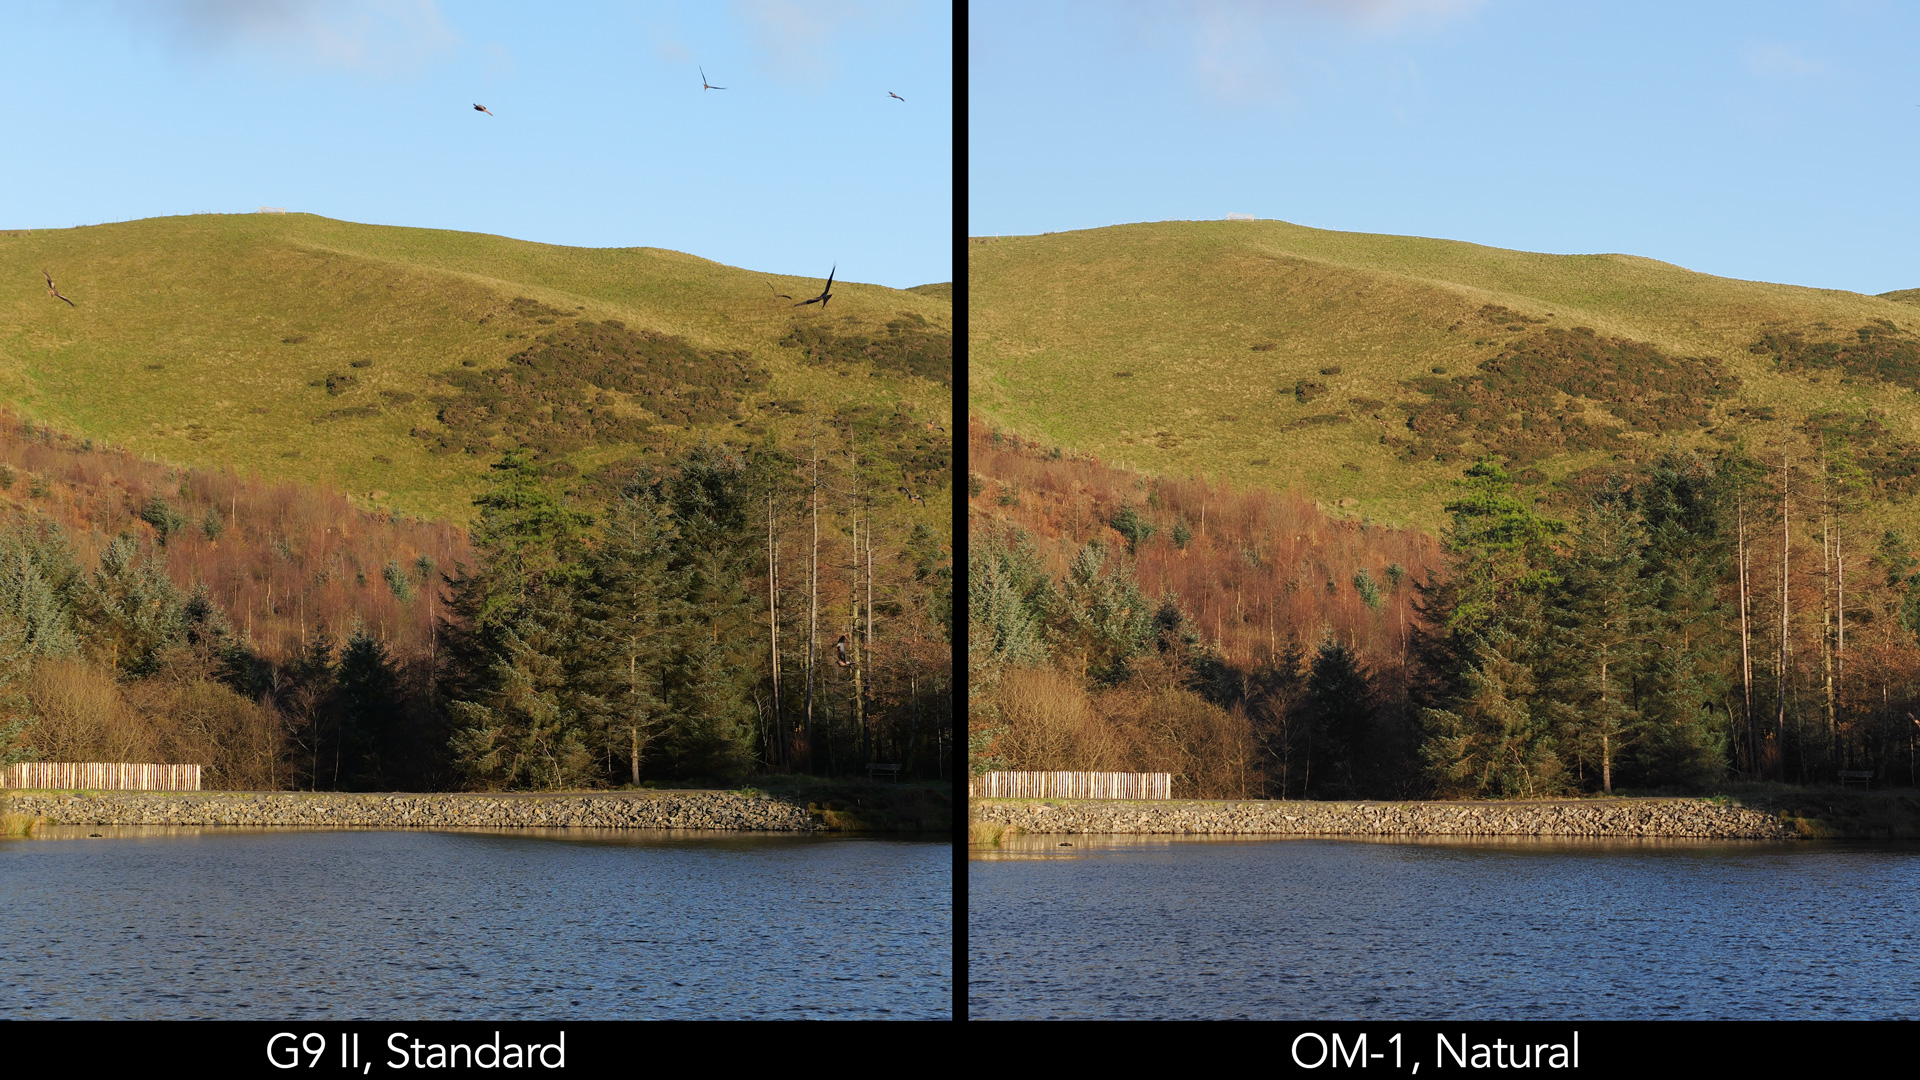
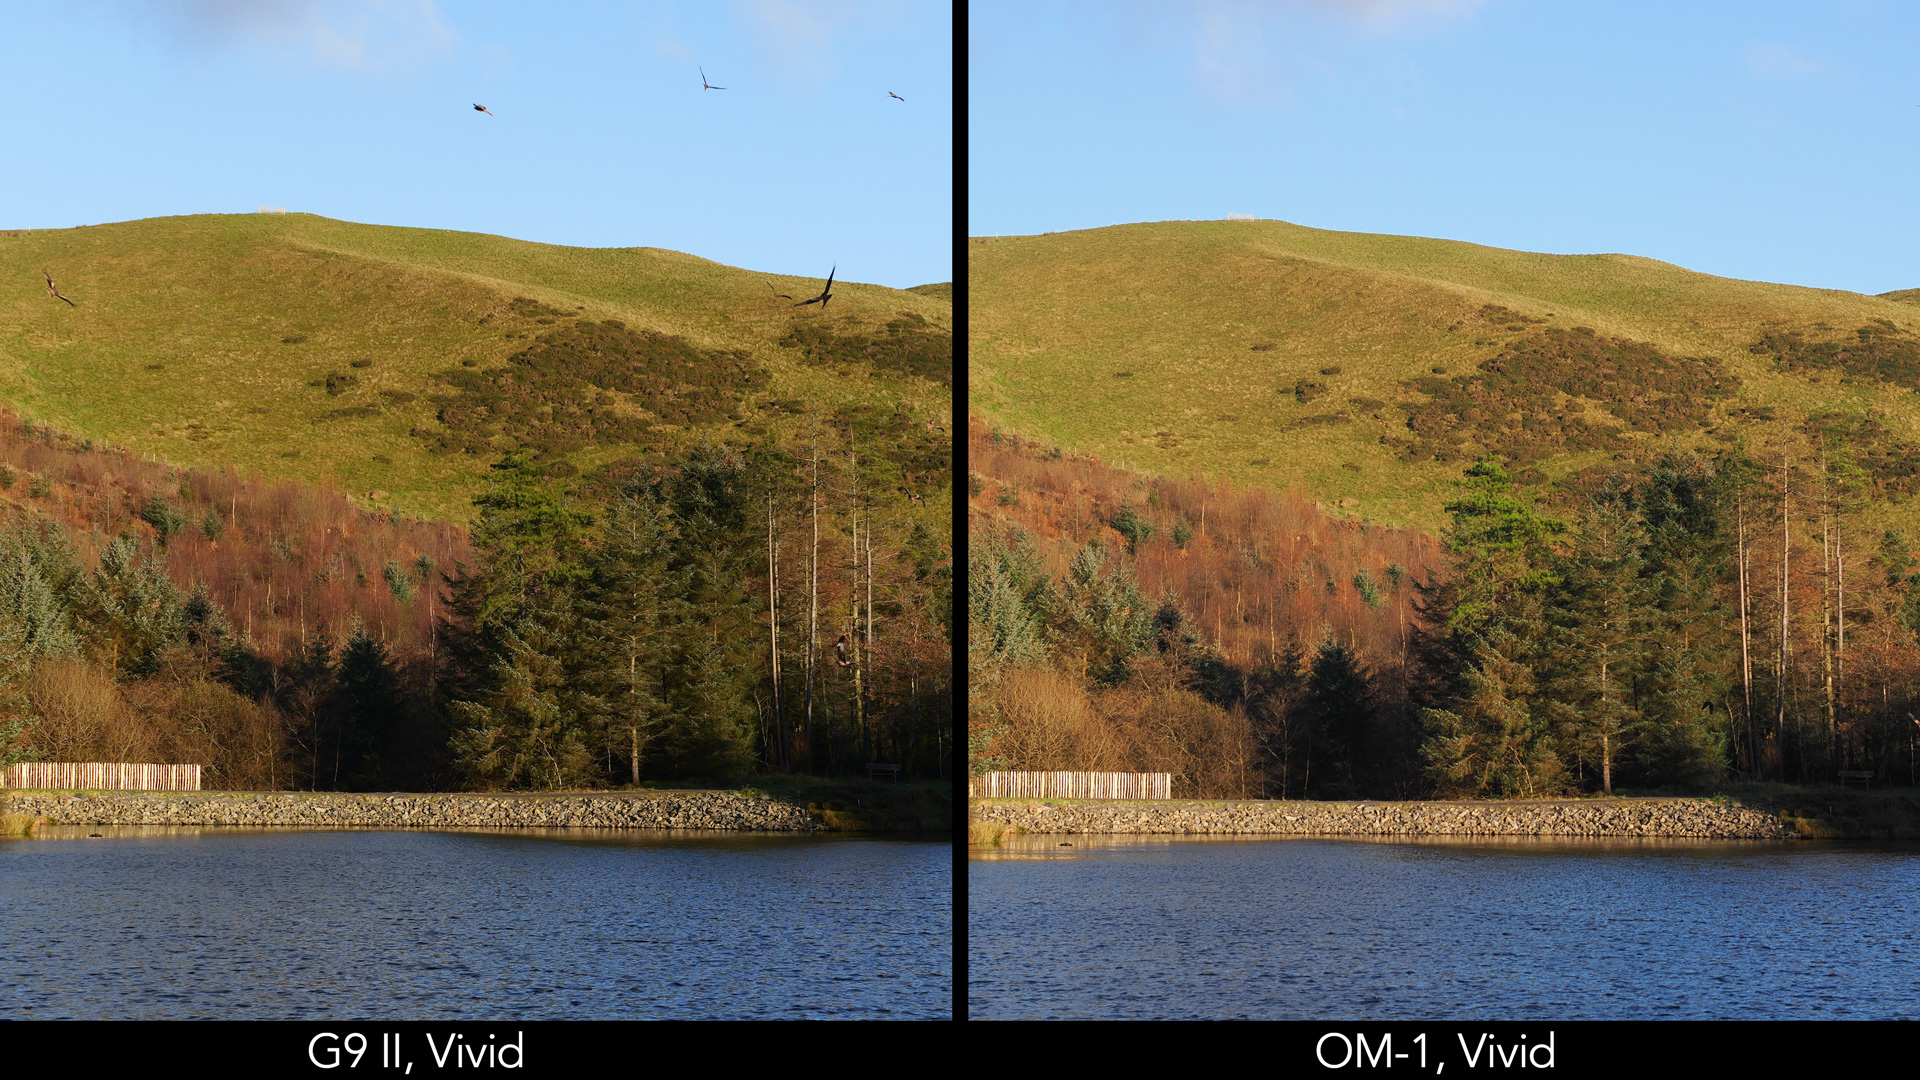
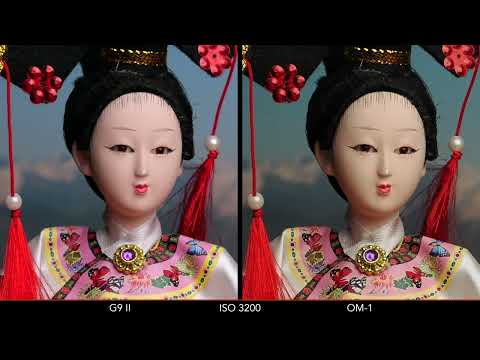
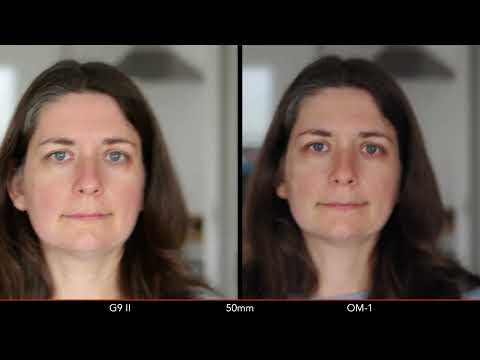
Next, let’s delve into colours using the straight-out-of-camera JPGs. In the first example, I took a landscape image around 3 PM during winter in Wales, capturing the warm light as the sun began to set.
Both cameras exhibit similar results, yet the OM-1 portrays brighter greens and reds on the hill. It’s worth noting that OM calls its standard profile ‘Natural.’ Conversely, while the Panasonic model also features a ‘Natural’ profile, it produces less contrast and saturation.
Here’s another example illustrating the results with the ‘Vivid’ mode, which adds more contrast.
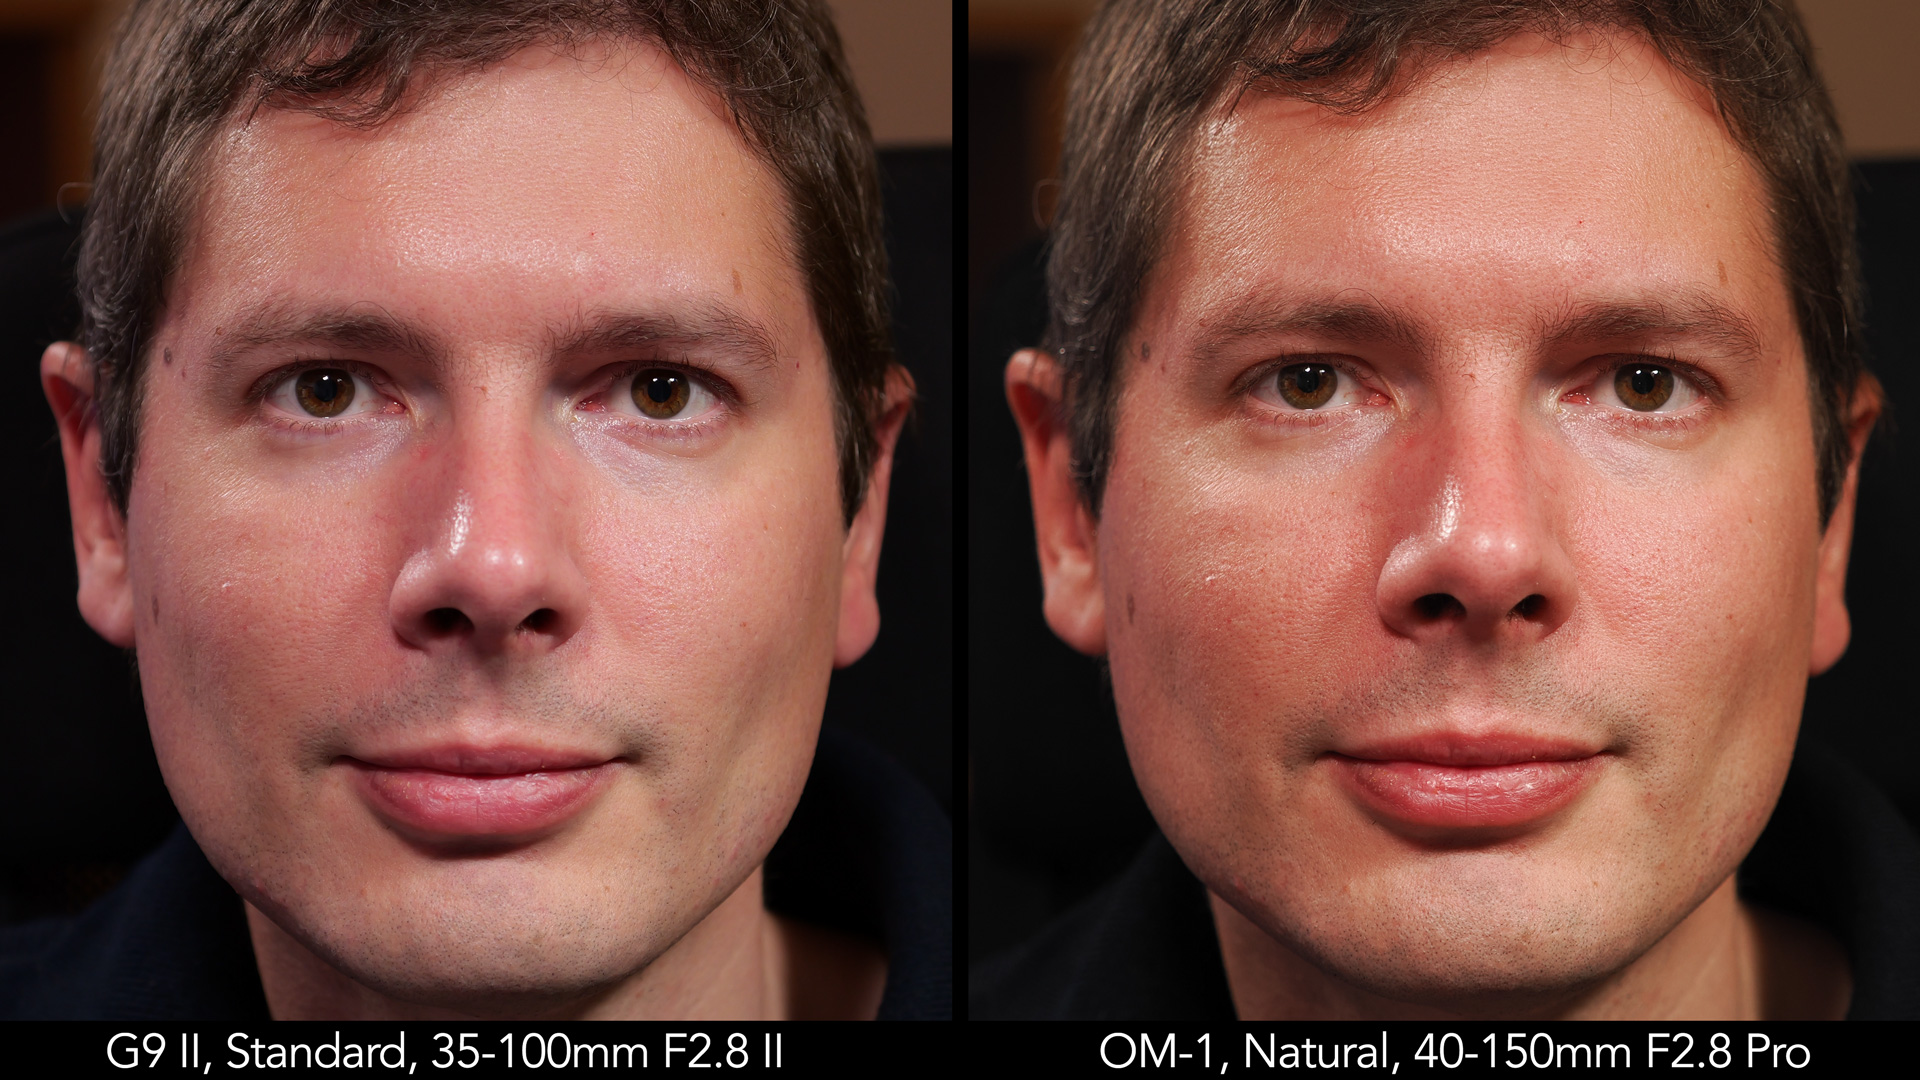
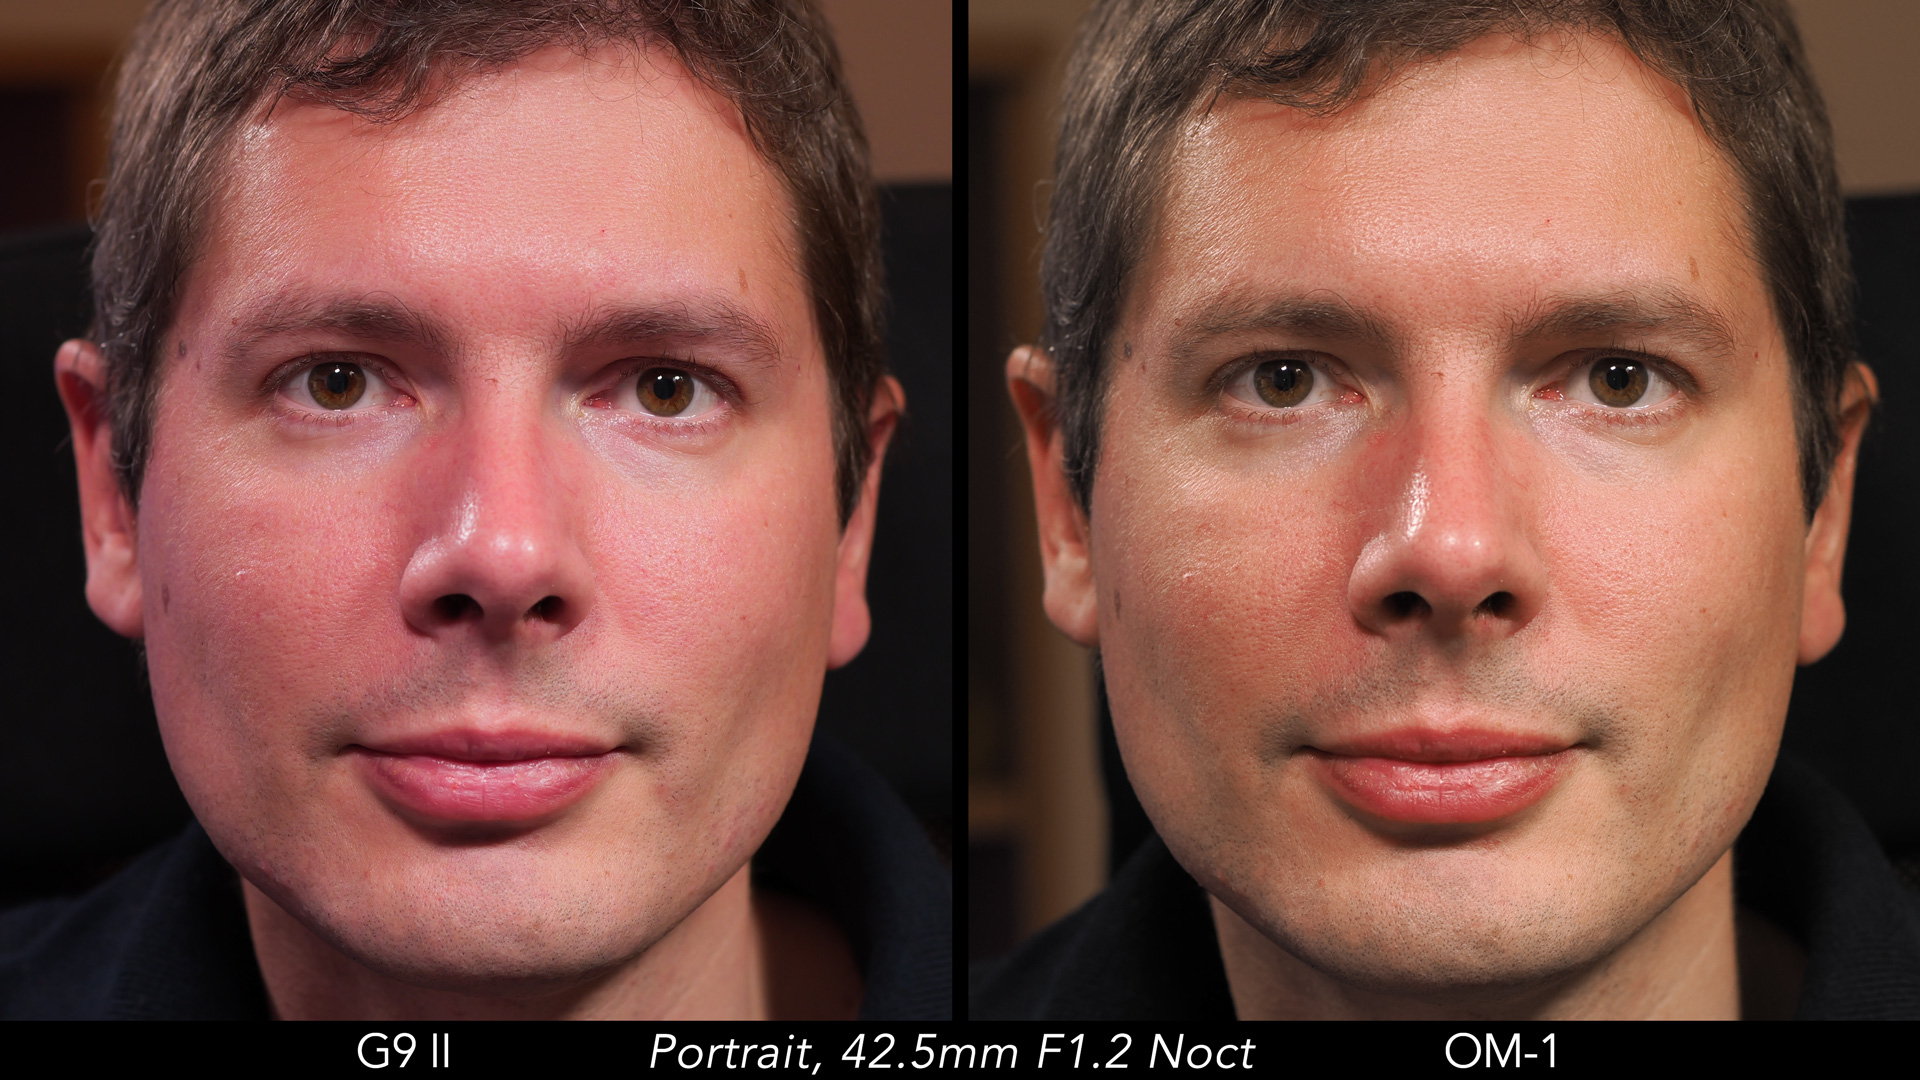
When observing skin tones, the OM-1, with the Natural profile, tends to produce higher contrast, emphasising more yellow and red tones compared to the Lumix camera, which, in its Standard setting, leans towards a softer look with a but of magenta hue.
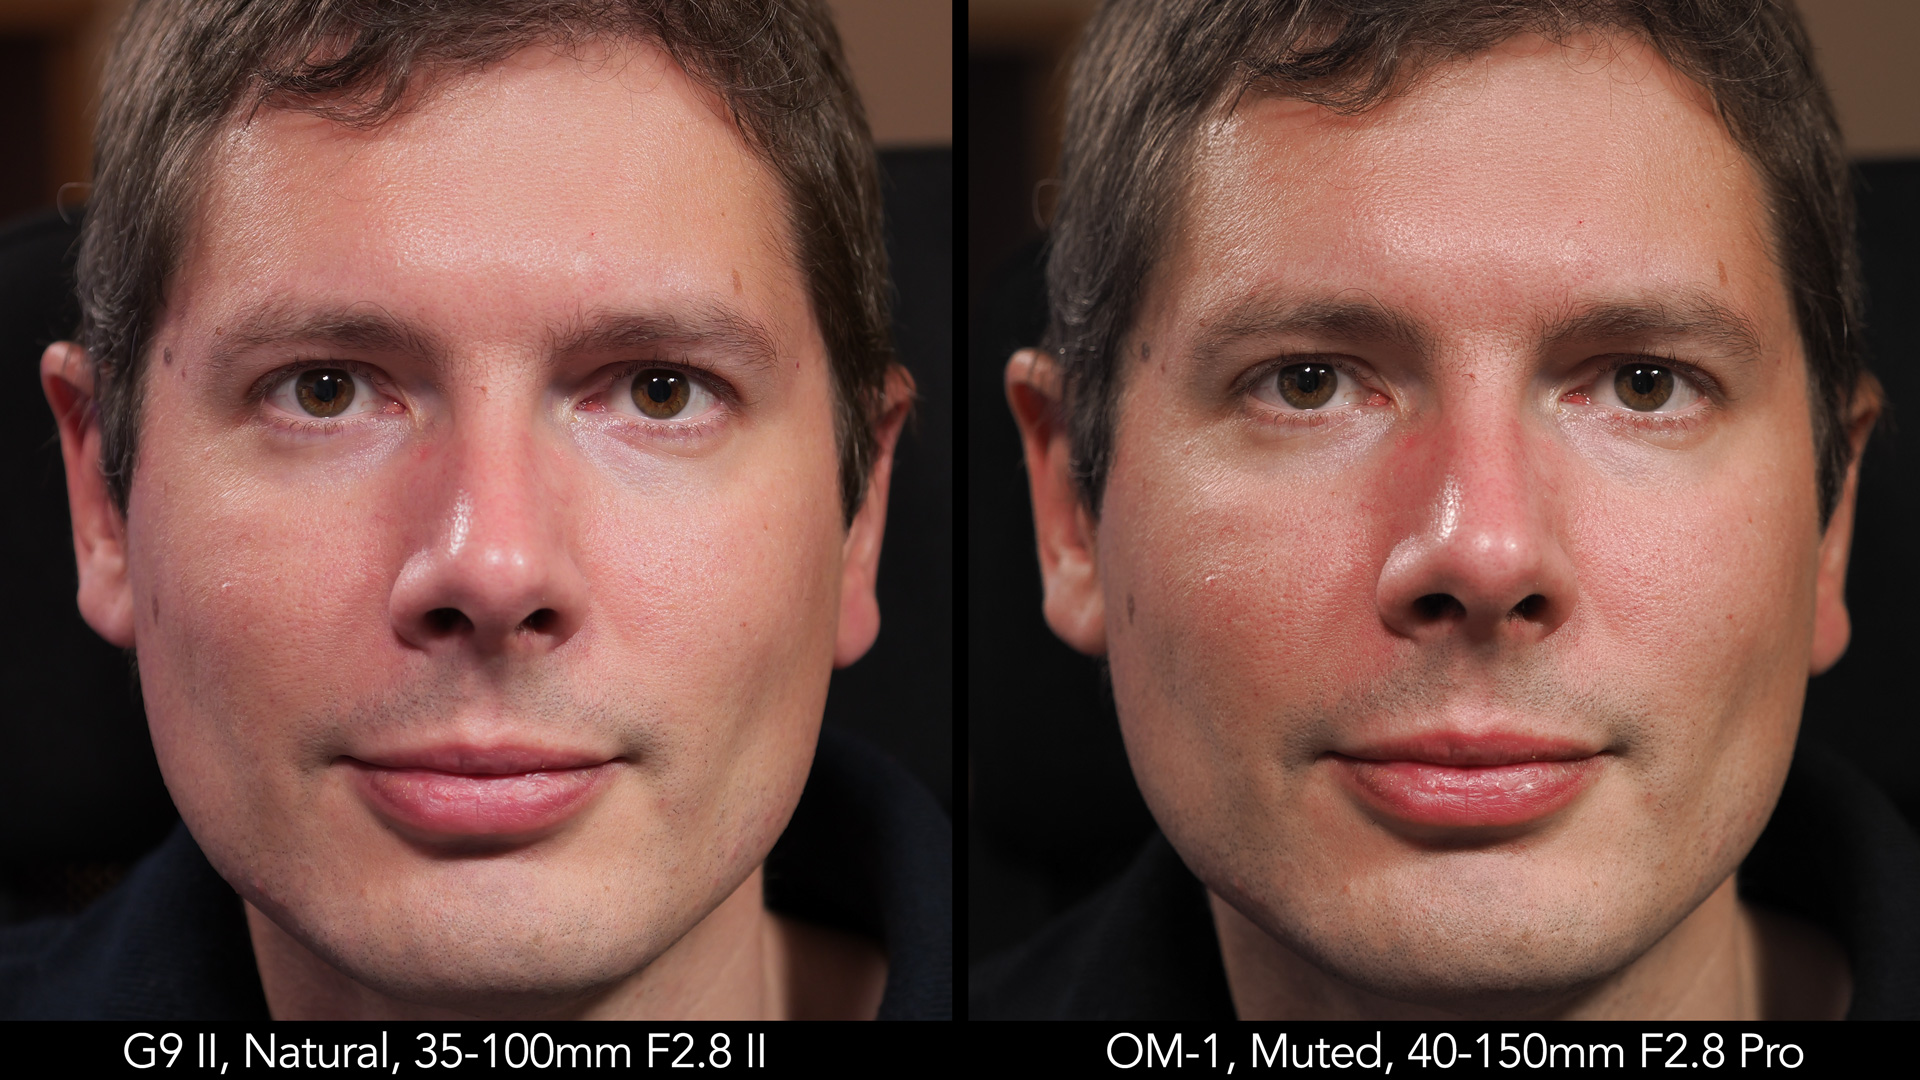
Shifting to the Muted profile on the OM-1 and the Natural profile on the G9 II, the contrast decreases, yet the variance in colour remains noticeable.
Selecting the Portrait profile accentuates a magenta dominance on the G9 II. However, the transitions between different colour shades appear smoother and more uniform on the Lumix model. In contrast, the OM-1 generates more distinct ‘patches’ dominated either by red or yellow tones.
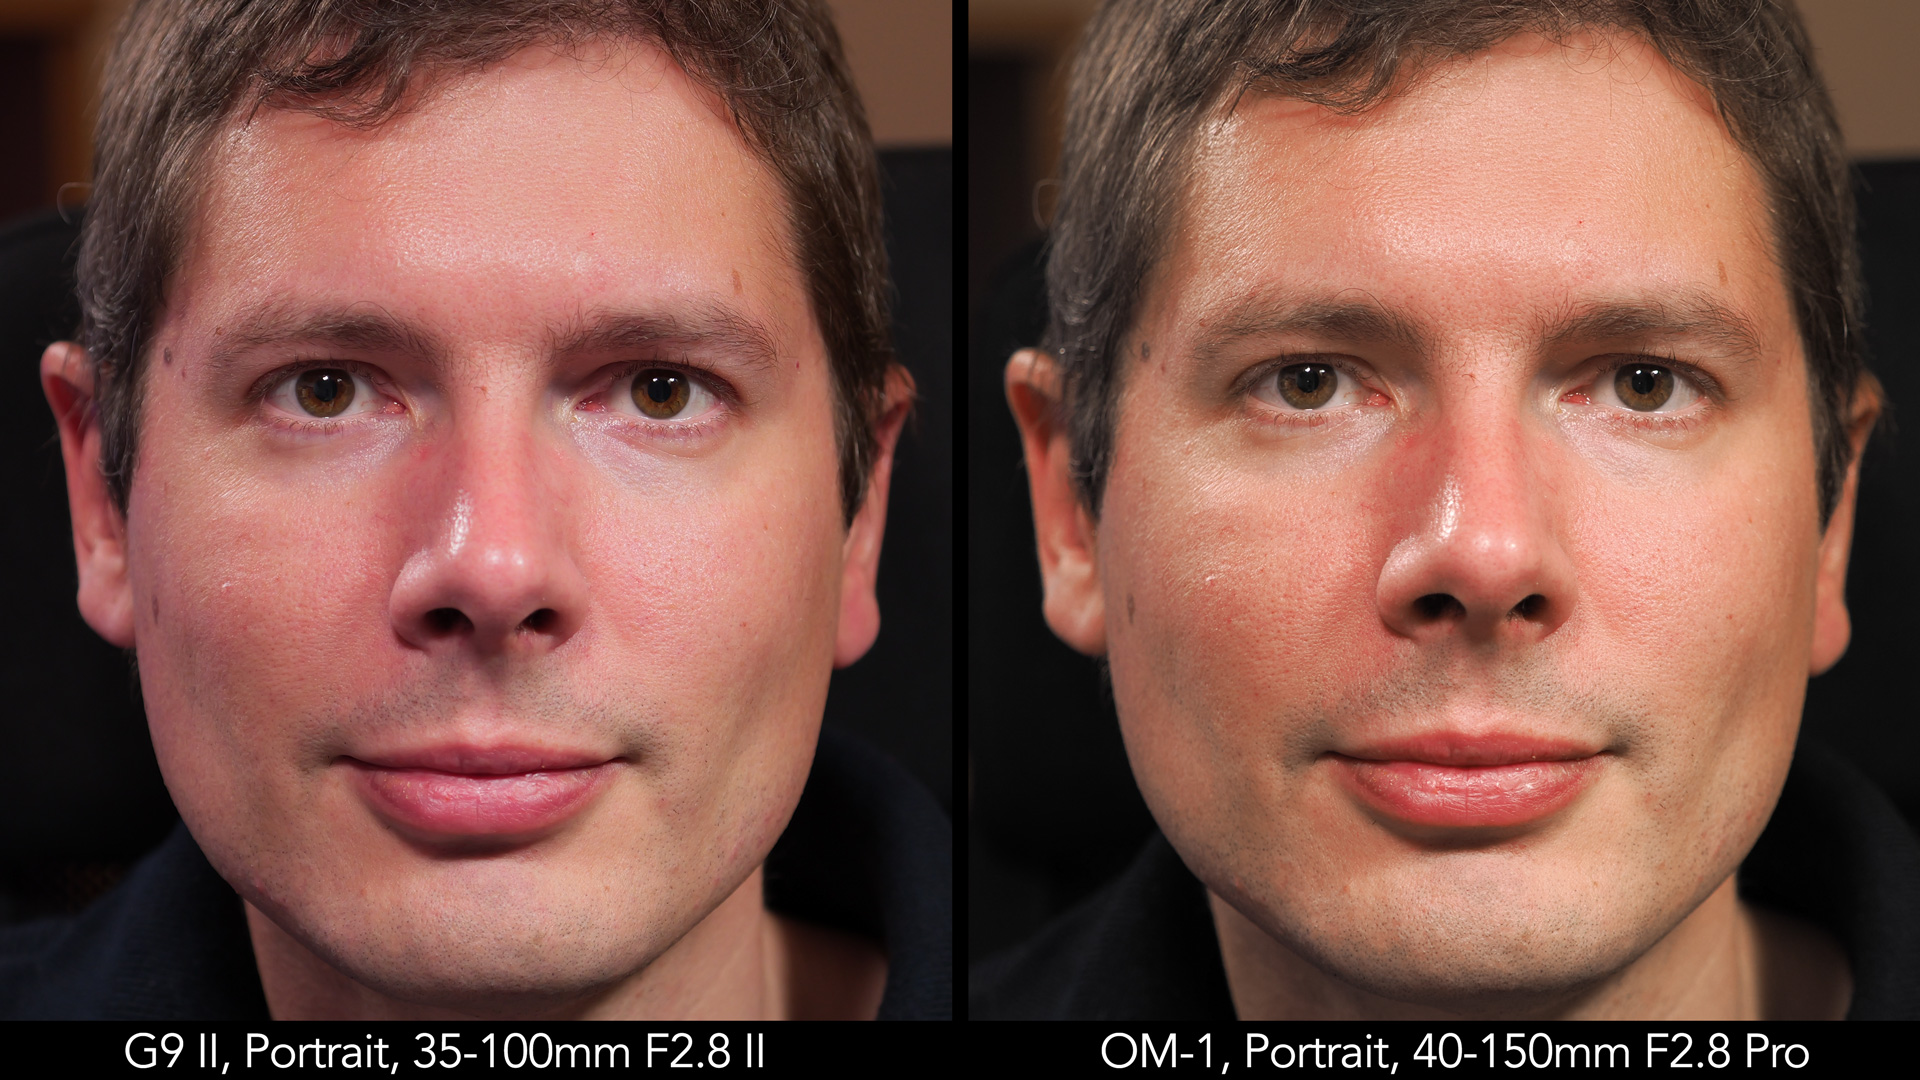
For this test, I used the Lumix G 35-100mm F2.8 II on the G9 II and the 40-150mm F2.8 Pro on the OM-1. Naturally, results may vary depending on the lens used, and subtle differences might arise when using an Olympus lens on the Lumix body or vice versa.
Here is another example involving the Leica DG 42.5mm F1.2 Nocticron mounted on both cameras. While the image on the OM-1 resembles the previous samples above, the prime lens significantly amplifies the magenta dominance on the G9 II.
Remember that you have the option to fine-tune these results in-camera by adjusting the WB Shift setting or editing the Colour profiles themselves. And, of course, shooting in RAW offers more flexibility and precise adjustments in post-production.
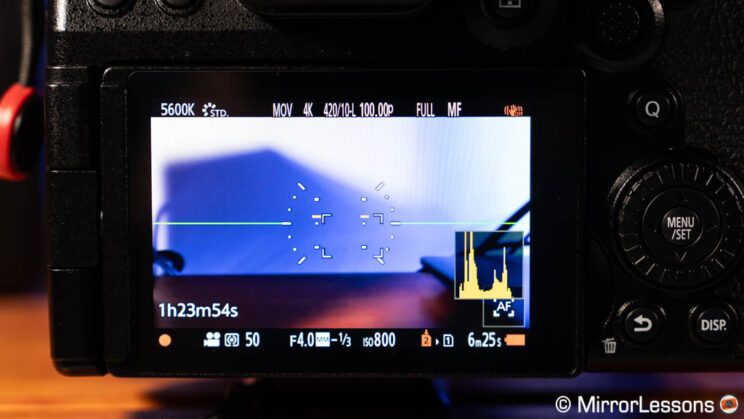
2. Video
The G9 II comes with serious video capabilities, inherited from the GH6 and that you won’t find on the OM-1:
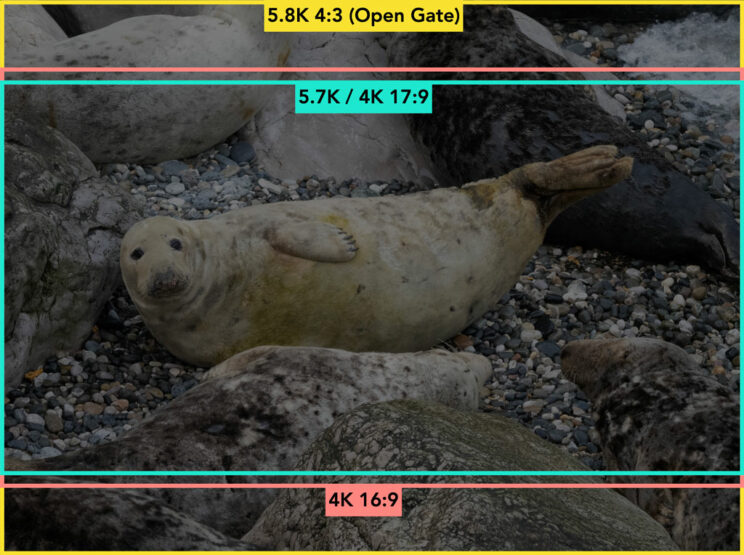
- 5.8K “open gate” (4:3 aspect ratio) up to 30p
- 5.7K up to 60p (17:9 aspect ratio)
- 4K / DCI 4K up to 120p
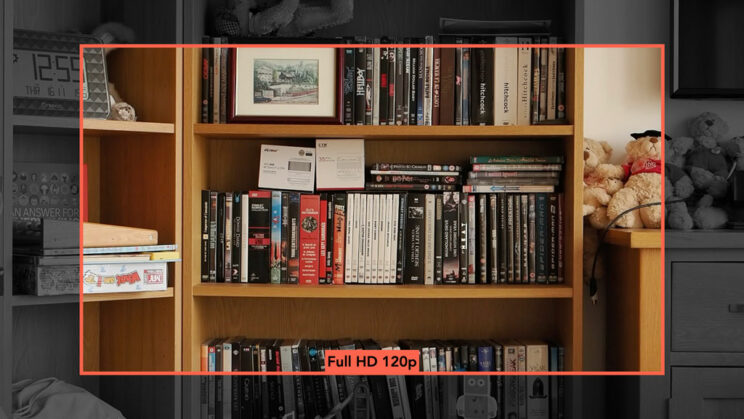
- Full HD up to 240p
- Anamorphic format
- Internal 10-bit 4:2:2 (5.8K, 5.7K and 4K 120p in 10-bit 4:2:0 H.265)
- Internal Prores (5.7K, C4K up to 60p, Full HD up to 60p)
- Bitrate up to 800Mbps with All-Intra (up to 4K 60p)
Note: Bitrate of 800Mbps, Apple Prores 5.7K and C4K can only be recorded on a SSD Drive connected to the USB port (more on this in Chapter 8).
The OM-1 can record in 4K and DCI 4K up to 60p, with the option of 8-bit 4:2:0 (H.264) or 10-bit 4:2:0 (H.265). In Full HD, it goes up to 120p.
Neither camera crops the sensor for most recording modes, except the OM-1 when selecting the fastest frame rate in Full HD.
In terms of sharpness, the G9 II holds the advantage owing to its higher resolution. Formats like 5.8K and 5.7K produce high quality footage with fine and crisp details.
Moving to 4K, the G9 II maintains excellent sharpness whether recording at 24p or 120p, and using different codecs doesn’t impact image quality.
On the other hand, the OM-1 reduces the sharpness when using the H.264 codec, but the footage improves considerably when opting for H.265 (available only with the OM-Log400 and HLG profiles).
In Full HD, the G9 II outperforms the OM model with better-preserved details and less aliasing. At 120p, the OM-1’s footage looks worse, while the G9 II maintains consistent quality. It’s only at 200/240p that you’ll notice a decrease in sharpness on the Lumix.

There are no restrictions concerning the recording duration, so it comes down to battery life and ambient temperature.
In my indoor tests conducted at 20˚C, the G9 II managed one hour and 9 minutes of continuous recording in 5.7K 60p before shutting down due to overheating. The warning on the LCD screen appeared just over an hour into the recording.
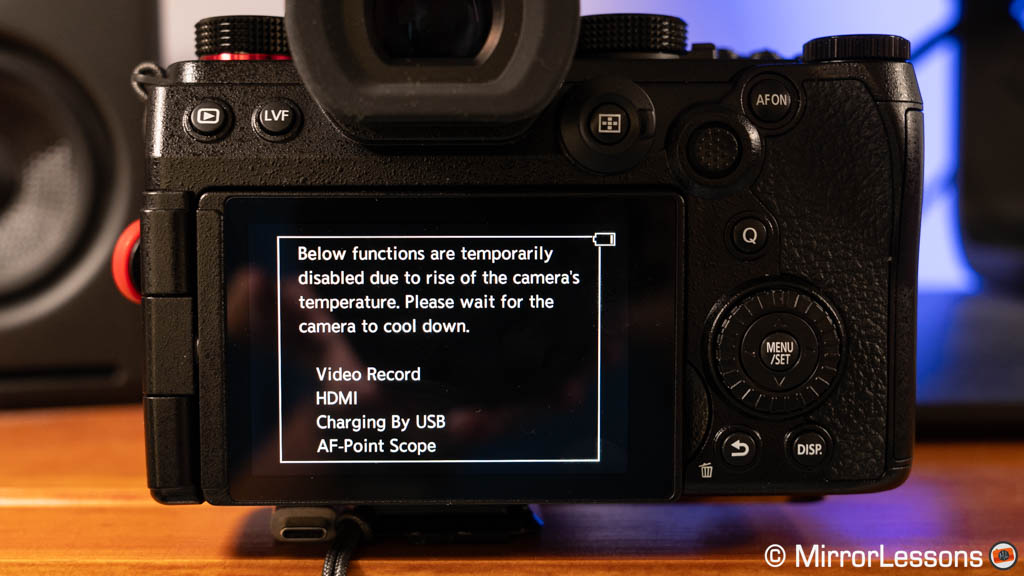
In 4K 100p, the Lumix lasted 1 hour and 27 minutes until the battery died without any temperature warning. In 4K 25p, it recorded 1 hour and 55 minutes, again without any overheating issue.
The OM-1 didn’t come across any problem with the internal temperature, and is capable of recording more than two hours and a half in 4K 25p.
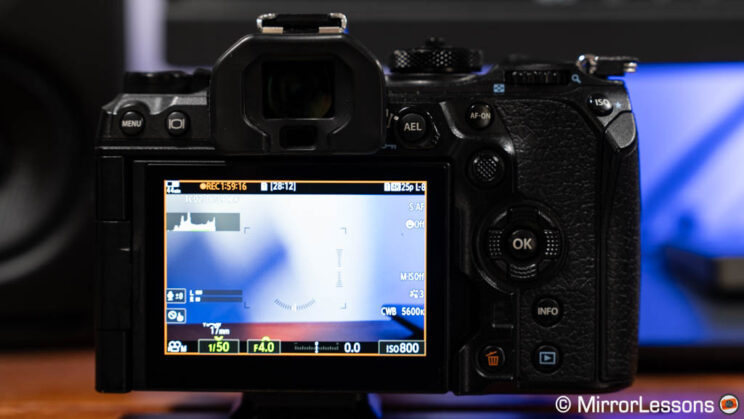
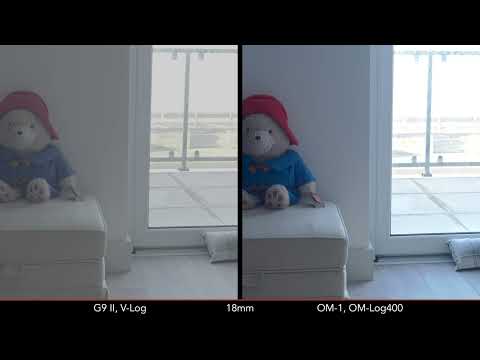
Advanced image profiles include V-Log for the G9 II and OM-Log400 for the OM-1, as well as an HLG option for both.
The G9 II exhibits superior dynamic range in video, notably when it comes to preserve more information in the highlights.
It’s important to note that the G9 II automatically applies the DR Boost function across all recording formats except those exceeding 60p. Consequently, when recording in 4K 120p, the dynamic range is reduced, particularly in the highlights.
In movie mode, the maximum ISO range available is 12,800 on both cameras.
The OM-1 produces more noise, and that becomes especially noticeable from ISO 3,200. The G9 II footage is also brighter with equal exposure settings, and using the same lens.
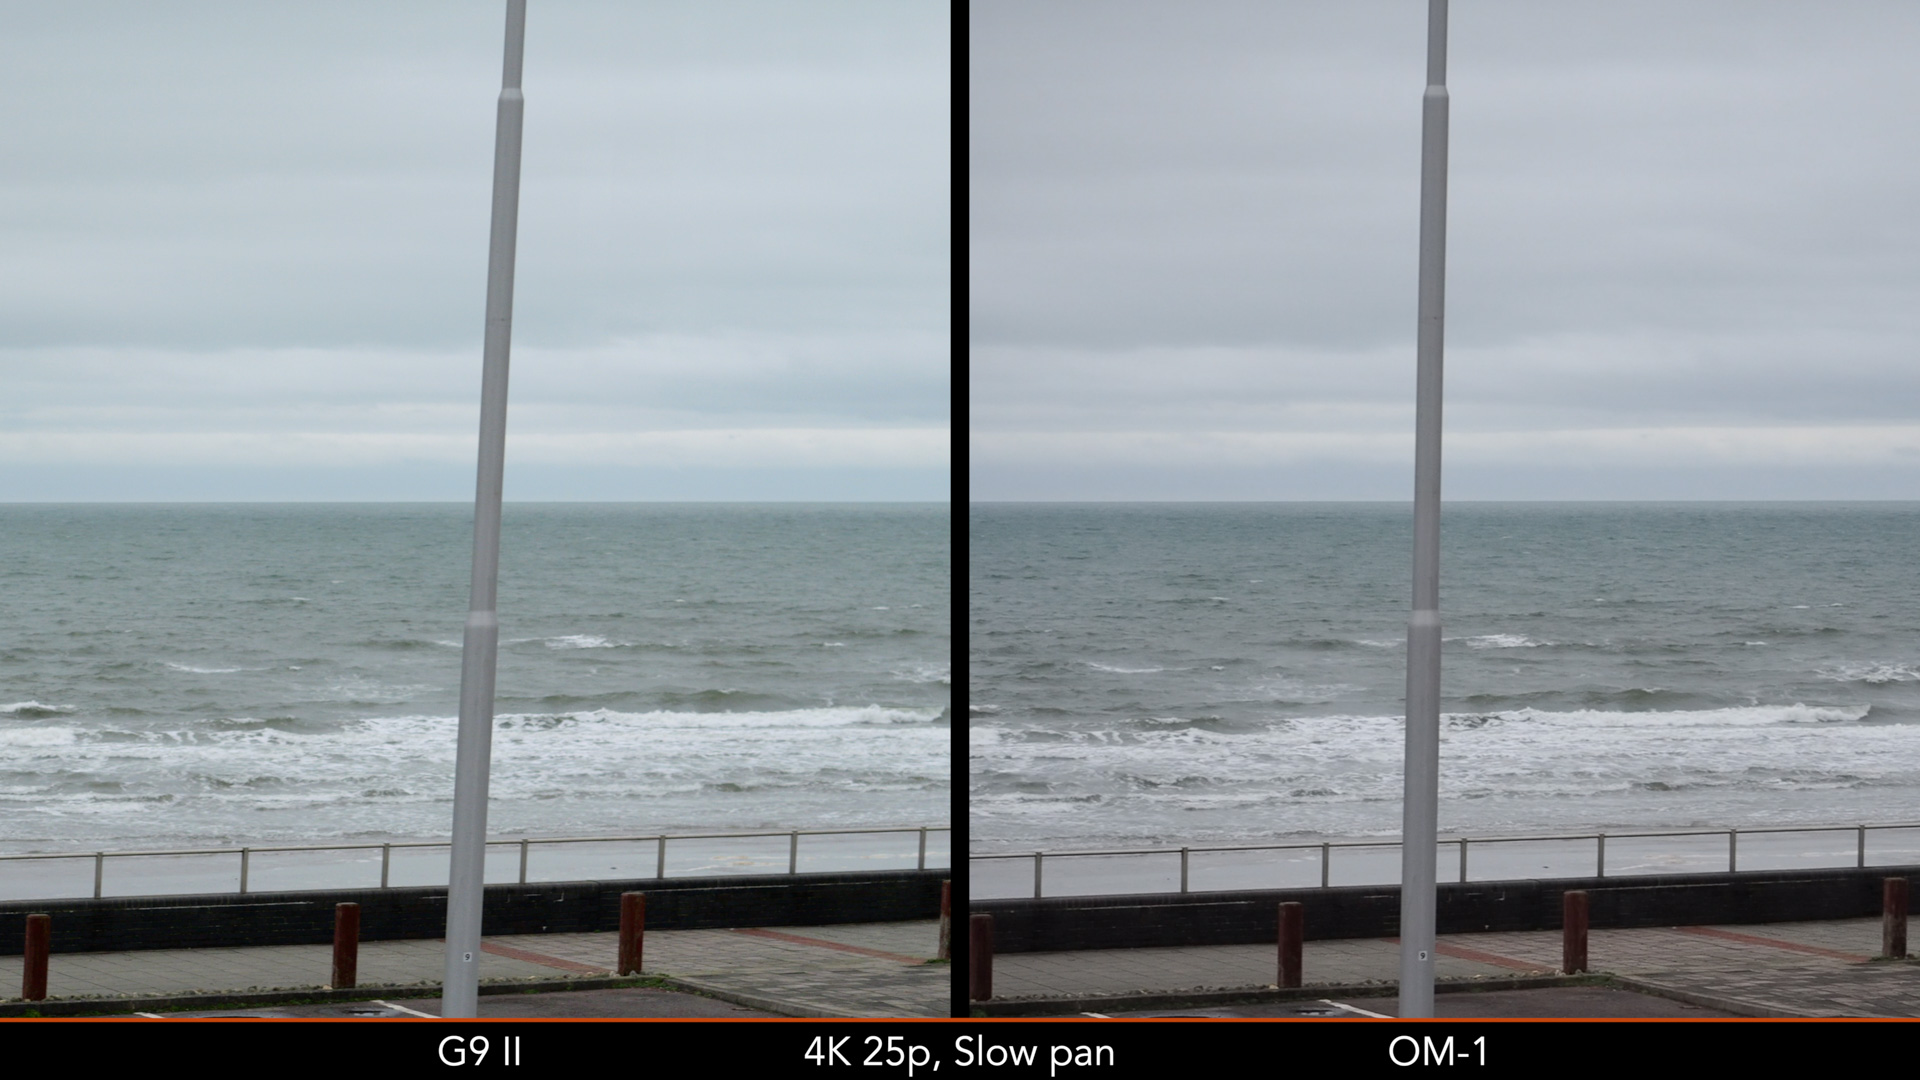
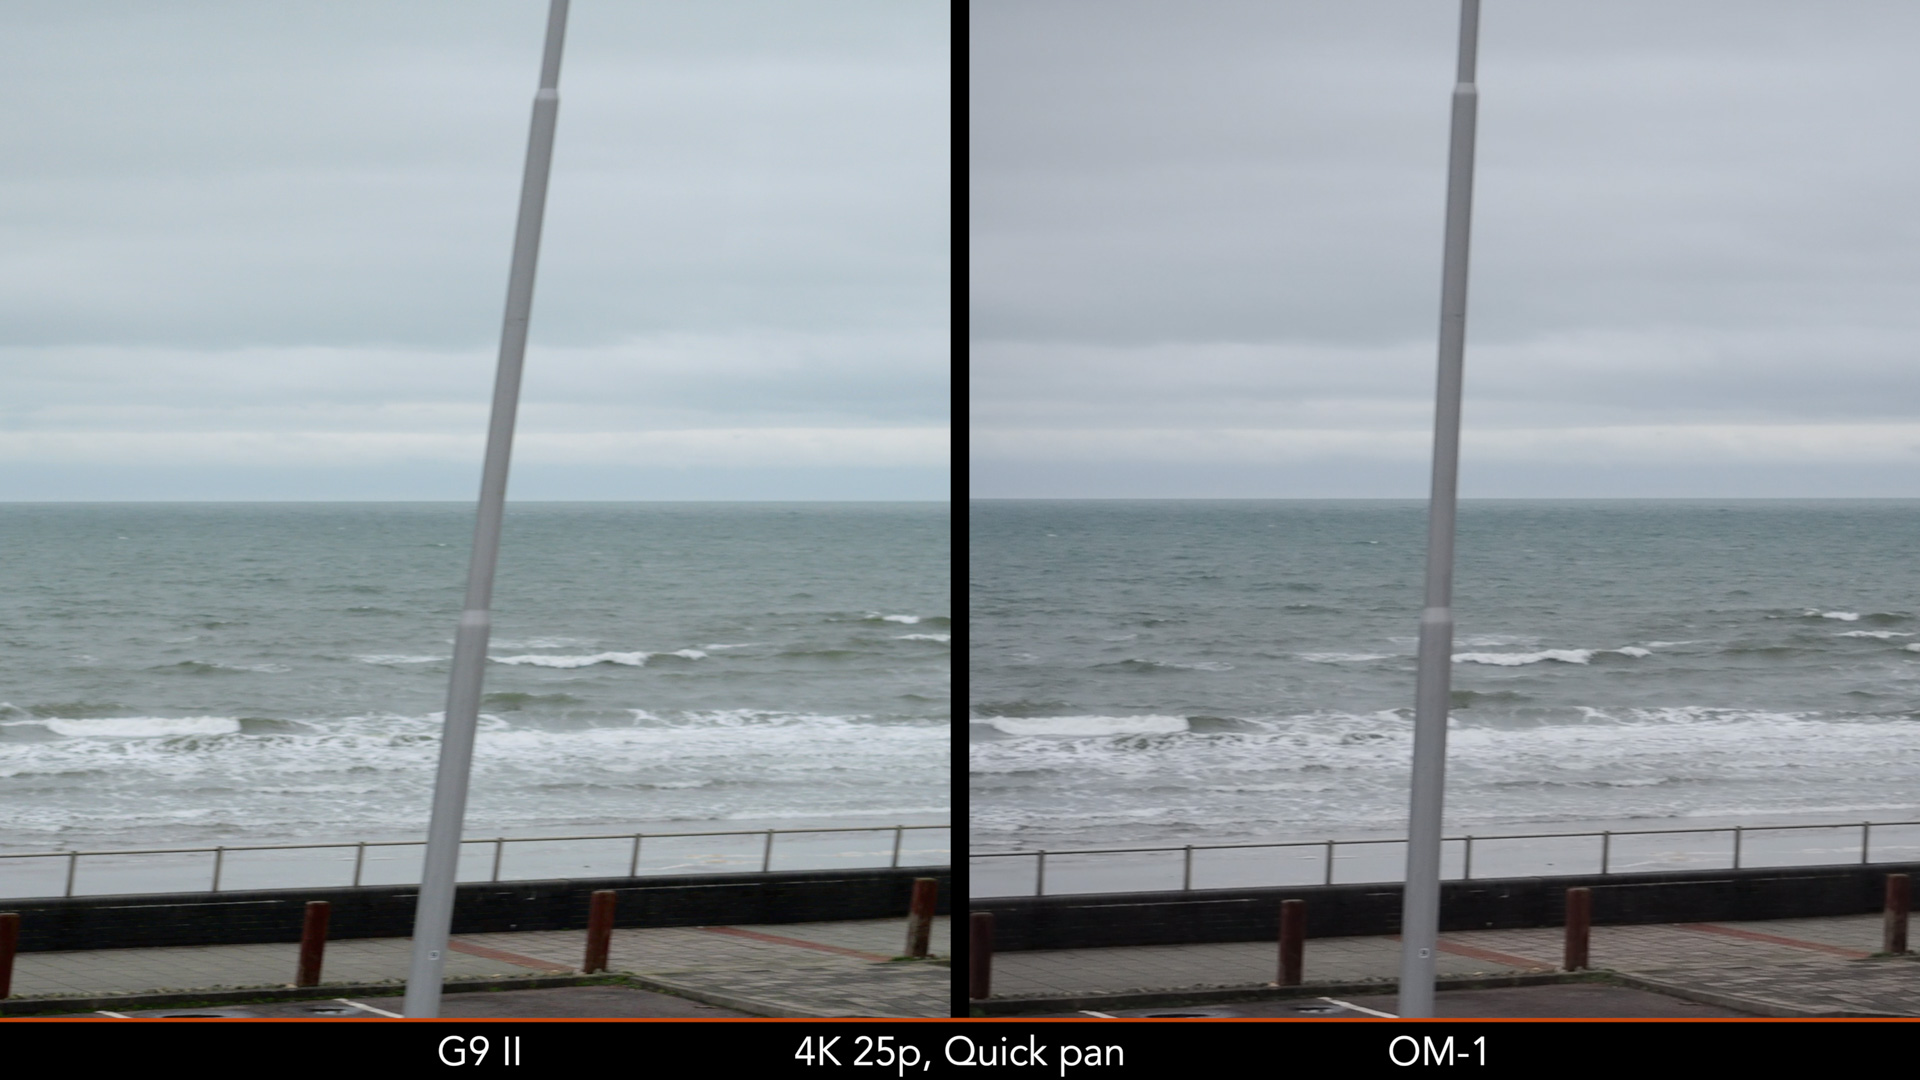
Concerning distortion when moving quickly with the cameras, the OM-1 produces less rolling shutter effect thanks to its stacked sensor design and faster sensor readout. This is especially true when panning quickly.
Finally, the G9 II offers more settings tailored for advanced videomakers, including:
- Synchro Scan
- Master Pedestal
- Waveform / Vectorscope
- Colour Bars
- Luminance Level
- shutter speed or angle / ISO or dB for exposure data
- load your own LUT when recording in Log
- extra audio settings.
3. Autofocus
The G9 II comes with 779 AF points and, more importantly, phase detection, the first time for a Lumix Micro Four Thirds camera, and the second Panasonic camera after the S5 II full frame model. In S-AF, it still uses the DfD contrast detection system (315 points) but switches to phase detection in continuous mode.
The OM-1 also has phase detection (available in Single and Continuous AF) with 1,053 cross-type points that cover the entire sensor. The quad-pixel sensor design means that each pixel is composed of four photodiodes that can be read independently, allowing the camera to analyse the scene in four directions. It can also use contrast detection with the same number of points.
Both cameras have advanced detection capabilities and can track various types of subjects, including animals and vehicles. The OM-1 is limited to face and eyes for humans, whereas the G9 II can also recognise the entire body of a person. The OM camera has a wider range for vehicles, extending to planes, helicopters, and trains, whereas the G9 can track cars and motorbikes.
In my initial test conducted in favourable lighting conditions, I analysed the accuracy of human subject detection, particularly the tracking of eyes. The subject walked towards the camera, then moved backward, and finally returned while rotating to evaluate the performance of both products when the person’s face wasn’t visible.
Overall, the OM-1 outperformed the G9 II with a keeper rate of 67% compared to 57% on the Lumix camera. Throughout the test stages, the G9 II struggled more to maintain focus on the eyes.
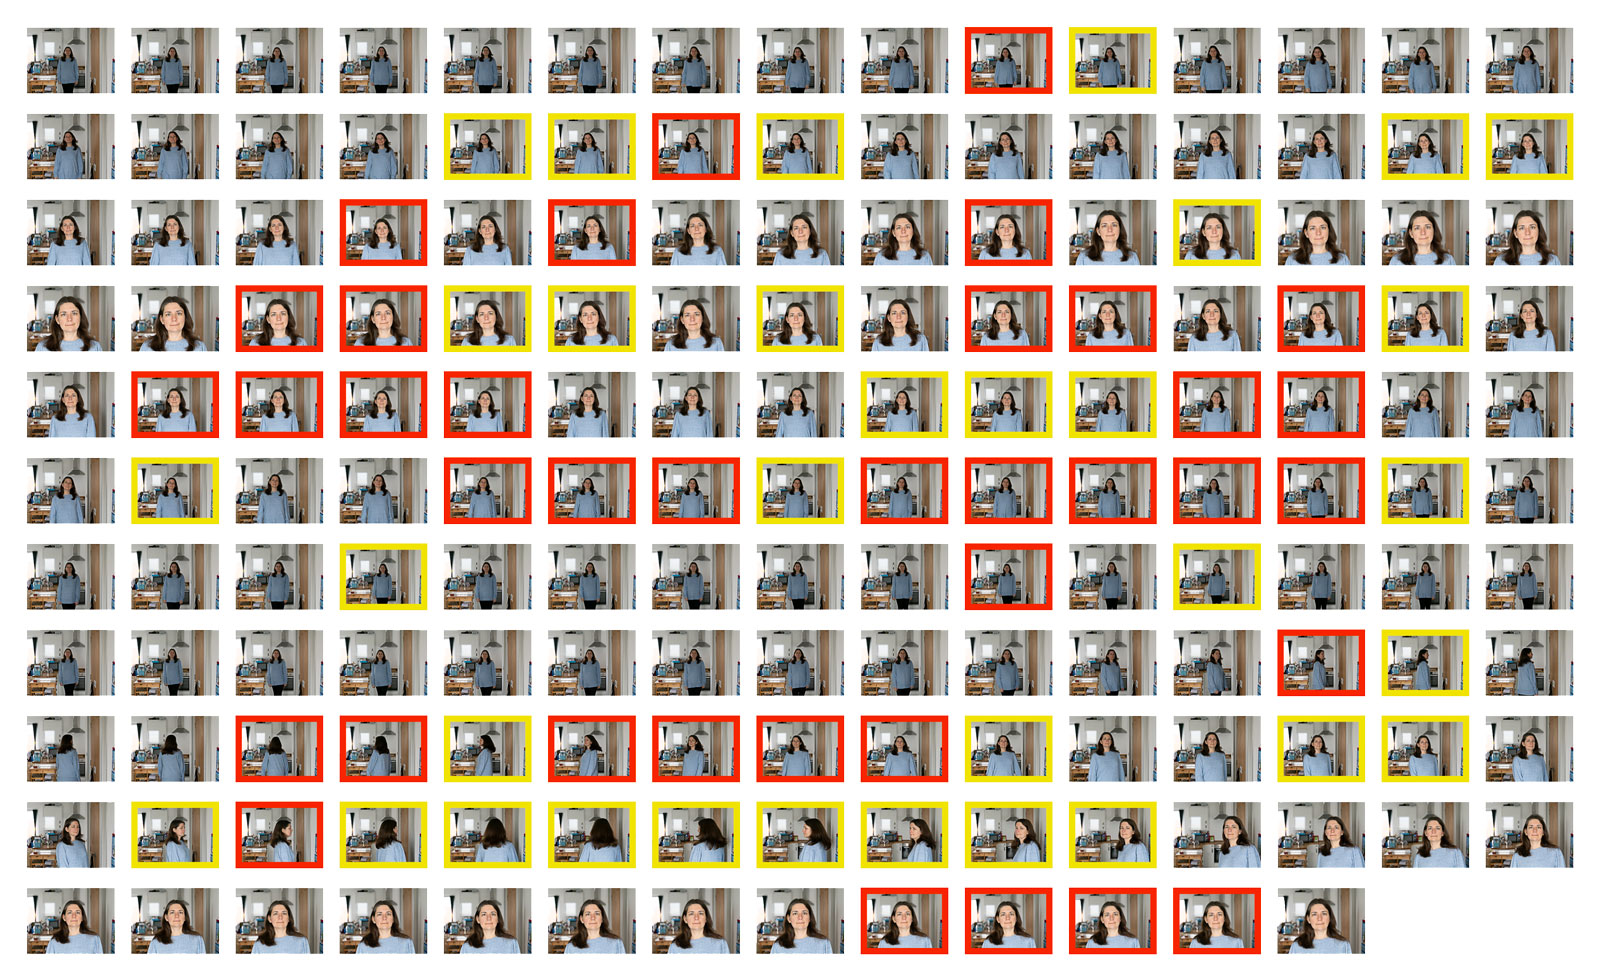
163 photos: 37 out of focus (red), 33 slightly soft (yellow)
Keeper rate: 57%
While the OM-1 demonstrated better performance, it also encountered limitations, particularly when the subject came closer to the camera, and when the face was no longer visible.
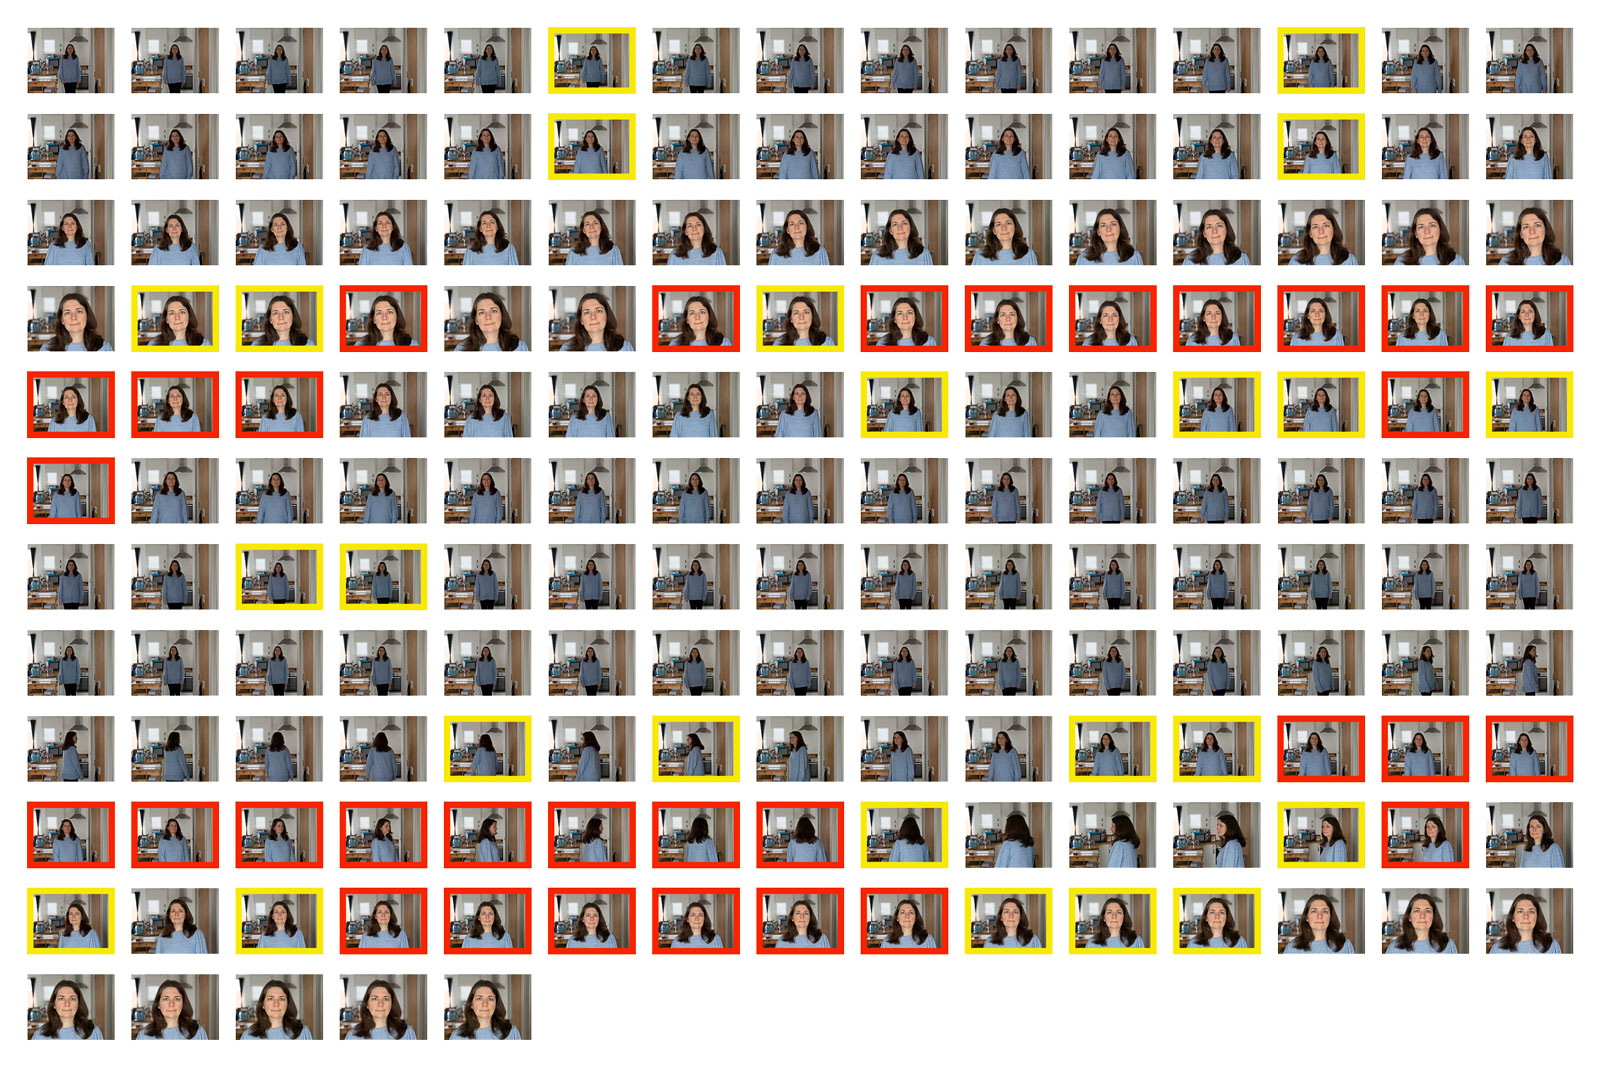
170 photos: 32 out of focus (red), 24 slightly soft (yellow)
Keeper rate: 67%
Interestingly, the results were reversed in the video recording test: the OM-1 struggled more to maintain focus on the subject, especially during rotations, while the G9 II had a more consistent performance.
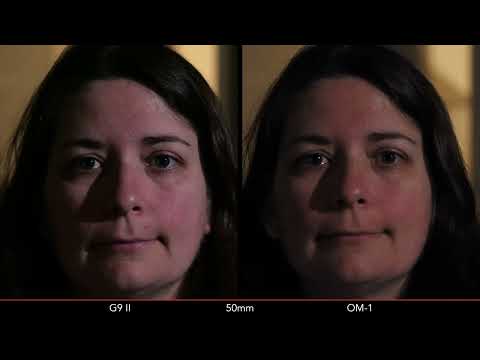
In low light, the G9 II offers a minimum sensitivity of -4EV (measured at f/2 and ISO 100). The OM-1 has a much better rating of -8EV at f/1.2 and ISO 100, which equals -6.5EV at f/2.
In my second test conducted in challenging light conditions, both cameras delivered a similar performance and keeper rate. The G9 II struggled more at the beginning, while the OM-1 lost focus when the subject entered complete darkness, requiring some time to readjust when she re-emerged into the light at the end.
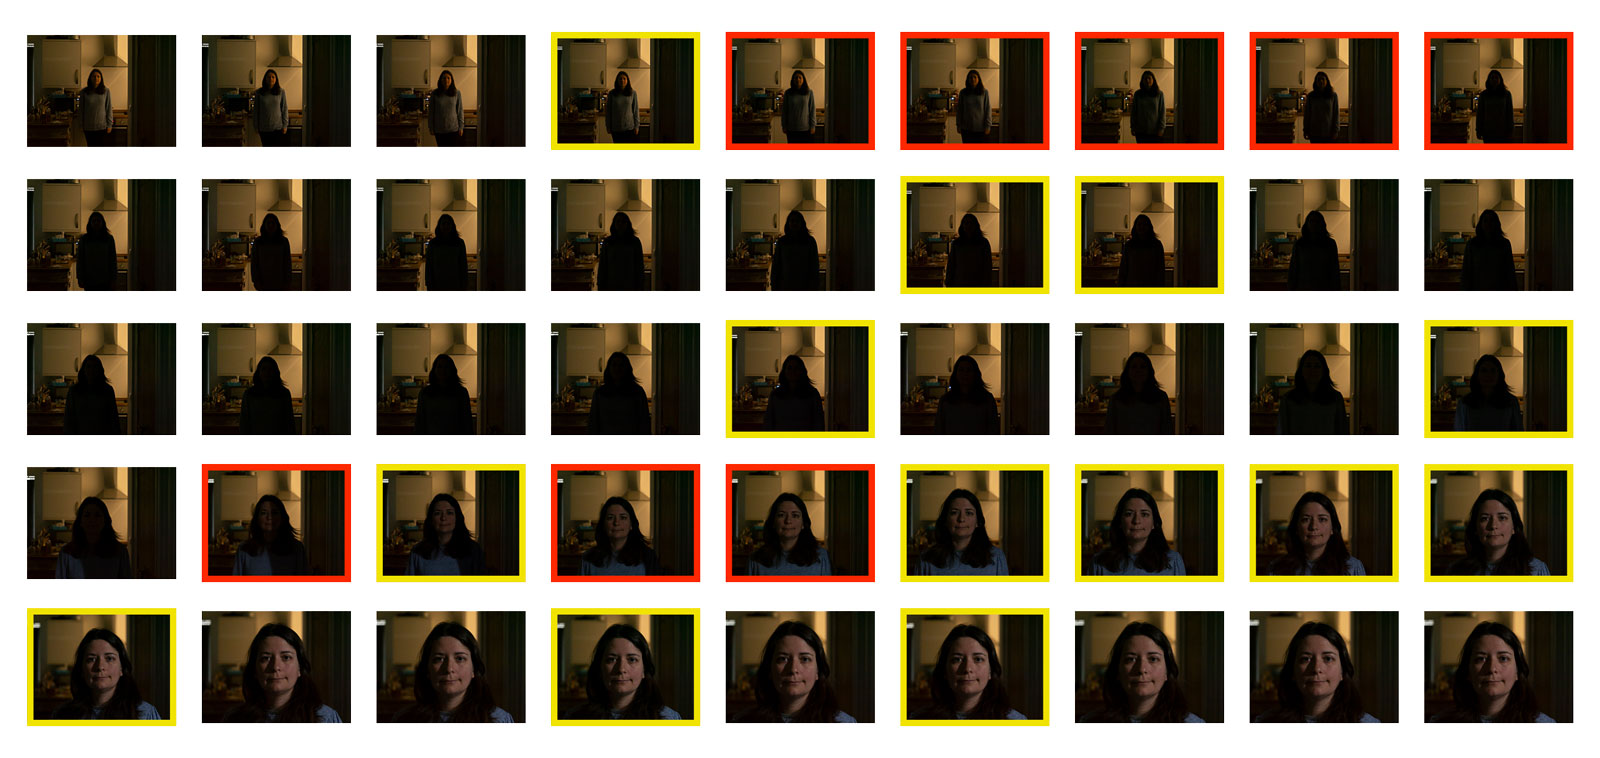
45 photos: 8 out of focus (red), 13 slightly soft (yellow)
Keeper rate: 53%

43 photos: 8 out of focus (red), 13 slightly soft (yellow)
Keeper rate: 51%
During video recording, the G9 II demonstrated more consistent subject tracking, while the OM-1 occasionally lagged behind, showing a slower response to correct and maintain focus on the subject.
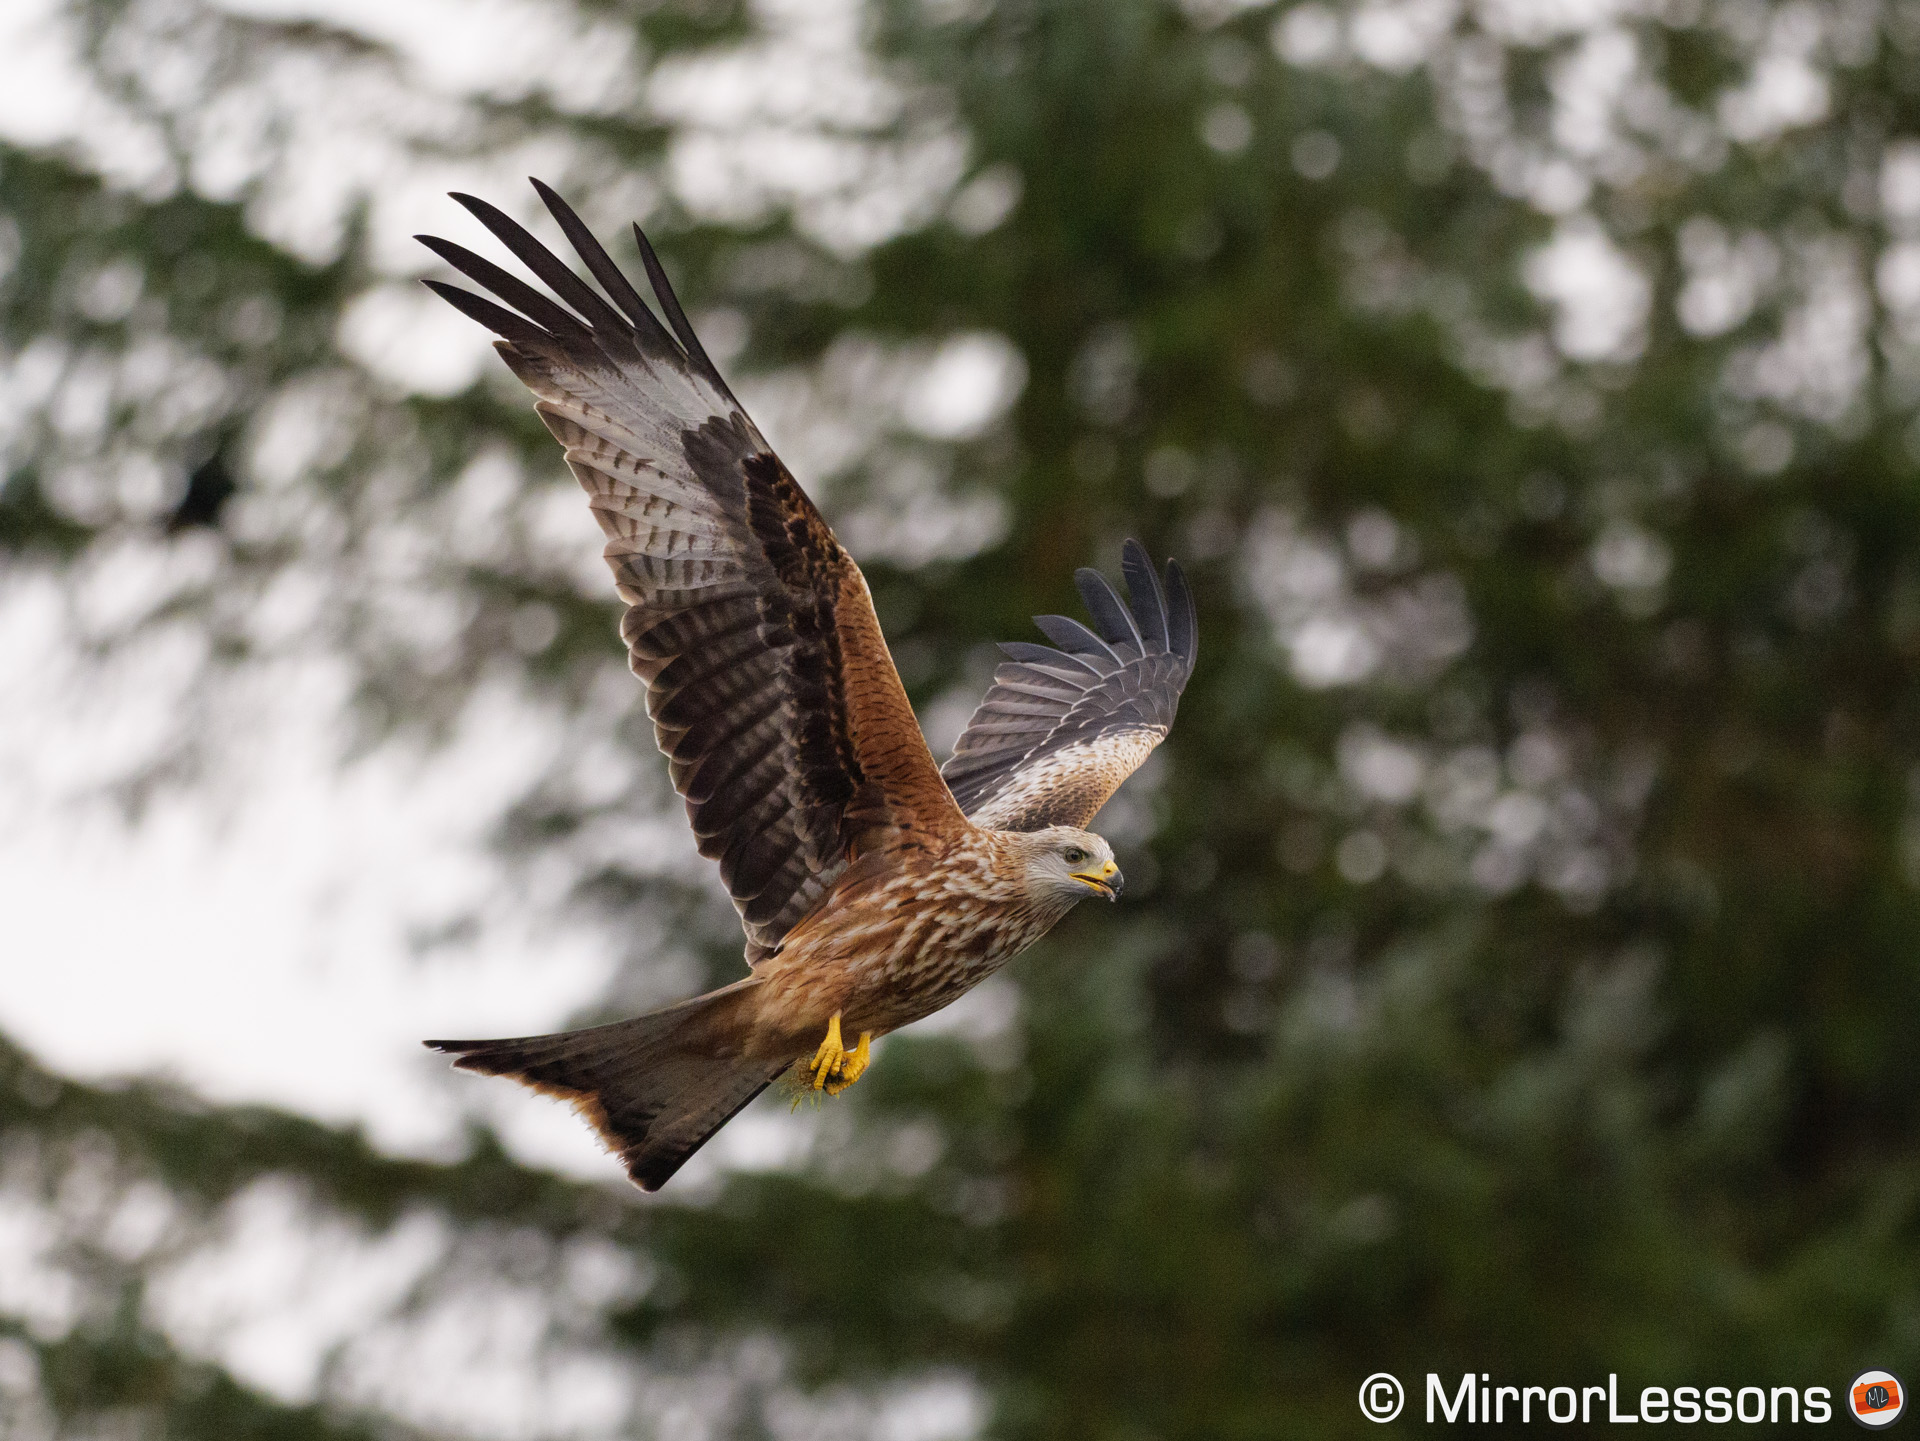
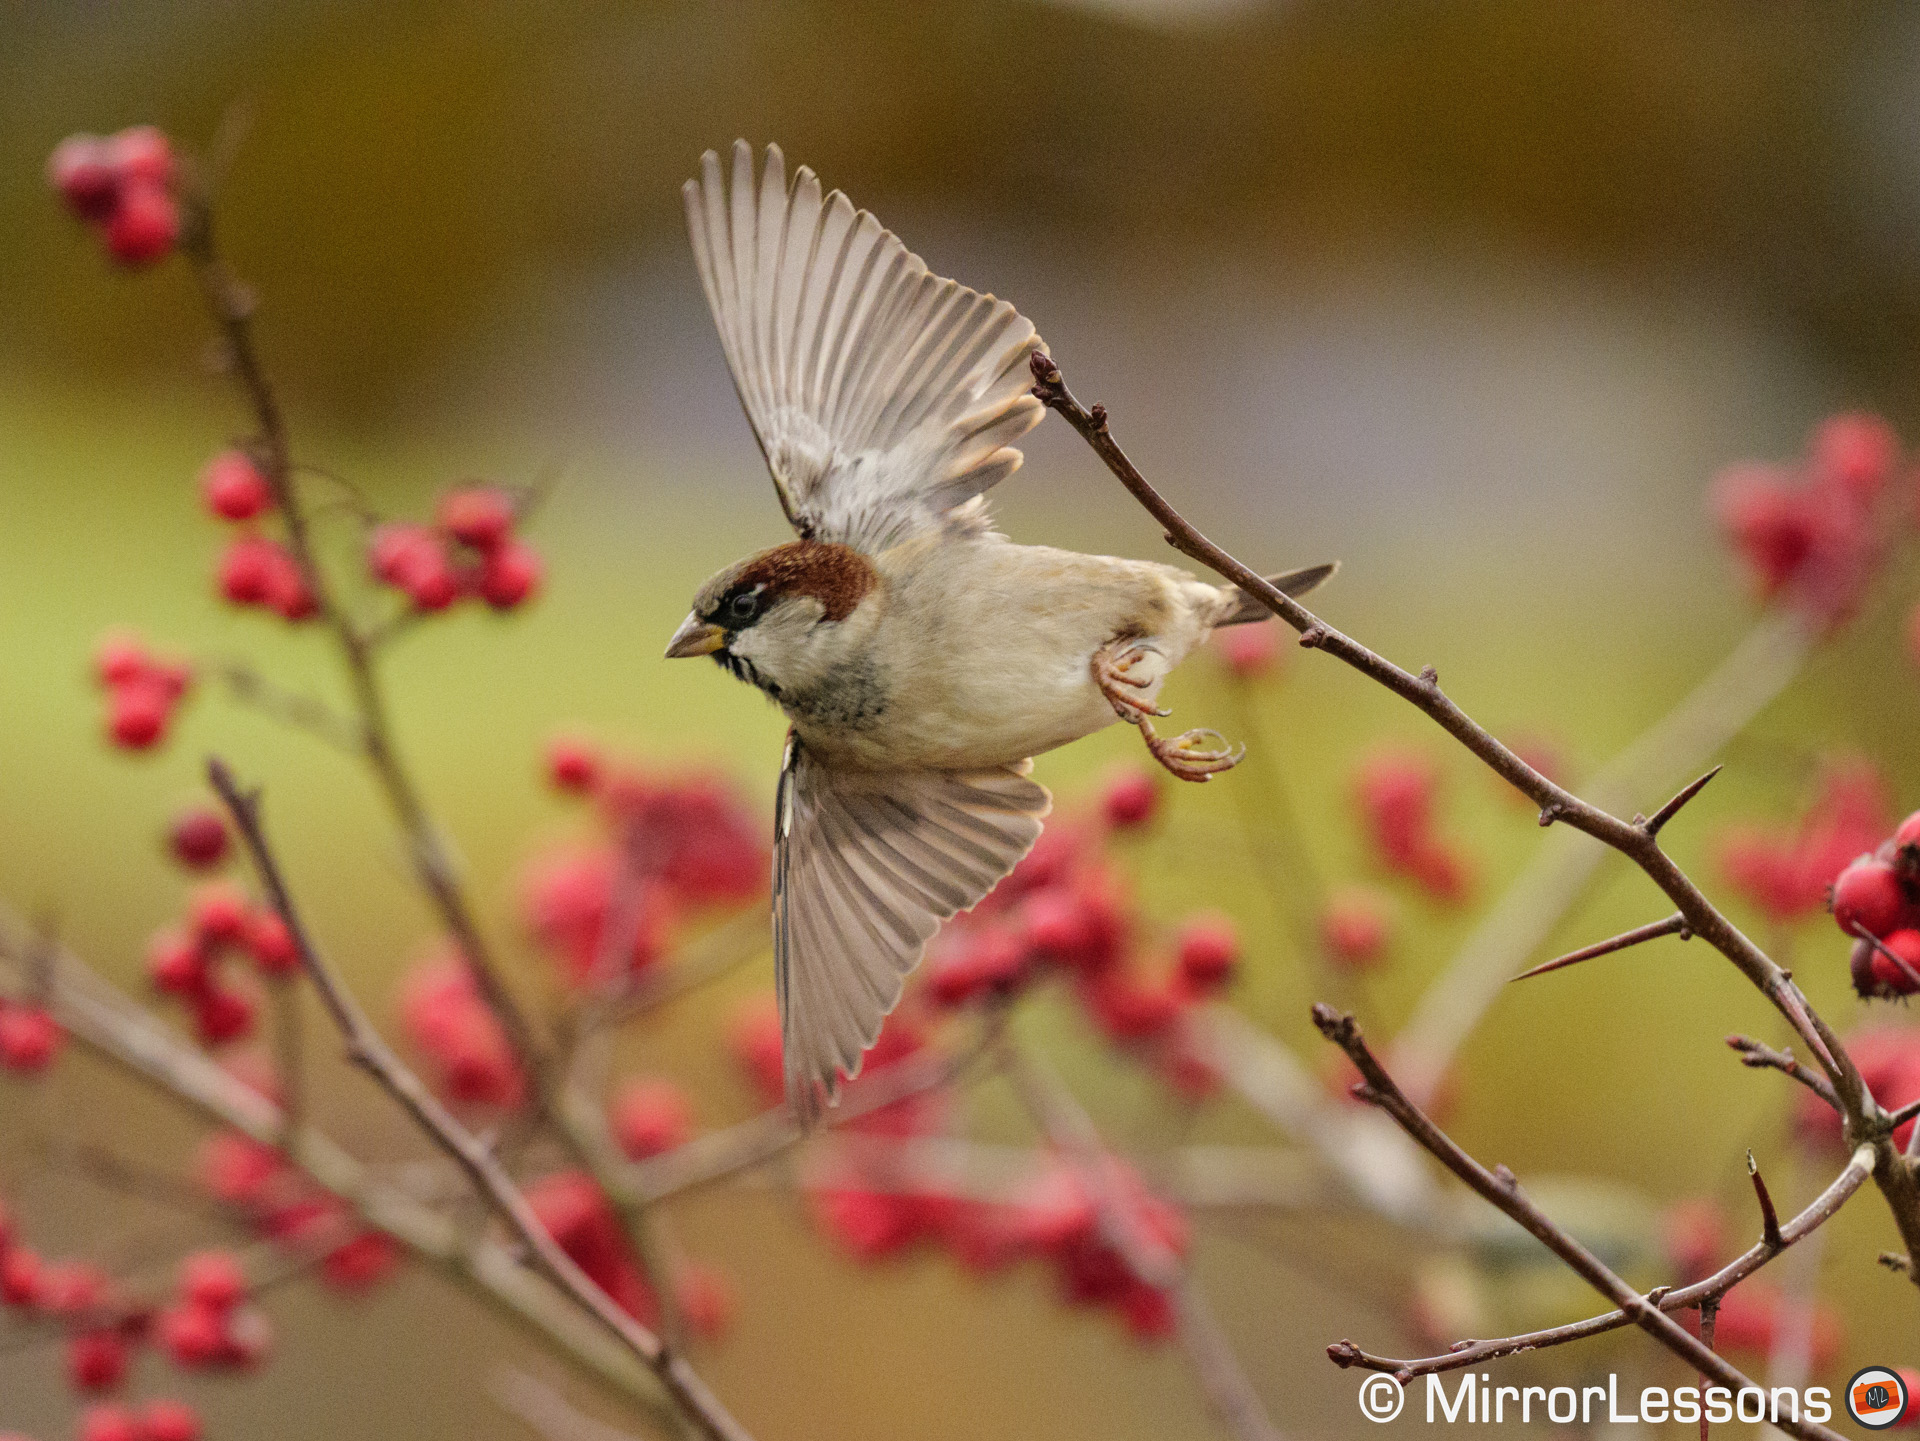
When it pertains to animals, both cameras possess the capability to identify various species, including birds. The OM-1 features a dedicated setting specifically tailored for them, whereas the G9 II encompasses everything within the Animal parameter. The OM-1 can discern the body, head, and eyes of animals or birds. With the Lumix, you have the option to solely detect the body, or the body and eye if desired.
The OM-1 excels in capturing still or slow-moving subjects thanks to the precision of its AF system. Bird detection is fast, reliable and dependable, wether the animal is large or small within the frame.


On the other hand, the G9 II faces more challenges in consistently capturing sharp images. Despite always confirming focus acquisition on the EVF or LCD screen, the actual success rate becomes apparent when reviewing the images on a computer, and it’s far from perfect. Often, the eye, or even the entire body appears soft, indicating the focus distance may be slightly too short or too far. This struggle is particularly noticeable when the bird moves its head or when the perch sways due to a gentle breeze.

LEICA DG ELMARIT 200/F2.8+TC1.4

LEICA DG ELMARIT 200/F2.8+TC1.4

LEICA DG ELMARIT 200/F2.8+TC1.4
When birds are surrounded or partially obscured by natural elements such as branches or leaves, Bird AF detection is invaluable for keeping the animal’s eye in focus. Both cameras impressed me in these challenging situations. However, once again, the OM-1 demonstrates more consistent focus accuracy compared to the G9 II.

LEICA DG ELMARIT 200/F2.8+TC1.4

LEICA DG ELMARIT 200/F2.8+TC1.4


Another annoyance with the G9 II is that it prioritises the bird’s eye only when the AF area is large enough to encompass the entire body. If you select a smaller AF area, useful to get that initial focus acquisition in the presence of distracting elements around your subject, the G9 II will concentrates on the body instead. This can result in more inaccurate focus on the eye. Note that this happens even when selecting the Body/Eye option for the Target Parts setting.
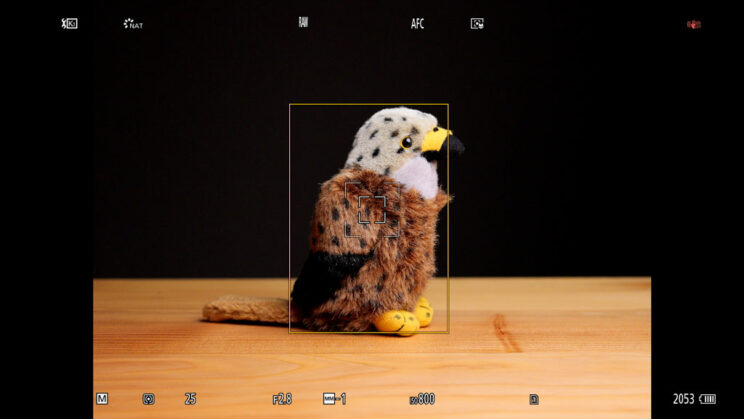
You can opt for the dedicated Tracking mode on the Lumix, which prioritises the head/eye at all times. However, I found this setting to be somewhat erratic and occasionally less precise.
The OM-1 offers more flexibility: even with a narrow focus area, once the subject is detected, priority is always given to the eye, even if the focus area doesn’t cover the entire body.
In video mode, the G9 II is less reliable when using S-AF, which relies exclusively on the DfD system (contrast detection). The camera frequently shifts the lens’ optical elements back and forth several times before acquiring focus, and any distractions near the subject can prevent the camera from focusing successfully. It’s better to work in C-AF, where you have the choice to set the G9 II to focus continuously only when pressing the record button, a very convenient option.
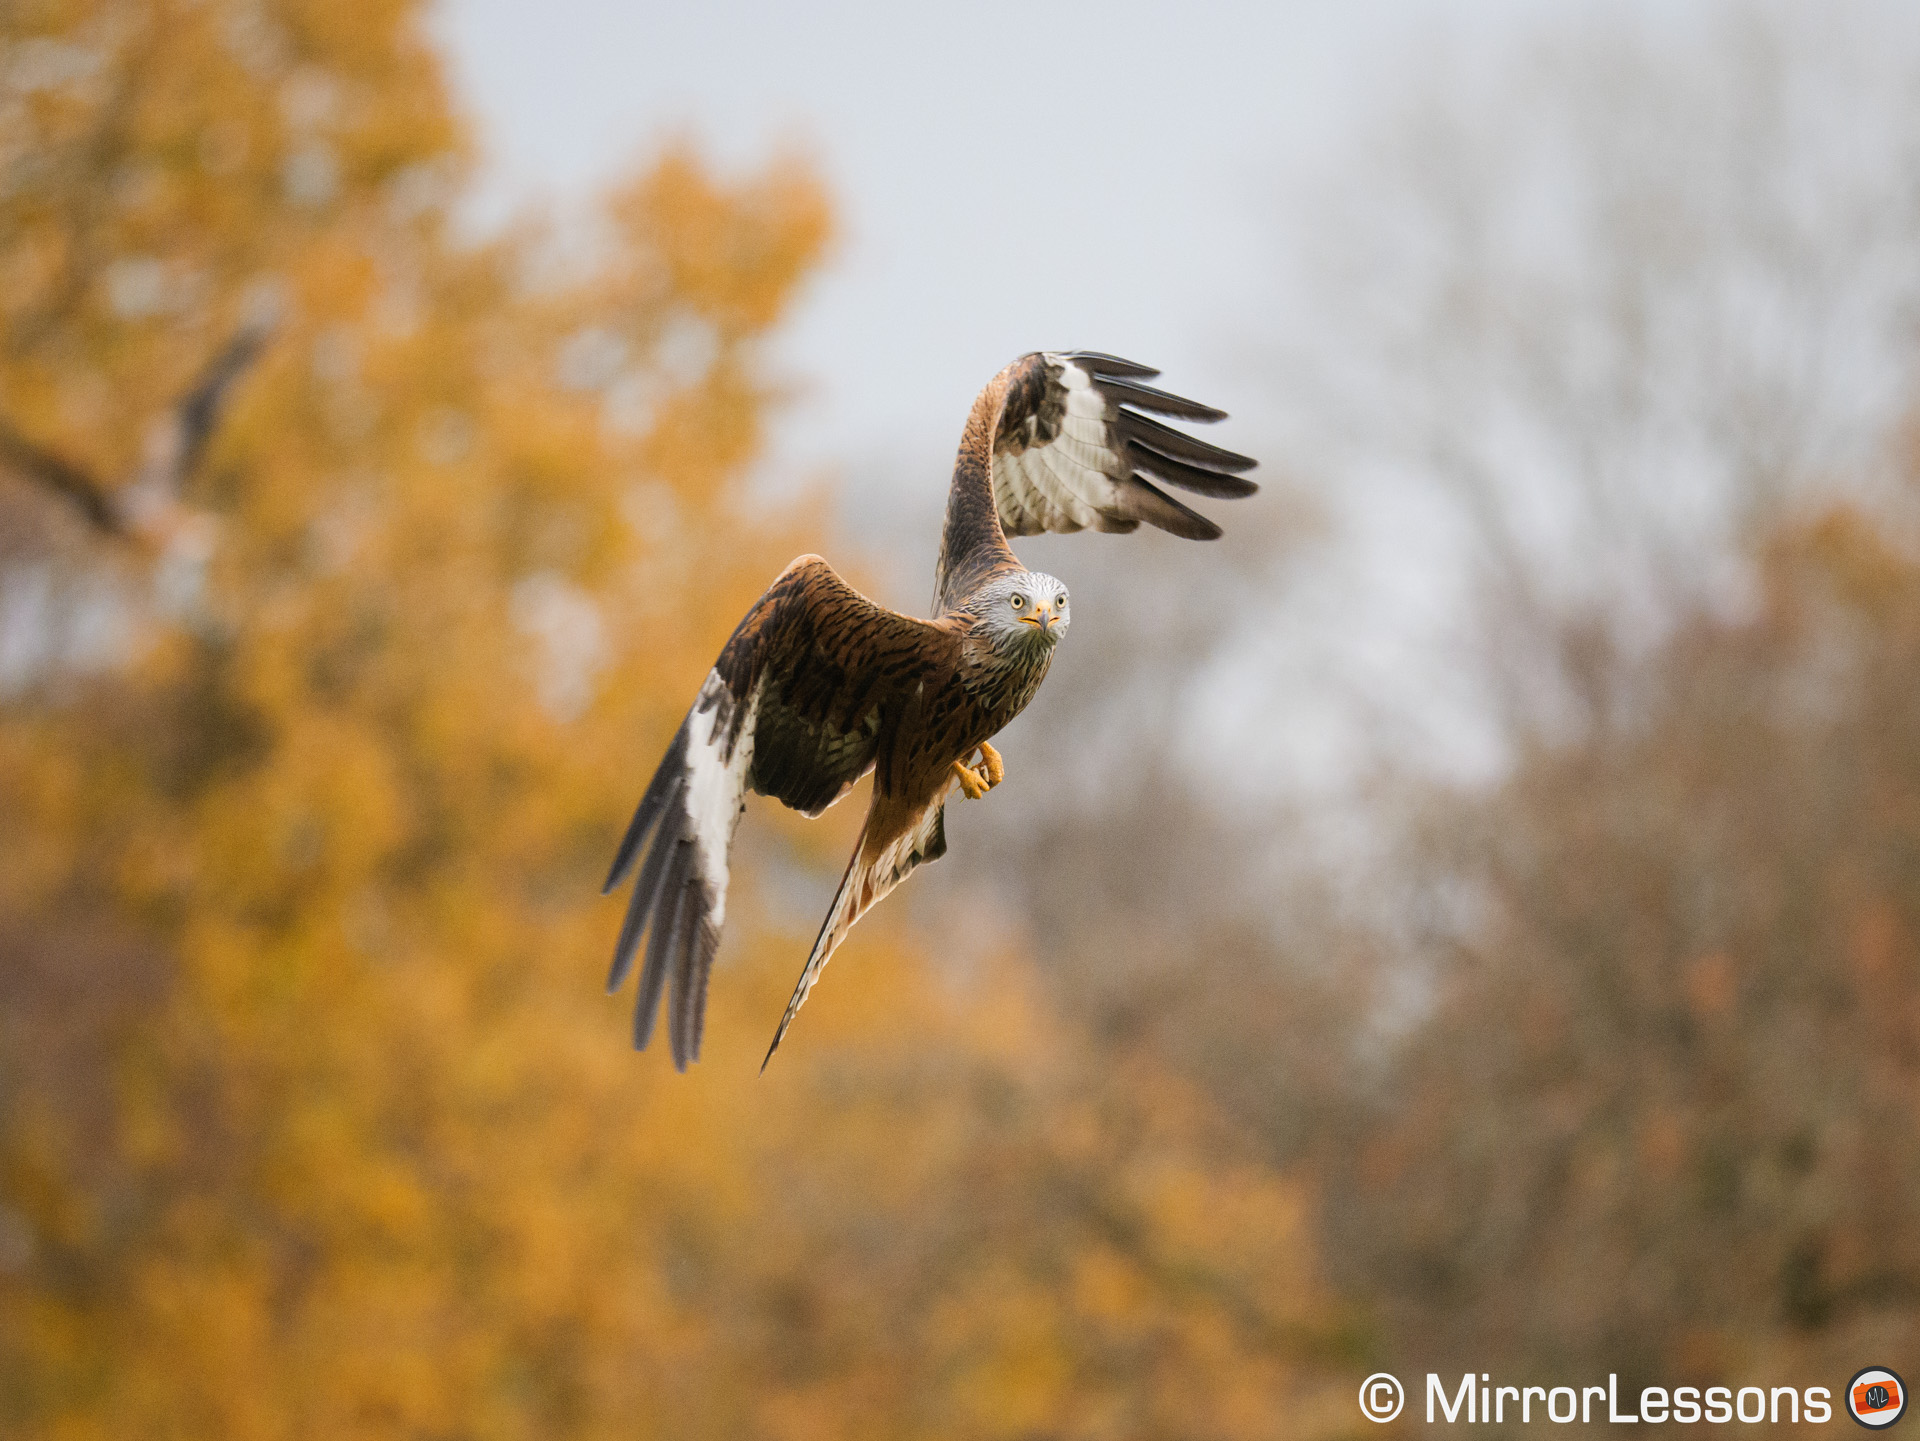
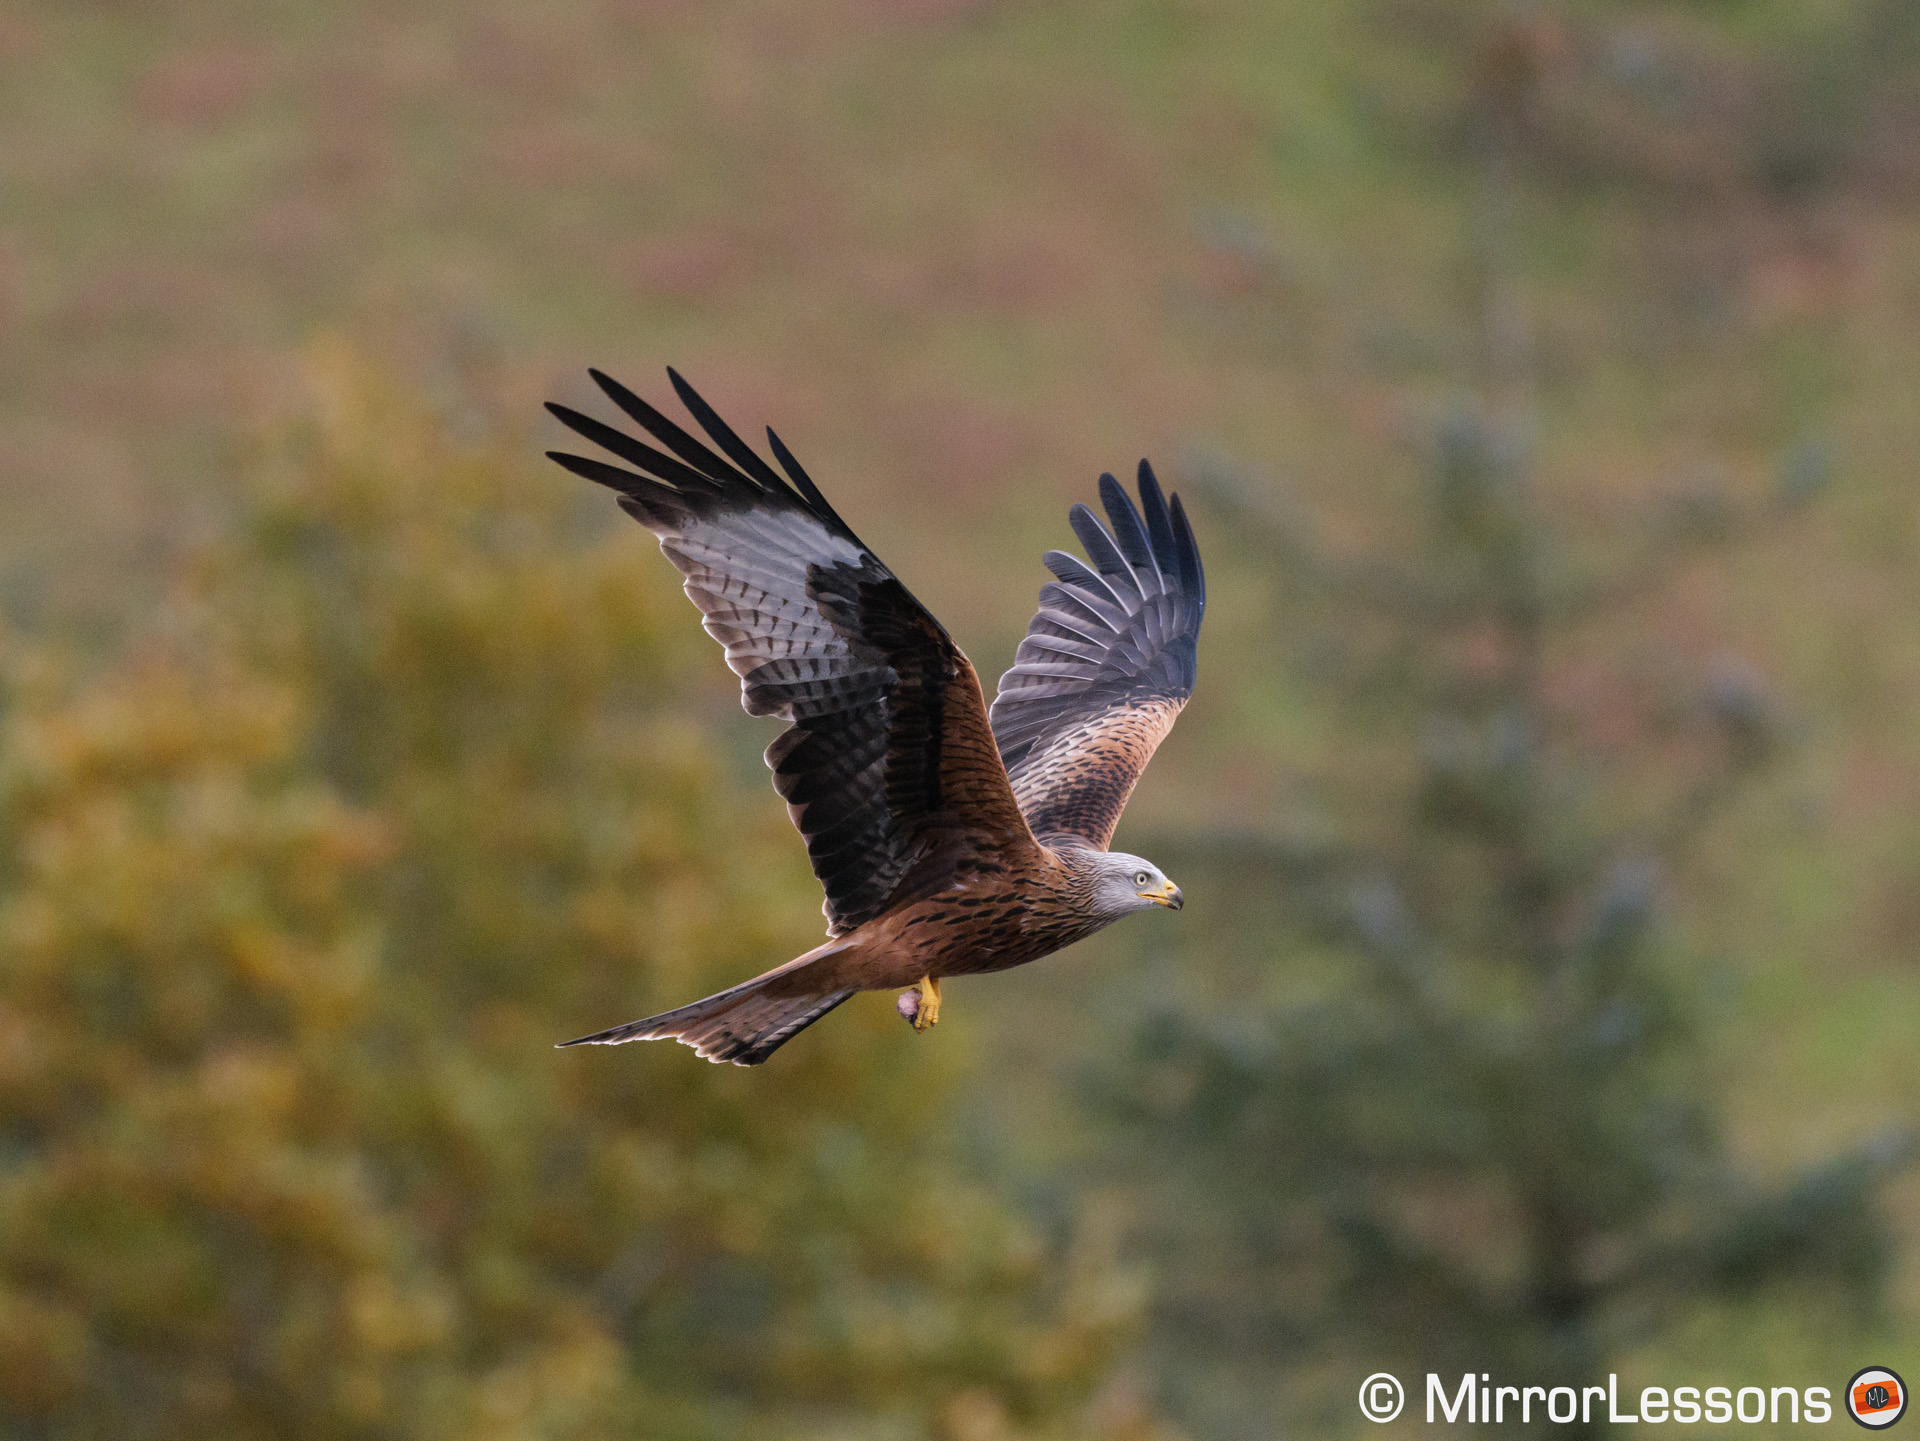
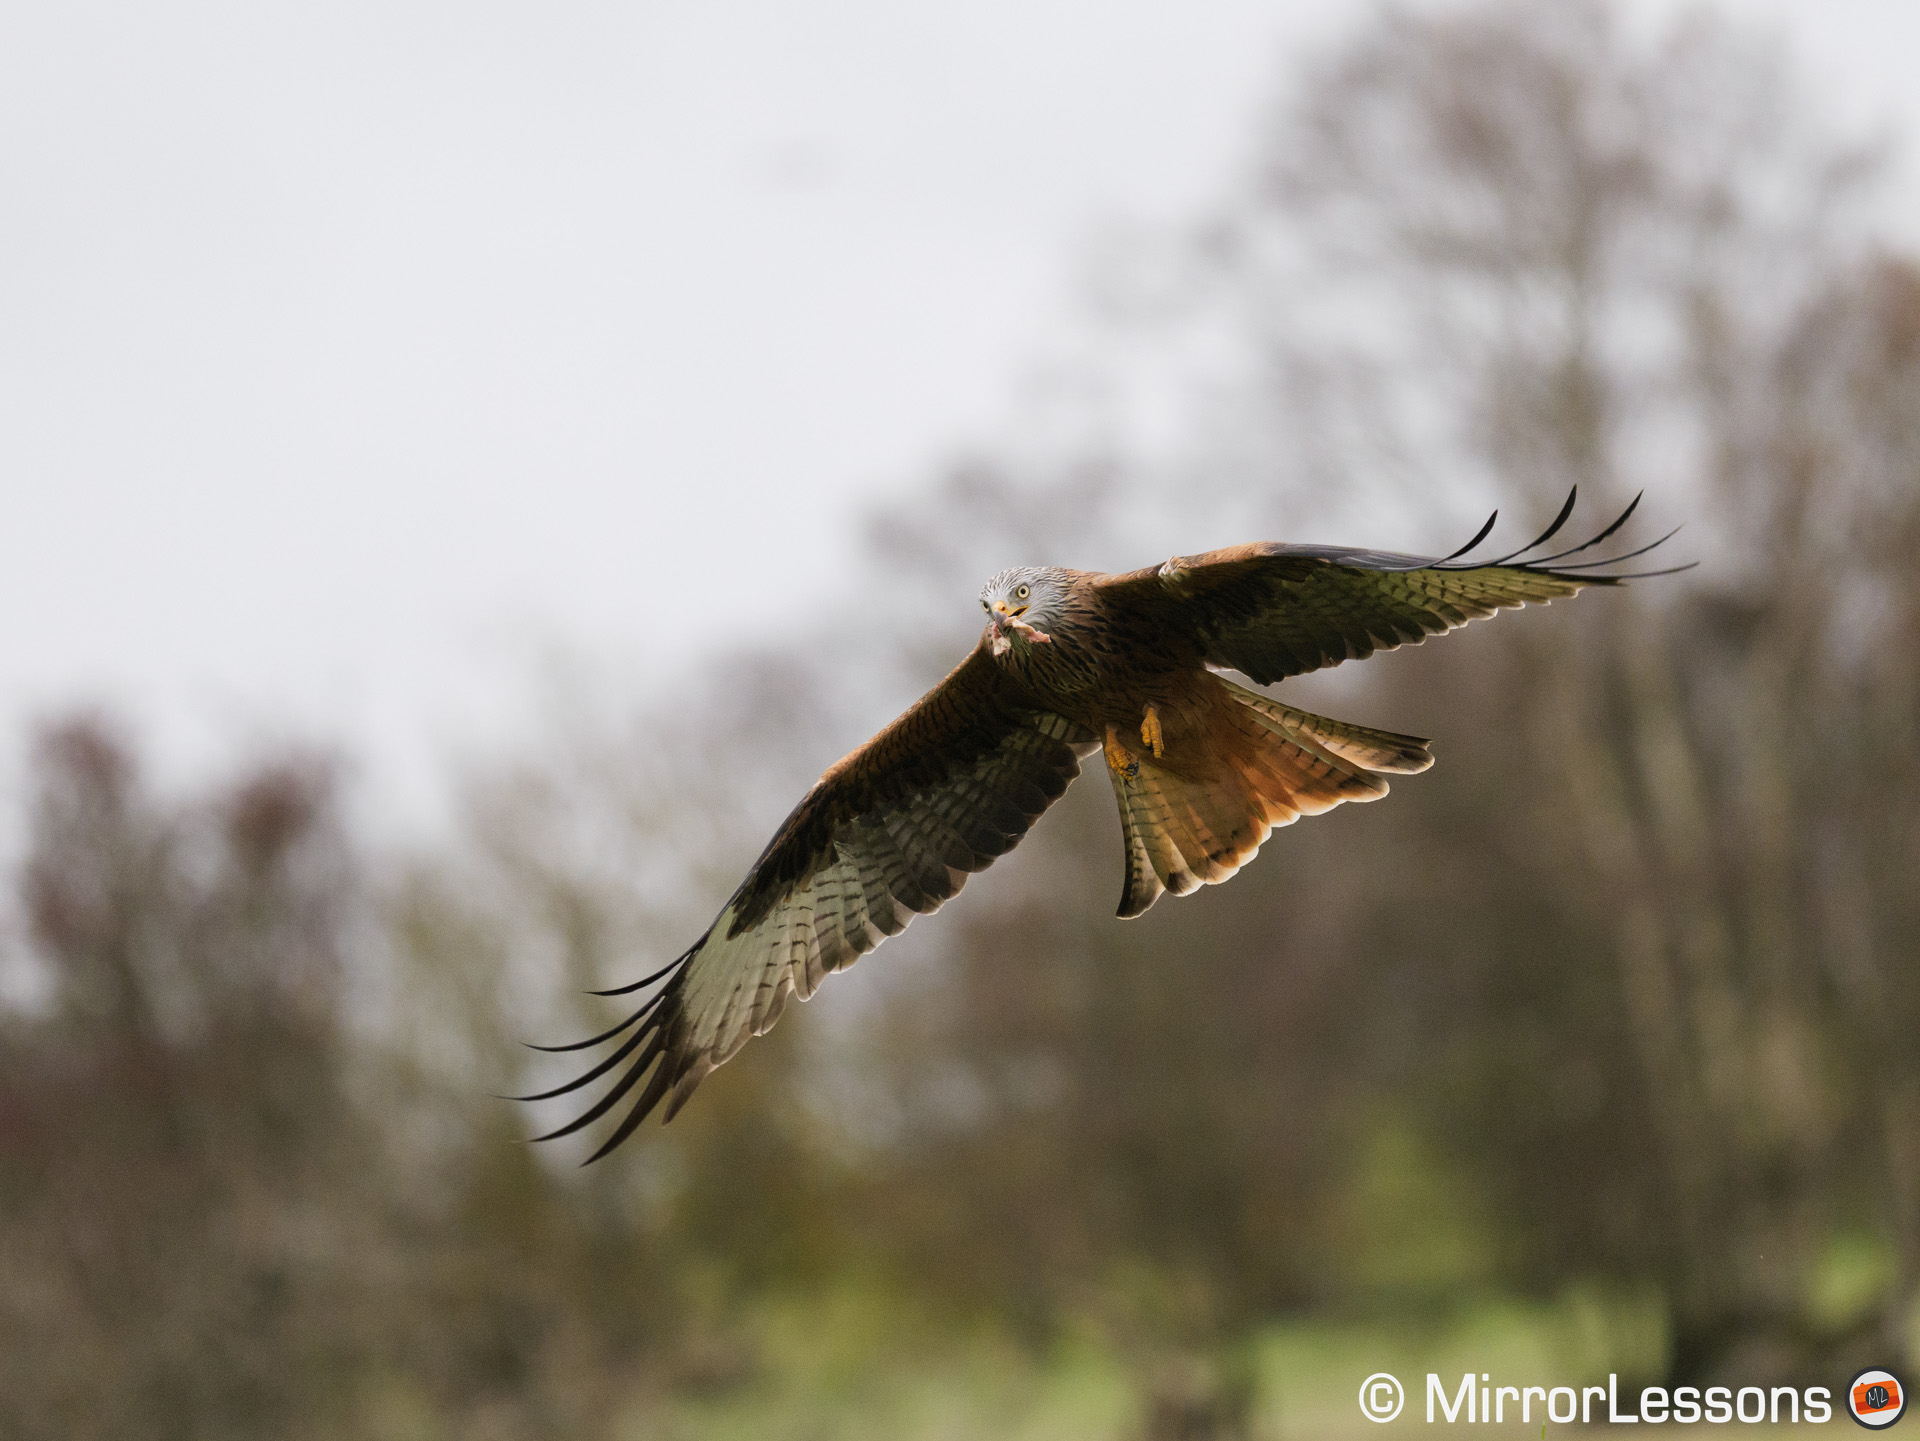
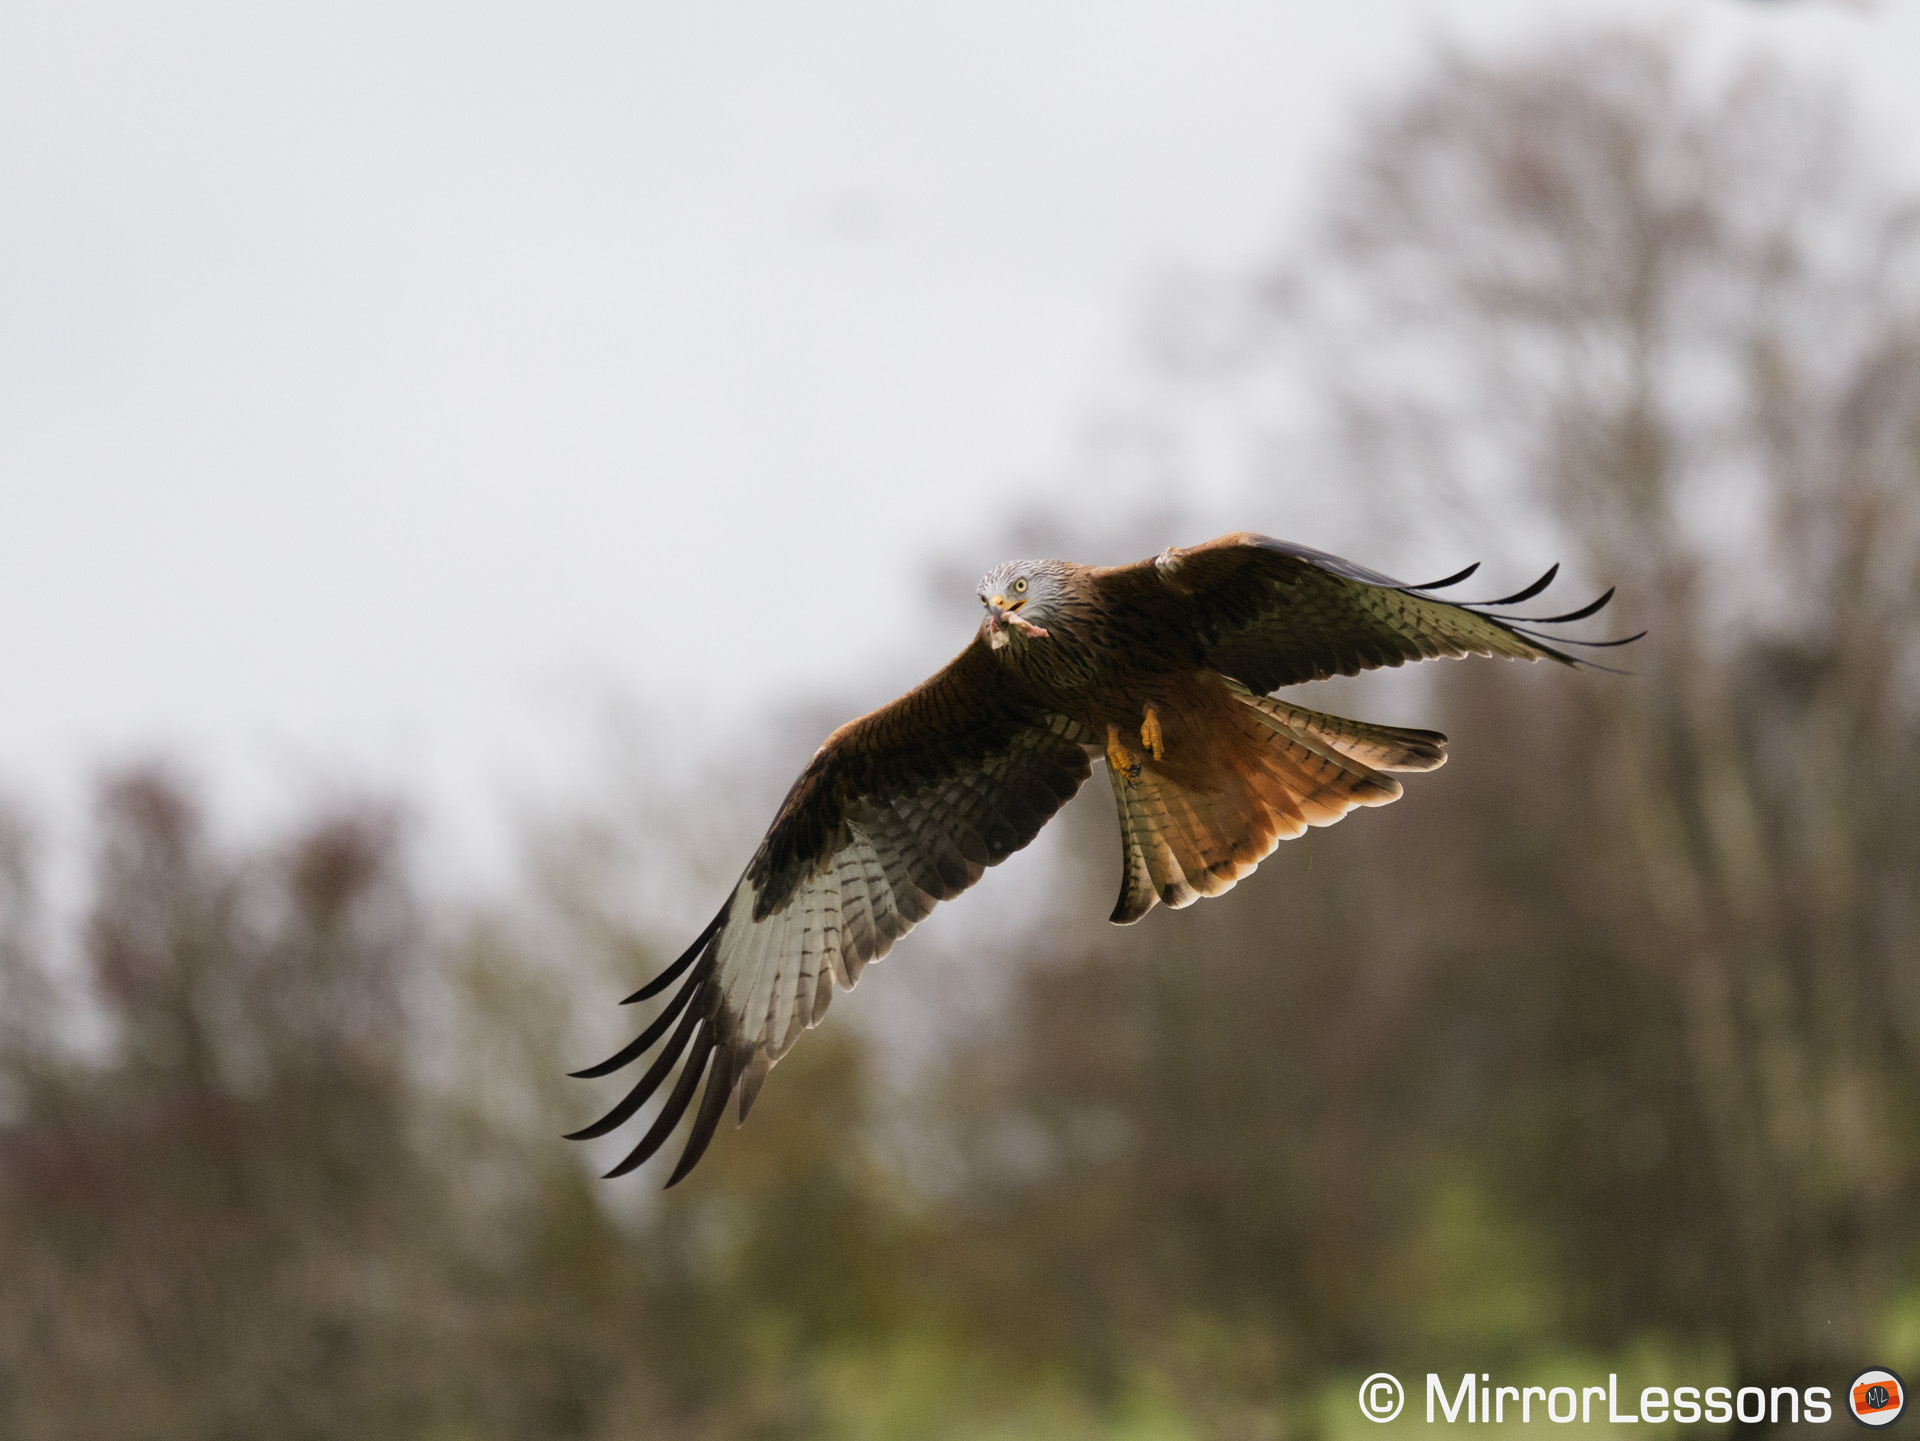
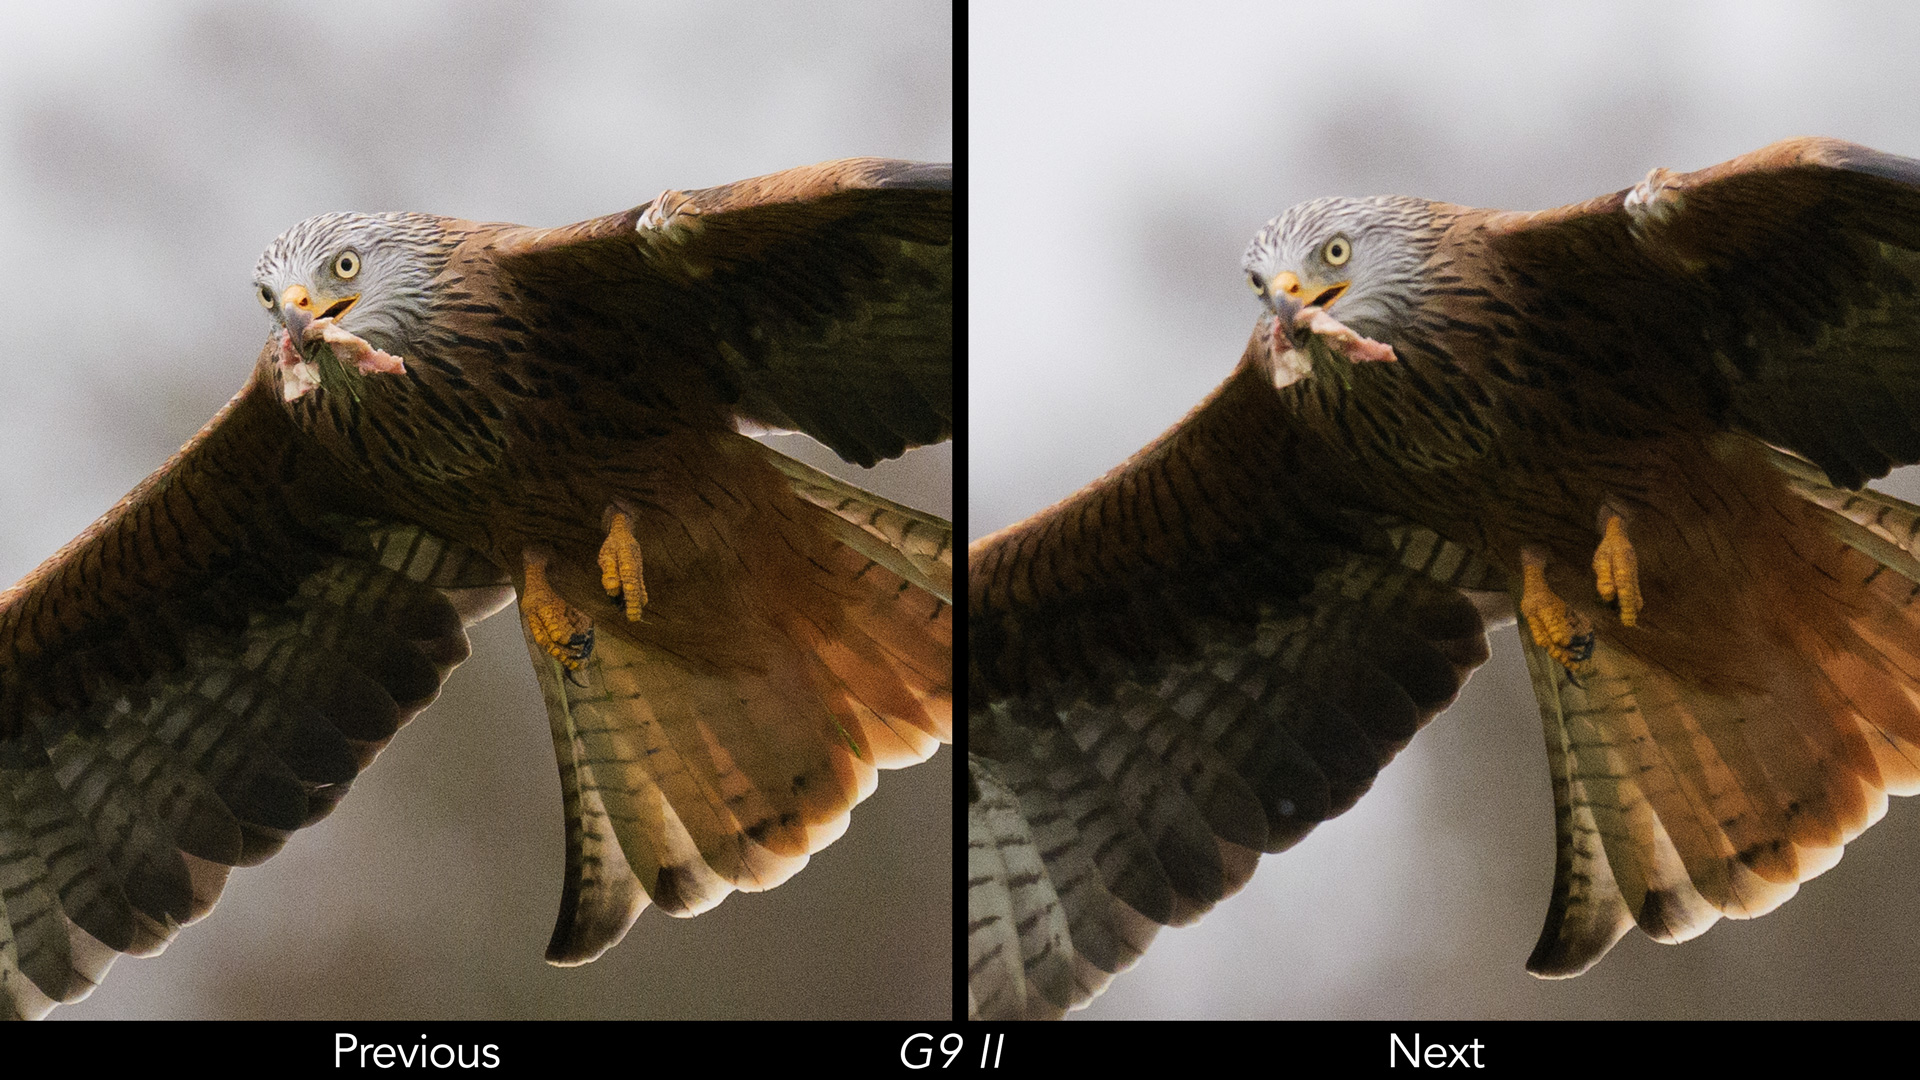
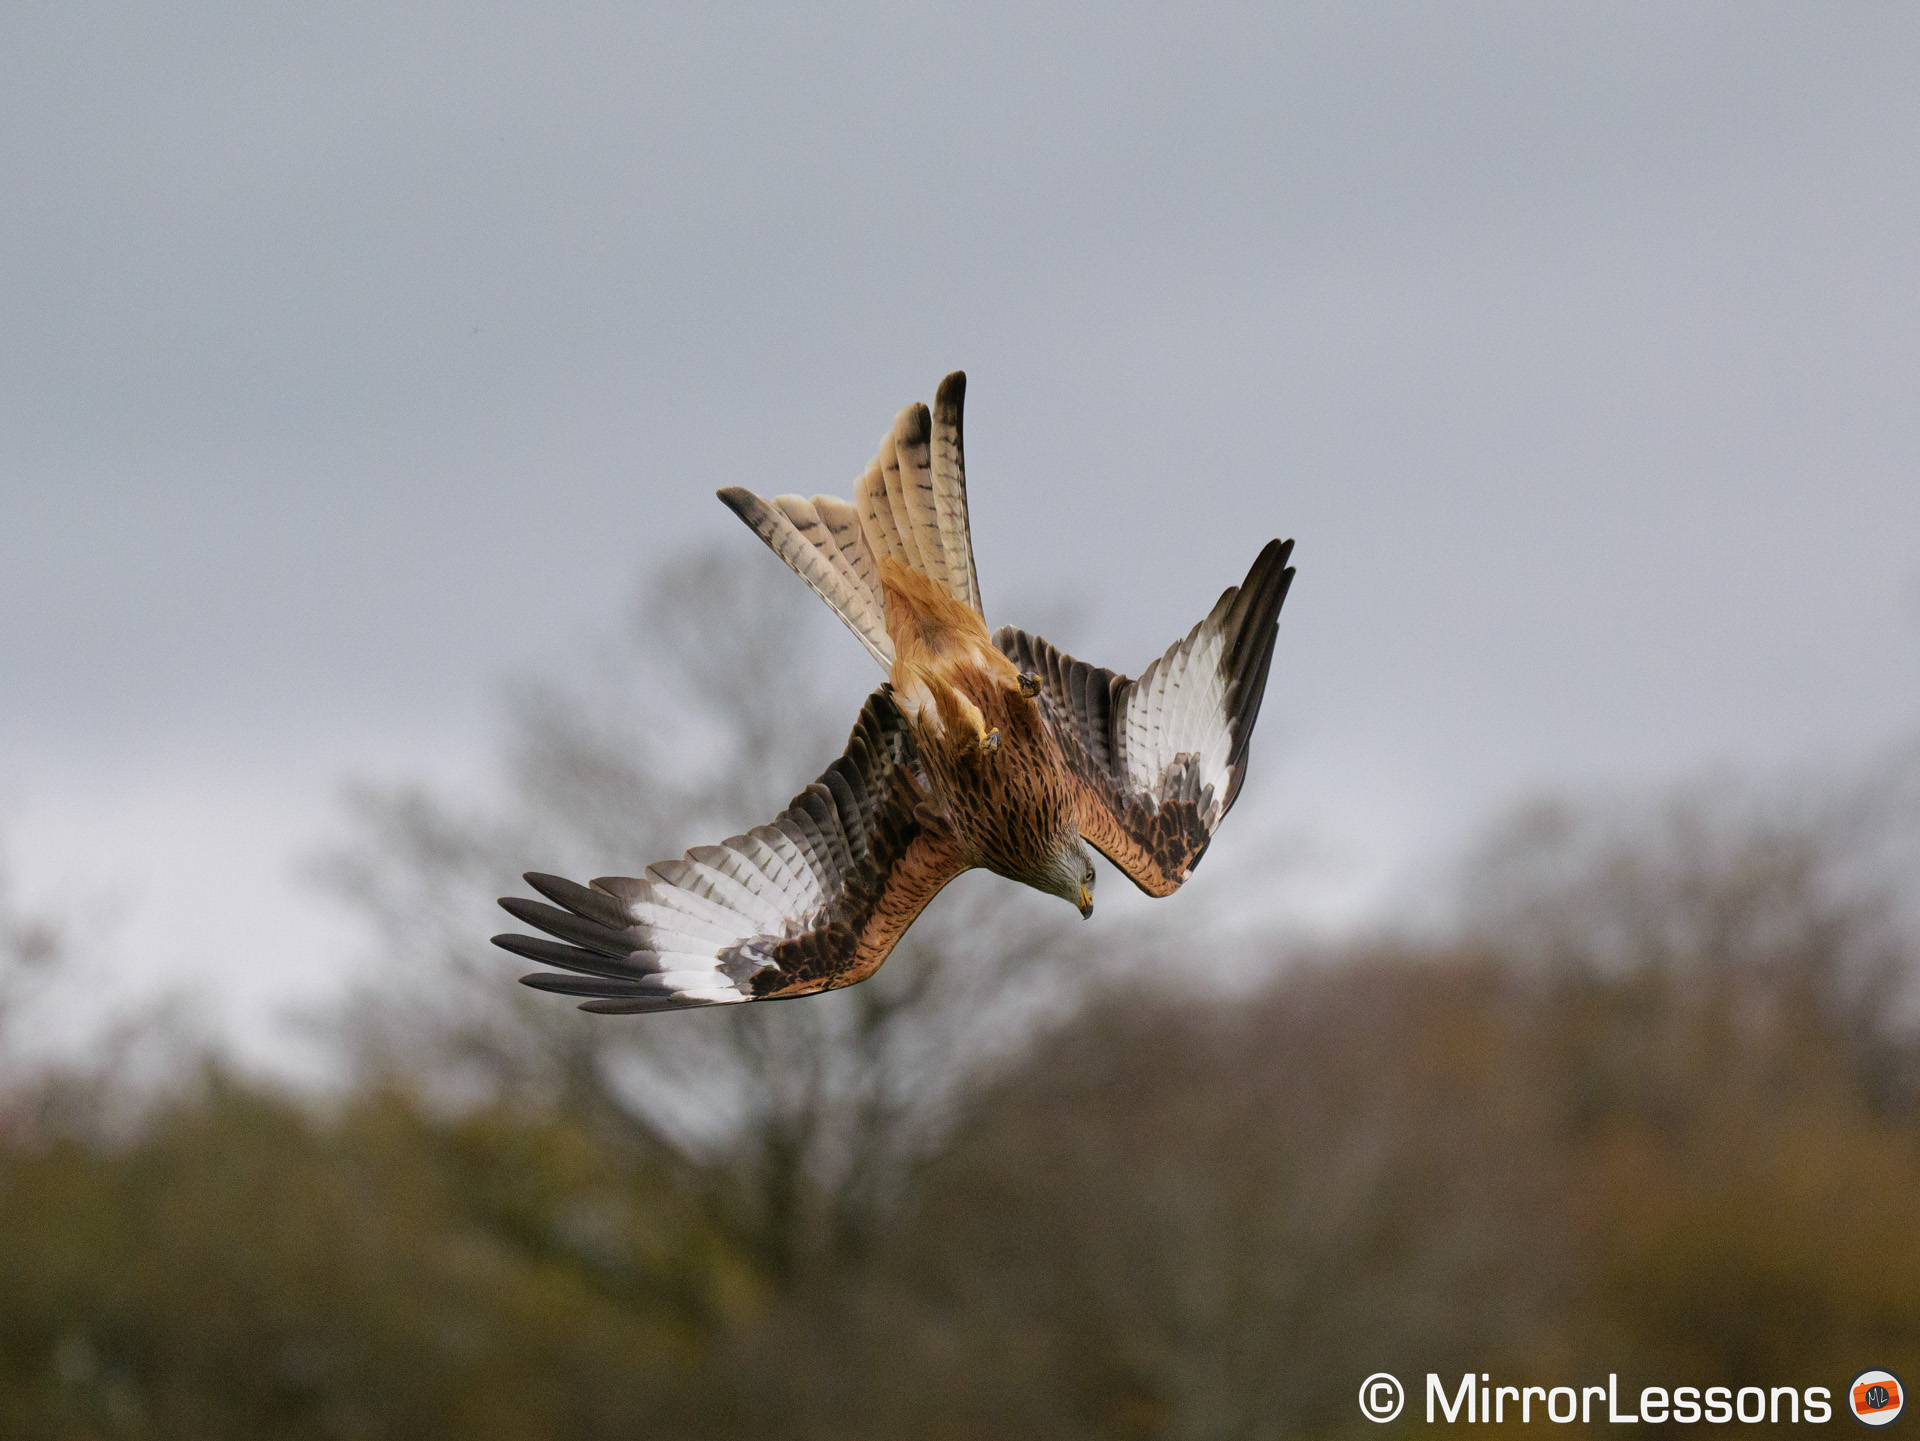
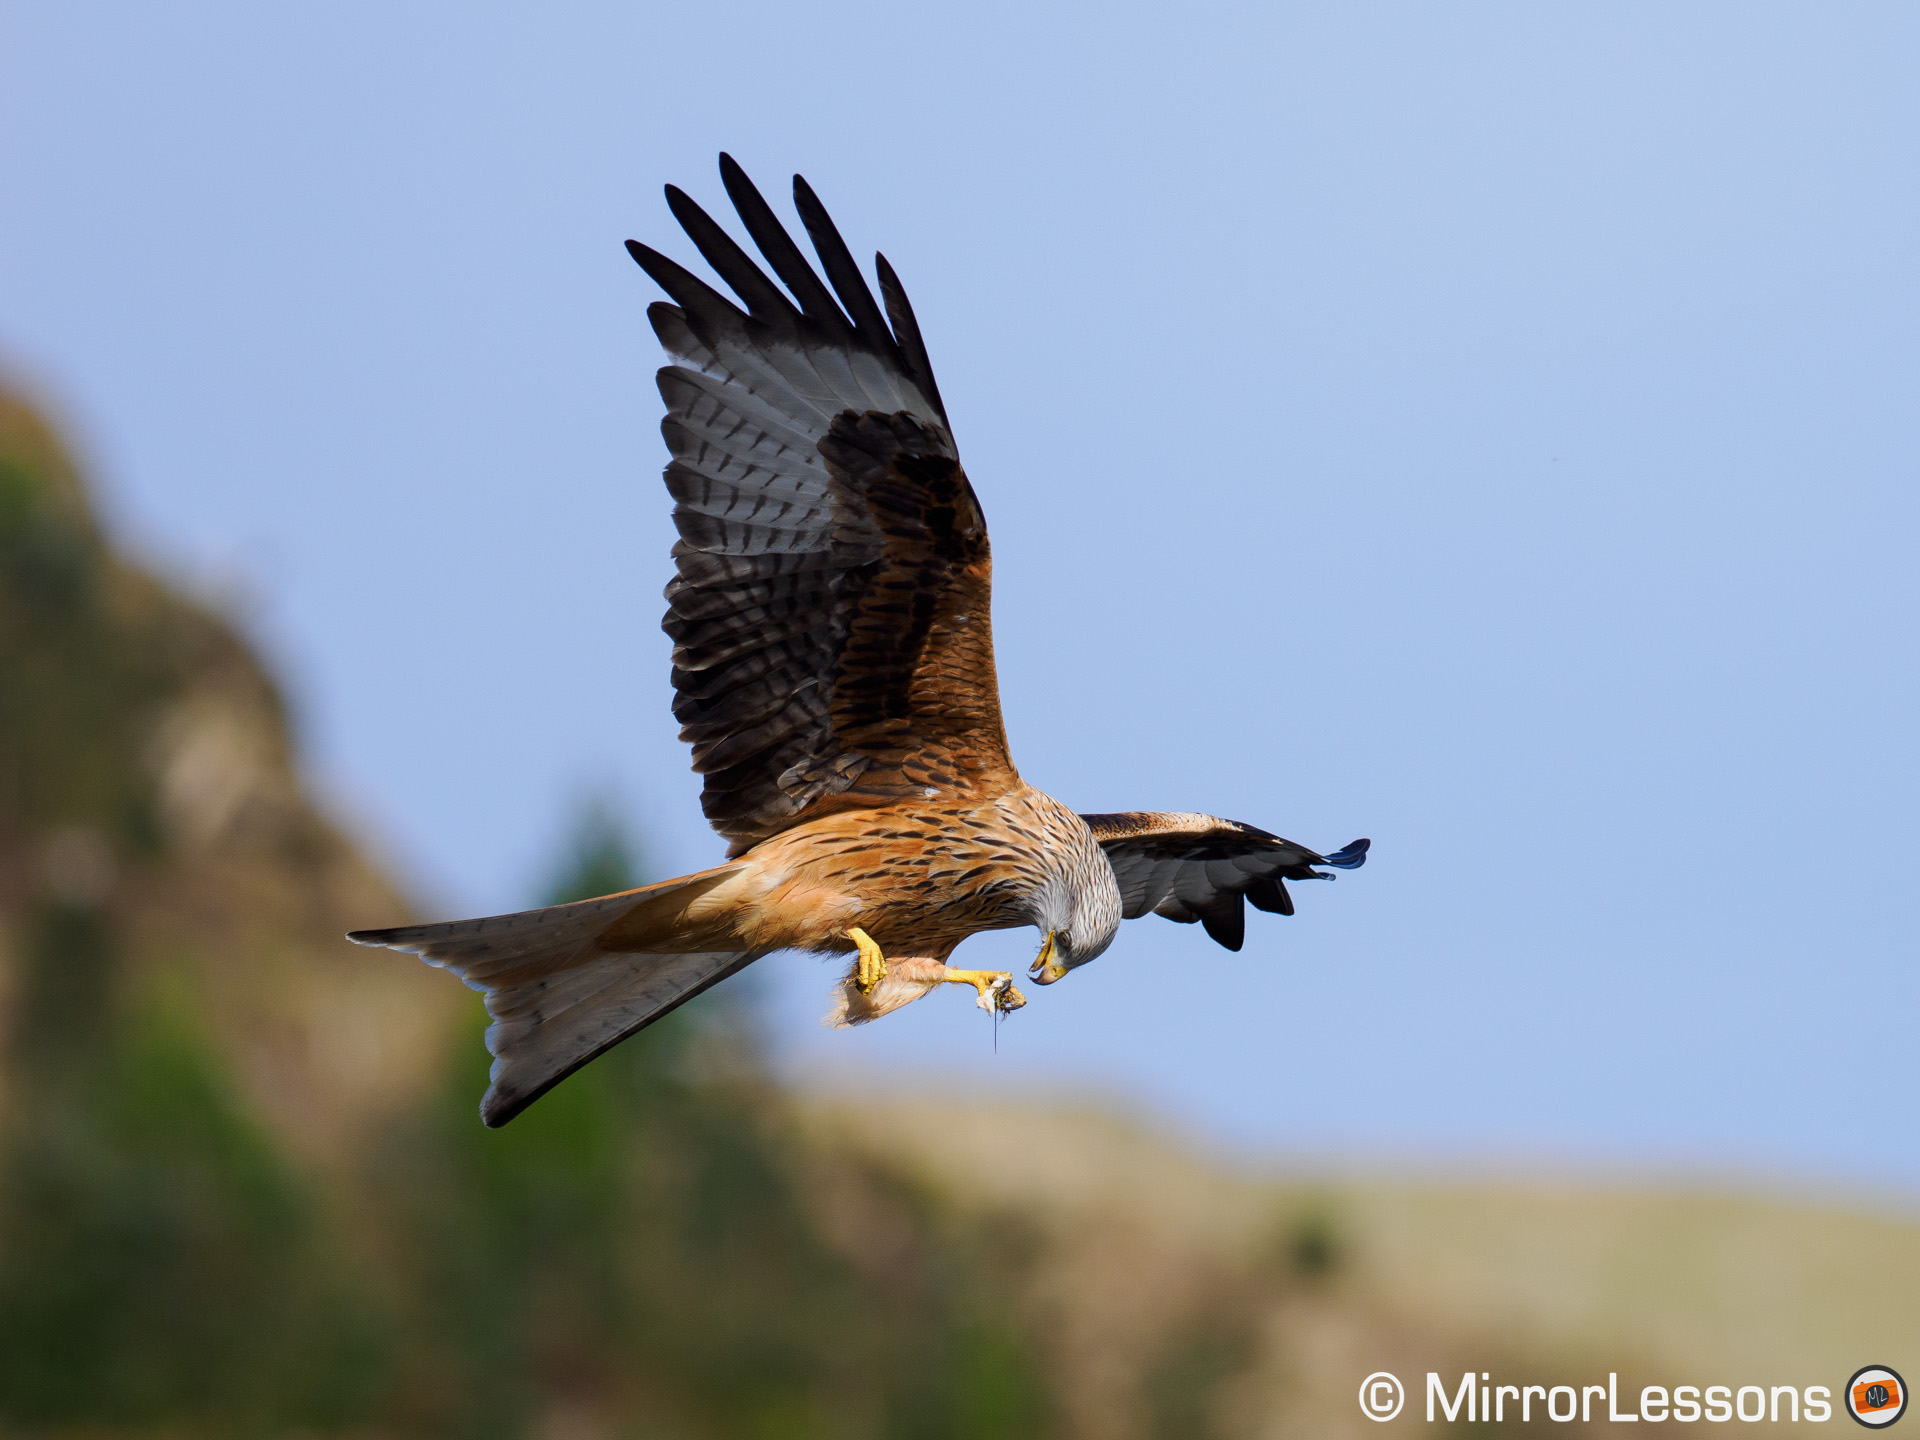
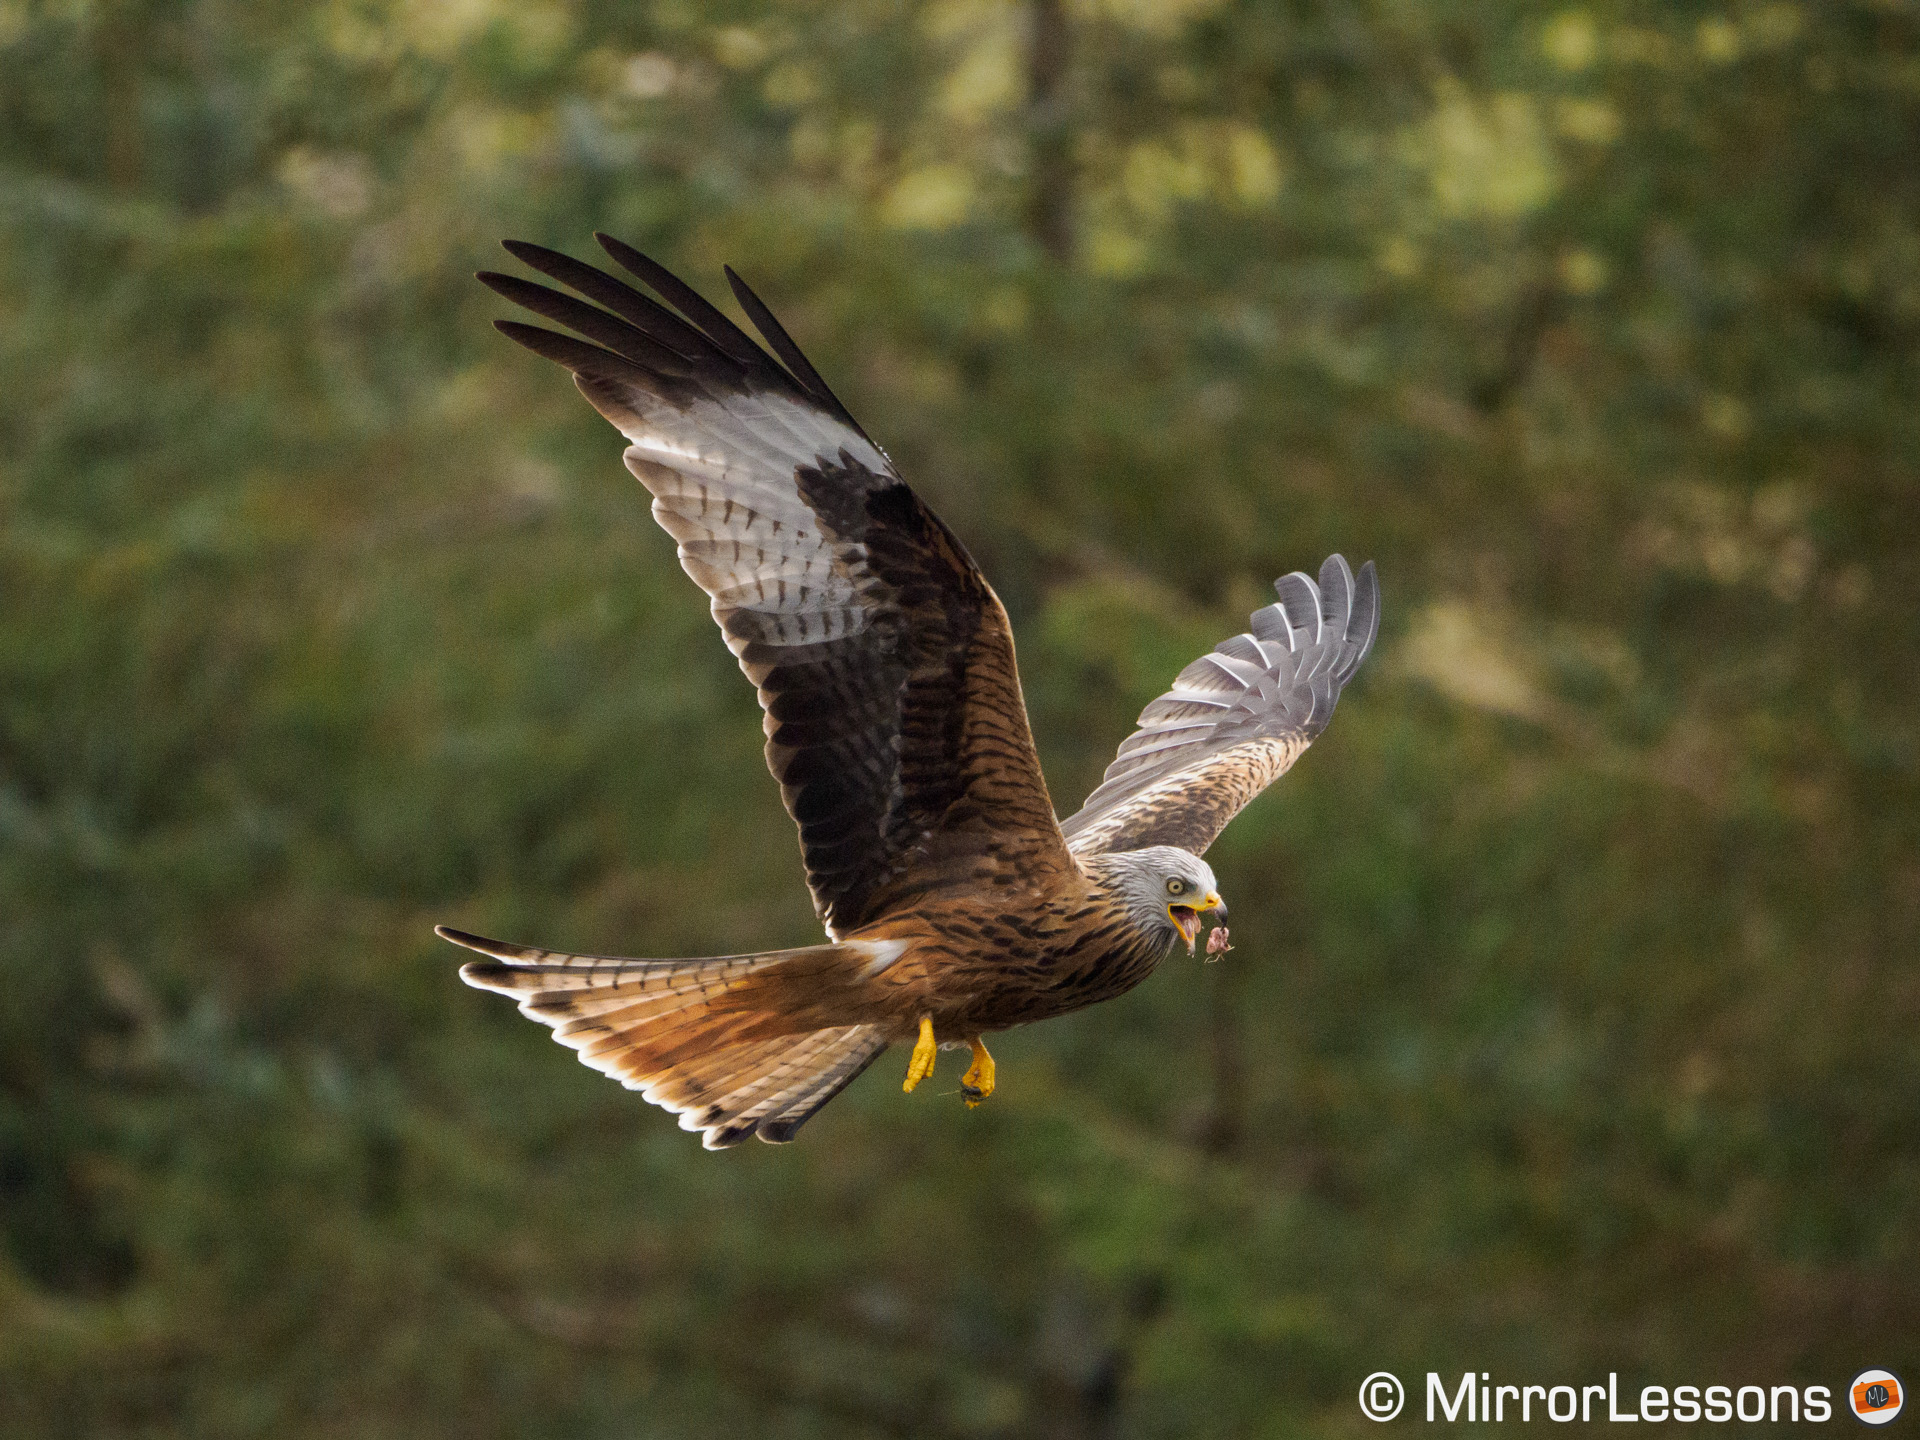
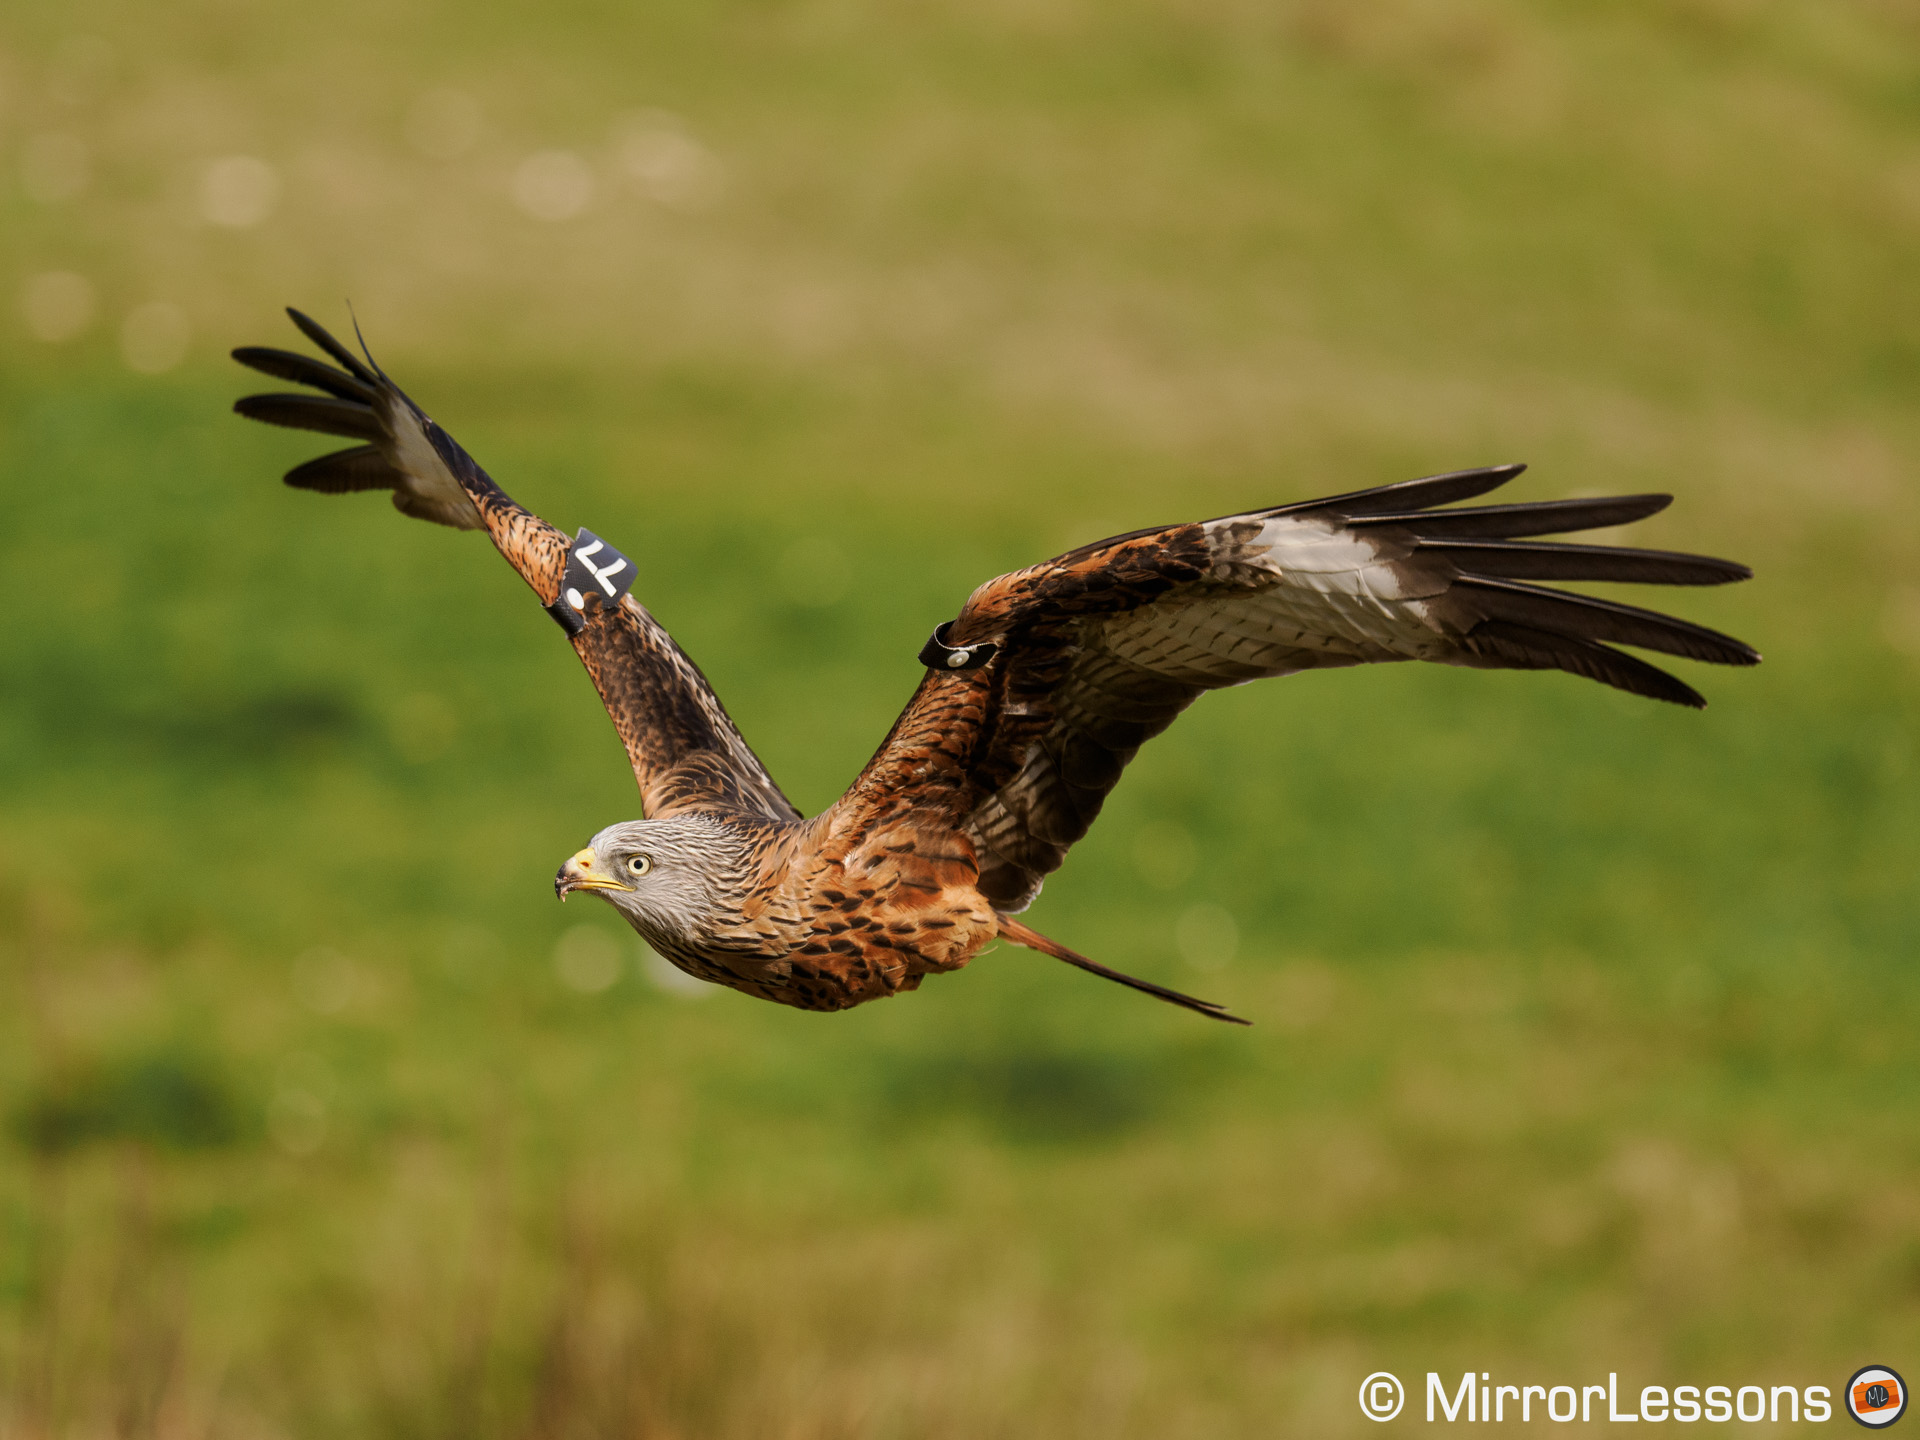
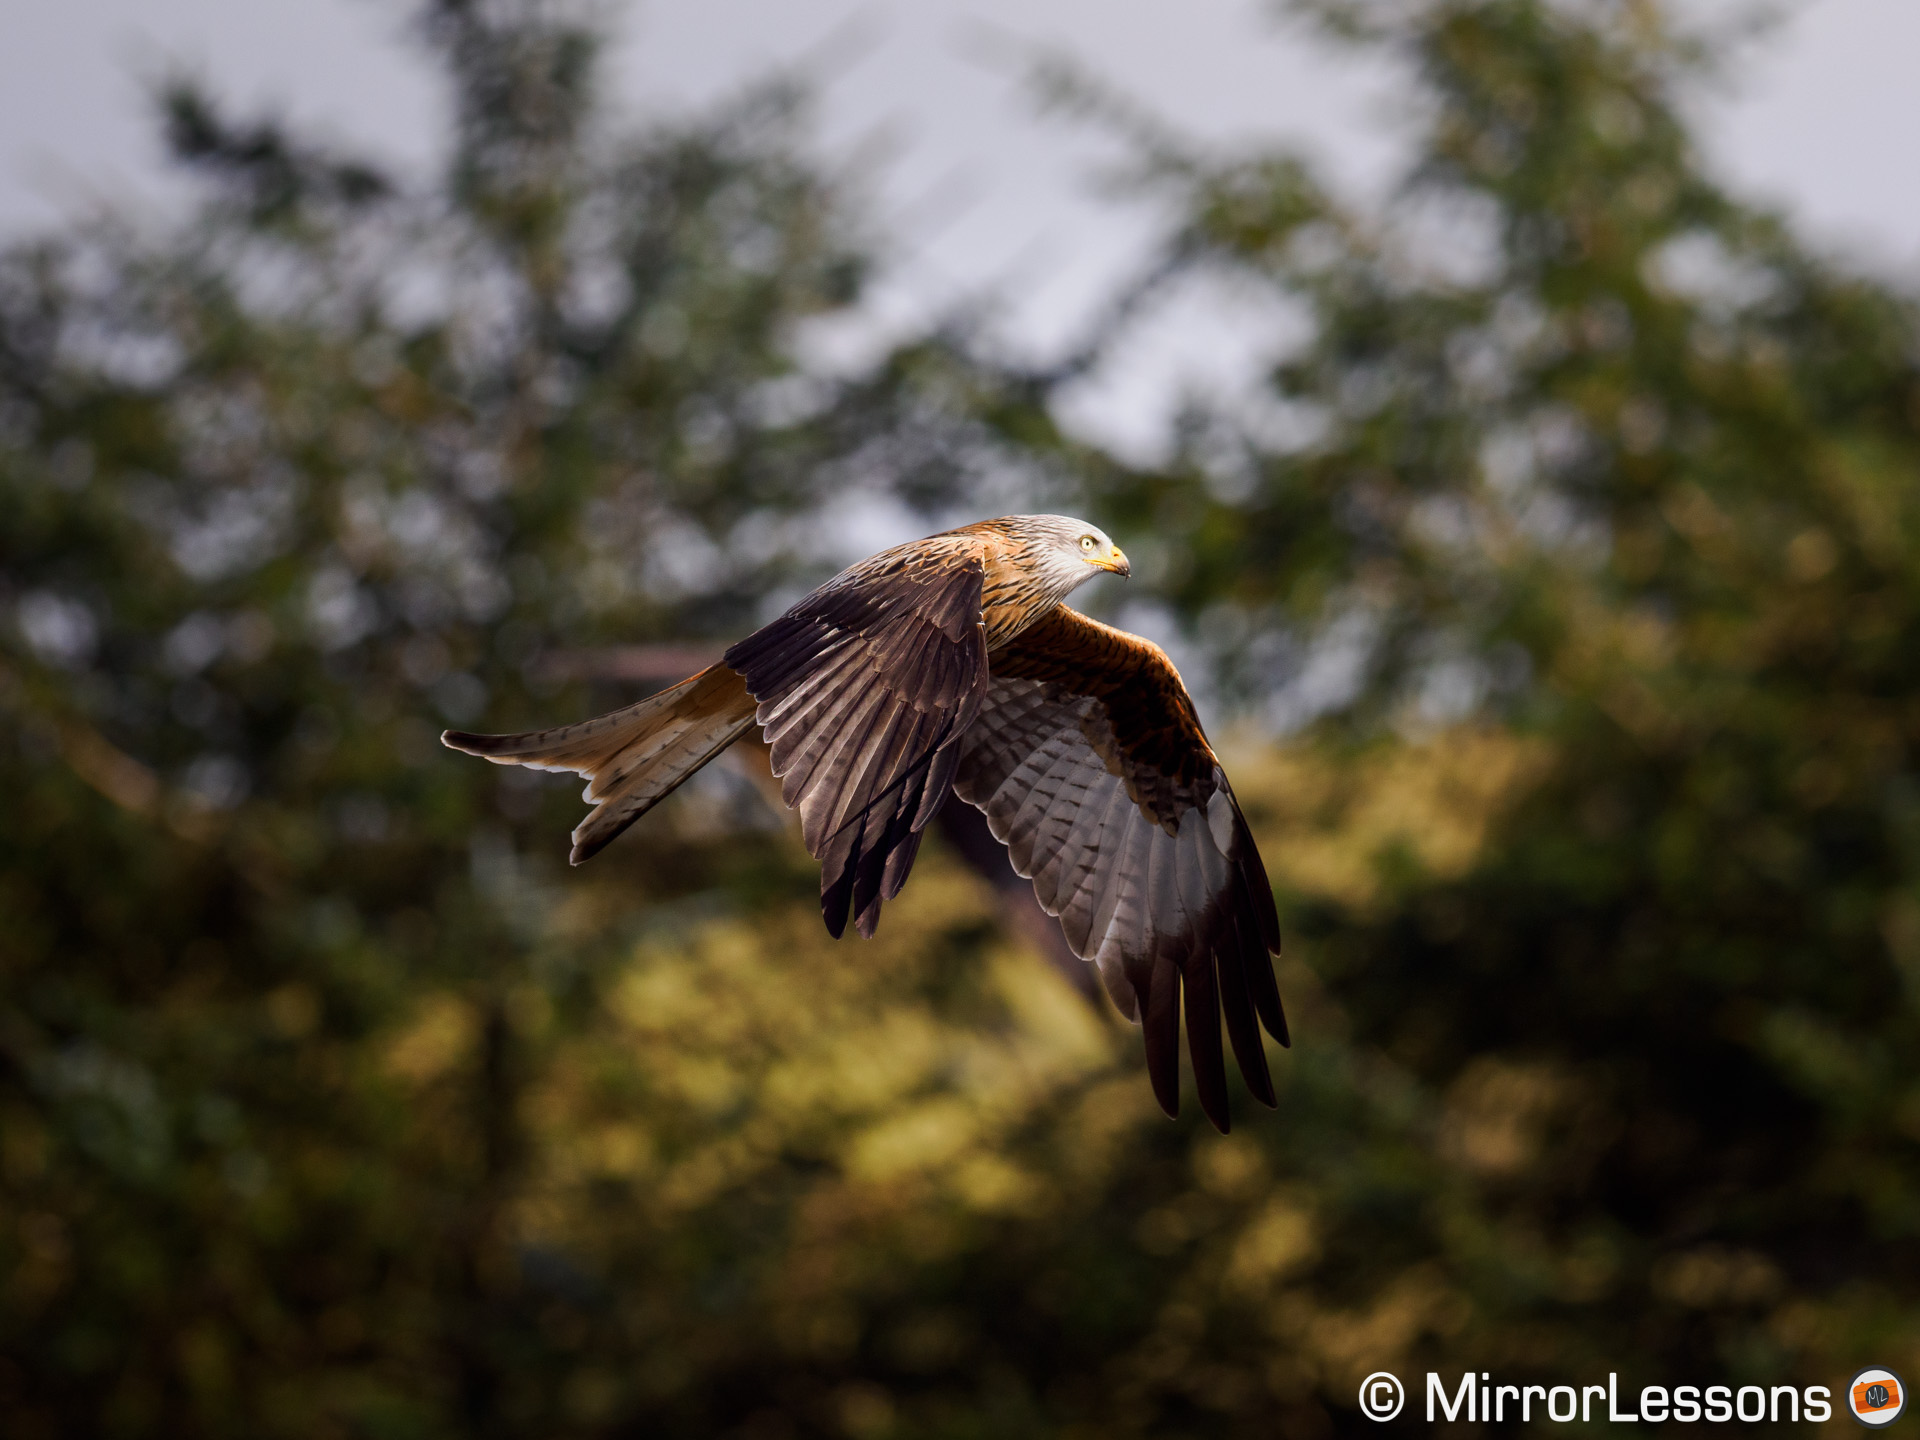
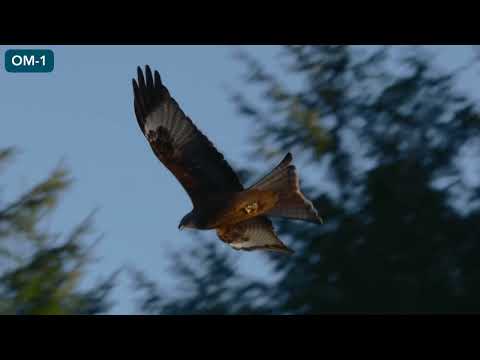
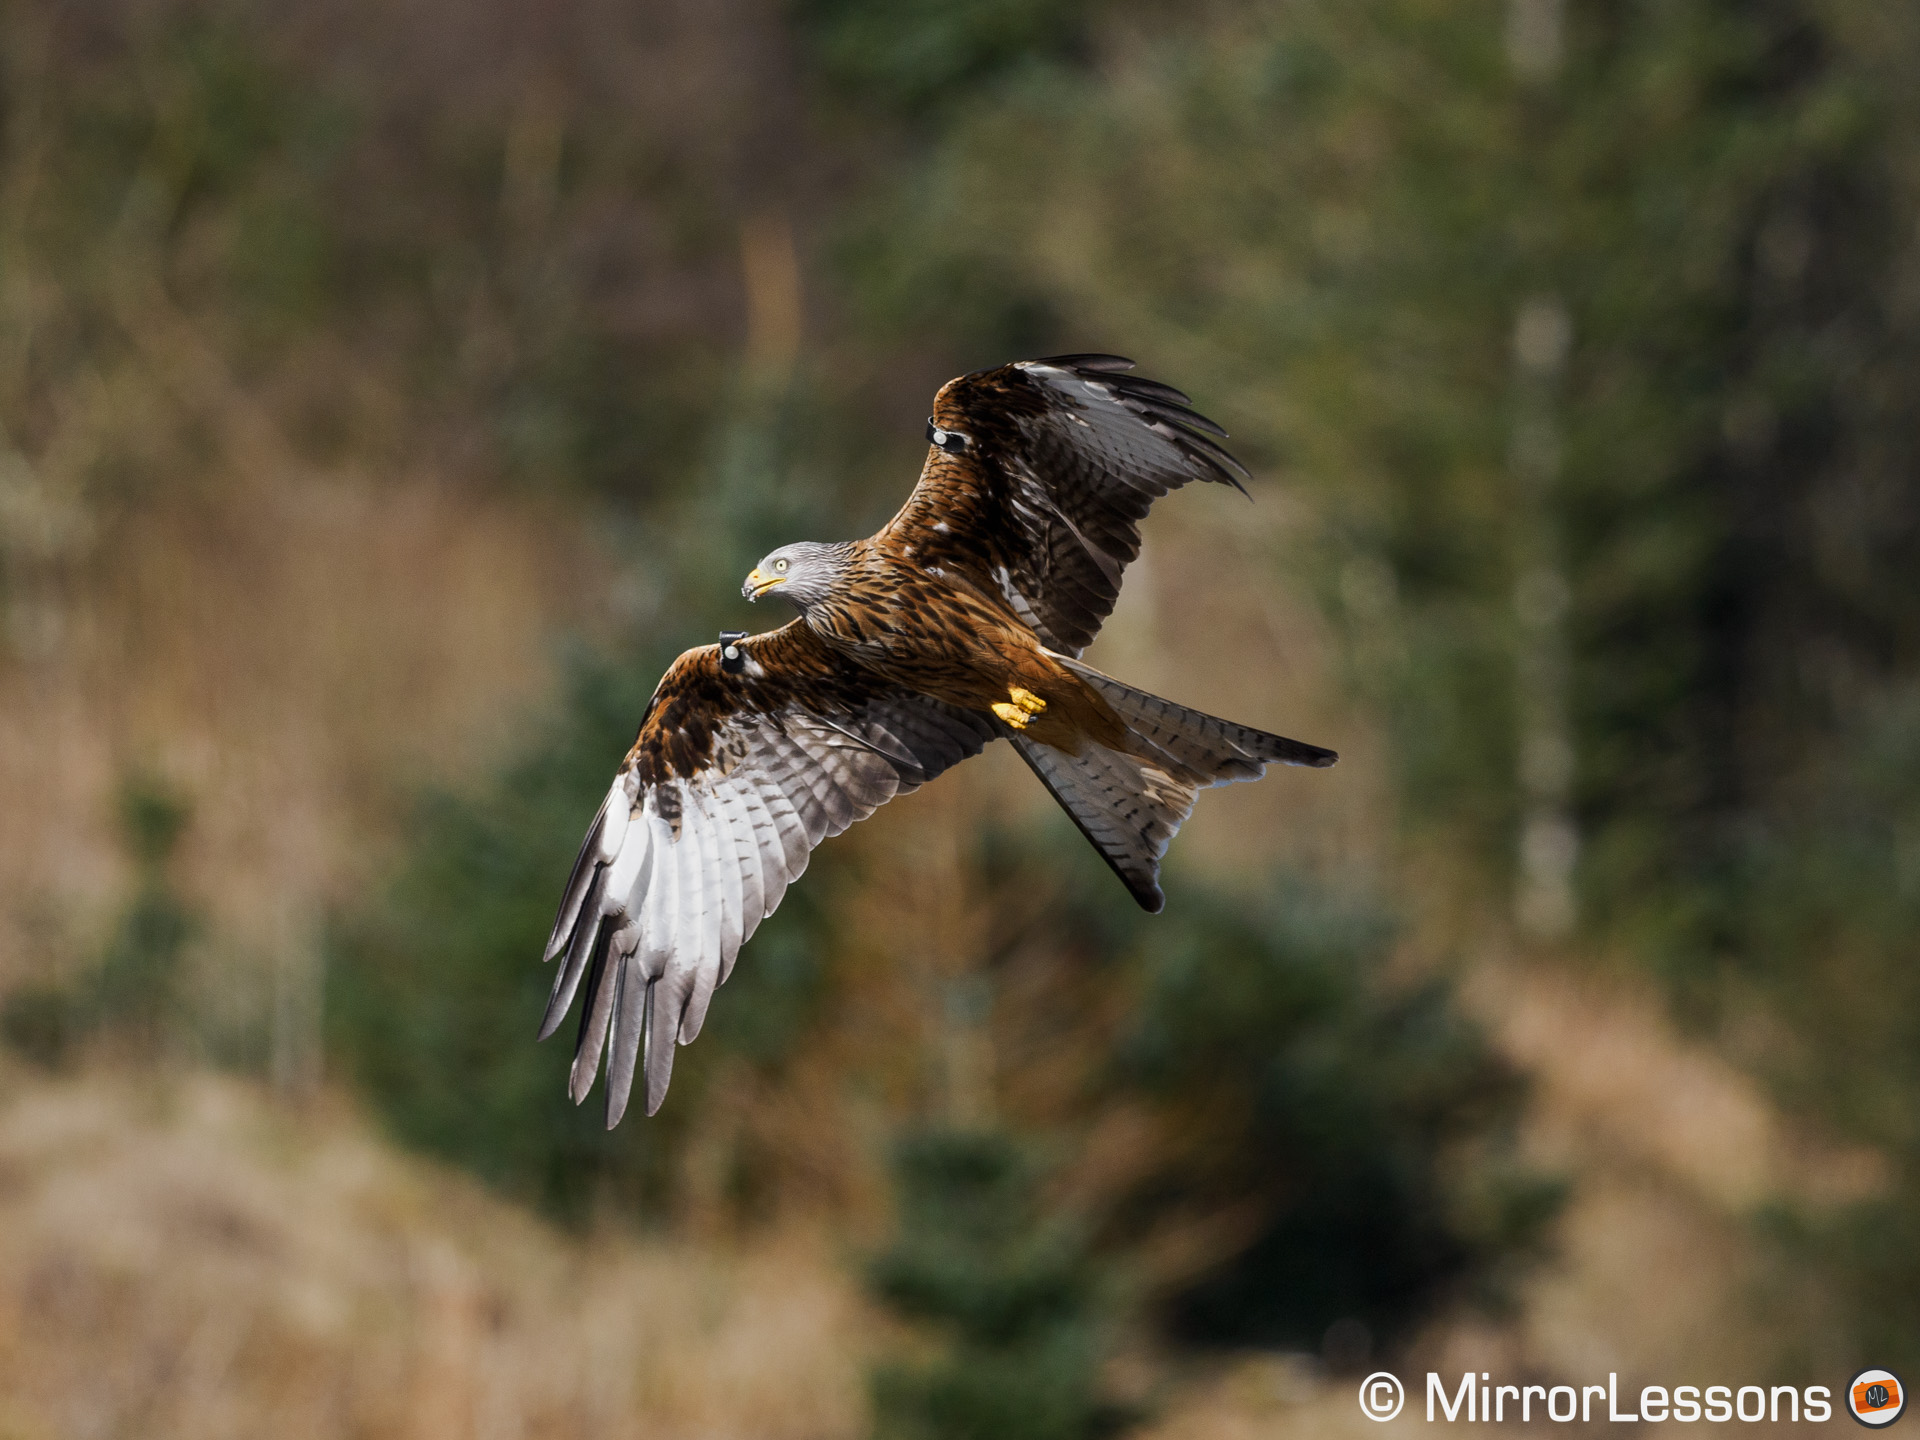
Now, let’s delve into capturing birds in flight, specifically with my usual red kite test. The G9 II surpasses any previous Lumix micro four-thirds camera by a substantial margin. Here is how it compares against its predecessor, the original Panasonic G9.
G9 II
82%
96%
G9
57%
70%
Note: The green percentage denotes 100% sharp images only, while the blue percentage includes slightly soft results.
LEICA DG ELMARIT 200/F2.8
What surprised me the most with the G9 II is how consistent its performance is. Working with two different lenses (Leica DG 200mm F2.8 and Olympus 300mm F4 Pro) and various setting combinations, the camera always averaged between 80% and 82%, aligning closely with the S5 II’s score as well.
OLYMPUS M.300mm F4.0
Another welcome finding for the G9 II is that working at the maximum drive speed of 60fps yielded the same keeper rate as working with the slower 6fps speed. This stands as a significant contrast to the original G9, where the hit rate would plummet below 40% when shooting at 20fps.
G9 II – 60 fps
82%
96%
G9 II – 20 fps
82%
95%
G9 II – 10 fps
80%
93%
G9 – 20 fps
38%
54%
G9 – 9 fps
57%
70%
The G9 II copes much better with busy backgrounds compared to its predecessor (and, for that matter, any Lumix camera with DfD autofocus), even when the bird appears smaller within the frame.
OLYMPUS M.300mm F4.0
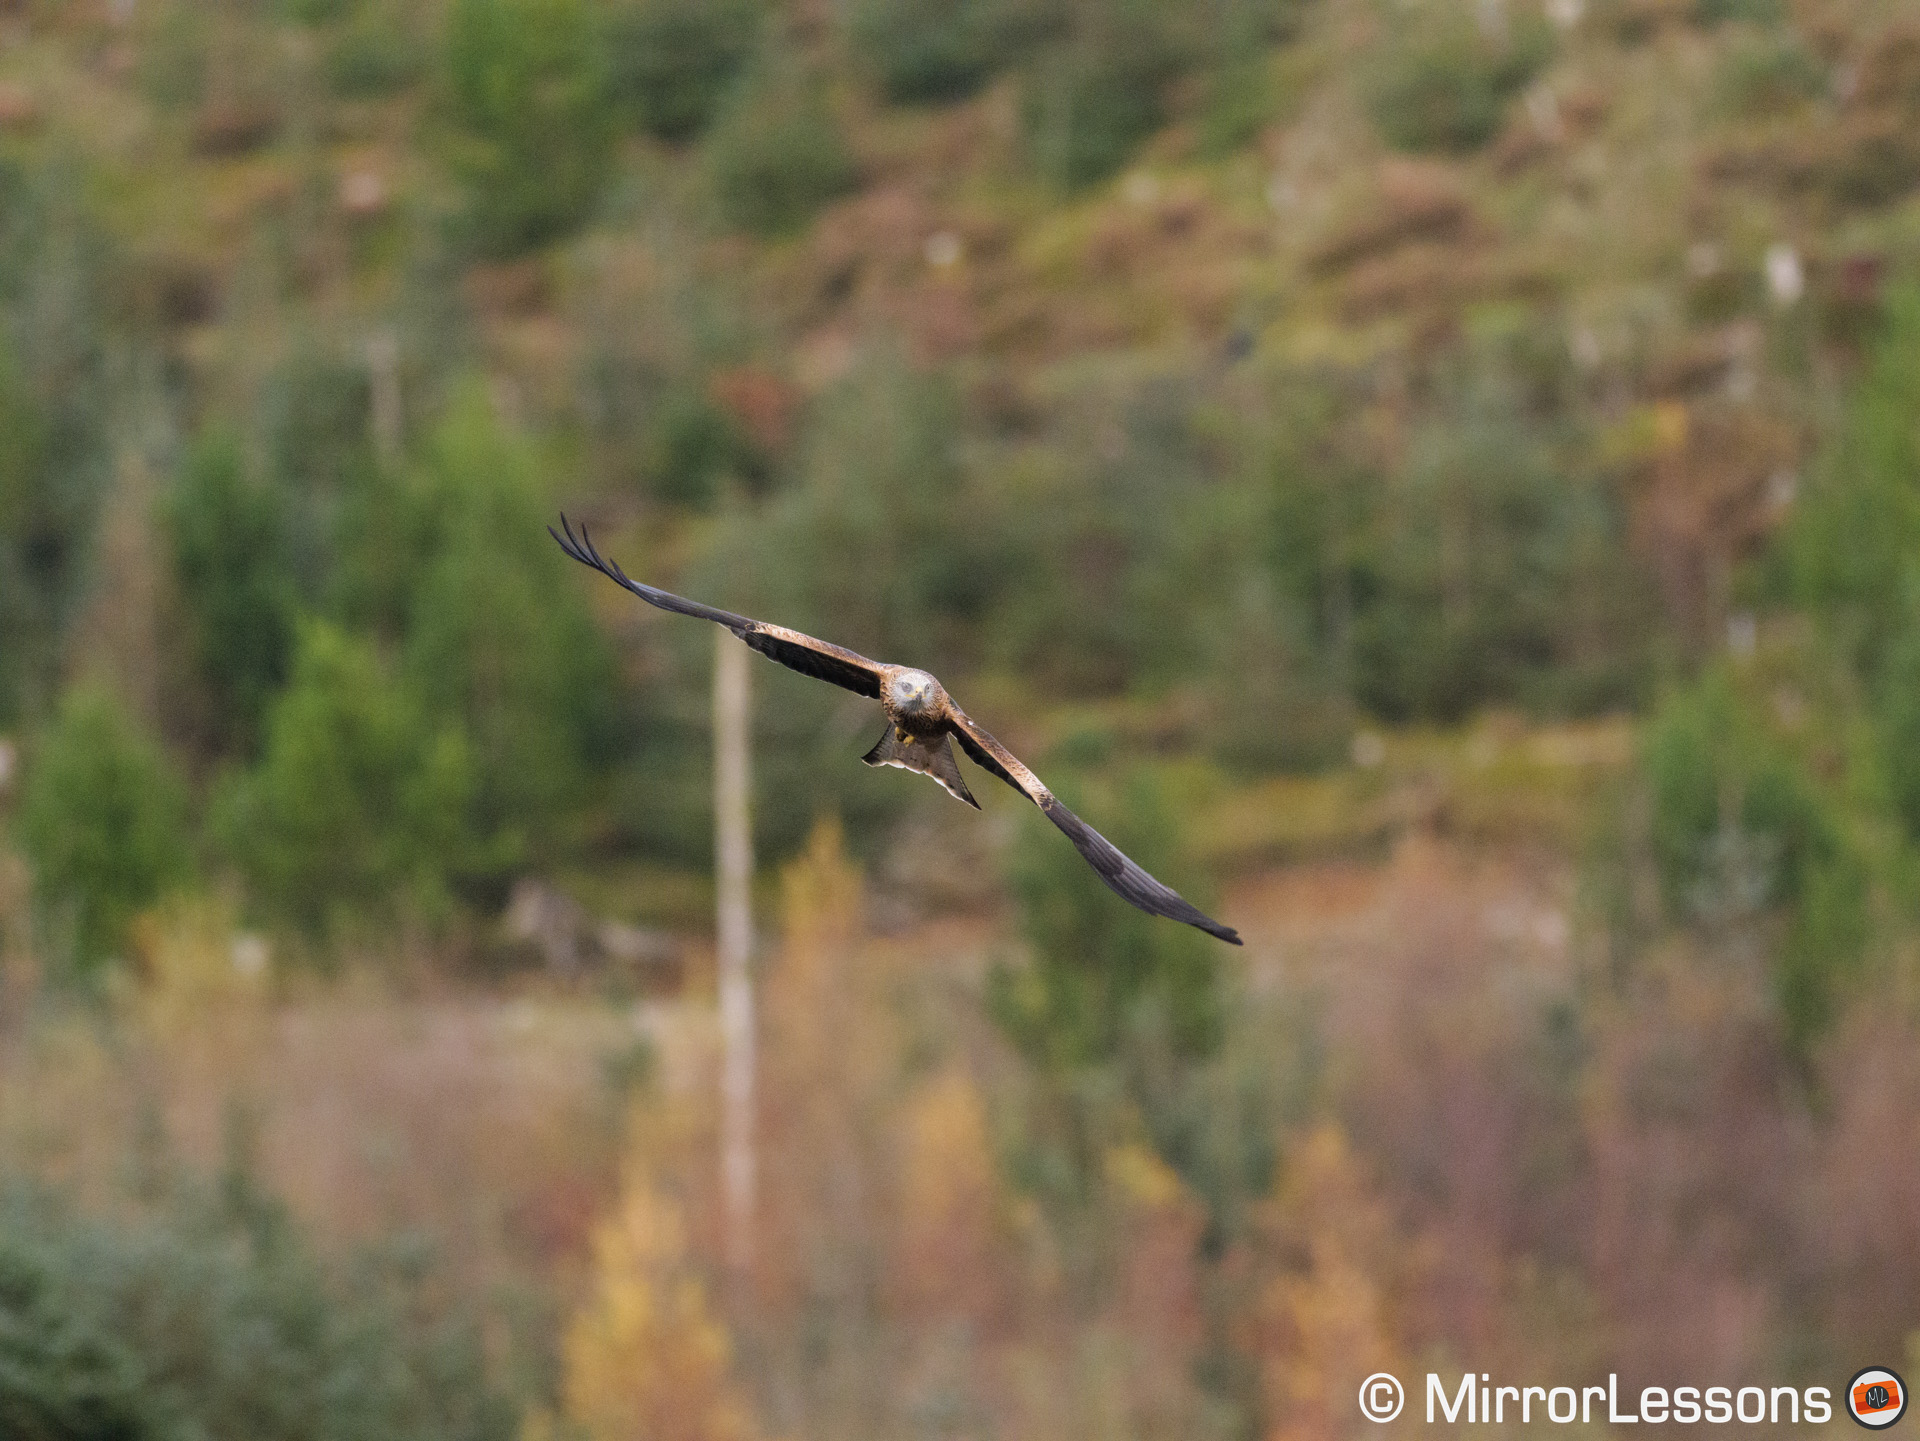
It’s not flawless and occasionally the G9 II’s autofocus can encounter moments of confusion, especially when the red kite ascends into the air, transitioning from a busy background (trees, hills, etc.) to a plain background (clouds). This alteration in contrast often triggered out-of-focus shots, but fortunately, the camera was able to correct focus quickly.
LEICA DG ELMARIT 200/F2.8
Another negative observation is that the Lumix model faced a slightly greater challenge when the red kite flew towards or away from the camera, as opposed to moving left or right.

LEICA DG ELMARIT 200/F2.8
The performance achieved with the Olympus 300mm F4 Pro lens remained consistent with the Leica lens, although there were instances where it took a bit longer to regain focus when the image was completely blurred.
OLYMPUS M.300mm F4.0
With the Leica DG 200mm F2.8 – now discontinued, but still regarded as one of the finest super telephoto lenses available for micro four thirds – the performance was impeccable. The only slight challenge I observed was when the bird flew closer to me, where the wider F2.8 aperture and shallower depth of field caused some confusion during the flapping of the wings, even with Eye detection enabled.
LEICA DG ELMARIT 200/F2.8
As for the OM-1, I’ve extensively tested this camera on multiple occasions since its release. I used it again for this comparison, with the latest firmware installed (1.5), but I didn’t find any improvement over previous versions.
This isn’t necessarily a negative thing. The OM-1 remains swift and responsive, boasting keeper rates slightly higher than those of the G9 II.
OM-1 – 50 fps
85%
95%
OM-1 – 25 fps
87%
95%
OM-1 – 10 fps
89%
98%
While the OM-1 achieves a higher AF score, it’s important to note that the difference is marginal, particularly when accounting for the fastest drive speeds offered by both products. The table below illustrates the number of keepers per second at each camera’s fastest drive speed (in C-AF).
G9 II – 60 fps
82%
49 / 60
OM-1 – 50 fps
85%
43 / 50
The OM-1’s bird detection mode is more responsive than the Panasonic’s Animal version, and the camera generally excels in promptly recognising and acquiring focus on a bird, regardless of its position or distance. It also had fewer issues with changes in the background inside a sequence, compared to the Lumix.
That being said, the OM-1’s performance lacks consistency. Throughout the various occasions I’ve tested the camera since its introduction, I couldn’t reproduce the same success rate every time. Despite using identical settings and lenses, the score sometimes hovered closer to 70%.
I tried various lenses with the OM-1 since its release, including the 300mm Pro and the 200mm F2.8, and these two lenses in particular delivered the same performance on this camera.
Finally, a note about video. The G9 II performed well when recording red kites in flight in 4K 120p, delivering nice slow-motion footage (but be careful with highlights, as 4K 120p has less dynamic range than 4K 60p). Similar to stills, a change in contrast in the background can confuse the autofocus, but overall, the camera proved quite capable of tracking the fast and erratic behaviour of these magnificent birds.
The OM-1 also produces decent results with autofocus when following fast birds, but the performance a bit less smooth at times. Note that Bird Detection is not available in movie mode if you select the standard C-AF mode. You must choose the C-AF+Tracking setting.
To conclude this chapter, here are the settings that yielded the best results for birds in flight.
Panasonic G9 II Settings for Birds in Flight
- AF Mode: Zone (largest)
- Animal Detection: On, Body (Eye/Body also works)
- AF Custom Setting: +1, +1, 0 (Set 4, customised, but you can configure any of the 4 sets)
- Focus Priority for AFC
- Back button focus: AF-ON Near Shift
- Drive: SH 20fps / 60fps (Electronic Shutter)
- Stabilisation: Off
OM System OM-1 Settings for Birds in Flight
- AF-Target Mode: Large
- Subject Detection: Birds
- Release Priority: Off
- AF Sensitivity: +2
- AF Scanner: On
- Drive Mode: 25/50fps (electronic shutter)
- Stabilisation: Off
4. Continuous Shooting Speed
The G9 II offers serious drive speed. With the mechanical shutter, it goes up to 14fps in S-AF and 10fps with C-AF. Move to the electronic shutter, and it delivers 60fps with Continuous AF or 75fps with Single AF.
If you think those speeds are not enough, then the OM-1 can deliver 120fps in S-AF (with C-AF, it’s 50fps). Switch to the mechanical shutter for a more moderate 10fps (Single and Continuous AF).
At 25fps and 50fps (SH modes), the OM-1 provides continuous live view without any blackouts, akin to cameras such as the Sony A9 and A1 series. This feature helps in tracking fast and erratic subjects because there are no interruptions or delays in the viewfinder.
Contrarily, the G9 II offers live view only for speeds up to 10fps, and there are blackouts. At faster speeds, the Lumix interrupts the live view and displays the captured images, causing a slight delay as what you see happened a moment earlier rather than in real-time. To note, at 20fps or 60fps, the experience on the G9 II is not too dissimilar from the OM-1 due to the rapid frame rate. However, there’s a minor delay at the start of the burst shooting, when the camera interrupts the live view.
Keep in mind that the OM-1’s 50fps burst in C-AF works with select Olympus lenses only. For other Olympus and all Panasonic lenses, the maximum speed is 25fps. The lenses are:
- 12-40mm F2.8 PRO
- 12-40mm F2.8 PRO Ⅱ
- 12-100mm F4.0 IS PRO
- 40-150mm F2.8 PRO
- 150-400mm F4.5 TC 1.25x IS PRO
- 300mm F4.0 IS PRO
With the electronic shutter, both cameras offer a pre-shooting mode, where images are loaded into the buffer memory before the shutter is pressed all the way down, a great function to capture unpredictable action. It is called Pre-Burst on the G9 II and Pro Capture on the OM-1.
LEICA DG ELMARIT 200/F2.8+TC1.4
Pre-Burst 60fps

Pro Capture SH2 (50fps)
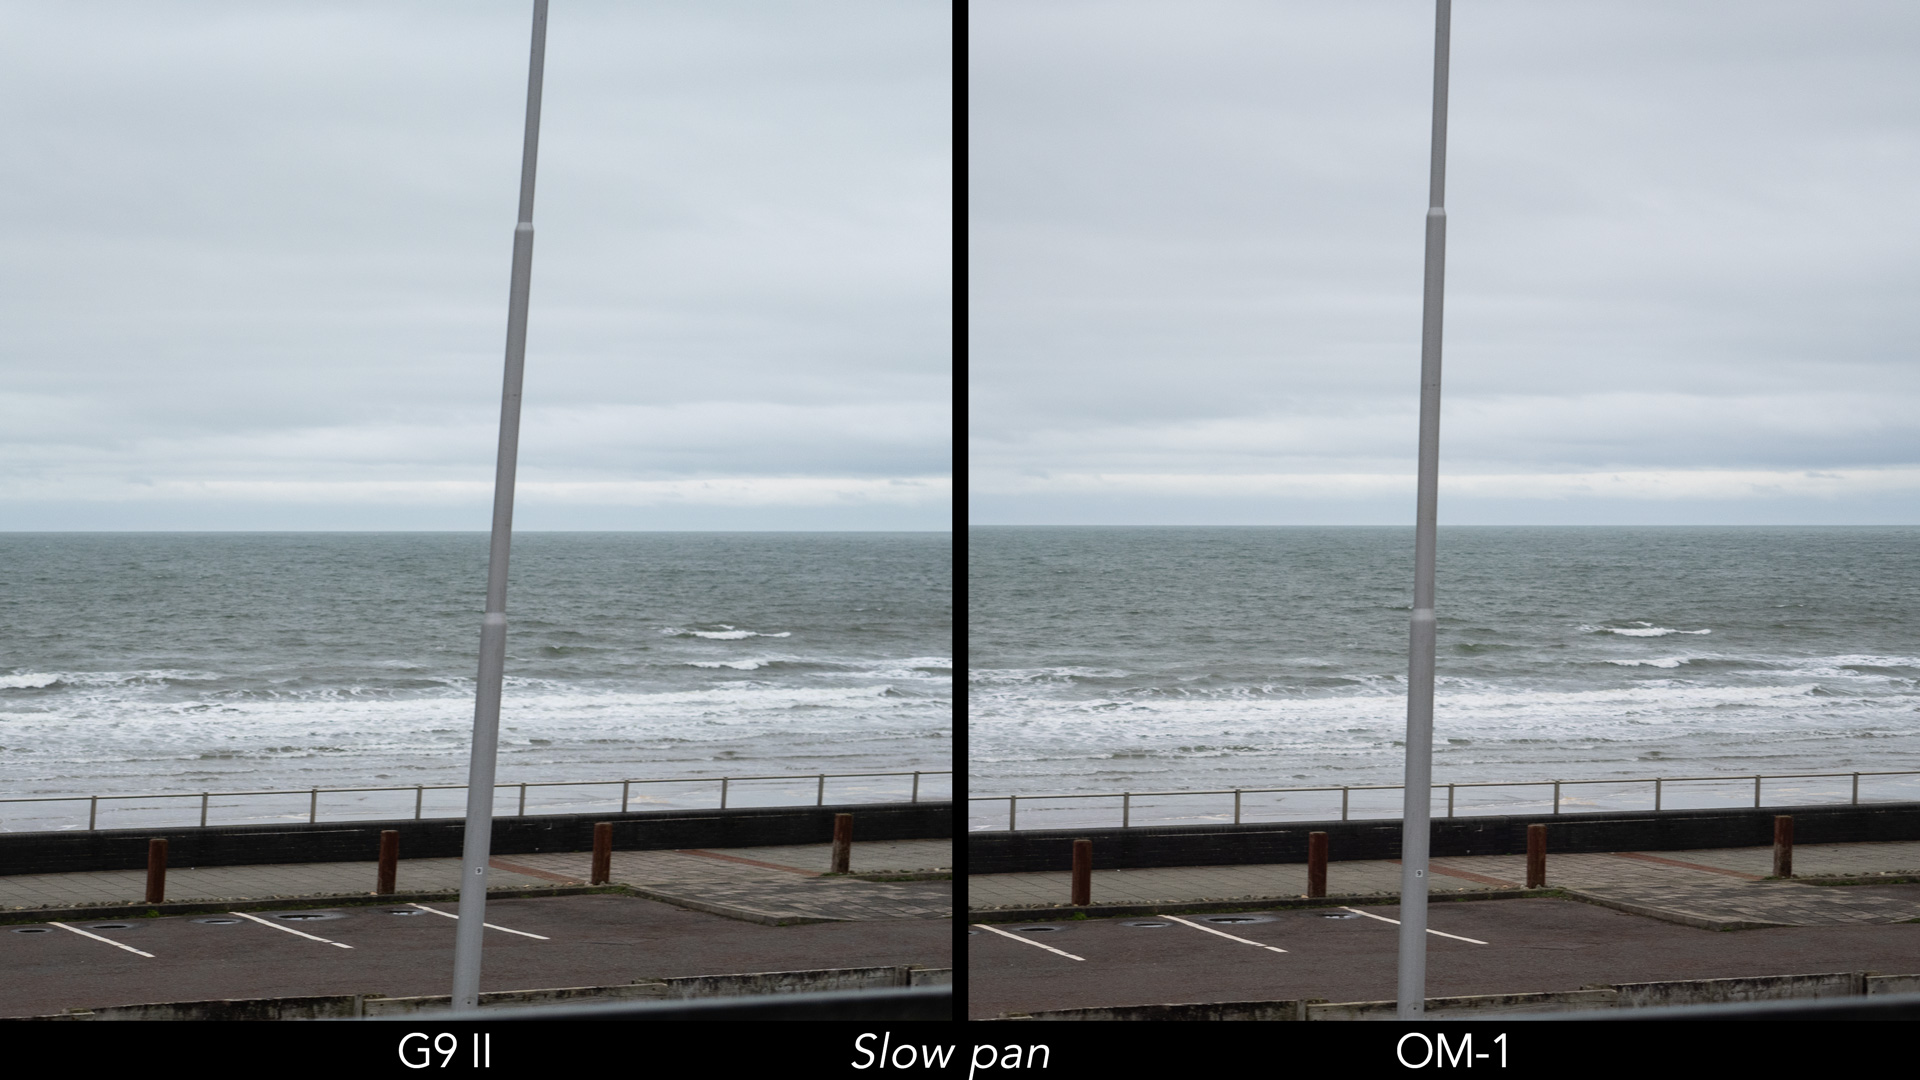
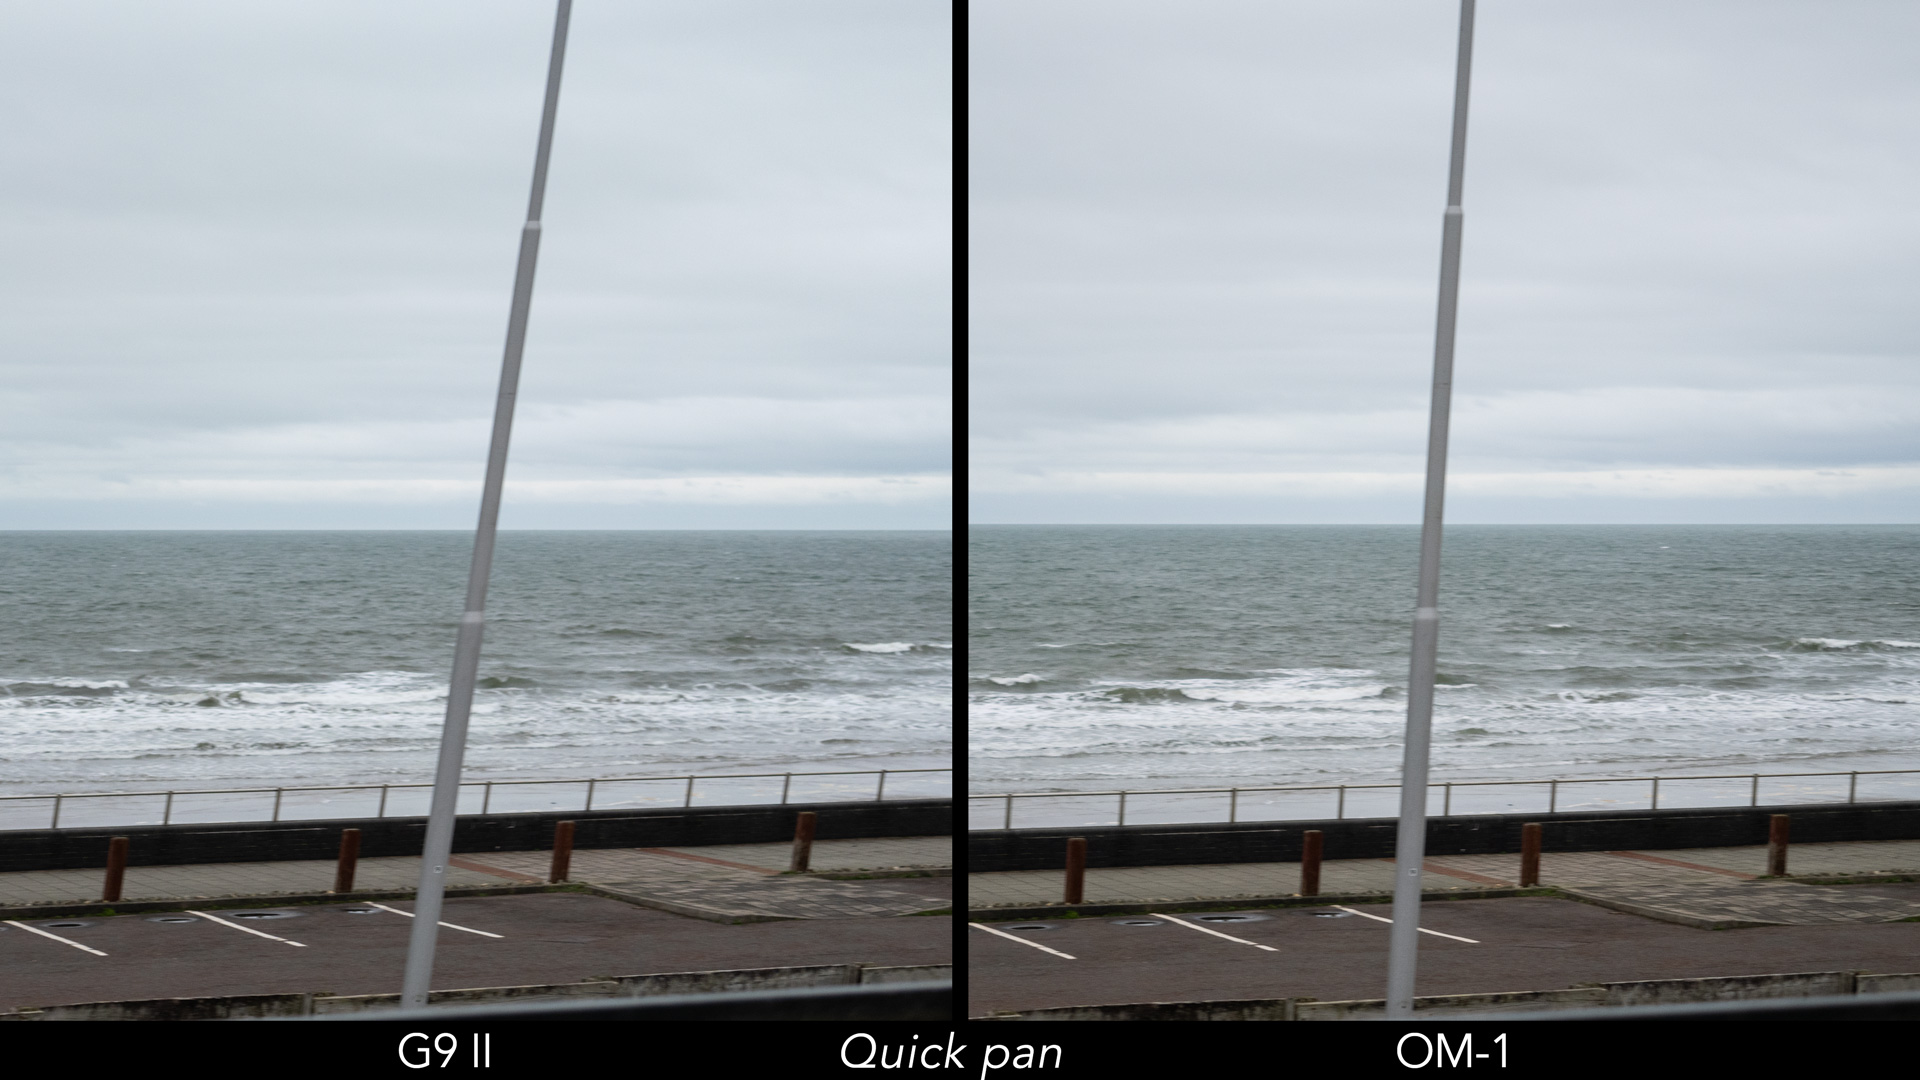
Speaking of electronic shutter, this is how the two cameras compare when panning: just like in video mode, the OM-1 produces less distortion.
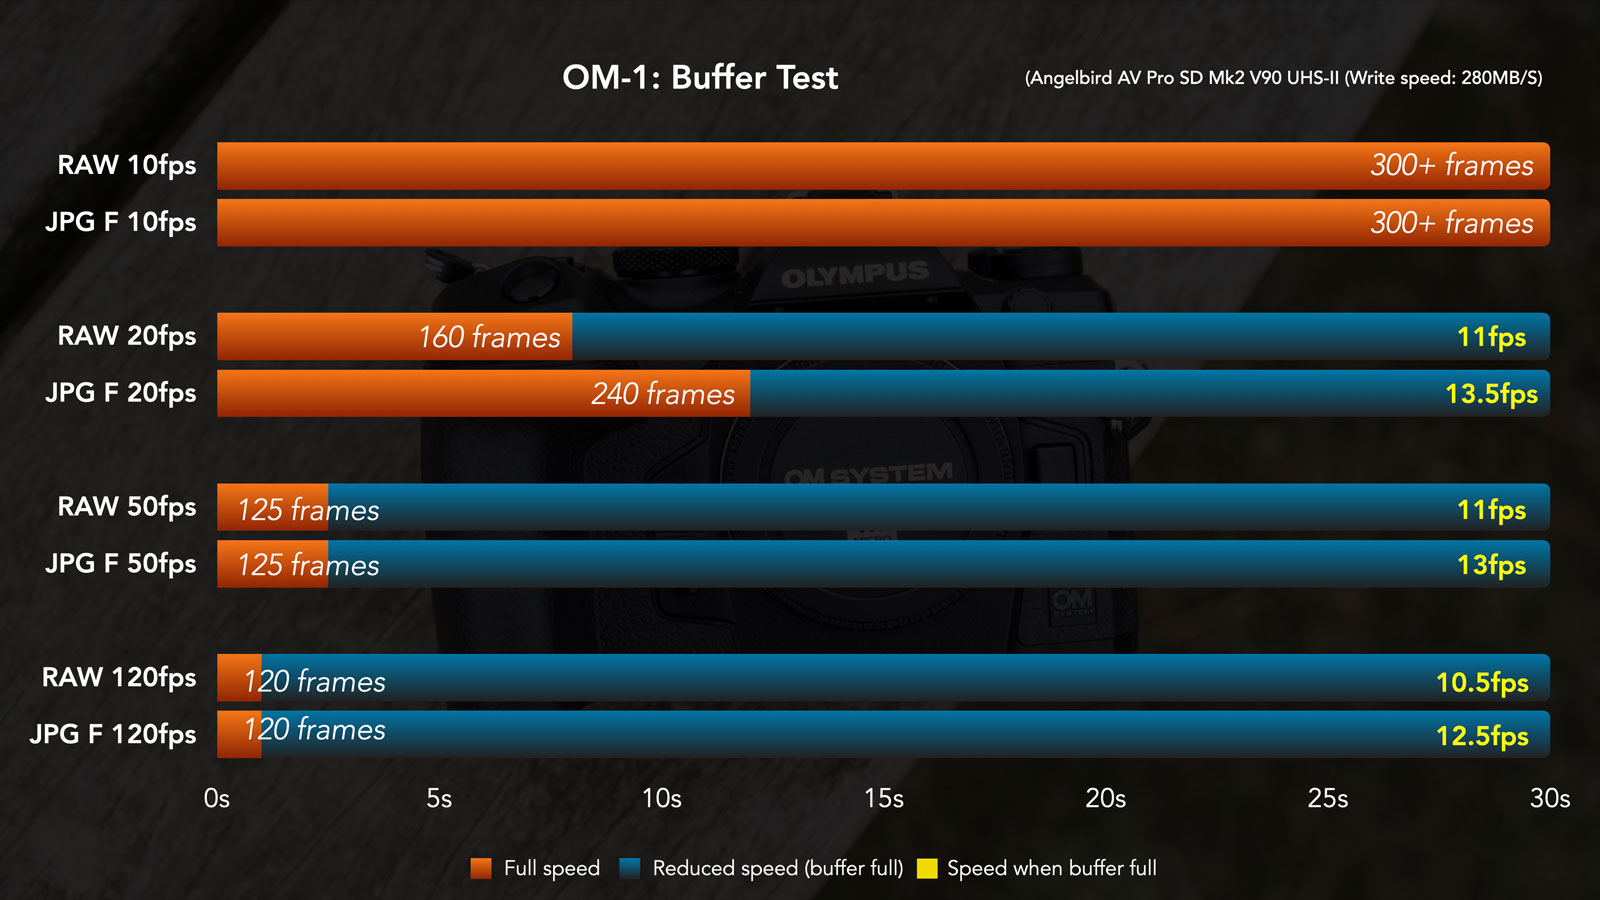
The buffer is better the Lumix model if you look at the fastest bursts: it can work at full speed for up to 200 frames, which means 10 seconds at 20fps, 3.3s at 60fps and 2.6s at 75fps.
By comparison, the OM-1 can manage 125 frames at 50fps (2.5s) before slowing down, and 1 second at 120fps. The difference is that, once the buffer is full, the camera continues to record pictures at a slower frame rate, whereas the G9 II stops entirely.
At the slow speed of 10fps, the OM-1 never slows down, unlike the G9 II that cannot reach 30s without reducing the frame rate.
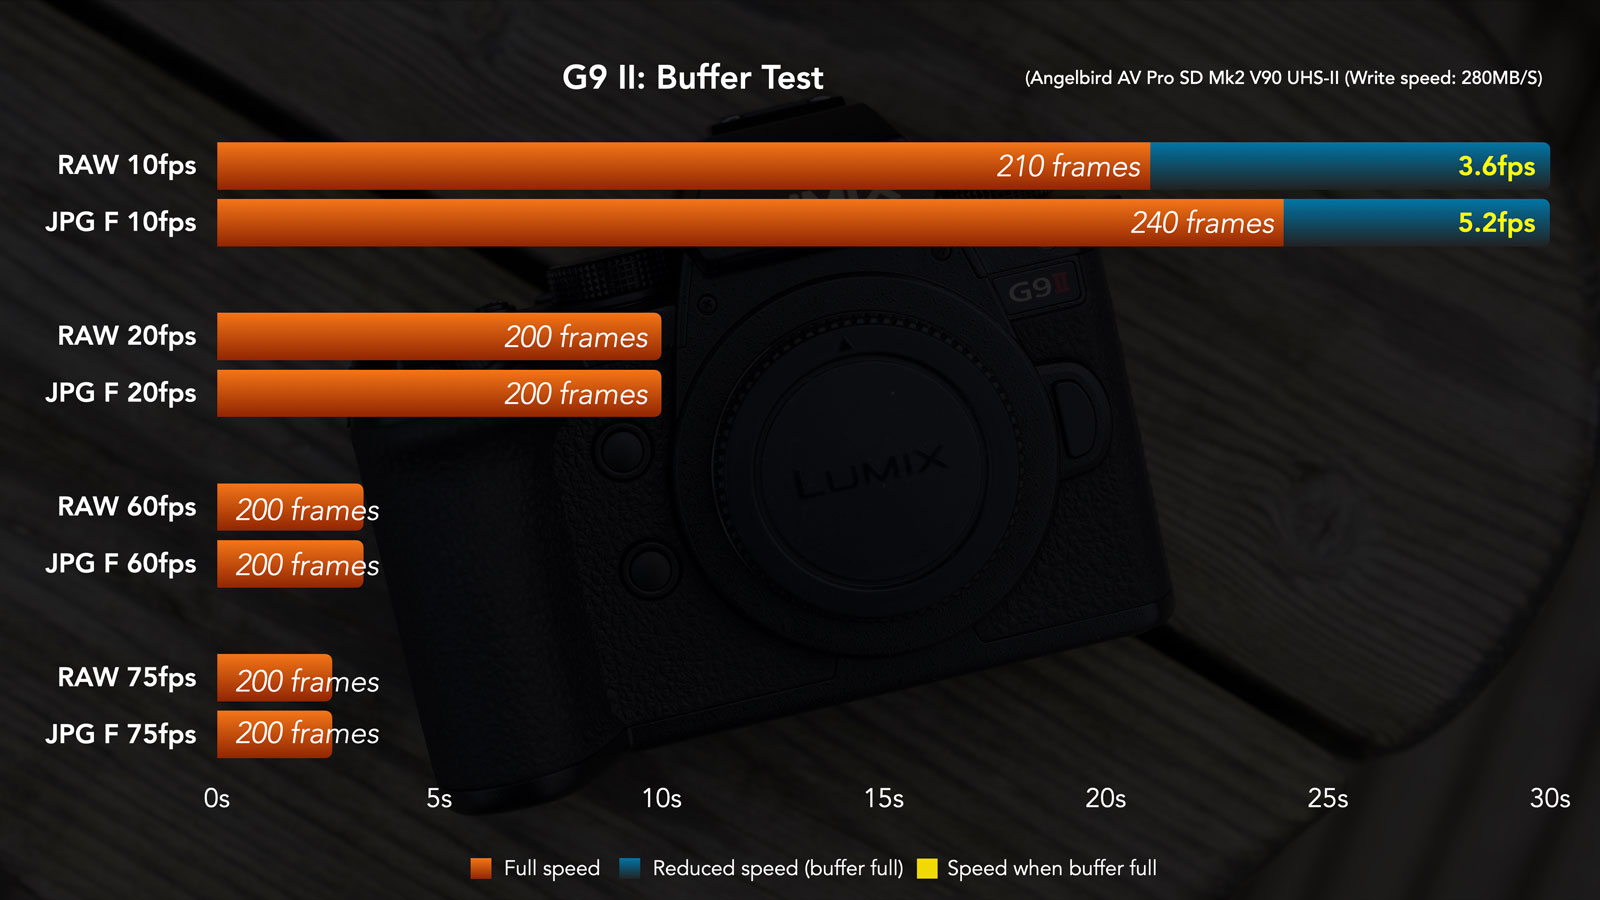
Another point to mention is that the G9 II is much slower in writing the files on the same SD card (Angelbird AV Pro Mk2 V90 with declared 280MB/s). For example, the Lumix model took 24 seconds to write all the files after a ten second burst at 10fps, whereas the OM-1 had written all images by the time I finished shooting.
5. Sensor Shift
The G9 II and OM-1 are equipped with 5-axis in-body image stabilisation (IBIS), which can be combined with optical stabilisation for further improvements. This is called Dual IS for the Panasonic and Sync IS for the OM model. Note that they are not cross-compatible: Dual IS only works with a Lumix body and Lumix OIS lens, and Sync IS with an OM System/Olympus body and OM/Olympus IS lens.
The G9 II has a superb rating of 8 stops of compensation with the sensor alone. Surprisingly, the rating with Dual IS is slightly lower at 7.5 stops. However, Dual IS can provide that 7.5EV rating at longer focal lengths, whereas sensor stabilisation is more effective with shorter focal lengths.
The OM-1 has a similar rating, but it’s the other way around: 7 stops of compensation with sensor shift alone, and 8 stops with Sync IS.
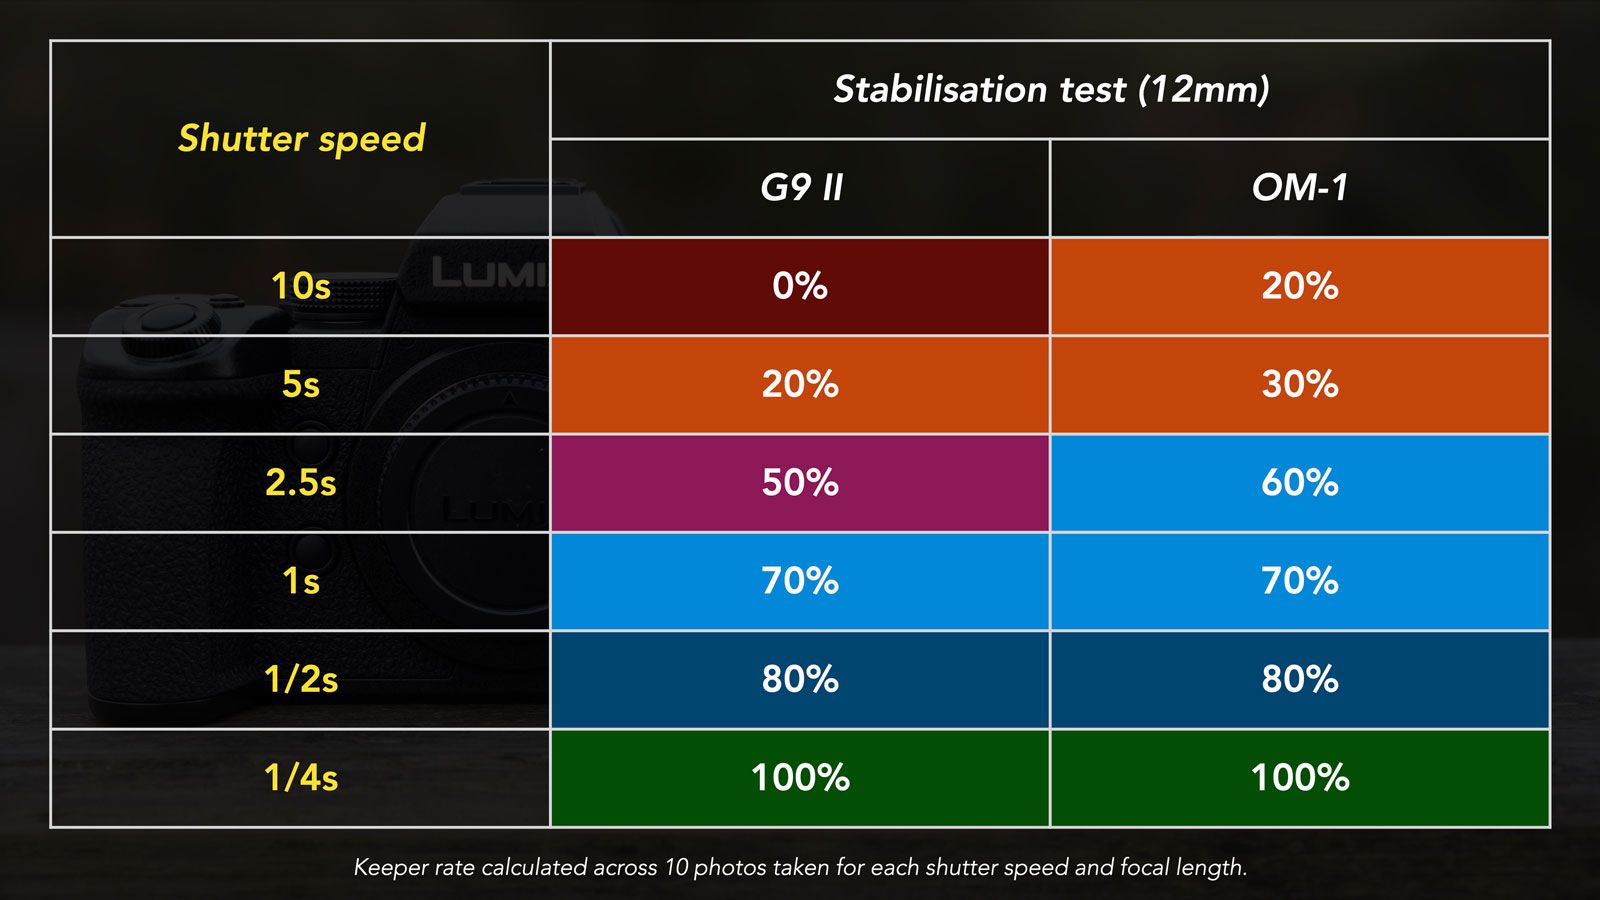
For still photography, I’ve only tested the sensor shift performance, and the results show that, after years of catching up, Panasonic now closely rivals the renowned Olympus IBIS system. While the OM-1 can still pushes the boundaries a tad further (provided you’re patient and can maintain utmost steadiness with your hands), from 1 second and faster (the shutter speeds typically used most often), the G9 II is on the same level.
Both cameras offer visual aids that can be activated on the screen to enhance stability (I.S. Status Scope on the G9 II, Handheld Assist on the OM-1).
For video, the two models provide additional settings, including electronic stabilisation.
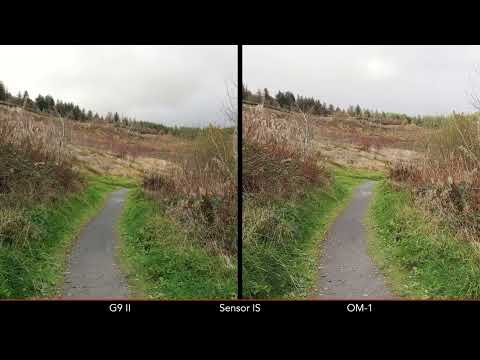
If we analyse a fixed shot recorded at 100mm (using the IBIS only), the results are very good on both, with the OM-1 being slightly more stable. The same conclusion can be drawn when activating the electronic stabilisation.
The G9 II comes with two electronic stabilisation options: Standard and High. The latter crops the sensor further with the intent of providing better results, but in this test I actually found the footage more shaky than with the standard level. The High level also produces more jerks and jitters when panning to follow a subject.
Additionally, the G9 II offers a Boost IS setting specifically designed for fixed shots, and it helps a little. On the OM-1, set IS Level to +1 and you almost get a tripod-like result. Very impressive!
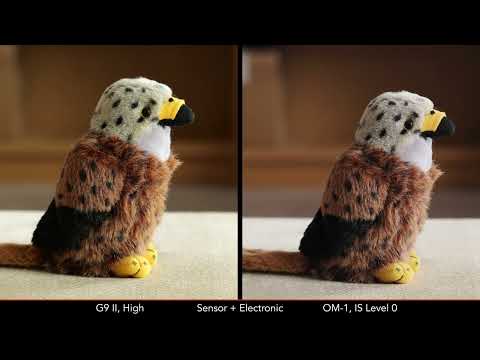
Next we have the walking test, where the OM-1 produces a more stable footage, although the G9 II is quite close in performance. If you activate electronic stabilisation, the Lumix improves a little, and so does the OM model although the latter can be more prone to jerks.
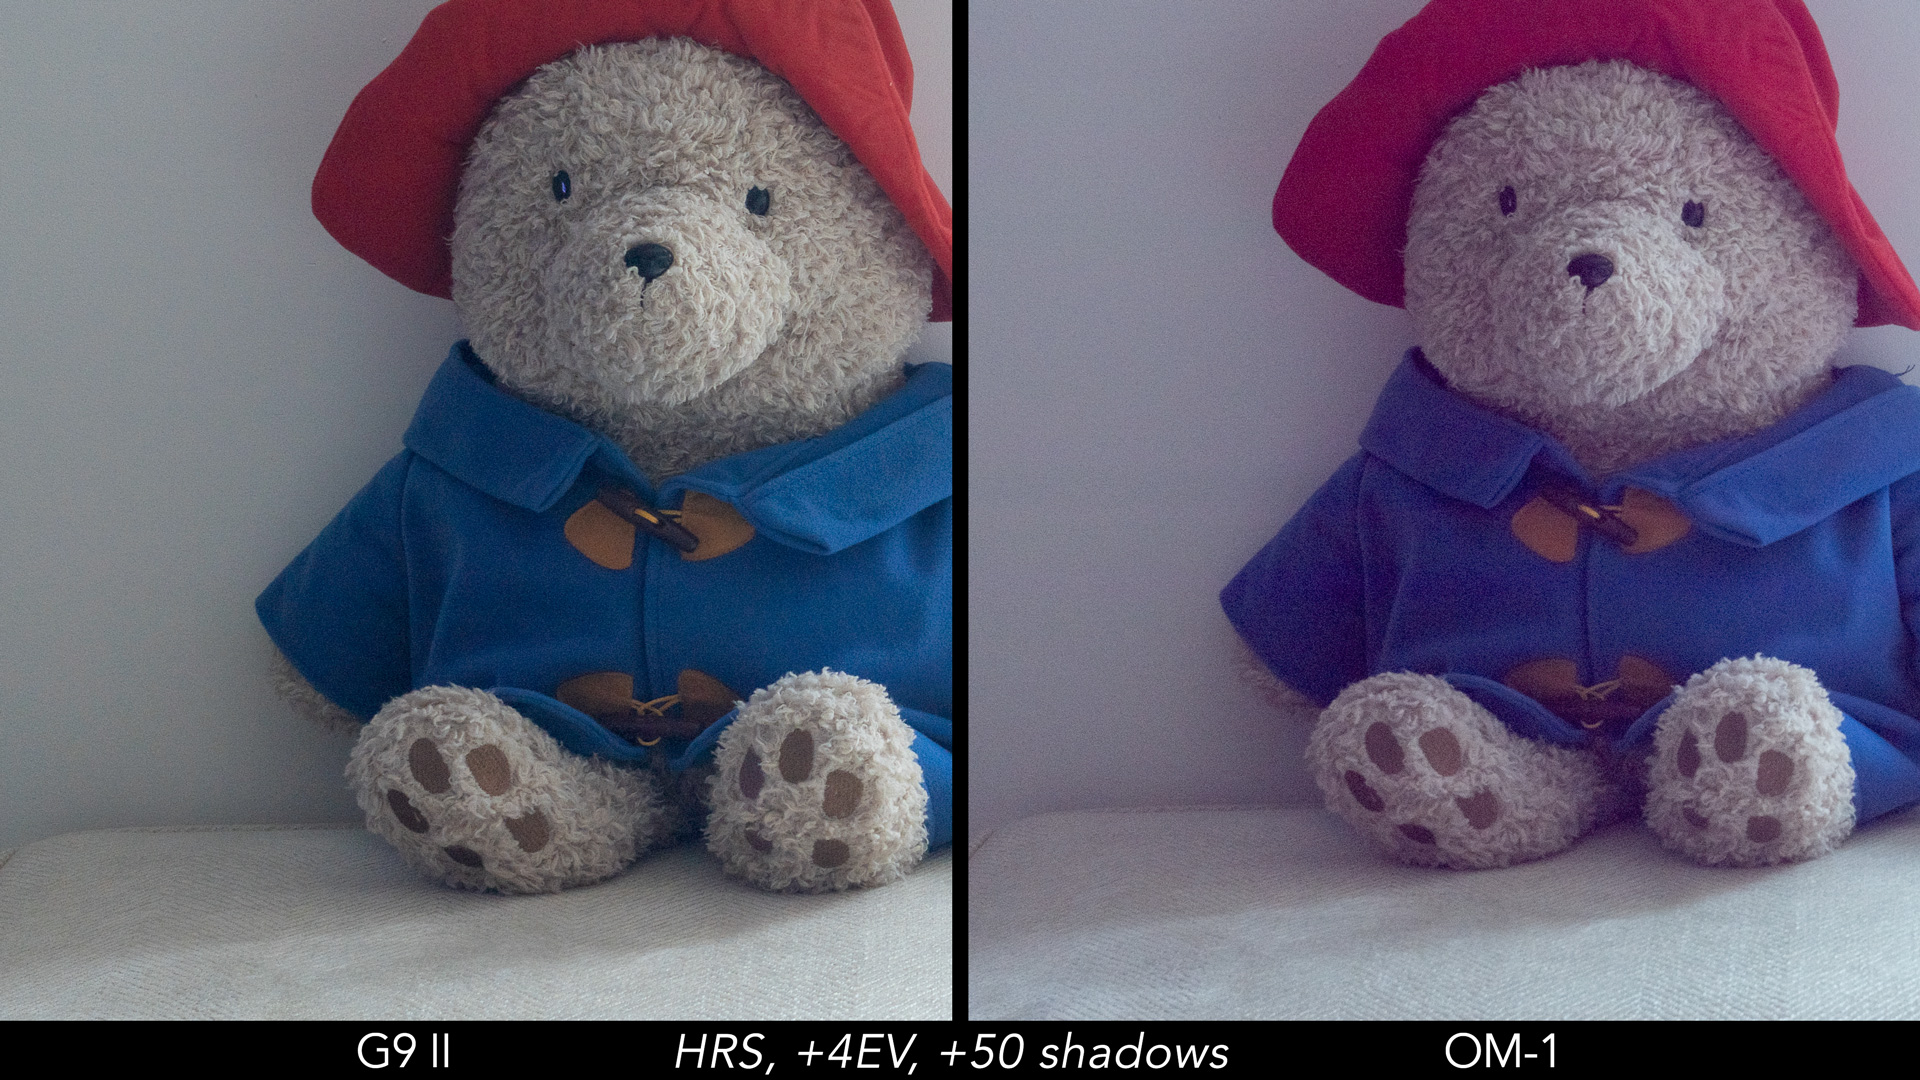
The two products can use sensor shift technology for another function, the high-resolution shot. The sensor is moved by half a pixel in between frames, and the total number of images captured is computed into a final file with a higher megapixel count. The G9 II can produce a 100MP photo, whereas the OM-1 goes up to 80MP.
If we analyse the RAW images, the Panasonic picture is sharper by default, whereas the OM-1 file needs adjustments in post to get the best out of it. This is not due the difference in resolution: the initial “soft” rendering is something I’ve noticed on every file produced by an Olympus/OM body that has this functionality.
What’s more, the High-Resolution mode can be used without a tripod, a first for Panasonic. The G9 maintains the same output of 100MP, whereas the OM model reduces the resolution to 50MP with the hand-held setting.
Last but not least, Panasonic provides the option to correct motion inside the frame to eliminate artifacts, a feature OM System has yet to include in its cameras, despite having been the first to introduce this function among mirrorless cameras (with the E-M5 II in 2015).
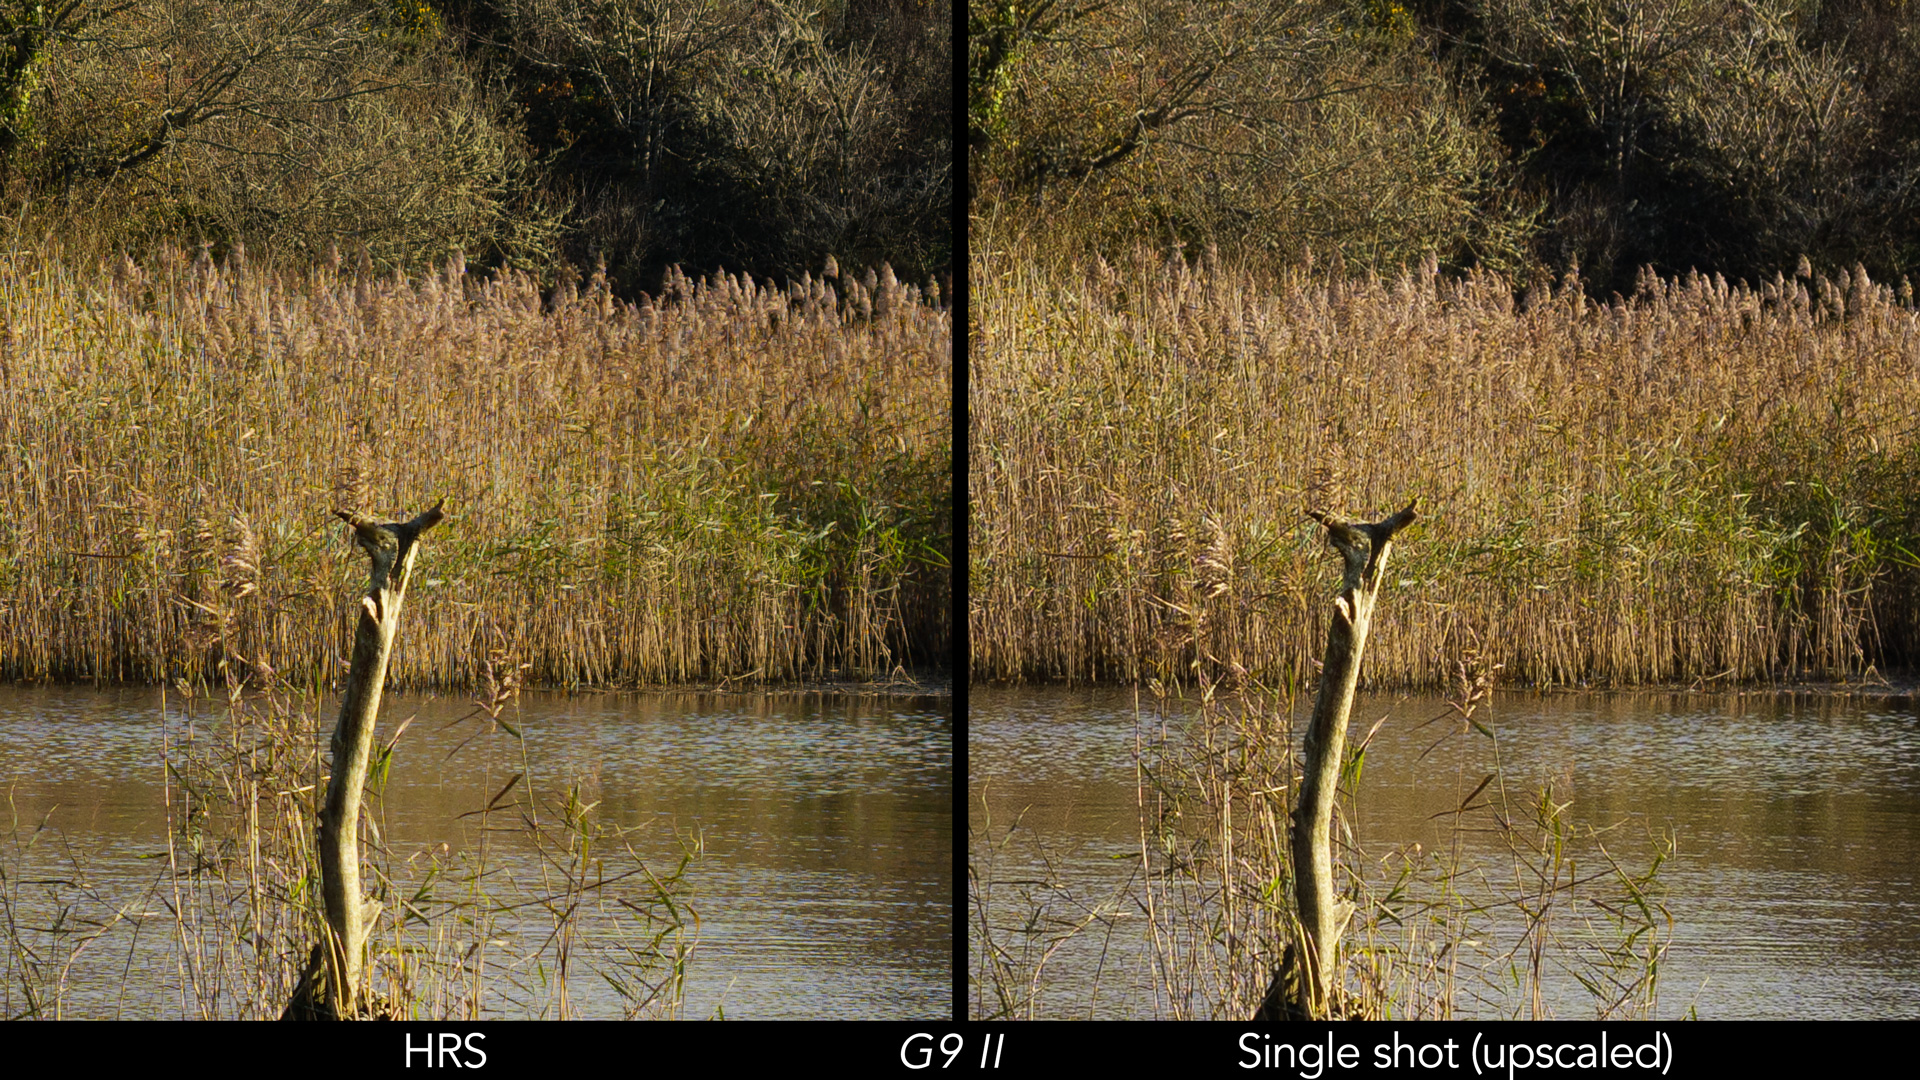
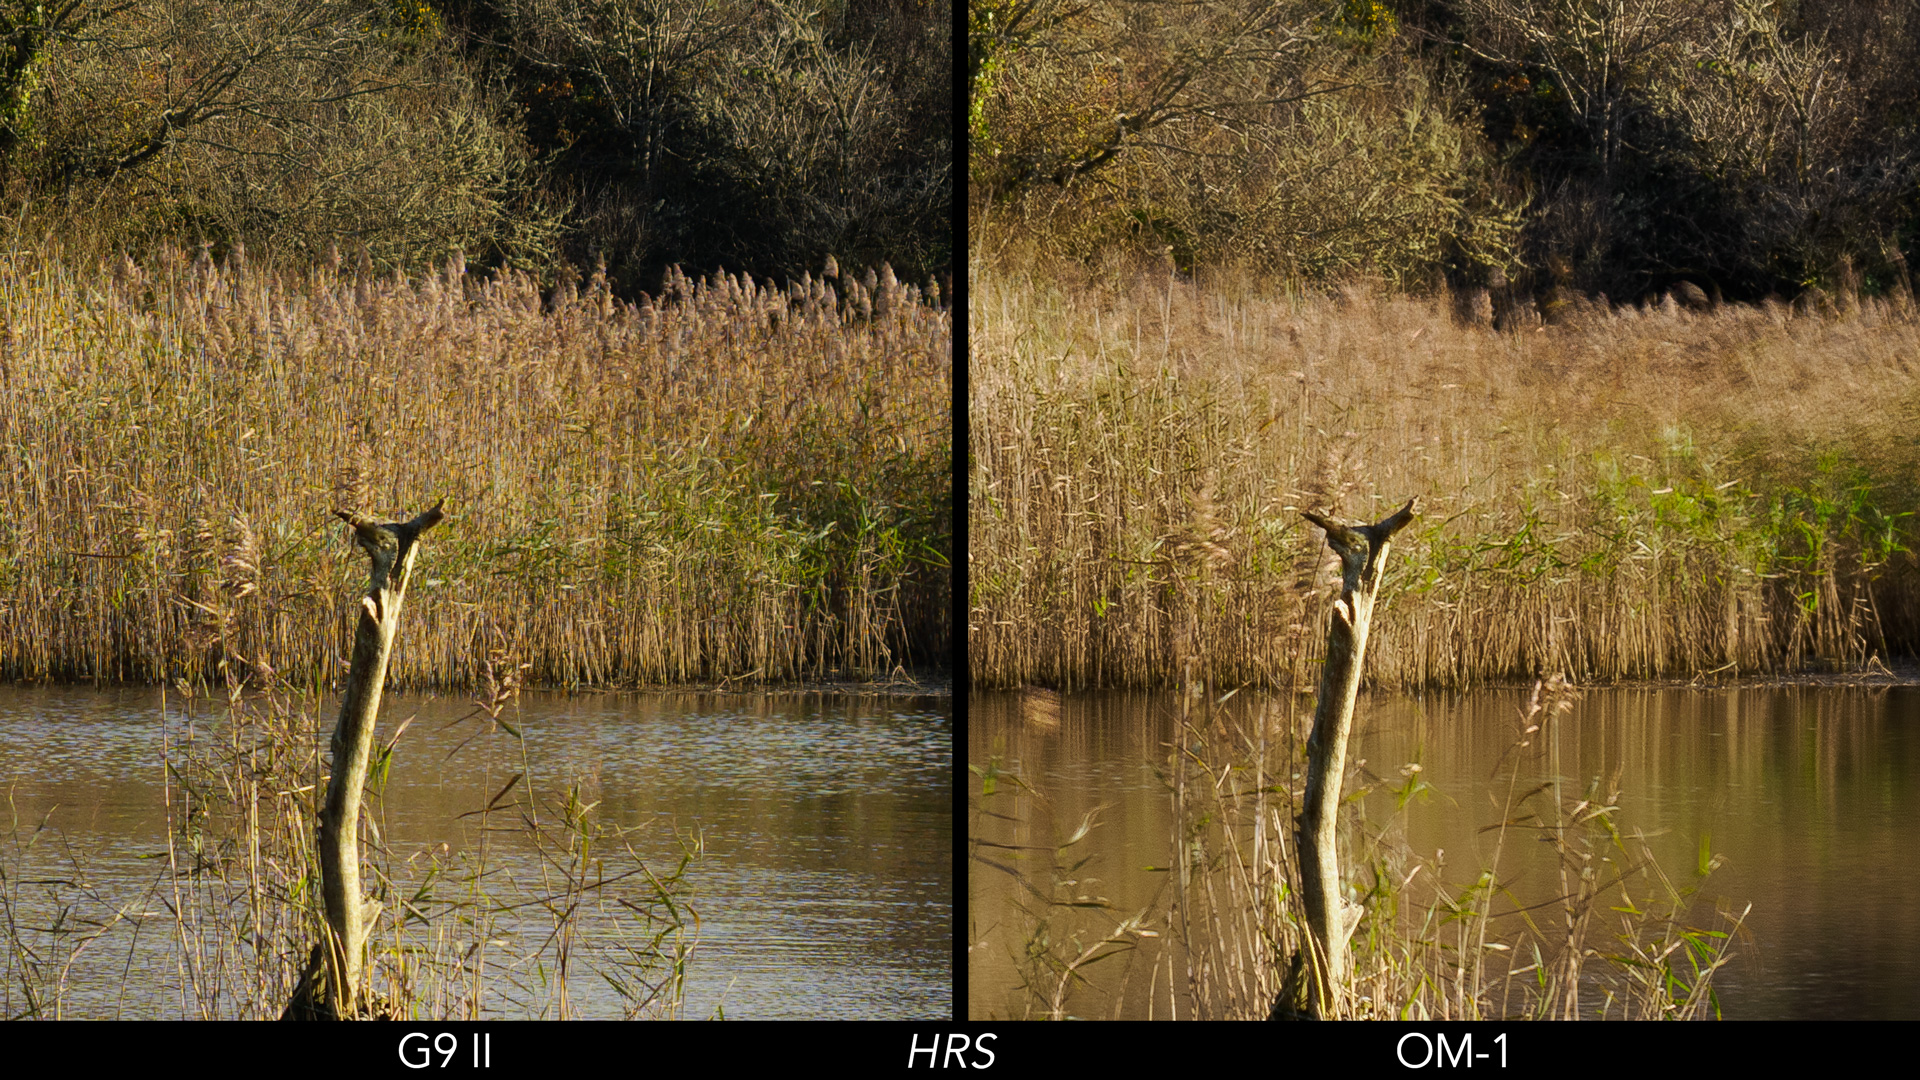
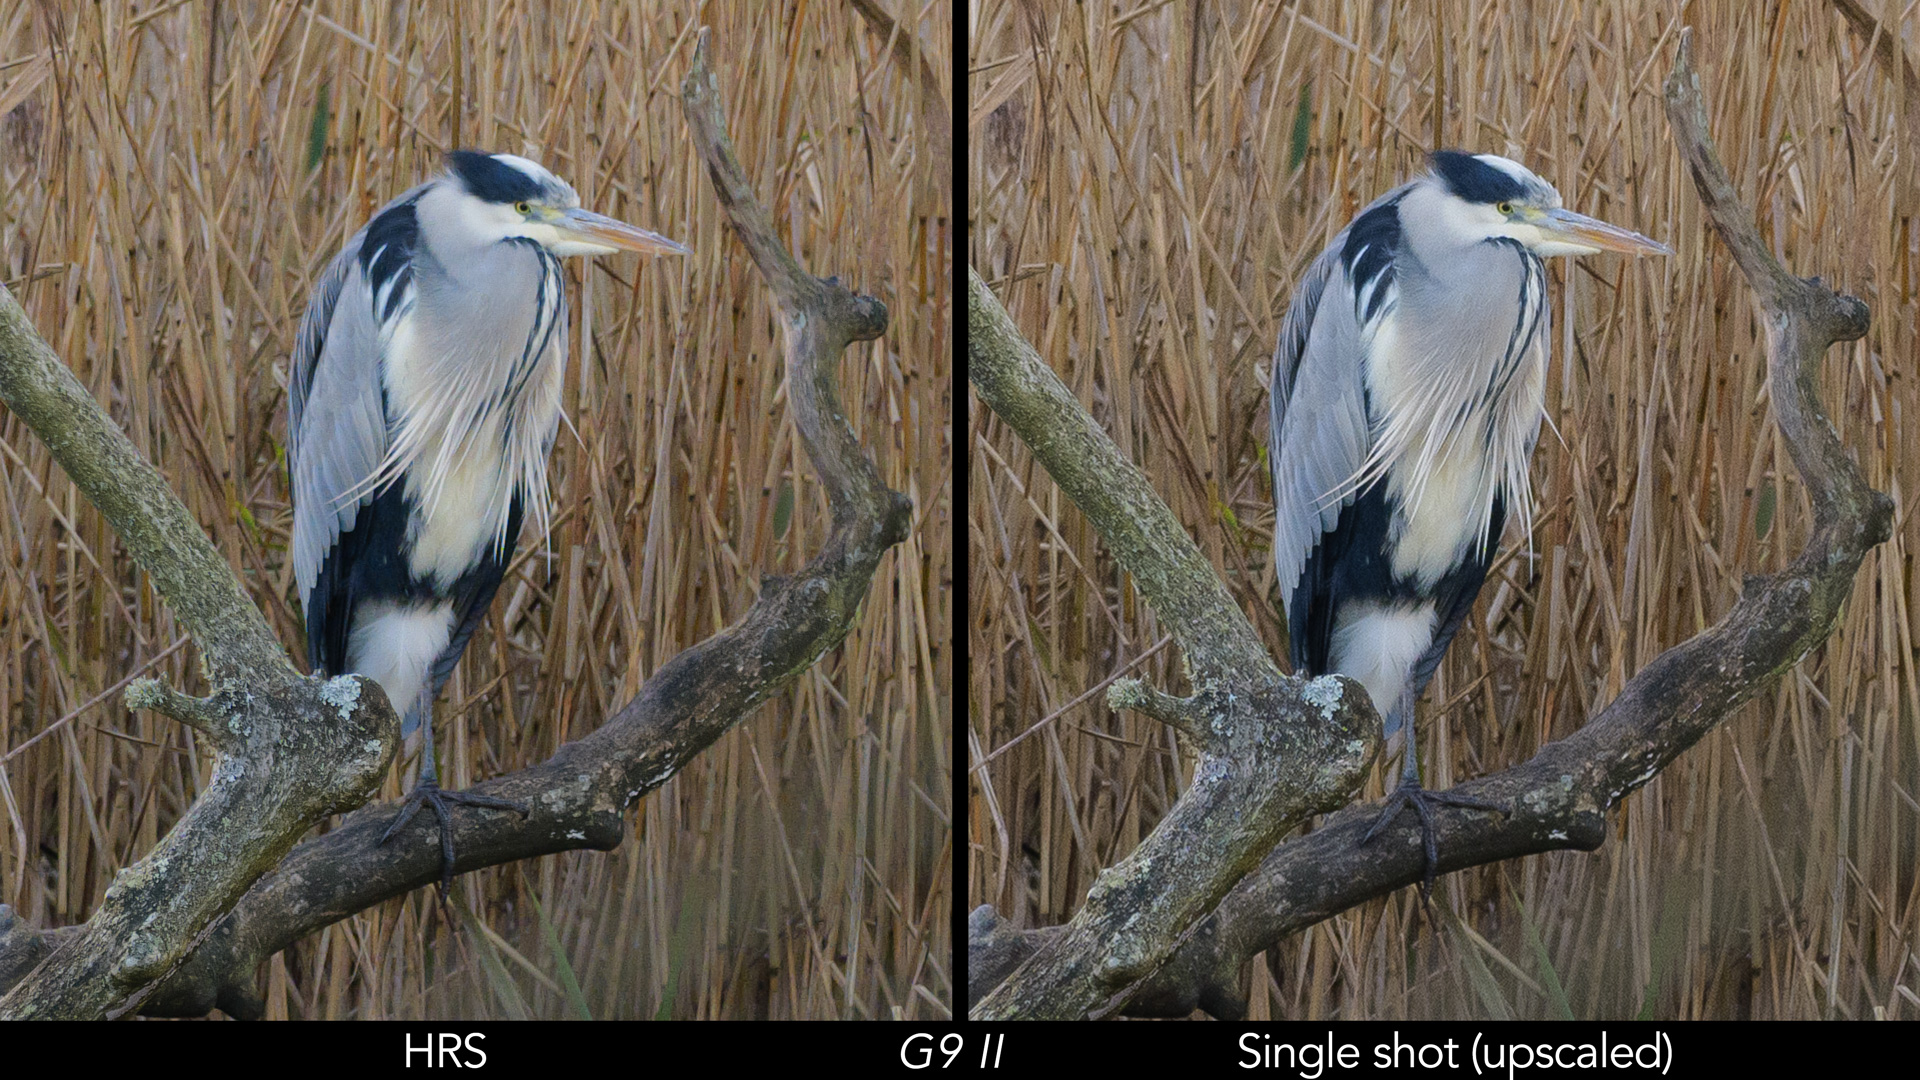
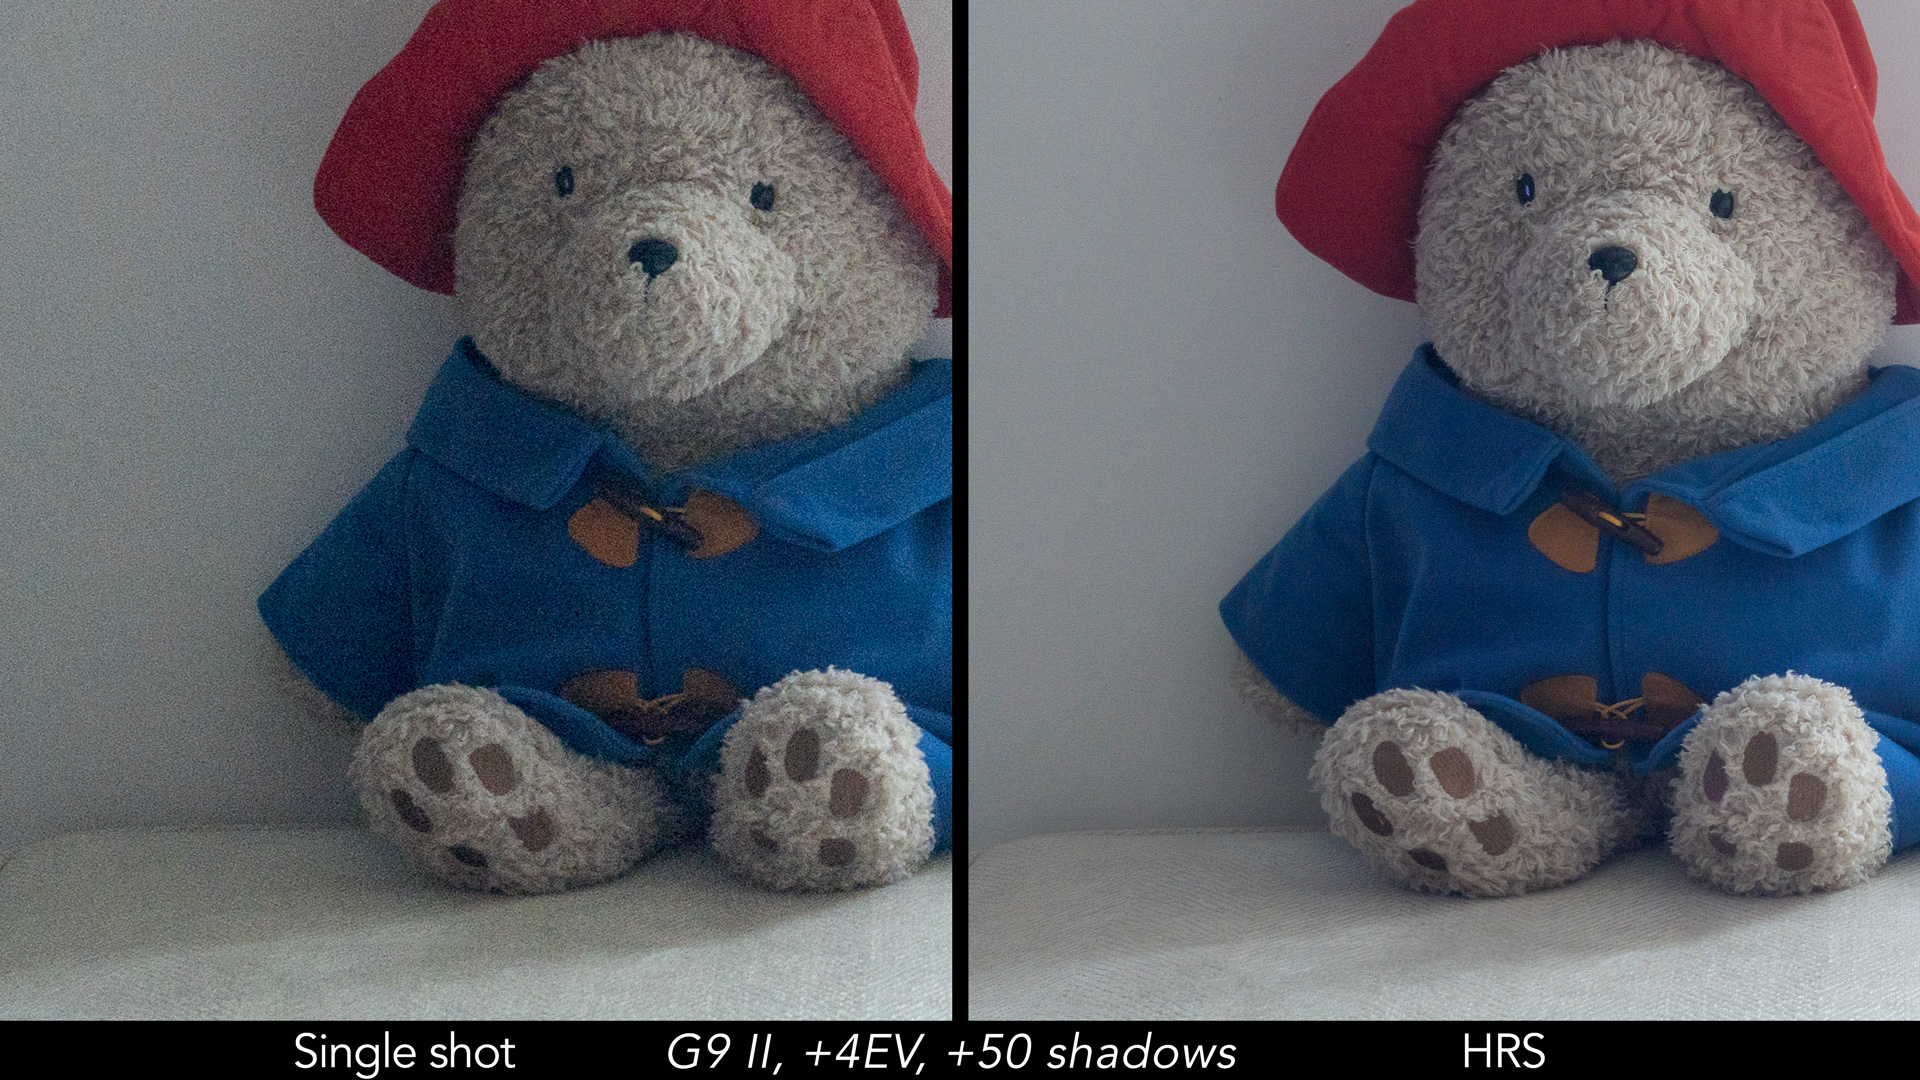
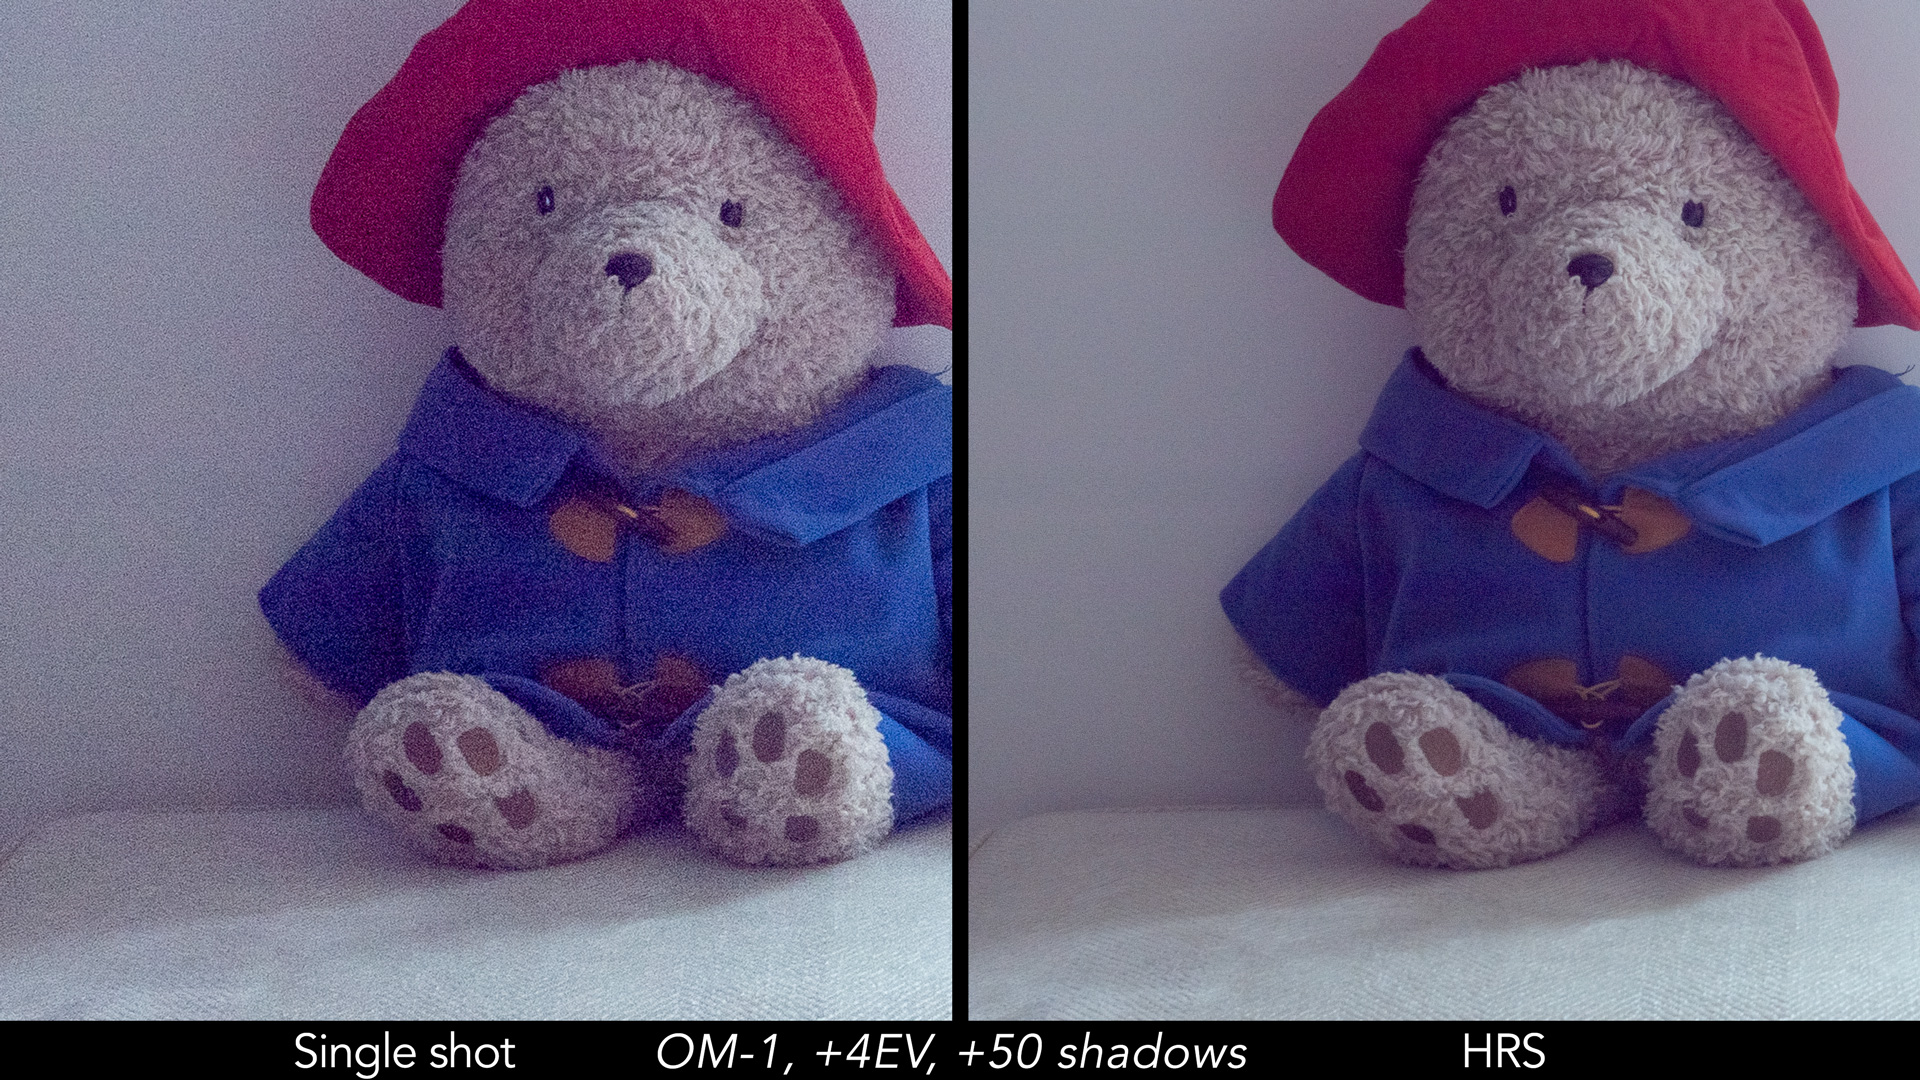
Motion correction works by using a portion of a single frame applied to the HRS shot. Consequently, that area of the image is less sharp but doesn’t exhibit peculiar artifacts. It works if the area of movement within the image is limited, such as a small bird flying in the sky, or a distant duck swimming in the background.
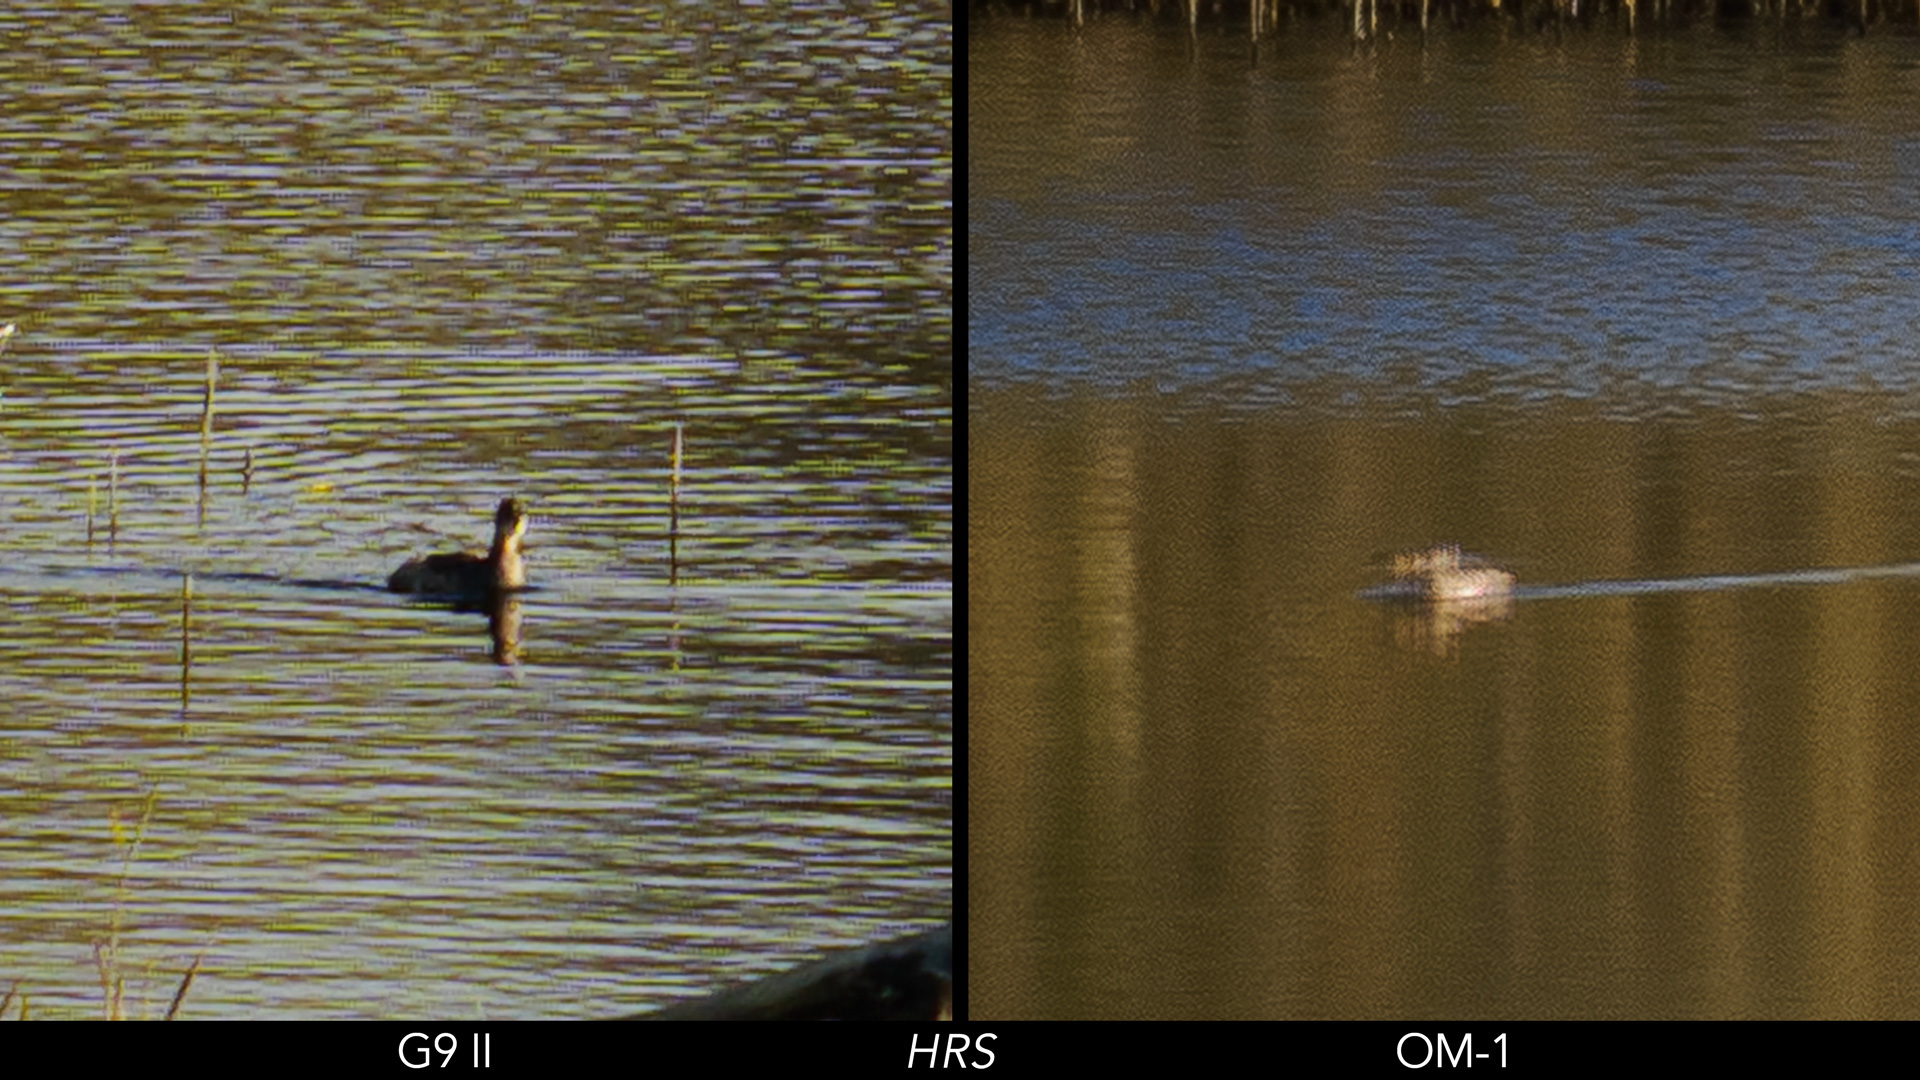
If elements like water, leaves, or other types of vegetation dominate most of your frame and are affected by movement, even from a gentle breeze, the loss of details and sharpness is more significant because the areas replaced with a single frame are extensive. In fact, you may as well turn the HRS mode off. In the example below, you can see how the single shot appears sharper, even when upscaled to 100MP.
Nevertheless, the odds favour the G9 II over the OM-1, which cannot correct motion and handle things like tall grass moved by the wind, resulting in an unpleasant motion blur effect.
Both cameras allow you to save a single frame simultaneously when capturing and processing a high-resolution file. Therefore, if the HRS isn’t perfect, you still have the option to use the lower-resolution version.
Despite these limitations, which are inherent to any camera offering the same functionality, the G9 II’s high resolution mode impressed me from a computational perspective. In an attempt to push the boundaries, I captured a few handheld shots using a long telephoto lens like the 300mm F4 Pro, and I was pleasantly surprised by the quality produced. However, as expected, the details still appear sharper in the single file.
Lastly, the High-Resolution mode can produce files with less noise in the shadows compared to the single low-res image. Applying the same dynamic range test in Lightroom, as seen in the first chapter, reveals that both images look significantly better, with the G9 II offering the best result between the two.
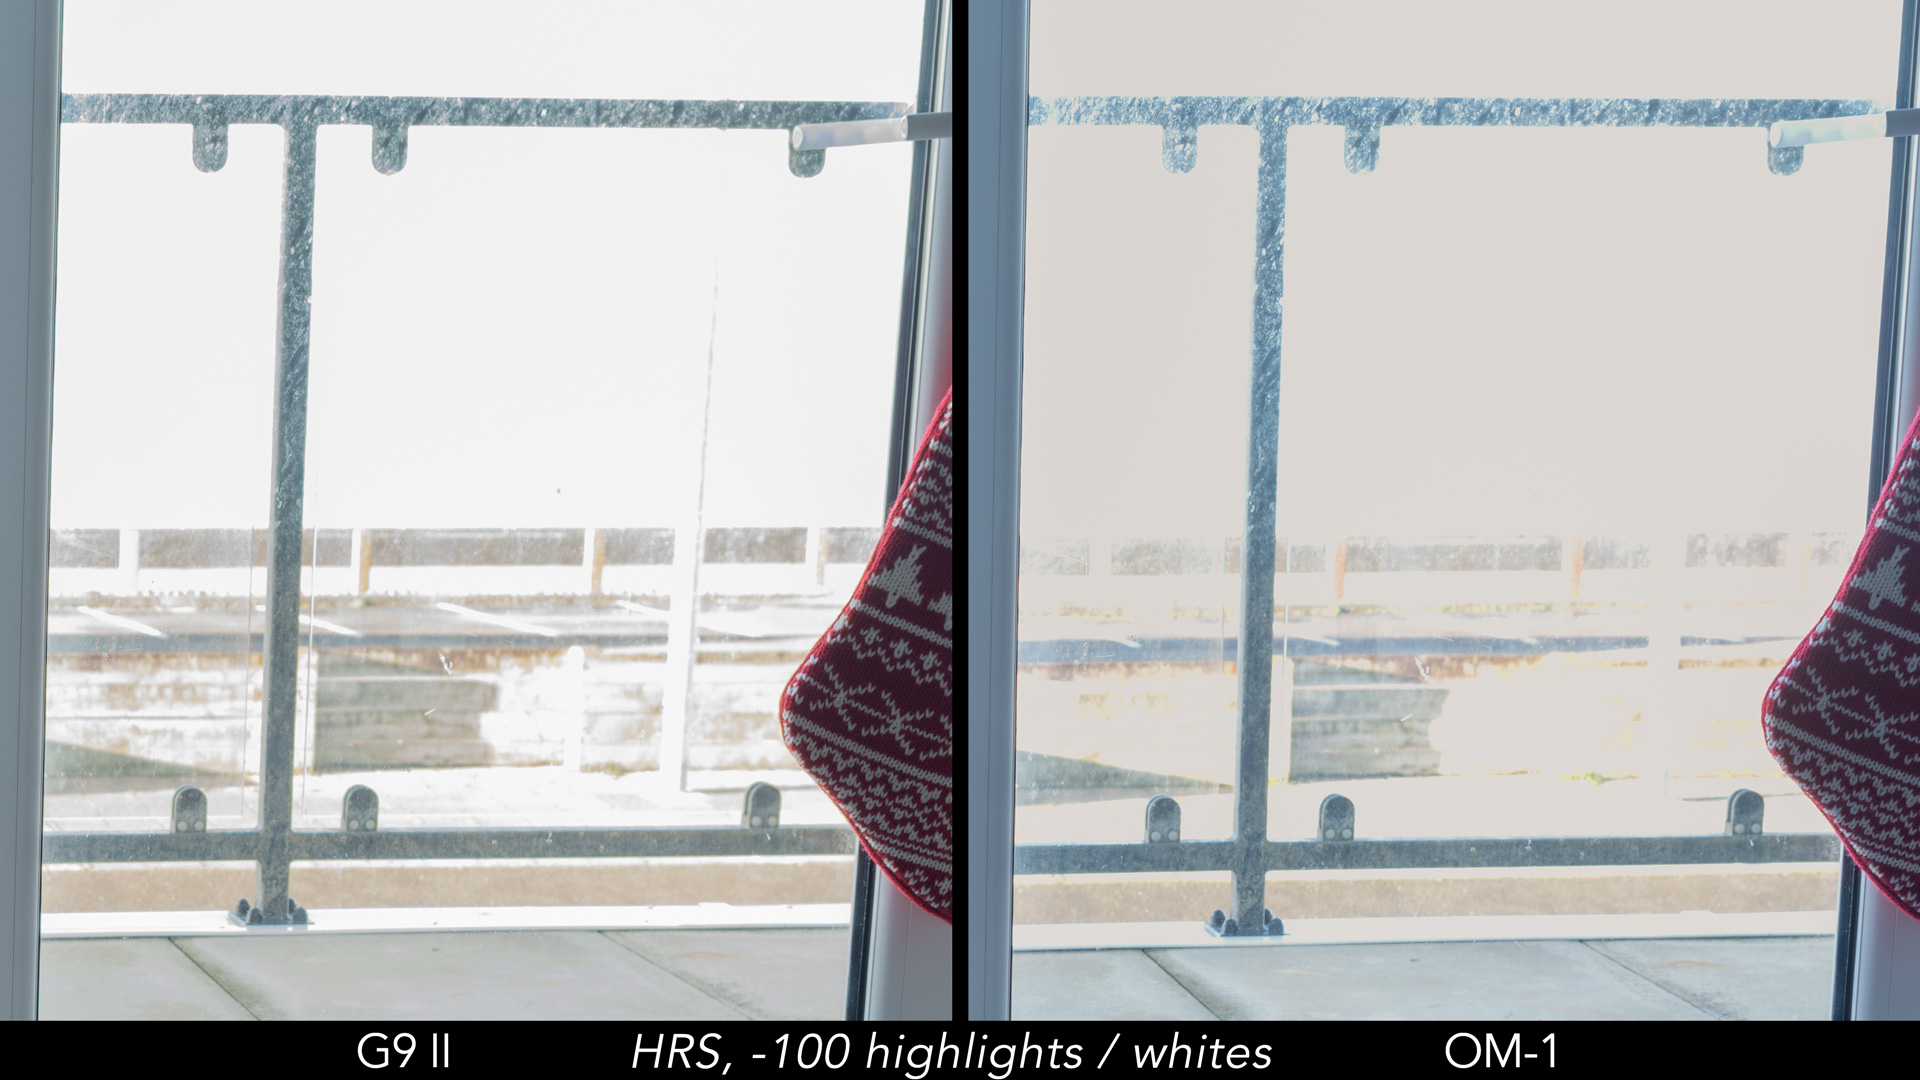
The same cannot be said for highlights, where the OM-1 loses the advantage it holds with the single file.
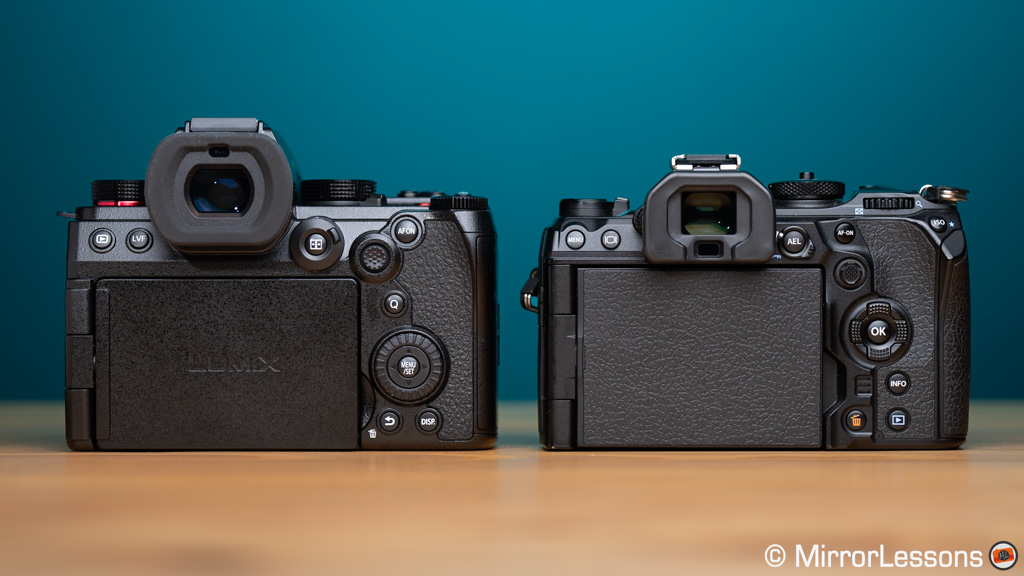
6. Viewfinder and Monitor
The G9 II has a good 0.5-inch OLED viewfinder with 3.69M dots and a magnification of 0.78x.
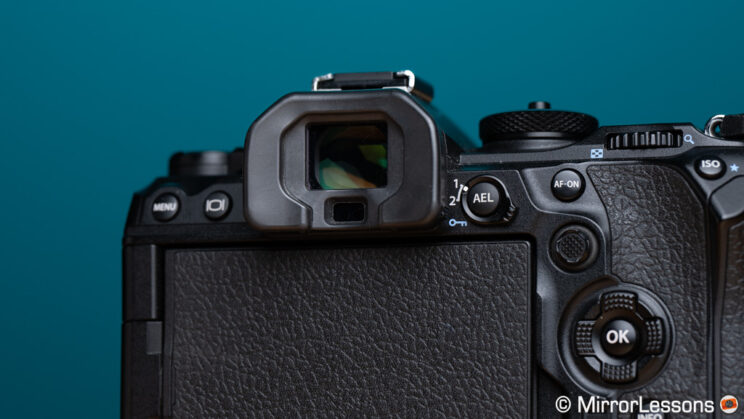
The OM-1 has a better-spec’d EVF with larger magnification (0.83x) and higher resolution (5.76M dots).
They both have an eyepoint of 21mm and a maximum refresh rate of 120fps. They loose a bit of resolution when the fastest frame rate is selected, but it’s not too noticeable.
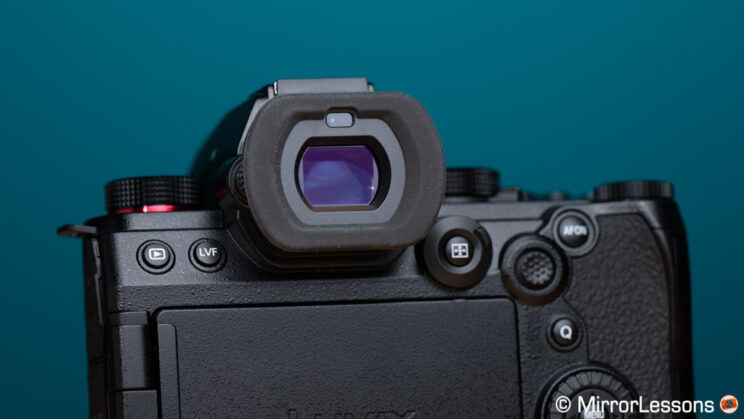
Overall, my experience with these two viewfinders has been very positive. However, despite the higher specifications of the OM-1, by the end of this comparison, I found myself favouring the G9 II version. It is brighter by default, and comes with a larger and more padded eyecup. Additionally, I find the Panasonic viewfinder more comfortable for use with glasses, as it enables me to see the four corners more easily.
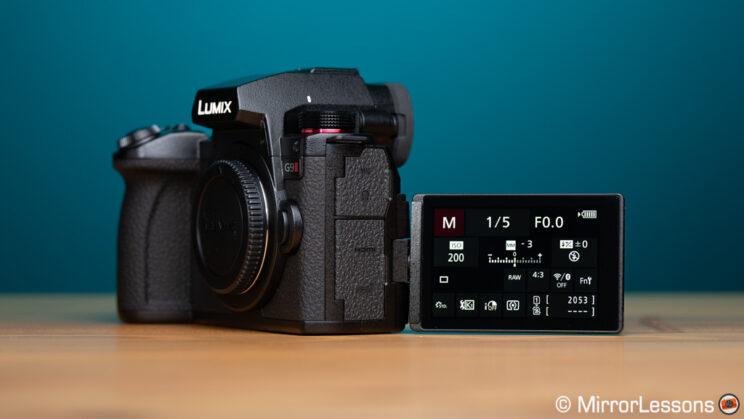
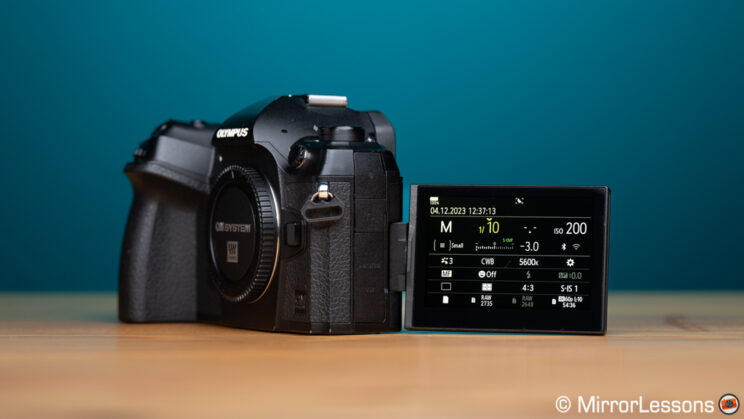
The rear LCD is slightly larger on the Lumix camera and has a bit more resolution too
- G9 II: 3.2-inch, 1.84M dots
- OM-1: 3.0-inch, 1.62M dots
They both have the standard multi-angle mechanism and are touch-sensitive. That said, the G9 II offers more touch functionalities, including navigating the main menu.
Both cameras offer the option to preview settings like exposure, picture profile, white balance, etc., or maintain a constant brightness that doesn’t reflect changes in exposure. With the OM-1, this can be quickly activated using the S-OVF function, while on the Lumix, you can disable Constant Preview.
One drawback of the G9 model is that when Constant Preview is engaged, it also mirrors the shutter speed. As a consequence, if you’re working at 1/10s, any movement produces significant motion blur on the screen, which can be very distracting. This particular quirk has persisted in Panasonic cameras for years, and it remains unclear why they haven’t aligned the exposure preview functionality with that of the OM-1 or other mirrorless cameras.
7. Design
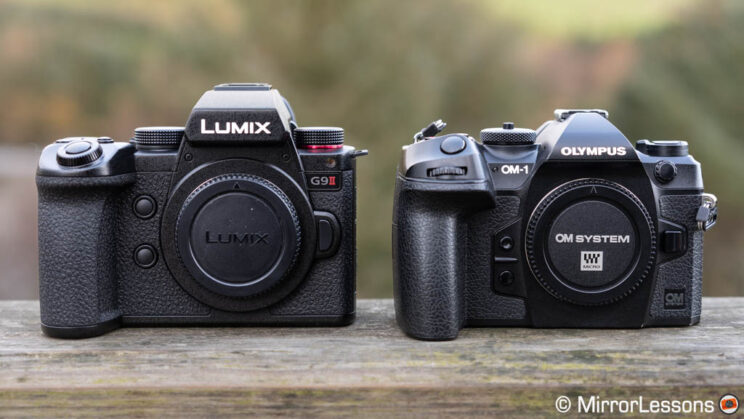
The G9 II is slightly taller and deeper, and slightly heavier as well. Its design and shell are exactly the same as the S5 II full-frame camera. They are both weather-sealed, and the OM-1 even has an IP53 rating.
- G9 II: 134.3 x 102.3 x 90.1 mm, 658g
- OM-1: 134.8 x 91.6 x 72.7mm, 599g
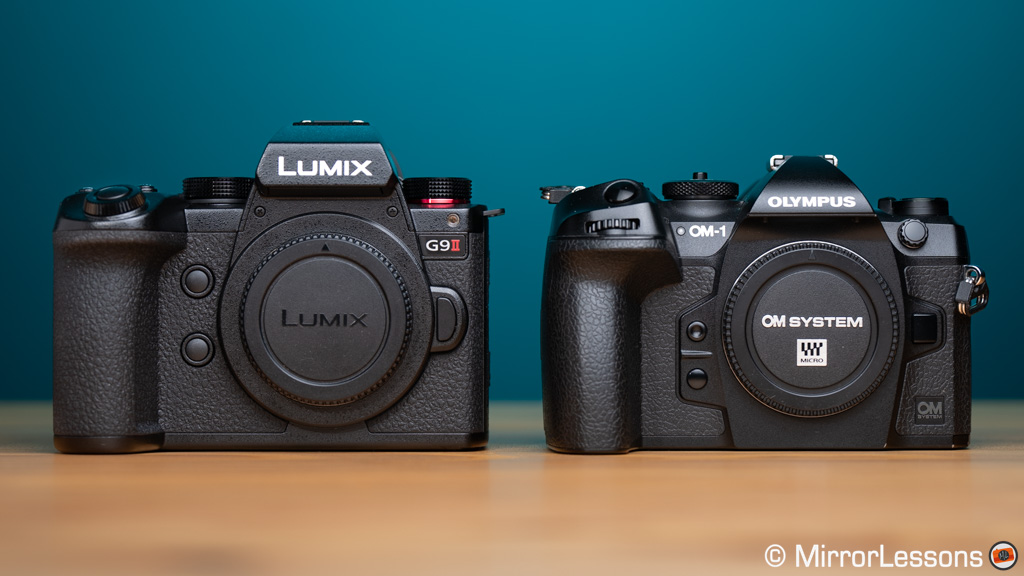
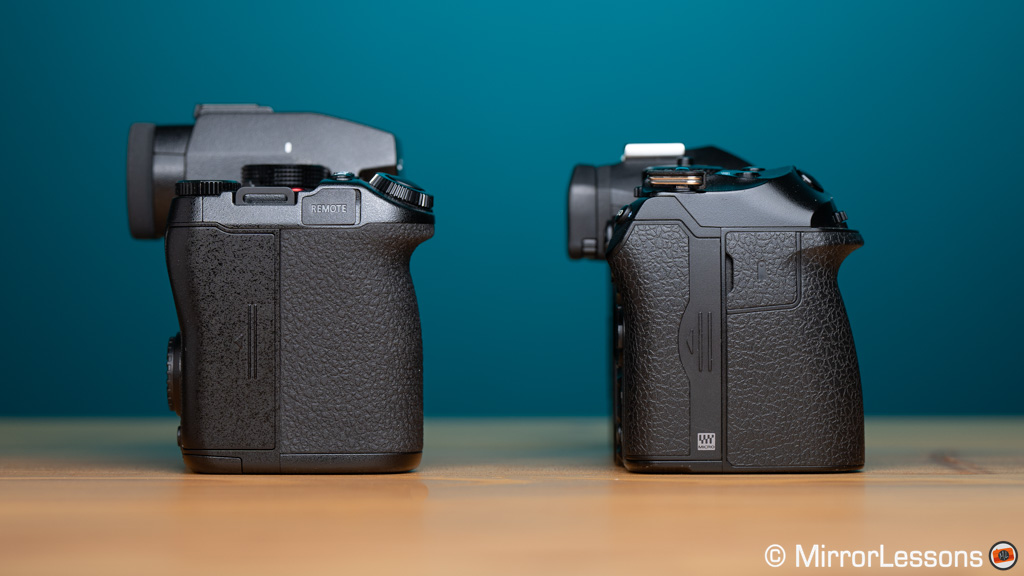
They both feature a large and tall front grip, ensuring a firm hold of the cameras, even when using just one hand. The grip on the OM-1 offers additional space under the shutter button, providing a more secure spot for the middle finger on the inside.
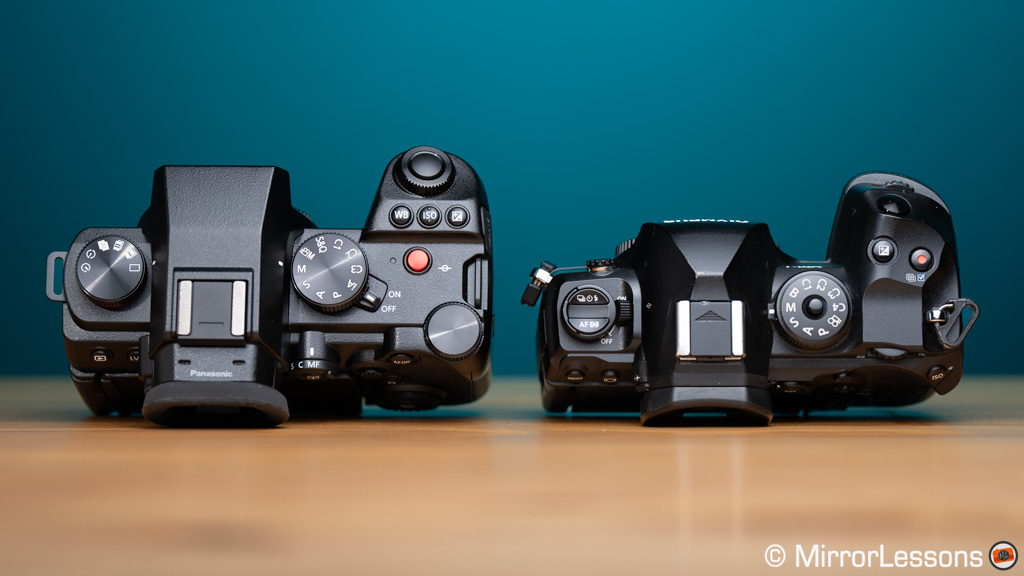
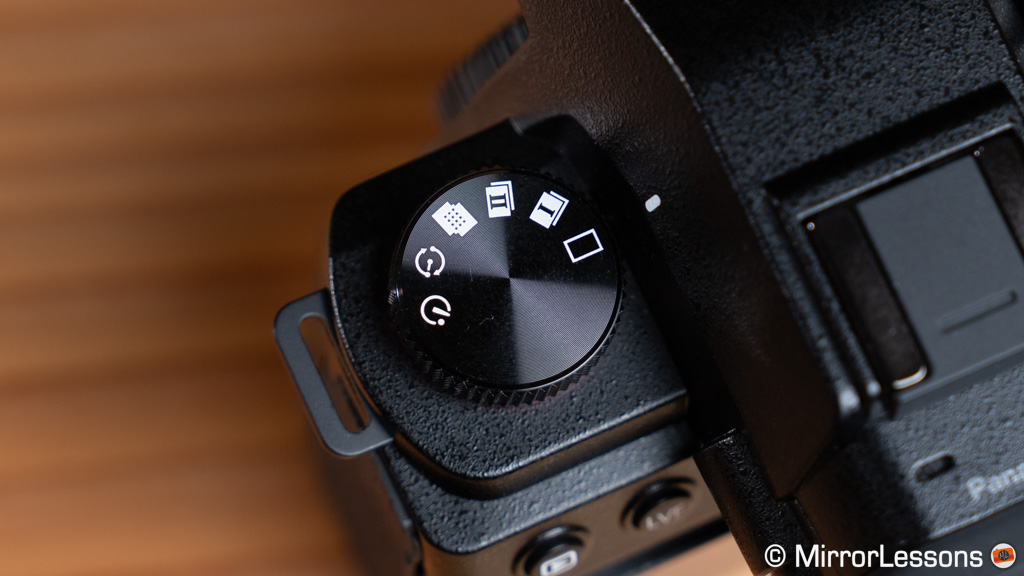
The two cameras offer a similar number of controls, albeit with different designs and placements. These controls include an AF joystick at the rear, twin exposure dials, a main shooting mode dial (which can be locked on the OM-1), and numerous function buttons, including two located at the front, near the mount.
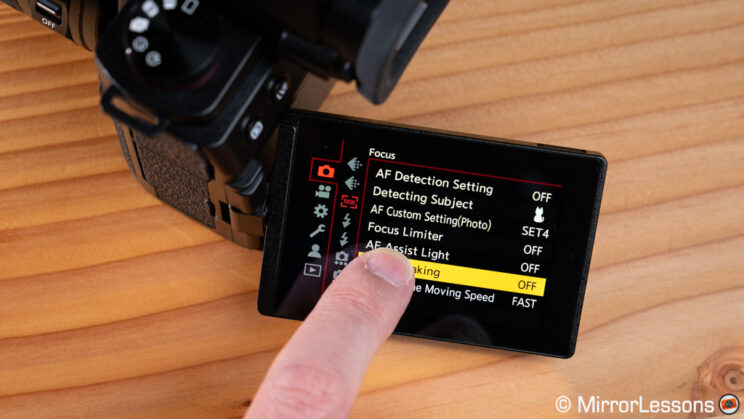
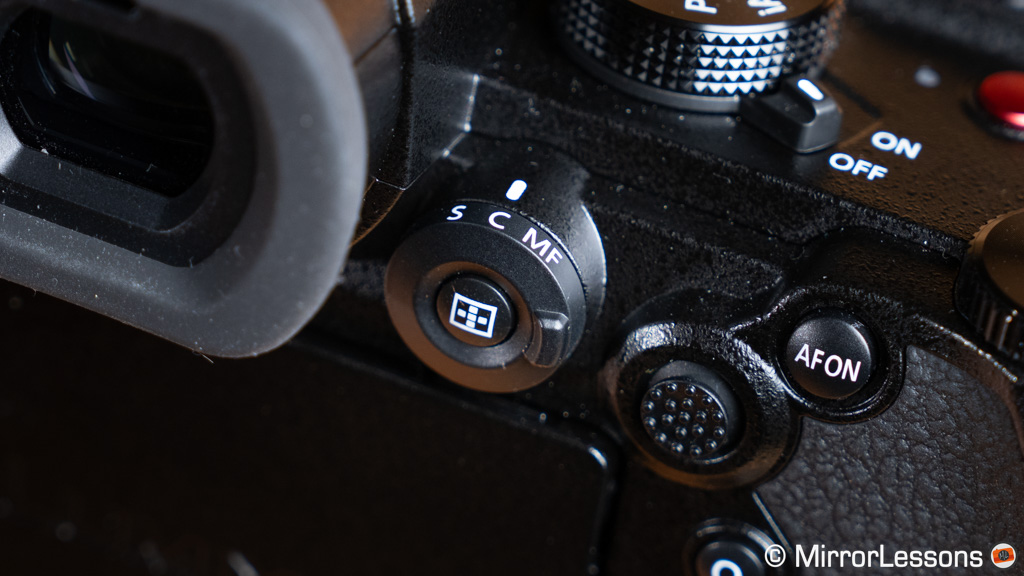
The G9 II stands out with a more intuitive layout, particularly beneficial for users who are less acquainted with the camera. I appreciate the inclusion of a drive dial on the top panel, along with the easily accessible WB, ISO, and Exposure Compensation buttons positioned near the shutter button (which are customisable). Additionally, the focus lever/button at the rear consolidates all the focus modes and subject detection settings into a single, convenient location.

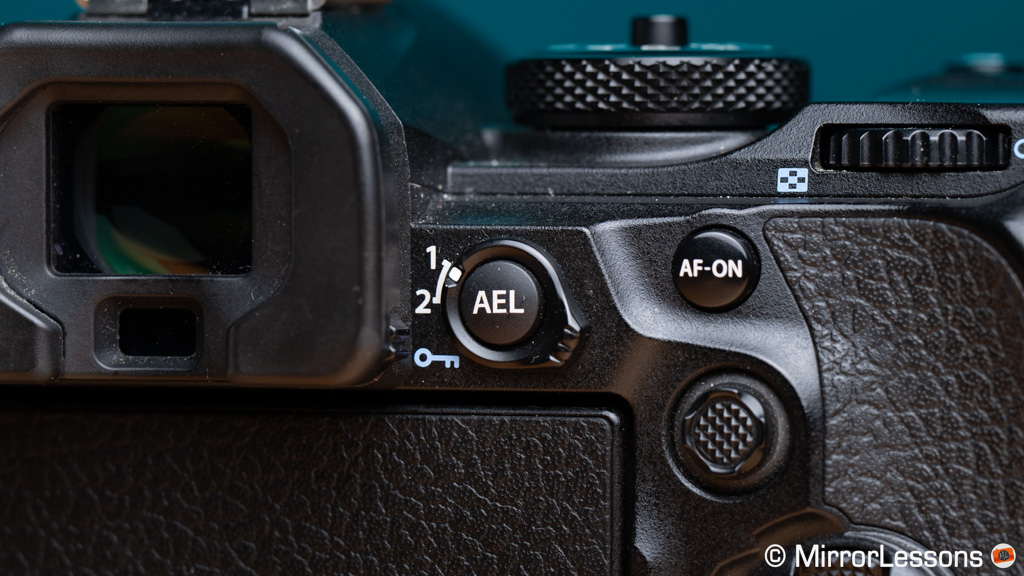
On the other hand, the OM-1 offers two buttons at the top that let you toggle between Drive and Flash settings, or Autofocus and Metering settings. Adjusting these parameters involves pressing and holding one of these two buttons while using the front or rear dial – a method that is central to several other functions on the camera. Additionally, there’s a rear lever with two positions, 1 and 2, which can be personalised.

In terms of custom buttons, the G9 II offers up to 17 options when each direction of the AF joystick and rear control dial is configured individually. Furthermore, there are five virtual Fn buttons accessible on the right side of the LCD screen, along with various options for the dials, making the Lumix camera an impressive product when it comes to customisation.
Comparatively, the OM-1 provides 10 function buttons, along with diverse dial options and the previously mentioned rear lever (which can even be used as an alternative power switch instead of the default one found on the top panel).
The menu systems are notably different, with the Lumix version offering an extensive array of additional settings and options. In terms of graphical user interface (GUI), I appreciate the intuitive and clear organisation on the OM-1, but the G9 II menu can also be navigated using your fingers.

Both cameras feature a ‘My Menu’ section allowing you to create shortcuts for your preferred settings. The OM-1 adopts a clever approach for this: simply hold the REC button for a few seconds anywhere in the menu to save an entry on one of the My Menu pages. Conversely, on the G9 II, you’re required to scroll through a lengthy list, which is more time-consuming.
Lastly, the G9 II allows you to customise the Q menu, whereas the equivalent on the OM-1 (Super Control Panel) cannot be modified.
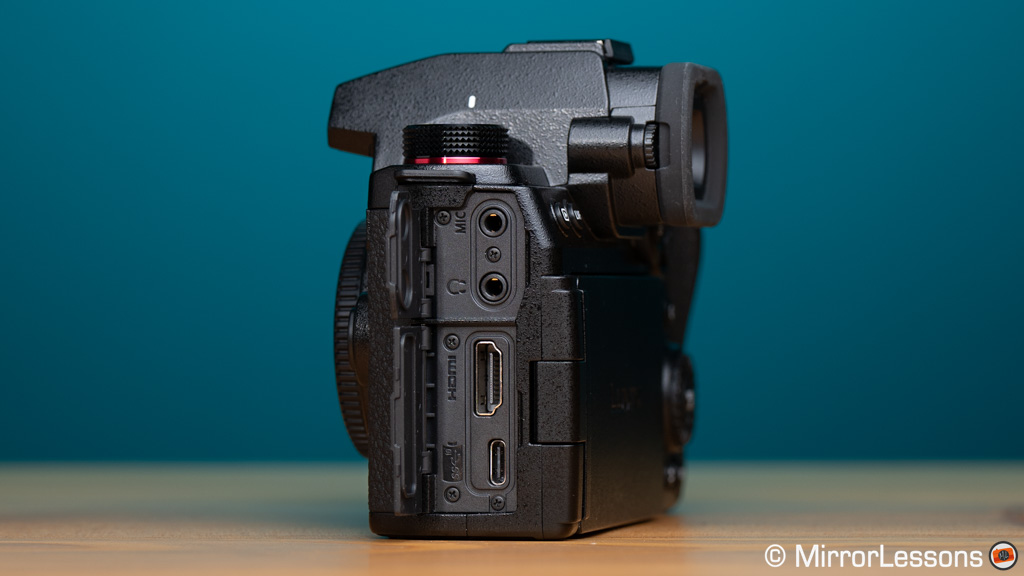
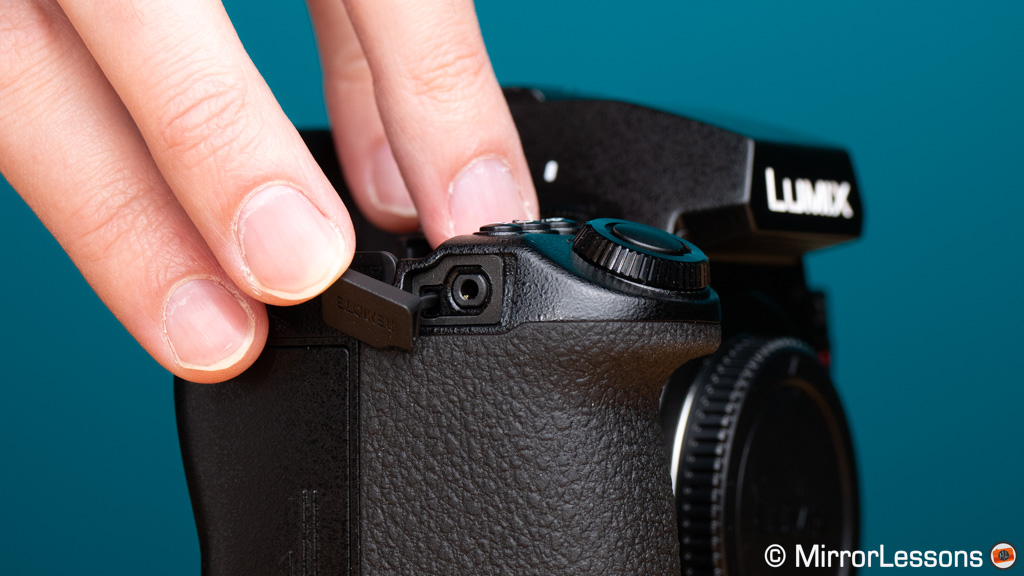
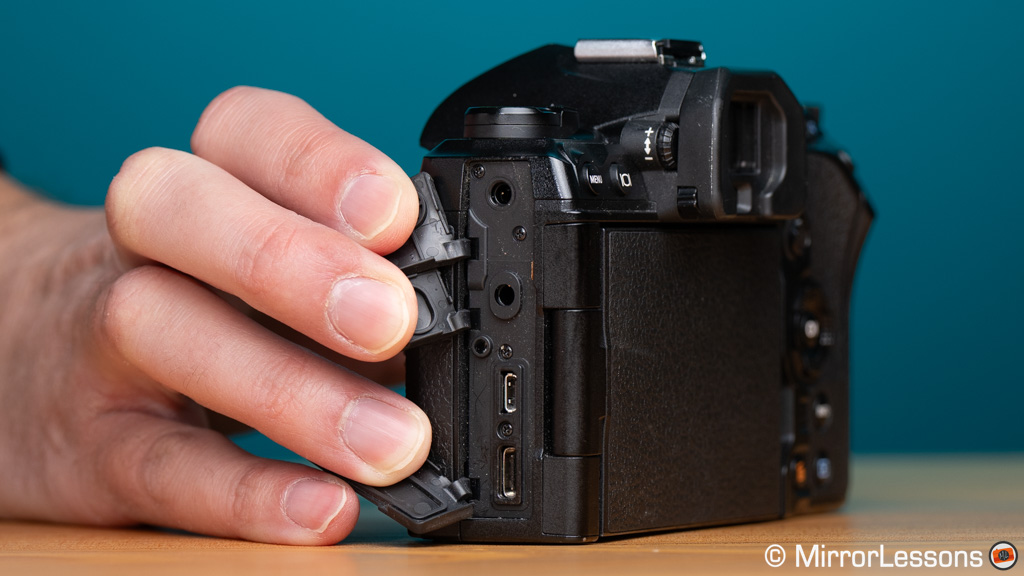
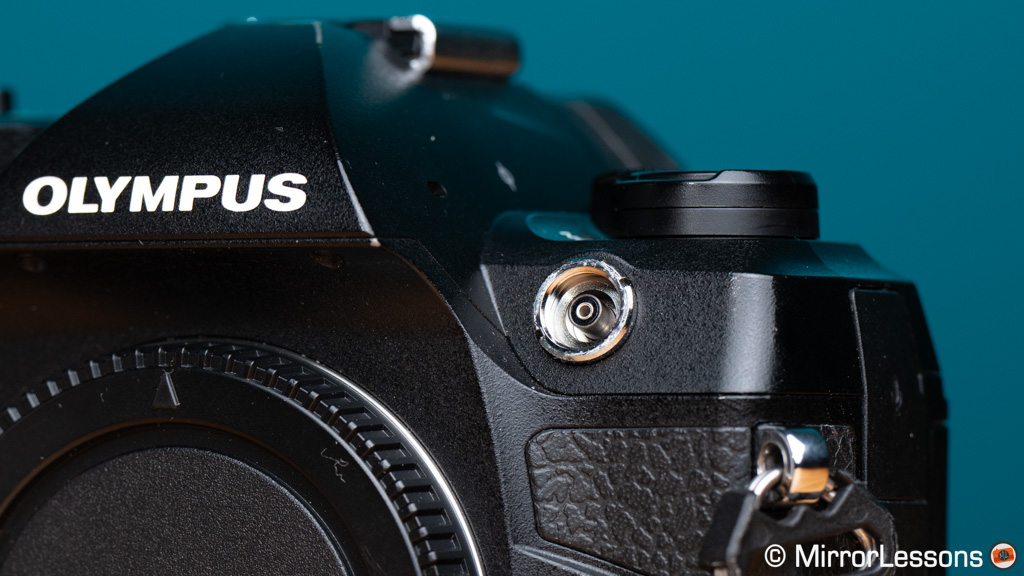
Concerning the physical connections, the G9 II has a 2.5mm remote input and a full-sized HDMI port versus the smaller Type D port found on the OM-1. The latter also sports a flash sync socket at the front.
Both come with a microphone input, headphone output, and a USB-C port. The Mic input on the Panasonic can also supply power to a microphone or work as a Line in.
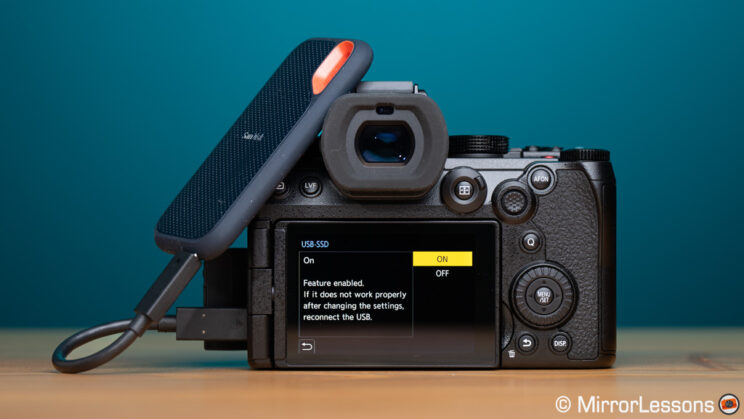
8. SSD Recording
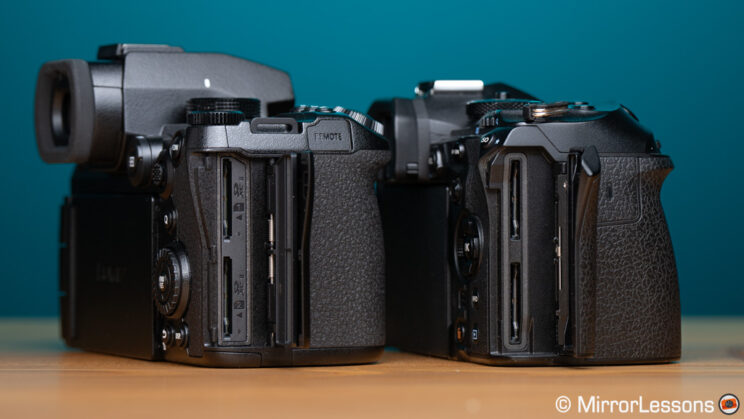
The G9 II and the OM-1 are equipped with two SD UHS-II card slots, which is great to extend the recording time, separate the type of files or backup everything on the second card. Note that only the Panasonic allows you to backup photos and/or video (photos only on the OM-1).
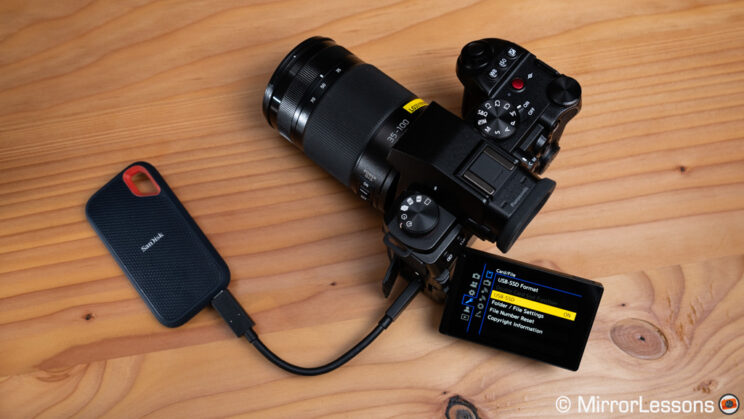
One very nice feature you’ll only find on the G9 II is the possibility to record photos and movies straight into an SSD drive, via the 10Gbps USB-C port. This means you can record more video clips without worrying about running out of space on your SD cards, and you can then plug the drive into your computer and start editing straight away. No need to transfer all the movie files first.
Using an SSD drive can also be more cost-effective. For instance, the 2TB Sandisk Extreme SSD is frequently discounted and available at a price similar to that of a single 512GB SD UHS-II card. However, the drawback is that you rely on an external connection, which is less secure than an internal memory card, and you’ll need to buy a rig or find a way to secure the drive next to the camera.
I conducted a quick test with my 1TB Sandisk Extreme SSD, and it performed remarkably well. The process of connecting/disconnecting the disk and formatting it was very quick.
To enable this functionality, you have to activate the USB-SSD option in the menu. It’s important to remember to turn off that same option before removing the SSD drive. Additionally, the drive must be formatted by the camera, and keep in mind that you cannot use the SD cards simultaneously.
Overall, SSD recording is a very positive addition, but comes with a few limitations:
- an SSD larger than 2TB won’t work
- the battery life will drain faster
- you cannot record videos with a frame rate higher than 60p without the optional Panasonic AC Adapter (DMW-AC10) and DC Coupler (DMW-DCC17)
Panasonic provides a list of SSD drives that are officially compatible. This doesn’t mean that others won’t work; but it’s advisable to test them thoroughly before use.
9. Battery Life
The G9 II has an estimated battery life of 370 images (when using the LCD monitor) or 390 images with the viewfinder (CIPA rating).
The OM-1 should do better on paper, with 520 images per charge (EVF or LCD not specified). As always, real-life use will lead to higher numbers than these.
For example, taking 1,600 photos of red kites in flight, and recording ten 4K 120p short clips drained the battery on the G9 II by two bars out of five (roughly 60% remaining).
A similar count with the OM-1 (but 4K 60p instead of 120p) only used 20% of power.
For video, the G9 II was able to record 1 hour an 55 minutes in 4K 25p before the battery died. The OM-1 did better, recording 2 hours and 27 minutes with 25% of battery life left.
Both cameras can be charged or powered with a power bank using the USB-C port.
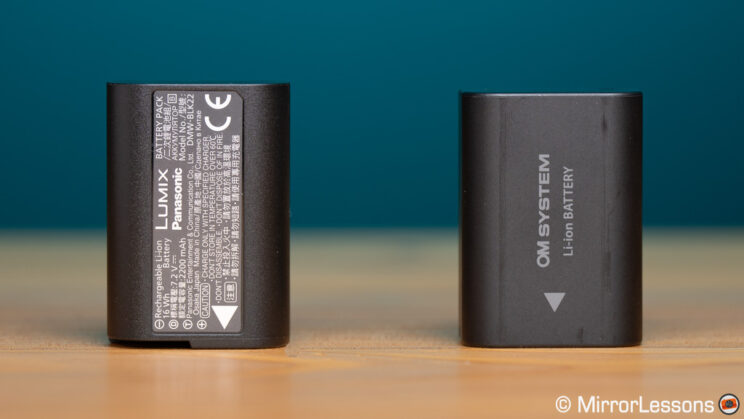
An optional battery grip is available: the DMW-BG1E for the G9 II, and the HLD-10 for the OM-1.
Finally, no battery charger is included in the box of either product.
10. Price
The G9 II is a bit less expensive, with a retail price of $1900, £1700, or €1900 for the body only.
The OM-1 is often available at a discounted price (country dependant), averaging around $1900, £1950, or €2000 (body only), and excluding extra offers such as seasonal cashback.
For example, at the time of writing (December 2023), the OM-1 would cost you £1600 in the UK.
It’s highly probable that Panasonic will introduce promotions next year, similar to what they did this year with the S5 II full-frame camera.
Reminder: the links below are affiliate links. If you decided to buy something after clicking the link, we will receive a small commission.
Extra Features
The two cameras offer a ton of extra functionalities. I will describe them briefly here.
Both come with:
- Time-Lapse
- Bracketing: AE, WB etc.
- Live View Composite: merge a series of images where only the brightest pixels are saved, useful for star trails or light painting work. It can also be used hand-held on the OM-1.
- Anti-Flicker / Synchro Scan: reduce banding or uneven exposure between shots when working under artificial light sources
- Starlight AF / Starry Sky AF: focus on the stars automatically
- RAW processing: make adjustments on the RAW file and save it as a JPG
- Wi-fi / Bluetooth
The G9 II can do:
- Focus Bracketing (but no Stacking in-camera)
- Stop Motion Animation
The OM-1 offers:
- Live ND: composite multiple frames to create a long exposure effect without using physical filters
- Focus Bracketing and in-camera Focus Stacking (stacking is limited to select lenses, and JPG output)
- Multiple Exposure
- Keystone Compensation: correct geometrical distortion with compatible lenses (JPG only)
- Live Bulb / Live Time: real-time progression on the monitor when taking a long exposure
You may also be interested in:
OM-1 Review for Bird Photography
Conclusion
Let’s address the obvious: if you’re keen on serious video capabilities, whether you’re a videographer or a hybrid shooter, the G9 II is the superior choice by a significant margin. It offers more resolution, faster frame rates, superior dynamic range (up to 60p), and boasts an array of additional settings. However, this isn’t groundbreaking news; historically, Panasonic has consistently outperformed Olympus/OM System in the realm of video.
Yet, if you’re here, chances are you’re also inclined towards still images and seek guidance on which of these two cameras is the better choice for photographers. If that is the case, we have more facets to explore.

LEICA DG ELMARIT 200/F2.8+TC1.4
The integration of phase detection autofocus has significantly elevated the competitiveness of the G9 II. Sure, the OM-1 came out on top in most of my tests, and its Bird Detection mode is more reliable, but the Lumix can now match a very similar level of performance, and the difference in keeper rate is rarely a deal-breaker.
Furthermore, the G9 II brings a good improvement in image quality – a rarity in the micro four thirds realm nowadays. While the additional 5MP might not appear significant, the sensor comes with more dynamic range, especially when adjusting shadows in post-production.
Panasonic has also made significant strides in areas where Olympus/OM System previously held unrivalled superiority. For example, the company has caught up with 5-axis stabilisation, and the G9 II performance has reached a level where the difference from the best-in-class OM-1 is negligible for the most part.
Another example is the high-resolution mode, where the G9 II not only can work hand-held like the OM-1, but also mitigates motion artifacts, a capability the OM-1 lacks.
Finally, the Lumix model showcases greater versatility within the micro four thirds system. For instance, its fastest drive speeds, with or without Pre-Burst, are compatible with any lens, whereas the OM-1 is restricted to specific M.Zuiko lenses depending on the setting used.

M.Zuiko 100-400mm at 400mm
At this point, you might assume I lean toward the G9 II. However, it’s important to note that the OM-1 retains several key advantages. Alongside its more accurate autofocus, it boasts better high ISO performance, produces less distortion with the electronic shutter, offers superior battery life, a more user-friendly menu system, and unique features like Live ND and Focus Stacking. Moreover, at the time of writing, it’s often available at a discounted price, making it the more budget-friendly option.
Ultimately, both cameras excel in their performance and you’ll need to dive into all the details described in this article to understand which product suits your needs best.
One last thought I can add is that the OM-1 now faces a robust competitor in the micro four thirds segment. While this benefits photographers by providing them with more choices, it also indicates that OM System will need to up their game for their next high-end model.
Reminder: the links below are affiliate links. If you decided to buy something after clicking the link, we will receive a small commission.