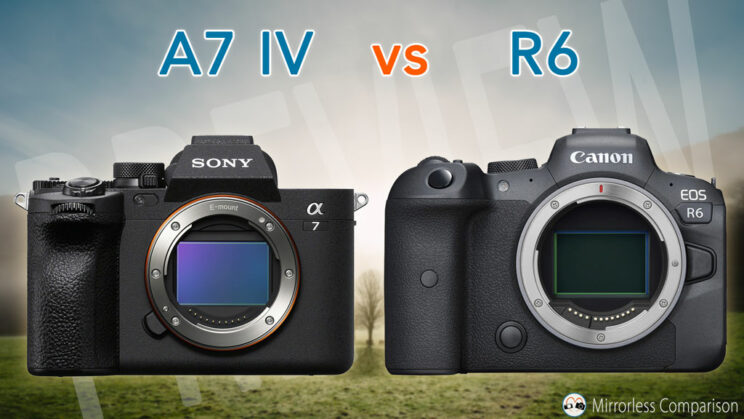
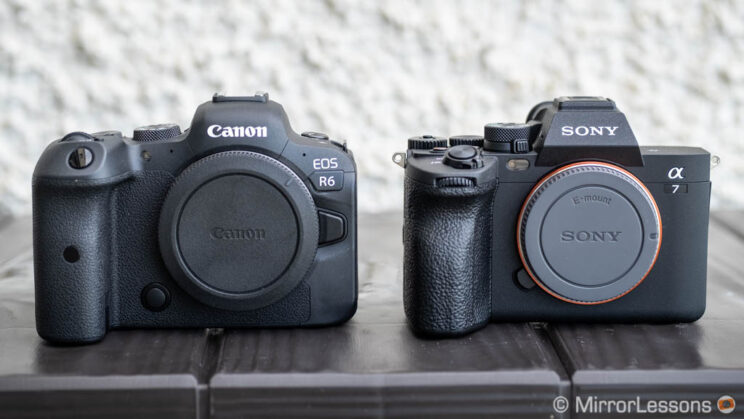
The Sony A7 IV arrived in 2021, three years after the A7 III, a product that helped Sony soar in popularity as a digital camera manufacturer, and has convinced many people to switch from Canon DSLRs.
With the R6, released in 2020, Canon got back on track with much better performance in comparison to the first EOS R, and a product that shows the company is finally taking the mirrorless market seriously.
Let’s see how these two very capable photography tools compare.
Editor’s note: this article has been upgraded to a full comparison with side by side images and in-depth feedback.
Ethics statement: the following is based on our personal experience with the A7 IV and EOS R6, which we purchased for personal and review purposes. We were not asked to write anything about these products, nor were we provided with any sort of compensation. Within the article, there are affiliate links. If you buy something after clicking the link, we will receive a small commission. To know more about our ethics, you can visit our full disclosure page. Thank you!
TABLE OF CONTENTS
– The 10 Main Differences in a Nutshell
– Main Specs
1. Sensor and Image Quality
2. Autofocus
3. Continuous Shooting
4. Stabilisation System
5. Video Recording
6. Design and Interface
7. Viewfinder and Rear Screen
8. Battery Life
9. Lenses
10. Price
– Extra Information
– Video Review
– Conclusion
The 10 Main Differences in a Nutshell
- Image quality: the A7 IV has more megapixels (33 vs 20) and a little more noise at high ISOs. Dynamic range is comparable.
- Autofocus: they are at a very similar level when it comes to face and eye detection, as well as tracking. They are the best on the market at this price point.
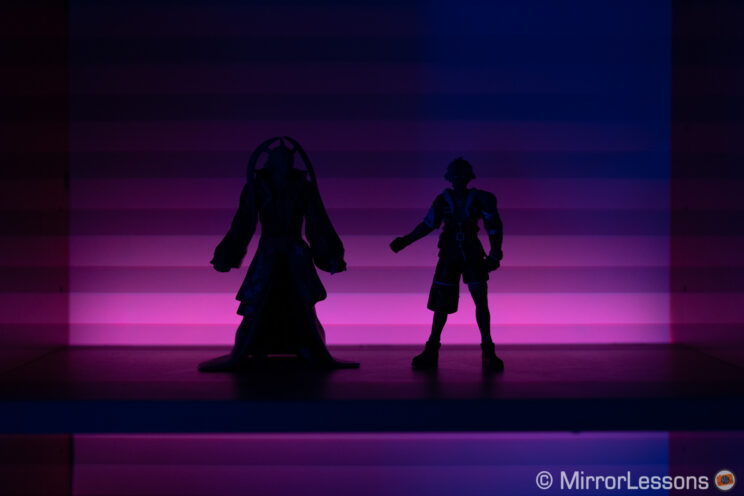
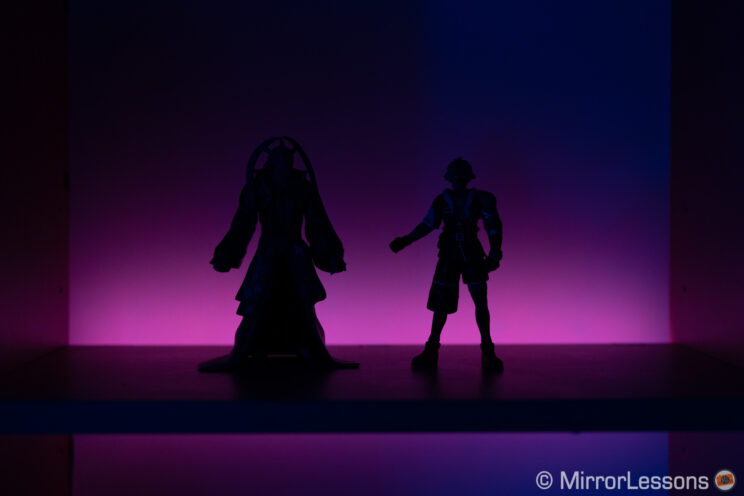
- Continuous shooting: the R6 can shoot at double the speed of the A7 IV (20fps vs 10fps). It also has a faster sensor readout, meaning less rolling shutter when using the electronic shutter (in photo mode).
- Stabilisation: the R6 allows you to shoot hand-held at 1s, or even 2s. The A7 IV struggles below 1/4s. For video, the R6 delivers better performance when walking with the camera, but the A7 model gives you the best results if you stabilise in post with Sony Catalyst.
- Movie mode: the A7 IV offers better dynamic range, more codecs, higher bitrates and doesn’t suffer from overheating, unlike the R6. The only advantage of the Canon is 4K 60p with a small 1.07x crop (vs 1.5x on the Sony).
- Design: I prefer the ergonomics of the R6, but the A7 IV is better than previous models and offers more customisation.
- Viewfinder and LCD: they are very similar and nice to use.
- Battery life: very similar performance (photo and video).
- Lenses: Sony has a much larger selection of native lenses, including options from third party manufactures.
- Price: very similar (only the Euro price is higher for the A7 IV, as of March 2022)
Main Specs
A7 IV
- Sensor: 33.0MP 35mm format BSI Exmor R CMOS
- Lens system: E-mount
- Weatherproof: Yes
- Internal Stabilisation: Yes (5-axis)
- Autofocus: Hybrid with 759 phase and 425 contrast detection points
- Continuous shooting: 3fps to 10fps with AE/AF Tracking
- ISO Sensitivity: 100 – 51200 ISO (pull 50, push up to 204800)
- Shutter Speeds: 1/8000 to 30s, Bulb
- Viewfinder: 0.5in OLED with 3.69M dots, 23mm eye point, 0.78x magnification and 120fps refresh rate
- Rear monitor: Multi-angle 3″ LCD (1.04M dots) with touch sensitivity
- Movie recording: 4K up to 60fps, Full HD up to 120fps, 10-bit 4:2:2 internal, S-Log, Cinetone and HLG gamma
- Built-in Flash: No
- Extra Features: WiFi, Bluetooth, Bracketing, Intervalometer, Wifi Tethering, USB streaming, Dual SD slots
- Dimensions: 131.3 x 96.4 x 79.8 mm
- Weight: 658g (including battery and memory card)
- Firmware version: 1.00
- Release: 2021
R6
- Sensor: 20.1MP 35mm format CMOS
- Lens system: RF-mount
- Weatherproof: Yes
- Internal Stabilisation: Yes (5-axis)
- Autofocus: Dual Pixel CMOS AF with 6,072 points
- Continuous shooting: 12fps or 20fps with e-shutter
- ISO Sensitivity: 100 – 102400 ISO (pull 50, push up to 204800)
- Shutter Speeds: 1/8000s to 30s, Bulb
- Viewfinder: 0.5-in OLED with 3,690k dots, 23mm eye point, 0.76x magnification
- Rear monitor: Multi-angle 3.0″ LCD (1.62M dots) with touch sensitivity
- Movie recording: 4K up to 60fps and 340Mbps, Full HD up to 120fps, 10-bit C-Log and HDR PQ
- Built-in Flash: No
- Extra Features: WiFi, Bluetooth, Bracketing, Tethering, Time-lapse, Dual SD slots
- Dimensions: 138.4 x 97.5 x 88.4mm
- Weight: 680g (including battery and memory card)
- Firmware version: 1.5.1
- Release: 2020
1. Sensor and image quality
The two cameras feature a 35mm sensor (full frame).
The A7 IV has two leading characteristics: more resolution (33MP vs 20.1MP) and a BSI design (back-illuminated) which collects light more efficiently than the standard design.
Resolution

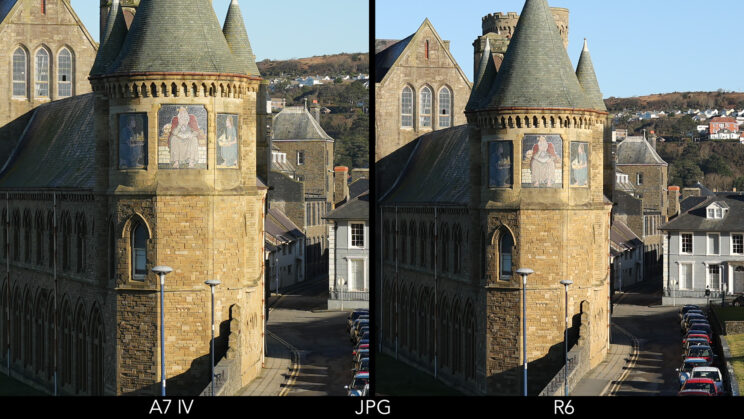
In our first test, you can see the difference in resolution when magnifying both images at 100%. In addition to the larger details, both the RAW file and the JPG of the A7 IV are a bit crisper.
Note that you can change various parameters to control image quality on the JPG files, including sharpness.
A higher megapixel count can also give you more room for cropping, if you need to. Additionally, both cameras have an APS-C mode: the A7 IV outputs a 14MP file versus 8MP on the R6.
The Canon has a low pass filter, whereas it is unclear if the Sony has one or not (there is lots of contrasting information on the web). Judging from my tests, if there is one, it is very weak.
Dynamic Range
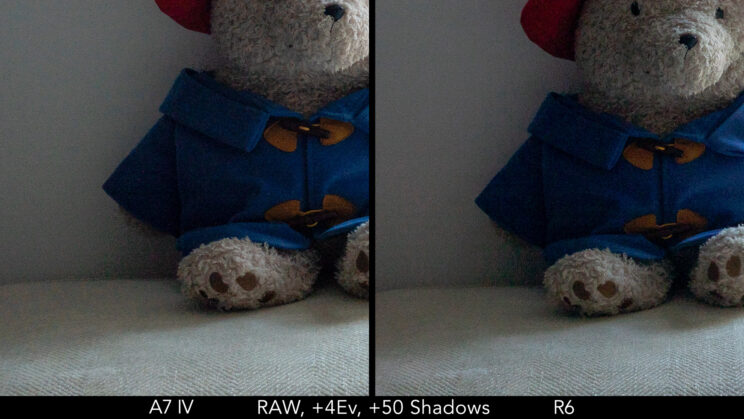
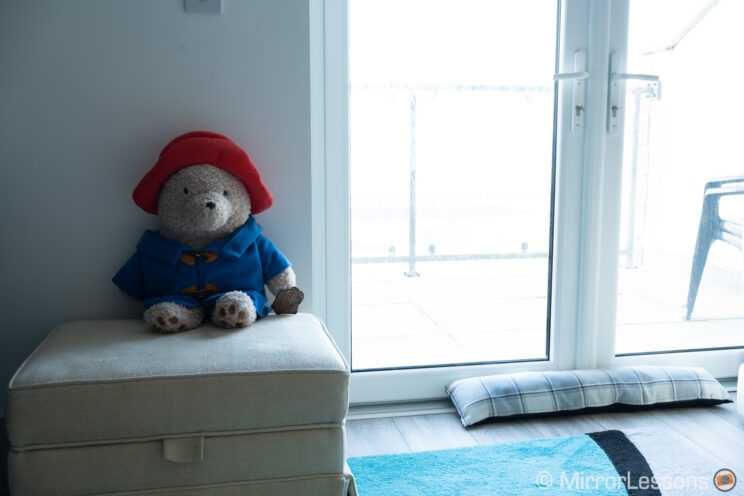
Moving on to dynamic range, a severe 4 stop recovery shows more noise in the shadows on the A7 IV file, but the R6 also shows more colour artefacts in the darkest areas.
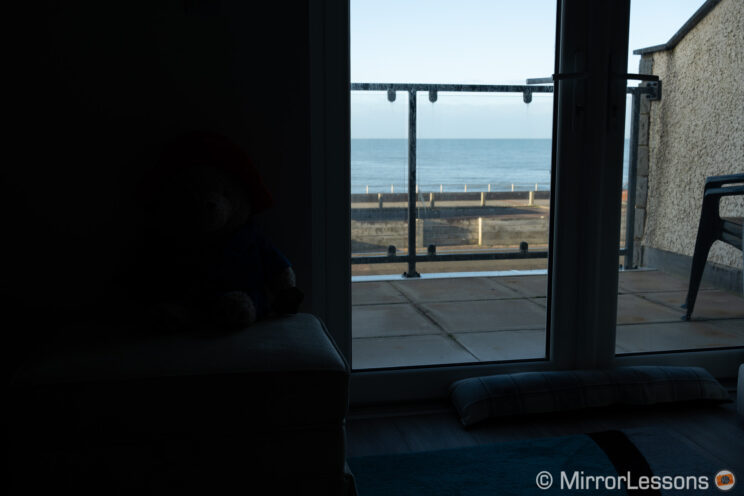
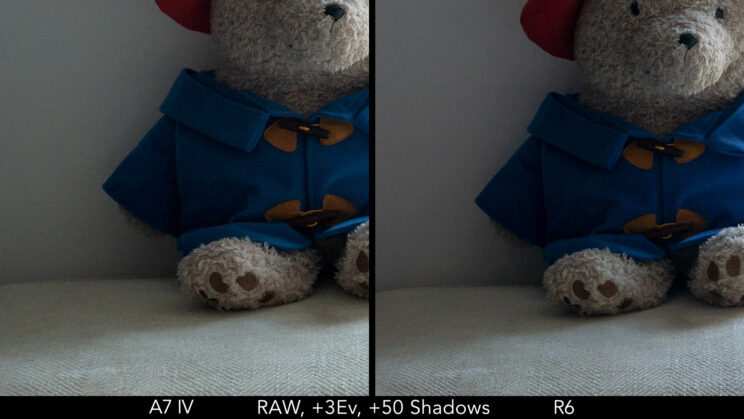
With a 3 stop recovery, the results are more similar. The A7 model stills displays a bit more noise, but also has less colour shift in the darkest zones.
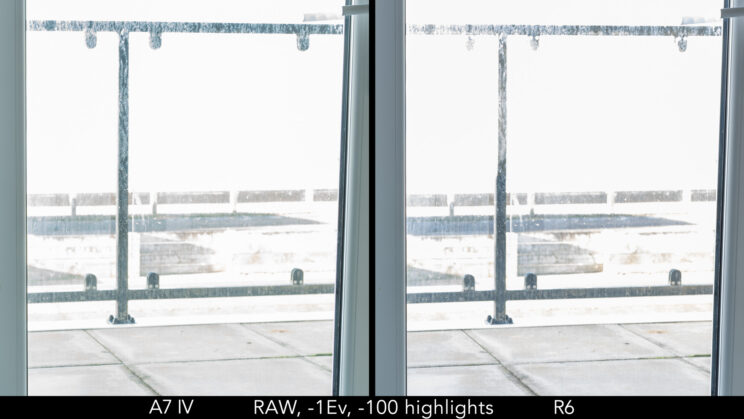
In the bright parts of the image, the amount of highlight preservation is the same.
Concerning image files, the A7 IV can shoot 14-bit RAW with three levels of compression: Uncompressed, Lossless Compressed or Compressed. The R6 has two: 14-bit RAW (lossless) or C.RAW (compressed).
These various options give you the following file sizes (on average):
| RAW Quality | A7 IV | R6 |
|---|---|---|
| Uncompressed | 68MB | – |
| Lossless Compressed | 38MB | 22MB |
| Compressed | 35MB | 12MB |
Note that with certain settings, RAW decreases to 12-bit. On the R6, this happens when using the electronic shutter. On the A7 IV, it happens when working in continuous shooting mode with Compressed RAW selected.
Both cameras have a few extra settings to control the JPG output. The Sony has the DR Optimiser mode with 5 levels, which opens the shadows mainly.
The R6 has the Highlight Tone Priority mode, which raises the minimum ISO by one stop (200) but maintains the same amount of details in the highlights as ISO 100.
ISO Sensitivity
The ISOs are slightly different between the two cameras as far as the normal range is concerned:
| A7 IV | R6 |
|---|---|
| 100-51,200 ISO (normal) | 100-102,400 ISO (normal) |
| 50-204,800 ISO (extended) | 50-204,800 ISO (extended) |
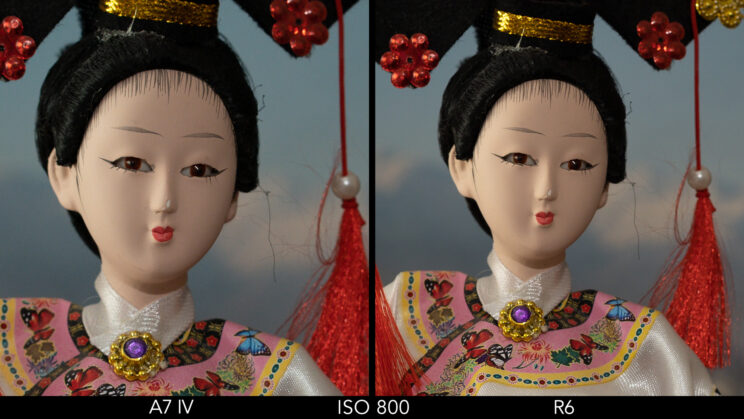
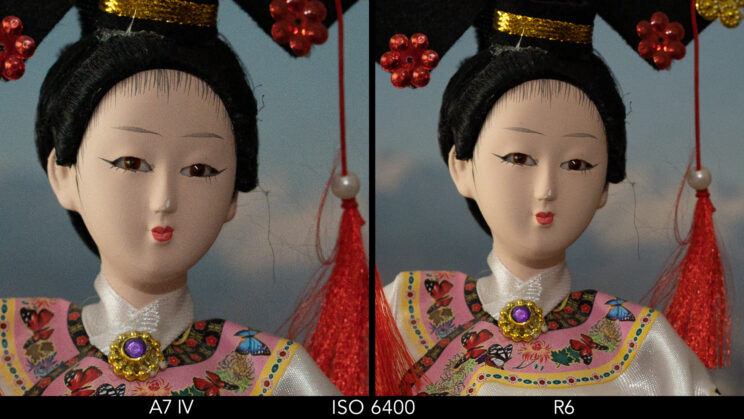
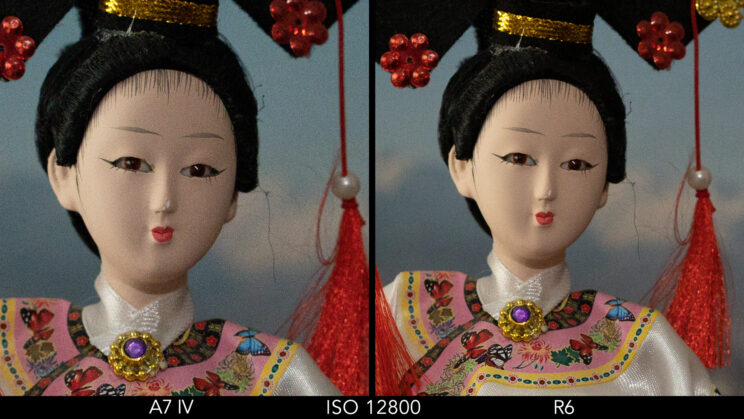
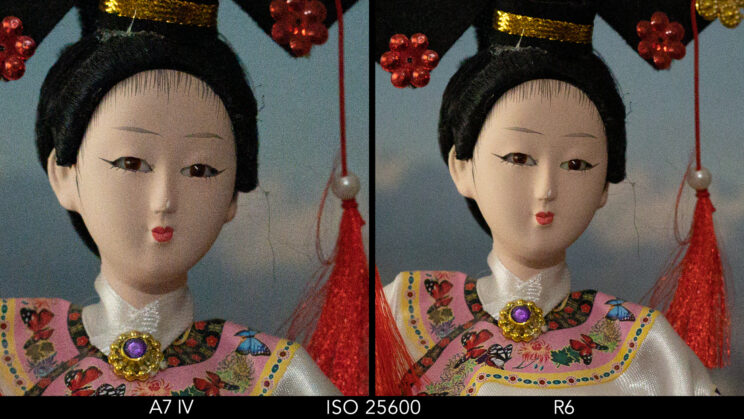
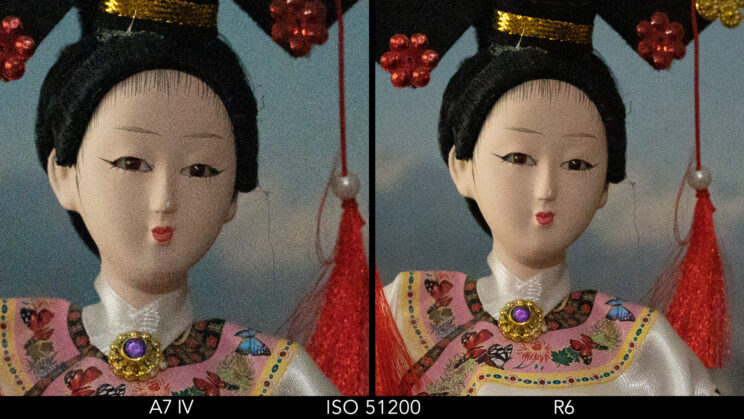
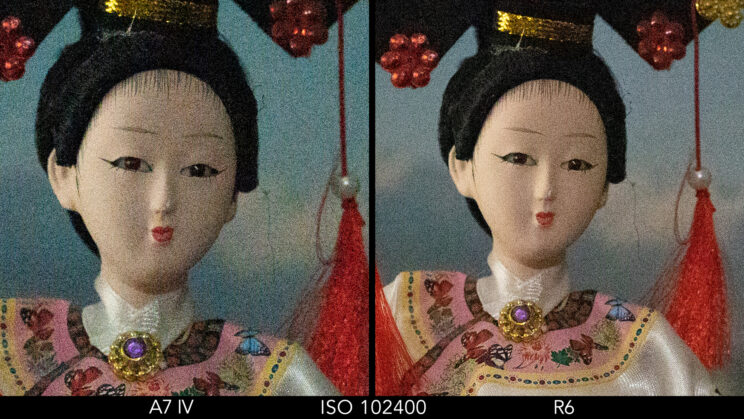
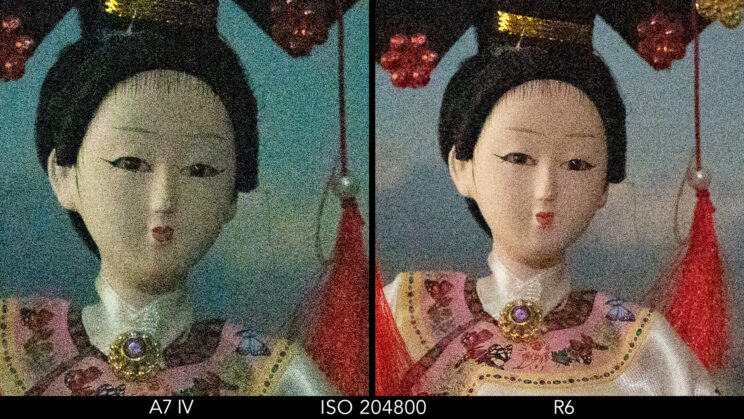
Now is a good time to mention that the brightness is not the same when using the same aperture, ISO and shutter speed on the two cameras. The A7 IV photo is approximately half a stop brighter than the Canon. I noticed the same thing when comparing the R6 with the A7 III.
Although there might be a difference in light transmission between the two lenses I used (FE 85mm F1.8 and RF 85mm F2), I think the two brands have calibrated their sensor slightly differently when it comes to sensitivity.
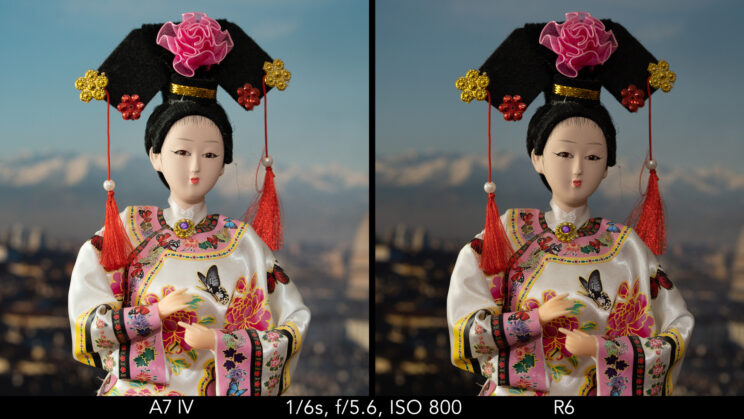
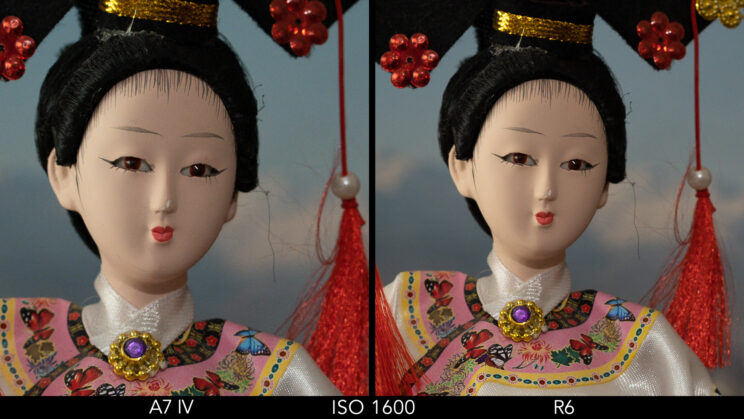
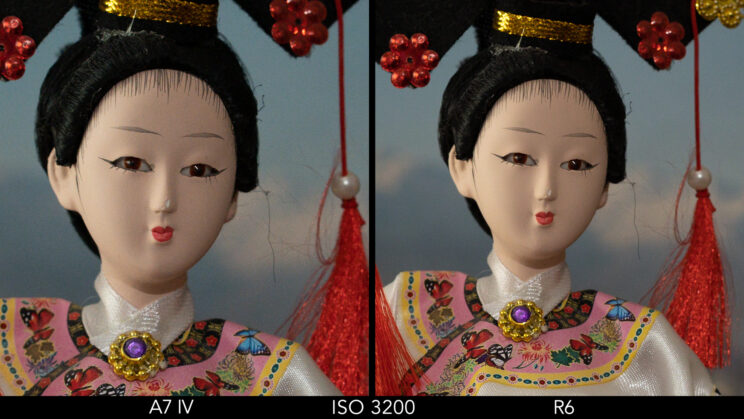
To make the side-by-side images easier to analyse, I tried to equalise the exposure as much as possible.
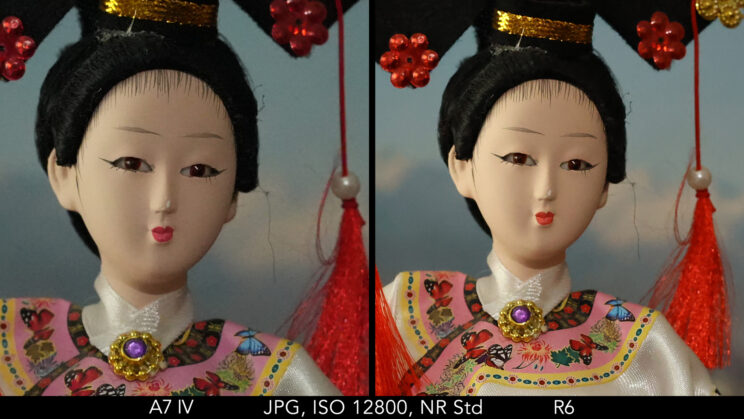
As expected, the R6 displays less noise overall, and the difference becomes more noticeable from 6400 ISO.
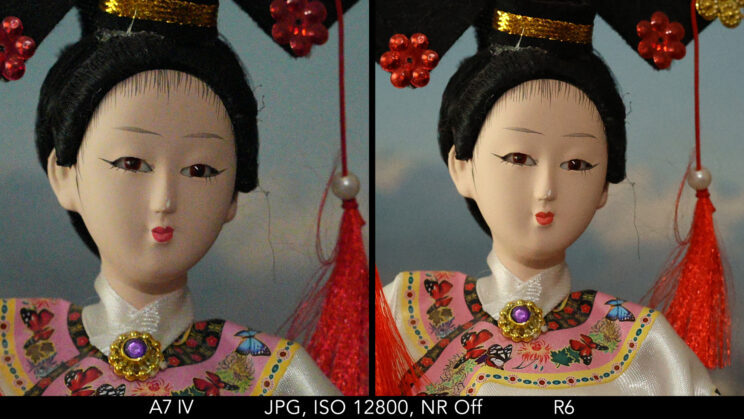
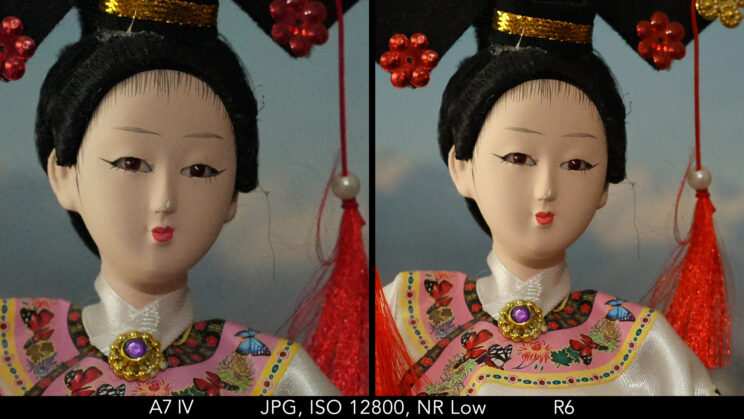
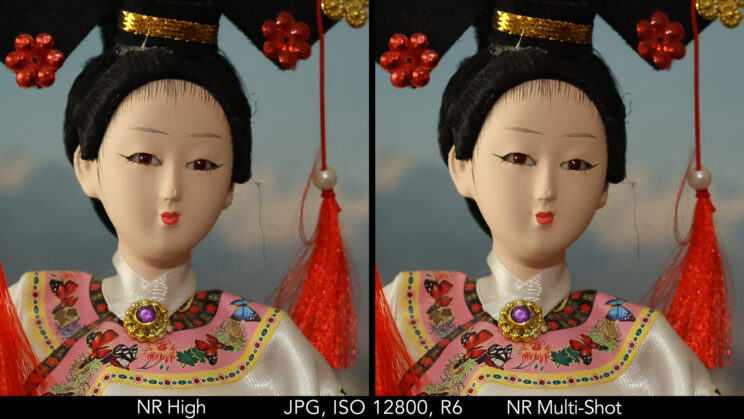
If you like to work with JPGs, both cameras have a Noise Reduction setting. If you leave NR off, the A7 IV image has more colour noise than the R6. If you set it to Low or Standard, colour noise is gone on the Sony but the Canon image is cleaner.
The R6 has two extra steps: the High level which starts to reduce details a little bit, and the Multi NR mode that merges three images to reduce noise further. The latter gives you a good balance between low noise and sharp details, but it won’t work well with moving subjects in your scene.
Colours and Parameters
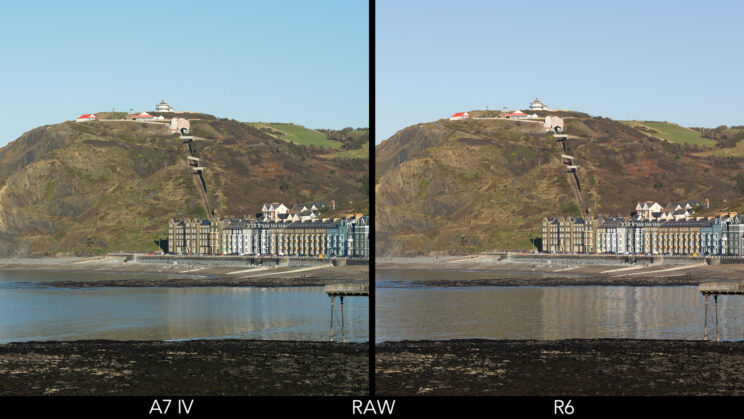
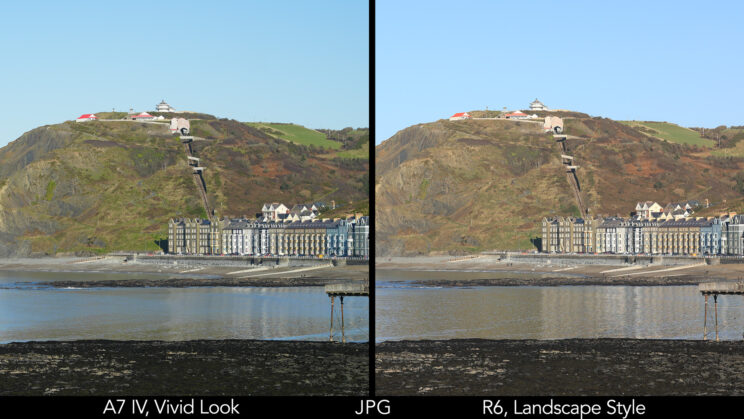
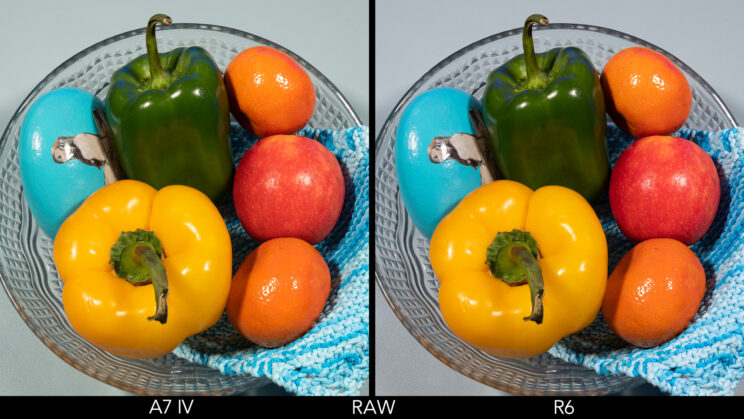
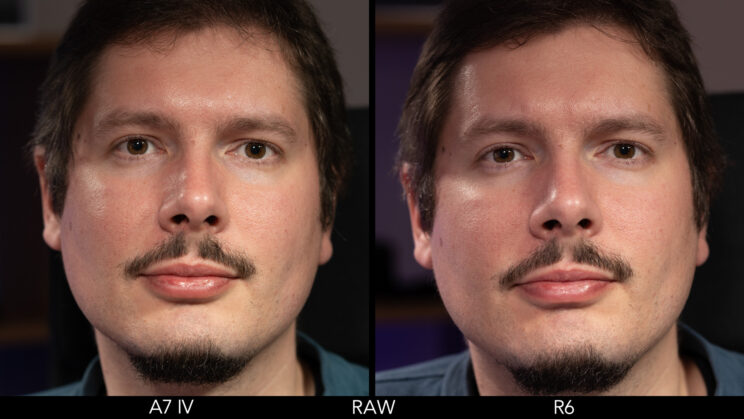
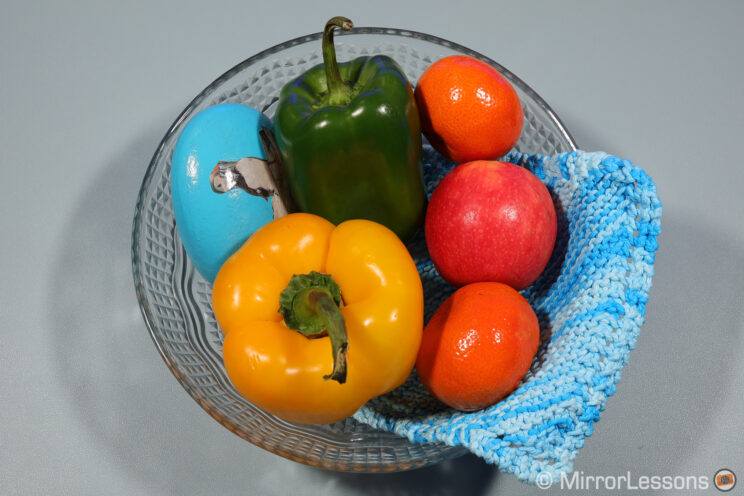
With the same parameters applied to both RAW files and, in this specific case, using the Adobe Colour Profile in Lightroom, the R6 image shift towards more magenta, whereas the A7 IV adds more green to the overall tint.
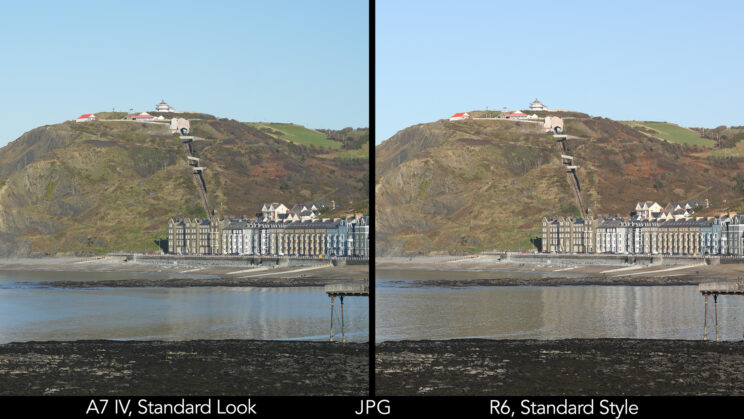
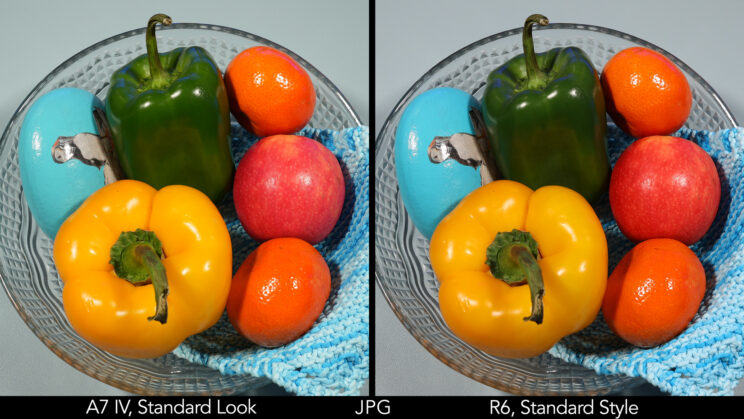
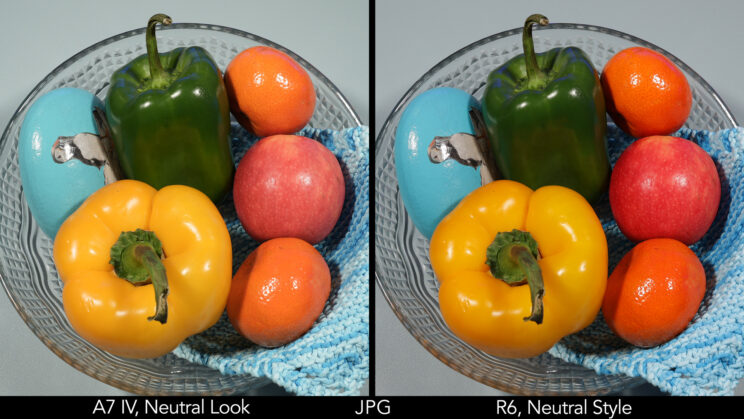
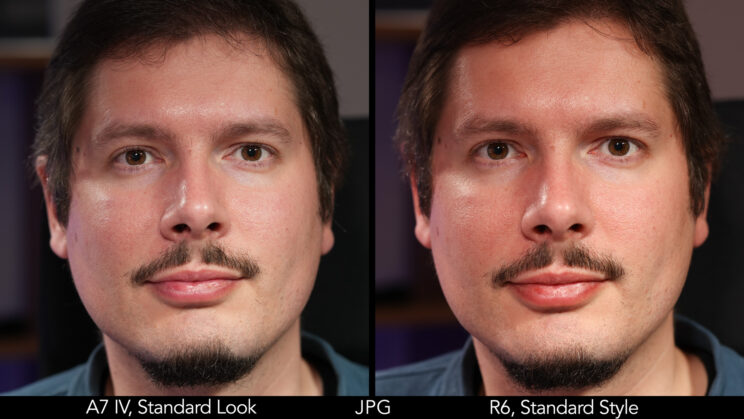
The same difference can be observed with the in-camera JPGs. Each brand has its own set of picture profiles. They are called Creative Look on the Sony and there are 10 of them. The Canon includes 7 Picture Styles.
If we look at a second example to analyse individual colours, you can see how the red of the apple is stronger on the Canon version, whereas the blue of the stone leans towards cyan in the Sony image. This is valid for RAW (equal parameters once again) and the Standard JPG profile.
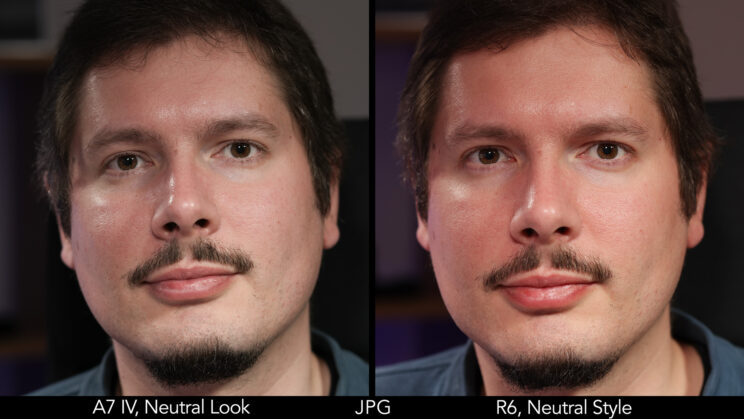
Most of the other profiles are quite different on each camera. For example, Neutral on the A7 IV has less saturation than the R6 version. Fine Detail on the Canon has lovely vidid colours, whereas Vivid2 on the A7 IV boosts brightness and clarity.

With skin tones, the R6 produces more red on the RAW file in comparison to the A7 IV (once again with the same parameters in Lightroom).
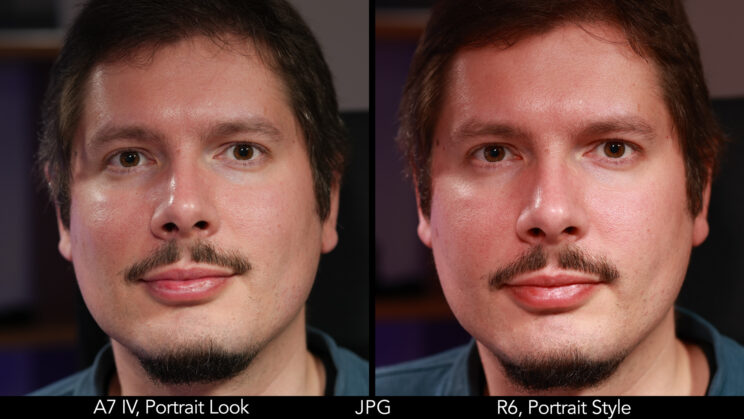
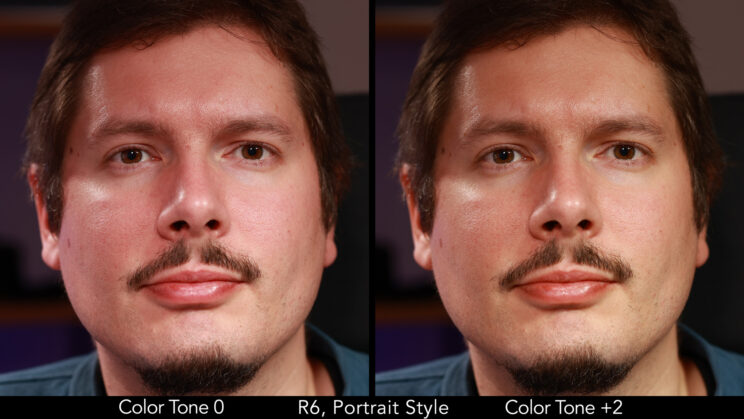
Switch to JPG and the push towards red becomes more evident on the R6 image. It becomes too strong for my taste on the Portrait Style. The A7 IV maintains a more balanced look.
The Neutral Style is my favourite on the R6 when it comes to skin tones, whereas that of the Sony lacks a bit of saturation with the default settings.
If you don’t like how a profile looks like with the default settings, don’t give up on it right away. Each one of them can be tweaked with various parameters on each camera, including sharpness, contrast and more. The A7 IV allows you to edit 9 different parameters, as opposed to six on the R6. These settings won’t affect the RAW file, only the JPG.
For example, adjusting the colour tone to +2 on the R6 reduces the reddish tone of the skin, giving you a more balanced look.
With RAW, the difference between the two cameras is less important, because you’re likely to post process your images in a different way, using specific presets to match your taste and preferences. Even various photo editor software can deliver different results from one another.
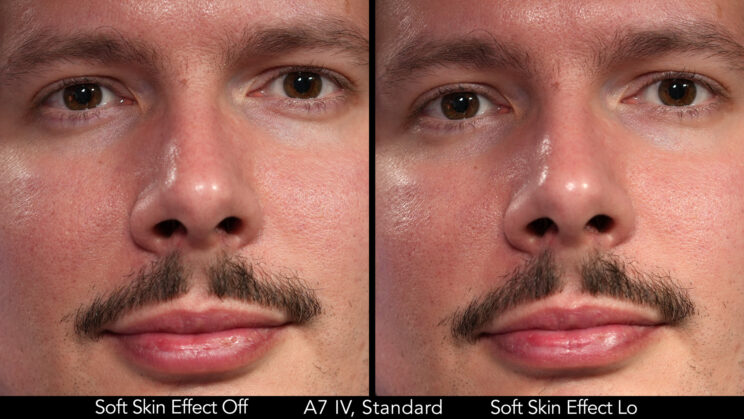
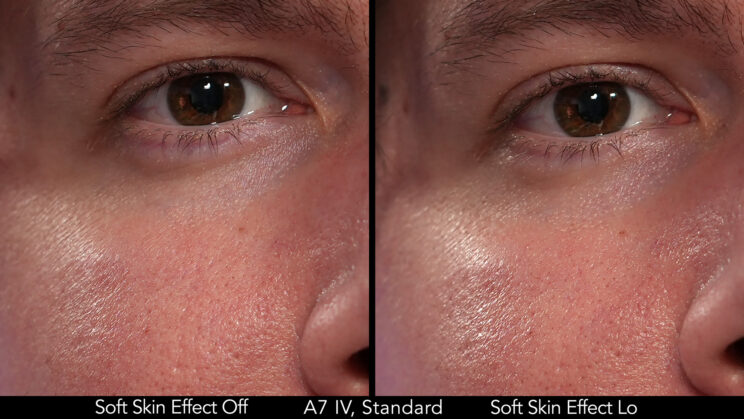
Finally, the A7 IV has a Soft Skin Effect setting that renders smoother skin tones on a person’s face. If you choose the Low level, I find the effect to be very subtle, and it’s not easy to see the difference at first, although the stronger wrinkles are reduced (under the eyes for example).
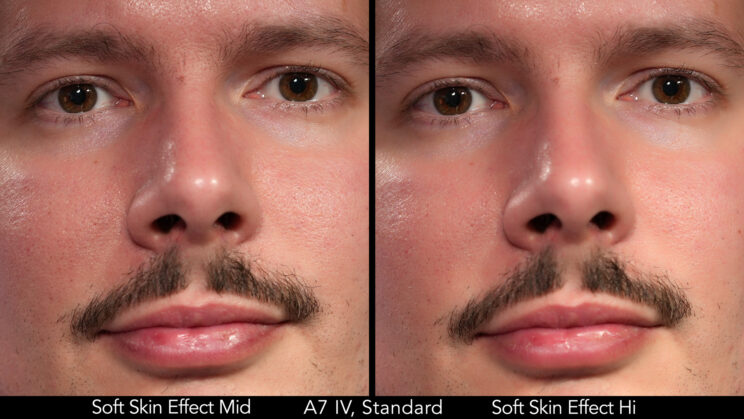
If you choose Medium, the effect starts to become apparent, whereas the Hi level makes the portrait unrealistic.
Other Settings
The two cameras include a lot of settings to control white balance automatically, with presets or by changing the kelvin temperature manually. If you choose Auto, they deliver similar results but the R6 goes for a cooler rendering when you select White Priority (in comparison to the same setting on the A7 IV).
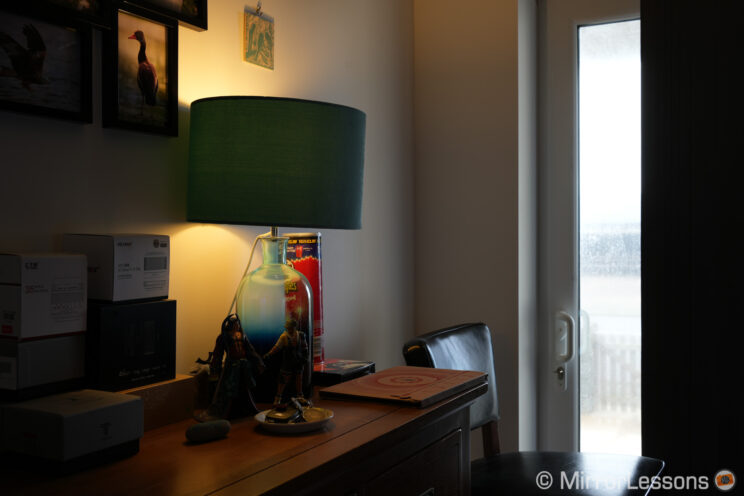
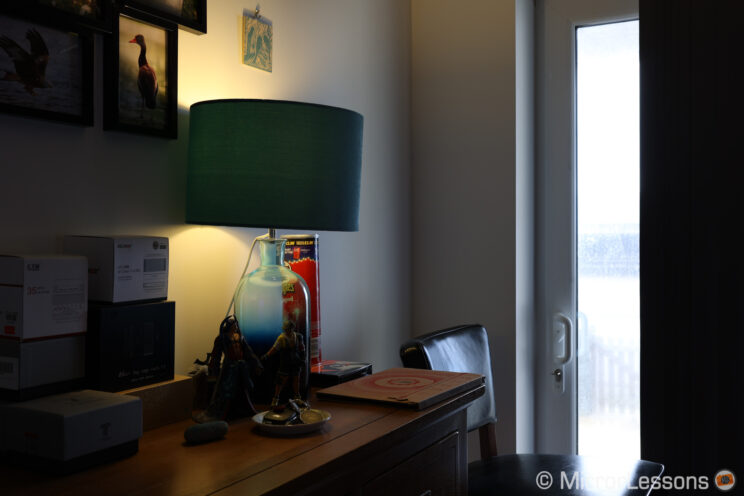
Finally, another option available on both products, in addition to JPG, is HDR/HEIF which works in 10-bit as opposed to 8-bit. Keep in mind that this format is still not widely used, nor is it compatible with every photo editor software (Lightroom can’t open them for example). The R6 can convert HEIF files to JPG in camera. With the Sony, you need to use the Imaging Edge software.
2. Autofocus
Both cameras feature an advanced autofocus system.
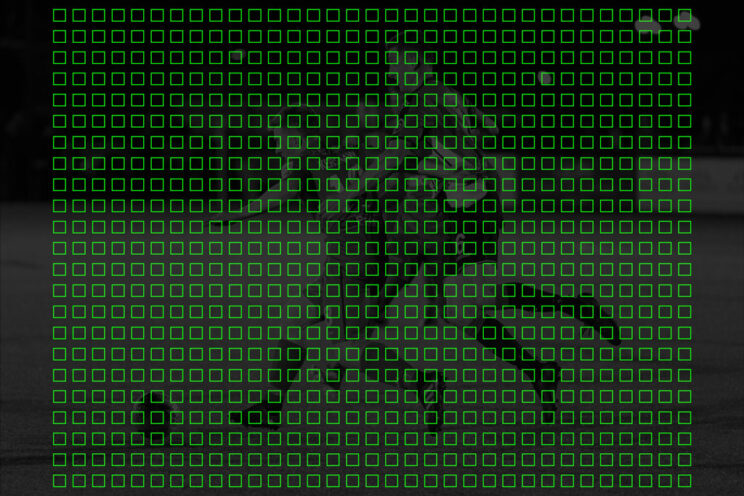
The A7 IV uses 759 phase detection points and 425 contrast detection points. The phase area covers 94% of the sensor. There is deep learning A.I. with real-time tracking and Eye AF. The latter works for humans, animals and birds, for photos and movie recording.
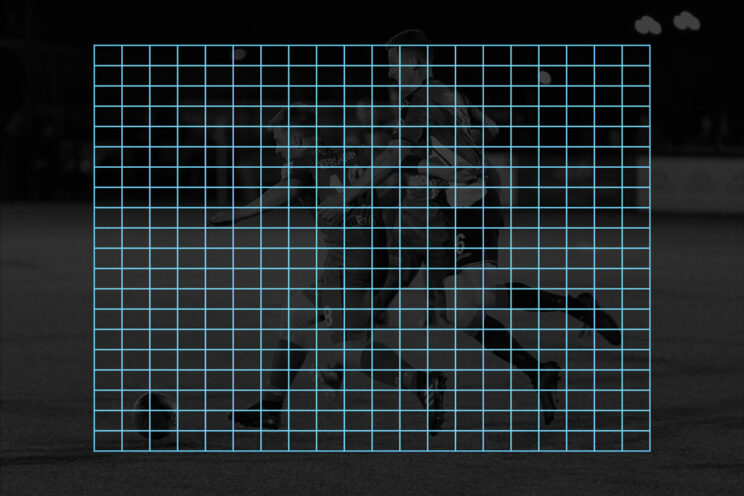
The R6 has Canon’s Dual Pixel CMOS AF II technology with 100% coverage when Tracking AF is used. (Otherwise it’s 100% horizontal and 90% vertical with other AF methods.) With the single AF method, there are more than 6,000 points. With the Tracking mode, 1,053 areas are used.
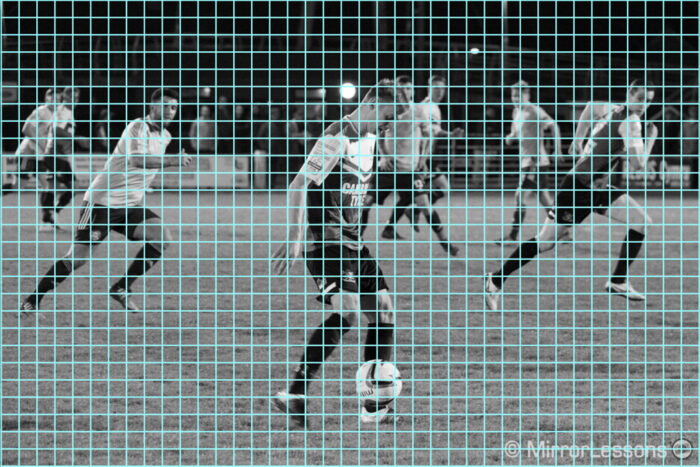
The R6 also features a deep learning algorithm and can detect the body, face or eyes of humans and animals, including birds. The latter works for video too.
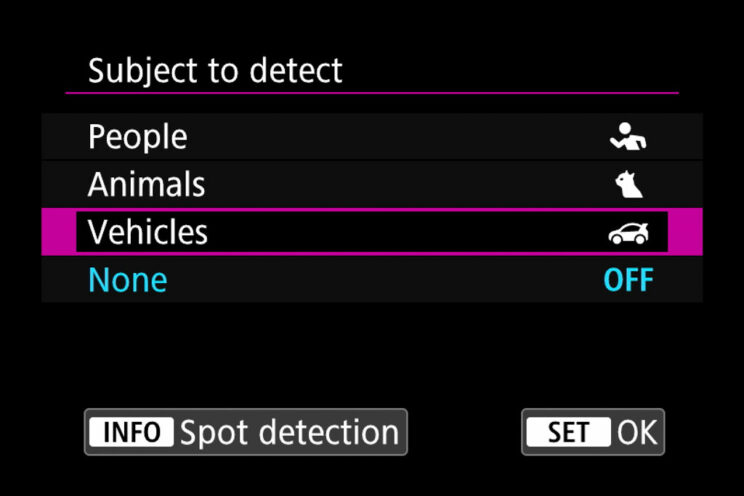
Additionally, the Canon can detect vehicles (formula race cars, rally cars, motorbikes). Unfortunately, I couldn’t test the this because it came later via a firmware update (1.5.0) and I haven’t found an opportunity to try it at a motorsport event yet.
Single AF
In Single AF mode (One Shot AF on the R6), the two cameras are fast and accurate. I rarely had any issues whatsoever, although I admit I don’t use S-AF at lot. I prefer C-AF and the back button AF method.
That said, and for the sake of this article, when I put the two cameras side by side, the R6 feels a bit snappier and more reactive overall, whereas the A7 IV can take a little longer to acquire focus. But I am nitpicking here, so don’t worry too much about this. Also, the performance can vary depending on the lens used.
Autofocus in Low Light
The R6 has an advantage in low light thanks to the greater sensitivity:
- A7 IV: -4Ev (f/2 aperture)
- R6: -6.5Ev (f/1.2 aperture, or -5Ev at f/2)
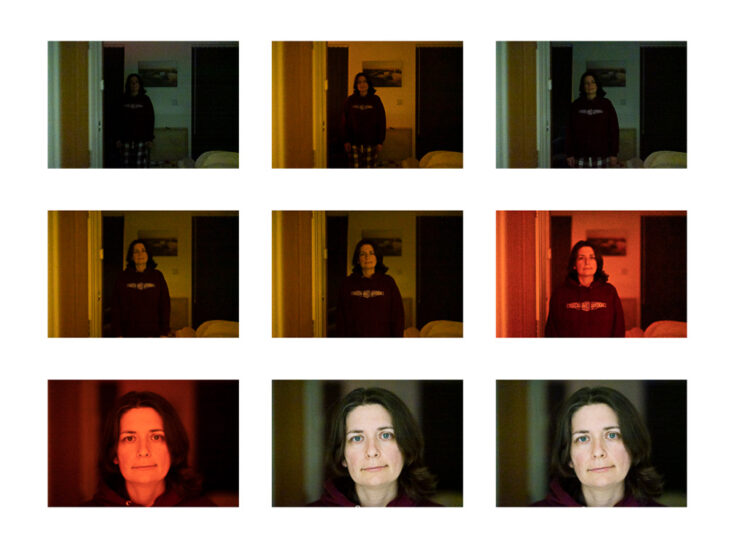
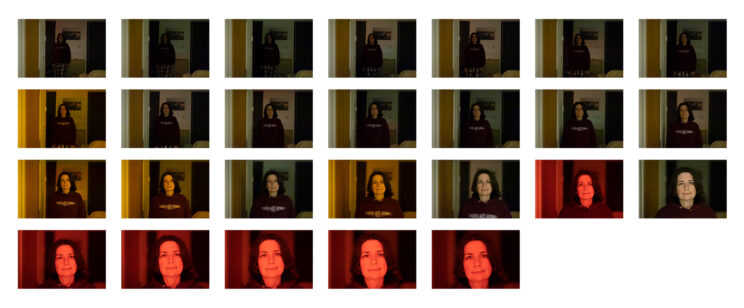
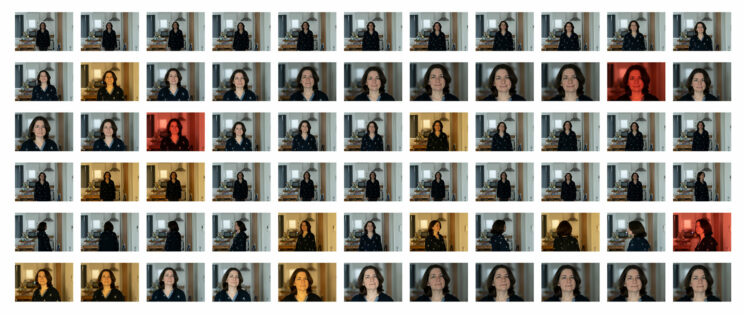
In the sequence below, the subject walked from the living room to the kitchen. There was only a weak LED light behind the TV in the living room, and another small string of LED lights in the kitchen under the shelves.
I set the drive mode to 3fps on both cameras, then selected tracking with eye detection and focus priority. I used the Sony FE 85mm F1.8 and the Canon RF 85mm F2.
The R6 took 26 shots, whereas the A7 IV only managed 9. The Sony was able to follow the person at the beginning of the walk, but then lost her completely until she arrived in front of the camera, which is the reason it took less images.
The Canon managed to track the subject all the way, but didn’t deliver a perfect sequence. With a 62% hit rate, it did better than the Sony, but also struggled to refocus correctly on the face at the end, where there was better light. It looks like the system got confused.
Another thing I noticed is that the R6 failed to detect the face and the eyes during the entire sequence, reverting to the normal tracking mode, whereas the A7 model was able to detect the eye most of the time.
What is curious is that in my A7 III vs R6 comparison, the Canon was capable of detecting the eyes in similar dark conditions, and with a slower lens (RF 24-105mm F4). Perhaps the camera struggled more with the 85mm because it has a different AF motor, or maybe the various firmware updates changed something. Unfortunately, I didn’t have the same set of lenses as last time to double-check my findings. The takeaway is that the R6 is better overall, but not 100% reliable either.
As an additional note, both cameras can use phase detection in continuous shooting mode down to f/22, which means that the performance is not affected when using telephoto zoom lenses and teleconverters.
Tracking and Eye AF for Humans
In the test below, the person walked back and forth, and then walked forward again while turning 360˚. The goal was to see not only how precisely each camera would be in maintaining focus on the eyes, but also how they would behave when the face is hidden.
The Sony gave me a very good keeper rate of 80%. It struggled a bit more when the subject walked backward, and when she turned.
The R6 did better, with a keeper rate of 86%. It’s not a great difference, but the Canon struggled less when the person wasn’t facing the camera.
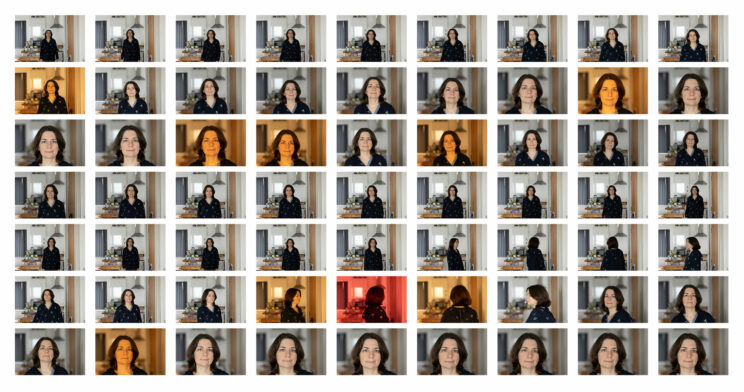
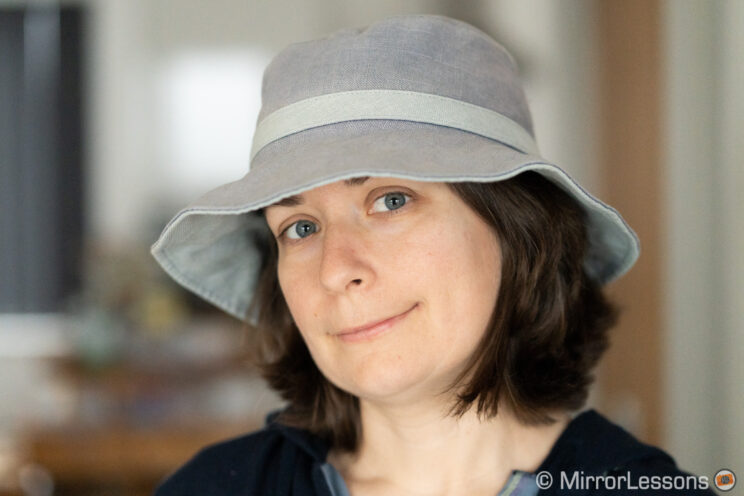
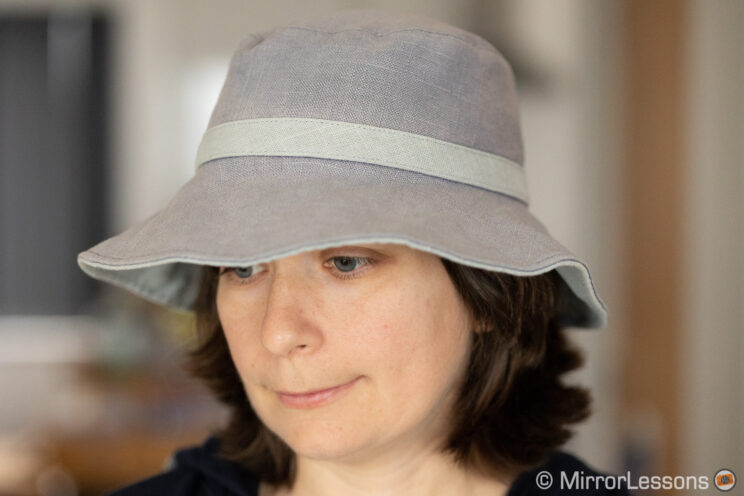
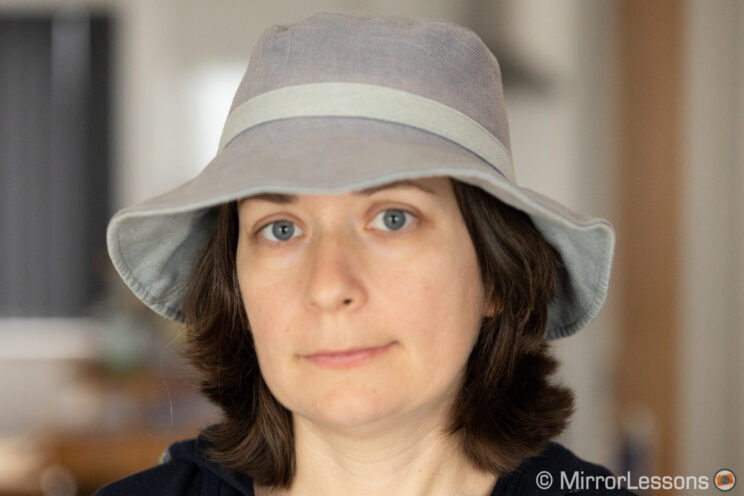
With a static subject that only moves his or her head, both cameras do really well. If the person wears a hat, they do a good job of focusing on the eyes even when they are about to be covered by the rim of the hat.
That said, the R6 can occasionally get confused and focus incorrectly for a few shots.
Since publishing my A7 III vs A7 IV in-depth comparison, some of you asked me if I had the same front-focusing problem with the Sony when using Eye AF (which was also mentioned by DPreview). The answer is no, I haven’t. I took various portraits of my wife and a lot of pictures of my toddler without finding anything out of the ordinary. Of course, it’s not always 100% accurate, but that is to be expected when using a fast aperture and chasing a young child that never stops moving.
On the R6, face and eye detection only works with the Tracking mode. You can’t select them with other AF Methods (areas). On the A7 IV, Eye AF can be used with any autofocus area, but I advise you to use it in conjunction with Tracking (or real-time tracking as Sony likes to call it).
Tracking on the A7 IV analyses the scene on different levels (brightness, depth, colour, focus, face and eyes) and is very precise. It will prioritise face and eyes when detected, but also continues to track the subject seamlessly when those are hidden. I find it to be the best setting to take pictures of my child walking and running around.
Tracking on the Canon doesn’t have a fancy name like the Sony, but is equally reliable and precise.
Both cameras allow you to prioritise the left or right eye, which is very useful when taking portraits. On the A7 IV, you can do this with the help of a custom button. On the R6, you move the AF Joystick left or right. The latter also allows you to go from one face to the other if there is more than one person in the frame.
Eye AF for Animals and Birds
The R6 can detect different part of the body of animals and birds, including the face and the eye. If the subject is too far, it will concentrate on the body, or the head depending on the situations. It switches to the eye once the animal fills a bigger portion of the frame.
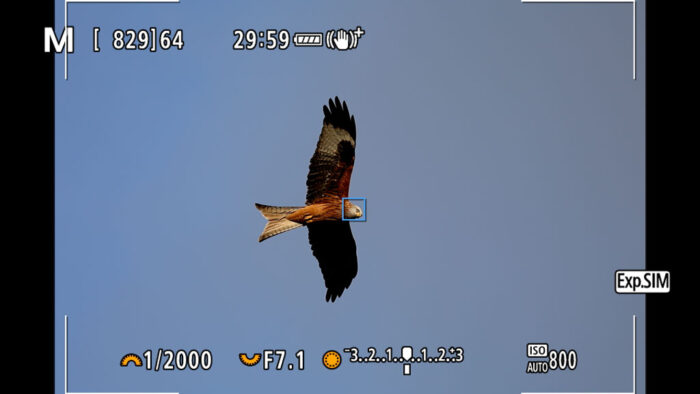
The A7 IV can only detect the eyes of animals and birds, it doesn’t distinguish between body and head like the Canon does. If the eyes are not detected, it follows the subject with the tracking mode or other AF area selected (I recommend using Tracking).
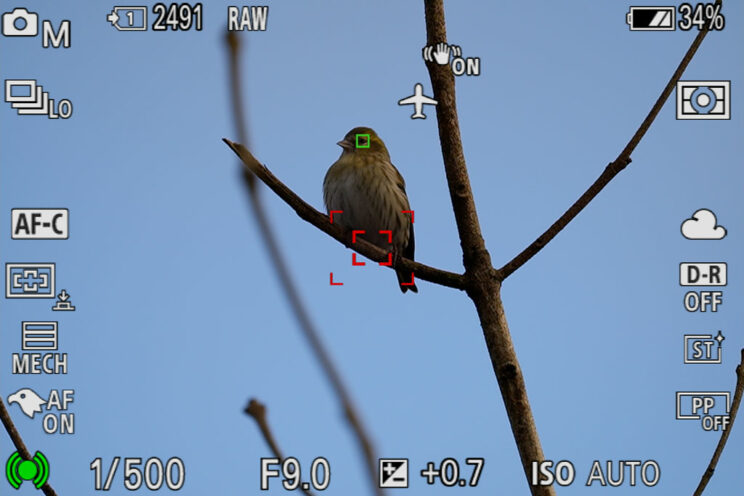
With the Sony, you need to select in the menu (or via a custom button) which subject you want to track: human, animal or bird. The camera won’t switch automatically between them.
On the Canon, you have to choose between humans or animals (which includes birds).
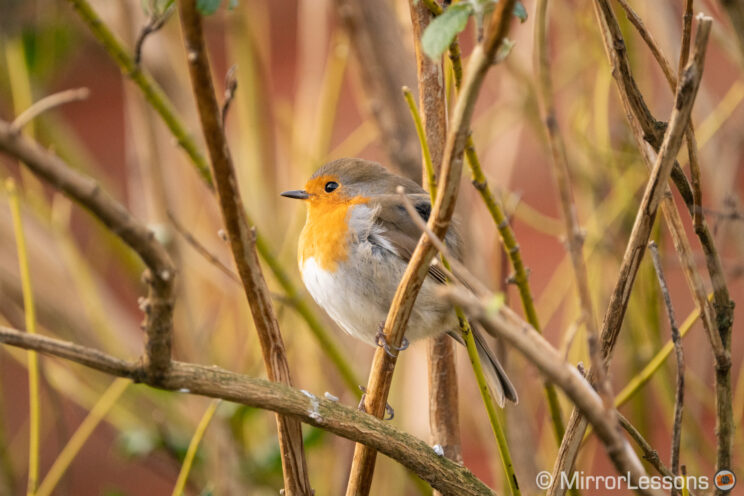
Bird detection works really well. It helps to ensure that the eye of the subject is in focus (as opposed to the body, which can lead to the eye or head being slightly soft). It also makes the composition easier to manage because you don’t have to move a small AF point manually with the joystick.
It can also work well if the animal is partially hidden by a natural element, such as branches on a tree. However it is preferable to start tracking the bird when the body is clear (when possible), otherwise the camera might mis-focus on the nearby branches.
Eyes are not always detected depending on the species. For example, the A7 IV struggles with ducks, unlike the R6.
Birds in Flight
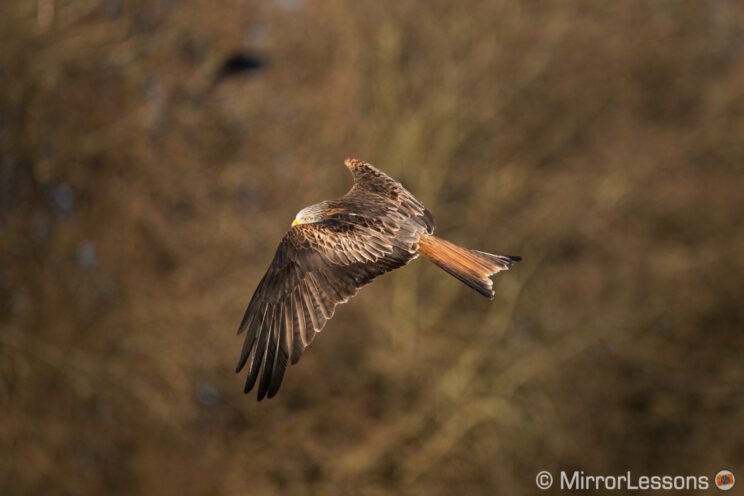
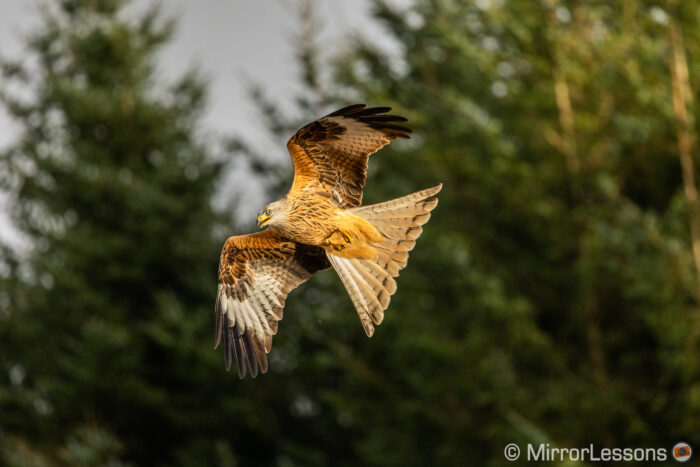
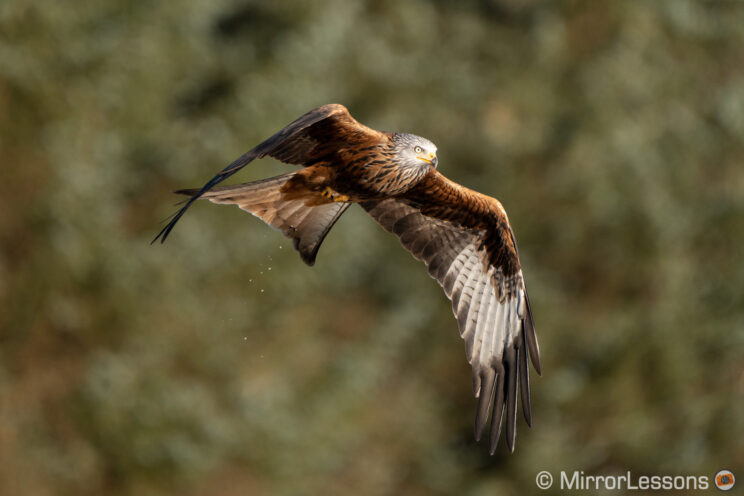
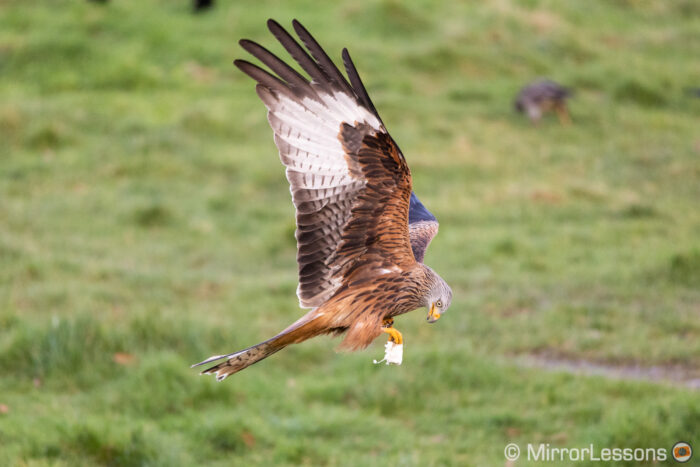
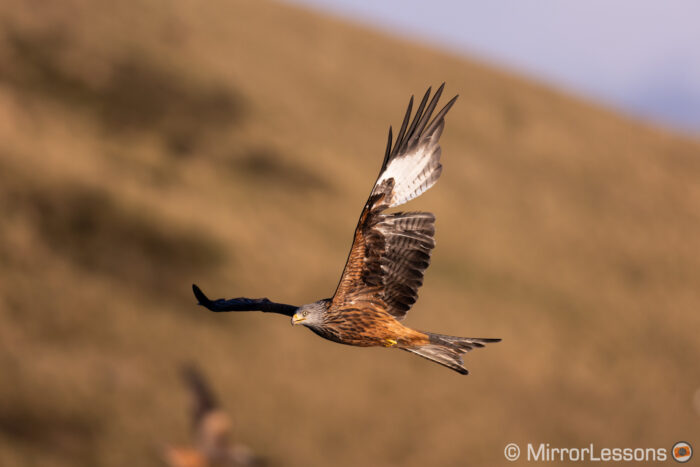
Moving on to my trusty red kites, both cameras deliver very similar results and the best score is almost identical.
| A7 IV | R6 | |
|---|---|---|
| Best Score | 94% / 99% | 93% / 97% |
| Average Score | 89% / 97% | 86% / 95% |
Note: Green (sharp images only) – Blue (sharp and slightly soft images).
The average score includes different days I went to the red kite feeding station, and various setting combinations I tried. Find out more about my birds in flight test.
In both cases, the tracking mode gave me the best result. Having Eye AF activated doesn’t make a huge difference on the A7 IV. The camera rarely detects the eye, unless the bird is really close to the camera.
On the R6, I find that Animal detection improves the keeper rate, giving me the best result written in the table above. It may not always detect the eye, but often detects the head, or switches to the body when the bird is more distant. If the bird is not detected (rare), the camera uses the normal tracking mode which is very effective.
So far, I’ve only tested the A7 IV with the 200-600mm G lens, whereas I had the chance to use the R6 with three different lenses: RF 100-500mm, RF 600mm F11 and the 13 years old Canon EF 800mm 5.6 with adapter. The camera gave me consistent results with all of them.
AF Settings for Photography
Both cameras offer a series of settings to control how the autofocus behaves. In addition to various focus areas, the A7 IV can make the AF more or less responsive (AF Track. Sens.), and prioritise the release of the shutter or focus accuracy.
The R6 has all that, and then some. It includes the Servo AF Cases with 4 presets that can be edited with two different parameters (Tracking sensitivity and Acceleration/Deceleration Tracking sensitivity). There is also an additional page in the menu with advanced setting that are not easy to understand at first.
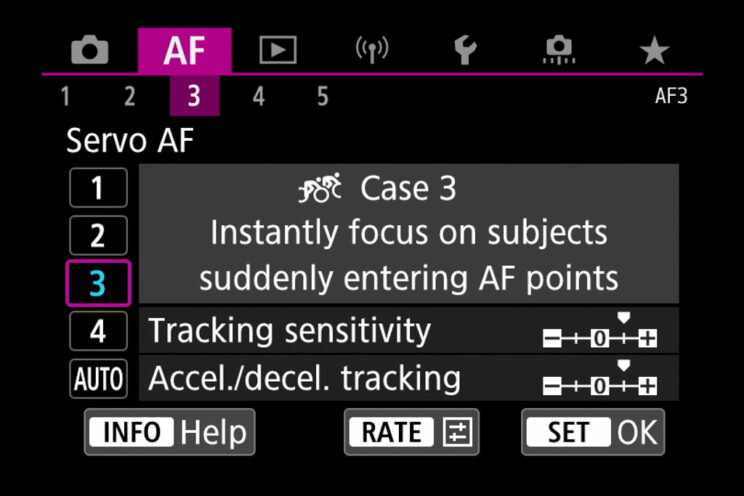
Fine-tuning the Canon for the maximum performance can take some time, but it’s worth saying that even without the absolute best settings, the R6 maintains a good performance and keeper rate. You can find out more about all the settings, as well as the best ones to use for wildlife/birds, in our Canon R5 / R6 set-up guide.
Then we have additional options but I won’t dig into them too much. For example, both cameras allow you to exclude certain AF areas from the menu (if you don’t need them), or adjust the number of steps required to move a single AF point on the screen. The A7 IV also allows you to change the colour of the AF area displayed on the screen.
AF Performance and Settings for Video
As stated earlier, face and eye detection also works when recording movie clips.
My tests with a human subject showed that the two cameras perform in the same way. The A7 IV is slightly slower when the subject is close to the lens, whereas the R6 lost focus momentarily when she moved away from the camera.
When she was wearing a hat, both products did an excellent job of keeping focus on the eye, and went back to the eyes after she covered her face momentarily. The R6 didn’t exhibit the same hesitation I found in the photo mode.
Eye AF with animals and birds works as well as it does in photo mode, with the same limitations described above.
Concerning the extra settings, both cameras allow you to control the sensitivity and speed of the autofocus to suit different situations. When set for the fastest performance, the R6 is slower than the Sony, whose focus shift can be almost instantaneous.
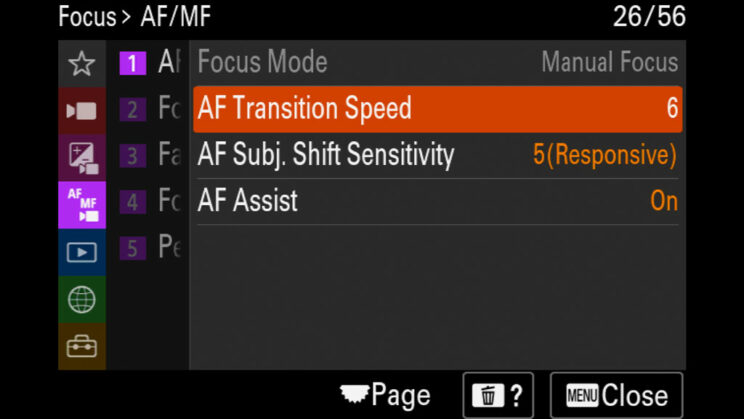
Another way to use these settings is to record slow and pleasant transitions from one point to the other in your image. In this case, both cameras allow you to find the right speed, but the R6 has an abrupt beginning and ending, whereas the A7 IV accelerates gradually at the start and decelerates gradually at the finish, giving you a smoother result.
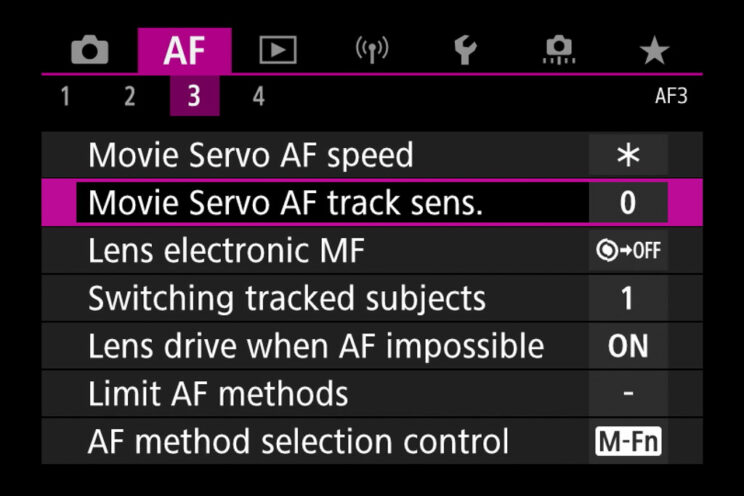
Manual Focus Assist
Both cameras offer focus magnification and peaking, but I would like to talk about two other functions that I find useful.
On the A7 IV there is Focus Map, a setting that overlays a graphic visualisation of your depth of field. Cool colours show what is behind the focus point, and warm colours what is in front of it. The areas of the image where there is no colour overlay show what is in focus, or more precisely what is within the depth of field.
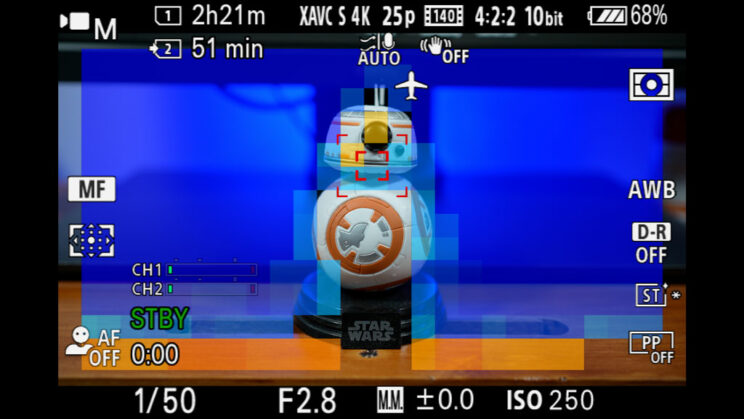
It takes some time to get used to it, and you may find the amount of vivid colours too invasive, but it works really well and with a great amount of precision, even when using a fast aperture.
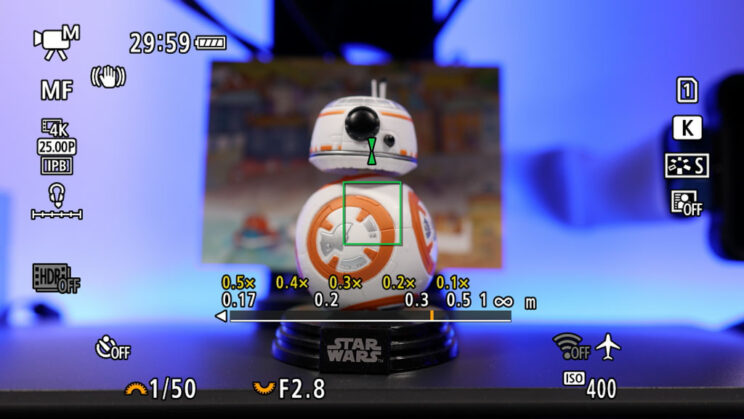
On the R6, you’ll find my favourite MF assist, Focus Guide. It uses the phase detection points of the Dual Pixel CMOS AF and tells you how much to adjust, and in which direction, to nail focus. Once you’ve achieved focus, the icon becomes green. It is the most precise and easy-to-use function I’ve ever tested on any cameras.
3. Shutter and Continuous shooting
The two cameras offer three shutter modes: mechanical, electronic first curtain and electronic. The maximum shutter speed available is 1/8000s, regardless of the shutter mode used.
When using a flash, the Canon syncs up to 1/250s with the electronic-first curtain and 1/200s with the mechanical shutter. The A7 IV works up to 1/250s with both.
When using the mechanical mode, the R6 has a quieter shutter sound than the A7 IV. With the electronic mode, they can both take pictures without emitting any noise.
Continuous Shooting
The R6 offers more drive speed: it can go up to 12fps with the mechanical shutter, or up to 20fps when using the electronic shutter. These speeds are available with AE and AF Tracking.
The A7 IV has a maximum of 10fps (mechanical or electronic mode), with exposure and autofocus tracking.
Note that the fastest speeds are not always available on the two cameras. For example, the Sony works at 6fps if you shoot with Uncompressed or Lossless Compressed RAW.
On the R6, various conditions such as cold, low battery or a shutter speed slower than 1/1000s can impact the fastest speed and cause it to drop to 9fps or even 7fps when using the mechanical shutter (data for the e-shutter is not available). With the electronic shutter, you can’t select a speed lower than 20fps.
At 10fps on the Sony, or 12fps/20fps on the Canon, live view is disabled and you see the last image taken in rapid succession. This gives you no blackouts, but what you are seeing is not live, but what just happened a few moments earlier. The fast burst of 20fps gives you a smoother view of the action, obviously.
At 8fps and lower speeds, the two cameras show you live view with blackouts.
On the R6, there is a setting called High Speed Display that works with the H burst only (8fps). When activated, the camera ‘covers’ the blackout with the image you just captured. Basically, the view constantly alternates between a live image and recorded image. Canon says that this solution makes the display more responsive, but I personally don’t like it because it gives you a feeling of latency.
Electronic Shutter Limitations
The advantage of the electronic shutter is to take pictures in silent mode. Also, it doesn’t affect the life-cycle of the mechanical shutter. Additionally, in the case of the R6, it allows you to record with a faster burst rate.
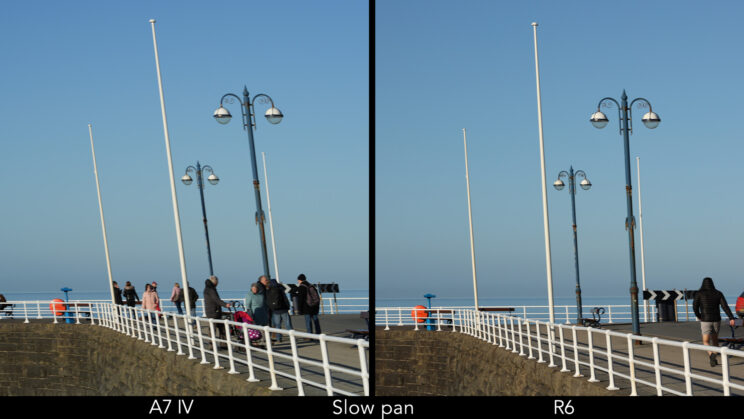
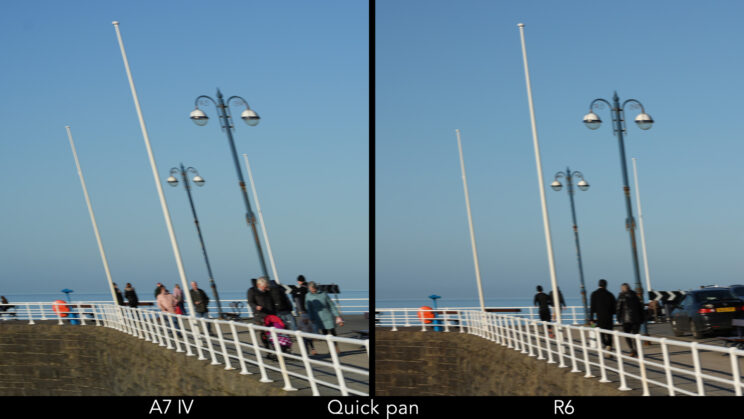
Using this function brings well known limitations you need to remember. The first is the rolling shutter effect, where lines appear distorted when moving quickly with the camera. The R6 suffers visibly less from it than the A7 IV, as you can see below.
Another problem of using the electronic shutter is banding, which is a series of horizontal lines that appear in your photos when working with certain types of light sources (fluorescent, LED). Sometimes it is very visible in the live view, sometimes you’ll need to magnify the image to notice it.
To reduce the chance of banding appearing in your images, the A7 IV has a setting called Variable Shutter, which allows you to adjust the shutter speed to a higher degree of precision than the default 1/3 step, and match the same frequency of the light source. It is available for photos and video.
In the example below, you can see how choosing a speed of 1/64.2s got rid of the problem.
Note that the Variable Shutter might not always be 100% effective so, when you can, take a few test shots and inspect your images carefully.
Finally, the Variable Shutter is different from the Anti-Flicker function, that is also available on the R6. The latter adjusts the speed of continuous shooting to match the 100Hz or 120Hz frequencies, which is useful to maintain a constant exposure across all the frames. It works with the mechanical shutter only.
Buffer
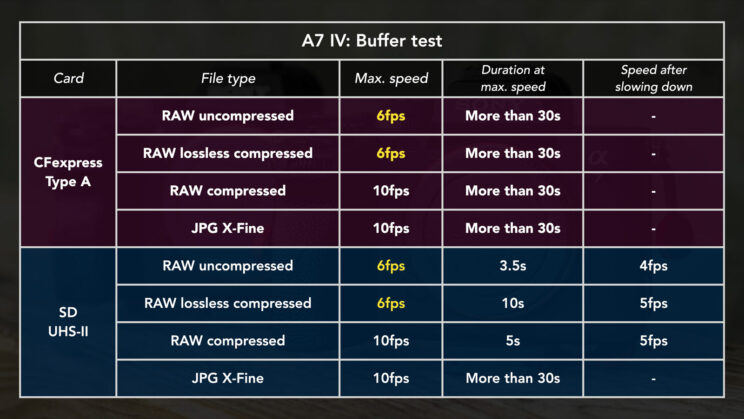
The A7 IV can shoot at 10fps for more than 30 seconds with RAW or JPG, as long as you use the CFexpress card. If you use an SD UHS-II card, the camera slows down after 5s when using RAW, continuing the burst at half the speed.
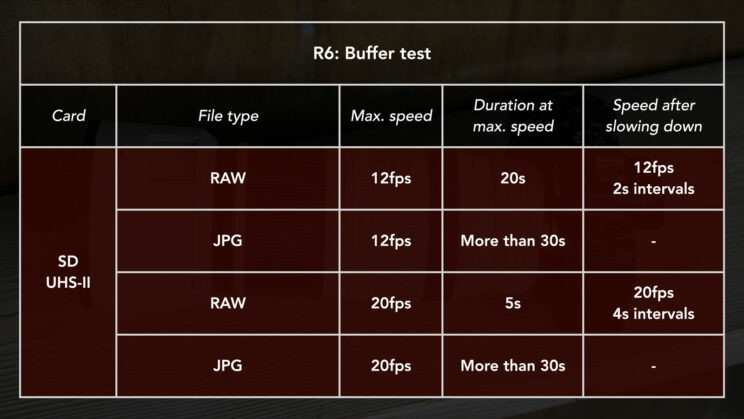
The R6 maintains the full speed of 12fps (mechanical shutter) for about 20 seconds. Then it does something different than the Sony: rather than slowing down the frame rate, it maintains the 12fps burst but with pauses of 2 seconds in-between.
At 20fps with the electronic shutter, the full speed on the R6 lasts for about 5 seconds, then there are 4 seconds-long pauses between bursts.
4. Stabilisation system
The A7 IV includes 5-axis stabilisation (IBIS) with an official rating of 5.5Ev of compensation.
The R6, on paper, offers superior performance with a record 8 stops of compensation. Keep in mind though that the rating can drop down to 7.5, 7 or even 6 stops depending on the lens used.
Stabilisation In Photo Mode
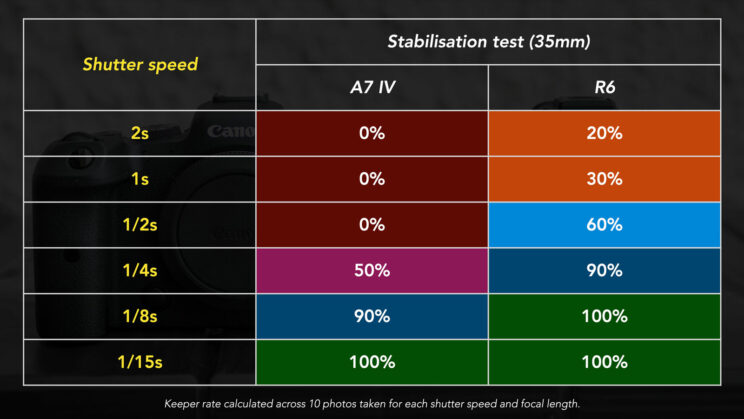
My test consists of taking 10 pictures for each shutter speed I want to try, and then analyse how many images are sharp and how many have motion blur.
I used the FE 35mm F1.8 on the A7 IV, and the RF 35mm F1.8 IS on the R6.
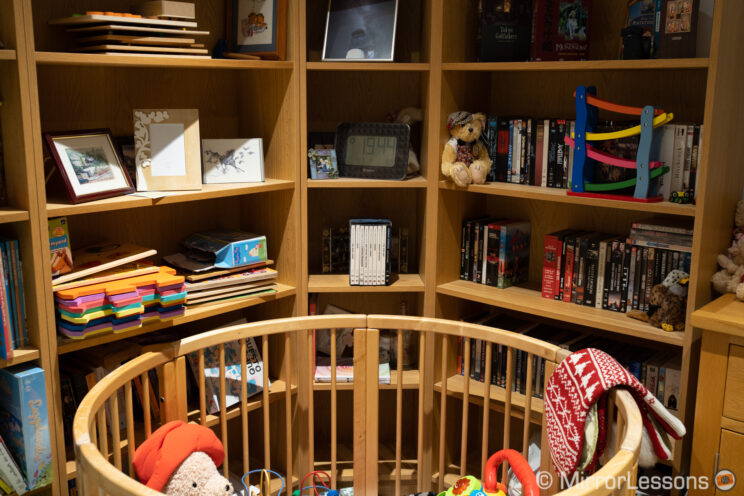
As you can see above, the R6 can manage a few shots with a shutter speed of two seconds, which is really good. The keeper rate improves from half a second, and is perfect from 1/8s. What is also interesting is that, among the bad shots taken at 2s and 1s, none of them are extremely blurred. You really need to zoom in on the image to notice the lack of clear details.
The A7 IV struggles with anything below 1/4s. Although it represents a minor improvement over its predecessor, the performance remains very similar to older A7 cameras, including the mark II model released in 2014 (the first full frame camera with IBIS).
The 35mm lens I used with the R6 has optical stabilisation, and at this point you might want to point out that it’s not a fair comparison, since the Sony lens lacks OSS.
The quick excuse for this is that I didn’t have a non-stabilised Canon lens, or a stabilised Sony lens with me. But there is also another factor to consider.
Canon has designed its IBIS system in conjunction with optical stabilisation on its lenses. They are designed to work together and most RF lenses are stabilised, except for a few primes.
There are fewer Sony lenses with optical stabilisation, I guess because the brand thinks the internal IBIS of the camera is enough (there might be other reasons of course).
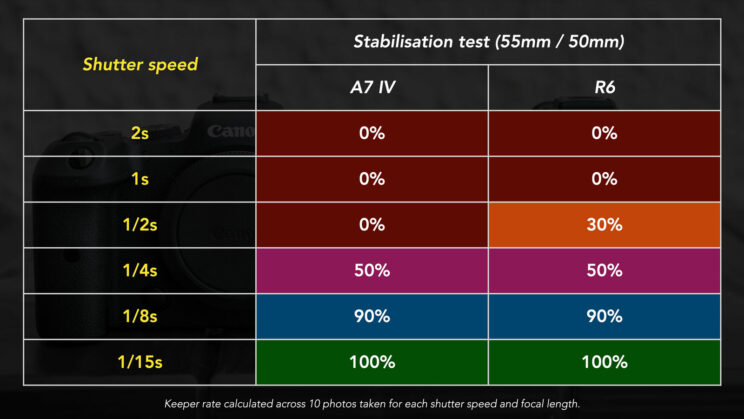
That said, I can provide you with additional feedback, because in 2020 I tested the R6 with the RF 50mm F1.2, which lacks optical stabilisation. Compared with my results on the A7 IV using the Sony 55mm lens, this is what happens.
The performance is more similar, but the R6 remains capable of better results with slower shutter speeds.
It is also worth pointing out that a Sony lens with good OSS, like the 24-105mm F4, can improve the results a little.
Stabilisation In Video Mode
Stabilisation is available with movie recording, and both cameras offer additional settings to improve the performance.
With a static shot, using an 85mm lens, the A7 IV does a better job, keeping the movements more contained in comparison to the R6. The latter fails to deliver consistent performance. There are moments where it looks better than the Sony, but three seconds later it can appear worse.
You can activate electronic stabilisation (called Active on the Sony, Digital IS on the Canon) to improve the quality, but bear in mind that the field of view is cropped as a consequence.
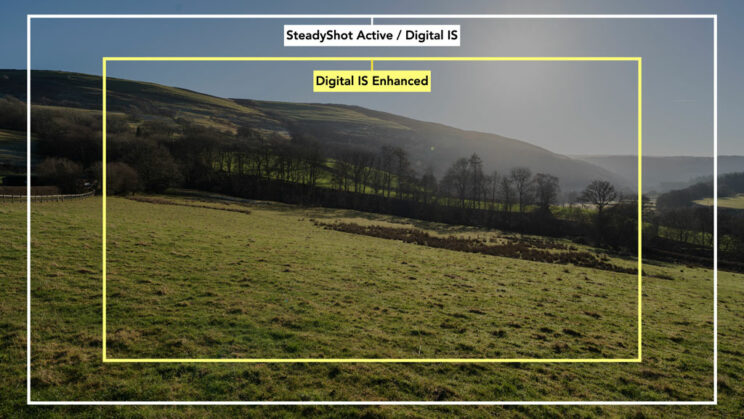
The A7 IV continues to offer better performance, although the advantage is reduced. The R6 has an extra step, Digital IS Enhanced, but the crop is more severe and the result doesn’t change a lot.
When walking with each camera, using a 35mm lens, the footage looks much better on the R6 without electronic stabilisation. The A7 IV is unusable with just IBIS, but the quality improves with the Active mode, getting closer to the performance of the Canon. The results are still far from perfect, with random jerkiness that ruins the shot. Digital IS Enhanced on the R6 doesn’t make a lot of difference.
There is another possibility with the A7 IV that involves the Sony Catalyst software. You leave IBIS off, and stabilise the footage in post where the software uses the data of the camera’s gyro sensor.
For fixed shots, Catalyst doesn’t make a relevant difference, but when walking, it gives you the best result out of all the options described above. One thing to keep in mind is that Catalyst reduces sharpness on the image a little.
You can watch examples of all this in my video review available in chapter 5 below.
5. Video recording
You can watch part 2 of our video review, or continue reading for a written version.
Frame Rate and Resolution
Both cameras can record 4K up to 60fps, but the A7 IV has to crop the sensor by 1.5x in order to do so, whereas the Canon performs a smaller crop of 1.07x for all frame rates in 4K. Up to 30p, the Sony uses the entire width of the sensor.
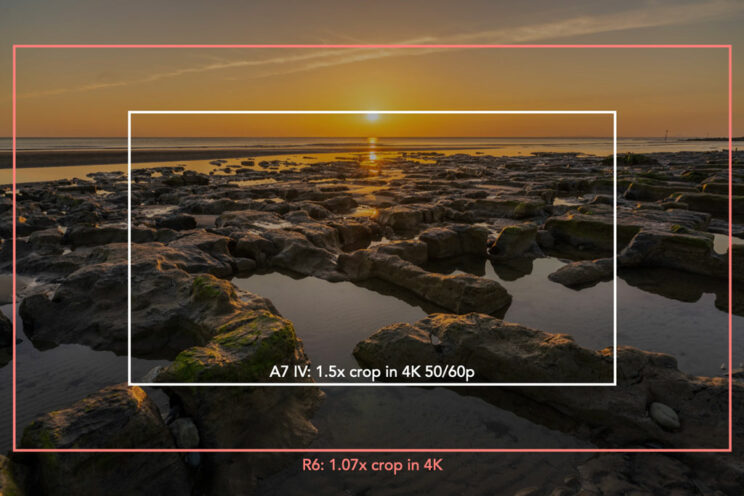
In Full HD, they can both record up to 120fps. The Canon is limited to 7 minutes / clip and this setting is only available with the High Frame Rate mode. This means that you get the slow motion effect in camera, but there is no sound. The A7 IV offers you both options: normal mode with audio, or S&Q mode.
In 4K, both cameras record by oversampling, meaning that they use all the pixels available and downscale the image to 4K, giving you the best image quality possible.
The A7 IV has a 33MP sensor as opposed to 20MP on the R6, so it uses a considerably higher number of pixels to create the video. This could lead us to think it delivers better sharpness, but in my tests I found the results to be very similar. In fact, the R6 might appear a bit sharper at first because its picture profile has more contrast.
As I wrote in my A7 III vs A7 IV full comparison, I think (but I could be wrong) that Sony decreases the sharpness a little with the image processor, perhaps to avoid excessive noise.
You can increase sharpness on the picture profiles of both cameras. I wouldn’t go past 6 on the R6, whereas the A7 IV looks fine even with the highest setting.
The results are the same in 4K / APS-C mode. In Full HD and full frame mode however, the R6 is a bit sharper.
Colour Depth and Bitrate
Both cameras offer 10-bit 4:2:2 internal recording. In the case of the R6, this is available only when selecting the Canon Log or HDR PQ settings, and it works with the H.265 codec.
The A7 IV can record with a maximum bitrate of 600Mbps when the XAVC S-I codec (All-Intra) is selected. The R6 reaches 340Mbps when recording 10-bit, or 230Mbps in 8-bit.
Here is a recap of all the options available.
| A7 IV | R6 | |
|---|---|---|
| SD Card | 8-bit 4:2:0 10-bit 4:2:0* 10-bit 4:2:2 | 8-bit 4:2:0 10-bit 4:2:2* |
| HDMI | 10-bit 4:2:2 | 10-bit 4:2:2 |
| Codec | XAVC S (H.264 Long GOP) XAVC S-I (H.264 ALL-Intra) XAVC HS (H.265 Long GOP)* | H.264 Long GOP H.265 Long GOP |
| Bitrate (max.) | 200Mbps (Long GOP) 600Mbps (ALL-Intra) | 230Mbps (8-bit) 340Mbps (10-bit) |
10-bit 4:2:2 is H.265 only on the R6.
Profiles and Dynamic Range
The difference in colour rendering we highlighted in the first chapter is even more evident when recording video. The R6 consistently generates an image with more reds, which becomes too extreme with the Portrait style (if you leave it to the default settings). I much prefer the Canon Neutral profile when it comes to skin rendering.
Keep in mind that just like for stills, the Look and Style profiles on each camera can be customised. For example, the colour tone parameter on the R6 allows you to reduce the reddish skin tone.
The A7 IV has a second set of profiles called… well, Picture Profiles! They include more advanced parameters that you also find on Sony’s cinema cameras. It is also the place where you can select Log and HLG curves, as well as Cinetone.
The R6 has HDR PQ (another HDR standard similar to HLG) and two Canon Log settings (C.Log and C.Log3).
The minimum native ISO is 800 for the two Sony log curves, whereas C.Log starts from ISO 400 and C.Log3 from ISO 800 on the R6. In both cases, you can set a lower ISO value but it is an extended value and dynamic range decreases as a result.
The A7 IV has better dynamic range, particularly in the highlights where it saves more information than the R6. This is valid with the HDR and Log profiles. Additionally, S-Log3 on the Sony has brighter shadows than the Canon Log3.
ISO for Video
The R6 has a reduced ISO range when recording video: 100 to 25,600 ISO, although the extended values still reach 204,800 ISO. For the A7 IV, only the extended ISO is more limited (up to 102,400).
Like in photo mode, the A7 IV image is brighter when using the same exposure settings. I tried to even the exposure as best I could to make the footage easier to compare.
The R6 shows more noise than the A7 IV, despite the lower megapixel count. It becomes more apparent from ISO 6400, but the Canon also preserves colours better at the highest settings.
Unlike the A7 IV, the R6 has a noise reduction option for movie recording. If you leave NR off, the noise increases as expected. With the High setting, the image is much closer to the A7 IV, which makes me think that the Sony applies noise reduction automatically.
Rolling Shutter
The rolling shutter effect (distortion when moving quickly with the camera) is about the same on both cameras. It is visible when moving slowly, and very invasive when panning quickly in full frame mode.
With the APS-C crop (Super35 on the A7), the distortion is less severe.
The Variable Shutter setting that can reduce or eliminate flickering on the A7 IV also works for video.
Recording Limitation and Overheating
The Sony has an advantage with long hours of recording, because it doesn’t have the 30 minute per clip limitation like the R6.
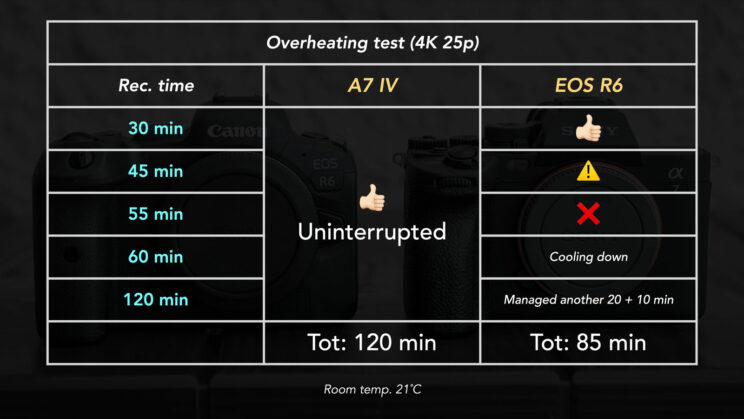
Furthermore, the A7 model has been designed to reduce overheating with the help of a heat dissipation structure. In my test, I was able to record without interruption for more than two hours (room temperature was 21˚C).
The R6 not only has the 30 minute limitation, but can overheat much more easily. In the same conditions, the warning icon appeared approximately 15 minutes after starting the second clip (total of 45 min). Ten minutes later, the camera shut down.
After a 5 minute break, the R6 let me record another 20 minutes, before shutting down again.
The test was performed with the Auto Power Off Temperature option set to High on the A7 IV, and the Standby Low Res setting (formerly Overheat Control) set to On for the R6.
Audio
Both cameras have a 3.5mm microphone input and headphone output.
The A7 IV can also work with digital audio via its multi-function shoe. You can record 24-bit audio up to 4 channels with compatible microphones.
Additional settings
The A7 IV has various extra settings designed for video. Some are very simple yet useful, like the possibility of displaying a red frame on the LCD screen when recording.
Another useful feature is called Breathing Compensation. When enabled, it eliminates the small change in angle of view that happens when focusing from the foreground to the background (a characteristic of many photographic lenses). Note that the field of view is cropped a little and not all lenses are compatible (see the list on the Sony website).
On the R6, there is the possibility to change the aperture in 1/8 steps rather than the standard 1/3, to make more precise adjustments.
6. Design and interface
Size and Grip
The Canon R6 is a bit larger and heavier than the Sony A7 IV. They are built with a magnesium alloy chassis and include weather-sealing.
- A7 IV: 131.3 x 96.4 x 79.8mm, 658g
- R6: 138 x 97.5 x 88.4mm, 680g
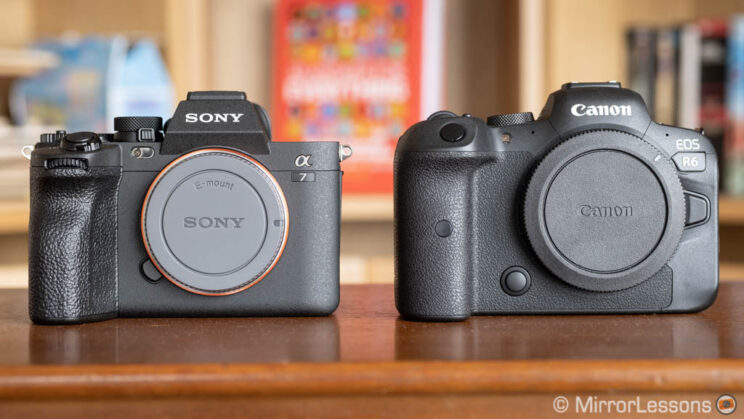
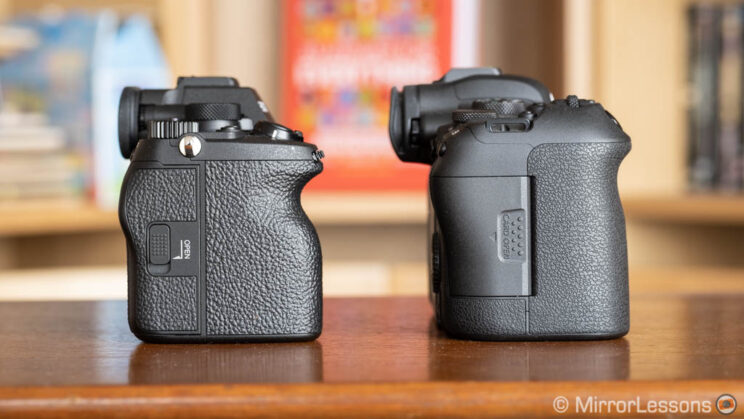
Sony has made good improvements concerning the ergonomics, which for years was one of the A7 series’ weakest points. I can rest my fingers more comfortably and the camera is less tiring to hold for an entire day of shooting, or with a large lens.
That said, the Canon grip remains more comfortable. Although the size is not dissimilar, it is more rounded and a bit larger. Furthermore, the shutter button is higher and more sloped towards the front, and feels a bit more natural to reach.
Buttons and Dials
Both cameras offer a good range of controls, including various dials and the AF joystick on the rear.
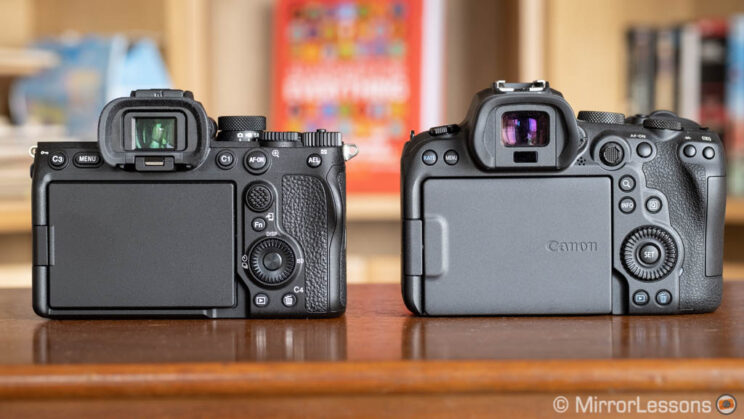
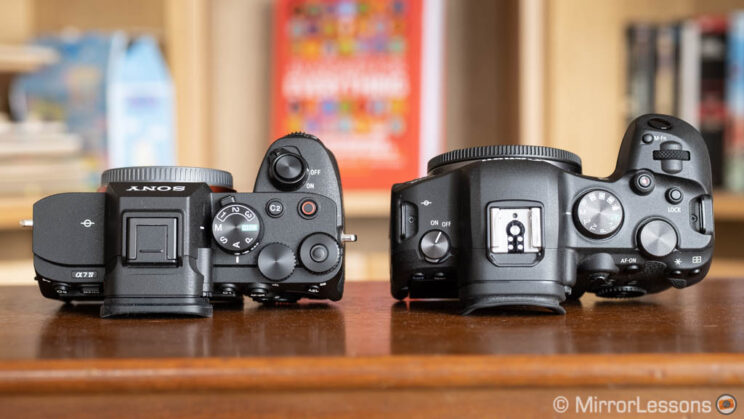
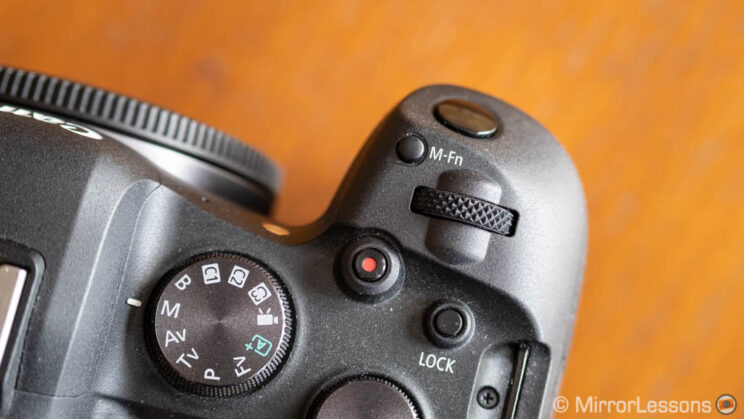
I found the dials a bit easier to turn on the R6, whereas the buttons are responsive and easy to press on both models. The only one I’m not fond of on the Canon is the M-Fn button because it is too small and in an uncomfortable position.
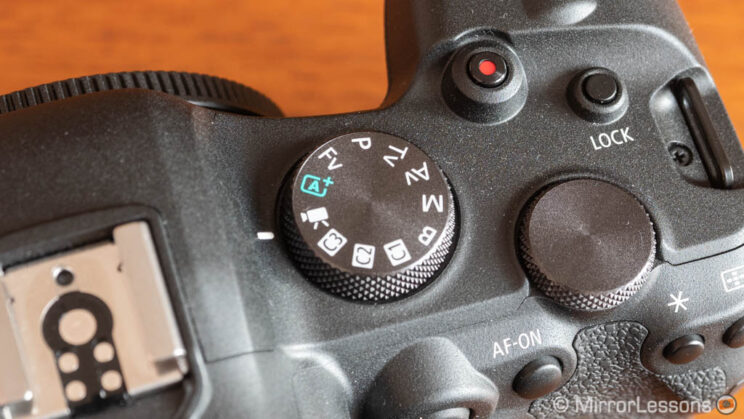
The A7 IV has one extra dial on top with a lock button. By default, it changes the exposure compensation, but you can assign another function to it.
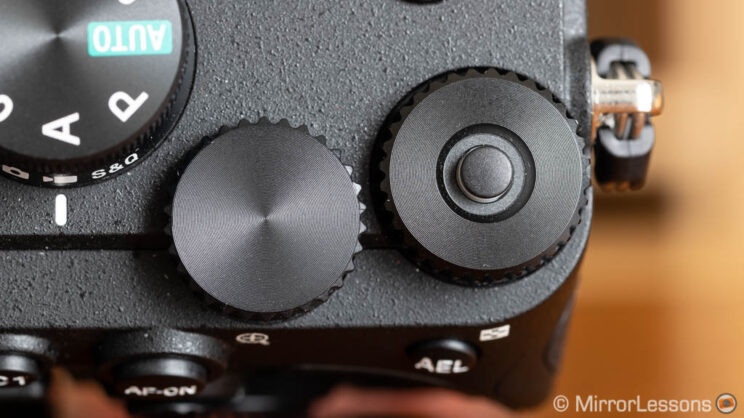
Both models have the classic PSAM / Auto shooting dial on top. However Sony decided to separate video by adding a smaller switch underneath, so that you can change more quickly between the photo mode, video mode or S&Q mode (Slow & Quick motion).
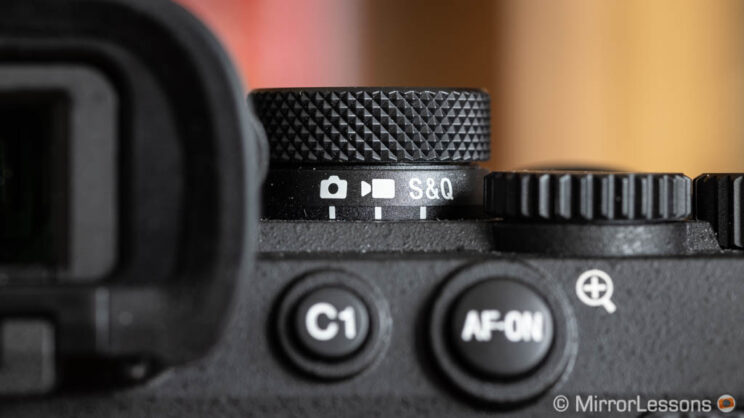
This allows you to use any of the PSAM modes on the main dial for video too, rather than digging into the menu. On the R6, once you set video on the top dial, you need to open the menu or the quick menu to choose the exposure mode.
Menu and Customisation
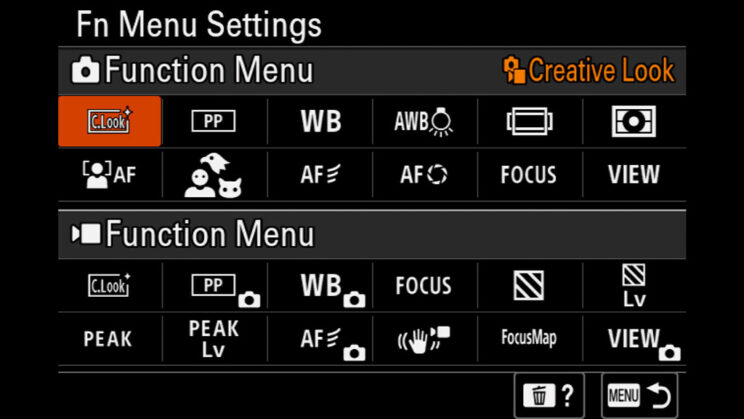
The Sony offers more customisation concerning the dials and number of custom buttons (12 vs 8).
Both cameras allow you to customise the function buttons separately for stills and video, but on the A7 IV you can do the same with the Fn menu too, whereas the Quick menu on the R6 cannot be personalised.
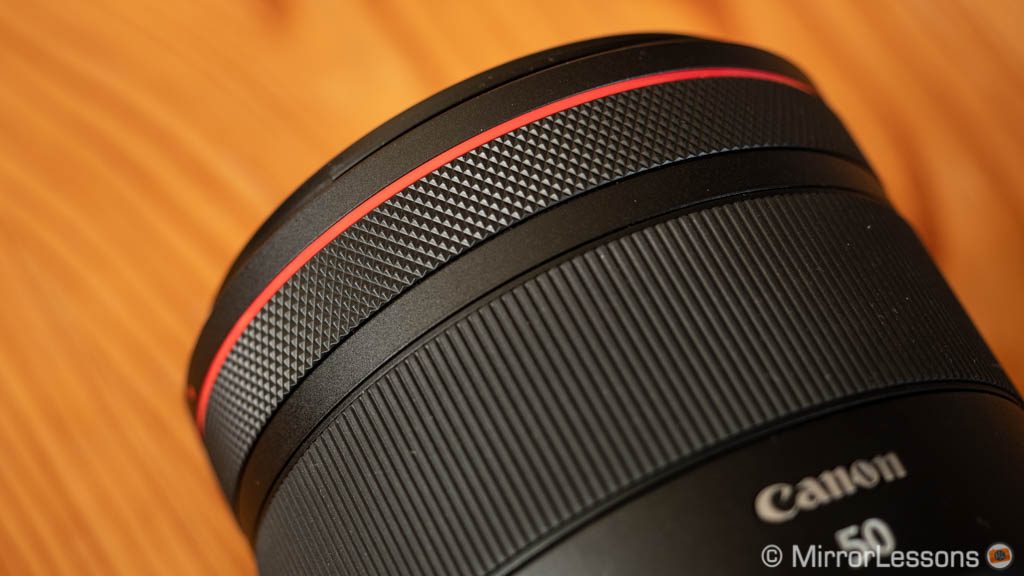
One thing that only the Canon system offers, is the possibility to customise the function ring that is available on every Canon RF lens. Select Sony lenses have a function button on the barrel.
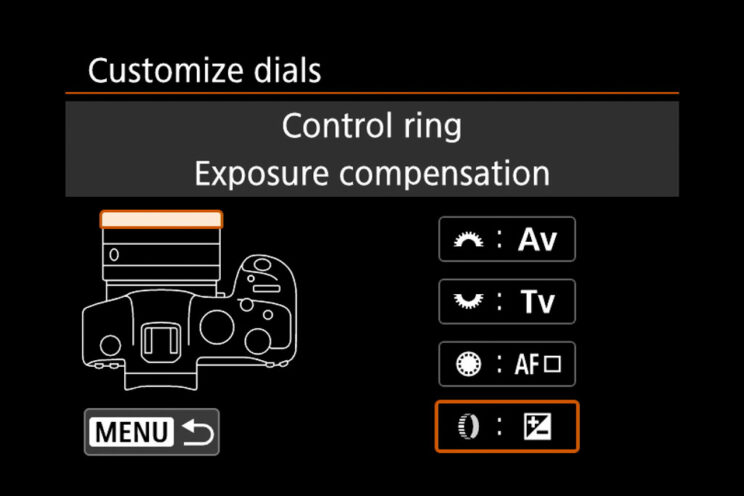
On the two cameras, basic settings such as exposure and focus area can be adjusted independently in still and video mode. On the A7 IV, you can select in the menu which setting remains independent.
The A7 IV features Sony’s new menu system, which is much better organised than the old one. That of the Canon is clear and easy to navigate for the most part.
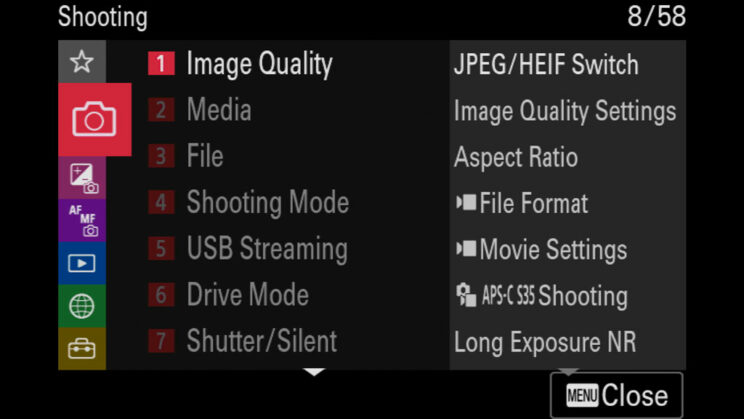
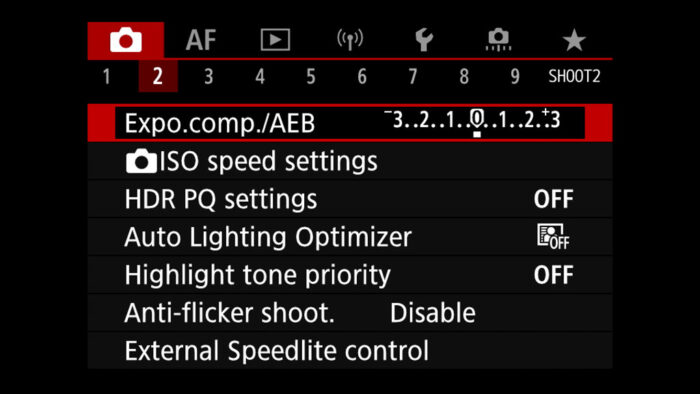
Both cameras allow you to use the touch screen to navigate the menu. On the R6, you can also access the quick menu or start video recording by touching the monitor.
The camera settings change accordingly when switching from still to video and vice versa, and both cameras have a My Menu section where to save additional settings.
Cards and Interface
Both cameras can use two memory cards at the same time. The R6 takes two UHS-II SD cards just like the A7 IV, but the latter is also compatible with CFexpress Type A cards (first slot only).
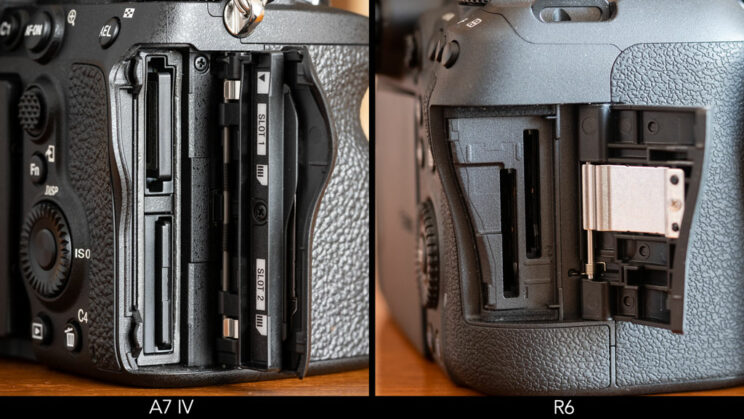
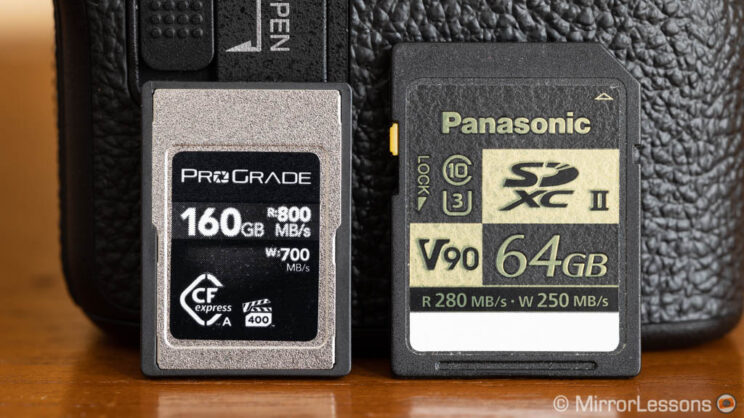
The advantage of the CFexpress card is a better buffer when shooting in continuous mode, as well as faster transfer speed with a compatible CFexpress card reader. It is also required when you want to record 4K 60p at the maximum quality and bitrate with the S&Q mode. The disadvantage is a much higher price tag than SD cards.
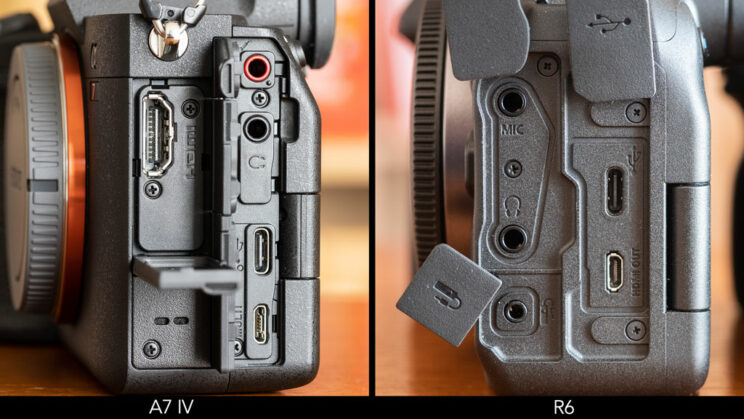
Next, we have the physical connections. Both cameras have:
- a microphone input / headphone output (3.5mm)
- HDMI output (full size on the Sony, Micro on the R6)
- USB Type C (10Gbps on the Sony, 5Gbps on the Canon)
7. Viewfinder and rear screen
The two cameras have a similar viewfinder when it comes to the resolution, size, refresh rate and eyepoint:
- 3.69M dots
- 0.5-in OLED panel
- 120Hz max.
- 23mm eyepoint
The magnification is a bit higher on the Sony (0.78x vs 0.76x).
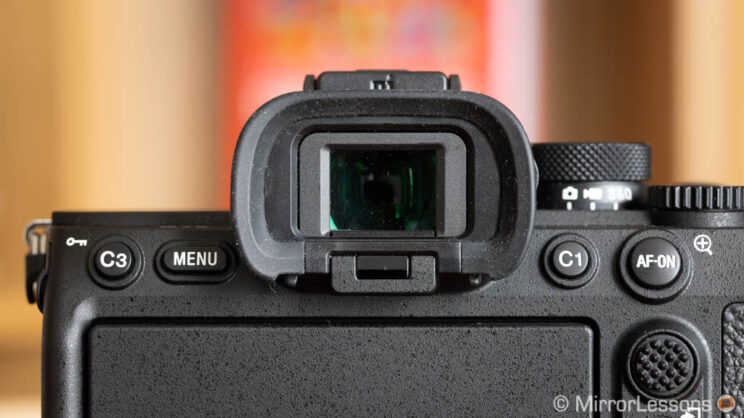
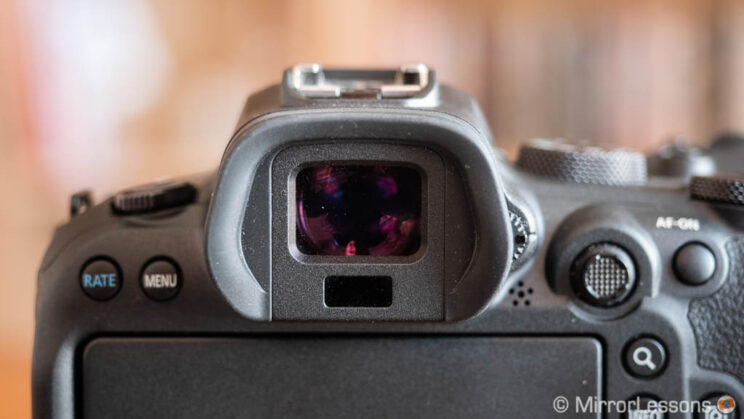
They are good viewfinders with enough clarity and a fast refresh rate, and I have little to complain about. They are also easy to use when wearing glasses.
On the rear, we find a multi-angle 3-inch LCD that is also touch sensitive. The R6 monitor has more resolution (1.62M vs 1.04M).
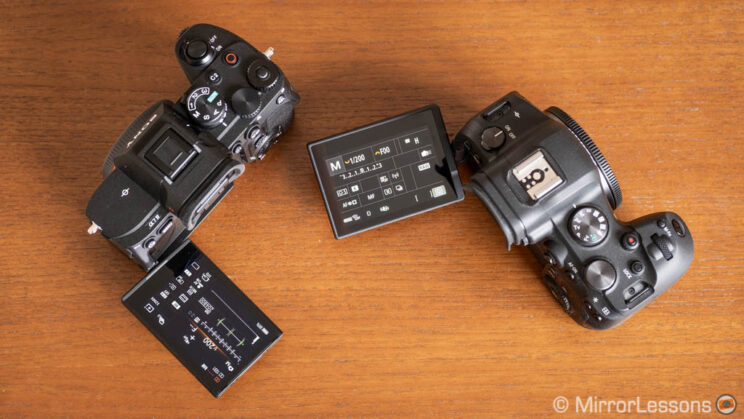
An interesting option on the A7 IV is that you can close the monitor to put the camera in stand-by mode. When you open it again, the camera wakes up.
Unfortunately, cables connected to the side of both cameras can get in the way of the LCD mechanism when it is fully open on the side and you want to rotate the screen up or down. They also block part of the view when the screen is flipped 180˚.
8. Battery life
The A7 IV uses the excellent NP-FZ100 battery and has a good rating of 610 frames per charge (LCD).
The R6 has worse performance, with an official rating of 510 photos (LCD).
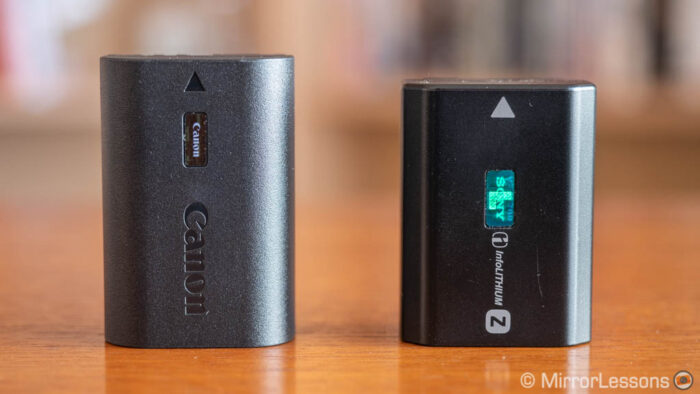
In real world conditions, I was able to capture nearly 2,600 photos of flying birds with the R6, and have about 60% juice left. The A7 IV battery performs on a similar level.
For video, the R6 recorded about 113 minutes in 4K 25p (four separated clips plus intervals to cool the camera) before the battery ran out. The A7 IV managed two extra minutes.
Both cameras can be charged or powered via USB but keep in mind that you need a high current charger for the Canon. A battery grip is also available for both.
One last thing is that the A7 IV comes without a battery charger in the box. You need to use the USB adapter, which means you can’t charge a battery while using a second one without buying an optional charger.
9. Lenses
The Sony full frame E-mount series started in late 2013 and, over eight years, the company has designed a superb range of lenses.
Thanks to the support of third party brands such as Sigma and Tamron there are now almost 100 lenses to choose from, for every budget and need (even more if you include manual focus lenses). Furthermore, Sony uses the same mount for its APS-C mirrorless series, which offers extra versatility.
The Canon RF system started in 2018, and Canon has developed no fewer than 26 lenses. Support from third party brands is more limited as of now. Unlike Sony, Canon started from scratch by building a new mount and ignoring its EOS M APS-C mirrorless system.
Canon EF DSLR lenses can be adapted on both cameras, although you need a third party adapter for the A7 IV, and the performance is not as good as that of the Canon, with the latter producing its own EOS R to EF adapter.
10. Price
The A7 IV is available for $2500, £2400 or €2800 (body only).
The R6 can be bought for a similar price (depending on the currency), starting at $2500, £2400 or €2500 (body only).
Prices as of March 2022.
Extra Information
The R6 has a series of extra features you won’t find on the A7 IV:
- Multiple exposure (up to 9 frames with various blending methods)
- RAW image processing (convert RAW to JPG)
- Time-lapse Movie (1080p or 4K)
The Sony on the other hand has more options for wired transfer and streaming.
You can use the camera as a webcam with the USB C connection, after selecting the streaming option in the menu. You don’t need to install a plugin on your computer for it to work, unlike the R6 which needs the Canon Utility Webcam. It works up to 4K 15p, or 1080p 60p, and you can record simultaneously to the memory card.
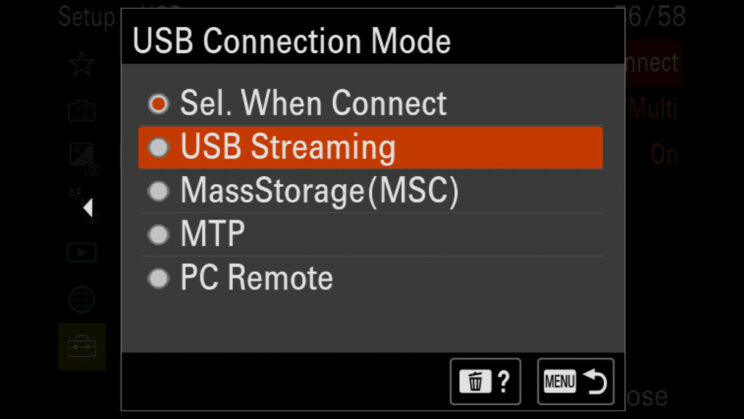
You also have the option of working with a LAN connection using a USB C to Ethernet adapter, or connect it via USB to a tethered smartphone.
Both cameras have Wifi and Bluetooth, and allow you to connect to an FTP server. On the R6, you can also upload your images to the Canon Cloud Web Service which works really well.
Finally, the Sony has copied Canon and introduced the Anti-dust Function. When enabled, the shutter curtains cover the sensor when the camera is turned off, in order to protect it from dust when changing lenses. Canon introduced this idea with the original Eos R four years earlier.
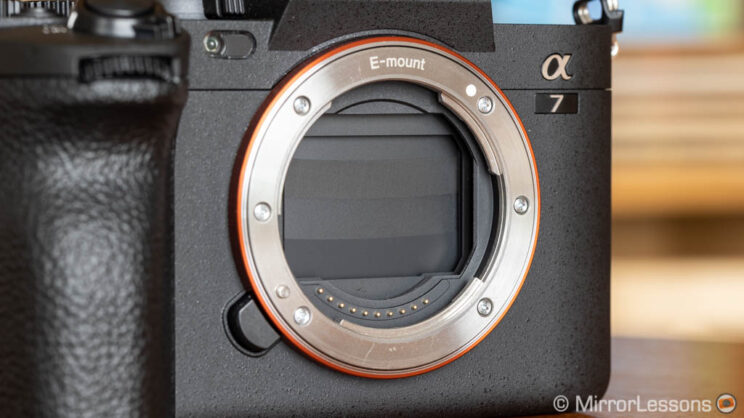
Keep in mind that the mechanical curtains are very delicate, and some users even recommend not enabling this function as they can be more easily damaged than the sensor itself.
Video Review
This comparison is also available in video format. Don’t forget to subscribe to our YouTube channel!
Conclusion
In the conclusion of my A7 III vs R6 full comparison, I said that Canon had closed the gap and even outperformed the Sony in key areas such as autofocus, stabilisation and video specifications. Obviously the age difference (the mark III model was two years older) could explain some of the differences in performance.
With the arrival of the A7 IV, the battle has resumed and part of my conclusion has changed.
In terms of autofocus, the two cameras are on the same level. You need specific situations to see a small advantage for one or the other, but overall they deliver an excellent level of speed and precision, and a similar keeper rate.
The R6 maintains an advantage with in-body image stabilisation (photos especially) and continuous shooting speed. I also prefer the Canon ergonomics, although the Sony is much better than before, and offers more customisation.
Concerning image quality, the main difference is the higher resolution of the A7 IV, which adds a bit more noise at high ISO, but has nothing to fear when it comes to dynamic range.
Then, there is video, where I think the A7 IV has the edge. Not only does it deliver more latitude with HDR and Log profiles, but it also has more codecs to offer, higher bitrates and can record for longer without overheating. The latter remains Canon’s weakest point.
The only real advantage for the R6 when it comes to movies is the possibility to record 4K 60p with a small sensor crop, whereas you need to accept a 1.5x crop on the A7 model.
Finally, if you take into account the excellent choice of lenses for E-mount, I think it becomes a bit easier to recommend the A7 IV. That said, they are both excellent cameras and it’s really up to you to decide which one is the best, based on what your needs are.
I hope this article can help you make a decision if you’re hesitating between these two products, and of course don’t hesitate to leave a comment if you have any questions. Thank you for reading!
Reminder: the links below are affiliate links. If you decided to buy something after clicking the link, we will receive a small commission.
Check price of the Sony A7 IV on
Amazon | Amazon UK | B&H Photo | eBay
Check the price of the Canon EOS R6 on:
Amazon | Amazon UK | B&H Photo | eBay

