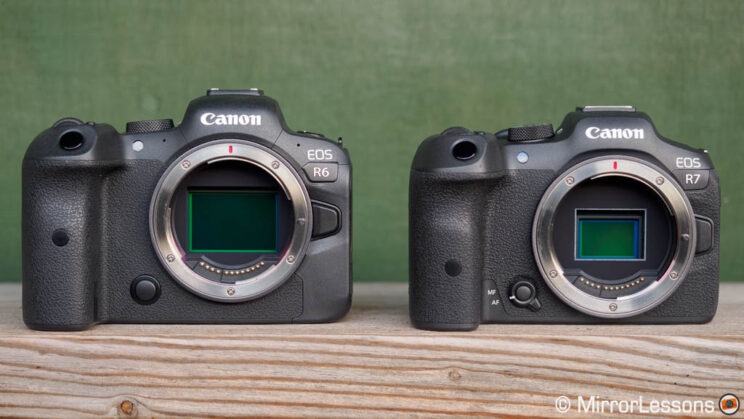
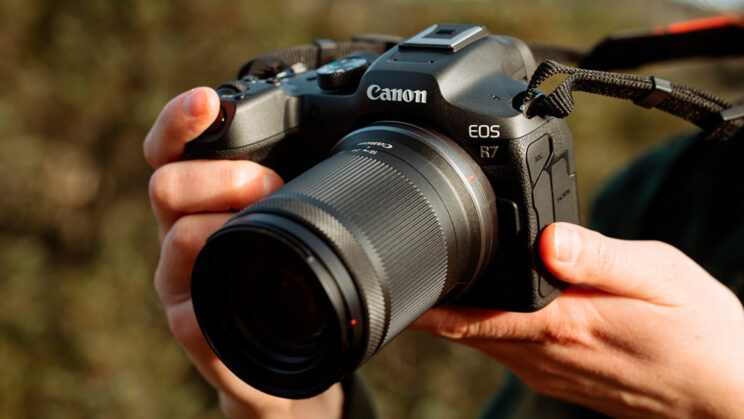
Canon has expanded its EOS R system to the APS-C format with the addition of two models, the R7 and R10. These are the very first APS-C cameras with an RF-mount, and they show Canon’s intention to build a larger system with two sensor sizes, just as it did for years with DSLRs.
In this article, we look specifically at the R7 and how it compares to the popular R6 full frame camera, a model we know very well and have reviewed extensively on this website and our YouTube channel.
Note: this review has been updated to a complete comparison with lots of side by side tests and real world feedback. While working on this update, Canon announced the R6 II, the successor to the original R6. I share a few thoughts about the new model at the end of the article.

Ethics statement: the following is based on our personal experience with the R6 and R7, which we bought we our own money. We were not asked to write anything about these products, nor were we provided any compensation of any kind. Within the article, there are affiliate links. If you buy something after clicking one of these links, we will receive a small commission. To know more about our ethics, you can visit our full disclosure page. Thank you!
TABLE OF CONTENTS
– The 10 Main Differences in a Nutshell
– Main Specs
1. Sensor: Size, Resolution and Image Quality
2. Autofocus
3. Shutter, Continuous Shooting and Buffer
4. Video Specifications and Quality
5. Overheating During Movie Recording
6. EVF and Rear Monitor
7. Design
8. Battery Life
9. Lenses
10. Price
– Additional Feedback (IBIS and R6 II)
– Video Review
– Conclusion
The 10 Main Differences in a Nutshell
- Sensor: the R7 gives you extra resolution which, combined with the APS-C crop factor, can be a nice advantage when you need the extra reach (think wildlife, or sports). However, the R6 is the one that delivers superior dynamic range and less noise at high ISOs. Picture styles are similar, although the R7 produces a bit less red overall.
- Autofocus: the performance is very similar, including Eye AF for portraits and animals, but the R6 has the upper hand with challenging subjects such as birds in flight.
- Speed: the R7 has a faster continuous shooting speed, but the higest FPS is ruined by excessive rolling shutter. The buffer is much better on the R6.
- Video: the R6 delivers optimal performance in 4K 30p and 60p. On the R7, the best quality is found up to 30p. They both record 10-bit 4:2:2 internally with Log or HDR, and the APS-C camera holds its ground surprisingly well concerning dynamic range. High ISO is better on the R6, unsurprisingly.
- Overheating: it’s the R6 Achille’s heel, making the full frame camera unreliable. The R7 does much better and can go past two hours without interruption.
- EVF / LCD: the R6 has a better viewfinder (larger, more resolution, easier to use if you wear glasses). The rear LCD is the same: vari-angle and touch sensitive.
- Design: these are two comfortable cameras to work with. The R6 has a few extra buttons but the R7 offers more customisation. It’s a shame that the unusual dial/joystick solution on the APS-C camera can make the user experience more frustrating.
- Battery life: good on the R6, excellent on the R7.
- Lenses: the choice of native APS-C lenses is very limited at the moment. Many full frame RF lenses are expensive. The system is still growing, so you may need to consider an adapter and EF lenses to have everything you need.
- Price: the R7 is more affordable.
Main Specs
R6
- Sensor: 20.1MP 35mm format CMOS
- Lens system: RF-mount
- Weatherproof: Yes
- Internal Stabilisation: Yes (5-axis)
- Autofocus: Dual Pixel CMOS AF II with 6,072 points
- Continuous shooting: 12fps, or 20fps with e-shutter
- ISO Sensitivity: 100 – 102400 ISO (pull 50, push up to 204800)
- Shutter Speeds: 1/8000s to 30s, Bulb
- Viewfinder: 0.5-in OLED with 3,690k dots, 23mm eye point, 0.76x magnification
- Rear monitor: Multi-angle 3.0″ LCD (1.62M dots) with touch sensitivity
- Movie recording: 4K up to 60fps and 340Mbps, Full HD up to 120fps, 10-bit C-Log/C-Log3 and HDR PQ
- Built-in Flash: No
- Extra Features: WiFi, Bluetooth, Bracketing, Tethering, Time-lapse, Dual SD slots
- Dimensions: 138.4 x 97.5 x 88.4mm
- Weight: 680g (including battery and memory card)
- Firmware version: 1.6.0
- Release: 2020
R7
- Sensor: 32.5MP APS-C format CMOS
- Lens system: RF-mount
- Weatherproof: Yes
- Internal Stabilisation: Yes (5-axis)
- Autofocus: Dual Pixel CMOS AF II with 5,915 points
- Continuous shooting: 15fps, or 30fps with e-shutter
- ISO Sensitivity: 100 – 32000 ISO (push up to 51200)
- Shutter Speeds: 1/8000s to 30s, Bulb
- Viewfinder: 0.39-in OLED with 2,360k dots, 22mm eye point, 0.72x magnification
- Rear monitor: Multi-angle 3.0″ LCD (1.62M dots) with touch sensitivity
- Movie recording: 4K up to 60fps and 340Mbps, Full HD up to 120fps, 10-bit C-Log3 and HDR PQ
- Built-in Flash: No
- Extra Features: WiFi, Bluetooth, Bracketing, Focus Stacking, Tethering, Time-lapse, Dual SD slots
- Dimensions: 132.0 x 90.4 x 91.7mm
- Weight: 612g (including battery and memory card)
- Firmware version: 1.1.0
- Release: 2022
1. Sensor: Size, Resolution and Image Quality
The first and most important difference starts with what is at the heart of the two cameras: the image sensor.
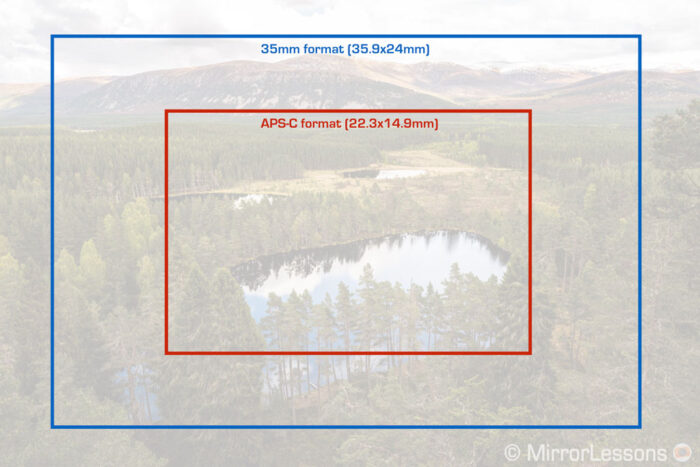
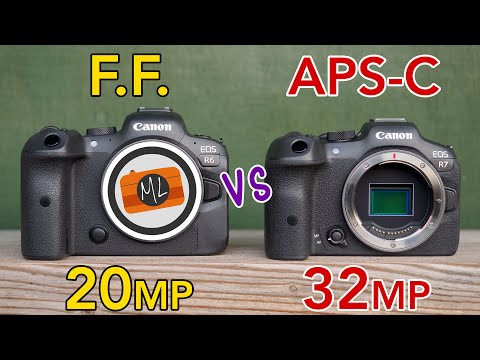
The R6 features a full frame sensor (35mm format), which is larger than the APS-C chip found on the R7 (the crop factor is 1.6x).
The resolution is also different: the R6 comes with 20.1MP, whereas the R7 offers 32.5MP.
Canon R6 vs R7: Dynamic Range
The R6 sensor may have an unexciting pixel count, but it has other advantages. One of them is dynamic range: the full frame camera shows less noise when brightening underexposed areas on the RAW file.
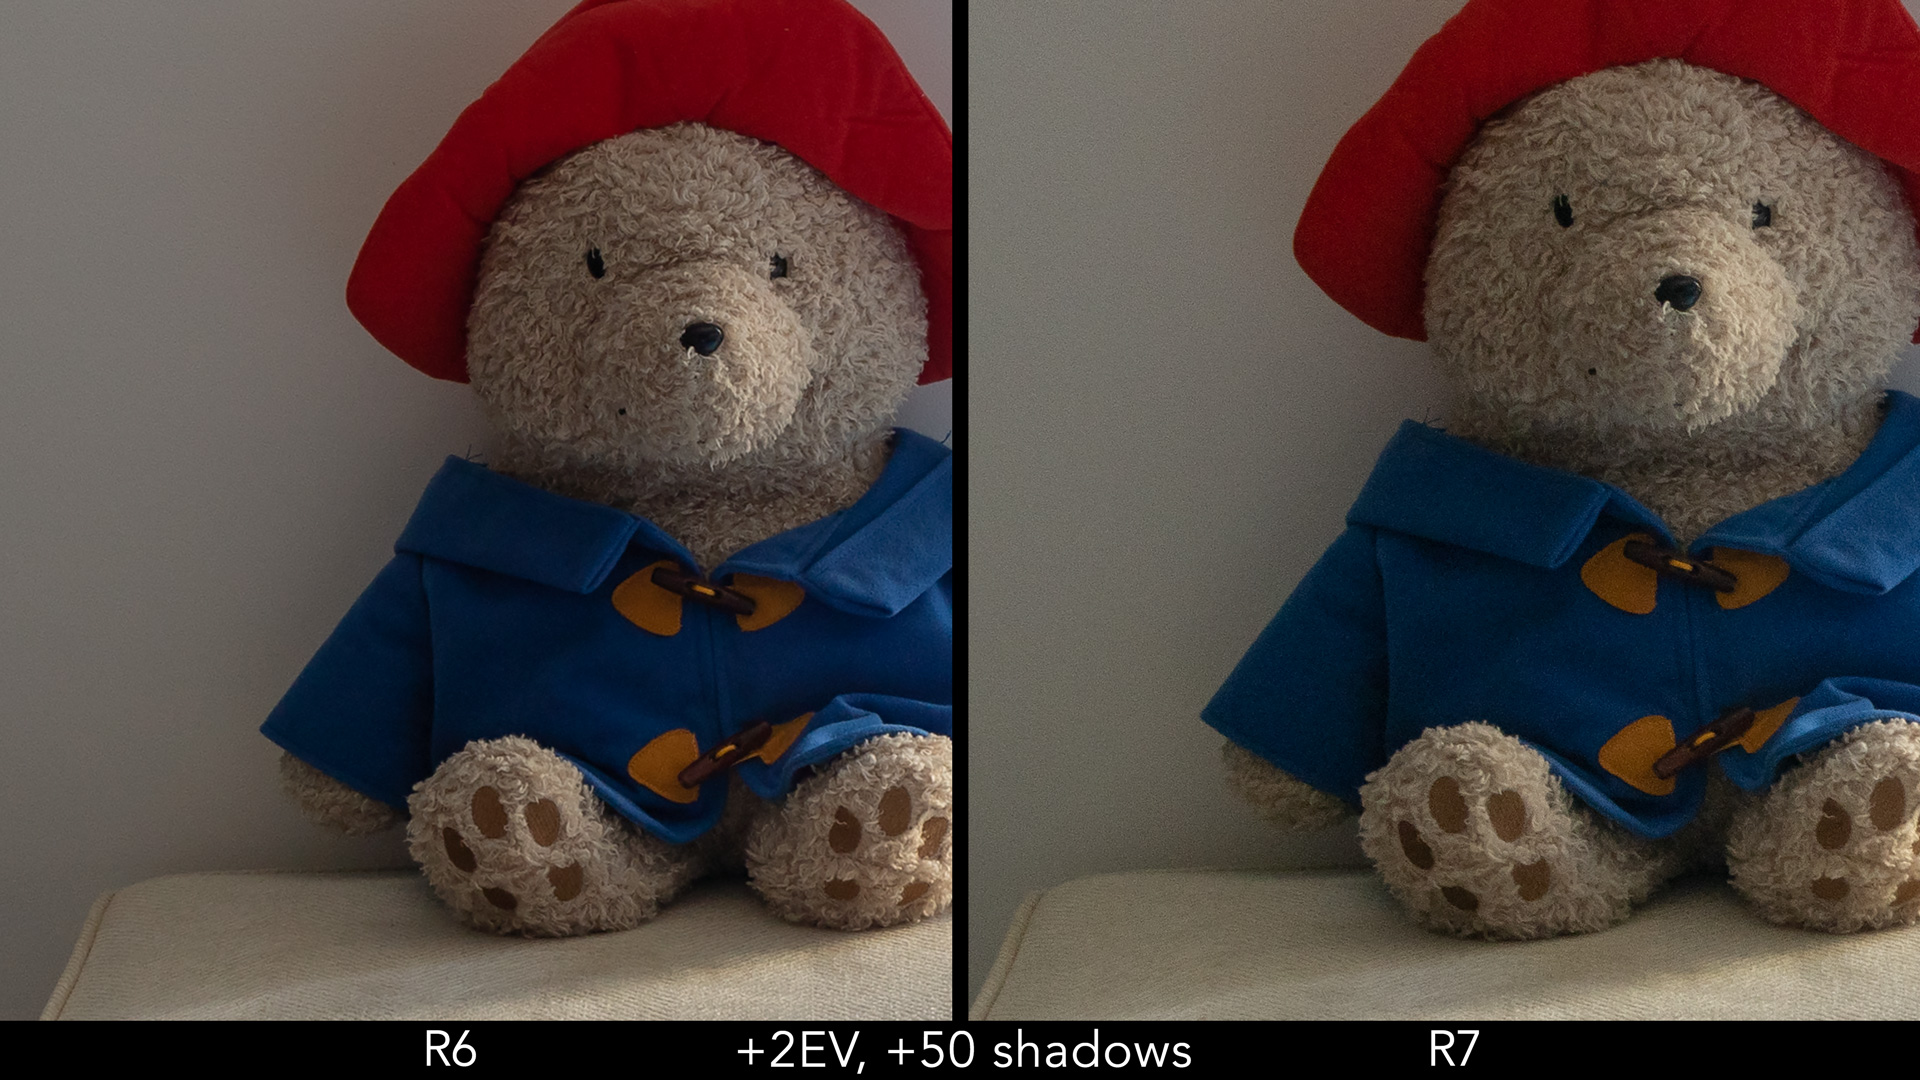
The difference is already visible with a mild 2 stop recovery, and even more so with an extreme 4EV boost.
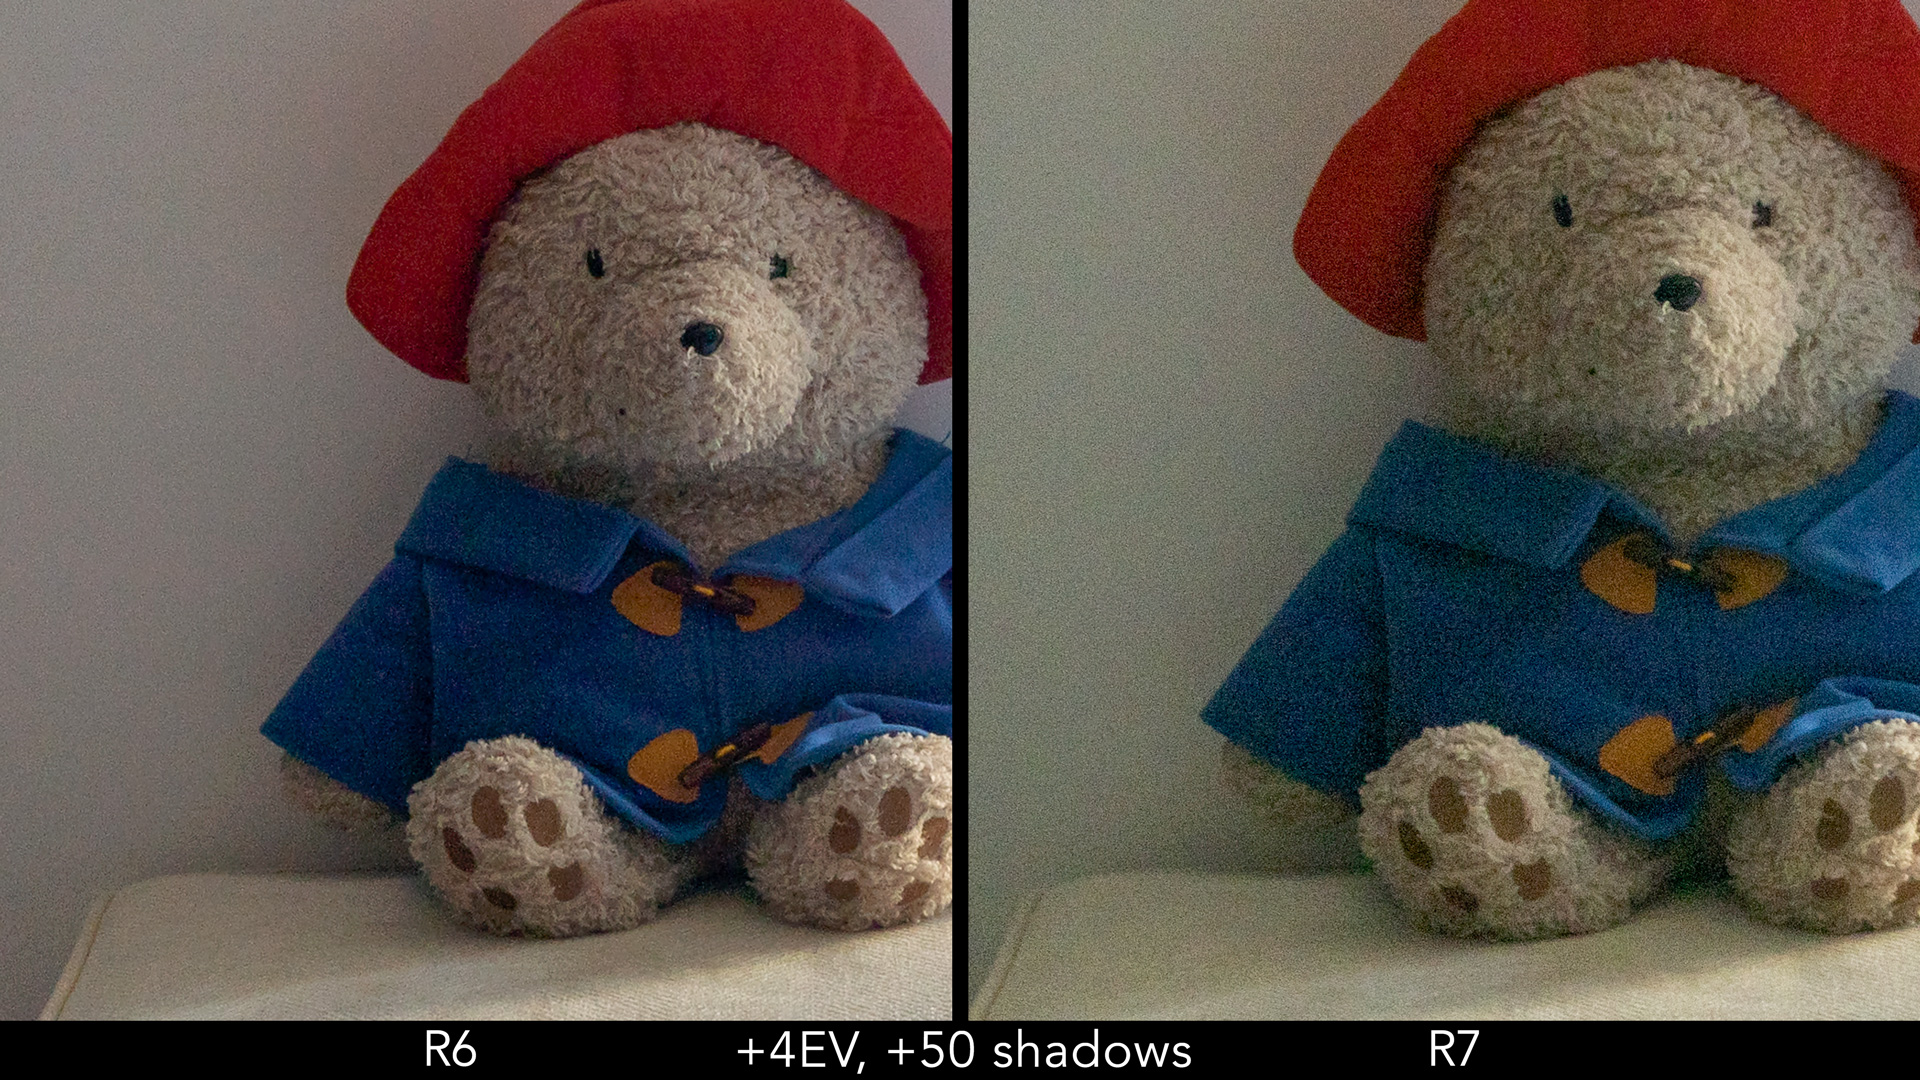
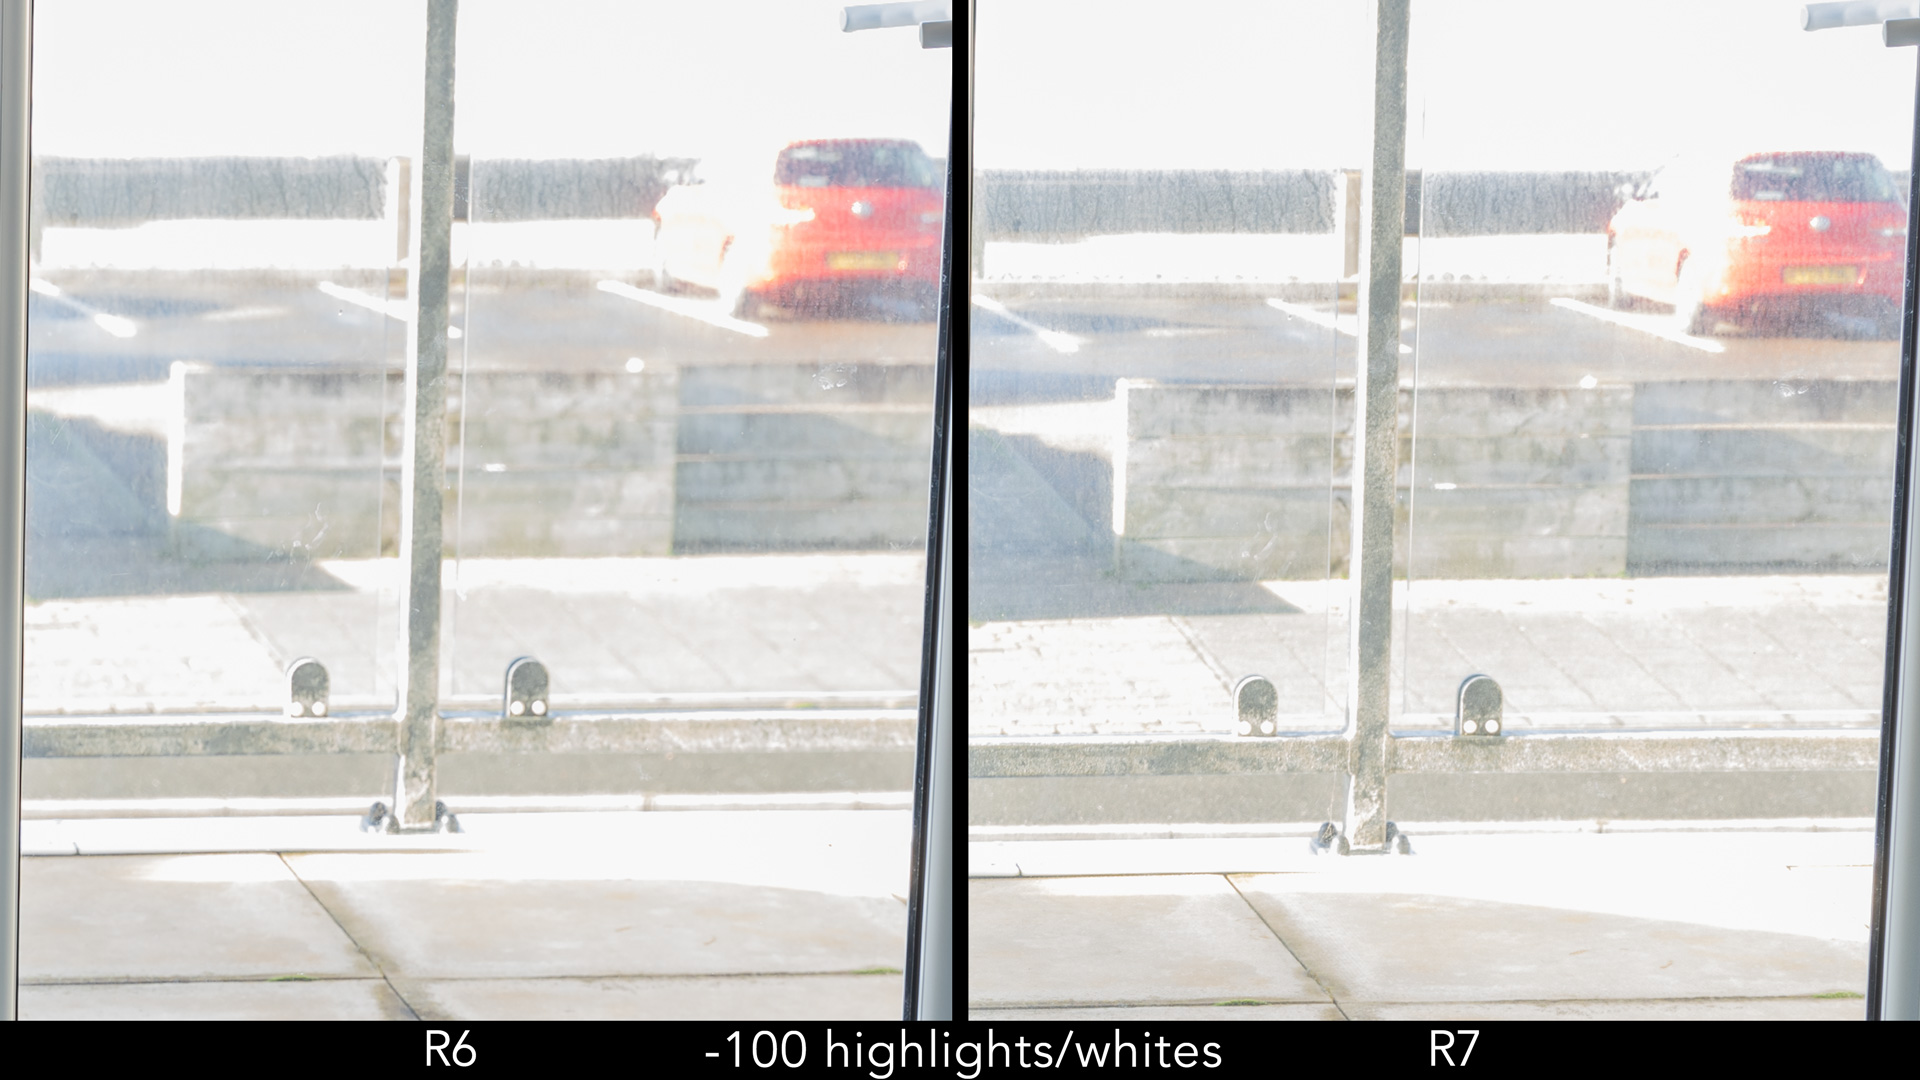
Highlight recovery is much more similar however, as you can see in the third example below.

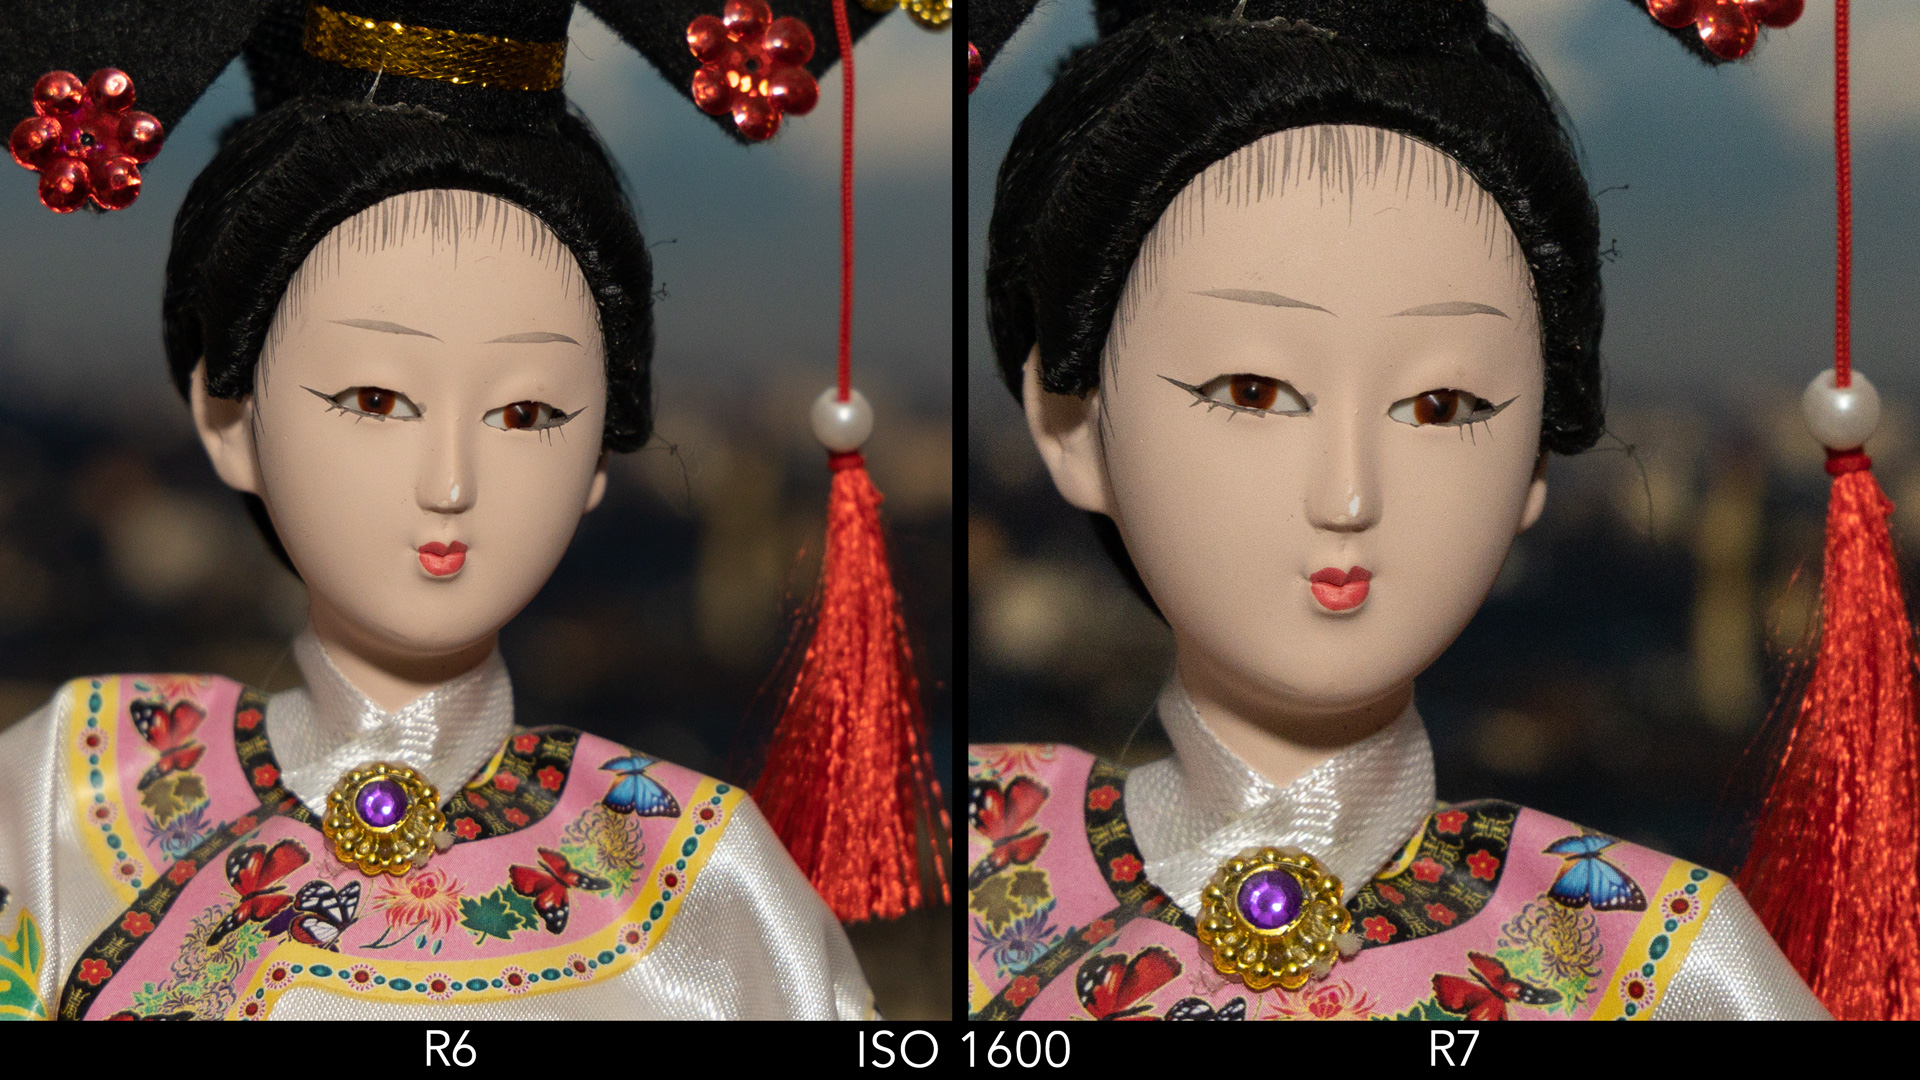
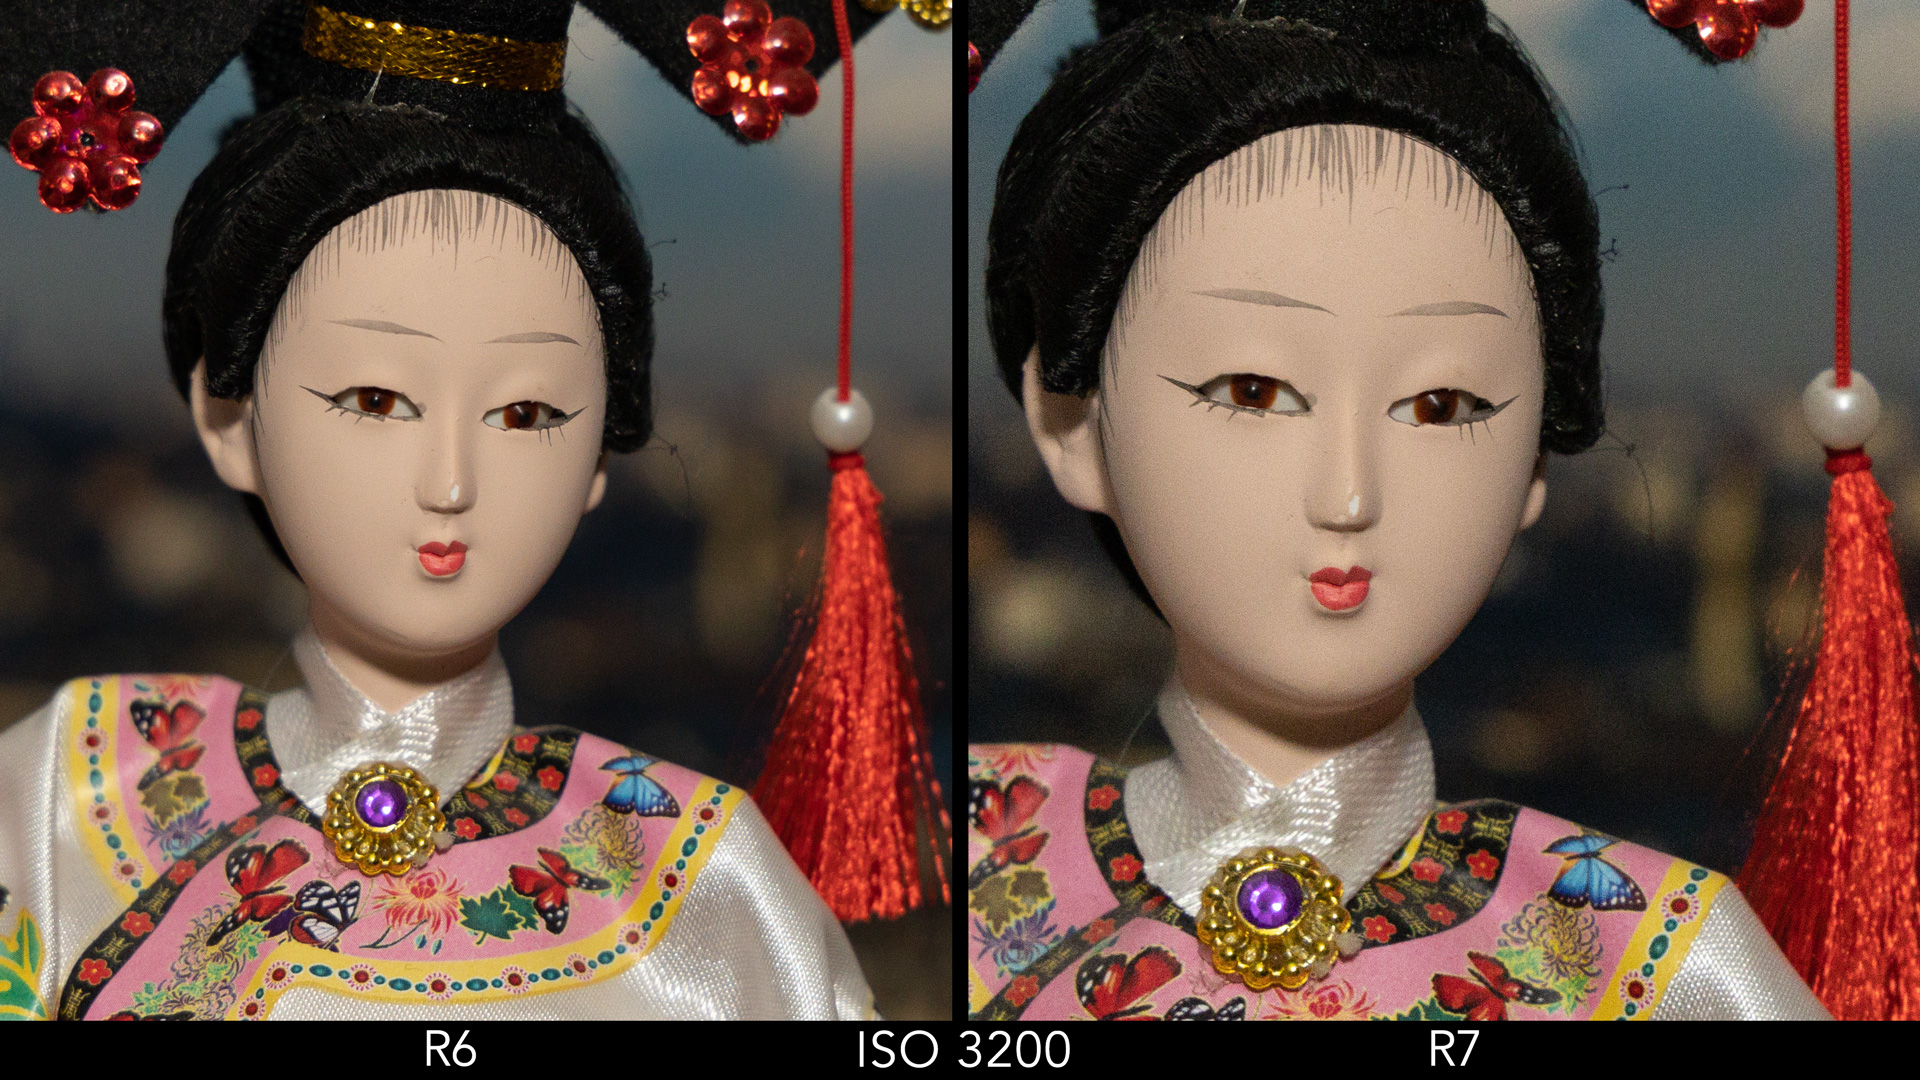
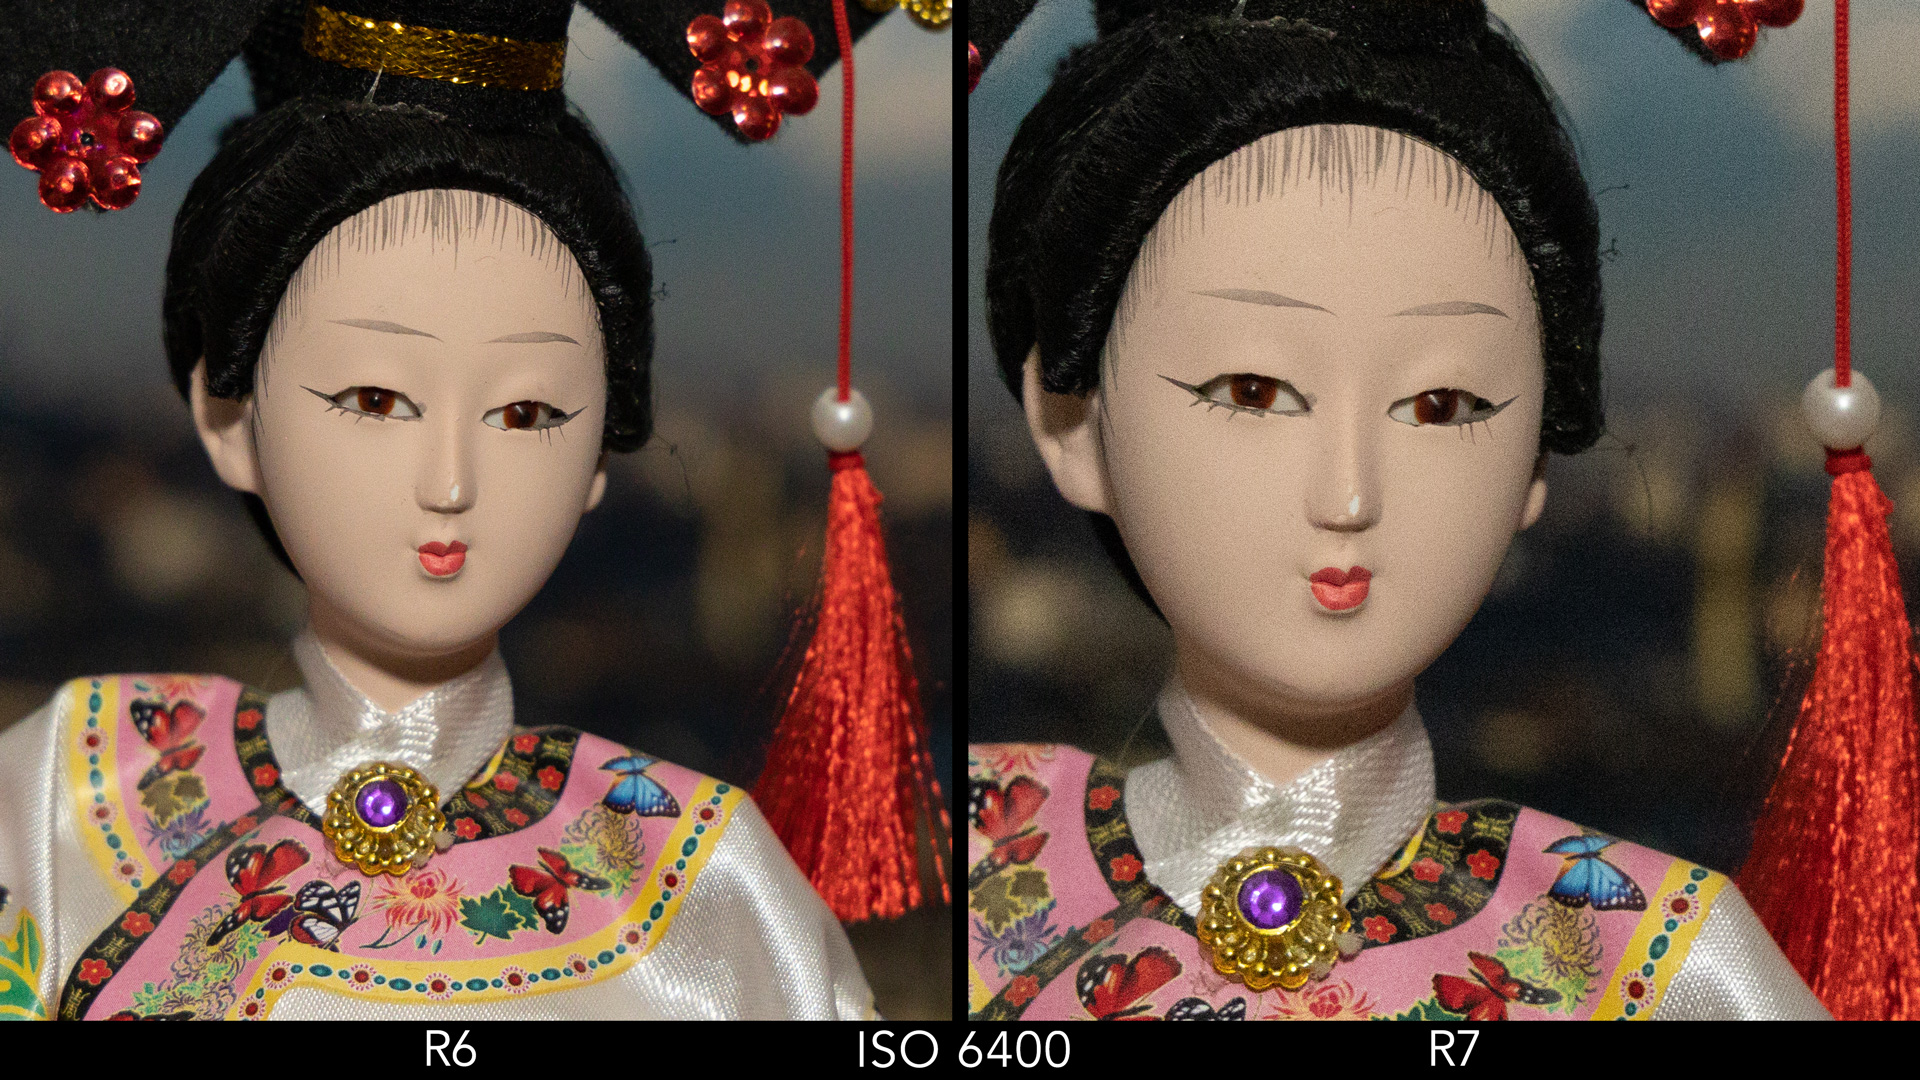
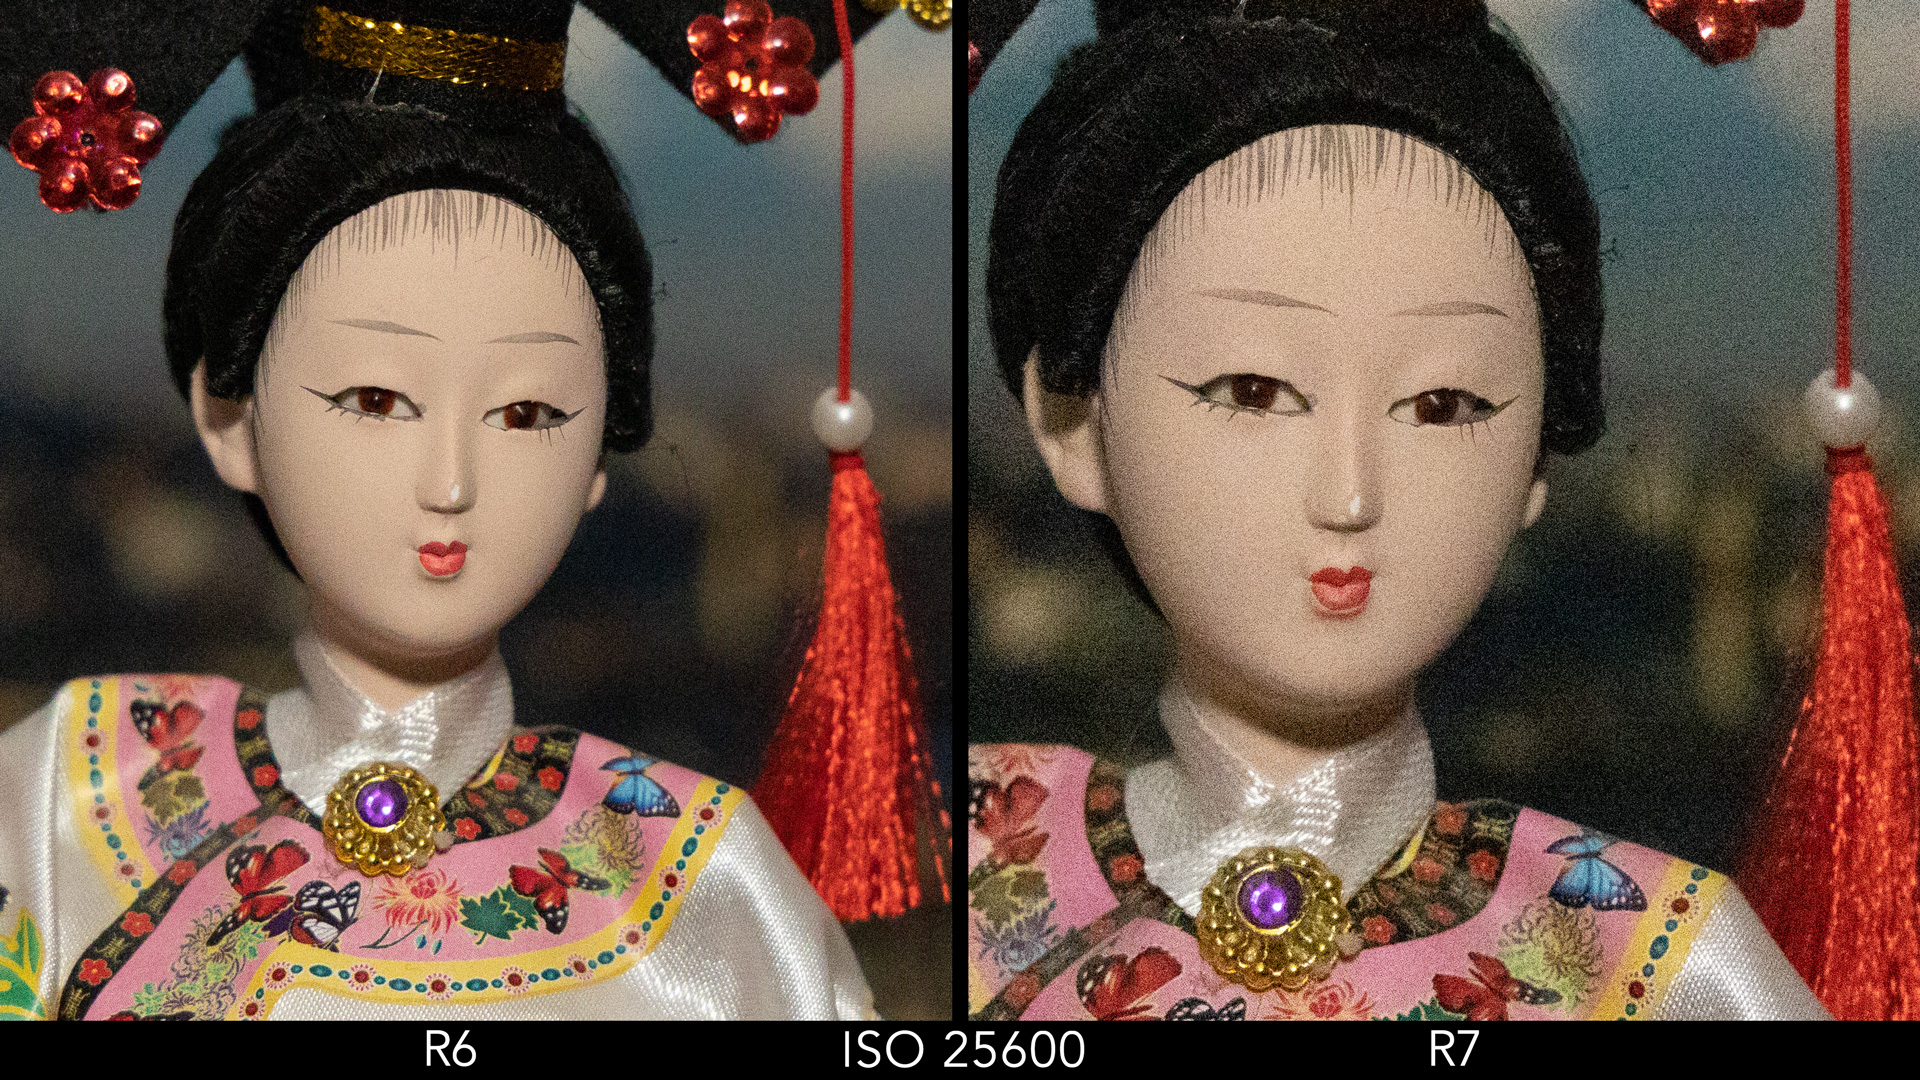
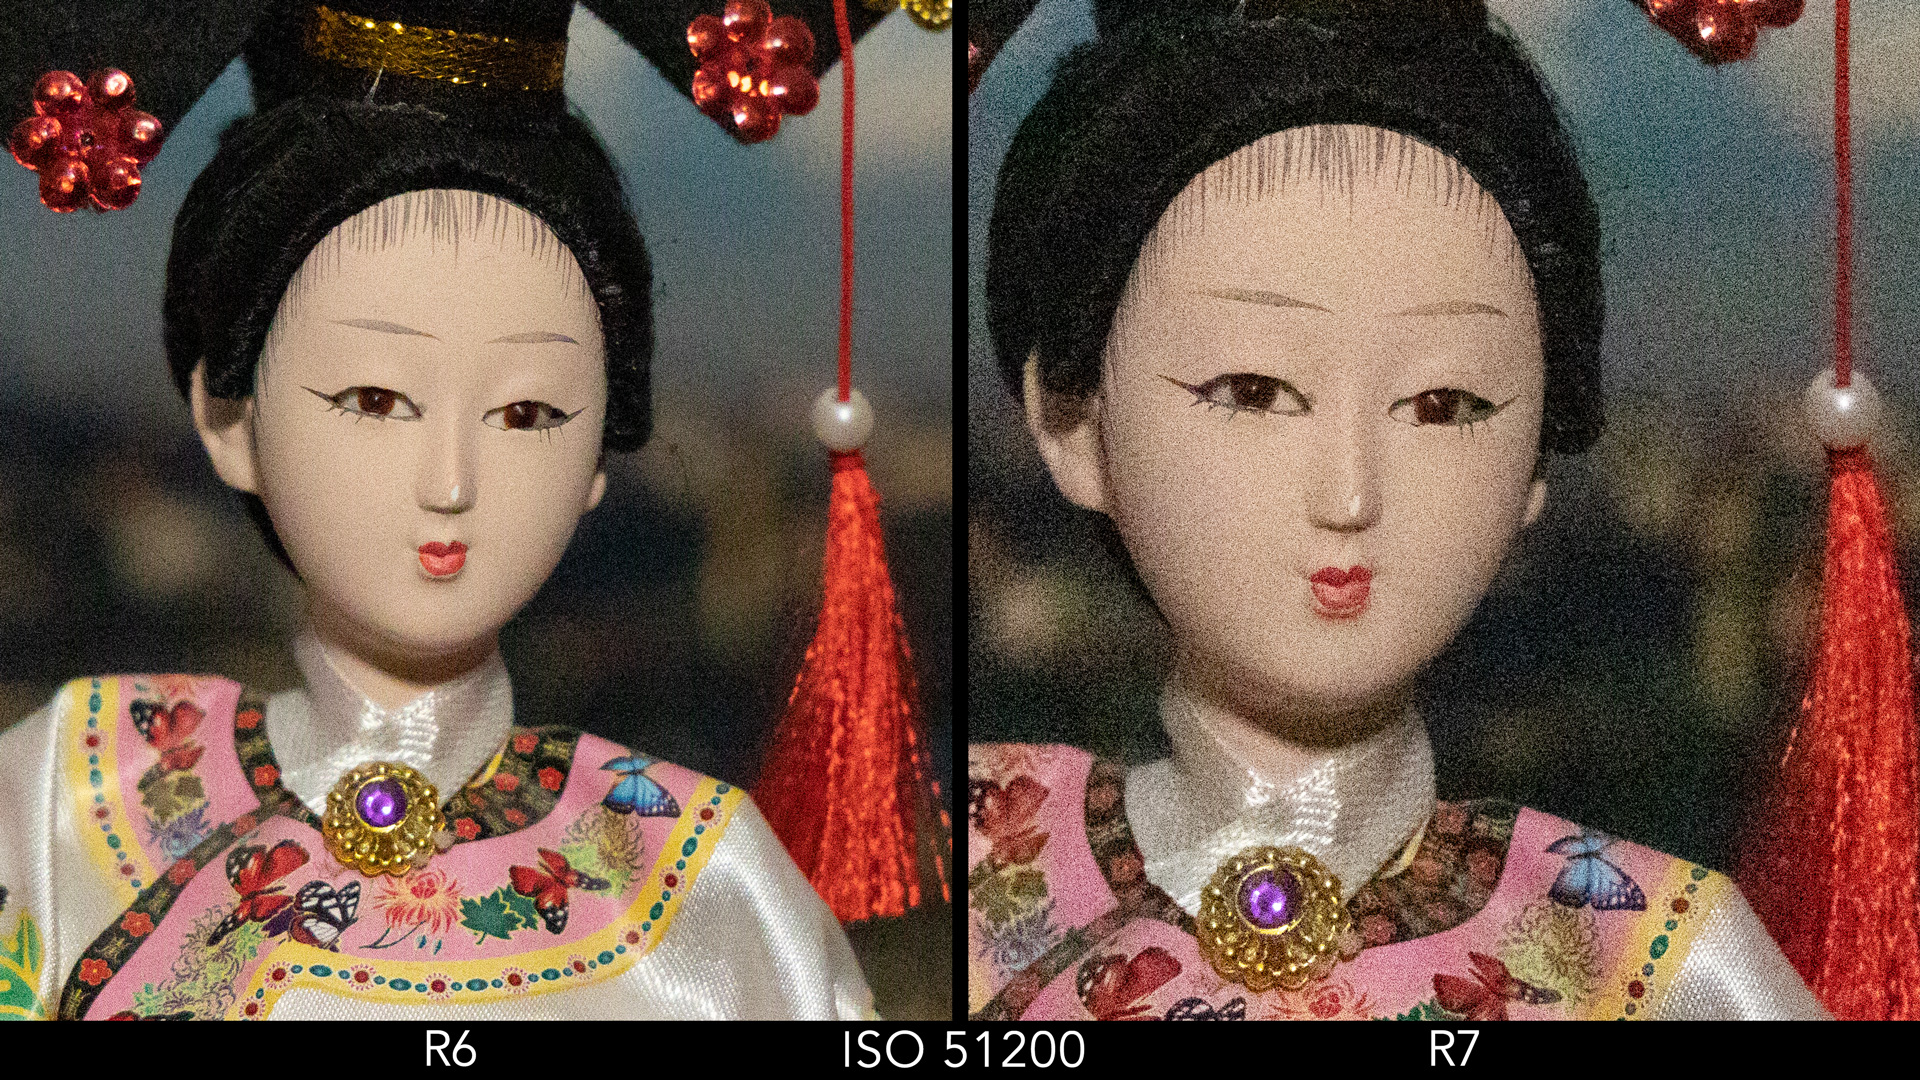
Canon R6 vs R7: Low Light (ISO)
Next we can talk about the ISO. First of all, the R6 has a vaster range:
ISO (photos)
Normal range
Extended range
R6
100 – 102,400
50 – 204,800
R7
100 – 32,000
100 – 51,200
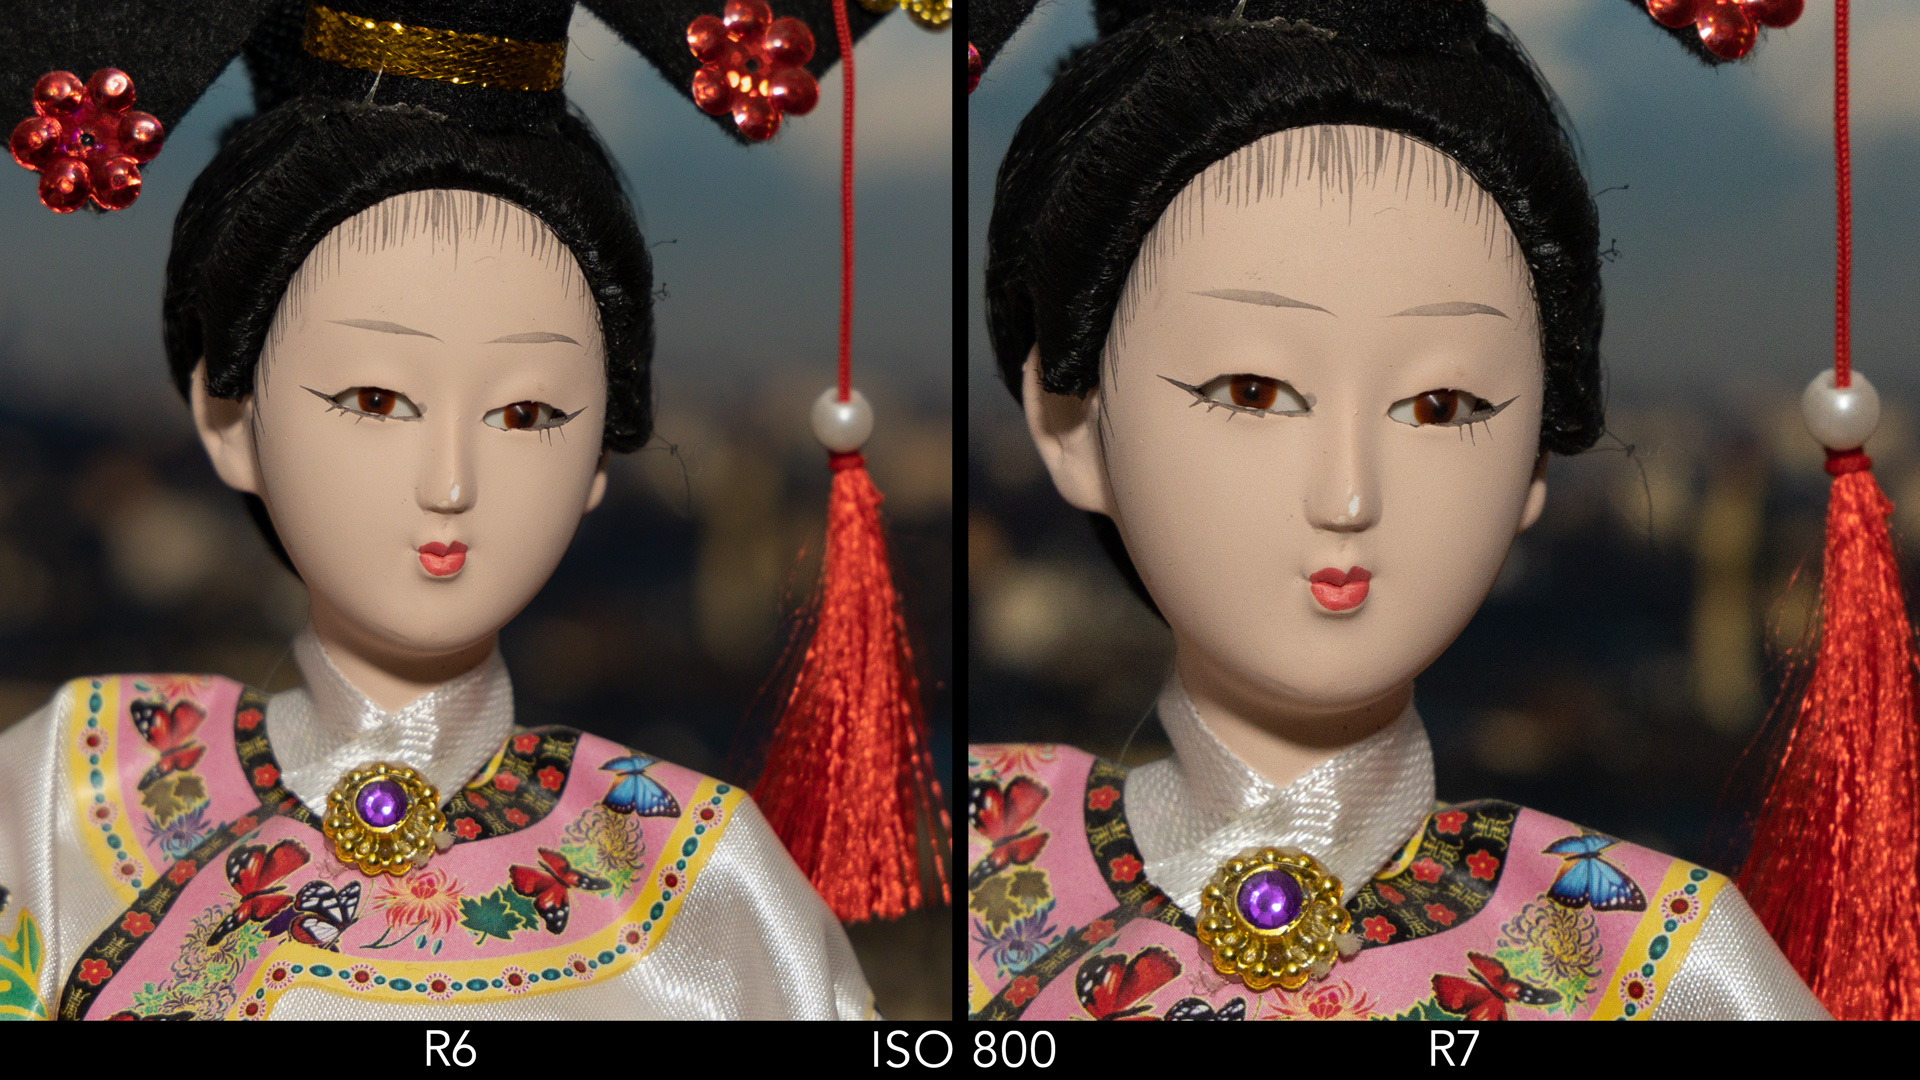
The larger sensor and the lower megapixel count help the R6 to produce photos with less noise as you increase the ISO level. The difference really starts to show from 3,200. I have to say the R7 performs well up to 6,400 all things considered, but it is obvious you can push the R6 to higher extremes.


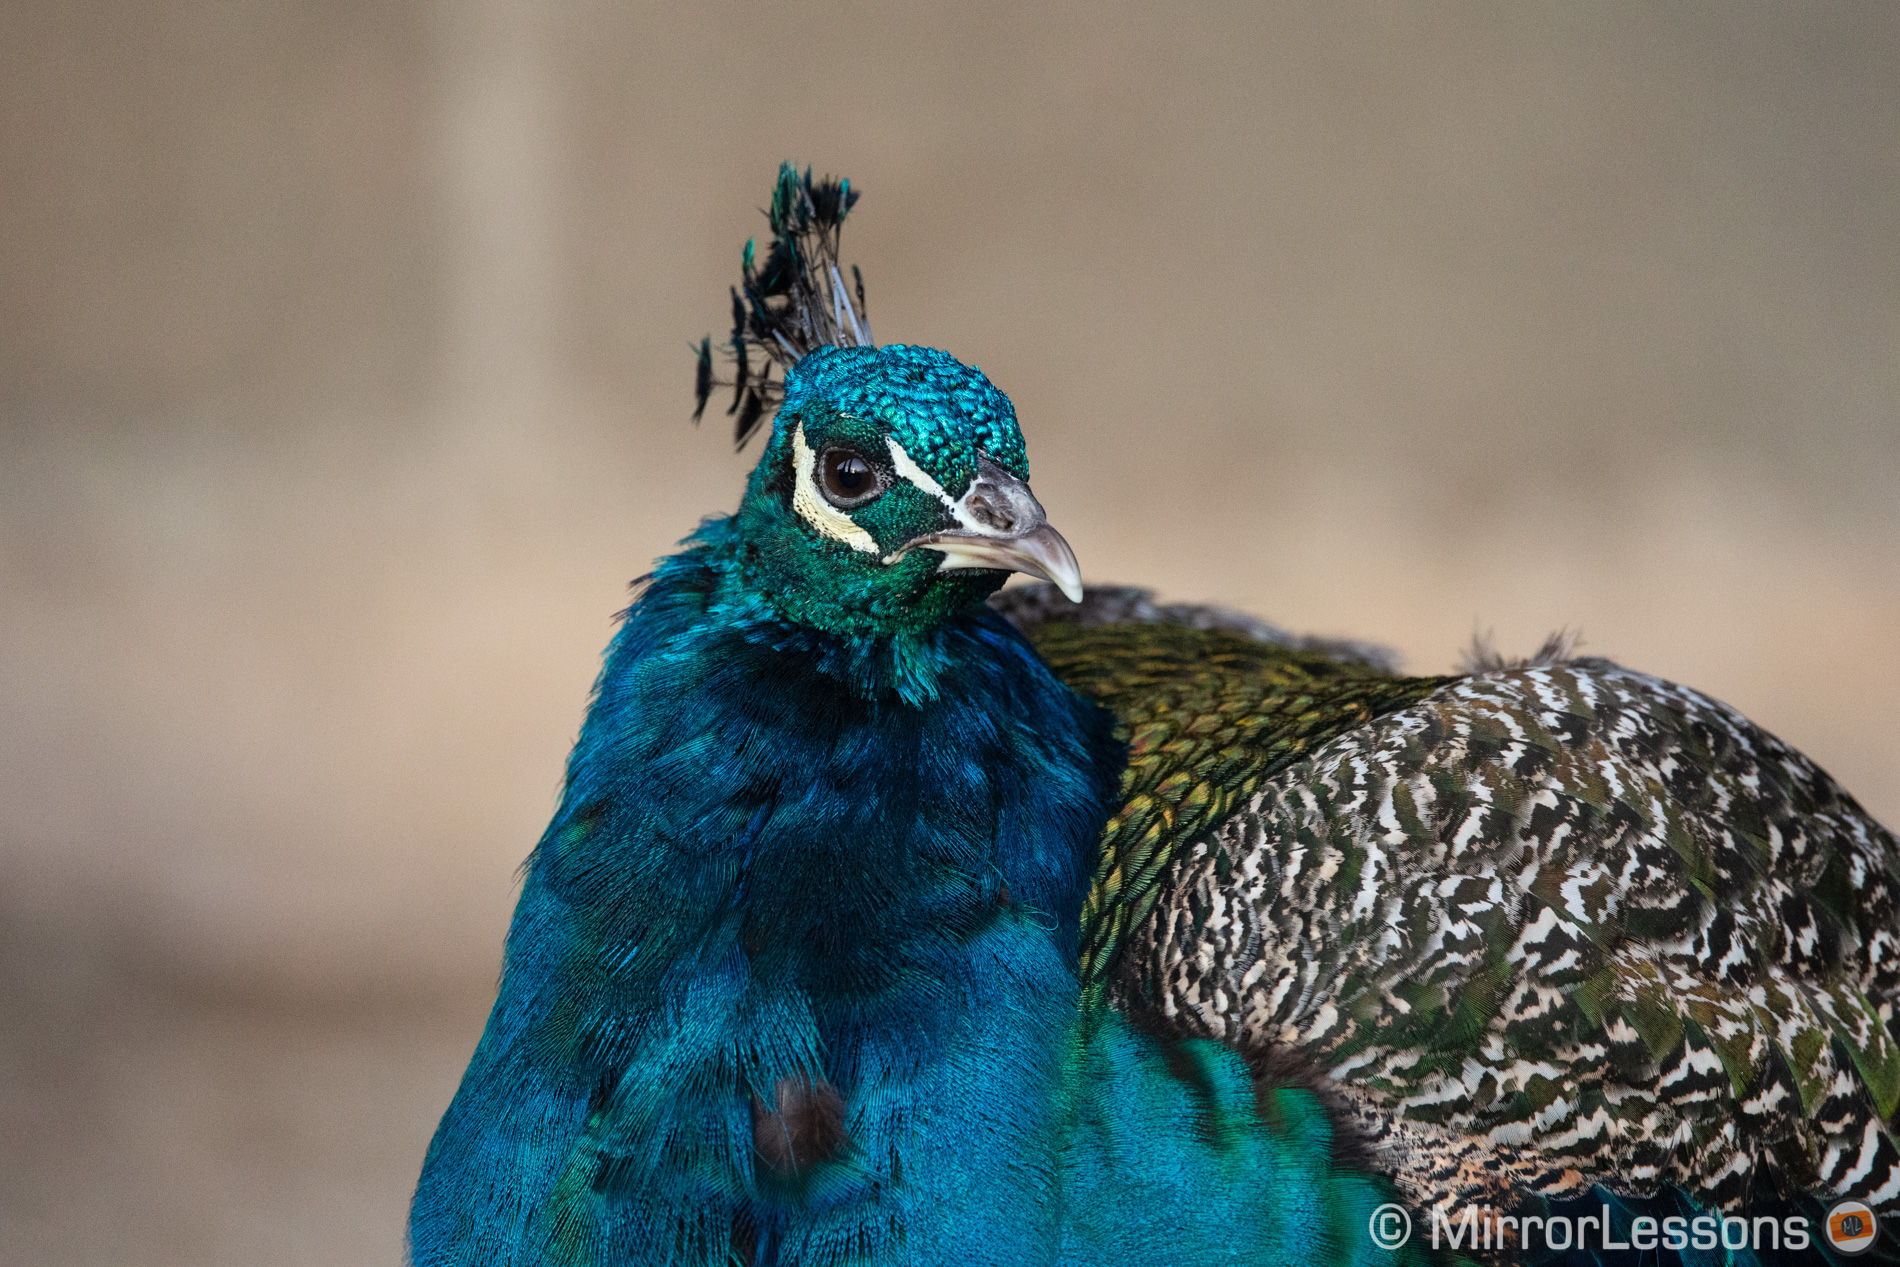
Canon R6 vs R7: Portrait (Skin Tones)
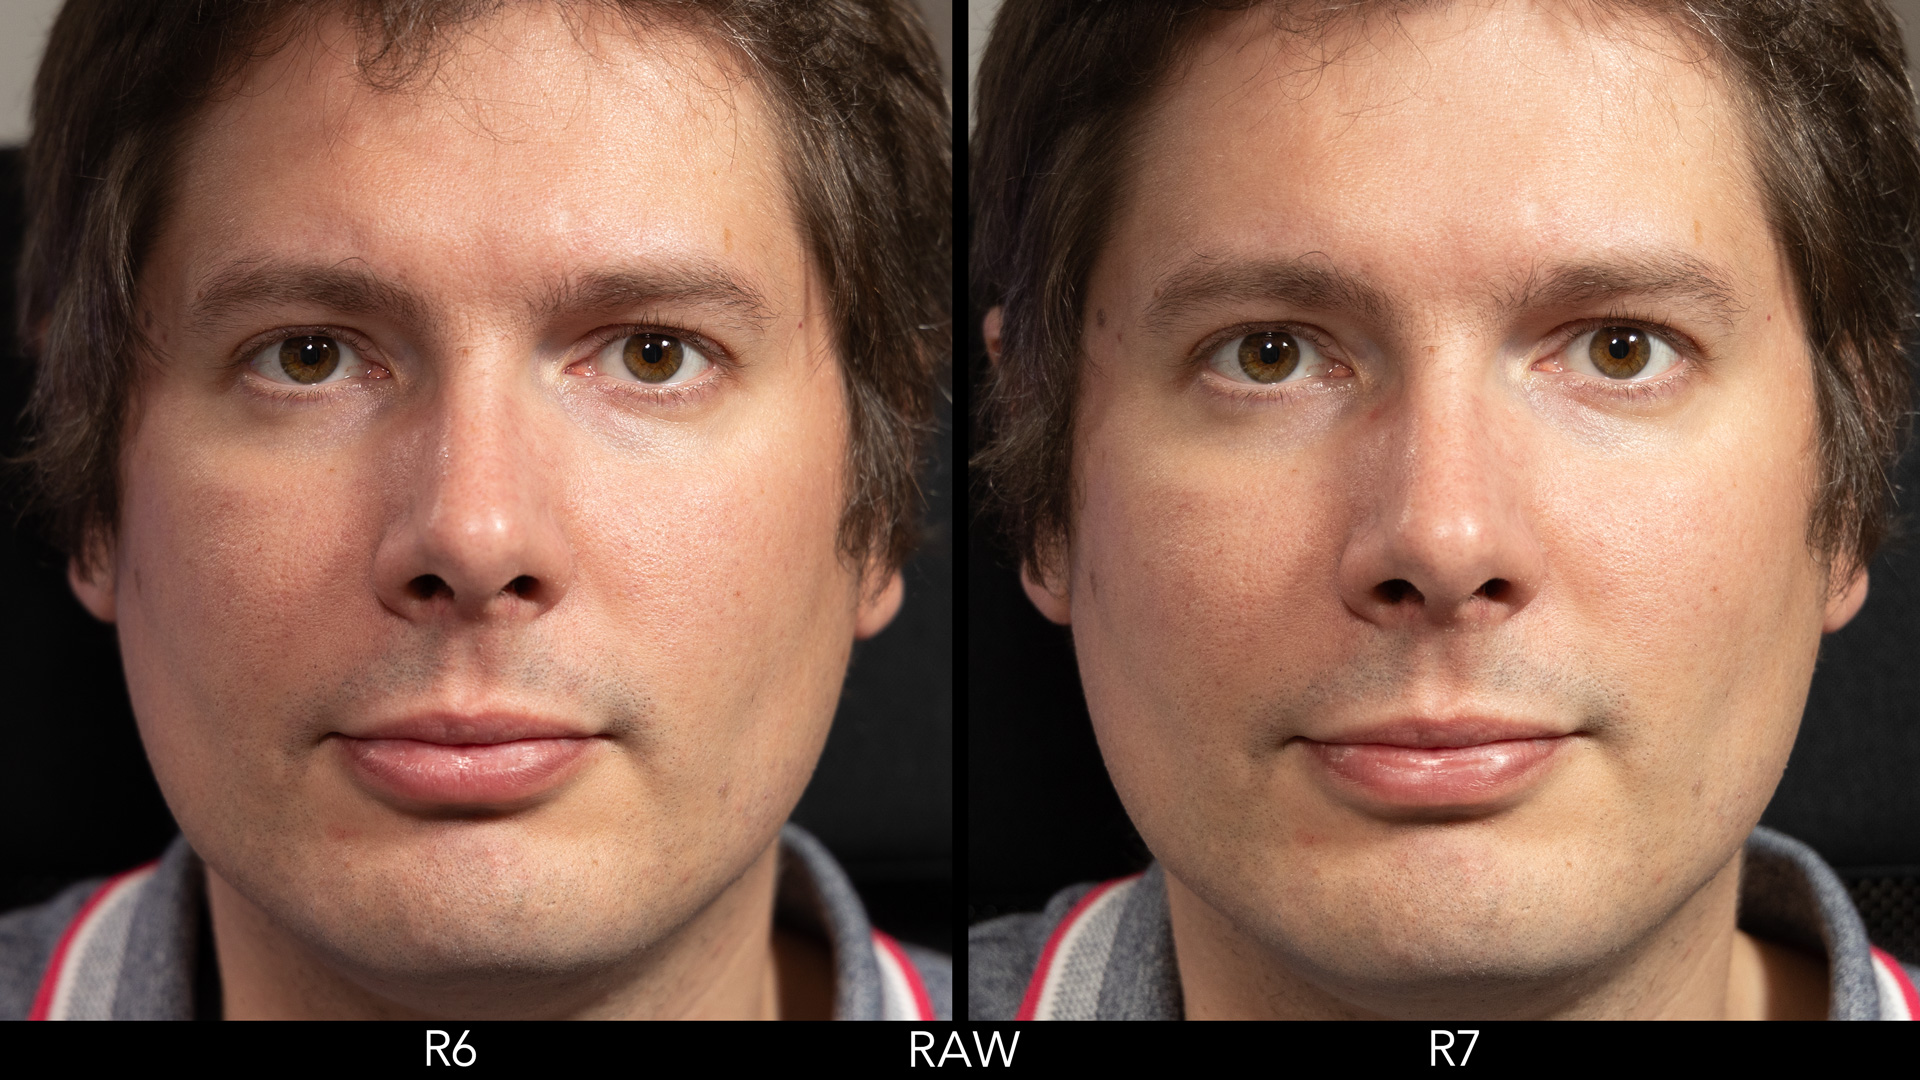
Moving on, I wanted to see if there would be any difference in the JPG output and the built-in colour profiles, and indeed there are some.
First, if I compare two RAW files taken with the same lens and settings, with the same parameters applied in the photo editor (Lightroom Classic in this case), the R7 image displays more yellow in comparison to the R6. Of course, we’re talking about RAW files, so colours can be easily matched, and a different editor will give you a different starting point.
With in-camera JPGS, the results are similar when using the Standard or Neutral profile, although here as well the R7 has a bit more yellow.

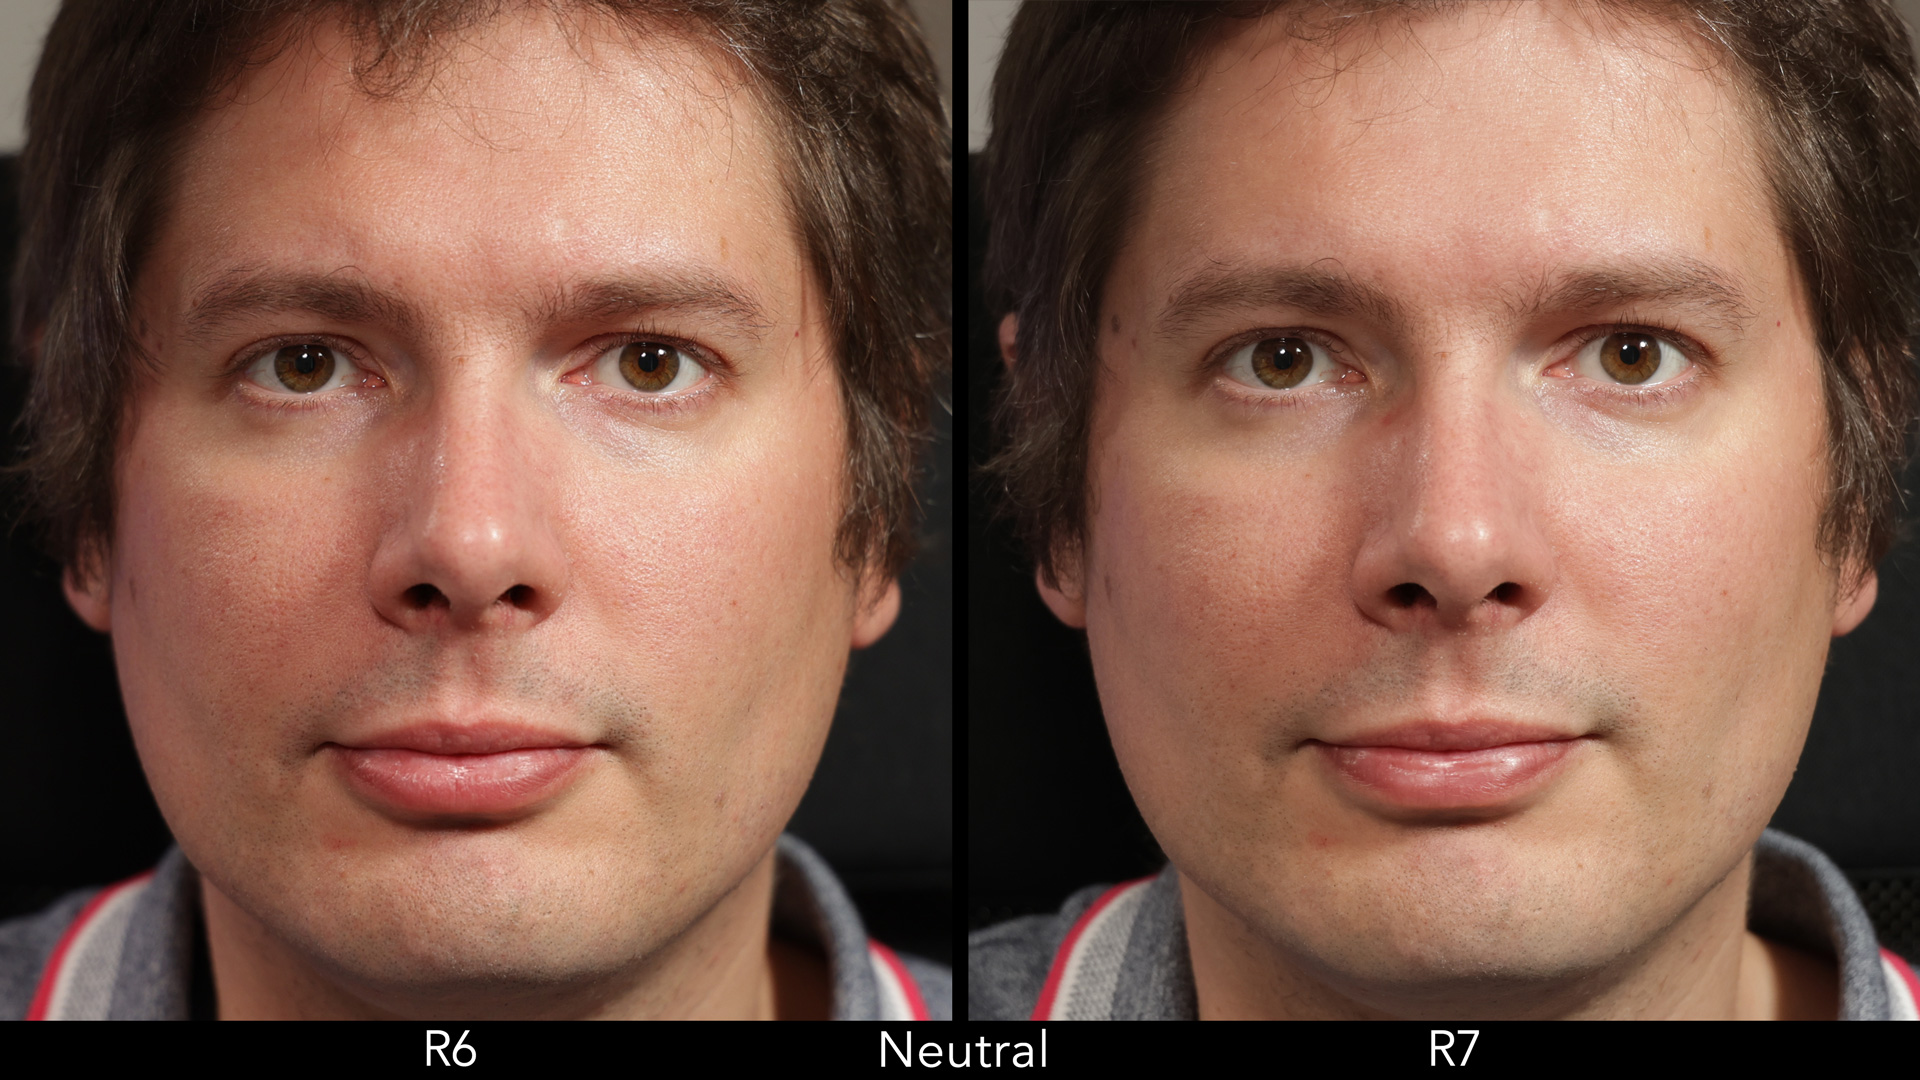
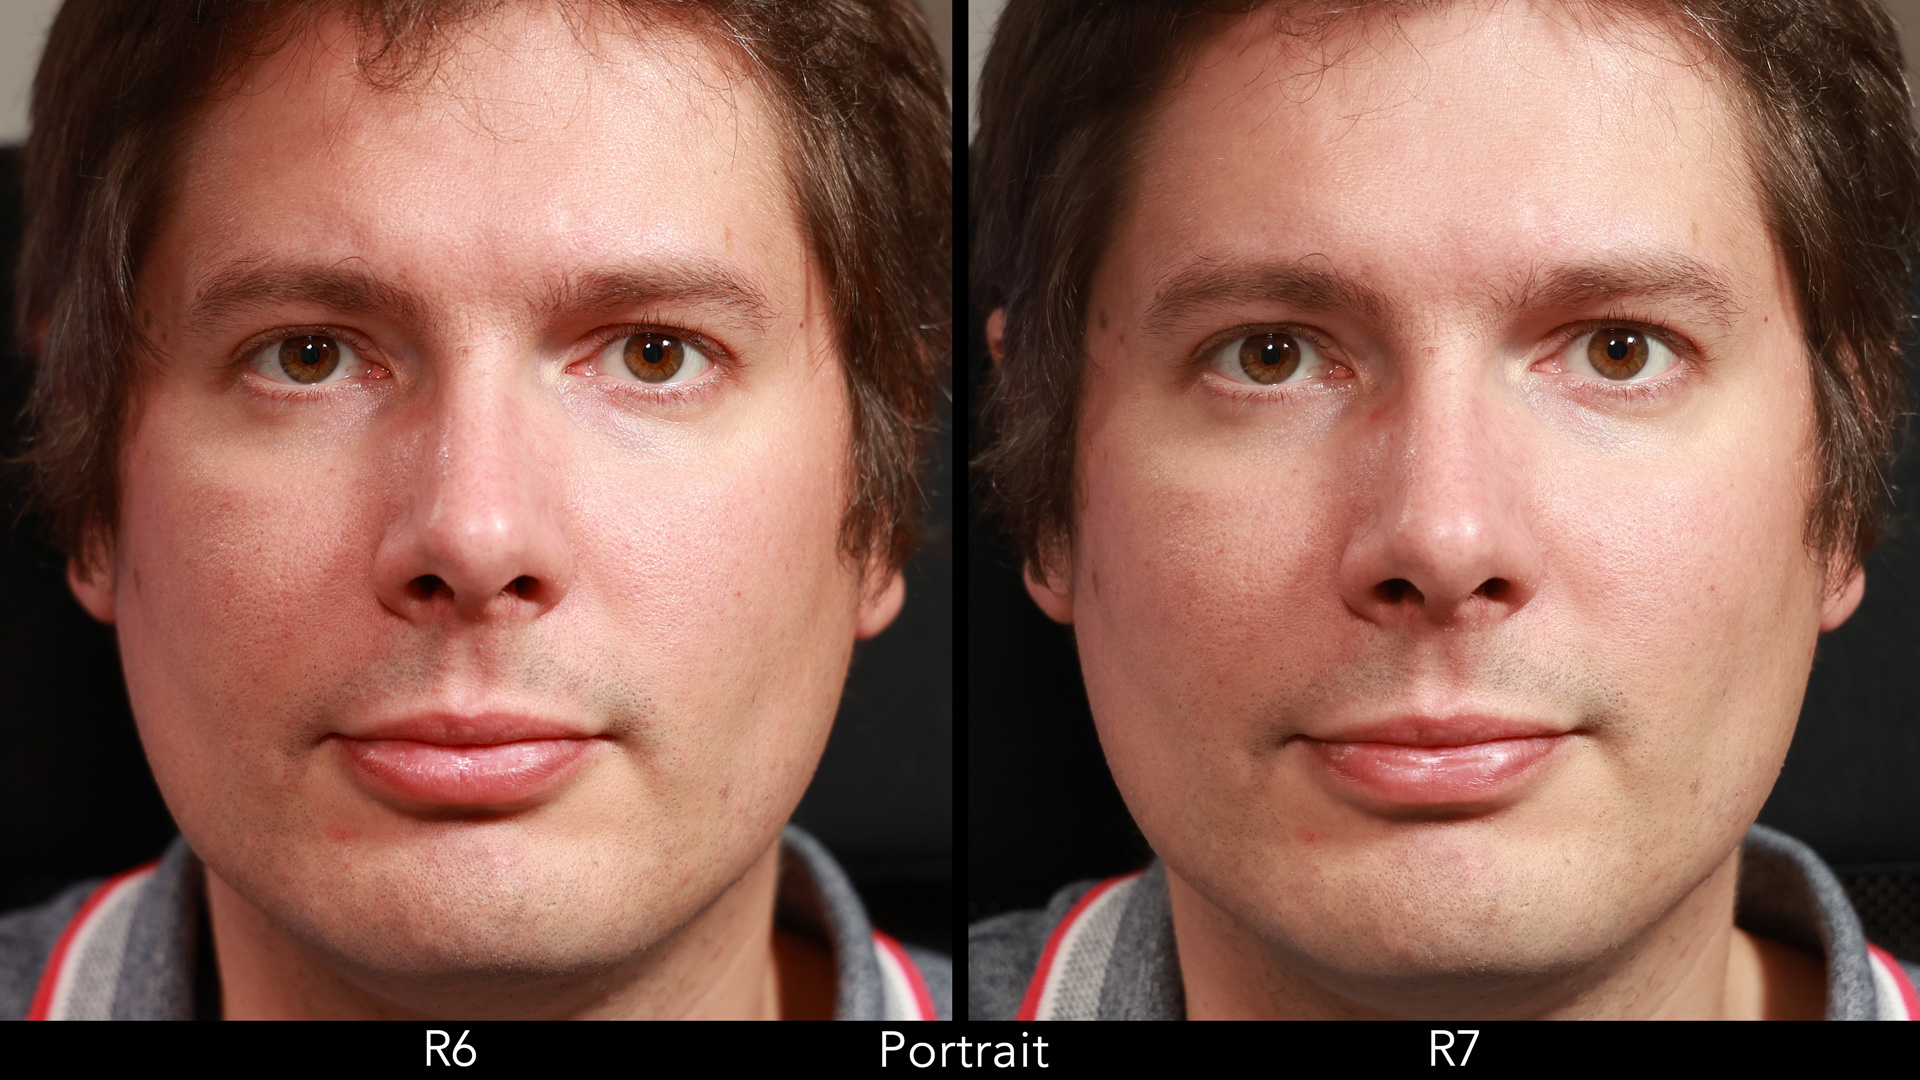
With the Portrait profile, the R7 image is less red, which I personally prefer. That said, the Neutral profile remains my favourite for skin tones.
Tidbits
Finally, a bit of extra information:
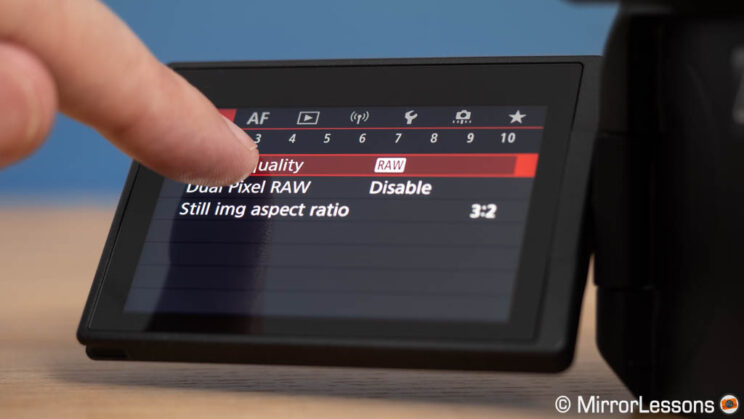
- both cameras can shoot RAW or Compressed RAW (C.RAW)
- In addition to RAW and JPG, you can also work with 10-bit HEIF files using the HDR PQ gamma
- The R7 has an additional RAW mode, called Dual Pixel RAW. When enabled, the camera uses the Dual Pixel CMOS AF II technology to save depth information into the RAW file. Later in Canon’s Digital Photo Professional software, you can make small adjustments such as fine-tuning the focus point.
2. Autofocus
Both cameras feature an advanced autofocus system, the Canon Dual Pixel CMOS AF II, and include a deep learning algorithm to recognise various subjects such as humans, animals and vehicles, and focus on their body/head/eyes (or helmet in the case of motorcycles and open-cockpit racing cars).
What’s interesting on Canon cameras is that neither the Animals nor Vehicles setting excludes humans. For example, if a person and a dog are in the same frame, the dog will be prioritised when choosing animal detection. However, if there’s only a person in the scene and you still have the animal setting on, the camera will detect and focus on the person successfully.
If we dig a bit, we can find some differences between these two cameras, starting with the total number of focus points available:
- R6: 6,072 points (1-point AF mode), or 1,053 points (Tracking)
- R7: 5,915 points (1-point AF mode), or 651 points (Tracking)
The second difference is the AF Zone setting (called AF Method on the R6). The R7 has three custom modes that allow you to create an area of any size you want. Furthermore, Subject Detection can be enabled from any AF Zone.
On the R6, your only option to work with Subject Detection is to select the Tracking setting, which works across the entire sensor (Whole Area AF).
These may seem like small improvements, but the extra flexibility of the R7 can be useful.
For example, during my Eye AF test, the R6 struggled to recognise the subject at the beginning, when she was far from the camera (small in the frame). So the camera started to jump to various AF points in different parts of the frame, focusing on the kitchen counter in particular. I had to touch the subject on the LCD screen for the R6 to prioritise her and forget about the rest.
On the R7, you can simply select a small AF area and keep it on the person at the centre. If the subject is detected, the camera will still track him/her across the entire frame, but if it doesn’t detect the subject, even momentarily, it will focus where your AF point is, giving you more control.
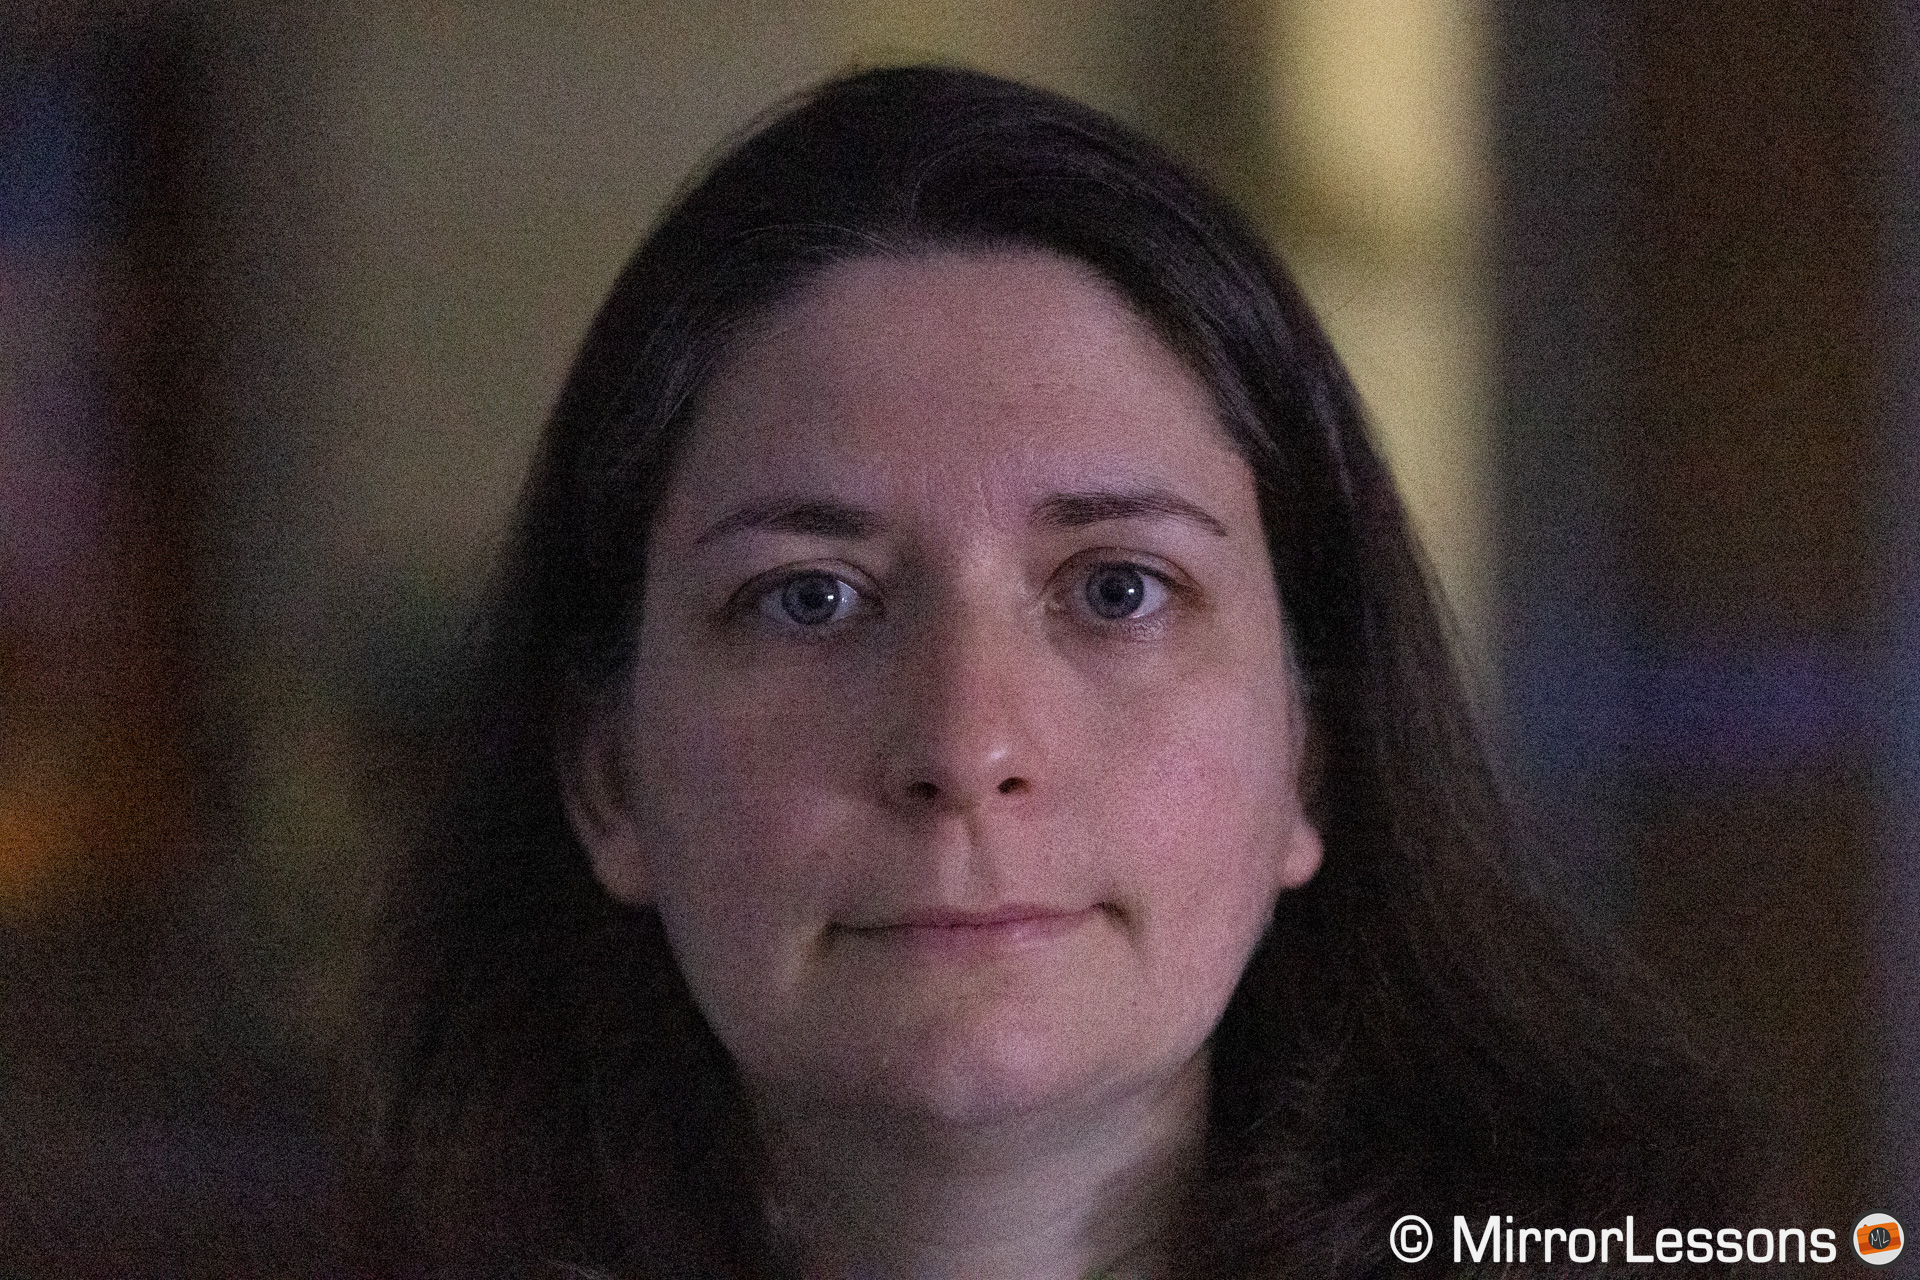
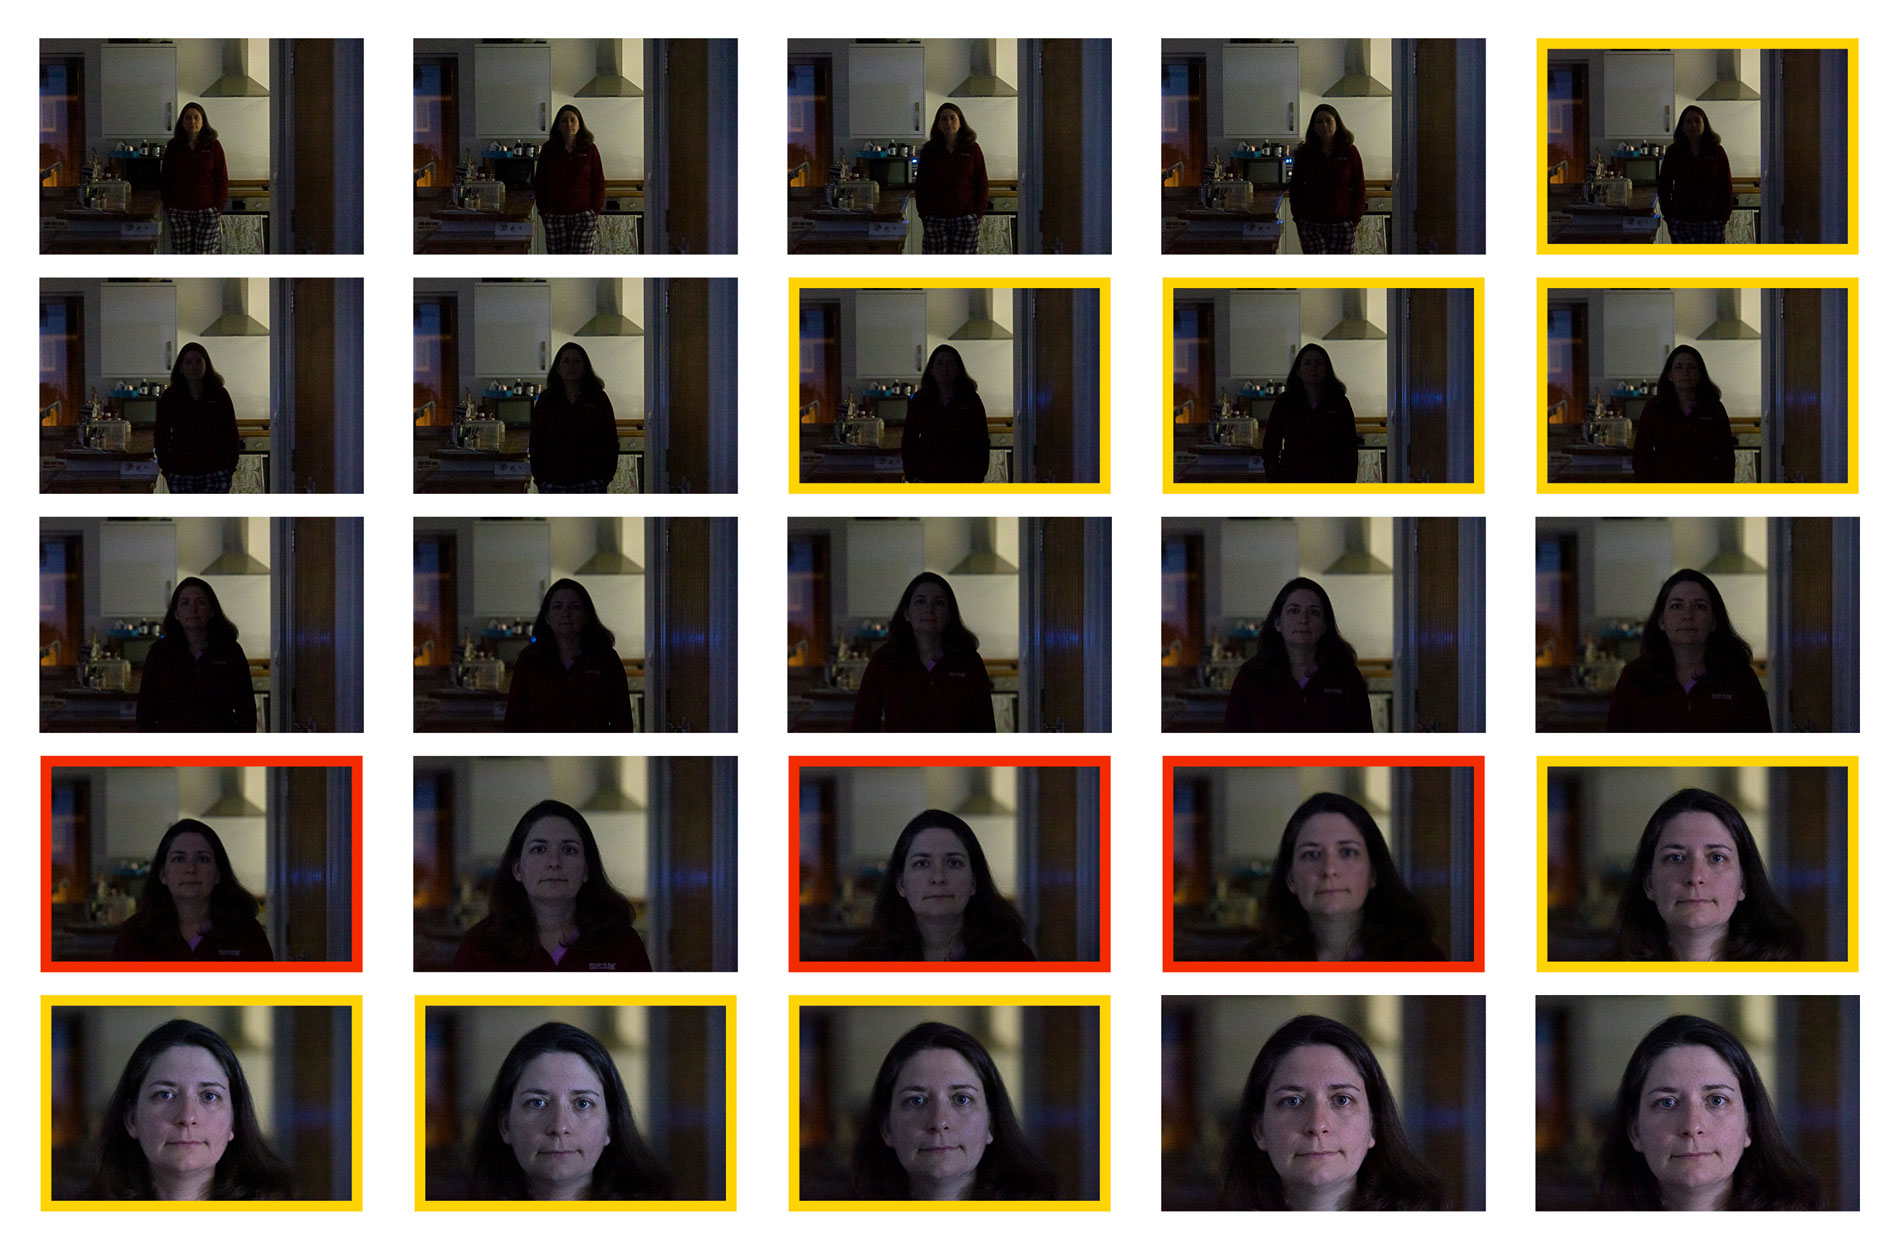
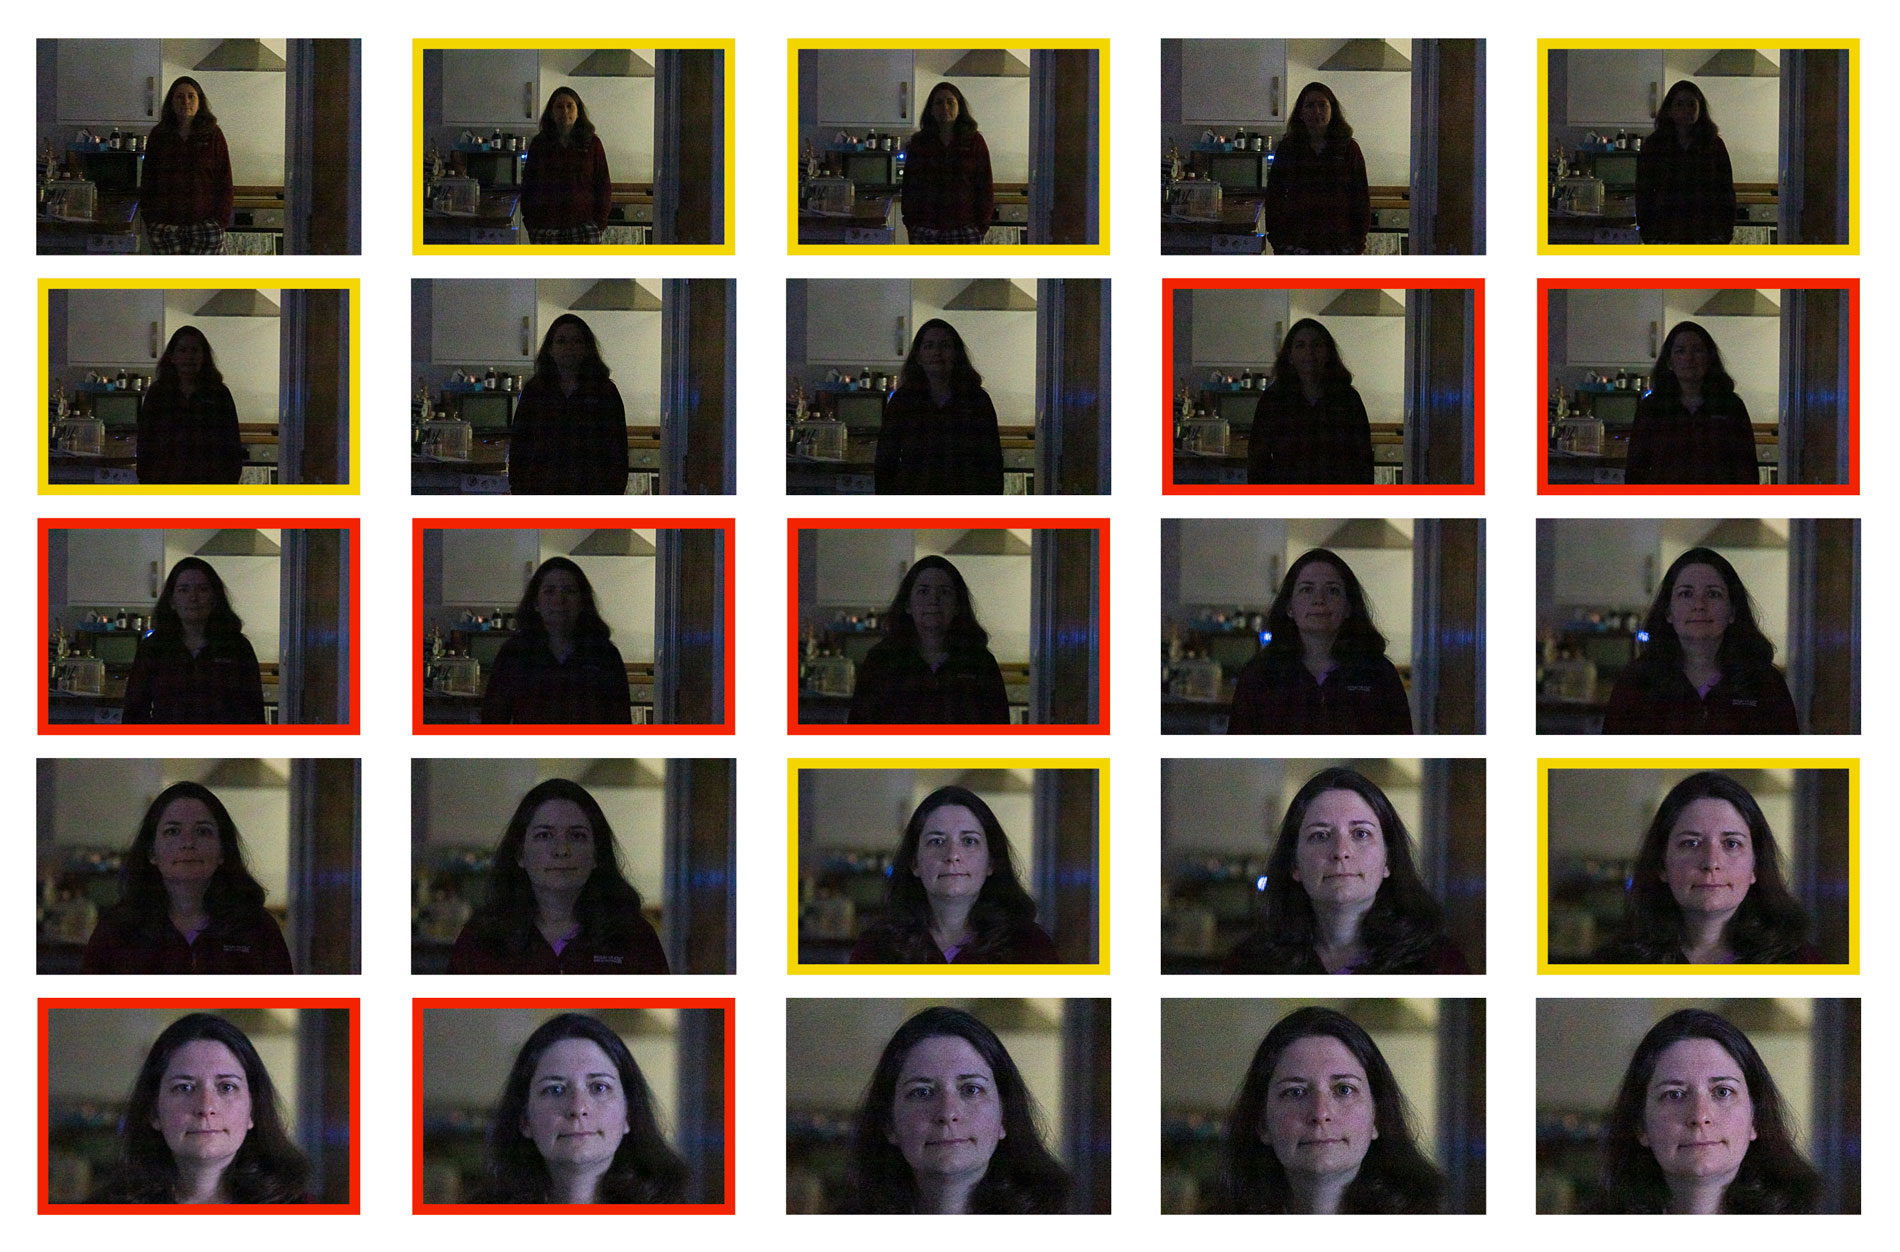
Canon R6 vs R7: Eye AF (for humans)
My face and eye detection test showed a very similar performance overall. The R6 gave me the same keeper rate as previous tests. It only struggled when the subject moved away from the camera, giving 4 out of focus shots in a row.
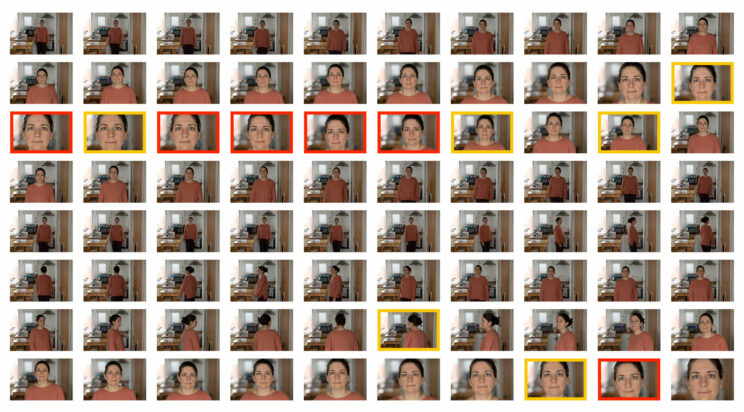
The R7 delivered a slightly higher keeper rate. I had fewer problems when the subject walked away from the camera, but there were more images that lacked pin sharp focus.
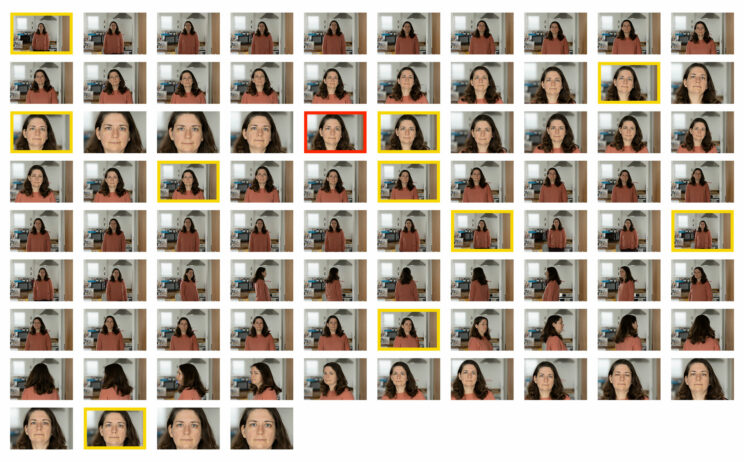
Neither camera struggled when the subject turned in a circle. When the face of the subject is not visible, they focus on the torso instead.
For video, the performance is very similar, although the R7 hesitated more when the subject was turning (face hidden momentarily), taking more time to refocus on the eyes when they became visible again.
Note: I made these tests using the RF 85mm F2 Macro IS STM. I know some of you will say the AF motor of this lens is not great, and that I should have used an L lens instead. However, the 85mm F2 is the only affordable native portrait lens you can buy (around $500). The F1.2 version is $2600, and F2.8 zooms are more than 2K. Realistically, R7 and R7 owners especially will settle for the less expensive lens, and my test gives them a realistic idea of what to expect. I think this is more useful and fair than mounting the most expensive lens out there that not everybody can afford.
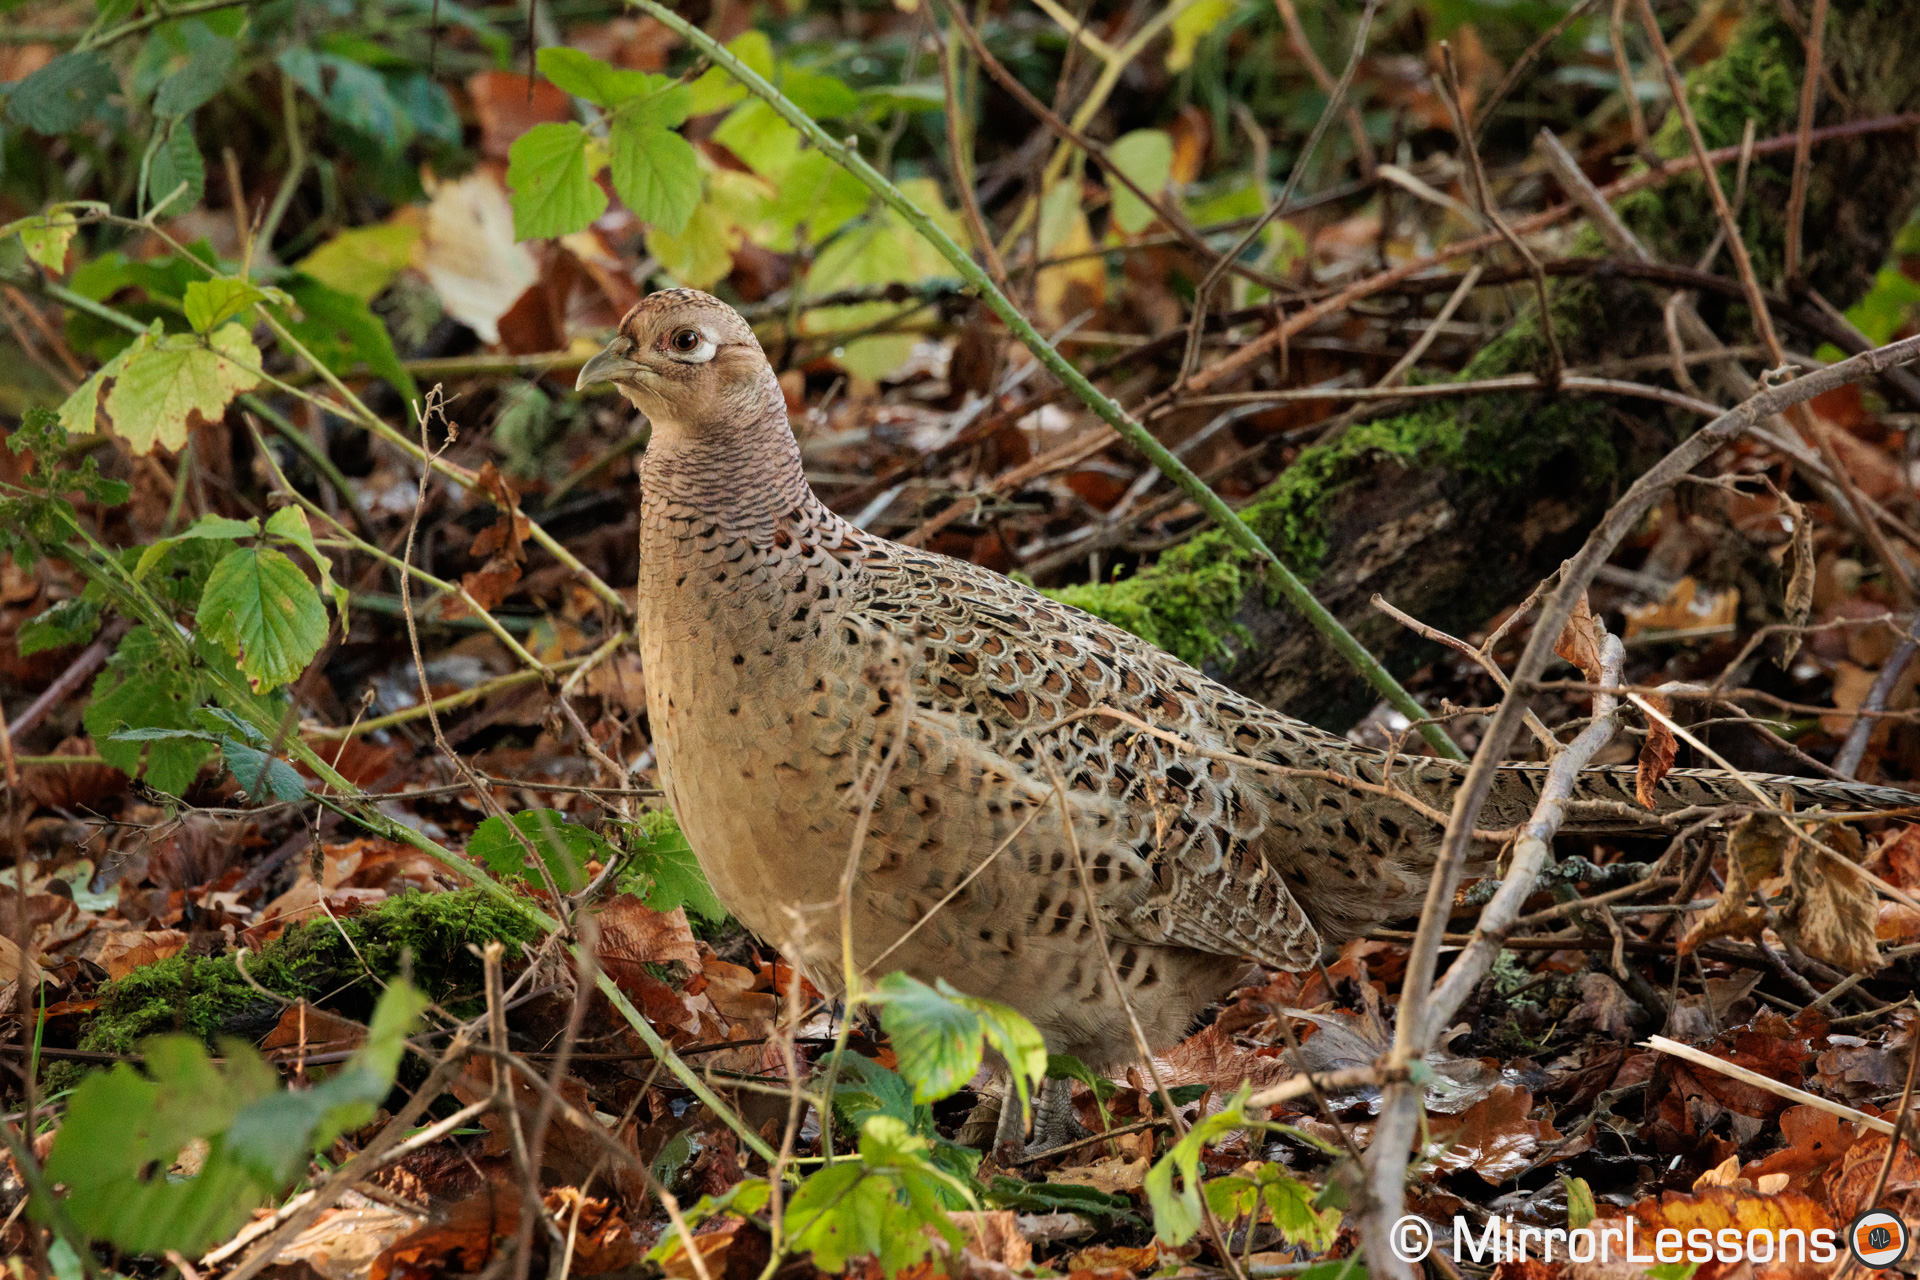
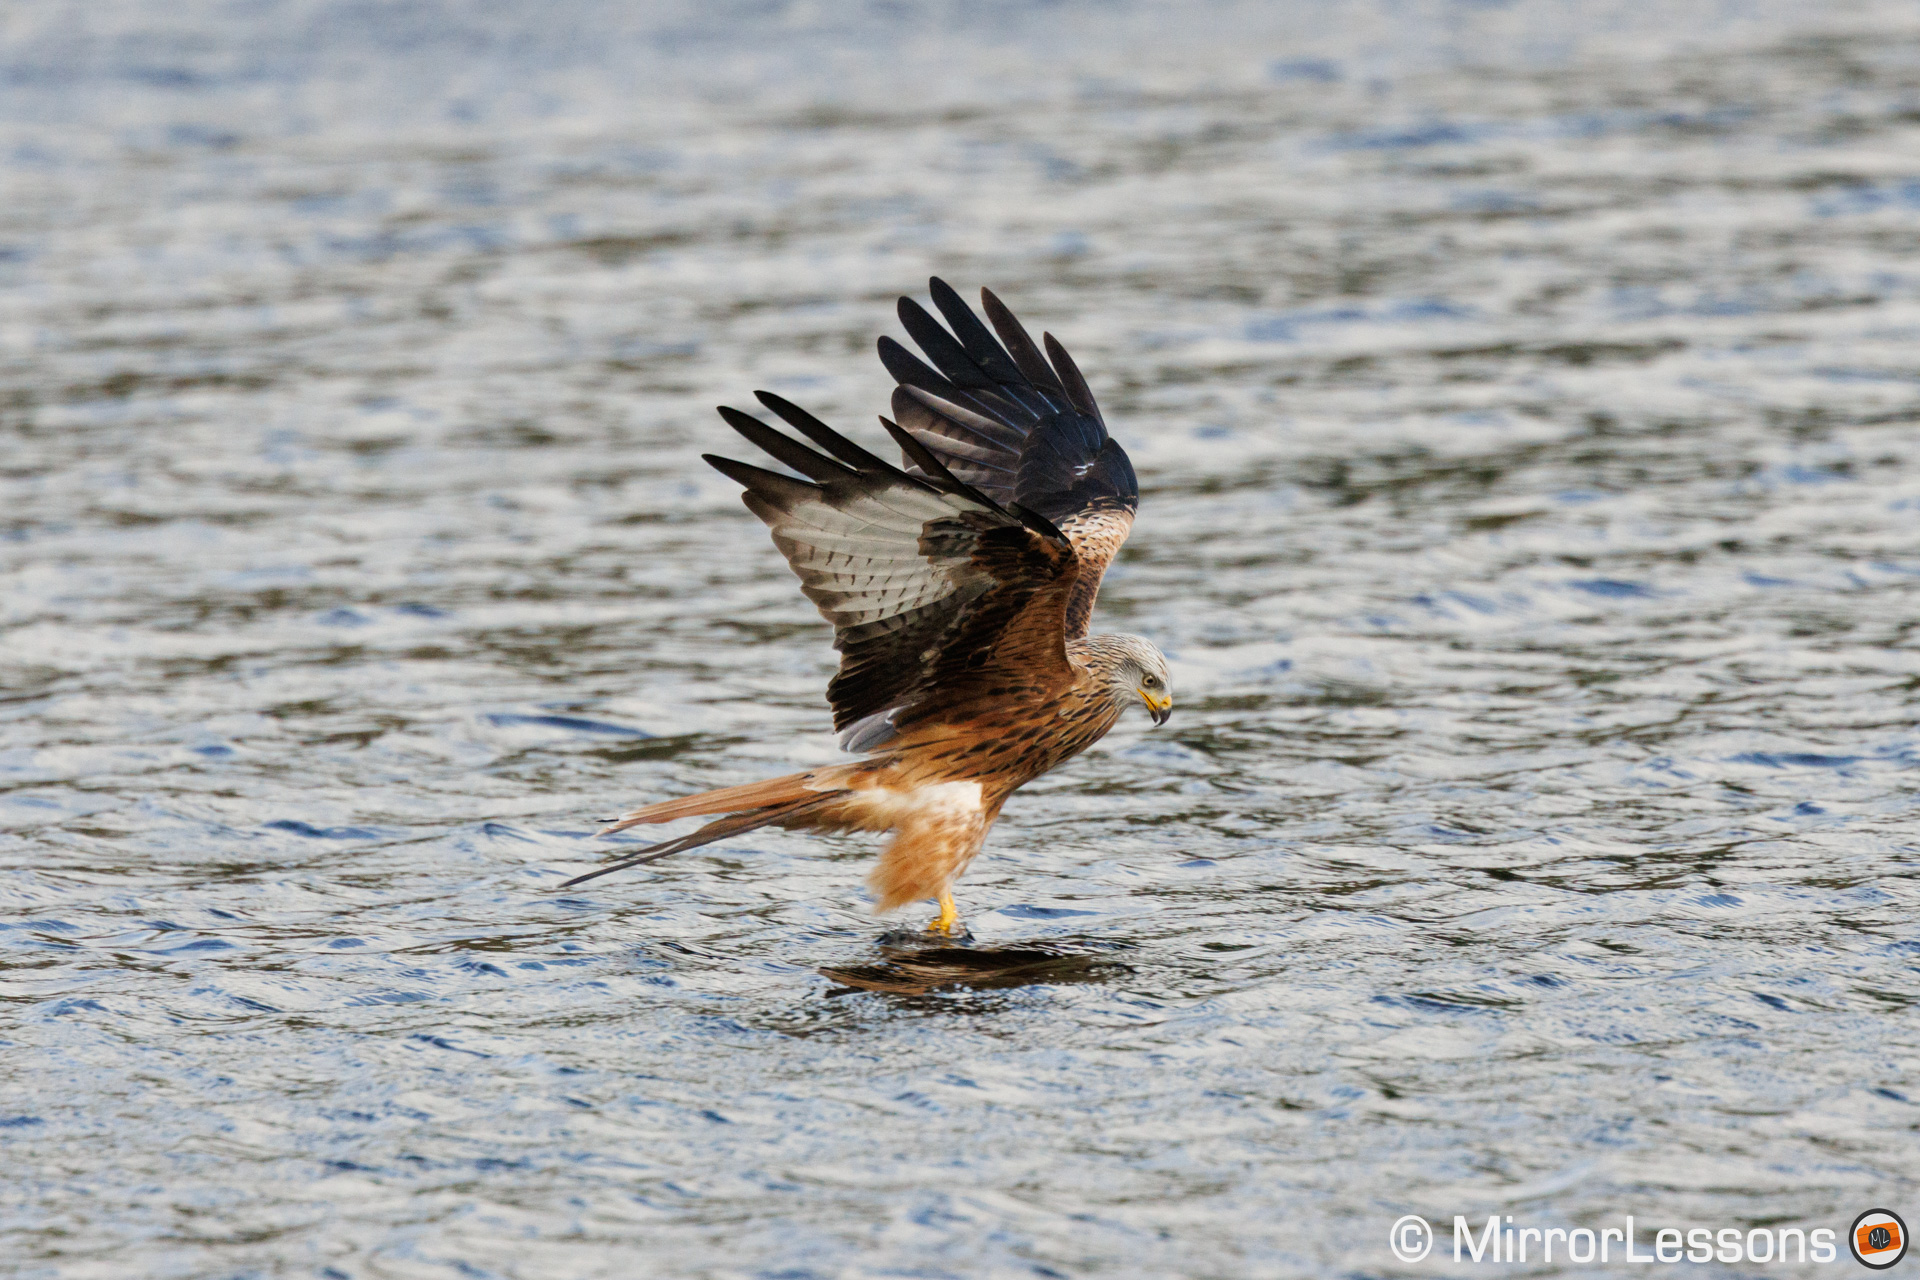
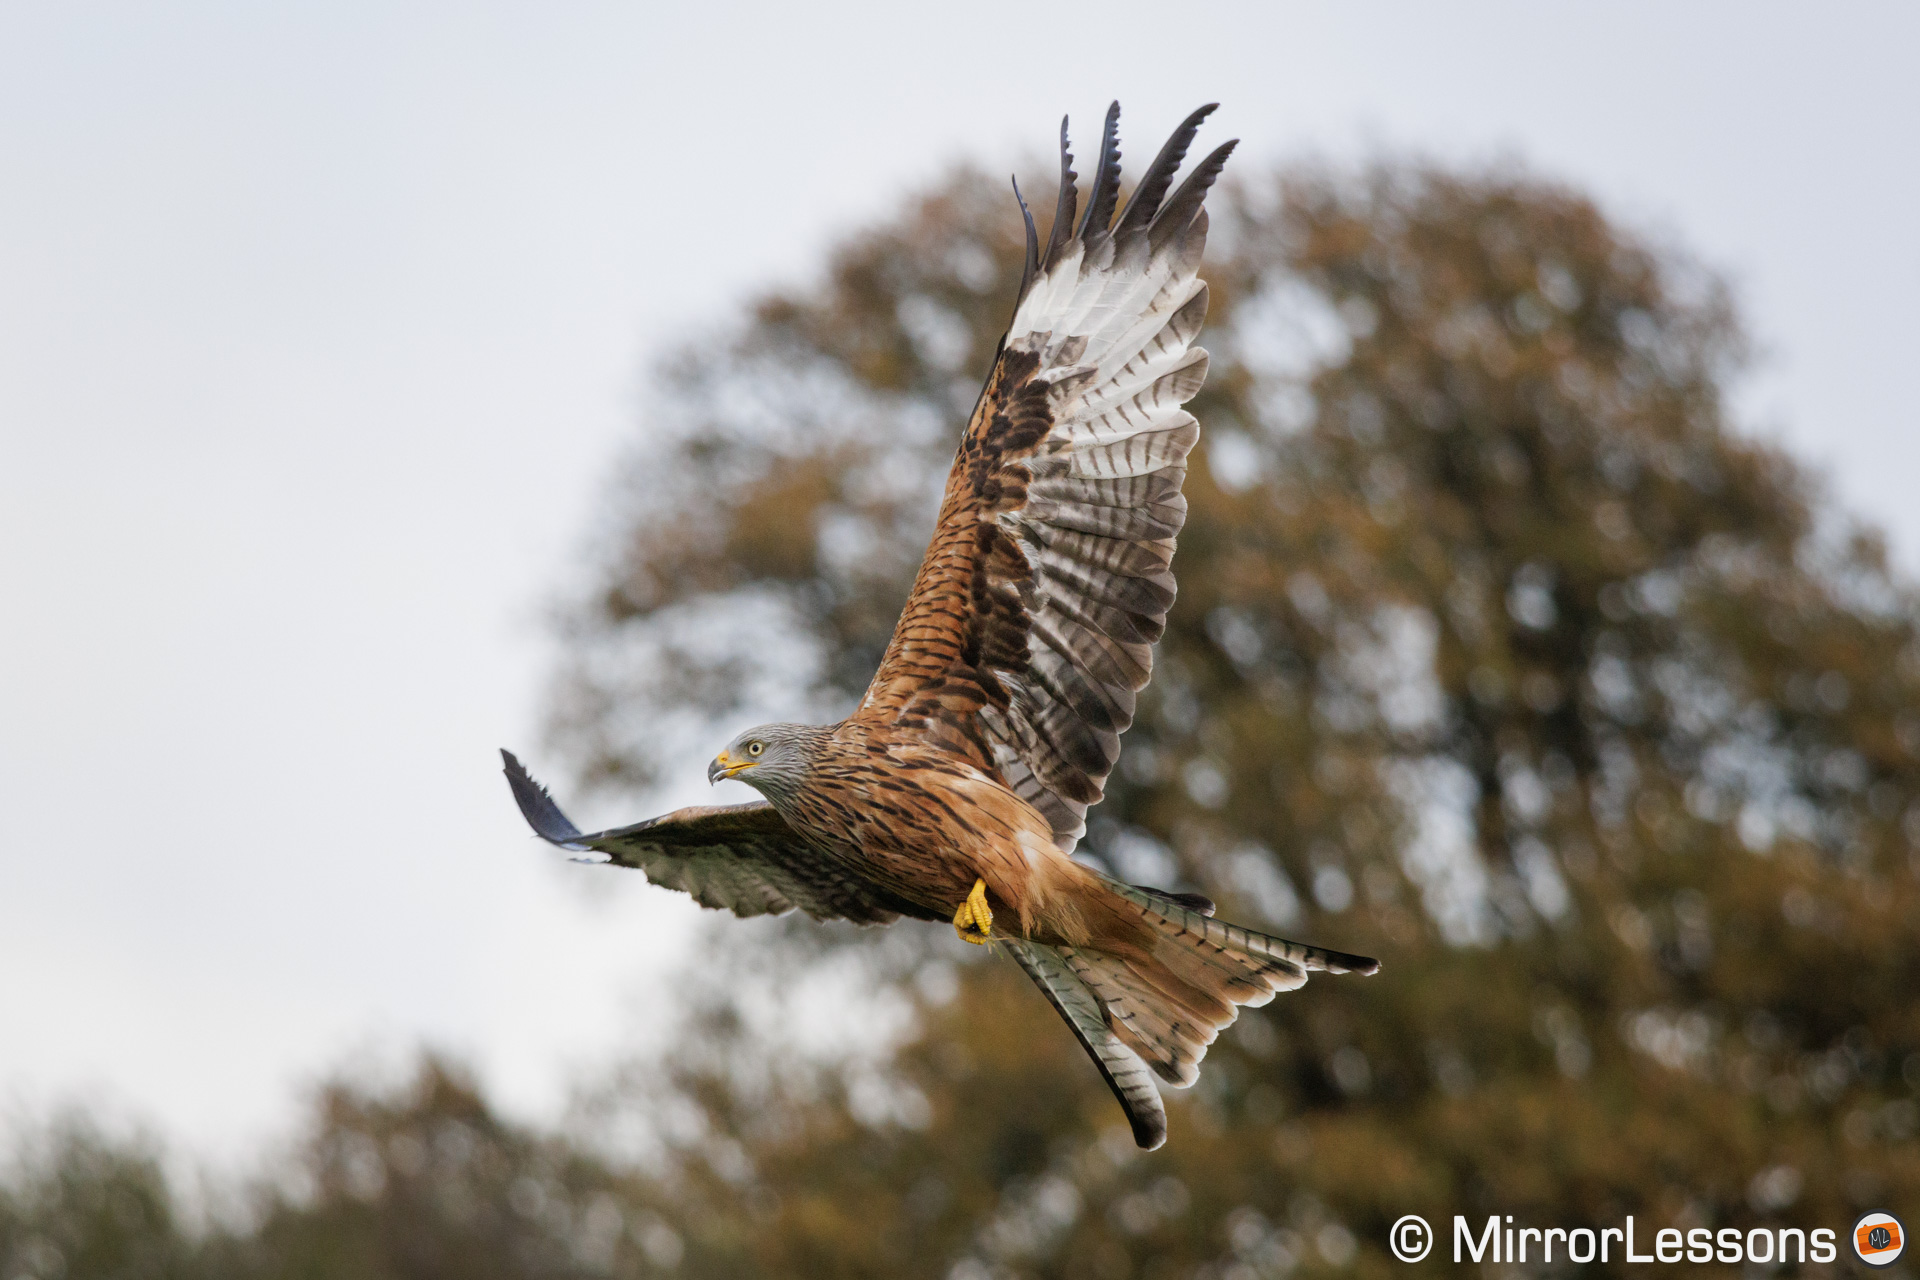
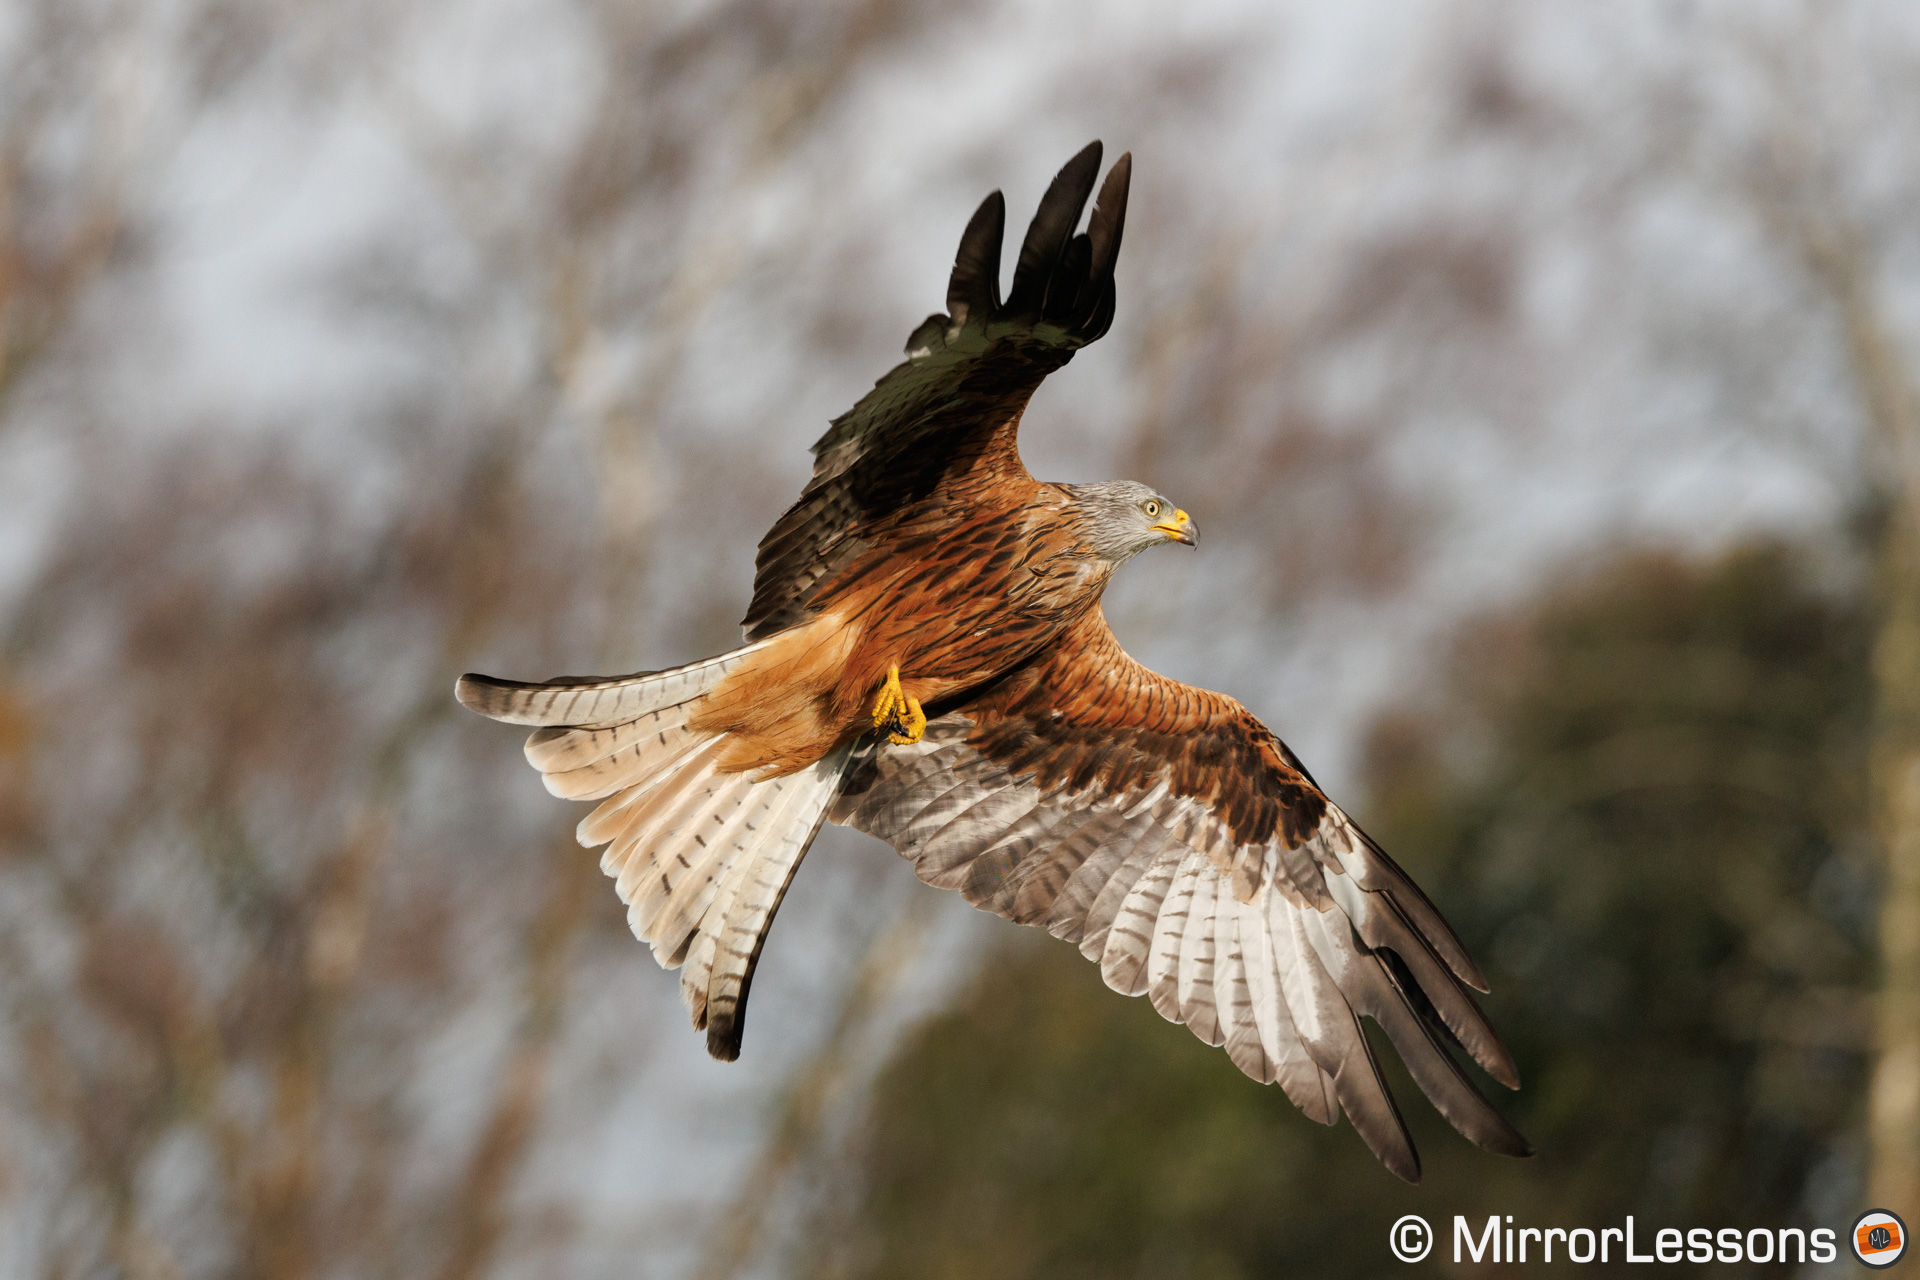
Canon R6 vs R7: Animal AF
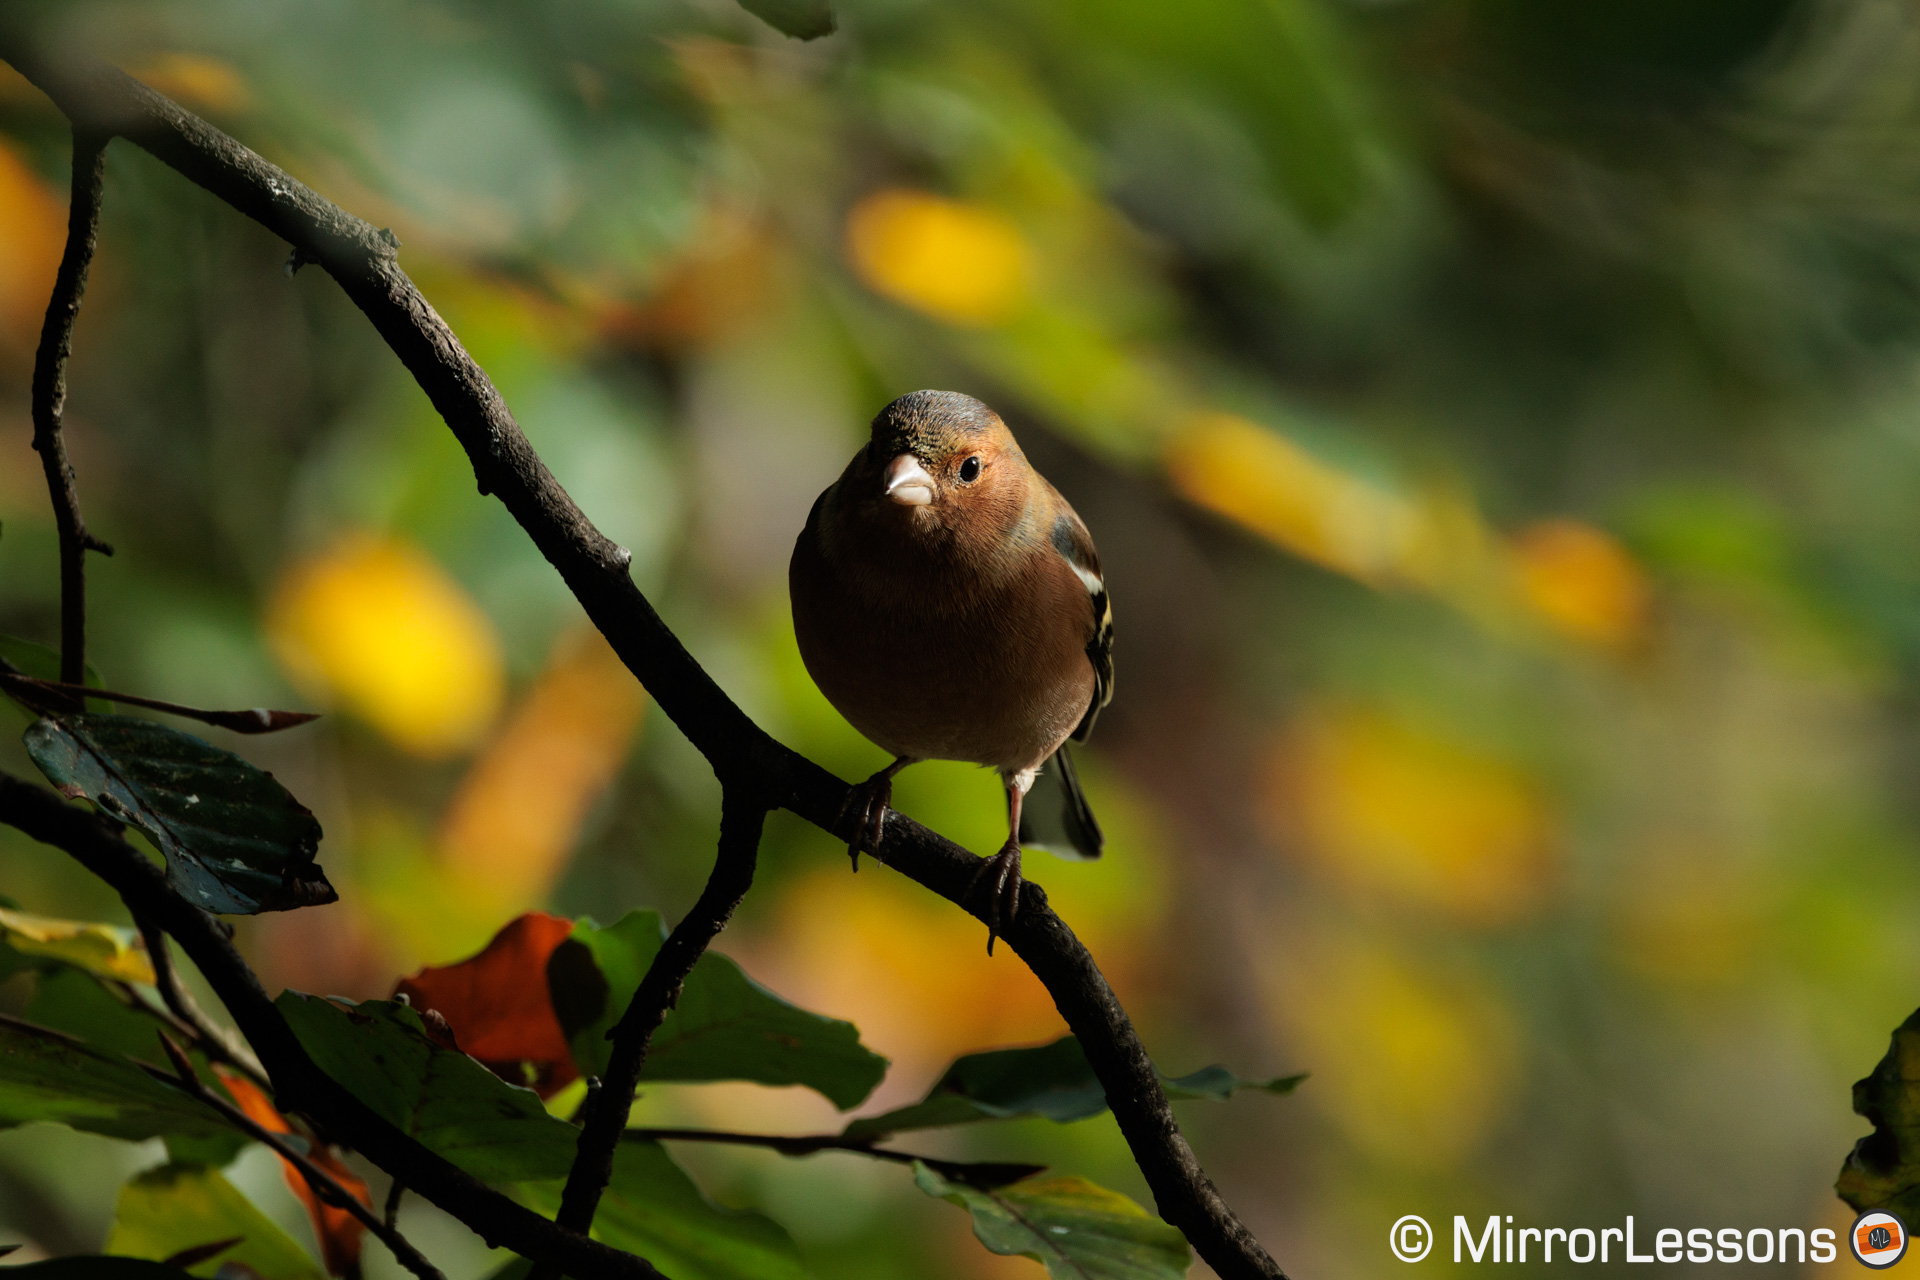
Concerning animal detection, both cameras perform really well. I was already accustomed to the R6 in this field: it’s fast and extremely reliable. The animal is detected right away, even when at a distance (small in the frame).
Focus is very accurate, whether you work at a distance or have the chance to get close to your subject. The camera will switch to the head or eye as soon as possible, increasing your chances to get optimal sharpness where it matters most.
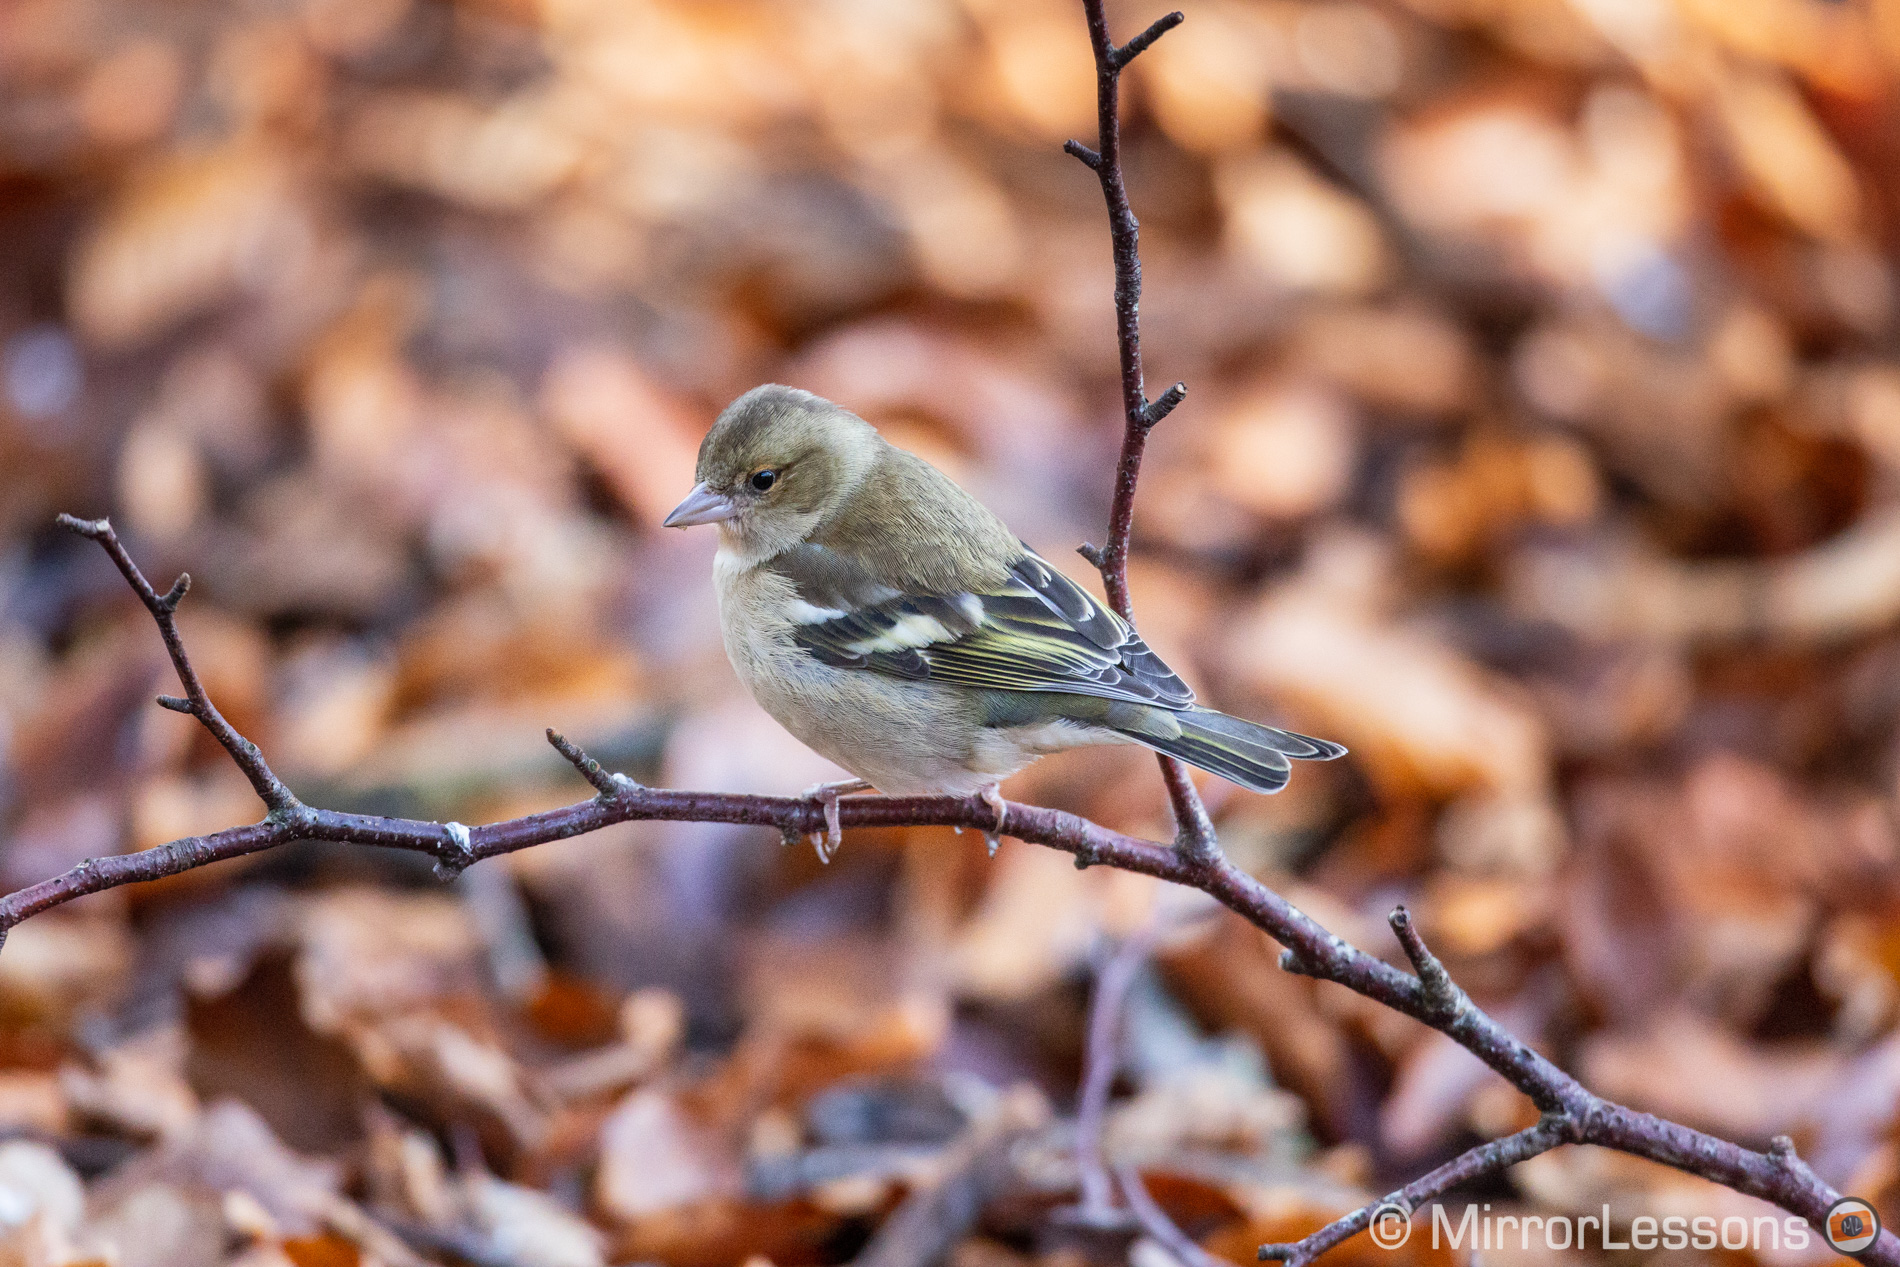
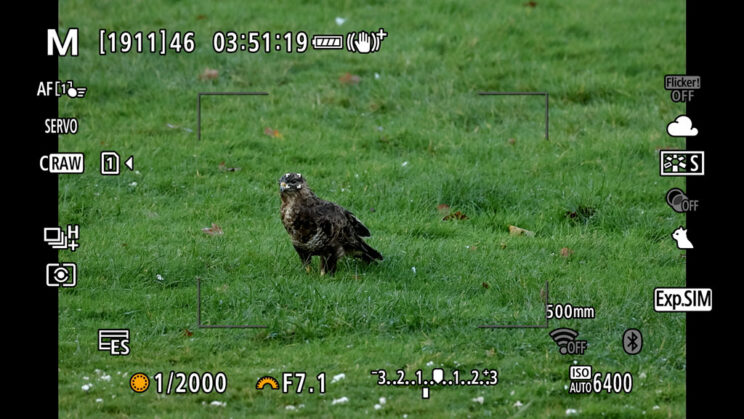
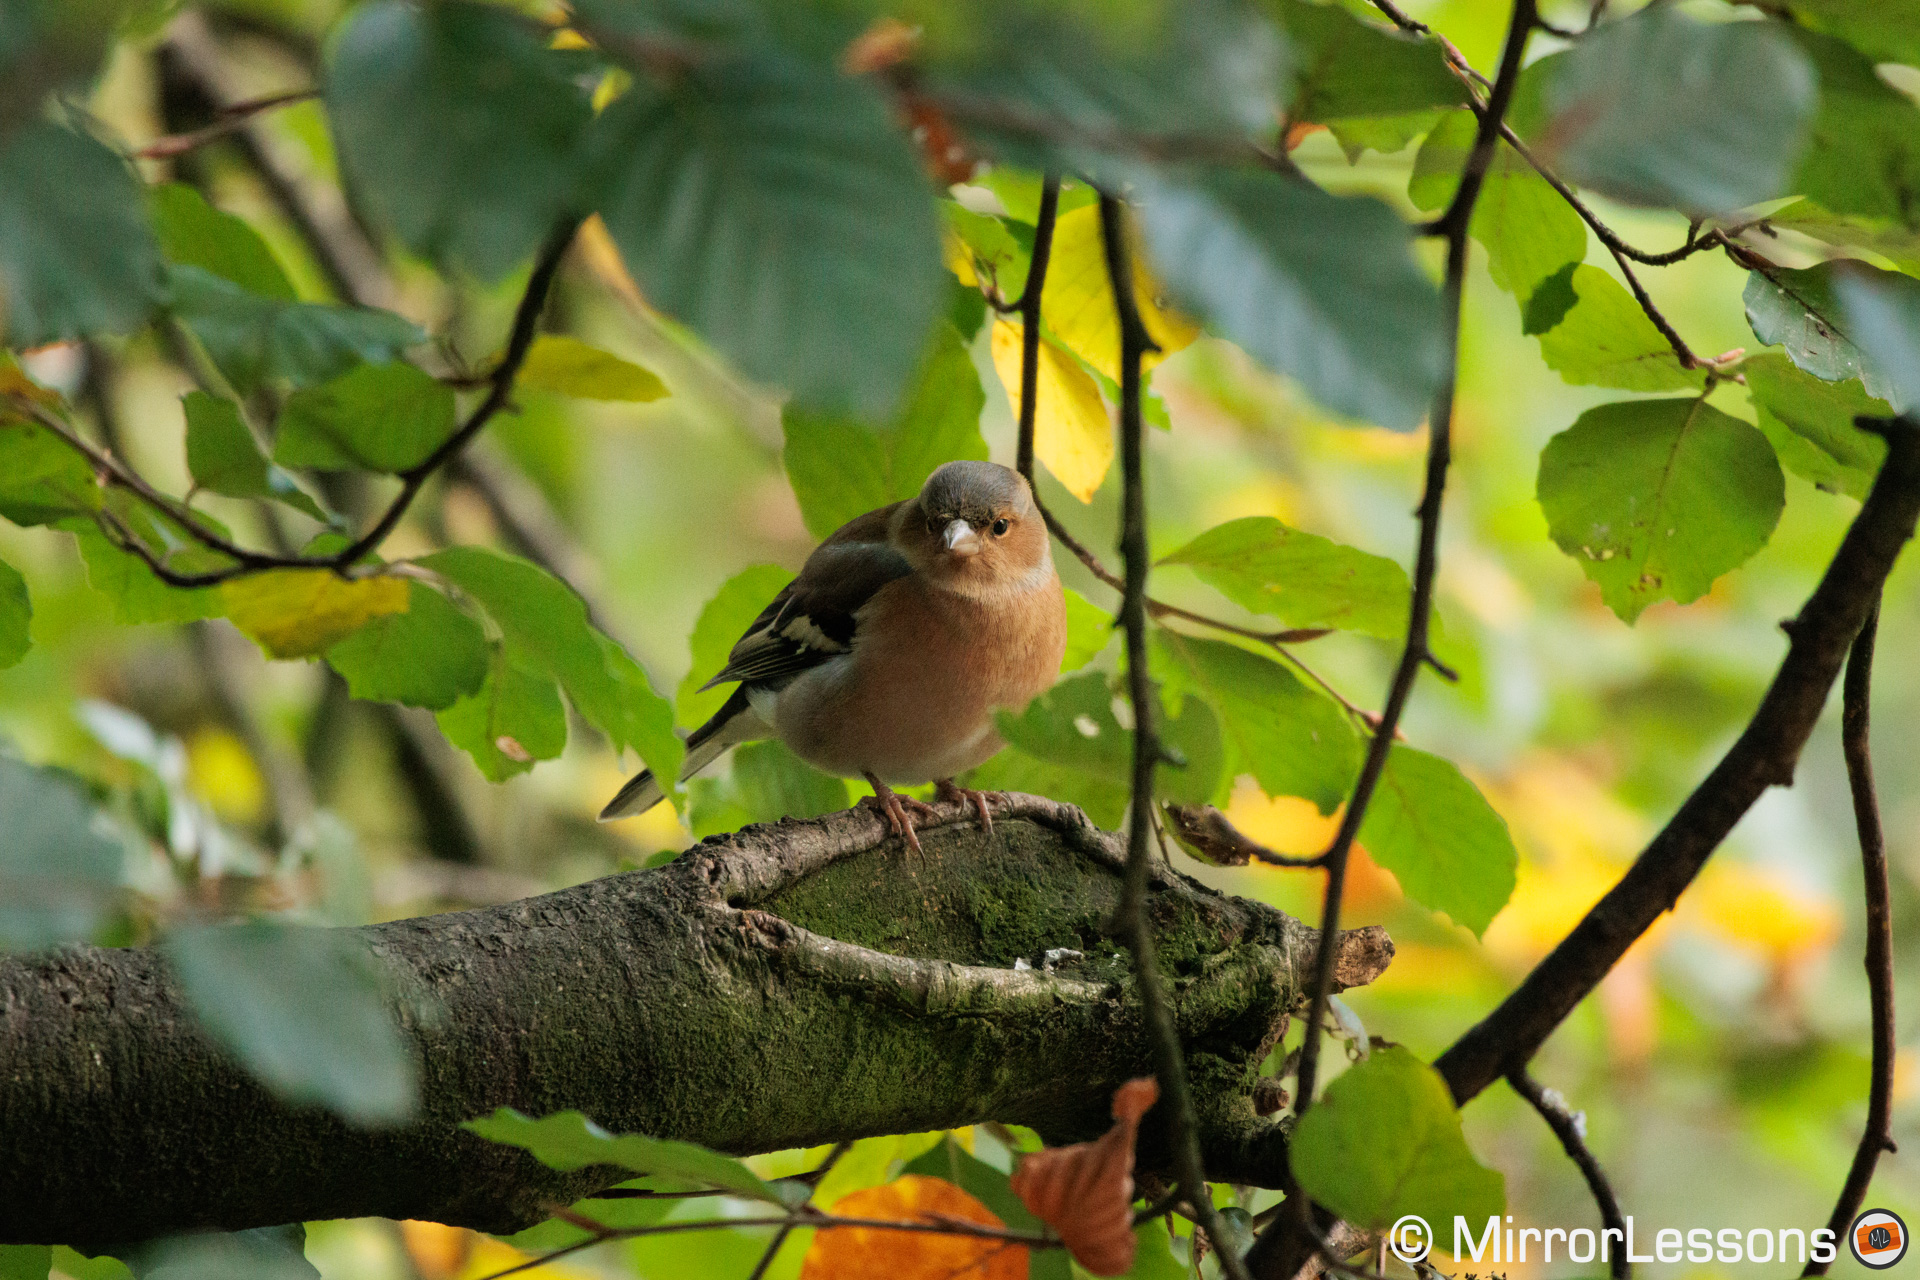
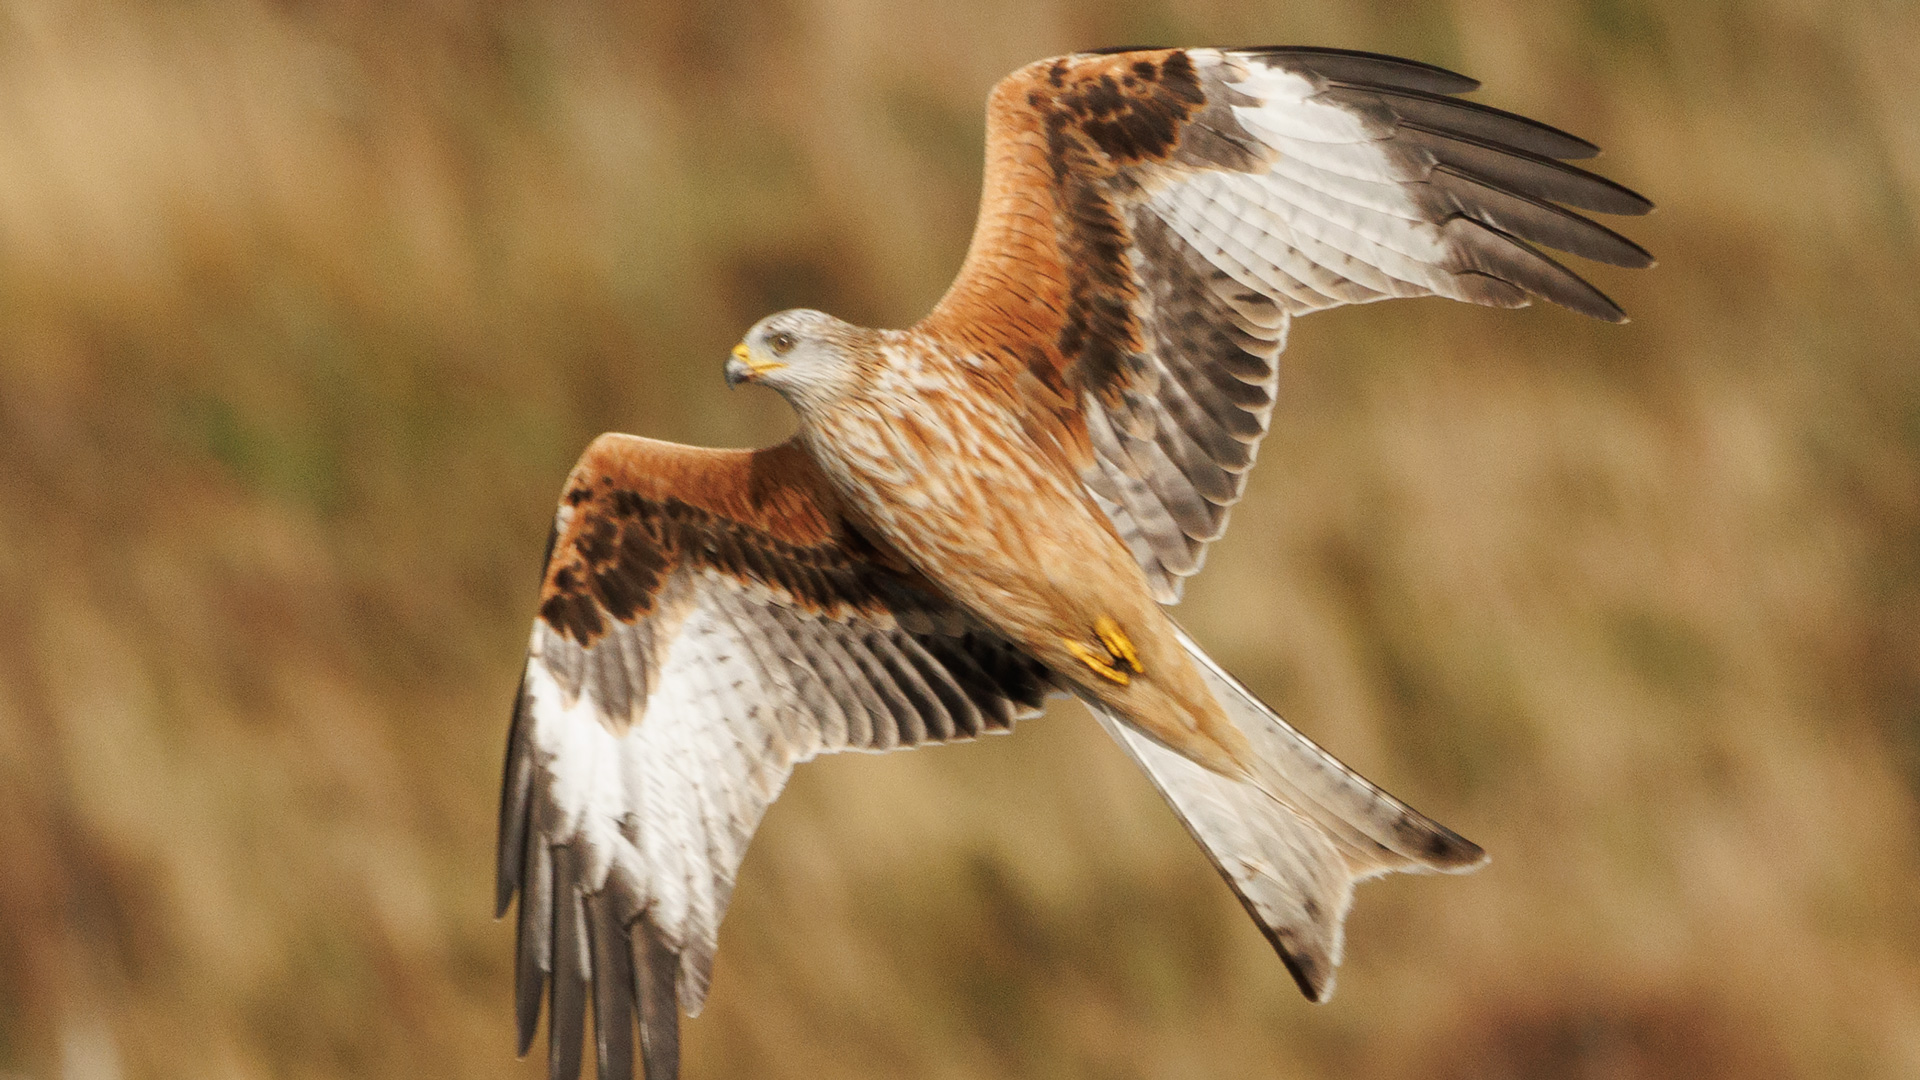
The R7 is at the same level with slow or static subjects: the keeper rate is high, even in difficult light, or for birds perched on a tree, surrounded by distracting elements in the foreground and background.
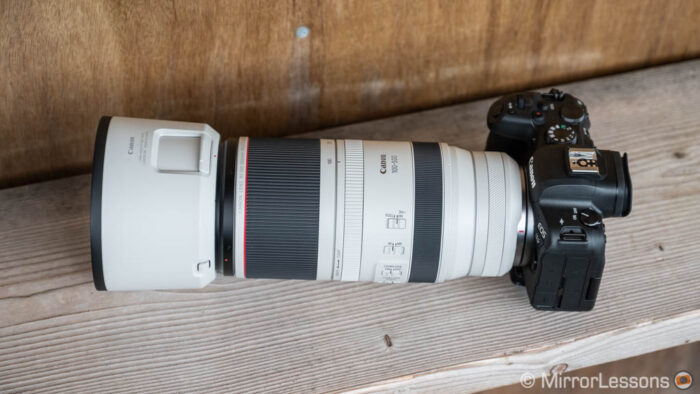
RF100-500mm F4.5-7.1 L IS USM at 500 mm
RF100-500mm F4.5-7.1 L IS USM at 500 mm
When the bird was not in the best position (not facing the camera entirely), the R7 still managed to nail focus precisely on the eye more than once. Like for humans, both cameras will revert to the body or head if the eyes are not visible.
RF100-500mm F4.5-7.1 L IS USM at 500 mm
One thing that can lower the performance is the lens used. With the RF 100-500mm mounted, speed and accuracy was top notch, but with the less expensive RF100-400mm, I found both cameras hunted a bit more than I would like.
RF100-400mm F5.6-8 IS USM at 400 mm
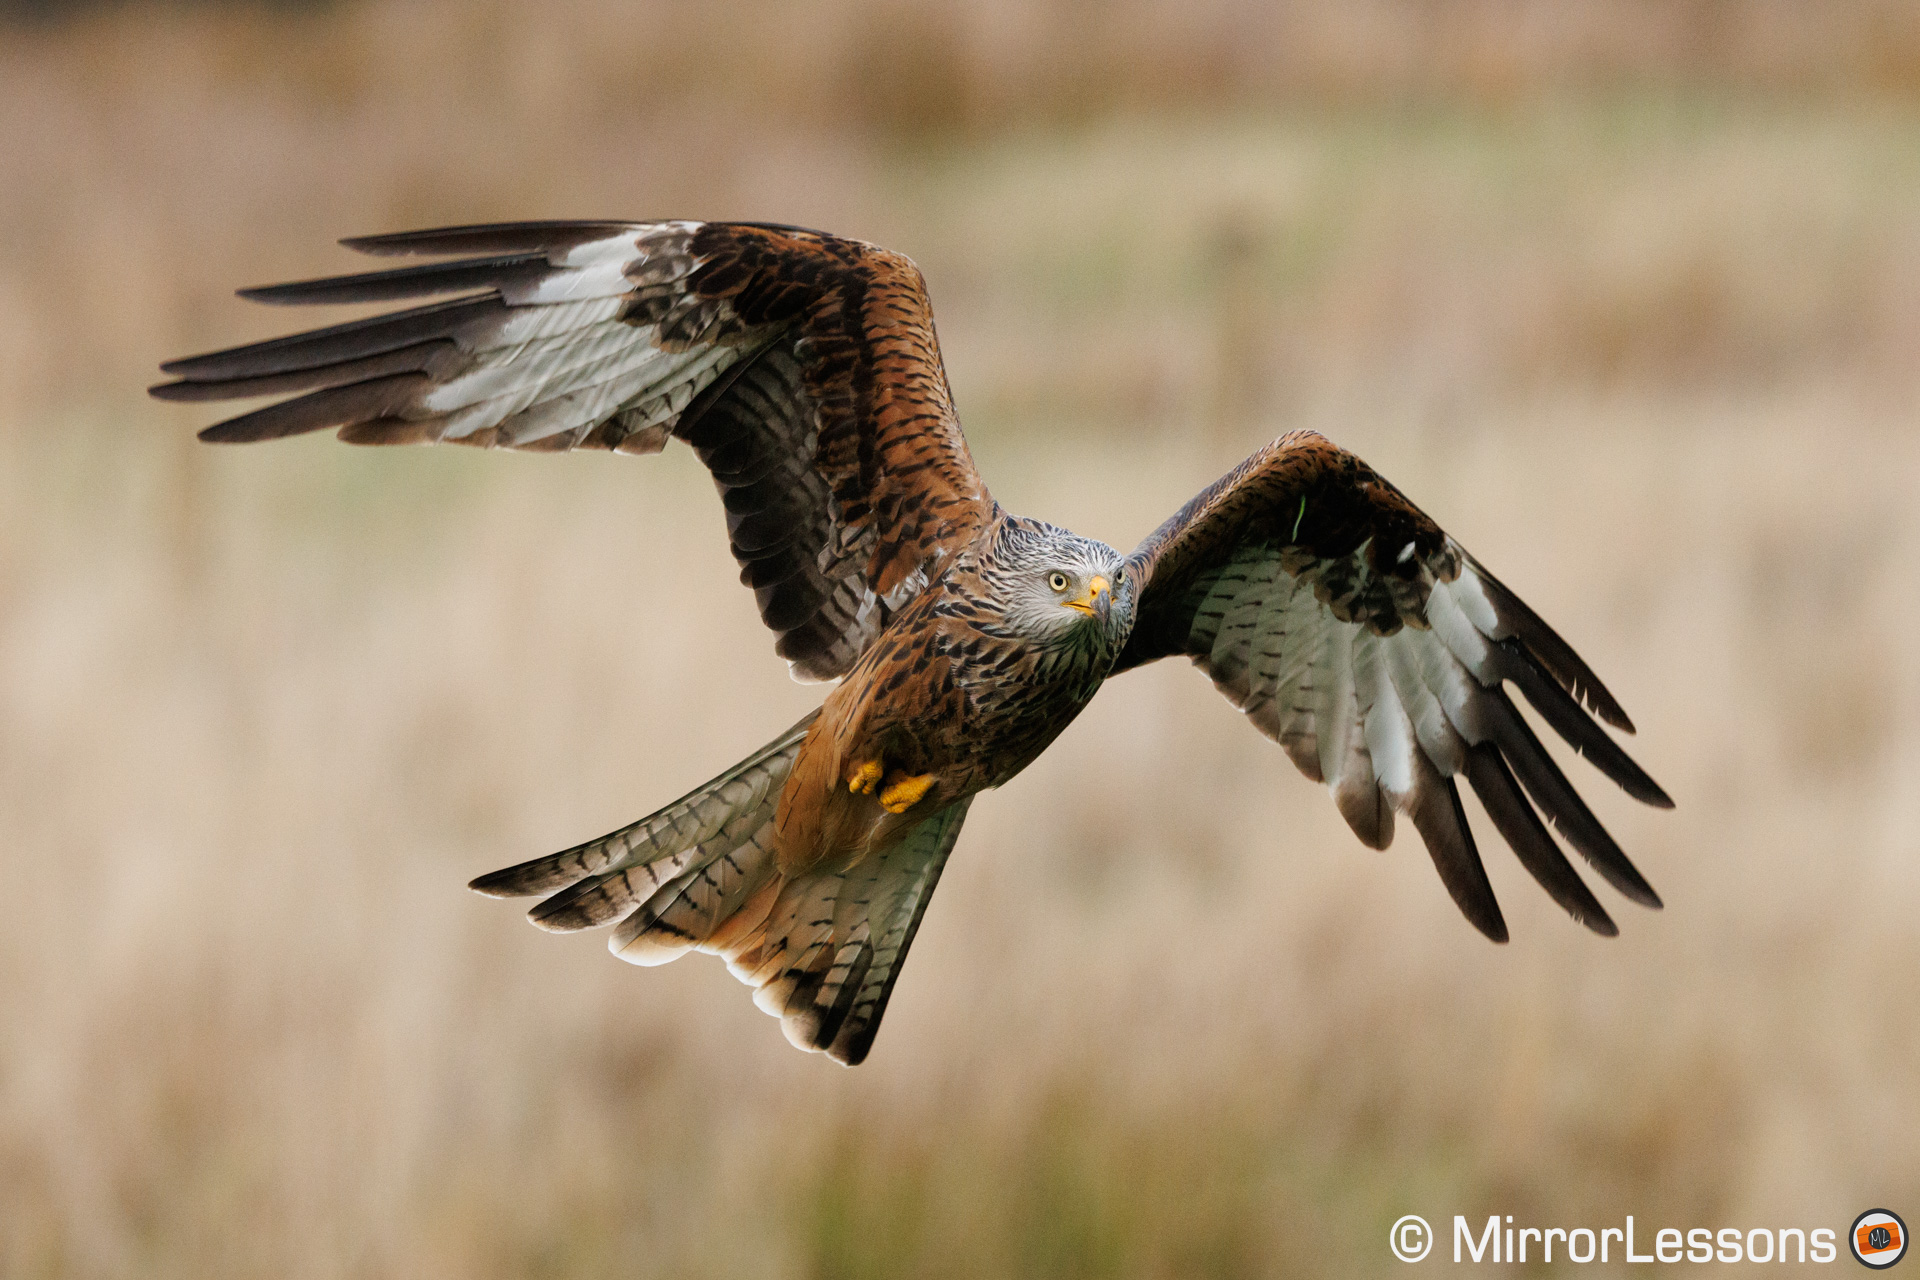
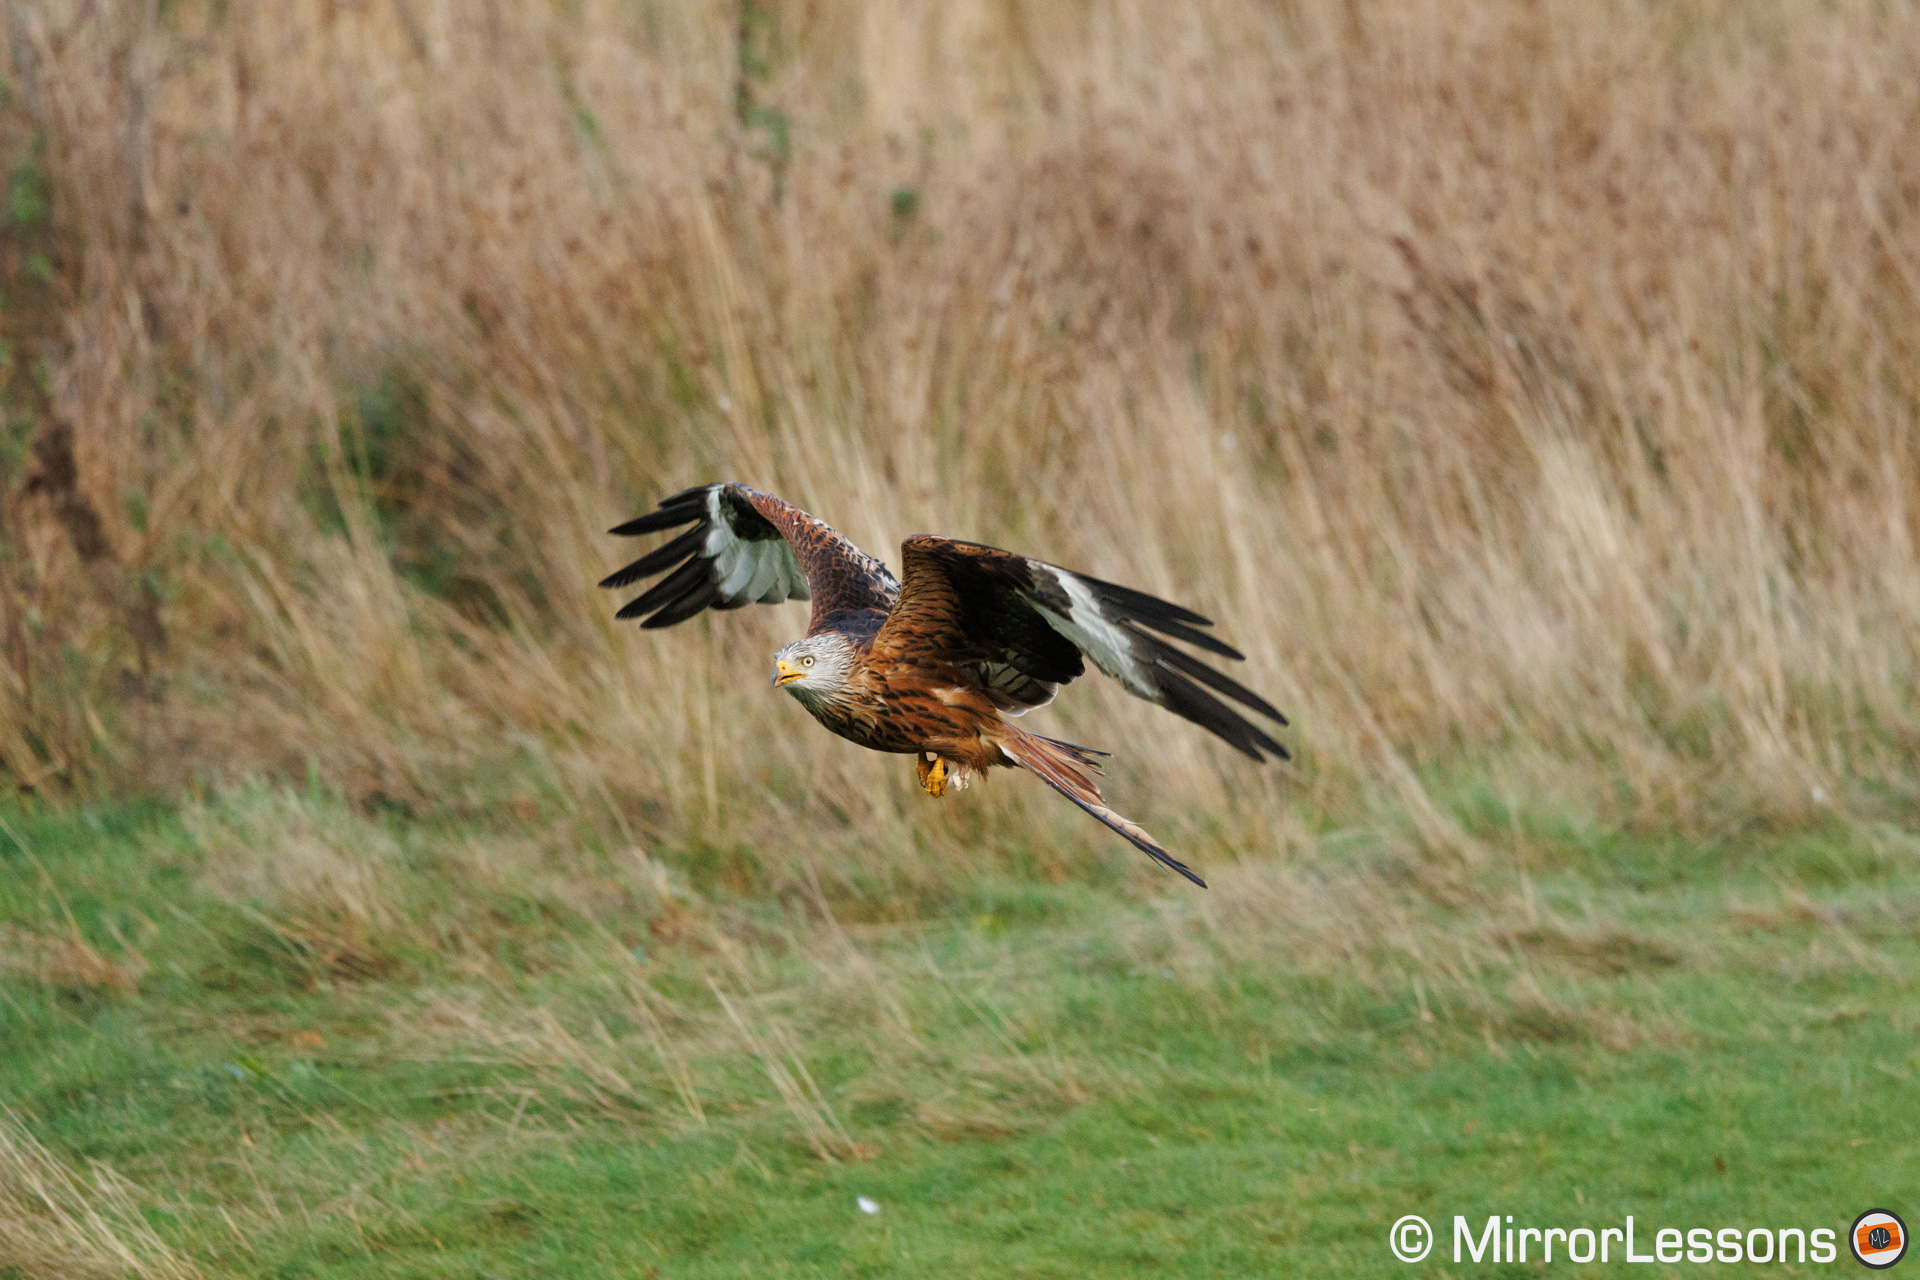
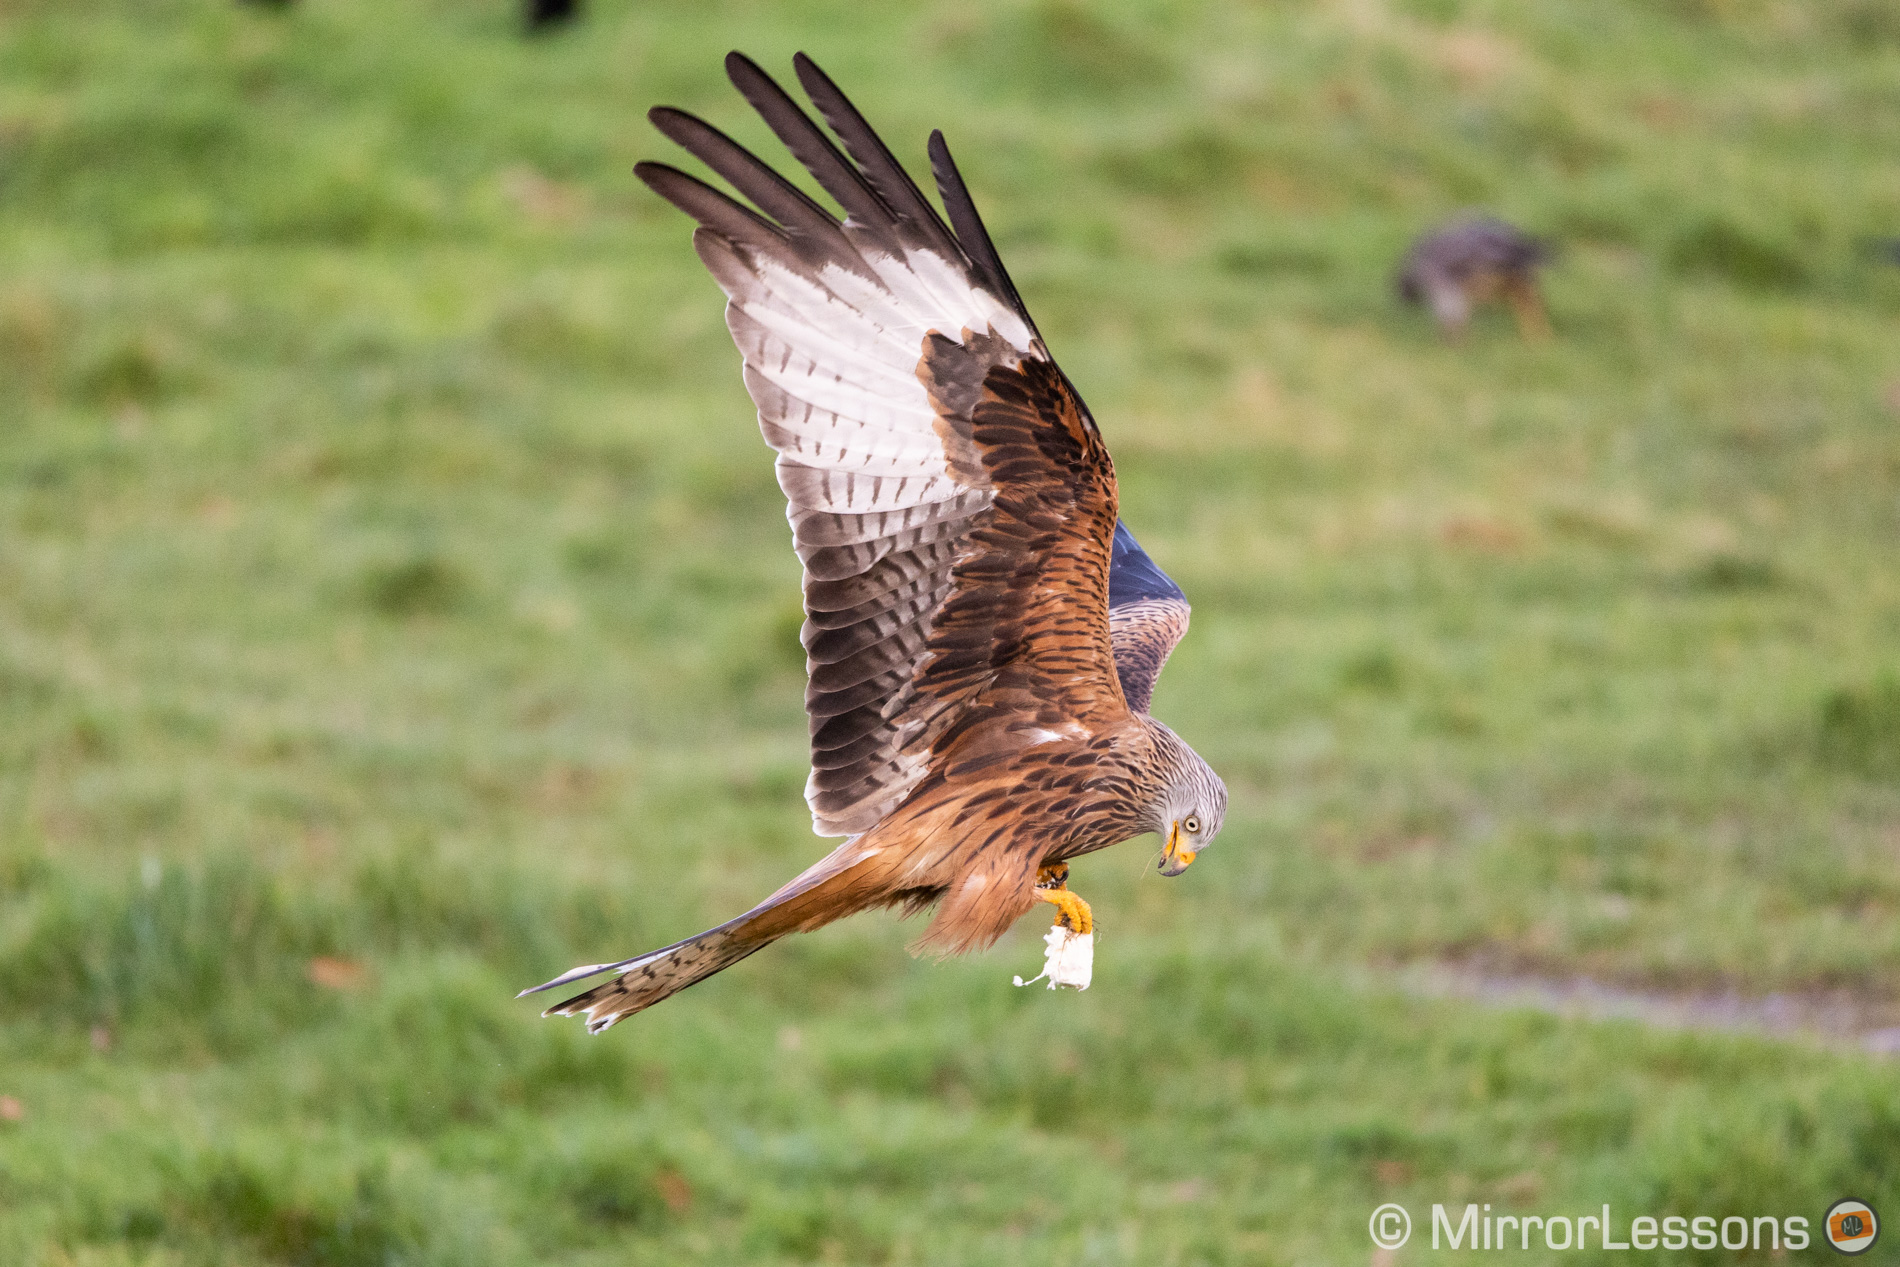
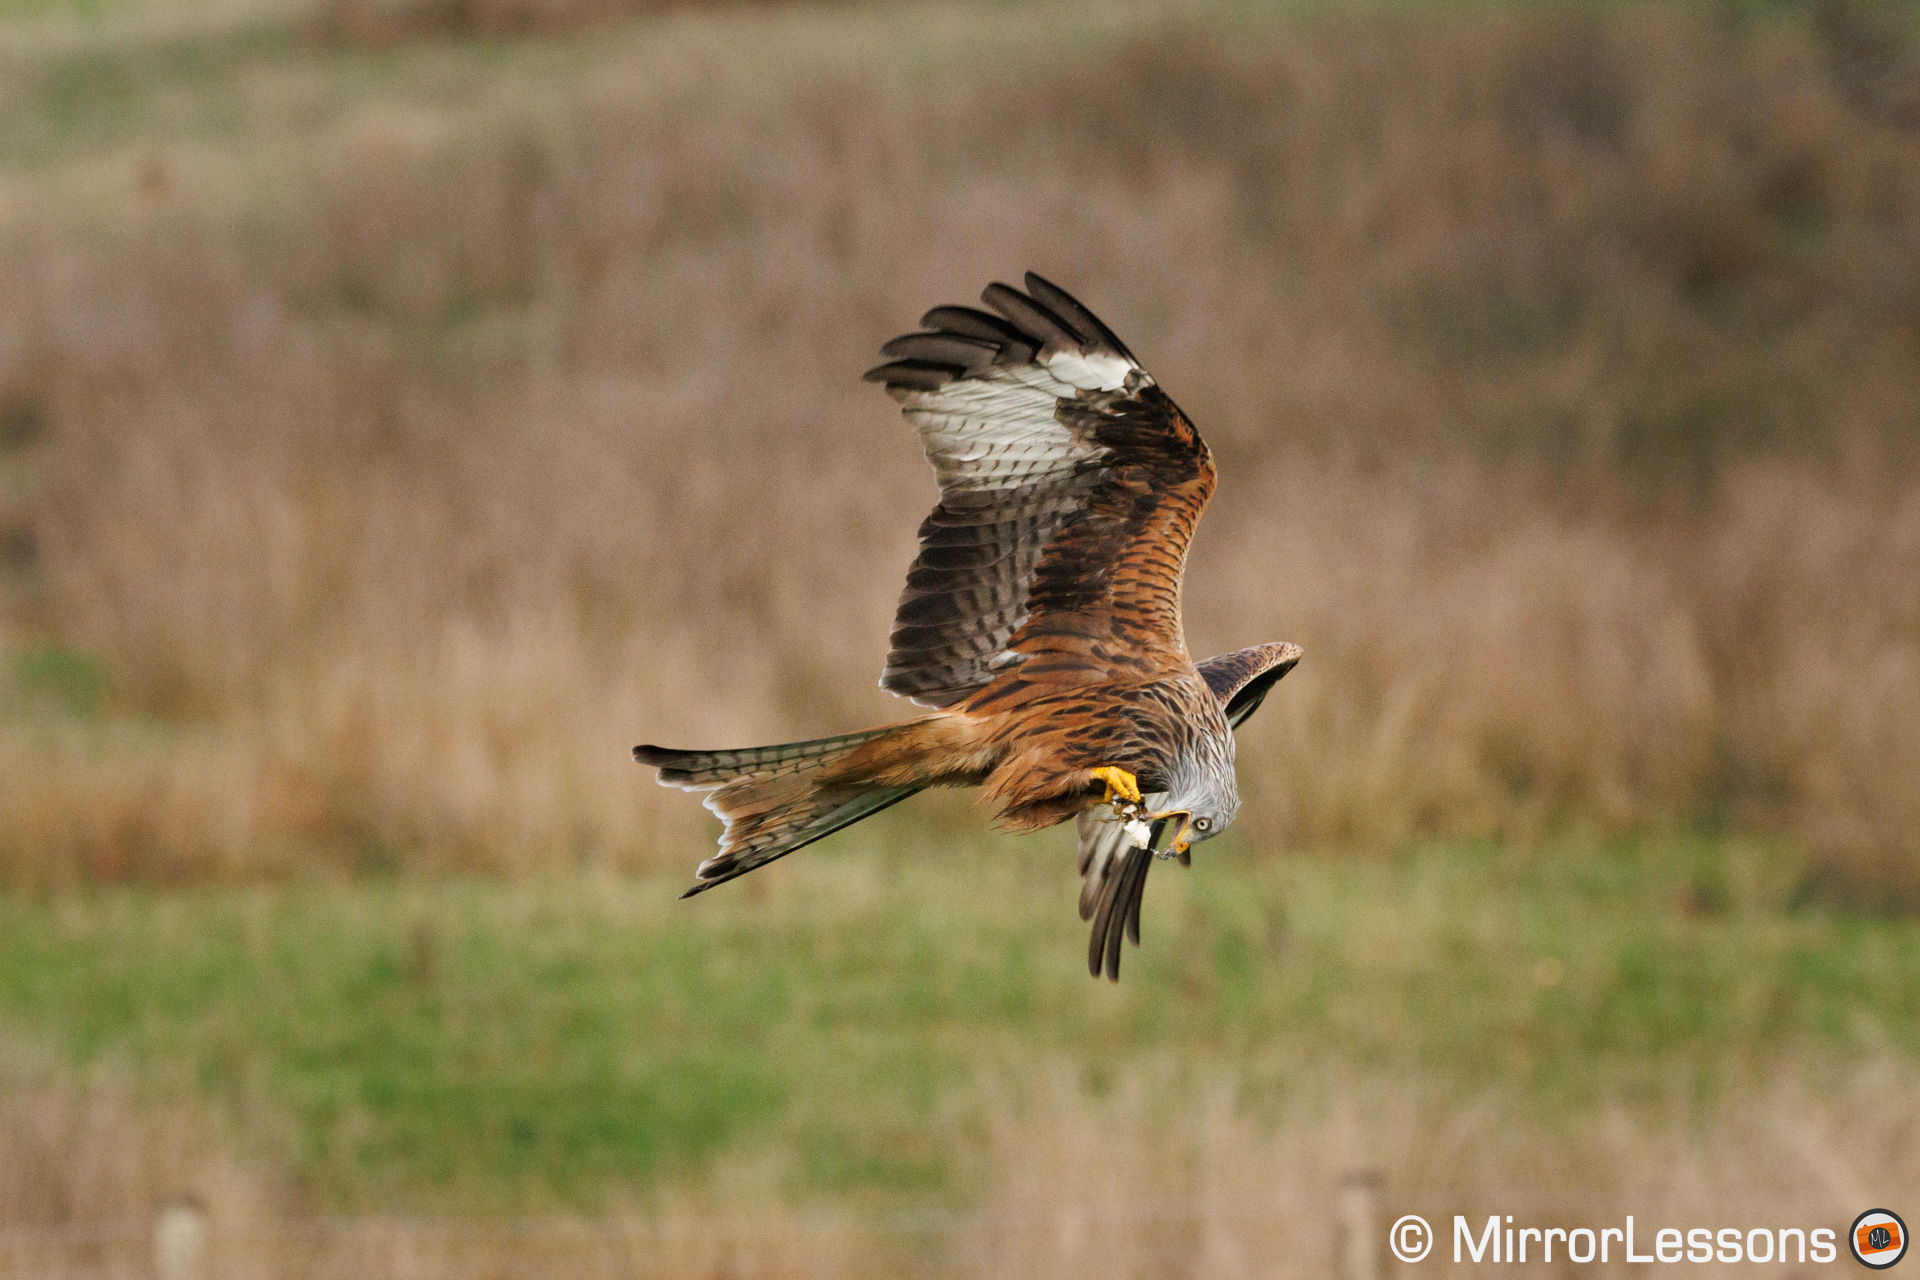
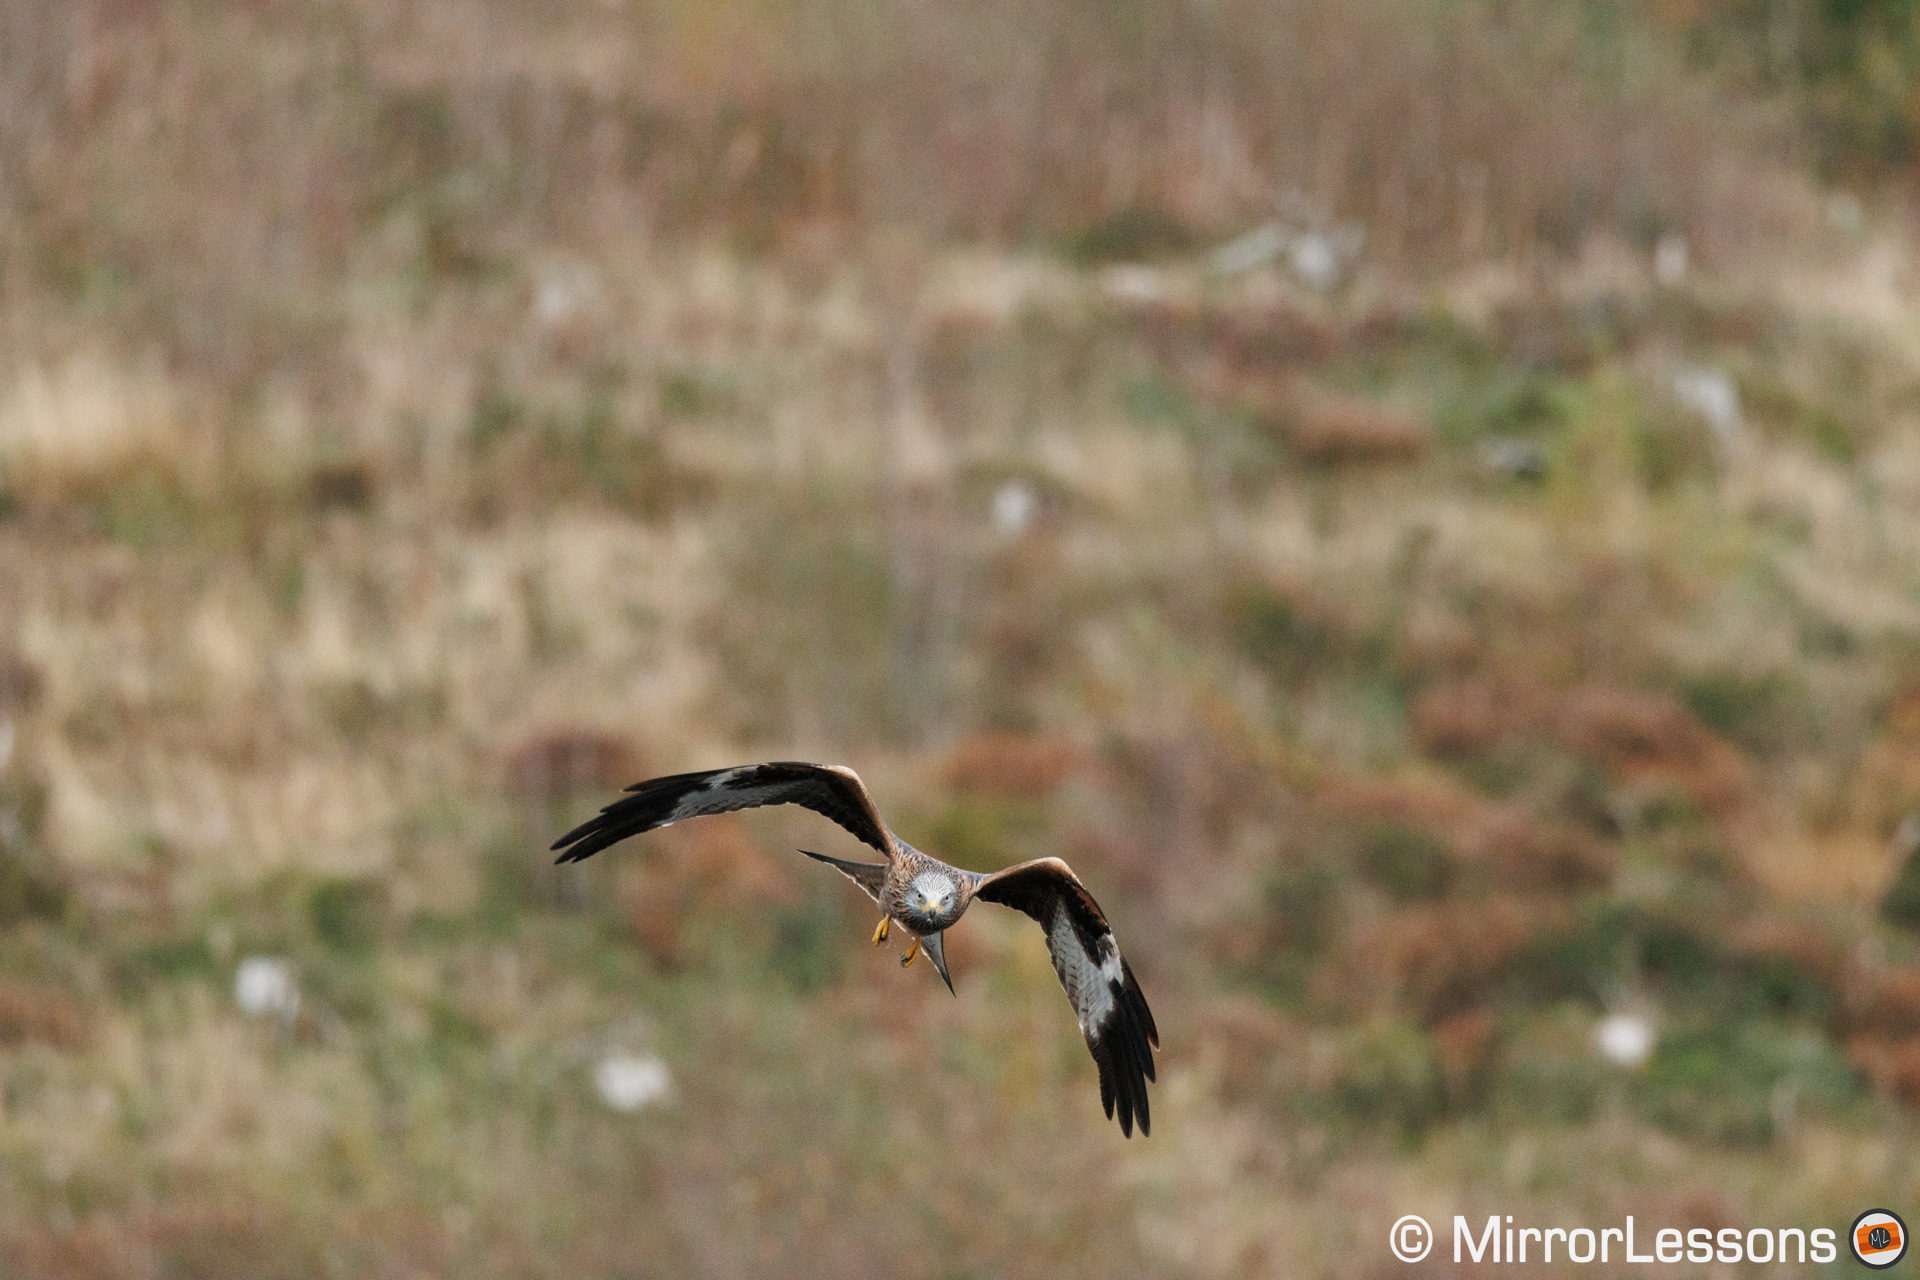
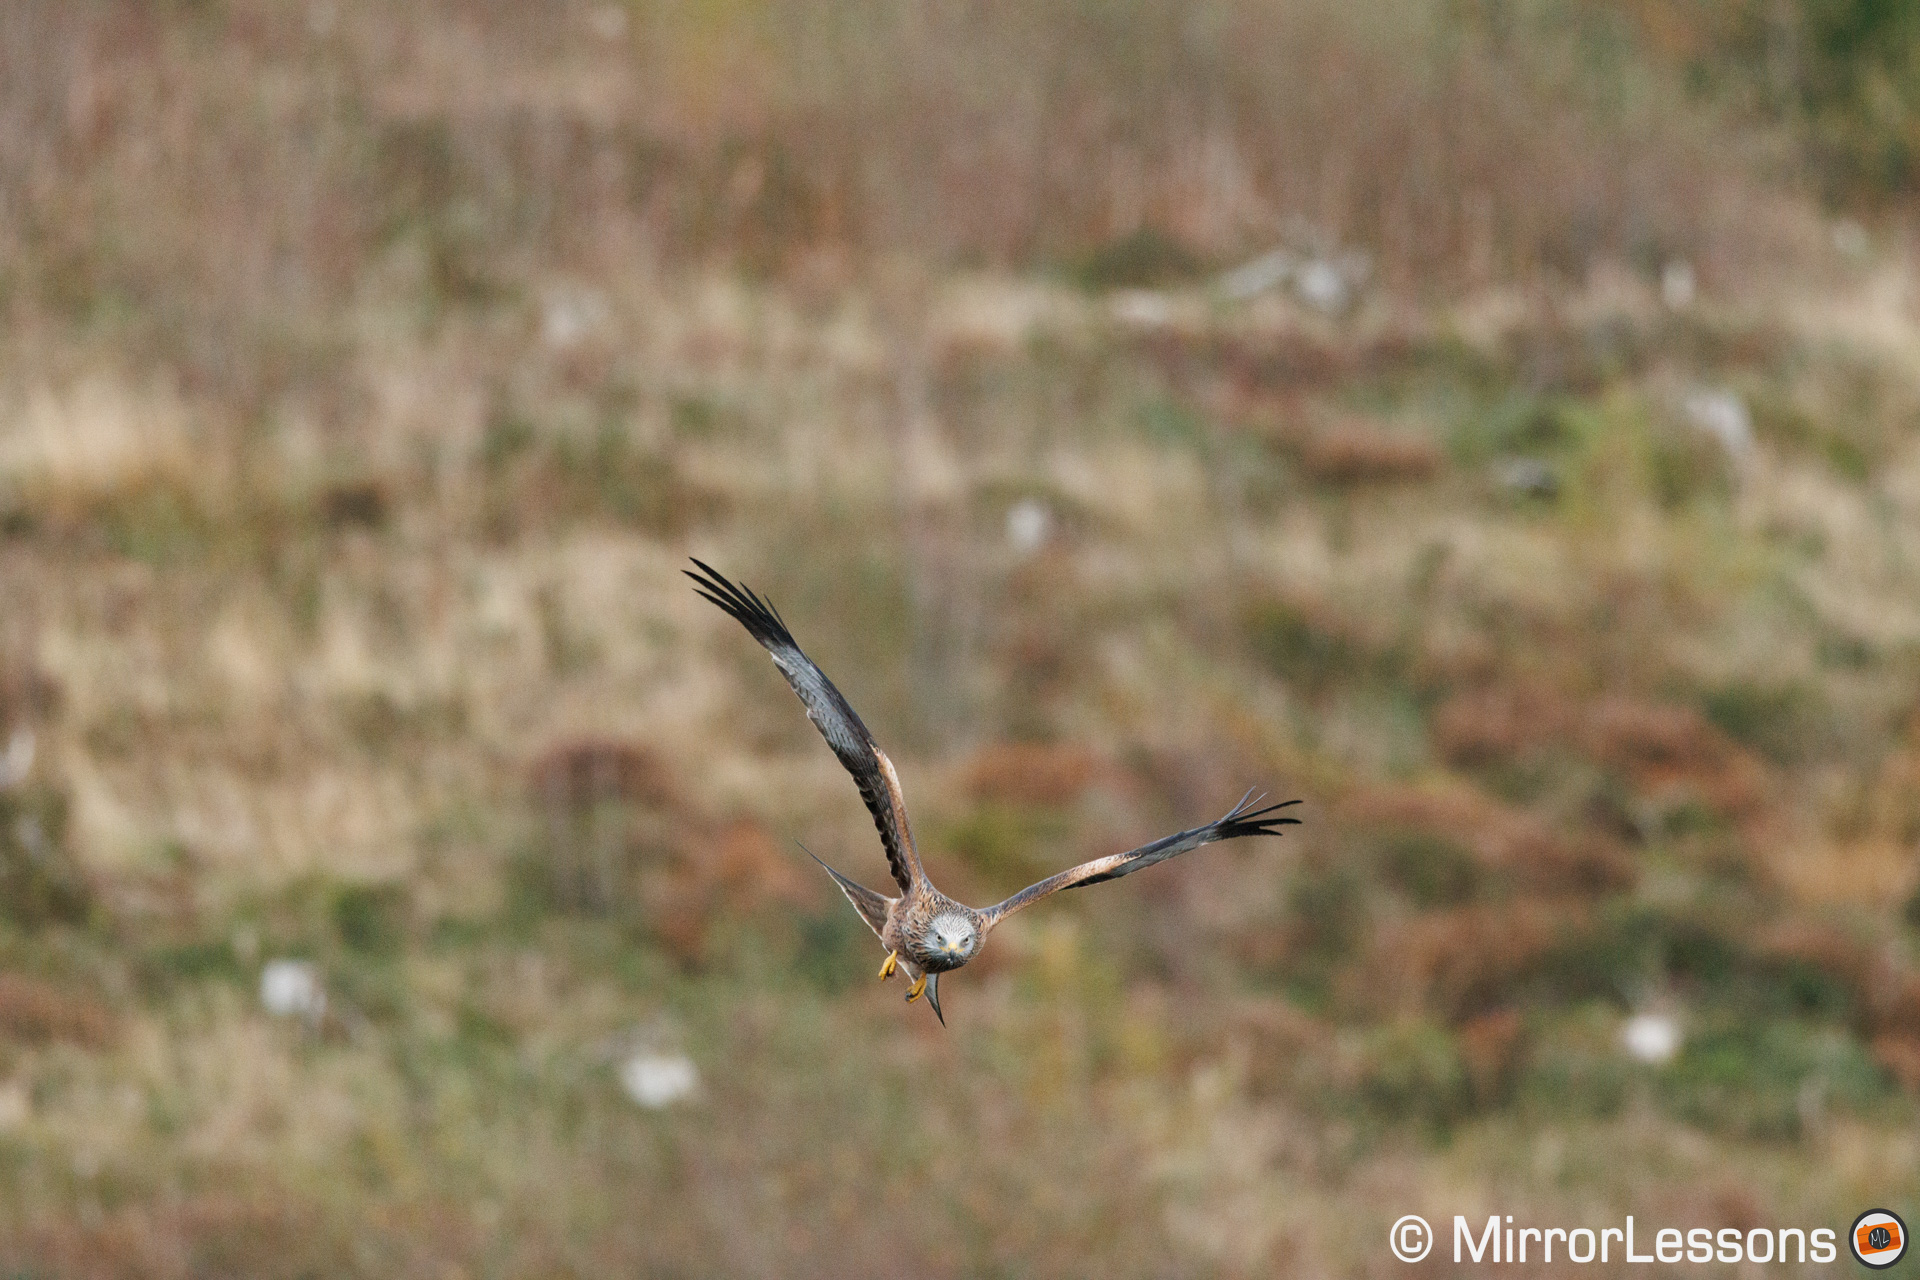
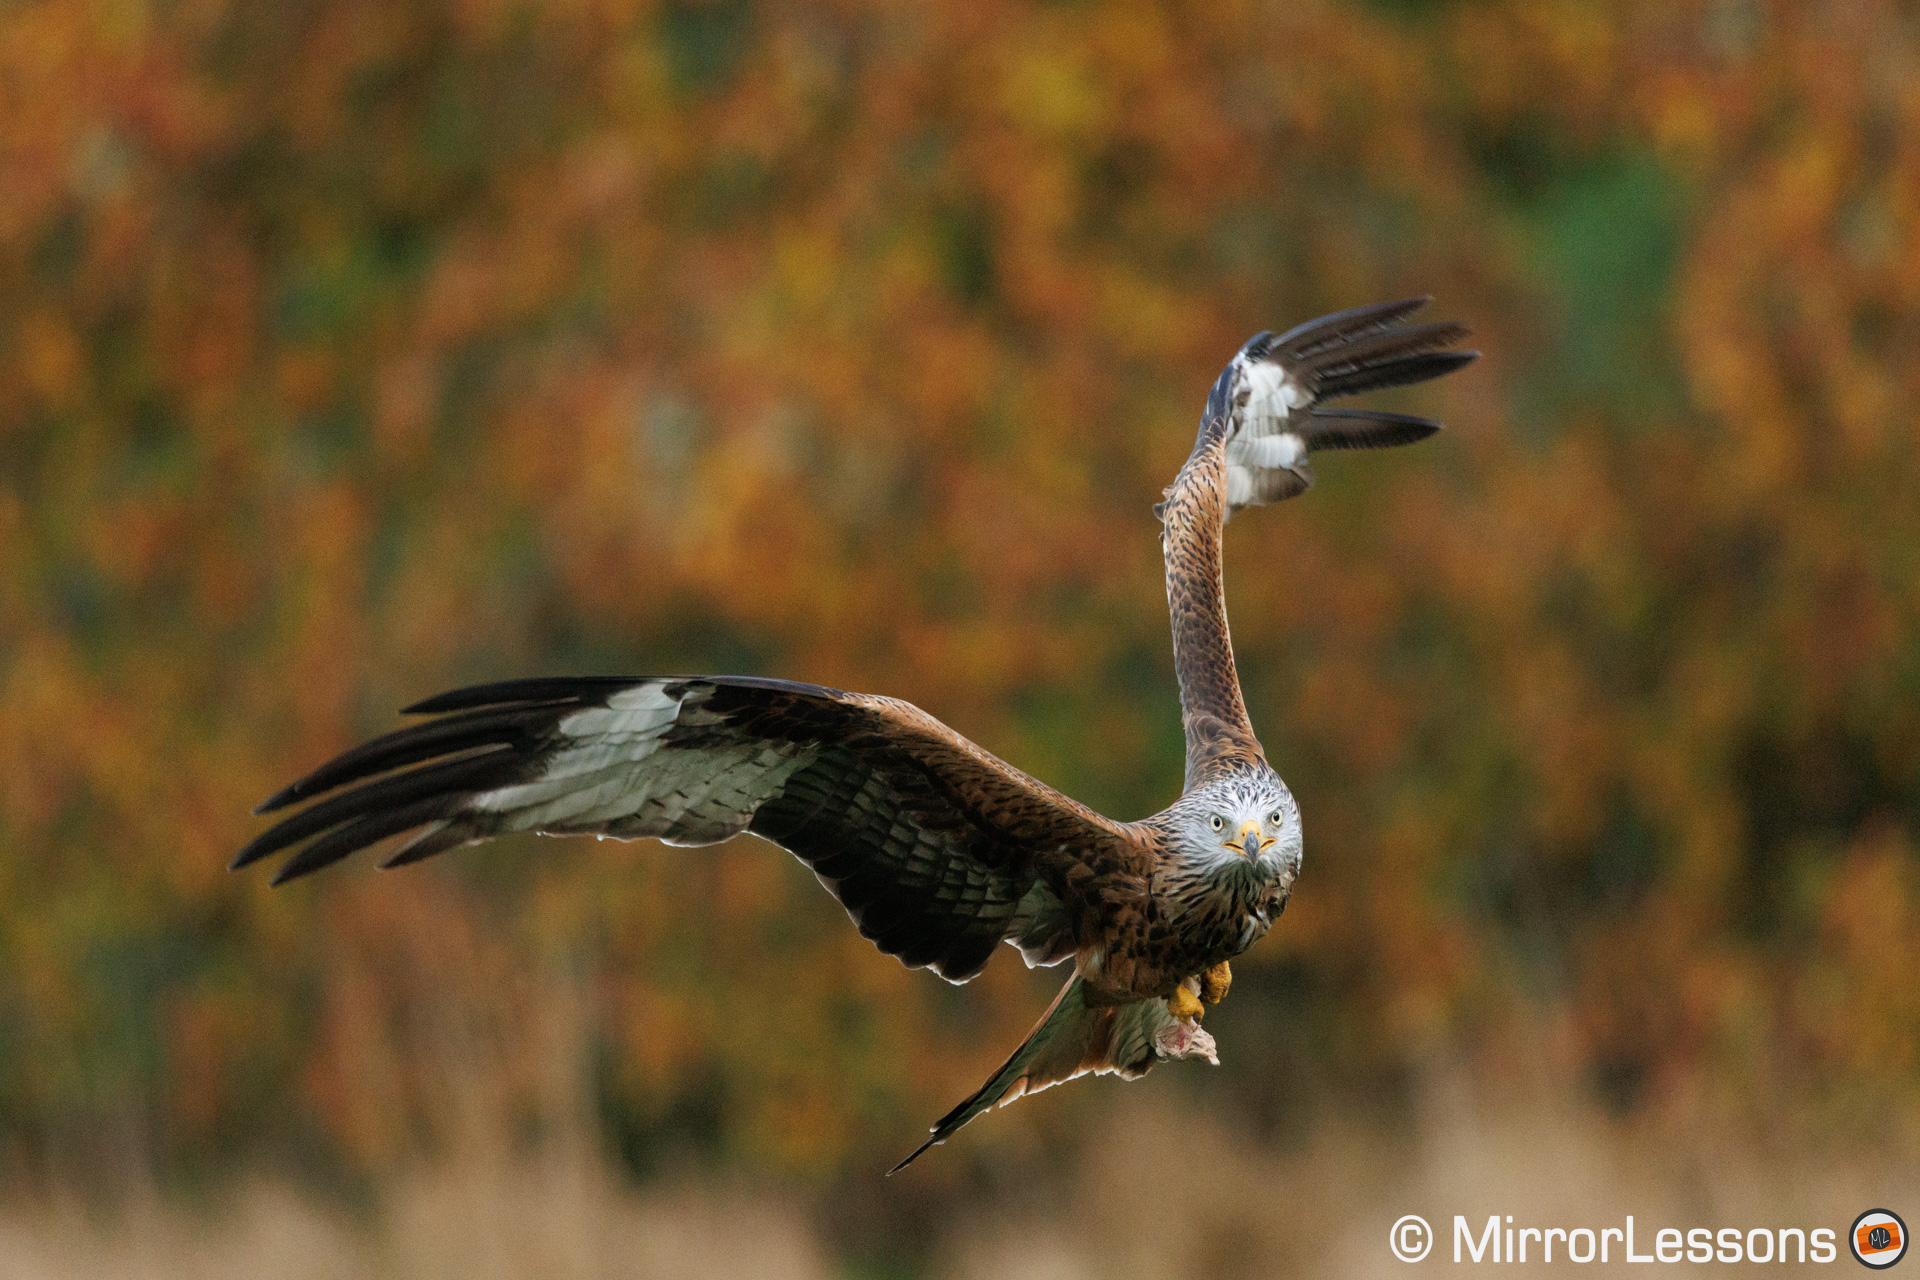
Canon R6 vs R7: Birds in Flight
My birds in flight test highlighted where the difference between these two cameras really lies.
The R6 is on another level, and is very similar to the flagship R3 as far as AF performance goes. In fact, its autofocus score (93%) is only one point behind. The camera received various firmware updates that improved the AF stability. It is a camera you can trust, and the moments where it struggles are rare.
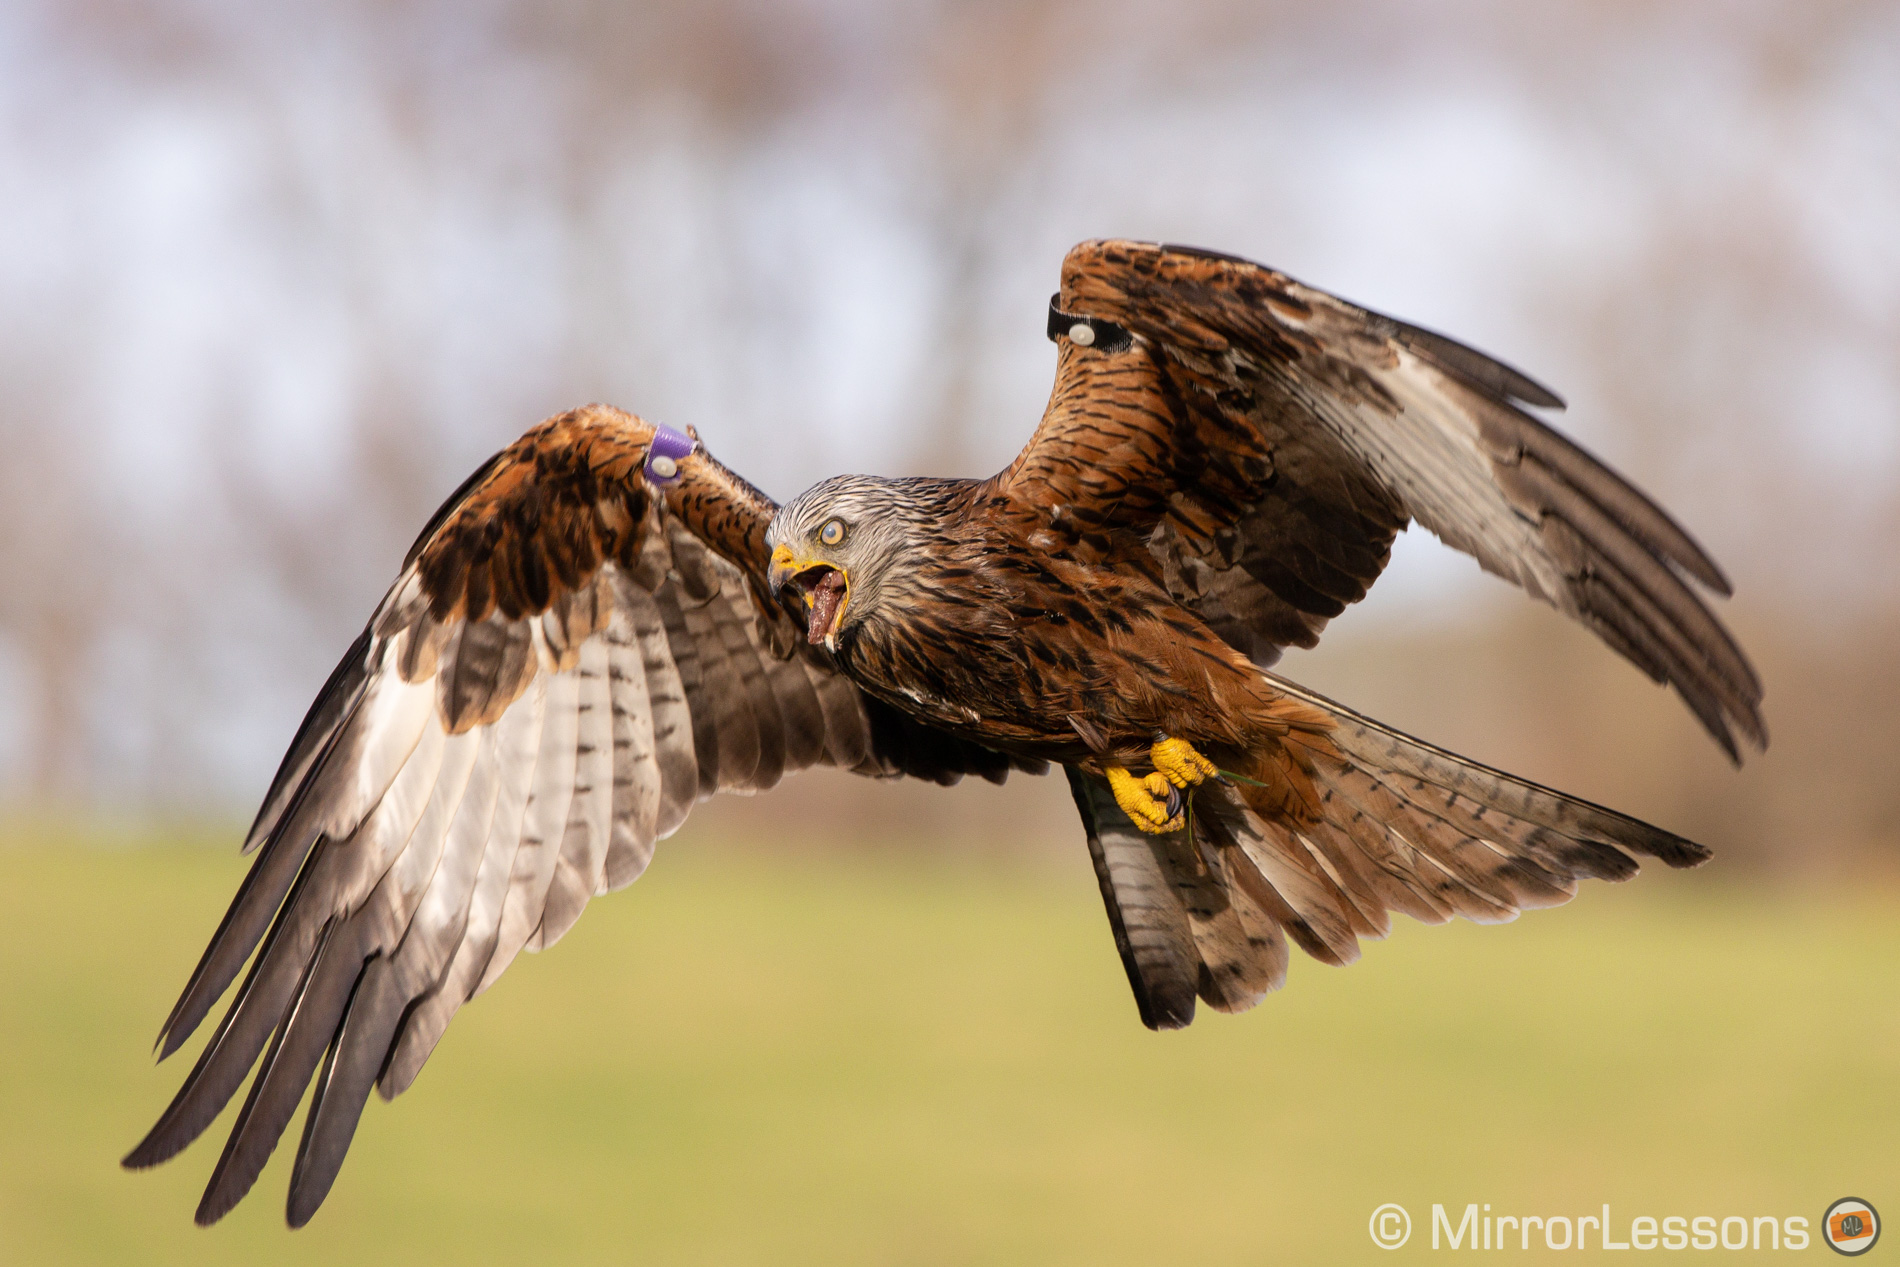

The R7 had a more difficult time, not only because of the lower score but also because its performance lacked consistency. I couldn’t replicate the best result I got on the first day (80%), and it averaged between 72-75% on the days that followed, even when using the same settings and lens.
RF100-500mm F4.5-7.1 L IS USM at 500 mm
RF100-500mm F4.5-7.1 L IS USM at 300 mm
The autofocus can lock onto the target really fast, but can also lose it just as fast with a busy background, focusing on the trees or field behind. Other times, the R7 struggled to correct focus when starting the sequence out of focus, so much that I often had to abort the burst and start again.
RF100-500mm F4.5-7.1 L IS USM at 428 mm
As always, I tried different setting combinations to see if I could improve the results, but to no avail.
R3
94%
100%
R6
93%
97%
R5
90%
99%
R7
80%
93%
Note: the green percentage includes 100% sharp images only, the blue percentage also includes slightly soft results.
One positive finding is that the keeper rate didn’t decrease when using the smaller and more affordable RF 100-400mm. I was a bit surprised in fact, considering that the lens struggled more with perched birds earlier on. I guess the performance is more susceptible to the specific situations, but I was pleased to see it can deliver good results for fast subjects such as the red kites.
RF100-400mm F5.6-8 IS USM at 300 mm
When compared to other brands, this is where the two cameras stand. Of course, some of these competitors have a slower drive speed, whereas others are faster. You can find out more about my birds in flight test in my dedicated article.
A9 II
96%
99%
A7 IV
94%
99%
R6
93%
97%
OM-1
89%
98%
a6600
85%
98%
X-H2S
82%
97%
X-T4
81%
96%
R7
80%
93%
For the record, the AF score of the R7 is far from terrible, but it can’t match the same performance as its full frame siblings, or other cameras such as the OM-1. Furthermore, the APS-C model showed significant limitations when using the electronic shutter (more on this in the next chapter).
RF100-500mm F4.5-7.1 L IS USM at 400 mm
RF100-500mm F4.5-7.1 L IS USM at 300 mm
For those interested, here are the settings for BIF that gave me the best results on both cameras.
R6:
- AF Method: Tracking
- Subject to Detect: Animals
- Eye Detection: Enable
- Switching tracked subjects: 0
- Servo AF: Case 3
- Lens drive when AF impossible: on
- Initial Servo AF pt for Tracking: Initial point
- Drive: 20fps (electronic shutter)
- Stabilisation: off (or Mode 2)
R7:
- AF Zone: Flexible Zone 1 (custom medium size)
- Start / Stop Tracking: off
- Subject Tracking: on
- Subject to Detect: Animals
- Eye Detection: Enable
- Switching tracked subjects: 0
- Servo AF: Case Auto
- Lens drive when AF impossible: on
- Drive: 15fps (mechanical shutter), 30fps (electronic shutter – Beware of Rolling Shutter – See next chapter!)
- Stabilisation: Off
RF100-500mm F4.5-7.1 L IS USM at 300 mm
Canon R6 vs R7: AF in Low Light
Next, we have the low light sensitivity where the full frame camera has an advantage of 1 and a half stops:
- R6: -6.5Ev (F1.2 lens)
- R7: -5Ev (F1.2 lens)
Both cameras can work down to f/22, which is useful when using small aperture lenses and teleconverters.
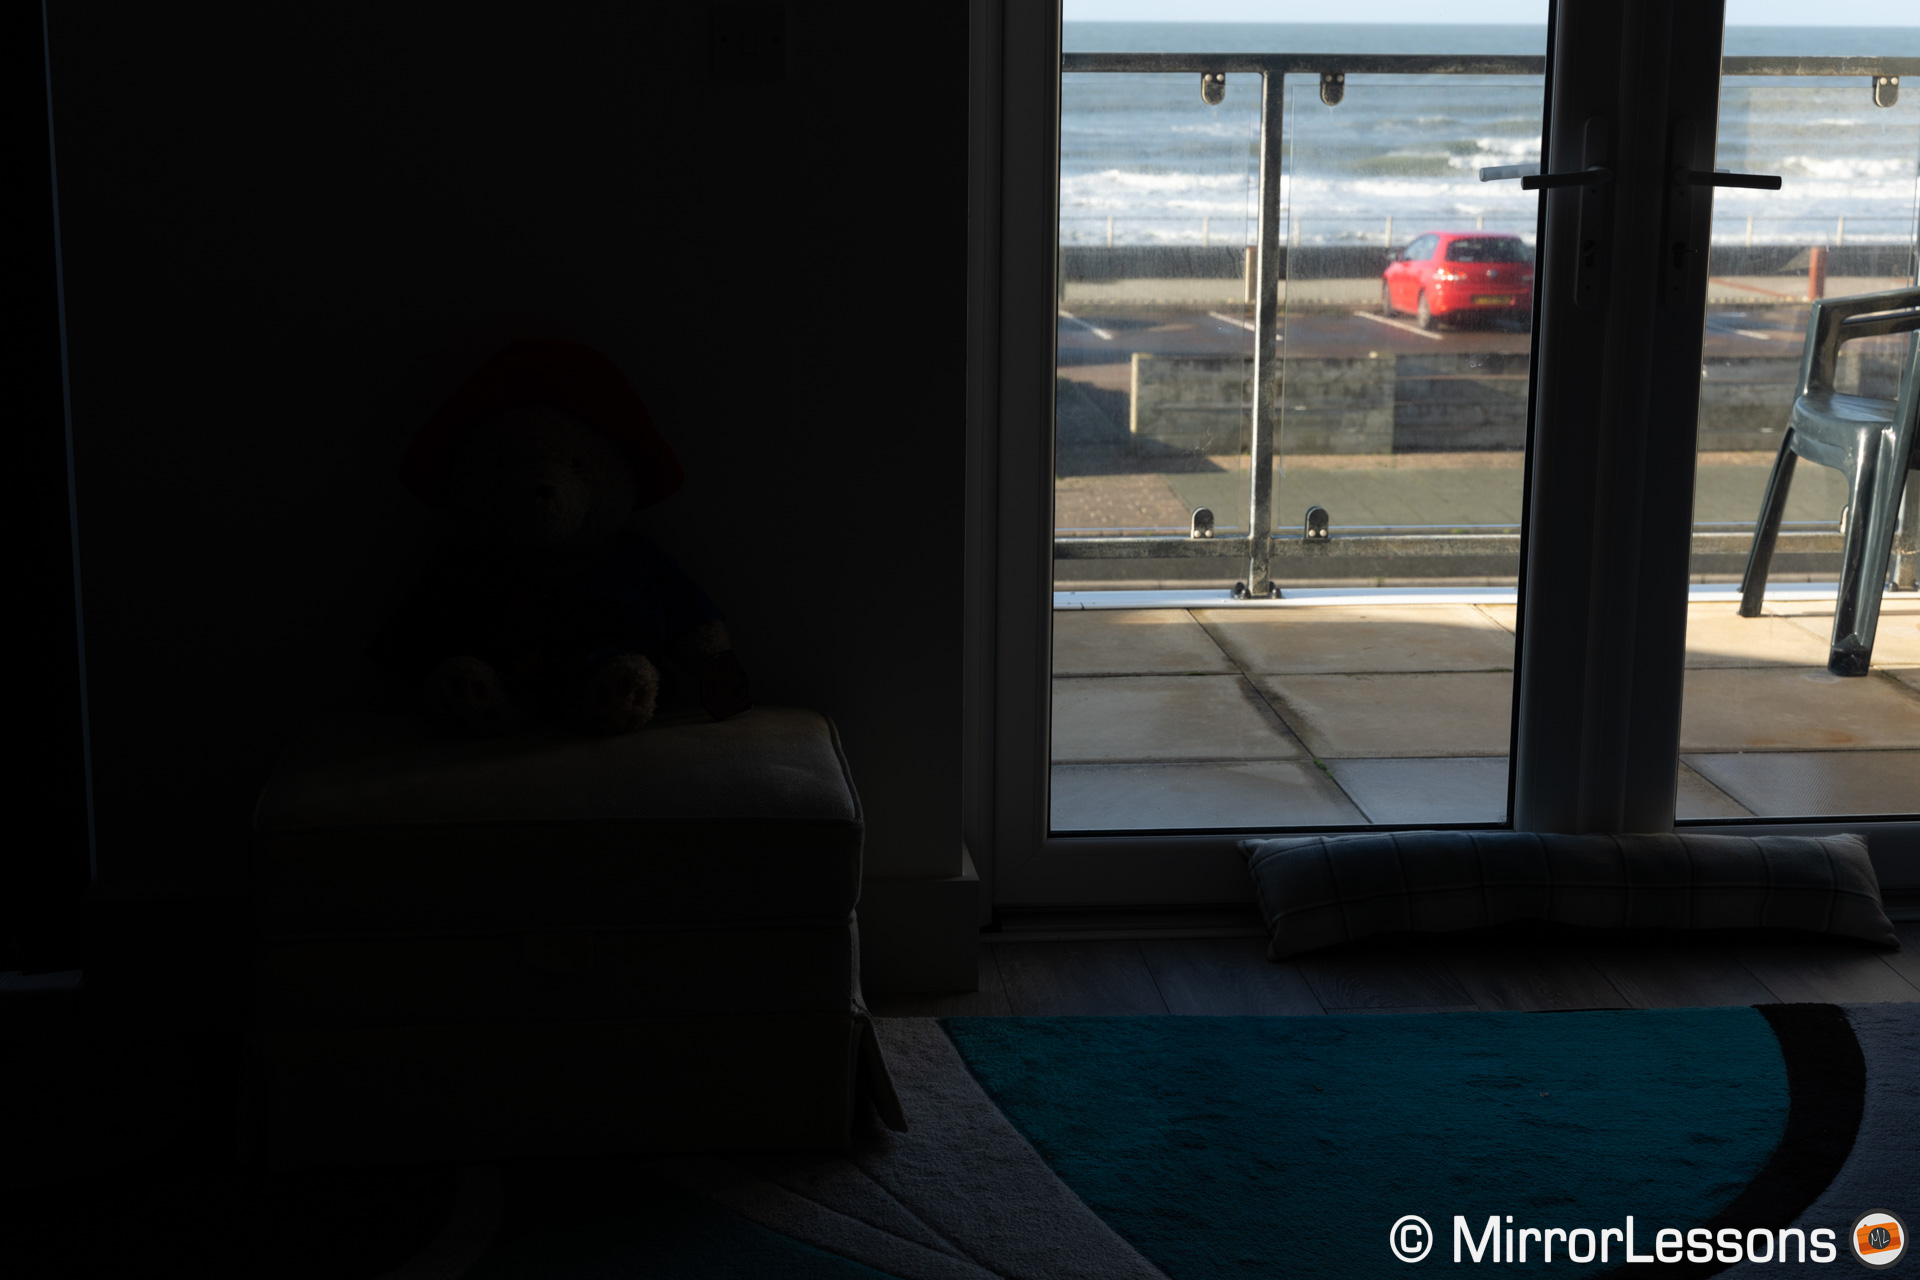
The test below is a bit extreme, because I only used two weak lights in the background and foreground, and the subject walked through the dark area between them. You can see from the exposure settings that it was a situation you hopefully won’t find yourself in.
I wasn’t expecting a great keeper rate, but both cameras managed to follow the subject from start to finish, although they struggled with focus accuracy on several occasions. The R6 had an easier time overall.
In video mode, with the same low light conditions, they both managed to track the person all the way.
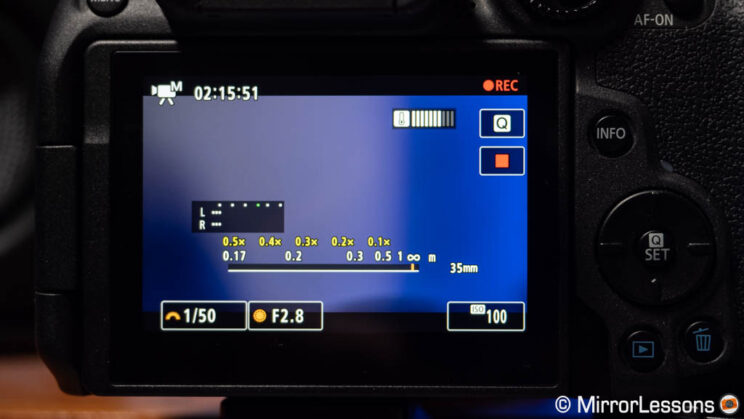
Canon R7: Focus Stacking
Finally, while you’ll find the focus bracketing function on the two models, only the R7 has the possibility of performing focus stacking in-camera. With the R6, you have to composite the images in post.
Focus Stacking works well if you select the right settings, most importantly the focus increments. If the value is too high (wider increments between each frame), the final result can display unnatural areas around the object, as you can see below.

RF85mm F2 MACRO IS STM
Focus increment: 4
With smaller increments, this is less likely to happen. Indeed, the second image below is spotless.
RF85mm F2 MACRO IS STM
Focus increment: 1
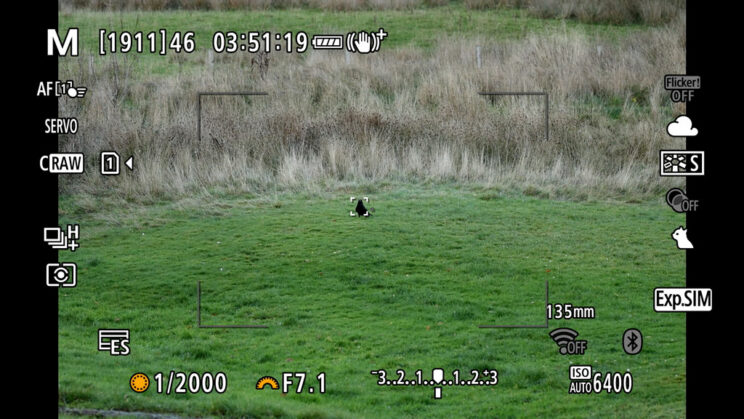
3. Shutter, Continuous Shooting and Buffer
Both cameras can work at a maximum of 1/8,000s when using the mechanical shutter.
Below you can listen to how the R6 and R7 sound when taking a single photo. The APS-C model is louder.
Switch to the electronic shutter, and the shutter speed remains the same on the full frame model. On the APS-C camera however, you can go 1 stop faster to 1/16,000s.
The R7 does slightly better when using flash too: 1/250s with the mechanical shutter, or 1/320s with the electronic front curtain shutter. The R6 works up to 1/200s (mechanical) or 1/250s (electronic 1st curtain).
As for the drive speed, the R6 can shoot up to 12fps with the mechanical shutter, or 20fps when using the electronic shutter.
The R7 is superior once again: 15fps (mechanical) or 30fps (electronic).
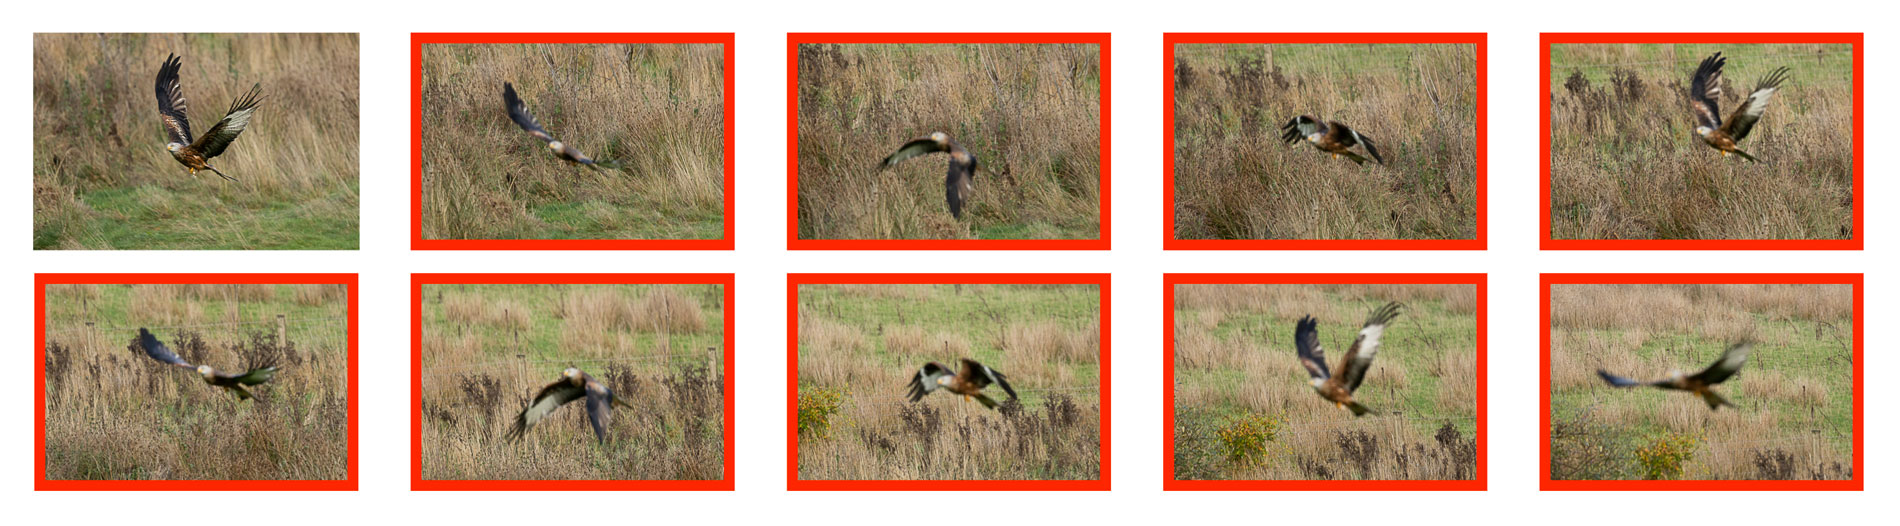
Canon R6 vs R7: Rolling Shutter
The extra speed offered by the electronic shutter is great, but one thing you need to keep in mind is distortion when moving quickly with the camera, or when your subject is very fast.
In the test below, you can see how the effect is more contained on the R6, especially when panning quickly.
A street lamp is an easy target to highlight rolling shutter because it has a basic vertical shape. But what about more complex bodies such as animals and birds? The limit found on the R7 gives me the opportunity to dig a bit more than usual into this topic.
I’ve tested many cameras for birds in flight using the electronic shutter, from older models such as the Olympus E-M1 II and Panasonic G9, to high-end products such as the Canon R3 or Sony A1, and of course many cameras in-between (A9, R6, X-T4 etc.).
All these cameras have a different sensor readout speed, i.e. the amount of time it takes for the camera to read all the pixels from top to bottom. The A1, A9 and R3 are among the fastest, and they will give you the smallest number of problems. But what about other cameras?
Well, as long as the sensor readout is fast enough, you can use the electronic shutter with confidence in most situations. This is valid for the Canon R6: I’ve used the camera many times for birds in flight, and I’ve never encountered a real problem with it.
That doesn’t mean it can’t happen though, and this is why I always do the rolling shutter test for photos, not just for video. In the case of the R6, I believe you need to move really really fast, or have a very fast subject, like one of those small birds that flap their wings at an incredible speed.
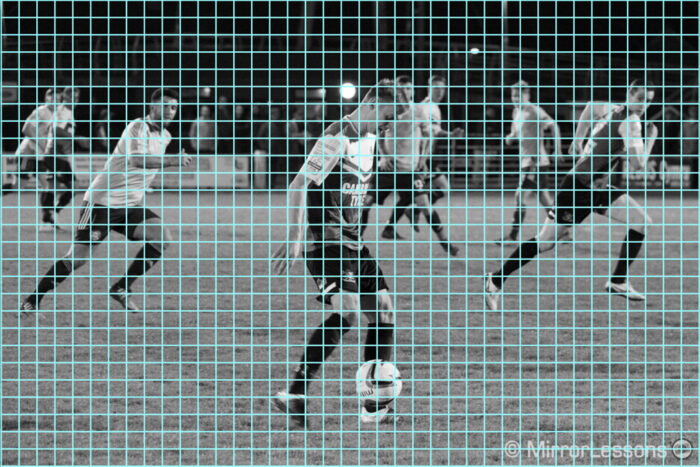
With the R7, rolling shutter is much more visible, to the point where every 3 or 4 photos I was reviewing on my computer, I could see something was off, my brain was disturbed by the image even though I wouldn’t necessarily see what was wrong right away. It would be either distortion on the animal itself, or distortion in the background. The difference between scrolling through R6 photos and R7 photos is staggering. Let’s look at a few examples.
In the first image below, concentrate on the hide and the tree trunk in the background. They are visibly distorted.

RF100-500mm F4.5-7.1 L IS USM at 500 mm
In the second image, you can notice the odd vertical lines of the tractor.
RF100-500mm F4.5-7.1 L IS USM at 300 mm
The tractor is distorted.
Next, click on one of the two images below, then go back and forth between them. You’ll notice that the background wobbles!
RF100-500mm F4.5-7.1 L IS USM at 500 mm
RF100-500mm F4.5-7.1 L IS USM at 500 mm
The fourth image has a poor composition: I struggled to keep the bird at the centre, as it suddenly moved down. But look at the size of its body and head. They are stretched, making the animal look fatter than it is.
RF100-500mm F4.5-7.1 L IS USM at 500 mm
In the fifth image, the left wing appeared stretched out towards the edge of the picture. However this is a more tricky example because a) bird feathers can bend, and b) they often appear blurry (especially towards the end of the wing) because the shutter speed is not fast enough. I have similar examples of photos taken with the mechanical shutter, so it’s harder to make a solid distinction in this case.
RF100-500mm F4.5-7.1 L IS USM at 400 mm
Another thing I noticed on the first day of shooting with the R7 was some weird motion blur. It was very windy, so the red kites would suddenly move up or down, and I had to correct the composition faster than I would normally do. I think my very fast panning corrections highlighted another problem: the in-body image stabilisation on the sensor (IBIS).

RF100-500mm F4.5-7.1 L IS USM at 500 mm
The first thing to understand is that you cannot separate sensor and optical stabilisation. They either work together, or they don’t work at all. So, even though optical stabilisation is likely to have a greater impact at long focal lengths, the sensor remains active and corrects for movements as well. And I believe, on a camera like the R7, these corrections on the sensor are counterproductive when taking actions shots. It is better to use a safe shutter speed and leave the stabilisation system off.
Some of you might say that it is safer to leave the IS off when working with a fast shutter speed anyway, but with other cameras I never encountered issues when leaving the IS on, especally when selecting Mode 2 on the lens (vertical correction only), when available.
But even without stabilisation, rolling shutter on the R7 is going to be a problem, which is a shame really. And, I just showed you some wildlife examples, but I can imagine that sports or events with artificial lights can give you problems as well. Of course you can use the mechanical shutter and work at 15fps, which is far from terrible, but you obviously won’t be able to take advantage of that faster drive speed the camera has to offer.
If you want to see more examples, check Duade Paton’s video where he showcases different examples of distortion caused by rolling shutter with different cameras. He also gives an exhaustive overview of the electronic shutter and the issues encountered with the R7.
Canon R6 vs R7: Buffer
Concerning the buffer memory, the R6 has a clear advantage, aided by the smaller resolution (i.e. smaller files) as well as the slower frame rate.
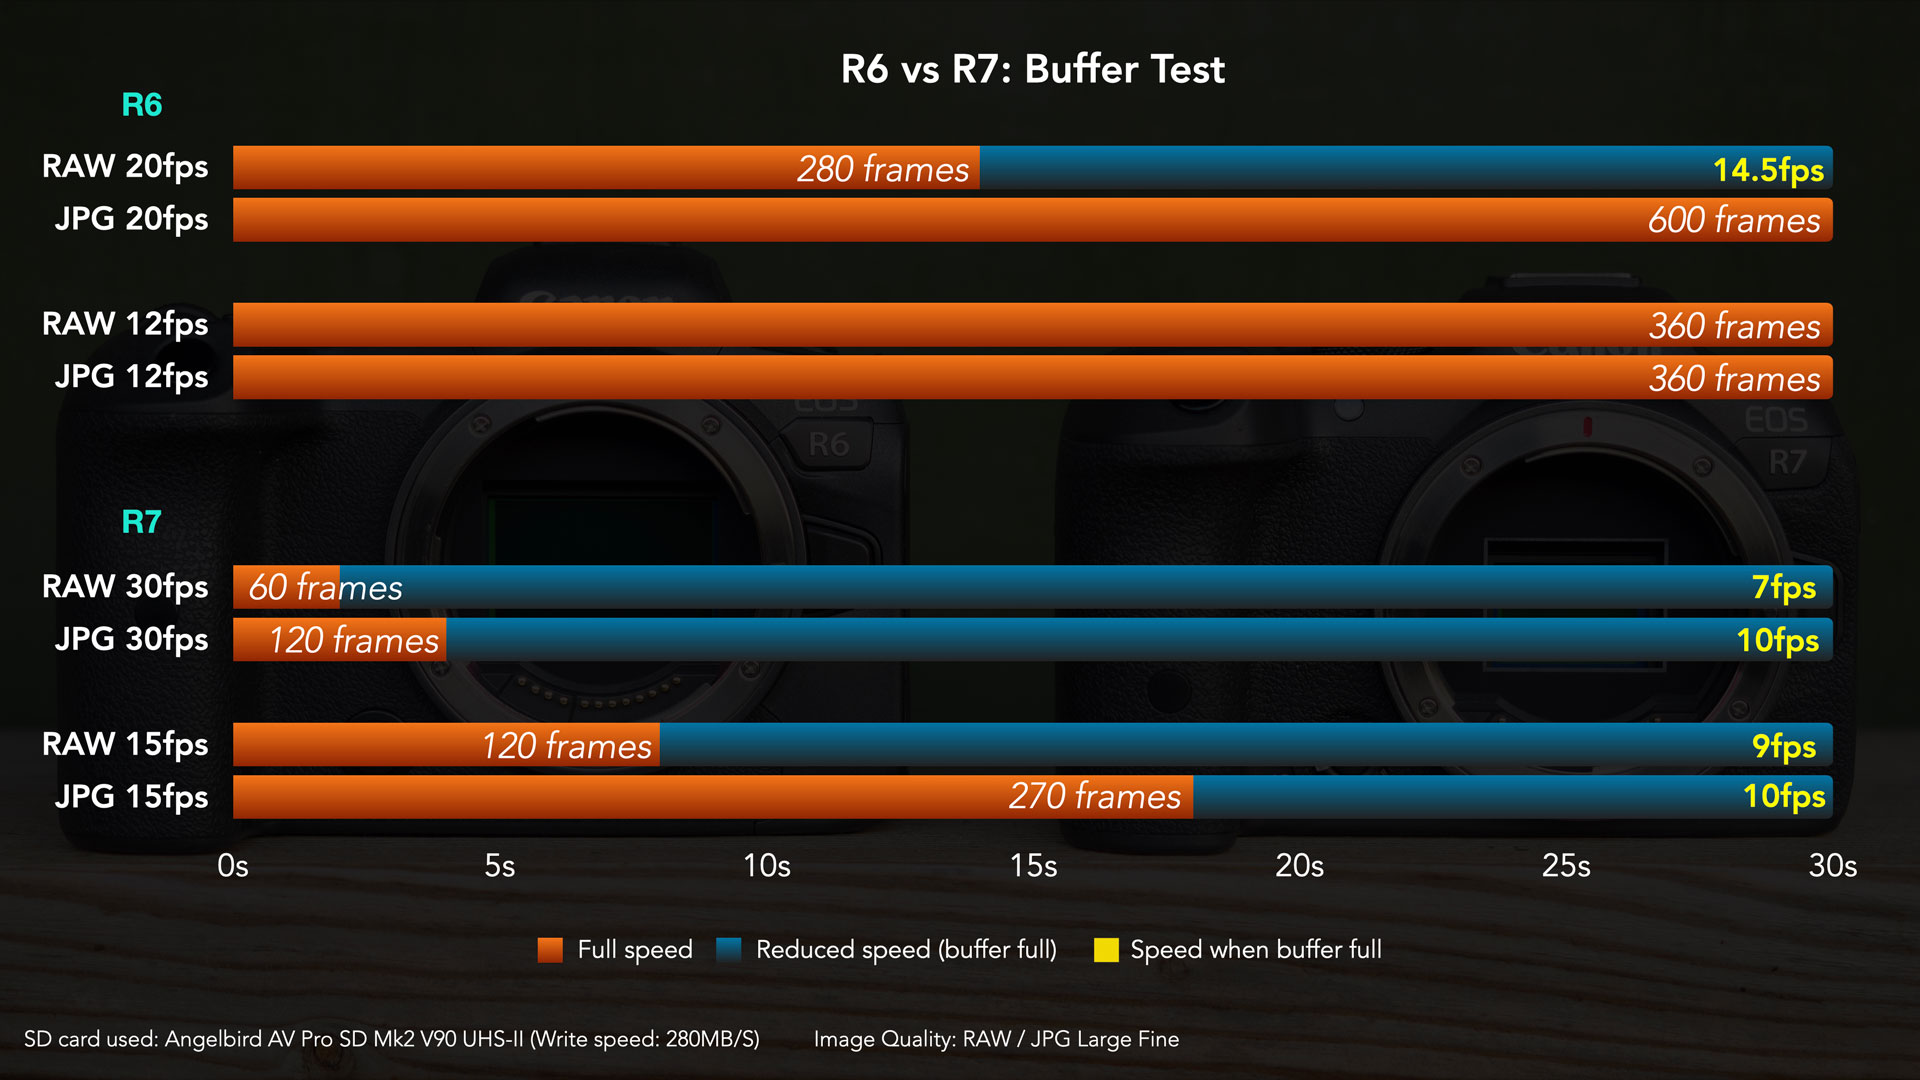
You can double the buffer on the R7 by choosing Compressed RAW (C.RAW) which is smaller in size than the normal RAW. This option is also available on the R6 by the way, and gives you unlimited performance at 20fps.
Quality
R6
R7
RAW
22MB
36MB
C.RAW
11MB
23MB

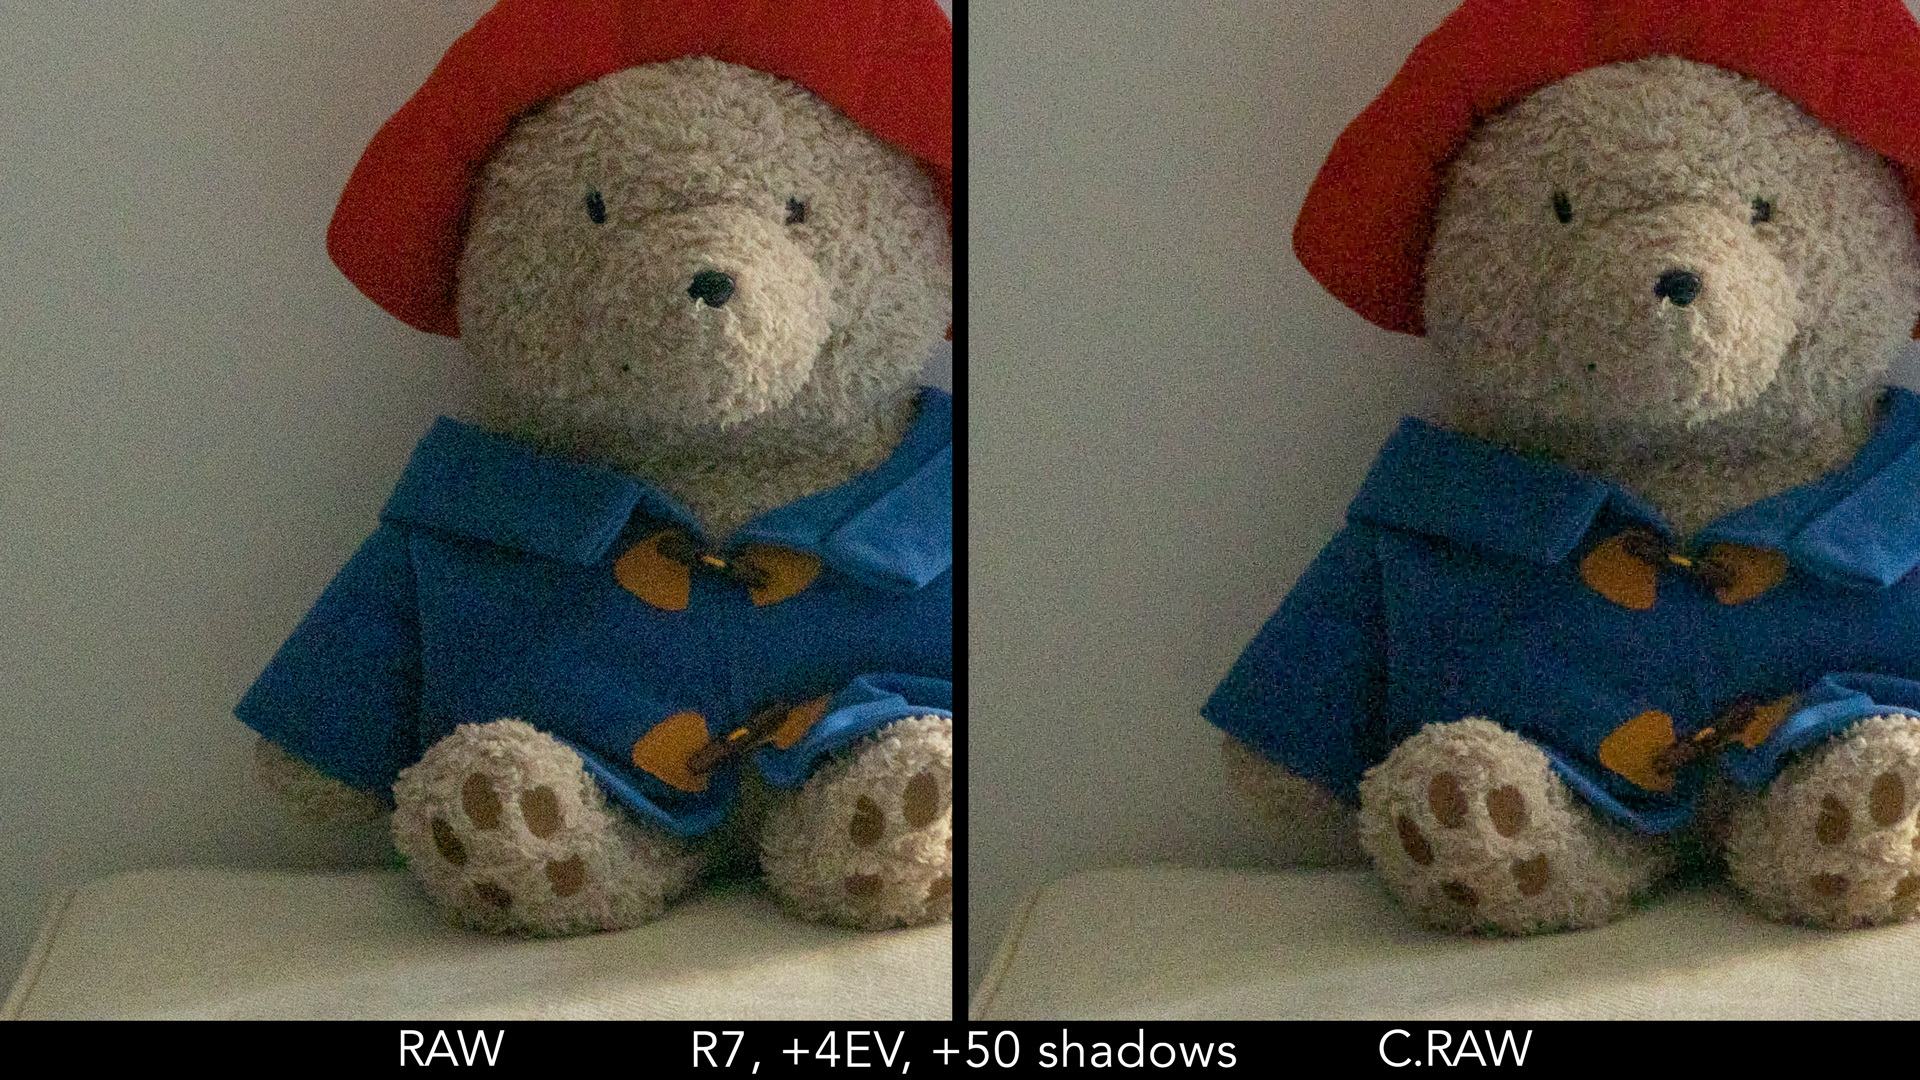
The difference in quality between RAW and C.RAW is minimal and in most situations, you won’t have trouble post processing your images with the compressed RAW version. You can see for yourself in the test below, after recovering 4 stops of exposure in the shadows. There are a few more colour artefacts on the R7 image, but it’s nothing drastic.
Canon R7: RAW Burst Mode
Next we can talk about the RAW Burst Mode, which is only available on the R7.
The RAW Burst Mode works at the fastest speed with the electronic shutter, and is designed to capture very fast action and give you the possibility of saving the perfect frame, a bit like the 4K Photo mode on Panasonic cameras.
You also have the option to enable Pre-shooting, which allows you to capture images 0.5s before the shutter button is fully pressed (so roughly 15 images with the drive speed of 30fps). The buffer keeps refreshing to give you the latest 15 frames when you press the shutter button all the way down. Note that the shutter button needs to be pressed halfway for Pre-Shooting to engage.
Pre-shooting is of great help to capture unpredictable moments, especially with wildlife photography, like for example a small bird flying off a branch or departing from a feeder.
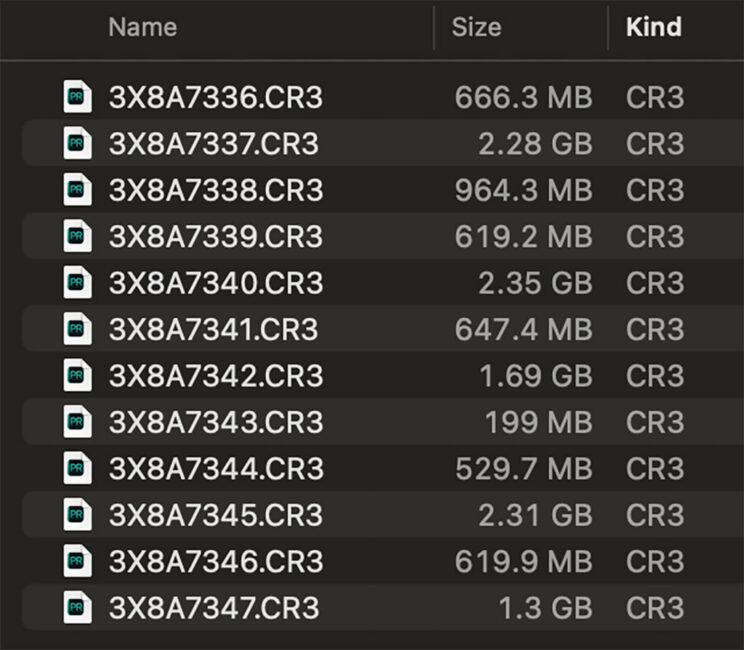
While the RAW Burst Mode sounds like a nice tool to use, there is one major limitation. The camera doesn’t save all the frames individually, but groups them into one large “roll” file. It has the same .cr3 extension, but popular photo editor softwares such as Lightroom or Photoshop won’t open it. They are also notably larger than single RAW files, as you can see in the screenshot below.
You have two options: either you select the frames you want to save directly in-camera, or you use the Canon Digital Photo Professional software on your computer.
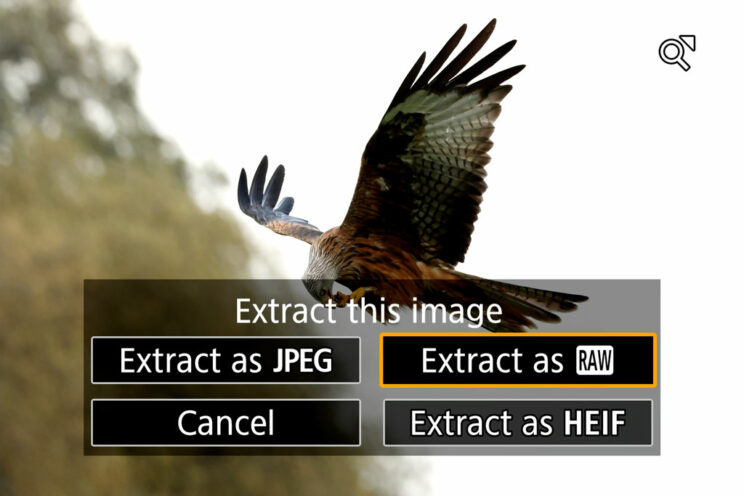
In both cases, you can extract individual RAW files (in addition to converting to JPG or HEIFF), and then transfer them to your favourite editor, but unfortunately you cannot save multiple frames at the same time. You have to go through one by one, and that will take a lot of time if you used this function extensively during the day.
I can understand why a batch save would not be available on the camera, but I struggle to understand why Digital Photo Professional doesn’t allow you to do it. There is a way to select multiple frames, but they are saved in another “roll” file, and you’re back to square one.
Finally, the RAW Burst and Pre-shooting modes bring a few extra limitations:
- the resolution is slightly lower (32MP rather than 32.5MP)
- you cannot select the ISO manually when working in Program, Shutter Priority (Tv) or Aperture Priority (Av)
4. Video Specifications
The R6 and R7 are capable of recording 4K up to 60p, and provide 10-bit 4:2:2 for internal recording.
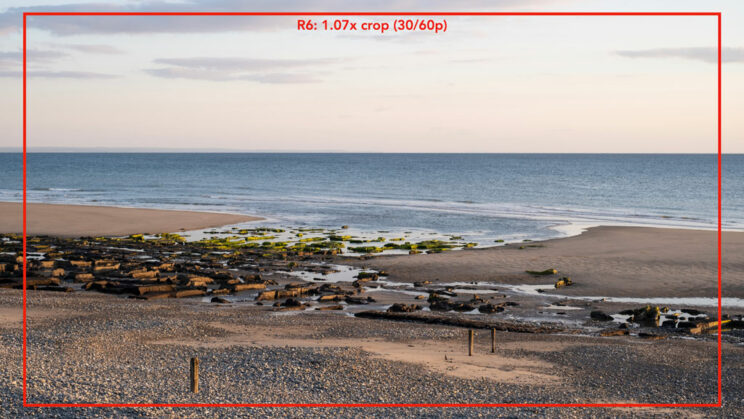
The full frame camera applies a small 1.07x crop in 4K, whether you record at 30 or 60p, but works by oversampling from a 5K area in each case.
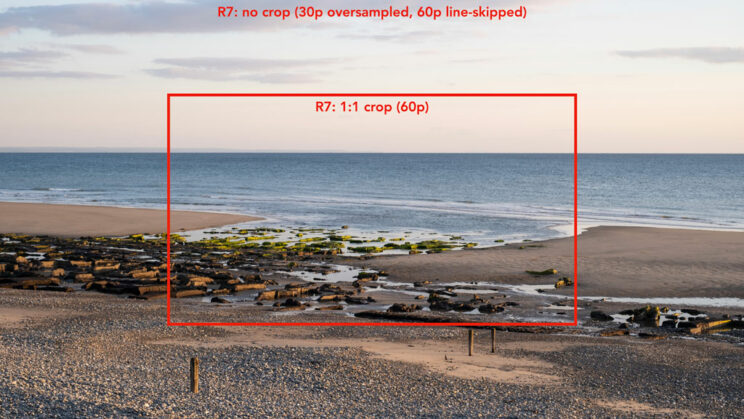
The APS-C model can record without a crop with two quality settings. Choose Fine, and the R7 saves 4K at the maximum quality, oversampling from a 7K area. The Fine setting is available up to 30p, and I find it gives very similar results to the R6. They both deliver smooth and crisp footage.
If you want 4K 50/60p on the R7, you have two options. You can record without a sensor crop, but the quality decreases because instead of oversampling, the camera does line-skipping (it doesn’t use all the pixels on the sensor). Details are less crisp, and you can notice aliasing.
The second option is to record on a 3840×2160 (1:1) pixel area, which translates into a severe 1.8x crop. The latter means a small portion of the sensor is used to record the video.
Speaking of cropping, remember that you also have to take into account the equivalence due to the different sensor sizes, full frame and APS-C (1.6x crop factor).
If we take a 35mm prime lens as an example, here is the equivalent focal length (in terms of field of view) you would get depending on the camera used, as well as the specific 4K setting selected. You can see how narrow the angle of view becomes on the R7 with the 1:1 pixel mode.
35mm focal length
R6
R7
4K 30p
37.5mm
(1.07x crop)
56mm
(APS-C crop)
4K 60p
37.5mm
(1.07x crop)
56mm
(APS-C crop)
100mm
(APS-C + 1:1 mode)
So to summarise, while both cameras can deliver similar results in terms of sharpness when working at 30p, the R6 has the upper hand if you prefer to work at 50/60p.
In Full HD, both products can go up to 120fps with the High Frame Rate function.
The bitrate is also the same:
- 4K 30p: 120Mbps (8-bit) or 230Mbps (10-bit)
- 4K 60p: 170Mbps (8-bit) or 340Mbps (10-bit)
Both cameras can record in 8-bit 4:2:0 (H.264) or in 10-bit 4:2:2 (H.265). The latter is available only when selecting the C-Log or HDR PQ profiles.
The R7 surprised me concerning dynamic range. With the C.Log3 profile, it holds up really well against the full frame camera, and actually I found a bit more noise in the shadows on the R6 footage. The full frame model also offers the C.Log profile that works with a native ISO 400, rather than ISO 800 with C.Log3.
At high ISO, the range is a bit different than for still photos:
ISO (video)
Normal range
Extended range
R6
100 – 25,600
100 – 204,800
R7
100 – 12,800
100 – 25,600
As expected, the R7 displays more noise, starting from ISO 3,200 especially. The quality of the APS-C camera is good up to 6,400 overall, but the R6 can be pushed a bit further.
Finally, concerning rolling shutter, the R6 suffers more than in still photo mode, and the two cameras can display a lot of it at a similar level. One way to reduce the distortion is to record at 50/60p rather than 24/30p.
The differences in skin tones are the same I found for the SOOC JPGs. The R7 delivers slightly less red, which is especially visible with the Portrait style.
You can see some side-by-side tests in my YouTube video at the end of this article.
5. Overheating During Movie Recording
The R6 (and the R5 launched alongside it) got a bad reputation for overheating easily while recording 4K video. Unfortunately, my own experience confirms this.
Despite a firmware update that introduced a new setting to cope with the problem (Standby Low Res, previously called Overheat Control), my tests consistently showed the same results.
The R6 can record the first 30 minutes without any problems, but once the second clip is rolling, it can shut down after 15 or 20 minutes. From there, how much you can record depends on how long you let the camera cool (power off). For example, a 5 minute break allowed me to record another 20 minutes.
To add insult to injury, my test was done indoors at a temperature of 21˚C. If you plan to do some shooting in the summer or in warm locations, the camera will give you more problems.
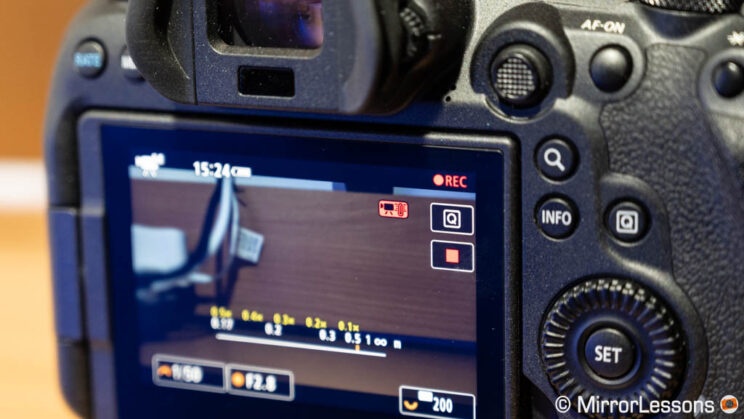
Fortunately, the R7 shows much more promising performance. I managed to record 2h20 min in 4K 25p at the maximum quality (Fine setting).
The temperature indicator (a very clever implementation) appeared after 45 minutes, and slowly increased to 7 bars out of 10 by the time the battery ran out. The camera was mildly warm by then. The ambient temperature was 20˚C.
Also note that the R7 doesn’t have the 30 minute / clip limitation, unlike the R6.
6. EVF and Rear Monitor
The R6 has a larger viewfinder with more resolution in comparison to the R7. The magnification is a bit higher and the eyepoint is slightly longer. While some of these specs may feel like an insignificant upgrade, the overall experience with the R6 is more pleasant, especially for someone like me who wears glasses all the time.
R6
R7
Panel
0.5-in OLED
0.39-in OLED
Resolution
3.69M dots
2.36M dots
Refresh rate
60/120Hz
60/120Hz
Magnification
0.76x
0.72x
Eyepoint
23mm
22mm
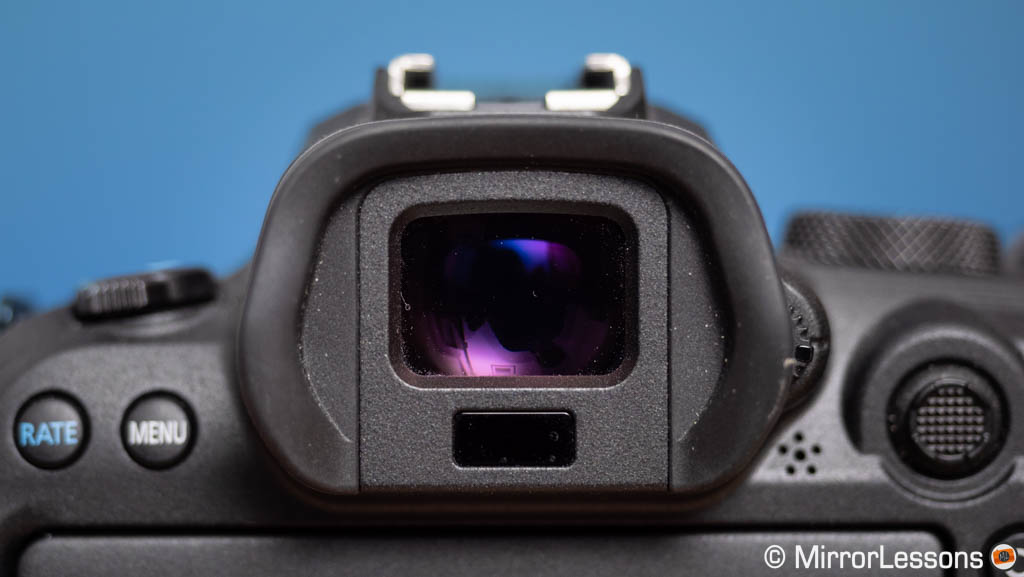
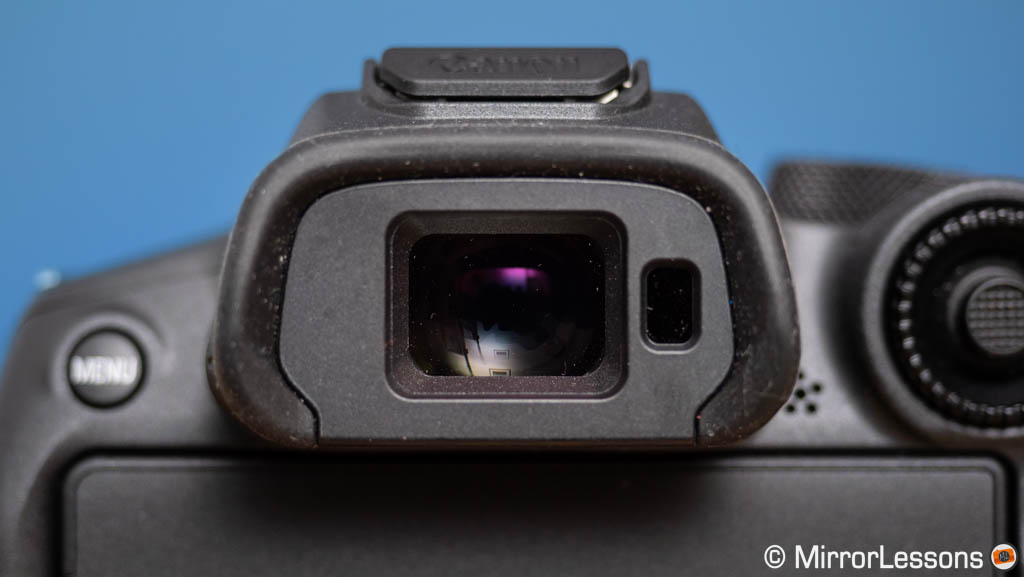
I wasn’t impressed by the specs of the R7’s EVF when the camera was announced and, after using it for an extended period, I can say it’s a decent viewfinder, but there is nothing that makes it stand out. It feels a bit outdated now that we’re approaching 2023. At least the frame rate goes up to 120fps, which is good when panning quickly to follow fast subjects.
The R7 also has an OVF View Assist option to “simulate” an optical viewfinder by disabling the exposure preview and increasing the overall brightness. The idea is to give you a HDR-like image but, being an old OLED panel, you don’t get the same true-to-life results I’ve seen on the flagship R3.
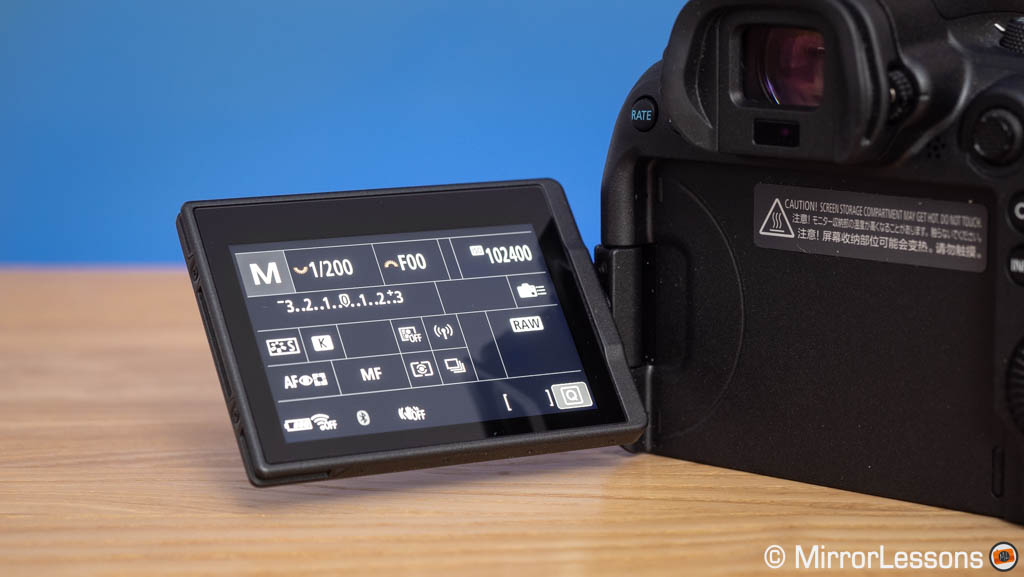
Concerning the LCD monitor on the rear, they are both touch sensitive, have a multi-angle mechanism and share the same resolution of 1.62M dots. They’re responsive, bright and crisp, so nothing to complain about here. They’re great to use.

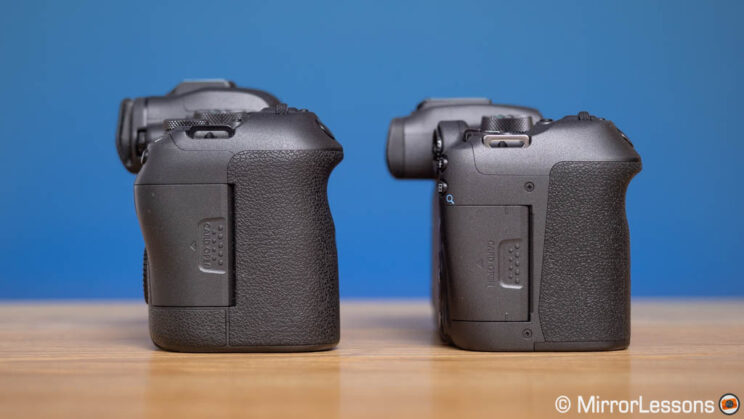
7. Design
The R6 is larger and heavier than the R7 but, after using both side by side for a few weeks, I can say the difference is minimal. Both cameras come with weather sealing.
- R6: 138.4 x 97.5 x 88.4mm, 680g
- R7: 132.0 x 90.4 x 91.7mm, 612g


The front grip is slightly taller and larger on the full frame body, which allows my fingers to rest with more comfort. On the R7, I need to squeeze them a little more, but it’s not a deal breaker.
Concerning the button layout, the R6 features three dials (two on top and one on the rear) to control exposure settings.
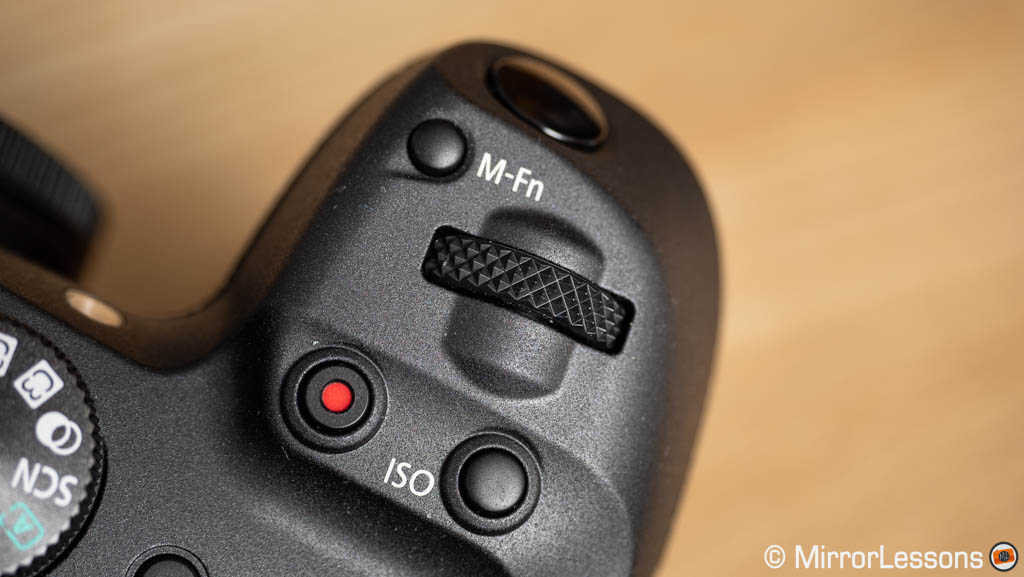
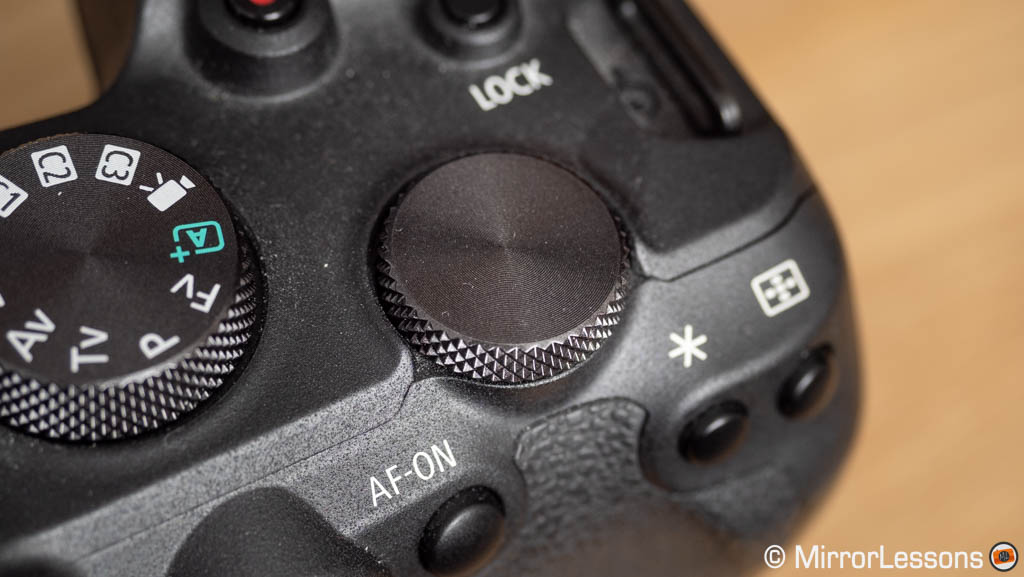
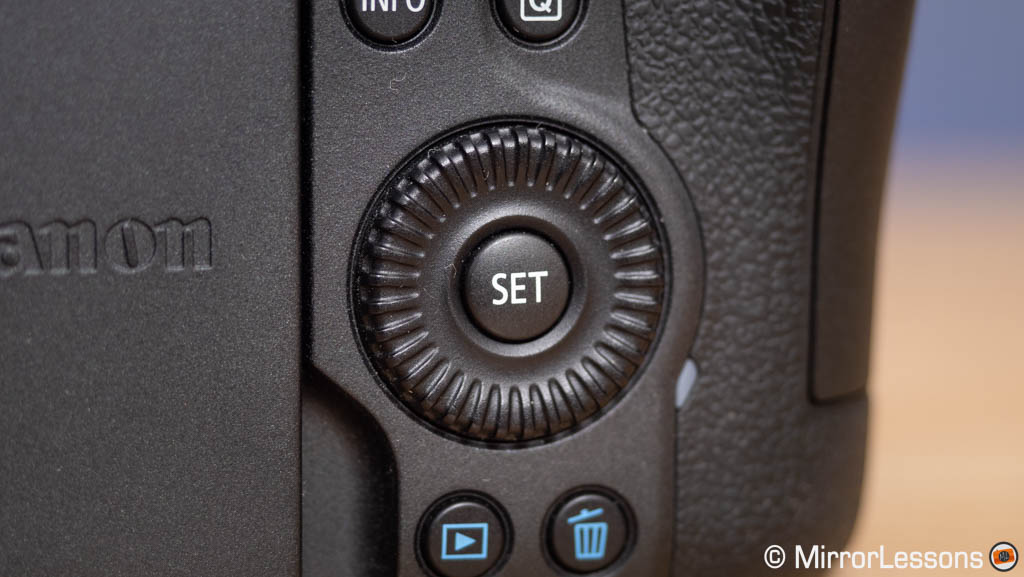
The R7 has two dials, one on top near the front grip, and one on the rear next to the viewfinder. The latter has an original design and is built around the AF Joystick. It’s a shame that Canon didn’t include the control dial at the back (around the SET button), so to have the same three-way control like on the R6. While going back and forth constantly between the two cameras, I missed not having a third dial to work with.
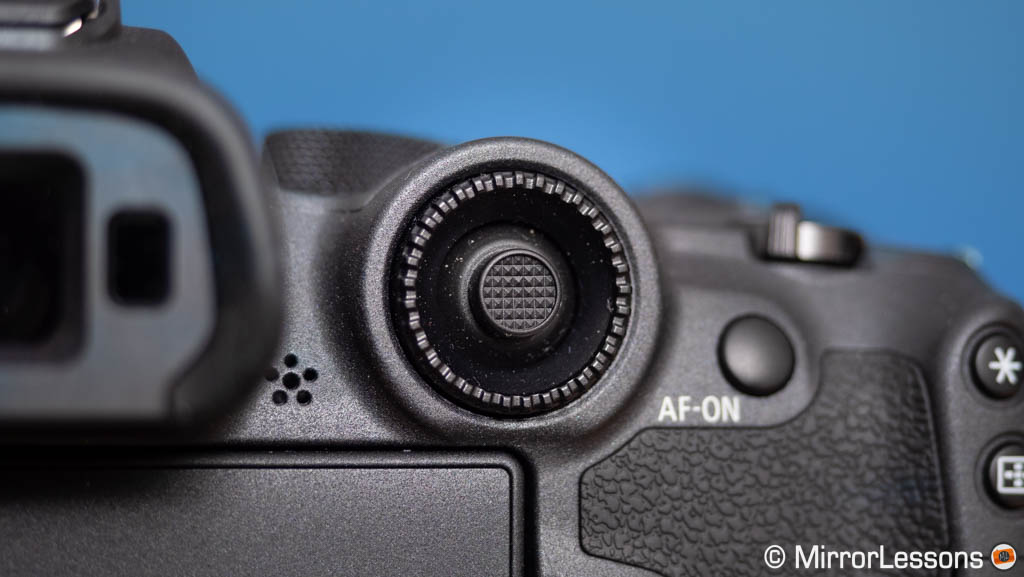
I need to take a moment to talk about that rear wheel / AF joystick combination on the R7. It certainly is an original solution, but it turned out to be a big annoyance because you end up touching the joystick accidentally. It sticks out a bit too much from the main shell, and many times I found my AF point had moved. You also have to be careful not to touch the wheel itself unintentionally.
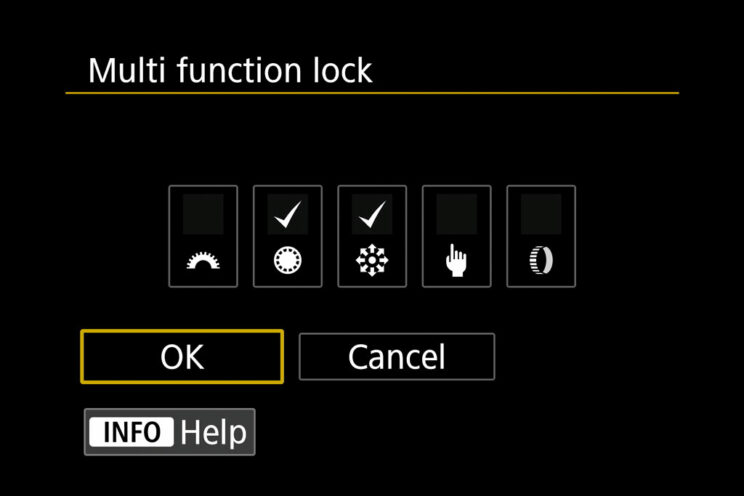
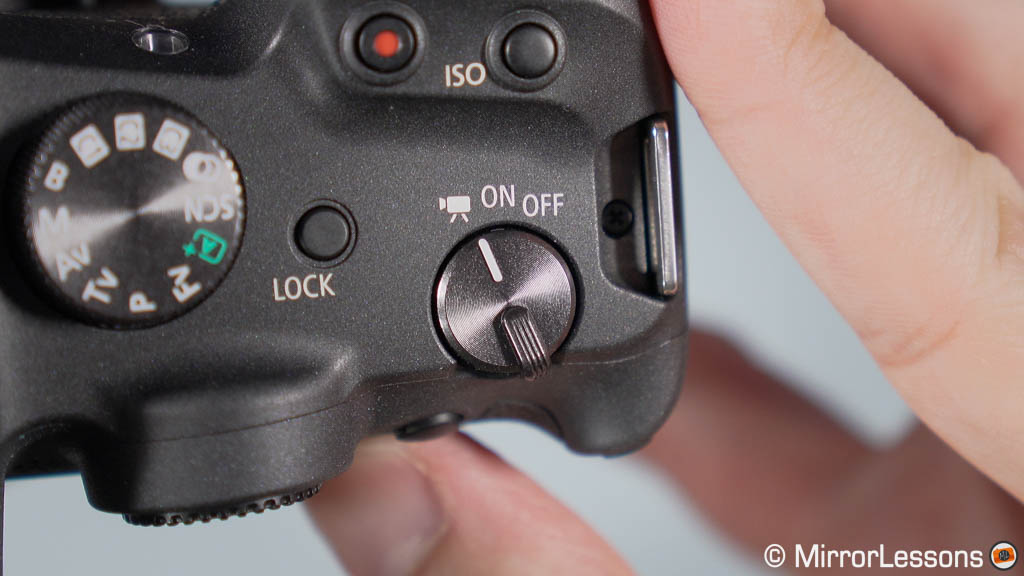
If this is really bothering you, the solution is to use the lock button found at the top of the camera. I configured it so that it only affects the rear wheel and the joystick. This way I can lock them both and not worry about changing a setting or moving the AF point by accident. The drawback is that every time you do want to change those settings, you have to remember to press the LOCK button first. It takes a bit of muscle memory to get used to it and, of course, it’s not as quick as the R6.
Another solution is to disable the joystick, and use the 4-way pad to move the AF area, but I find the joystick quicker and more responsive.
On the top plate, the on/off switch is found on the left on the R6, and on the right on the R7. The solution on the APS-C camera also lets you switch to movie mode, which is quicker and more comfortable than rotating the main shooting dial of the R6.

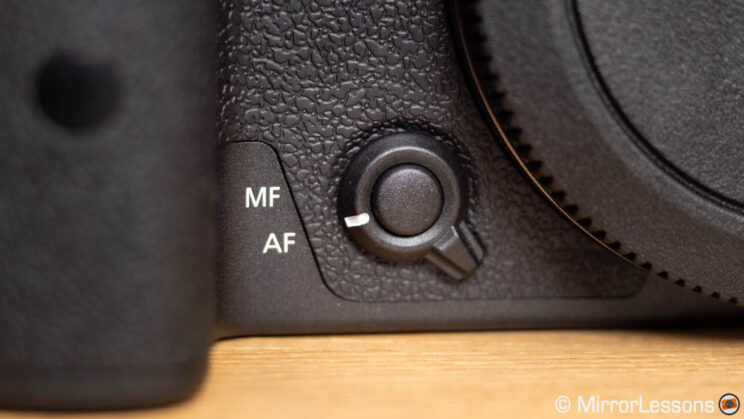
On the front, near the bottom, the R7 has a handy AF/MF switch that includes a centre button that can be customised.
The R6 has additional buttons on the rear (magnification and ‘rate’), which means you can perform these operations directly without additional steps.
That said, the R7 offers more customisation: 12 buttons can be mapped (including the four-way pad at the rear), versus 7 on the R6. Furthermore, the Q menu can be edited, unlike with the full frame model.
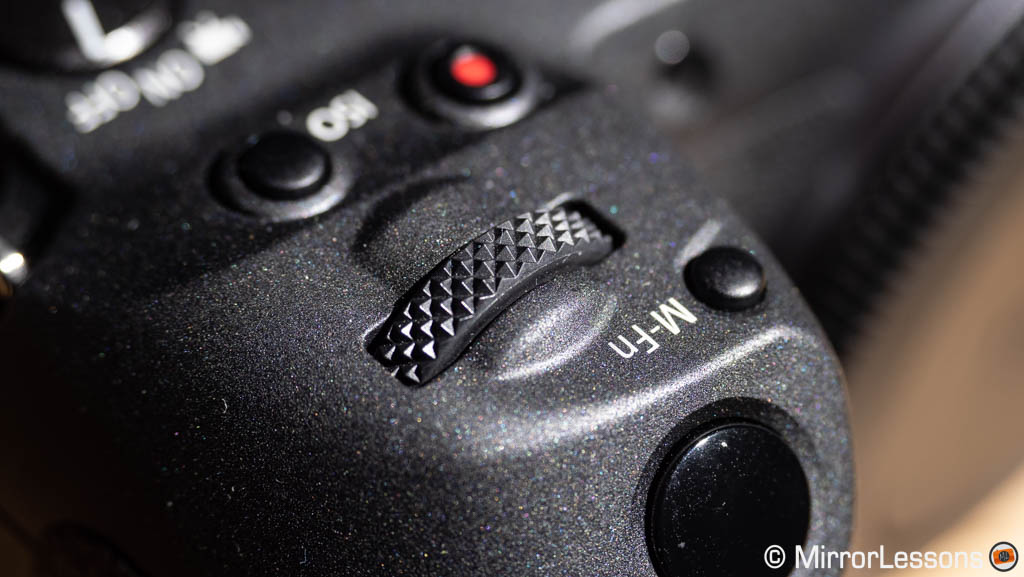
All the buttons are nice and precise to use. Only the M-Fn button on top is a bit too small for my liking.
The menu system is the same, and can be controlled entirely via the touch screen. Both cameras include a My Menu section to shortcut your favourite settings.
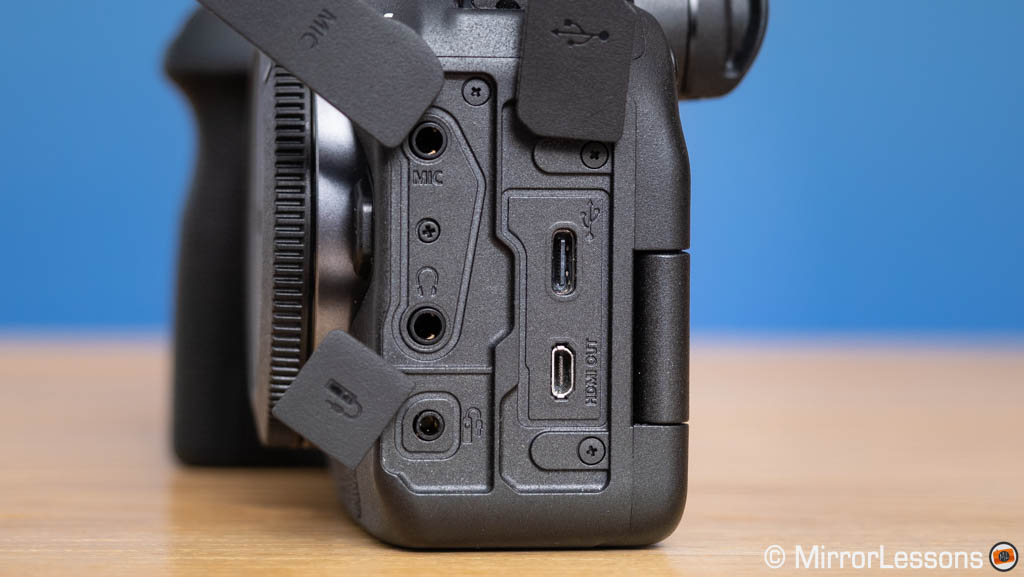
Concerning the connections, the two cameras have a Micro HDMI port, a 10Gbps USB C port, audio in & out (3.5mm) and a remote controller socket.

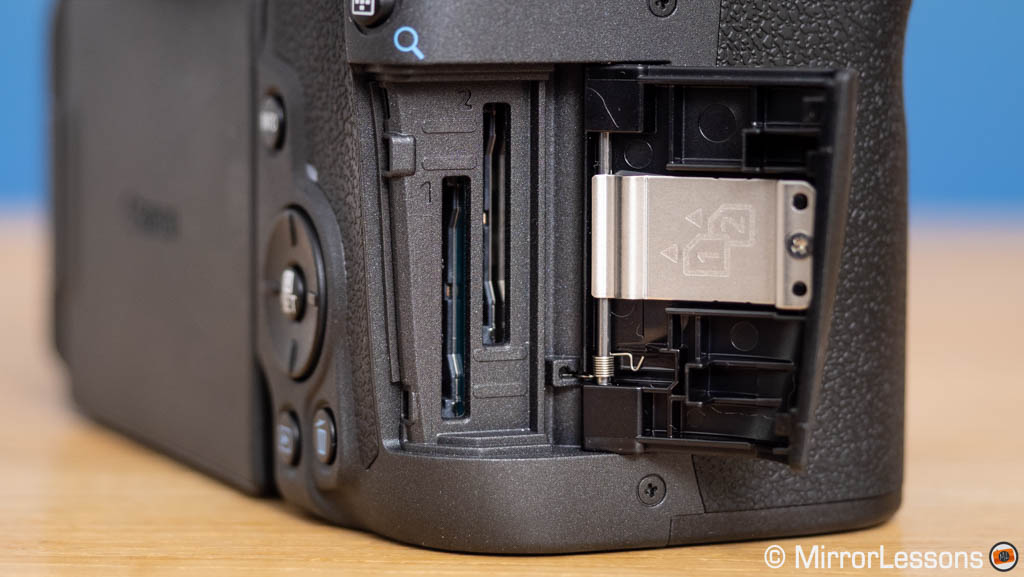
Finally, they both sports two SD card slots that are UHS-II compatible.

8. Battery life
The two cameras use the same battery, the LP-E6NH, but their ratings are different.
The R6 can capture 380 shots (EVF) or 510 shots (LCD) on a single charge.
The R7 does better, with 500 shots (EVF) or 770 shots (LCD). Note that in both cases, these rating are measured with the power-saving mode enabled on the cameras.


As always, remember that this data rarely reflects real world use.
For example, in my last test I captured 1,755 RAW images of birds in flight at 20fps with the R6, and there was 79% battery power left.
The R7 did better: with more photos captured (2,757) in the same conditions, the indicator was showing 78% by the time I left.
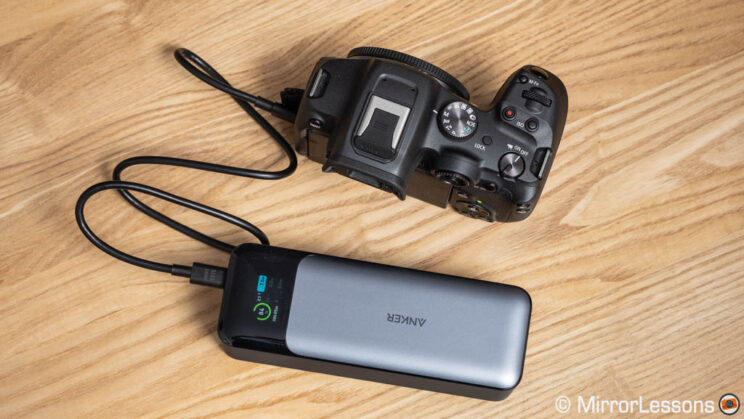
You can use the USB port to charge or power the two cameras. Note that Canon cameras are a bit more picky about the powerbank you use. You need a high current one or it won’t work. When the camera is turned on, the battery icon is grayed out and the battery does not charge.
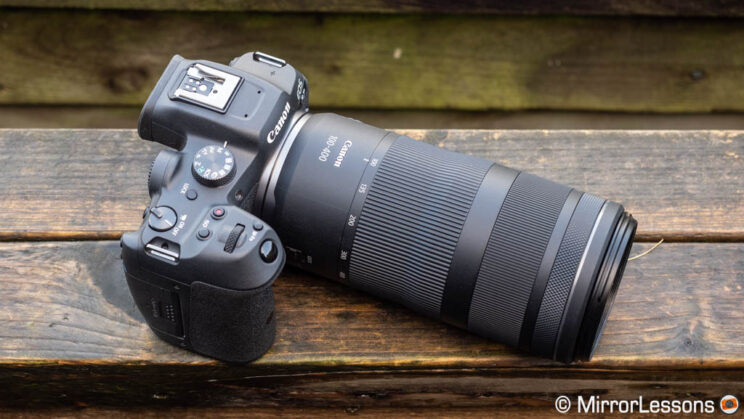
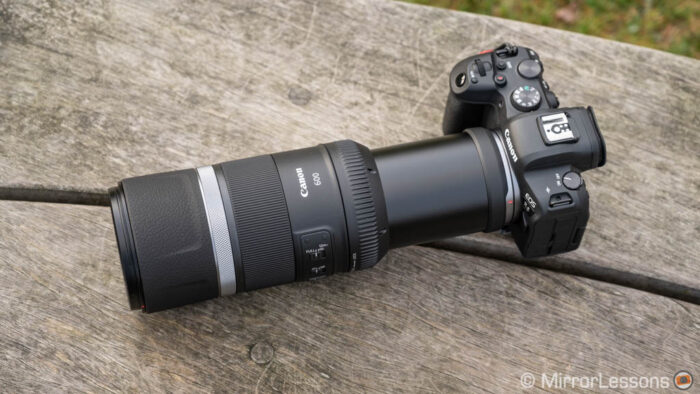
9. Lenses
Although both cameras share the same mount, it’s important to talk about lenses.
The R7 (and R10 launched at the same time) are the first APS-C cameras with an RF-mount. Canon also unveiled two zooms at the same time, the RF-S 18-45mm F4.5-6.3 IS STM and RF-S 18-150mm F3.5-6.3 IS STM, but these are the only two native RF lenses designed for APS-C.
Naturally, we can expect more to come in the future but for now, you’ll have to look at the full frame catalogue if you want anything beyond the kit lens, or the ‘cheap’ all-rounder lens.
The advantage is that you can use the 1.6x crop factor to get more reach with the full frame lenses, and that is something wildlife and bird photographer will be especially interested in, for the same reasons they show interest in older APS-C DSLRs such as the Canon 7D. For example, the RF 100-400mm F5.6-8 gives you an equivalent field of view of 160-640mm, whereas the RF 800mm F11 “extends” (so to speak) to 1280mm.
The disadvantage is that there aren’t a lot of affordable yet fast lenses at the moment. There are the RF 16mm F2.8, the RF 35mm 1.8 and a few others, but any F2.8 or F4 constant aperture zoom or F1.2 prime will cost you much more. Even the RF 100-500mm F5-7.1, which is an excellent lens for nature photography, is almost three grand. I also think the system could do with more support from third-party manufacturers (Sigma and Tamron would be a great addition).
Of course, we have to give Canon time to grow the APS-C segment, so this chapter is not meant to be a criticism, but rather to inform potential buyers.
In the meantime, photographers have the option to use the EOS R to EF adapter and access a long list of APS-C and full frame lenses designed for Canon’s DSLRs. All the automatism are retained and the performance is good. It’s not the best solution if you want to keep the size of your gear as compact as possible, but it remains an option nonetheless, and one that can be very useful to those who already own EF-mount lenses.
One final note: Canon has another APS-C mirrorless system, the EOS M series, but the lenses are not compatible with the RF-mount.
10. Price
This is perhaps the biggest decision-making factor if you’re hesitating between these two cameras.
The R6 is more expensive and can be found for around $2300, £2400 or €2500.
The R7 is much more affordable with retail prices starting at $1500, £1350 or €1500.
Note: prices are for the body only, and are as of December 2022.
Additional feedback: IBIS and R6 mark II
Both cameras come with 5-axis image stabilisation (up to 8 stops of compensation, depending on the lens).
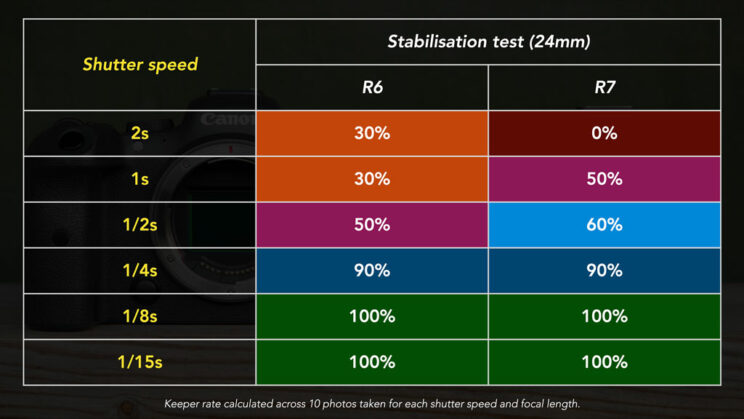
I did my usual hand-held test and only the R6 managed to give me a sharp shot with a shutter speed of 2 seconds. At 1 second however, the R7 prevailed. With faster exposures, the results are very similar. Overall this is good performance from both cameras.
For video, the R7 does a bit better in stabilising the footage when walking. It’s not perfect but you get a fewer jerks than the R6. On both models, you can also enable Digital IS but I rarely find it makes a huge difference.
Now for a few words about the Canon EOS R6 mark II that was announced at the beginning of November 2022, while I was working on this article.
The 2nd generation model has a new sensor (24MP), promises a faster readout (less rolling shutter) and the drive speed doubles to 40fps, which is quite impressive. The autofocus can detect more types of animals in addition to receiving an overall software improvement. Hopefully, overheating when recording 4K video should be a thing of the past.
I hope to test the new camera soon, but I think the R6 will remain a good contender for the R7, especially if it comes down in price.
Video Review on our YouTube Channel
Conclusion
I won’t deny it: when the R7 was announced, I welcomed it with open arms, and I was pleased to see the RF-mount expanding into APS-C territory. The camera promised high level specs for a competitive price, something that is becoming rarer and rarer, with many mirrorless models reaching $2k, if not more. Naturally, as a wildlife photography enthusiast, I saw great potential.
After testing the R7 for more than a month, I can say I have very mixed feelings about it.
For some users, I think it can be an excellent entry to Canon’s EOS R system. It offers excellent resolution, good image and video quality (up to 30p), and the autofocus performance is excellent for the most part. Add a decent battery life and much better heat management with 4K recording, and I can see why it could become a popular model.
However, as soon as you start to push the R7 to its highest performance, there are important limitations to be aware of.
The drive speed of 30fps sounds great, but you have to deal with a small buffer and invasive rolling shutter (which is valid for video too). The RAW Burst setting gives you the pre-shooting mode, but the limited workflow built around it can be frustrating.
From an ergonomics point of view, the design is very good except for that large wheel located around the AF joystick, which you need to lock if you don’t want your AF point to jump all over the place.
What about the R6? Well, this one is easy. I was already well acquainted with it before the R7 arrived. It is the camera that finally put Canon amongst the main players on the mirrorless market (along with the R5).
The 20MP sensor certainly feels a bit “meh” by today standards when it comes to resolution, but you get better dynamic range and better high ISO. The 20fps burst with the electronic shutter is more reliable thanks the faster sensor readout (less rolling shutter), and buffer is almost limitless.
The autofocus is as good as the R7, even without the latest algorithm, and the full frame camera does actually better with difficult subjects such as birds in flight. The R6 also offers better quality if you want 4K 60p, but overheating can be a big limitation depending on the ambient temperature.
In the end, the price is the main factor at play here: the difference is not insignificant unless you can find a less expensive second-hand R6. But please pay attention to the lenses: the choice for APS-C is limited if you only look at the RF-mount, and many full frame lenses are expensive. The Canon EOS R APS-C segment has just started and needs to grow.
Reminder: the links below are affiliate links. If you decided to buy something after clicking the link, we will receive a small commission.
Check the price of the Canon EOS R6 on:
Amazon | Amazon UK | B&H Photo | eBay
Check the price of the Canon EOS R7 on:
Amazon | Amazon UK | B&H Photo | eBay