Last update on: March 6th, 2019
Since its announcement in early 2015, the X-T1 has been one of Fujifilm’s most popular cameras. It is for this reason that the company released a smaller version one and a half years later – the X-T10 – that was priced more attractively despite having the same the image quality and autofocus performance as the X-T1.
When the third generation of X series cameras was revealed in January 2016, it was only natural for Fujifilm to embrace the same strategy. This time it took just seven months for the brand to announce the X-T20, a smaller version of the flagship X-T2 that once again has the same performance as its older sibling but comes at a more attractive price.
This difference in price is the factor that is most likely to influence your decision but you may also be wondering: are there any other differences worth talking about? The answer to that is yes, and we’re going to cover them all in this complete comparison. Enjoy!
Ethics statement: We purchased the X-T2 and X-T20 to conduct our full reviews and comparisons. We were not asked to write anything about these products, nor were we provided with any sort of compensation. Within the article, there are affiliate links. If you decide to buy something after clicking the link, we will receive a small commission. To know more about our ethics, you can visit our full disclosure page. Thank you!
[toc heading_levels=”2″]
Article Updates
- March 2019: added feedback about the Enhance Details setting on Adobe Lightroom and how it improves RAW files rendering
- July 2018: some edits following the latest firmware available (4.10 for the X-T2, 2.0 for the X-T20)
- December 2017: added information and feedback concerning firmware updates for the two cameras (3.0 for the X-T2 and 1.10 for the X-T20)
Main Specifications
X-T2
- Sensor: 24 MP APS-C X-Trans III CMOS
- Lens system: X-mount
- Weatherproof: Complete (Splash dust and freeze proof)
- Internal Stabilisation: None
- Autofocus: Hybrid with up to 325 points (7×13 and 13×25 grids selectable)
- Continuous shooting: 8 fps and 5 fps, up to 11fps with optional battery grip, 14fps with electronic shutter (AF-S and AF-C)
- ISO Sensitivity: 200 – 12800 ISO (pull 100, push 25600 to 51200)
- Shutter Speeds: 1/8000 to 30 seconds, up to 1/32000s with electronic shutter
- Viewfinder: 0.5in OLED with 2,360k dots, approx. 100% FOV coverage, 23mm eyepoint, 0.77x magnification and 100fps refresh rate
- Rear monitor: 3-ways articulated 3″ LCD (1.04M dots)
- Movie recording: 4K up to 30fps, Full HD up to 60fps
- Built-in Flash: No but EF-X8 unit is included
- Extra Features: WiFi, Panorama, Timelapse, Bracketing, Multiple exposure
- Dimensions: 132.5 x 91.8 x 49.2mm
- Weight: 507g (including battery and memory card)
- Firmware version when tested: 4.30
X-T20
- Sensor: 24 MP APS-C X-Trans III CMOS
- Lens system: X-mount
- Weatherproof: No
- Internal Stabilisation: None
- Autofocus: Hybrid with up to 325 points (7×13 and 13×25 grids selectable)
- Continuous shooting: 8 fps and 5 fps, up to 14fps with electronic shutter (AF-S and AF-C)
- ISO Sensitivity: 200 – 12800 ISO (pull 100, push 25600 to 51200)
- Shutter Speeds: 1/4000 to 30 seconds, up to 1/32000s with electronic shutter
- Viewfinder: 0.39in OLED with 2,360k dots, approx. 100% FOV coverage, 17.5mm eyepoint, 0.62x magnification and 54fps refresh rate
- Rear monitor: Tilting 3″ touch sensitive LCD (1.04M dots)
- Movie recording: 4K up to 30fps, Full HD up to 60fps
- Built-in Flash: Yes
- Extra Features: WiFi, Panorama, Timelapse, Bracketing, Multiple exposure
- Dimensions: 118.4 x 82.8 x 41.4mm
- Weight: 383g (including battery and memory card)
- Firmware version when tested: 2.01
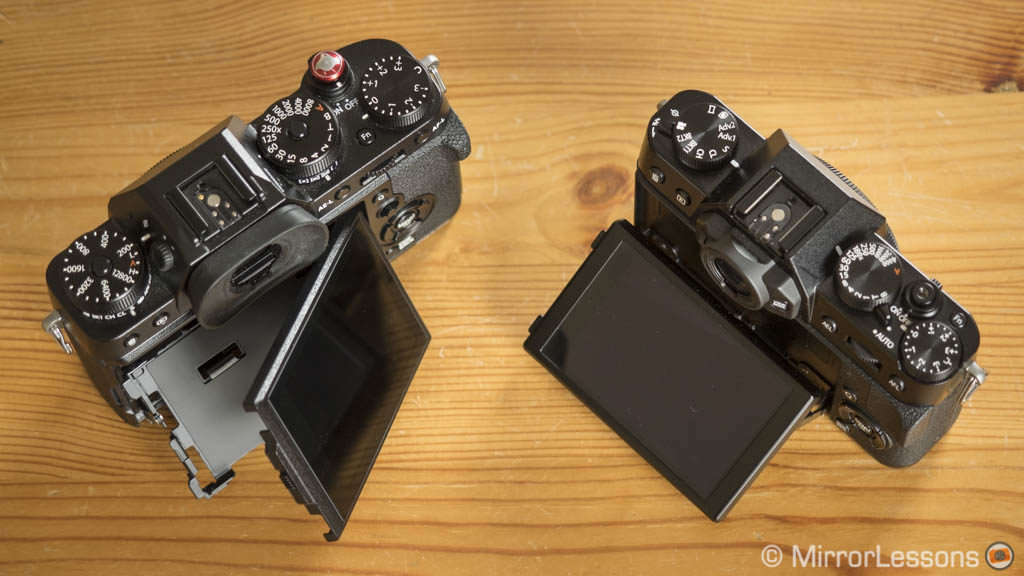
Design and build quality
The first difference we should analyse is the build quality. Unlike the X-T20, the flagship X-T2 is fully weather-sealed against dust, water and cold temperatures down to -10°.
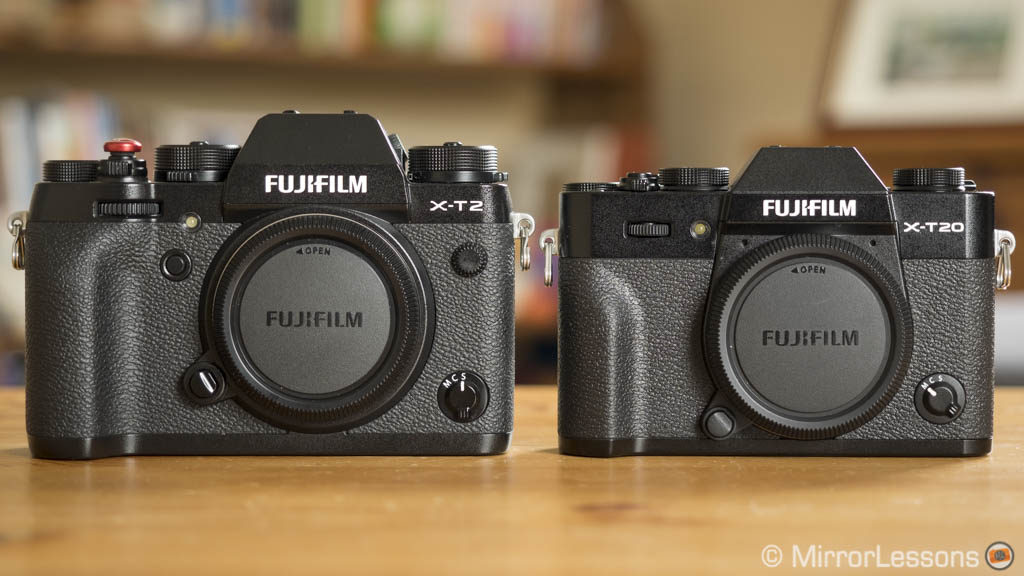
This difference in build quality can be perceived when handling both cameras at the same time. The X-T20 has more plastic parts and lacks the magnesium alloy skeleton found inside the X-T2. However the top and bottom plates as well as the dials on top are made of metal.
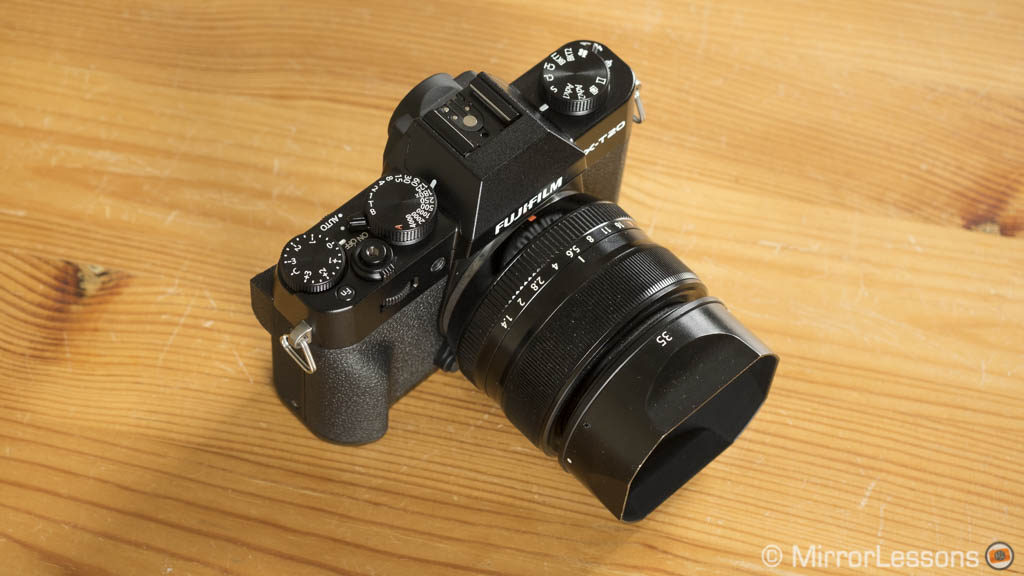
However, the plastic construction also gives the X-T20 an advantage: it is extremely light. The difference in weight surprised me when I held it for first time and made me realise that I’d forgotten just how light the X-T10 was. The X-T20 is also smaller than its big sister and remains nice and compact when used with prime lenses such as the f/2 series or the XF 27mm f/2.8 pancake lens.
Also note that because there is less space between the mount and the bottom of the X-T20, larger lenses like the 18-135mm will extend beyond the bottom of the camera.
Small trivia: the X-T2 is available in black or graphite silver (special edition). The X-T20 is available in black or silver.
When it comes to the ergonomics and grip, Fujifilm did a good job with the X-T20 overall but the reduced size of the camera brings a few limitations.
The body is thinner, the front grip is less prominent and the thumb rest on the rear is smaller. This can become an issue if you have larger hands or use long and heavy lenses that can unbalance the camera and make it more uncomfortable to hold.
That said, I don’t find the X-T2 grip perfect either when using telephoto lenses like the XF 50-140mm or the XF 100-400mm. The solution for both cameras is optional accessories.
We often use thumb grips from Lensmate which attach to the hotshoe and improve the grip without adding any bulk to your set-up. Fujifilm offers official landscape grips for both cameras and you can find third-party solutions as well. For the X-T2, there is also the battery/vertical grip.
Long story short, with a small extra investment you can enhance the ergonomics of both cameras.
A small yet welcome detail that Fujifilm didn’t exclude from the X-T20 is the threaded shutter release button that allows you to attach a soft release button. (Once again, we use the ones from Lensmate.)
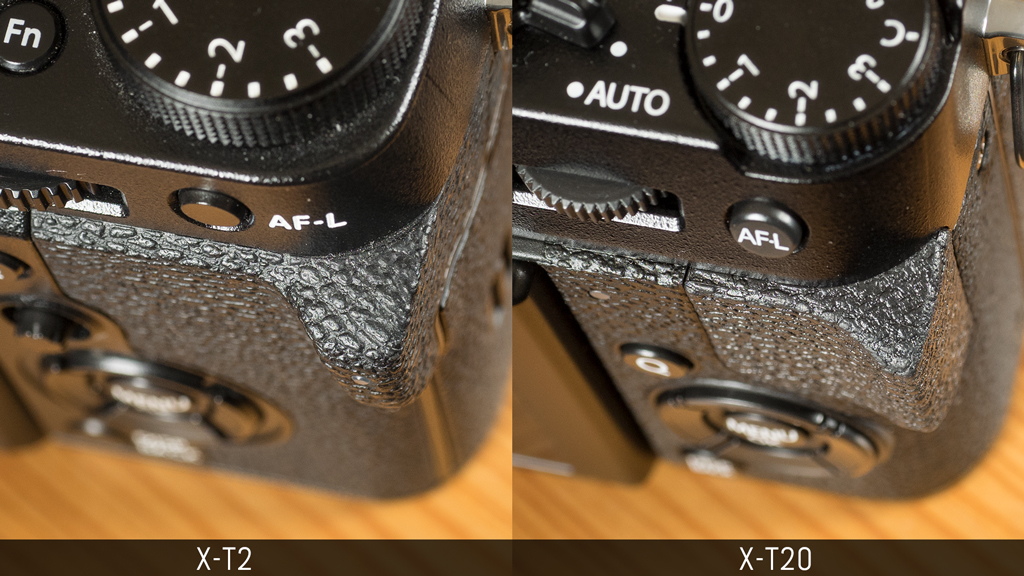
The dials are well-built and turn smoothly on both cameras. The only one I find harder to use on the X-T2 is the Metering sub-dial. The buttons are easy to access but the ones on the X-T20 have slightly more depth which improves the tactile experience a little.
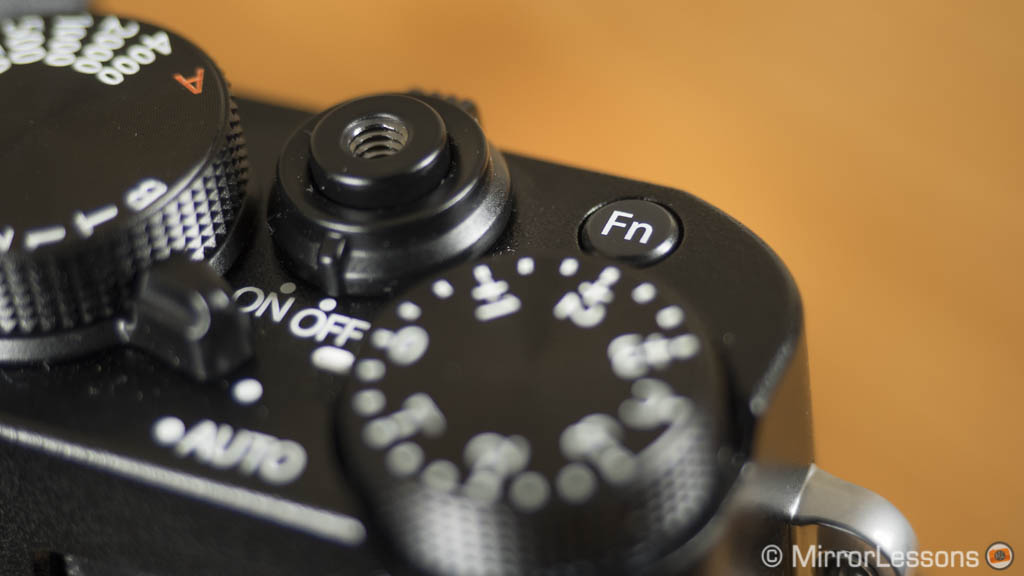
One flaw on the smaller camera is the Fn button on top: it is too flush with the body and difficult to press or find if you are looking through the EVF.

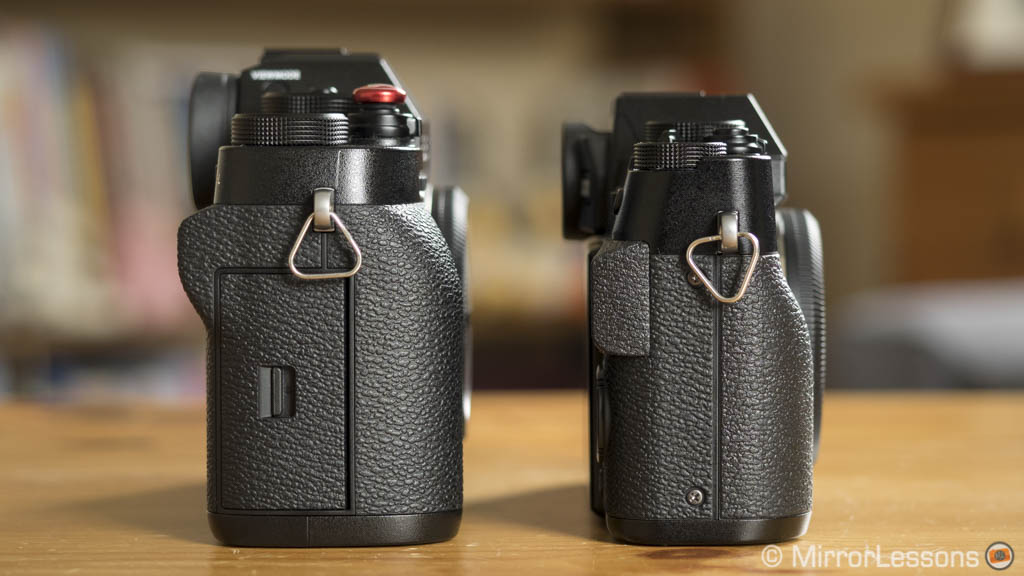
Another difference concerns the memory card compartment.
The X-T2 has a dual slot on the side that is UHS-II compliant which means you can use compatible SD cards that have a faster writing speed. A dual slot allows you to save more photos, record a back-up on the second card or separate the file types (RAW, JPG and video).
The X-T20 has one UHS-I slot accessible from the bottom where the battery is.
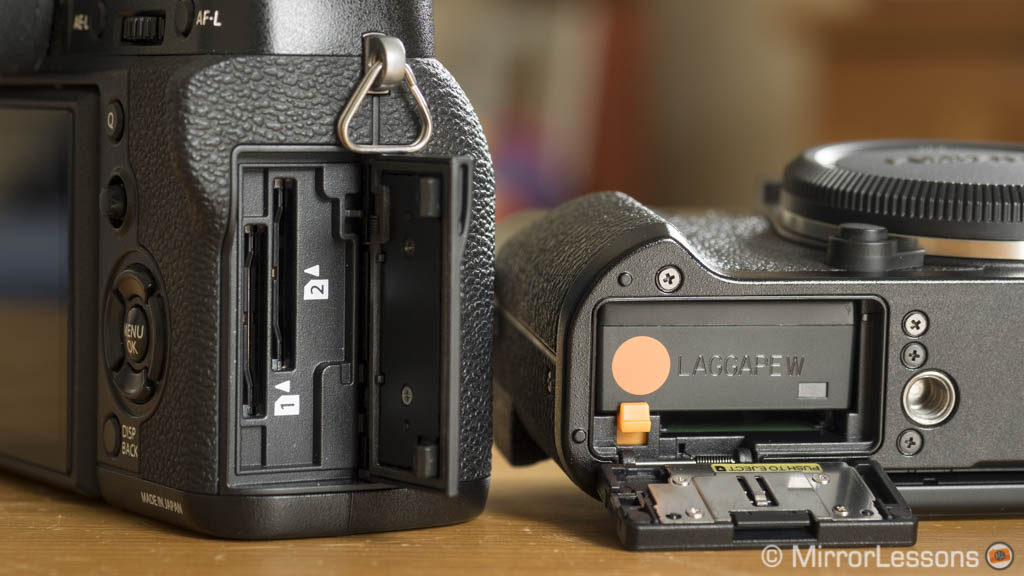
One annoying difference is that the tripod attachment on the X-T20 is de-centred and therefore too close to the battery door. If you are using a tripod and need to change the battery, you have to unmount the plate first unlike on the X-T2.

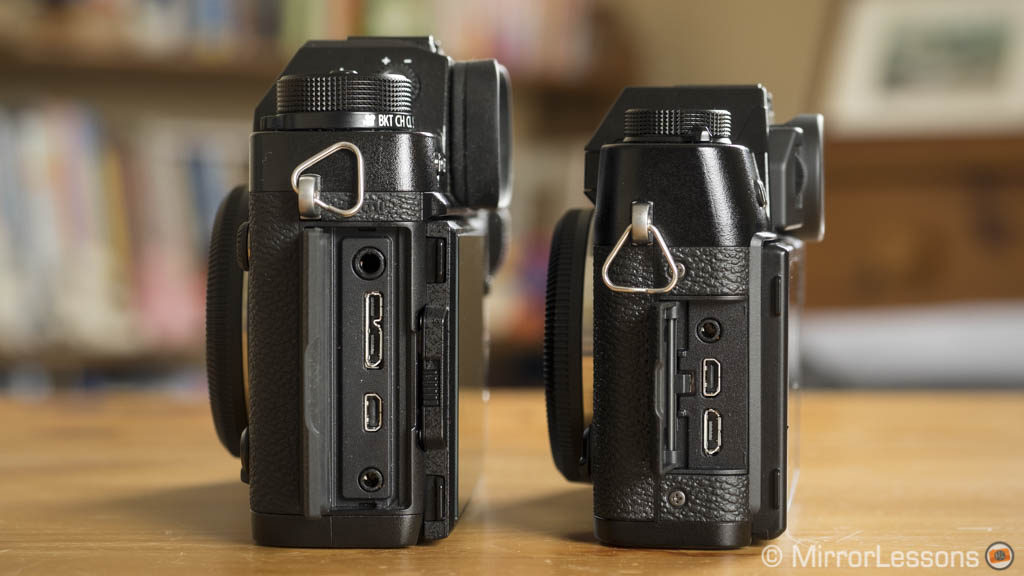
Finally concerning the connections, the X-T2 has microphone and remote inputs, a USB 3.0 port and a Micro HDMI output. The X-T20 has a hybrid remote/mic input (2.5mm) and uses a micro USB 2.0 terminal instead.
Viewfinder and rear monitor
A difference that I personally find quite relevant is the viewfinder.
The X-T2 has one of the best EVFs on the market: it is large (0.5 inches) with a good magnification of 0.77x and a fast refresh rate of 100fps when the Boost mode is selected. Brightness and clarity are excellent thanks to the OLED panel. You also get a larger and softer eyecup that I find more comfortable when wearing glasses.
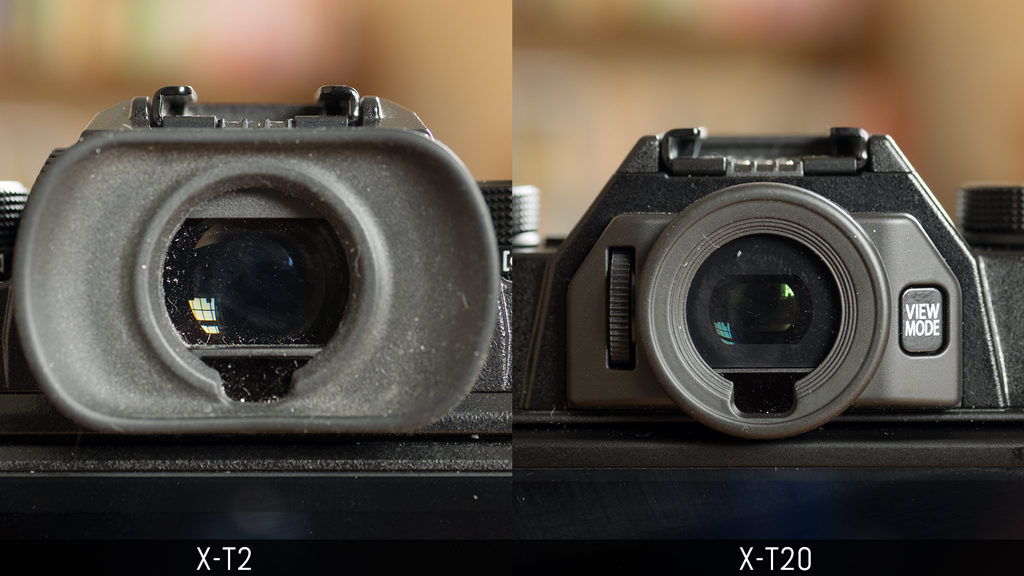
The viewfinder on the X-T20 is good but smaller (0.39 inches) with a lower magnification of 0.62x. It uses an OLED panel as well which means that brightness and contrast remain good. The refresh rate is 54fps.
Small trivia: on the X-T2 you can adjust the brightness of the EVF manually down to -7 as opposed to -5 on the X-T20.
Then we have the rear monitor. We find the same resolution on both cameras but only the X-T20 has a touch sensitive screen.
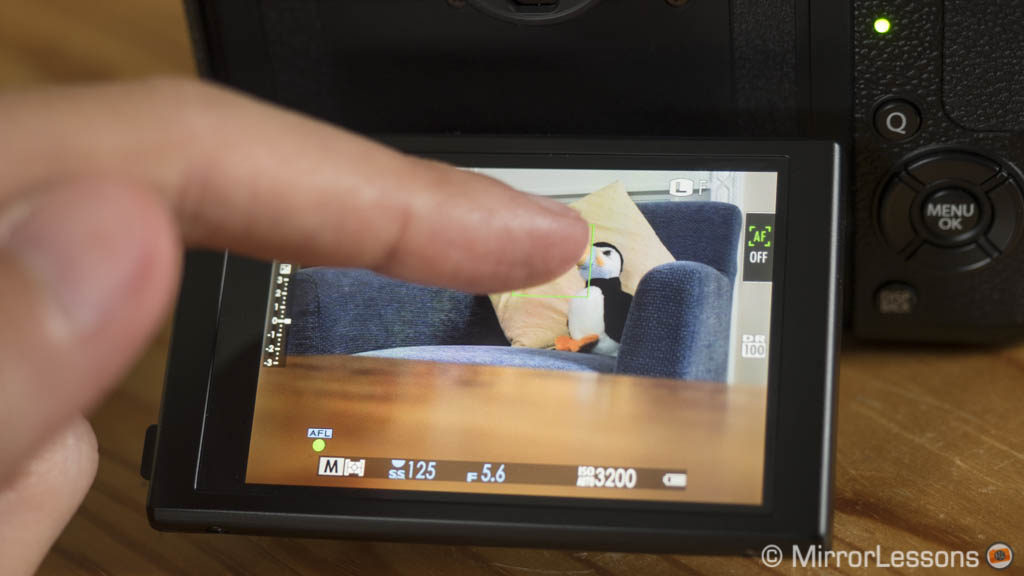
Touch technology allows you to select the focus area, select and focus, or take a picture. You can quickly switch between these three modes or turn it off entirely with the virtual button on the right side of the screen. In playback mode you can swipe through your pictures or pinch to enlarge the image. Firmware 2.0 adds more options like the possibility to select settings in the Q menu.
The touch operation is precise and reliable and can be used during video recording as well. Firmware 1.10 added an extra function on the X-T20: you can use the touch panel operations while framing with the viewfinder, including moving the AF area. However I find it to be a little bit too slow for my taste and I prefer to stick with the 4-way D-Pad when it comes to the AF point.
The X-T2 doesn’t feature touch sensitivity but the monitor can be orientated on three axes which is interesting when composing in vertical/portrait orientation. The X-T20 has a standard tilting mechanism.
Small trivia: on the X-T2 you can select “Eye Sensor + LCD Image Display” from the view modes which automatically displays the images taken on the LCD while the EVF can be used for a quick look.
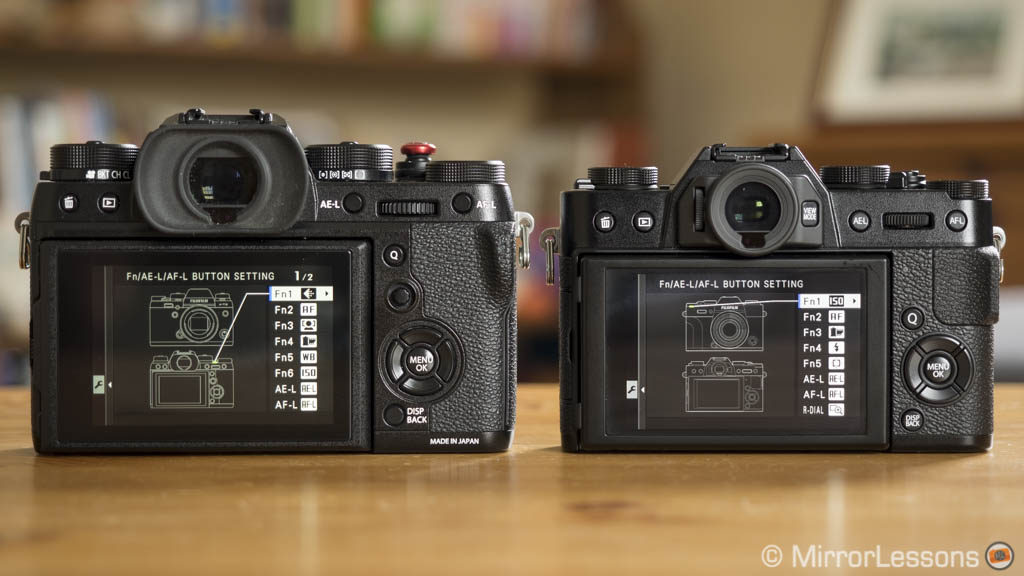
External controls and customisation
The Fujifilm X-T2 is the company’s best achievement so far when it comes to ease of use and customisation, and it is also one of the most enjoyable mirrorless cameras I’ve used to date.
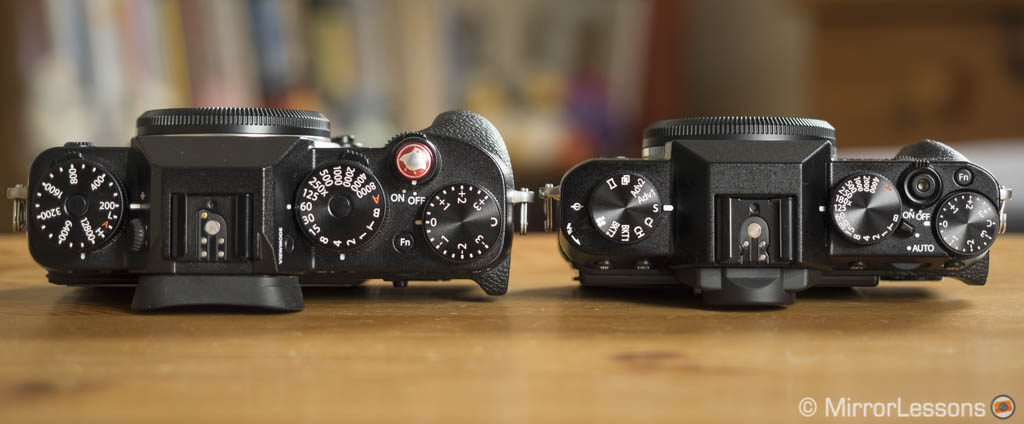

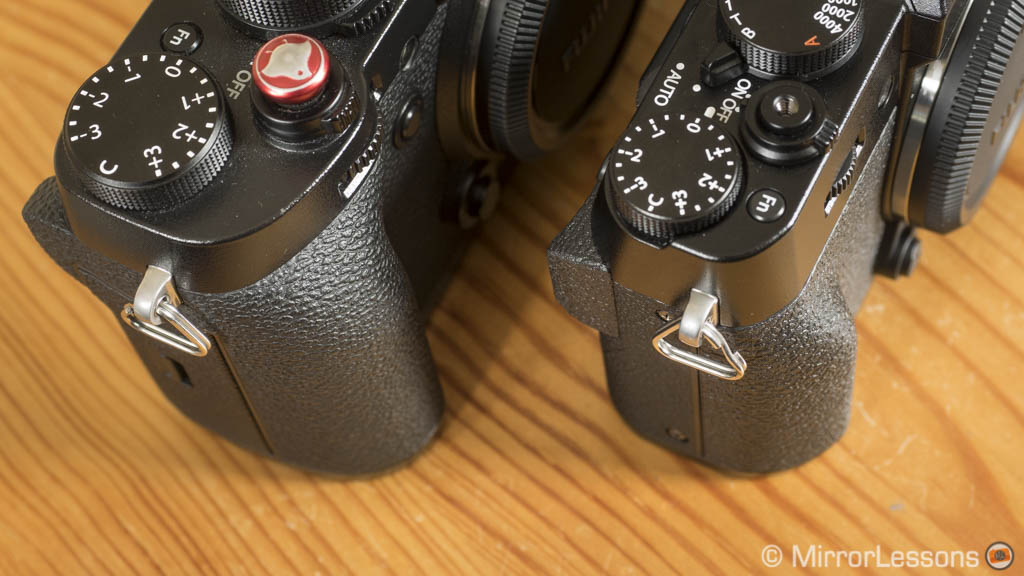
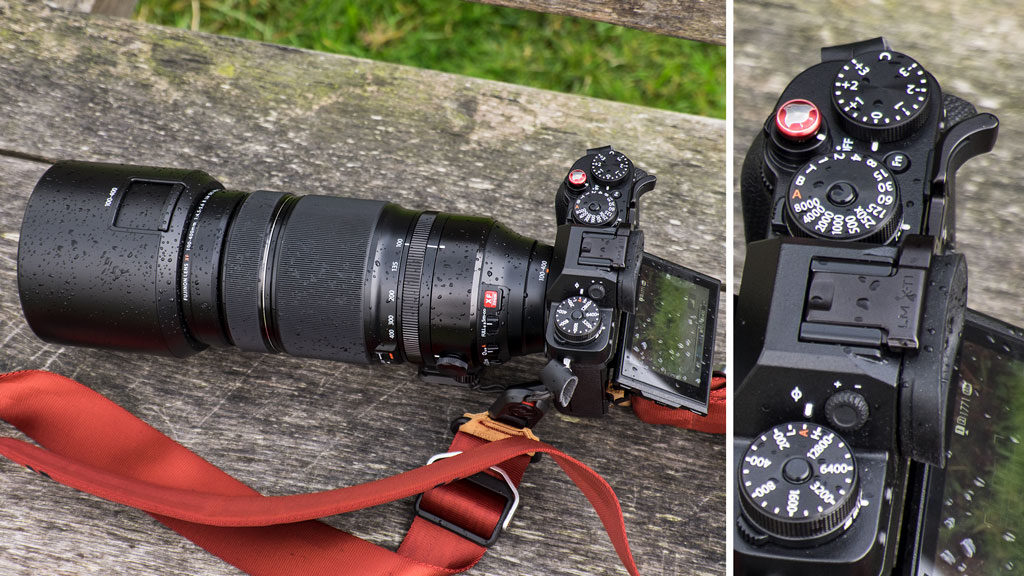
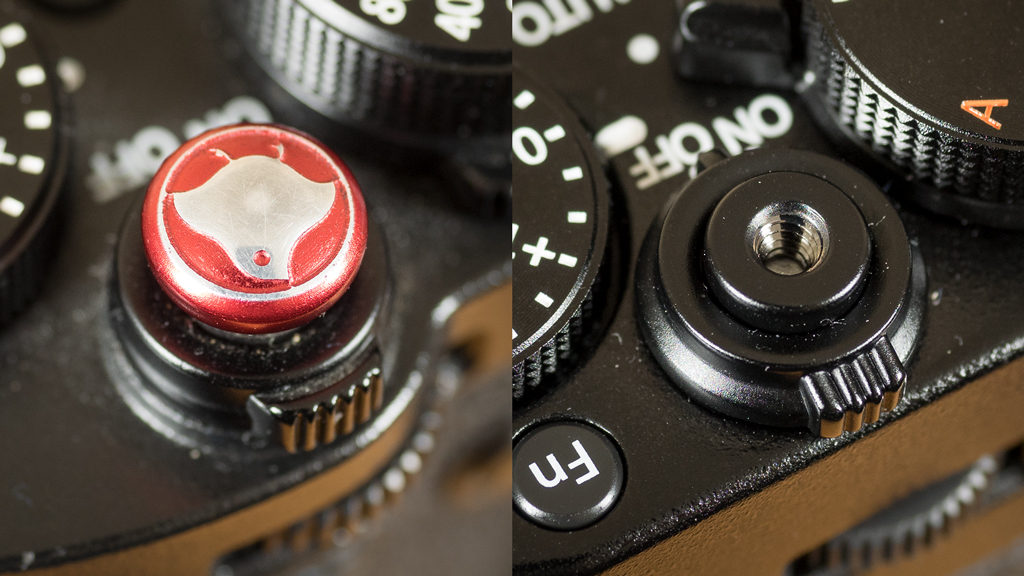
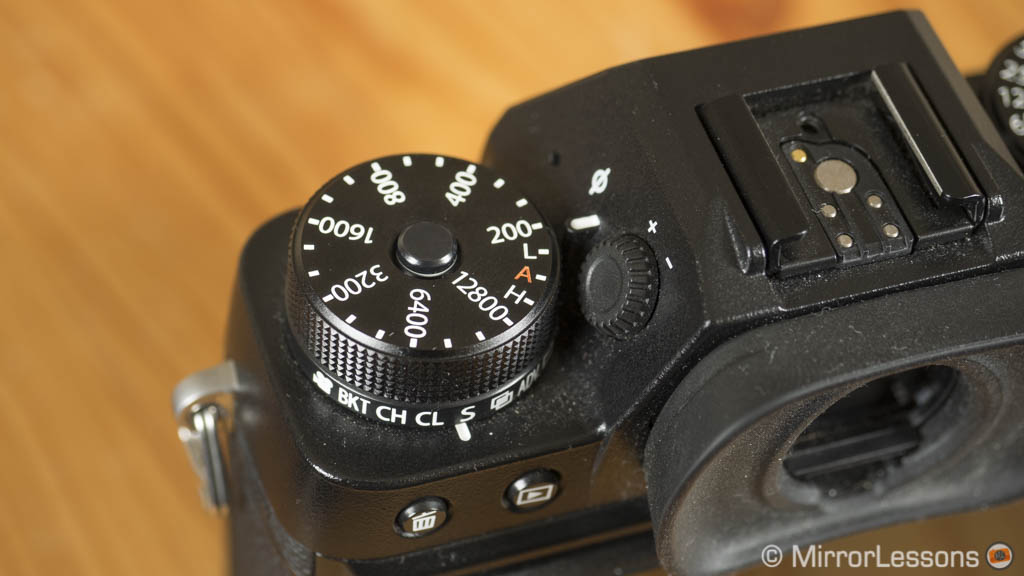
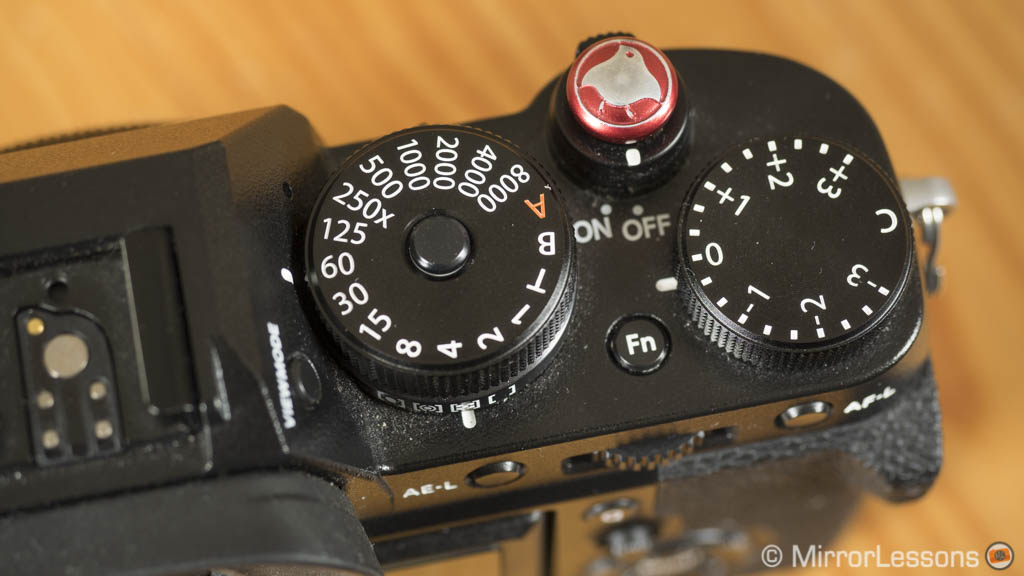
The flagship distinguishes itself with its ISO dial, as well as the sub dials for the various shooting modes and metering. The ISO and shutter speed dials can be locked or unlocked thanks to their centre button.
Small trivia: if you set the ISO dial to A on the X-T2, you can use the front command dial to change the values instead (you need to set it up in the menu first).
The X-T20 does lack a few extra dials, buttons and options in comparison to the X-T2 but remains a straightforward camera to use nonetheless.
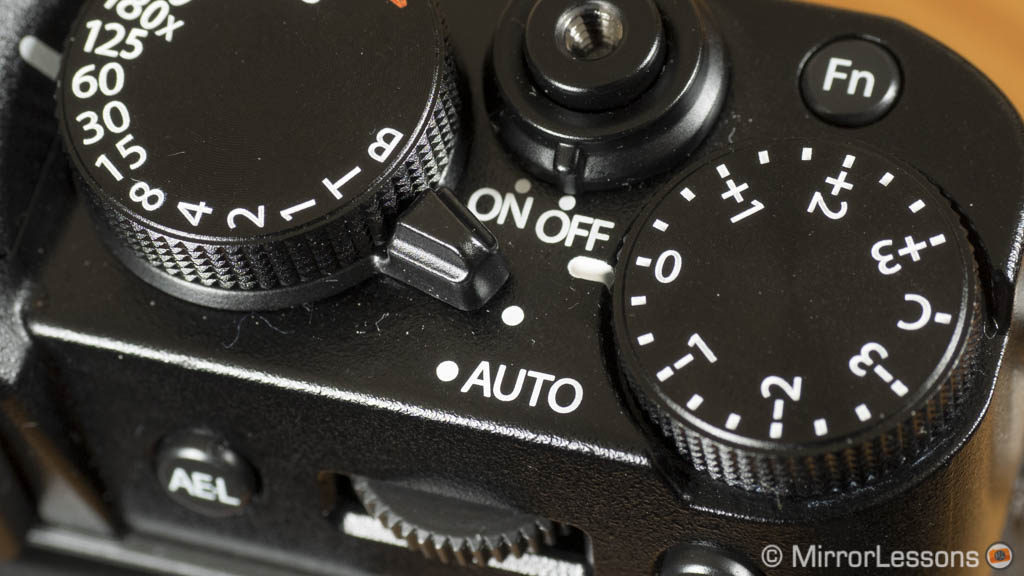
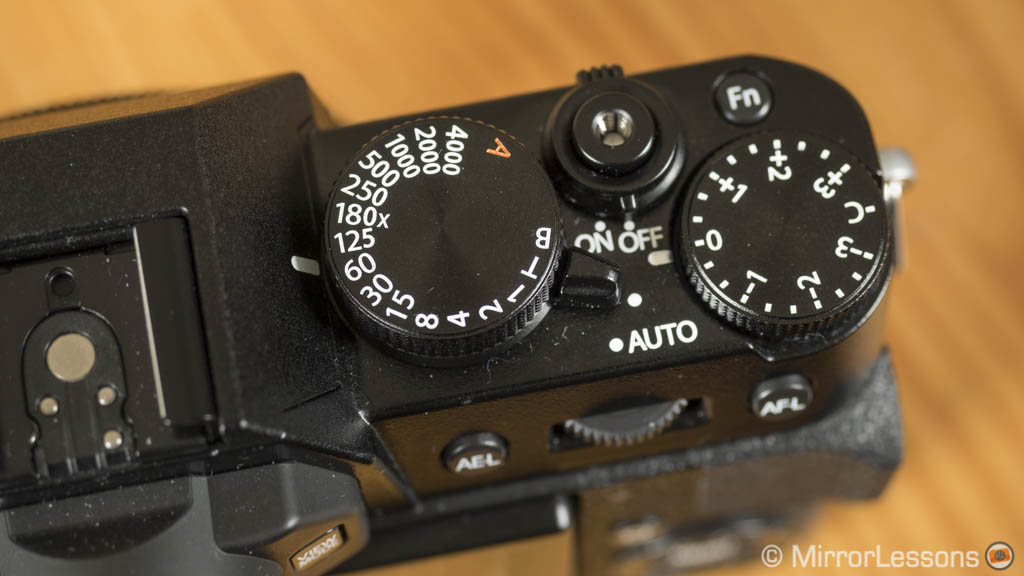
To control ISO or metering you need to assign them to a function button or use the Q menu. There is a handy shooting mode dial on the top left that has two additional steps in comparison to the sub-dial of the X-T2: you find two bracketing modes and two advanced modes that can be configured in the menu.

Because the X-T20 targets beginners as well, it has an extra lever on top that allows you to switch to an automatic mode. You can then choose different scenes with the front command dial depending on the genre you are photographing (sports, landscapes, portraits, etc.) and the camera will pick the appropriate settings for you. You can still use the exposure compensation dial and focus with the touch screen.
The X-T2 doesn’t have an Auto mode and the only thing that comes close is putting the ISO, shutter speed and aperture dials to A.
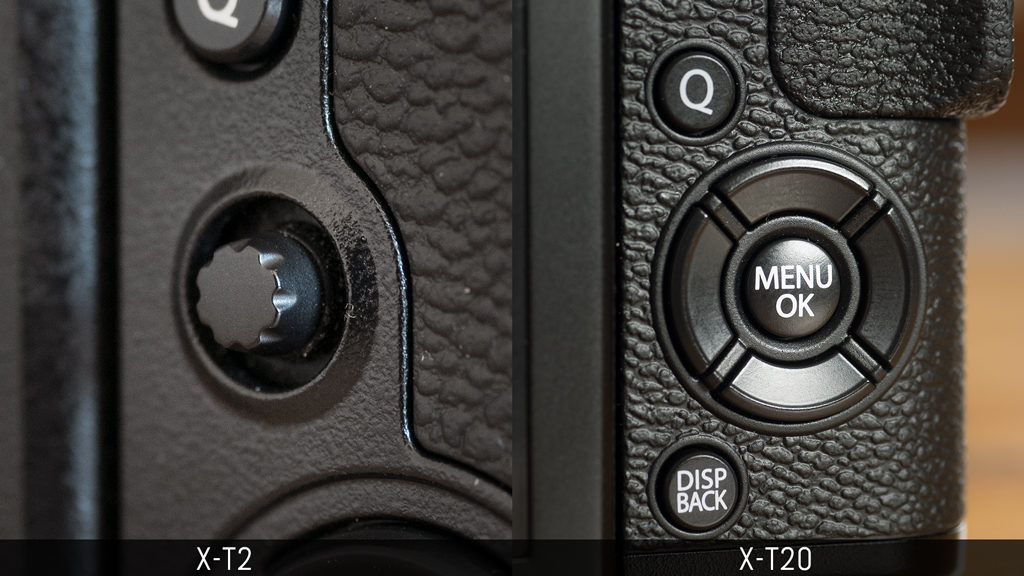
Another difference is the presence of an AF joystick on the X-T2. On the X-T20, you can either choose to use the four buttons of the rear pad directly (which means you lose 4 Fn buttons) or call the focus area with one button first and use the four-way pad to move its position.
Small trivia: the X-T2 has an additional AF mode called “ALL” that allows you to switch between all focus area settings by using the Command Dial.
As for the similarities, both cameras have the AF/MF mode selector on the front and a shutter speed dial that works in 1Ev steps. The X-T20 has an extra 180x step which refers to the maximum sync speed with flash.
If you want to adjust the shutter speed in 1/3 Ev steps, you can use one of the two command dials. Note that the X-T2 allows you to block these 1/3 steps if you’re afraid you might change the values inadvertately.
The exposure compensation dials work in ±3Ev but you can expand it to ±5Ev via the C step and adjust it with the command dial. There are two command dials (front and rear) on both cameras as well as the four-way pad near the LCD screen.
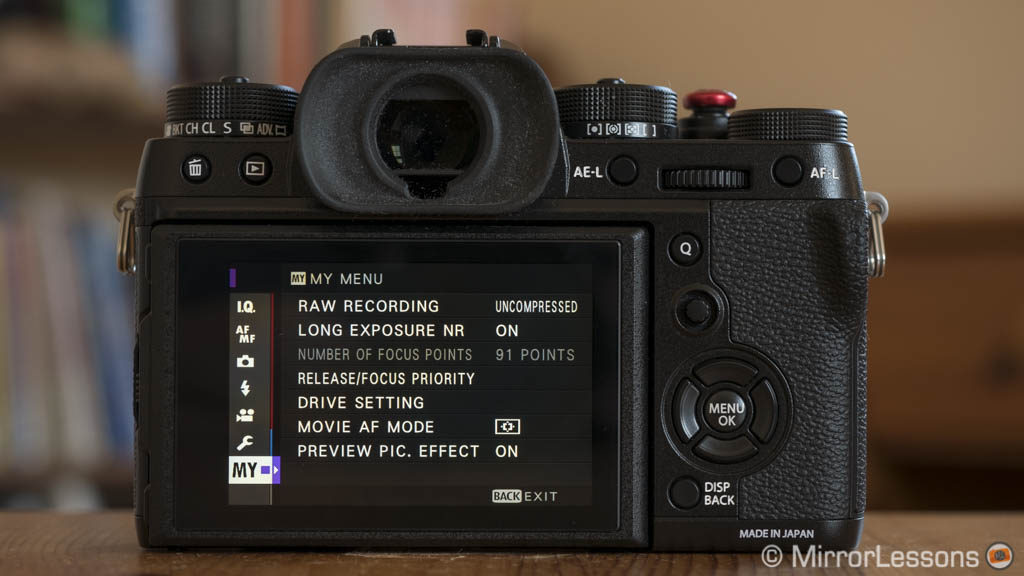
The Quick menu is the same with 16 boxes that can be personalised. The menu system includes the My Menu page where you can add shortcuts to your favourite settings.
The X-T2 has 9 function buttons including one on the front near the AF illuminator light. The X-T20 has 8 function buttons. Note that among these configurable buttons you will find the rear command dial that can be pressed to activate the desired function.
You can configure up to 7 Custom Settings on both cameras. You can save parameters concerning the image quality (sharpness, film simulation, etc), as well as the ISO value on the X-T20. However only the X-T2 allows you to input a custom name for those saved preferences.
Small trivia: the X-T2 has a Lock function that can lock either all the buttons or a limited number related to a specific function you want to render inoperative.
The latest firmware updates added extra customisation like the possibility to change the location and size of the information displayed on the EVF and LCD screens.
Image quality
Because the image quality is exactly the same, I won’t analyse side-by-side images in-depth. Rather I’ll share a selection of the best photographs I’ve taken so far with the two cameras in various conditions.
The sensor is a 24MP X-Trans III CMOS chip powered by the X-Processor Pro engine, which are the same exact specifications found on the X-Pro2 and X100F.
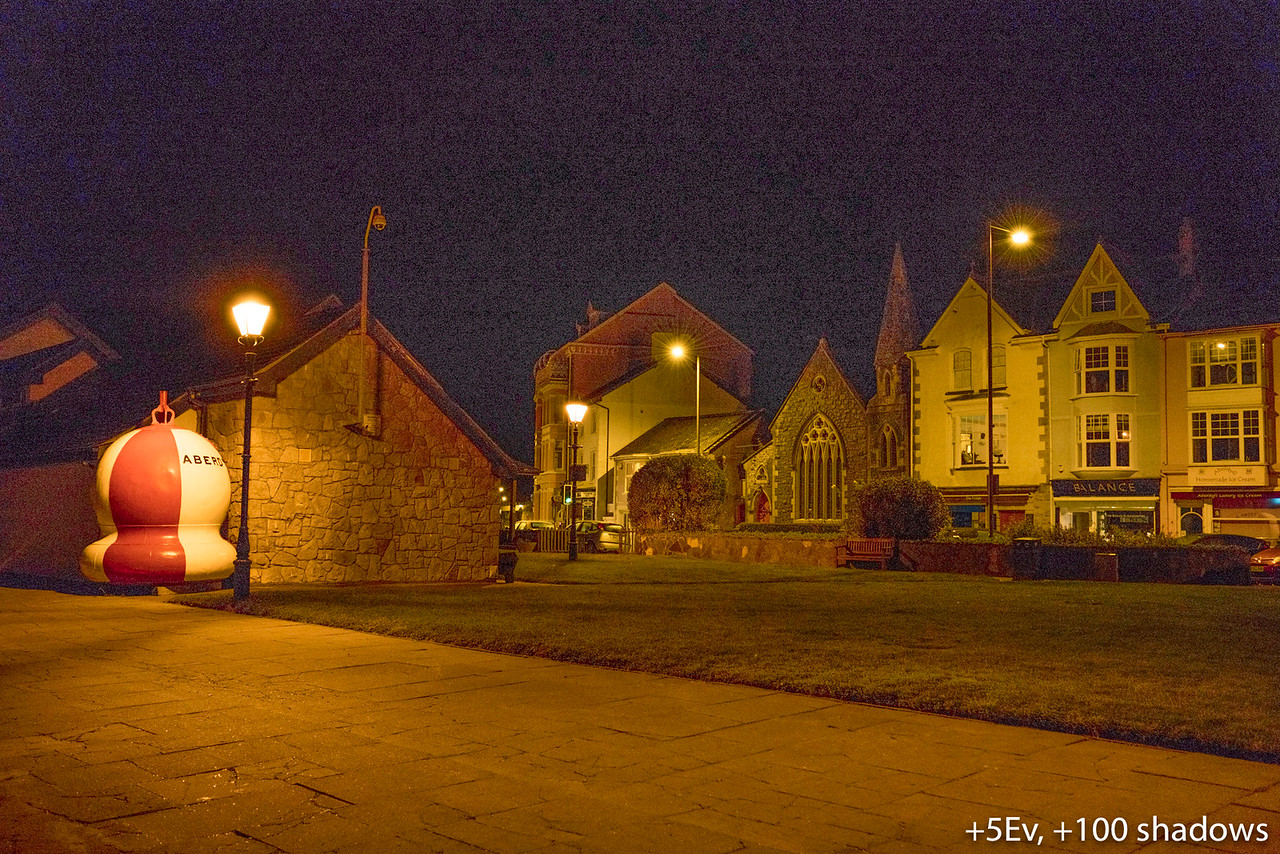
Dynamic range doesn’t disappoint and both the X-T2 and X-T20 are among the best APS-C cameras you can find today. You can recover a good amount of highlight information and opening the shadows in post production doesn’t produce too much noise even when noise reduction is kept to low.


Both cameras offer the option of shooting RAW in uncompressed or lossless compressed which reduces the file size by almost half without compromising the quality. As you can see in the example below, an extreme exposure recovery with Lightroom produces identical results with both files.


The native sensitivity starts at 200 ISO and goes up to 12800. The results are excellent up to 6400 but even the highest value of 12800 is very usable.
Another characteristic of the X-Trans sensor is that it is ISO invariant which means that you can choose to expose your image correctly by selecting the correct ISO level or bring back the correct brightness (exposure recovery) in post production without affecting the quality.

Below you can see an example at 6400 ISO with noise reduction set to Off, then On, using Adobe Lightroom. Even without NR, colour noise is almost absent and the results are identical on the two cameras as expected.


The extended “push” values go up 25600 and 51200 ISO but there the noise becomes more invasive and you lose some colour information as well.
Also note the that highest values remain underexposed by one stop when using the RAW file. For the low “pull” extended values, the X-T2 gives you more options (ISO 100, 125 and 160) whereas the X-T20 only offers the 100 step. Auto ISO with three presents and minimum shutter speed control are available too.
Note: if you are curious to see the same image taken at all high ISO values, you can check this gallery made with the X-T20.
Naturally both cameras include the full series of film simulation modes which are essentially picture profiles with a lovely colour palette. Some of my favourites are Astia, Classic Chrome and Acros. For each you can also select a grain effect with two levels (weak and strong).


The SOOC JPG quality is very good and you can control different settings including saturation, sharpness, shadows, highlights and noise reduction. The DR setting extends the dynamic range when shooting at ISO 400 and 800.
Note that increasing sharpness too much can give your portraits an overly detailed look (I don’t go past +1 personally). At high ISOs, Noise Reduction can be aggressive if set to a value higher than +1 or +2.

The auto white balance works well on both cameras. When using manual white balance, the X-T2/X-Pro2 tend to produce a greenish tint unless you tweak the WB Shift setting.
The X-T20 seems to have a more natural rendering and doesn’t require any extra adjustments. It is something I noticed for video as well which suggests that Fujifilm may have made some minor changes in the image processor of the new camera.


The difference above is relevant if you like to have perfect JPGs straight out of camera. Remember that the cameras include RAW conversion so you can shoot RAW+JPG and if you are not satisfied with colours or the white balance, you can produce a second JPG out of the RAW file in the playback menu.
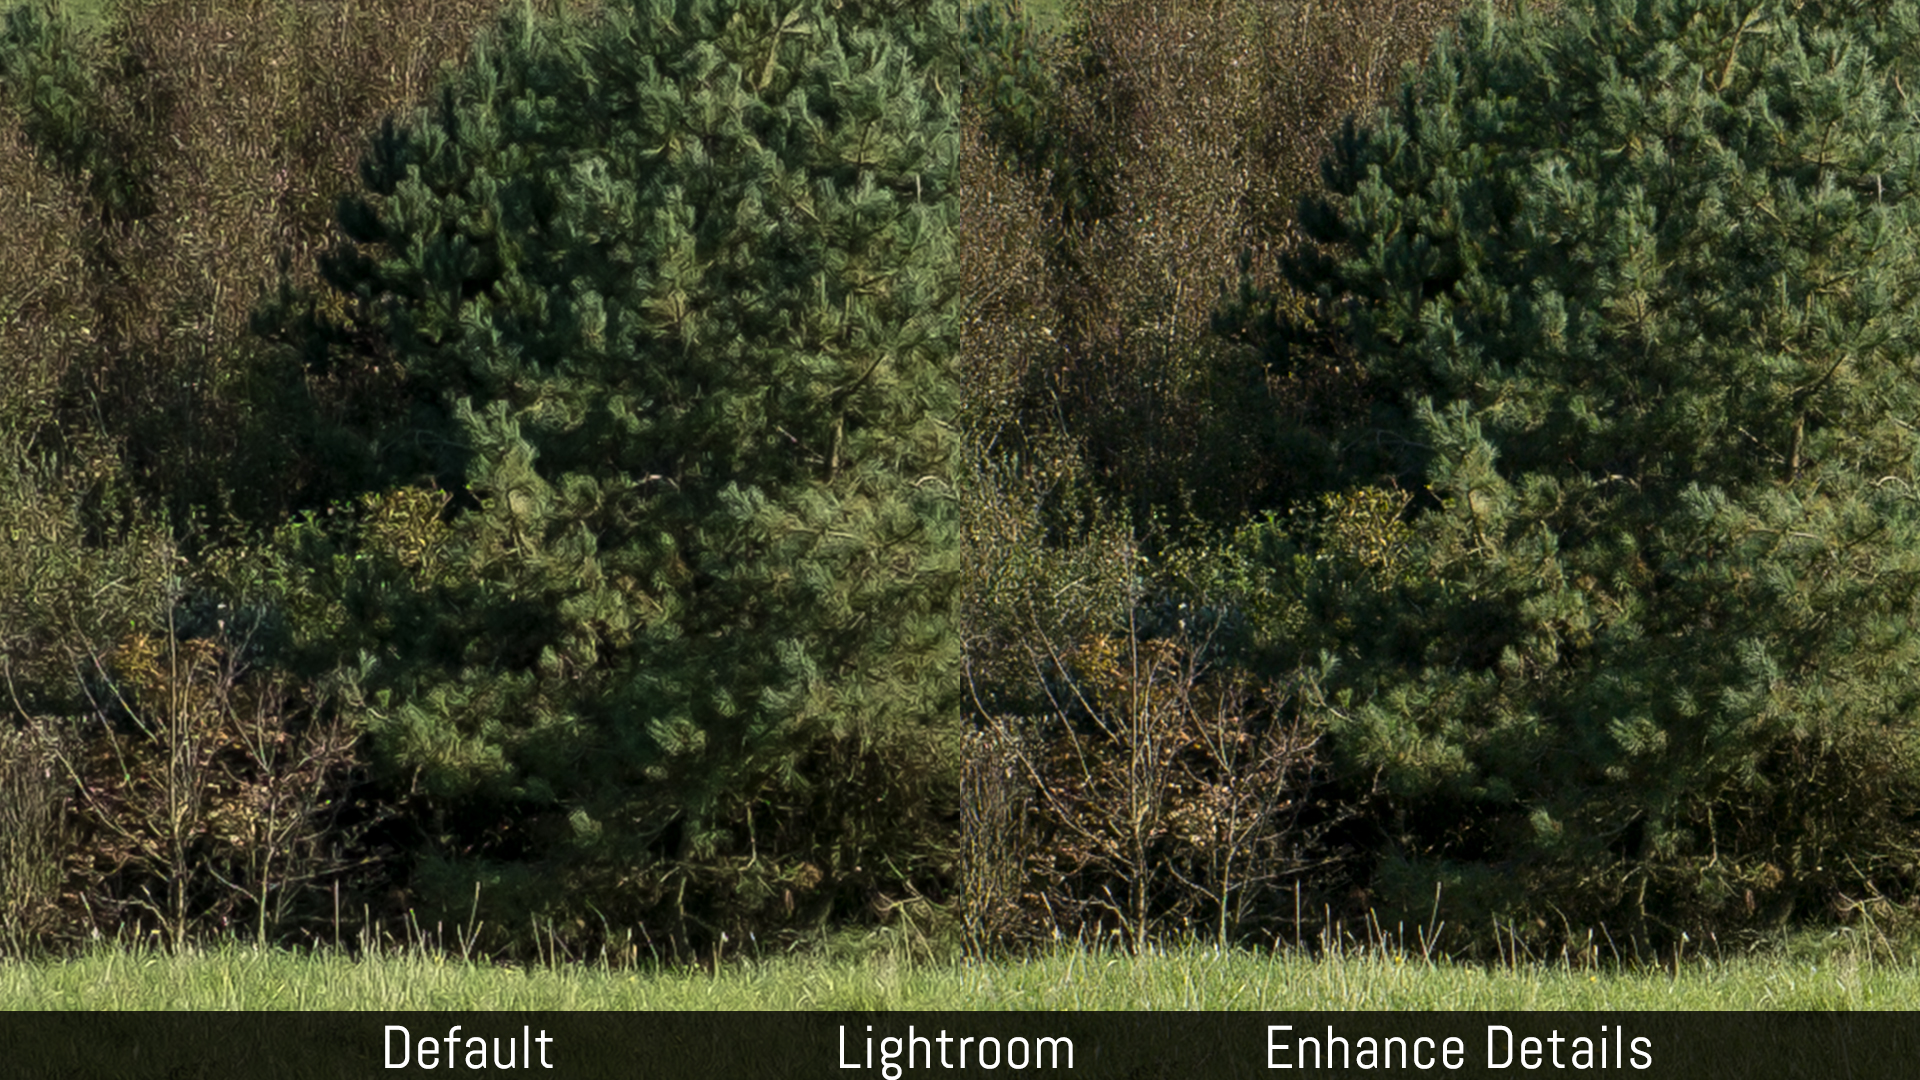
Let’s conclude with two notes concerning the Fuji X-Trans technology and this specific 24MP sensor that I already mentioned in other comparisons.
First we have the RAW post processing software. Lightroom* does a good job and I use it most of the time but if you want superior sharpness and finer details, there are other software such as Iridient Developer that do a better job. The latter also helps to reduce the so-called “watercolour effect” that washes out small elements in the background.


*Note: The version 8.2 of the Adobe software has a new function called Enhance Details that improves the rendering of Fuji X-Trans RAW files. The process can take some time if your computer is not very powerful and a new file is created once the procedure is completed.
Second we have the sensor flare that I first spotted on the X-Pro2 and then the X-T2.
In certain backlit conditions when the light rays enter at a specific angle inside the lens (easier to spot in the late afternoon), the cameras produce a purple flare and a grid artefact. The good news is that Fujifilm seems to have corrected the problem with the X-T20. I performed a few side-by-side tests: the flare was always easy to spot on the X-T2 but not on the X-T20.


Are the purple flare/grid artefacts completely gone on the X-T20? Well, I do have a few examples where you can see a small trace but overall the problem seems to be much more contained than on the X-T2. Hopefully this means that Fujifilm has minimised the issue and that the latest X-T2/X-Pro2 models to come out of the factory aren’t affected either.


As for current X-T2/X-Pro2 owners who are affected by this problem, it is worth remembering that it only takes a slight re-adjustment of the composition to avoid the purple flare (which is visible in the EVF/LCD) and get rid of the problem.


Single and continuous autofocus
In addition to the sensor, the X-T2 and X-T20 also share the same autofocus technology. It features a mix of contrast and phase detection points and you can choose between a 13×25 grid (325 points) or 7×13 grid (91 points). Note that when selecting Zone AF or Wide/Tracking with CH continuous shooting, only the 49 native phase detection points at the centre can be used.


Focusing is fast in Single AF mode, regardless of the light conditions. Face and Eye detection work well but occasionally the cameras can confuse the eyes with the nose or other parts of the person’s face, or lose track of the face if the person is moving about too much.

Note that older lenses have a slow AF motor so the speed can decrease a little and both cameras occasionally misfocus, even in single mode.
The various AF points and options are the same on both cameras. You can choose between a single area (6 sizes available for the X-T2, five for the X-T20), Zone AF (3×3, 5×5 or 7×7 grids) and Wide/Tracking. Zone AF is my favourite for action and birds in flight.


Small trivia: the X-T2 has an extra setting called Store AF Mode By Orientation. It allows you to use different focus points and focus modes depending on the orientation of your camera (landscape or portrait).
The performance is excellent in continuous mode and is one of the best you can find on a mirrorless camera.
I’ve shot numerous sports events with the X-T2 and as expected I found the same performance with the X-T20 during a downhill MTB event.


Both cameras feature the AF-C Custom Settings to configure the behaviour of the autofocus according to the type of action being photographed. They control three parameters – Tracking sensitivity, Speed tracking sensitivity and Zone Area Switching – and can be useful when there are obstacles between you and the subject (Set 2) or to have the most reactive speed possible when the subject appears in your frame (Set 4).
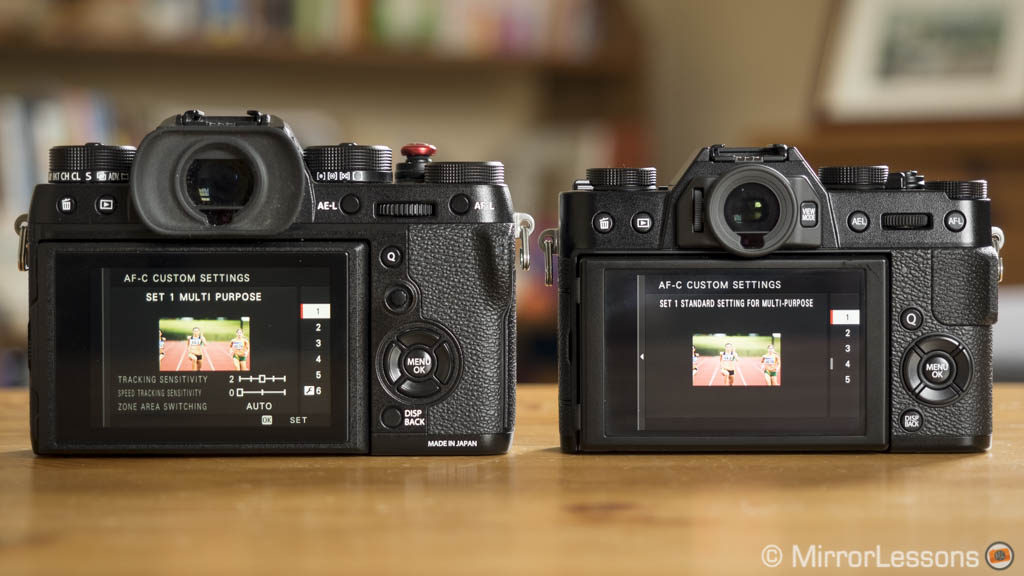
You can choose between five sets but only the X-T2 has a sixth option that can be customised manually. That being said, X-T20 owners will be fine with the five presets. I found myself in need of the sixth set only once (for birds in flight) and my parameters were very similar to Set 4.
They AF-C Custom Settings can increase your keeper rate and chance of success but keep in mind that they can also have the opposite effect if you select the wrong one. If the subject behaves more erratically or if you have doubts as to which setting to choose, Set 1 – which has been designed for multi-purpose use – is pretty reliable. Unless you really need to improve the AF behaviour, it is better to stick with it. For the MTB shots seen above, I used Set 3.

Set 1 or Set 5 work better for group sports.

Set 4 works well for BIF
Note: the latest firmware updates have improved the autofocus algorithm. The cameras can track a subject twice as fast and 50% smaller than before, but I didn’t find a substantial difference. That being said it could prove interesting for more difficult situations like birds in flight. The X-T2 has received further algorithm tweaks with firmware 4.10 including more low light sensitivity for the phase detection points (-1Ev and minimum aperture of f/11).
Shutter, continuous shooting speed and buffer
The mechanical shutter sound is discreet on both cameras but they produce a slightly different type of noise, with the one of the X-T20 being more acute. The X-T2 mechanism is rated for 150,000 cycles while Fujifilm doesn’t reveal the same details for the X-T20. That said, these numbers are just a reference and don’t necessarily reflect the real lifespan of the camera.
The first difference concerns the fastest mechanical shutter speed: the X-T2 can go as fast a 1/8000s while the X-T20 stops at 1/4000s.
These maximum values can be overcome with the electronic shutter where both cameras go as fast as 1/32000s.
Concerning long exposures, the X-T20 can go as slow as 30 seconds unless you use the Bulb mode (up to 60 min). The X-T2 can shoot down to 15 minutes with the T mode or 60 minutes with the Bulb mode.
There are two types of burst modes: CH and CL. The first gives you faster speed but no live view (the last picture taken is shown instead). The second gives you live view with blackouts but the speed decreases to 5fps.
In CH mode both cameras can go as fast as 8fps. To increase the speed to 14fps, you need to select the electronic shutter. Note that the latter can produce distortion with fast subjects/when panning fast and banding under certain types of artificial lights. The mechanical speed can reach 11fps on the X-T2 with the optional battery grip. Firmware 4.10 adds a flick reduction mode on the X-T2, useful when shooting indoor under artificial sources such as fluorescent light.

An example of distortion due to rolling shutter
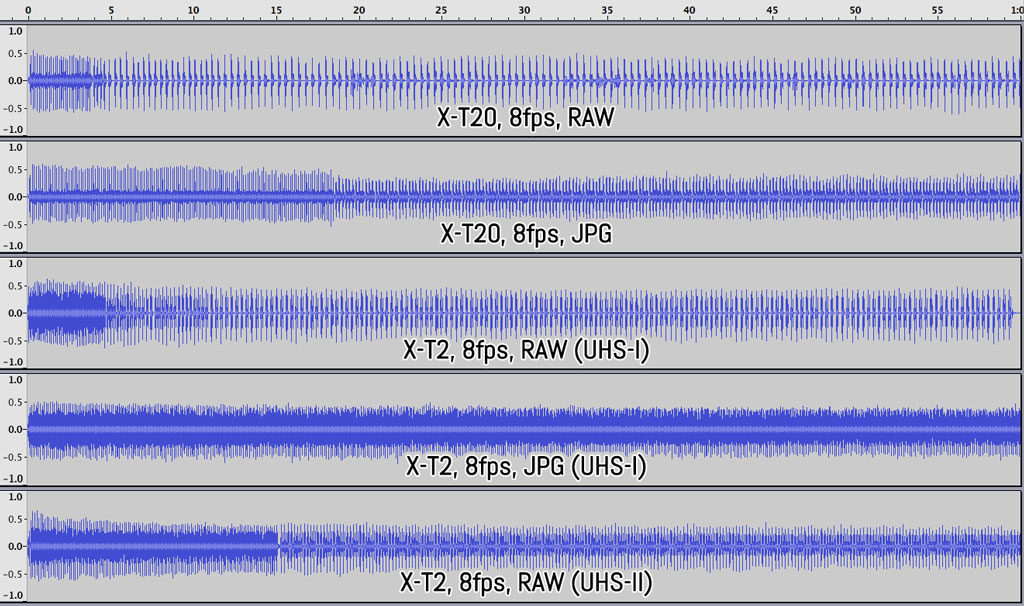
To test the buffer capabilities, I ran a side-by-side test at 8fps using the same memory card. Overall we can notice that both cameras do well up to 4s with RAW before decreasing the speed when using an UHS-I card. The X-T20 speed decreases more considerably. With JPGs, the X-T2 can shoot at full speed for more than a minute while the X-T20 slows down after 20s approximately. With a UHS-II card the X-T2 can shoot at full speed up to 15s with RAW files.
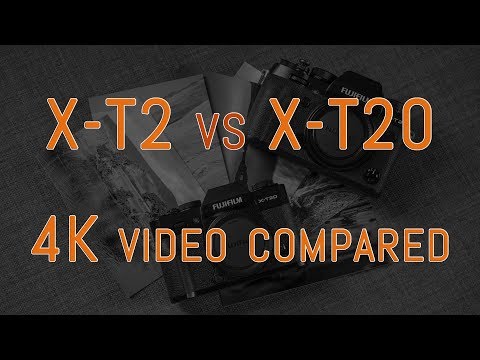
Video capabilities
The X-T2 and X-T20 can record 4K video at 100mbps and up to 30fps. In Full HD, they can go up to 60fps.
The continuous autofocus – which first impressed me on the X-T2 – performs as quickly and as accurately on the X-T20.
The AF-C Custom settings work for video as well but you can only use face detection in 1080p, which doesn’t perform as well as for stills: often both cameras fail to detect the face or lose track of the subject.
There are a few differences worth highlighting concerning the video quality.
First, the X-T2 records 4K by performing a slight crop on the sensor (1.17x) which means it does full pixel readout to record more detailed footage. The X-T20 uses the entire width so there are no changes to the field of view. However the camera sub-samples so the quality decreases a little. Fine details aren’t as crisp in the X-T20 footage and there is a little more noise at high ISOs. The smaller camera has more rolling shutter as well.
Below you can watch a quick video comparison between the two cameras.
The film simulation profiles give you beautiful colours. You can change the highlight and shadow settings between -2 and +4 to have more or less contrast. Keep in mind that on some occasions the negative values can create unnatural results such as when dealing with skin tones and portraits.
Only the X-T2 has the option of a Log profile (F-Log) to record the widest dynamic range possible. It can be recorded internally on the SD card (Firmware 4.10) or via the HDMI if you want to use an external recorder. Both cameras output a 4:2:2 8-bit signal via the HDMI port.
The X-T2 has a few additional advantages in comparison to the X-T20 if you are looking for more options and control:
- 120p high-speed video in Full HD (firmware 4.10)
- you can set the audio input volume in 20 steps instead of 4
- you can choose which card slot to record the video files to
- ISO values can be changed while recording
- it has a 3.5mm jack mic input and you get a headphone output with the optional battery grip
- it can extend the recording time from 10min (4K) or 15min (1080p) to 30min with the optional battery grip
Note that the X-T20 does have a microphone input but it’s a 2.5mm port which can be used for a remote trigger as well.
Flash and other features
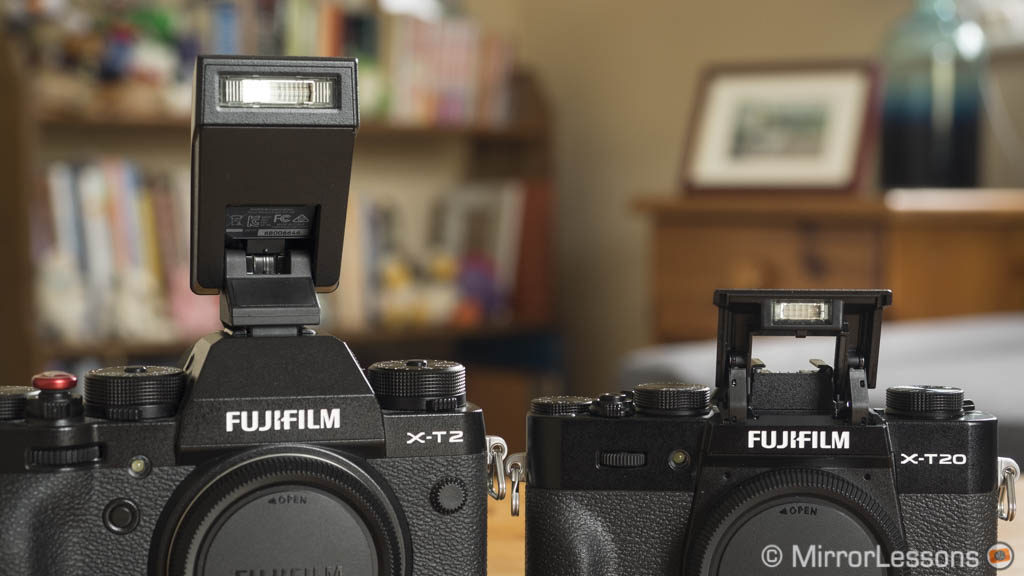
The X-T2 has a maximum sync speed of 1/250s while the X-T20 stops at 1/180s. The flagship camera lacks a built-in flash unlike the X-T20 but is supplied with the little EF-X8 unit.
The two cameras can work in TTL, Commander or Manual modes. You get options such as slow TTL, Front or Rear Sync curtain, compensation up to ±2Ev and three Red-Eye removal settings. The TTL-Lock mode allows you to lock TTL metering according to the last image taken.
They are compatible with the recent EF-X500 flash and all its functions including wireless shooting and High Speed Sync. You can also find TTL compatible flashes from third-party manufacturers but be aware that some of them might have a few limitations for HSS or wireless communication. Firmware 3.0 on the X-T2 brings compatibility with select third party triggers and flashes with HSS and TTL support (ProFoto Air Remote for example).
When it comes to extra features, both cameras share an almost identical list in which we find:
- Metering: four options with Average, Spot, Centre-Weighted and Multi
- Manual Focus assists: magnification, peaking (3 colours with two intensities each) or Digital Split Image (monochrome or colour)
- Panorama: two angles and four directions available (JPG only)
- Multiple exposure: 2 images (JPG only)
- Advanced Filters: 13 effects like Toy Camera, partial colour, etc
- Interval Timer Shooting: you can choose up to 999 shots or shoot indefinitely, and delay the start to a certain time
- Wifi: you can control the cameras remotely via a mobile device, transfer JPGs or use the Fujifilm Instax printer
- RAW Conversion: adjust exposure, white balance and other settings and save it as a JPG file
- Pixel mapping: to map out dead pixels
- Copyright information: save your name and copyright information to the EXIF data
- Fujifilm X RAW Studio: the software allows you to connect the X-T2 via USB and process RAW files with your computer by using the camera’s X-Processor Pro engine. It’s identical to the built-in RAW conversion feature but with the added benefit of using your computer monitor and a batch processing option.
- Fujifilm X Acquire: the software allows you to save and restore your camera settings.
The X-T2 reserves a few extra settings and options for itself like:
- Dual View: an extra MF assist that splits the screen into two sections with the magnified area on the right.
- Bracketing: ISO, Film Simulation, White Balance or Dynamic Range are available on both cameras with 3 shots each. AE bracketing can be used up to ±3 Ev and 9 shots on the X-T2 while it stops at 3 shots and ±3 Ev on the X-T20.
- Focus Bracketing: added to the X-T2 via firmware 4.10, it allows you to record several shots (up to 999 frames) and vary the focus distance in-between. The focus shift amount can be set in 10 steps.
- Shutter AF and Shutter AE: you can select different settings for the AF-S, AF-C or MF modes
- Voice Memo: you can record a voice memo for a picture up to 30 seconds in Playback mode.
- Tethered shooting: available via USB or wireless connection. You need a third-party Lightroom plugin or software to run it.
Battery life
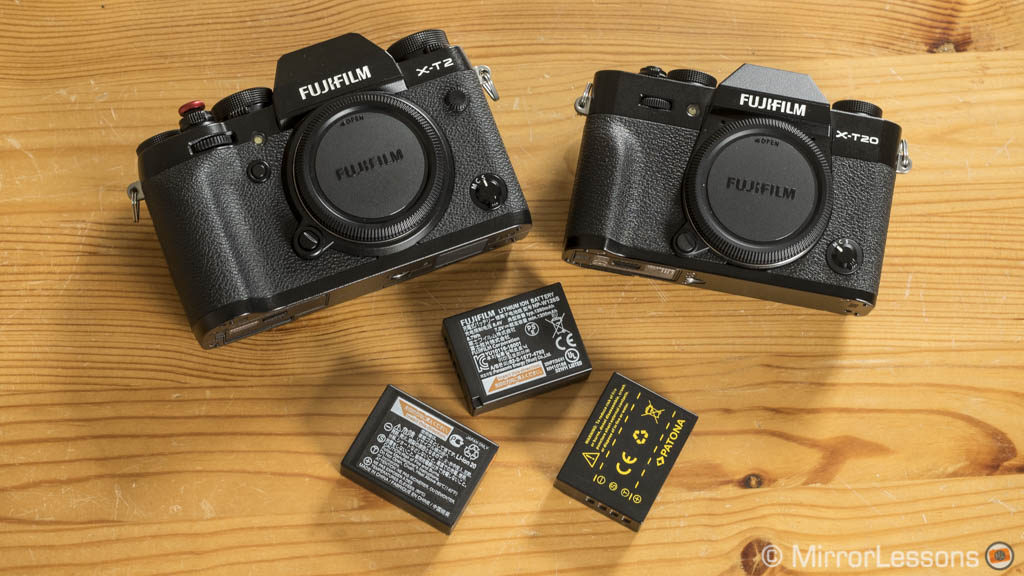
The X-T2 and the X-T20 use the same battery and are supplied with the recent NP-W126S. The performance is similar on both cameras when set to the same default settings. It can decrease a little more quickly if you use the Boost mode on the X-T2 or the High Performance mode on the X-T20.
Naturally the battery life decreases more rapidly when shooting in continuous mode or when recording 4K video. With normal use you can get through the day with one battery, especially if you turn the camera off when you aren’t using it but I would advise one spare battery at least. For intensive shooting involving video, a third battery is a good idea.
Both cameras can be charged via USB and the X-T2 has the option of the VPB-XT2 battery grip where you can house two additional batteries. It can also be used as a double battery charger with the AC-9VS AC adapter.
Price
This is certainly the aspect that could influence your decision more than any of the previous topics. The X-T20 can be found for:
- $850 / £800 / €850 body only*
- $950 / £900 / €950 with the XC 16-50mm kit lens*
- $1150 / £1100 / €1200 with the XF 18-55mm lens*
The X-T2 is almost twice as expensive at $1600 / £1400 / €1600* for the body alone. There is only one kit lens (18-55mm) which increases the price to $1900 / £1650 / €1940*.
Note that you can find additional bundles for the X-T20 (two lenses) or for the X-T2 (battery grip).
*As of June 2017
Conclusion
If we avoid nitpicking over details concerning the design, ergonomics, buttons, dials and minor settings, summarising this comparison becomes quite easy.
The X-T20 gives you the same image quality and autofocus performance as the X-T2 for almost half the price. It’s a hard proposition to beat and those who consider the lack of a touch screen a “deal-breaker” will be pleased to know that by spending less, they get the one thing the flagship camera does not have. Furthermore, Fujifilm seems to have solved the purple flare issue I’ve experience with the X-Pro2 and X-T2. (Hopefully this means that the latest copies of the flagship models have been fixed as well.)
If we analyse everything each camera has to offer, it becomes clear that the X-T2 retains several advantages. I personally like the larger body and the more prominent grip. Not only does the flagship feel more solid and come with weather-sealing but its EVF is also larger and you have more physical controls. The optional battery grip, larger buffer and dual SD card slot (UHS-II compatible) are all welcome additions for professional work.
The X-T20 is extremely light and when used with small primes, it is surprising how compact it can be. It lacks some minor settings in comparison to the X-T2 but the majority of them could come to the camera via firmware.
The X-T2 has an advantage for video as well: the full pixel readout allows for more sharpness and better high ISO performance and it has less rolling shutter. It also offers more audio control, F-Log via HDMI and the optional battery grip that extends the recording limit in 4K and 1080p.
But all these things aside, your wallet is likely to make that final decision for you. Whichever you choose, you can rest assured that these are two cameras that offer an excellent user experience, are very easy to use, and deliver where it matters the most.
Choose the Fujifilm X-T2 if:
- you want a more robust body and weather-sealing
- you want to work with a larger EVF
- you want better ergonomics and controls as well as a dual SD card slot
- you want better quality for video
- you want an extended battery life via the optional battery grip (which also gives you more video recording time and increases the continuous shooting speed)
Choose the Fujifilm X-T20 if:
- you are on a budget or prefer to spend the extra money on a second lens
- you want something lighter and smaller to carry around (with the right lens)
- you want a touch screen
Check the price of the Fujifilm X-T2 on
Amazon | Amazon UK | B&H Photo | eBay
Check price of the Fujifilm X-T20 on
Amazon | Amazon UK | eBay | B&H Photo
Second-hand Fujifilm cameras on
You may also like:
- Fujifilm X-T2 vs X-T3 – Complete comparison
- Fujifilm X-T1 vs X-T2 – Complete comparison
- Fujifilm X-T1 vs X-T20 – Five key aspects analyzed
- The Best Accessories for the Fuji X-T20 compared
- Fujifilm X-T2 vs X-Pro2 – complete comparison
Sample Images
X-T2


X-T20


