I’ve written about the Sony A7 IV multiple times on this website, but it’s been a while since I had the chance to test a Panasonic camera. Actually, the last time I got my hands on one was back in 2019, when I took the S1R full-frame camera, and the G9 micro four thirds camera, for a trip to Scotland.
It wasn’t my intention to ignore Lumix over the past couple of years, but as an independent and solo camera tester, I simply don’t have the time to try every single product that hits the market. These cameras, despite being pretty cool on paper, aren’t as popular as the ones from Sony, Canon, and Nikon, so I have to be selective.
For the S5 mark II however, I decided to make an effort, not only because some of my readers have been asking for it, but also because Panasonic has finally implemented phase detection autofocus. I’ll explain why this is important in the autofocus section, but in a nutshell, I was curious to see if a Lumix full-frame camera could now compete head-to-head with one of the most popular mirrorless out there.
Ethics statement: the following is based on our personal experience with the A7 IV and S5 II. We were not asked to write anything about this product, nor were we provided any compensation of any kind. Within the article, there are affiliate links. If you buy something after clicking one of these links, we will receive a small commission. To know more about our ethics, you can visit our full disclosure page. Thank you!
Table Of Contents
– Main Specs
1. Design
2. Image Quality
3. High Resolution Mode
4. Autofocus
5. Drive
6. Video
7. Stabilisation
8. Lenses
9. S5 mark II X
10. Price
– Video Review
– Conclusion
Main Specs
S5 II
- Sensor: 24.2MP 35mm format BSI CMOS
- Lens system: L-mount
- Weatherproof: Yes
- Internal Stabilisation: Yes (5-axis)
- Autofocus: Hybrid with phase and contrast detection
- Continuous shooting: 9.7fps, 30fps with electronic shutter
- ISO Sensitivity: 100 – 51,200 ISO (pull 50, push up to 204,800)
- Shutter Speeds: 1/8,000 to 30s, Bulb
- Viewfinder: 0.5in OLED with 3.69M dots, 21mm eye point, 0.78x magnification and 120fps refresh rate
- Rear monitor: Multi-angle 3″ LCD (1.84M dots) with touch sensitivity
- Movie recording: 6K 30p open gate, 5.9K 30p, 4K up to 60p, Full HD up to 180p, 10-bit 4:2:2 internal, V-Log
- Built-in Flash: No
- Extra Features: WiFi, Bluetooth, Focus Bracketing, High Resolution Mode, Intervalometer, Dual SD slots
- Dimensions: 134.3 x 102.3 x 90.1 mm
- Weight: 740g (including battery and memory card)
- Firmware version: 2.0
- Release: 2023
A7 IV
- Sensor: 33.0MP 35mm format BSI Exmor R CMOS
- Lens system: E-mount
- Weatherproof: Yes
- Internal Stabilisation: Yes (5-axis)
- Autofocus: Hybrid with 759 phase and 425 contrast detection points
- Continuous shooting: 10fps
- ISO Sensitivity: 100 – 51,200 ISO (pull 50, push up to 204,800)
- Shutter Speeds: 1/8,000 to 30s, Bulb
- Viewfinder: 0.5in OLED with 3.69M dots, 23mm eye point, 0.78x magnification and 120fps refresh rate
- Rear monitor: Multi-angle 3″ LCD (1.04M dots) with touch sensitivity
- Movie recording: 4K up to 60fps, Full HD up to 120fps, 10-bit 4:2:2 internal, S-Log, S-Cinetone and HLG gamma
- Built-in Flash: No
- Extra Features: WiFi, Bluetooth, Bracketing, Intervalometer, Tethering, USB streaming, Dual Memory card slots
- Dimensions: 131.3 x 96.4 x 79.8mm
- Weight: 658g (including battery and memory card)
- Firmware version: 2.00
- Release: 2021
1. Design and Ease of Use
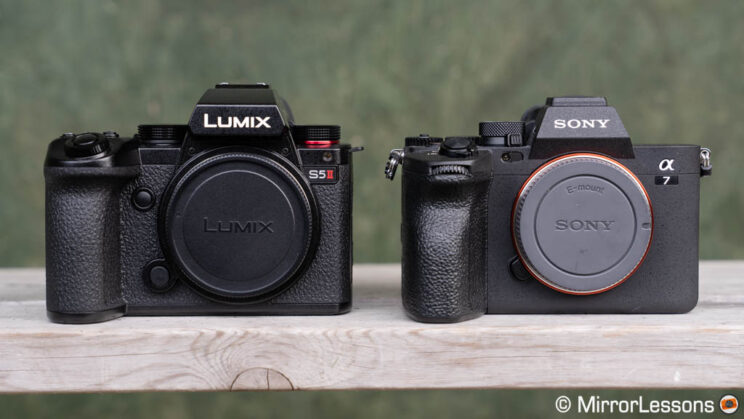
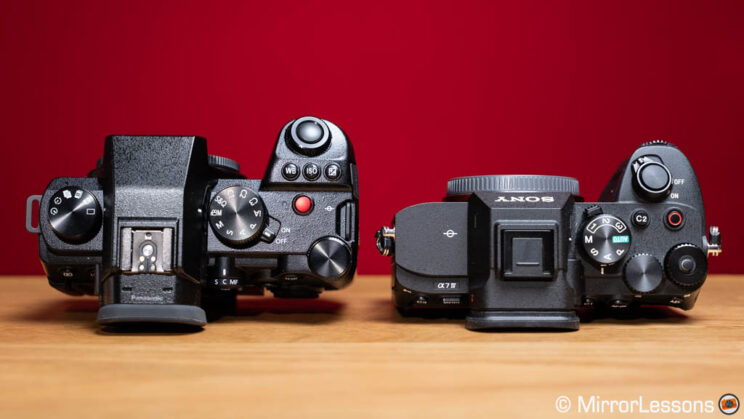
Both cameras are weather sealed, but the S5 mark II is slightly wider, a bit taller, and a tad heavier.
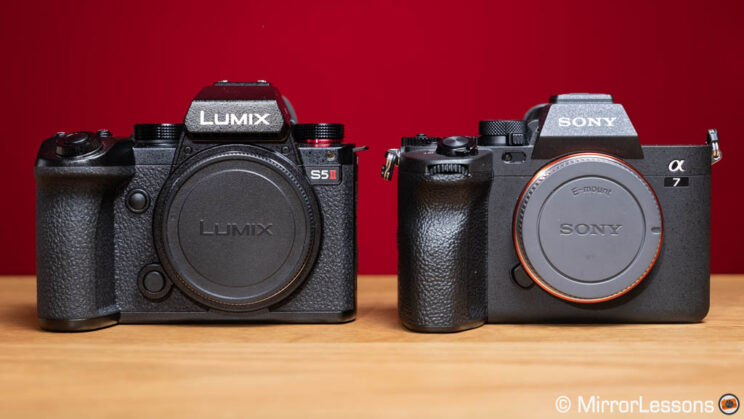
When it comes to the front grip, they’re pretty similar in size, but personally, I find the Lumix grip to be more comfortable. On the other hand, the Sony grip design puts more pressure on your middle finger, especially when you’re holding a heavy lens. And trust me, that can become uncomfortable after a full day of shooting.
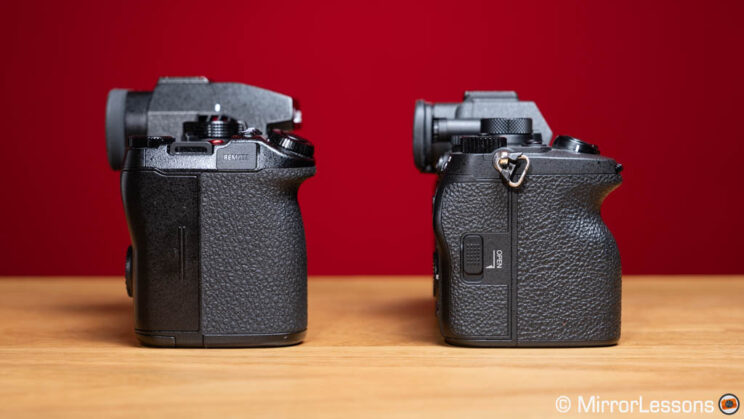
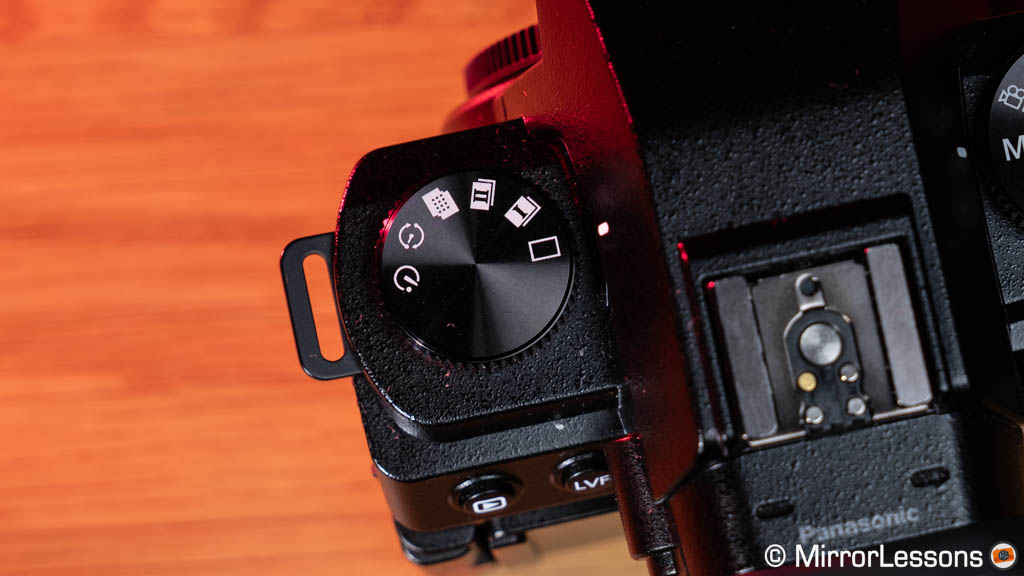
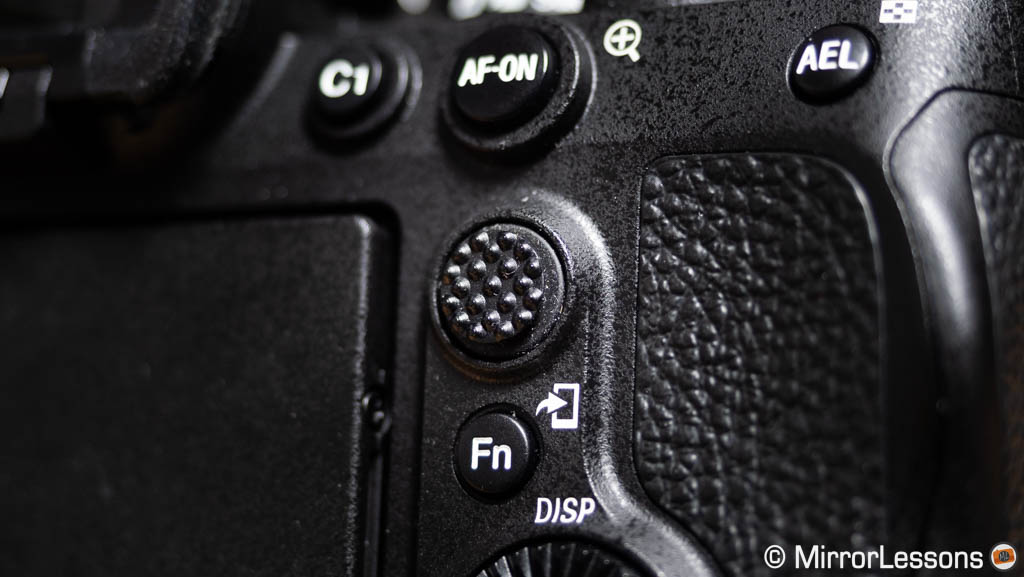
The S5 mark II maintains a similar button and dial configuration to previous Panasonic cameras I’ve tested, including the S1, S1R, and G9. This consistency is a positive thing for me because I genuinely appreciate this button layout. It’s a camera that I could unbox, charge the battery, and start taking pictures right away without feeling completely lost.

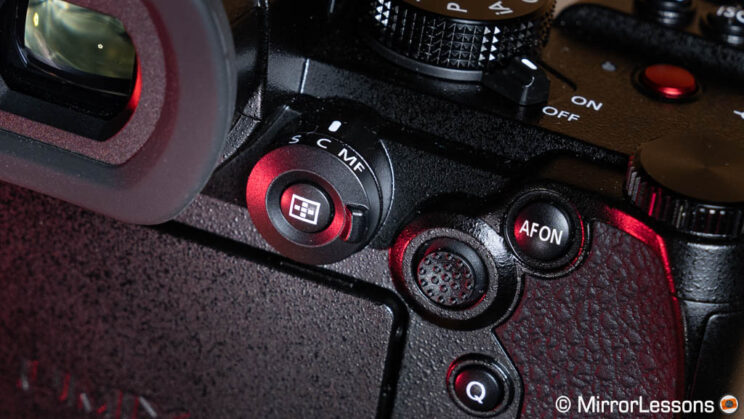
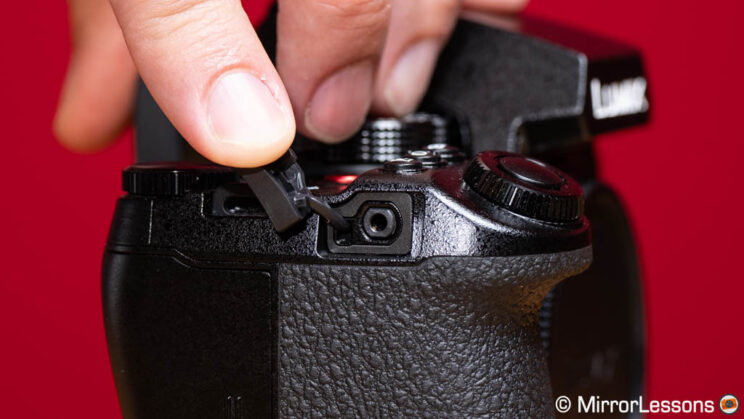
One feature I particularly love is the focus mode lever and focus button below. In one place, you have everything you need to adjust the main autofocus settings.
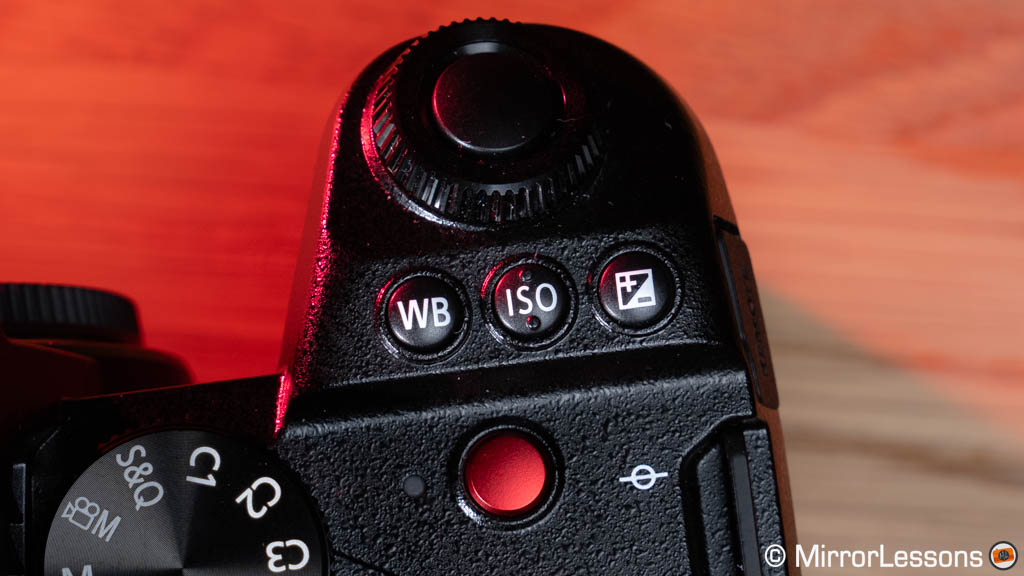
Additionally, there’s a dedicated dial for the drive mode, which is quite useful. Basic settings like ISO and white balance have dedicated buttons as well.
The Sony also offers a good number of buttons that are nice and precise to use. However, I find that I need to configure this camera a bit more to have all the settings in the positions I prefer. Fortunately, there’s a lot of customisation available, which is a positive aspect.
I also appreciate the rear dial on the Sony that can be locked, and I must say, I prefer the responsiveness and precision of the autofocus joystick on the A7 IV.
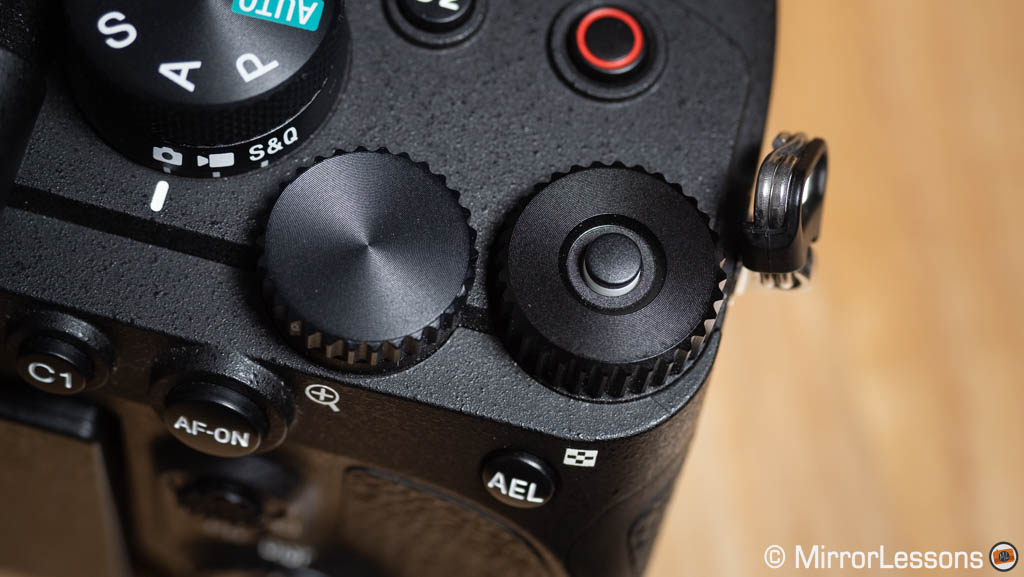
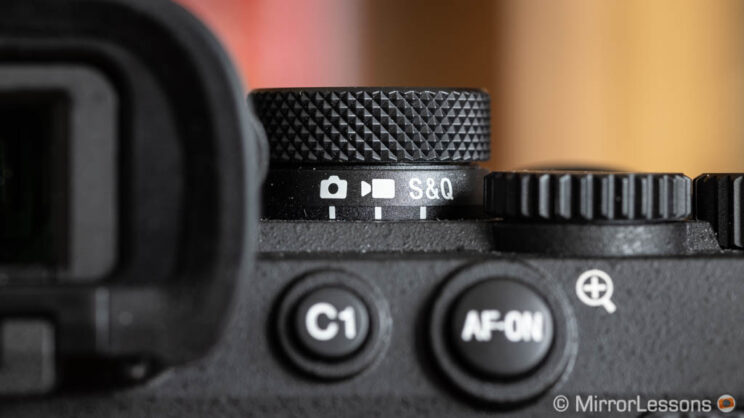
Another useful feature on the Sony is the dedicated photo/video switch. While it may not be the easiest to grab and turn, it allows you to use custom modes 1, 2, and 3 separately for photos and videos, which can come in handy.
Customisation is a key aspect of both the S5 mark II and the A7 IV. The Panasonic has a total of 14 function buttons, along with 5 virtual buttons that can be accessed on the right side of the LCD screen. On the other hand, the Sony offers 12 custom buttons.
In addition to button customisation, both cameras allow you to map the dials according to your preferences. They also provide a My Menu section and a quick menu that can be edited to fit your needs. Last but not least, many settings such as exposure, white balance, picture profiles etc. can be individually adjusted for photo and video modes, which is extremely useful.
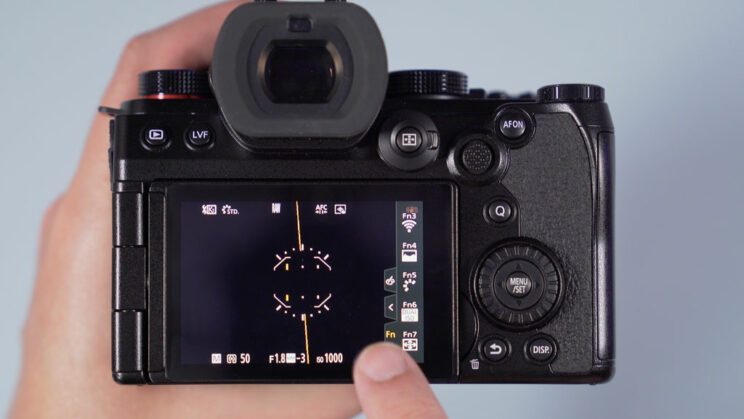
The menu systems on both cameras can be operated via the touch screen. They are well-organised, but it does take some time to become familiar with them, mainly due to the extensive range of settings and options available.

When it comes to the viewfinder, the two products offer similar specifications with good resolution and clarity. The frame rate is fast and responsive when needed and, in real-world use, I didn’t notice any significant difference between them. I wear glasses all the time, and while using the two cameras, I do lose sight of the extreme corners, but that isn’t a major issue.
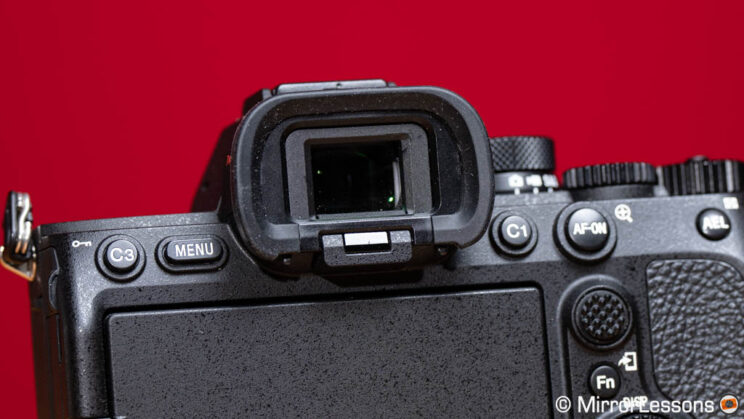
However, one noticeable distinction is the design of the eyecap. On the Panasonic, it is larger and features padding all around, providing a more comfortable experience. In contrast, the Sony version lacks padding at the bottom. This means that with the S5 mark II, I can rest my glasses on the EVF more comfortably without applying too much pressure.

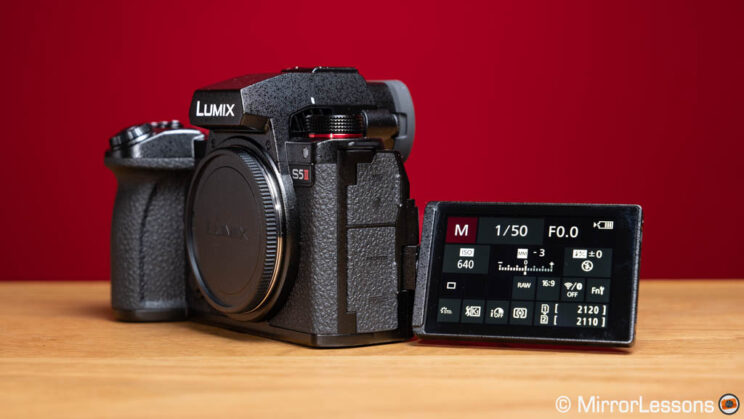
Both cameras have vari-angle monitors with touch sensitivity. However, there’s one interesting difference. The S5 mark II has a higher resolution screen (1.84M vs 1.04M dots), allowing you to appreciate the additional details in most situations, but here’s the catch: when using focus magnification in manual focus mode, the details on the Panasonic screen are soft. This means you may find yourself going back and forth multiple times, trying to find the perfect focus position with the least softness, and hoping it’s the correct focus point.
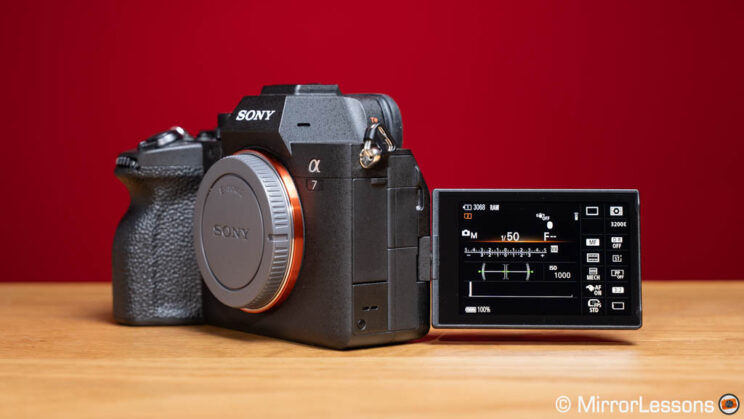
The Sony screen performs much better in this regard, delivering sharp details that make manual focus adjustments easier.
Moving on to battery life, overall the A7 IV does better than the S5, especially when using high-performance settings like a faster EVF frame rate, increased brightness on the screen, image stabilisation, continuous autofocus, etc. The battery won’t drain too quickly.
Battery life on the Lumix tends to decrease faster with all these high-performance settings. I’d say it’s about 20% worse than the Sony.
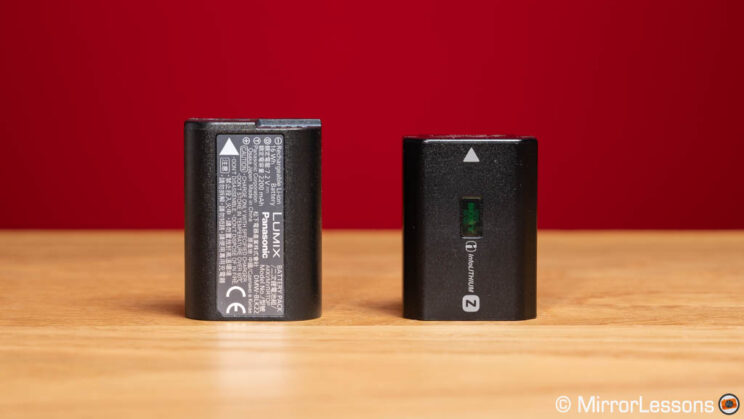
During my red kite feeding session, I managed to capture over 2600 images with the S5 mark II in just a few hours, and there were still two bars left (the Sony would have three bars left in the same situation). So, if you’re going out for a short stint of shooting, the Lumix battery will hold up well. However, if you plan to be out all day photographing various subjects, I do recommend to carry a spare, to be on the safe side.
Speaking of batteries, neither of these cameras includes a dedicated charger in the box. You only get the mains plug and a USB cable that attach to the camera directly. However, you can also charge the batteries using a power bank if you’re on the go. Additionally, both cameras offer the possibility of an optional battery grip for extended power and convenience.
Moving on to the connectors, the S5 offers a microphone input, a headphone output, a full-size HDMI port, a 10Gbps USB-C port and, on the other side, there is a 2.5mm remote input.
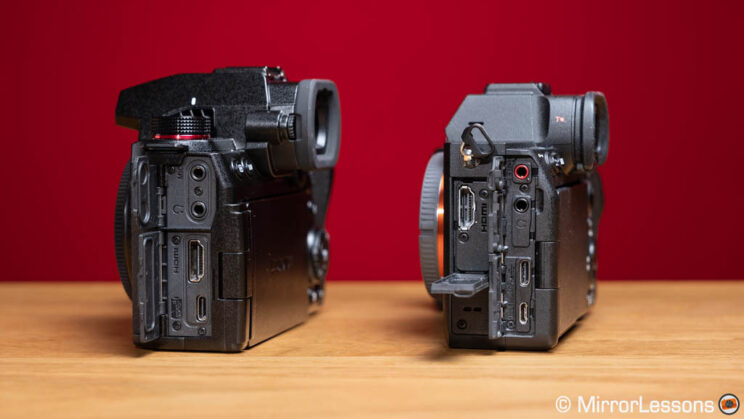
The A7 IV is quite similar, featuring a full-size HDMI port, audio input and output, a USB-C port with the same 10Gbps speed, and an additional micro USB 2 port. Having two USB ports can be useful: for example, you can power the camera with the USB-C while simultaneously using a remote commander attached to the smaller USB connection.
Finally, let’s talk about memory cards. The S5 mark II offers two SD card slots, both compatible with the UHS-II protocol. As for the Sony, it provides two compartments as well, but the first slot is hybrid and can also accommodate a CFexpress Type A card. This is particularly useful as it helps with buffer performance, and is required if you want to record 4K footage at the maximum quality with the Slow and Quick motion mode.

2. Image Quality
Both cameras feature a full-frame sensor, but they differ in resolution. The S5 has 24.2-megapixel, while the A7 IV takes it up a notch with 33-megapixel. Both sensors have a backside illuminated design.
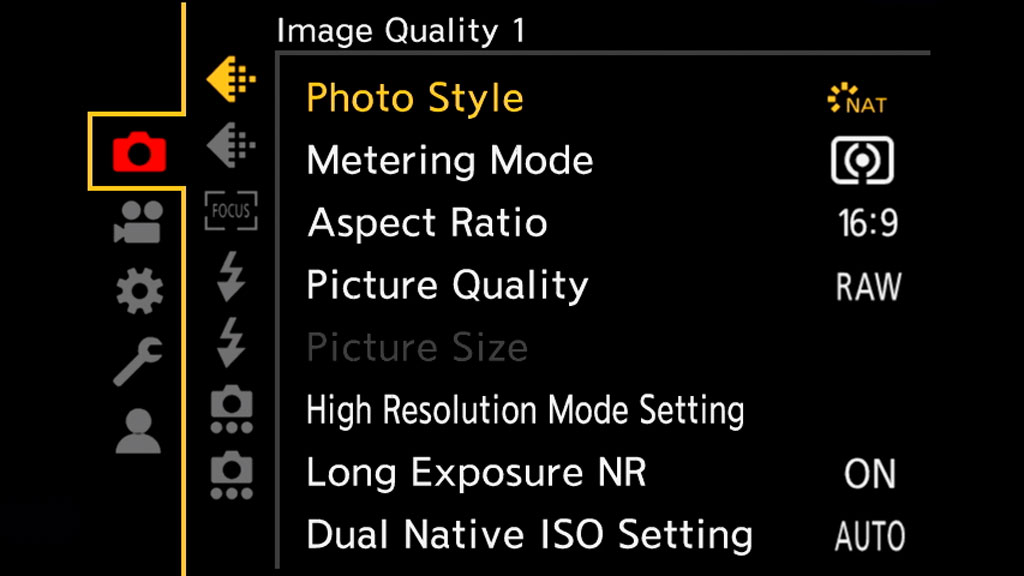
Concerning the image recording capabilities, the Lumix offers options for recording still images in lossless compressed RAW, JPG Fine, or both formats at the same time.
The A7 IV takes it a step further and provides more choices within each format. For RAW images, you have the option of uncompressed, compressed or lossless compressed, the latter with three different sizes to choose from. When it comes to JPG, the Sony offers the Extra Fine compression option. But that’s not all — the A7 IV also supports recording in the 10-bit HEIF format, which provides more colour information than the 8-bit JPG file.
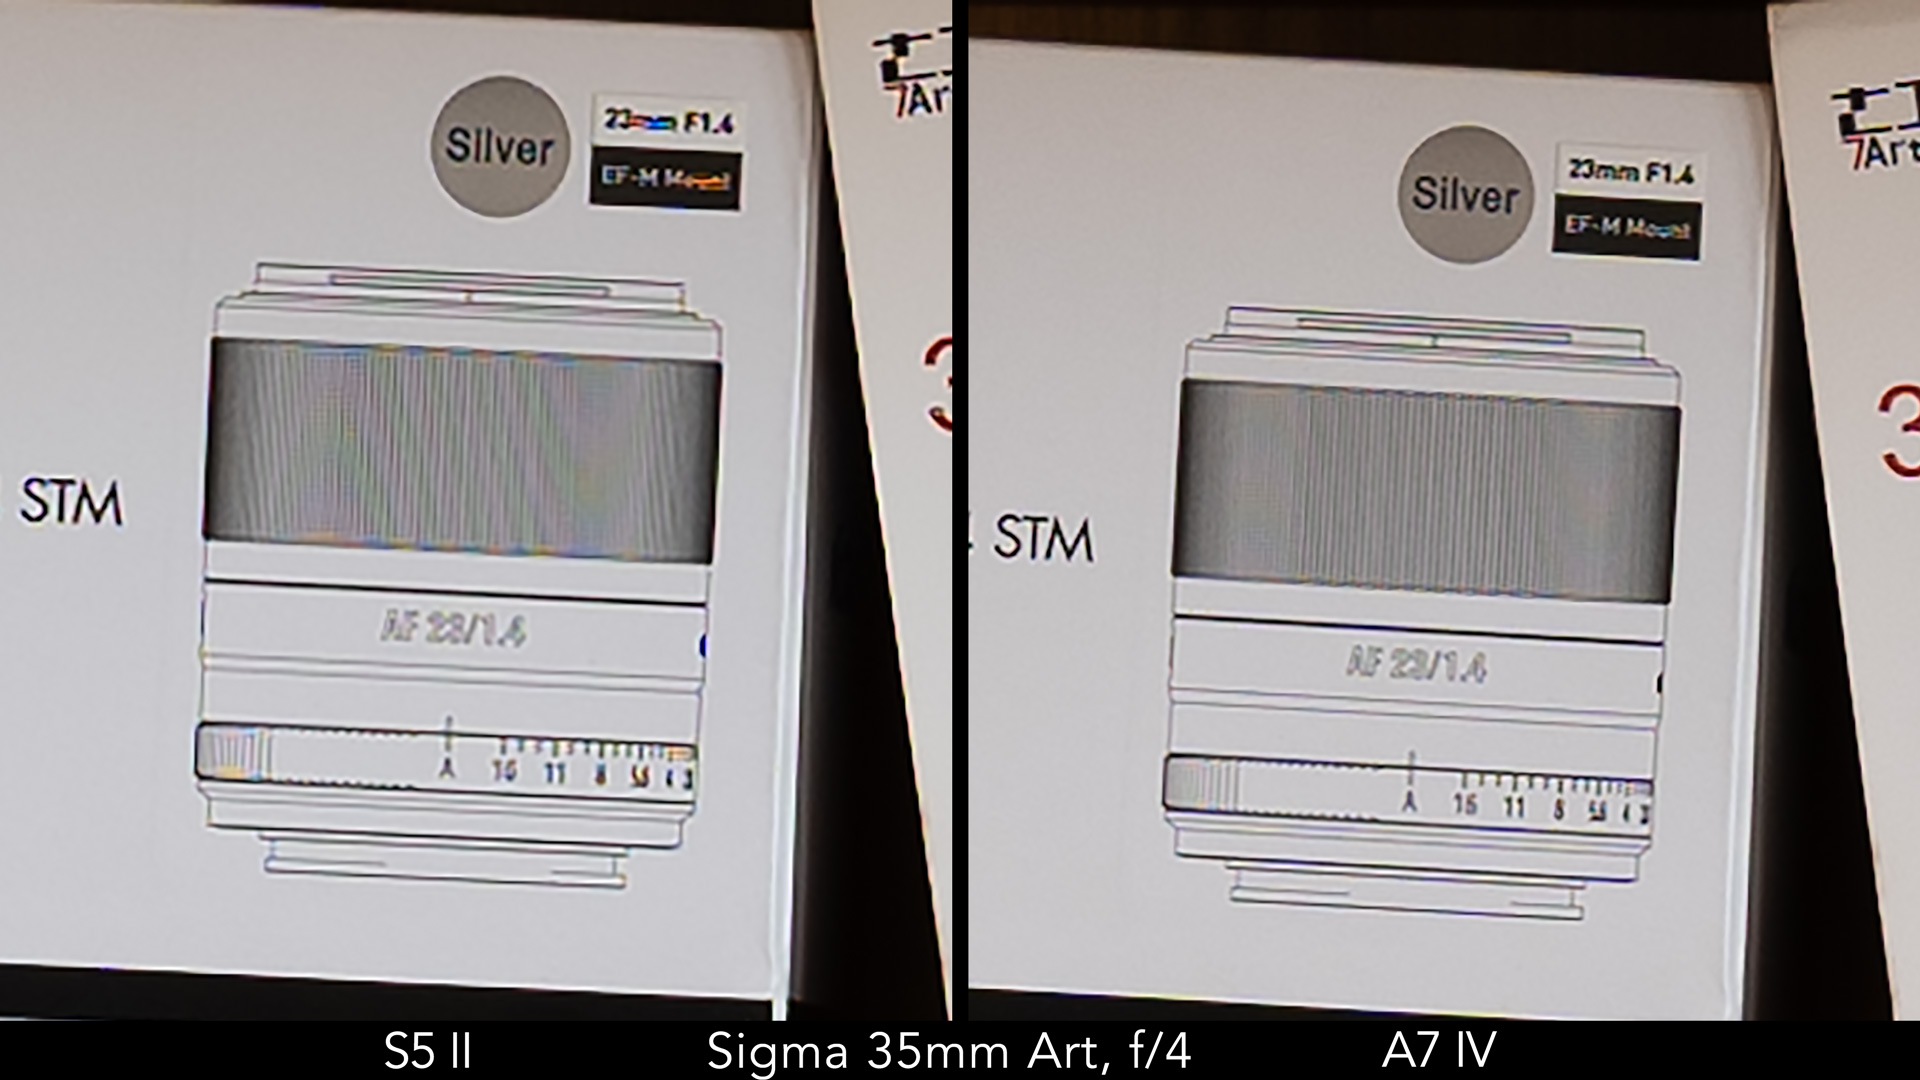
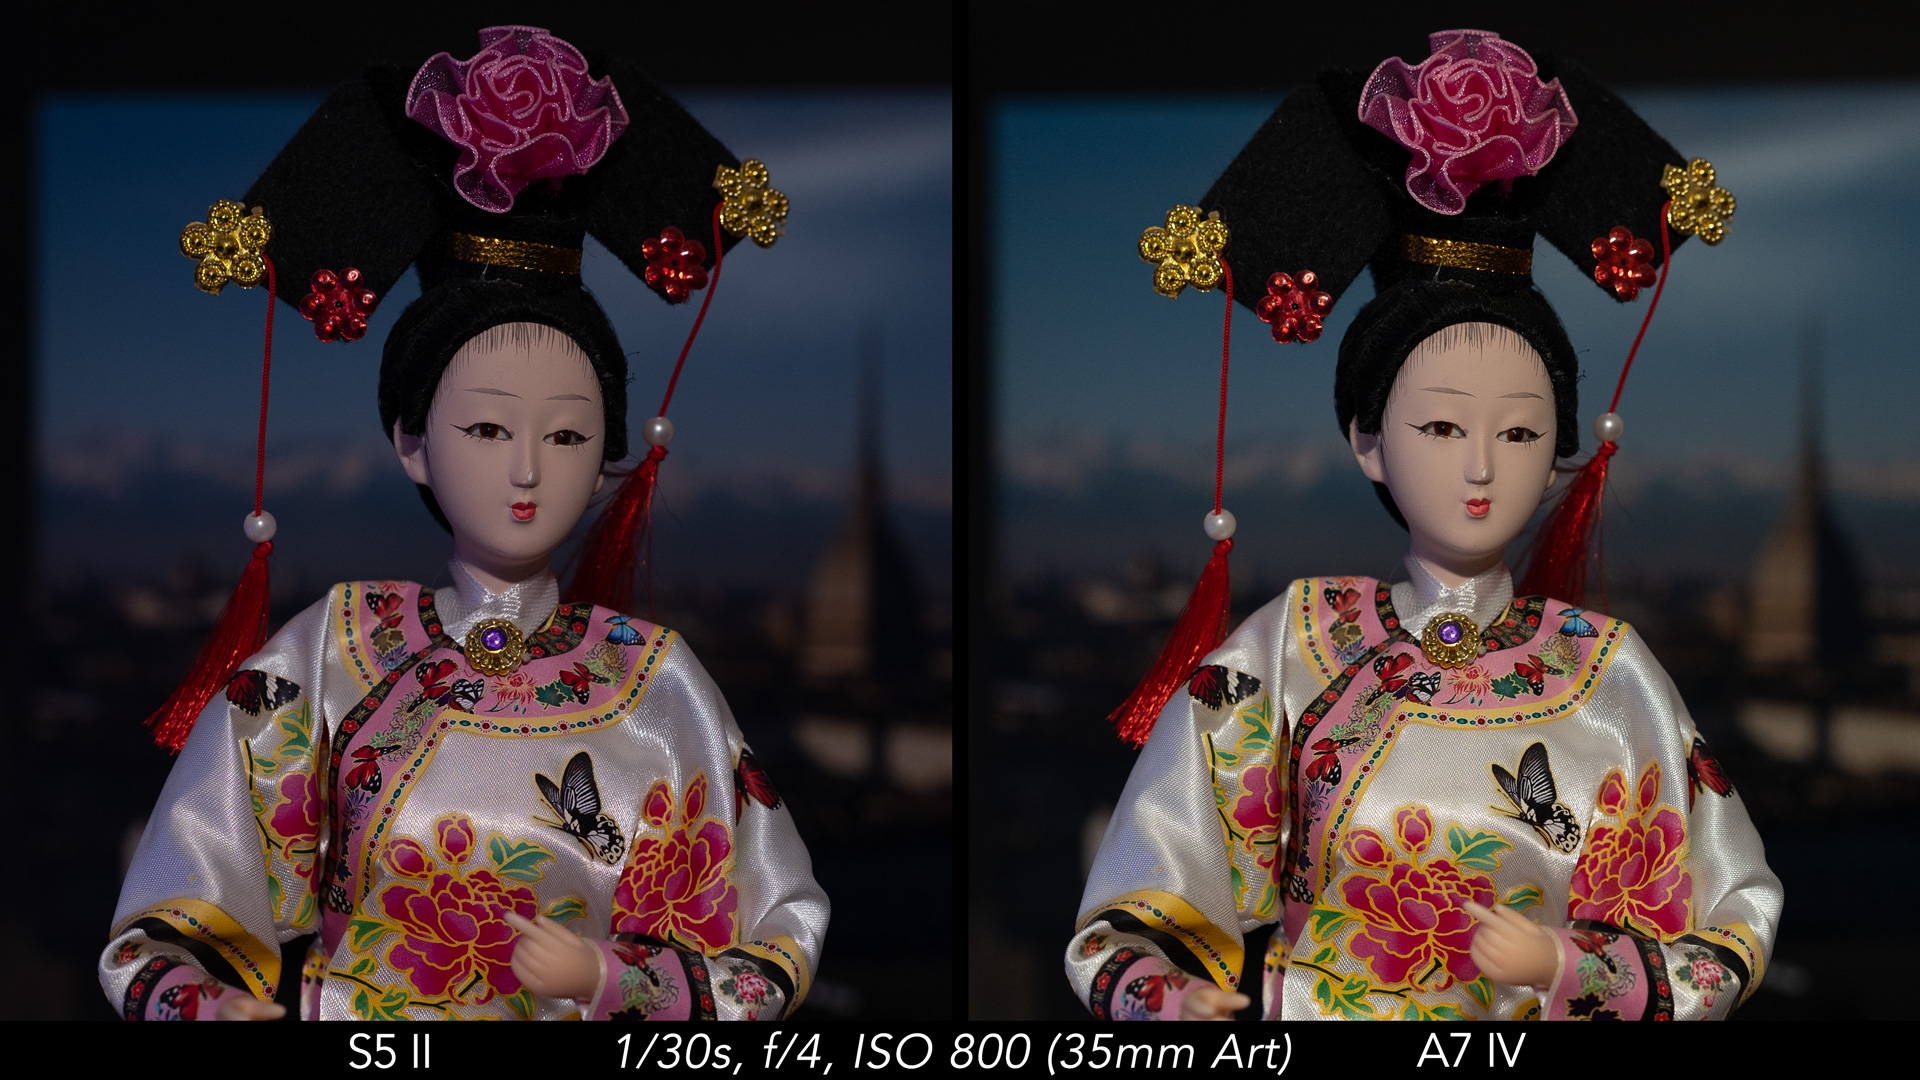
Let’s move on to the first test: sharpness. For this, I used two Sigma 35mm 1.4 Art lenses — the mirrorless DN version, to be precise. These are available for both camera mounts, so it’s an apples-to-apples comparison.
The S5 mark II has an advantage here because it doesn’t have the anti-aliasing / low pass filter. Of course, the Sony benefits from its higher resolution, so in the end, both cameras are excellent and deliver similar results.
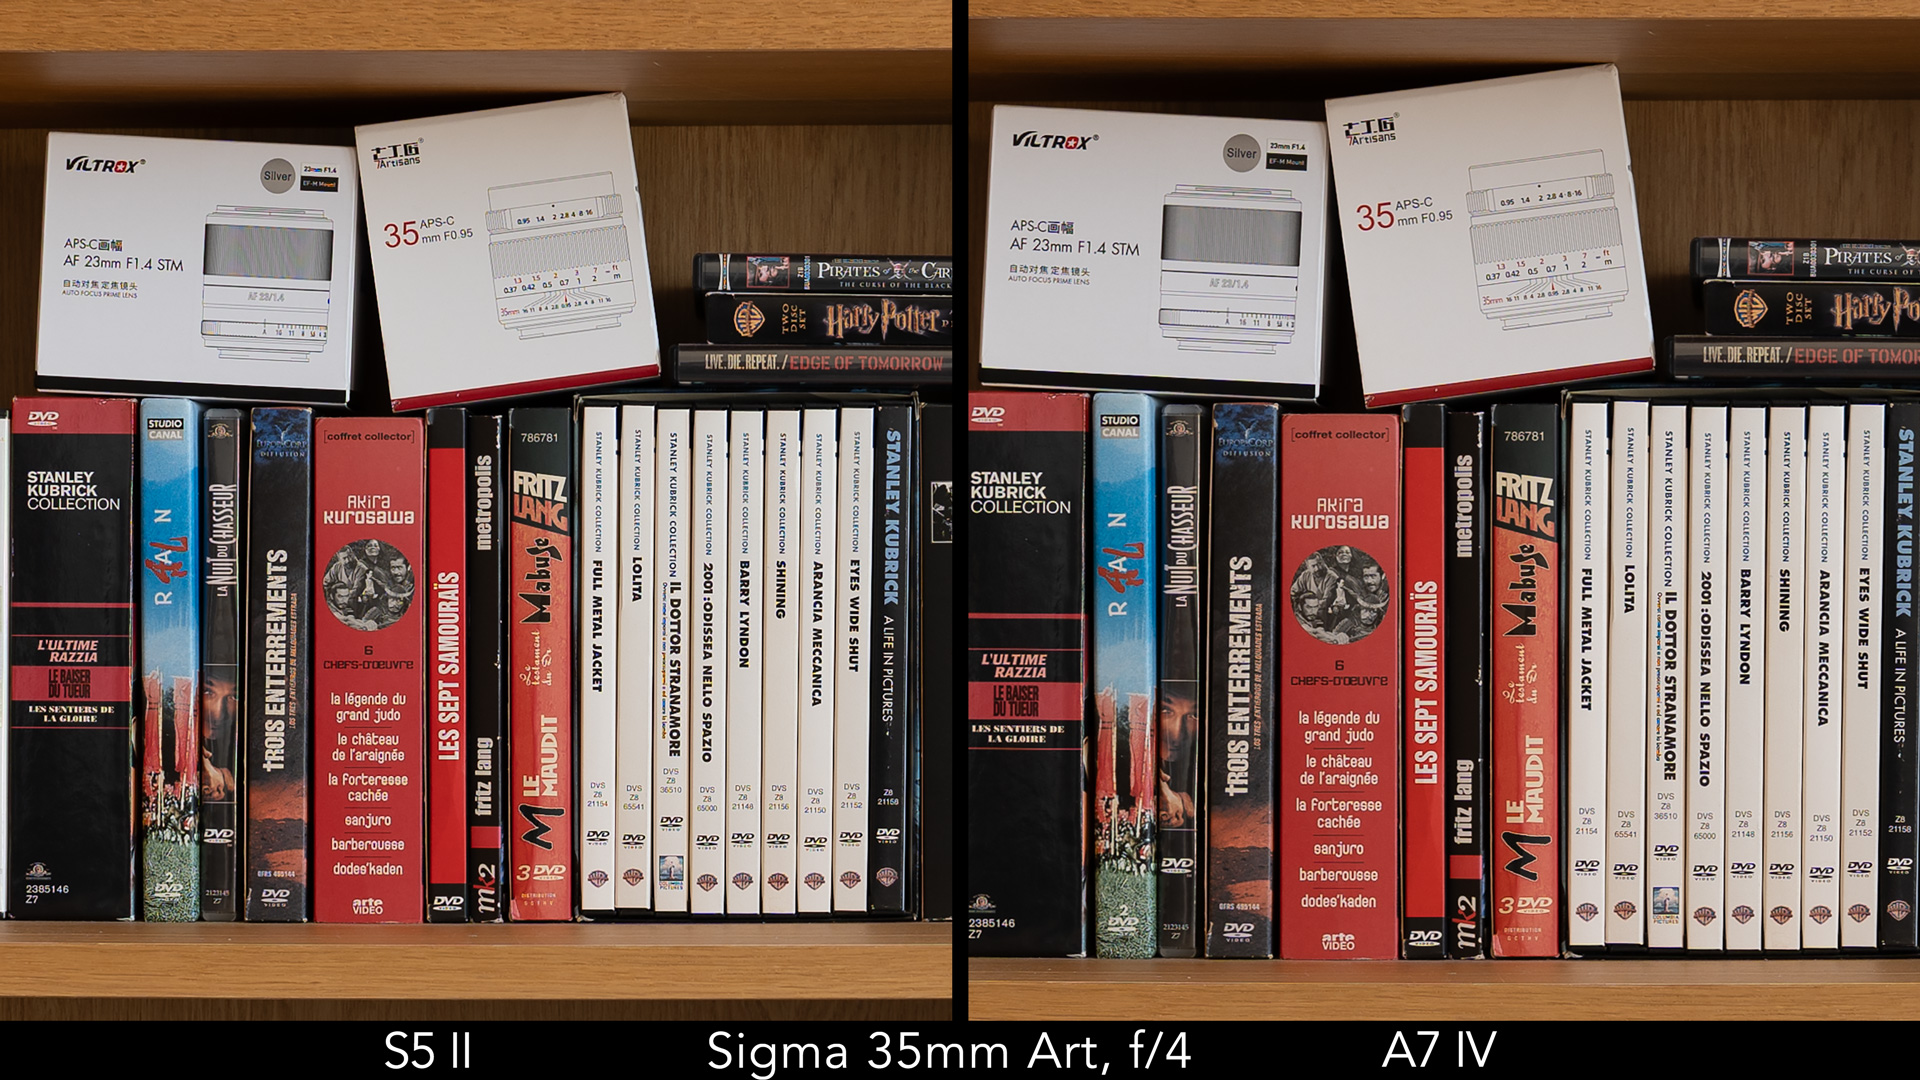
The only notable difference is a bit of moiré present in the S5 image, which is not surprising, and you need to zoom in significantly to notice it. The Sony image shows no signs of moiré, and this suggests that the A7 IV likely has an anti-aliasing filter, albeit a weak one.
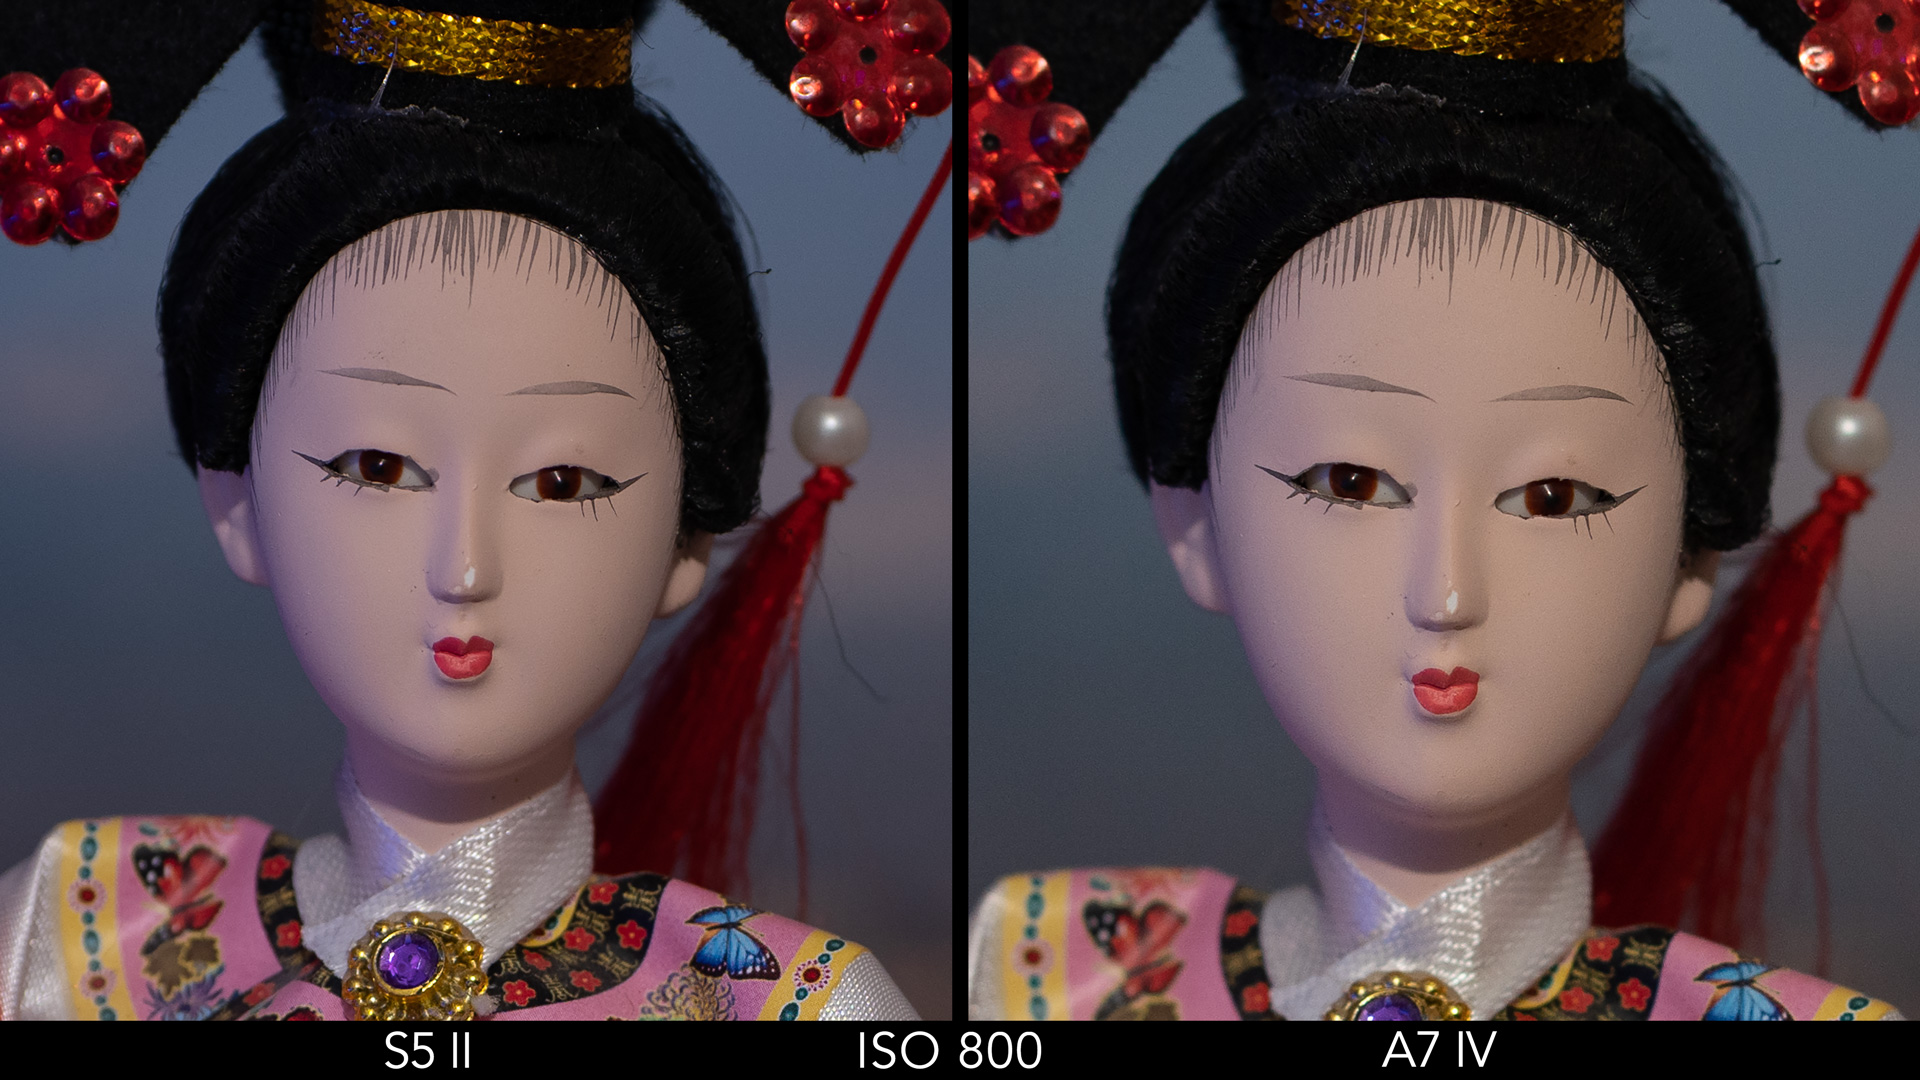
The next test is dynamic range. The shadows recovery with the RAW files is impressive on both cameras. Even with an extreme push, they perform well. If anything, there is slightly more noise on the blue coat in the A7 IV image, just to nitpick a little.

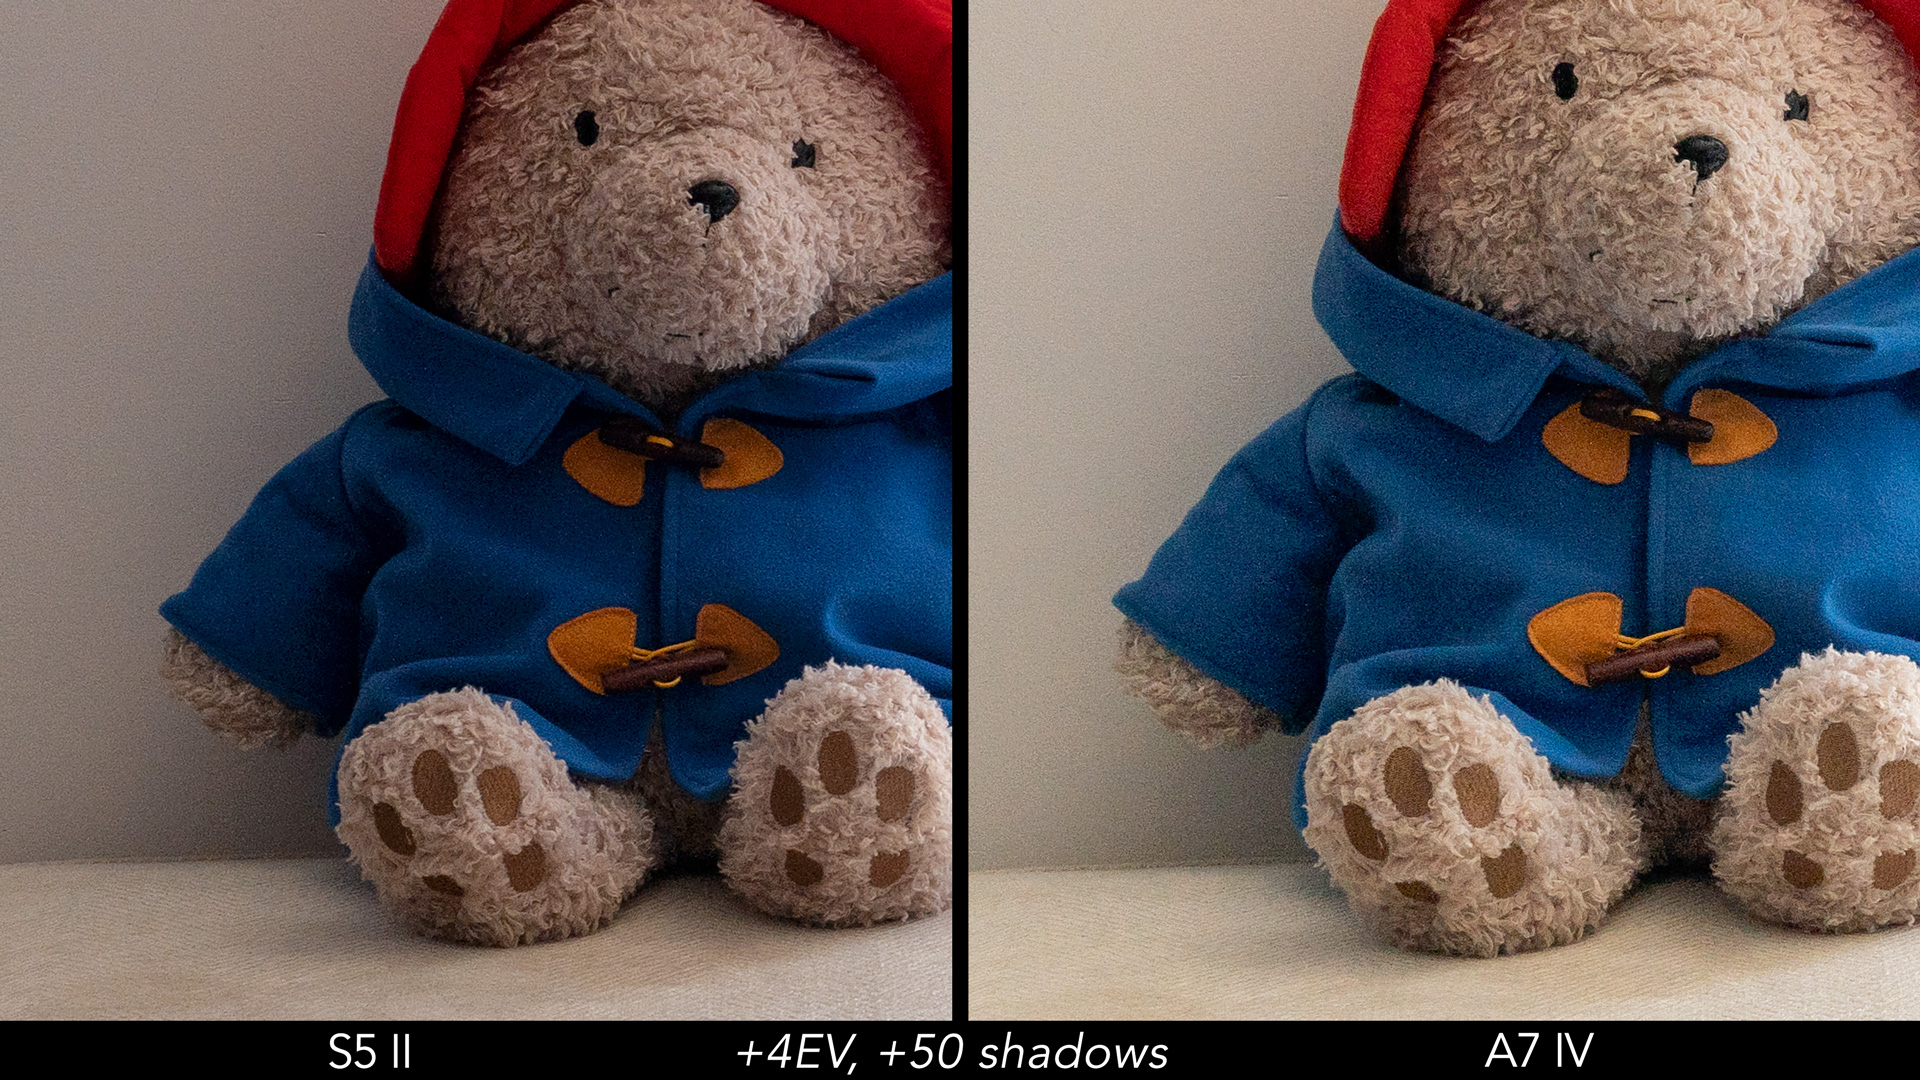
However, it’s worth noting that the S5 mark II image appears slightly darker with the same exposure and recovery settings in Lightroom. I’ll come back to this further down. The good news is that even when I increase the recovery on the S5 to 4.5 stops (which hopefully you’ll never need to do), the amount of noise generated remains contained.
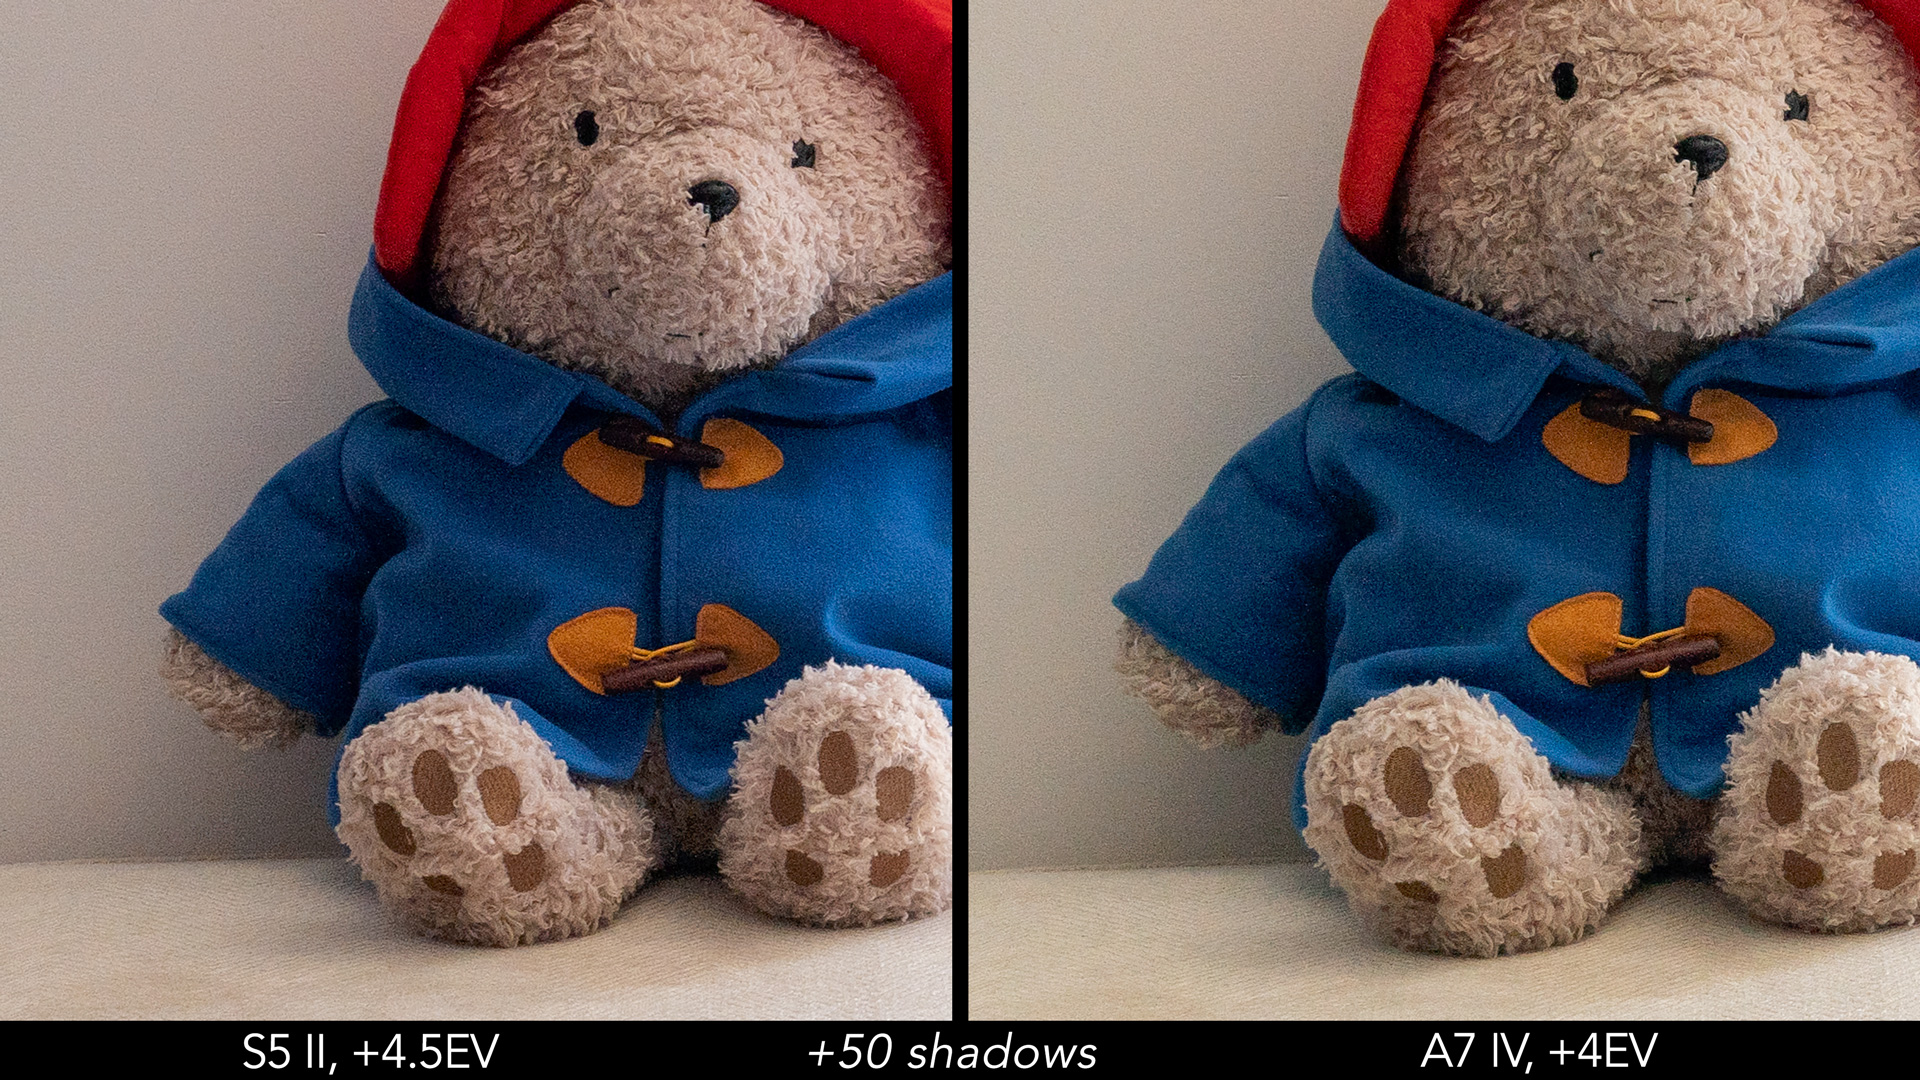
Concerning the highlight recovery capabilities, with the same exposure settings, the S5 manages to retain a bit more colour in the background sea. Overall, it’s a small difference, and once again, the image on the Lumix appears slightly darker than the Sony.

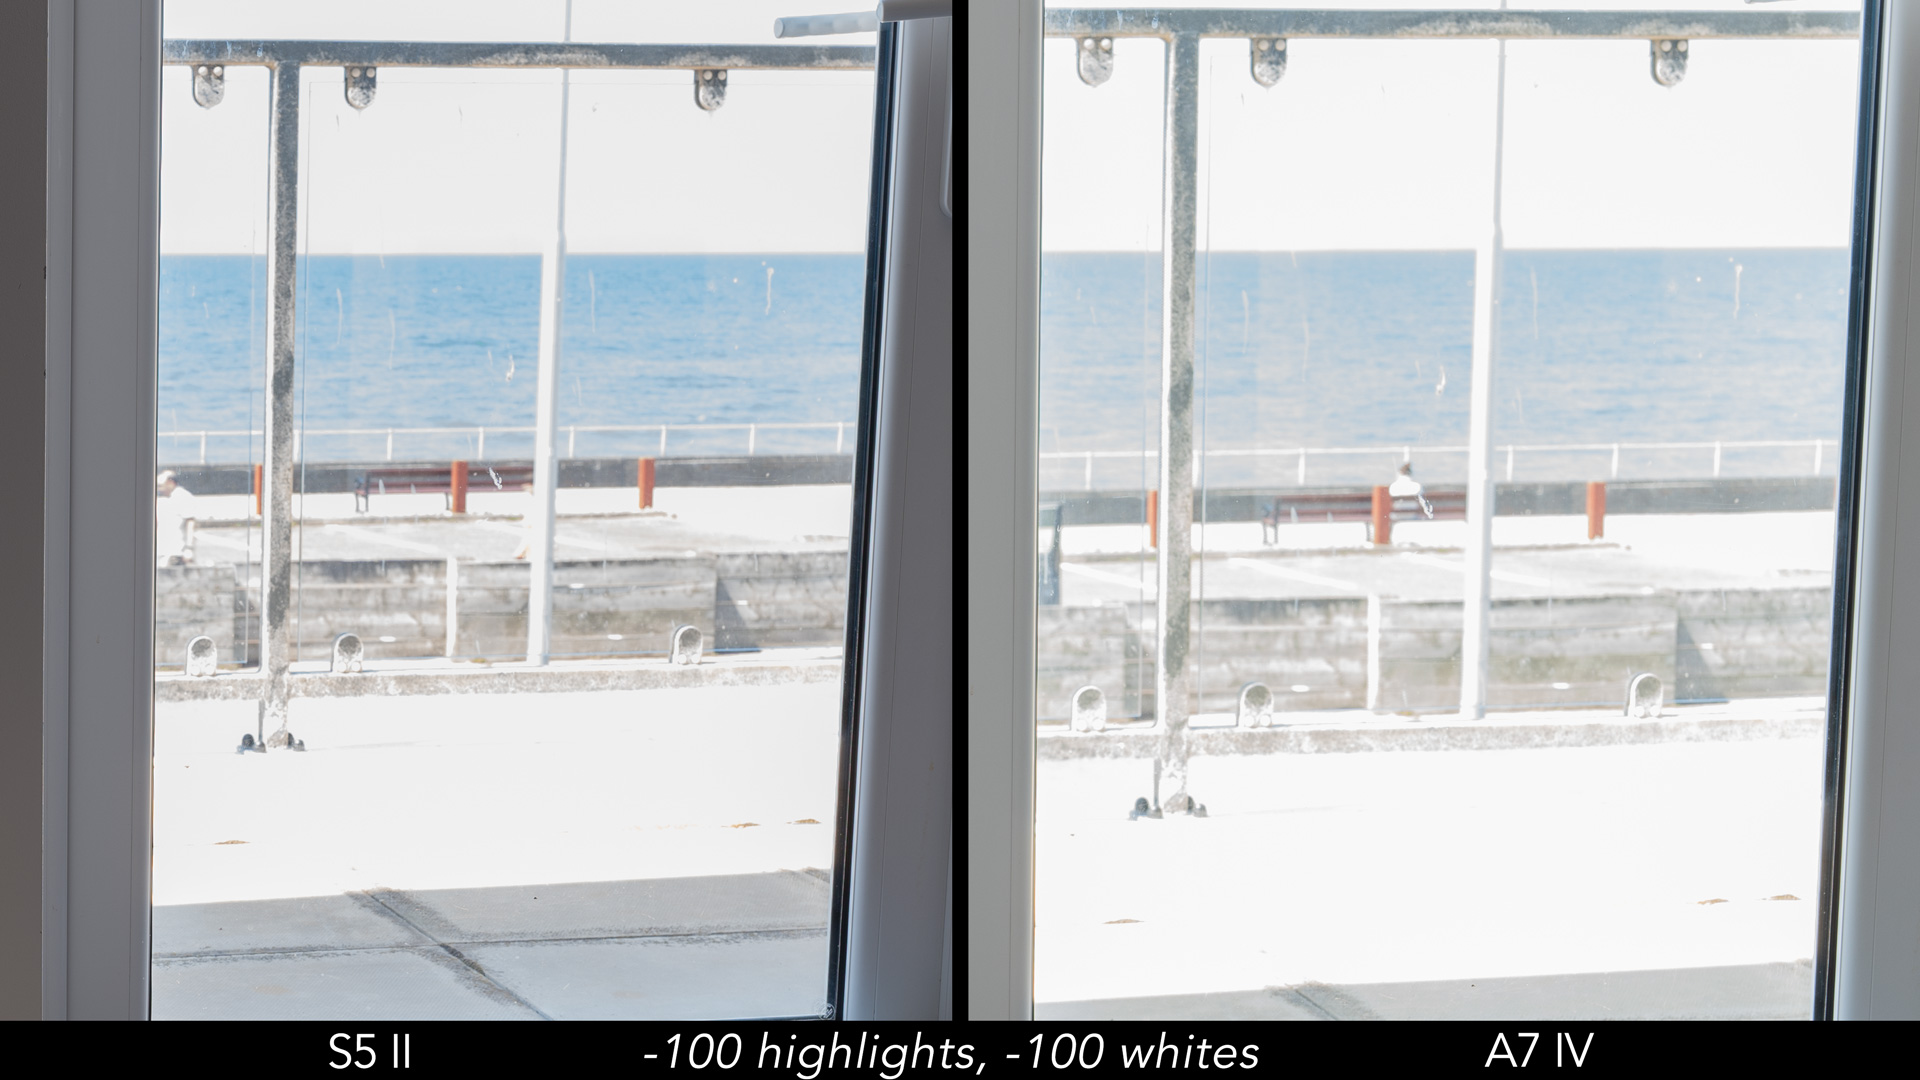
So, let’s address this difference in brightness. It’s not a significant concern because you would only notice it when comparing cameras side by side. However, for the sake of fairness in this test, I double-checked using the same lens, and the Panasonic appears to be about half a stop darker than the Sony with the same exposure settings.
This suggests that the two sensors are calibrated differently, to put it simply. For the next test on ISO levels, I decided to adjust the exposure on the Lumix to achieve comparable brightness, making it easier to analyse the images.
Overall, the S5 mark II produces less noise as you increase the ISO setting. It becomes noticeable from ISO 3,200 and becomes even more apparent as you go higher. Additionally, the Panasonic maintains better colour accuracy at the highest ISO values.


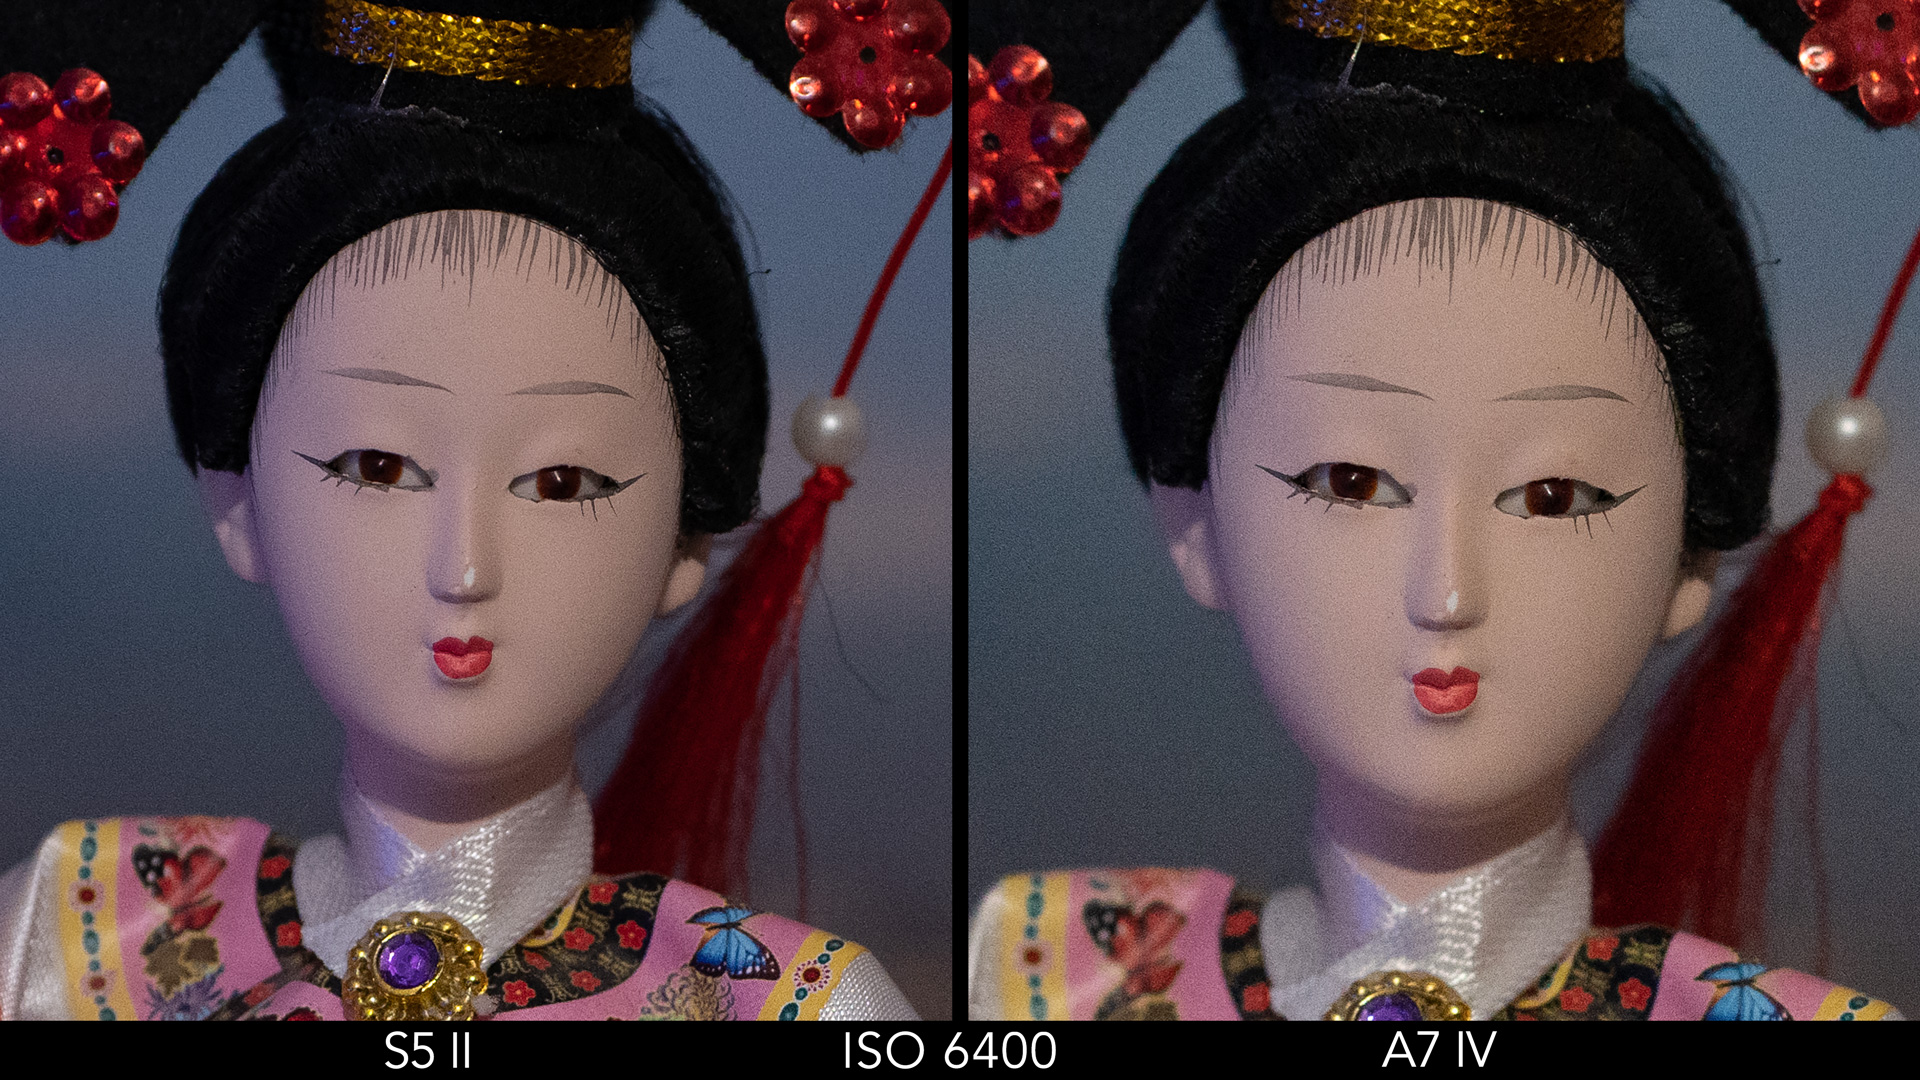


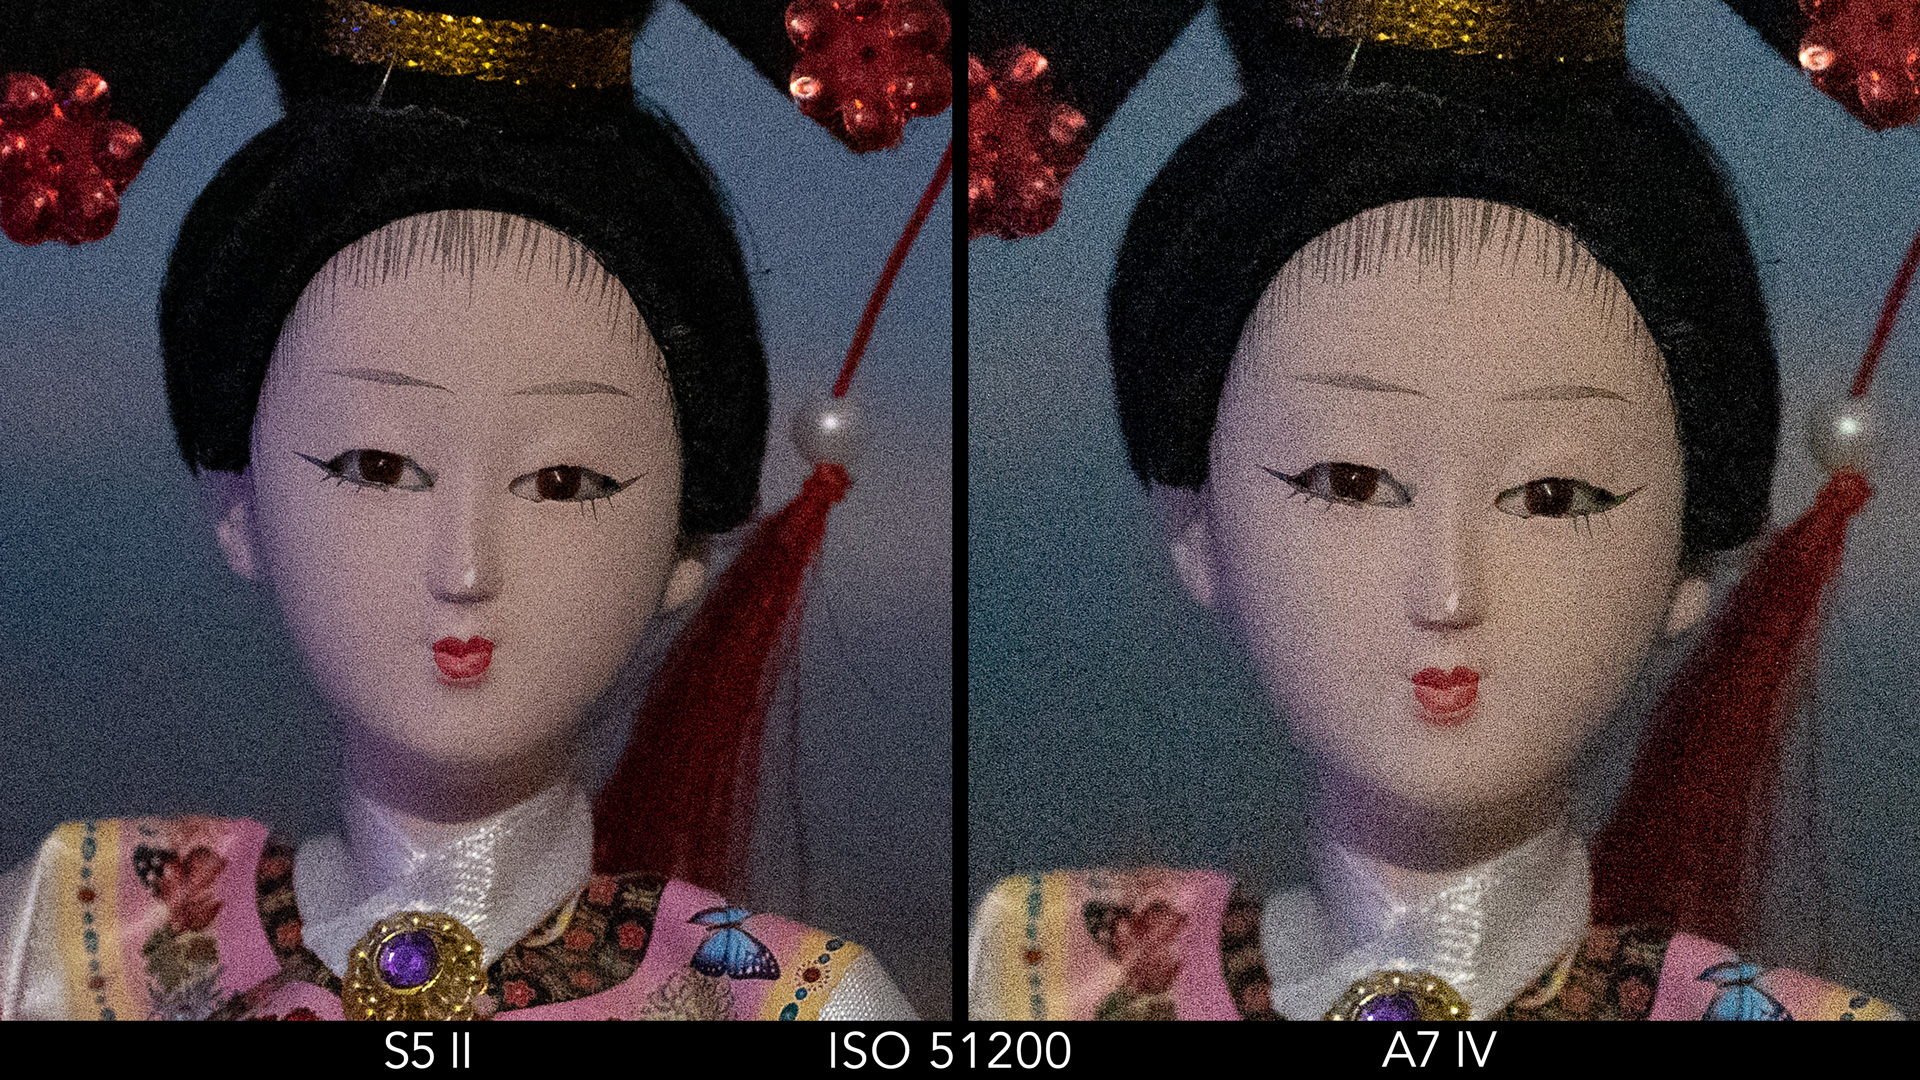
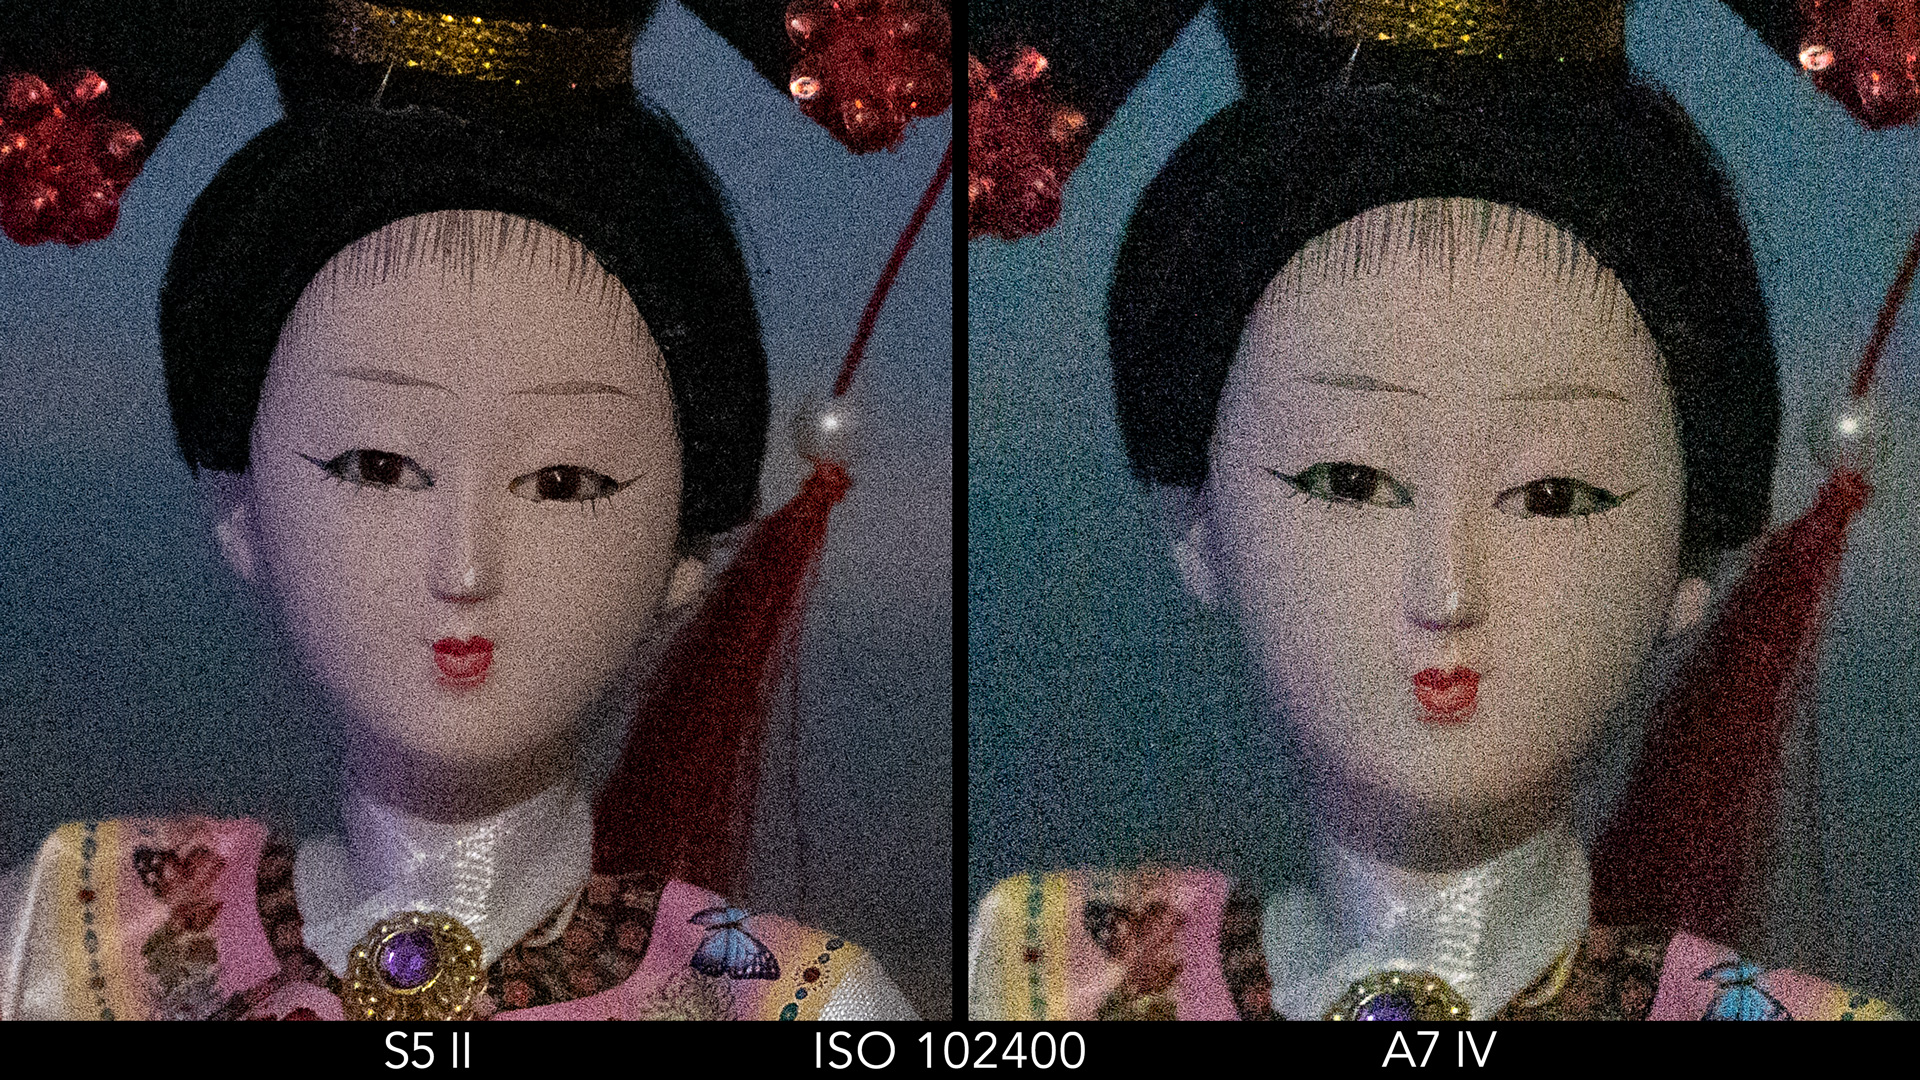

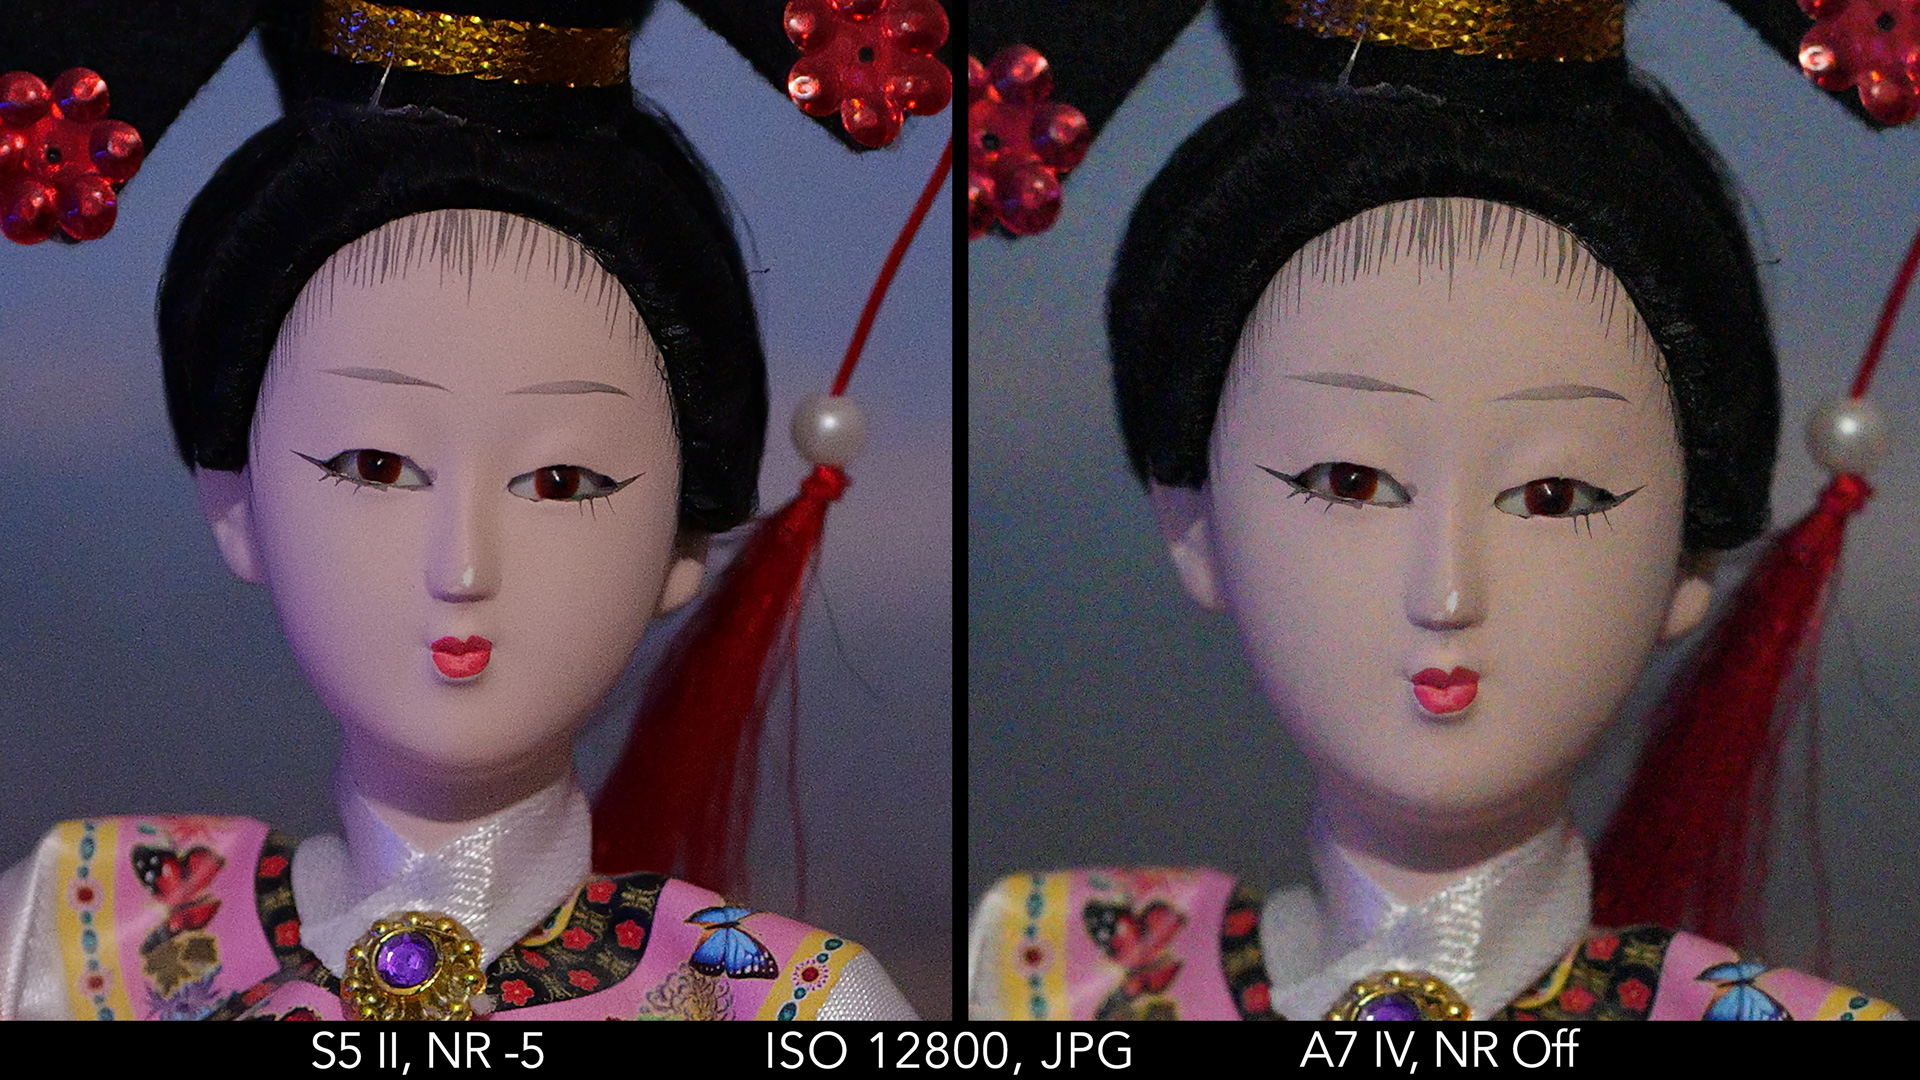
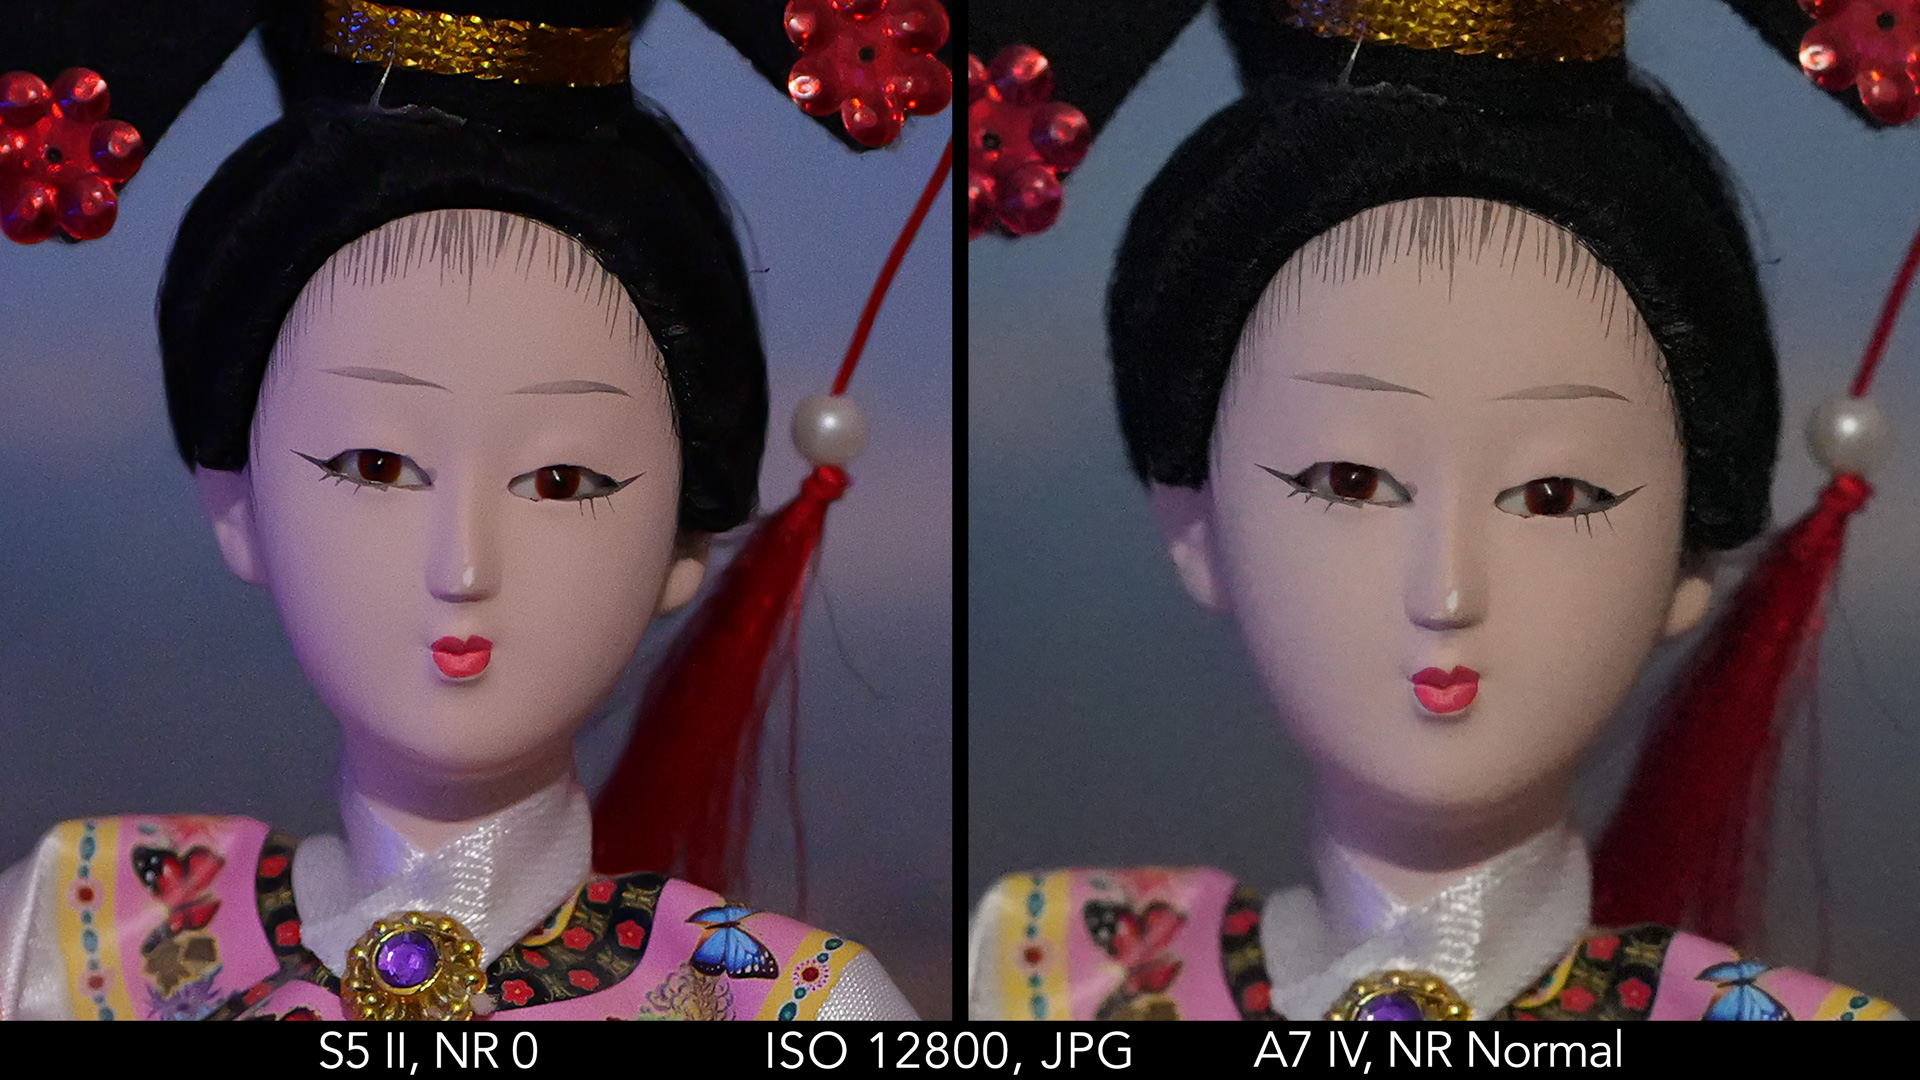
The Panasonic also excels in noise reduction on the straight-out-of-camera JPEGs. There is less colour noise when the noise reduction is kept to a minimum, and it also preserves a good amount of details as you increase the strength of this setting.
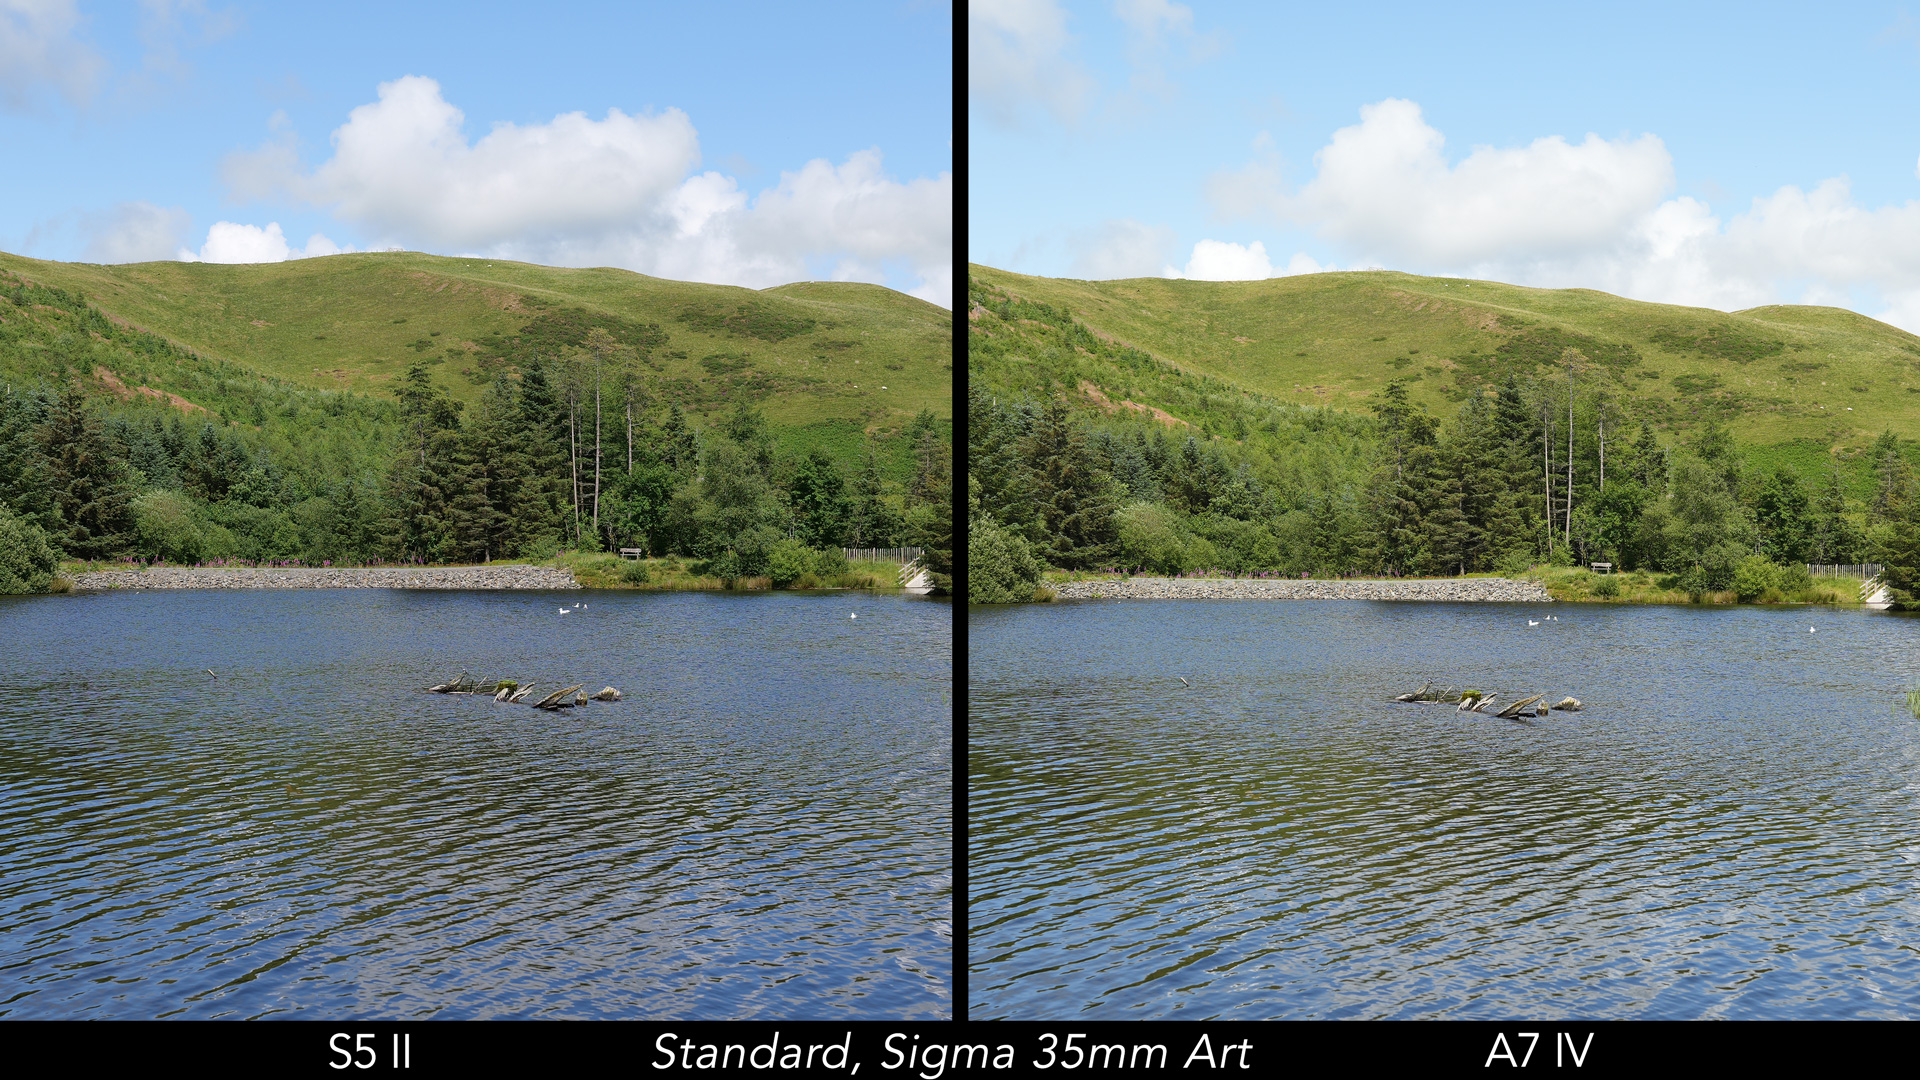
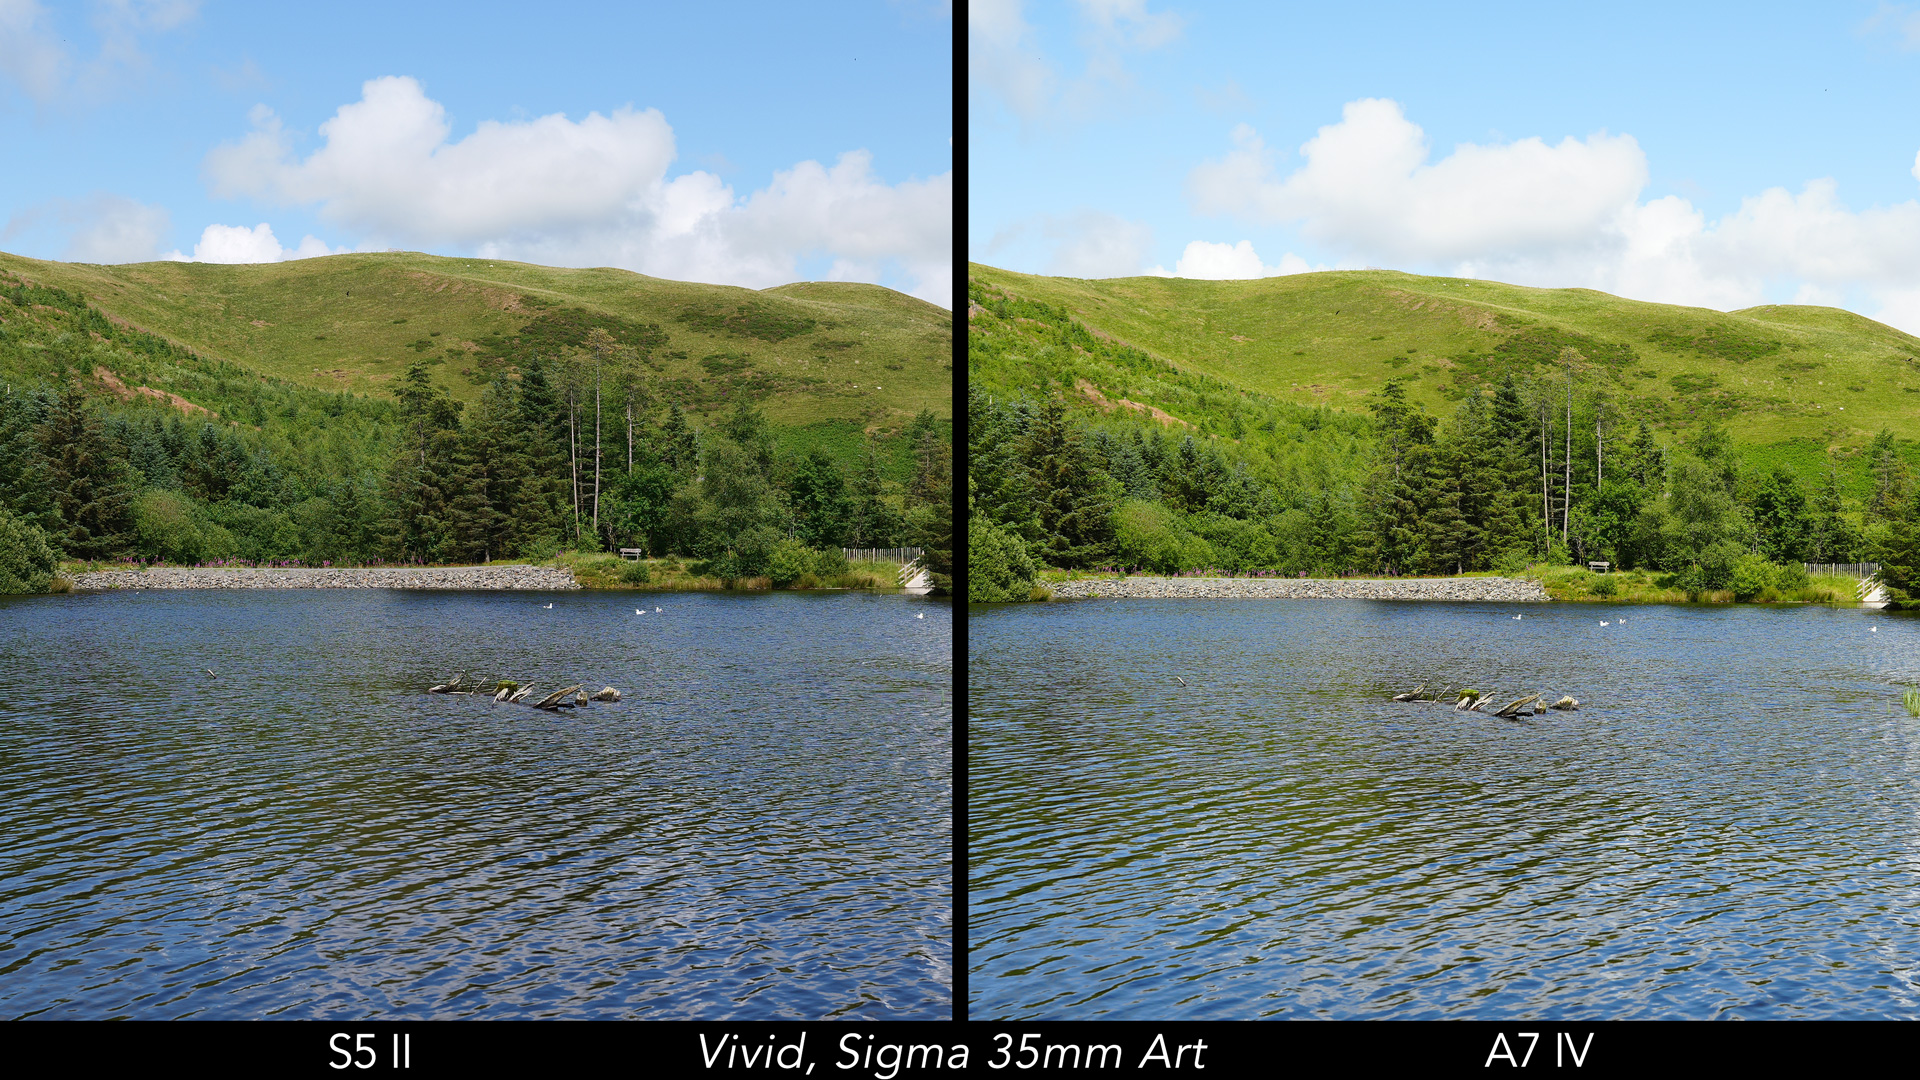
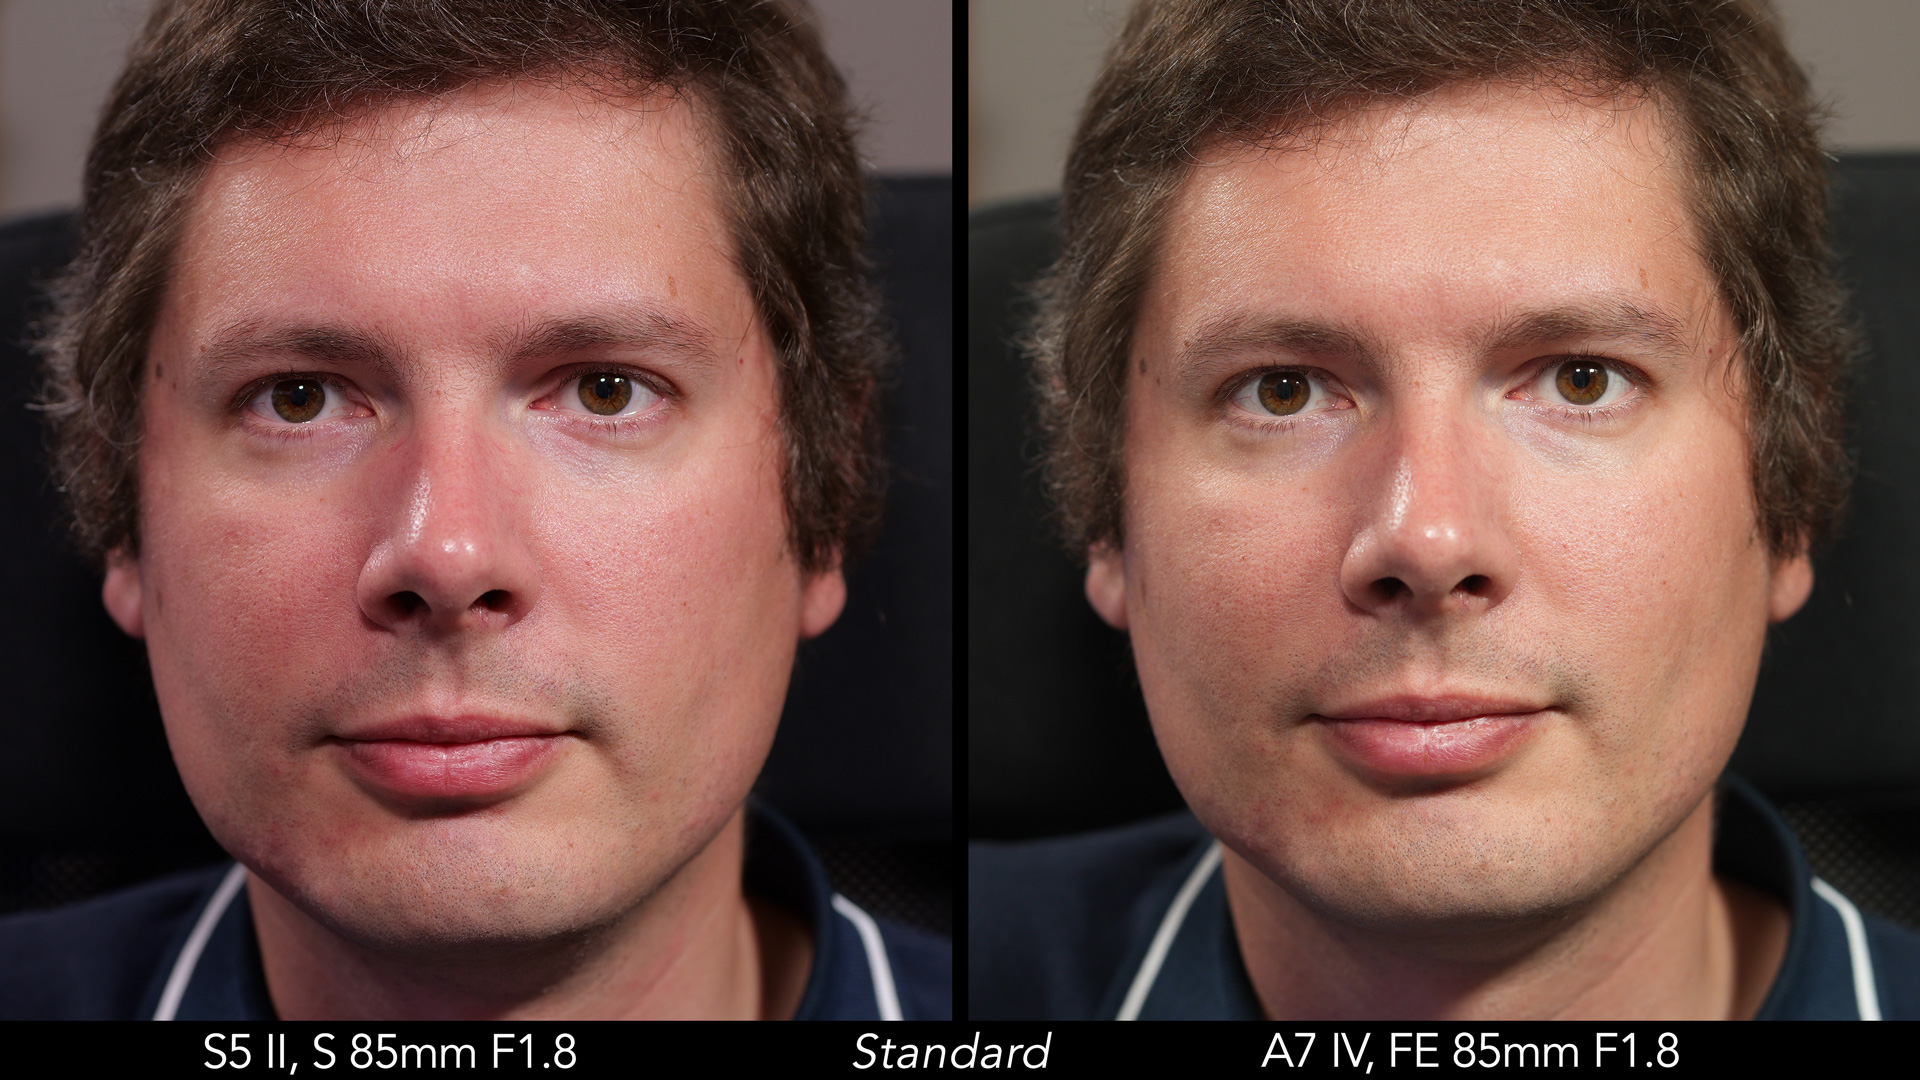
Since we’re discussing JPEGs, let’s conclude this chapter by taking a look at the picture styles, or colour profiles.
In this landscape image captured with both cameras using the same Sigma lens, the A7 IV version appears slightly warmer with the standard profile, but the difference is minor.
When switching both cameras to the Vivid profile, the Sony increases the brightness and saturation, making the greens really vibrant, perhaps a bit too much, while the S5 maintains a more natural tone. Keep in mind that every profile can be customised on both cameras, allowing you to adjust saturation, contrast, and other parameters to your liking.
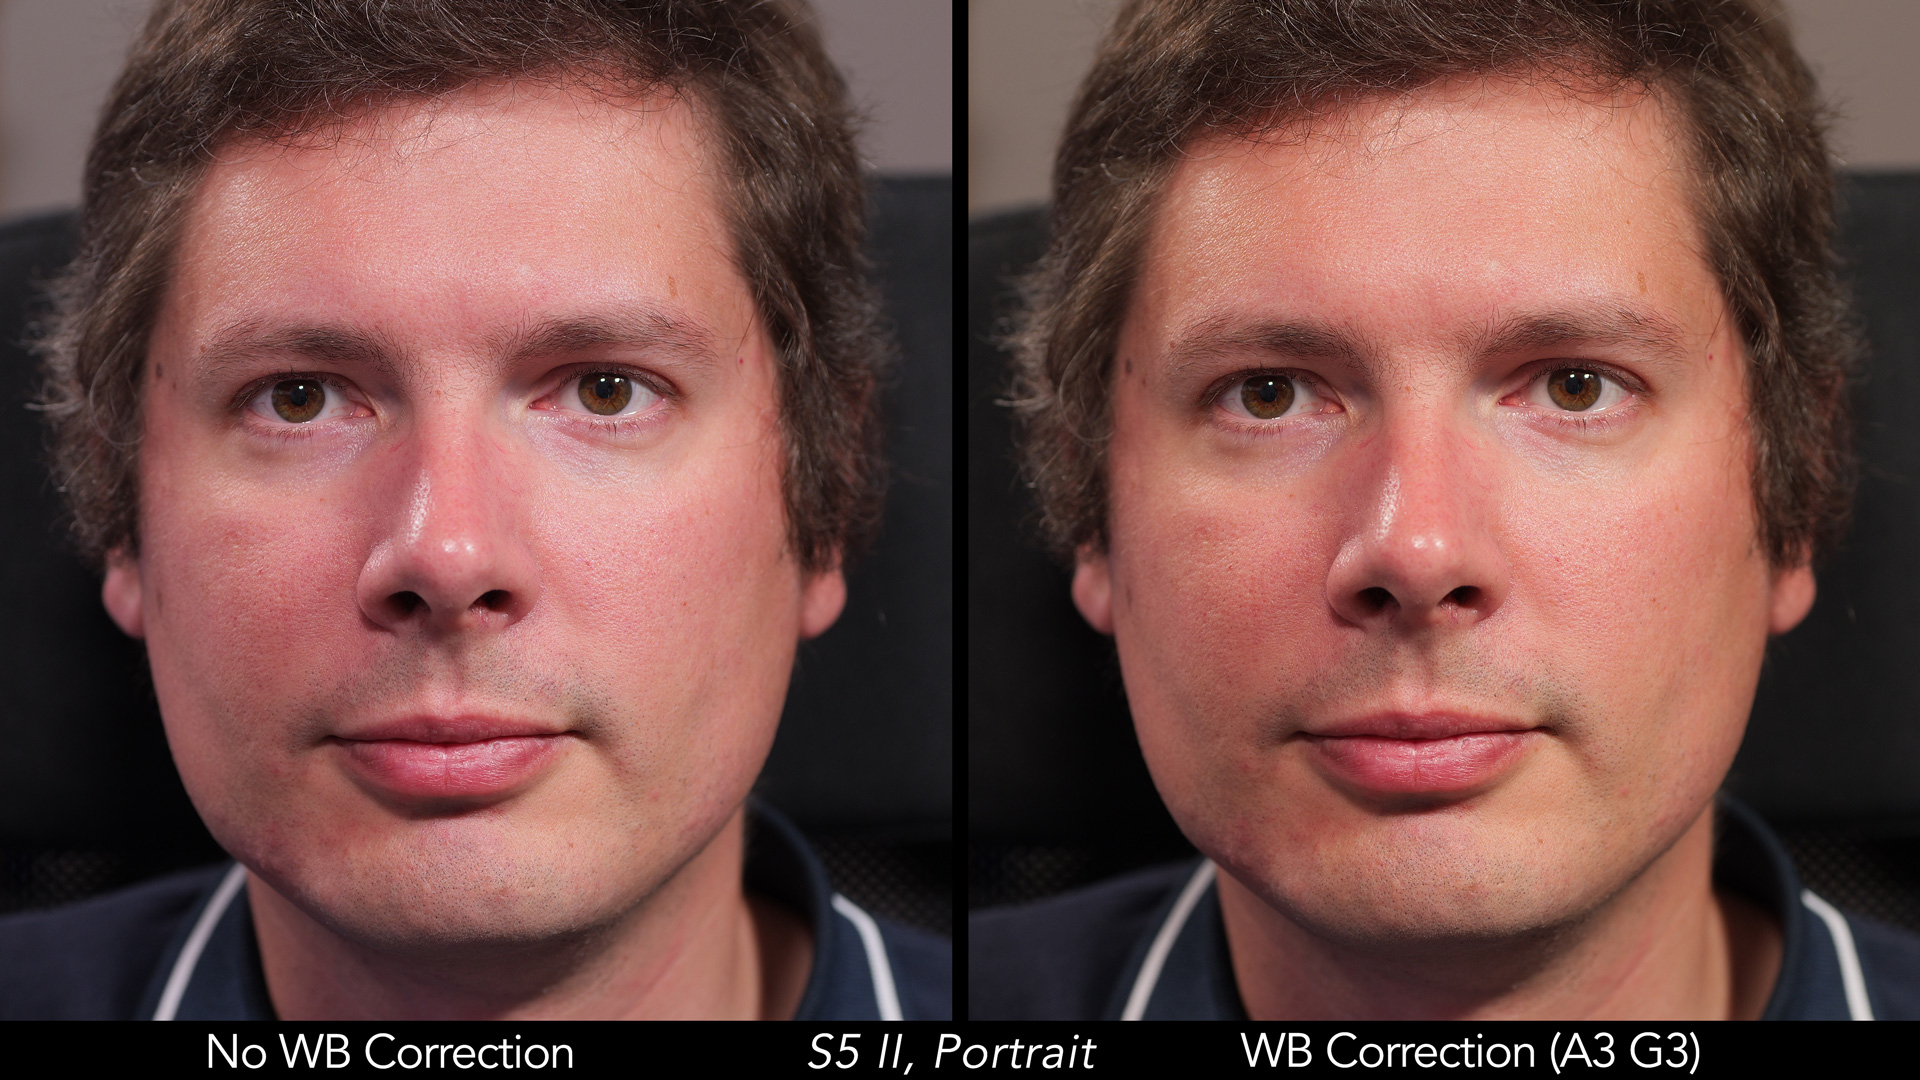
When it comes to artificial light and skin tones, the Panasonic tends to exhibit more magenta and red hues, while the Sony leans towards a yellowish look.
This distinction becomes even more pronounced when using the Portrait profile and, personally, I find the magenta tones on the S5 image to be a bit intense.
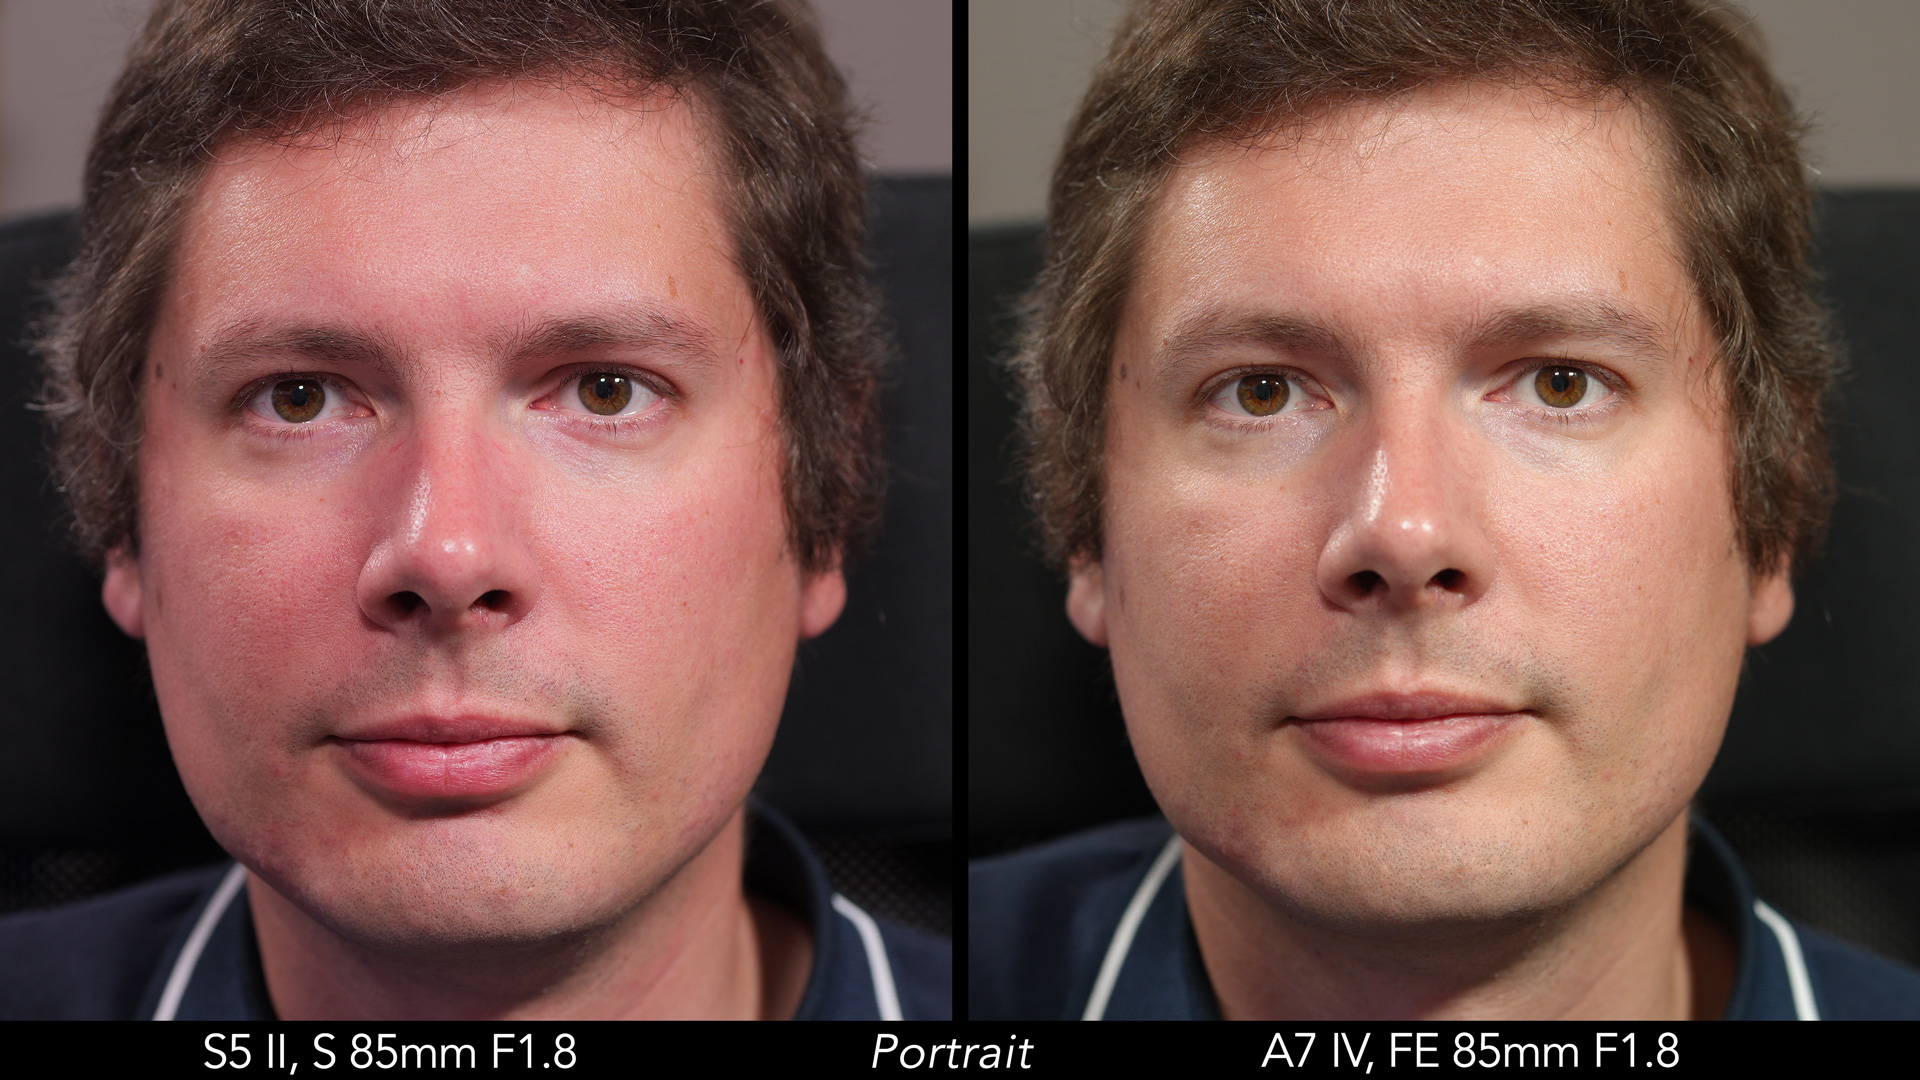
But once again, you have the flexibility to make adjustments in-camera. Specifically, you can utilise the WB shift function to correct the colours according to your preferences.
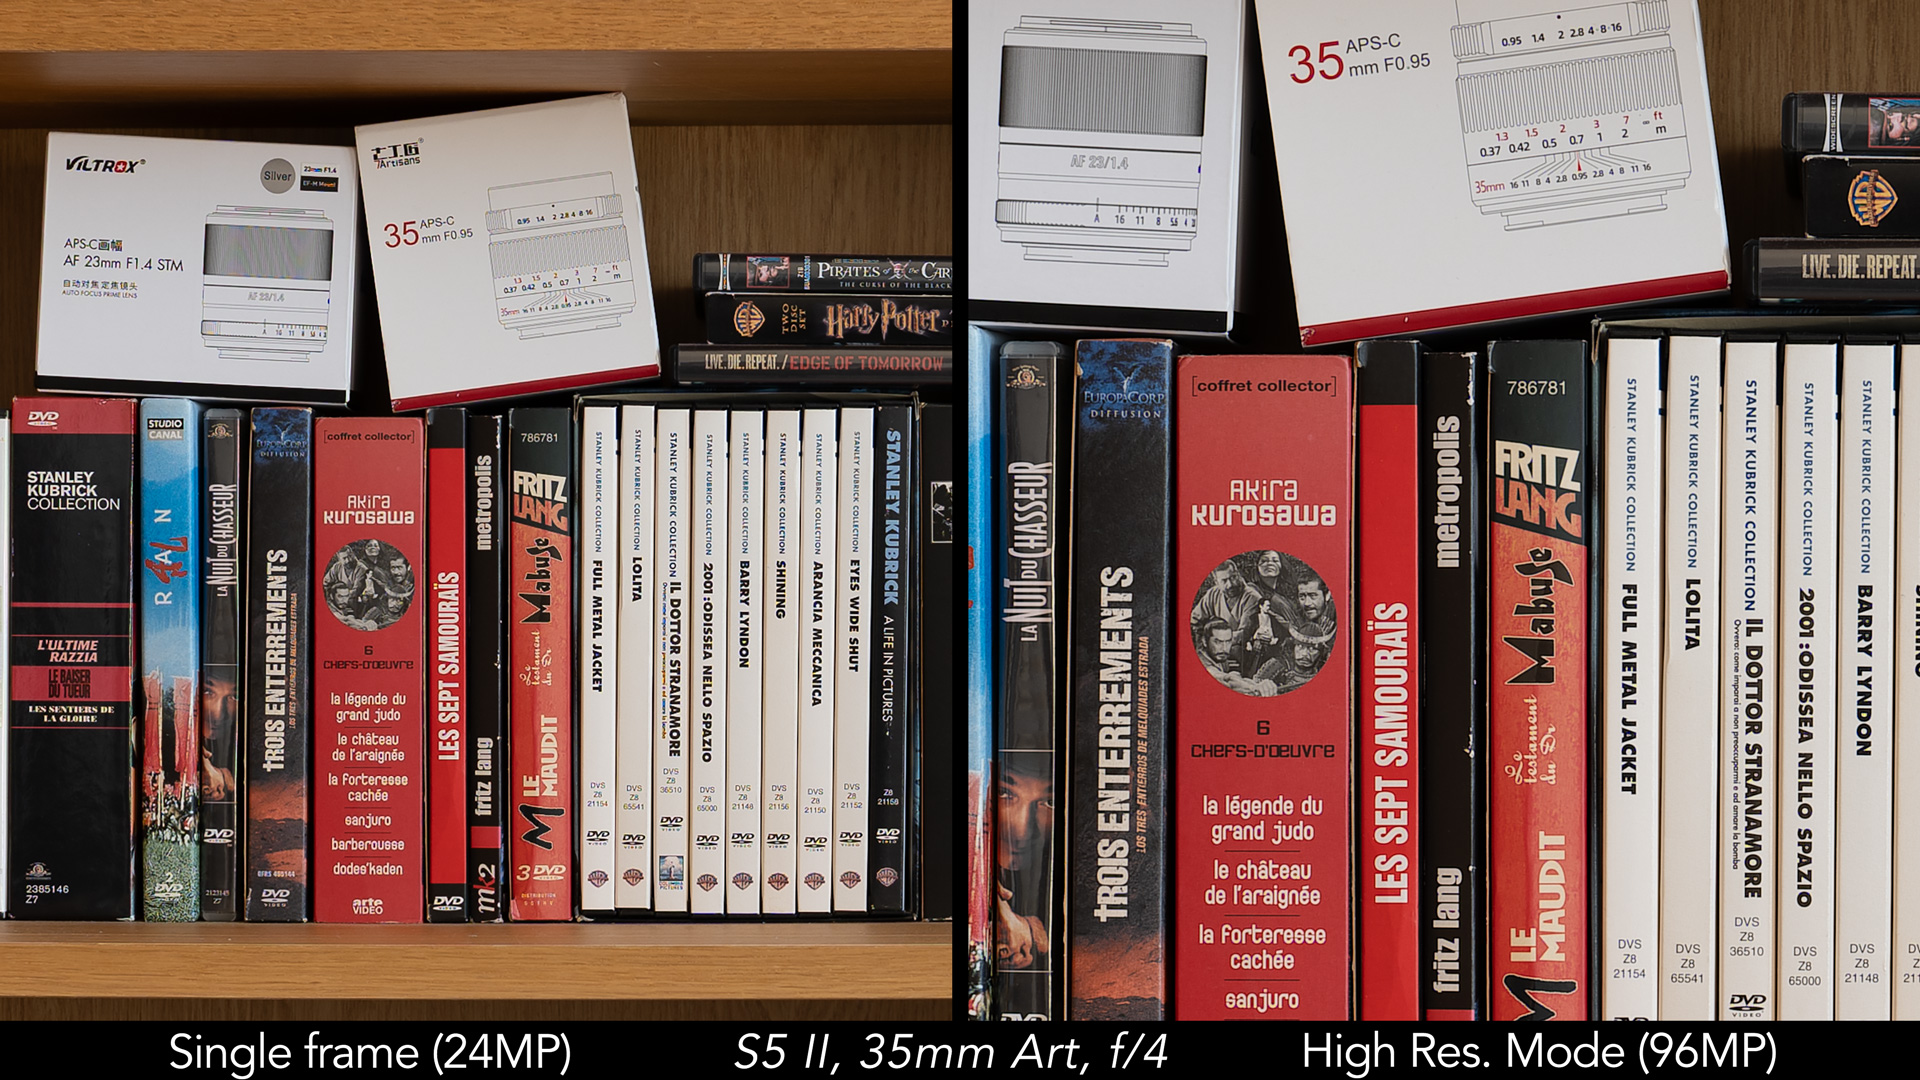
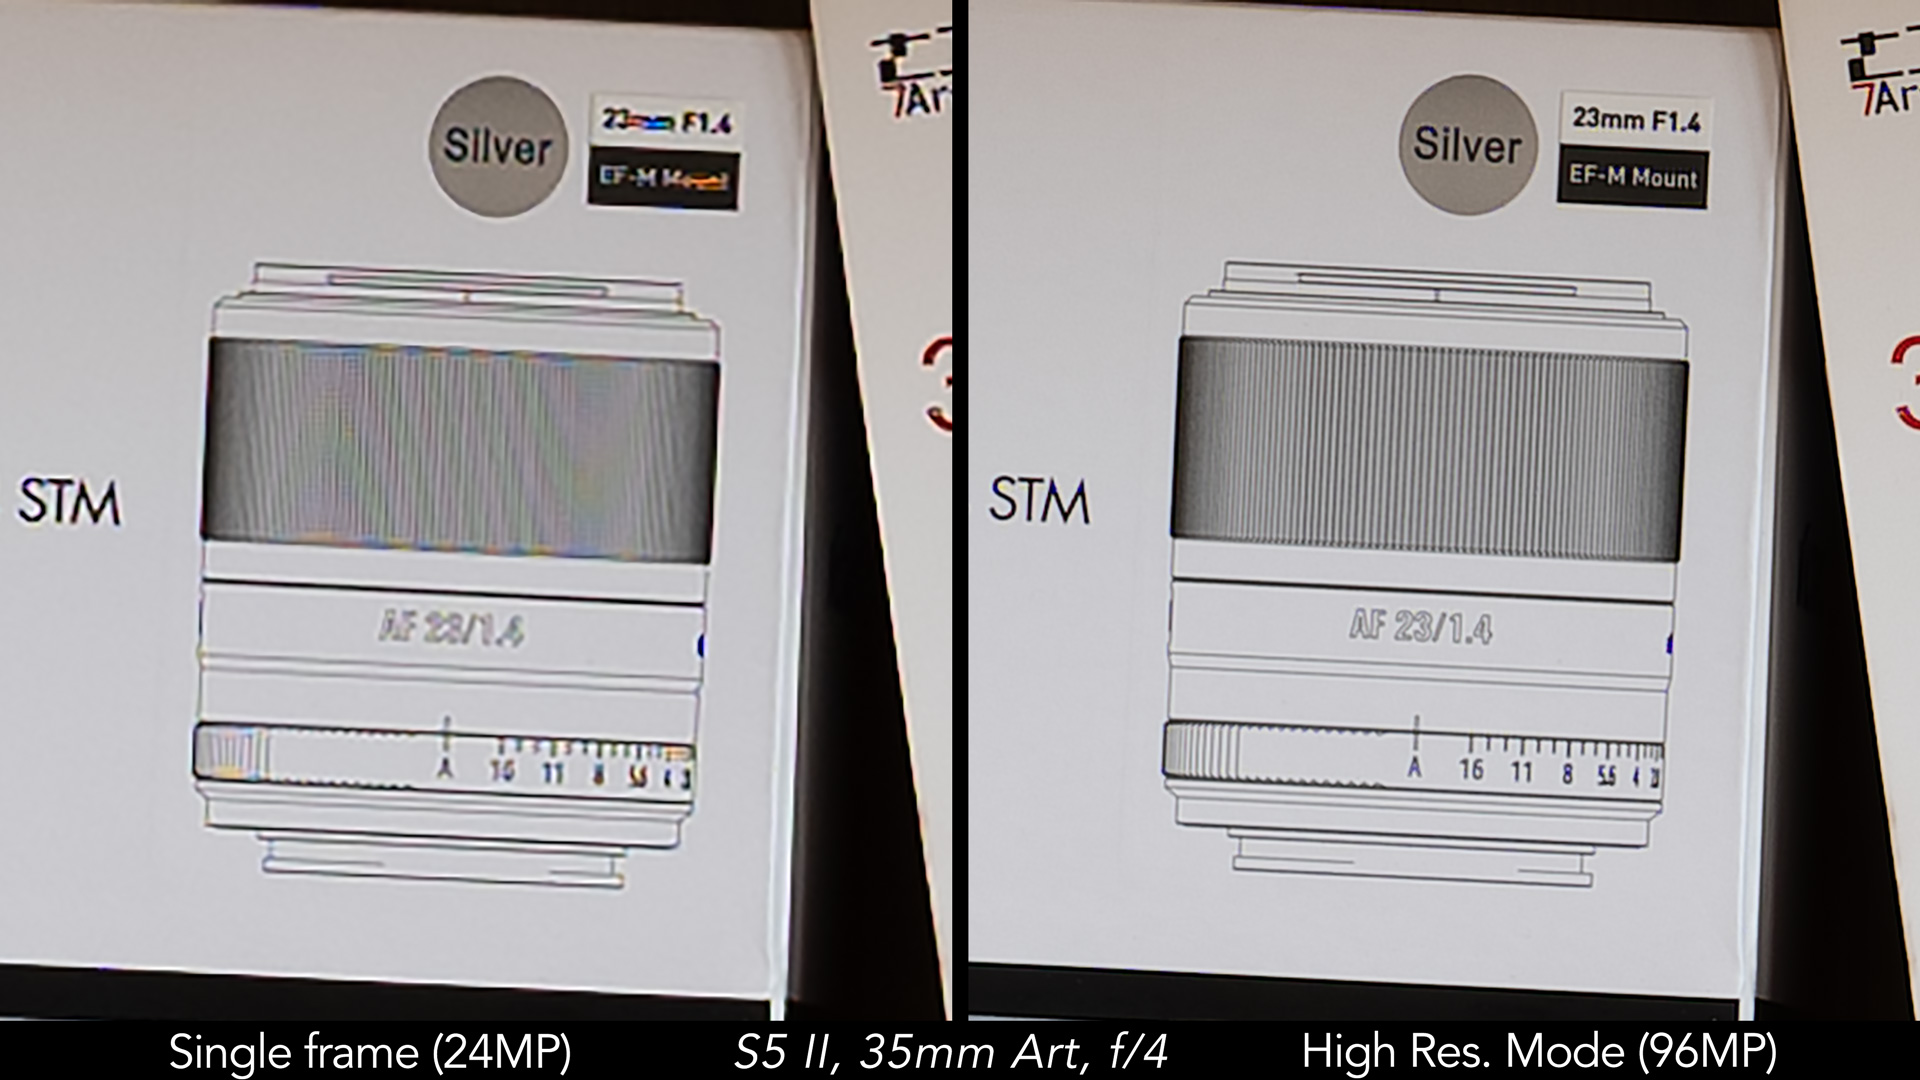
3. High Resolution Mode
There is a special feature you’ll find exclusively on the S5 mark II — the High-Resolution Mode. This function isn’t new; you can find it on many mirrorless cameras, including some Sony models.
Essentially, thanks to the sensor-shift technology that provides 5-axis image stabilisation, the S5 can capture 8 frames in a row, shifting the sensor by half a pixel between each shot. It then merges these 8 photos in-camera to create a final image with 96 megapixels of resolution. And while the Sony A7 IV also features 5-axis image stabilisation (which we’ll discuss the dedicated chapter), Sony has reserved this extra function for its high-end cameras, for now at least.
As you can see here, the 96-megapixel file offers an incredible amount of detail. The clarity and definition are significantly enhanced, and moiré is effectively eliminated. This is because colour resolution has increased as well, due to each point on the image being captured by all three red, blue, and green pixels.
However, as with many other cameras that share this high resolution mode, there are a few limitations to keep in mind. Firstly, the S5 needs to be mounted on a robust tripod to avoid any camera shake. Additionally, moving elements within your scene can pose a challenge.
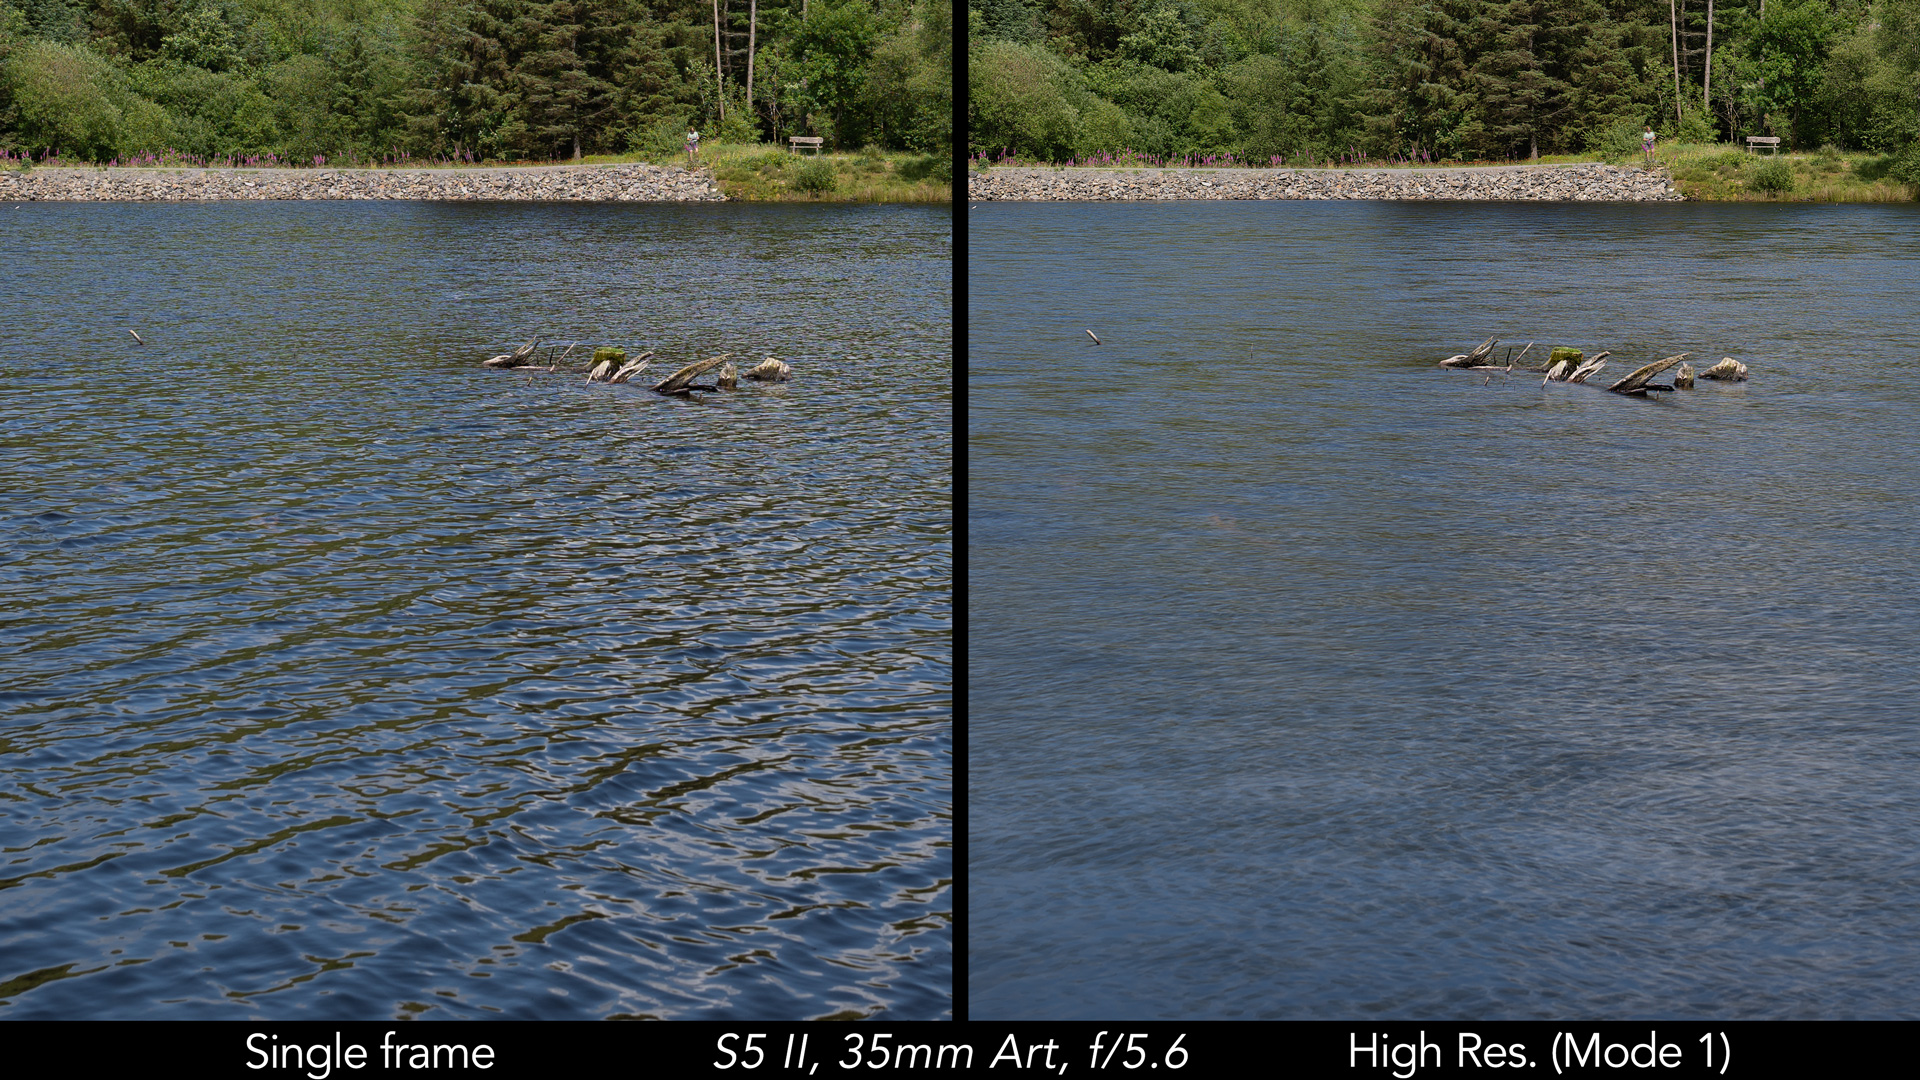
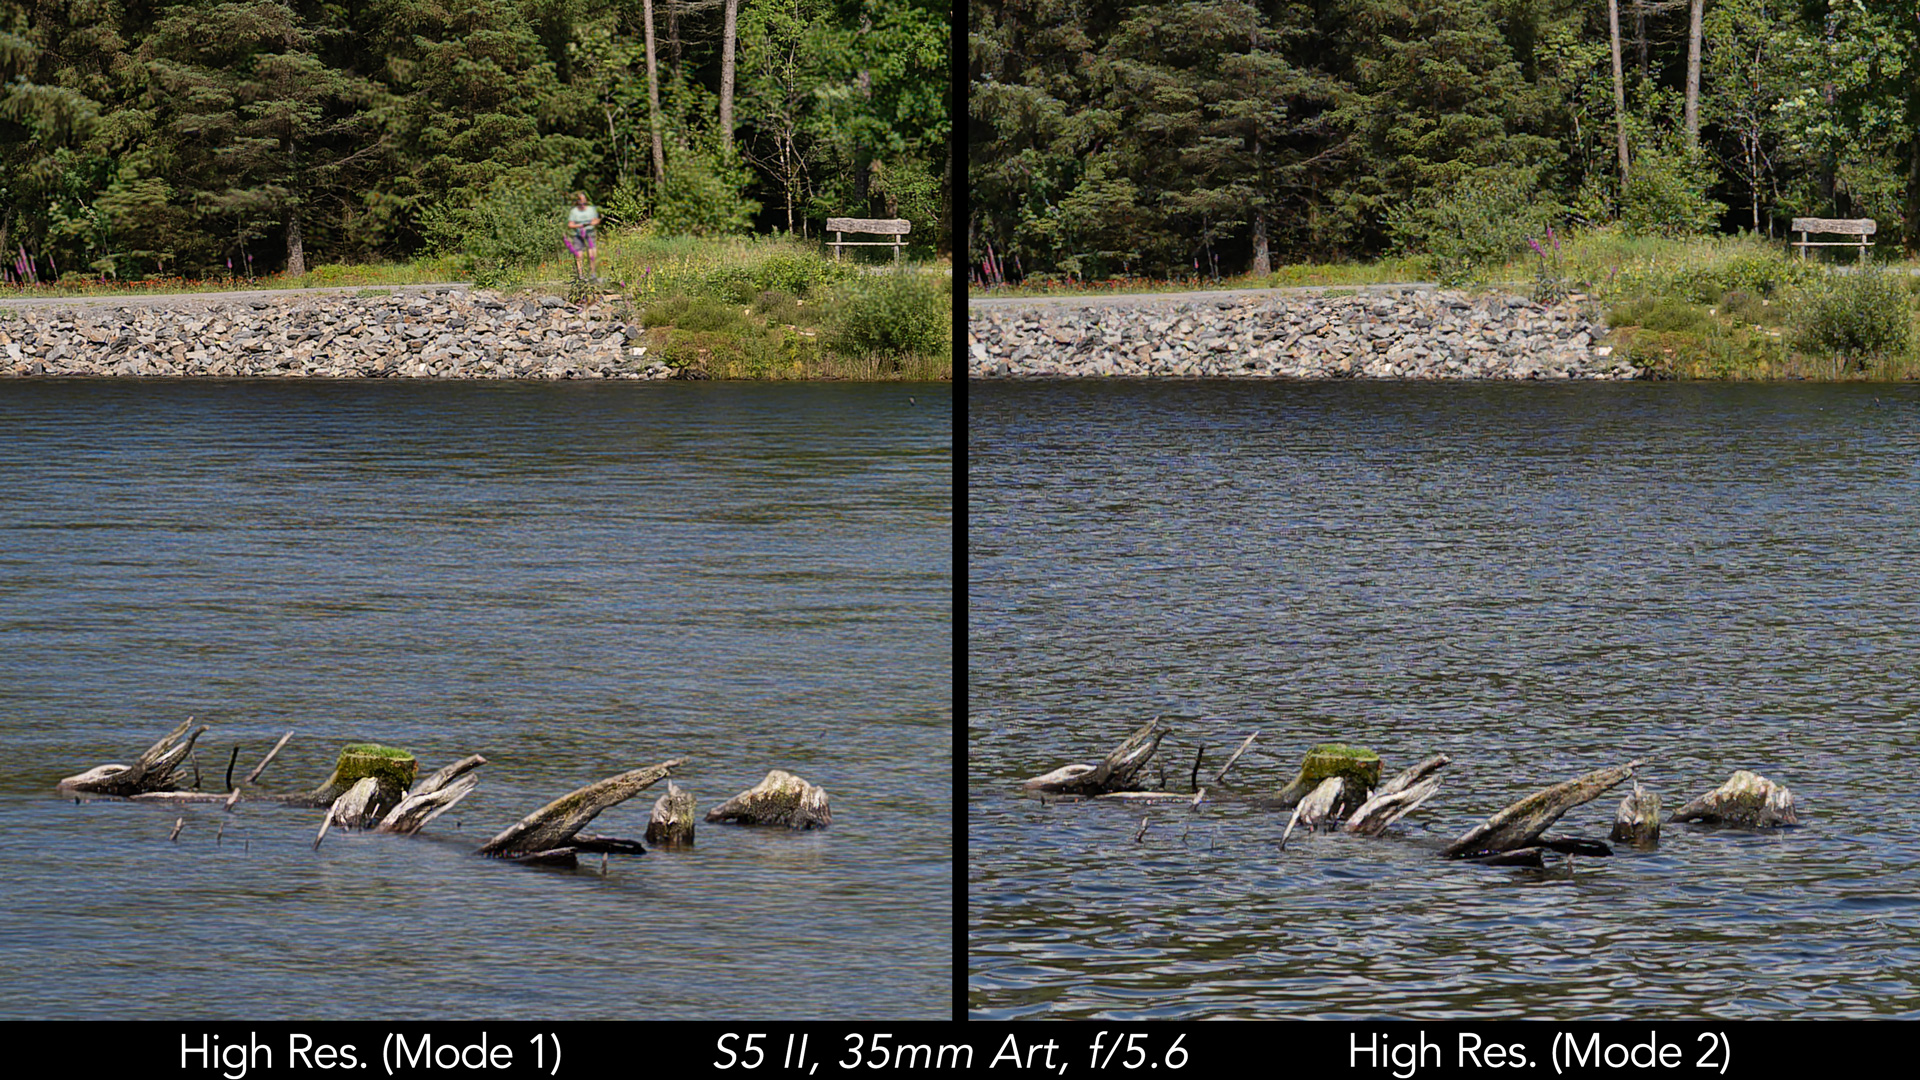
Panasonic provides two options: Mode 1, works well when there is no movement, whereas Mode 2 compensates for movements by taking portions of a single frame and merging them into the final image.
In Mode 1, as you can see, the water appears unnatural, losing all the details of the waves.
Additionally, if you look at the sky, flying birds appear multiplied and almost ghost-like. While they can be easily removed in post-production when against a plain blue sky, it can be more challenging if they are flying against trees or complex backgrounds.
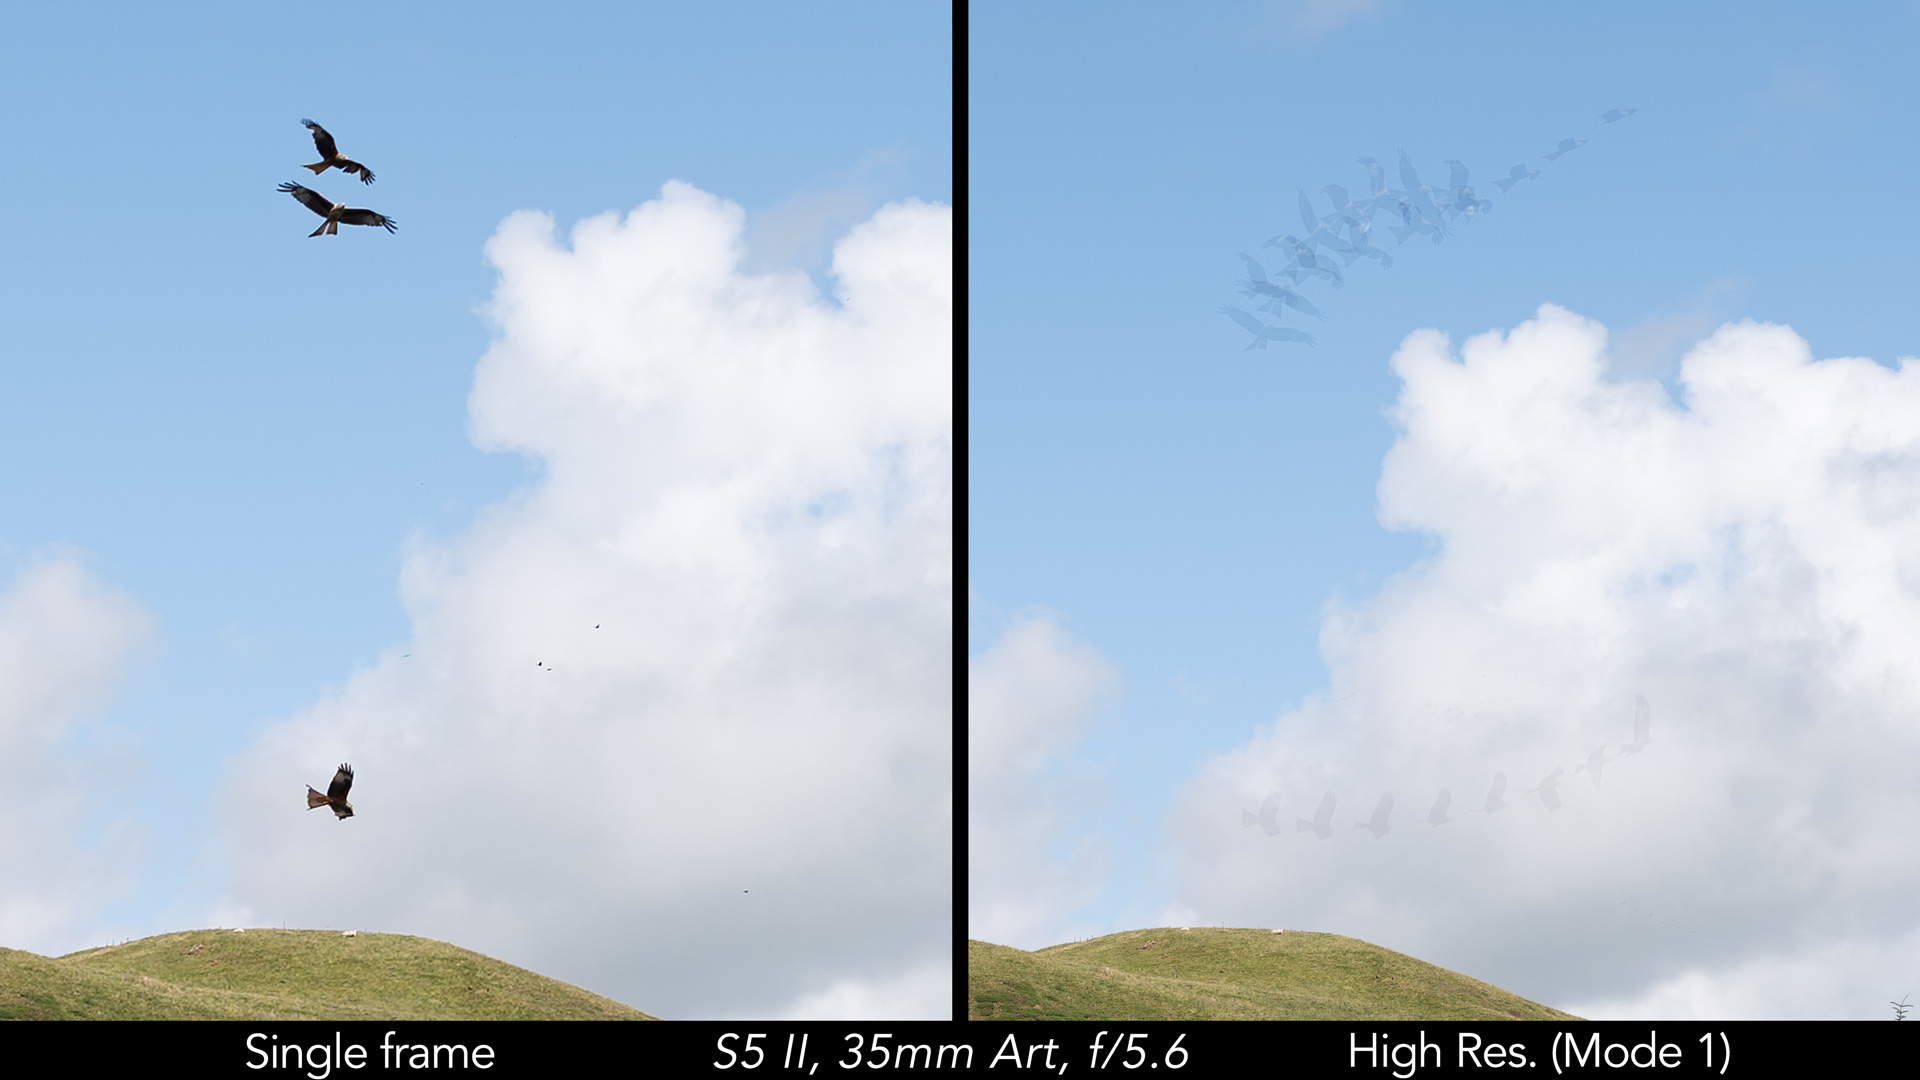
With mode 2, as you can observe, the water looks natural now, and the birds are properly captured without any artefact.
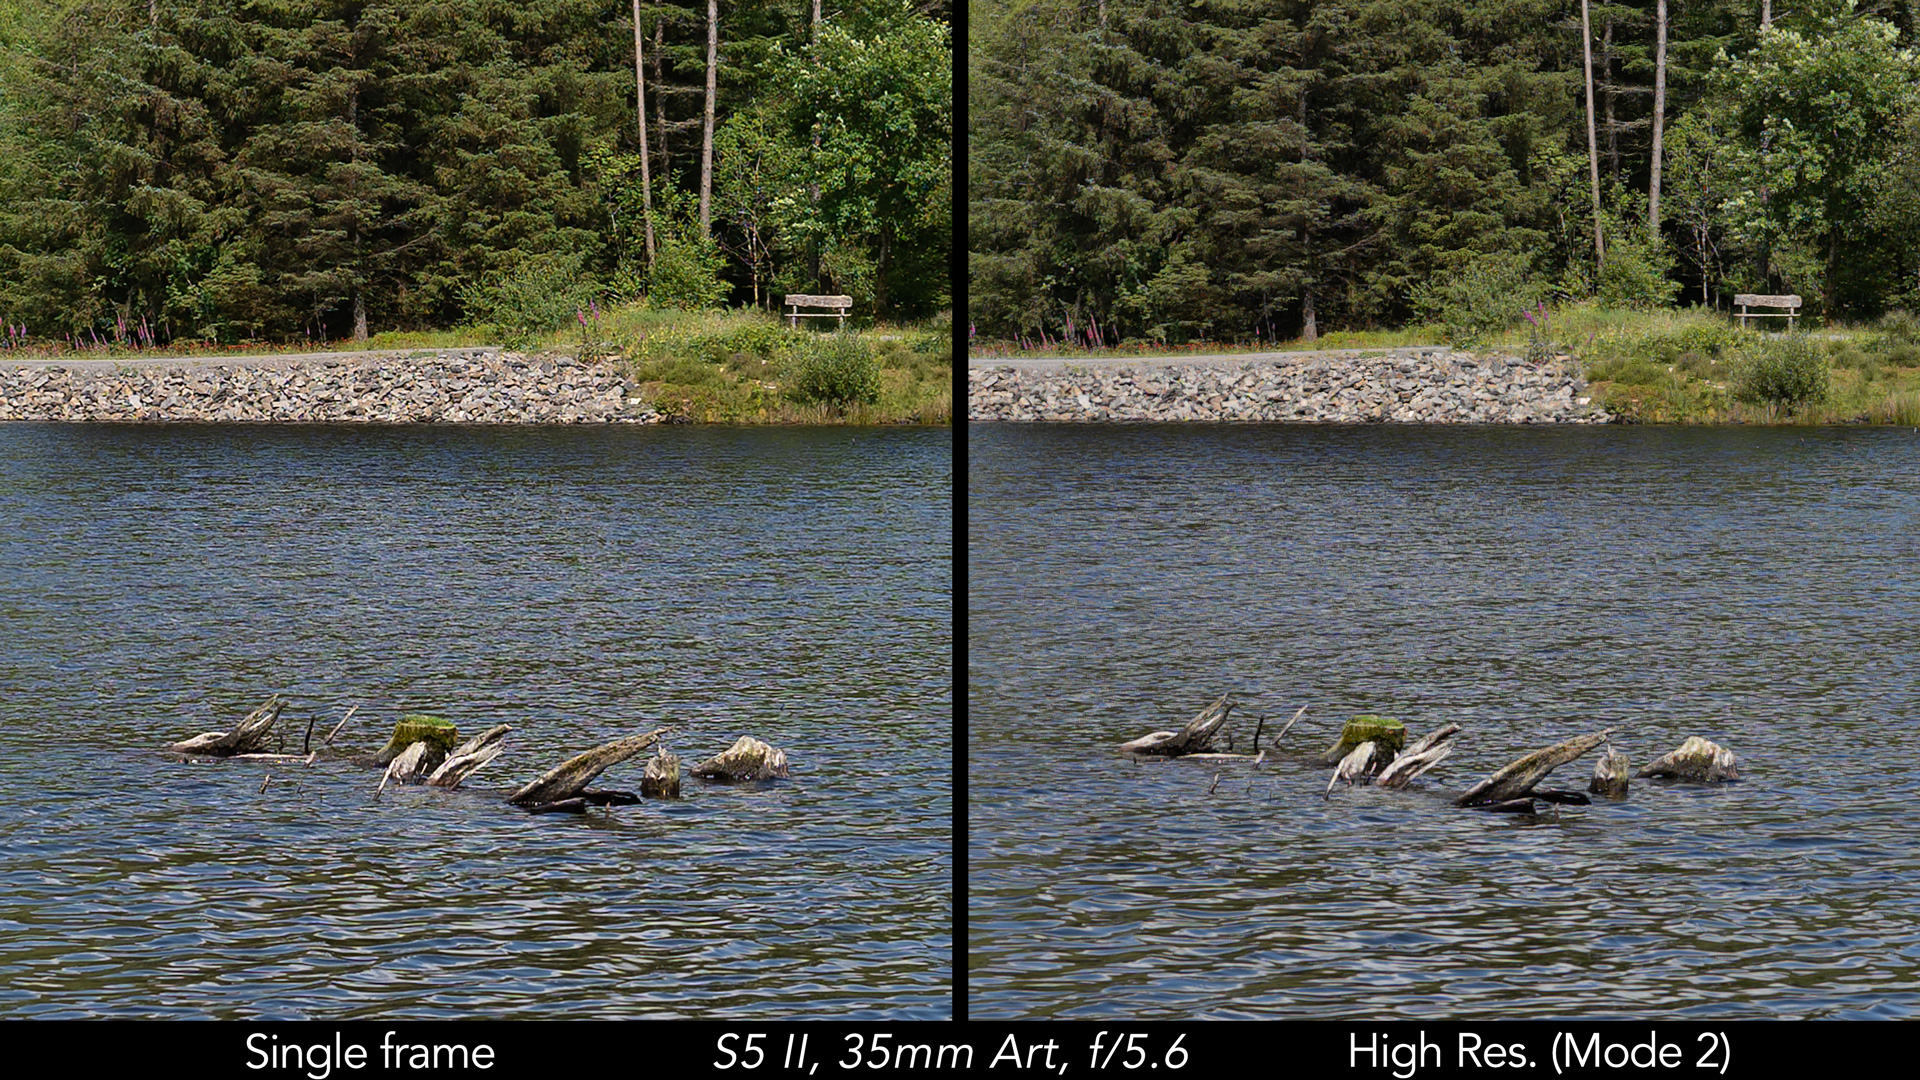

However, Mode 2 also decreases sharpness throughout the entire image. If you take a look at the stone wall in the background, which was certainly unaffected by the wind, the image taken with Mode 1 appears sharper. Perhaps Mode 2 tends to overcompensate.
So the high resolution mode is an interesting feature but has its limitations in terms of when and how it can be effectively used. Potentially, its best application would be still life photography in a studio but unfortunately, flash doesn’t work when this mode is enabled.
4. Autofocus
I’m not going to delve into a detailed history and technical explanation to keep this article as concise as possible. However, it’s important to understand that as mirrorless cameras evolved and became more competitive, most camera brands transitioned from contrast detection autofocus to phase detection autofocus. This change was driven by the fact that phase detection AF is faster, more accurate, and more reliable, particularly in capturing moving subjects and working in challenging situations.
Panasonic, on the other hand, chose to stick with contrast detection autofocus and developed their own version called Depth From Defocus, or DfD.
Now, I’ve tested many cameras with DfD autofocus, and to be fair, they performed decently in many situations. However, they struggled with challenging subjects, such as birds flying against busy backgrounds. They also proved to be unreliable and unpredictable, causing issues even with simple things like using face detection for vlogging. There are plenty of YouTube videos discussing these limitation and, as a result, Panasonic gained a somewhat negative reputation for their autofocus performance.
When the S1 and S1R, Panasonic’s first full-frame cameras, were released in 2019 with DfD autofocus once again, many people, including myself, started to lose interest in Lumix cameras, except for specific products like the GH6 or the S1H from a videomaker’s perspective.

That’s why the S5 mark II is significant – it shows that Panasonic finally understood that phase detection autofocus is the better choice. Now, the question we all want to know is: how does it compare to other mirrorless cameras, such as the A7 IV?
Note: the S5 II uses DfD autofocus in Single AF mode, but switches to phase detection in continuous mode.
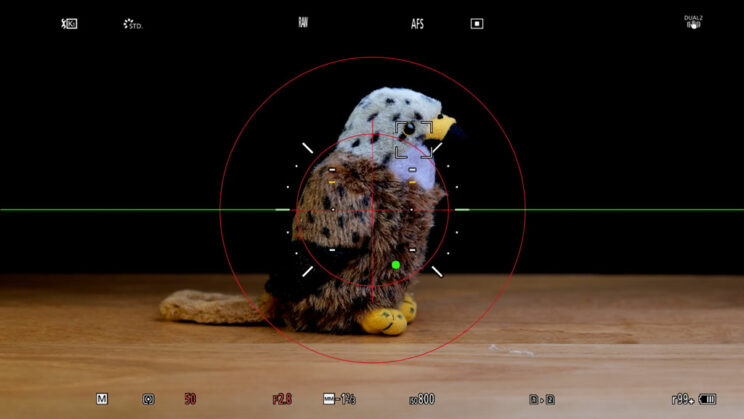
Let’s start with my face and eye detection test. The S5 II offers two options: the Human setting, which tracks the entire body, and the Face/Eye setting which, as you can guess, focuses only on the face and eyes.
Using the Human setting, the camera appears to be detecting the person even when they turn away, whereas the other setting reverts to normal focus points. But that’s what you see on the LCD screen. When I analyse the actual photographs, the Face/Eye only setting proves to be more accurate. The Human setting struggles more, especially when the subject is farther away.
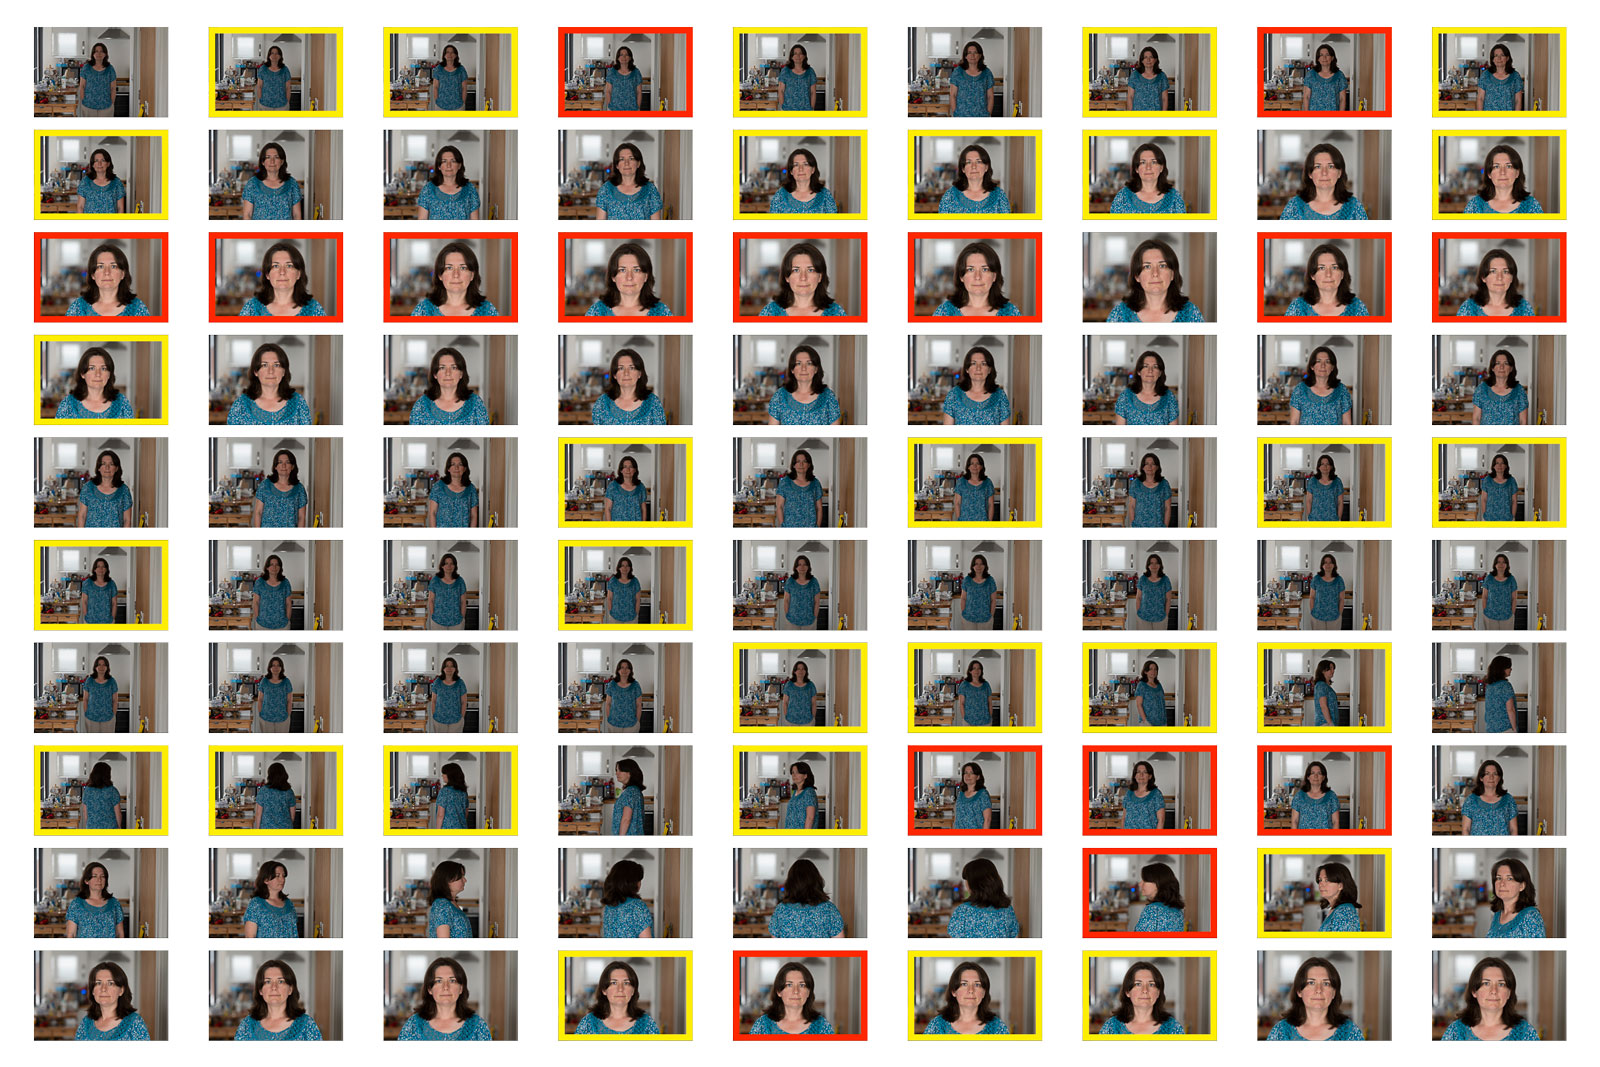
90 photos: 15 out of focus, 29 slightly soft
Keeper rate: 51%
96 photos: 16 out of focus, 20 slightly soft
Keeper rate: 62%
A 62% keeper rate is not bad, but in comparison, the A7 IV performs much better with a 90% accuracy. There are no issues when the subject is smaller in the frame, and it corrects focus more quickly. Even when the focus is slightly off, it’s only by a very small amount.
85 photos: 1 out of focus, 7 slightly soft
Keeper rate: 90%
For video, however, the performance is pretty much the same. You might expect the S5 mark II to be worse, considering what I just showed you, but it actually does much better than in photo mode. It’s stable, fast, and I got the same result with both the Human setting and the Face/Eye setting.
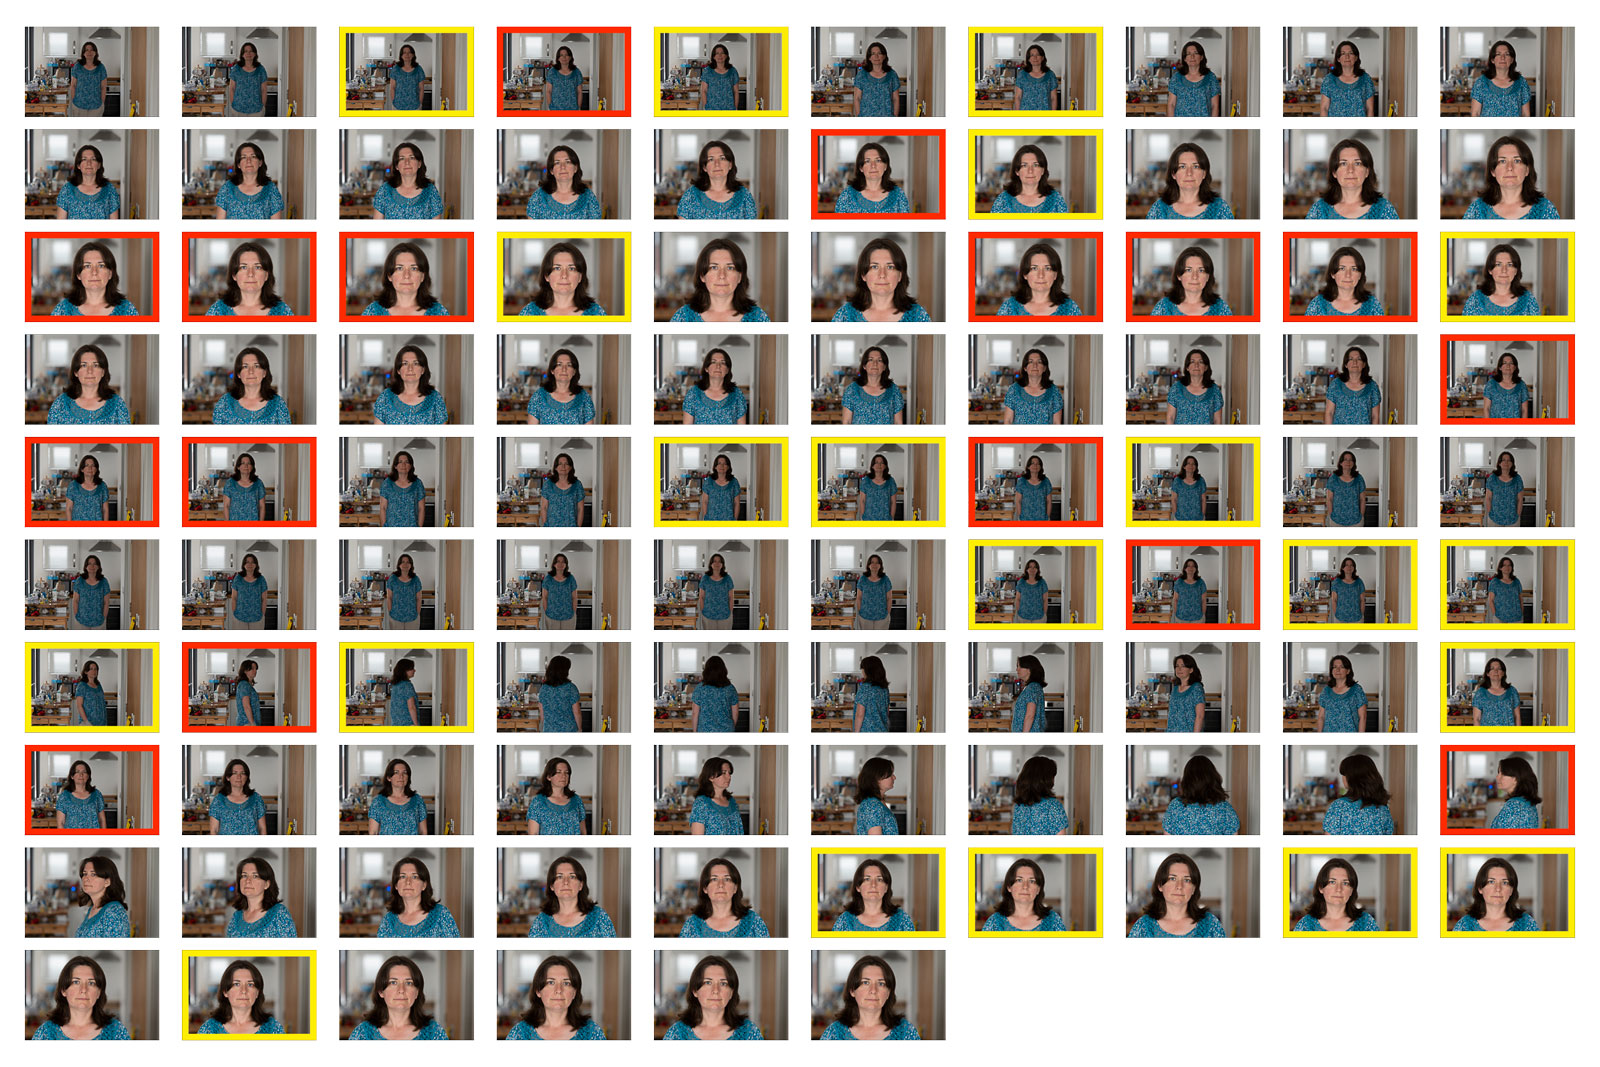
In another test, this time in low light, we see a similar difference in still images. The S5 struggles more, while the A7 IV maintains a better keeper rate. But for video, once again, they perform at the same level. So, it seems that the Panasonic excels more in video recording than in stills.
31 photos, 6 out of focus, 7 slightly soft
Keeper rate: 58%
27 photos: 1 out of focus, 5 slightly soft
Keeper rate: 78%
In addition to these tests, I used the S5 mark II for a gig at my local cinema. I have used the A7 IV in the same location multiple times in the past.

In this situation, the S5 mark II worked well once I turned off subject detection and used the traditional single autofocus point. With that, it rarely missed a shot. It occasionally misfocused on the background, but it was just one frame, and then it was back on track.
Face and eye detection were more limiting because as soon as the singer turned his or her head slightly, the S5 stopped detecting the subject too easily and occasionally jumped to something else, like the shirt or the person’s arm. The tracking mode was also unreliable, easily jumping from one thing to another.
The main difference with the A7 is that you have the ability to use Eye AF at all times. It remains stable and highly precise, even when the person is moving. Another advantage is the possibility to combine Eye AF with the tracking mode. If the musician momentarily turns away, the tracking area will remain locked onto the musician’s head, and as soon as the eye becomes visible again, the camera will switch back to focusing on the eye.

Both cameras have the ability to recognise animals, not just humans. The A7 IV has a specific setting for birds. The Sony only focuses on the eye of the animal, whereas the S5 II detects the entire body.
When it comes to static animals, particularly small animals surrounded by elements such as branches, the animal detection feature on the Panasonic camera is not reliable. After a couple of minutes, I had to turn it off because the autofocus area was constantly shifting across the screen, mistakenly focusing on a foreground leaf or a background branch instead of the bird in the centre. Once again, the single AF point setting is the way to go on the S5.
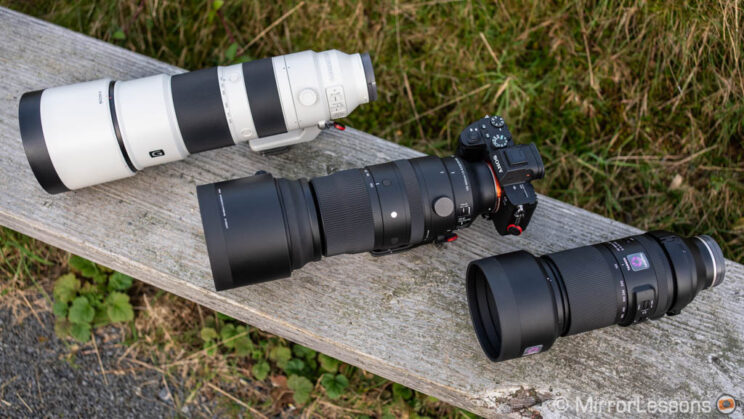
150-600mm F5-6.3 DG DN OS Sports 021

150-600mm F5-6.3 DG DN OS Sports 021
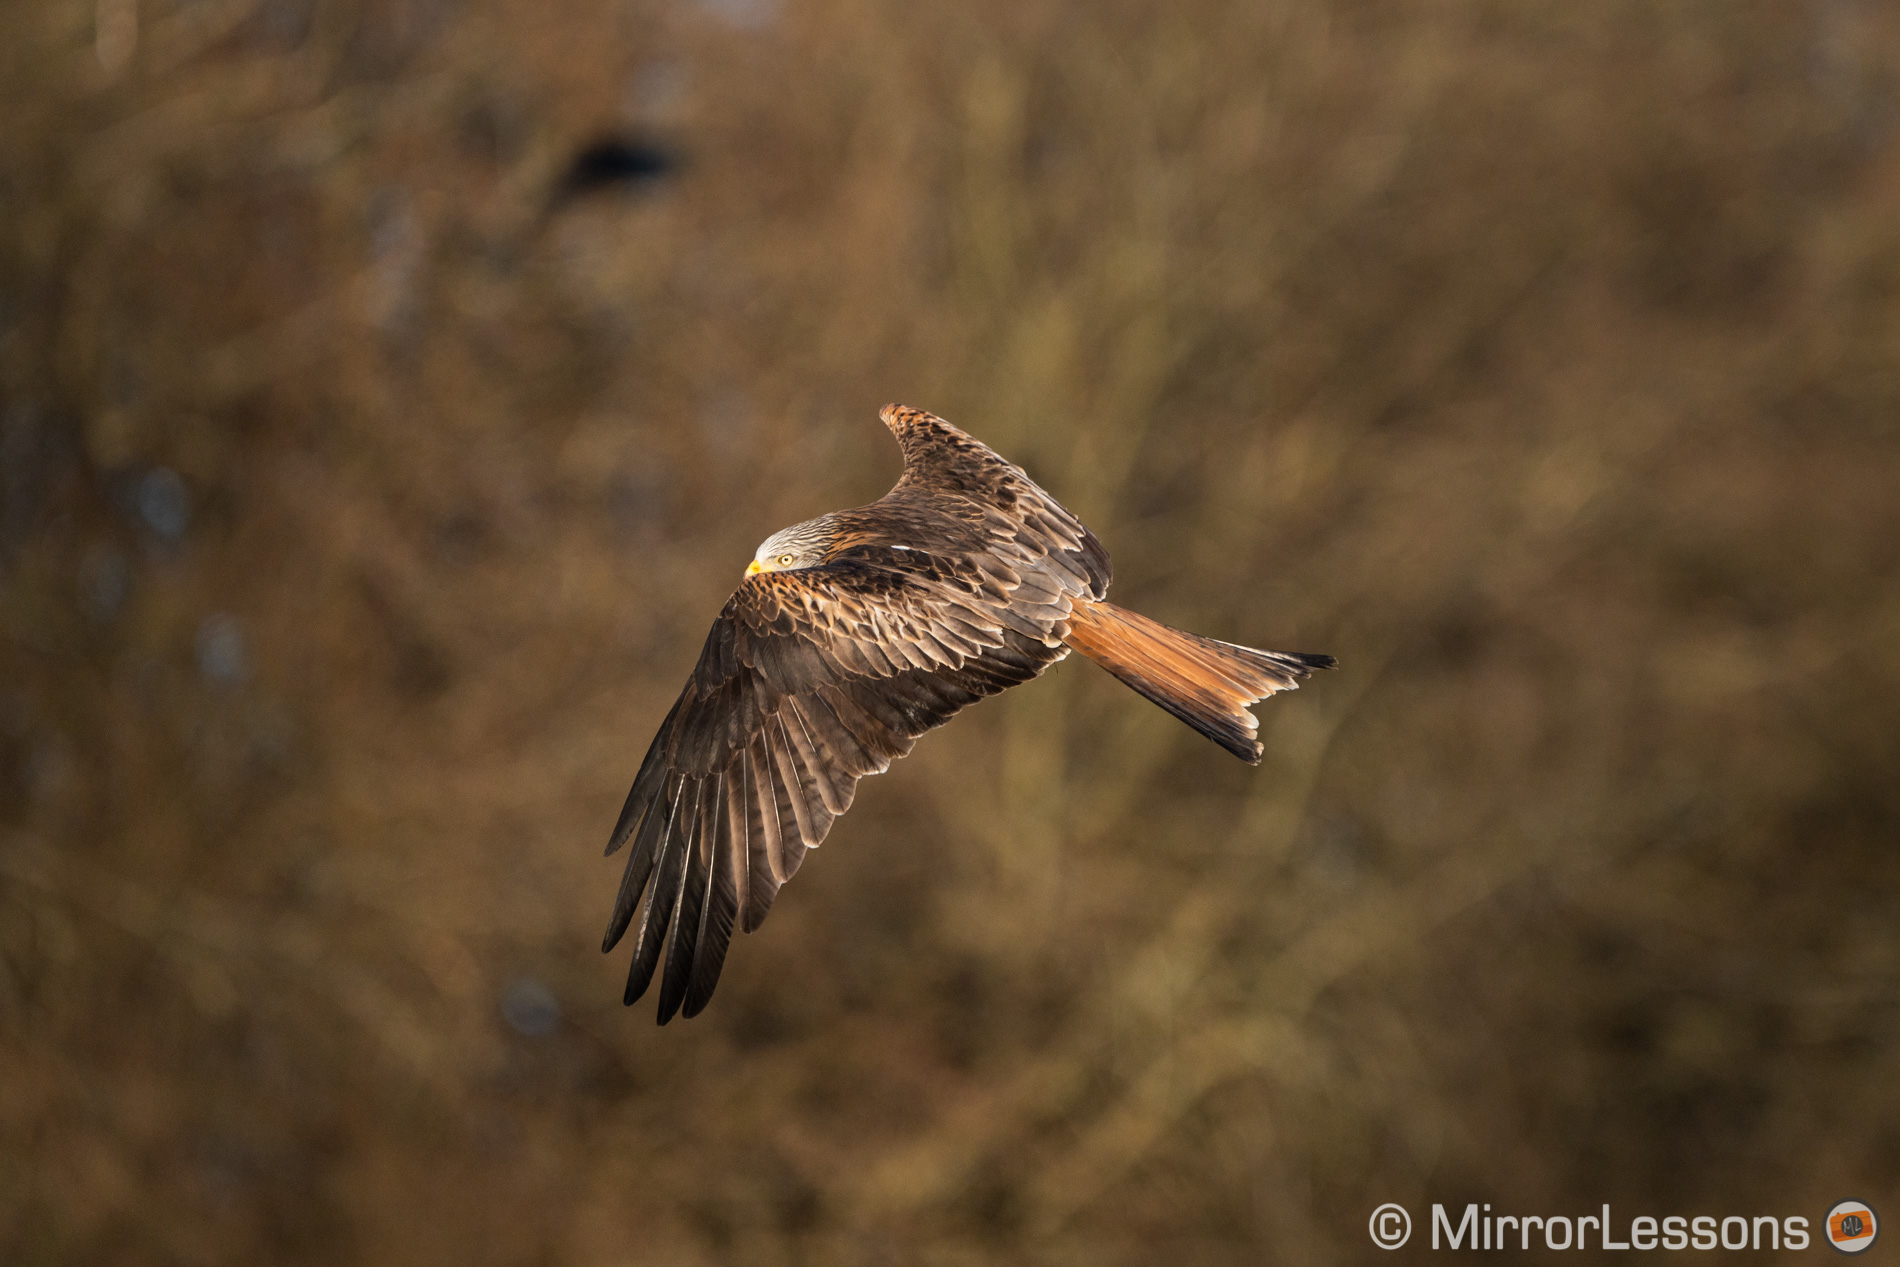
With the A7 IV, you have the advantage of using Eye AF at all times. Even when the bird is partially covered by elements, the camera still recognises the subject. It may not always be flawless, but it will deliver consistent performance most of the time.

FE 200-600mm F5.6-6.3 G OSS + 1.4X Teleconverter

FE 200-600mm F5.6-6.3 G OSS + 1.4X Teleconverter
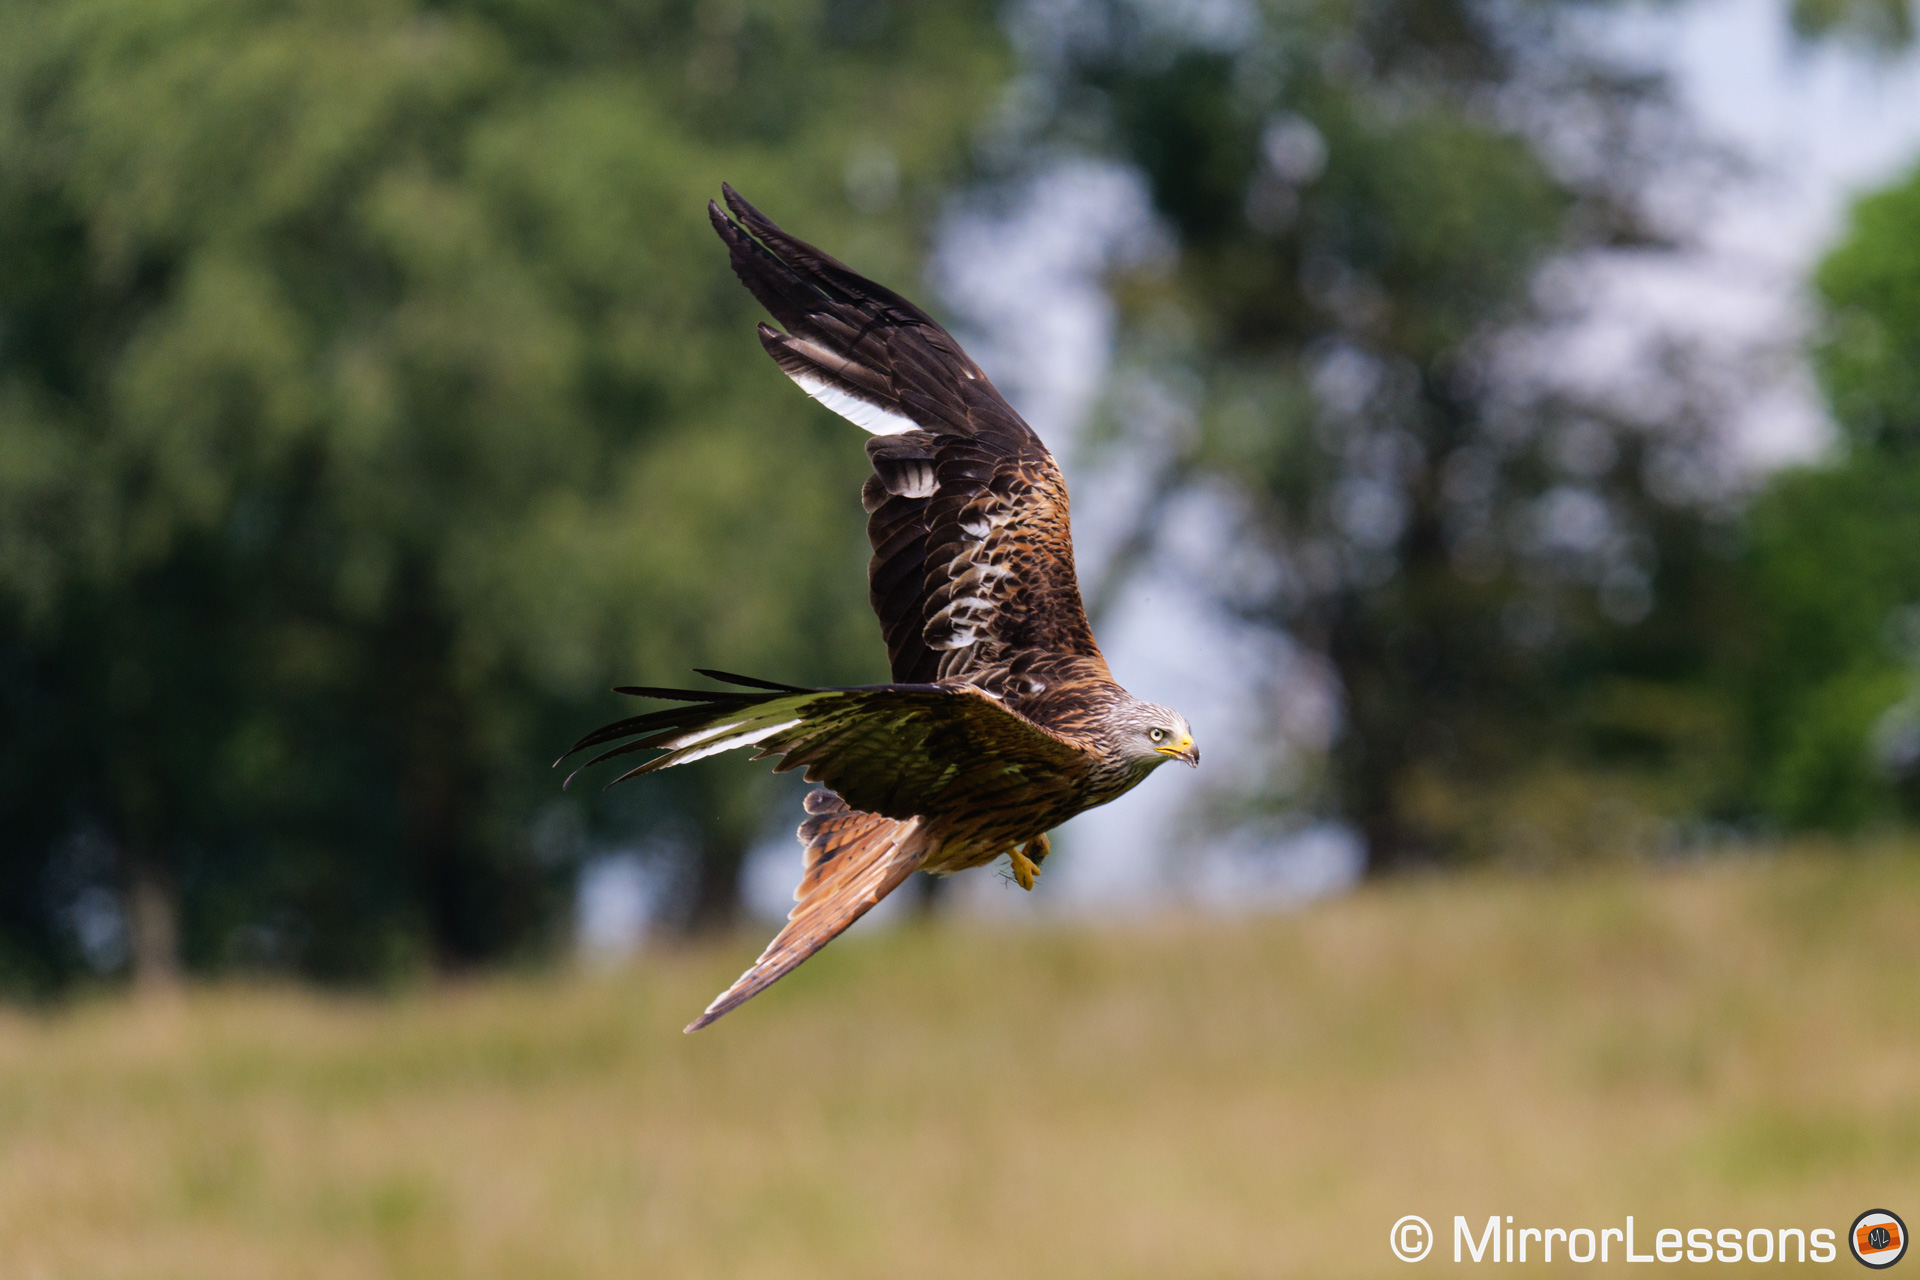
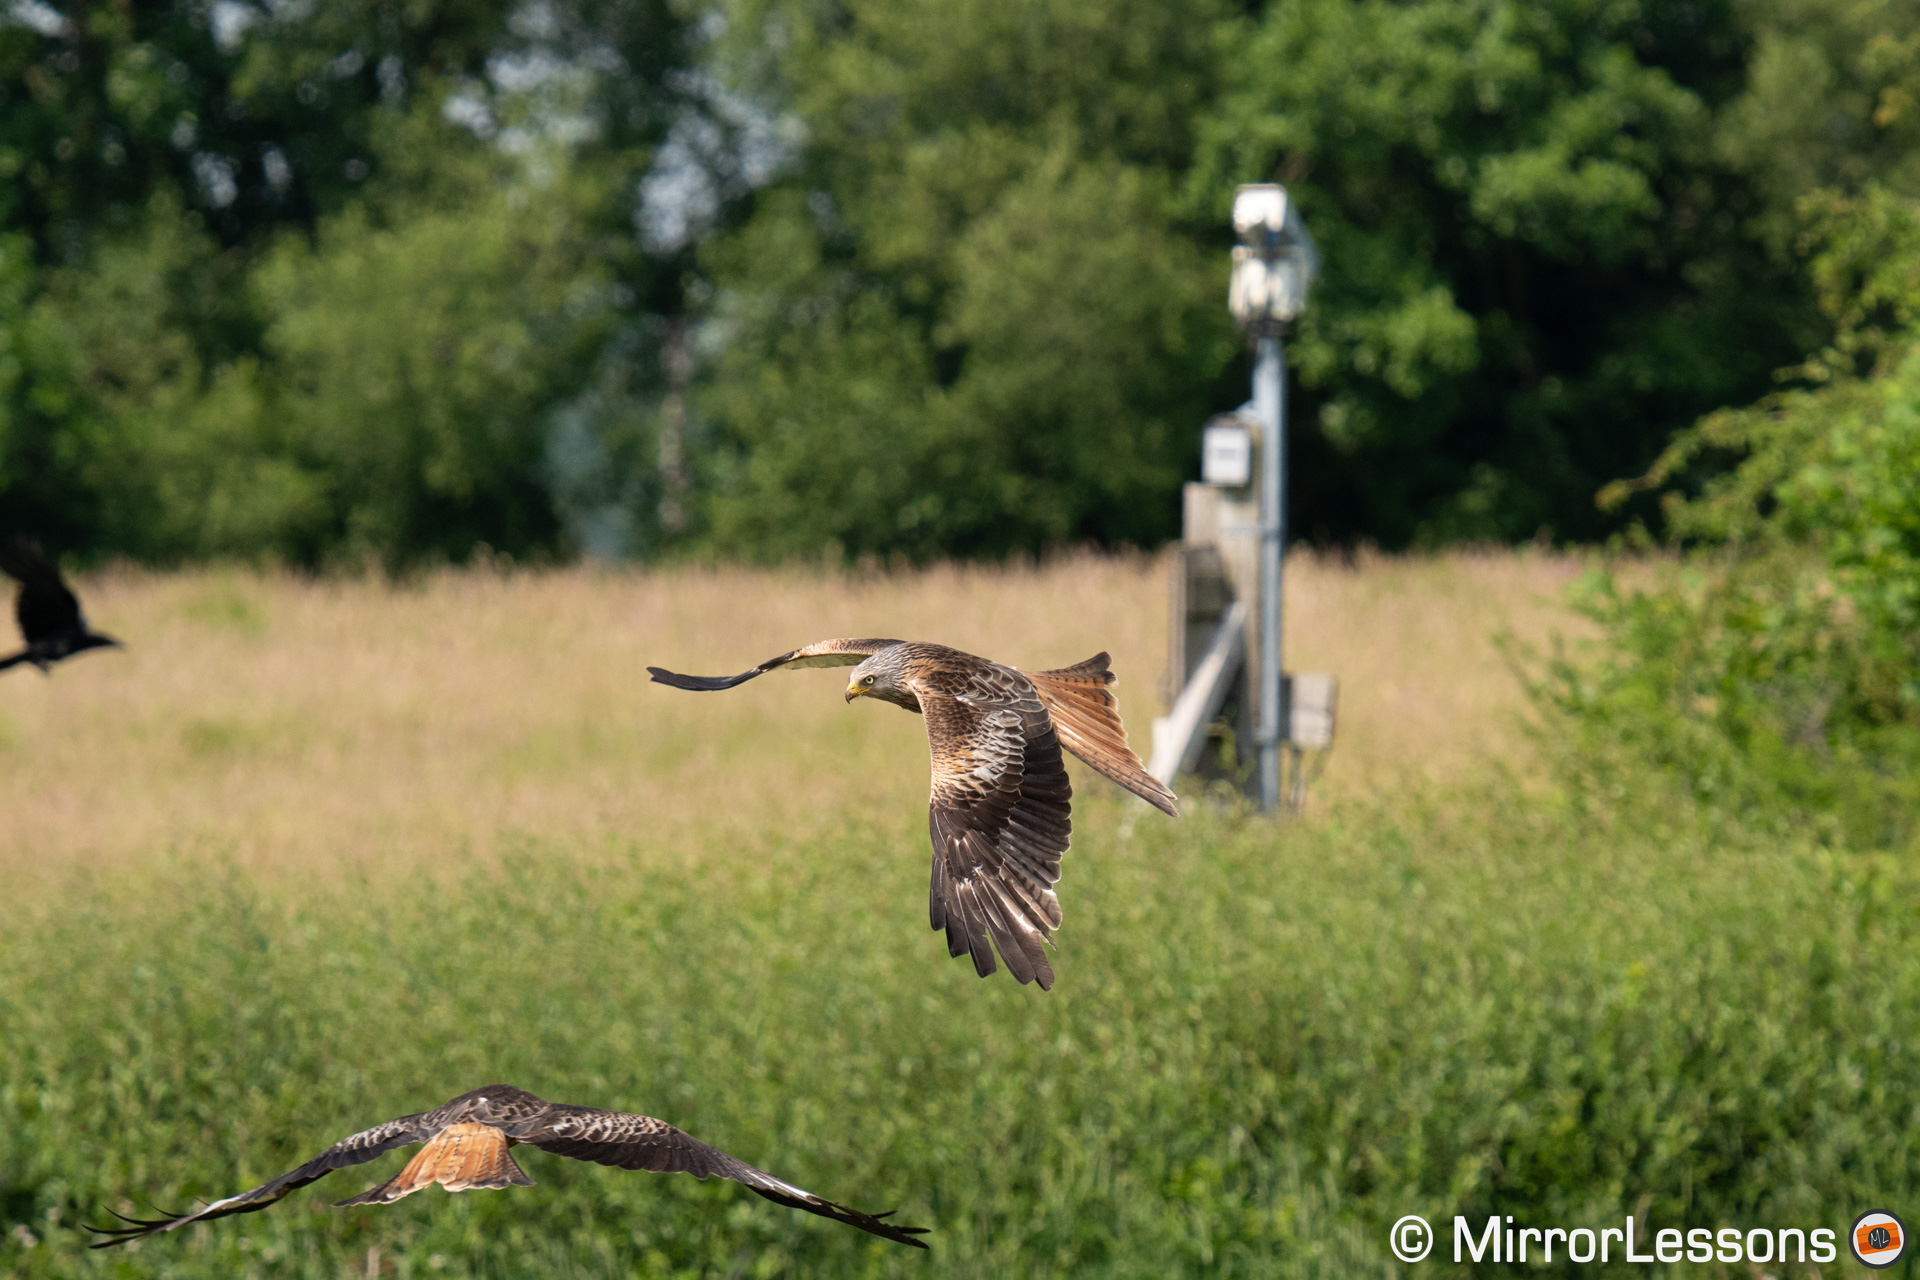
Now, let’s move on to my birds in flight test, and I’m sure some of you skipped ahead to this part right away. First, let’s talk about the AF score for birds in flight. For more detailed information, you can check out the full article.
In short, the A7 IV delivers a higher keeper rate, but what I was able to achieve with the S5 mark II surpasses any previous Lumix camera I’ve tested in this specific scenario.
AF Score – Birds in Flight
A7 IV
94%
99%
S5 II
83%
96%
The inclusion of phase detection makes a significant difference in the S5 model. The autofocus is much more stable, even with a busy background. It doesn’t get as easily confused as previous DfD cameras.
150-600mm F5-6.3 DG DN OS Sports 021
Below, you can see the average score with both clear and busy backgrounds, and it’s much more consistent. Previous cameras would perform well with a clear sky background, but their performance would drop to around 40% or 30% with a busy background.
S5 II – AF Score – Birds in Flight
Busy background
81%
96%
Clear background
86%
96%
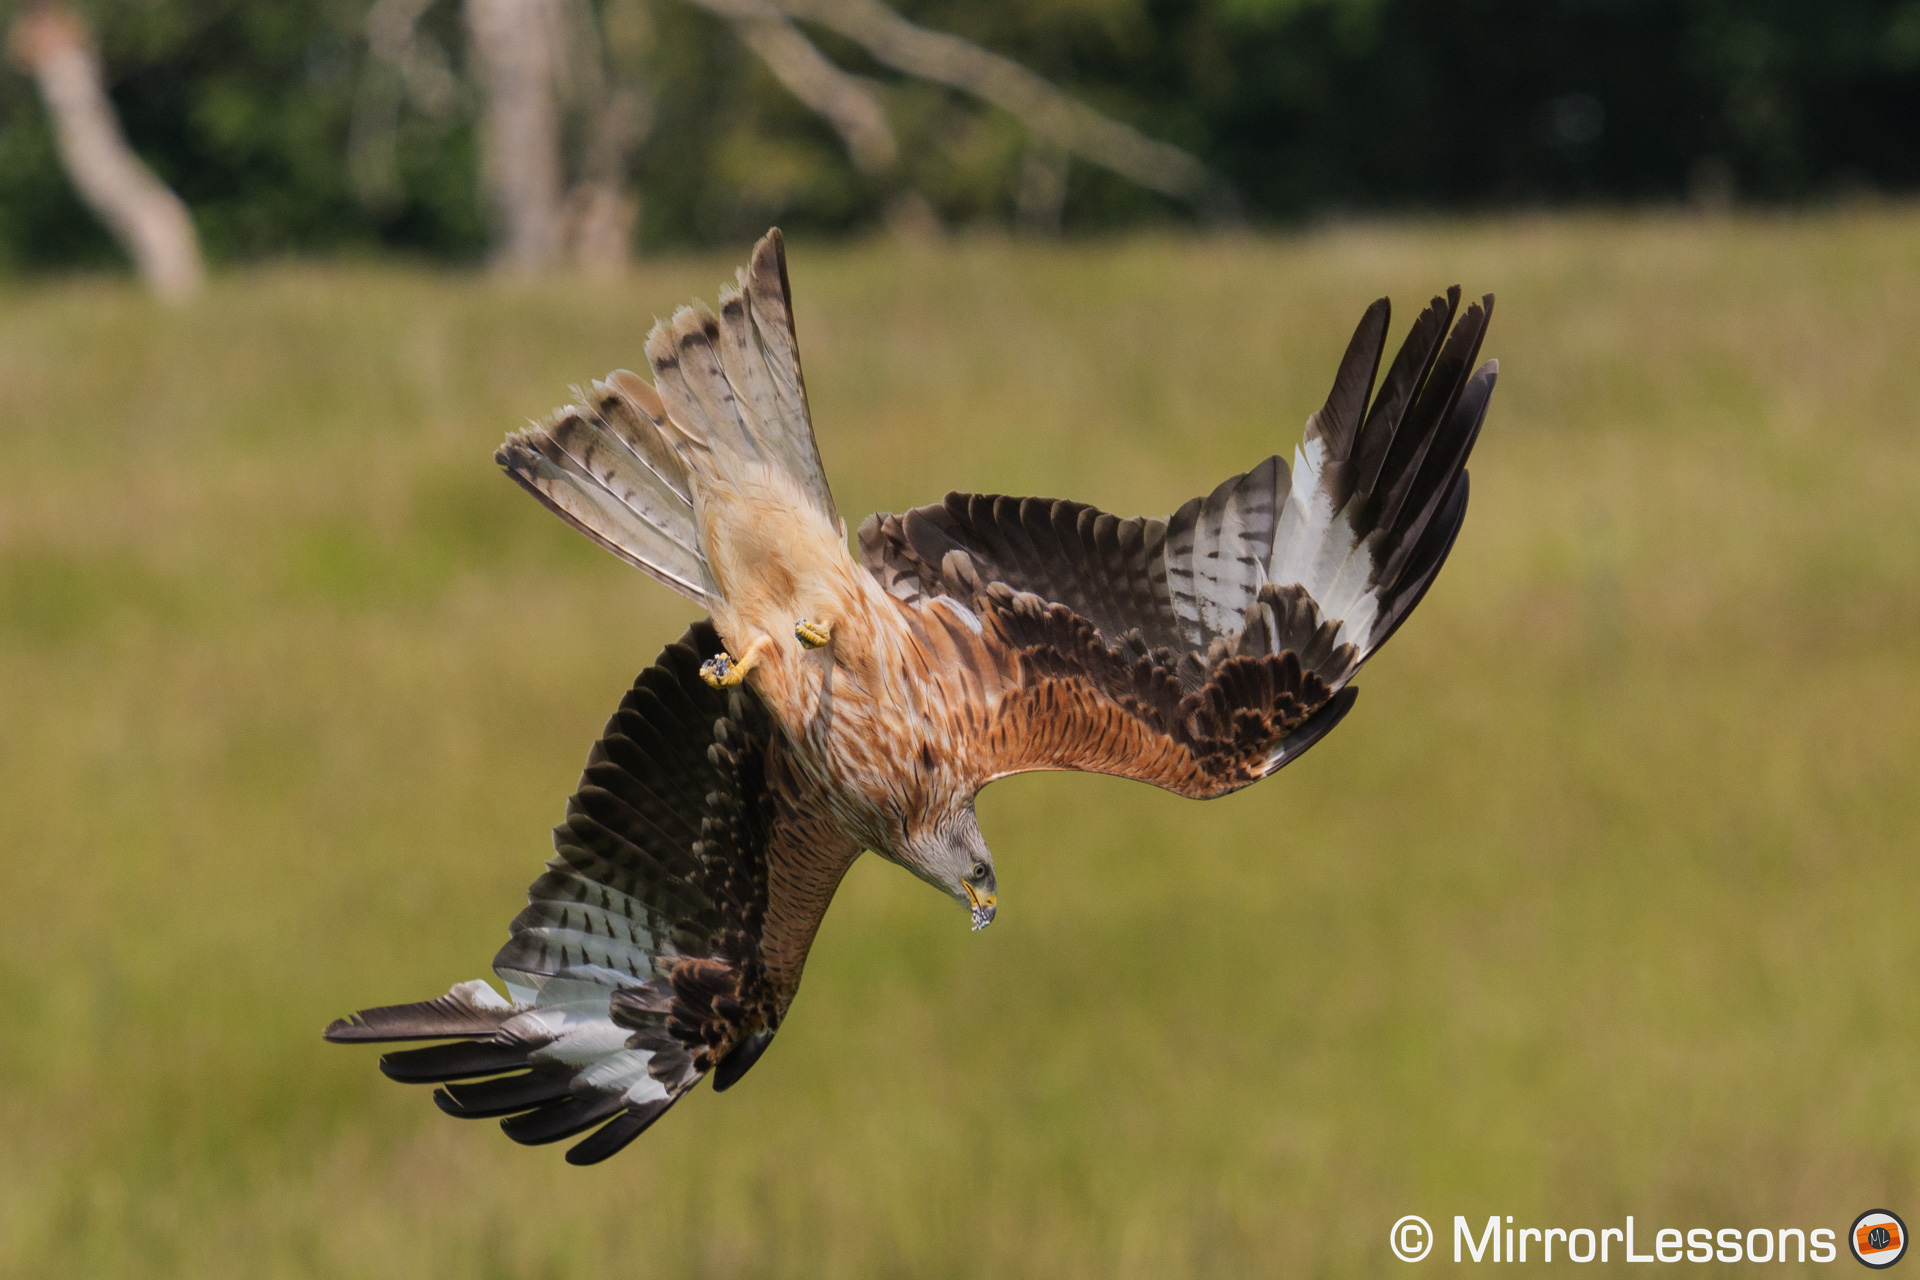
150-600mm F5-6.3 DG DN OS Sports 021
Once again, finding the right settings is crucial to getting the best performance out of the Lumix model. You’ll want to disable subject detection for the same reasons I explained earlier, and avoid using the tracking mode, which is not reliable for this type of action. The setting that yielded the best results for me is the Zone focus area. It may not be very large, but it definitely outperforms other settings.

150-600mm F5-6.3 DG DN OS Sports 021
In comparison, the A7 IV is easier to set up. There are less settings to worry about, and the tracking mode works exceptionally well.

Here’s a list of what I believe are the best settings for each camera, when it comes to autofocus and birds in flight.
S5 II
- AF Mode: Zone (largest)
- Animal Detection: Off
- AF Custom Setting: +1, +1, 0
- Focus Priority for AFC
- Back Button Focus: AF-ON Near Shift
- Drive Speed: H 7 fps
- Shutter: mechanical
- Stabilisation: Off
A7 IV
- Focus Area: Tracking with Expand Flexible Spot
- Subject Detection: On or Off
- AF Track Sensitivity: 5 (Responsive)
- Priority Setting in AF-C: Focus
- Drive Speed: Hi+ 10 fps
- Shutter: mechanical
- Stabilisation: Off
I also couldn’t help but wonder if the S5 could achieve an even better score with a faster lens. I used the Sigma 150-600mm Sport, the new one specifically designed for mirrorless cameras, and I found the AF motor to be a bit slow, especially when the camera needed to quickly adjust focus. In fact, there were a few moments where I had to abandon the sequence because it wasn’t quick enough. This behaviour was the same as what I observed with the E-mount version a few years ago. Even updating the lens to the latest firmware didn’t improve its performance.
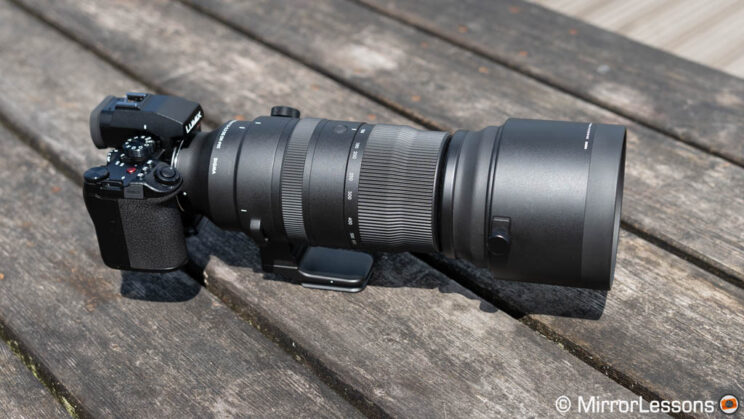
Currently, there aren’t many options when it comes to super telephoto lenses for L-mount cameras. There’s the Sigma 60-600mm, which unfortunately wasn’t available when I rented the gear, and there are also two 100-400mm lenses from Panasonic and Sigma (but I wanted something with more reach). I would be curious to see what the S5 mark II could achieve with a premium high-end telephoto lens, if such an option ever becomes available.
5. Drive Speed
With the mechanical shutter, the S5 mark II can shoot up to 9fps, or to be precise, 9.7fps according to my test. However, if you want continuous autofocus, the maximum available is 7fps, and with focus priority, it becomes 5fps. Interestingly, in my birds in flight test, I didn’t find a significant difference between Predictive AF at 7fps and focus priority at 5fps.
One noticeable distinction is that the S5 II has a slightly higher lag in the EVF when working in continuous mode compared to the A7 IV. It’s not a significant difference, but it’s something I observed during my time with the two cameras.
Switching to the electronic shutter, the S5 mark II can operate at an impressive 30fps with RAW files, and with a decent buffer capacity. The autofocus performance remains solid, and although the keeper rate dropped slightly in my birds in flight test, the possibility of capturing more frames per second is obviously a big advantage. It’s worth noting that the S5 lacks features like the pre-burst mode, which would be valuable with such a high shooting speed.
S5 II – Drive / AF score – Birds in Flight
30 fps
71%
21 / 30
7 fps
83%
5 / 7
On the other hand, the A7 IV can record at 10fps with continuous AF and focus priority, with no additional boost in performance when using the electronic shutter. However, the 10fps speed applies to compressed RAW: if you select lossless or uncompressed, the speed drops to about 6fps.
Speaking of the electronic shutter, there are the usual limitations such as distortion when panning quickly. The S5 mark II appears to have a faster sensor readout, resulting in slightly better distortion control compared to the Sony.
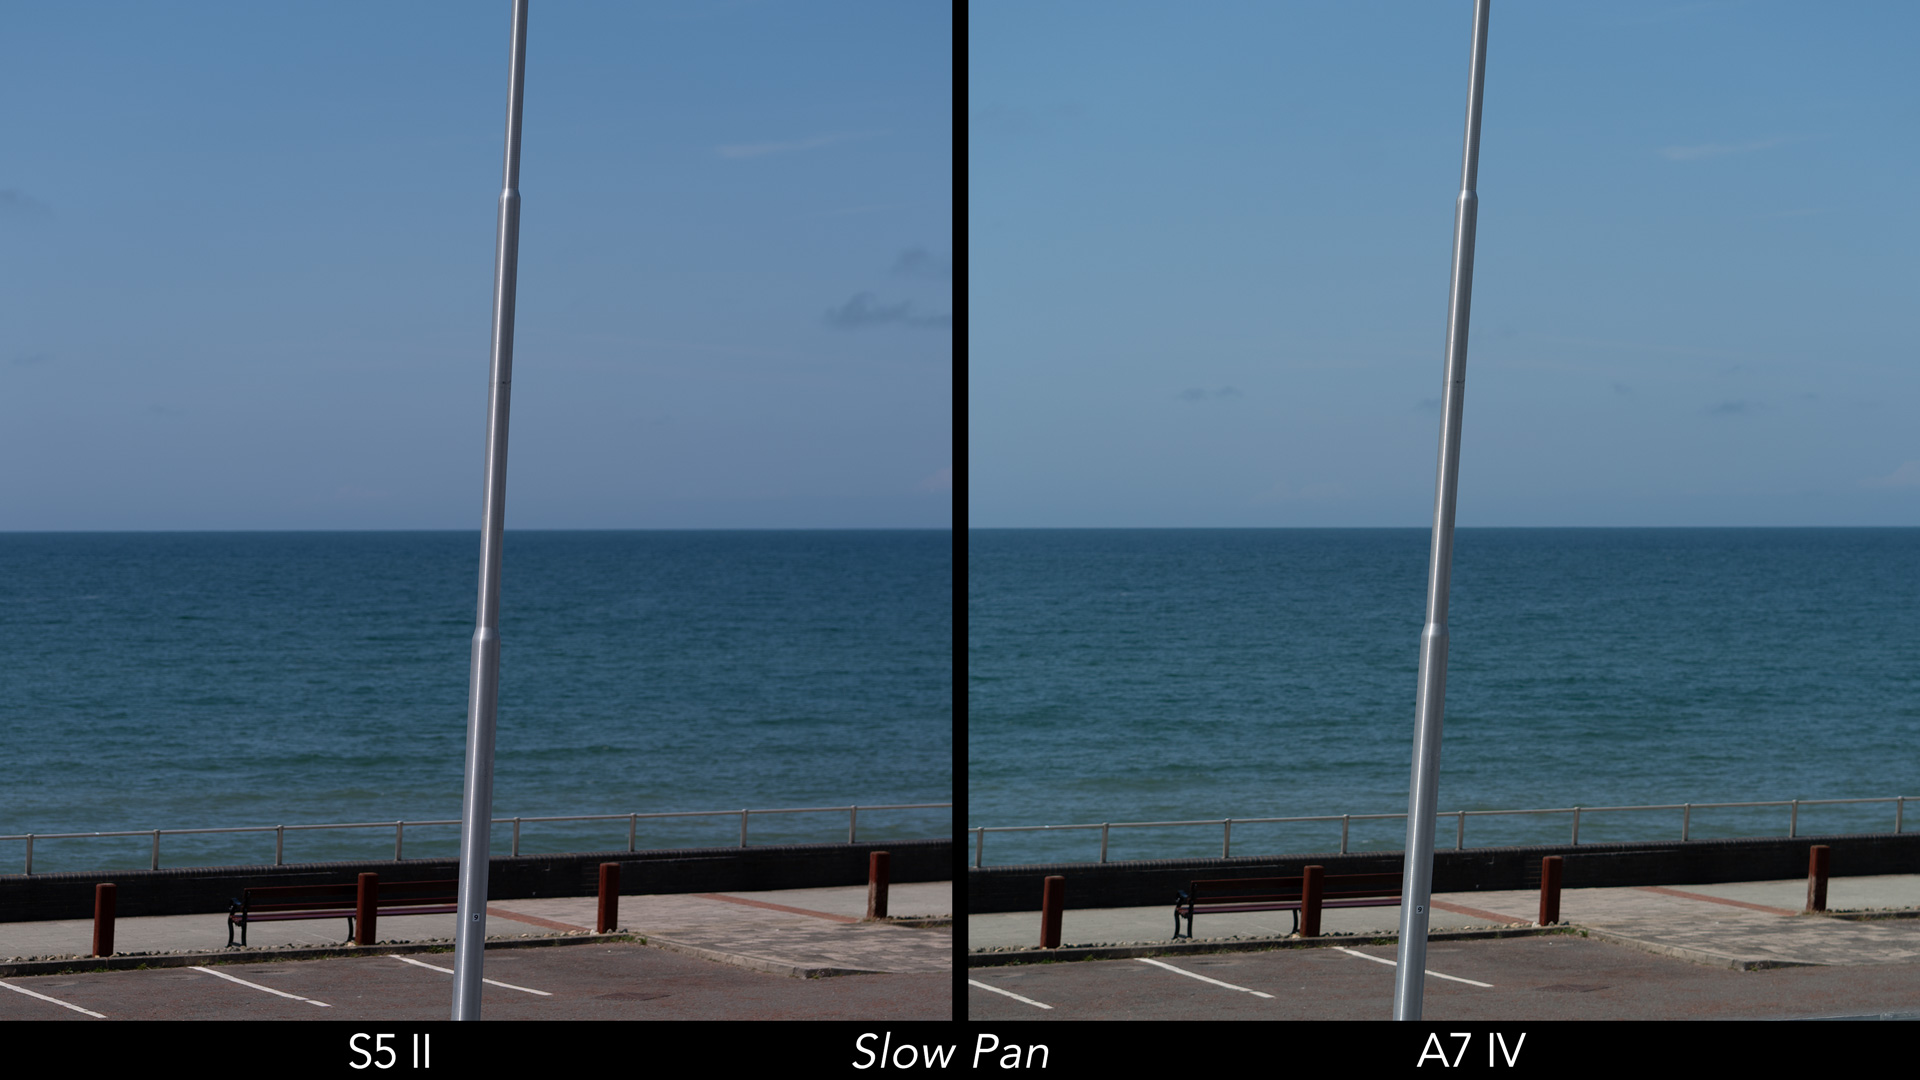
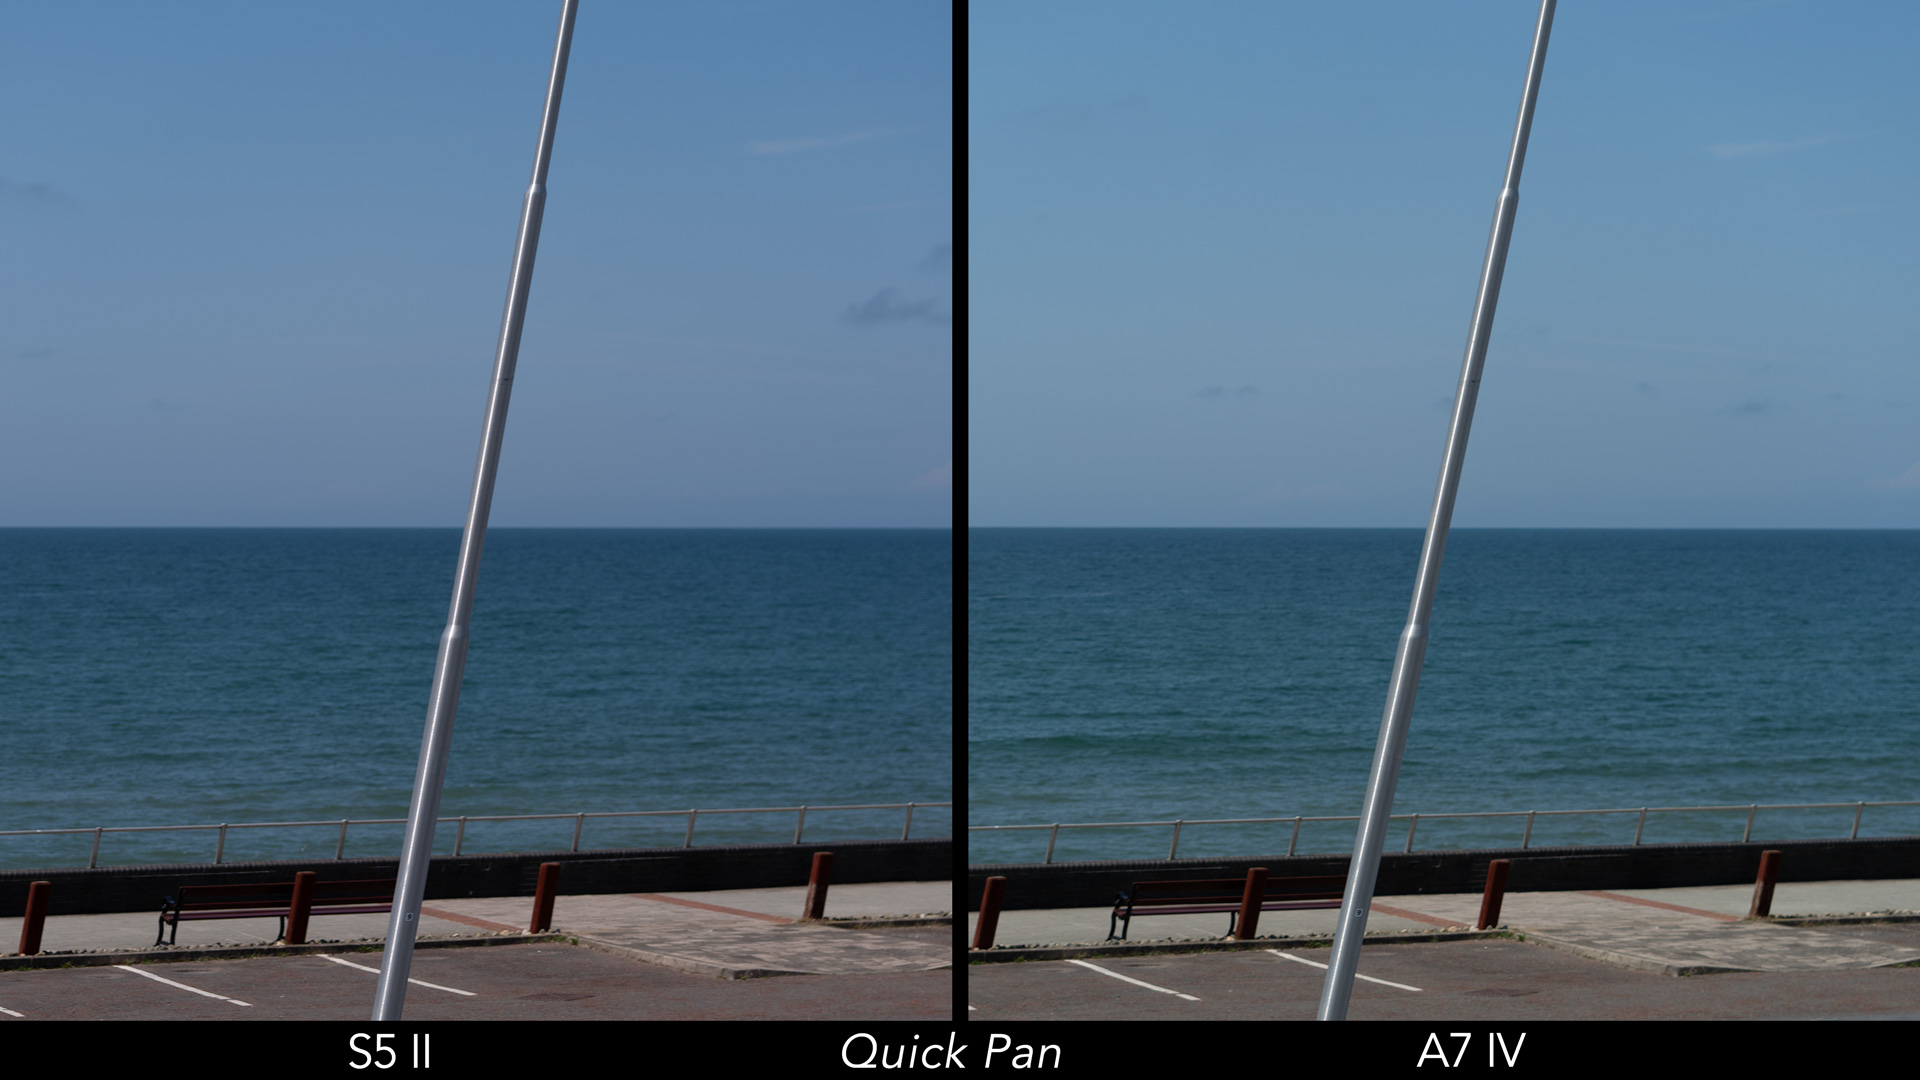
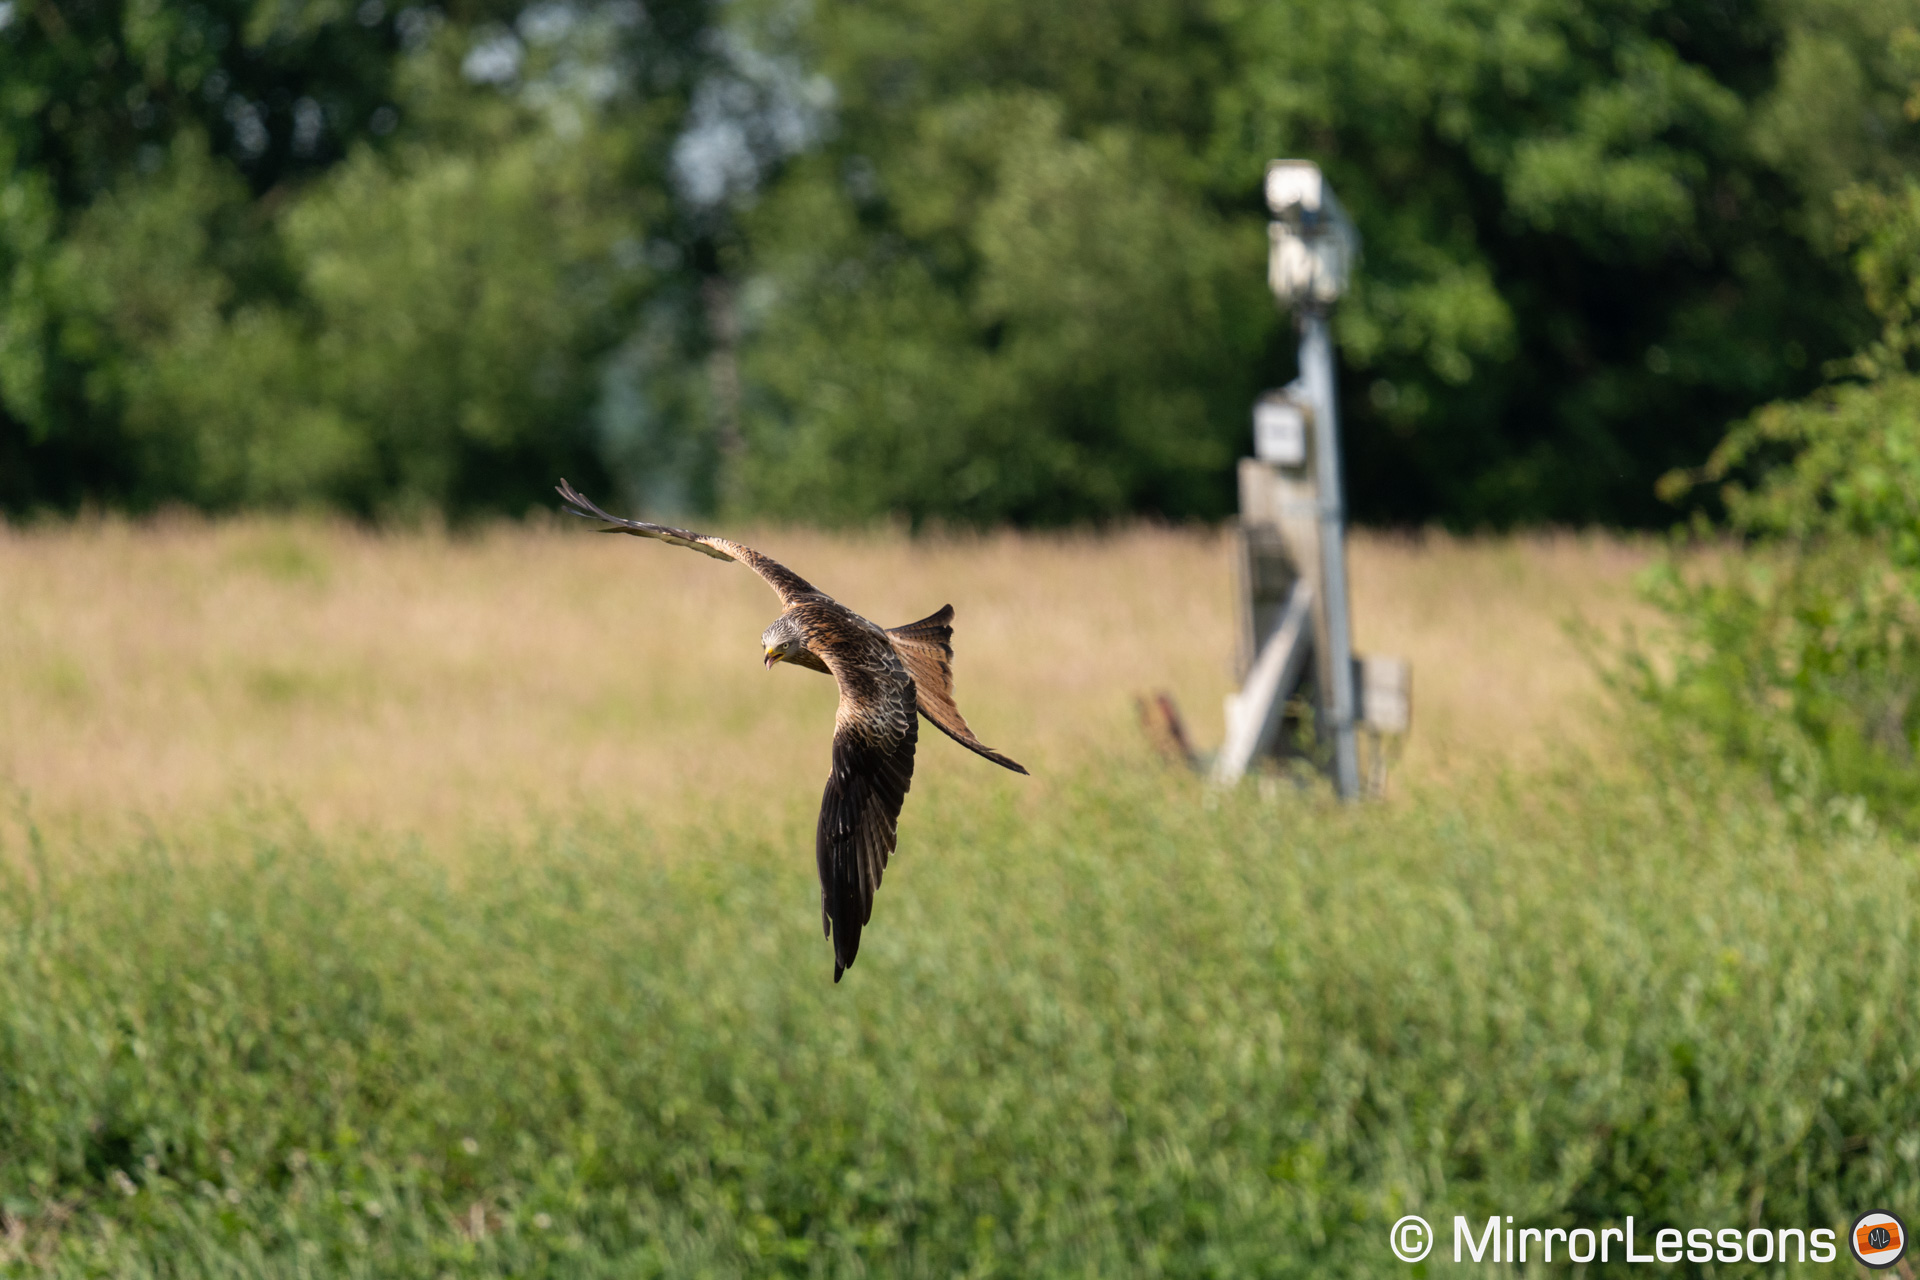
However, it’s important to note that distortion is still noticeable in fast-action shots. Take a look at these additional examples featuring the red kites, taken at 30fps: observe how the pole in the background becomes more diagonal.
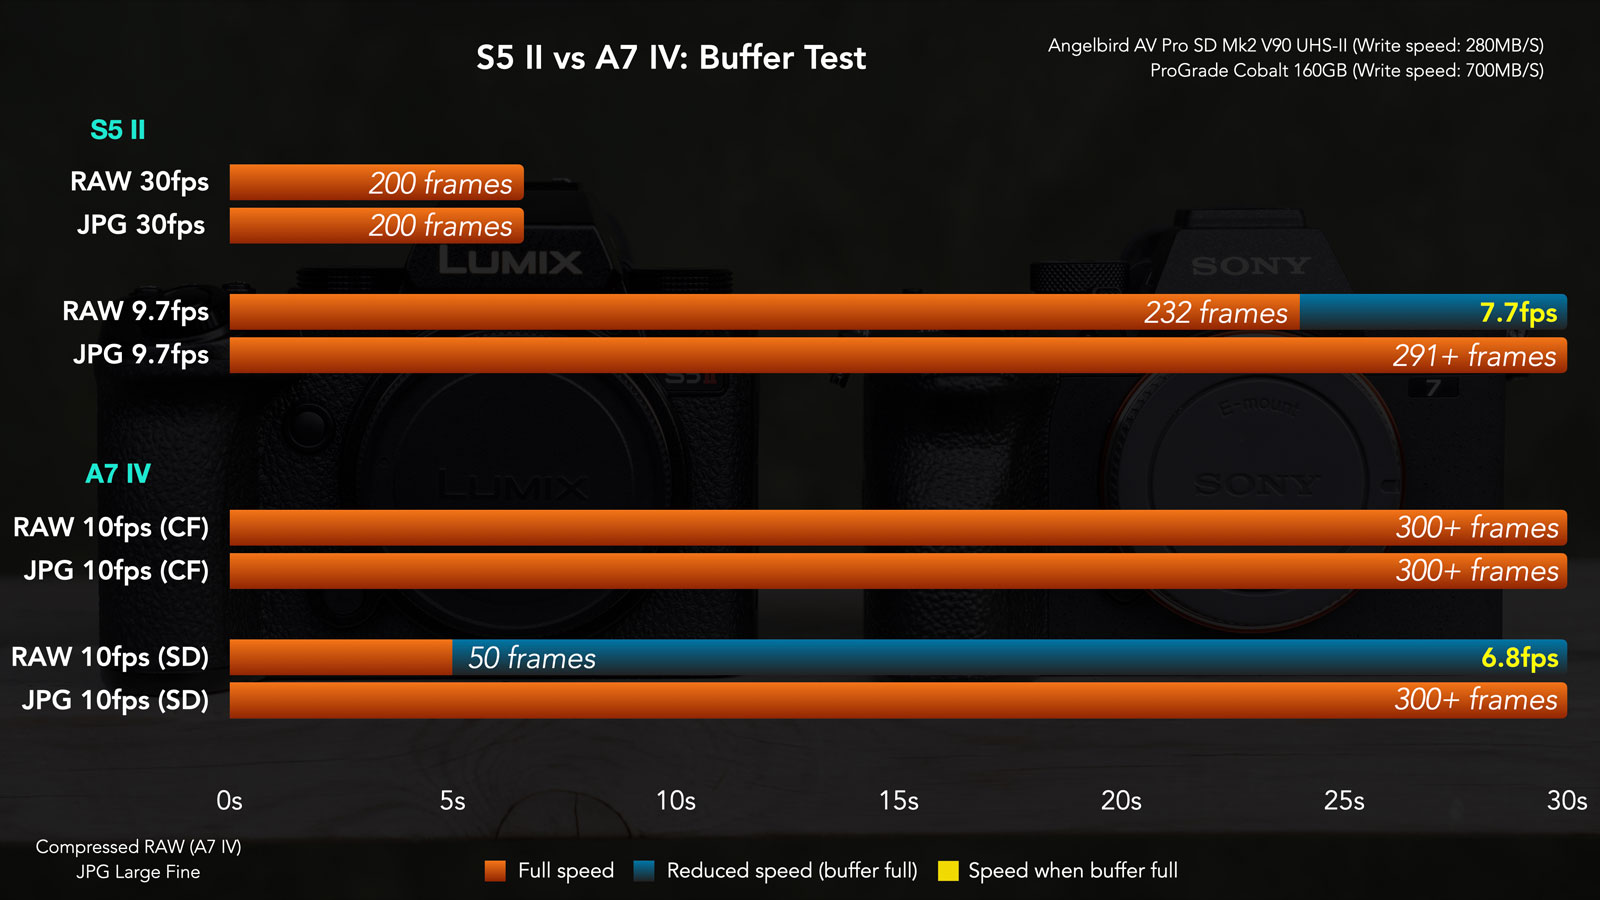
When it comes to buffer performance, the S5 can sustain nearly 7 seconds of continuous shooting at 30fps with RAW or JPG, which is quite impressive. At 9.7fps, it maintains full speed for 22 seconds with RAW before slowing down, while with JPGs, it continues for over 30 seconds.
The A7 IV’s buffer is flawless when using a CFexpress card, whether shooting RAW or JPG. However, when using an SD card, the performance with RAW files is more limited.
Another factor to consider is that the Panasonic takes more time to completely clear the buffer, whereas the Sony is much faster, when using a CFexpress card.
6. Video
Note: side by side comparison tests for video can be found in my video review near the end of this article.
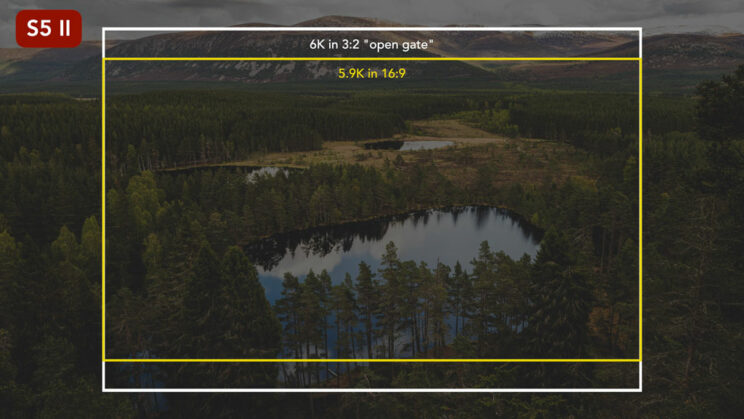
These are two highly capable cameras in terms of video. Let’s start with the S5 mark II, which can shoot in 6K up to 30p in open gate mode, utilising the full sensor area instead of cropping for a 16:9 aspect ratio. It also offers 5.9K resolution in 16:9 if you prefer that, and there is an anamorphic mode too. Additionally, you have the option to choose between the traditional 16:9 or the DCI version at 17:9 aspect ratio for most sizes.
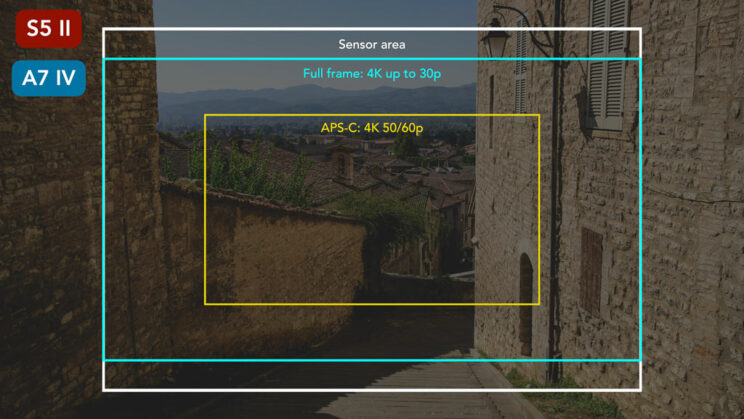
On the other hand, the A7 IV doesn’t go beyond 4K resolution, and it is limited to the 16:9 format. When comparing 4K capabilities, both cameras use the full sensor width up to 30p, but switch to APS-C crop for 50p and 60p recordings.
In my sharpness test using the same Sigma 35mm Art lens, I found that the S5 II has an advantage in capturing sharper and more detailed footage when recording in 6K, which is no surprising.
However, in 4K, the Sony A7 IV appears slightly sharper in both full-frame and APS-C modes. Perhaps the Lumix adds a bit of softening to the footage to minimise moiré (I couldn’t find any). It could also be due to the A7 IV’s higher sensor pixel count. Both cameras employ oversampling, utilising all available pixels, but the A7 IV works from a 7K area compared to the S5’s 6K area in full frame mode, for example.
For those interested in Full HD, the S5 mark II delivers better quality with less aliasing compared to the A7. It’s worth noting that both cameras offer higher frame rates in Full HD, with the Panasonic capable of recording at 180fps and the Sony at 120fps.
Both of them can record in 10-bit 4:2:2 internally. The S5 also has the option to output 12-bit RAW via the HDMI port, although this requires a paid upgrade. Unfortunately, I didn’t have the opportunity to test this feature.
In terms of dynamic range, the S5 II offers the V-Log profile, while the A7 IV provides S-Log2 and S-Log3, with the latter offering the widest latitude on the Sony. Both cameras perform on the same level in retaining detail in shadows and highlights.
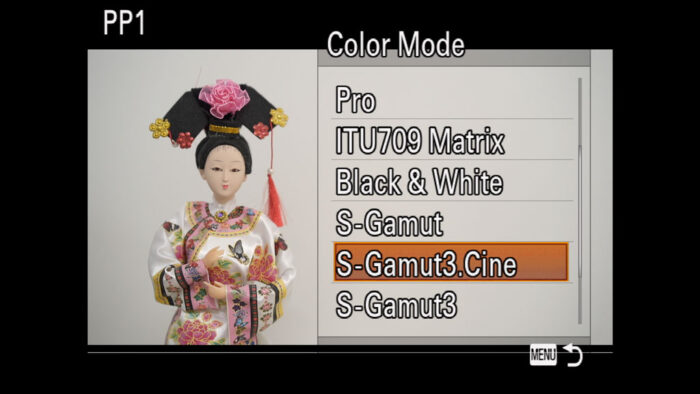
The S5 II offers additional video profiles designed for filmmakers, including HLG, Flat, Cine-Like D and V (version 2), and Like709. You can also load your own custom Look Up Tables (LUT) into the camera.
The A7 IV offers the Picture Profiles, allowing for greater customisation of your image. These advanced settings provide a range of gamma and colour modes among other things, including HLG and Cinetone, just to name a few.
When it comes to ISO performance, the S5 exhibits less noise, particularly between 1600 and 3200 ISO. Beyond that range, the noise patterns differ slightly. The Lumix produces smaller, sharper noise, while the Sony seems to apply more noise reduction. As the ISO level increases, the Sony starts to lose some colour accuracy, whereas the S5 II maintains better colours and details, albeit with more noise. The Panasonic reaches a maximum ISO of 204,800, although the quality at such high levels is not great to say the least.
In my test, I recorded the footage with the Panasonic’s noise reduction set to 0. Unfortunately, you cannot change this setting on the Sony, but on the S5 II, you can adjust it from -5 to +5. Even when you increase the effect, there is still an acceptable level of sharpness and detail, making the noise reduction setting quite usable.
Another noteworthy feature of the Lumix is its dual native ISO capability. The base values vary depending on the selected profile. For example, using V-Log, ISO 4000 exhibits less noise than ISO 3200. While the difference is not dramatic, it can be useful to know when recording around these ISO settings.
A similar consideration applies to the A7 IV and S-Log3. In this case, ISO 3200 performs better than ISO 2500.
Rolling shutter is another factor to consider, and once again, the S5 mark II fares slightly better, especially in full-frame mode. In APS-C mode, the performance between the two cameras is more similar.
Neither has the 30-minute clip limitation and can record continuously for an extended period. In my test, at an average room temperature of 21˚C, both cameras managed to record for slightly over two hours before the batteries died. There were no indications of overheating on the screen, and the cameras were only mildly warm to the touch when recording stopped. It’s worth noting that performance may vary depending on the shooting environment’s temperature and humidity.
The Panasonic S5 offers a fan setting that allows you to control its noise level and activation time, which can be beneficial when recording audio. It’s worth mentioning that the A7 IV doesn’t incorporate a built-in fan for cooling. Instead, it relies on a heat dissipation design featuring a sigma graphite heatsink.
Finally, the S5 provides several additional settings that filmmakers may appreciate. Notably, you have the option to display a waveform or vector scope on the LCD. Another useful feature is the ability to engage continuous autofocus only when pressing the recording button, preventing the camera from focusing during standby mode. This eliminates the need to constantly switch between single and continuous autofocus between takes.
The A7 IV is not short of extra options either. One notable feature is the excellent lens breathing compensation, which works with select lenses and eliminates the small zoom effect when focusing from a distant subject to a closer one.
7. Stabilisation
Both the Panasonic S5 II and the Sony A7 IV feature 5-axis stabilisation, enabling sharper images and more stable video footage. The Lumix offers a rating of 6.5 stops with Dual I.S., which combines sensor and optical stabilisation. When using just the built-in stabilisation on the sensor, the camera provides 5 stops of compensation. On the other hand, the A7 IV has a stabilisation rating of 5.5 stops, and that is for the sensor only.
To assess the performance of the cameras at slow shutter speeds in photo mode, I conducted a test using 35mm lenses, so looking at the performance of the sensor alone. For each exposure value, I captured 10 images and analysed the level of sharpness achieved.
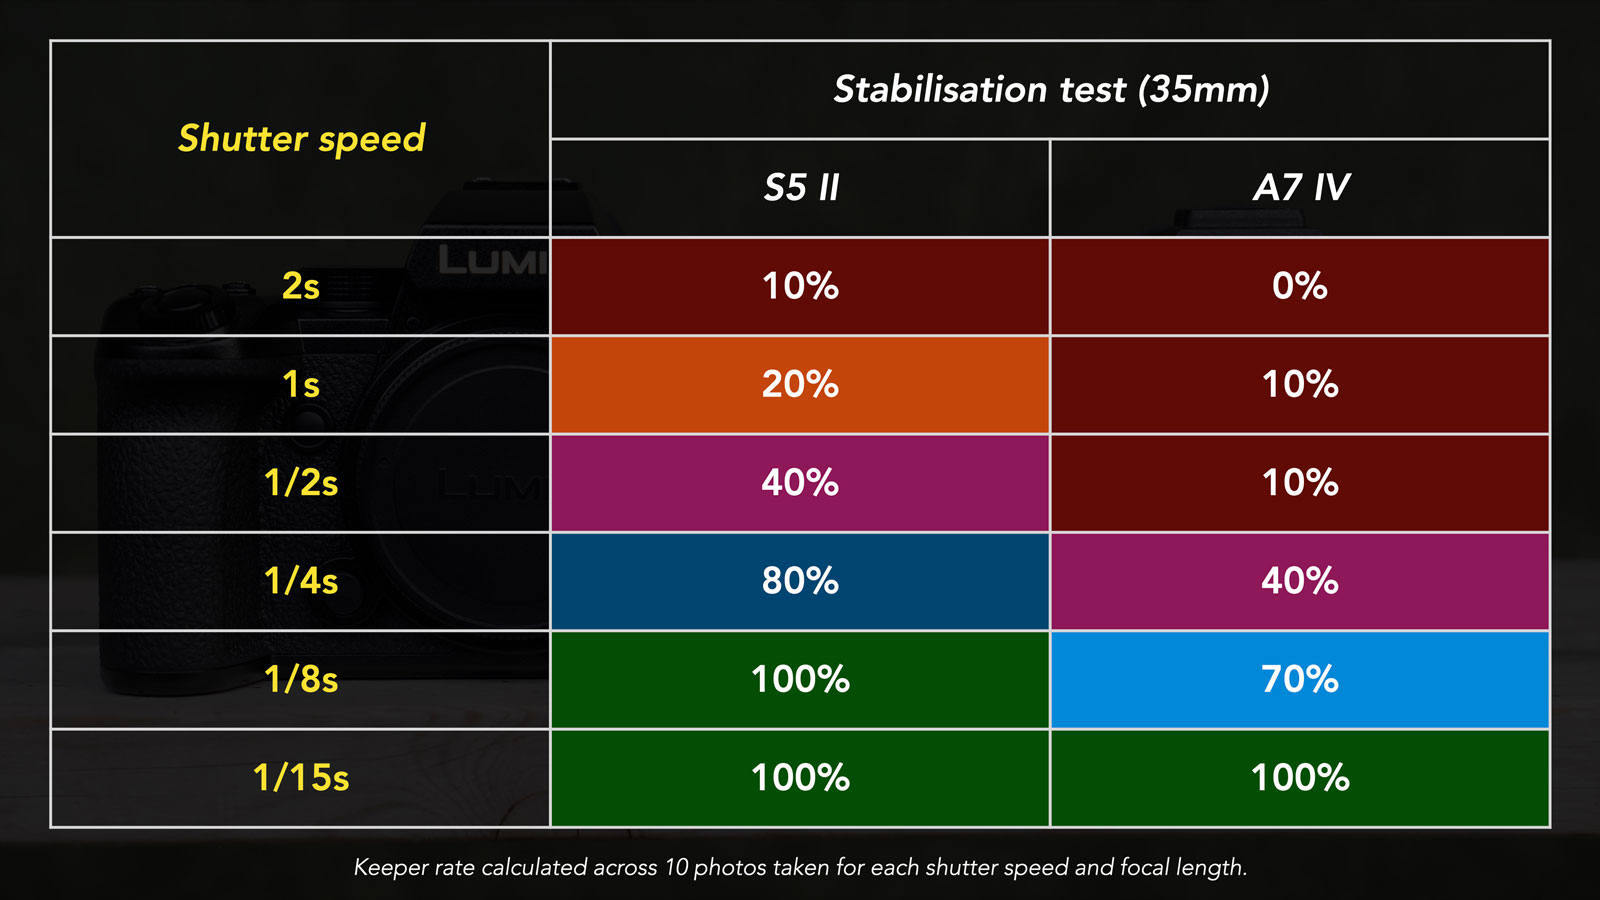
The S5 II demonstrated its capability by producing a good result with a 2-second exposure, and the keeper rate improved significantly from 0.5 seconds. On the contrary, the Sony A7 IV showed satisfactory performance only starting from 1/4s. The Lumix camera can be fully trusted from 1/8s, whereas the Sony requires a shutter speed one-stop faster to achieve similar results.
The S5 mark II has a useful feature called Status Scope I.S., which displays a reference point on the screen to indicate the amount of camera shake. Unfortunately, this feature is not available for video recording.
Regarding video capabilities, Panasonic claims that the S5 II incorporates a new Active I.S. technology that can compensate for more significant camera shakes while walking. And let me tell you, it truly lives up to its claims.
In my test footage, the S5 mark II delivered an impressive performance, probably one of the best I have achieved on a full-frame camera. That said, there are still some visible shakes remaining, as well as a jello effect that distorts the image and can be distracting. However, in comparison, the A7 IV’s stabilisation is much worse.
Both cameras offer electronic stabilisation, which involves a slight sensor crop but aims to improve performance. The Sony appears better with its Active mode, but the S5 II outperforms it once again. It’s important to note that with the sensor crop, the field of view becomes narrower, which may affect your shooting needs.
As mentioned in previous videos, the optimal approach for smooth results with the A7 IV is to disable the stabilisation altogether, and use Sony Catalyst software in post. The app uses gyro data from the camera and produces effective results, making it more comparable to what the S5 achieves in-camera. The catch is that there is a decrease in sharpness on the clips stabilised with the Sony software.
In terms of static handheld shots, the A7 IV actually performs slightly better with the standard SteadyShot mode, which was unexpected considering the previous results. When electronic stabilisation is activated, the Panasonic improves, but the A7 IV still retains a slight advantage. However, the S5 offers an additional setting called Boost I.S., which improves the quality for static shots like these.
Examples of stabilisation performance for video can be found in my YouTube review further down.
8. Lenses
Let’s move on to the lens systems. The S5 II utilises the L-mount, originally designed by Leica for its SL mirrorless system and later rebranded as the L-mount when Leica, Panasonic, and Sigma formed the L-mount alliance. Consequently, the S5 II has a good range of lenses to choose from. Panasonic has released 14 lenses so far, and the advantage is that all the full-frame mirrorless lenses designed by Sigma are also compatible, greatly expanding the lens options. It’s important to note that Leica SL lenses are compatible as well, but they tend to be more expensive.
However, when it comes to lens variety, A7 IV users have a broader selection due to the longer existence of the E-mount system. For example, in the telephoto lens range, E-mount holds the advantage. Moreover, at the time of this video recording, there are more brands, including Samyang and Tamron, designing lenses for Sony, providing photographers with even more options.
9. S5 mark II X
It’s worth mentioning the existence of a second version of the Lumix camera called the S5 Mark II X. This variant features an all-black matte finish and offers enhanced features tailored for videomakers.
With the X version, you get a higher bitrate, an ALL-Intra compression option, the ability to record slow motion in 10-bit 4:2:2 (as opposed to just 4:2:0), and the 12-bit RAW output via HDMI is already unlocked, eliminating the need for an additional purchase. Moreover, the X model provides options for wired and wireless IP streaming.
Why Panasonic didn’t include all this in just one camera, that I don’t know, but this second version only comes at a $200 premium, so if video is your primary focus, it may be worthwhile considering the X model.

10. Price
If you’re considering the Panasonic, here’s some good news: it’s cheaper to buy with a retail price of $2000, £2000 or €2100, for the body only.
The A7 IV is more expensive: $2500, £2400 or €2700.
Note that the prices are as of July 2023, excluding cashback and special offers.
Video Review
This comparison is also available in video format on our YouTube channel.
Conclusion
Let’s address the question posed in the introduction: Has phase detection autofocus put Panasonic back on track? In my opinion, the answer is yes, with a few reservations.
When we look at advanced settings like human and animal detection, Sony still holds the edge. Panasonic has room for improvement, particularly for photography, and especially when it comes to animals. However, if you can do without these advanced features and rely on regular focus areas, the S5 II proves itself as a capable camera, surpassing its previous limitations with contrast detection.
Of course, a camera is not solely defined by its autofocus capabilities. The S5 II offers a host of other interesting features. Its ergonomic design and intuitive controls enhance the overall user experience. The image quality stands among the best in its segment, and the video capabilities outshine those of the A7 IV. Not to mention the additional perks like stop motion animation, live view composite, and focus bracketing, just to name a few. Furthermore, the S5 II comes at a more affordable price point.
I think the biggest praise I can give the S5 is that it really seems to be a camera carefully crafted for the user experience, from the ergonomics to all the little settings you find in the menu that can make your life a bit easier, for photos and video. It really is a great and fun camera to use on a daily basis.
Yet, as much as I appreciate the S5 mark II, considering the overall package, including the system and lens options, I believe the A7 IV provides better value. There is a broader range of lenses available, an extensive lineup of cameras and accessories. And if you want better high-end autofocus, the A7 IV can deliver more, especially on the photo part.

It’s also worth noting that the market has become increasingly competitive, with Canon and Nikon also releasing cameras with outstanding performance. I think Panasonic will need to work harder to make their models stand out. To their credit, they have made strides in the realm of video, which has been their forte from the start.
Reminder: the links below are affiliate links. If you decided to buy something after clicking the link, we will receive a small commission.
Check price of the Panasonic S5 II on
Amazon | Amazon UK | B&H Photo | eBay
Check price of the Sony A7 IV on
Amazon | Amazon UK | B&H Photo | eBay