Updated on: July 3rd 2019
The flagship OM-D E-M1X is Olympus’ most advanced and expensive mirrorless camera to date, and it is also the first to adopt a design with a built-in vertical grip. The two-year-old OM-D E-M1 mark II has lost its front-runner title as a result, but retains its rightful place just a step below the new camera.
There are obvious differences between these two models, but also a lot of similarities when it comes to quality and performance.
After publishing our initial impressions, we spent more time with the two cameras to gain a better understanding of where the new camera fits into a system that has always been known for its compactness, and it turns out that there are a lot of things to talk about!
Ethics statement: we spent a month with the E-M1 II and E-M1X, and we have tested the former several times before. Within the article, there are affiliate links. If you buy something after clicking one of these links, we will receive a small commission. To know more about our ethics, you can visit our full disclosure page. Thank you!
- You are on page 1: design, ease of use, image quality and high res shot
- Page 2: image stabilisation, autofocus, speed, video, extras and conclusion
Table of Contents – Page 1
1. Article updates
2. Main Specs
3. Design, build quality and interface
4. Controls and customisation
5. Viewfinder and rear monitor
6. Image quality
7. Sensor shift: High Resolution mode
Article updates
- July 2019: firmware 3.0 for the E-M1 II brings significant improvements to the autofocus performance, among other things. We’ve updated the article accordingly and you can also read our dedicated post here.
Main specs
OM-D E-M1X
- Sensor: 20 MP 4/3 Live Mos
- Lens system: Micro Four Thirds
- Weatherproof: Complete (splash, dust and freeze proof -10°C)
- Internal Stabilisation: Yes (5-axis), Sync IS compatibility on select lenses
- Autofocus: Hybrid with 121 points
- Continuous shooting: 15fps (AF-S), 10fps (AF-C), 60fps (AF-S) and 18fps (C-AF) with electronic shutter
- ISO Sensitivity: 200 – 25600 ISO (Pull 64)
- Shutter Speeds: 1/8000 to 60 seconds, 1/32000s with electronic shutter
- Viewfinder: 2,360K dots, approx. 100% FOV coverage and 1.65x (0.83x) magnification, 21mm eyepoint, 120p refresh rate
- Rear monitor: Multi-Angle 3″ LCD touch sensitive monitor (1,040K dots)
- Movie recording: 4K up to 30fps, C4K at 24fps, Full HD up to 120fps, OM-Log400
- Built-in Flash: No
- Extra Features: WiFi, Bluetooth, Timelapse, Live Time, Live Composite, Live ND, Focus Stacking, High Res Shot hand-held, Pro Capture
- Dimensions: 144.4 x 146.8 x 75.4mm
- Weight: 997g (including battery and memory card)
- Firmware version: 1.0
OM-D E-M1 mark II
- Sensor: 20 MP 4/3 Live Mos
- Lens system: Micro Four Thirds
- Weatherproof: Complete (splash, dust and freeze proof -10°C)
- Internal Stabilisation: Yes (5-axis), Sync IS compatibility on select lenses
- Autofocus: Hybrid with 121 points
- Continuous shooting: 15fps (AF-S), 10fps (AF-C), 60fps (AF-S) and 18fps (C-AF) with electronic shutter
- ISO Sensitivity: 200 – 25600 ISO (Pull 64)
- Shutter Speeds: 1/8000 to 60 seconds, 1/32000s with electronic shutter
- Viewfinder: 2,360K dots, approx. 100% FOV coverage and 1.48x (0.74x) magnification, 21mm eyepoint, 120Hz refresh rate
- Rear monitor: Multi-Angle 3″ LCD touch sensitive monitor (1,040K dots)
- Movie recording: 4K up to 30fps, C4K at 24fps, Full HD up to 60fps
- Built-in Flash: No but external FL-LM3 is supplied
- Extra Features: WiFi, Timelapse, Live Time, Live Composite, Focus Stacking, High Res Shot, Pro Capture
- Dimensions: 134.1 x 90.9 x 68.9mm
- Weight: 574g (including battery and memory card)
- Firmware version: 2.3
Design, build quality and interface
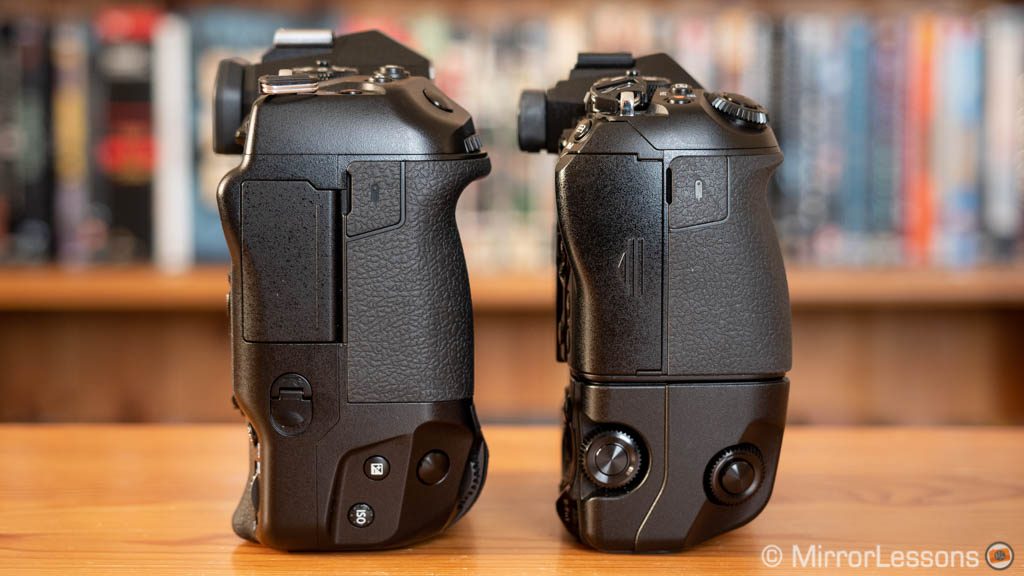
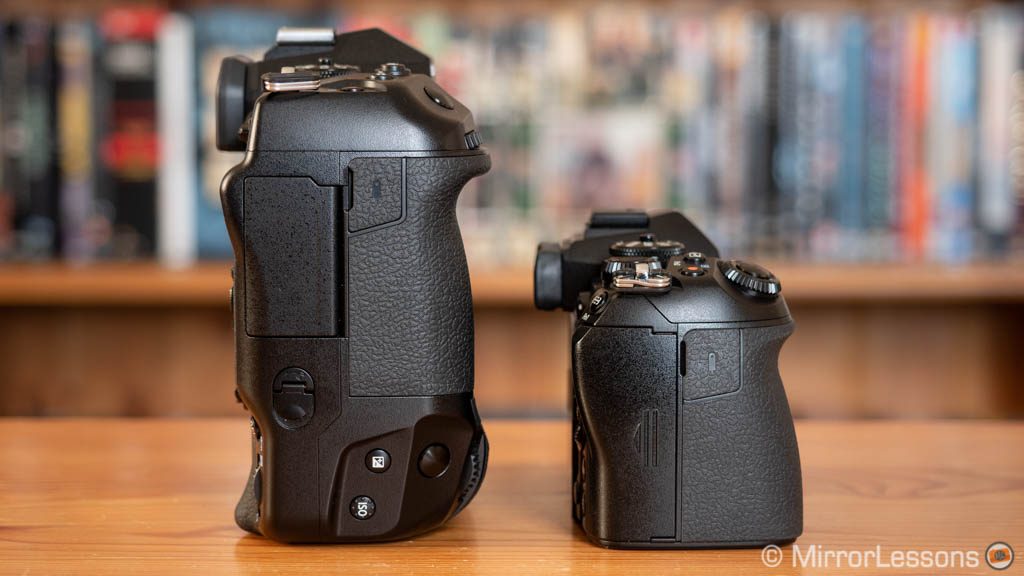
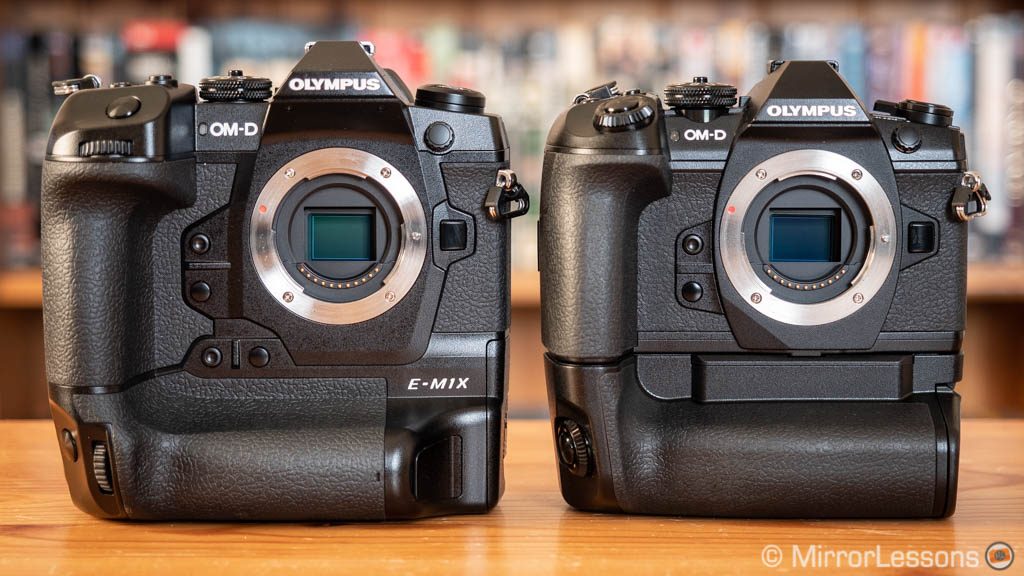
The E-M1X is the first mirrorless camera to feature a built-in vertical grip. This design makes it much larger than other Olympus models including the E-M1 II.

E-M1 II: 134.1 x 90.9 x 68.9mm, 574g (including battery and memory card)
For mirrorless users, this shape is something new but in the world of professional cameras, it is quite common. Nikon and Canon have been producing flagship DSLRs with the same kind of design for years and for good reason.
First there is the build quality. You can mount the optional battery grip to the E-M1 II and end up with similar dimensions, but having one unibody chassis rather than two connected pieces allows the camera to be more robust. It has also allowed Olympus to optimise the hardware inside such as, for example, the implementation of better heat dissipation.

E-M1 II: 134.1 x 139.8 x 68.9mm, 799g (including HLD-9, 2 batteries and memory card)
We can argue that the E-M1 II is also very well built and I won’t disagree with that. Both products have a magnesium alloy chassis and feature full weather sealing (splash, dust and freeze proof). But with the E-M1X, Olympus has raised the bar even higher. The camera is built like a tank and you only need to hold it for a few minutes to feel the difference straight away.
Another advantage of this larger unibody is the grip which is bigger with a deeper finger rest. The more I used it, the more I appreciated how comfortable the camera is to hold for long periods despite the weight. Even Heather was impressed by it and she usually prefers smaller cameras.
If you always use your camera with the optional battery grip, you’ll certainly appreciate the design of the E-M1X but the E-M1 II retains the invaluable advantage of being more compact and, despite the smaller size, the grip is well made and remains comfortable to hold with large lenses. This is something I’ve always liked about the mark II model because personally I tend to avoid battery grips: I like to keep my set-up as compact as possible.
That being said, there is something I want to point out: even though I used the E-M1X with the same set of lenses I tested on the E-M1 II before (Pro lenses mainly including the 300mm f/4) I didn’t have to change backpacks. I wasn’t under the impression that I was carrying something heavier. The lenses are still compact and remain one of the main strengths of the micro four thirds system. (Actually I was able to pack both cameras and all the lenses inside my Peak Design 30L!)
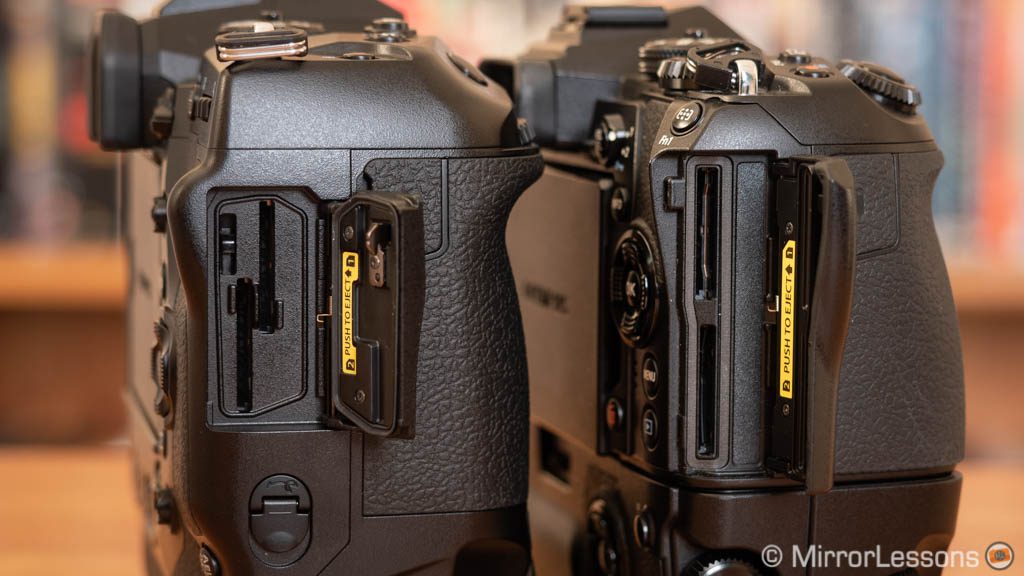
You’ll find two SD card slots on both cameras. On the mark II model only slot 1 is compatible with the UHS-II standard, whereas the E-M1X can accept it in both slots. The X model has a more robust mechanism for the card cover and there is a dedicated toggle that you need to twist in order to open it, which feels more secure than the sliding door on the E-M1 II.
As for the physical connections, both cameras share:
- 3.5mm microphone input and headphone output
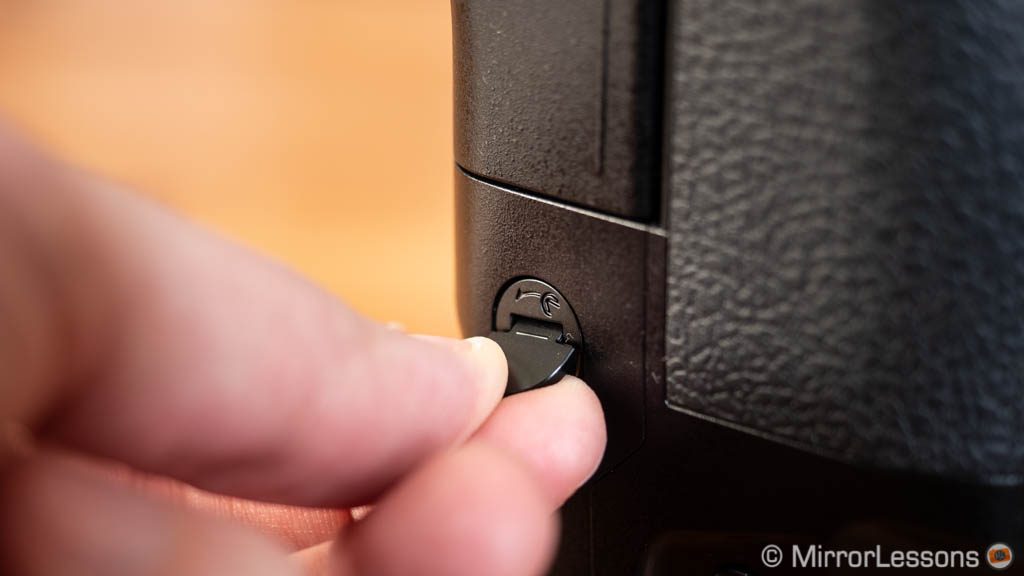
- 2.5mm remote input (located on the other side)
- USB Type C port
- HDMI Type 4 (Micro) output
- flash sync socket (front right)
One interesting thing is that Olympus guarantees weather-sealing on the E-M1X even when cables are connected to the remote, headphone or microphone ports.

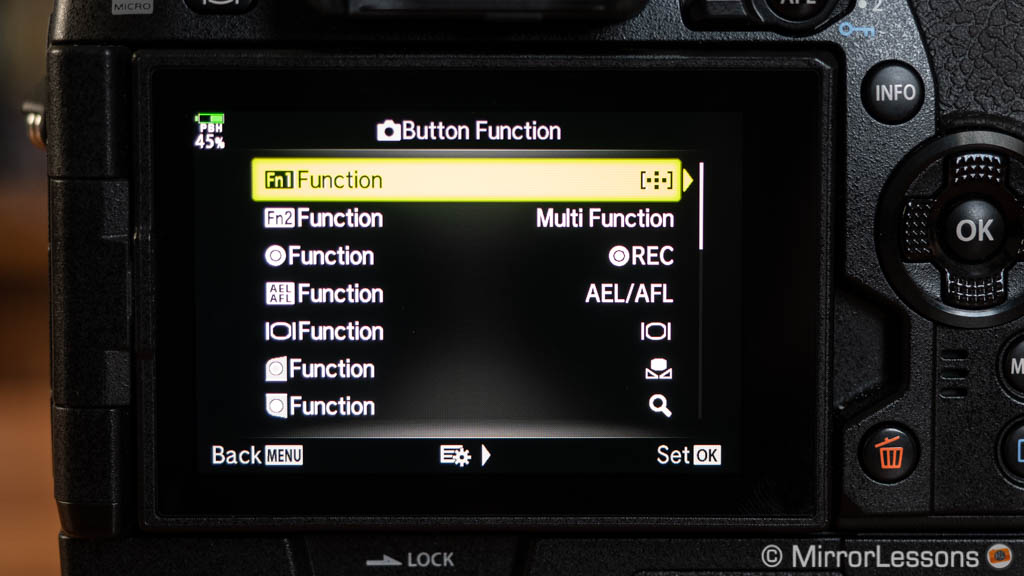
Controls and customisation
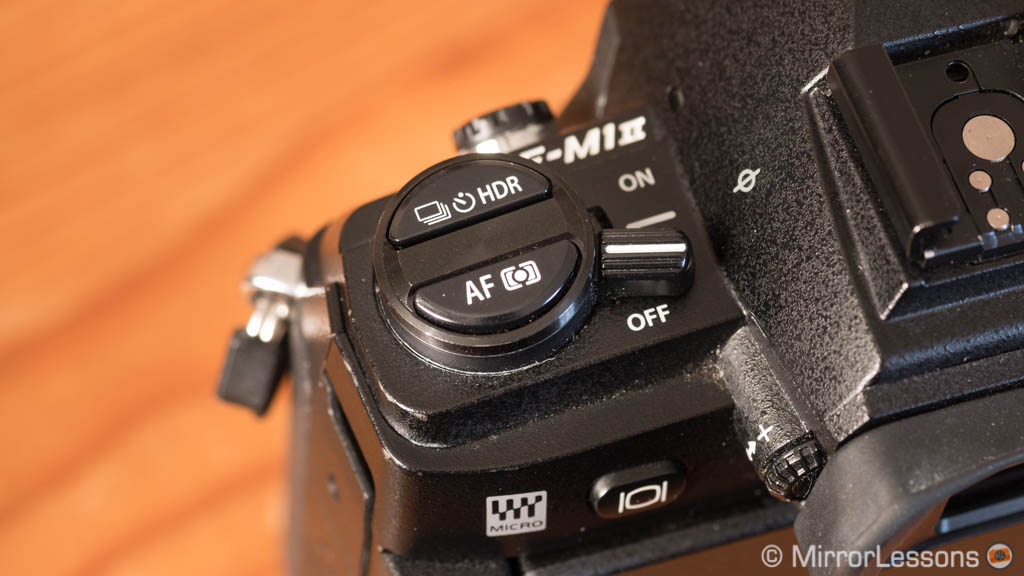
The button layout is similar on the two cameras but the E-M1X gets some upgrades.
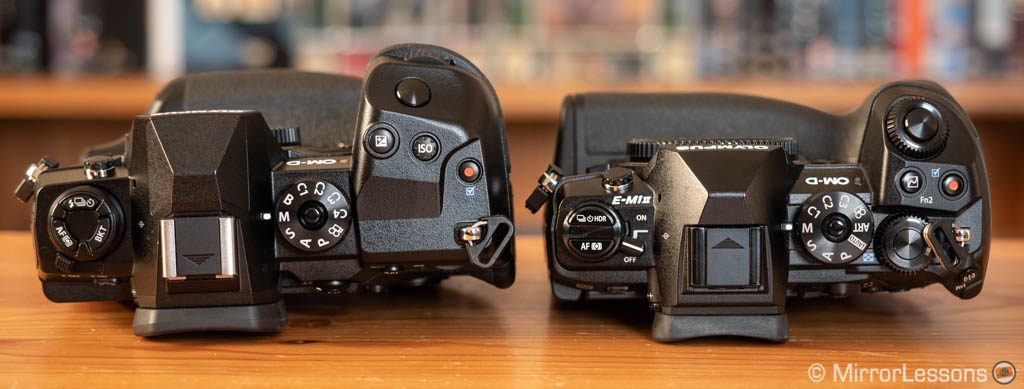
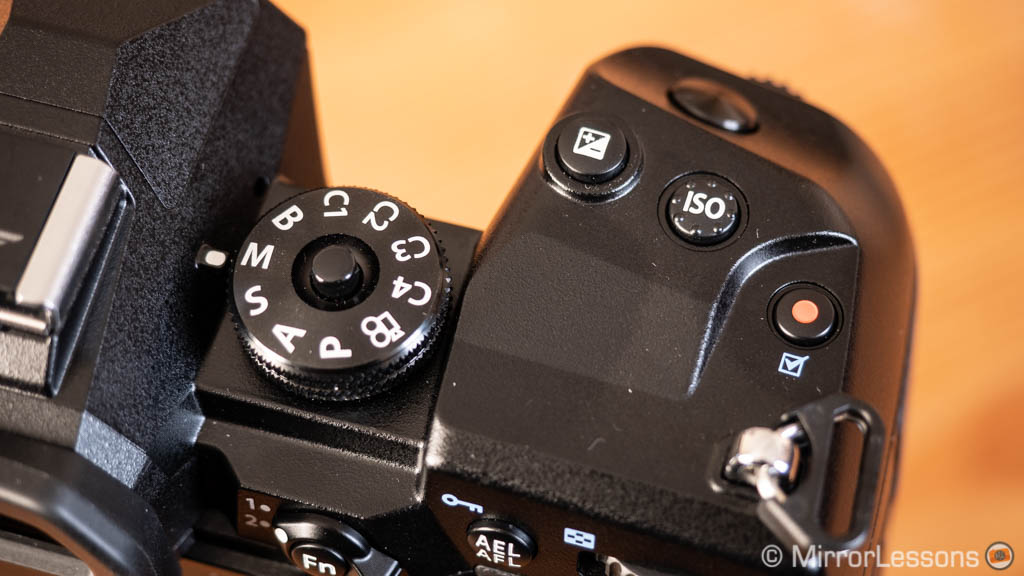
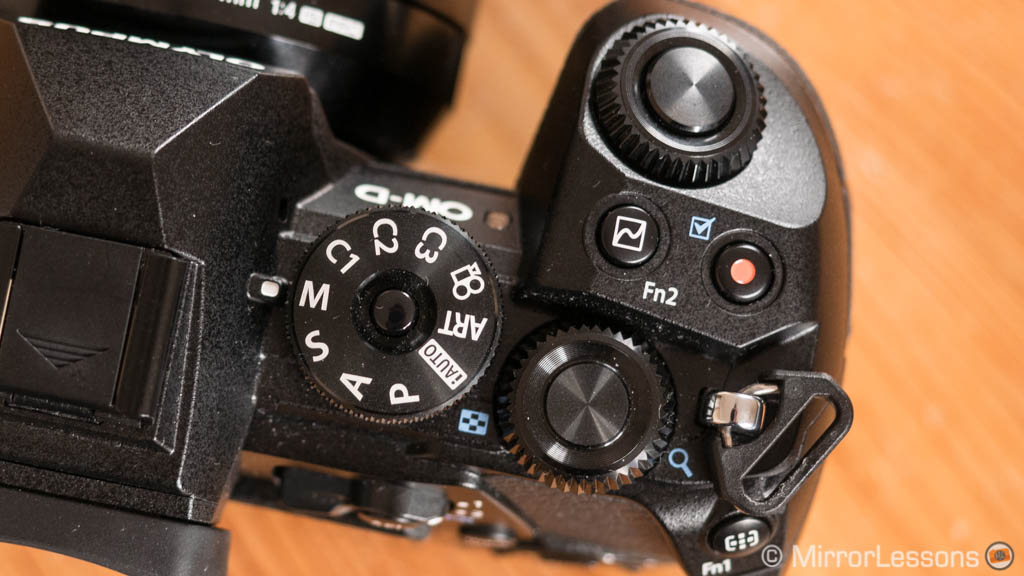
First the buttons are larger for the most part and the ones on top have different heights and textures to help you locate them better when looking through the EVF. On the top right the E-M1X has four custom modes instead of three on the main dial, and three buttons assigned by default to ISO, exposure compensation and video recording, although you can change them in the menu. The E-M1 II has just two buttons (Fn2 and video).
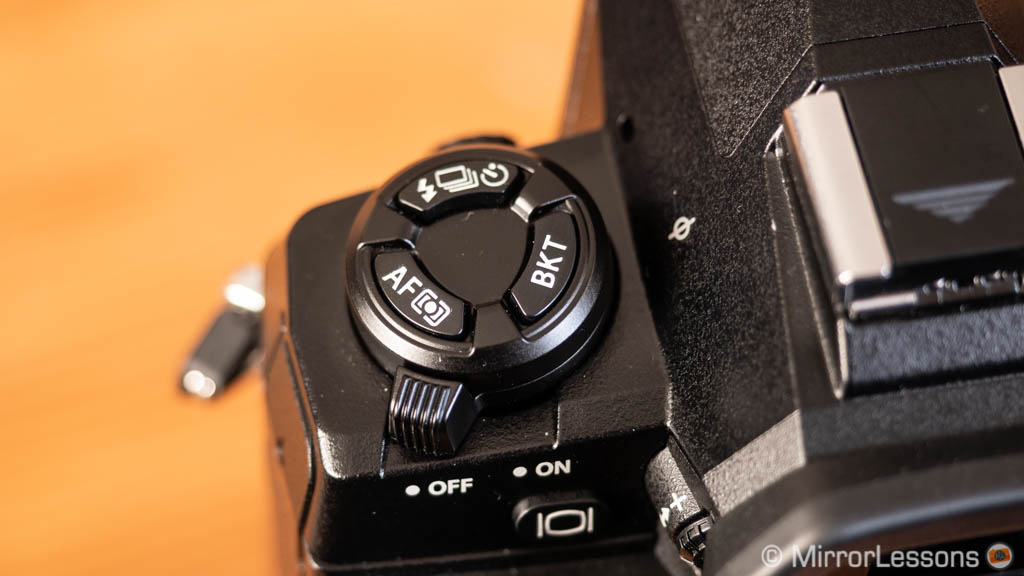
On the top left the flagship has an extra button for bracketing in addition to the drive and AF modes. These buttons are softer to press on the X model but also less sensitive. You really need to push hard, especially the AF one, and this is one of the very few complaints I have about the larger camera.
Another difference is the placement of the twin dials. On the E-M1 II they are entirely visible and sit on top, whereas on the E-M1X they are embedded into the front grip and on the rear side. They are precise and reactive on both cameras so I didn’t really feel a difference. Perhaps a small advantage of the mark II is that the front dial surrounds the shutter release button so your finger only needs to move slightly to use one or the other, but I didn’t have trouble adapting to the E-M1X.
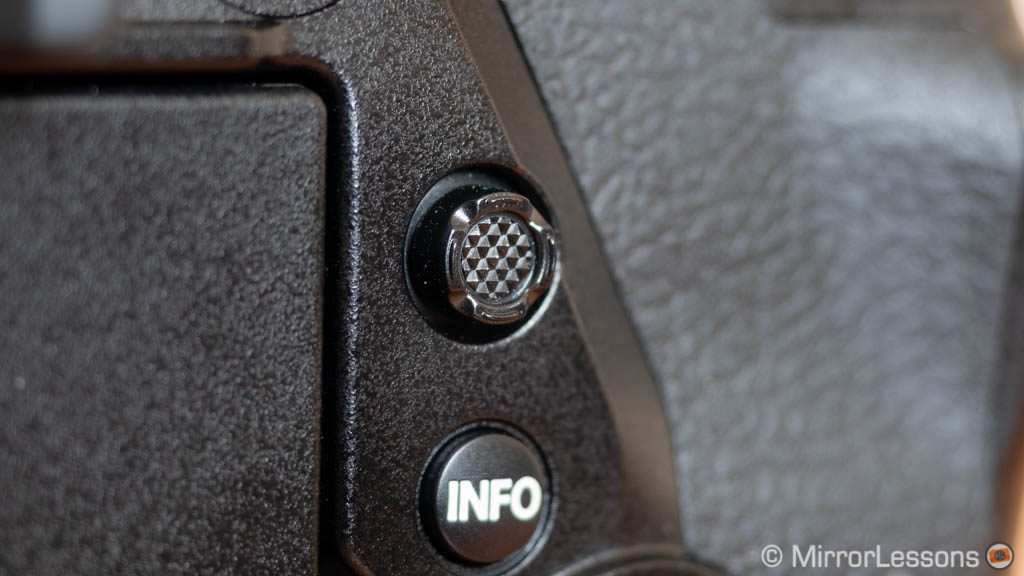
On the rear the most relevant addition to the flagship model is the AF Joystick. It moves in 8 directions and is very precise. Pressing it can trigger a setting of your choosing, and you also have the option to disable it.
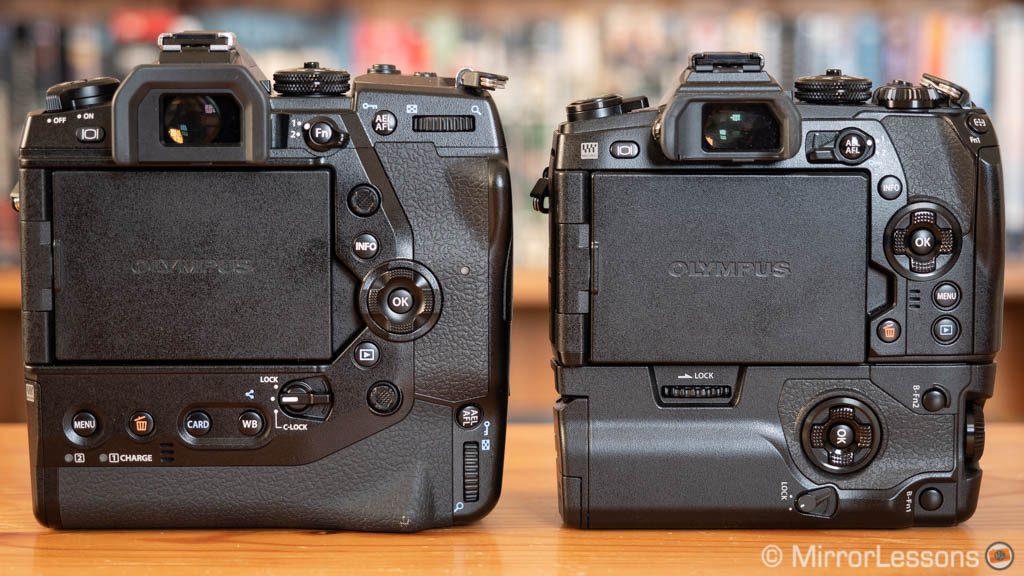
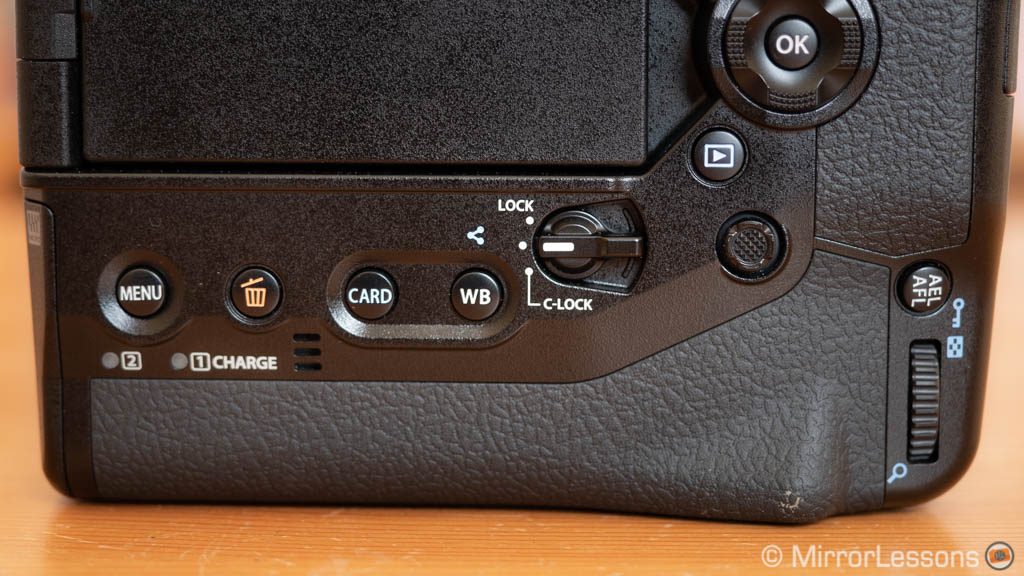
The rear panel reveals exclusive CARD (switch between the two slots) and WB buttons on the E-M1X. The menu button has been moved to the left which I found less comfortable to reach. Both cameras have a 4-way pad that can be used for different functions or to move the AF point.
Note that both models give you additional options to move the autofocus area: you can use the twin dials (one moves the point horizontally, the other vertically) or the touch screen, which means there are 4 different ways on the E-M1X and three different ways on the E-M1 II to move the AF point.
Some of the buttons – including the shutter release – are replicated for vertical shooting on the E-M1X.
The optional HLD-9 grip on the E-M1 II also replicates the most important buttons but lacks the two Fn buttons out front, ISO and exposure compensation on top and the second AF Joystick. It does have its own 4-way pad however as well as an extra button on the rear.
The buttons for vertical shooting can be locked but on the E-M1X you find an extra C step that allows you to choose which buttons gets disabled.
The flagship has 12 function buttons that can be customised, including the two out front, and the ones for ISO and WB. An additional five are found for vertical orientation. The E-M1 II has 9 custom buttons by comparison, plus two on the optional HLD-9 grip. The arrow pad on the optional grip behaves like the one configured on the camera.
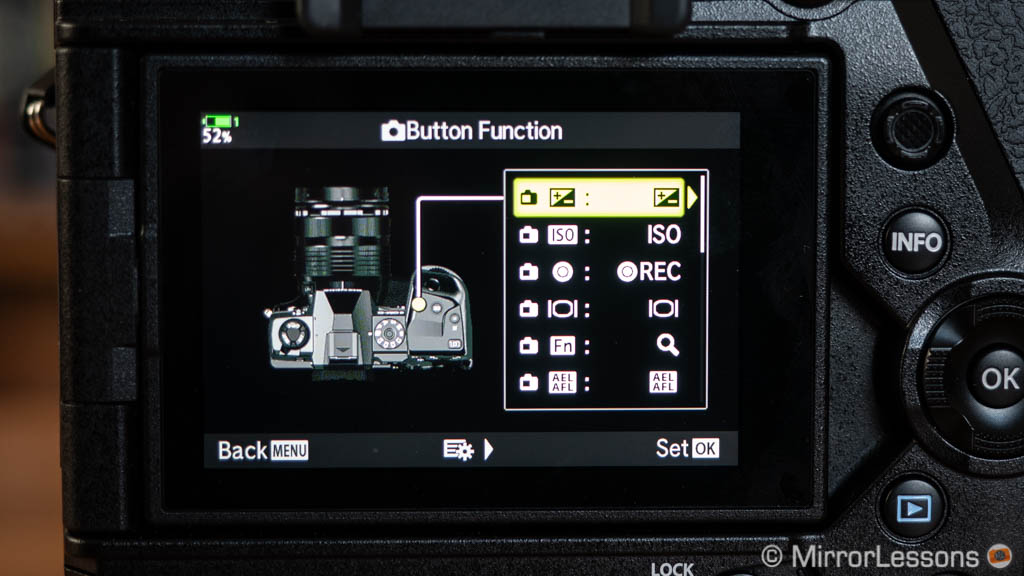
Other customisation possibilities include assigning different functions to the twin dials with the help of the function lever on the rear (similar to the AF point described above) and changing the rotation direction of the dials. The Fn lever can be used to turn the camera on and off if you prefer it to the default switches on top.
The E-M1X has an additional option that is very welcome: the possibility to assign live composite or live time to the B step on the main dial, which means you don’t have to scroll down through all the shutter speeds to activate them.
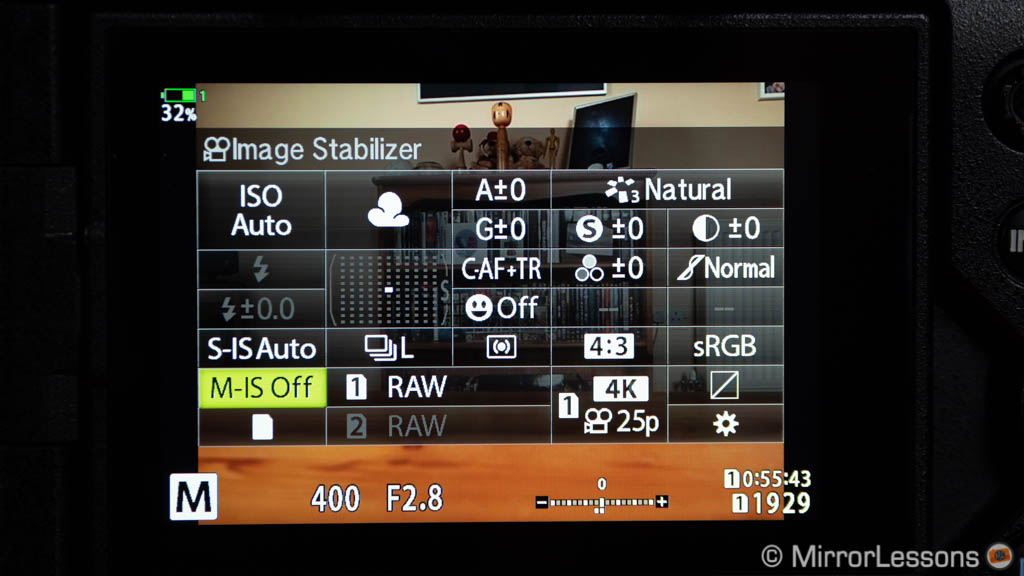
The menu system is more or less the same on both cameras when it comes to the graphic interface and organisation, and the same goes for the Super Control Panel.
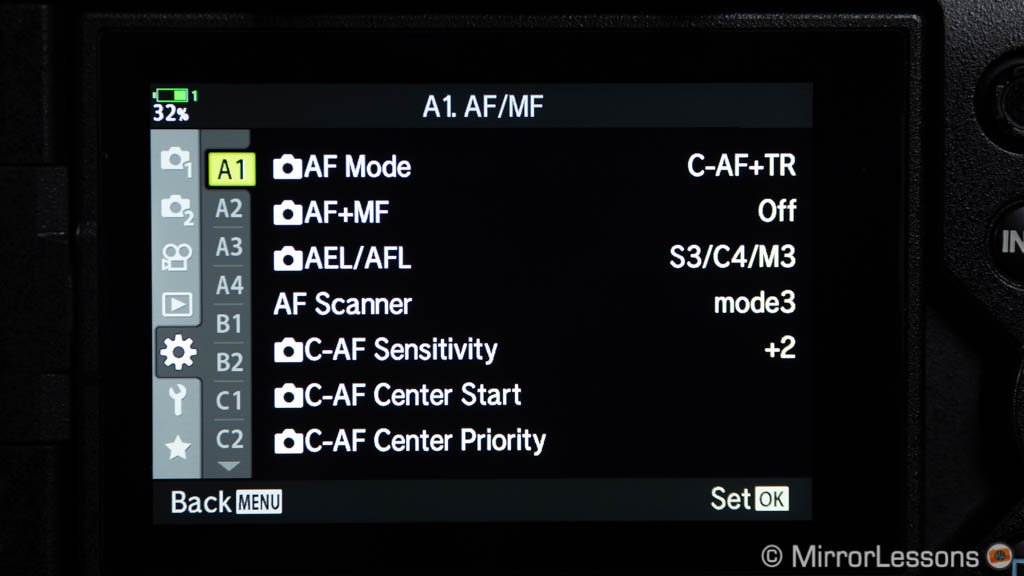
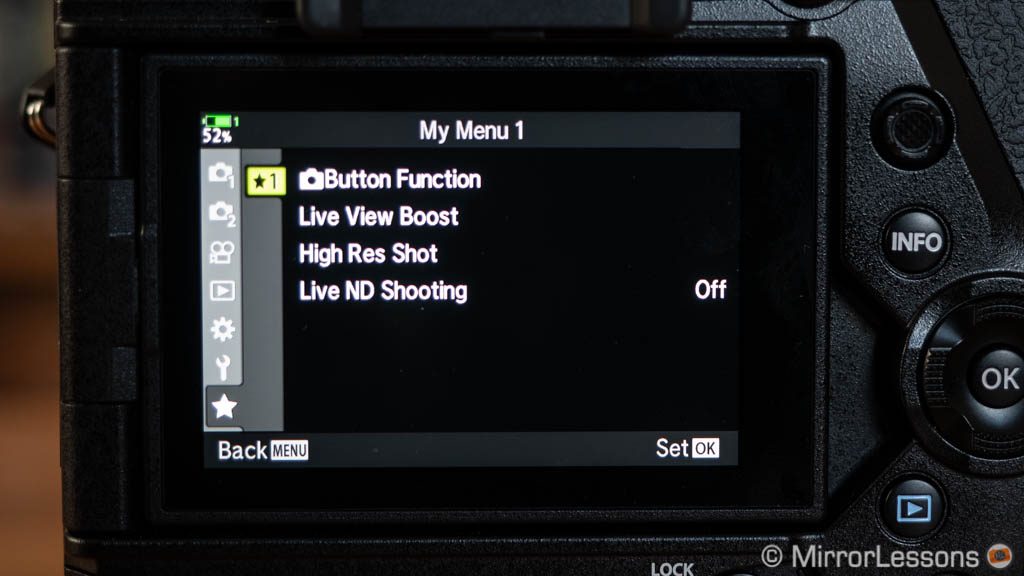
On the E-M1X you’ll find some improvements such as a clearer visualisation of all the function buttons when you customise them, and the My Menu section where you can add your favourite settings (5 pages maximum). You can add them at any time by pressing the video record button while scrolling through the main menu menu, which is very clever.
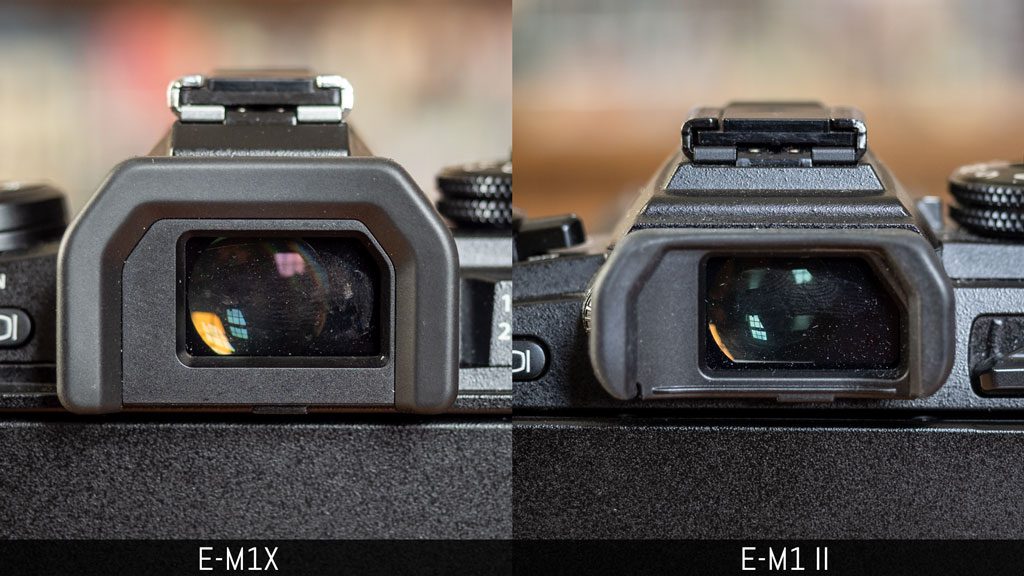
Viewfinder and rear monitor
Both cameras have an electronic viewfinder with 2.36 million dots.
The E-M1X EVF has a new optical design that increase the magnification to 0.83x, versus 0.74x on the E-M1 II. It does feel much larger on the flagship model but it’s a shame that it doesn’t come with more resolution now that we’ve seen higher numbers from other mirrorless products.
That being said, the E-M1X EVF is very good thanks to the bright and clear LCD panel. It also has a slightly shorter lag (5ms vs 6ms) and while both viewfinders can go up to a refresh rate of 120fps, the flagship’s uses a progressive scan which gives you a sharper view when tracking.
The rear LCD screens share the same characteristics: they have a multi-angle mechanism, are 3 inches in size, have a resolution of 1.03M dots and are touch sensitive. You can adjust the colour temperature, brightness and vibrance (vivid or natural).
Touch gestures include moving the AF point, taking a shot or selecting settings in the Super Control Panel. You can also activate the AF Targeting Pad to use the touch screen while composing the EVF. I noticed that the E-M1X is more reactive than the mark II model. You can also use this feature when the monitor is flipped out to the left.
For both the LCD and EVF, you can control live view to either display the exposure in real time, or prioritise a bright view while disregarding the settings in use (useful if you work with strobes in a studio for example). The E-M1X has an additional option for the On2 setting (optimised for night shooting): you can choose frame rate or quality priority. The former will display false colours whereas the latter will have a slower frame rate.
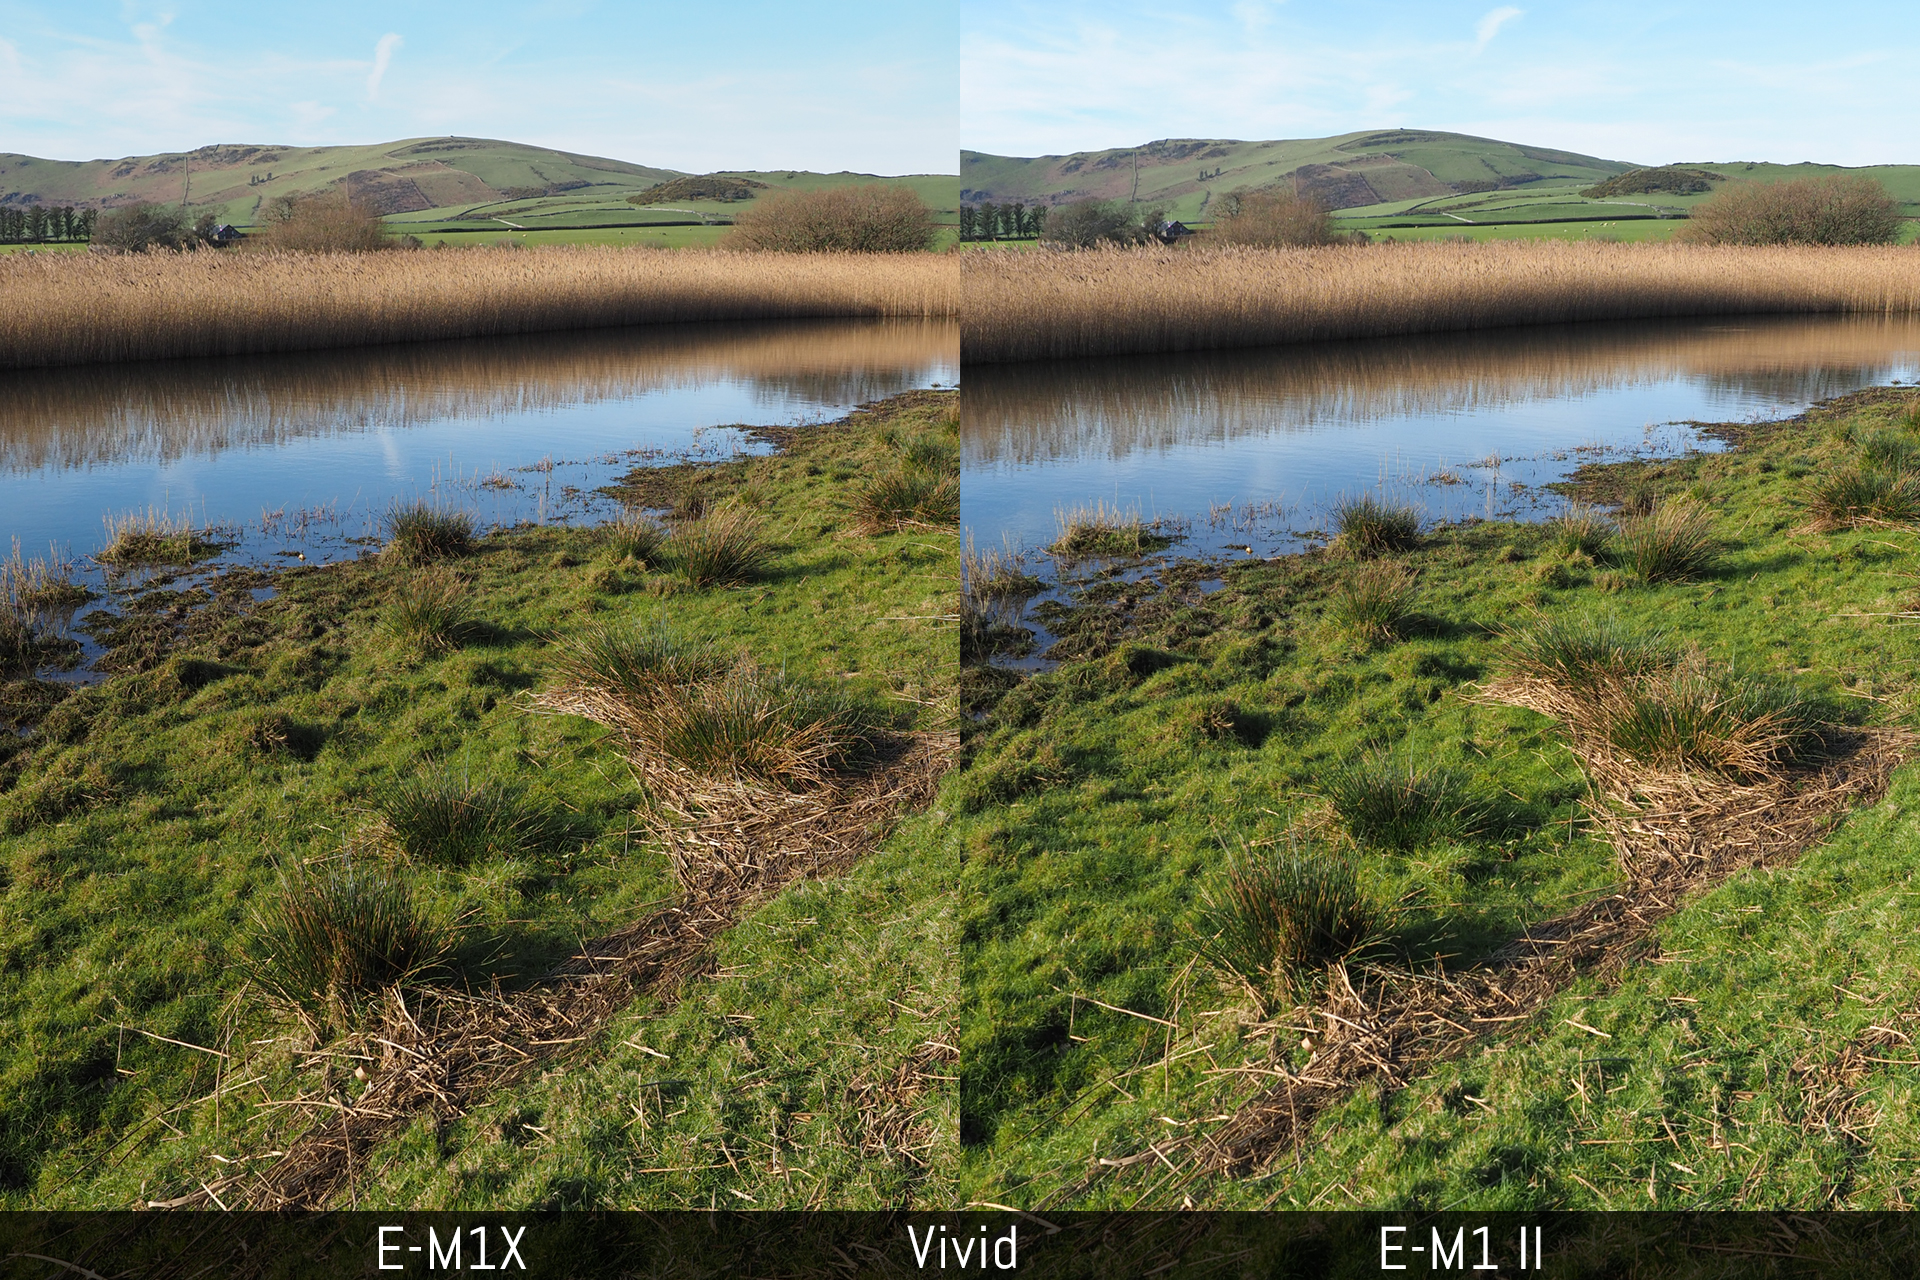
Image quality
The E-M1X and E-M1 II incorporate a four thirds sensor with 20.4MP and no AA filter. They feature the TruePic VIII image processor but the flagship has two inside the body. This improves several things that are mainly processing speed related (see autofocus and following chapters).
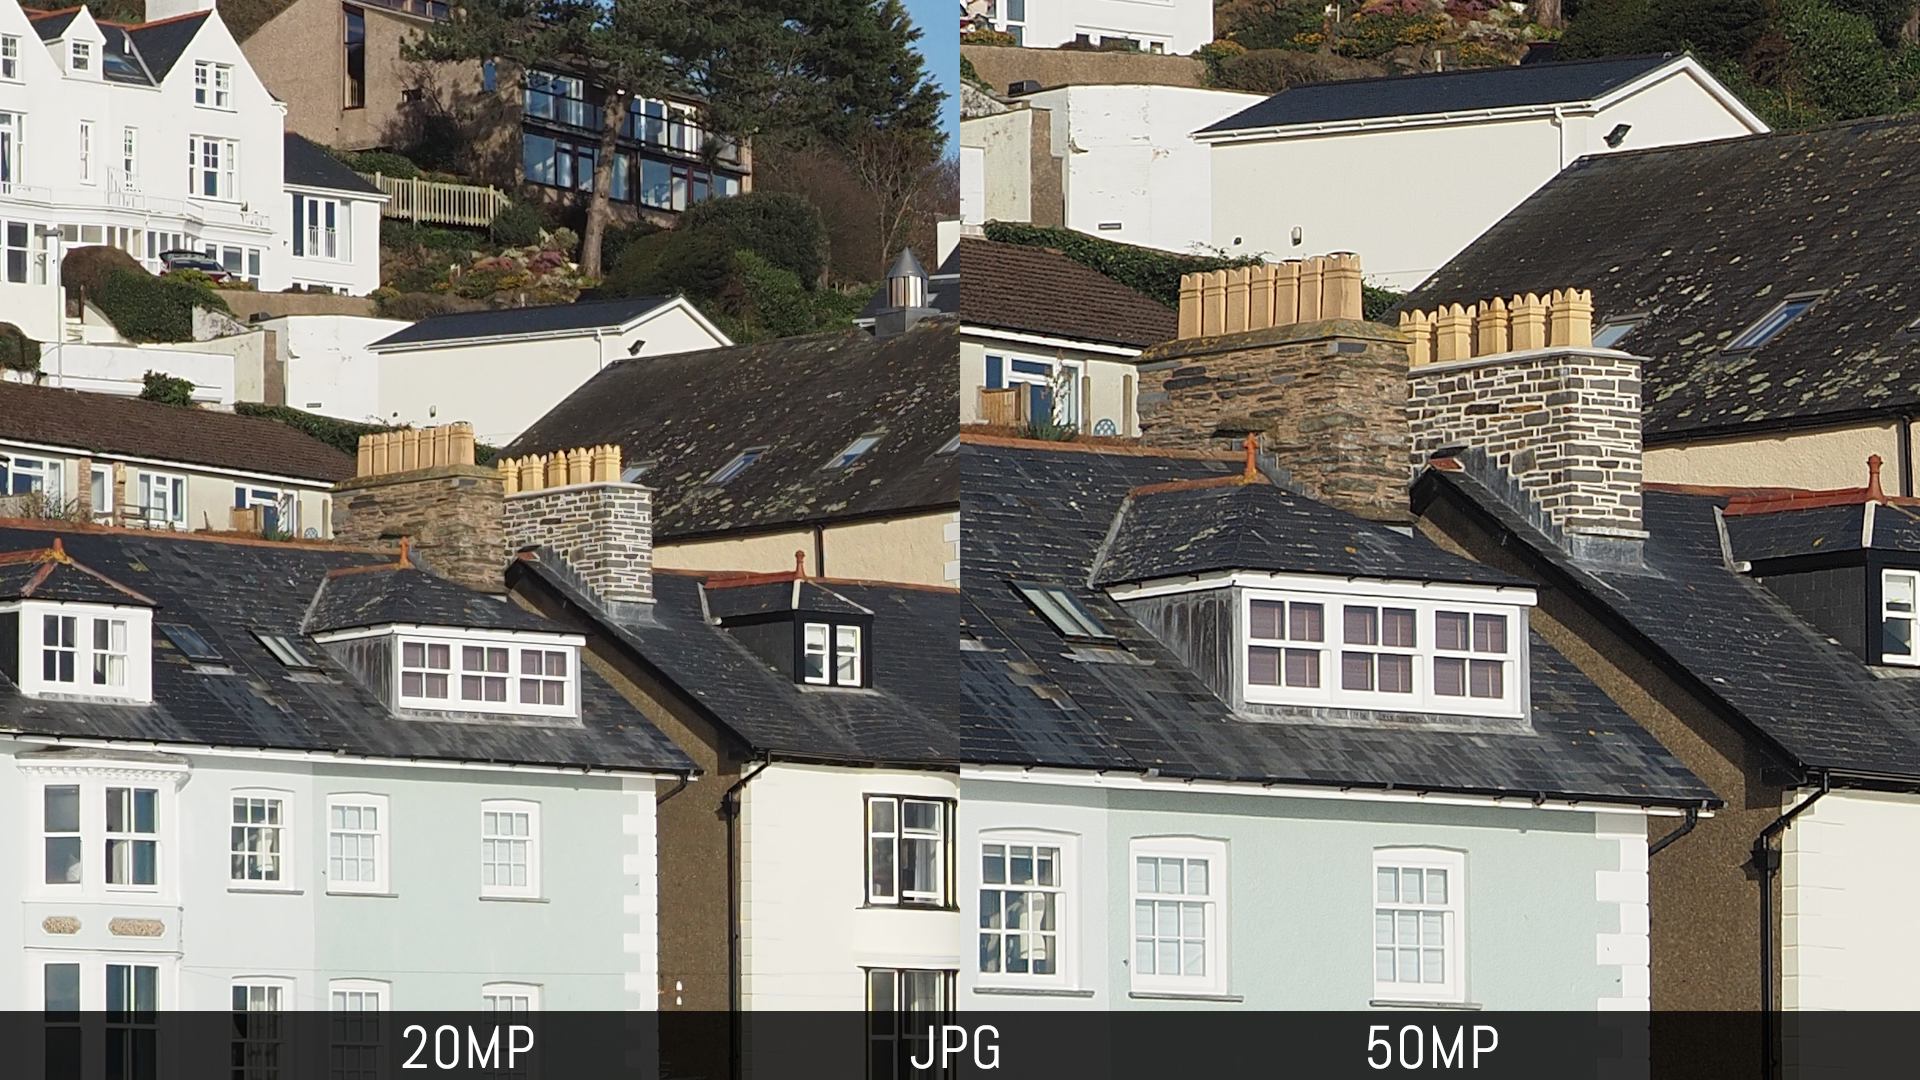
In terms of sharpness and detail rendering, there is nothing to declare: both files behave in the same way. For the SOOC JPGs, you can increase sharpness in two steps and the image processor gives you the same result on both cameras. You can increase the resolution with the High Res Shot mode which we talk about in the dedicated section further down.
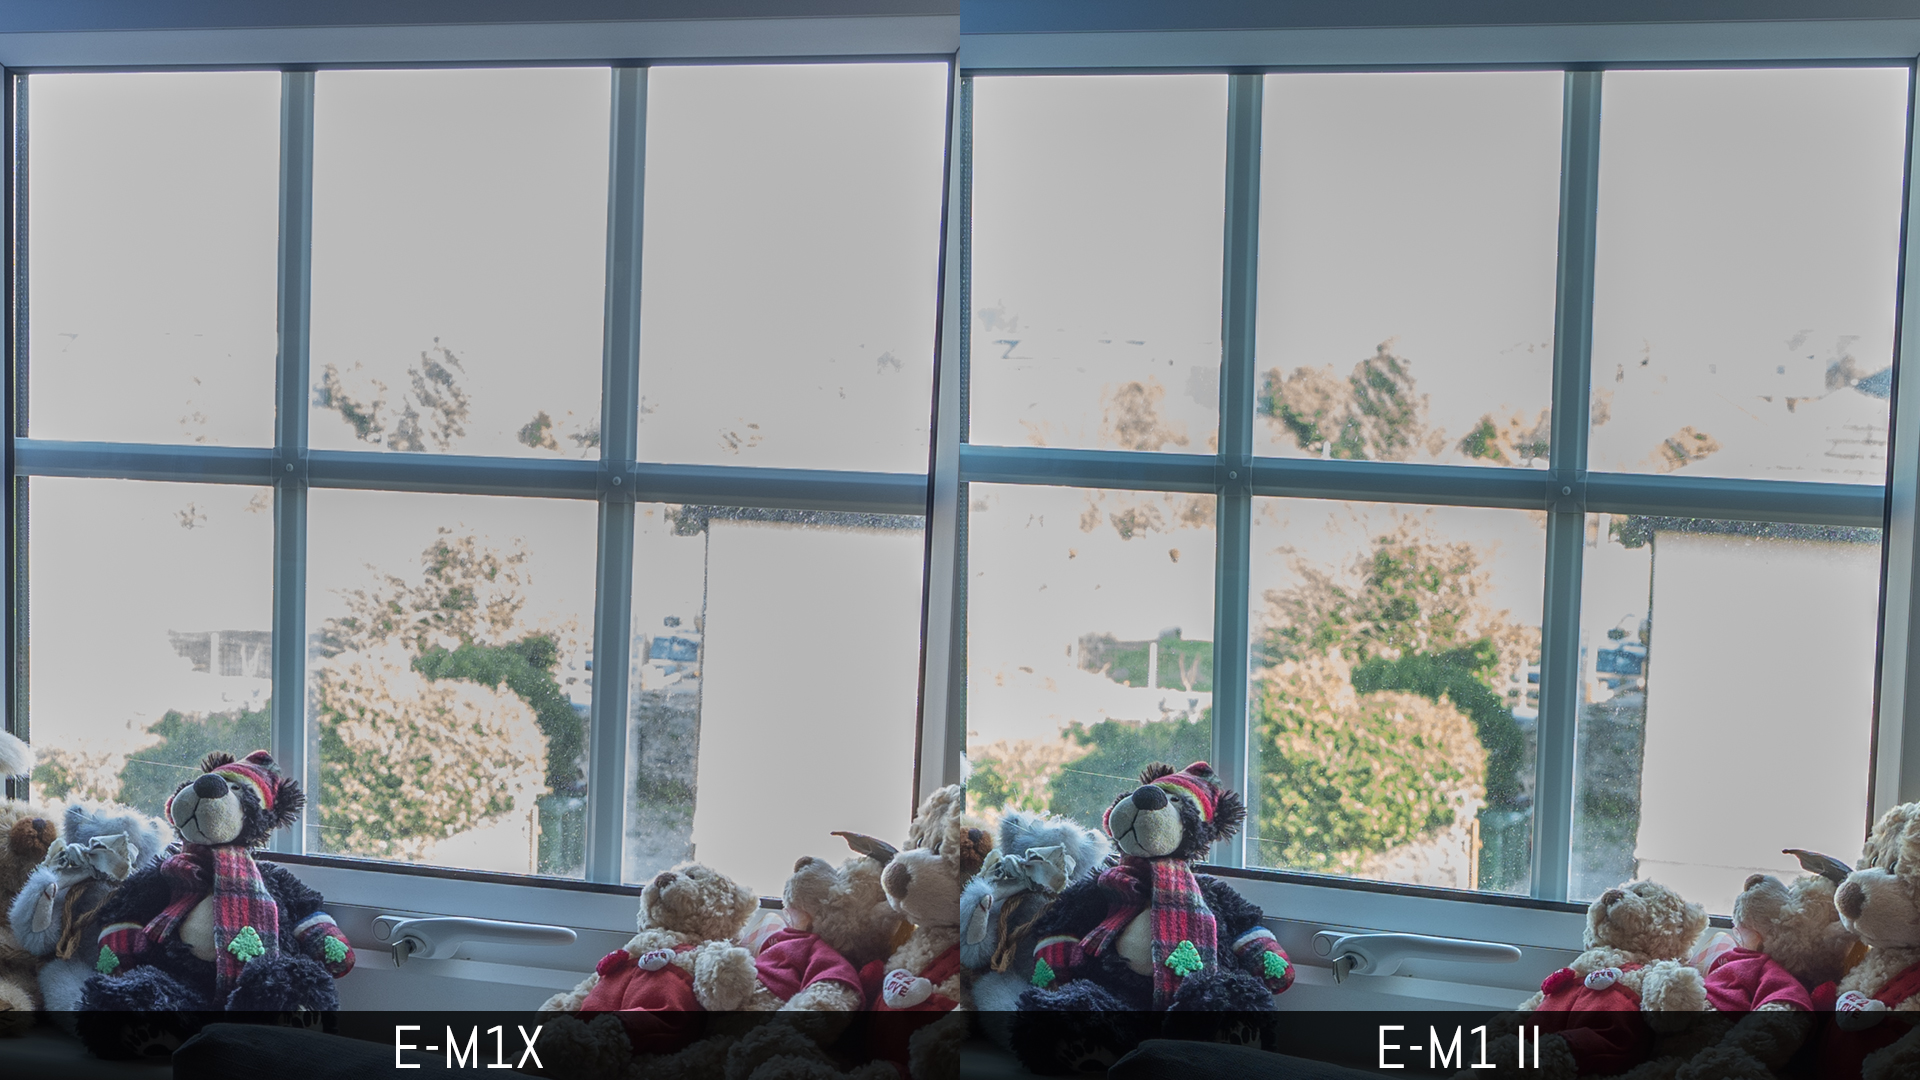
The flagship model features an updated version of the E-M1 II sensor: it has a new anti-reflective coating that is supposed to reduce flare and ghosting, as well as an optimised optical design that improves sensitivity. Happily I did come across some improvements to dynamic range.
The E-M1 II displays more noise when recovering 3 stops and requires more colour noise reduction. If you push the sliders even more, the mark II starts to shift towards magenta in the shadows. Both cameras shoot RAW in 12-bit lossless compressed.


With more moderate adjustments to the RAW files, the difference is more subtle but the E-M1X image remains a bit cleaner.
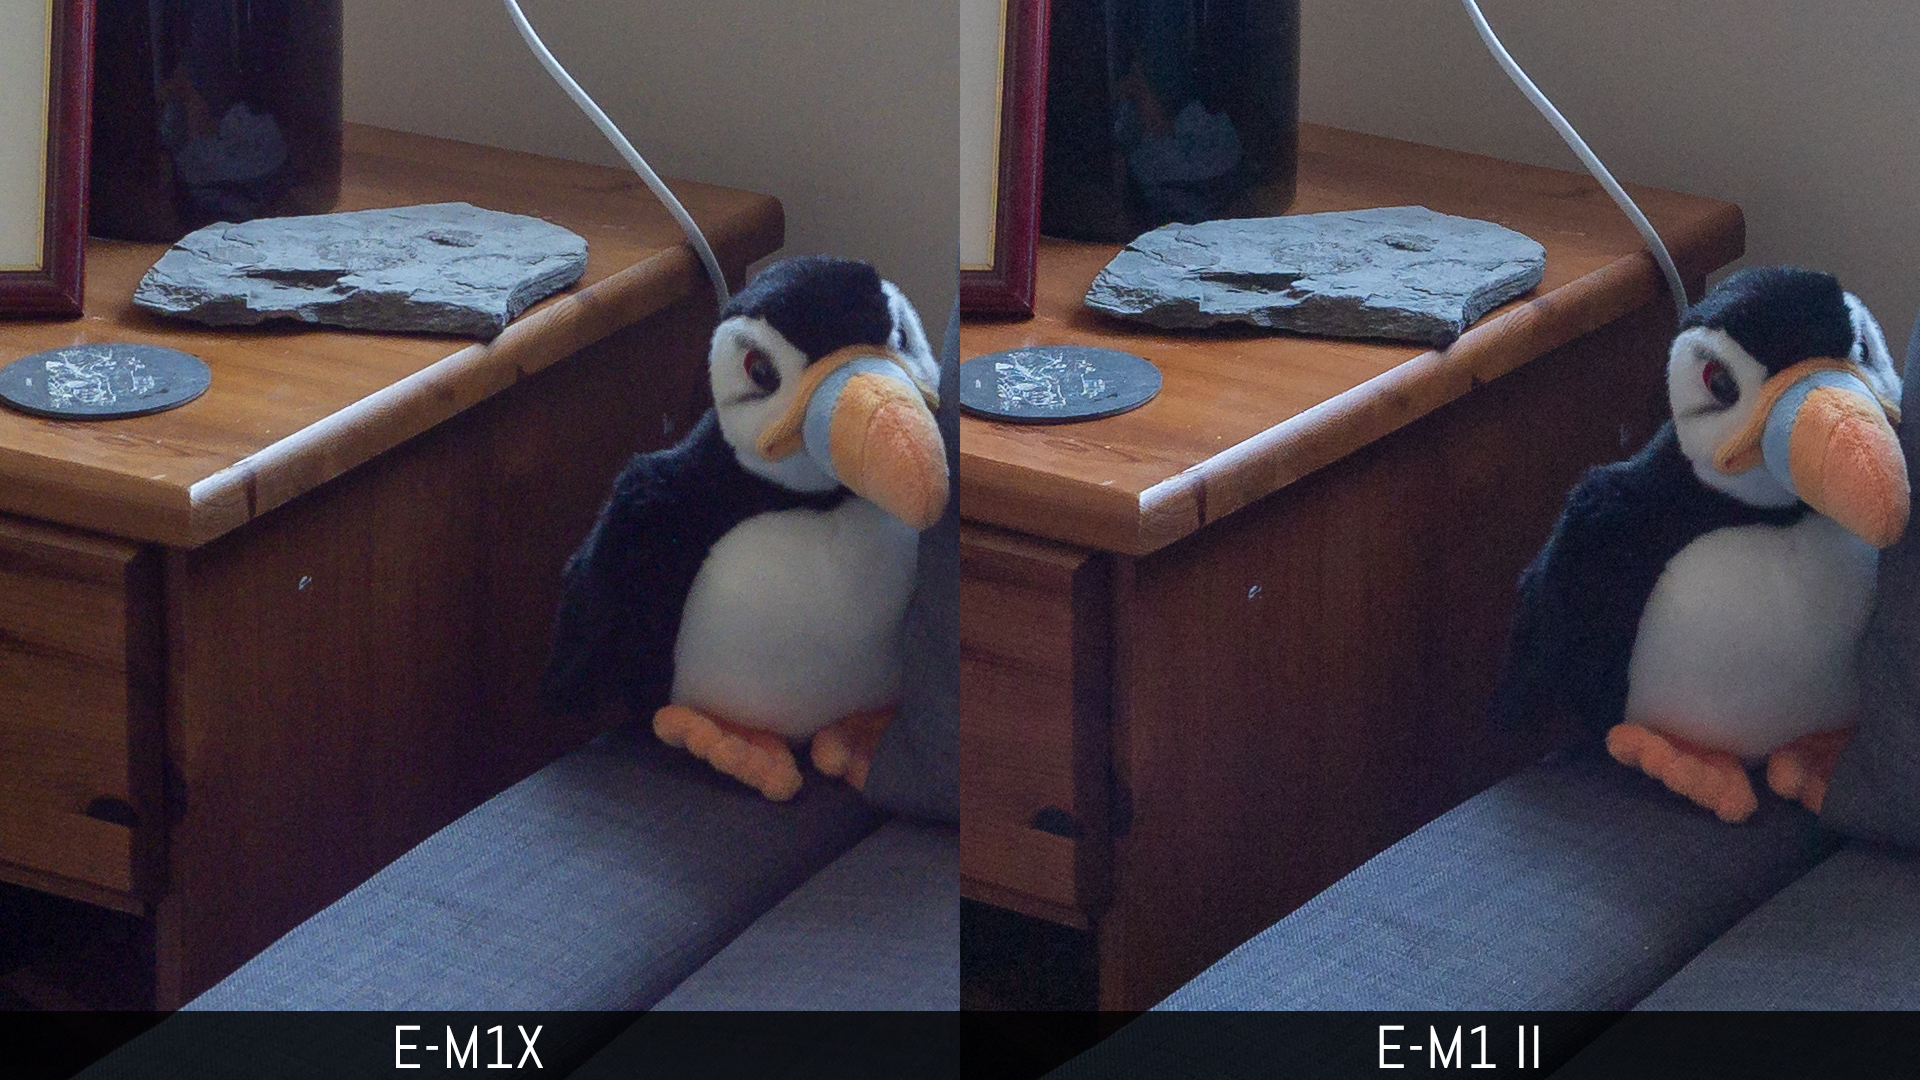
In the highlights, it is the E-M1 II that retains a bit more information but it’s not a big difference.
The normal ISO range is the same (200 to 25600). The E-M1X has two extended “pull” values (ISO 100 and ISO 64 equivalent) whereas the E-M1 II only gives you ISO 64.
In my first article I wrote that I didn’t see a significant difference in ISO performance, but after further analysis the E-M1X seems to have a bit less noise between 3200 and 12800 ISO. It’s not game changing by any means but a small improvement nonetheless. Interestingly when opening the file with the default Adobe Colour profile in Lightroom, the E-M1 II files are more saturated.


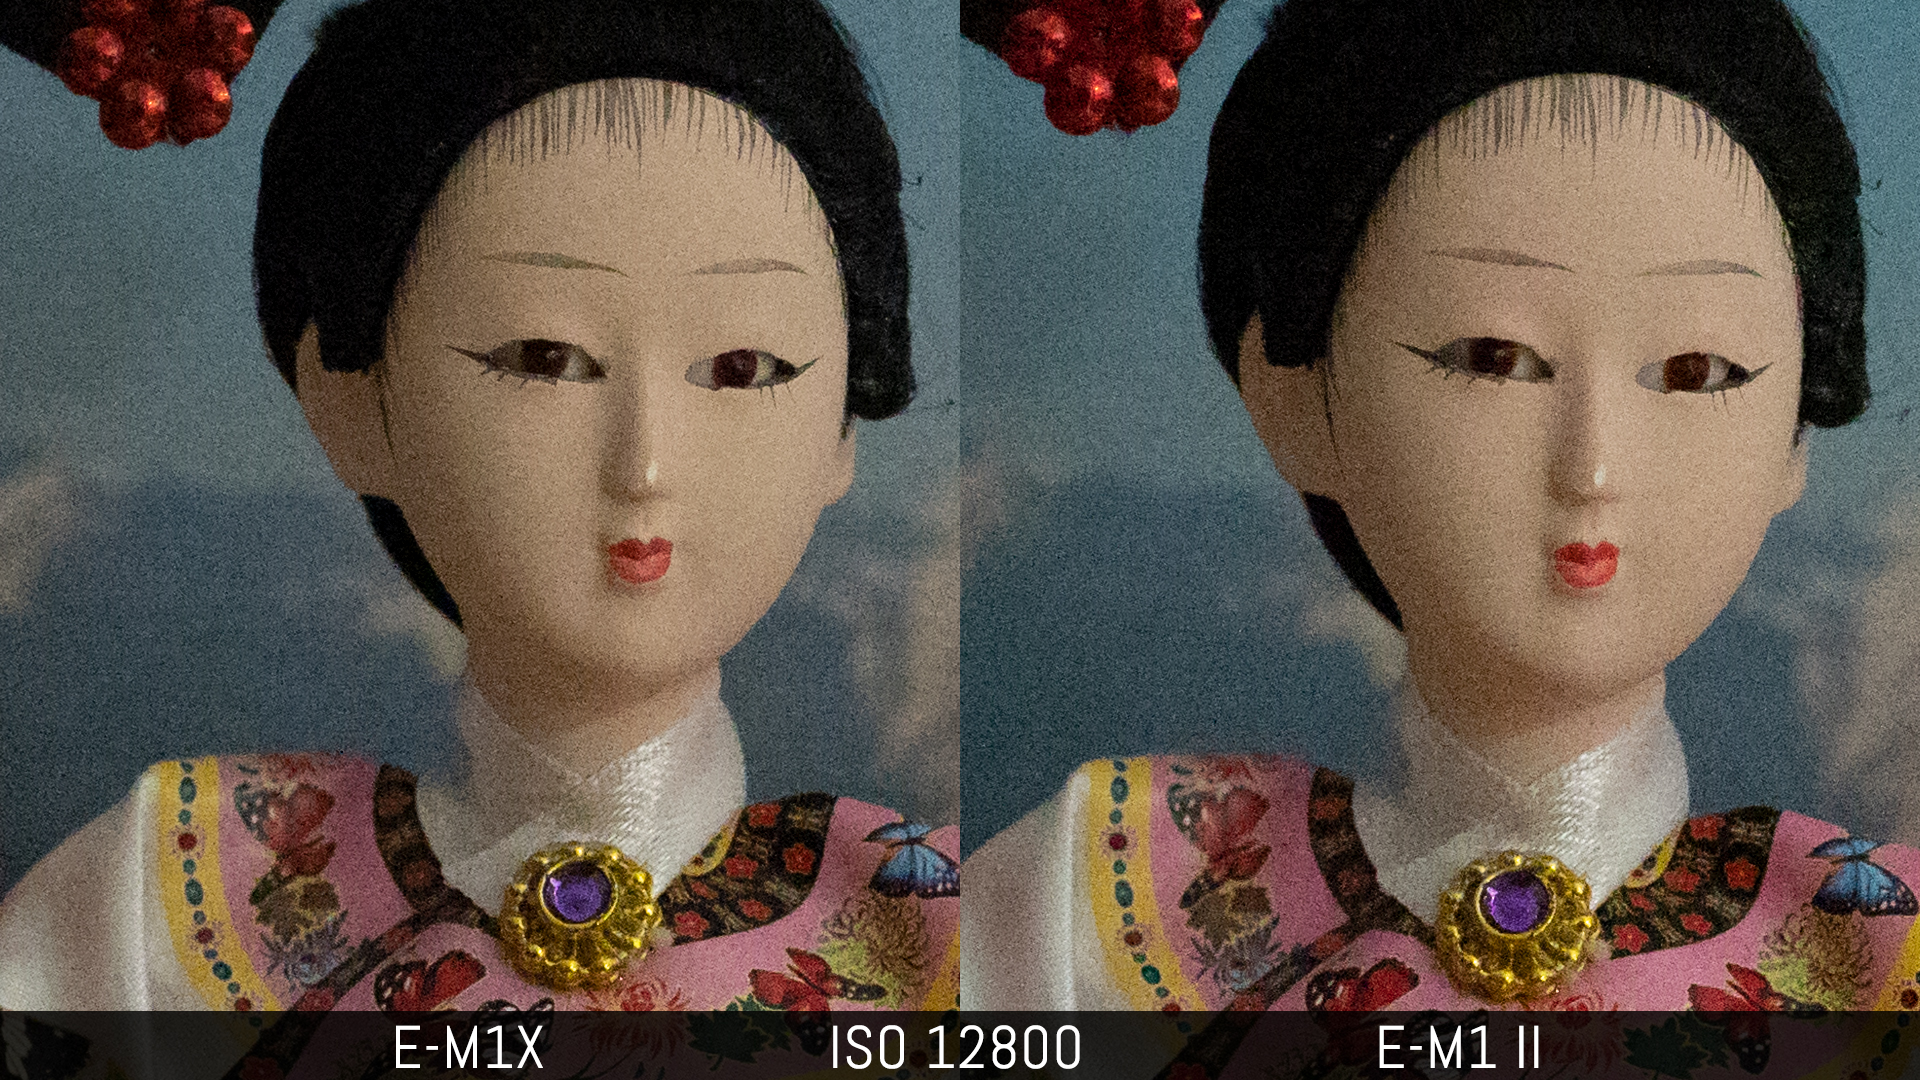
The highest sensitivity value is mostly unusable on both cameras.

With in-camera JPG files, you can set noise reduction in four steps (Off, Low, Normal and High). The E-M1X displays a bit more noise overall but looks sharper whereas the noise filter on the E-M1 II is more aggressive.


The colour palette hasn’t changed that much. In Lightroom you get very similar results with the RAW files, especially if you select the emulated camera profile rather than the Adobe ones. With the SOOC JPGs, the E-M1X produces an ever so slightly more yellow tint.
The same reasoning applies to skin tones. Both cameras do a good job with auto white balance, whereas manual white balance can display more of a green tint but you can adjust that in-camera with the WB compensation setting.
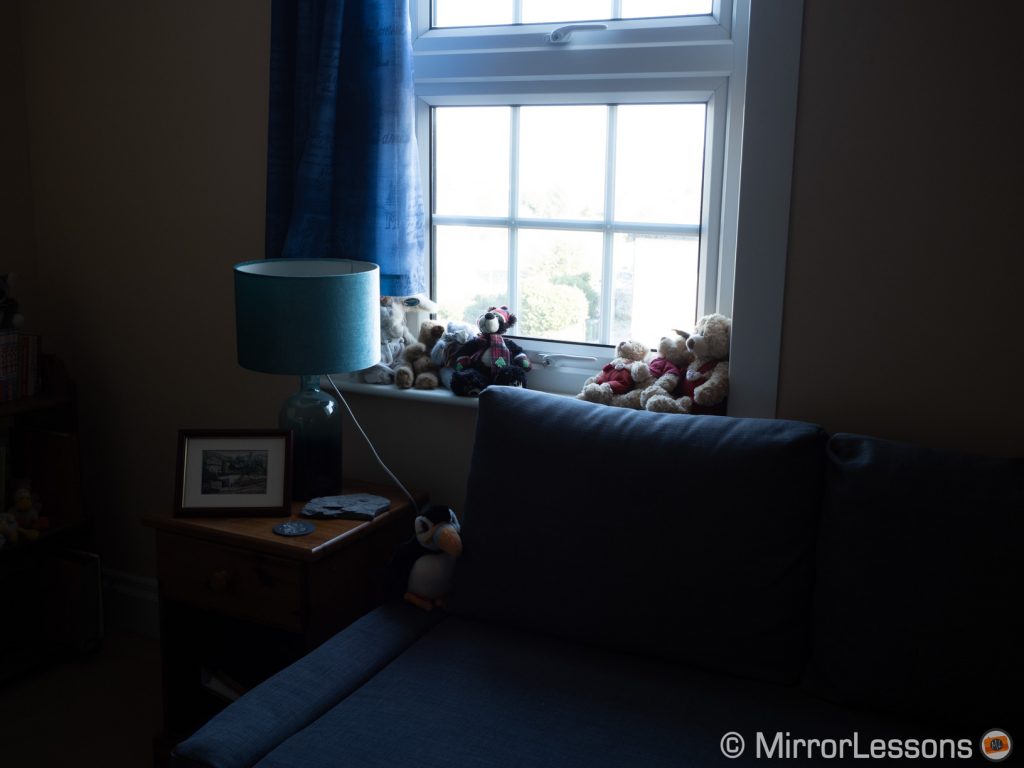
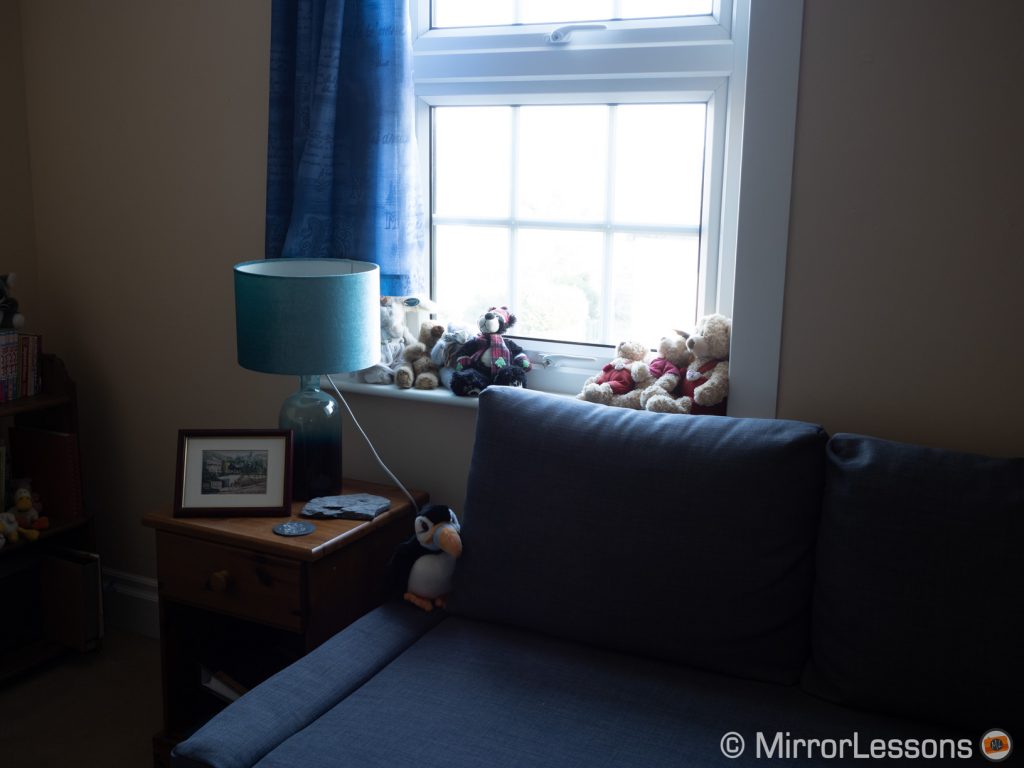
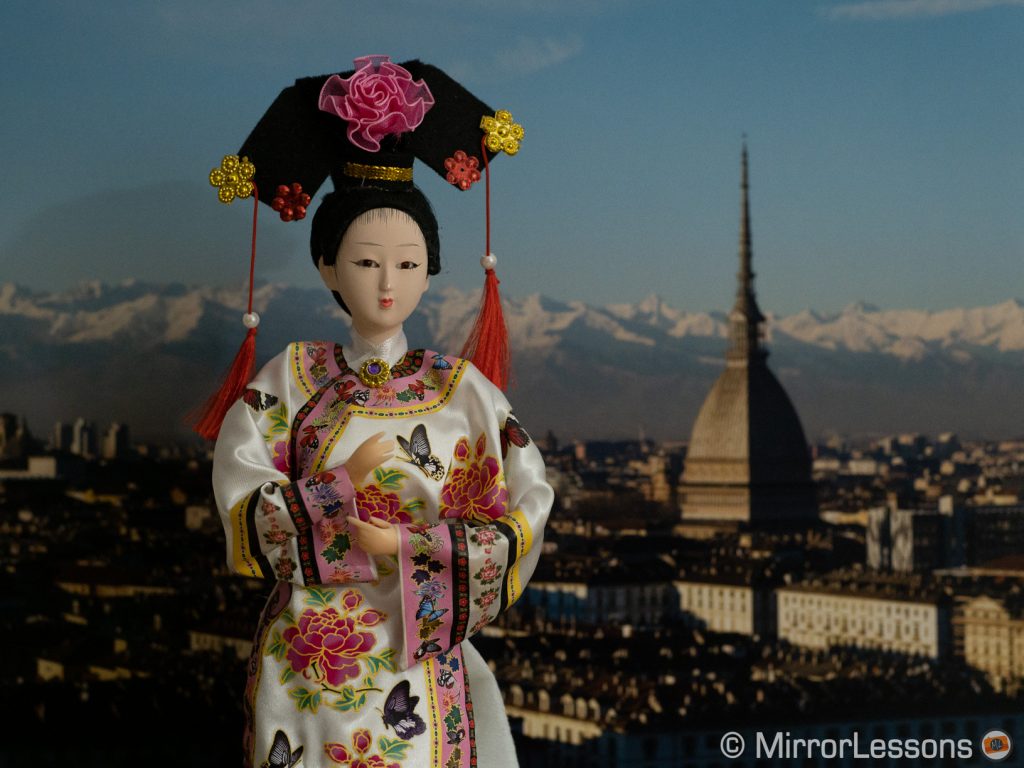
Note: I apologise for the inaccurate focus of the image on the right. It looked fine on the LCD screen and by the time I realised the focus wasn’t precisely on the eye, I’d already sent the cameras back.


Both cameras have a SuperFine JPG option in addition to Fine and Normal.
As for metering, their behaviour is very similar. Settings include Multi, Centre-Weight, Spot, Spot Metering Highlight and Spot Metering Shadow.
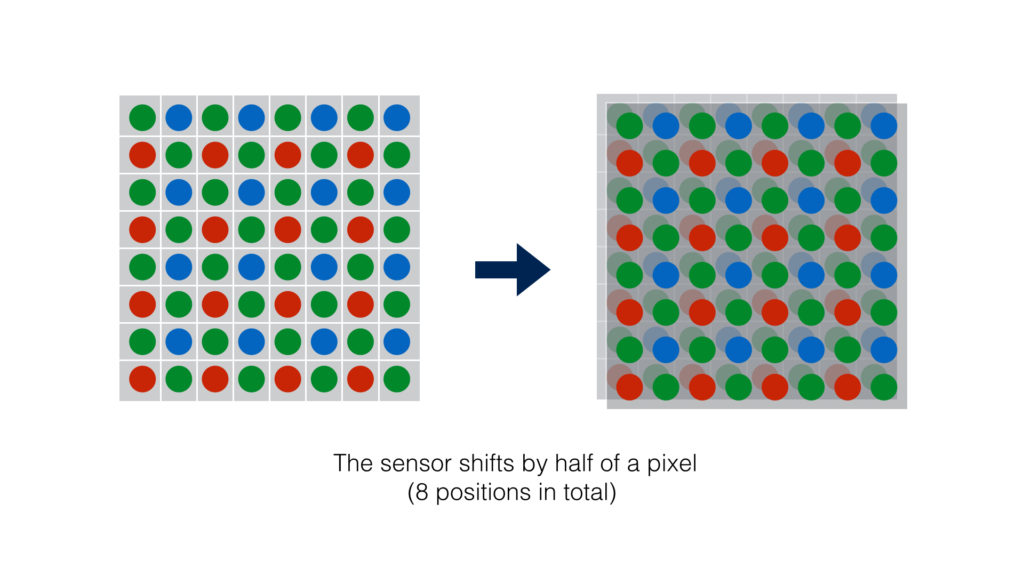
Sensor shift: High Resolution mode
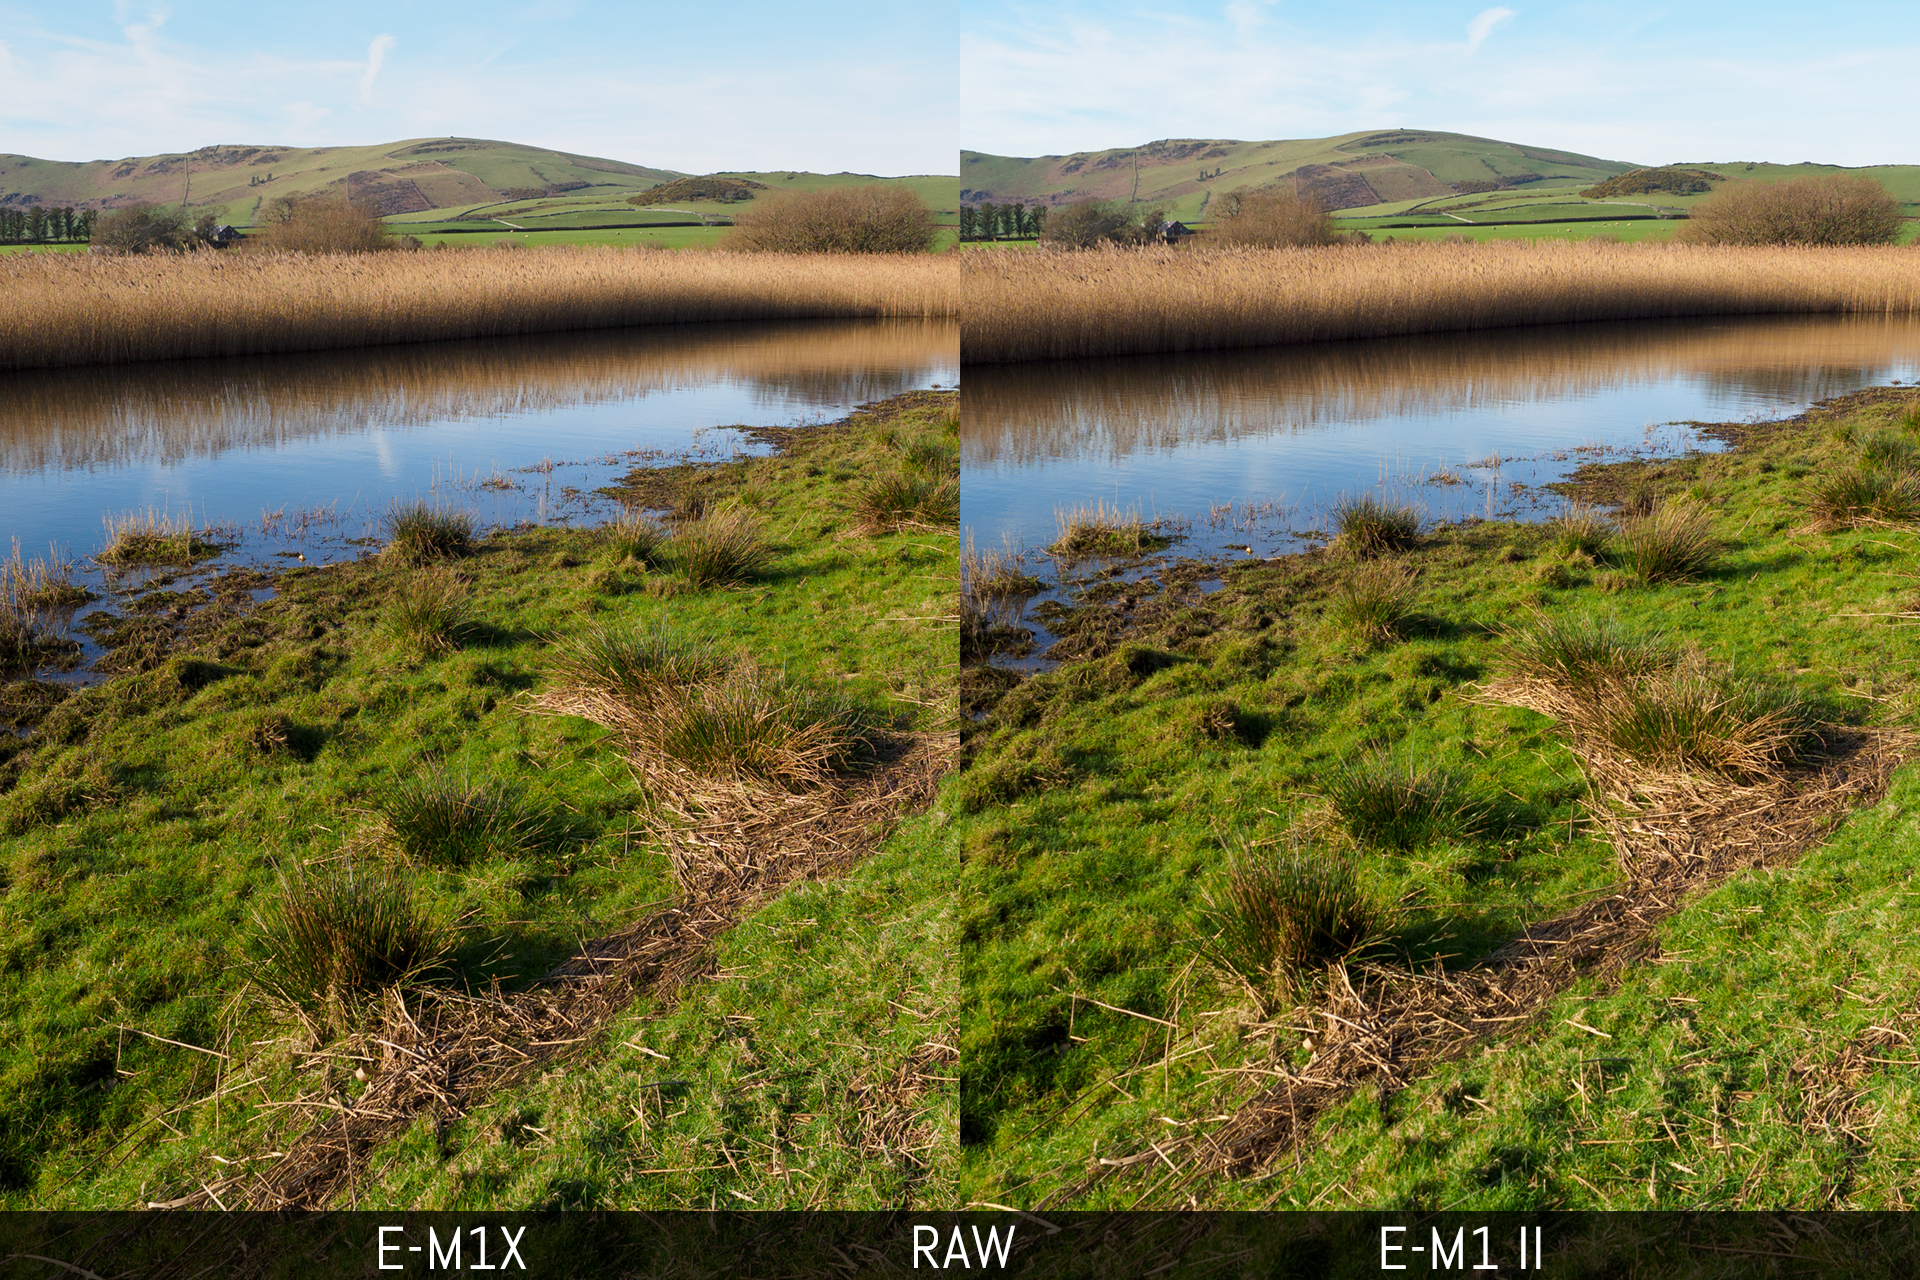
The E-M1X and E-M1 II feature 5-axis sensor stabilisation which I will talk about in a moment, but the sensor shift technology used in both cameras can serve another purpose: to increase the resolution by combining multiple shots. This function is called High Resolution Photo (also referred to as High Res Shot or HRS).
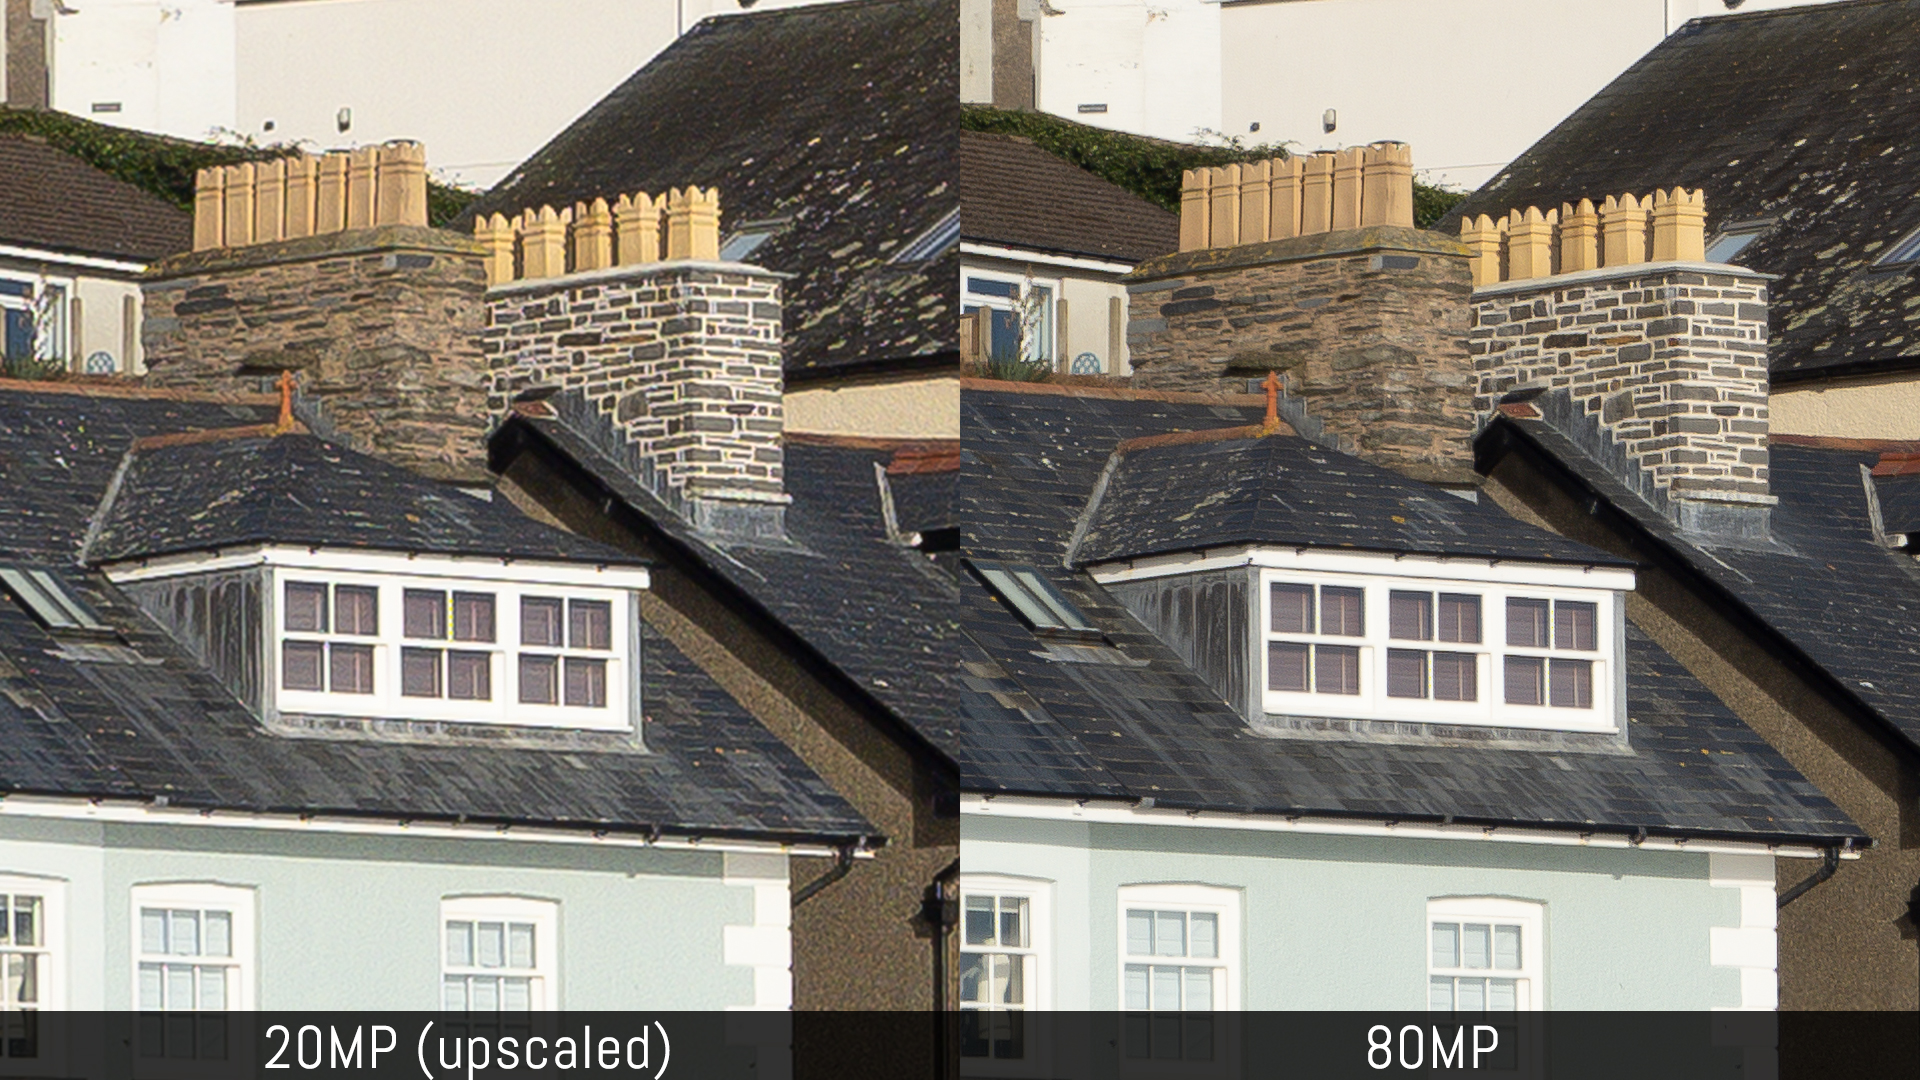
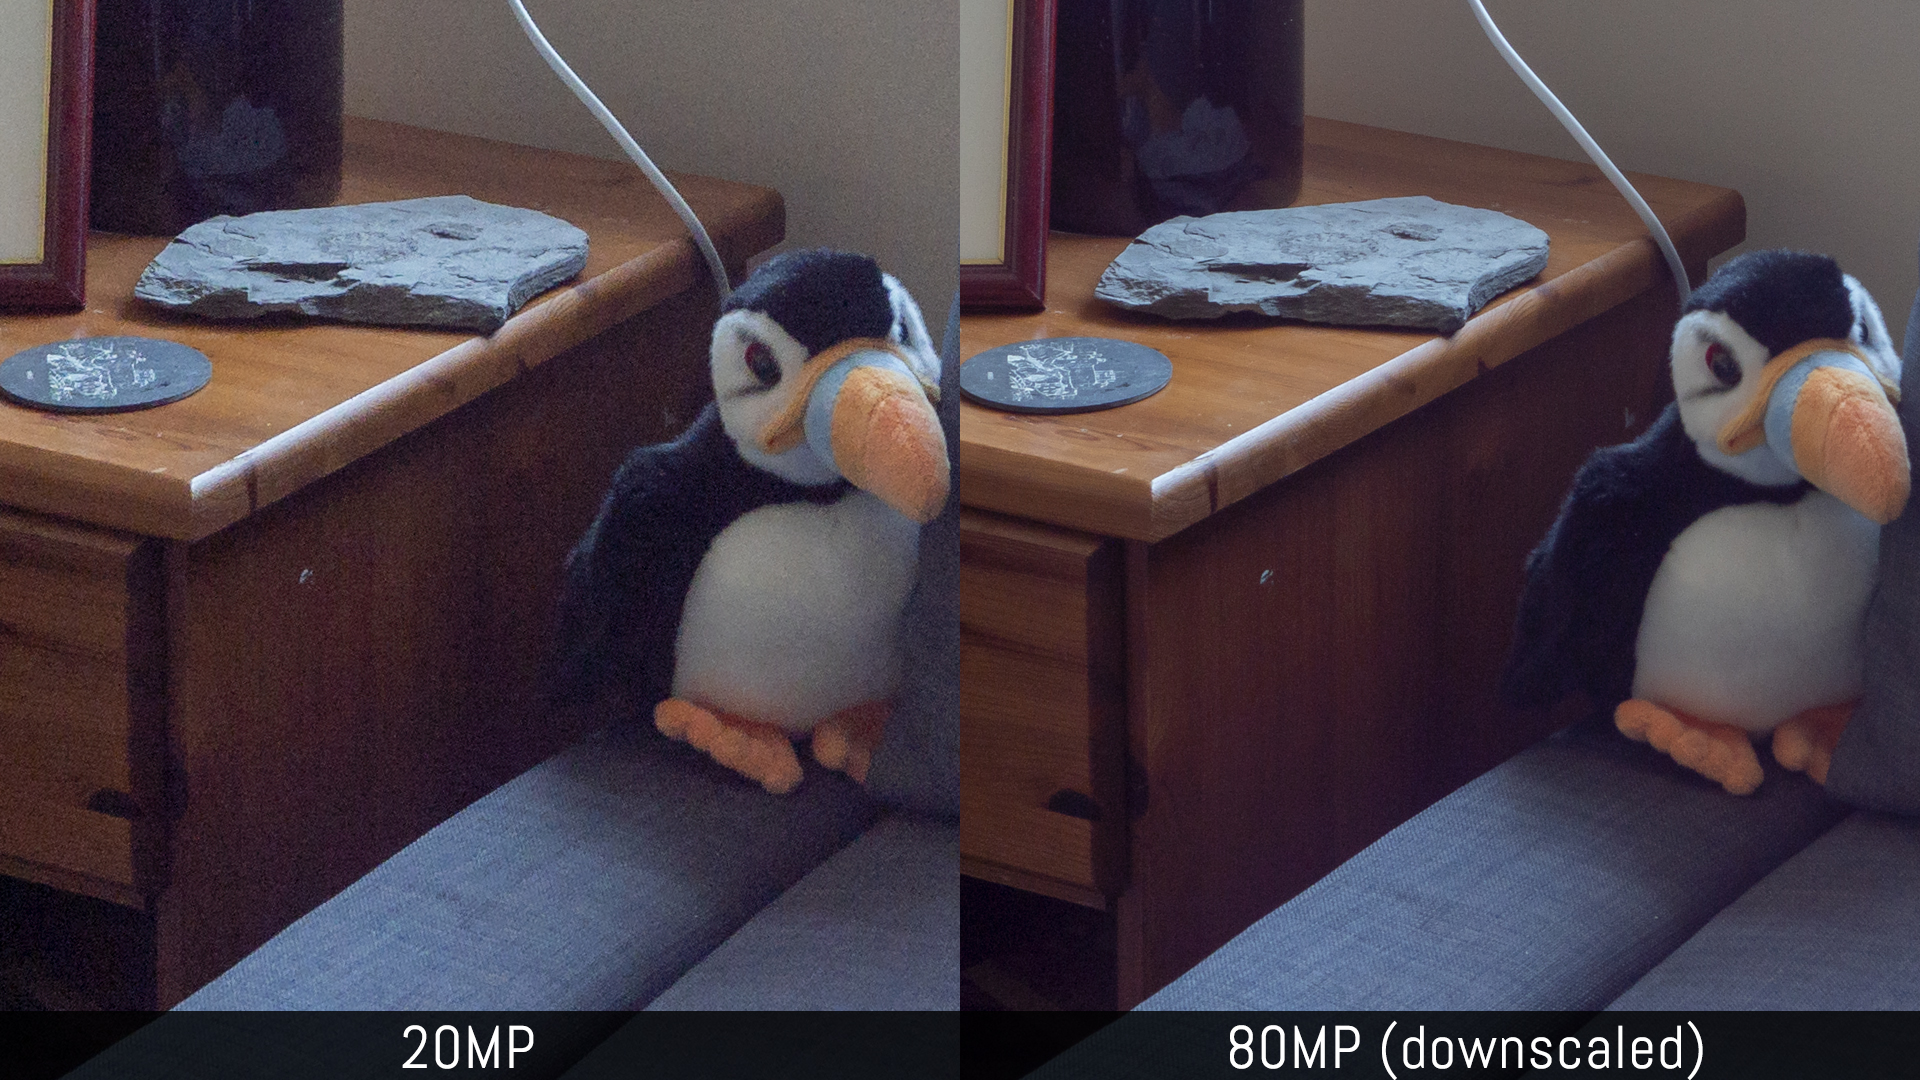
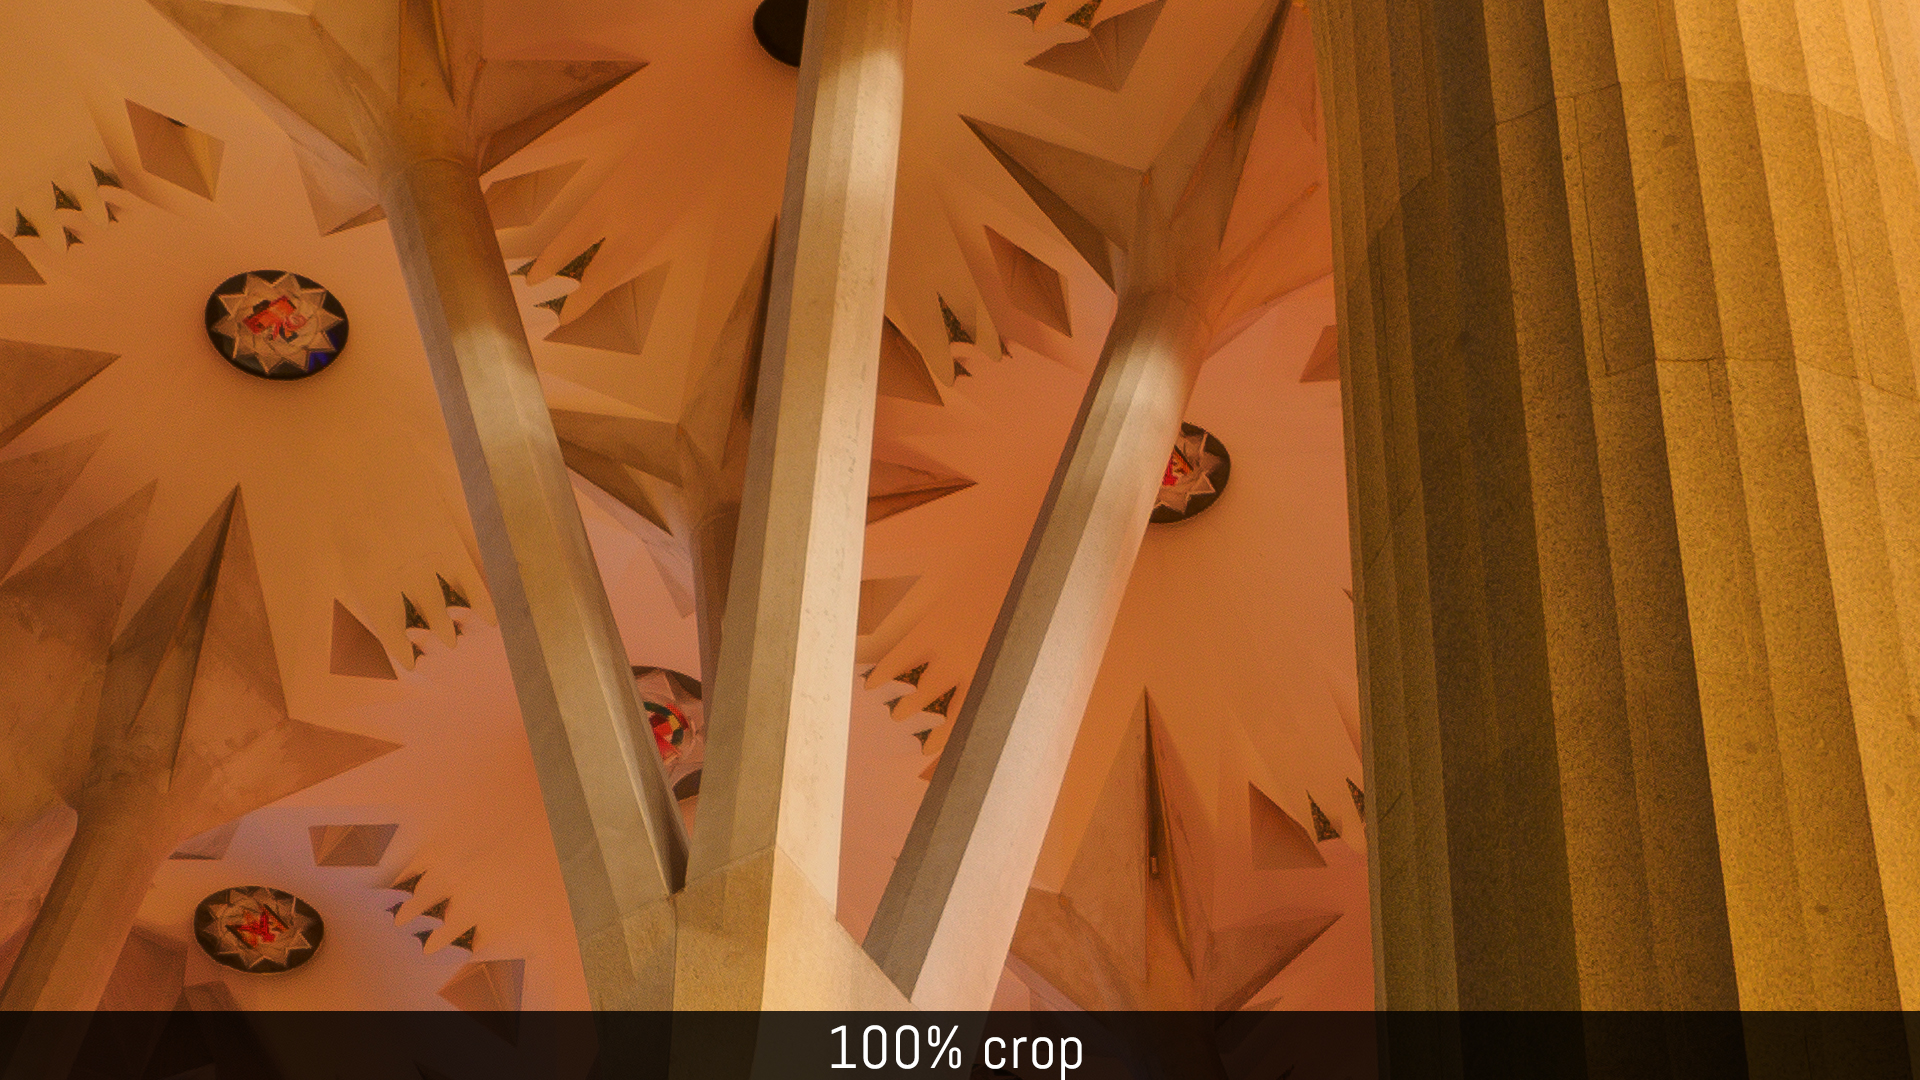
The cameras take 8 consecutive images and move the sensor by half a pixel between each shot. The 8 pictures are then composited to create the final output. The resolution is 80MP for RAW and 50MP for JPG.
Note that when loading the HRS RAW files in various editing softwares, they often don’t appear very sharp by default. You need to increase sharpness and details to get an optimal rendering. In fact I often find the normal shot easier to work with, and if I downsize the HRS image to 20MP, the single shot appears a bit sharper. Of course if I do the contrary (upsize the single shot to 80MP), the advantage of the High Res mode becomes apparent.


80MP shot: Sharpness: 50, Radius: 1.2, Detail: 70, Luminance NR: 0
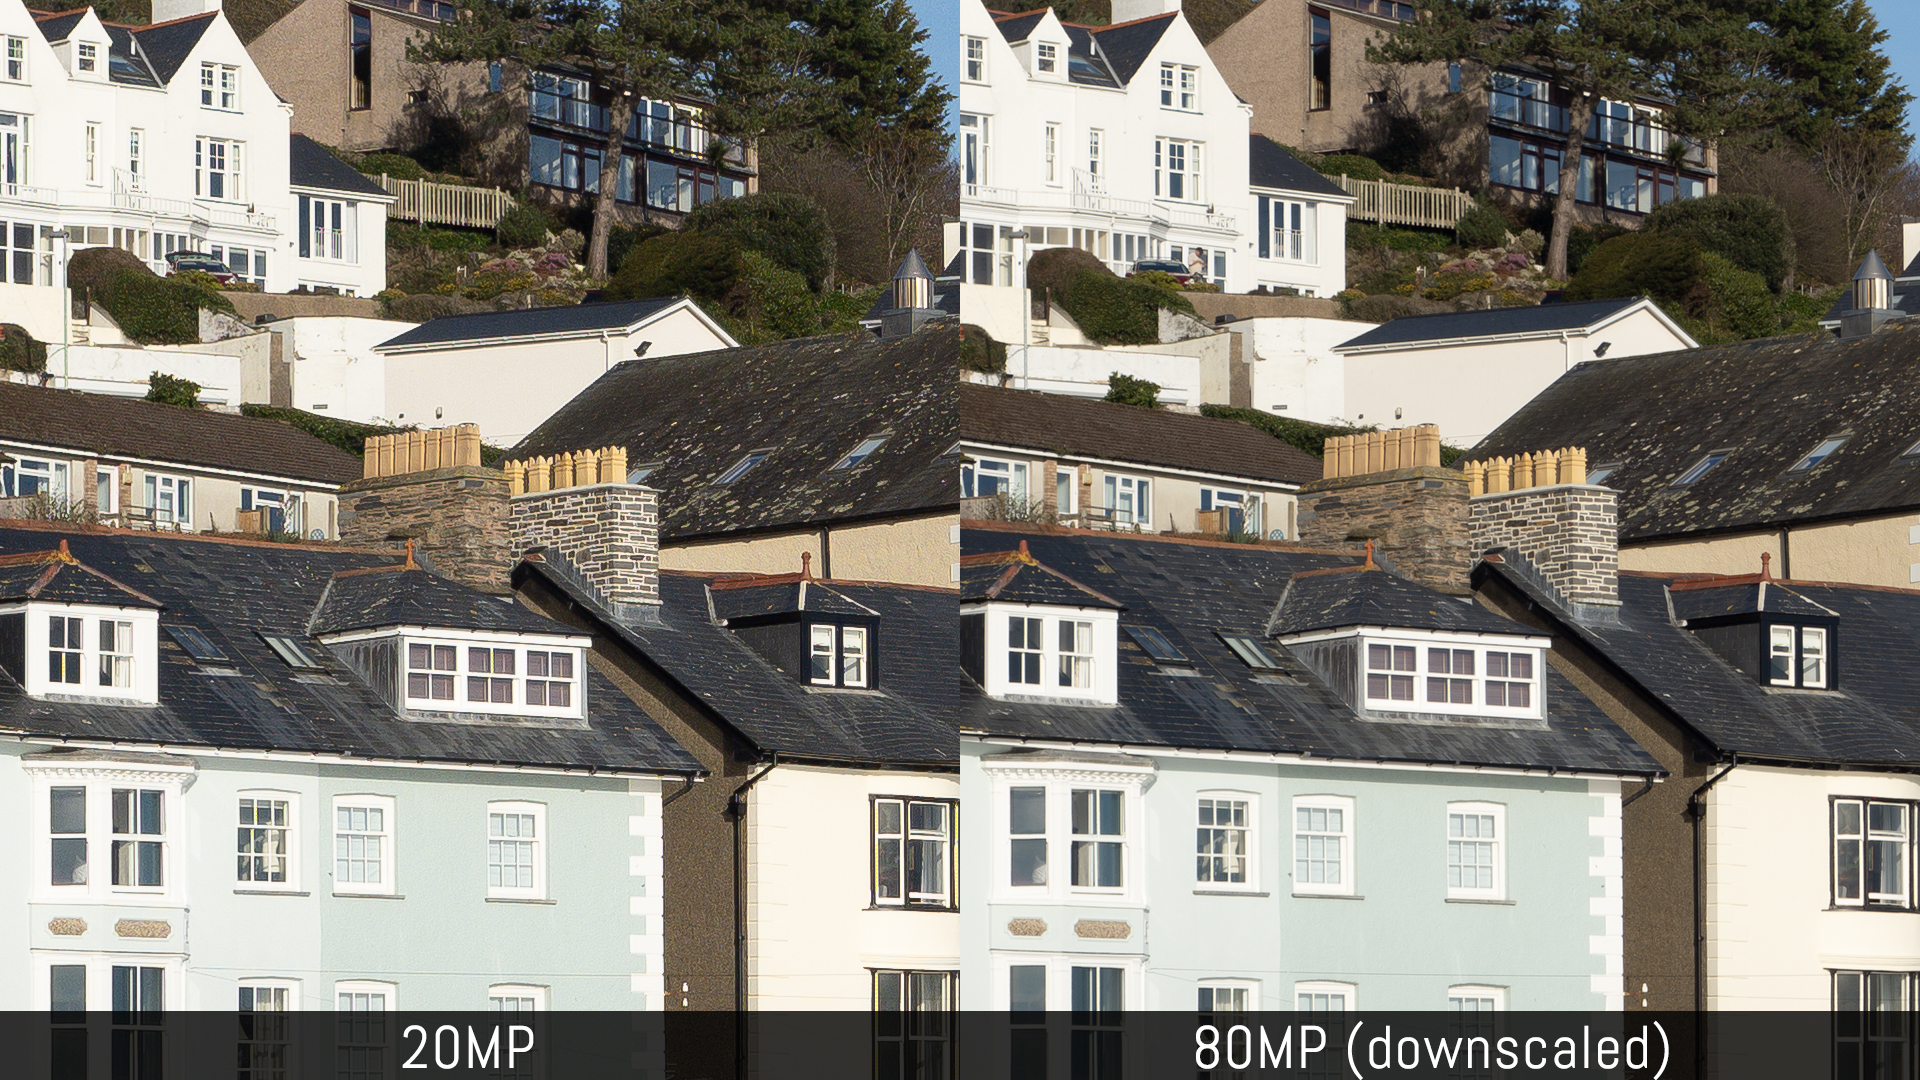
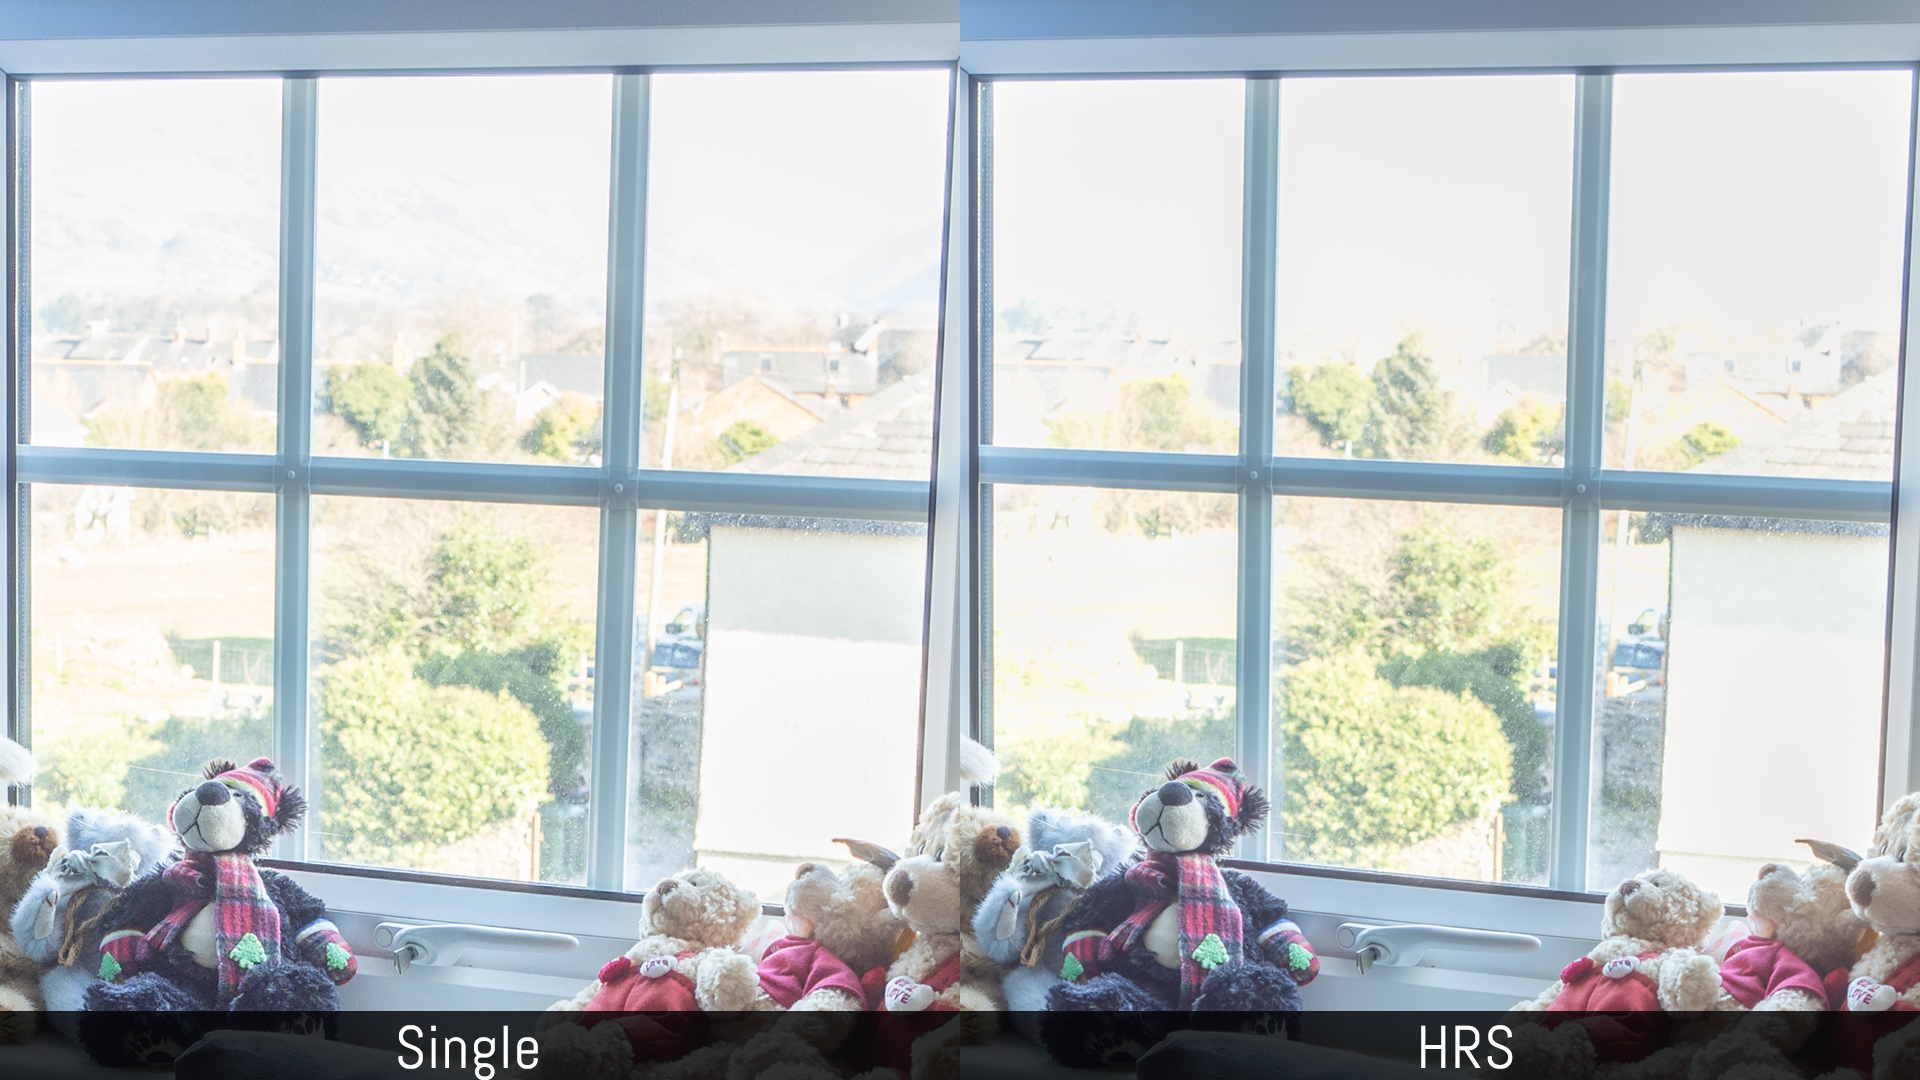
The High Res Shot mode also improves colour resolution because each point on the image is recorded by all three RGB pixels as opposed to just one green, red or blue channel.
A benefit of having more colour information is that there is less noise when recovering the shadows. If we analyse the same scene we used for our dynamic range test, you can see that the HRS version appears cleaner than the single 20MP version.
Again the E-M1X has less noise than the E-M1 II if we compare the HRS file of both cameras.

However in the highlights the high resolution version loses information in comparison to the single 20MP shot, and the E-M1 II retains a little more information overall.

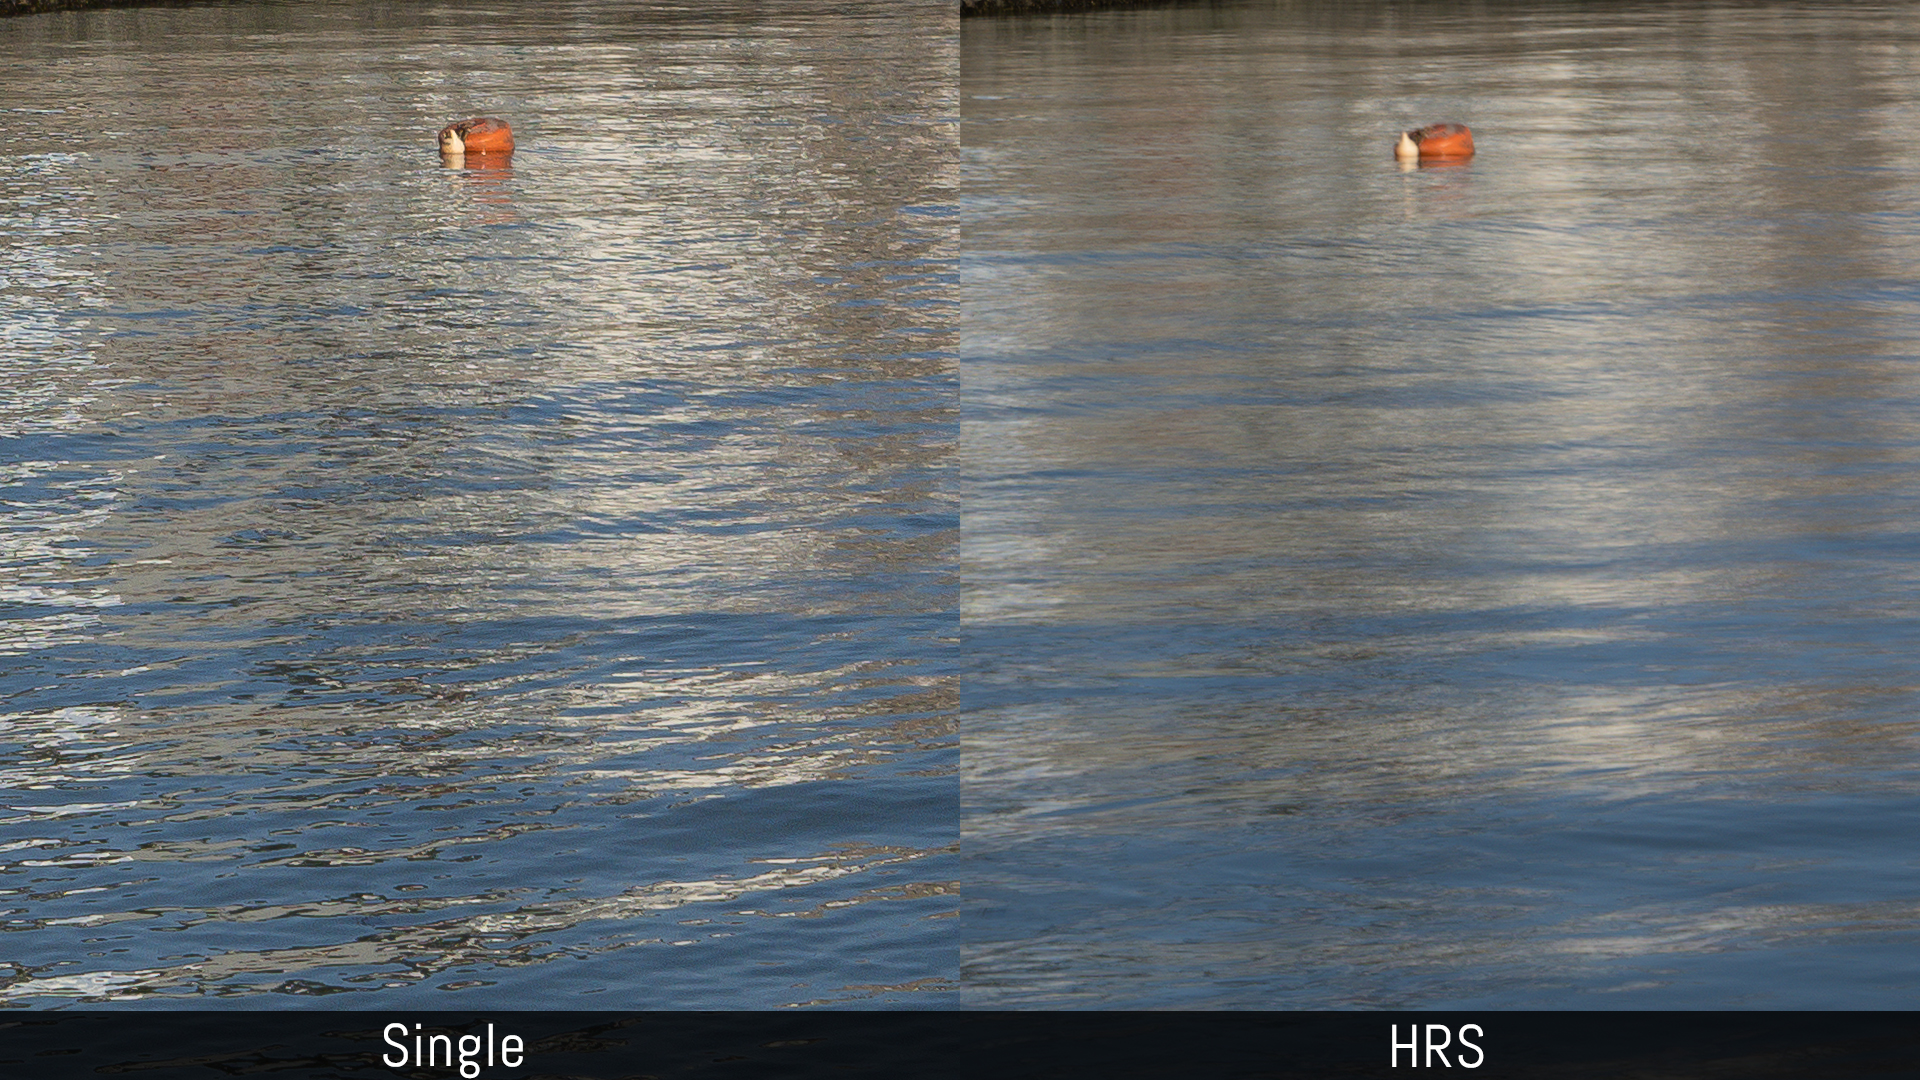
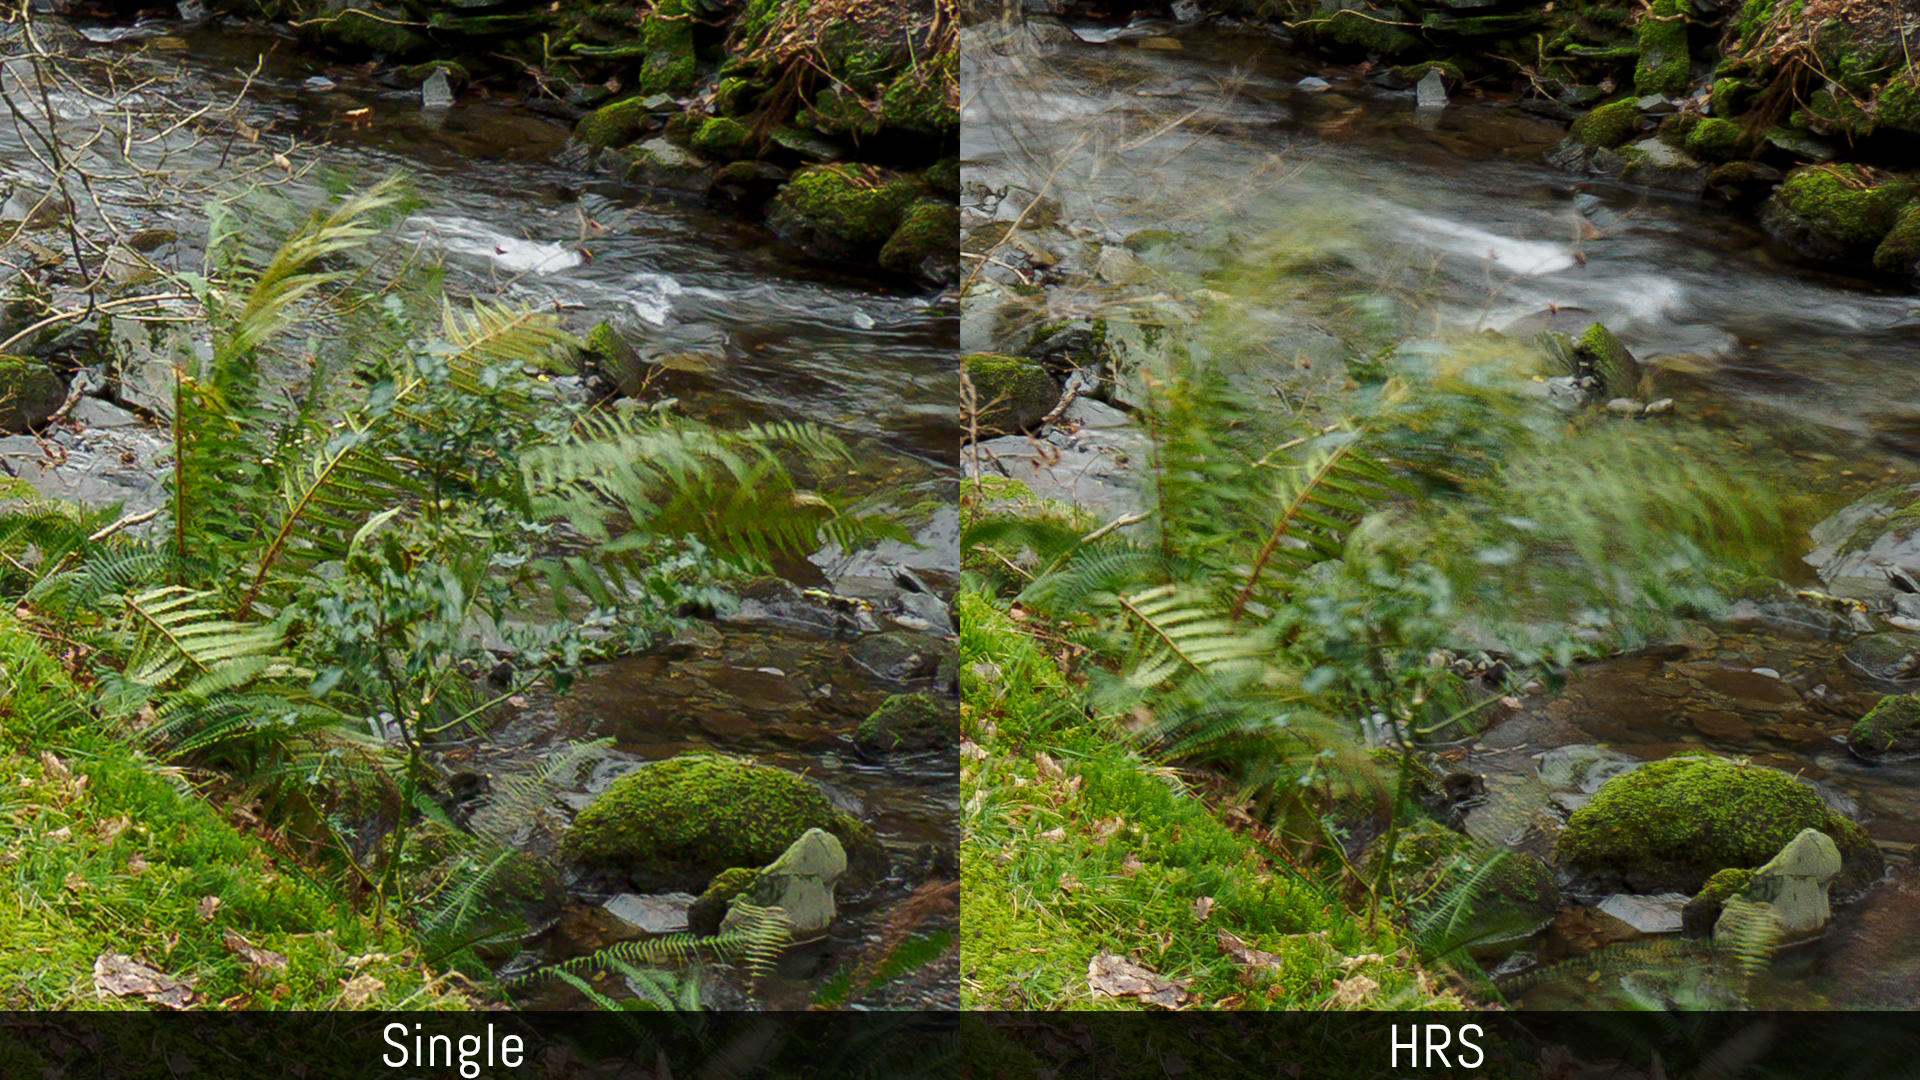
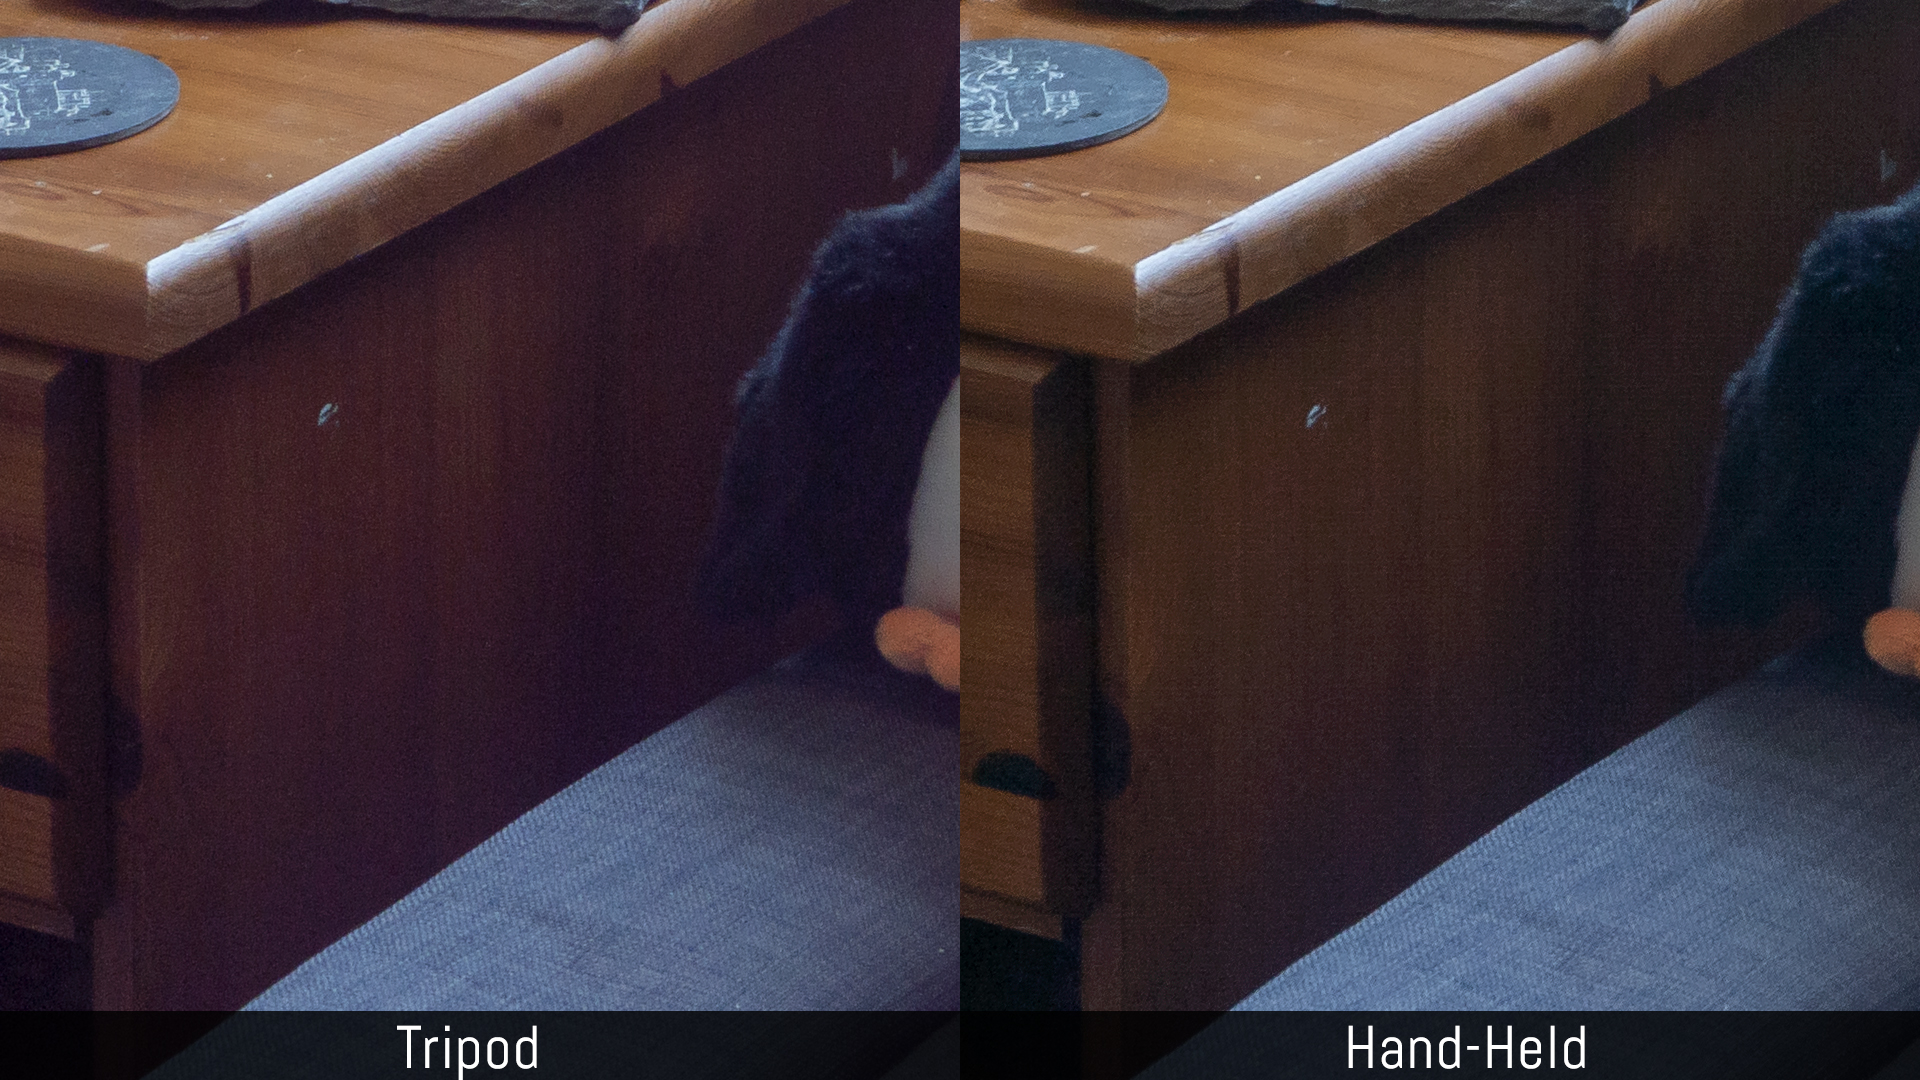
There are a few limitations to this method: movements in your scene are likely to create artefacts. Both cameras attempt to minimise them by replacing that portion of the image with a low resolution version extracted from a single frame, but it doesn’t look as good as you can see in the examples below.

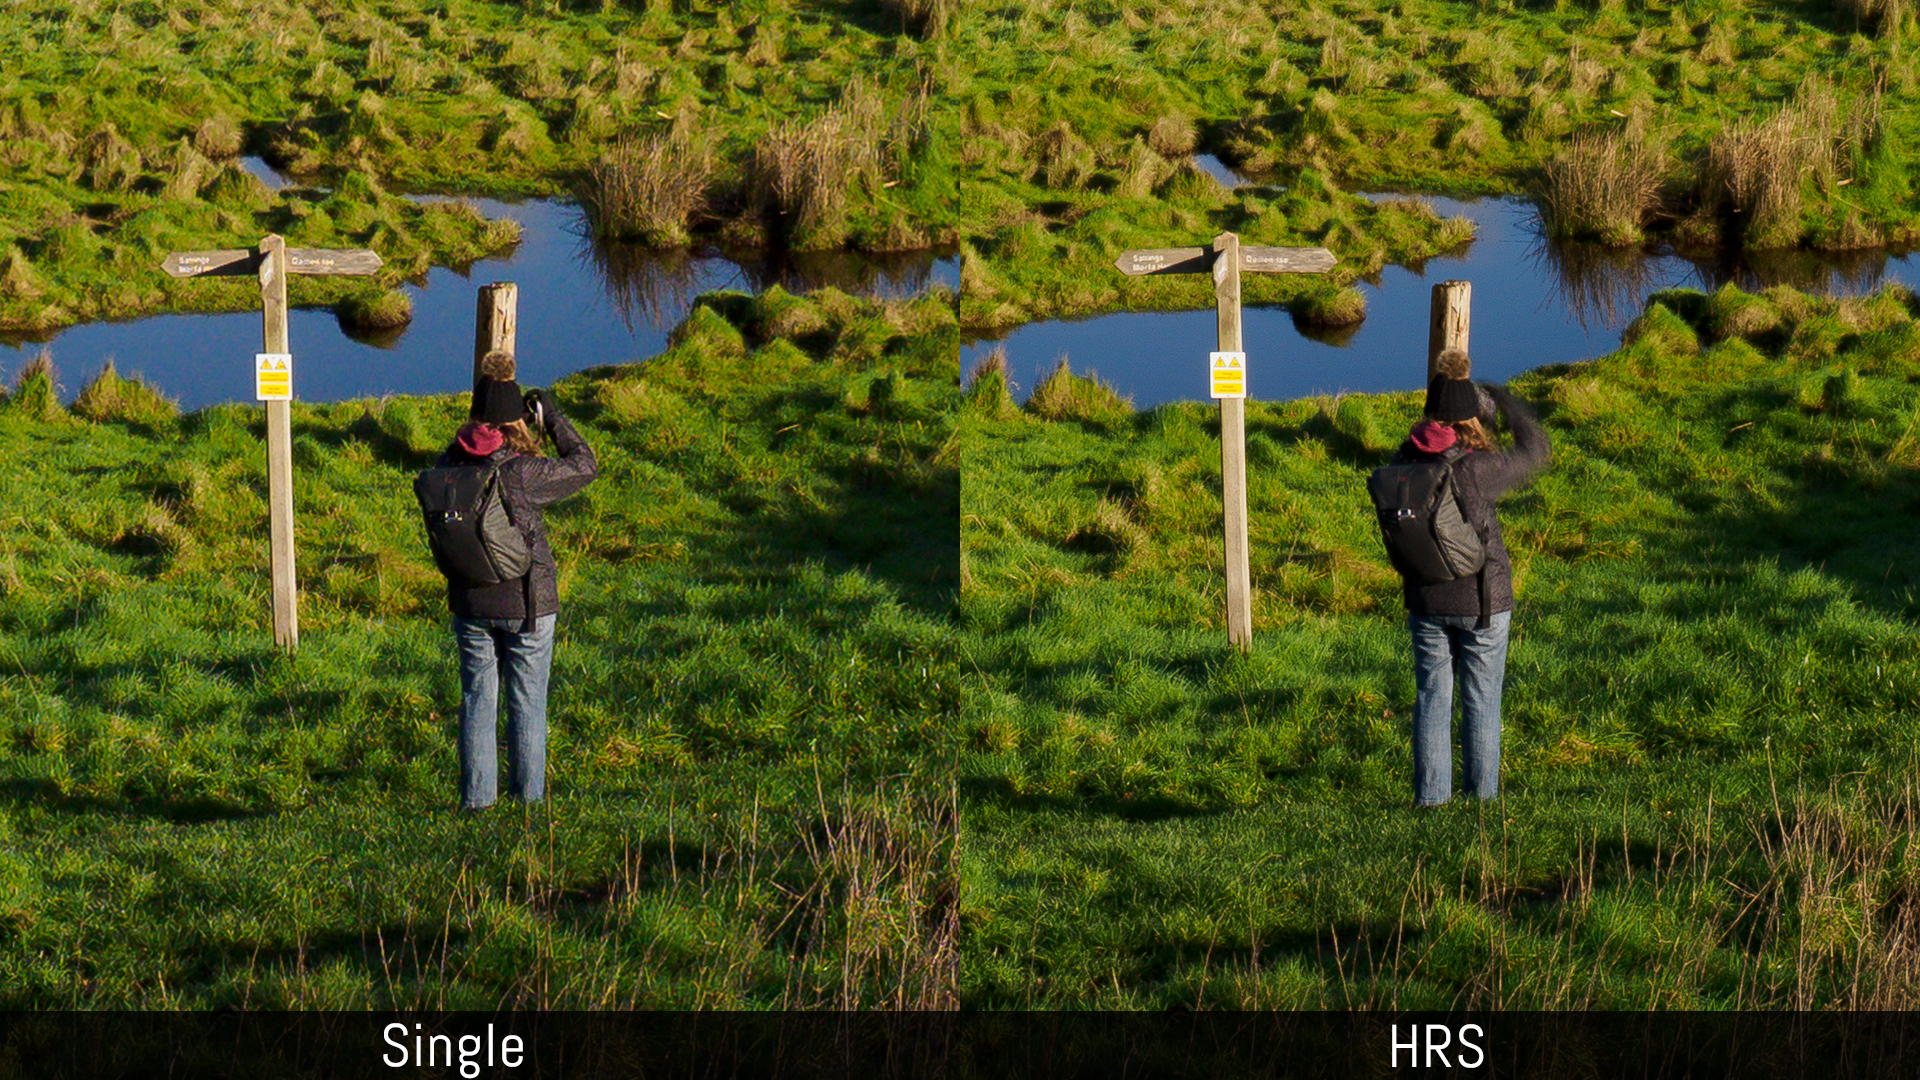
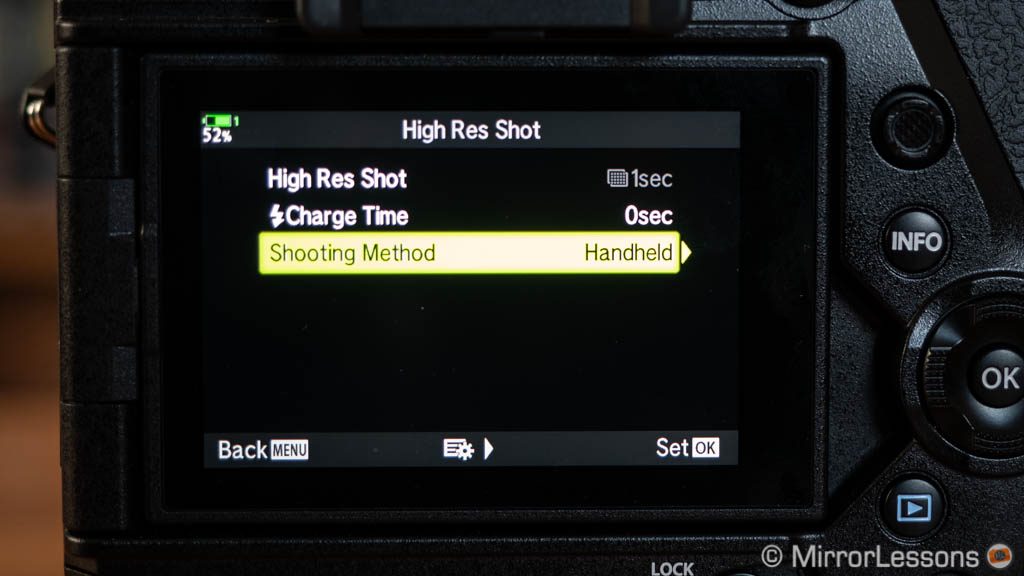
The examples I’ve analysed up to this point were all taken with the cameras on a tripod, which is essential with the E-M1 II if you want a useable result. The E-M1X however has a significant advantage: it lets you use the HRS mode hand-held, albeit with a resolution of 50MP for both RAW and JPG.
You have to select the Tripod or Hand-Held option in the menu because the processing method is different. With the hand-held mode, the E-M1X takes 16 shots instead of 8 and uses stabilisation data between each frame to create the final output. The processing time is longer as well: around 10 to 12 seconds as opposed to 5/6s with the Tripod mode.
The hand-held mode for the High Res Shot is one of the benefits of having two TruePic VIII processors inside the body: they make all these fast calculations possible and HRS hand-held a reality.
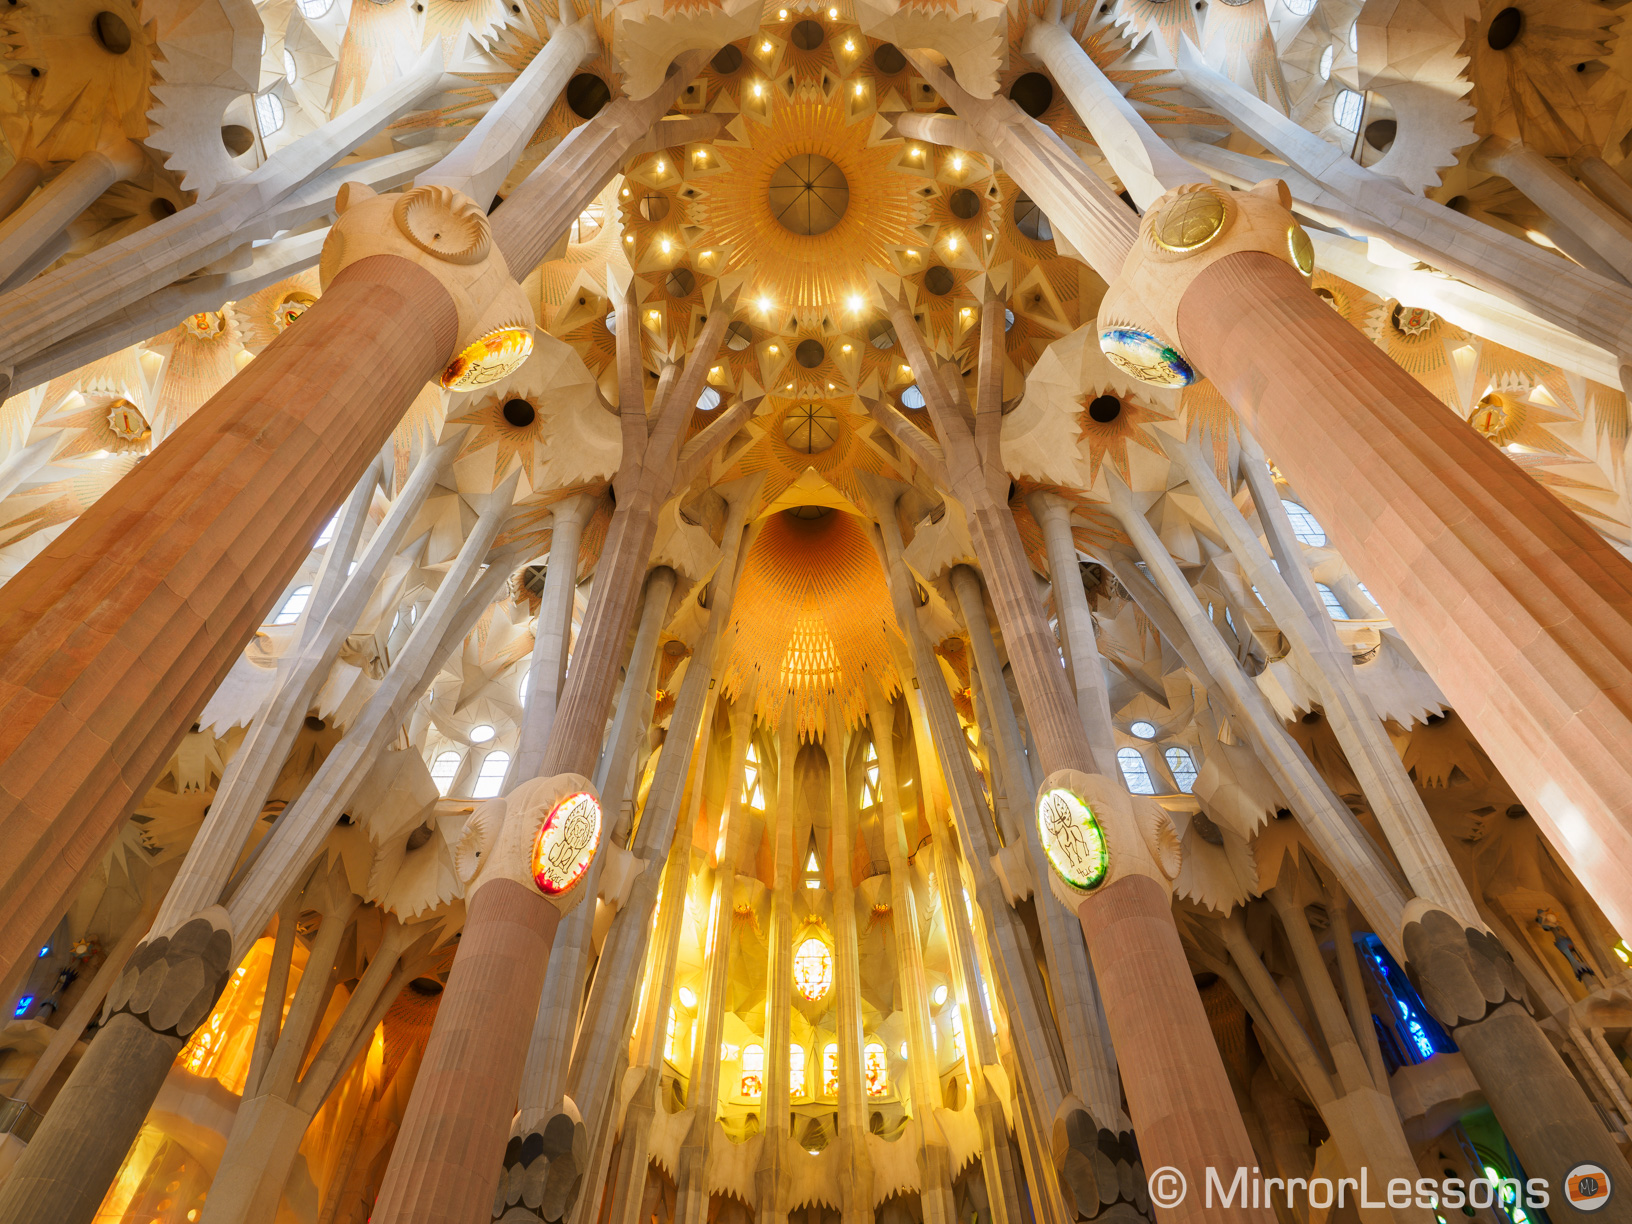
The hand-held mode works really well and it doesn’t seem to produce more artefacts than the Tripod mode. I took advantage of it while visiting the Sagrada Familia in Barcelona. I wanted to capture all the details of the stunning architecture and the E-M1X made this very easy to achieve.


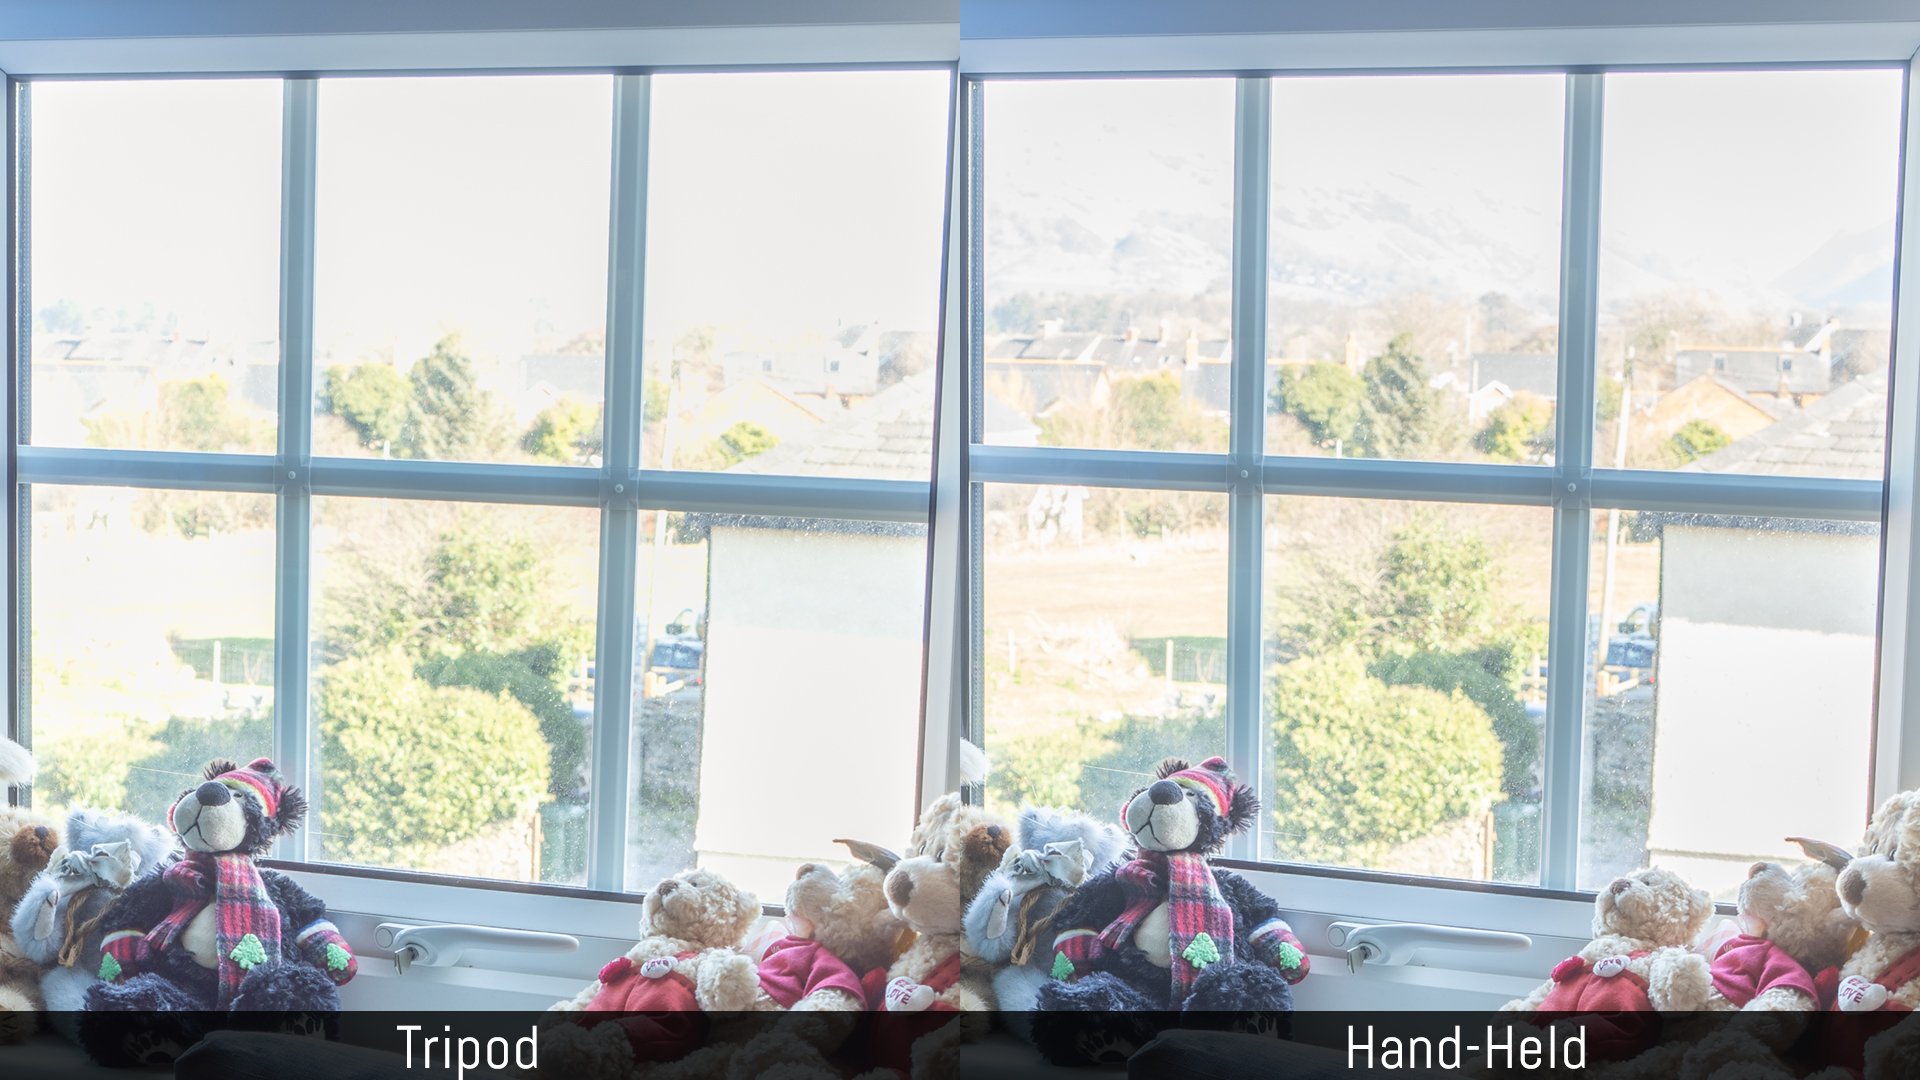
Another interesting thing is that the hand-held version gives you the best results concerning dynamic range. There is no colour shift in the dark areas, and it retains more highlight information than the 80MP “tripod” mode.
The HRS hand-held can work with long focal lengths as well. Of course the further you zoom, the higher the chance that you’ll end up with inaccurate results. Same reasoning applies to slow shutter speeds but the camera seemed to work fine at around 1/3s.
The maximum aperture available in all cases is f/8 to avoid diffraction and loss of sharpness. The ISO sensitivity is limited to 6400 on the E-M1X and 1600 on the E-M1 II.
Check price of the OM-D E-M1X on
Check price of the OM-D E-M1 II on
Second-hand Olympus gear on