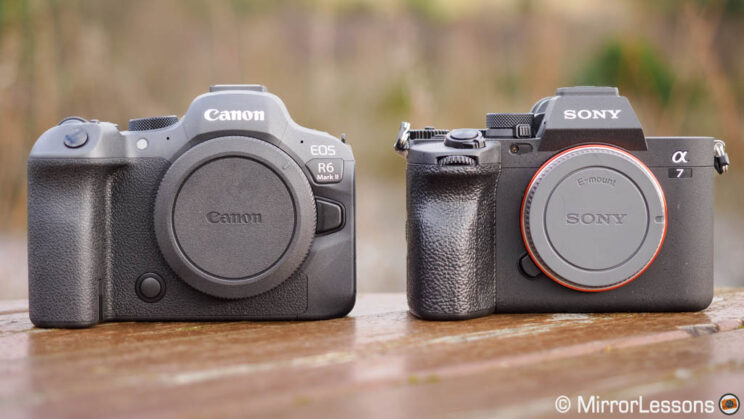
The Canon EOS R6 mark II and the Sony A7 IV sit in the prosumer category of full frame mirrorless cameras, appealing both to enthusiasts as well as professional photographers.
The R6 II is the successor to the popular R6, and brings a few key changes that make the camera more competitive, while also fixing a few issues found on the first model.
The A7 IV is the fourth generation model in the E-mount series that Sony started in 2013, five years before Canon joined the full frame mirrorless market. It has obtained a great level of maturity, and is supported by lots of lenses and accessories designed for the system.
In this full comparison, I will guide you through all the things you need to know to understand which camera fits your needs best, whether you are a photographer, a videographer or both. Don’t forget to let me know which one you prefer and why in the comments!
Ethics statement: the following is based on our personal experience with the R6 mark II and the A7 mark IV. We were not asked to write anything about these products, nor were we provided with any sort of compensation. Within the article, there are affiliate links. If you buy something after clicking the link, we will receive a small commission. To know more about our ethics, you can visit our full disclosure page. Thank you!
Table of Contents
– The 10 Main Differences
– Main Specs
1. Design
2. Cards, Battery, Connections
3. Image Quality
4. Autofocus
5. Shutter and Drive Speed
6. Stabilisation System
7. Video Recording
8. Extra Features
9. Lenses
10. Price
– Video Review
– Conclusion
The 10 Main Differences in a Nutshell
- Design: the R6 II has a larger grip and better ergonomics overall, but the A7 IV offers more customisation
- Cards, Battery, Connectivity: two SD slots each, but the A7 IV also works with one CFexpress Type A card. Similar battery life, and similar connections with the Sony sporting a full sized HDMI port instead of the micro sized version.
- Image Quality: they are similar overall. The Sony does a bit better in the highlights and offers more resolution.
- Autofocus: the R6 II is faster and more accurate with Eye AF (humans especially, in good and low light). They deliver the same performance for birds in flight, but the R6 II does that at 4 times the drive speed.
- Shutter and Drive: up to 10fps for the A7 IV, 40fps for the R6 II, which also has a faster sensor readout and the Pre-Shooting option. Buffer can be limited on the Canon model, if you work at the maximum speed.
- Stabilisation: the R6 II is superior for still photos, as well as for video, although Sony’s secret weapon is post stabilisation with Catalyst, especially when moving with the camera.
- Video: the R6 II does 4K 60p without a crop, and has less rolling shutter. The A7 IV offers more options concerning codecs, has a higher bitrate and more image settings.
- Extra Features: both include a nice range of extra functionalities, such as Focus Breathing compensation, USB webcam mode, and more
- Lenses: there is more choice of native autofocus lenses for Sony
- Price: similar in USD, whereas the Canon is more expensive in Europe.
Main Specs
R6 II
- Sensor: 24.2MP 35mm format CMOS
- Lens system: RF-mount
- Weatherproof: Yes
- Internal Stabilisation: Yes (5-axis)
- Autofocus: Dual Pixel CMOS AF II with 4,897 points
- Continuous shooting: 12fps, or 40fps with e-shutter
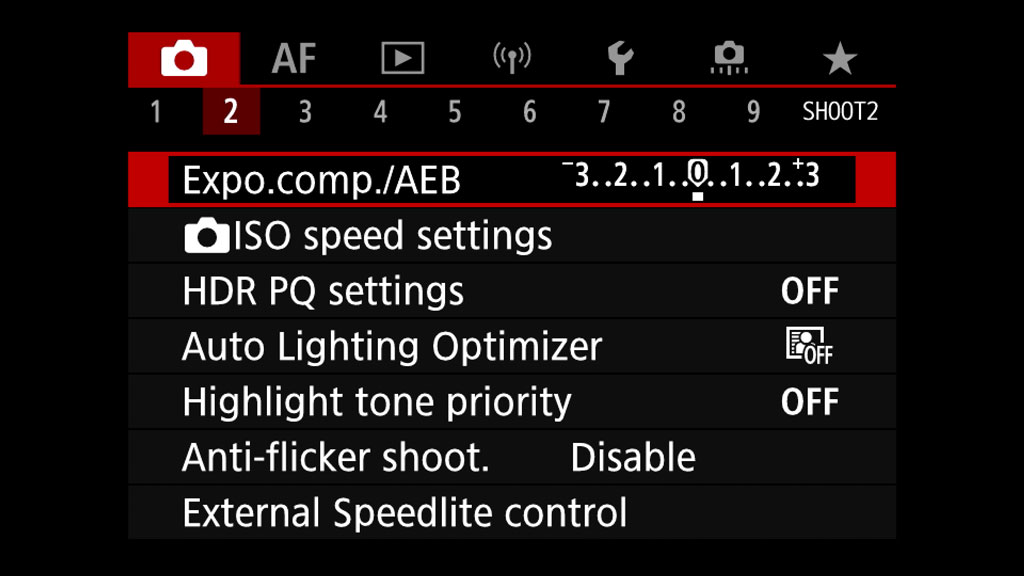
- ISO Sensitivity: 100 – 102,400 ISO (pull 50, push up to 204,800)
- Shutter Speeds: 1/16,000s to 30s, Bulb
- Viewfinder: 0.5-in OLED with 3,690k dots, 23mm eye point, 0.76x magnification
- Rear monitor: Multi-angle 3.0″ LCD (1.62M dots) with touch sensitivity
- Movie recording: 4K up to 60fps and 340Mbps, Full HD up to 180fps, 10-bit C-Log3 and HDR PQ
- Built-in Flash: No
- Extra Features: WiFi, Bluetooth, Bracketing, Focus Stacking, Streaming mode, Tethering, Time-lapse, Dual SD card slots
- Dimensions: 138.4 × 98.4 × 88.4mm
- Weight: 670g (including battery and memory card)
- Firmware version: 1.1.1
- Release: 2022
A7 IV
- Sensor: 33.0MP 35mm format BSI Exmor R CMOS
- Lens system: E-mount
- Weatherproof: Yes
- Internal Stabilisation: Yes (5-axis)
- Autofocus: Hybrid with 759 phase and 425 contrast detection points
- Continuous shooting: 3fps to 10fps
- ISO Sensitivity: 100 – 51,200 ISO (pull 50, push up to 204,800)
- Shutter Speeds: 1/8,000 to 30s, Bulb
- Viewfinder: 0.5in OLED with 3.69M dots, 23mm eye point, 0.78x magnification and 120fps refresh rate
- Rear monitor: Multi-angle 3″ LCD (1.04M dots) with touch sensitivity
- Movie recording: 4K up to 60fps, Full HD up to 120fps, 10-bit 4:2:2 internal, S-Log, -Cinetone and HLG gamma
- Built-in Flash: No
- Extra Features: WiFi, Bluetooth, Bracketing, Intervalometer, Wifi, Tethering, USB streaming, Dual SD slots
- Dimensions: 131.3 x 96.4 x 79.8mm
- Weight: 658g (including battery and memory card)
- Firmware version: 1.11
- Release: 2021
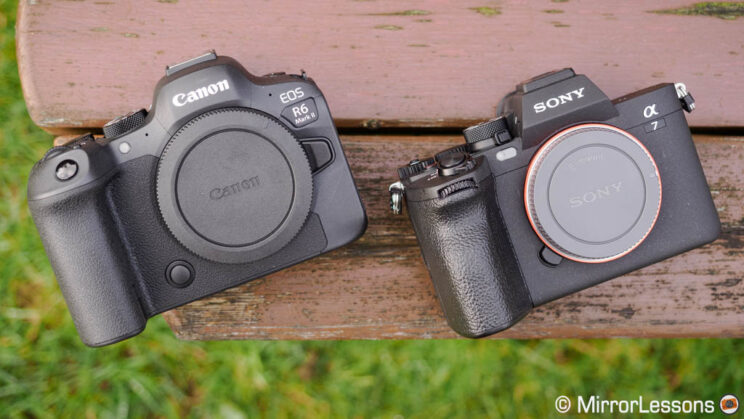
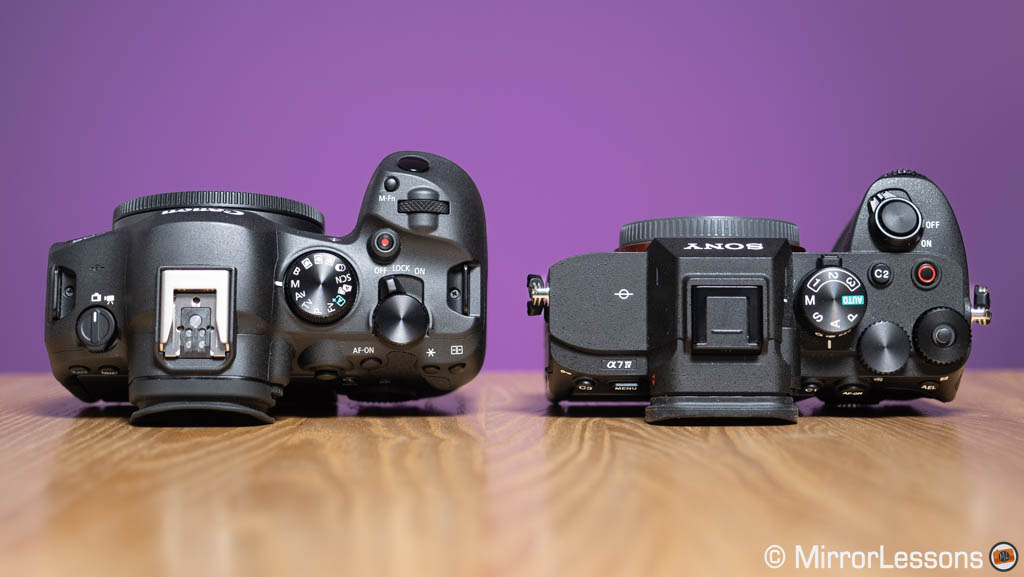
1. Design and Functionality
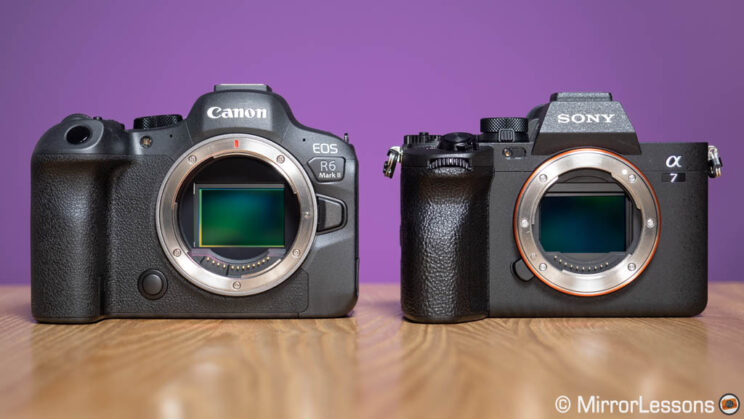
The R6 mark II is slightly larger and heavier than the A7 mark IV. Both cameras offer weather sealing and are built with a magnesium alloy chassis.
- R6 II: 138.4 × 98.4 × 88.4mm, 670g
- A7 IV: 131.3 x 96.4 x 79.8mm, 658g
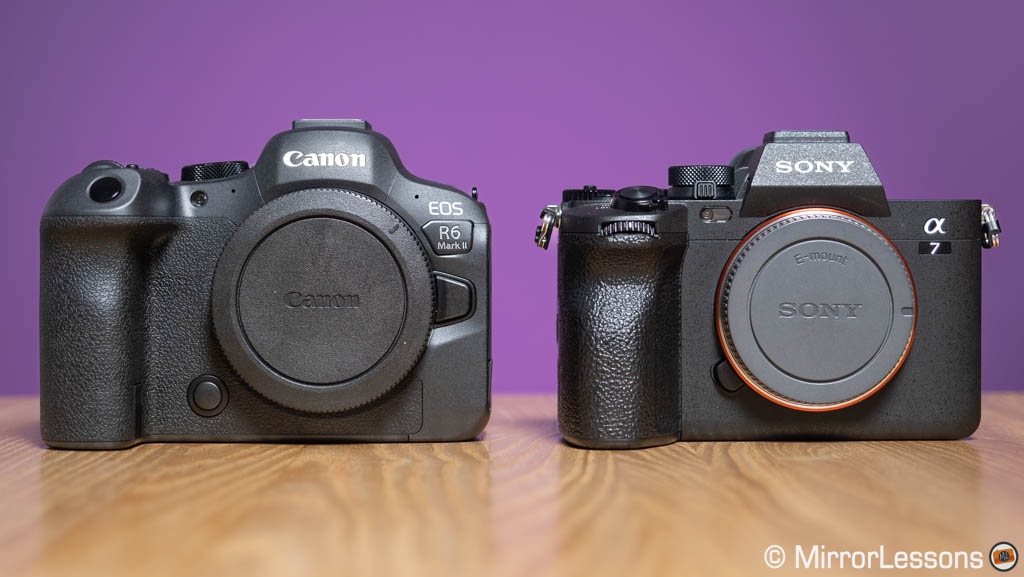
The Canon design is my favourite mainly because of the larger, rounder and taller grip. Just like its predecessor, the original R6, I find the camera much more comfortable to hold, even with large lenses.
If I nitpick, I can also say I prefer the position of the shutter button, which is found at a 45˚ angle and your finger reaches it more naturally.
The A7 IV grip is not terrible, but I have to squeeze my fingers a bit more and I miss extra space at the bottom when using medium to large lenses, like the FE 135mm F1.8 GM for example.
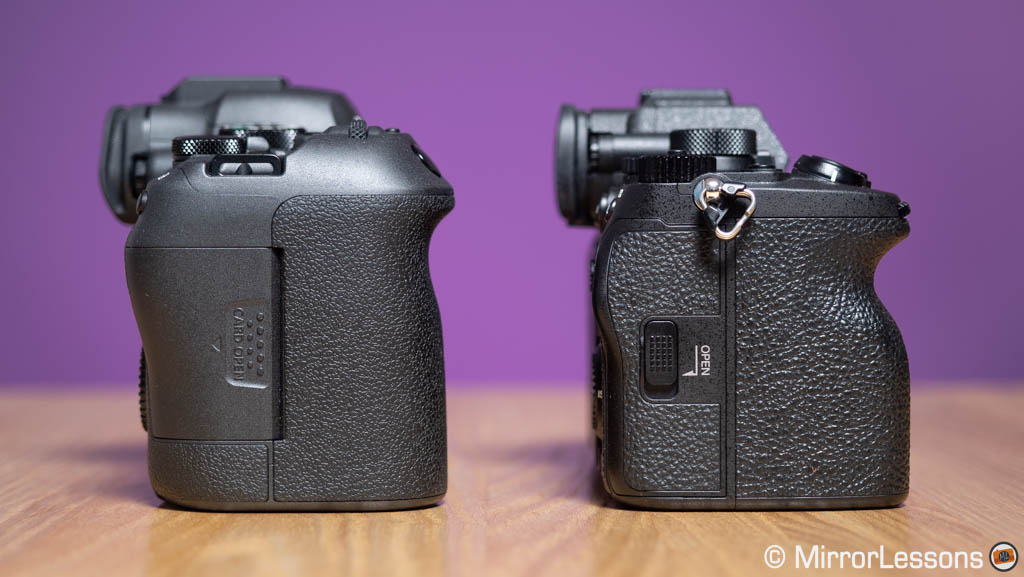
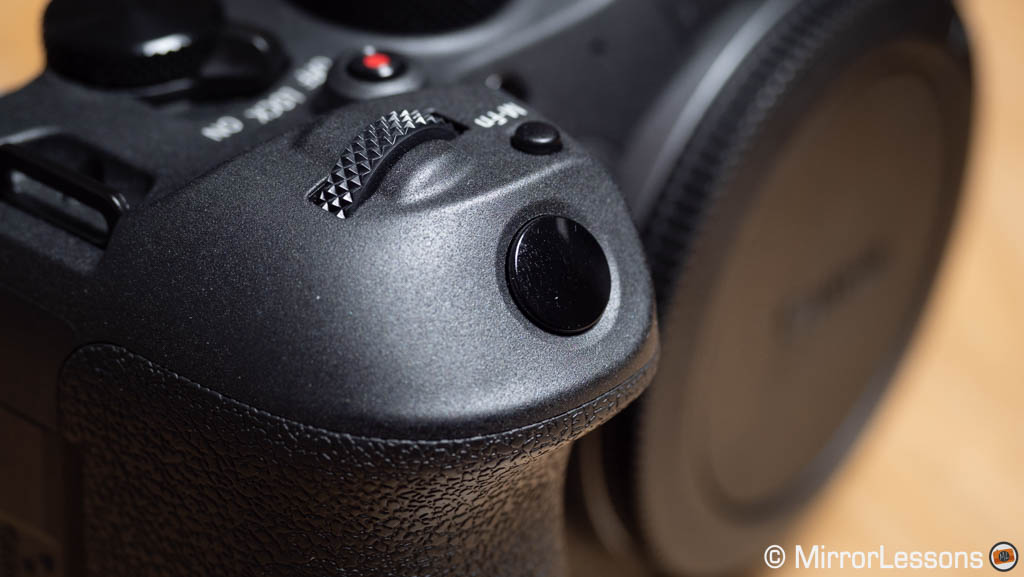
Buttons and Dials
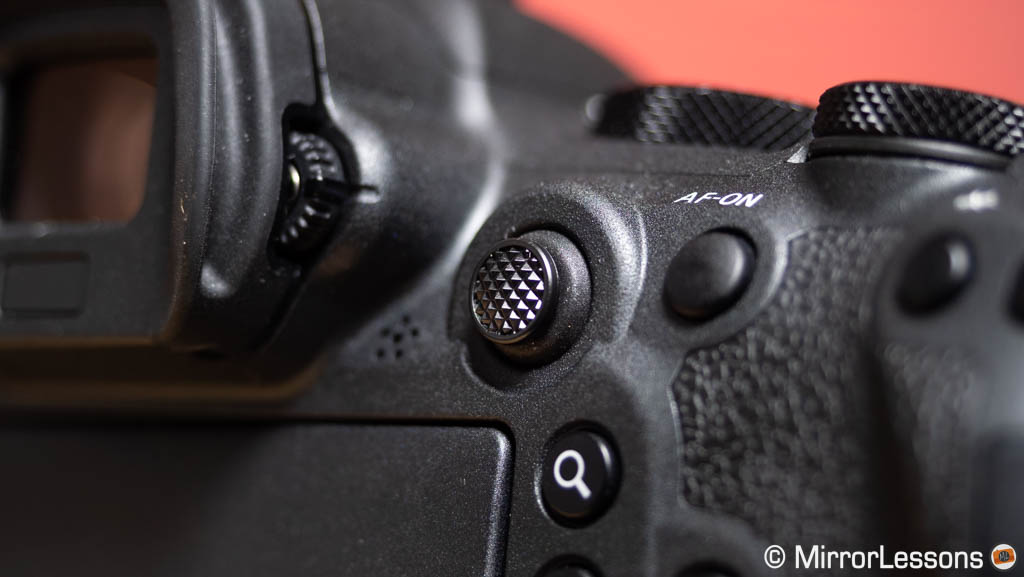
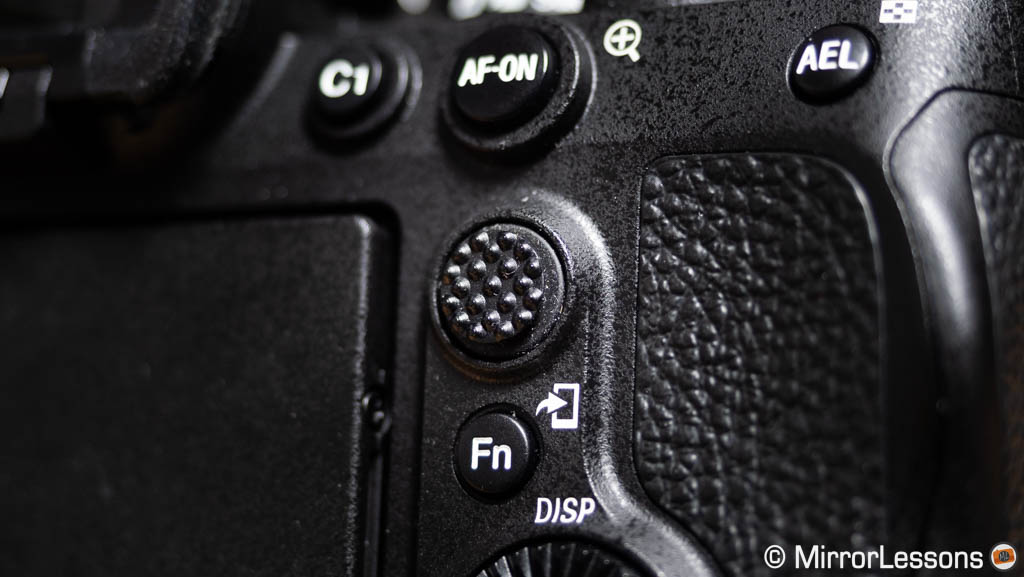
The dials are smoother to turn on the R6 II, but otherwise both cameras offer precise controls when it comes to the buttons, as well as the AF joystick on the rear.
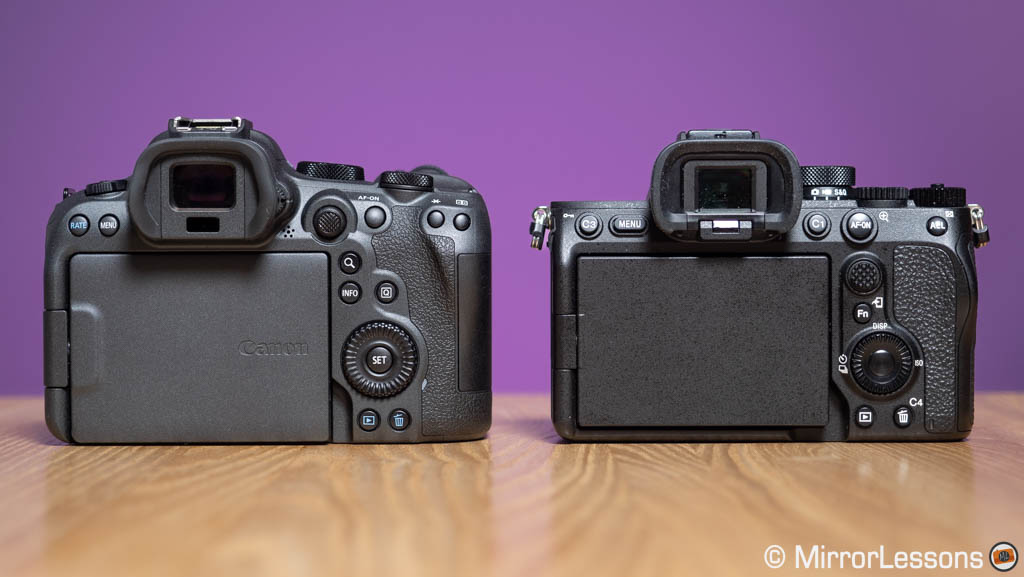
Concerning the joystick, the Canon version has more movement, whereas that of the Sony has a deeper texture and more grip but, in the end, they are both pleasant to use in their own way.
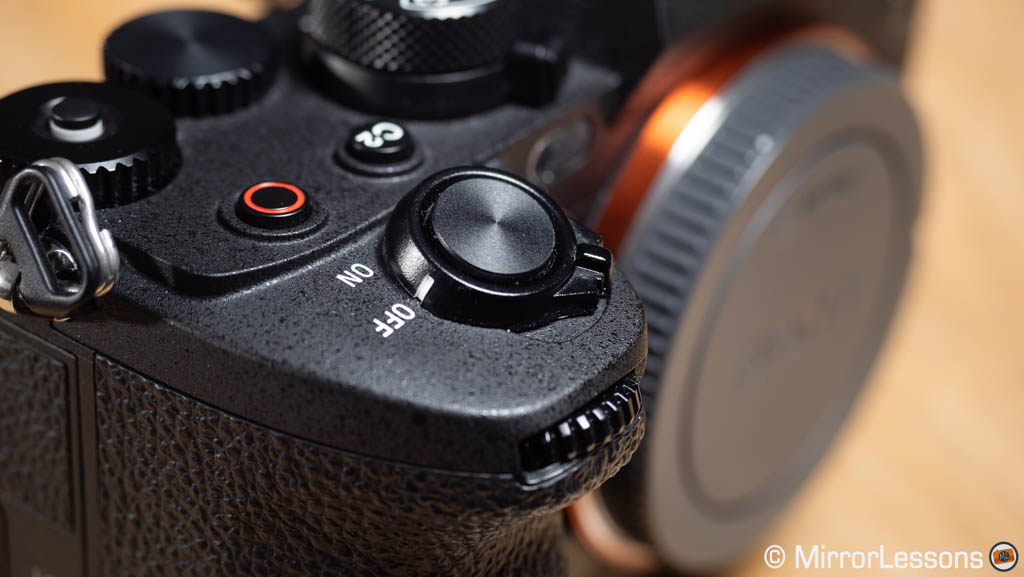
The A7 IV has an extra dial located on top, which can be customised, with a handy lock button.
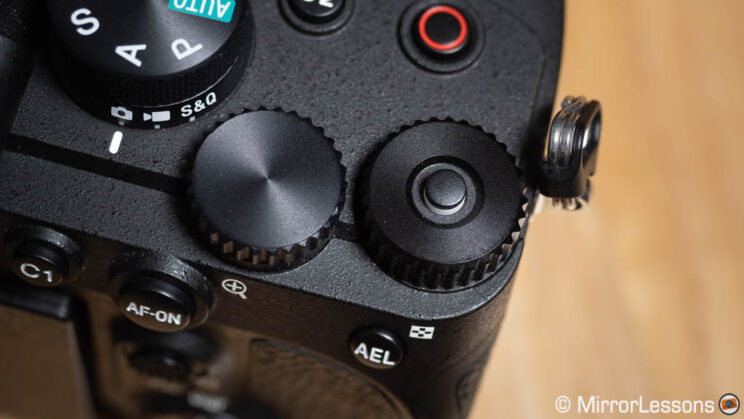
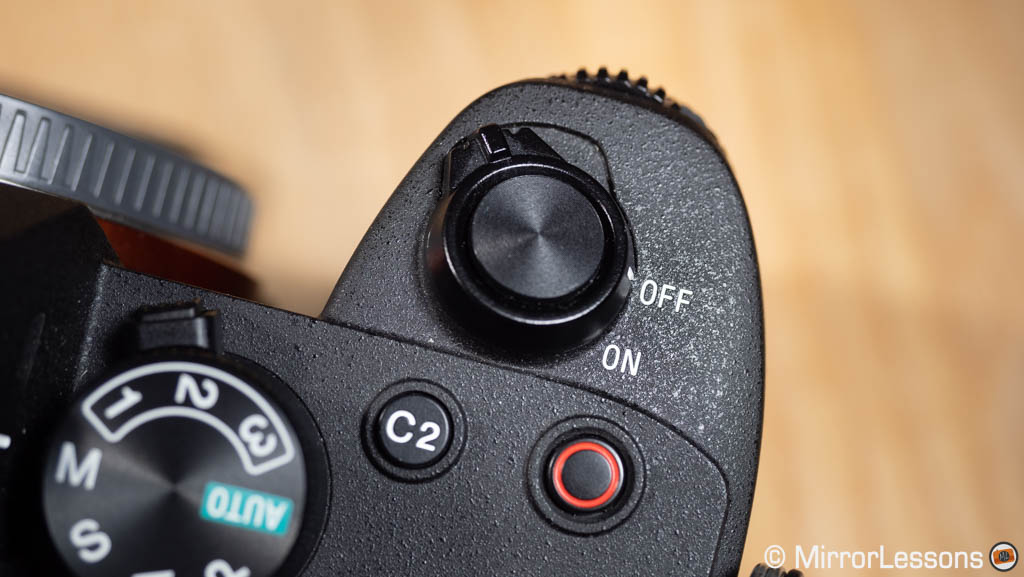
The on/off switch is located around the shutter release button on the Sony. The Canon model has a separate on/off lever built around the rear dial, and there is also a “lock” position in the middle. The latter can be used to lock various buttons and dials to prevent unwanted changes. Note that the same can be done with the A7 IV by pressing and holding down the Fn button.
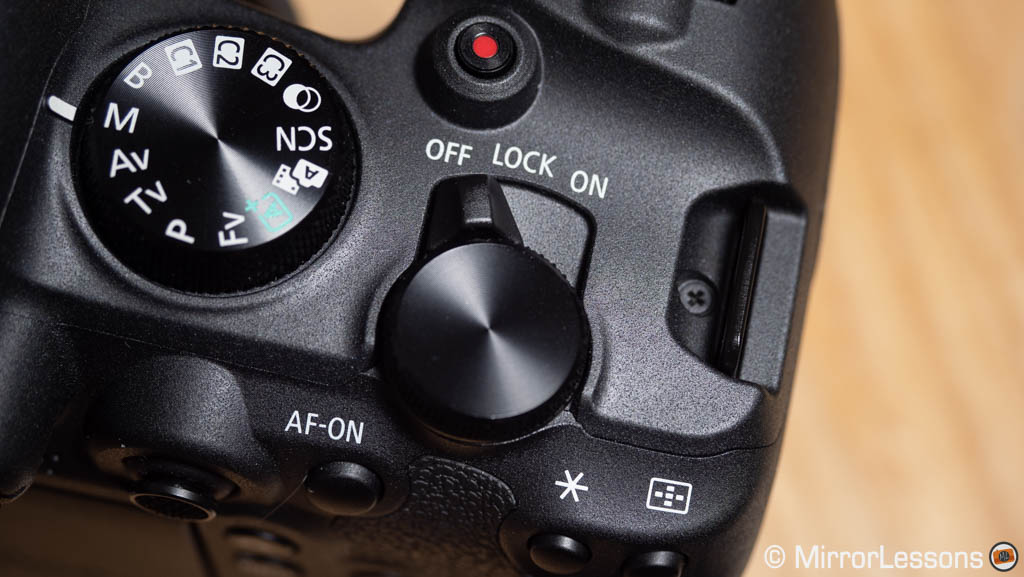
Both cameras feature a dedicated lever to switch between photo and video mode. That of the Sony is found under the main shooting dial, whereas Canon placed it on the top, on the left side of the viewfinder. This means you can conveniently use the main dial on both models to change shooting modes (Manual, Aperture priority etc.), as well as use any of the Custom modes, for stills or video.
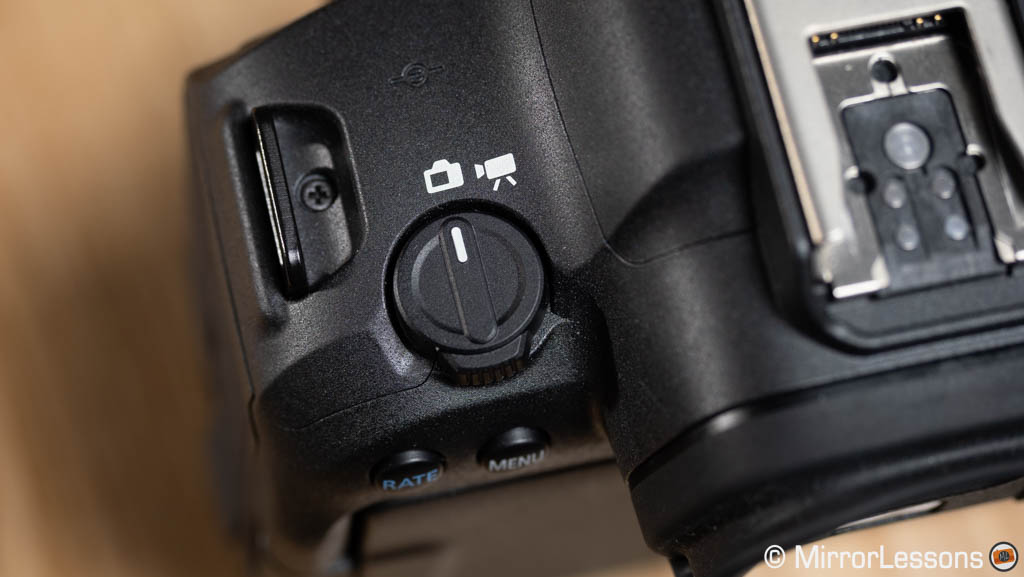
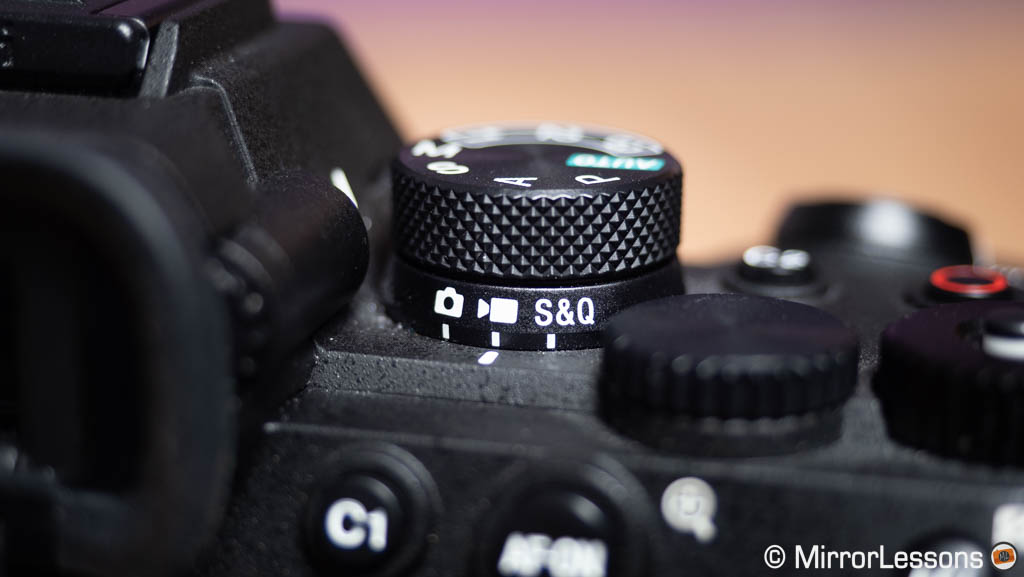
Note that the lever on the A7 IV also allows you to activate the S&Q mode, which is the setting you want to create quick or slow motion videos in-camera. Canon has a slow motion feature too, called High Frame Rate, but it is only accessible via the menu.
Customisation
The A7 IV has 12 custom buttons (located on the top and rear), whereas the R6 II has only 7 (found on top, on the rear, and one on the front near the lens mount). These can be configured separately for stills or video, and it is also possible to keep settings such as exposure, picture profiles and white balance separate. Additionally, you can map the function button found on select lenses and, with Canon RF lenses, you also have the control ring.
Extra personalisation is found via the My Menu section and the Quick/Fn menu, and this is valid for both products.
The main menu system and graphic interface is quite different. I find the Canon version a bit more straightforward to learn and navigate for the most part, but the Sony is definitely much better organised that previous generations of cameras.

Viewfinder
The R6 II and the A7 IV are similar when it comes to the viewfinder specs. They share the same:
- resolution (3.69M dots)
- size and panel technology (0.5-in OLED)
- frame rate (60/120Hz)
- eyepoint (23mm)
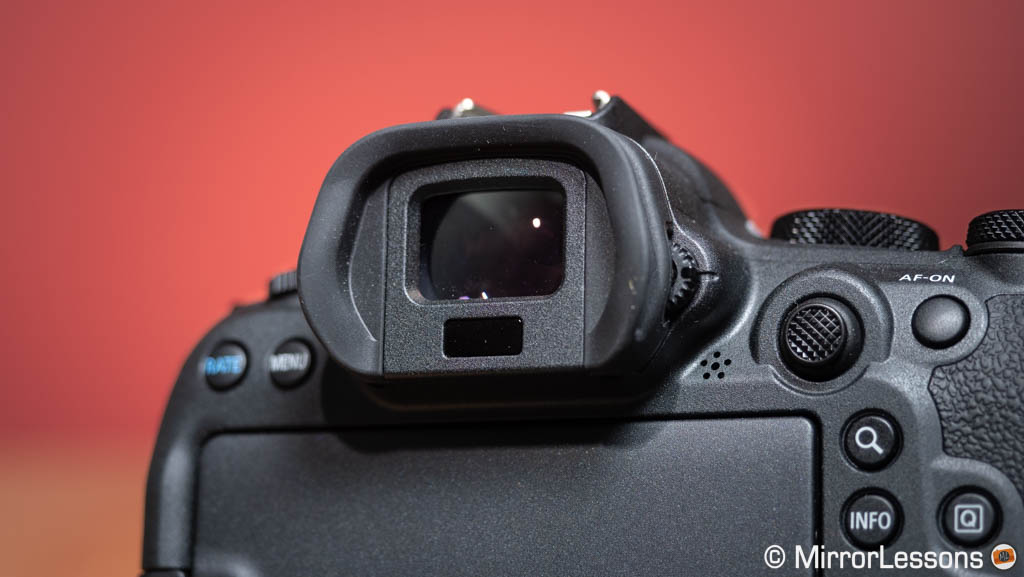

The only small difference is the higher magnification on the Sony (0.78x vs 0.76x). But when shooting in the real world, I find both viewfinders satisfying to use, and comfortable enough when wearing glasses.
Rear LCD
The rear monitors are also similar, as both cameras sport a 3.0-in LCD with a multi-angle mechanism, which allows you to flip it 180˚ to the side. Only the resolution favours the Canon: 1.62M vs 1.04M.
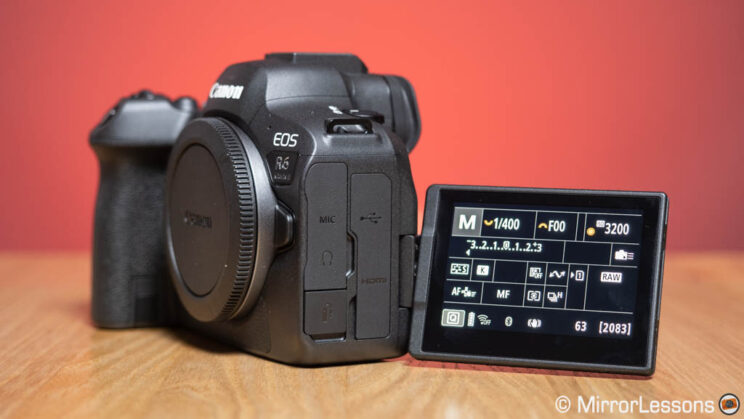
A cool feature of the A7 IV regarding the monitor is that you can put the camera in standby mode by simply closing the LCD. Open it, and the camera becomes active again. This option can be disabled if you don’t want it.
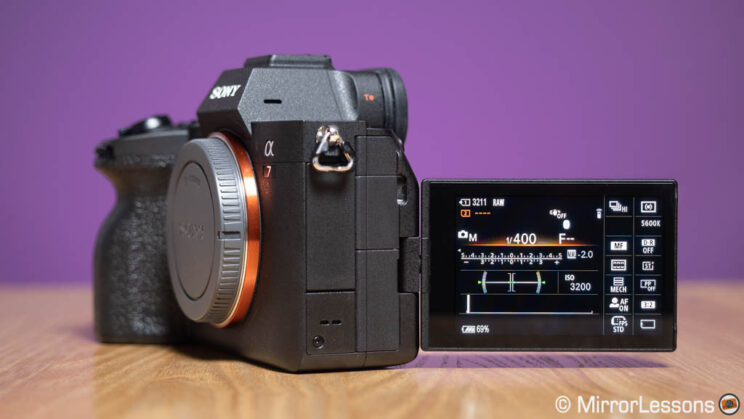
You can use the touch functionalities of both screens to navigate the menu, take a picture or move the AF point. On the R6, you can also access the quick menu or start video recording by touching the monitor.
2. Cards, Battery and Connections
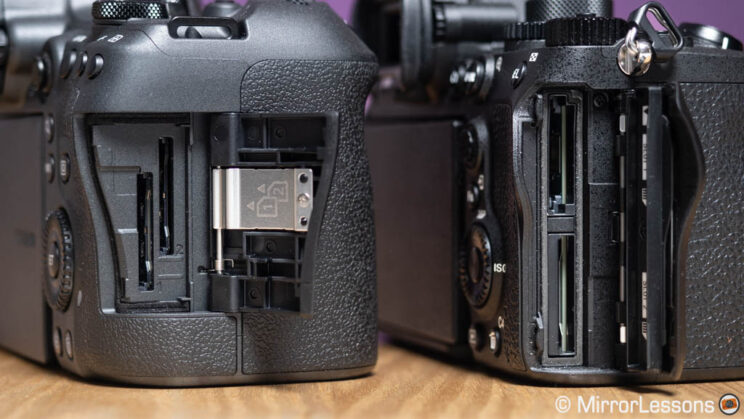
You’ll find two memory card slots on each model. The R6 II uses two SD card with UHS-II compatibility. The A7 IV does the same but slot number 1 is hybrid and can also take a CFexpress Type A card. The latter is more expensive but offers superior writing / reading speeds. It can help with the buffer, and is necessary to record 4K 60p at the maximum quality with the S&Q mode.
The A7 IV comes with the excellent NP-FZ100 battery, and was given a CIPA rating of 610 frames per charge (LCD).
The R6 mark II uses the LP-E6NH and, on paper, seems to be even better than the Sony with a score of 760 shots when using the rear monitor.
In real world use, I can easily capture 2,500+ images using continuous autofocus and image stabilisation, as well as record several 4K video clips, and still have more than 60% battery life left on the Sony. The R6 II mark will consume a bit less in the same scenario (around 70% left).
For video, the Canon managed 2 hours and 15 minutes of 4K 25p before the battery ran out. In the same conditions, the A7 IV was able to record for nearly two hours (115 minutes) before the battery died. This test was done without C-AF or IBIS activated.
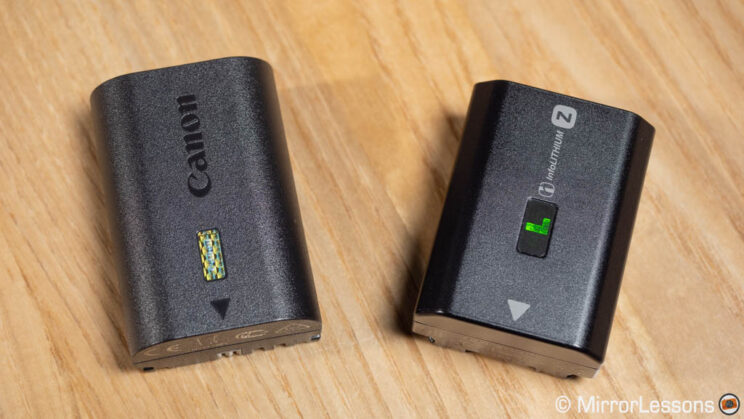
USB charging and power delivery is available for both products, and there is also an official battery grip made by Sony and Canon.
One annoying detail about the A7 IV is that the battery charger is not included, only the USB cable and AC adapter are provided in the box.
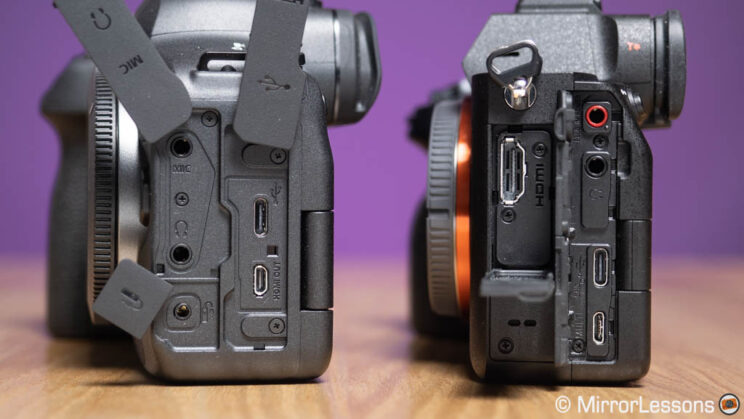
Let’s finish this chapter with the physical connectors. The R6 II and A7 IV have a:
- microphone input (3.5mm)
- headphone output (3.5mm)
- 10Gbps USB C port
- HDMI output (full size ‘Type A’ on the Sony, Micro ‘Type D’ on the Canon)
- multi-function shoe with digital audio support
3. Image quality
The A7 IV and R6 II feature a full frame sensor (35mm format) but the pixel count is different: the Sony comes with 33MP and a BSI design (back-illuminated), whereas the Canon has 24.2MP.
Resolution
Is 9MP a big difference? Have a look at the first two images below and see for yourself. These were taken using the FE 85mm F1.8 and RF 85mm F2, two portrait lenses that are comparable in price and optical quality. They were stopped down to f/4 to get optimal performance. No extra sharpness was added to the RAW files, apart from Lightroom’s default parameters. The A7 IV file is slightly sharper, but by a very small amount.

Dynamic Range
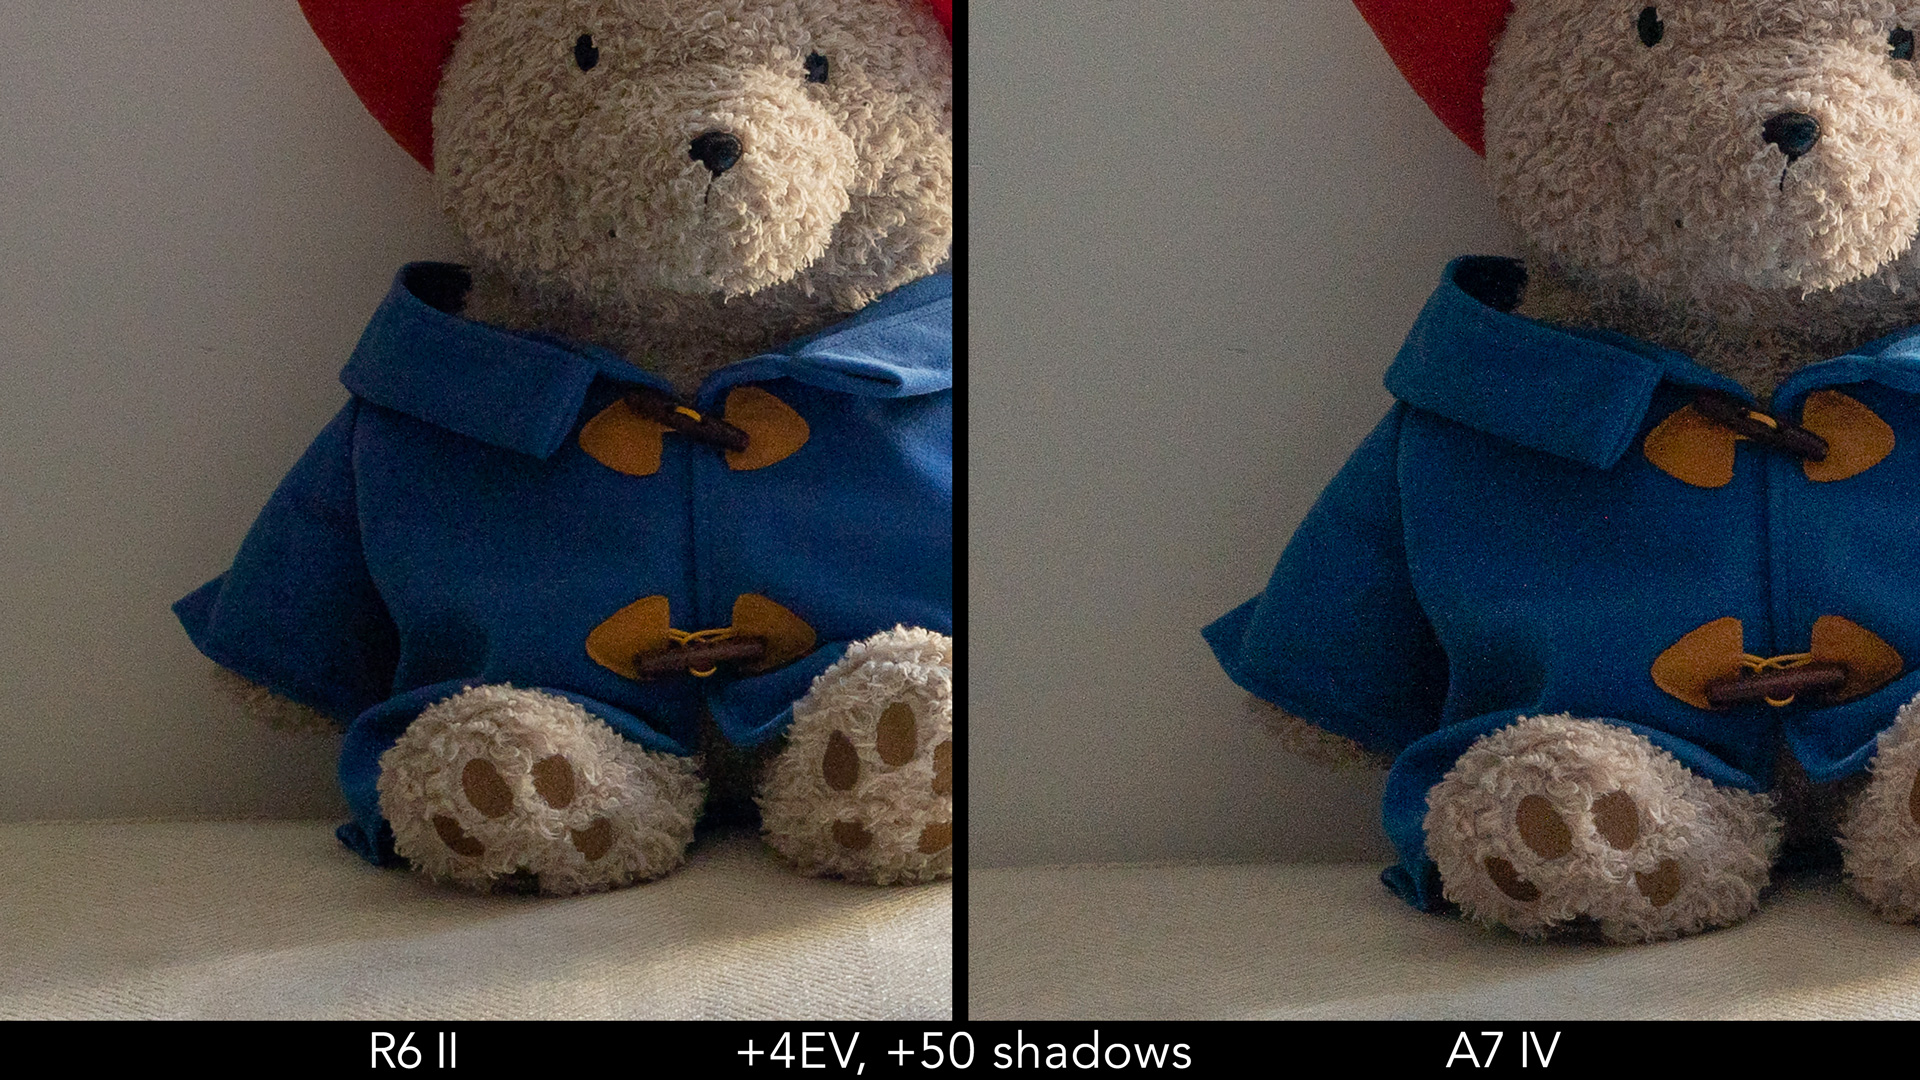
The scene below has a high contrast between the dark interior and the sunny outdoors. Find the best middle-ground exposure, and both cameras do well with shadow and highlight recovery.

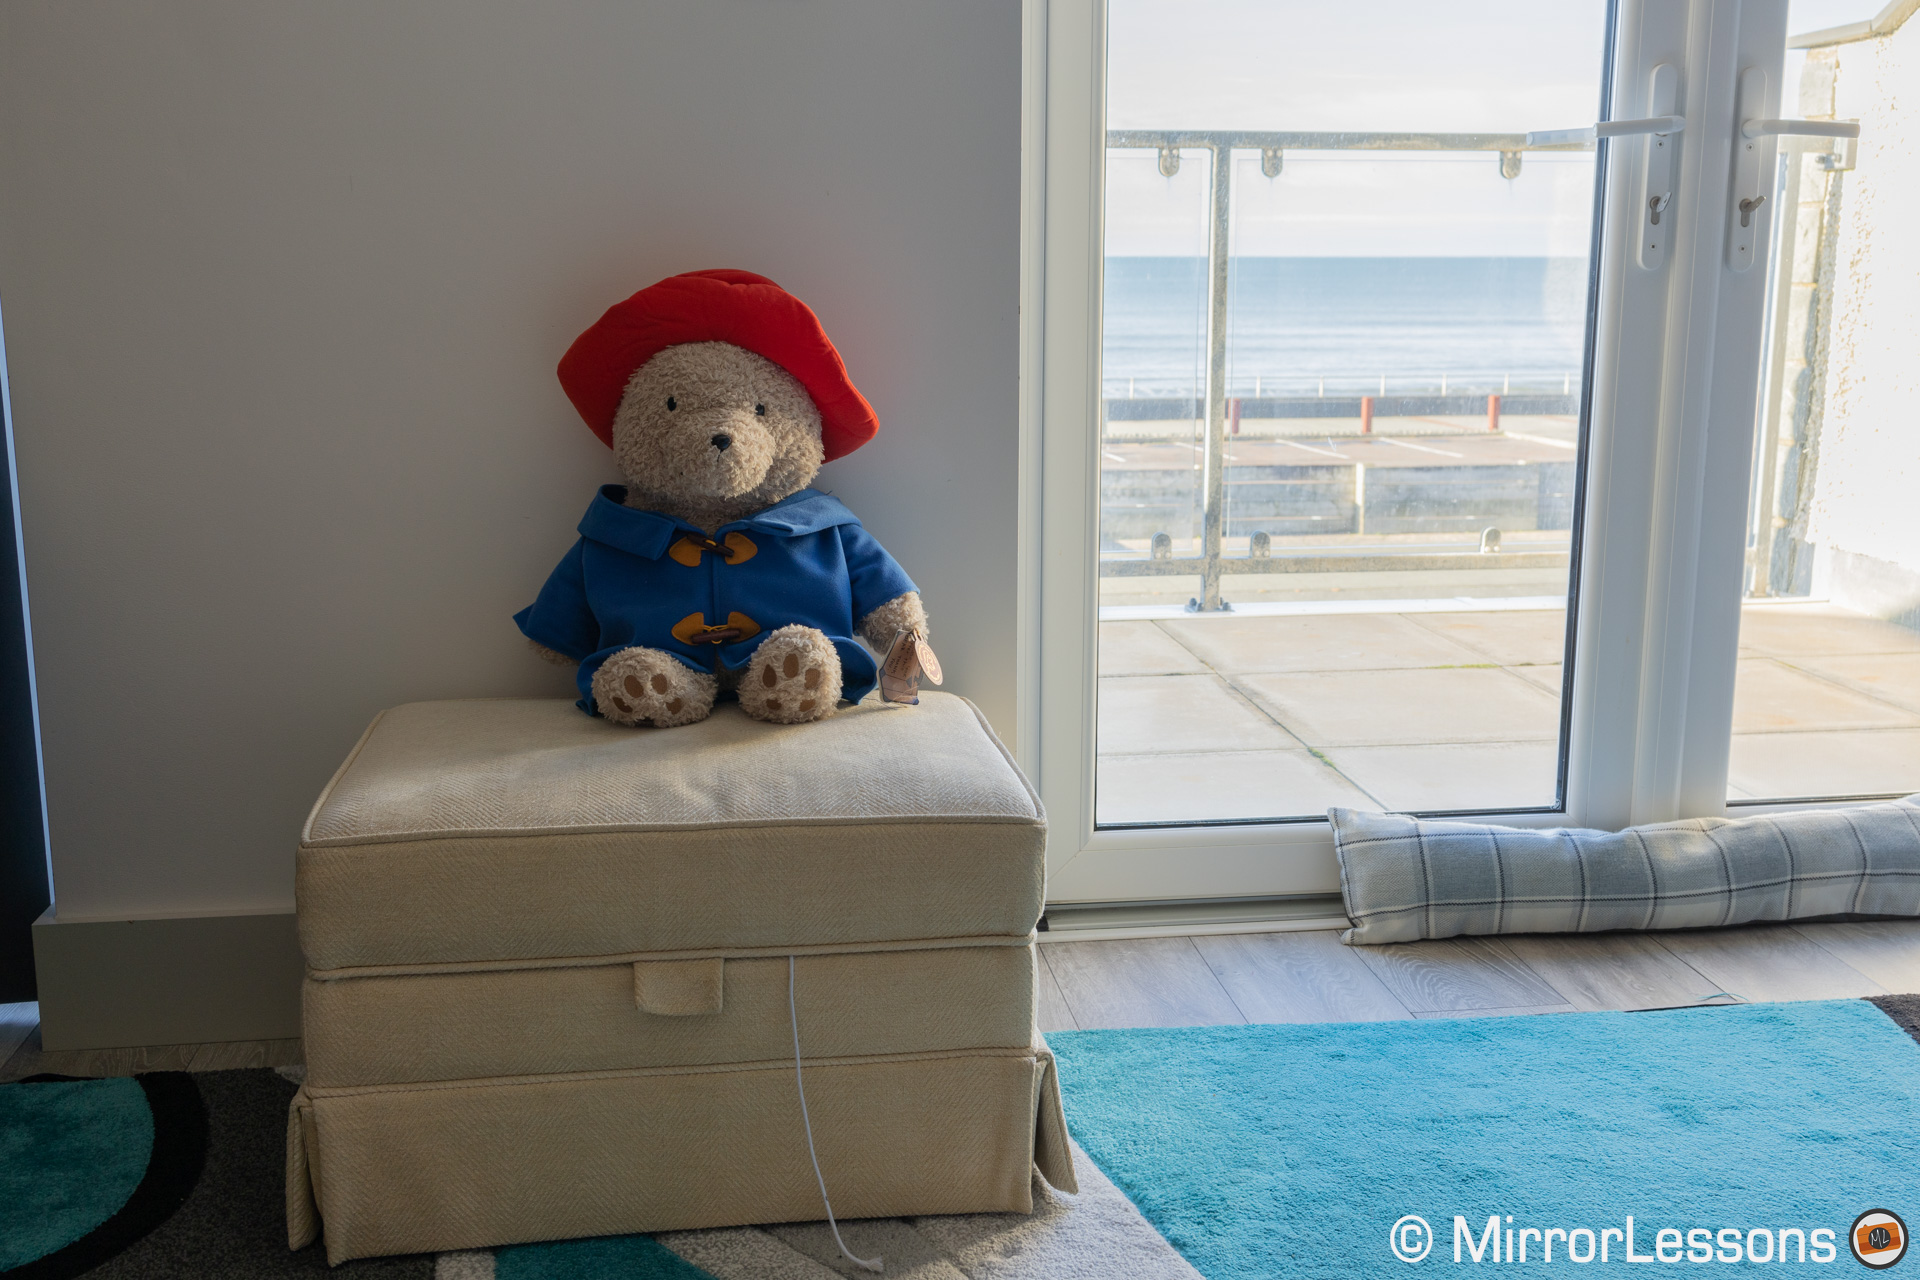
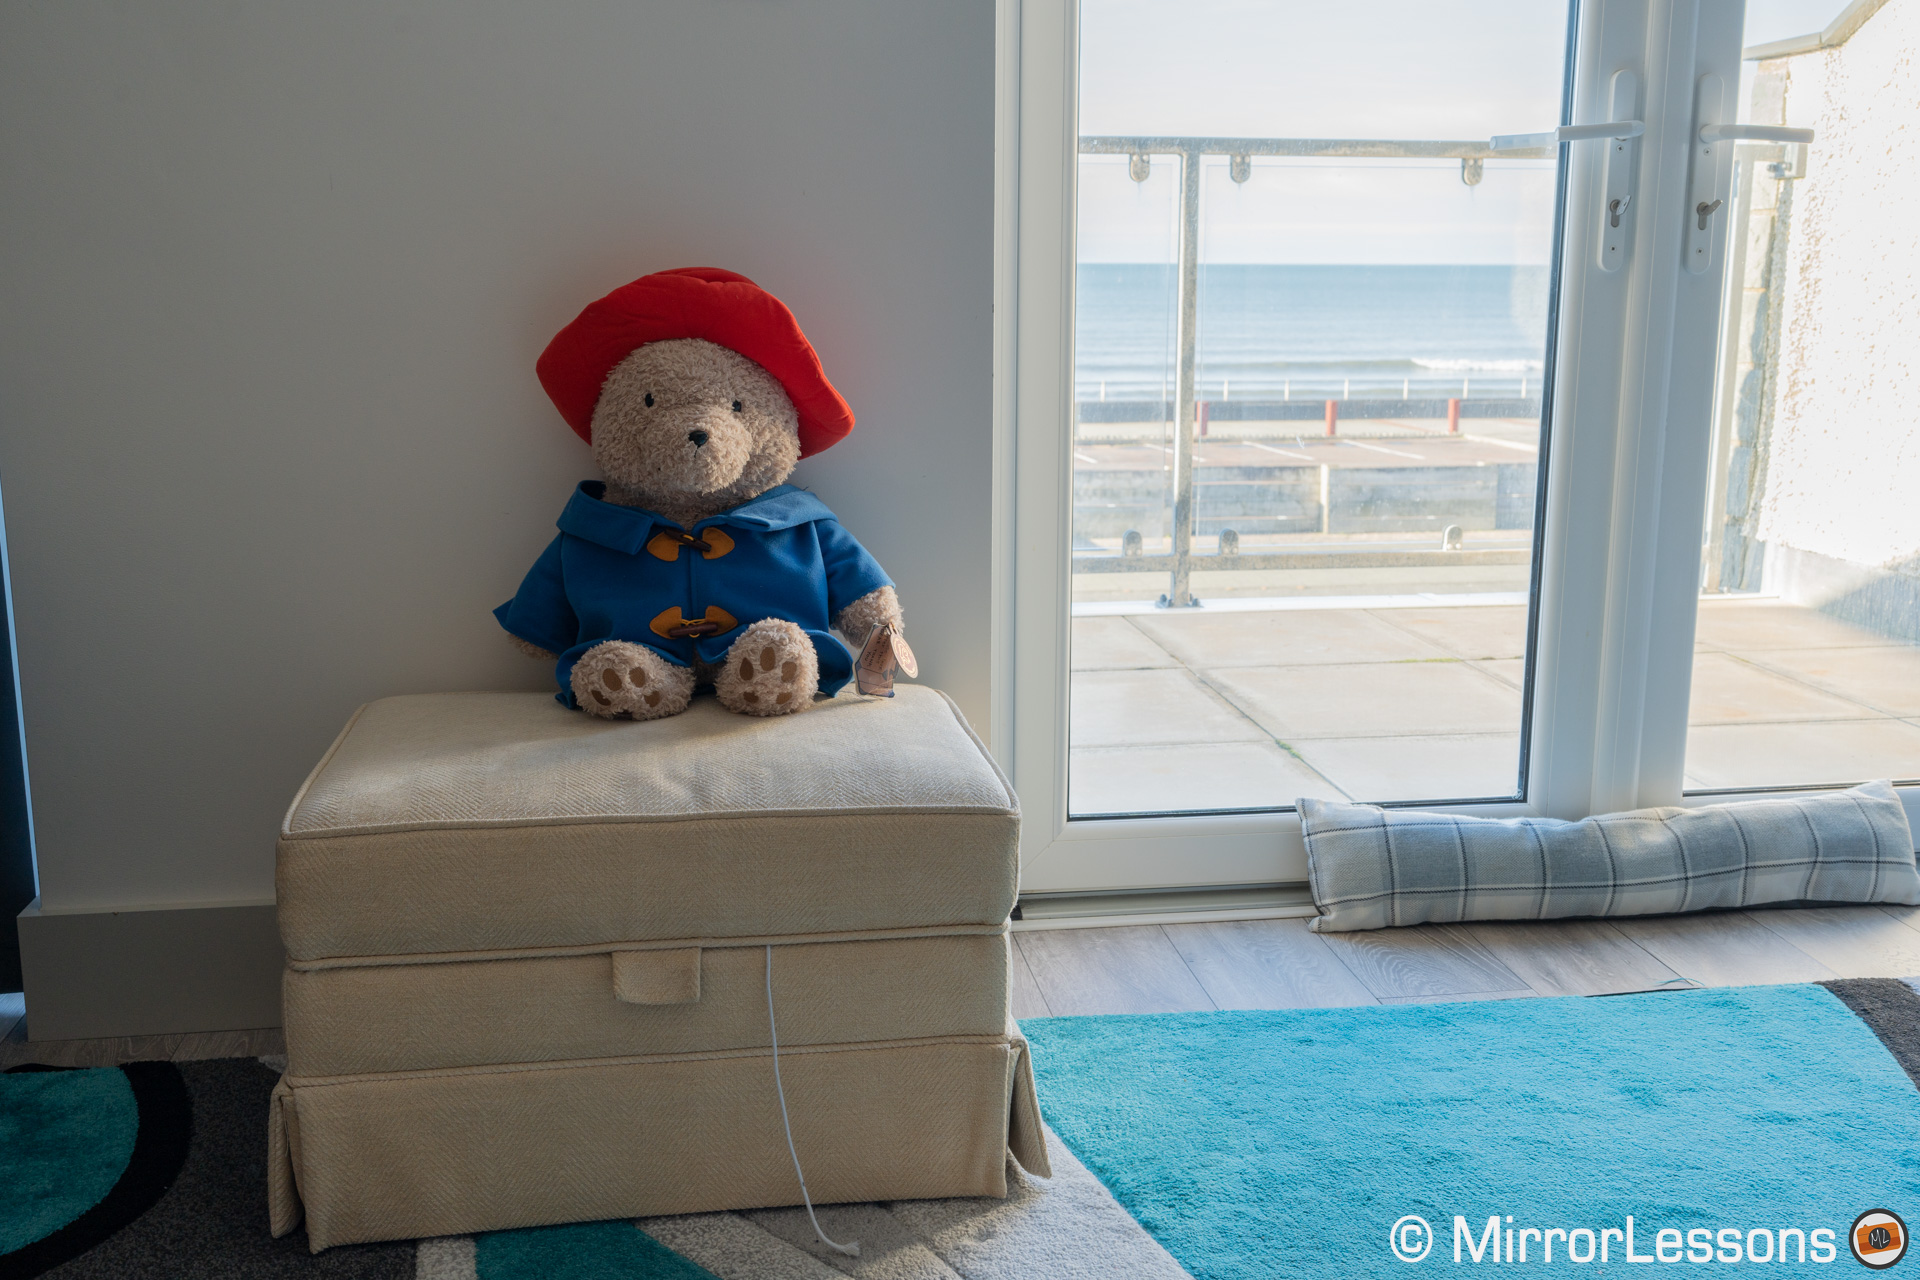
Push the histogram to the extreme, and the difference remains too small in the shadows to bother with a description.
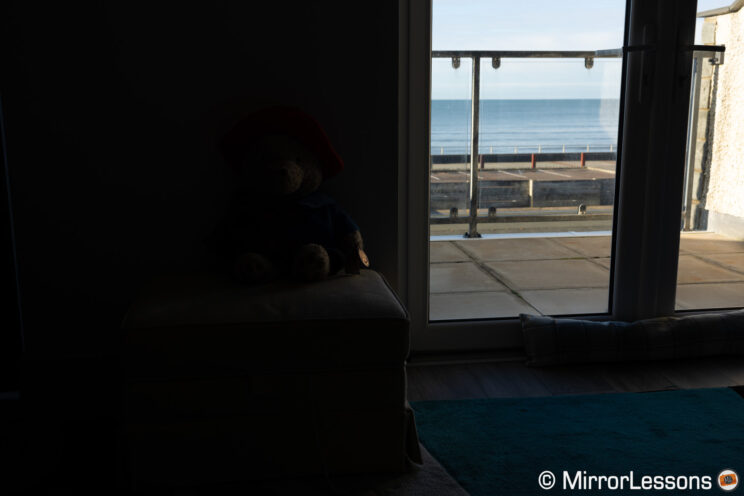
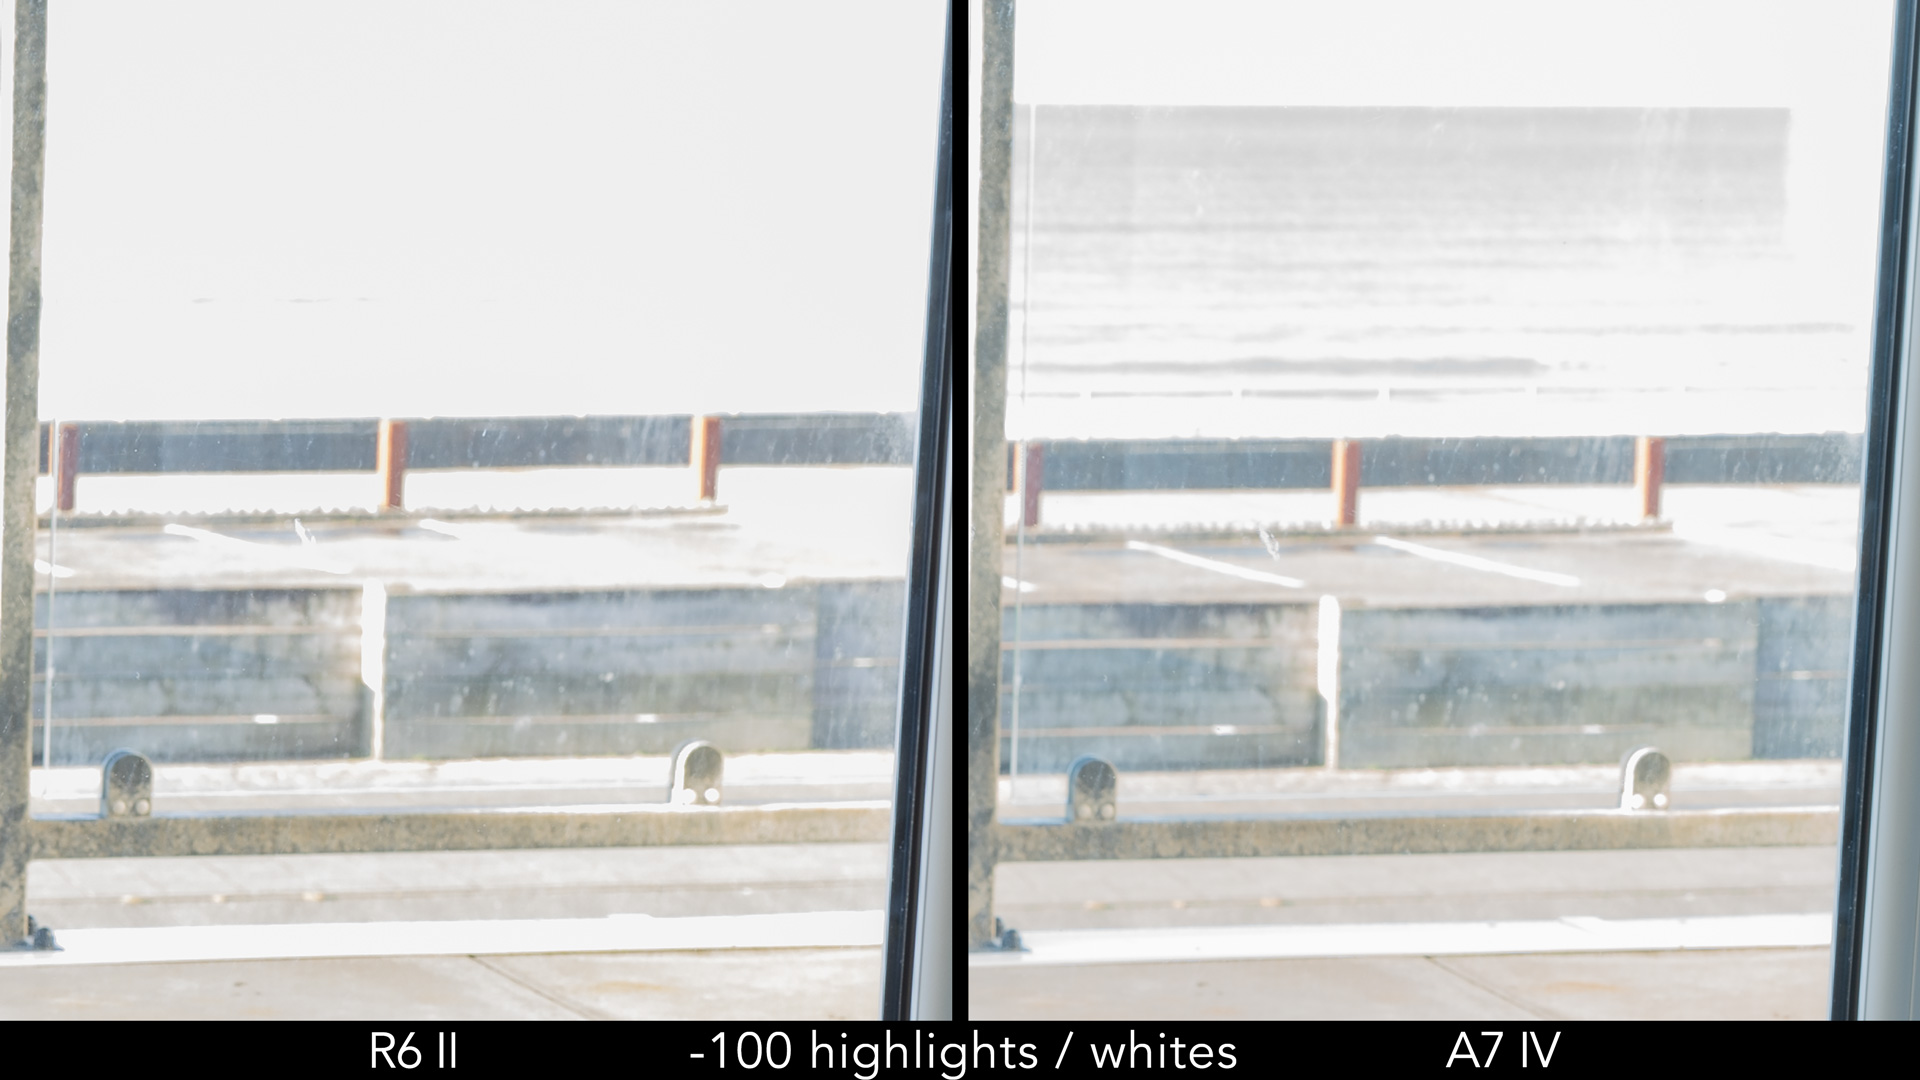
If we overexpose the window however, the A7 IV manages to save a few extra details on the sea and the parking lot in the background. So the Sony has an advantage here, but those interested in the Canon should not be too concerned. I had to push the test really far to find a difference.

A quick note about the 14-bit RAW files. The A7 IV offers three variations, whereas the R6 II has two.
RAW Quality
R6 II
A7 IV
Uncompressed
– –
68MB
Lossless Compressed
26MB
38MB
Compressed
13MB
35MB
Note: the RAW files colour depth decreases to 12-bit on the R6 II when using the electronic shutter in continuous mode. On the A7 IV, this happens in continuous mode with the Compressed RAW setting (mechanical and electronic shutter).
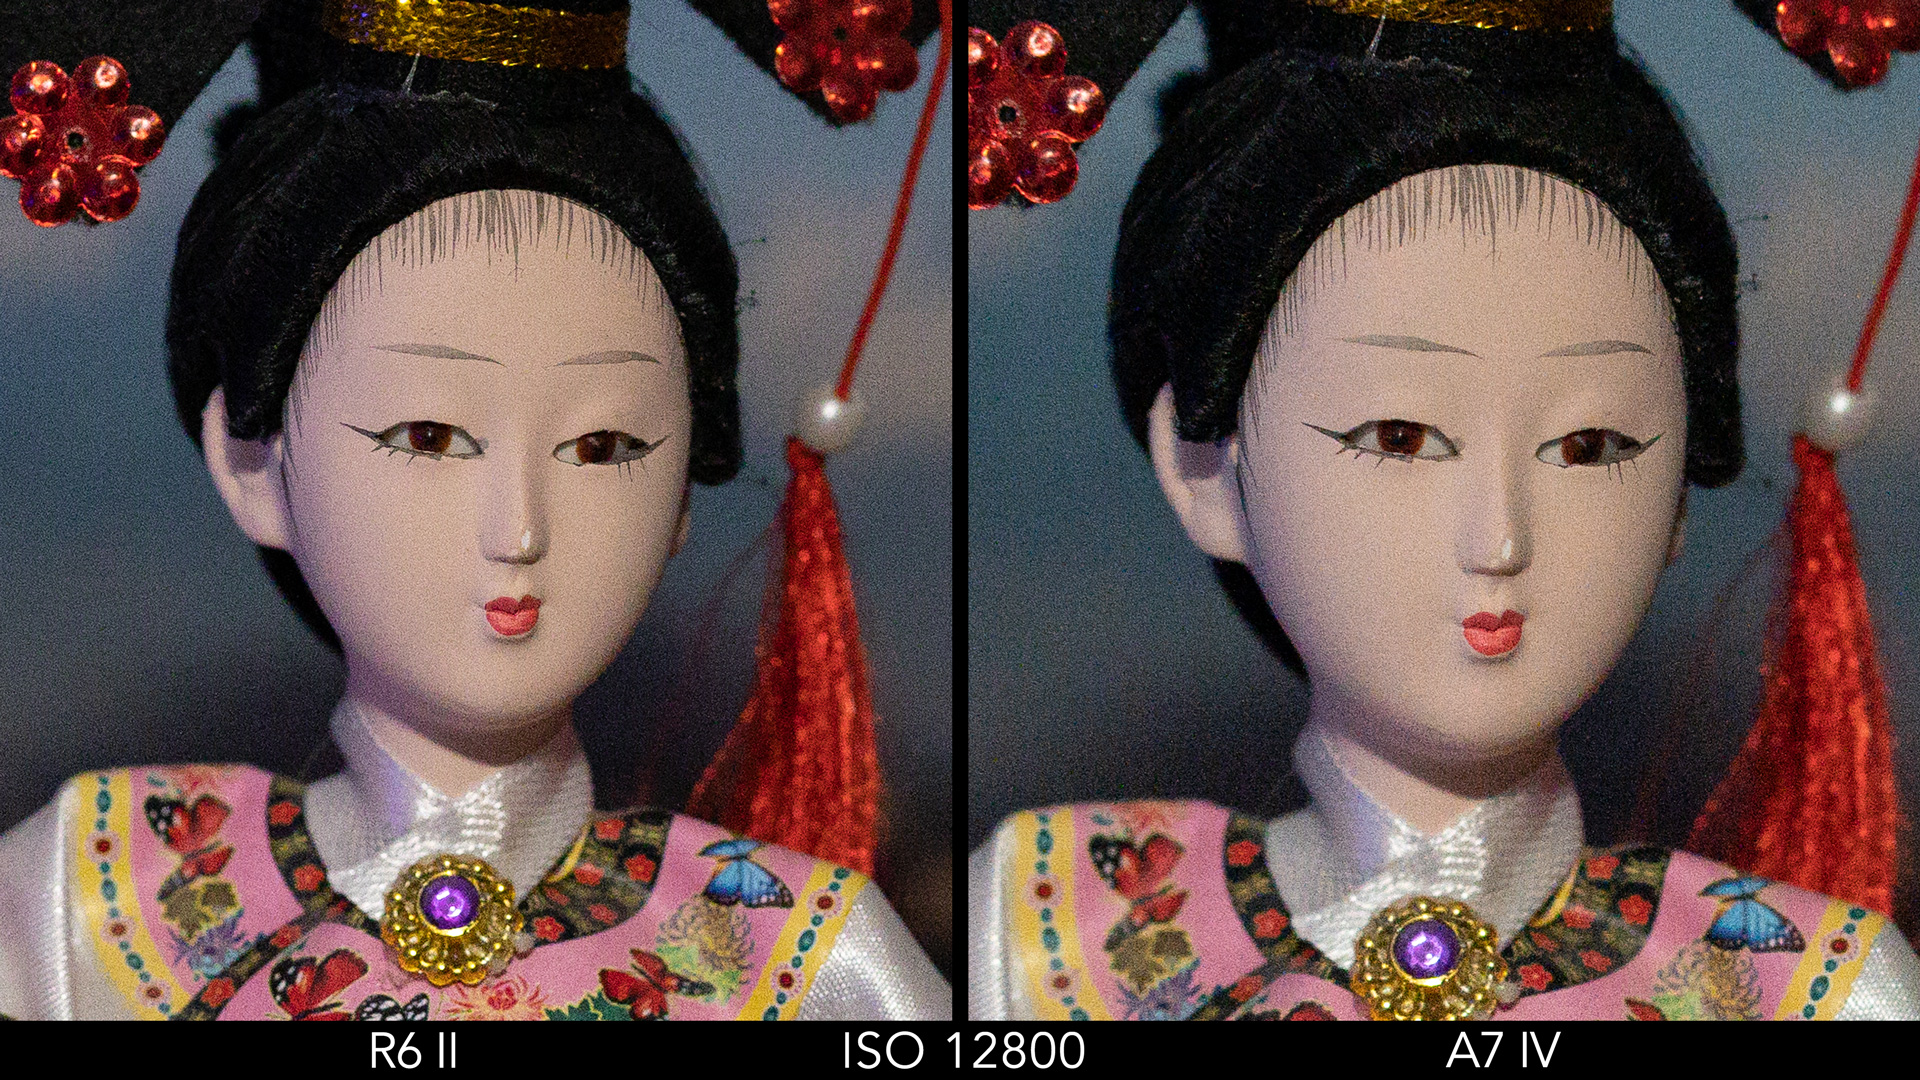
ISO
The ISO range is slightly different, specifically concerning the normal ISO values:
ISO
Normal range
Extended range
R6 II
100 – 102,400
50 – 204,800
A7 IV
100 – 51,200
50 – 204,800
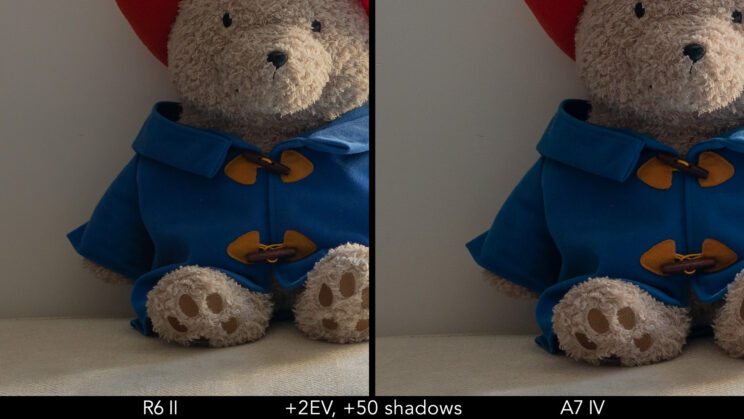
In the third test below, you can see the disparity between the two cameras is contained once again. The A7 IV shows more noise overall, but it’s a small trade off in exchange for the extra resolution.


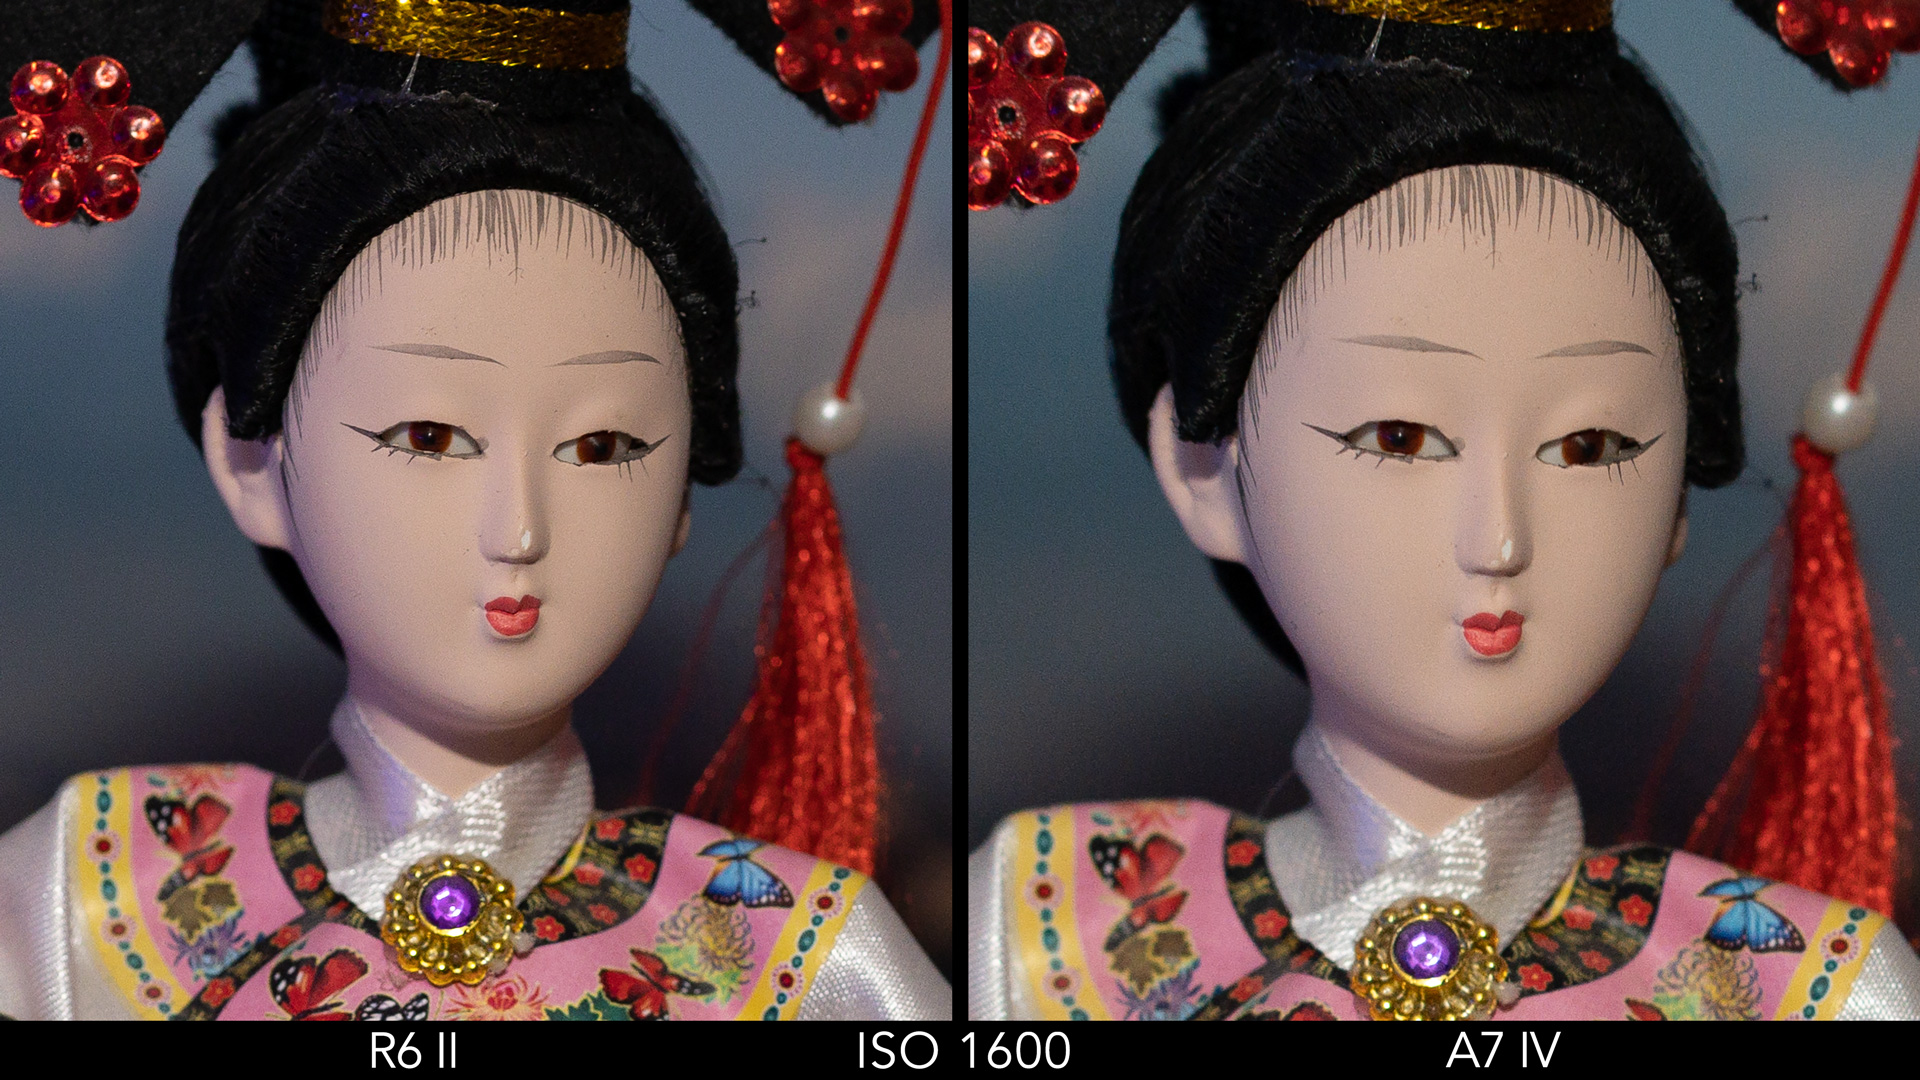


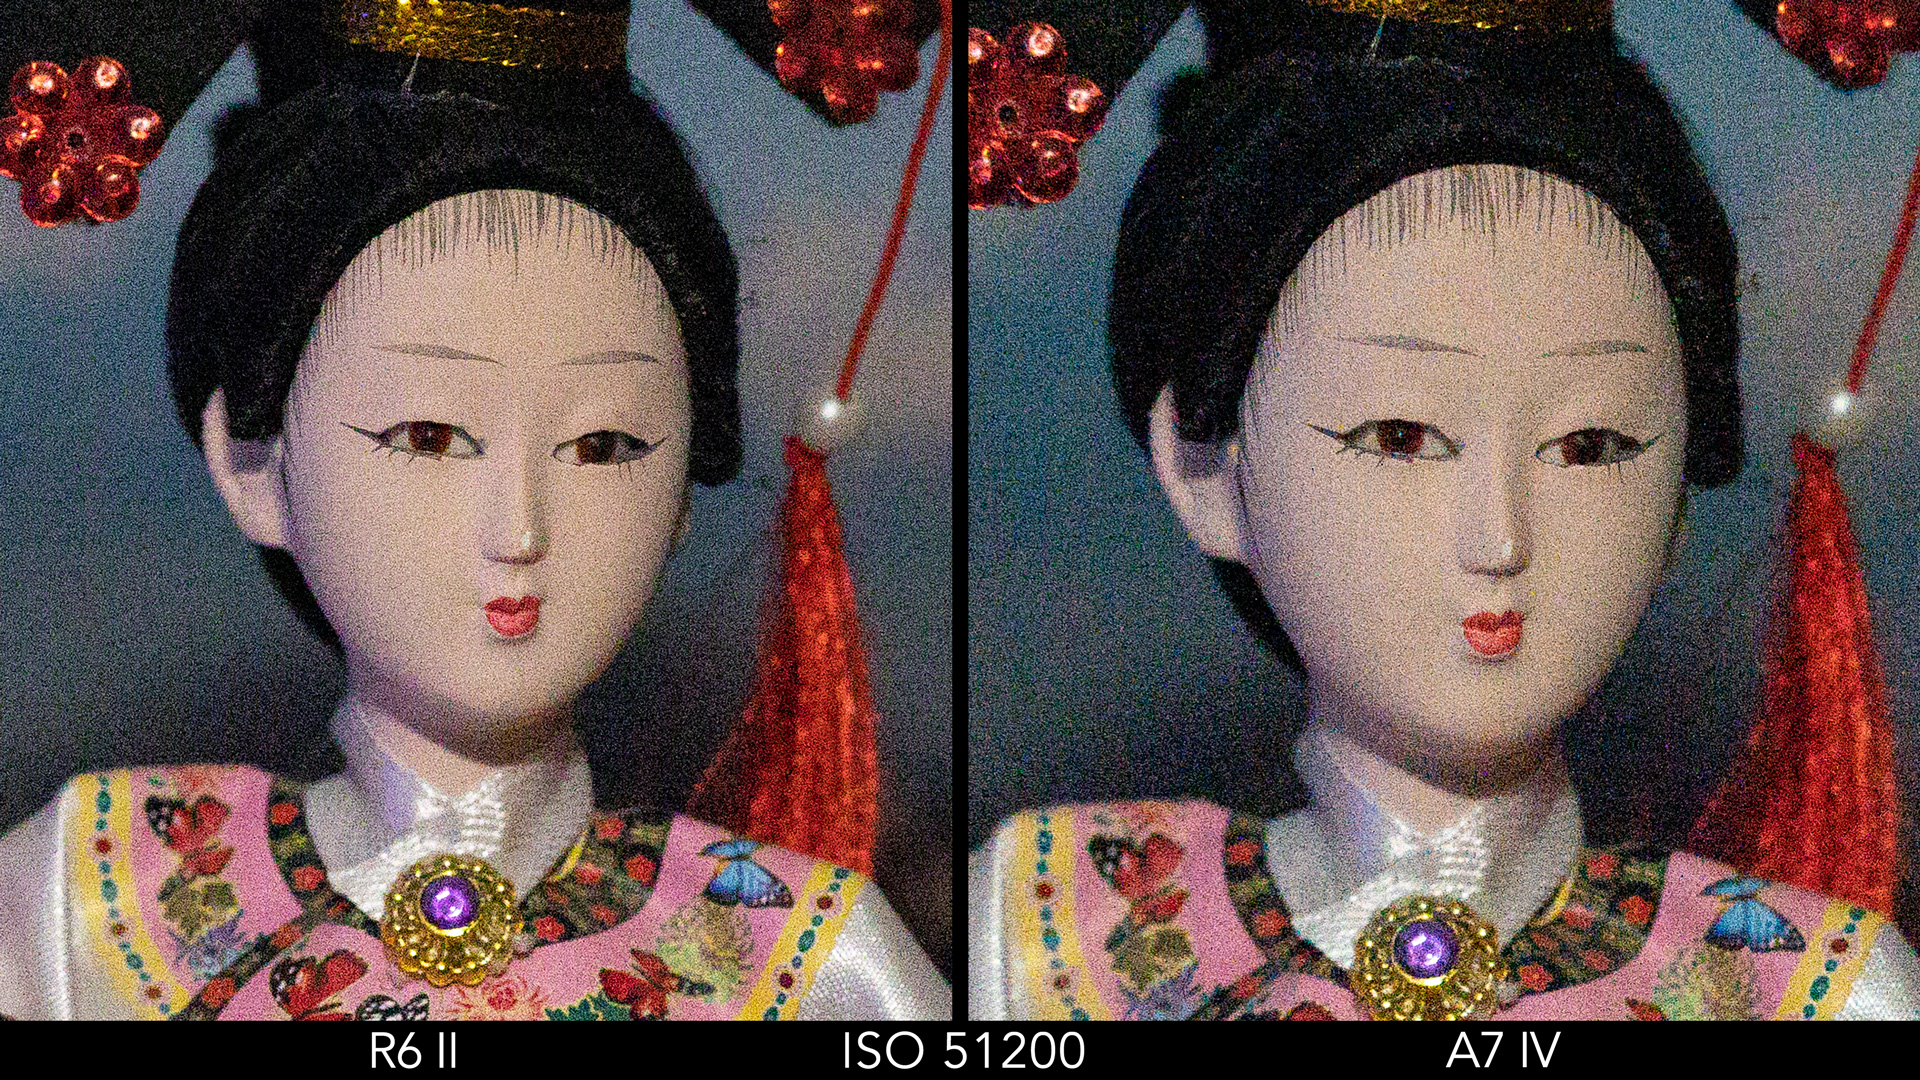
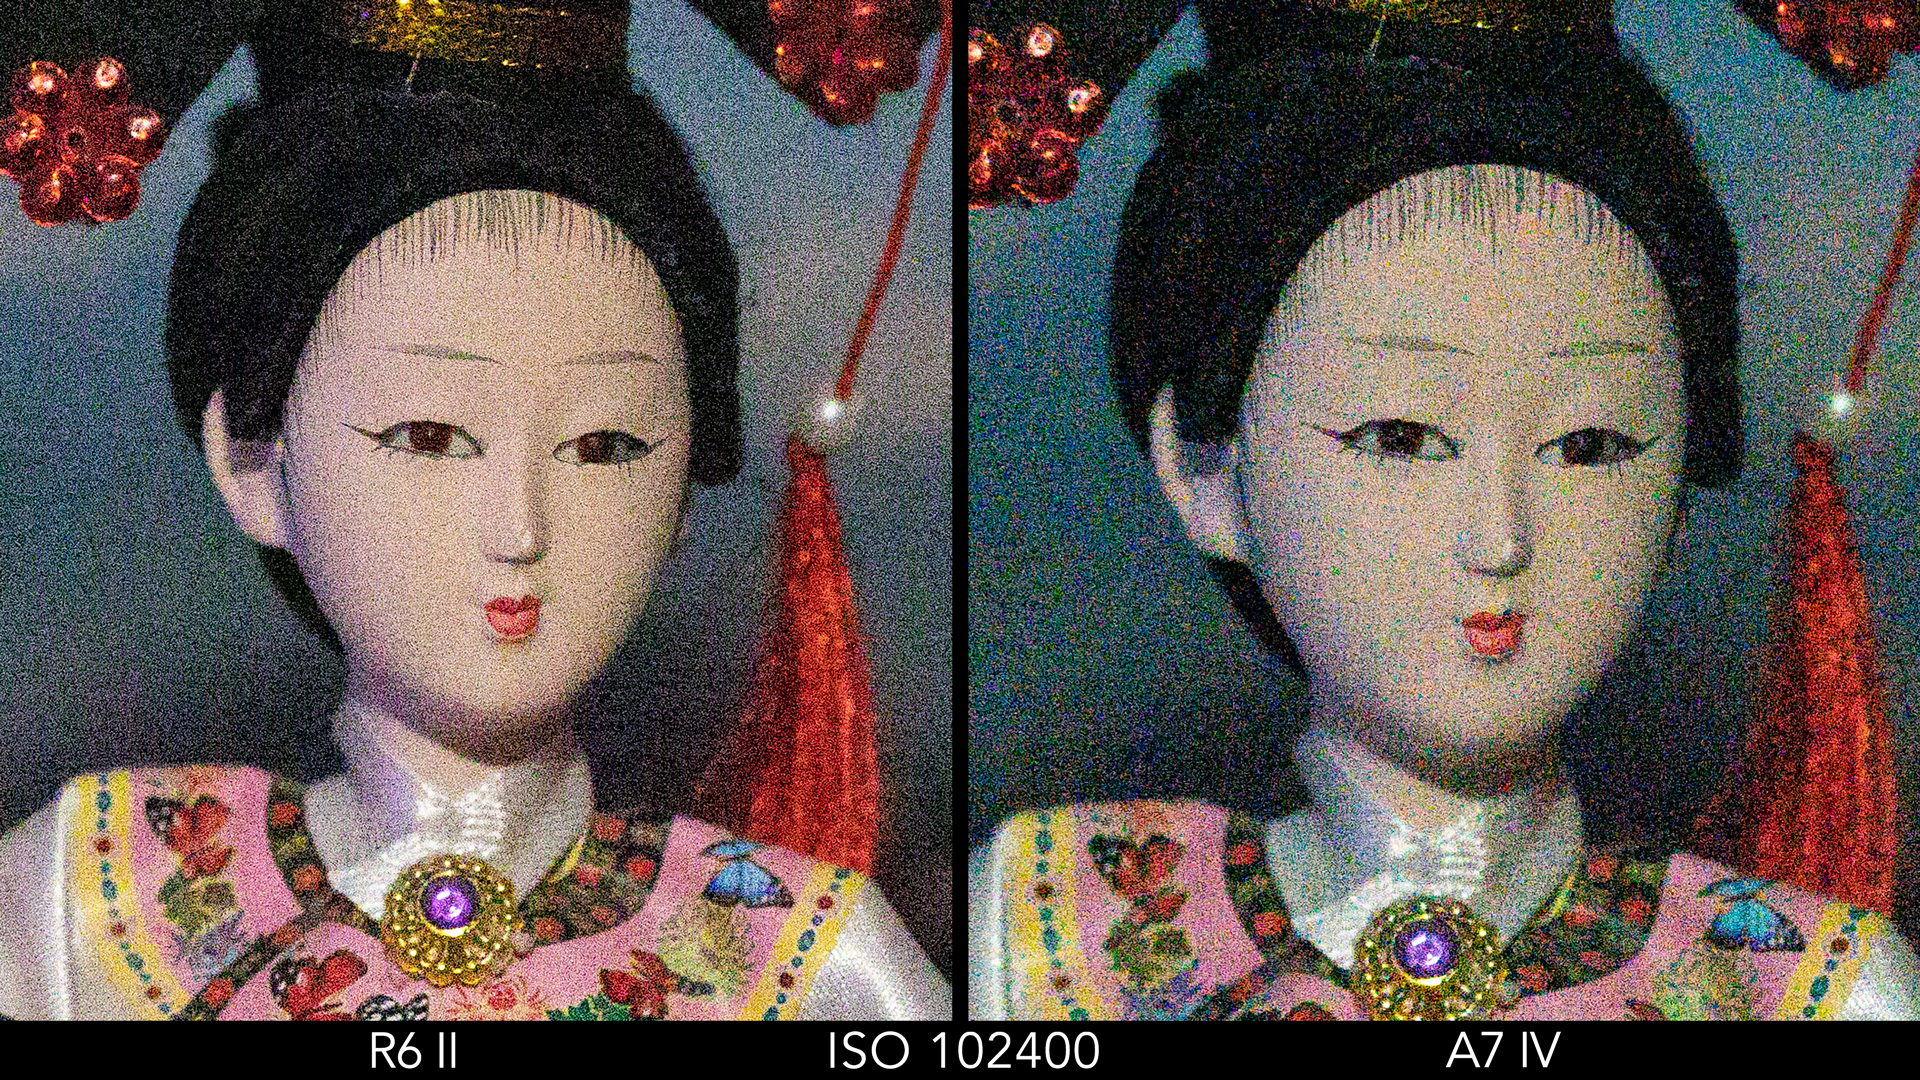
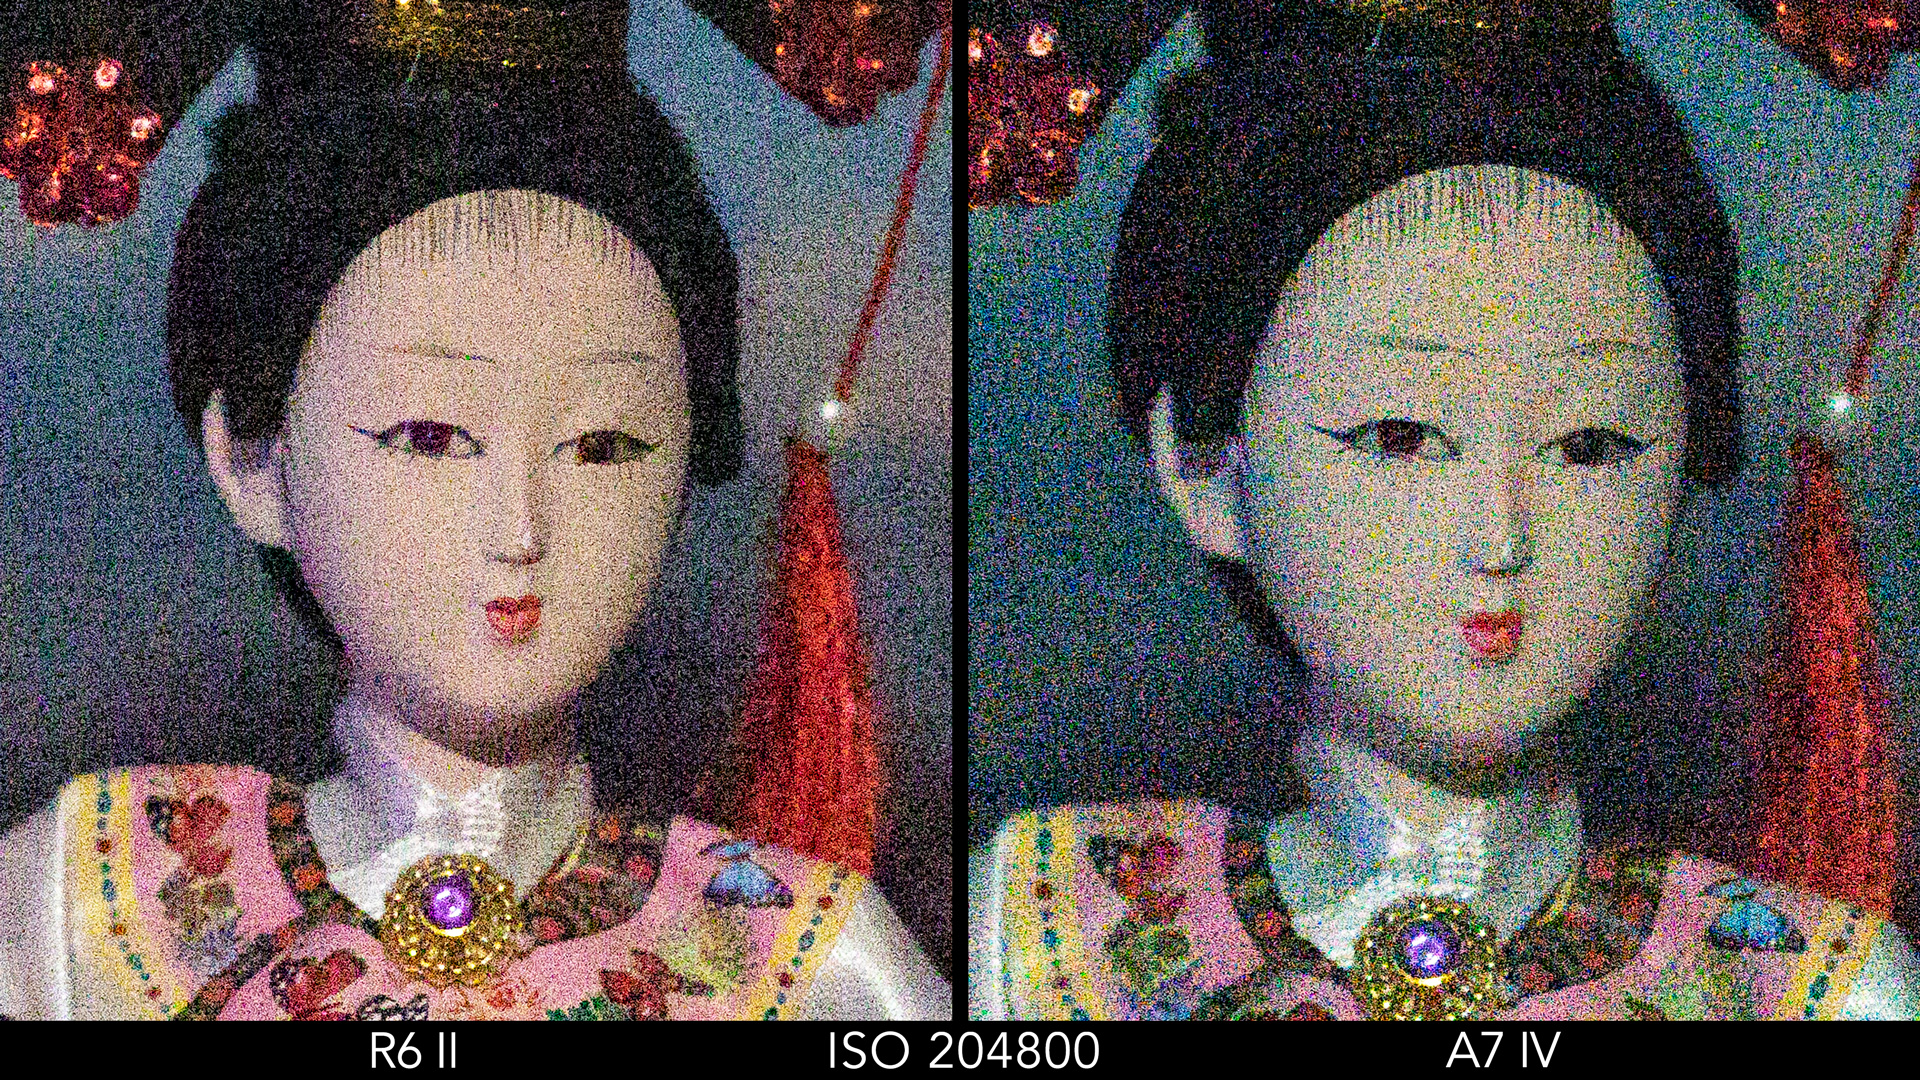
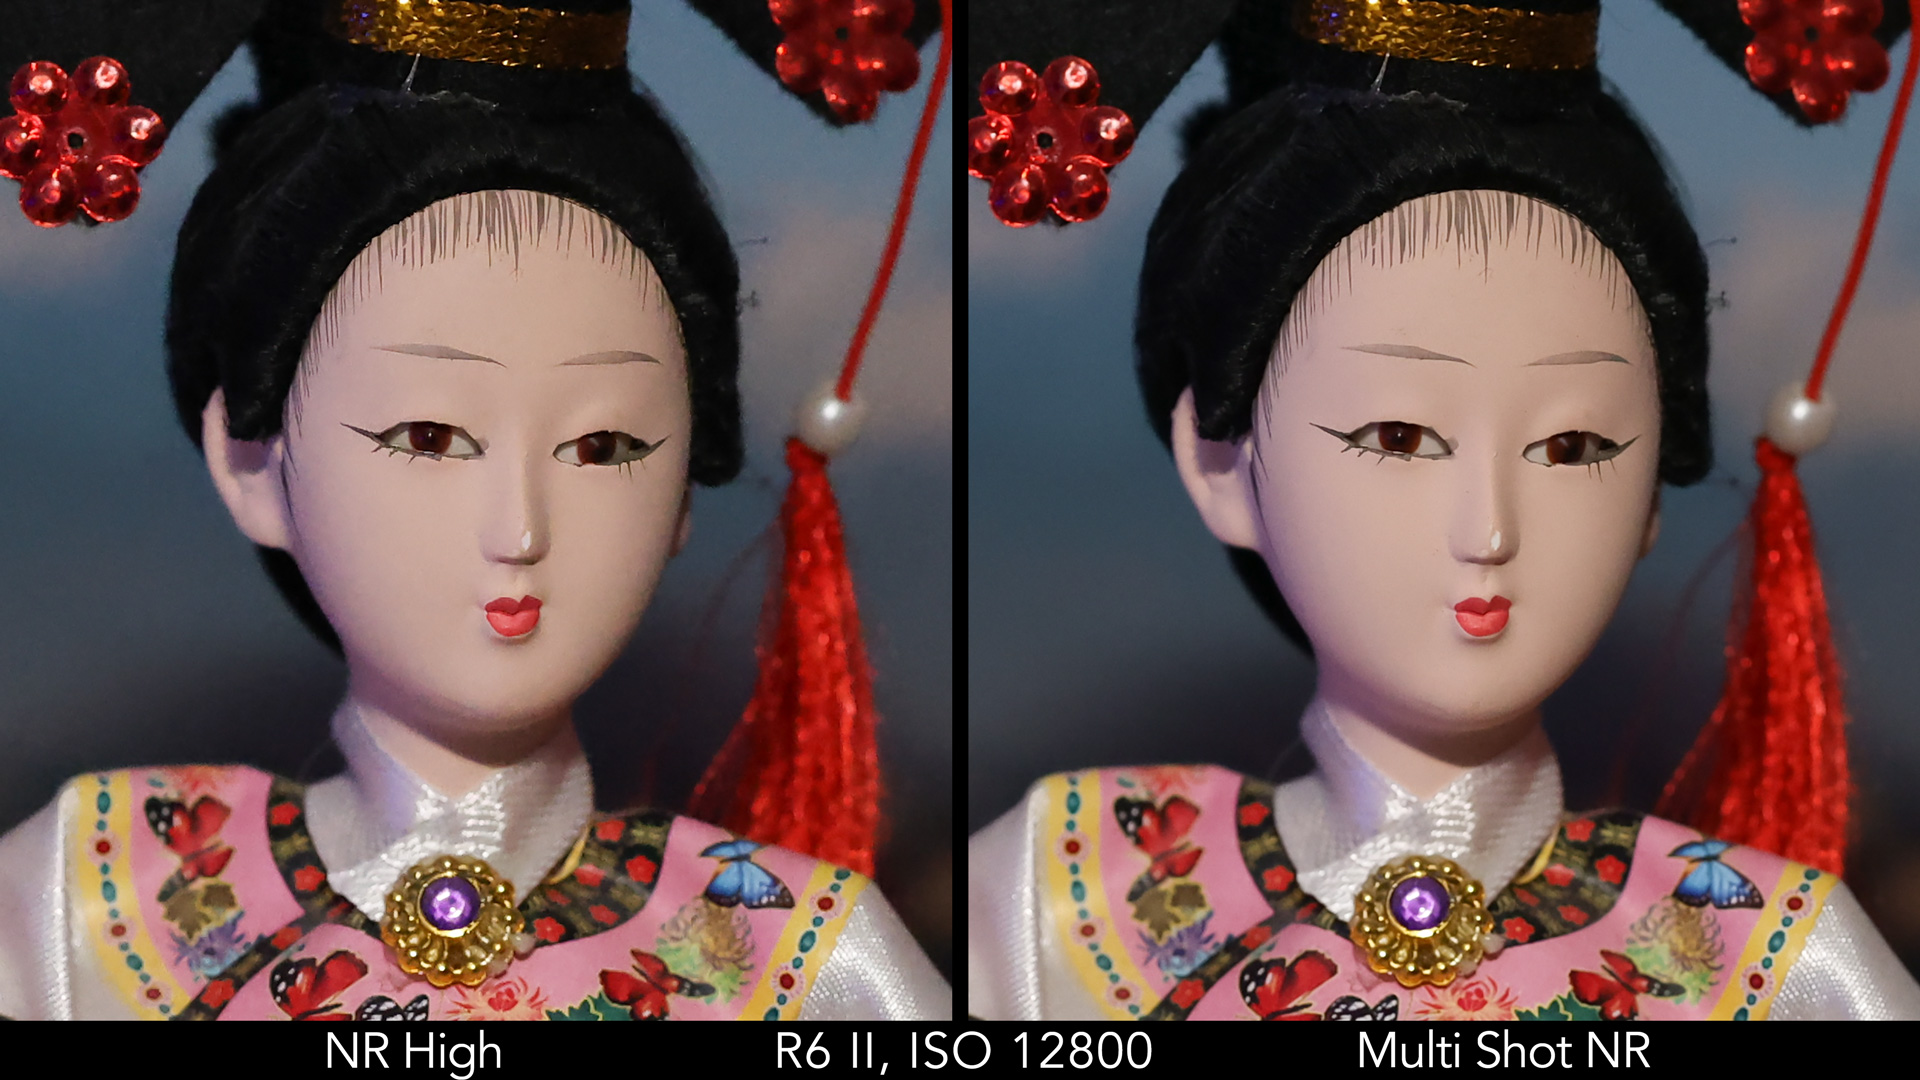
If we look at the JPGs, and each camera’s noise reduction capability, I much prefer the results of the R6 II. Even with NR off, there is no colour noise, unlike with the A7 model. When set to Standard, the Canon image is cleaner, with more vibrant colours. With that said, the R6 also loses more details in the blacks, especially on the doll’s hair.

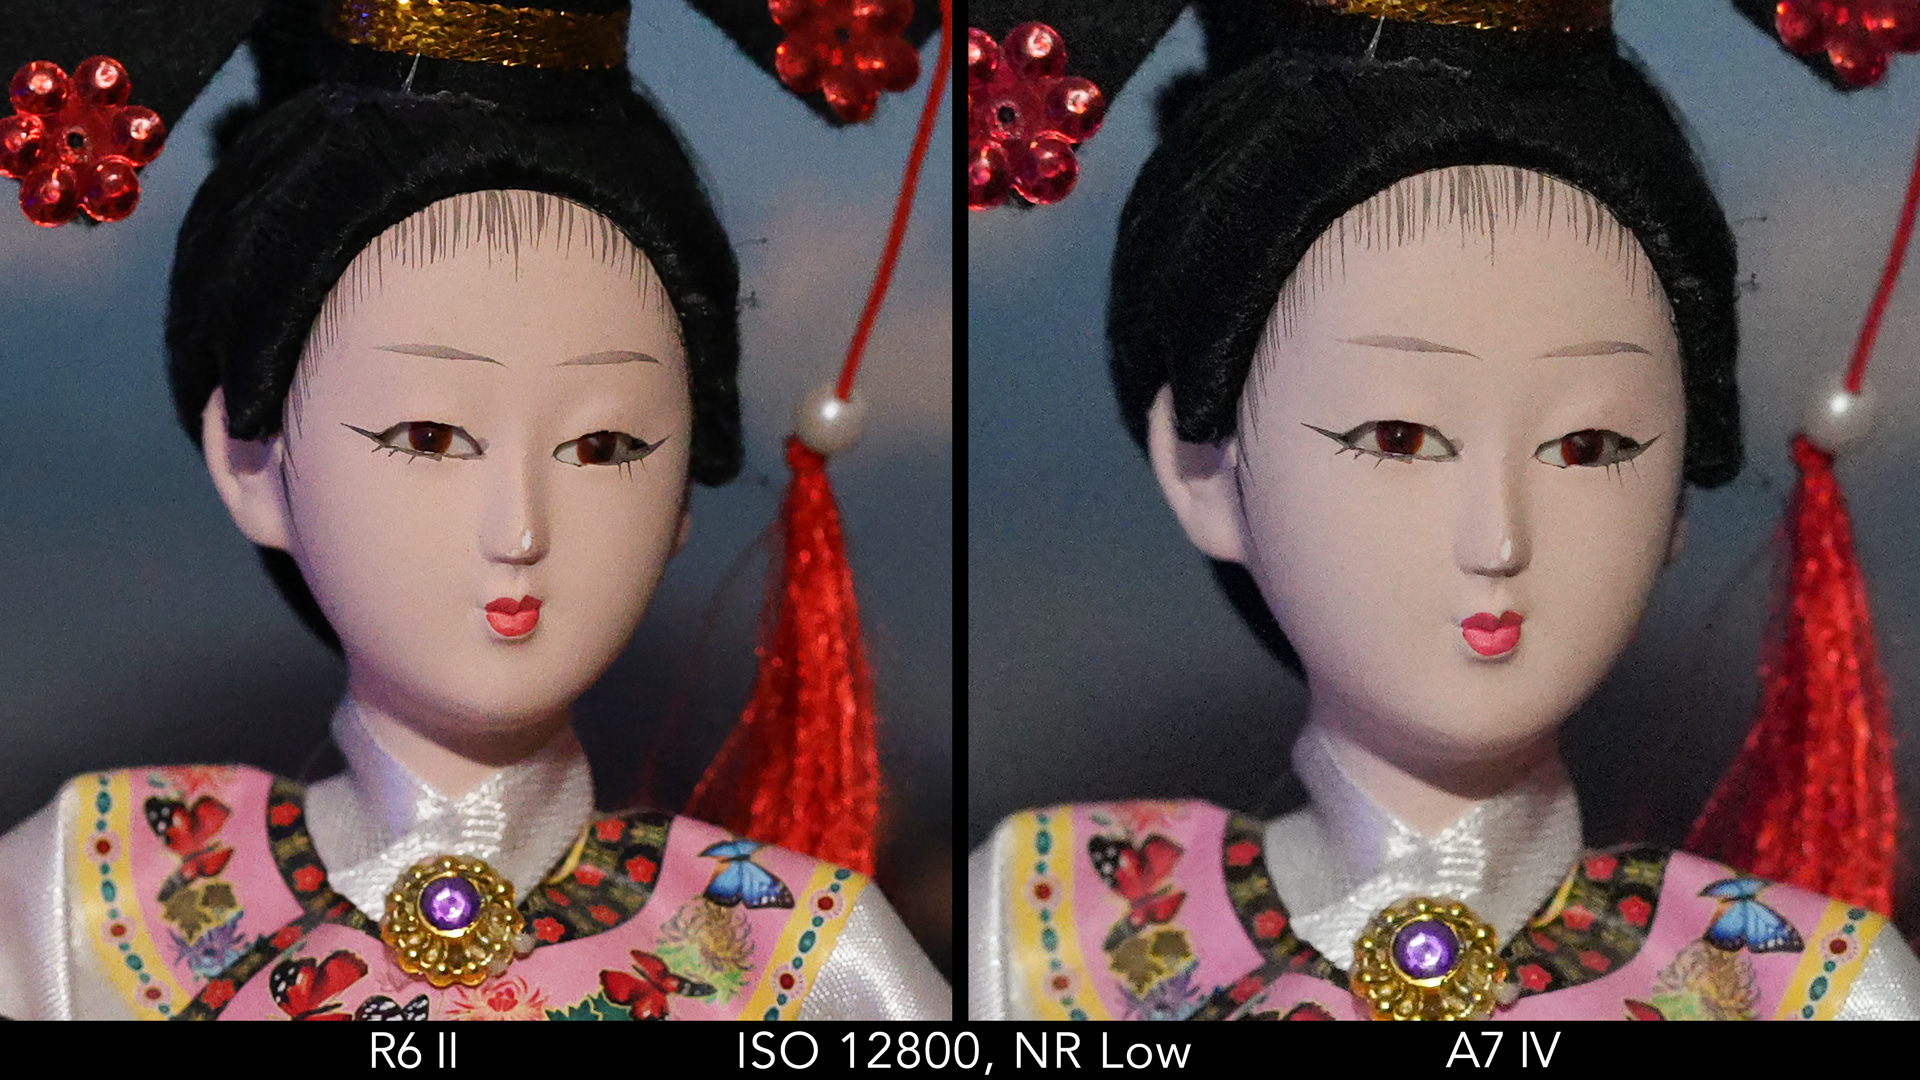

Note that the R6 also has a high NR level, as well as a Multi-NR mode. The latter is almost noise free while retaining a good amount of details, but it works by combining multiple frames, so it won’t do well with moving subjects.
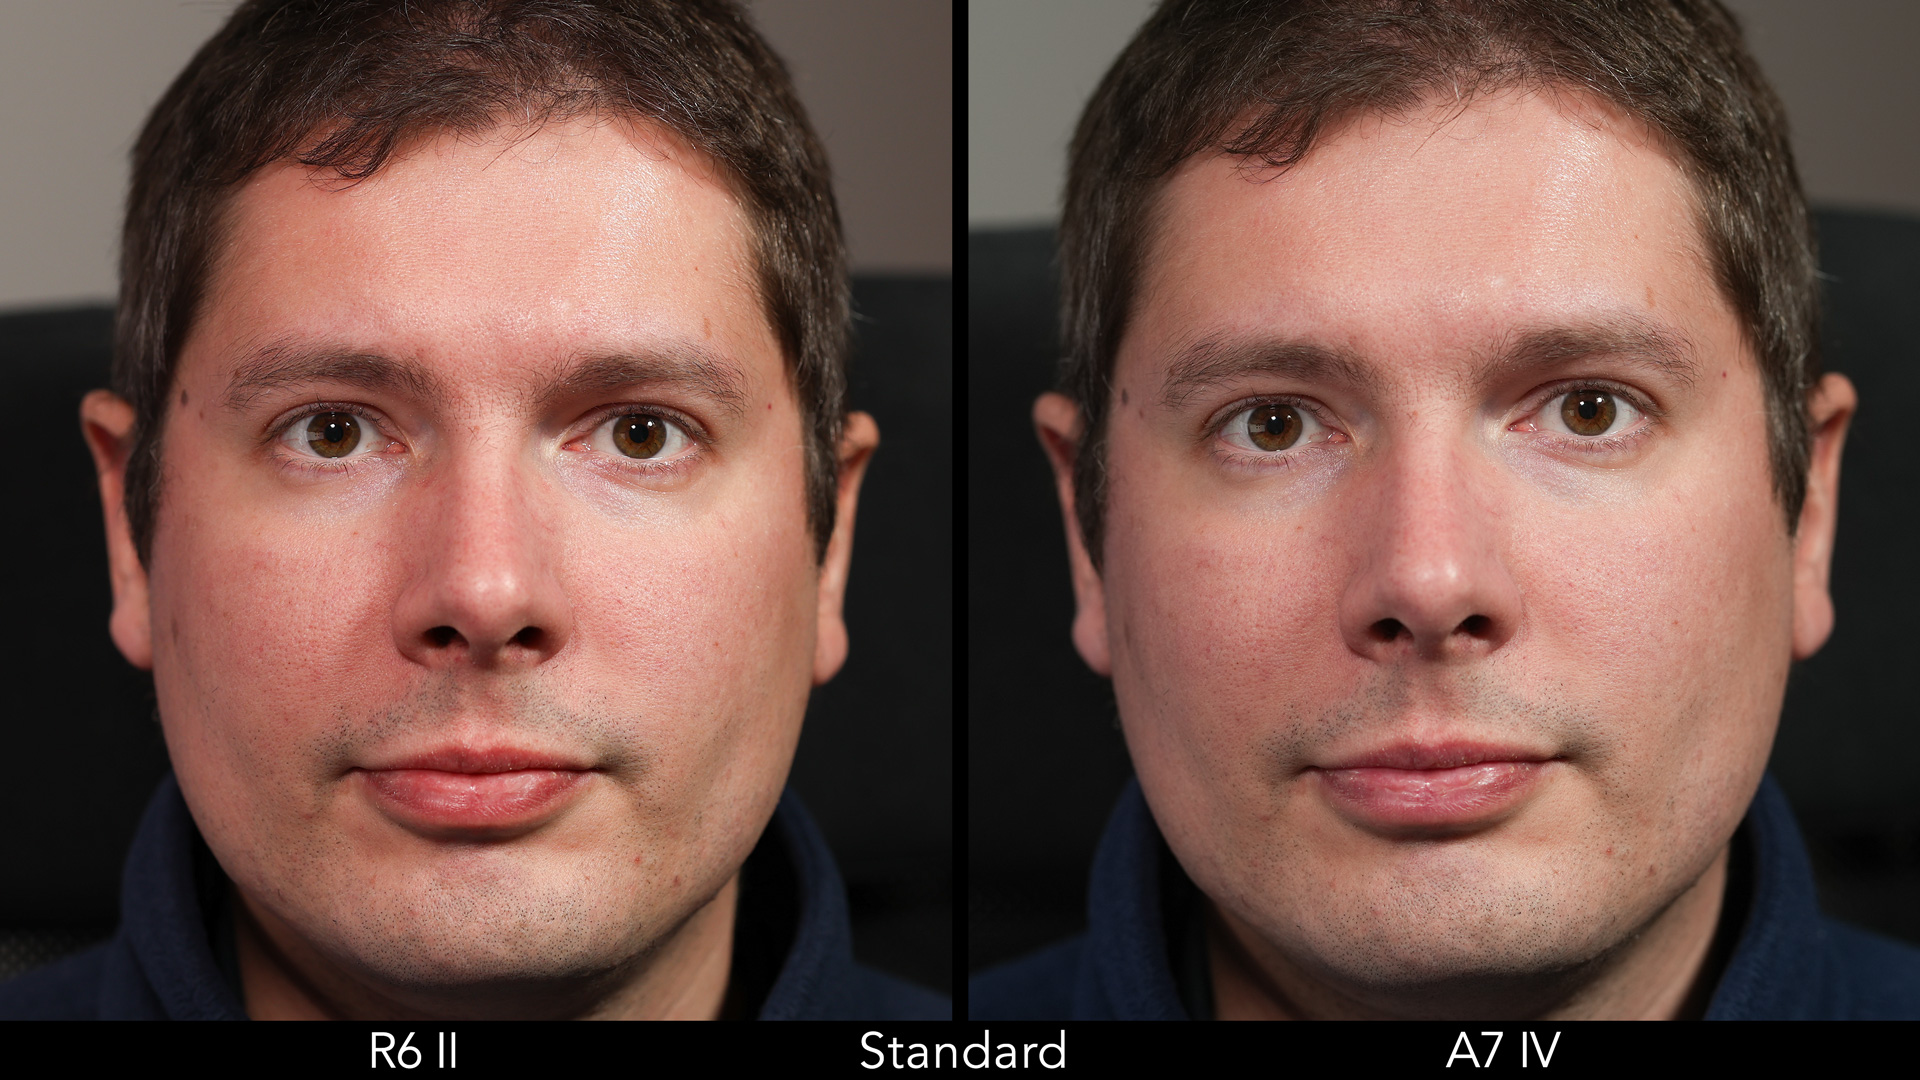
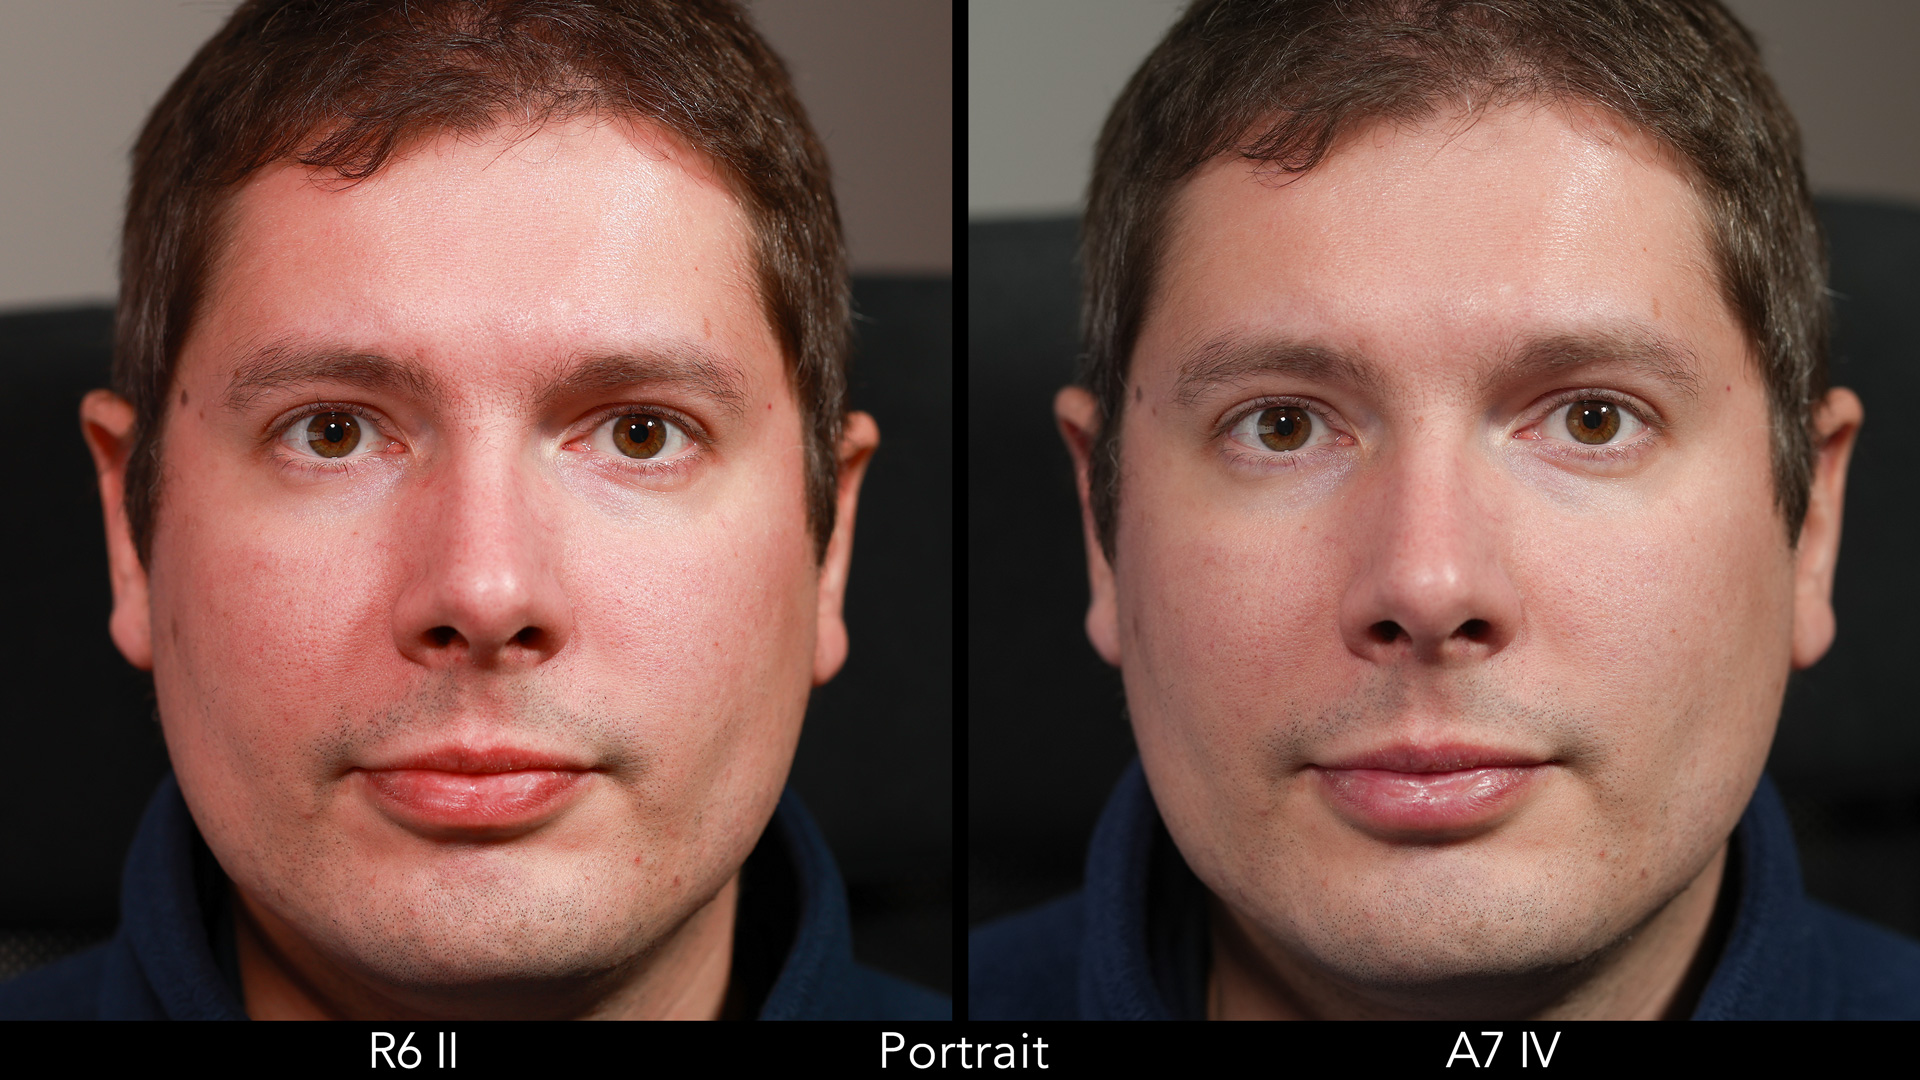
Colours
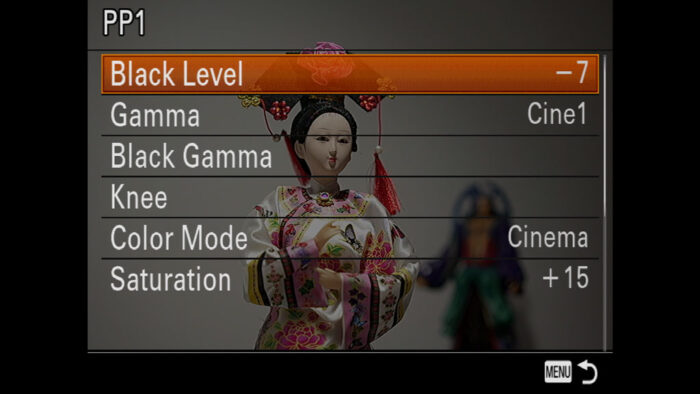
Let’s have a look at the built-in colour profiles of each camera, the Canon Picture Style and the Sony Creative Looks. These can be customised with various parameters, in addition to the white balance shift. I will only show you the results with the default setting.
First we have a landscape image taken near sunset, so the sunlight was warm. The Canon leans toward more reds, the Sony towards green, and it becomes very apparent with the Landscape / Vivid profiles.
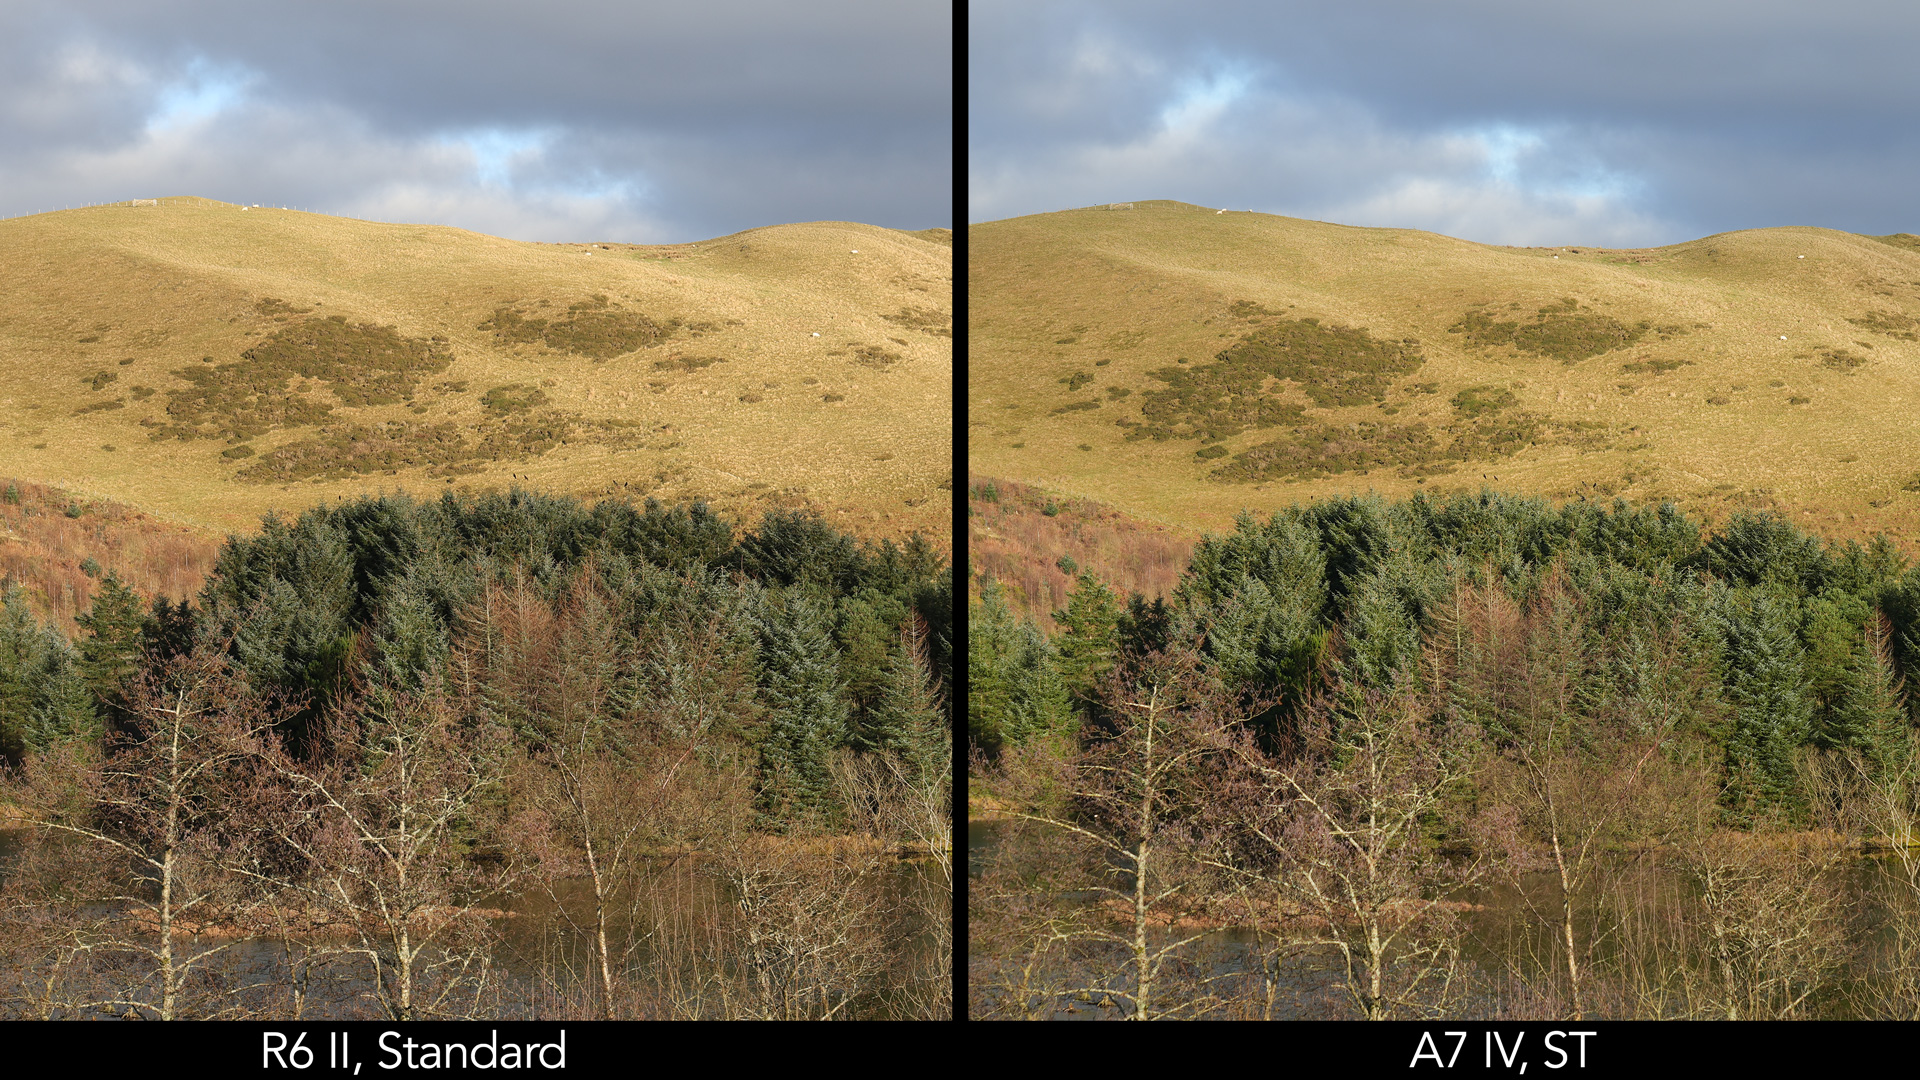
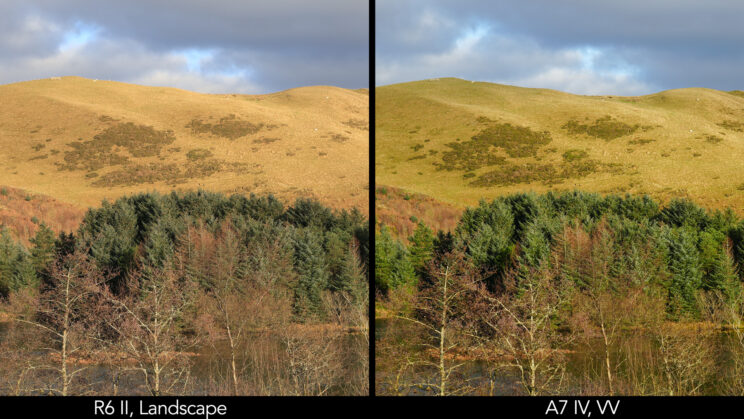
With skin tones, the R6 II displays more contrast and a slightly warmer result with the Standard style.
Red dominates the Portrait style on the Canon, whereas the Sony version has less contrast and softer tones.
As always, I find Neutral gives the most balanced result on the R6 model, whereas the same profile on the A7 IV loses saturation.

4. Autofocus
The R6 mark II features the Dual Pixel CMOS AF II system from Canon, which provides 100% sensor coverage when using the automatic AF area modes, or 100% horizontal and 90% vertical with a manual single AF point. With the latter, there are no fewer than 4,897 positions available, whereas with Tracking or other automatic AF modes, the camera uses 1,053 points.

The AF system on the A7 IV is made of 759 phase detection points, but the camera can also use 425 contrast detection points. The phase detection points cover roughly 94% of the sensor.
Subject Detection
Both cameras come with an advanced software and deep learning algorithms. They can recognise a variety of subjects. These are the ones stated officially by the two companies.
Subject Det.
R6 II
A7 IV
People
Eyes
Head
Torso
Eyes
Face
Animals
Dogs
Cats
Birds
Horses
Zebras
Animals
(generic)
Birds
Vehicles
Cars
Motorcycles
Trains
Airplanes
– –
To the list above, I can add a few notes:
- the Canon has helmet priority for open-cockpit racing cars and motorbikes.
- portrait photographers will be happy to know that both cameras can prioritise the left or right eye of a subject (humans only).
- The A7 IV only detects the eye of an animal or bird, whereas the Canon can detect the head and body too.
- Only the R6 II has an Auto option that will automatically recognise the type of subject without selecting the setting manually
The list above is an indication, especially when it comes to animals. For example, dogs and cats mean that every animal that resembles or comes from the same family will be recognised (tigers, etc.). Sony doesn’t describe species of animals, apart from birds, but the A7 IV is capable of detecting horses and zebras no problem.
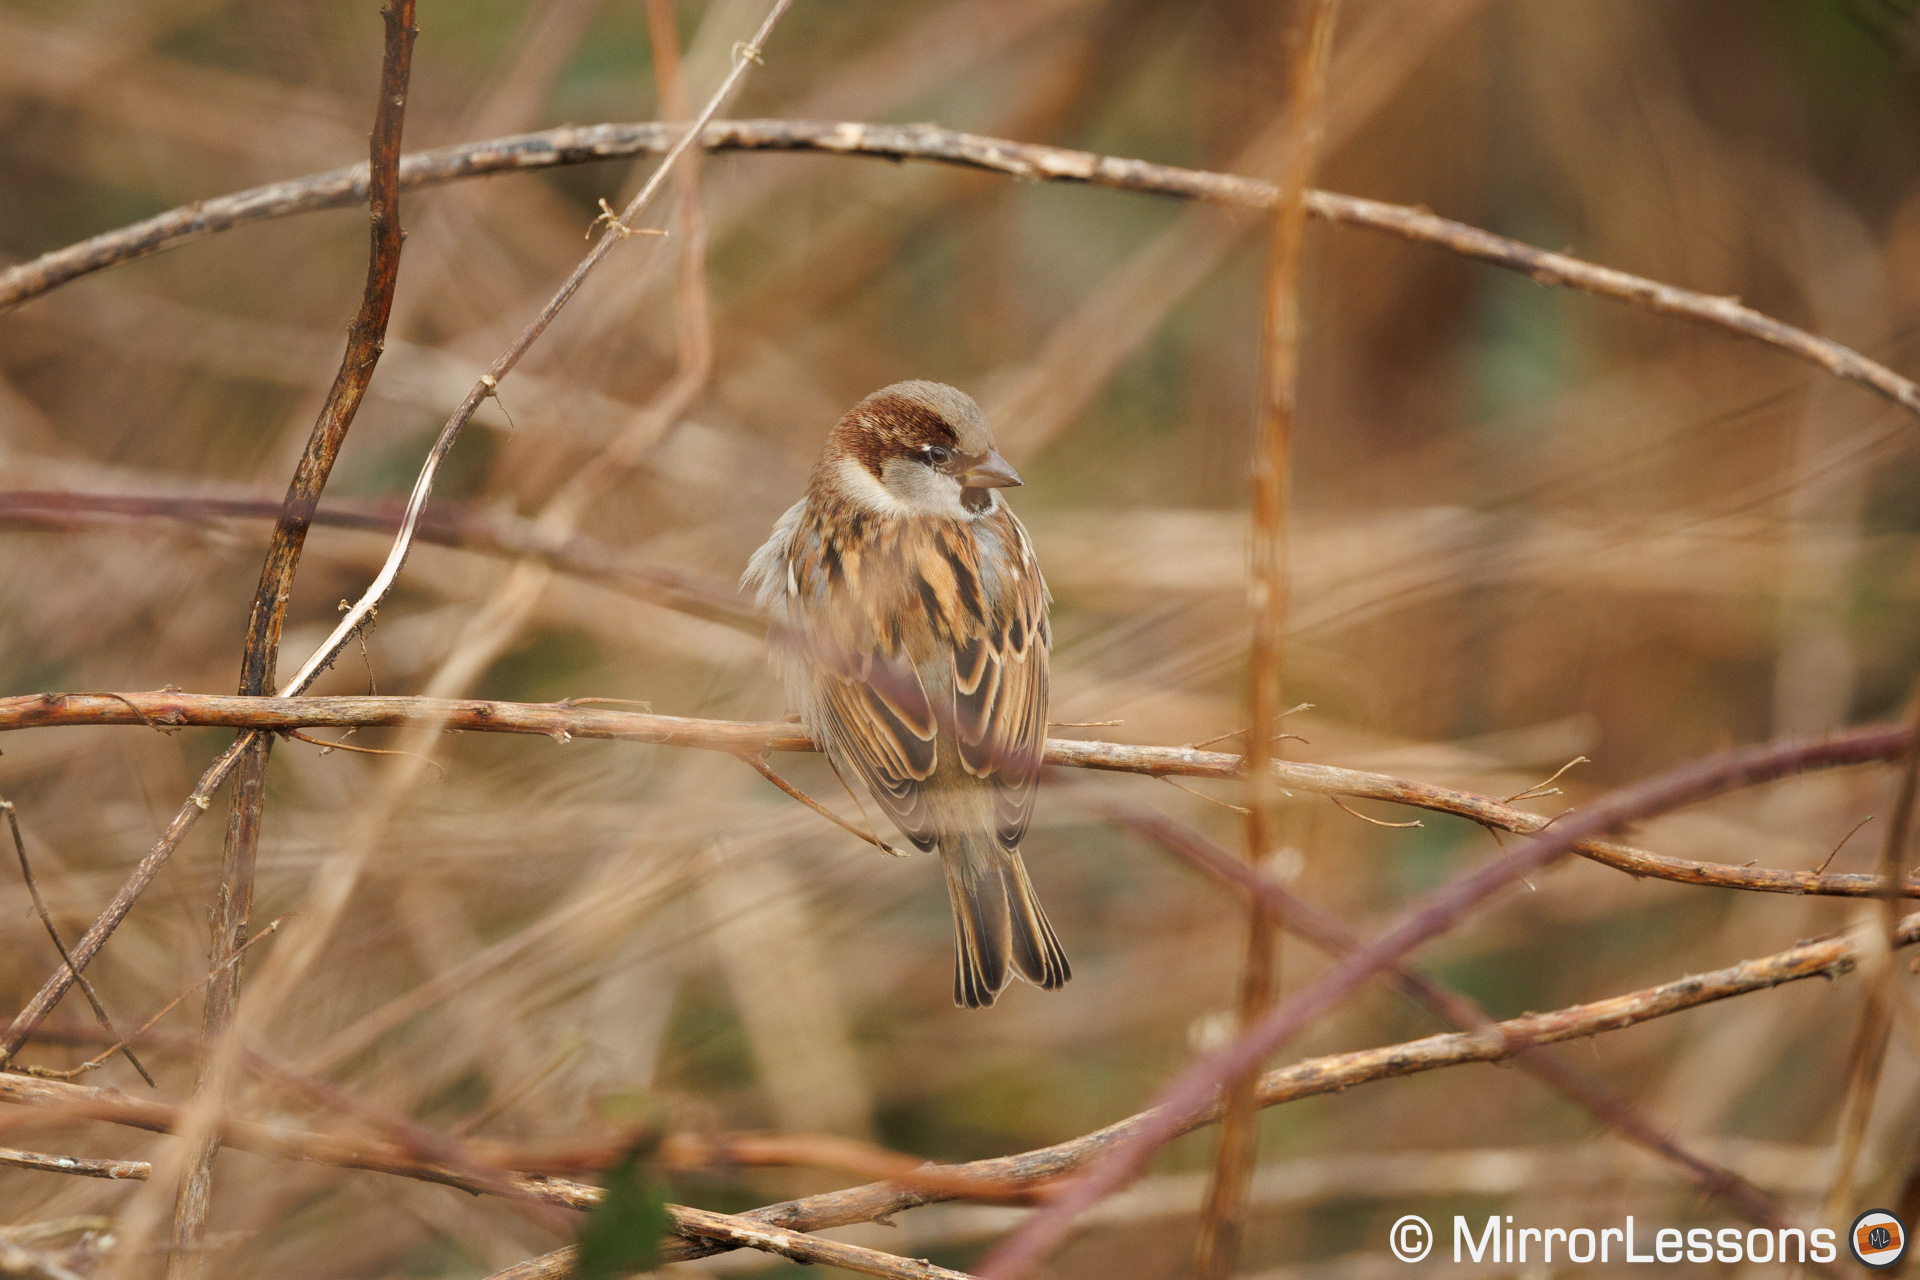
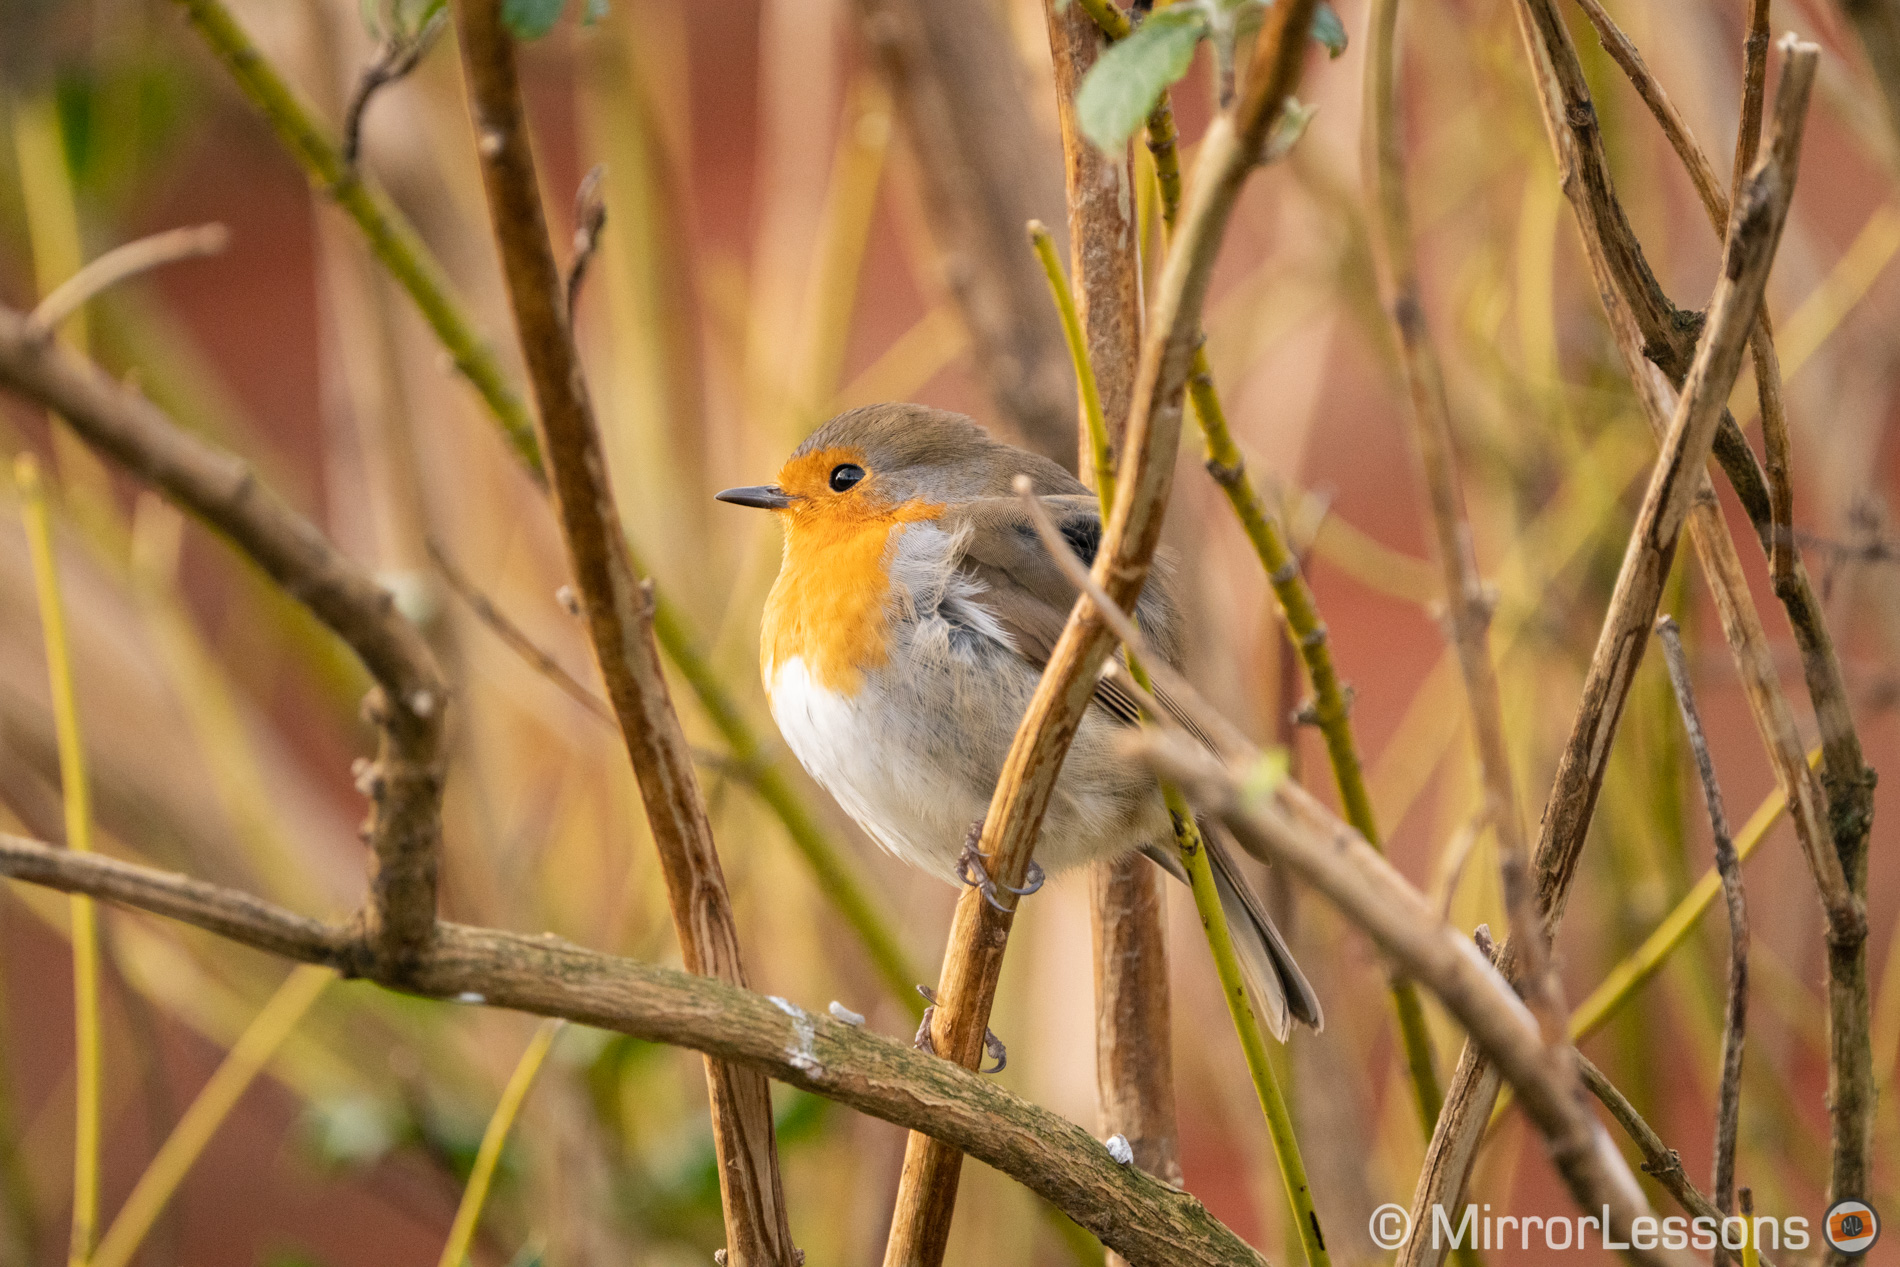
I didn’t have a chance to try the Vehicle option, but I had more luck with birds. Overall, these two cameras do really well, even if the subject is partially covered by branches or leaves. The big advantage of this technology is that you have a higher chance of getting the eye in focus without the need to position a small AF point on the subject manually, knowing the animal won’t wait for long. It just makes a photographer’s life easier.
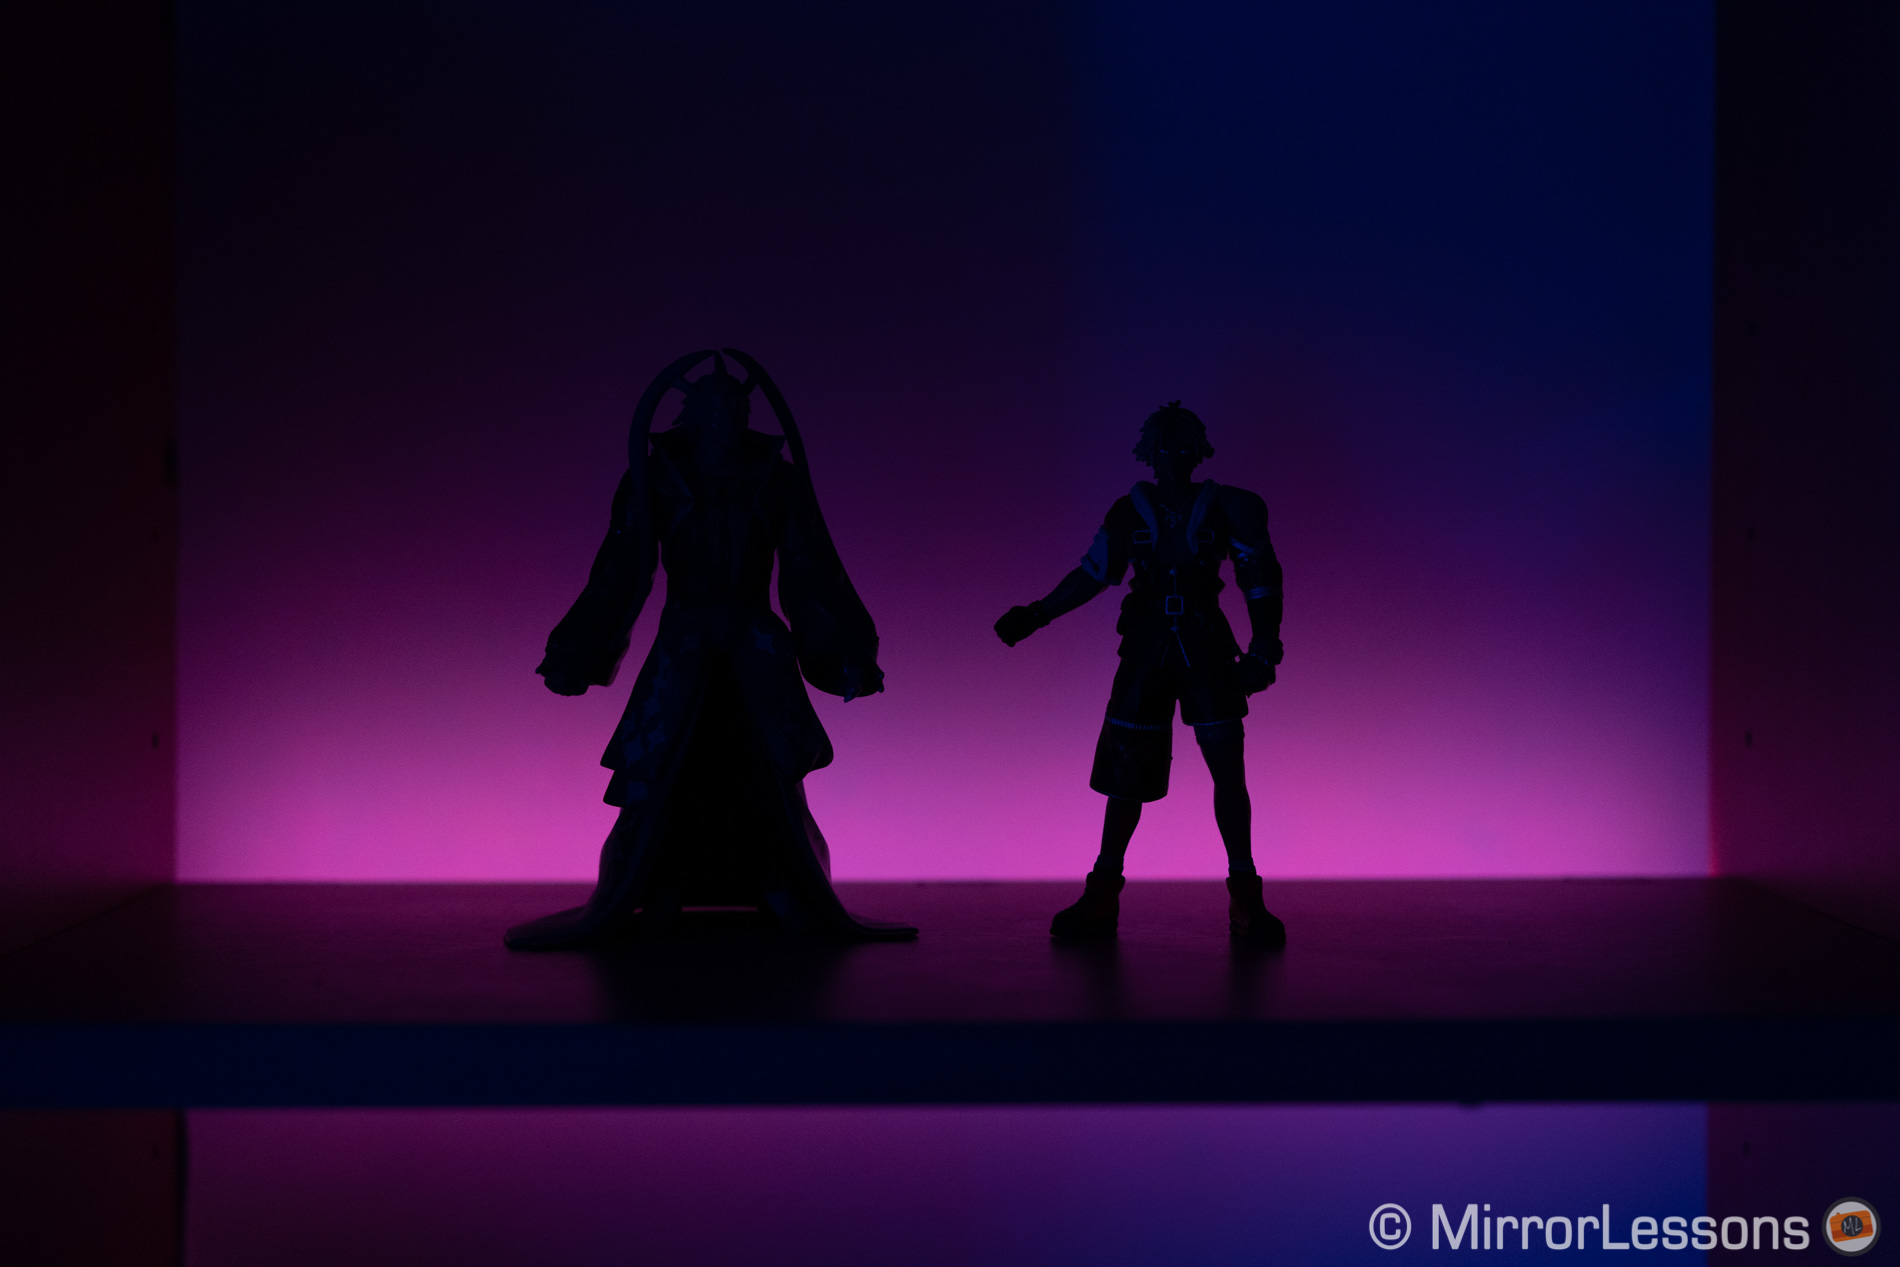
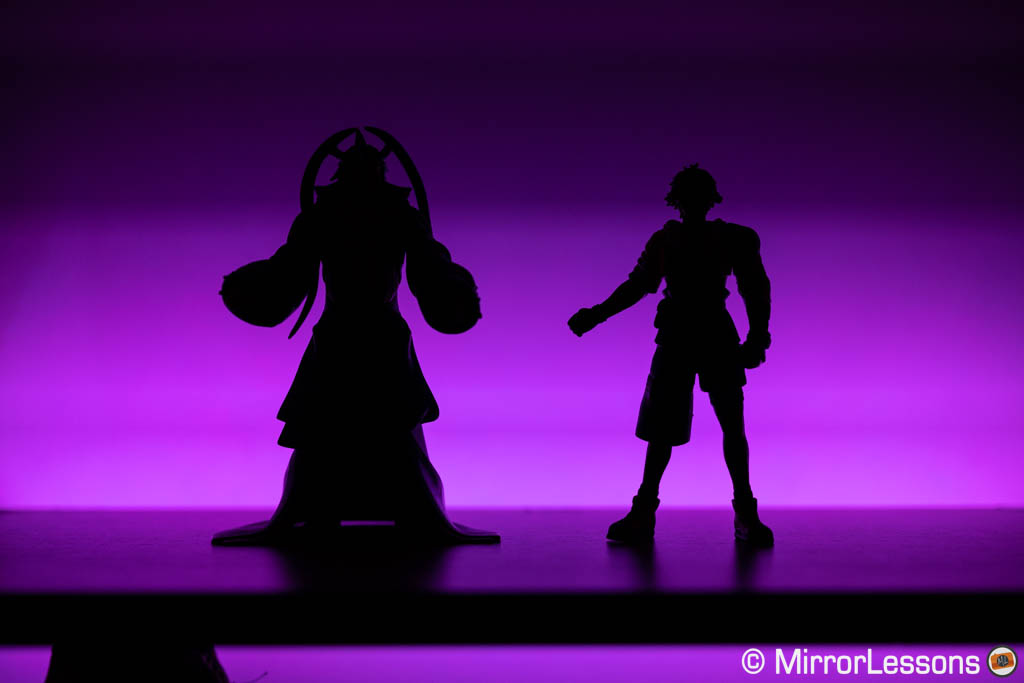
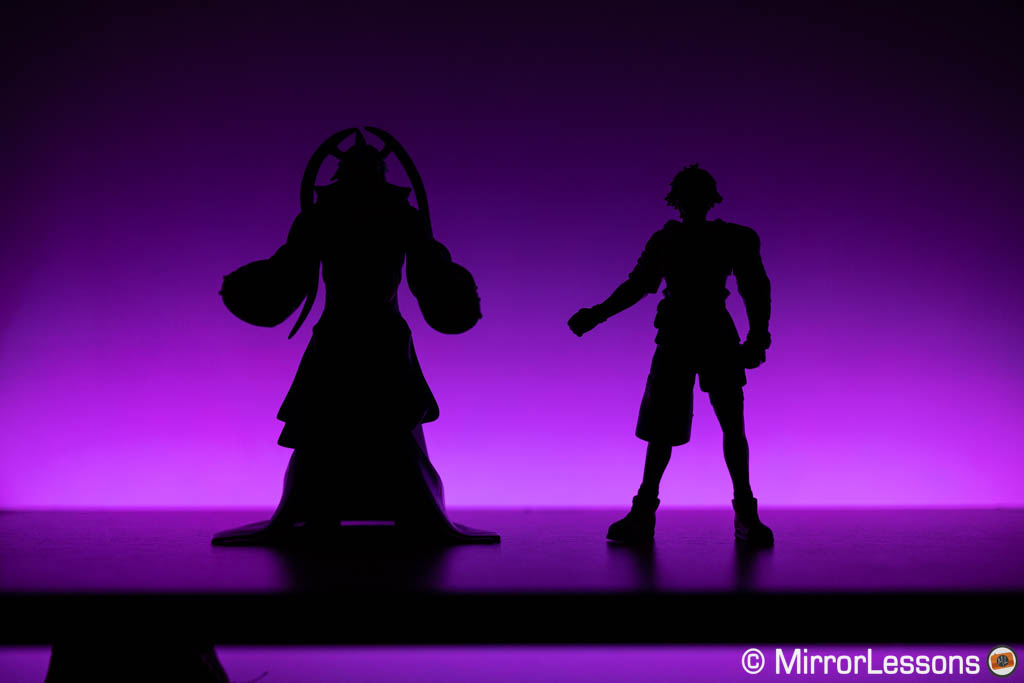
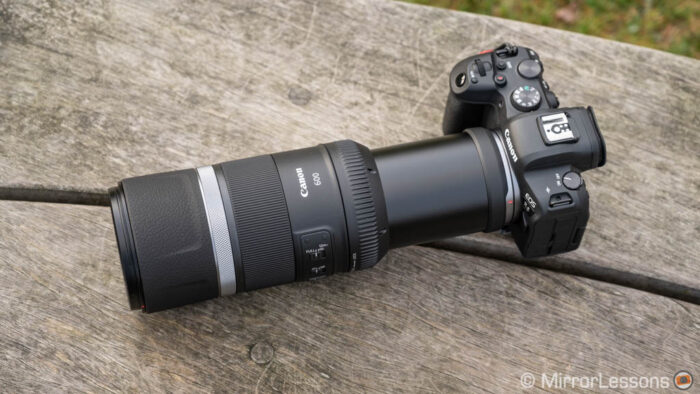
RF100-500mm F4.5-7.1 L IS USM at 500 mm
Single AF and Low Light Test
I rarely use S-AF, but when I tested this particular mode side by side, the R6 II felt a bit quicker overall. (I used the RF 24-105mm F4 and FE 24-105mm F4, I’m sure there will be small variations depending on the lens used).
The Canon has a better rating in low light, with an advantage of 1 stop at comparable apertures:
- R6 II: -6.5EV (measured at f/1.2, which equals to -5EV at f/2)
- A7 IV: -4EV (f/2 aperture)
Also note that both cameras can work with phase detection down to f/22 during continuous shooting, so using teleconverters with zoom lenses will maintain optimal AF performance.
In the test below, the Canon was able to deliver a much better keeper rate than the Sony. The A7 IV struggled to adjust focus as the subject was walking forward, resulting in fewer photos taken as well.
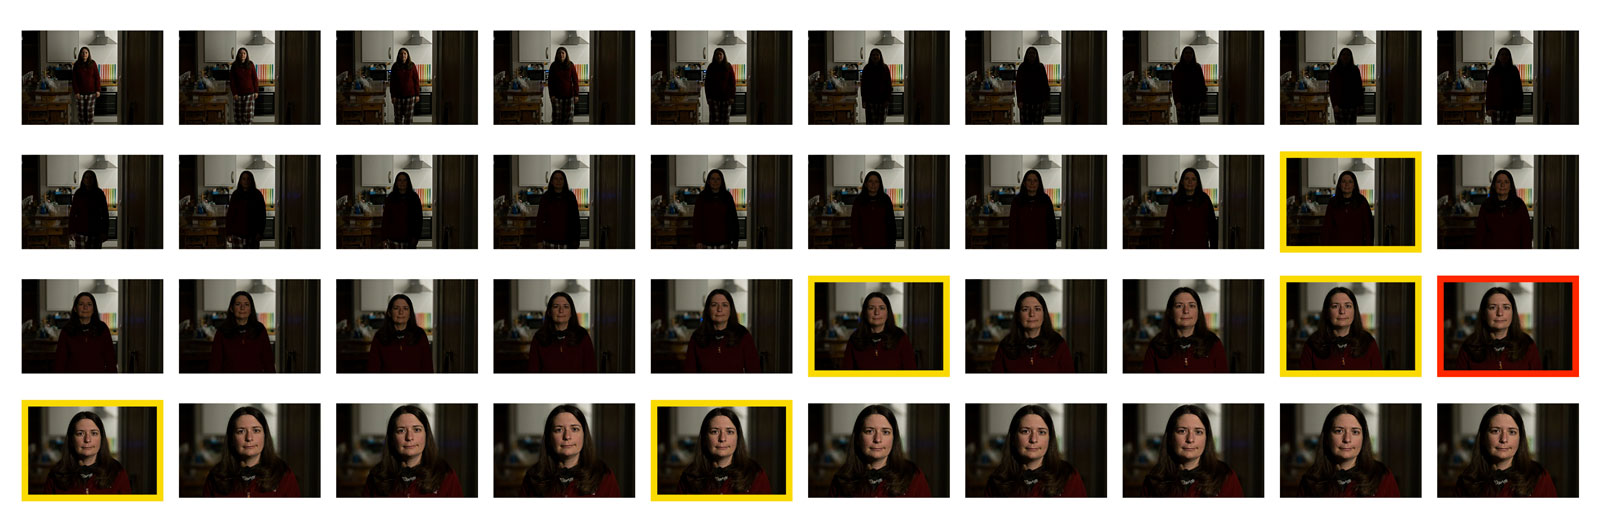
40 photos: 1 out of focus, 5 slightly soft = 85%
30 photos: 2 out of focus, 11 slightly soft = 57%
In the same test with 4K video, the A7 IV is closer to the R6 II in performance, and struggles less to follow the person from start to finish. In fact, it is the Canon that was slightly slower near the end, when the subject stops.
Note: you can watch the video tests in my YouTube video, available at the bottom of this article.
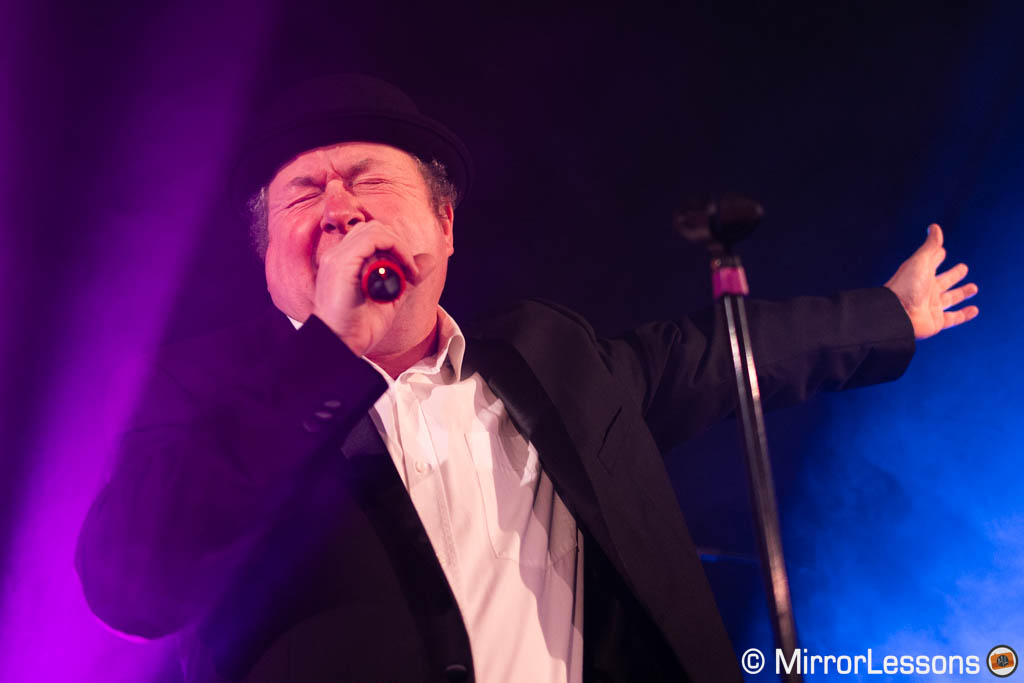
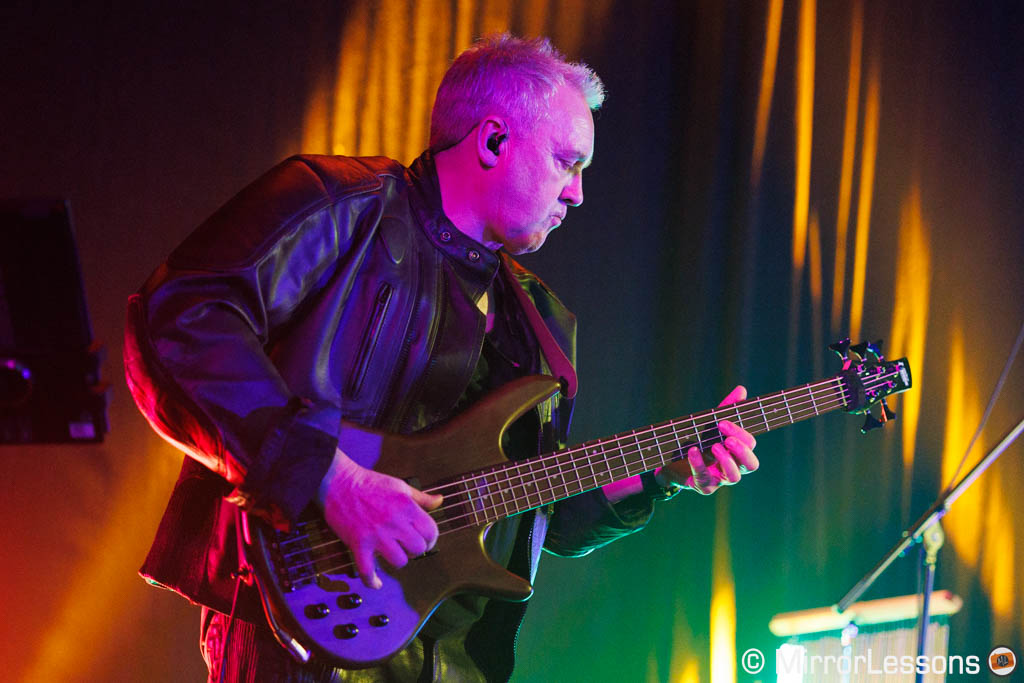
I had the chance to use these two cameras at a number of events, particularly concerts and comedy shows, so here is some extra feedback along with a few photos.
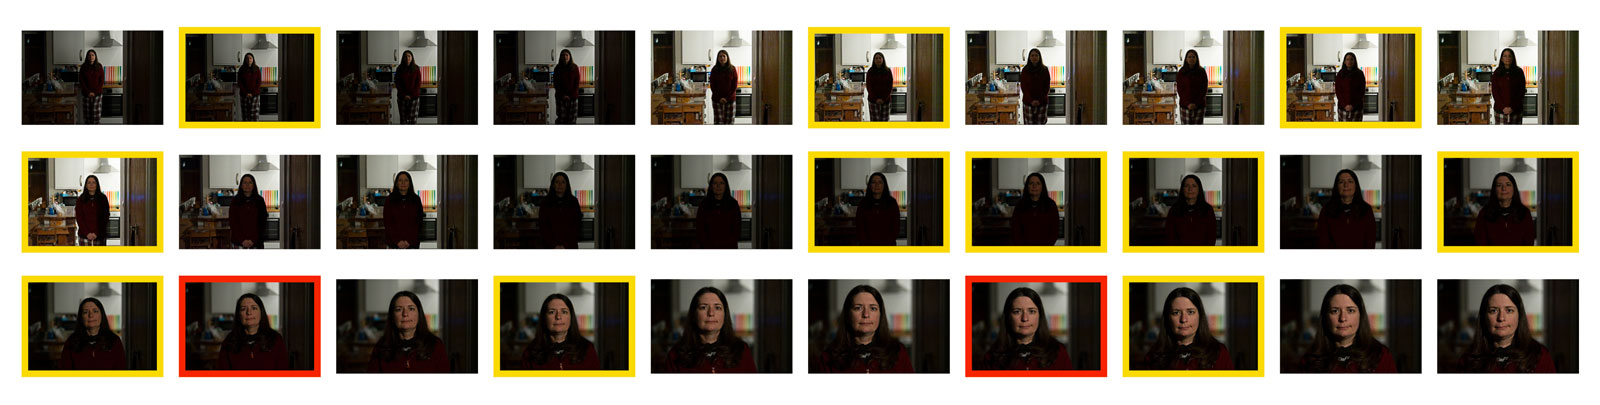
Although the A7 IV proved inferior in my low light test (which, to be fair, is a bit extreme), the camera didn’t disappoint with performers on stage, as long as the scene was decently lit. Eye AF proved to be extremely reliable.
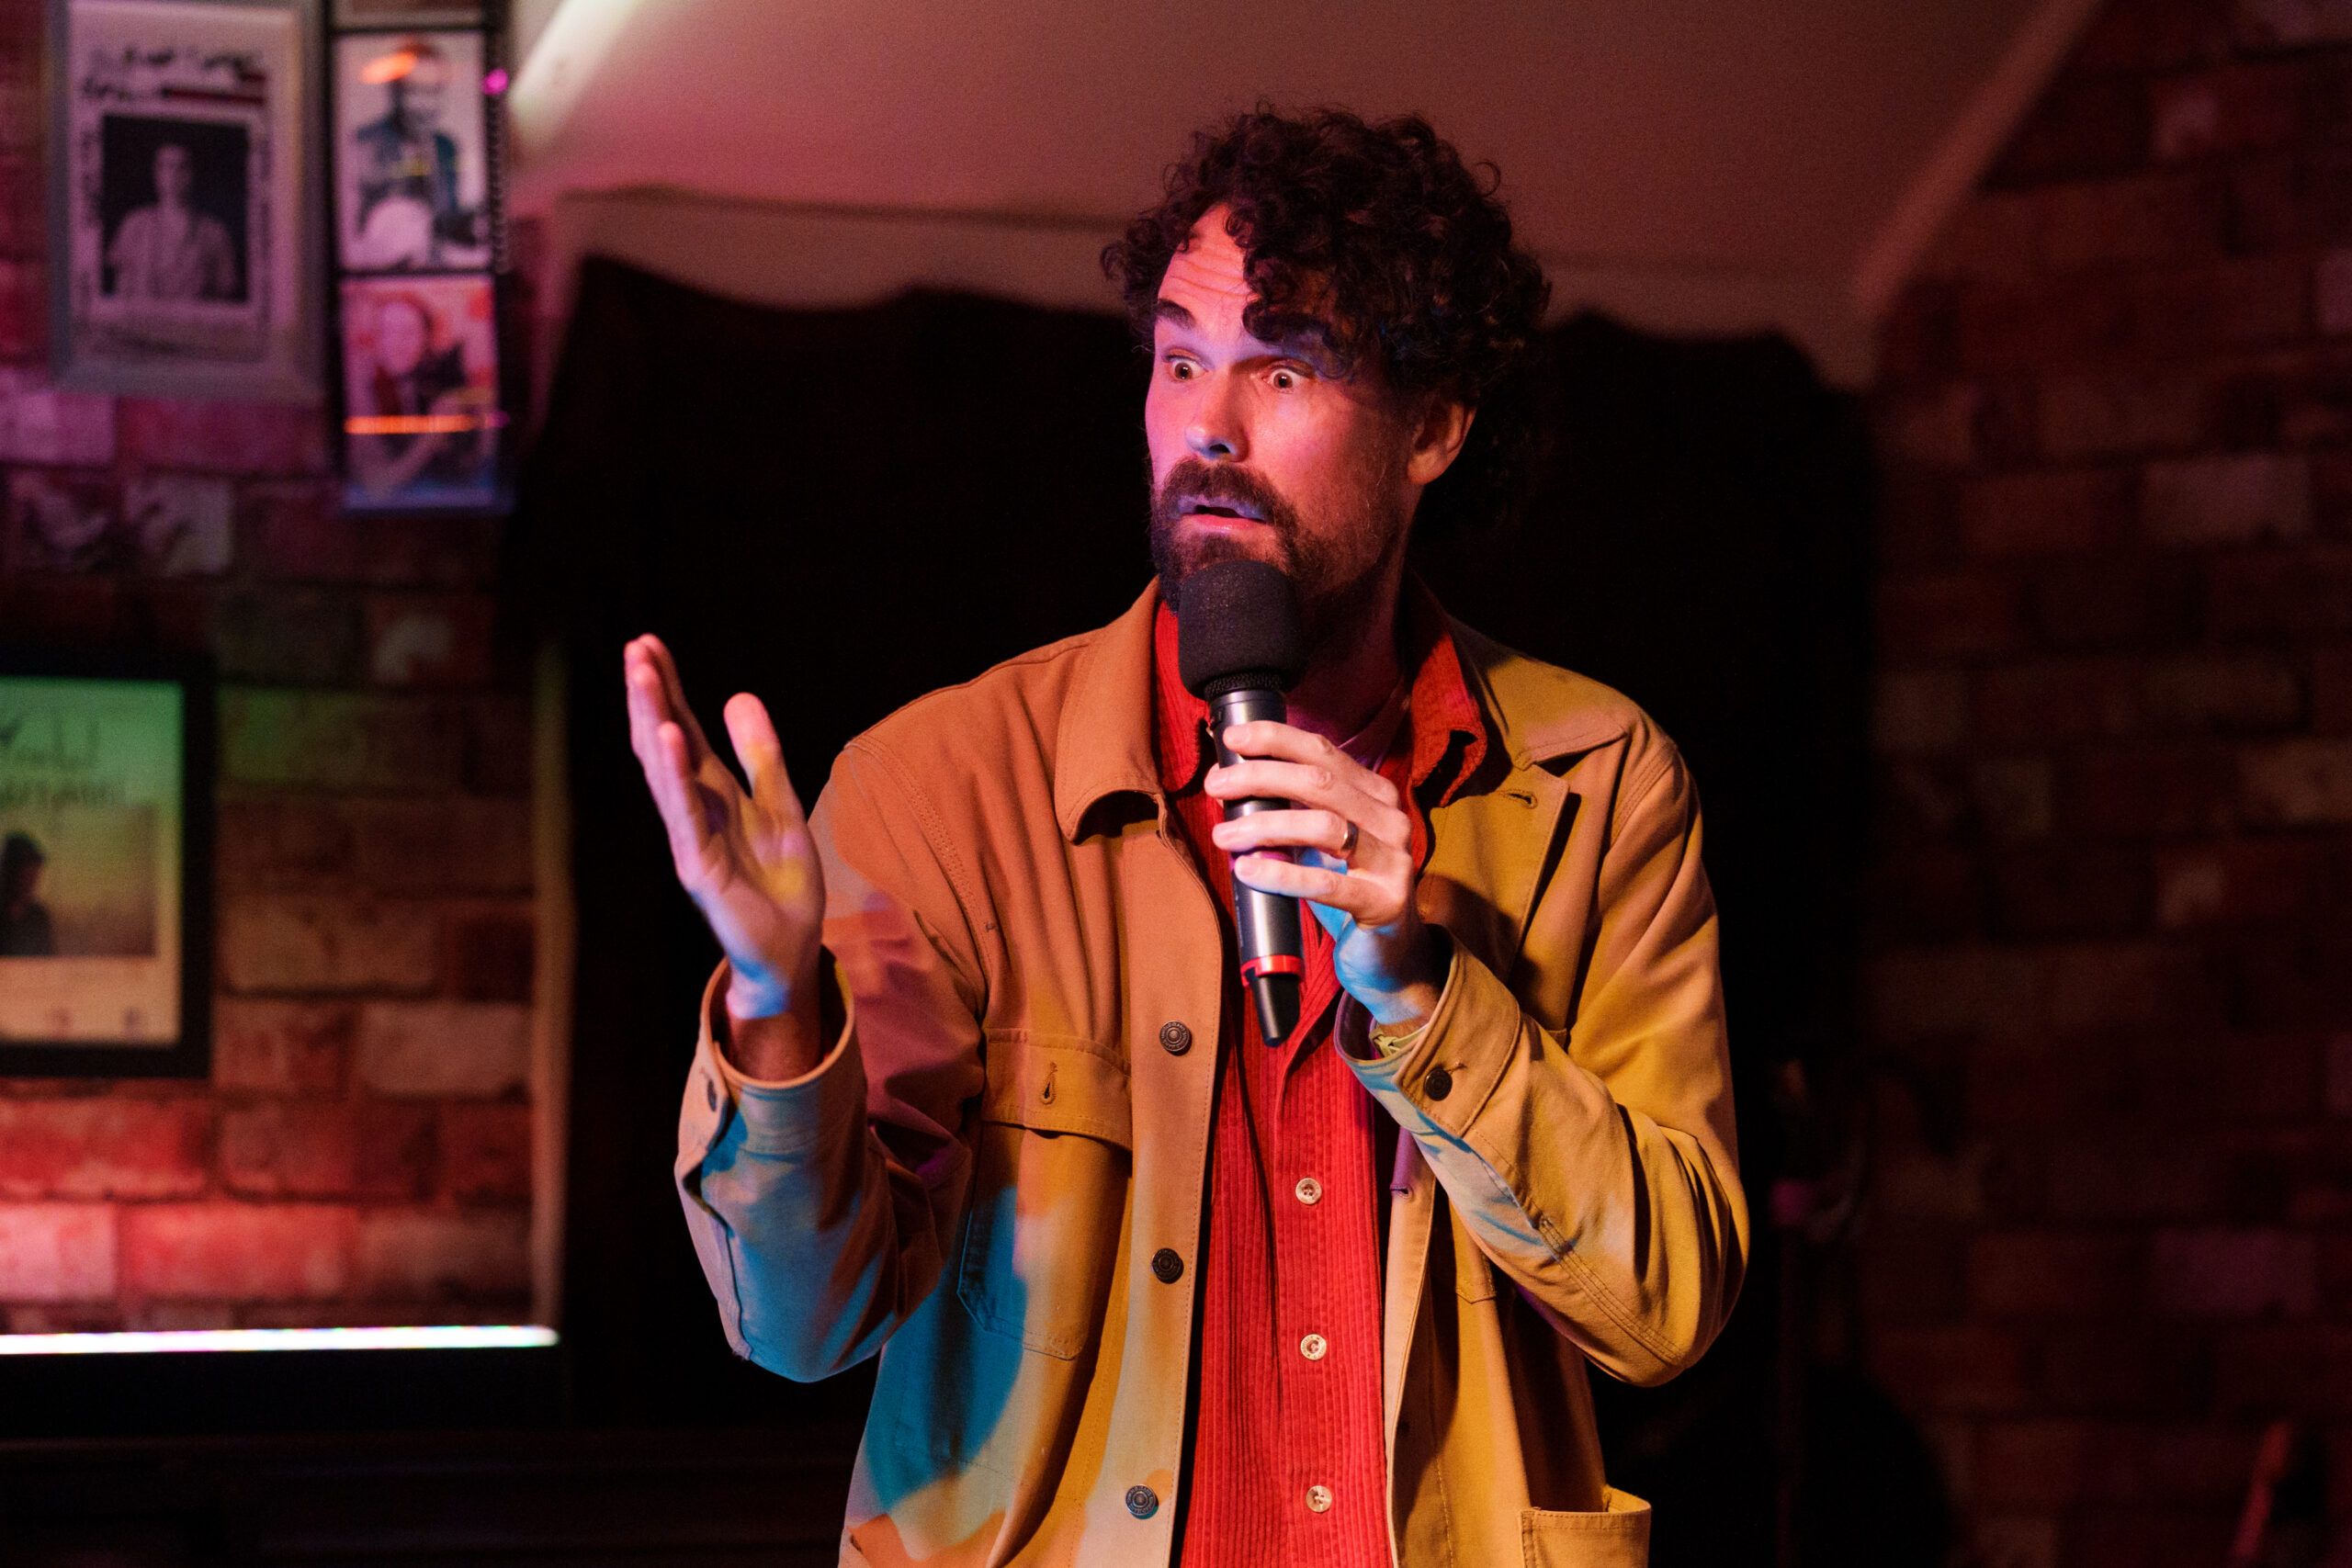
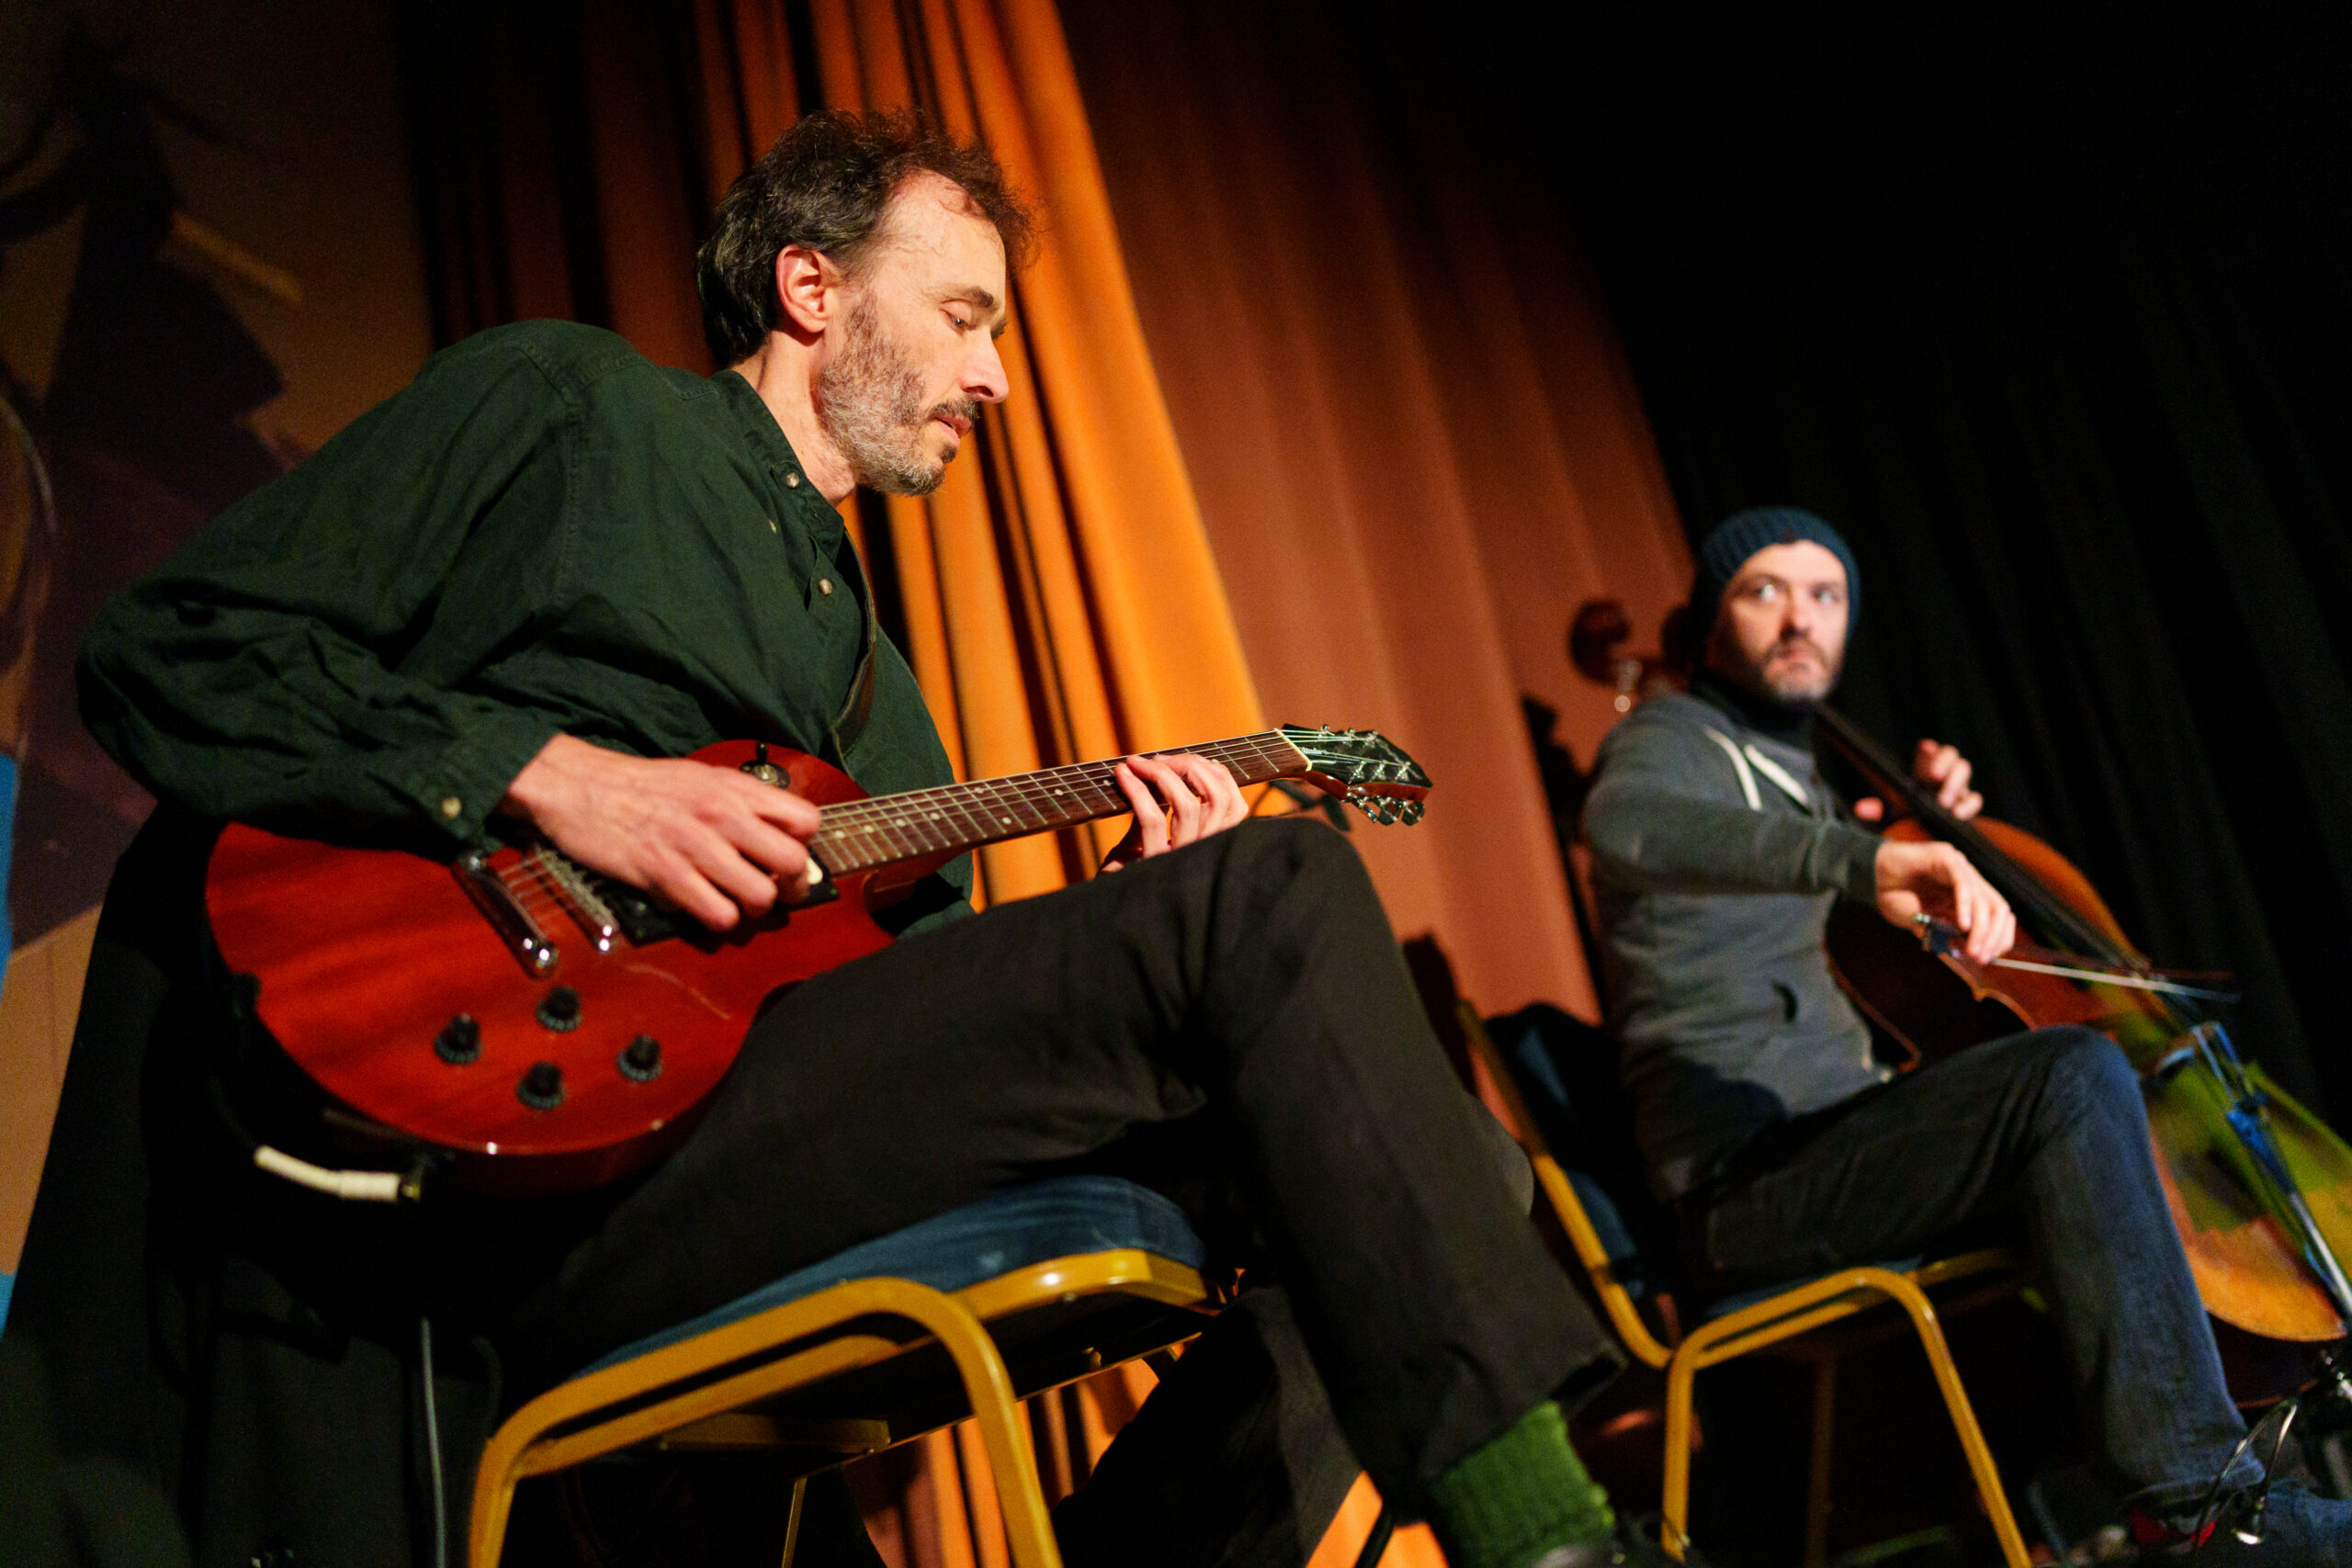
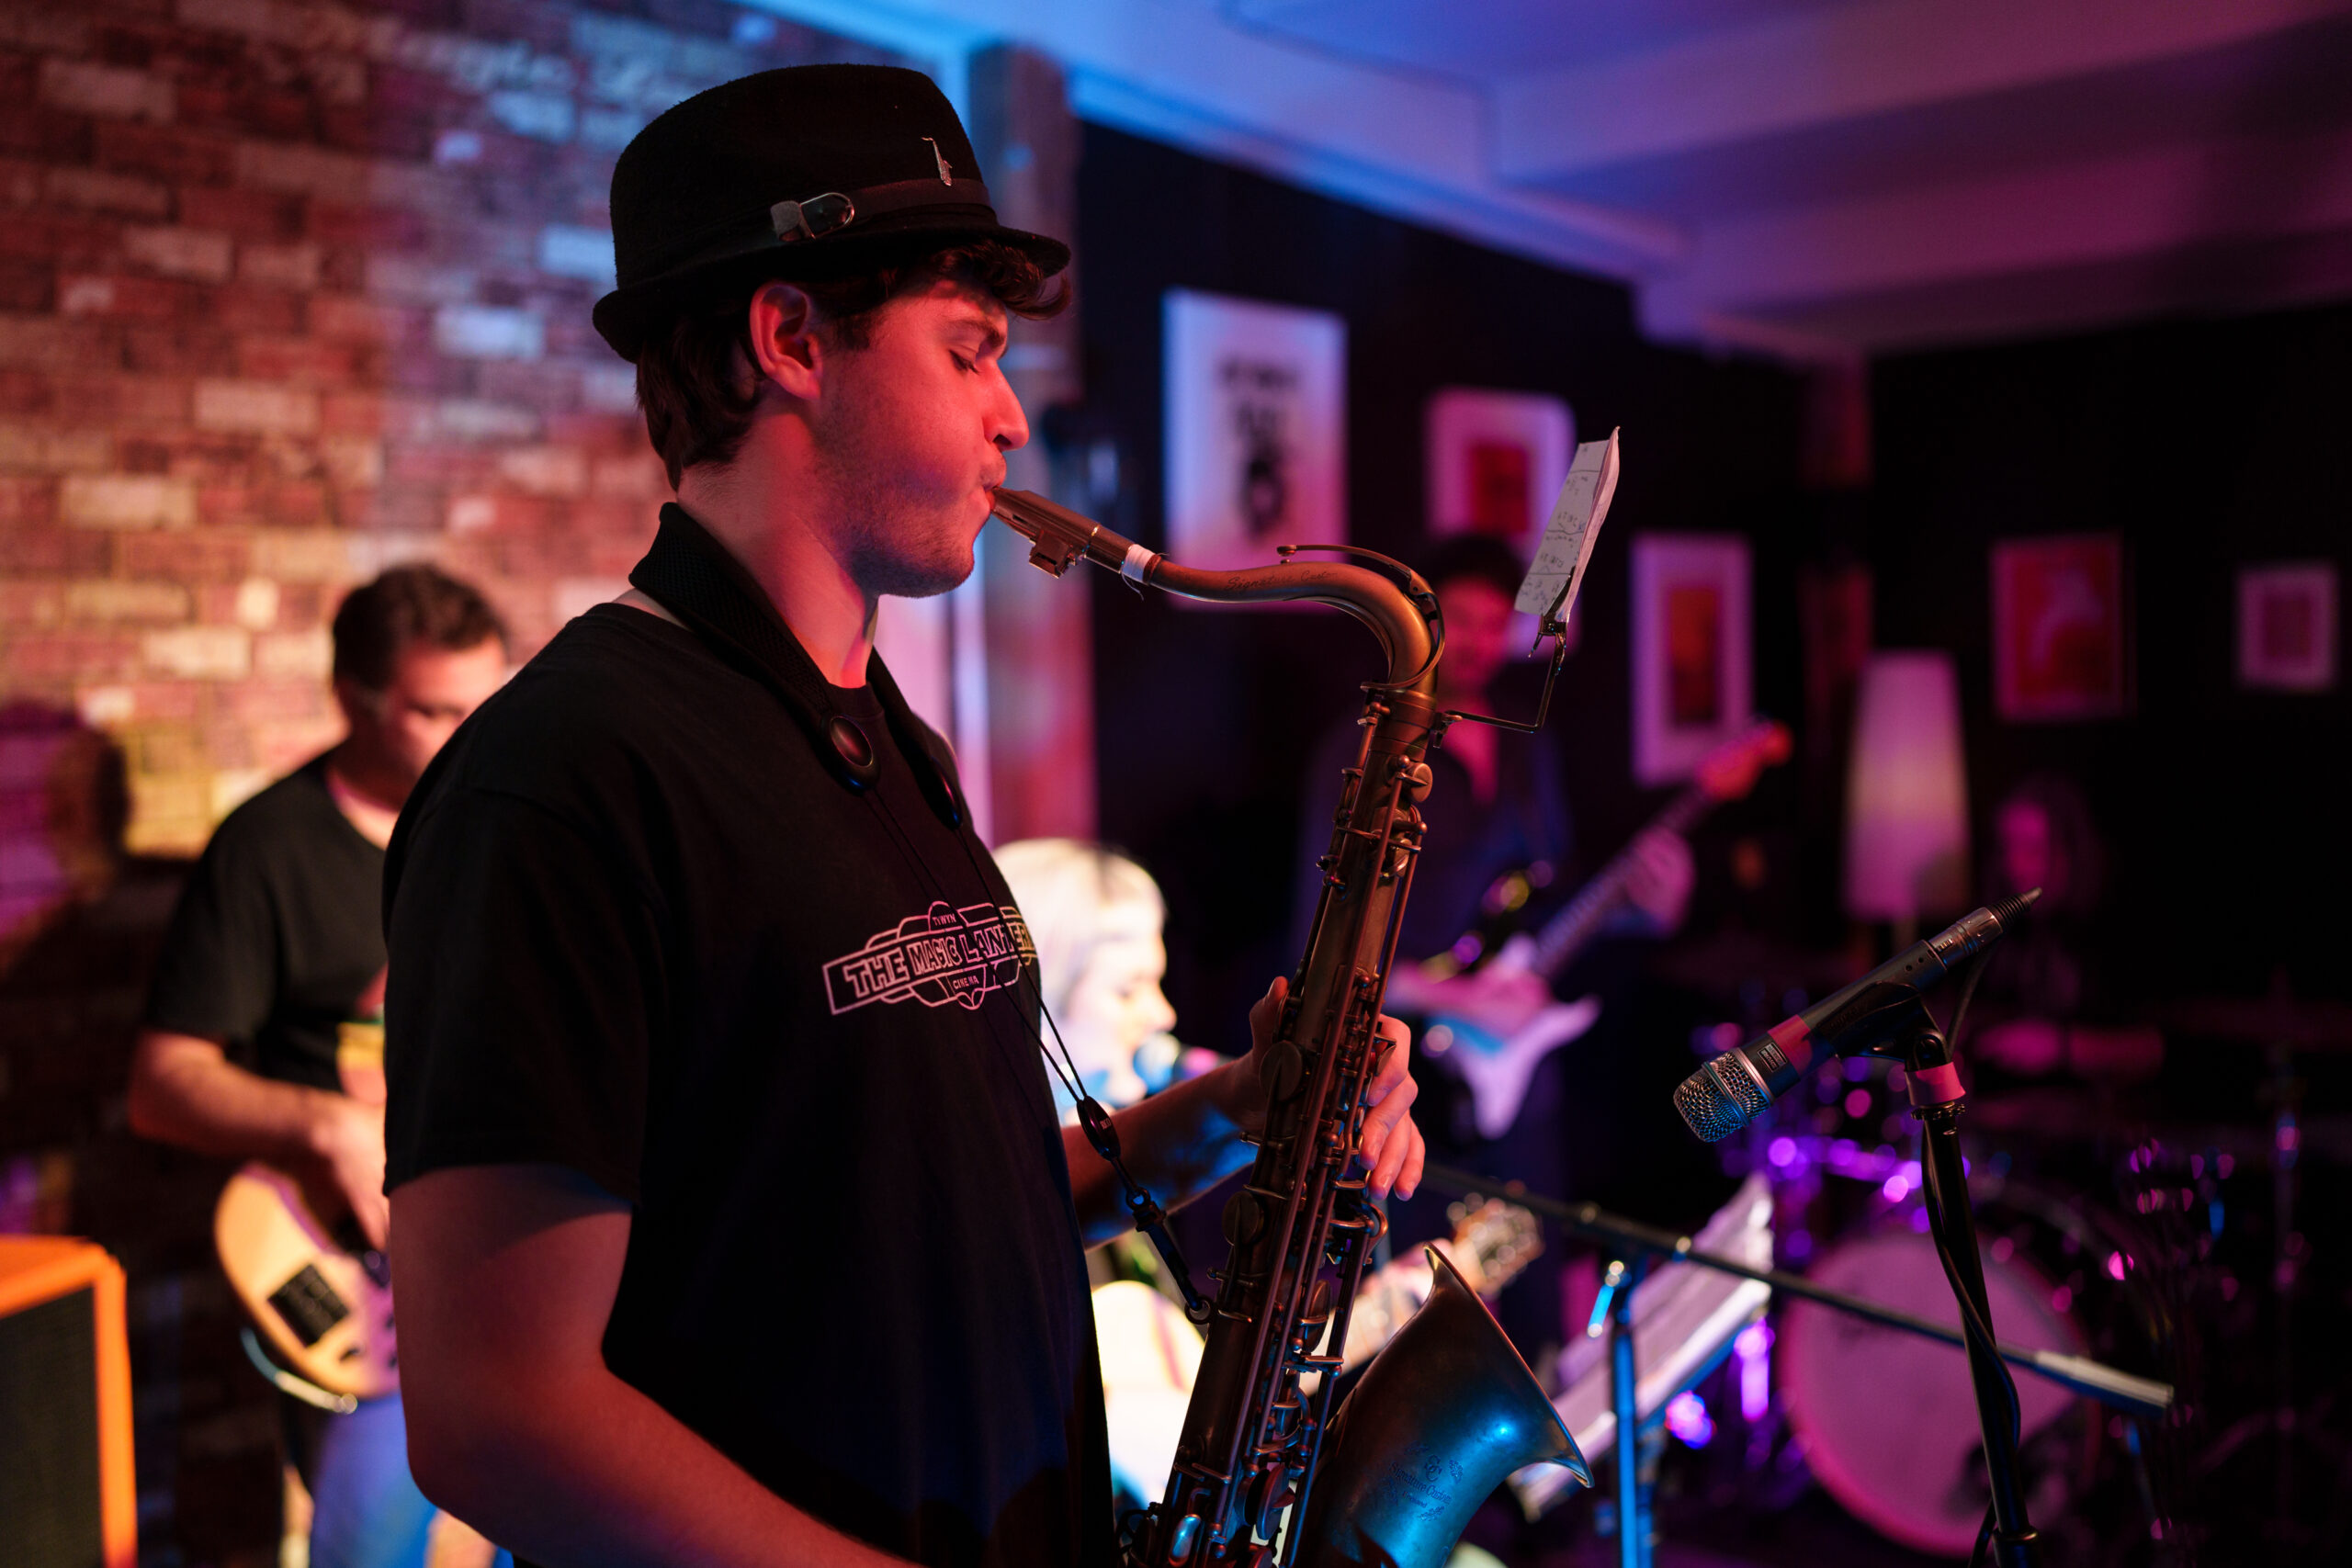
I still think the R6 II is superior, mainly because it can handle more critical light conditions better, and I also find it a bit more precise when the artist is facing sideways rather than being in front of the camera. But all in all, you can get great results with both models in this kind of situation.
RF35mm F1.8 MACRO IS STM

RF85mm F2 MACRO IS STM
Eye AF Test (for People)
For the same test, performed in daylight, the R6 mark II wins once again, with a very similar keeper rate to the low light test. The A7 IV did better with 79%, a result that agrees with previous reviews. The Sony struggled more when the subject was close to the camera, resulting in more out of focus images.
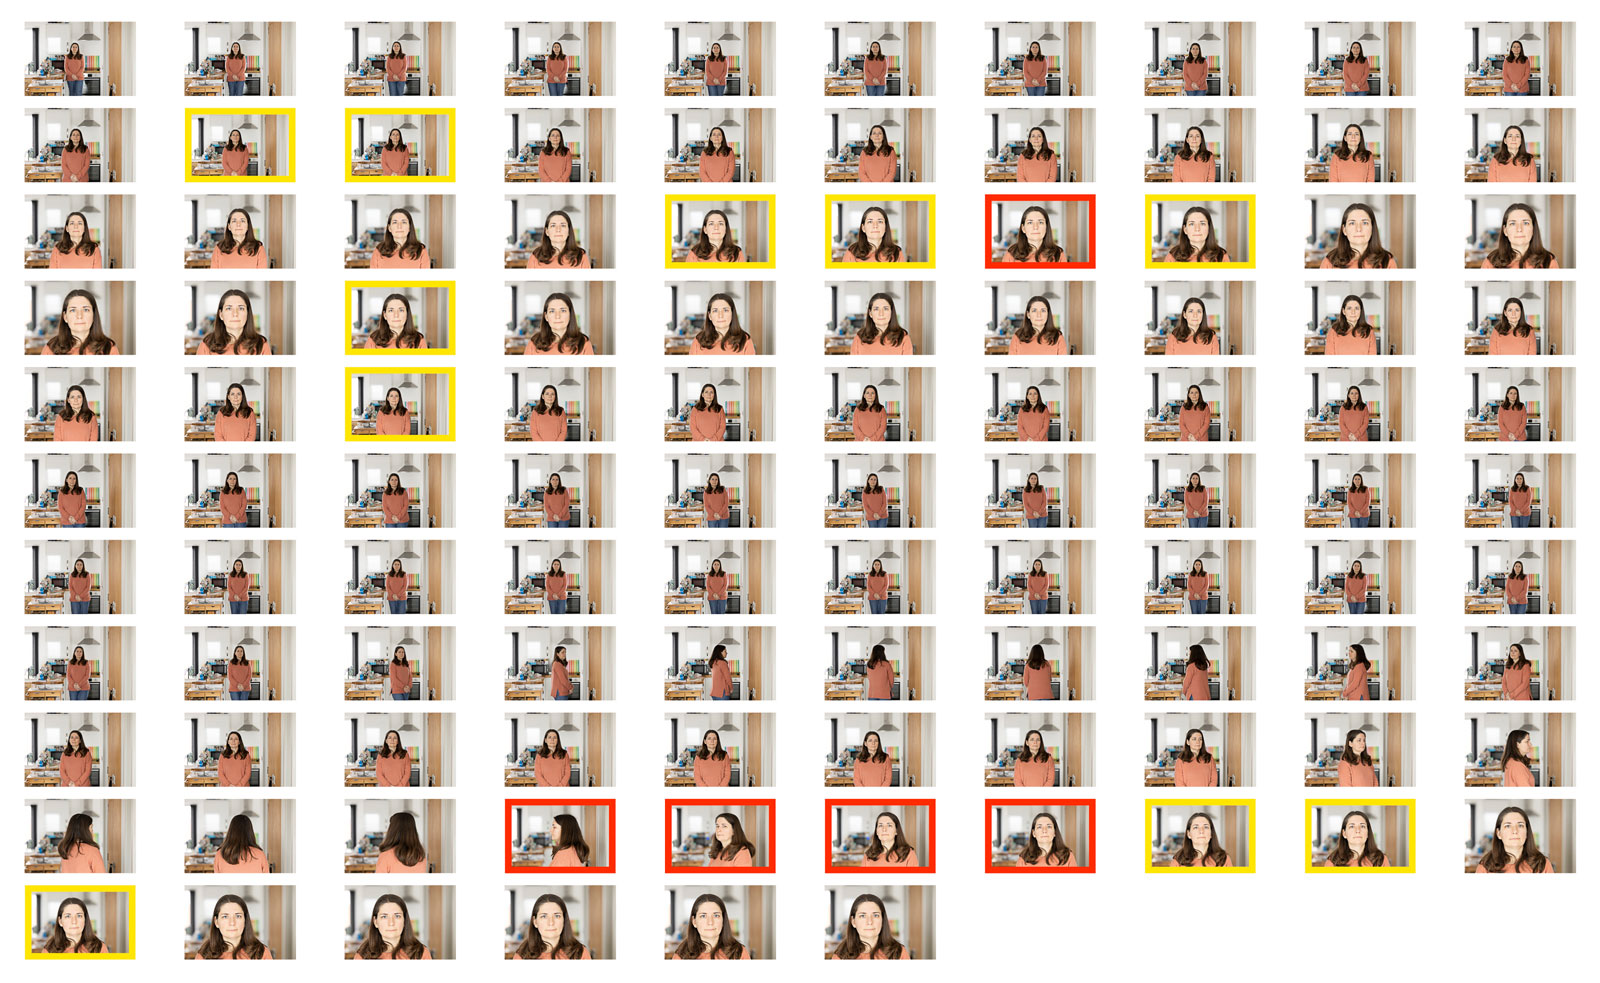
106 photos: 5 out of focus, 10 slightly – 86%
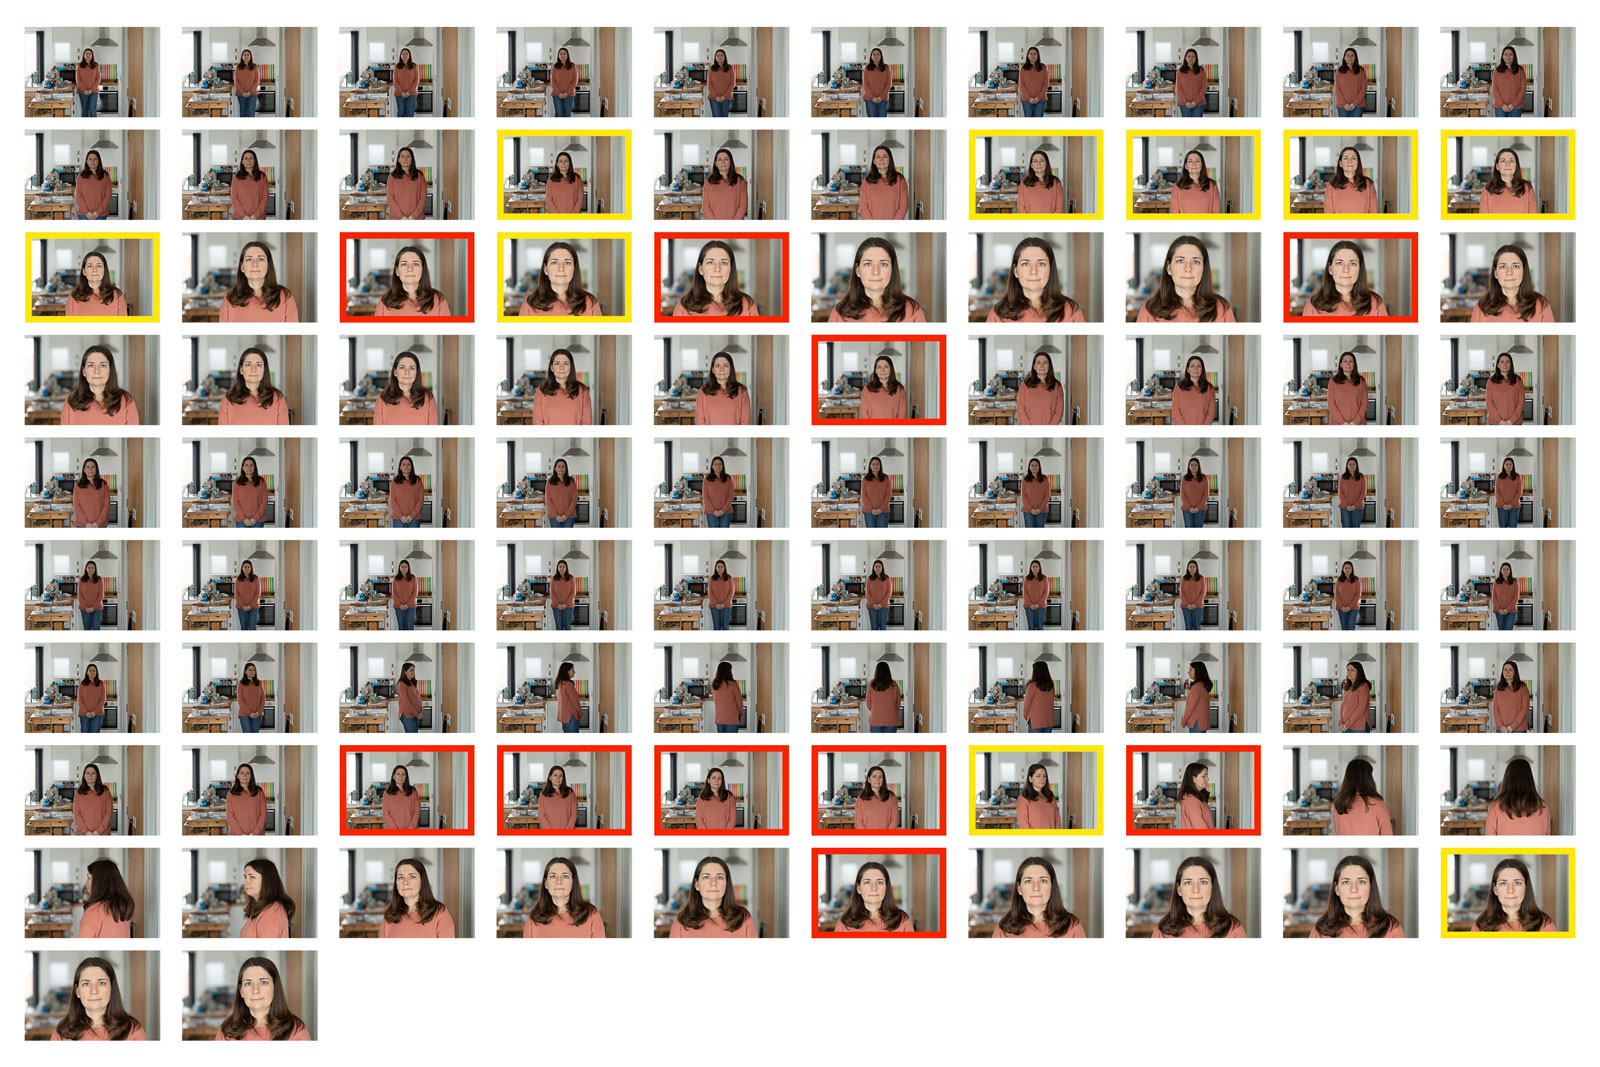
92 photos: 10 out of focus, 9 slightly soft – 79%
In video mode, the performance is more even once again, and it is the R6 model that was a bit slower in keeping track of the subject when she was turning on herself.
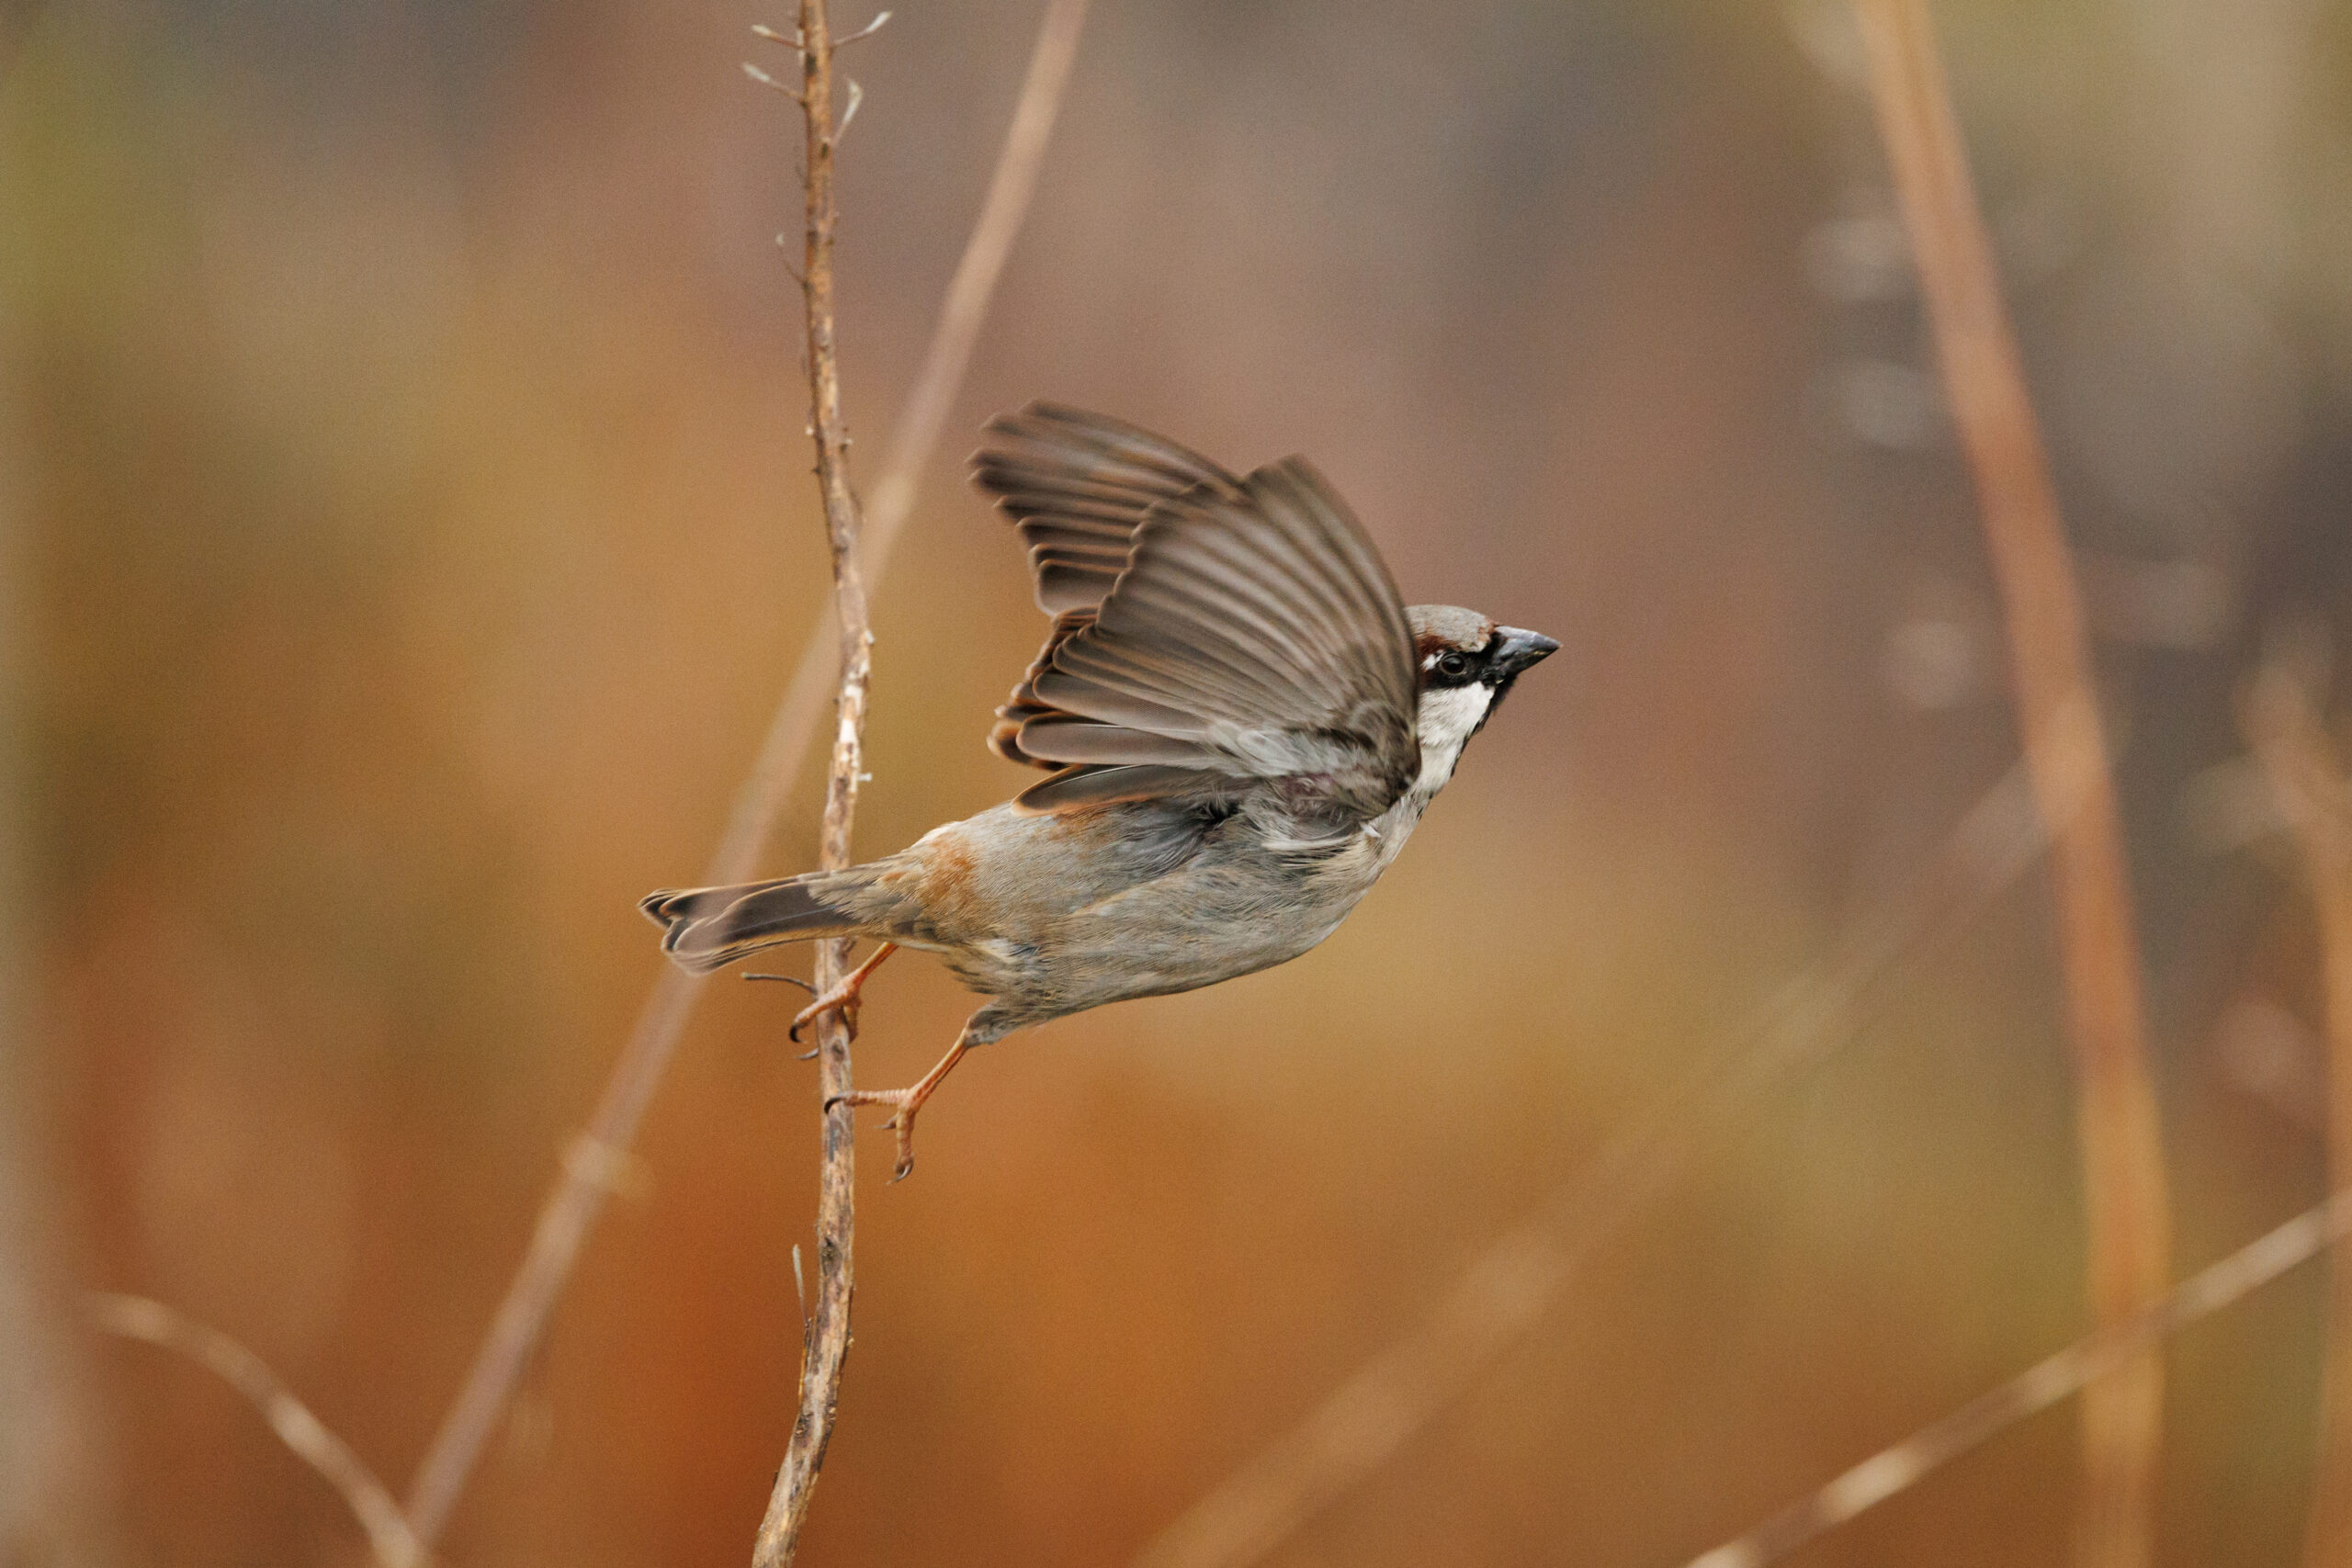
Birds in Flight Test
Here is the part many of you like, and you can read all about it in my best mirrorless cameras for birds in flight article where I’ve ranked more than 30 cameras!
Let’s begin with the keeper rate I got with the two cameras, followed by the settings that gave me the best performance, as well as the lens used.
A7 IV
94%
99%
R6 II
93%
99%
Note: Green = sharp images only / Blue = sharp + slightly soft images
Canon R6 II with RF 100-500mm:
- AF Zone: Flexible Zone 1 (medium size)
- Subject Tracking: on
- Subject to Detect: Animals
- Eye Detection: Auto
- Switching tracked subjects: 0
- Servo AF: Case Auto
- Lens drive when AF impossible: on
- Drive: 20fps / 40fps (electronic shutter)
- Stabilisation: Off (or Mode 2)

RF100-500mm F4.5-7.1 L IS USM at 500 mm
Sony A7 IV with FE 200-600mm:
- AF Area: Tracking with Expand Flexible Spot
- Subject Detection: Birds (on or off, no real difference)
- Focus Priority in AF-C
- AF Track. Sensitivity: 5 (Responsive)
- Drive: Hi+ (10fps)
- Stabilisation: Off (or Mode 2)
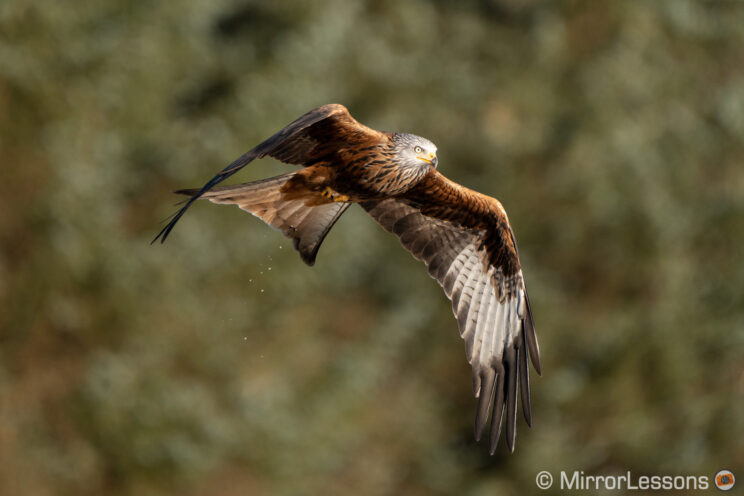
Both cameras rarely mis-focus on a busy background. They are both very reactive and very quick to correct focus inside a burst sequence.
The applause here goes to the R6 II which, in addition to delivering a better AF score, works 4 times faster than the Sony in continuous shooting mode! Chapeau Canon!
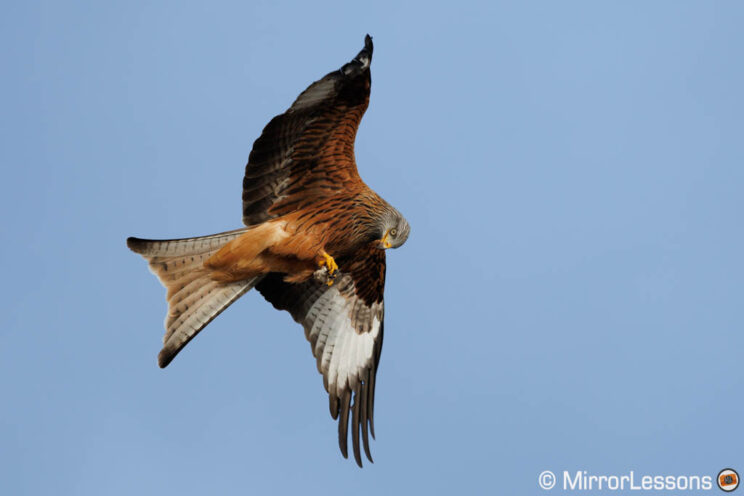
RF100-500mm F4.5-7.1 L IS USM at 500 mm
5. Shutter, Continuous shooting and Buffer
The R6 II and A7 IV can shoot up to 1/8,000s with the mechanical shutter. Switch to the electronic shutter, and the R6 II can go up to 1/16,000s.
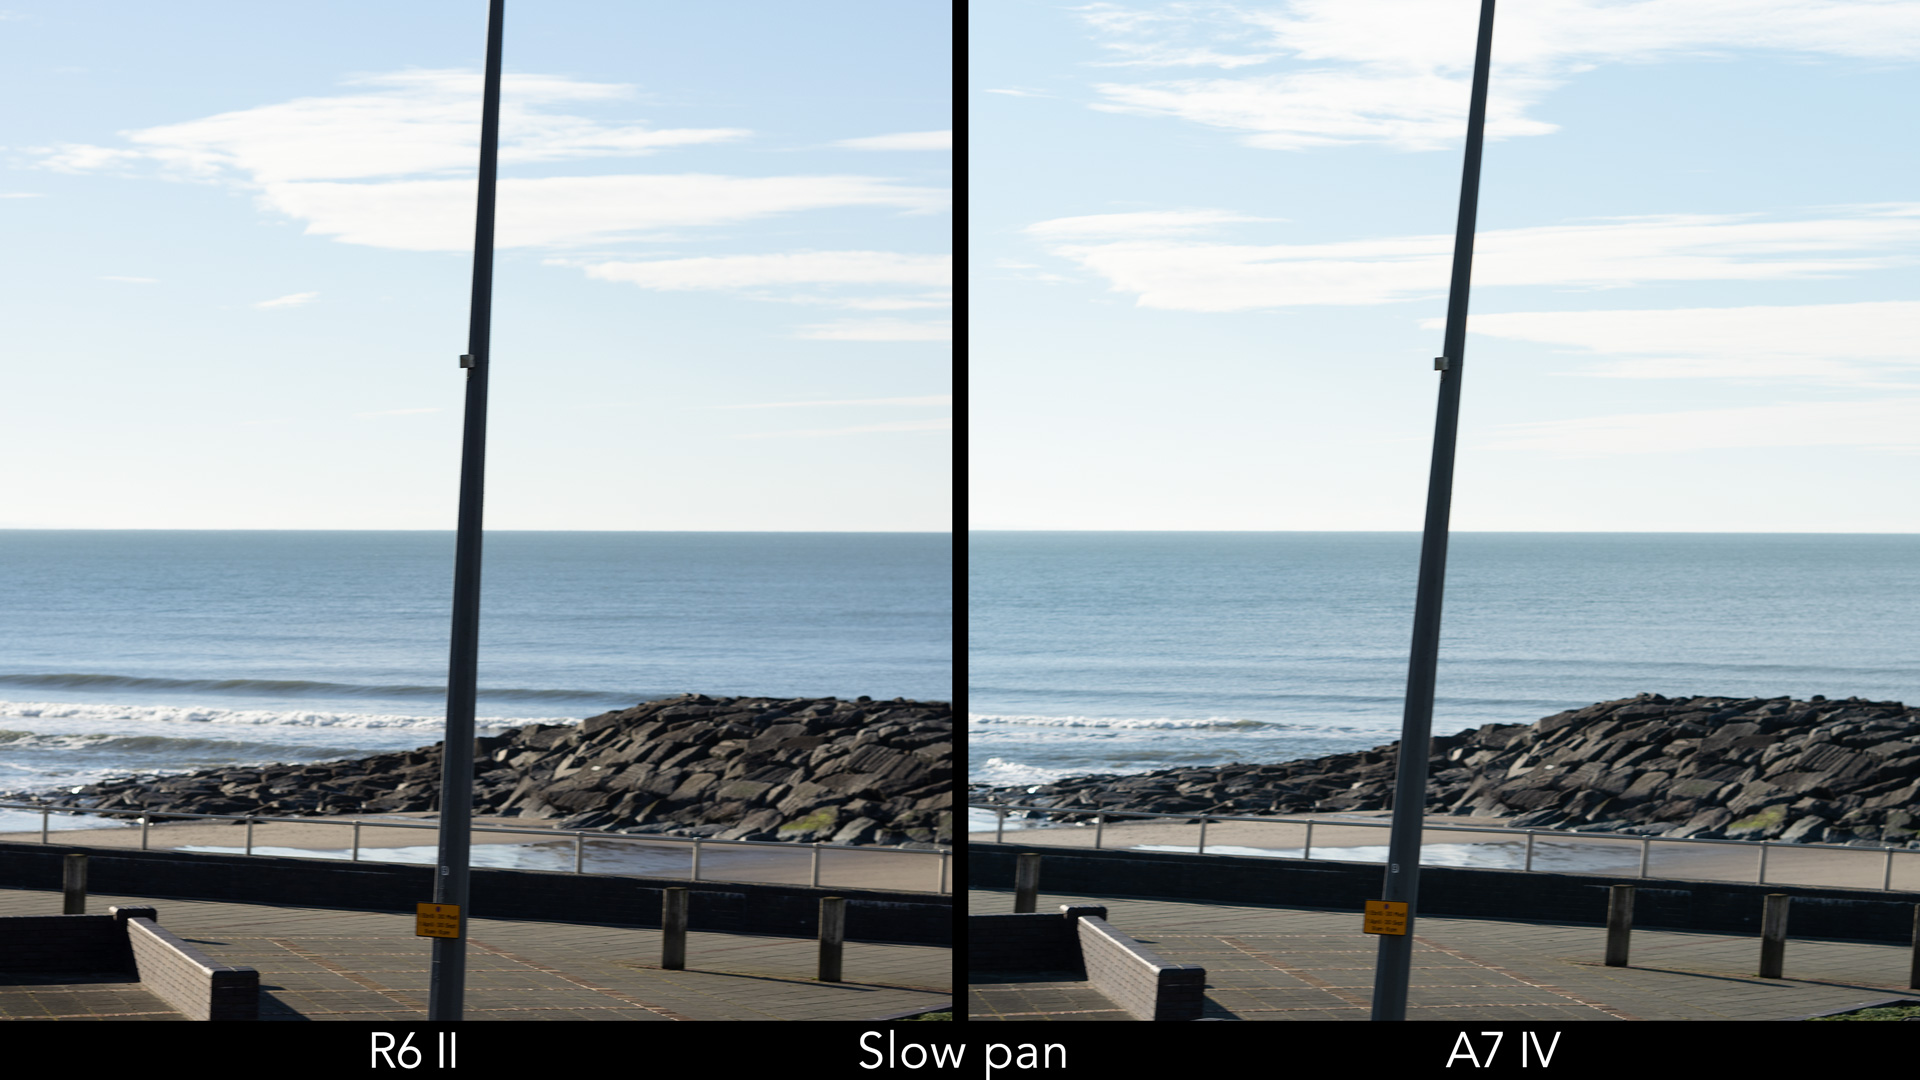
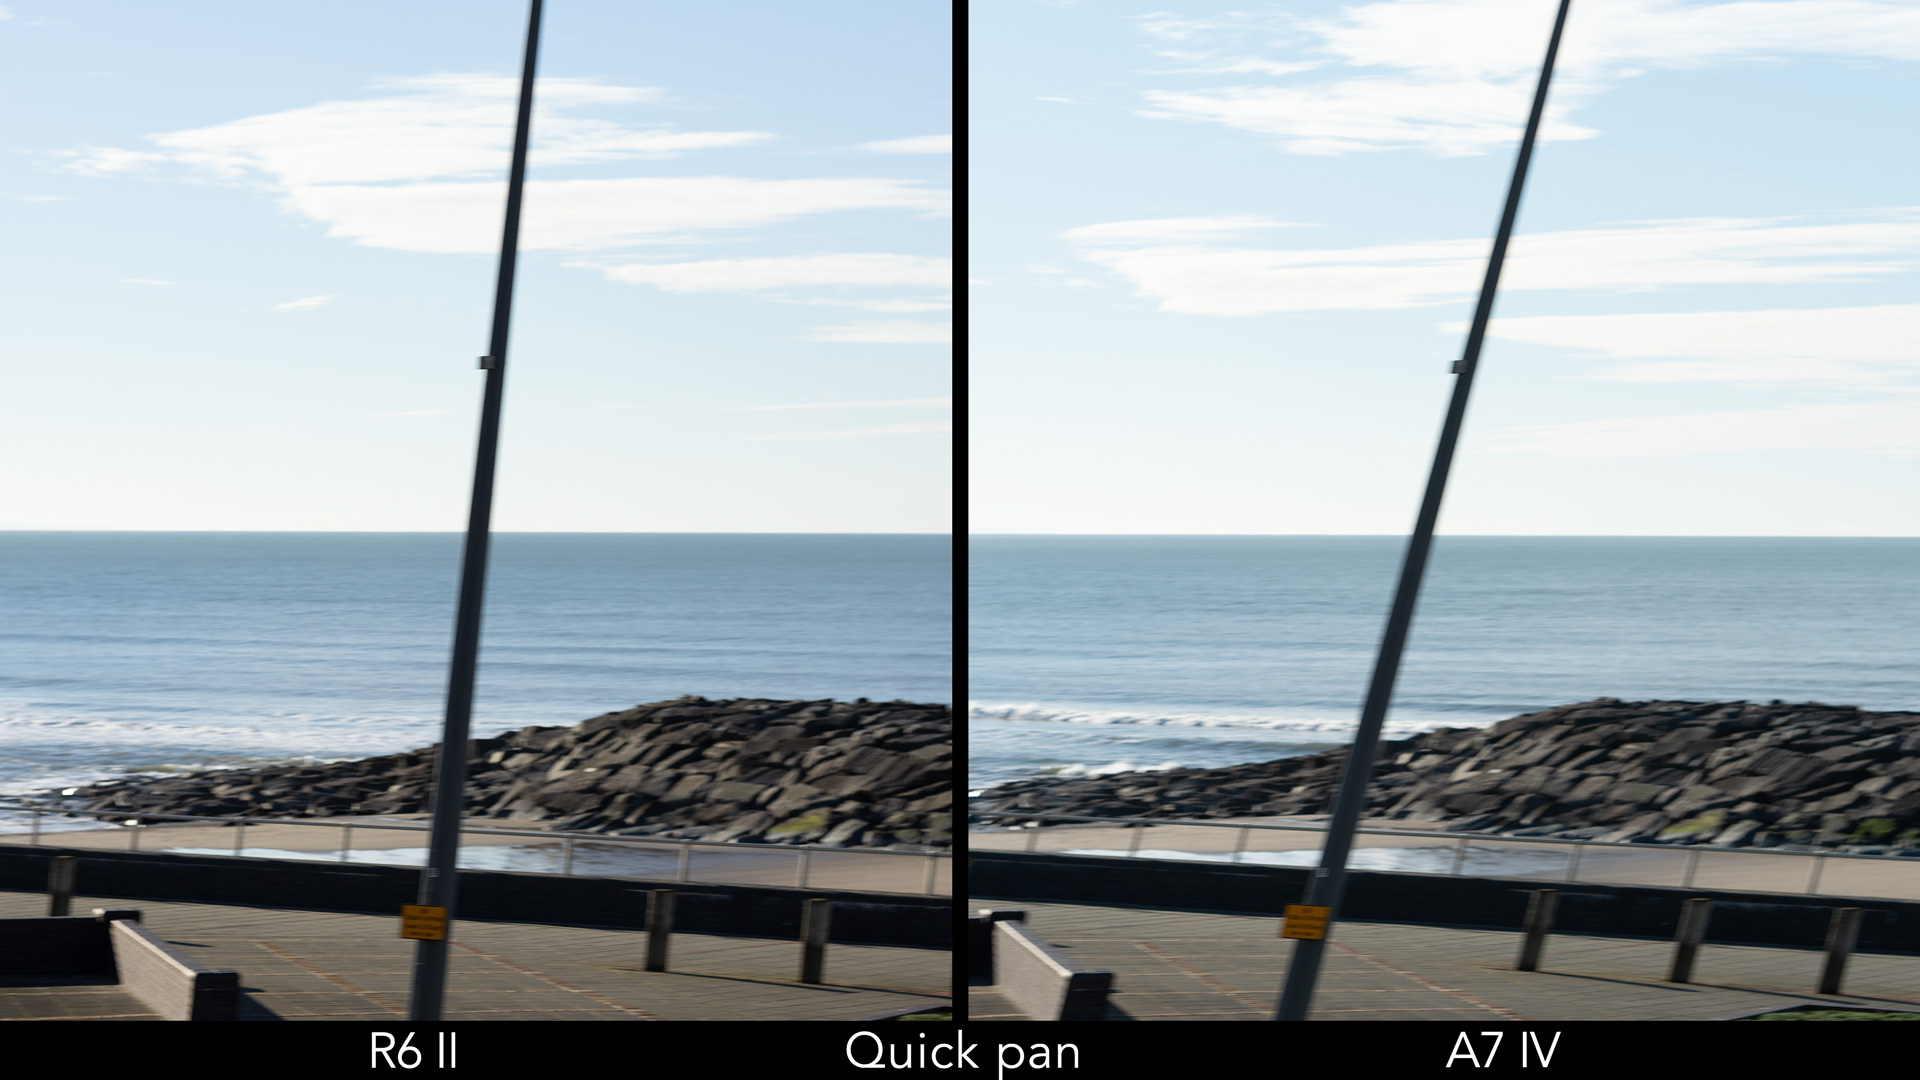
The Canon has a more discreet mechanical shutter sound in comparison to the Sony. You can hear it for yourself below.
Drive Speed
The electronic shutter allows you to take a picture without any sound coming from the mechanical curtains, but that’s where the A7 IV’s story ends.
The R6 II can do more with the e-shutter: in addition to the faster exposure speed mentioned above, it can also shoot in continuous mode up to 20 or 40fps. The latter is an impressive number. With the mechanical shutter, it goes up to 12fps.
The Sony doesn’t go faster than 10fps (when using compressed RAW, otherwise it’s 6fps), whether you use the mechanical or electronic shutter.
Note about live view: between 12fps and 40fps, the R6 II doesn’t have any blackouts but what you see is not a live view, but the images already captured a moment earlier. At 40fps, the speed is so fast that you get a smooth view of the action that almost looks like it’s live, but it’s not: there is a small delay between the action and what you see in the viewfinder. The A7 IV uses the same method at 10fps. Below 12/10fps, both cameras offer live view with blackouts.
The advantage for the Canon doesn’t stop here: it has a faster sensor readout, which translates into less distortion when moving quickly with the camera (rolling shutter effect).
Anti-flicker
Both cameras have an anti-flicker function, valid for the mechanical shutter, which attempts to match the 100Hz or 120Hz frequencies to reduce uneven exposures or colour shifts when taking pictures under flickering light sources such as fluorescent lights.
If you use the electronic shutter, one problem you can encounter is banding, where lines with different exposures (darker, brighter) appear in your images. The slower the sensor readout is, the worse it can get.
Thankfully, both cameras offer a high-frequency anti-flicker mode that can be used for that purpose. On the Sony, it’s called variable shutter, but they both do the same thing: they adjust the shutter speed to a higher degree of precision than 1/3 steps, to reduce or eliminate banding completely.

A nice plus on the R6 II is that it has an automatic option, where it attempts to detect the flickering and adjust the shutter speed without the need to manually find the right value.
Remember that flickering can appear in various forms: it can be very visible or very discreet, and you may not see it until you magnify your photos. My advice is to take a few test shots in the location, if you can.
The HF anti-flicker and Variable Shutter settings are also available for video.
Buffer
The performance of the two cameras is influenced by many variables: resolution, drive speed and type of card used.
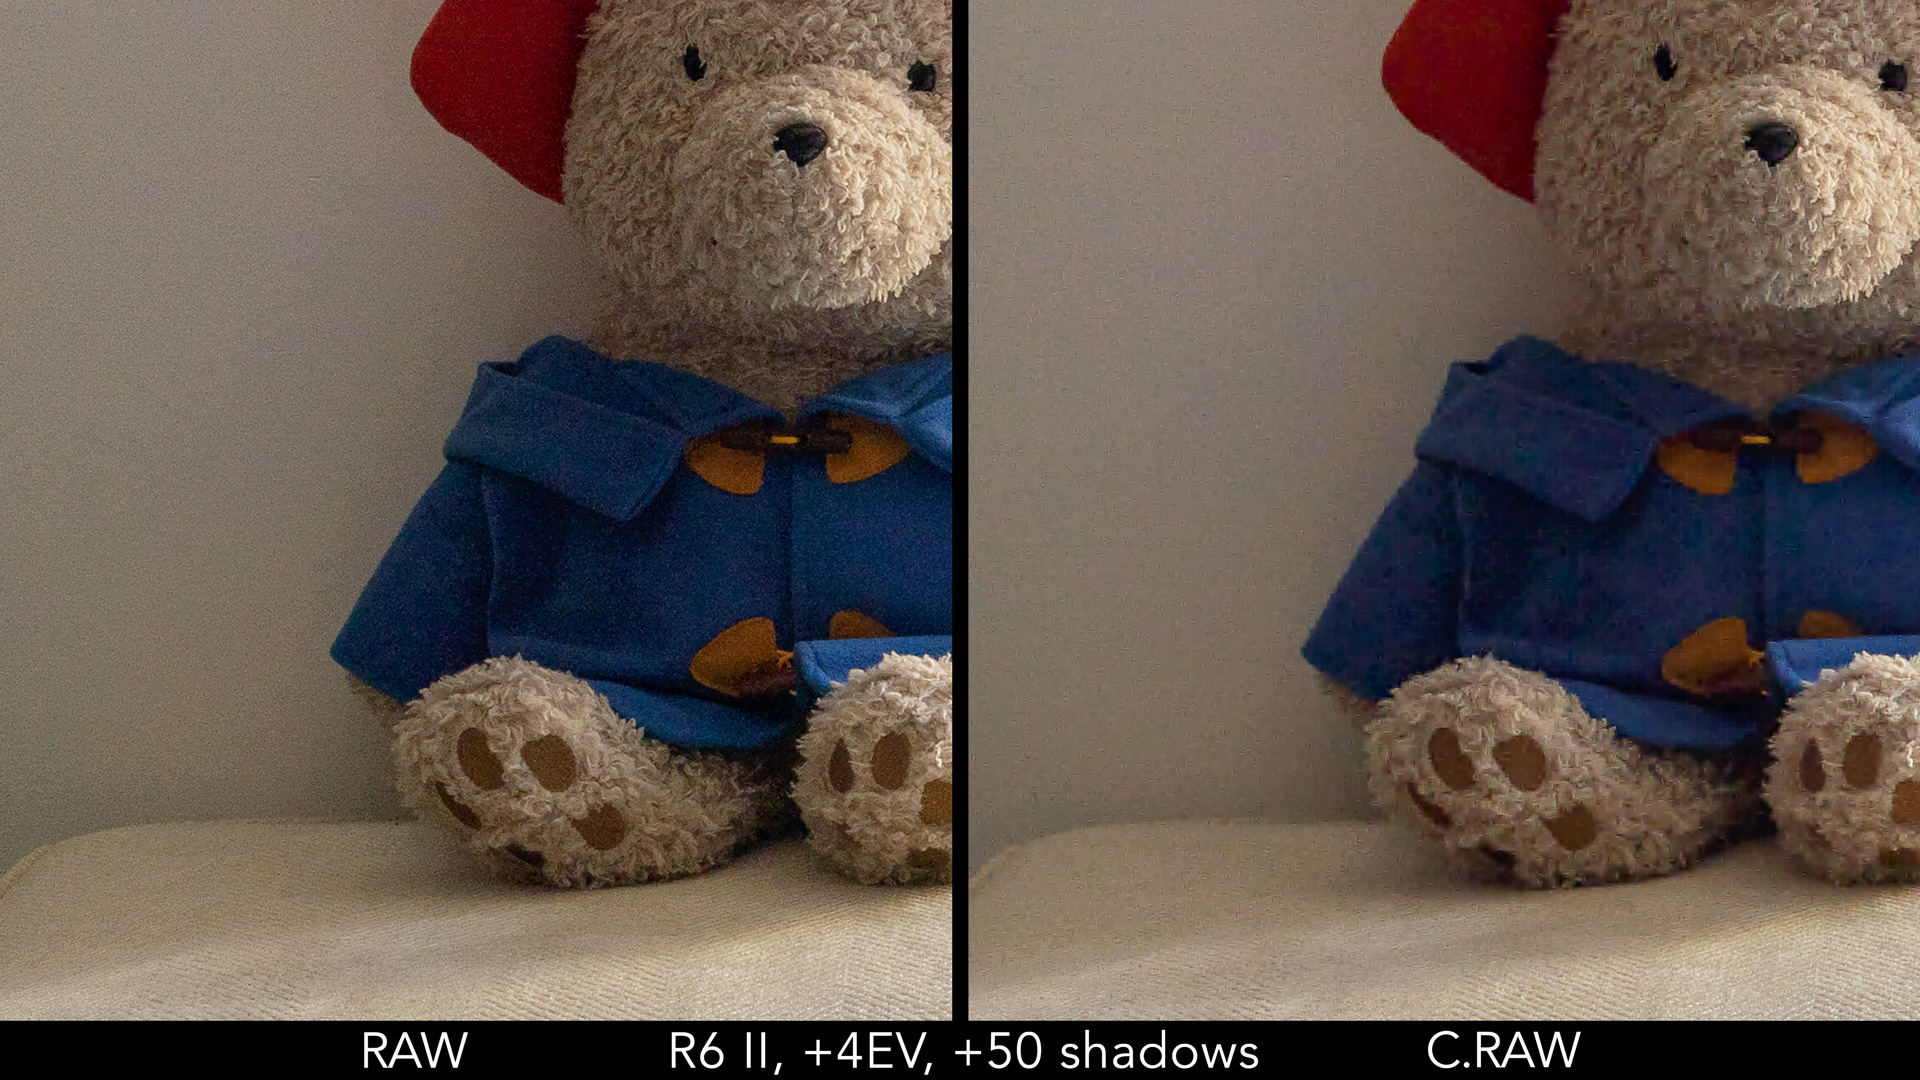
The R6 II doesn’t perform miracles when shooting at 20fps or 40fps. With the latter in particular, the buffer fills after two seconds, and the annoying part is that the camera will stop shooting for several seconds, rather than continuing at a slower speed straight away.
You can improve the performance by selecting C.RAW, but be aware that extreme shadow recovery on the Compact RAW format delivers far less quality than the normal RAW mode, something that doesn’t happen on the Sony.
The performance of the Canon is much better at 12fps, and that is a speed close to the Sony, so it’s easier to compare.
With the A7 IV, the result varies depending on the card. Insert a CFexpress Type A in the first slot, and the camera never slows down. With an SD card, the performance with RAW is much slower than the Canon.
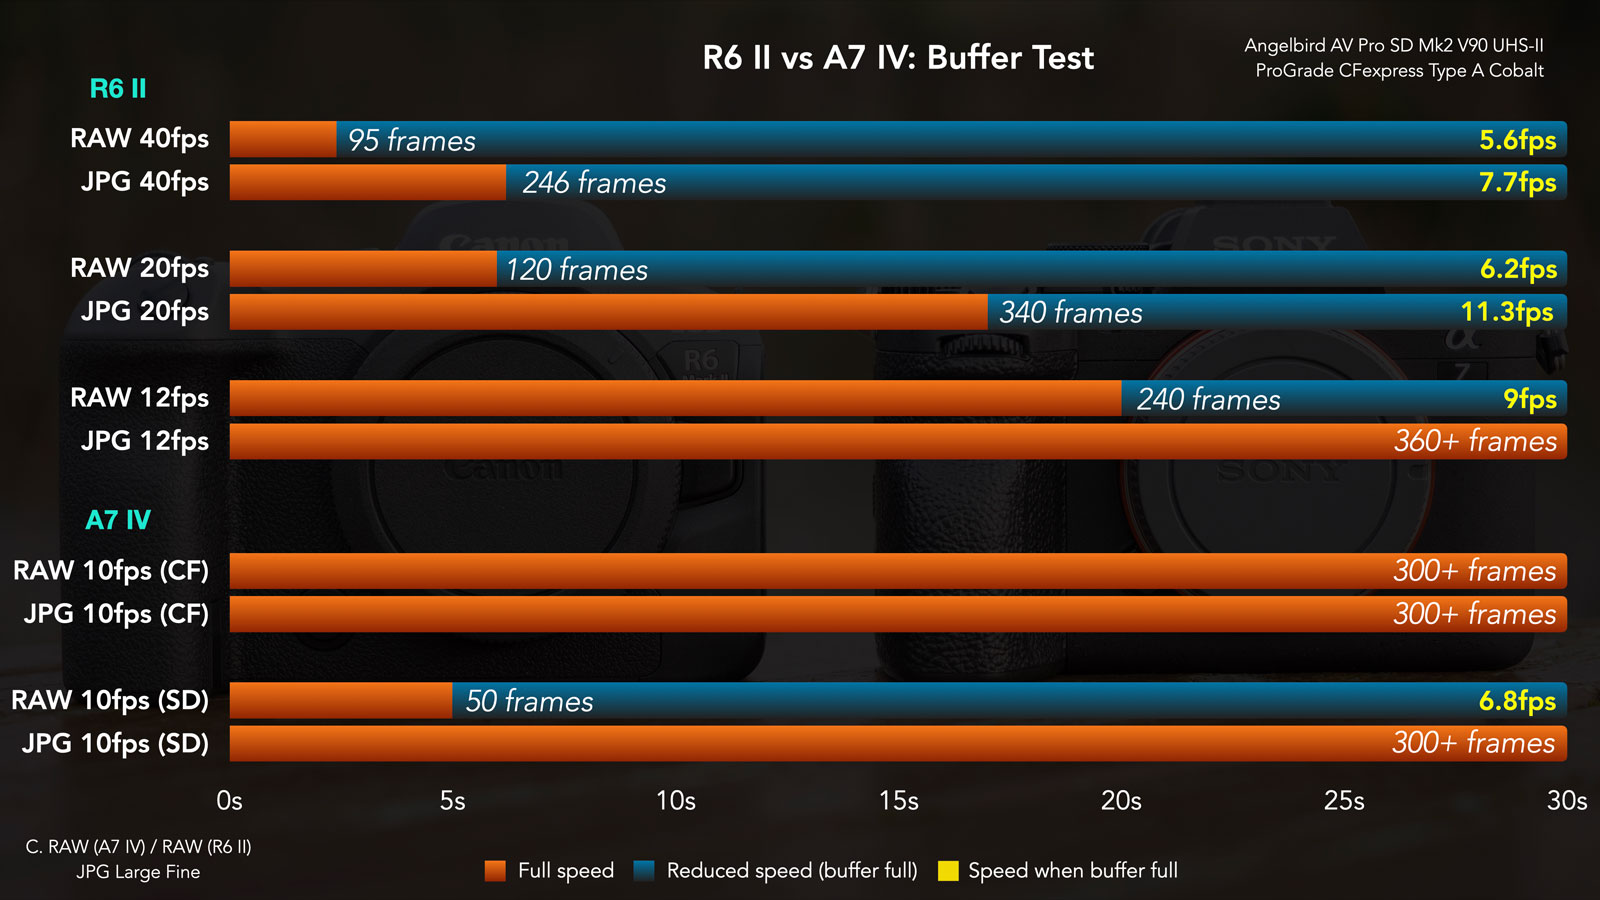
RAW Burst Mode
The R6 II has an extra function you won’t find on the A7 IV: the RAW Burst Mode works at 30fps (so electronic shutter) and delivers a superior buffer by saving all the frames in one big RAW file (called “roll”) rather than saving all the images separately.
Furthermore, this feature offers the Pre-Shooting mode, where the camera starts to load and refresh 15 frames in the buffer memory before you fully press the shutter button. This is great to capture moments that are difficult to anticipate, such as a small bird flying off a branch.
RF100-500mm F4.5-7.1 L IS USM at 500 mm
The downside of this mode is that you have to extract single RAW files manually, and one by one, using either the camera in playback mode, or the Canon Digital Photo Professional software on your Mac / Windows computer.
6. Stabilisation system
Both cameras feature in-body 5-axis image stabilisation. The R6 II has a maximum rating of 8 stops, but that will vary depending on the lens used. The A7 IV rating is 5.5 stops (only one lens mentioned, the FE 50mm F1.4 ZA).
Stabilisation In Photo Mode
I took 10 pictures at various shutter speeds to see how far I could push the two cameras with slow exposures hand-held. I used the RF 24-105mm F4 and the FE 24-105mm F4 G. Both of these lenses have optical stabilisation, so the two cameras combine IBIS and OS. Here are the results.
Stabilisation Test (35mm)
Shutter Speed
R6 II
A7 IV
2s
10%
0%
1s
30%
10%
1/2s
60%
20%
1/4s
80%
40%
1/8s
90%
60%
1/15s
100%
80%
1/30s
100%
100%
Overall, the R6 II shows superior performance all along, with a consistent higher keeper rate until we reach “safer” shutter speeds such as 1/30s.
I was able to push the Canon down to 2 seconds, an exposure time that is certainly not easy to manage, but possible with patience.
The A7 IV struggles to deliver consistent performance until I set the speed to 1/4s, and I had to go up to 1/15s to finally see a good keeper rate. In-body stabilisation has never been Sony’s forte, with the A7 IV delivering similar results to its predecessor. Things are starting to change with the arrival of the A7R V, but that will be for another article.
Stabilisation In Video Mode
Note: the tests for video can be seen in my YouTube video further down.
When recording video, a static scene shot hand-held at 105mm will give the Canon an advantage: the footage from the R6 model is more stable.
When walking with both cameras, using the 24-105mm lenses set at 24mm, the R6 II provides smoother and more stable footage overall. The A7 IV struggles much more to compensate for every moment of the operator’s legs and arms.
There are additional settings you can use. On the R6 II, you have the Digital IS option with two levels: On and Enhanced. Being electronic stabilisation, added on top of the physical mechanism inside the camera and lens, the field of view gets narrower. With On, it’s a small difference, whereas Enhanced definitely magnifies your image more significantly.
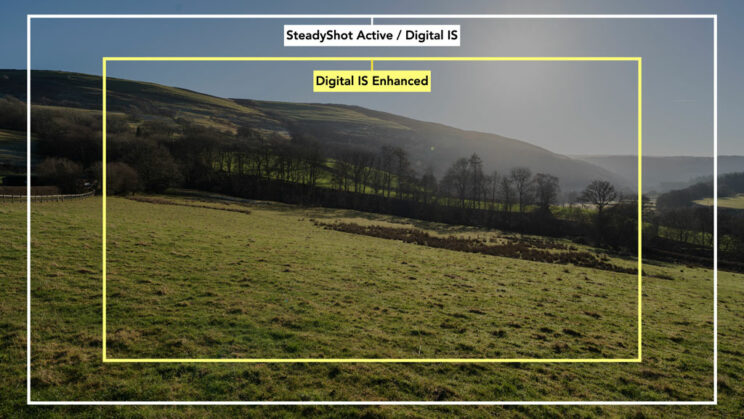
On the A7 IV, you have the Active mode which, similarly to Digital IS, will add electronic stabilisation and crop the image a little. Or, you can leave the stabilisation completely off and use the Sony Catalyst software in post. The advantage, in comparison to other stabilisation settings found on popular editing apps such as Final Cut or Premiere, is that Catalyst uses the gyro sensor data of the camera, so it can stabilise to a higher degree of precision.
Digital IS on the Canon does improve the performance a little with static shots. The Enhanced level is the best overall, but the difference with the On level is not significant, and the heavier image crop can be annoying. The Active mode on the Sony doesn’t make a real difference, and remains inferior to the Canon solution.
When walking, Digital IS doesn’t add a lot more stability, but reduces the warp distortion visible in the four corners of the image (a common problem with the IBIS technology). The Active mode on the A7 IV makes the footage look much better, and closer to performance of the R6 II. Digital IS Enhanced adds too much motion blur, so I would avoid it.
Out of all these options, Catalyst is the one that gives you the smoothest and most stable result when moving with the camera. Note that you will get better details and less motion blur if you increase the shutter speed a little for the clips that you intend to stabilise in post. The only problem with using Catalyst is the sharpness of your footage decreases. You can bring it back a little in post to minimise the problem.
7. Video recording
Note: you can watch the video tests in my YouTube video further down.
The R6 II and A7 IV are two capable cameras for video with 4K resolution, 10-bit internal codecs, unlimited recording, and more.
Frame Rate and Resolution
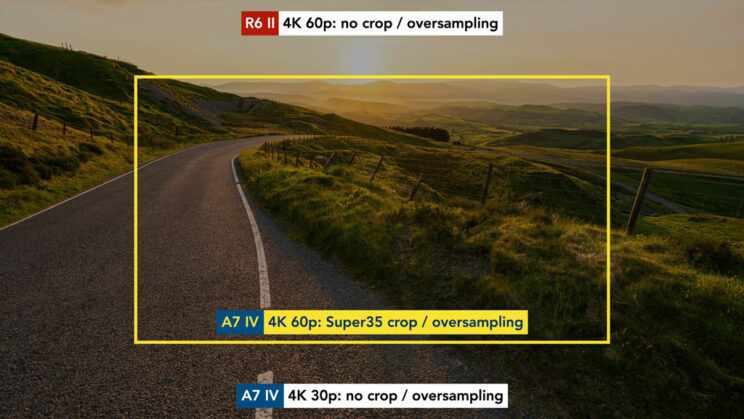
The two cameras can record 4K up to 60p, but only the R6 II can do this without a crop. Although the A7 IV works with the full width of the sensor up to 30p, it can only increase the frame rate to 60p with the Super35 mode (APS-C), which results in a 1.5x crop in your field of view.
In Full HD, the R6 II can record up to 180fps with the High Frame Rate mode, which works with no sound and delivers the slow motion result in camera. The A7 IV goes up to 120p but you can choose to record this frame rate in normal mode (with sound), or via the S&Q mode to get the slow motion effect saved on the memory card.
When selecting 4K, both cameras use the oversampling method to create the files, which means they use all the pixels available (6K for the R6 II, 7K for the A7 IV up to 30p), and downscale the image to 4K to deliver the best image quality possible in terms of details.
In my test, I found a very similar quality between these two cameras when it comes to sharpness, using the RF 85mm F2 and FE 85mm F1.8 stopped at f/4. The 1080p footage is much softer however, with visible traces of aliasing.
Colour Depth, Bitrate and RAW
You can record in 10-bit 4:2:2 internally, or via the HDMI output. Bear in mind that on the R6 II, the internal recording in 10-bit is only available when selecting the Log or HDR profiles.
The A7 IV can deliver a higher bitrate (max. 600Mbps) thanks to the ALL-Intra codec, whereas the Canon only works with IPB (Max. 340Mbps).
The R6 II offers something you won’t find on the Sony model: 6K 12-bit RAW, but only via the HDMI output and optional Atomos Ninja V or V+ recorder, so you’re looking at an extra expense to get this feature.
R6 II
A7 IV
SD Card
8-bit 4:2:0
10-bit 4:2:2*
8-bit 4:2:0
10-bit 4:2:0
10-bit 4:2:2
HDMI
10-bit 4:2:2
12-bit 6K Prores RAW
10-bit 4:2:2
Codec
H.264 Long GOP
H.265 Long GOP
XAVC S (H.264 Long GOP)
XAVC S-I (H.264 ALL-Intra)
XAVC HS (H.265 Long GOP)
Bitrate
(max.)
230Mbps (8-bit)
340Mbps (10-bit)
200Mbps (Long GOP) 600Mbps (ALL-Intra)
Profiles and Dynamic Range
The difference with the colour profiles I highlighted in the image quality chapter is also valid for video.
But if you want to take advantage of the best dynamic range each camera has to offer, you need to look at the HDR and Log curves.
The R6 II works with the HDR PQ standard, and the Canon Log3 gamma. The A7 IV offers Hybrid Log Gamma (4 variants), S-Log2 and S-Log3.
When working with Log, the minimum native ISO is 800. You can select lower values, but these are extended and won’t retain the same amount of details in the highlights.
When the two cameras are compared side by side, using C.Log3 and S-Log3, the brightness in the shadows is similar, but the Sony saves more information in the highlights.
The Sony also offers more advanced settings to customise the image for video thanks to the Picture Profiles. That is where you’ll find the S-Cinetone curve, and many other parameters you normally find on Sony high-end cinema cameras.
ISO for Video
The R6 mark II has a narrower ISO range for video, whereas the extended range is higher.
ISO – Video
Normal range
Extended range
R6 II
100-25,600
100-204,800
A7 IV
100-51,200
100-102,400
The level of noise is similar as you increase the value. The R6 II does produce a bit more overall, but it’s a small difference until you reach 51,200 ISO. There, the Canon starts to use the extended ISO, whereas the A7 IV still uses the native range, and the gap increases. Obviously we’re talking about very high ISO levels that hopefully you won’t have to use often.
The R6 II has a noise reduction setting you can use for video. Like for still JPGs, disable it and the noise pattern increases. Set it too high and you lose some details. Standard is the most balanced parameter.
Rolling Shutter
In 4K 25p, the R6 II shows less distortion when panning quickly. You can improve the performance further on the Canon by selecting 50p or 60p. That is also valid for the A7 IV by the way, but remember that 50/60p means an APS-C crop.
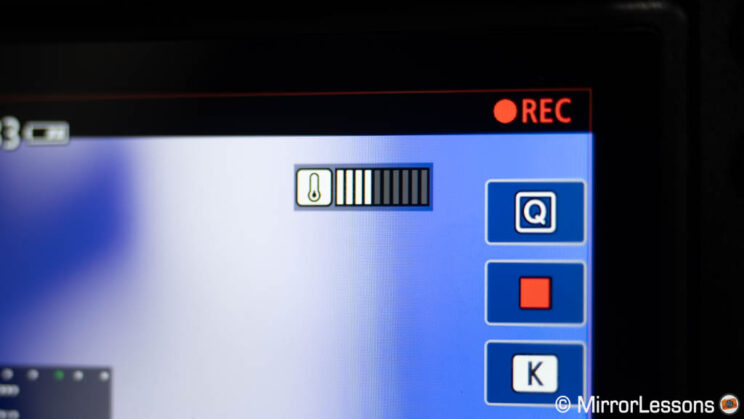
Recording Time and Overheating
Neither camera has the 30 minute / clip limitation, so you can record without interruption until the cards are full, or the battery is empty. Your only potential enemy will be warm ambient temperatures.
In my test, done at home with a temperature of about 20˚C, both cameras did well. The R6 II recorded uninterrupted for 2 hours and 15 minutes before the battery gave up. The A7 IV did just over two hours, so not far off.
Each model has a setting to “force” the camera to record for longer if the inside temperature starts to build up. This won’t prevent the cameras from shutting down if it becomes too warm, but it can give you some extra time. It goes without saying that all of this depends on where you are filming, and how warm your location is.
On the R6 II, there is also a handy temperature indicator that appears when the camera starts to heat up, with 10 bars that go up progressively, giving you a decent indication of when it may stop. In my test, it only appeared when recording 4K 50p, but the battery ran out before I could see it go to the maximum (1h and 30min).
8. Extra Features
I won’t go in-depth in this chapter, but I can highlight some of the most interesting features you will find on these two cameras.
- Focus Bracketing / Stacking (R6 II): you can bracket frames taken at different focus increments to increase the depth of field, with the option of stacking them in-camera. This is useful for macro photography (and landscapes too). With the correct focus increment, the built-in stacking option works quite well.

RF85mm F2 MACRO IS STM
Focus increments: 1
- Breathing Compensation (both): it gets rid of small changes in angle of view when you focus from the foreground to the background in video mode (giving the impression of a small zoom in or out). Not all lenses are compatible. Check the Sony website and the Canon website for an updated list. It works really well on the A7 IV. Unfortunately, I didn’t have a compatible lens with me to see how the Canon version works.
Note: the Canon link only shows two lenses, but Canon has released firmware updates for other ones. Hopefully they’ll update the page soon.
- Webcam mode (both): use the R6 II or the A7 IV as a webcam with just the USB connection, no plugin required! It is as straightforward as it sounds. The Sony works up to 4K 15p or Full HD 60p, the Canon up to Full HD 30p.
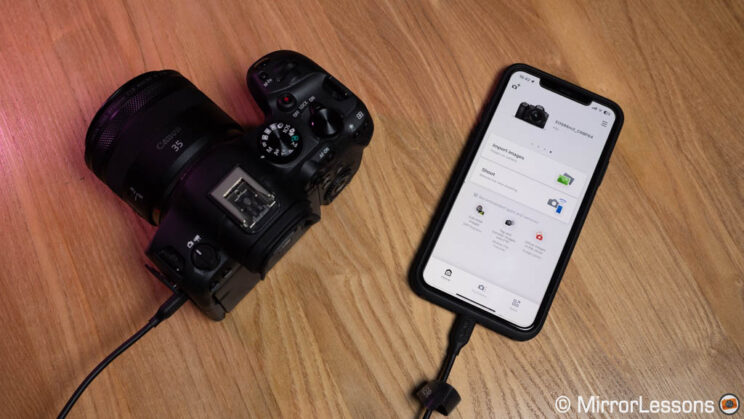
- Smartphone remote control via USB (R6 II): most mirrorless cameras can be controlled remotely with a smartphone via Wifi. With the R6 II, you can use the same Canon Camera Connect app, but with a USB cable. No need for Wifi, which means you’ll save battery life on the camera. The connection is quick and more stable. I think this should become an option for every camera and every brand going forward.
- Focus Guide (R6 II): my favourite manual focus assist (I say this every time, I know). It uses the Dual Pixel CMOS AF system to tell you how much to adjust, and in which direction. So intuitive and effective.
- LAN connection (A7 IV): plug-in a USB C to Ethernet adapter, and you can work with a wired LAN connection. You can also use the 4G/5G connection of a Sony smartphone via USB.
- Anti-dust mode (both): when your turn off the camera, the mechanical curtains of the shutter cover the sensor, preventing dust from going further when changing lenses for example. It’s a neat idea (Canon was the first with the original EOS R), but remember the shutter curtains are delicate, so continue to take the same care as before.
9. Lenses
The Sony full frame E-mount system began in late 2013, expanding the system from the APS-C line-up. Almost 10 years later, A7 users can count on an impressive selection of AF lenses from Sony itself, but also Tamron, Sigma, Samyang, Zeiss and other third party manufacturers.
Then you can add to that manual focus lenses, and countless of opportunities with adapters and lenses from other systems. I’m not sure what’s really missing at the moment. In fact, Sony has already started to updates some of its lenses (24-70mm F2.8 GM II, 70-200mm F2.8 GM II).
The EOS R system was unveiled in 2018, so there is a 5 year gap to close. Canon has done a very good job so far: there are a lot of high end zooms for professionals, and a good selection of affordable primes for enthusiasts. But of course, we need more, and some RF lenses can be quite expensive too. There is no support from third party brands at the moment, as Canon doesn’t seem keen to make the RF-mount license available to any other company (except RED, but that’s for cinema cameras). Hopefully, this will change in the future.
I think many Canon users that switch to a mirrorless body today still heavily rely on Canon EF lenses, especially if they already have a good collection at home. Canon has made no fewer than three adapters, and they work really well in terms of automation and autofocus.
10. Price
The R6 II was launched with the retail price of $2500, £2800 or €2900, for the body only.
That makes the A7 IV less expensive in Europe: it can be found for $2500, £2400 or €2700. The camera has been around for longer, so you have a higher chance to find it at a lower cost second-hand.
The prices above are as of February 2023.
Video Review
Conclusion
This is the third in-depth comparison I’ve published between these two brands and camera series: first there was the R6 vs A7 III, then the A7 IV vs R6, and now the R6 II vs the A7 IV. It has become a classic here on this website, and a fun review to produce as well.
I’m going to state the obvious here, but it’s important to reiterate it nonetheless: these are two fantastic cameras and there is little excuse not to get the shot you want. With that said, there are important differences to summarise.
If you’re interested in action, whether it is sports or wildlife, the R6 II has more to offer thanks to the faster continuous shooting speed. Even without choosing the fastest option available (which limits the buffer), you can still work at double the speed of the A7 IV. The sensor readout is fast, and the autofocus is among the best out there. Even for dynamic portraits, concerts and low light events, the Canon proved faster and more reliable than the Sony.
RF85mm F2 MACRO IS STM
The A7 IV offers a lot of versatility in video mode when it comes to codecs, bitrate and image tuning, but the R6 II can record at 60p in 4K without a crop, has much less rolling shutter, and delivers 12-bit Prores RAW via HDMI. It also has better stabilisation, unless you use the Sony Catalyst software with the E-mount model.
Design and ergonomics can be a very personal thing. I prefer the R6 II overall, but some of you might disagree, or might have an extra appreciation for the customisation offered by the Sony model.
The A7 IV has its own list of advantages, starting with the sensor that delivers the same quality with the added benefit of more resolution. It is the perfect balance between dynamic range, high ISO performance and megapixels.
Last but not least, the Sony E-mount system has an extraordinary selection of native autofocus lenses from the brand itself and third parties. And that is not something to underestimate.
Reminder: the links below are affiliate links. If you decided to buy something after clicking the link, we will receive a small commission.
Thanks for the great review, I was trying to decide which camera would be a better fit for my photography and occasional video productions, I think I prefer the Canon.