Canon has released a beta software that allows you to use a number of DSLR and mirrorless cameras as a webcam with just the USB cable.
This release came as a pleasant surprise. I’ve wondered for years why the manufacturer didn’t make this feature a default on all their cameras. With the Covid-19 pandemic and many people forced to stay home, Canon decided it was time to finally enable the functionality to support its customers.
The Canon utility app was first released for Windows, and now that a Mac version is available, I can finally test it out.
Important note about compatibility
The EOS M name in the title refers to the series of cameras (this is how Canon calls it). Unfortunately not all of them are compatible with this feature as of now. Among mirrorless cameras, you can use the EOS M6 Mark II, EOS M50, EOS M200, EOS R, EOS RP, EOS R5 and EOS R6. There are also various DSLRs available. You can check the full list on the Canon website. I hope Canon will continue to update the software to support more cameras, including older models.
Ethics statement: the following is based on my own tests with the Canon EOS RP. We were not asked to write anything about this product, nor were we provided any other compensation of any kind. Within the article, there are affiliate links. If you buy something after clicking one of these links, we will receive a small commission. To know more about our ethics, you can visit our full disclosure page. Thank you!
How to set up your Canon camera as a webcam
To start using your Canon camera as a webcam, a few steps are necessary.
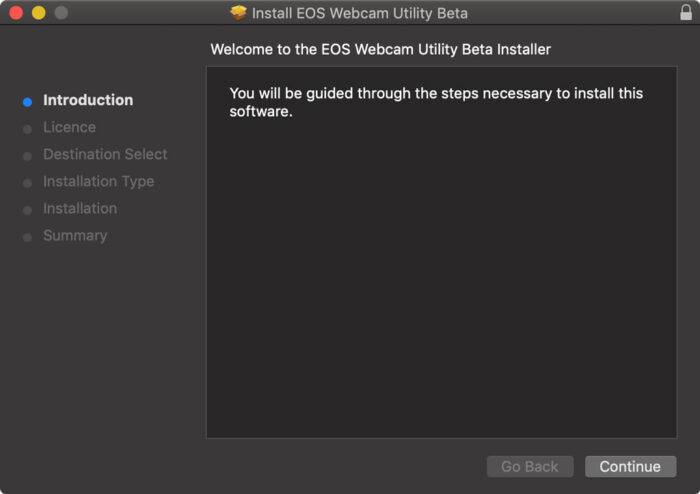
Step 1: install the EOS Webcam Utility software
The software allows your computer to “see” your camera as a video source when connected to the USB port.
- Go on the Canon website and navigate to the EOS Webcam Utility page
- Scroll down until you see a list of compatible cameras. If your camera is listed, click on it to open the download page. (More on compatible cameras further down.)
- The website should pick your operating system automatically, but you can double check with the drop down menu next to Operating System. Below, in the list of softwares available, you should see EOS Webcam Utility Beta 0.9.0. Click on the SELECT button on the right to expand the area, then click on the red DOWNLOAD button.
- Once the download has finished, locate the zip file on your computer, double click to decompress it and open the installer package. Follow the instructions on screen. You will be asked to restart your computer once the installation has finished.
Step 2: prepare your Canon camera
Before starting to use the camera as a webcam, let’s go through a couple of tips to make sure you make the most out of it.
- Use a fully charged battery
- Mount a lens that is wide enough (35mm or shorter) so that you can frame your face easily even if the camera is close to you.
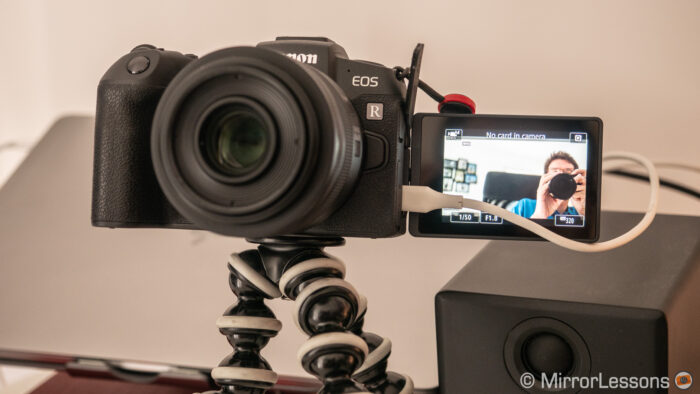
- Set your camera on a tripod and find a position that suits your working environment and the composition. I suggest mounting the camera on a small tripod (I used the Gorilla Pod) so that you can place the camera directly on your desk.
- Turn your camera on and set the main shooting dial to video mode.
- Disable optical stabilisation on the lens, and digital IS on the camera if there is such a feature, since you don’t need them – plus the latter will crop your field of view
- In the camera menu, in Movie Rec. size. you can choose the resolution and frame rate you want to use. I’ll talk about this further down, but if you don’t know what to choose, start with FHD 25p or 30p.
- Select Movie Manual exposure with the Q SET button and adjust the exposure settings yourself. A shutter speed of 1/50 (or 1/60 for 30p) will do, and you can set the aperture and ISO accordingly based on how much light you have in the room. If you’re rather not fuss with total manual settings, you can set the ISO to Auto so that the camera manually adjusts the sensitivity, or go fully automatic by choosing Movie Auto exposure.
- Choose a Picture Style that doesn’t have too much contrast or saturation. Standard, Portrait or Faithful should work best.
- Set the white balance to automatic if you’re not sure which setting to use. If you know precisely which lights are in your room, you can select one of the presets or even choose a temperature manually.
- Make sure that Movie Servo AF is enabled, and select Face/Eye detection. Your Canon will track your face and keep you in focus when you move. This is especially useful if you use a fast aperture such as 1.8 or 2.8 to have more shallow depth of field.
- In Set Up Menu, disable the Eco mode and in Power Saving, disable the Auto Power Off. This ensures that your camera doesn’t power off while you’re in the middle of a live video or Skype call.
Step 3: use your Canon EOS camera as a webcam
You’ve installed the software, prepared your camera, so now all that is left to do is connect it and start using it!
- If your camera has a multi-angle screen, rotate it 180˚ to compose better. If it has a touch screen, you can use it to change settings without fussing with the buttons on the rear.
- After your computer has restarted, connect your Canon camera with the USB cable and turn the camera on.
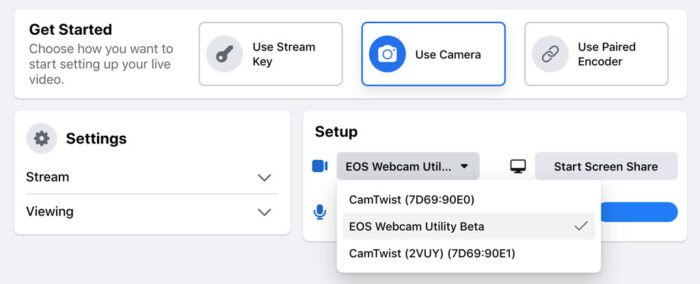
- Go to a website or application you want to use to live stream or video call, such as Facebook Live, Skype, Zoom, etc.
- In the video/audio settings, select EOS Webcam Utility Beta as the video source. Once that is done, the image should appear on the feed.
You’re almost there, but there are still a few things to consider. Please read the additional notes below.
Your Canon EOS as a webcam: limitations and extra information
Because the software released by Canon is still in its beta form, you might experience a few bugs and there are some limitations to be aware of.
As things are subject to change, please visit the Canon website for more up to date information.
Software and apps compatibility
With the Mac OS version, there are currently a few limitations concerning the applications you can use. For Skype, Zoom and WebEx, use the web-based app rather than the desktop app. There are also less cameras compatible, but I think it is only a matter of time before it gets the same features as the Windows version.
On my Skype, it worked the first time I opened the application, but from the second time onward it wouldn’t connect anymore so I had to log in on the Skype website and use the web-app. Make sure to be on Chrome because it won’t work on Safari. FaceTime seems to be incompatible too.
Audio
As of now, you can’t select the Canon cameras for the audio source. It is limited to video, at least on my Mac. This means you can’t use the camera’s built-in microphone, or one connected to the camera’s 3.5mm port.
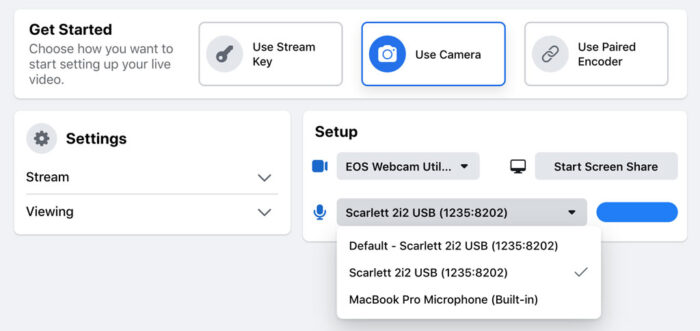
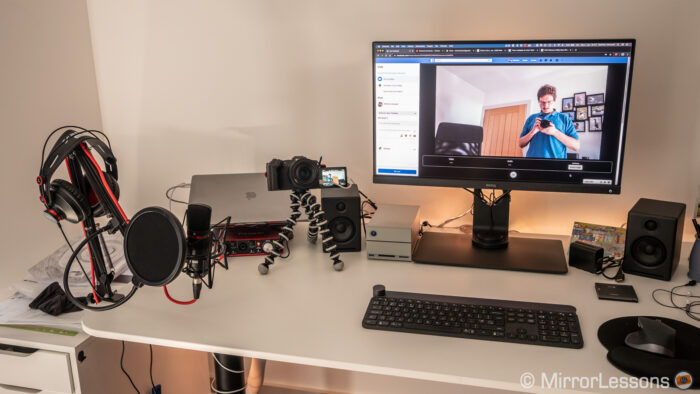
You will need to use the built-in microphone of your laptop, a USB microphone or any other audio set up that can be connected to a computer in order for this to work. In my case, I have the Focusrite Scarlett 2i2 set up (XLR microphone + USB sound card).
The risk of having two different sources for audio and video is that you can experience sync problems between the image and sound. This can depend on the streaming software used. My setup worked fine with Skype, but on Facebook Live and YouTube Live the video was delayed in comparison to the audio.
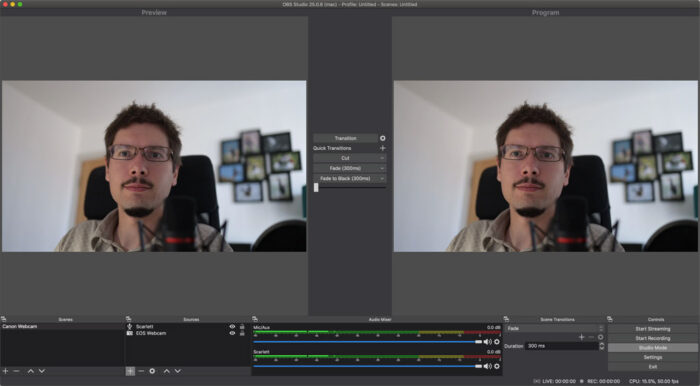
One workaround is to use an encoder software as an intermediate player that takes the video and audio sources and send them to the application you’re using for the stream. Among the additional settings at your fingertips, there is the possibility of adding a delay to the audio track. Some trial and error is necessary to find the right setting (mine was 140ms). I used OBS Studio which is a free open source software. You will find several resources online that explain how to use OBS.
Resolution and Frame Rate
Depending on your EOS model, you might have the option to choose 4K or Full HD in your camera menu. With 4K, your camera will most likely crop the field of view heavily (the EOS RP crop is a huge 1.75x) which will make it tricky to compose the image correctly unless you have the space to move the camera further from where you’re sitting. Plus, it is very unlikely that you’ll be able to stream 4K, so there is no need for this kind of resolution.
In fact, even streaming in Full HD can be challenging. The streaming quality of your live video will depend on the speed of your internet connection, and more precisely the upload speed. Domestic connections are usually slower in upload than download, so you may want to perform a few tests to see what kind of quality you’re getting.
Skype, Facebook, and Youtube can adjust the quality automatically depending on your internet speed. If you want more control, OBS Studio is once again the answer because it allows you to configure video and audio streaming settings, including the bitrate.
After several attempts with my set up, I realised that my wifi connection was struggling to output more than 3MB/s. So I settled on on a resolution of 720p and 30 frames per second. I set the EOS RP to 720p so that OBS didn’t have to downscale the video feed and consume more computer power. If you have a faster connection, you might be able to go higher at 1080p. Again, the web is full of tutorials about settings for live streaming.
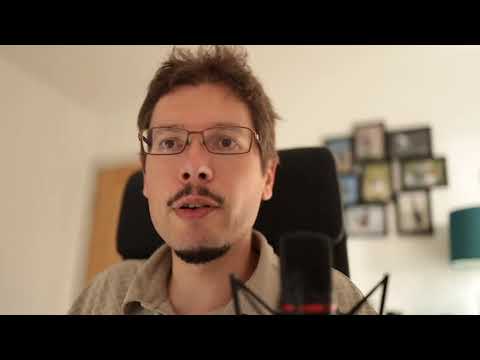
You can see the test I did below with YouTube Live.
Battery
Your Canon EOS cannot be powered via USB while it is in operation. If you’re planning to do long webcam sessions, I suggest to buy the optional AC adaptor to make sure you don’t run out of juice. The battery life varies depending on the camera of course, but it will drain faster than you think.
Conclusion
This move from Canon is a good first step forward and I hope it will encourage other brands to do the same (Fujifilm has already started, and Panasonic has released something as well although it doesn’t seem as straightforward as the Canon solution). I like the idea of digital cameras becoming webcams when needed without having to buy extra accessories.
That said, for now the software is still beta and there are limitations to be aware of. I think the biggest one is not being able to choose the camera as the audio source. Although for a superior broadcast you’ll want to use a separate microphone, a beginner might be fine with just the built-in one. Another option is to use a mic that connects to your camera, which would prevent any video/audio sync problems. Hopefully when the final version is available, these things will be fixed.