Earlier this year, Voigtlander announced its very first set of native E-mount primes with electronic contacts: the 10mm f/5.6 Hyper Wide Heliar, 12mm f/5.6 Ultra Wide Heliar, and 15mm f/4.5 Super Wide Heliar.
While the 10mm is a brand new lens and claims the title of the widest rectilinear lens in existence, the 12mm and 15mm are remakes of the popular M-mount versions.
We recently we had the chance to review them individually on MirrorLessons, but since we happened to have all three on hand at the same time, I grabbed the opportunity to compare them side-by-side as well. Let’s get started!
Ethics statement: Flaghead Photographic Ltd. kindly provided us with samples of the Voigtlander 10mm f/5.6, 12mm f/5.6 and 15mm f/4.5 to test for two weeks. We were not asked to write anything about the lenses and were not provided any other compensation of any kind. Within the article, there are affiliate links. If you buy something after clicking the link, we will receive a small commission. To know more about our ethics, you can visit our full disclosure page. Thank you!
[toc heading_levels=”2″]
Design and Ease of Use
Before we begin, let’s take a brief look at all the main physical and optical differences between the three lenses. With the obvious exception of the field of view, the table reveals that they have quite a lot in common, including a solid metal construction, a minimum focus distance of 30cm, and 10 aperture blades.
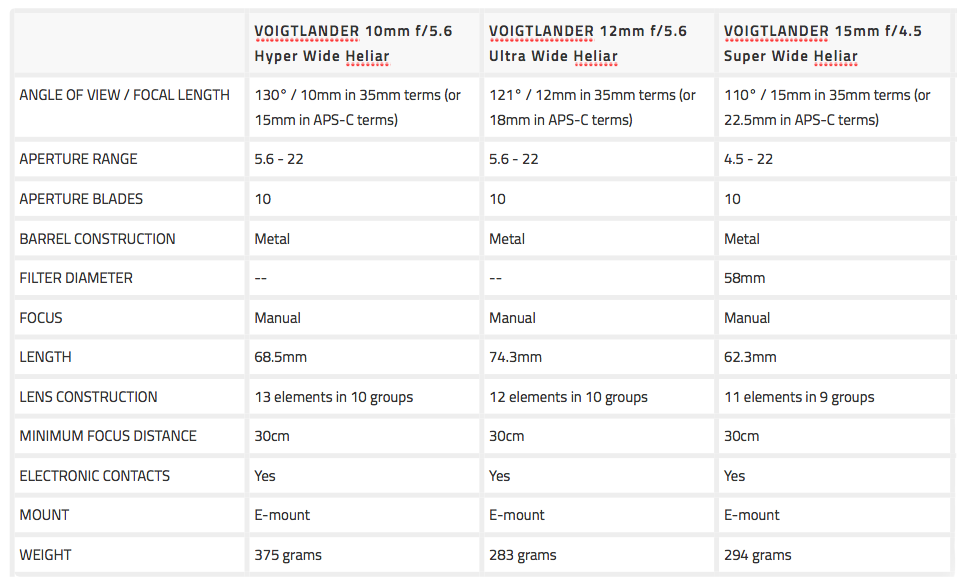
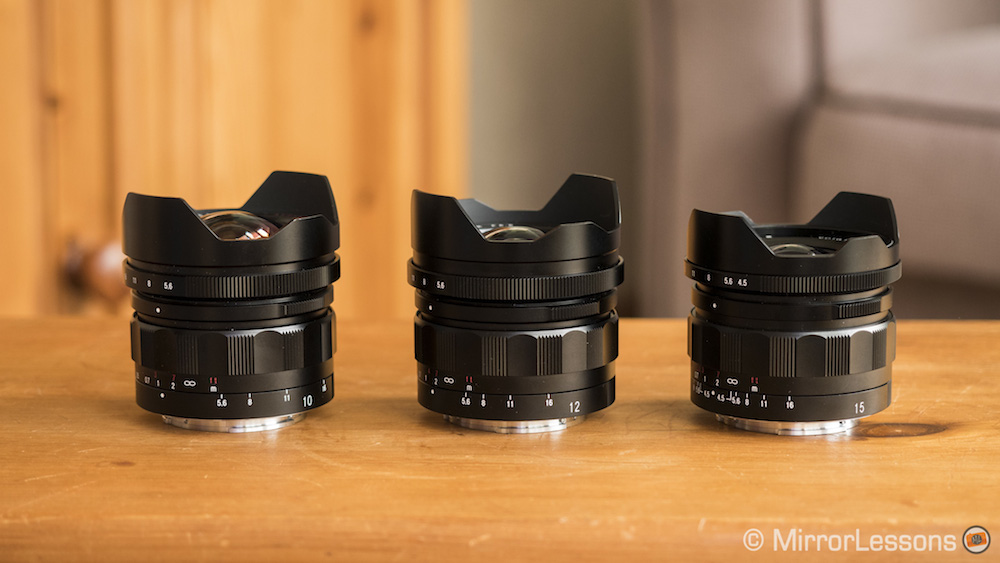
Looking at the three lenses side-by-side, you might have difficulty telling them apart were it not for the markings on the barrel. All three have a black finish with a ribbed aperture ring that turns in 1/3 stop increments, indented focus ring, distance scale, depth of field scale, and built-in petal-shaped lens hood.
The aperture ring in particular is interesting because it can be de-clicked for video use. This is achieved by pushing a third ring (the aperture control ring) towards the aperture ring, turning it 180 degrees, and aligning the two indexes. We’ve found the procedure both intuitive and easy to carry out.
The distance and depth of field scales are a handy addition but as expected the camera’s manual assists are more reliable if you require extreme precision.
Of the three lenses, the 10mm is the heaviest but is beaten in terms of height by the 12mm. Even though the 15mm is the shortest, it weighs a little more than the 12mm. In practise, you won’t feel much of a difference between the three. Much like Zeiss’ Loxia series, the diameter of all three lenses is more or less the same as the E-mount itself, making them a good match for both the full-frame and APS-C series.
An important characteristic of all three lenses are the electronic contacts that allow them to transmit EXIF data. The lenses will also transmit lens correction information and give you access to 5-axis stabilisation and manual focus assists when paired with the latest models.

Due to the extreme angle of view of the 10mm and 12mm, neither has a filter thread for traditional screw-in filters. The 15mm, being somewhat narrower, makes room for a 58mm filter thread. Similarly, only the 15mm has a clip-on lens cap while the other two feature a pressure fit cap due to the convex shape of their respective front elements. Keep in mind that none of these lenses has a removable lens hood so the use of square filters can be problematic.
Finally, the 15mm has a maximum aperture of f/4.5, which is slightly faster than 10mm and 12mm’s maximum aperture of f/5.6. Admittedly, the difference isn’t huge, but it can be of some benefit in low-light situations where you want to keep your ISO value as low as possible.
A good example is the Milky Way shot I took below. I was able to keep my ISO value to 3200 (which is still quite clean on Sony cameras such as the A7s, A7s II or A7r II) while with the 10mm or 12mm, I probably would have had to raise it to 4000 or 5000 ISO.

Optical Quality – Through the lens
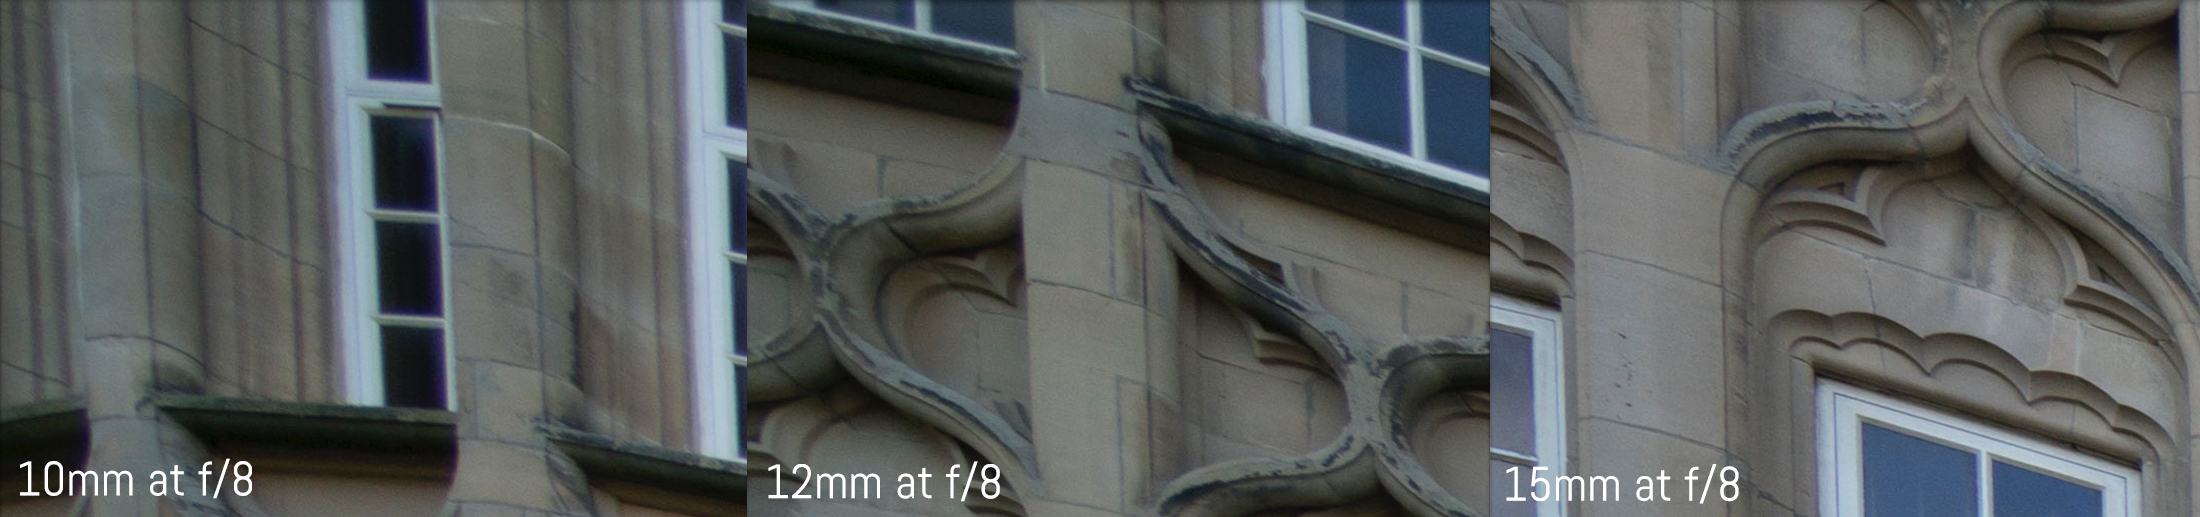
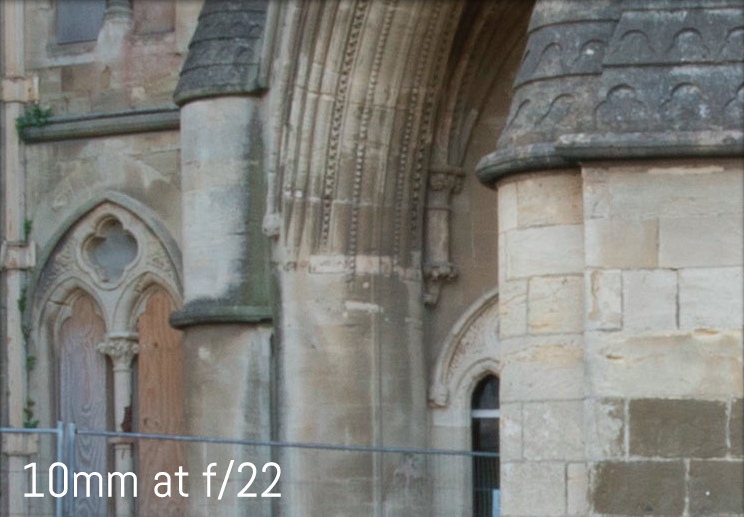
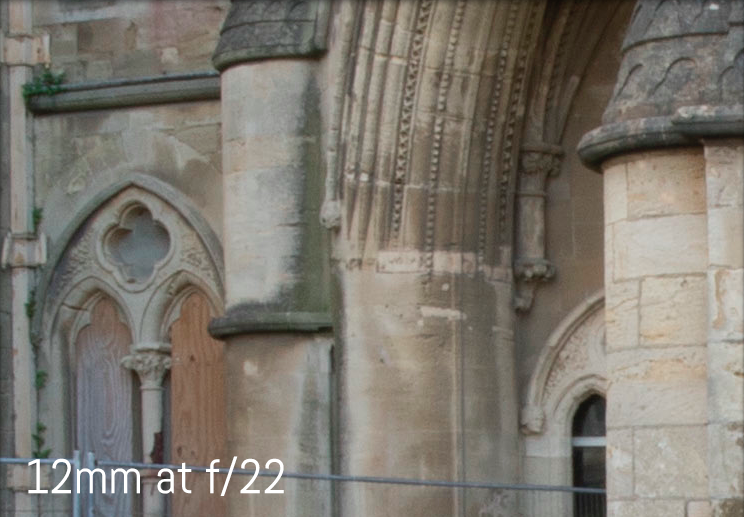
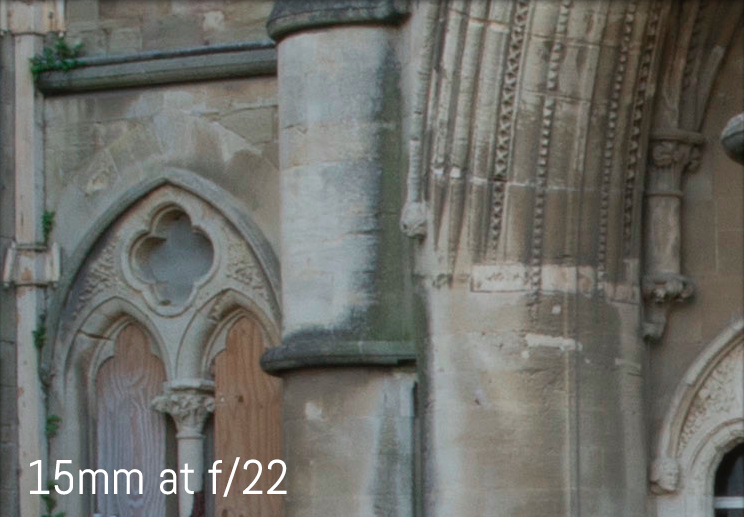
First, let’s turn our attention to the sharpness of the three lenses, starting at their fastest apertures (f/4.5 on the 15mm and f/5.6 on the 10mm and 12mm).
Overall, the perception of sharpness is very good on all three lenses. At the centre, it appears that the 15mm is a little sharper than its wider siblings, but this is also related to the narrower angle of view magnifying tiny details that appear further away.
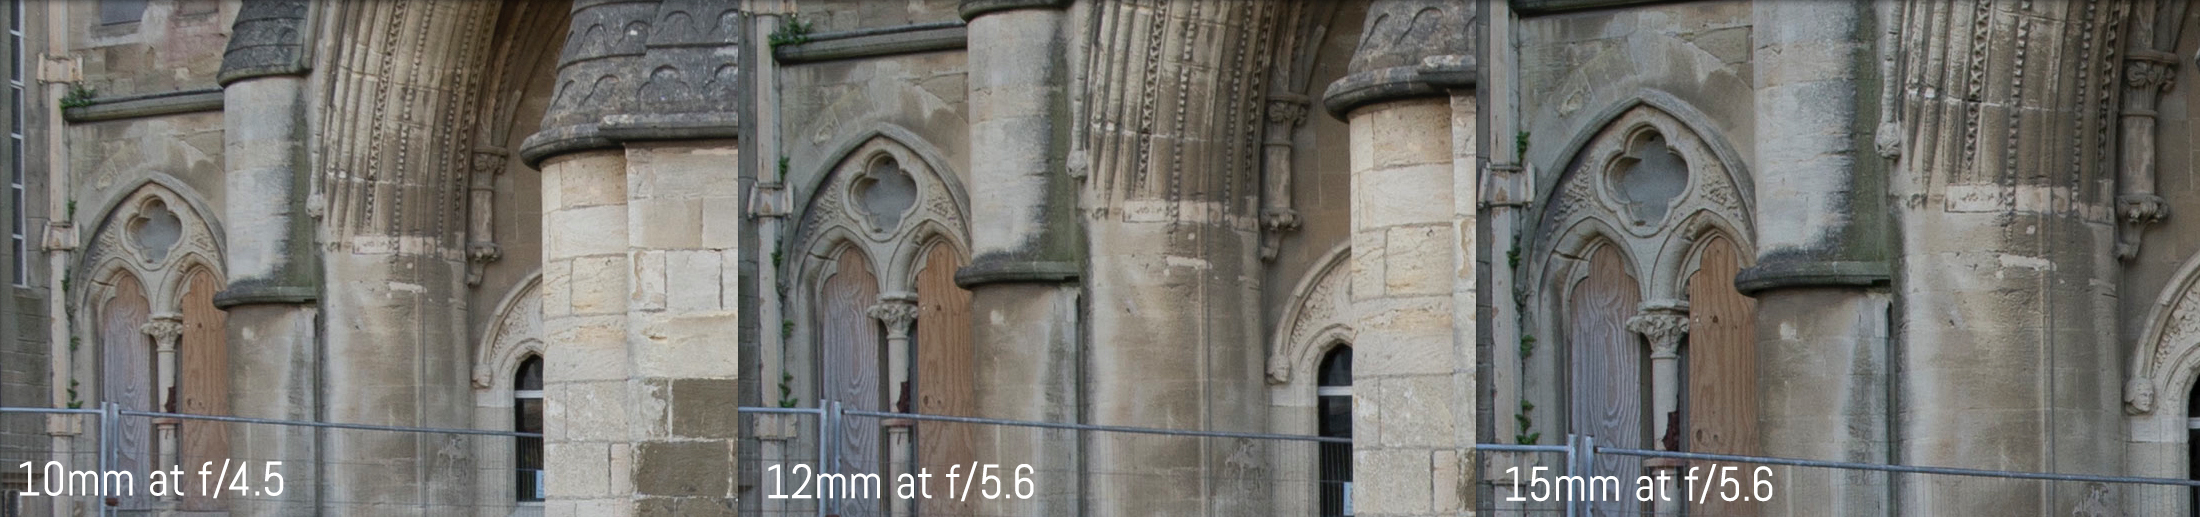
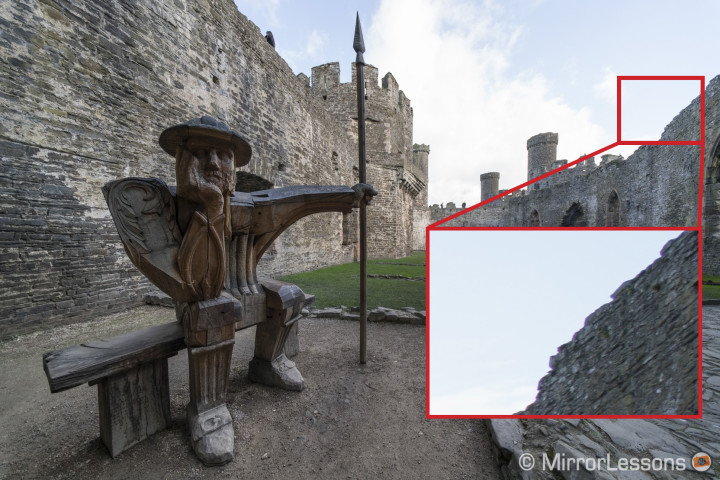
Corner performance is noticeably worse due to the extreme wide angles of these three lenses. Unsurprisingly, the 10mm has the softest corners, followed by the 12mm and 15mm in that order.
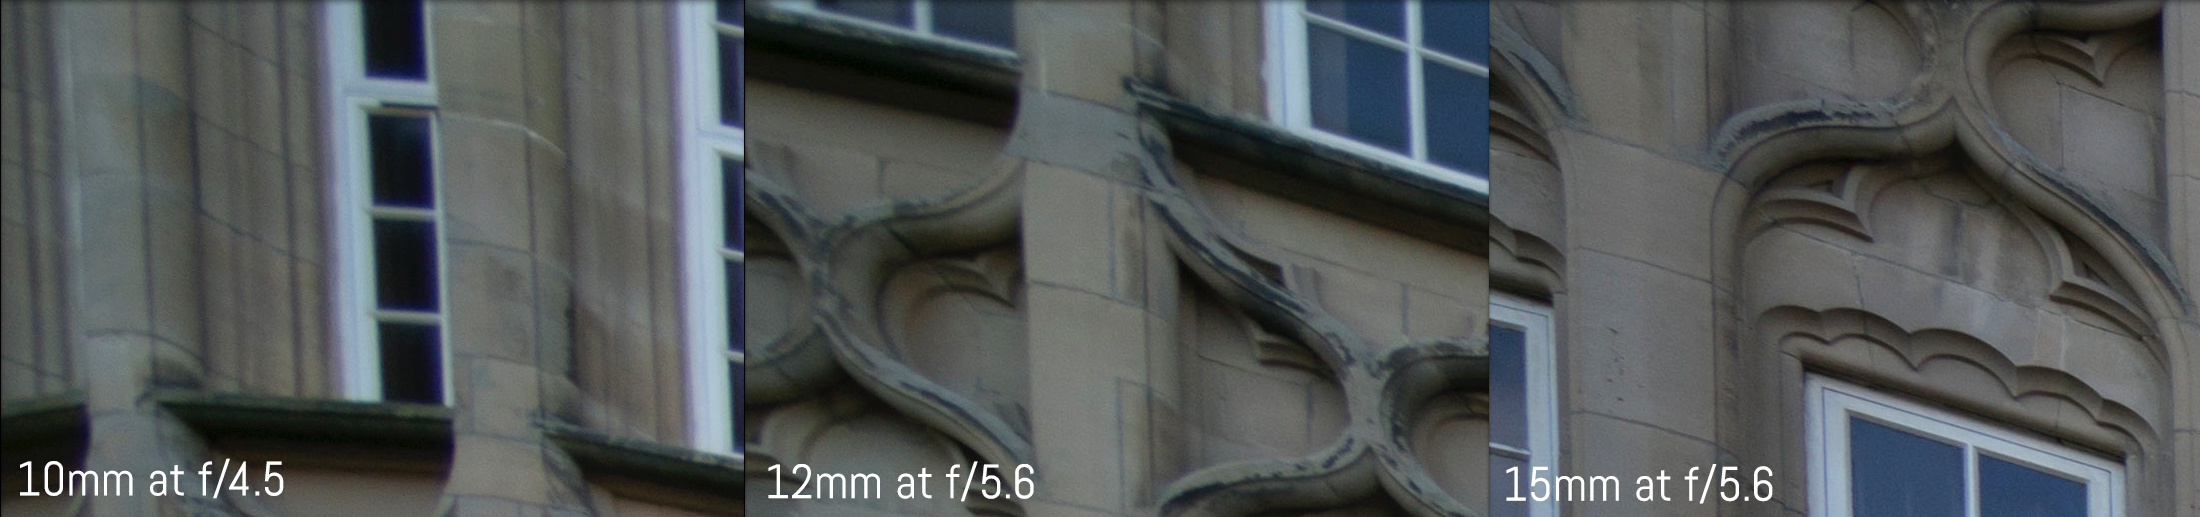
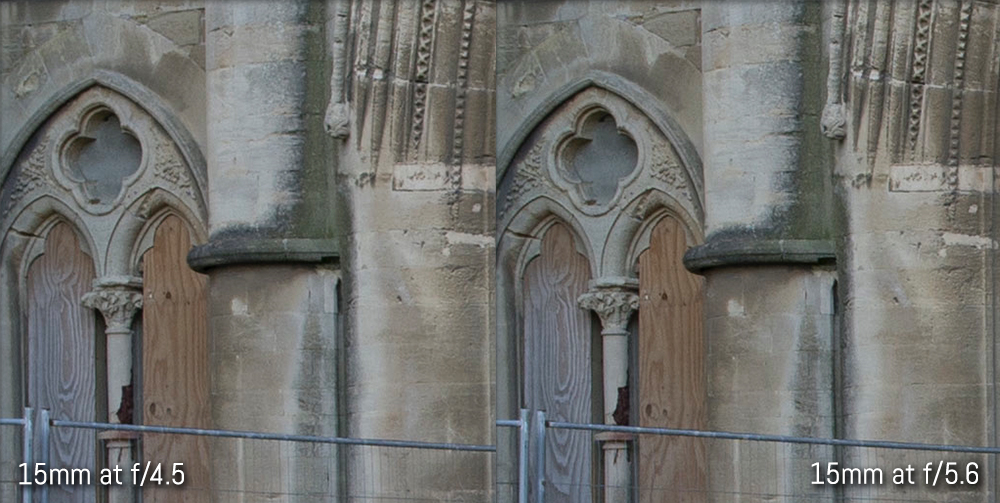
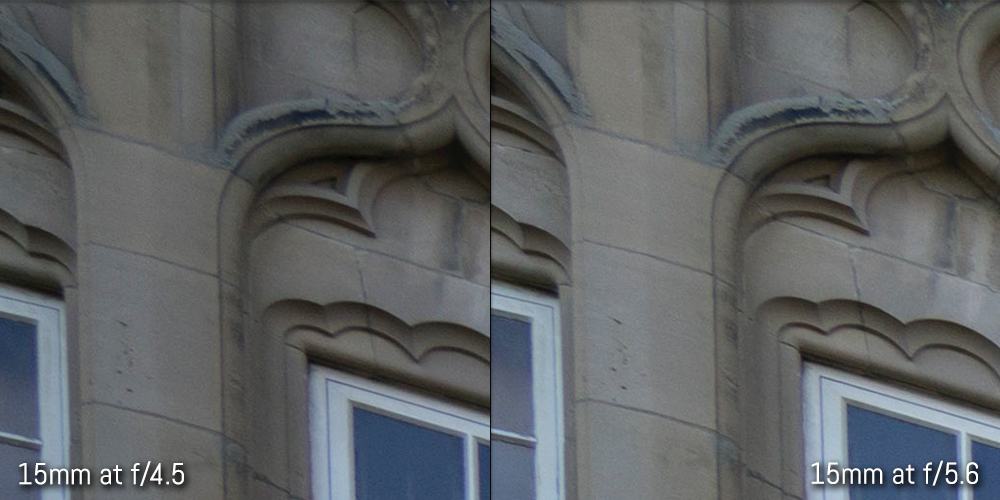
At their fastest common aperture of f/5.6, the results are similar since f/5.6 is only a tad sharper than f/4.5 on the 15mm as you can see below.
Moving on to f/8, we can see that all three lenses remain sharp at the centre, though not quite as sharp as at f/5.6. It is at this aperture that corner sharpness reaches its peak on all three lenses. Once again, if we ignore the difference in detail magnification due to the angle of view, the performance is comparable at the centre. In the corners, the 15mm remains the sharpest and the 10mm remains the softest.
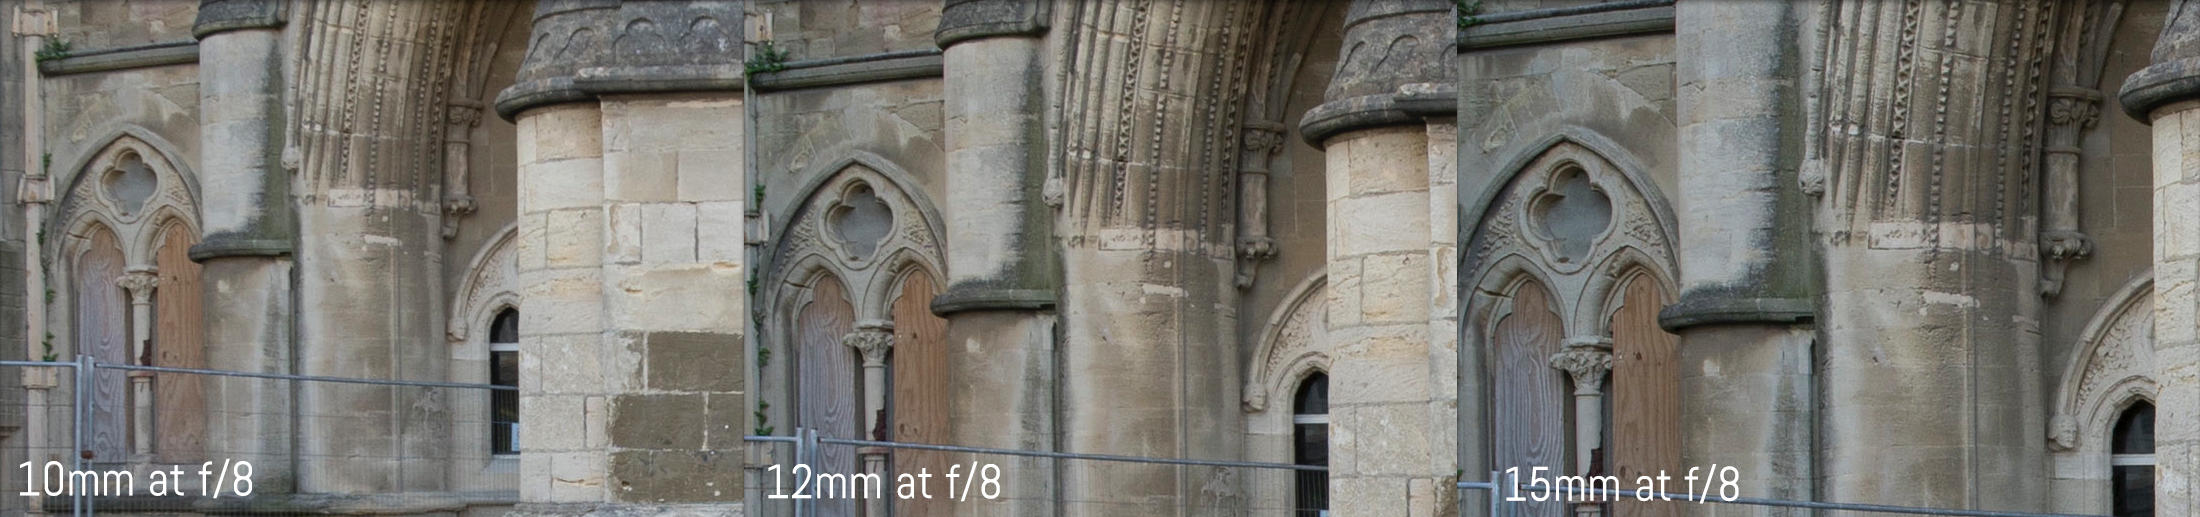
The performance at f/11 is very similar to f/8 at both the centre and in the corners.
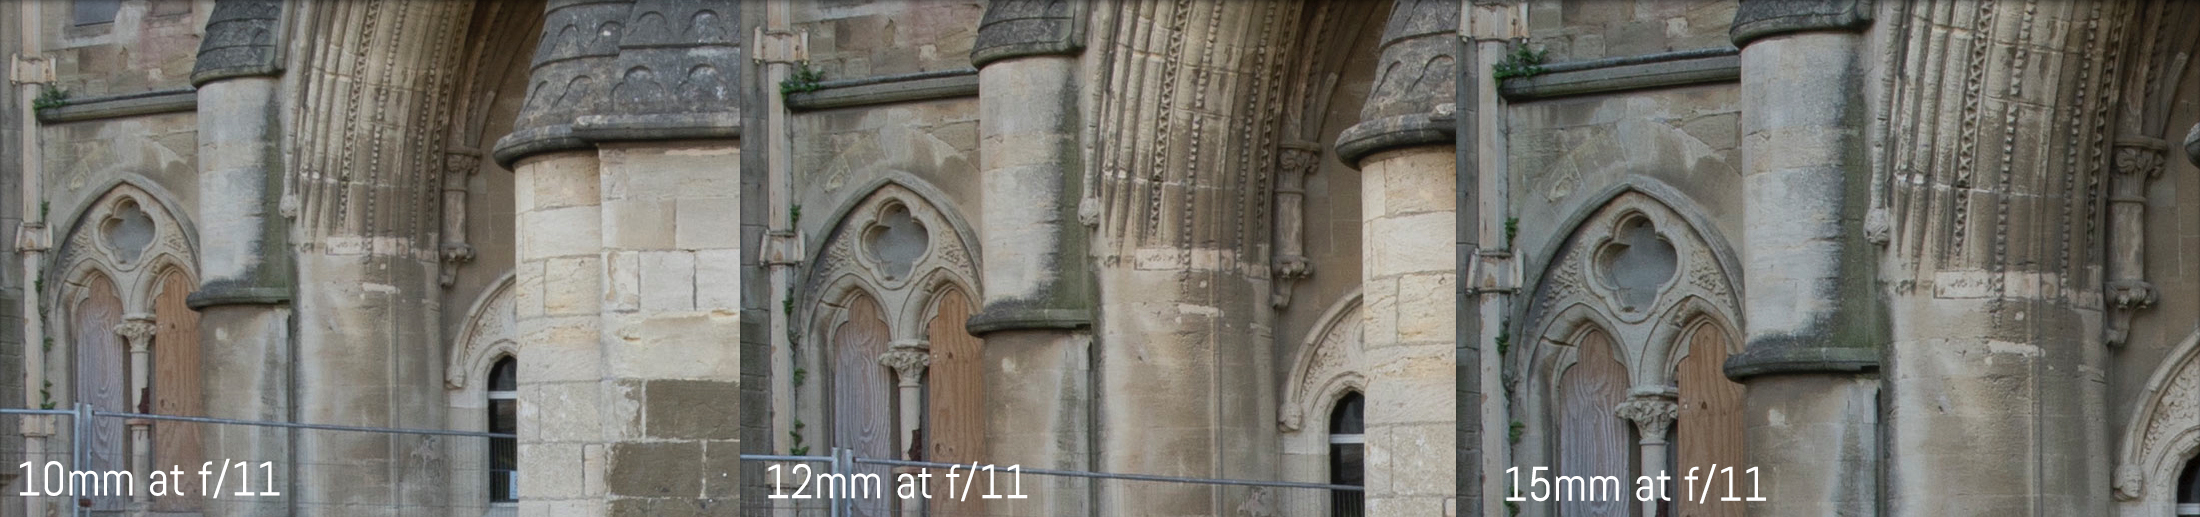
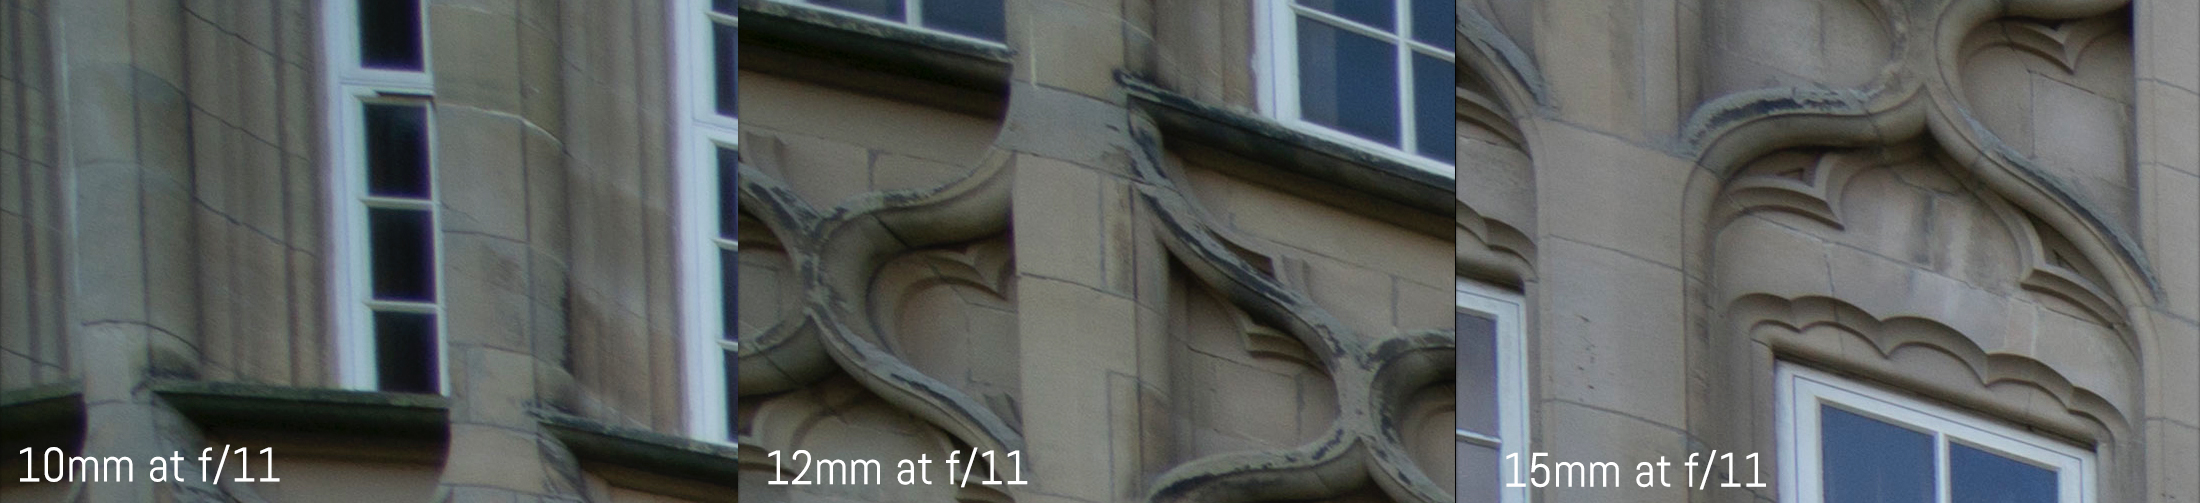
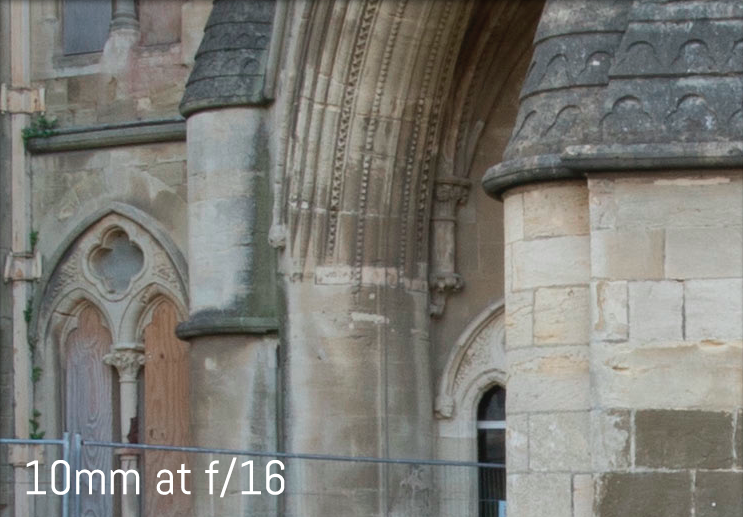
From f/11 onwards, we begin to see signs of diffraction. f/16 remains useable while f/22 should be avoided, as is the case with most lenses.


Since these three lenses are so wide and lack a fast aperture, it isn’t easy to achieve a shallow depth of field even if you focus at their common minimum focus distance of 30cm. This is especially true of the 10mm and 12mm because focusing close can also cause extreme distortion.


All three lenses have the same degree of flare resistance, which happens to be excellent. I only came across a handful of minor examples even though I shot directly into the sun on multiple occasions.


Likewise, all three produce a beautiful sun star flare.


Vignetting, barrel distortion and some minor chromatic aberration at the edges of the frame are all a consequence of the wide nature of these lenses. While vignetting and distortion can easily be fixed in post-production by applying the dedicated lens profile and/or playing with the vignetting slider, chromatic aberrations can be somewhat trickier to eliminate. Using the Remove Chromatic Aberration tool in Lightroom can help but won’t eliminate the problem completely.

Below are the worst examples of chromatic aberration I came across during my testing period with these lenses.


Field of View
Now that we know the 10mm, 12mm and 15mm all perform similarly in optical terms, we can turn our attention to the more pertinent matter of the field of view.
While adding or subtracting a few millimetres will barely alter your field of view at the medium to telephoto end, doing so can drastically change perspective at the wide end of the spectrum. To see this, let’s take a look at a few real-world examples of the same scene taken with the 10mm, 12mm and 15mm on the full-frame A7r II.
The Pier – Architecture
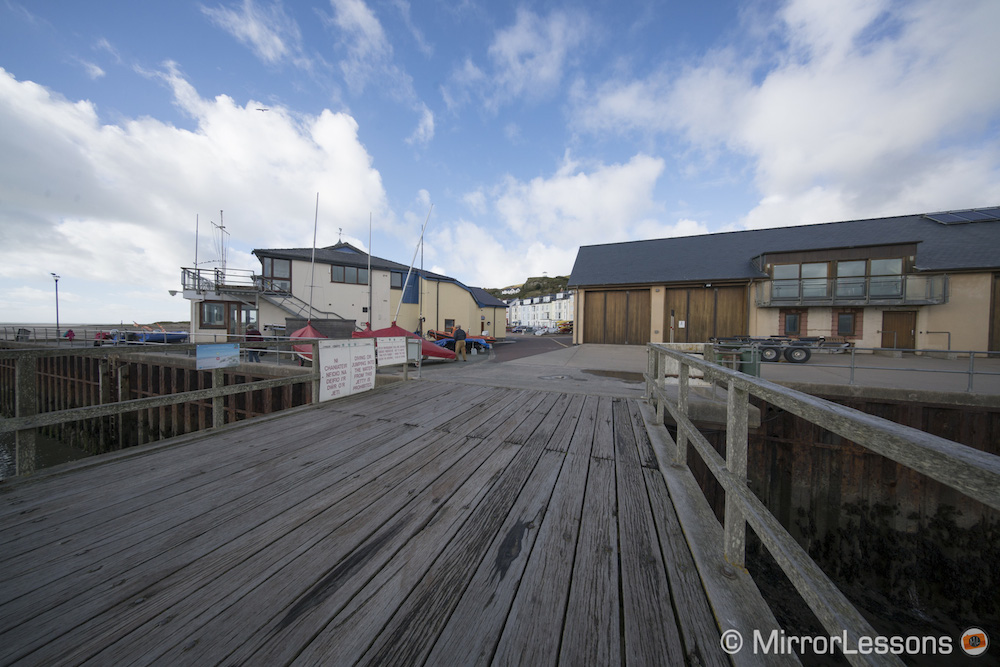
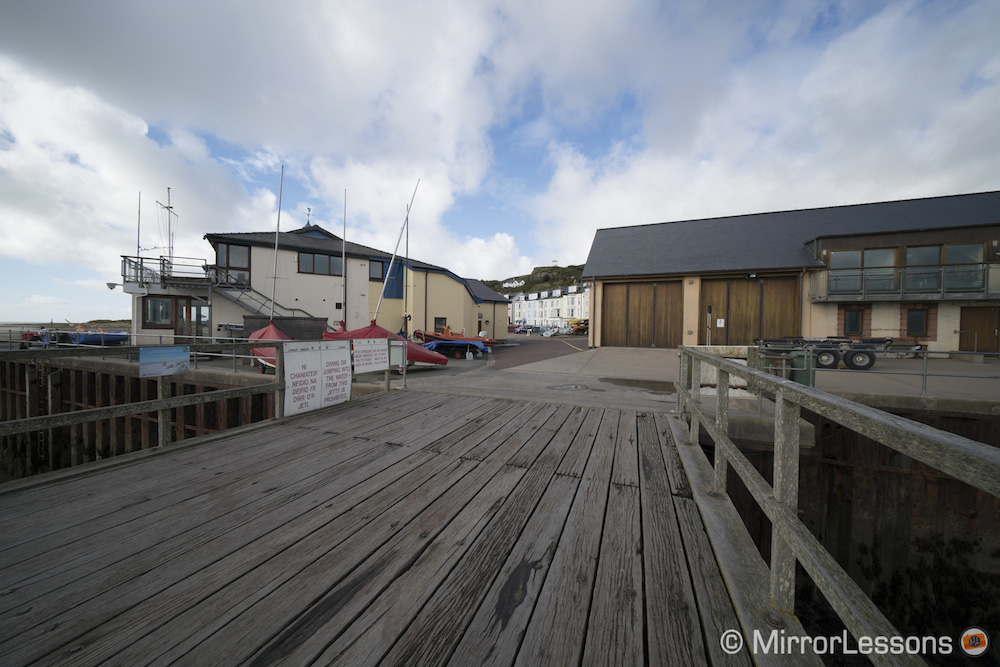
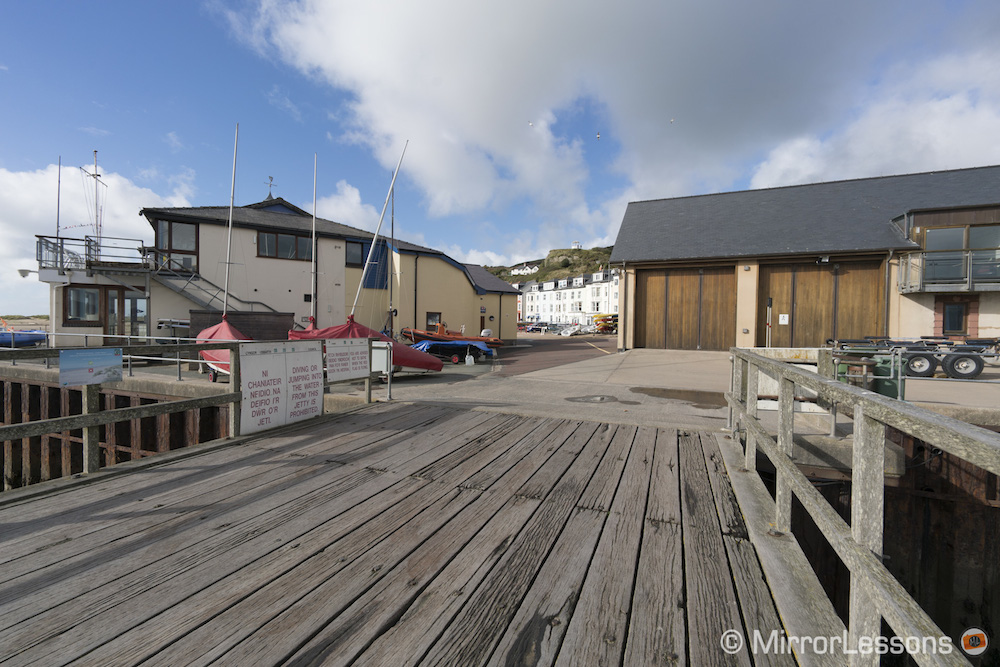
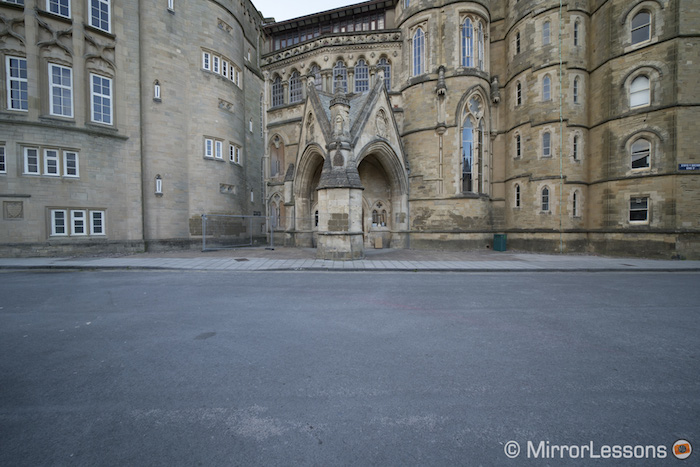
This first example features a variety of architecture including a wooden pier, a few buildings and some white houses off in the distance. I started by composing the shot with the 15mm and followed up by taking two subsequent shots with the 10mm and 12mm without changing my position.
As you can see, the 10mm and 12mm capture much more of the foreground (the pier) and the sky than the 15mm. What’s more, the central elements such as the white houses in the background appear much smaller and less significant in the 10mm and 12mm examples than in the 15mm example.
Of the three, I personally find the original composition taken with the 15mm to be the most balanced because near-equal importance is given to the pier, sky and buildings in the middle ground. There are also fewer superfluous elements near the edges of the frame. Had I stood closer to the buildings, giving less space to the pier, the 10mm or 12mm could have been the more interesting choice.
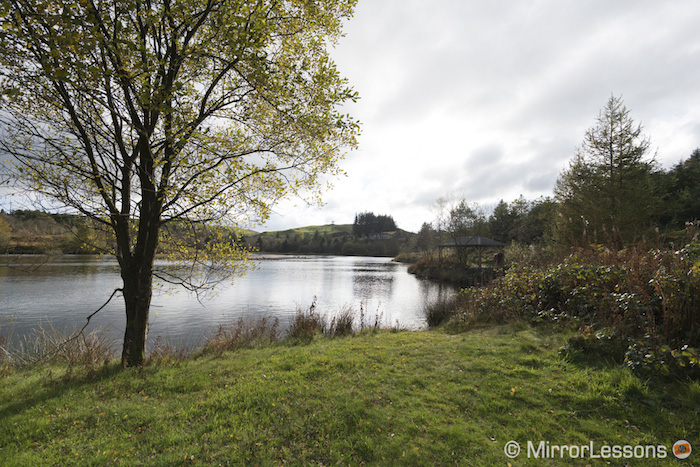
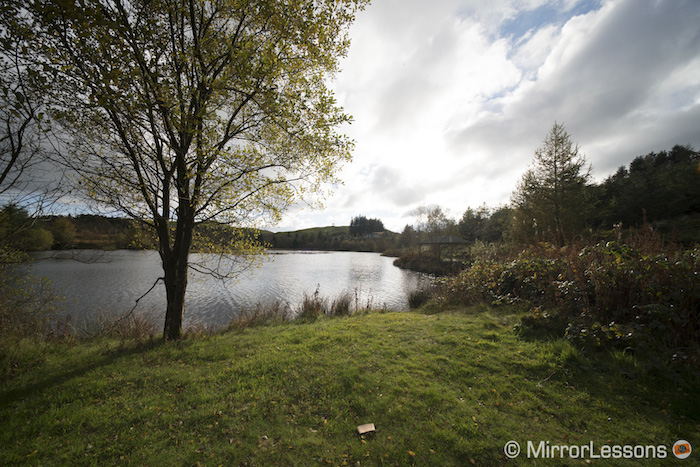
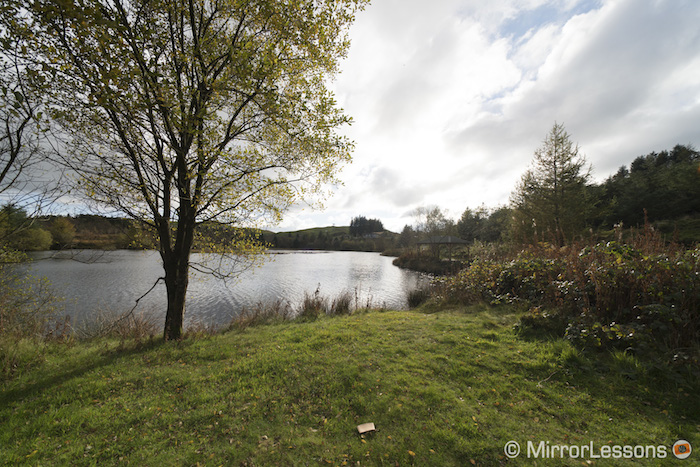
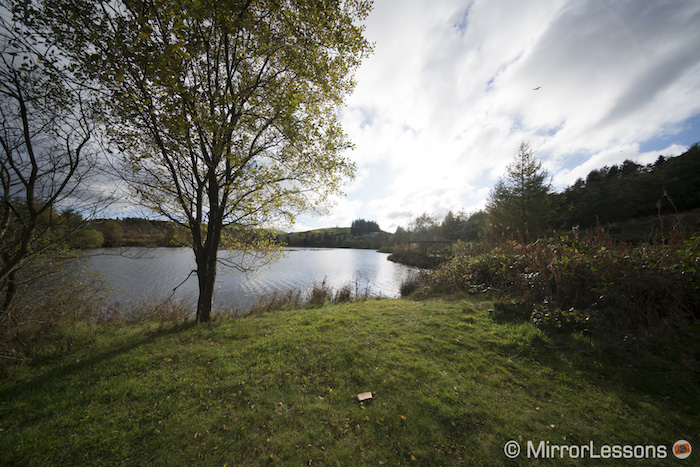
The Roman Road – Landscape
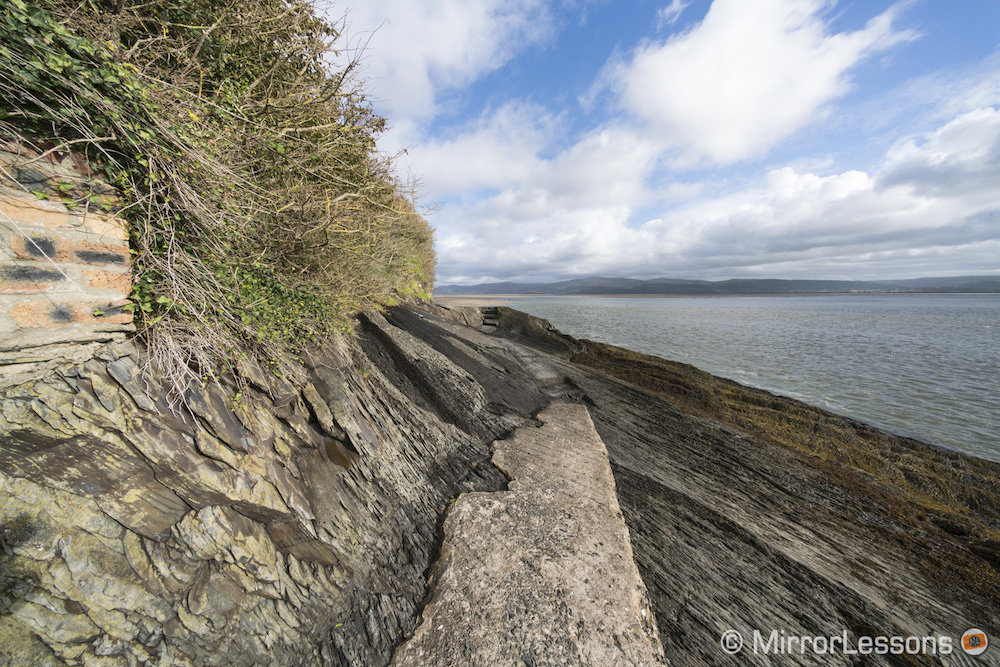
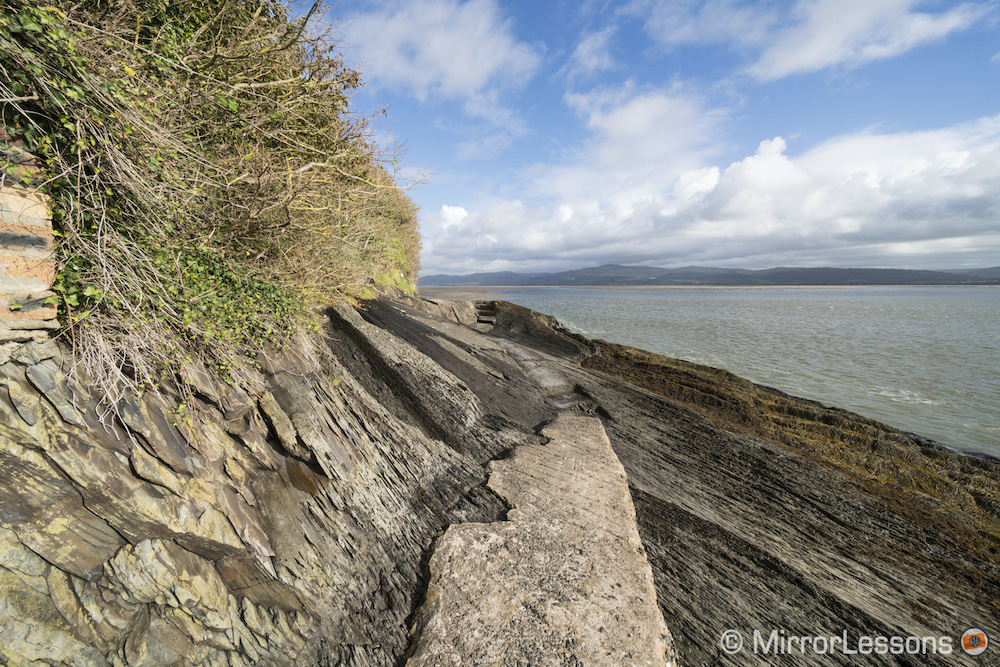
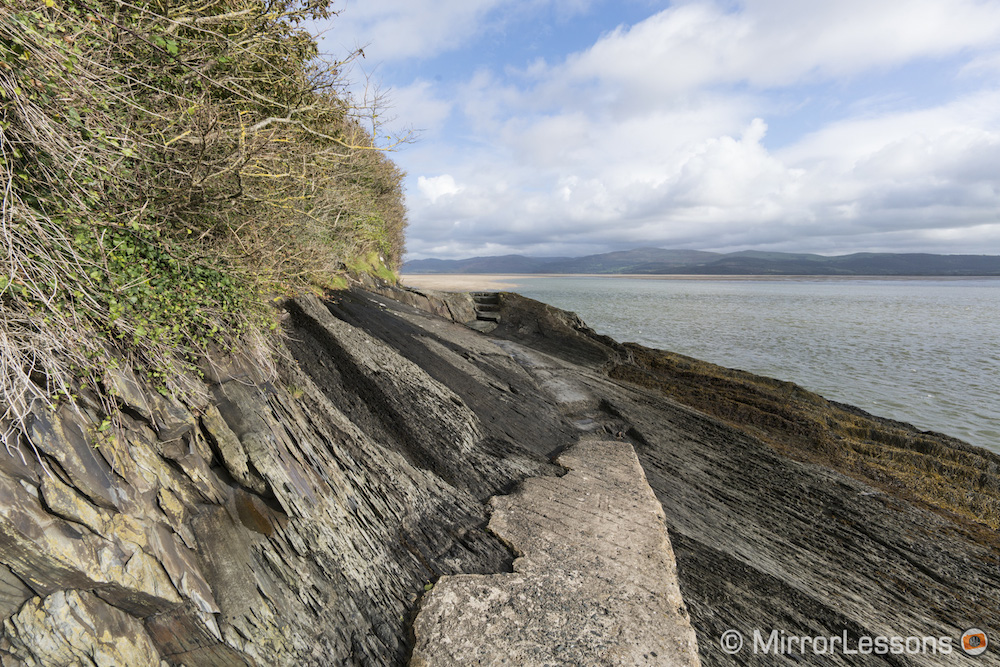
Next we have a set of landscape shots taken with the three lenses. The original composition was taken with the 12mm.
In this case, the difference is less obvious because changing focal lengths doesn’t result in specific elements (e.g. windows or street lamps) appearing or disappearing from the composition like in the previous example. Indeed, even though I used the 12mm to compose the shot, I find that the results from the 10mm and 15mm work just as well.
Keep in mind that not all landscape shots are as flexible as the one above. Had there been more elements in this particular shot, such as boats on the water or a person standing on the rocks, my preference for one composition over the others would have certainly been stronger.
Seaside Town at Night – Architecture
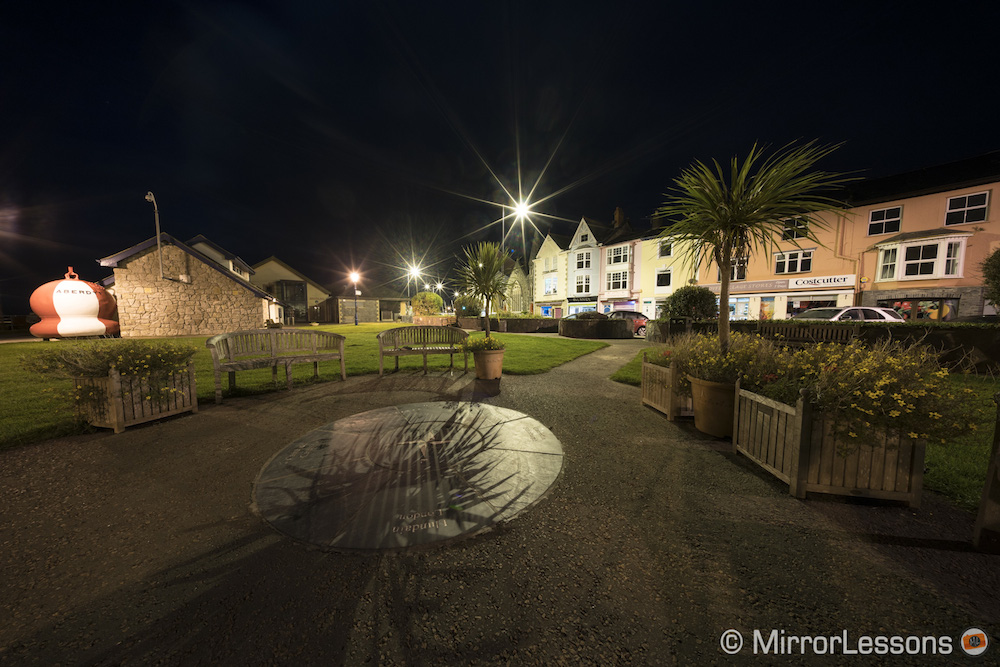
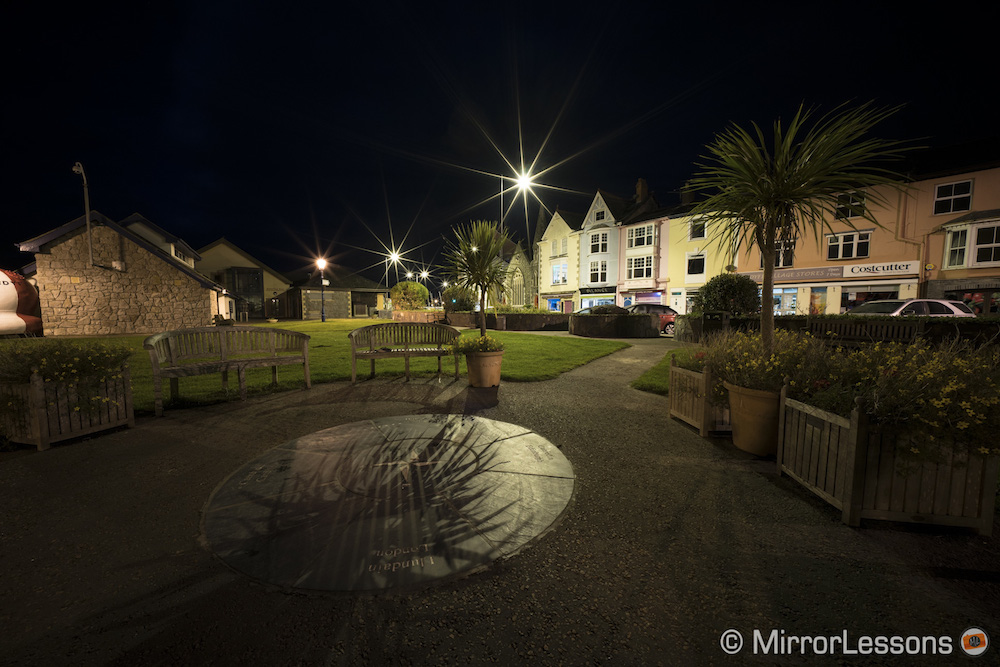
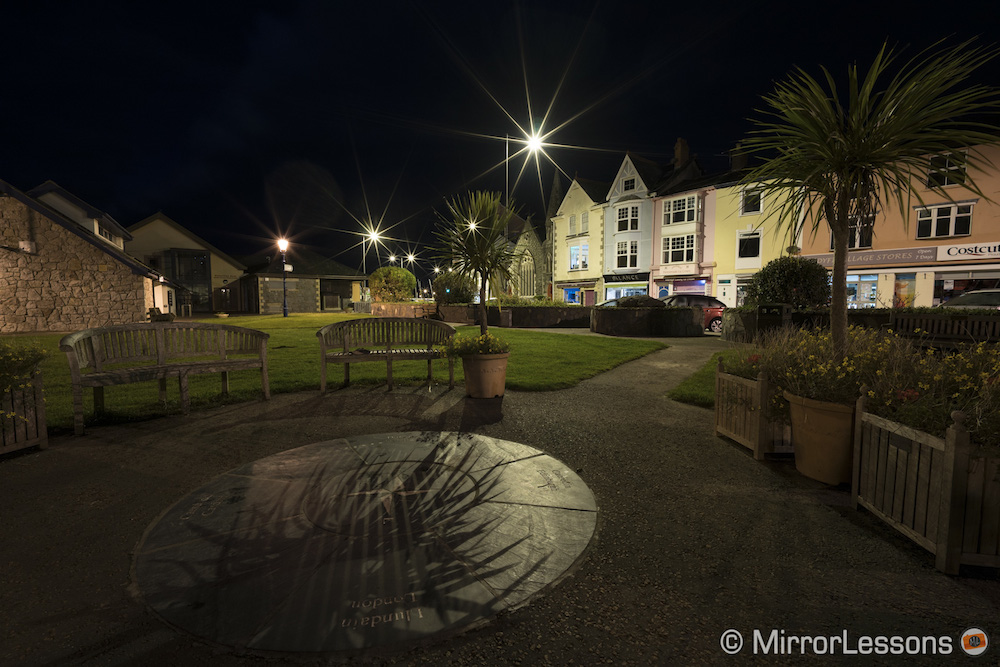
The final set of examples were taken at night, once again surrounded by architecture. Interestingly, though I took the original image with the 15mm, I actually find the composition taken with the 10mm to be the most visually engaging.
Its extreme wide angle exaggerates the shadow of the palm tree, turning it into a leading line that draws your eye toward the circle on the ground and the star at the centre of the frame. (The same happens with the 12mm, though not to the same extent, while the 15mm is too narrow to incorporate the base of the tree’s shadow.) It also makes room for the large red and white buoy at the left edge of the frame, which is cut off by the 12mm and disappears completely in the 15mm example.
With the APS-C format
By using these three lenses on an APS-C camera such as the a6300 or with the A7r II set to APS-C crop mode, you can work with a slightly narrower angle of view. Specifically, the 10mm becomes a 15mm, the 12mm becomes an 18mm and the 15mm becomes a 22.5mm.
Sadly I wasn’t able to take side-by-side shots using our a6300 but I did manage to take a few individual shots that demonstrate how the field of view changes.


Something to consider if you are torn between the 10mm and 15mm is to purchase the 10mm f/5.6, and use it in crop mode on your full-frame A7 camera when you want the 15mm field of view. With the A7r II and its 42MP full-frame sensor, for example, you would still end up with a very useable 18MP file.
Conclusion
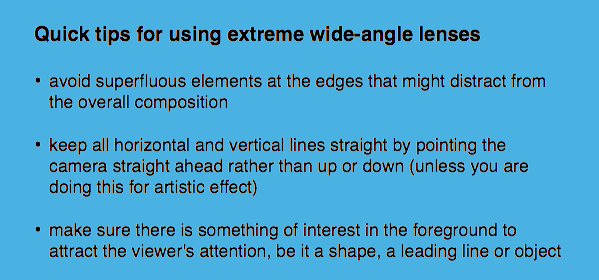
Extreme wide-angle lenses are anything but easy to use if you aren’t accustomed to them, but they can open the door to a world of creative possibilities when used effectively. I fully admit that I am a long way from becoming an expert, but working with the three Voigtlander lenses for the past couple of weeks has certainly fuelled my passion for the genre and encouraged me to improve my technique.
At this point, you may be wondering which of the 10mm, 12mm and 15mm is the most sensible purchase. Though this obviously depends on your personal needs and preferences, here are my two cents based on my fortnight with these lenses.
The “safe” choice is the 15mm because it is more forgiving than either the 10mm or 12mm, whose extreme wide angles frequently require you to think outside of the box to create an effective composition. Indeed, some of my favourite images with the 10mm and 12mm lean toward the abstract, relying heaving on leading lines and shapes in the environment.


With the 15mm, on the other hand, I found it easier create more traditional-looking landscape and architectural images that revolve around a specific subject or message because the distortion effect doesn’t dominate the image.


What can be said about the 10mm and 12mm is that they can make even the dullest of scenes appear interesting because of the exaggerated way in which they distort. The 15mm may be the safest choice of the three, but the 10mm and 12mm will let your imagination run wild.
Choose the Voigtlander 10mm f/5.6 if you:
- are an experienced landscape or architectural photographer looking for a challenge
- enjoy creating abstract compositions with leading lines and shapes
- are also interested in the 15mm, as 10mm will give you a 15mm field of view in APS-C crop format
Choose the Voigtlander 15mm f/4.5 if you:
- prefer a more traditional wide-angle lens
- like the idea of having a slightly faster aperture for indoor or astrophotography
- often use screw-on filters for long exposure photography
Choose the Voigtlander 12mm f/5.6 if you:
- are looking for a middle ground between the 10mm and 15mm
Check price of the Voigtlander 10mm f/5.6 on
Check price of the Voigtlander 12mm f/5.6 on
Check price of the Voigtlander 15mm f/4.5 on
Sample Images


