For many years, the Ricoh GR was something of a lone ranger in the premium compact category, being the only model to feature a 16MP APS-C sized sensor and a fixed 28mm equivalent lens along with the Nikon Coolpix A. The latter failed to make a dent in the market however because of its sluggish AF and prohibitive price at the time of its release.
In fact, between the release of the original GR in 2013 and its successor the GR II in 2015, not a single camera brand except Nikon and to some extent Sigma with its unique Sigma DP series was able to seriously challenge Ricoh’s monopoly of this particular niche.
That is, until now.
The new Fujifilm X70 falls into direct competition with the Ricoh GR II, which is essentially the same as the original GR with a few minor upgrades. They both have an 28mm equivalent lens, no viewfinder, and bodies of almost identical proportions. It is no wonder that photographers are now questioning which is the better choice for street, travel and documentary photography, the primary genres for which these cameras would be used!
Over the past couple of weeks, we’ve had the chance to use the two cameras out in the field, both around rural Wales and in the grand old city of Cardiff, giving us a pretty good idea how they compare. Let’s check them out now, shall we?
Ethics statement: We were provided with a sample of the Ricoh GR II whereas the X70 is part of our personal collection. We were not asked to write anything about the cameras, nor were we provided with any sort of compensation. Within the article, there are affiliate links. If you buy something after clicking the link, we will receive a small commission. To know more about our ethics, you can visit our full disclosure page. Thank you!
[toc heading_levels=”2″]
Main Specs
X70
- Sensor: 16 MP APS-C X-Trans II CMOS
- Lens system: 18.5mm (28mm equivalent in 35mm format)
- Weatherproof: No
- Internal Stabilisation: None
- Autofocus: Hyrbid AF with 40 contrast and 9 phase detection areas
- Continuous shooting: 8 fps, 3fps
- ISO Sensitivity: 200 – 6400 ISO (extended 100, 12800 to 51200 JPG only)
- Shutter Speeds: 1/4000 to 30s, up to 1/32000s with electronic shutter
- Viewfinder: None
- LCD Screen: tilting 3″ touch sensitive LCD monitor (1,040k dots)
- Movie recording: Full HD up to 60fps, manual exposure control
- Built-in Flash: Yes
- Extra Features: WiFi, Panorama, Bracketing, Interval shooting, Digital teleconverter, multiple exposure
- Dimensions: 112.5 x 64.4 x 44.4mm
- Weight: 340g (including battery and memory card)
GR II
- Sensor: 16 MP CMOS
- Lens system: 18.3mm (28mm equivalent in 35mm format)
- Weatherproof: No
- Internal Stabilisation: None
- Autofocus: Contrast detection AF with 9 areas
- Continuous shooting: 4 fps
- ISO Sensitivity: 100 – 25600 ISO
- Shutter Speeds: 1/4000 to 300 seconds
- Viewfinder: None
- LCD Screen: fixed 3″ LCD monitor (1,230k dots)
- Movie recording: Full HD up to 30fps
- Built-in Flash: Yes
- Extra Features: WiFi, NFC, bracketing, interval shooting, multiple exposure, Interval composite
- Dimensions: 63 x 117 x 34.7mm
- Weight: 251g (including battery and memory card)
Design, Ergonomics and Ease of Use
Looking at the two cameras side-by-side, the first thing you’ll notice is that the Fujifilm X70 has a much more classic appearance compared to the Ricoh GR II, which has more contemporary lines.
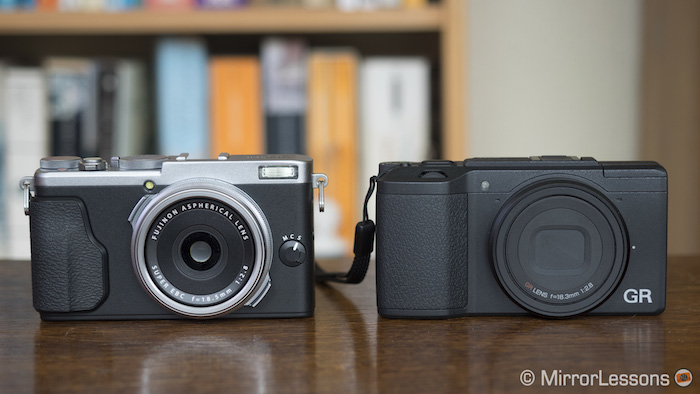
The dials of the Fujifilm X70 are more traditional and reminiscent of film cameras. These include a shutter speed dial, exposure dial and aperture dial around the lens. In total, there are seven customisable buttons on the body. There are also dedicated buttons for the various continuous shooting modes (called Drive) and Auto modesand a customisable Q (quick) menu to access all the most important settings.
The Ricoh GR II gives you access to these essential settings as well thanks to its many external toggles, dials and buttons but its layout is definitely more modern. There are three customisable buttons around the body and a very handy Adj. Lever which lets you flip between five different functions and magnify your images in playback mode. There is also a locking Mode dialwith PSAM modes, TAv (auto ISO with control over S and A) video, auto and three customisable preset settings (My1, My2 and My3).
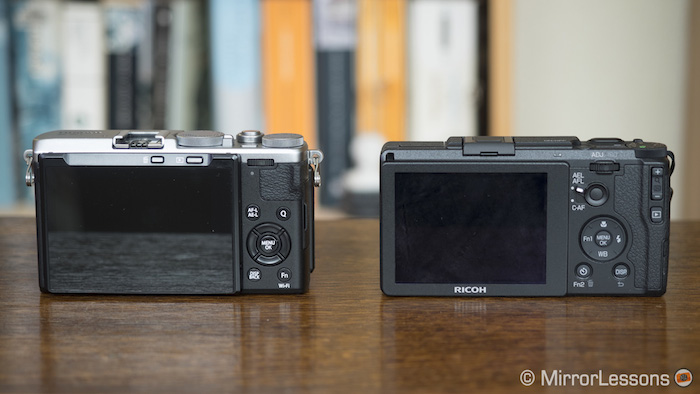
Both are intuitive, but if I had to give the prize to one, I’d probably choose the GR II.
There seems to be a well-placed button, dial or toggle for every function, meaning that you rarely have to go into the menu. These include shutter speed, aperture, ISO, focusing, metering, burst, exposure compensation, magnification, WiFi, and the unique Snap mode which I’ll discuss later on.
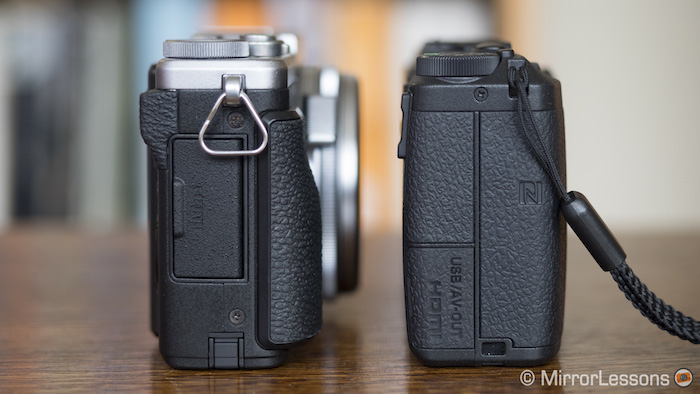
The two cameras are very well-designed and have similar dimensions. They both feature a comfortable grip on the front and a place for your thumb to rest on the rear. Neither requires an additional thumb rest or grip to improve the ergonomics.
The X70 is pocketable but if you use it with a lens hood (which you will need), it becomes bulkier. The GR II is the lighter of the two and can easily slide into your jacket pocket when you aren’t using it.
Neither is weatherproof and I doubt either would survive if I dropped them on a concrete pavement.
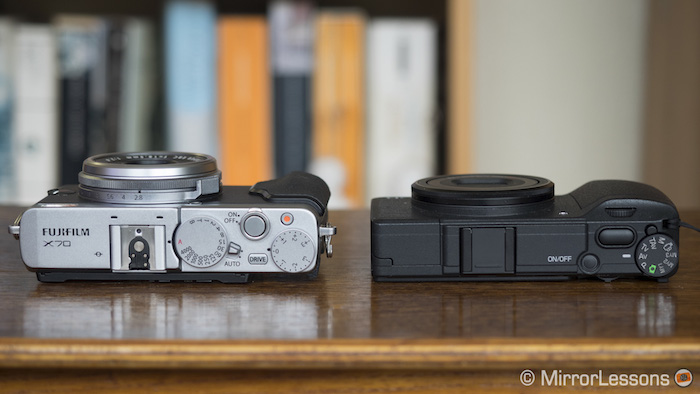
The 28mm equivalent lens of both cameras is flat and compact. The Ricoh’s is smaller but it extends a little when you turn on the camera, while that of the X70 does not. What’s more, the Ricoh’s has a lens shield that automatically opens and closes when you activate or deactivate the camera. The X70’s comes with a lens cap.
The X70’s lens has a very nice ribbed aperture ring that features an automatic mode and turns in clicks from f/2.8 to f/16. It also has a focus ring that doubles up as a customisable control ring when you aren’t in manual mode. Sadly, it isn’t very easy to access and can be imprecise when you try to switch between functions.
The GR II doesn’t have an aperture ring or focus ring, so all manual adjustments must be made by first pressing the Macro arrow on the control pad in manual mode and rotating the front dial. I find this solution uncomfortable compared to having an actual focus ring.
Neither camera comes with a lens hood so you may want to purchase one to protect the lens from bumps and flare. We personally use the third-party JJC lens hood on the X70 (the same as the one for the X100 series) and the GH-3 lens hood can be purchased for the GR II.
If you are looking for a viewfinder, electronic or otherwise, you won’t find one here. This choice was probably made to keep the two cameras as compact and pocketable as possible. However, both have a bright 3-inch LCD screen.
The X70’s 1040k-dot LCD screen tilts up 180 degrees and down 45 degrees. When flipped up, it activates face and eye detection so you can take selfies. It is also the first Fujifilm camera with touch sensitivity, so you can choose your AF point or take a shot by tapping the screen.
The GR II’s 1230k-dot LCD screen is fixed and does not feature touch capabilities. This is regrettable as tilting touch screens are very useful for street photography and shooting at awkward angles. It is strange that Ricoh did not consider its addition a priority given the prevalence of tilting touchscreens on today’s mirrorless cameras.
If you miss having a viewfinder, you can purchase the VF-X70 optical viewfinder for the X70 or the GV-1 optical viewfinder for the GR II. Note that the former is twice the price of the Ricoh version.
Both cameras have a hot shoe and a flash. The flash of the GR II pops up while that of the X70 is built-in. Both have +-2EV of compensation. Thanks to the leaf shutter mechanism, both cameras can sync up to 1/4000s.
The battery life is decent on both cameras, though you can extend that of the X70 by putting it into Low performance mode. I’ve found that one battery on either camera will last about a half a day of intensive shooting or a day of light shooting.
Image Quality: The sensor
As mentioned at the beginning, both the Fujifilm X70 and Ricoh GR II have large 16MP APS-C sized sensors inside a very compact body. However, the two sensors have different characteristics.
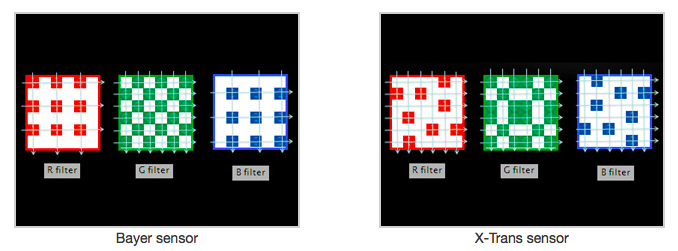
The X70 features an X-Trans II sensor. It uses an irregular pattern of pixels to reduce moire without the need for an anti-aliasing filter. The irregular pattern ensures that every horizontal and vertical line has at least one R, B and G pixel.
The Ricoh GR II has a conventional Bayer sensor but unlike other Bayer sensors, it does not have an anti-aliasing filter.
The dynamic range of both cameras is very good, though my impression is that the Fuji’s RAF files are slightly more flexible especially in terms of shadow recovery and retain a more natural look. If you push the shadows of the Ricoh’s DNG file too much in post, it will exhibit a colour cast and excessive noise. Highlight recovery is slightly better on the X70 as well.


Click on the image to see a high res version

Click on the image to see a high res version

Click on the image to see a high res version

Click on the image to see a high res version
Within the GR II menu, there is a Dynamic Range Compensation option that expands the dynamic range of the images, while the X70 has a Dynamic Range Bracketing option with the choice between 100%, 200% and 400%. These options are valid for the OOC JPGs.
Moving on to the high ISO performance, both cameras produce very useable files up until ISO 3200, and at a push, even ISO 6400. Of course, whether you consider a file useable or not will depend on your tolerance for noise and loss in detail.
The X70 has a native ISO range of 200 to 6400 with a Low ISO 100 value and push values of 12800, 25600 and 51200. The extended values are only available as JPGs, which is one of the reasons we rarely go above 6400.
The GR II has a native ISO range of 100 to 25600. Unlike the X70, you can take RAW and JPG files at all values.


Click on the image to see a high res version

Click on the image to see a high res version
The X70 doesn’t display much noise or loss in saturation but does lose much of its fine detail to smudging at 12800 and above. This is also because you are limited to JPG files beyond 6400.
Amazingly, the GR II RAW files retain lots of detail even up to 25600 but this is counteracted by an excessive amount of noise at 12800 and above. The RAW files also seem to lose some saturation at the higher values. The JPGs aren’t quite as noisy as the RAW files, but they don’t retain as much detail either.
Keep in mind that for the JPGs you can adjust the noise reduction in the menus of both cameras. On the X70, NR ranges from -2 to +2 while on the GR II, you can set it to Off, Auto, Strong, Medium and Weak.
You can find a full set of sample high ISO images here featuring both OOC JPGs and exported RAW files with the same exposure and white balance (3200K). Noise reduction was set to 0 on the X70 and Off on the GR II.
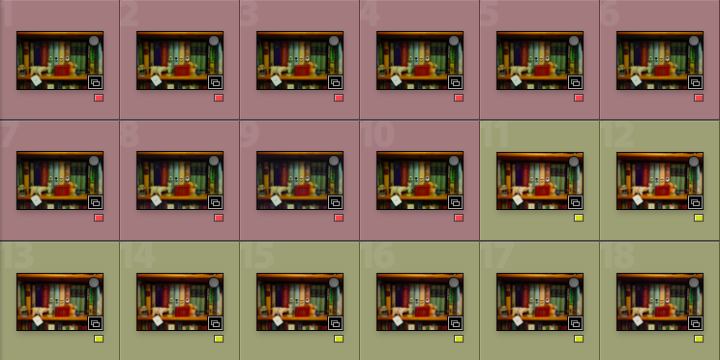
When it comes to colour, the rendering of the X70 tends toward a warmer/yellowish tint while the GR II files tend towards magenta when both cameras are set to their respective standard profiles (Provia Standard on the X70 and Standard on the GR II) and with the same white balance. In low light, the X70 seems to have a greener rendering than the GR II.


If we compare the RAW files, the colours are much more similar if we apply the same colour profile to both images. The GR II retains a slightly more magenta tint in comparison to the RAF file of the X70.
Both have a number of picture profiles available on both cameras that can expand your creative expression.
The X70 has Fujifilm’s Film Simulation Modes, which are picture profiles that inherit their names from popular films produced by Fujifilm such as Provia and Velvia. These profiles are amongst the most attractive and natural we’ve come across on a digital camera, and can be accessed from the menu/Q menu or assigned to a function button. From the menu, you can adjust the sharpness, saturation, highlights and shadows of the profiles. They only affect the JPG files.
The GR II comes with two sets of picture profiles. The first consists of Standard or Vivid from the Image menu, plus two customisable options. Then we have the Effects profiles, which are natively accessible from the Effects button on the side of the camera. They too only affect the JPGs. By pressing the Fn2 button, you can manually adjust the saturation, contrast, sharpness and vignetting of these profiles. The B&W profiles in particular are renowned for their contrast, character and film-like grain and are often used by street photographers.
Personally speaking, I prefer the colour profiles from the X70 and the black and white profiles from the GR II. I’ve provided a few examples below that show the various profiles from both cameras.

Click on the image to see a high res version

Click on the image to see a high res version

Click on the image to see a high res version

Click on the image to see a high res version

Click on the image to see a high res version

Click on the image to see a high res version
Below is a series that compares the black and white filters of the GR II (Black & White and Hi-Contrast) with those of the X70 (Monochrome, Monochrome+Yellow, Monochrom+Green, Monochrome+Red). Admittedly, there isn’t a huge difference and you could probably bring the results closer together by tweaking the sharpness and contrast but there is something quite lovely about the light film grain and the deep blacks of the GR II. You can see the full resolution versions here.
The X70 comes with a separate set of Advanced Filters (Toy camera, miniature etc), which aren’t nearly as nice as the Film Simulation Modes.
Image Quality: The lens
A primary characteristic that makes both the Fujifilm X70 and Ricoh GR II desirable is the fixed lens.
In APS-C terms, the X70 has an 18.5mm focal length while the GR II has a slightly wider 18.3mm focal length, both of which equate to roughly a 28mm field of view in 35mm format. This is a great focal length not only for street photography but also landscapes and environmental portraits. Both have the same aperture range – f/2.8 to f/16 – with an automatic option.

Click on the image to see a high res version

Click on the image to see a high res version

Click on the image to see a high res version

Click on the image to see a high res version
What should be said before anything else is that the GR II’s lens delivers visibly sharper images than that of the X70 at all apertures in both the centre and corners at the lower ISO values (100, 200 and 400). The difference is most noticeable at f/2.8.
Both sensors lack an anti-aliasing filter but the sensor/lens combination of the Ricoh camera has a clear advantage when you open either the JPGs or RAW files in Adobe Lightroom. If you open the RAW files in another software program like Iridient Developer (which is known to demosaic Fuji’s RAF files better than Lightroom), the results still show an advantage in sharpness for the GR II file.

Click on the image to see a high res version

Click on the image to see a high res version

Click on the image to see a high res version

Click on the image to see a high res version


Click on the image to see a high res version
The bokeh, however, is barely decipherable between the two cameras. Given the no-so-fast aperture of f/2.8 and the wide angle, you have to get quite close to your subject to render a soft and creamy background. The minimum focus distance of both cameras is 10cm which isn’t bad.

Click on the image to see a high res version

Click on the image to see a high res version

Click on the image to see a high res version

Click on the image to see a high res version
You’ll come across flare when using both cameras, so it is advisable to buy a lens hood. On the GR II, the most common type of flare I encountered was a purple dot near the main light source, while the X70 produced a rainbow flare in the corner of my image.

Click on the image to see a high res version

Click on the image to see a high res version
There are very low levels of chromatic aberration and distortion and vignetting aren’t an issue.
Both cameras have a digital teleconverter option, though it is worth bearing in mind they perform a simple sensor crop, not an actual change in focal length. With the X70, you can choose between 35mm and 50mm while with the GR II, you have the option of 35mm or 47mm. The difference is that the X70 upsamples the crops in camera so that they match the 16MP of the 28mm images.
Autofocus, Manual Focus and Performance
In my time with the Fujifilm X70 and Ricoh GR II, I never had any trouble with the speed or reliability of their respective autofocus systems in S-AF. Being wide-angle cameras, they are mainly intended for street, landscapes, cityscapes and perhaps the odd environmental portrait, so it is less likely you’ll be using them for sports or other action genres.


The X70’s has a more recent hybrid AF system with contrast and phase detection points and three AF modes: Single Point, Zone and Wide/Tracking. Single Point lets you choose any one of the 49-point focus areas and focus on a specific point, while Zone lets you choose 3×3, 3×5 or 5×5 AF areas to help you track moving subjects. Wide/Tracking uses all 77 points and is best for unpredictable moving subjects.
The GR II has contrast detection AF system with four AF modes: Multi AF, Spot AF, Pinpoint AF, and Subject Tracking. Spot and Pinpoint let you focus on specific points, whereas Multi automatically selects and focuses using all the contrast detection points. Tracking is supposed to follow your subject (you’ll see why I say “supposed” below).
While there are burst options on both cameras, the X70 has a faster continuous shooting speed of 8fps versus the GR II’s 4fps. However, the GR II has a better buffer, being able to take up to 10 RAW files or 999 JPGs in a burst as opposed to the 10 JPGs of the X70. If you reduce the X70’s burst speed to 3fps, you can take an unlimited number of JPGs.
In C-AF mode, I noticed a significant difference in the performance of the two cameras.
The X70 is more capable of accurately tracking moving subjects even in situations without much contrast thanks to its Hybrid AF system. For example, when I took a burst of Mathieu running towards me (C-AF, 8fps, Zone with 3×3 points, Focus priority, JPG only), all the shots were in focus save the last one where he got too close. This isn’t surprising because we had similar results with the Fujifilm X-T1 whose AF system is identical.
The GR II’s contrast detection AF system, on the other hand, struggles with moving subjects. I tried both Tracking and Spot with C-AF, continuous burst shooting, and Focus priority and none of the shots of Mathieu running towards me were in focus. I then asked him to walk and only the first 3-4 shots in a burst of 9 were in focus.

All shots of Mat running towards me were in focus with the X70

Even when Mat walked slowly towards me, less than half of the shots were in focus with the GR II.
The GR II has a very useful option for street photography called Snap Focus which works much like zone focusing on a manual focus lens.
You can set the autofocus to a fixed focus distance (1m, 1.5m, 2m, 2.5m, 5m or infinity) and the camera displays a distance scale on the left side of the LCD screen. Depending on the aperture chosen, it will show you how large your in-focus zone is. Since the camera doesn’t need to lock onto a subject or scene, focus acquisition is instantaneous. On the GR II with its 28mm lens, I found that choosing 2m with the aperture set to f/11 lets you have everything from 1m to infinity in focus.
You can also select an option called Full Press Snap that you can use with a normal AF mode. If you fully press the shutter button (without half pressing first), the camera switches instantly to snap mode to take the shot and focuses at the distance set in the menu for the snap focus mode. You also have a Auto-Hi option where the camera additionally switches to Auto ISO.

Click on the image to see a high res version

Taken using Snap Focus
Of course, you can focus manually on both cameras but as I mentioned before, X70’s control ring and the GR II’s front dial aren’t very comfortable if you manually focus on a regular basis. However, there are many useful manual assists to make up for the physical awkwardness of the two cameras.
The X70 has a number of useful manual focus assists, including Focus Peaking, Digital Split Image and Magnification. I personally find Magnification the most accurate of the three. It can be used in conjunction with the other two assists.
The GR II also has many manual assists including a Distance Scale, Magnification, Mode 1 (focus peaking), Mode 2 (B&W image with stark edges), Mode 3 (reversal of B&W in mode 1) and Mode 4 (reversal of B&W in mode 2). However, it isn’t easy to find the assists in the menu: you have to press Fn2 after entering the ambiguously named FA/Move Target section to access them.
Both cameras feature a leaf shutter mechanism, allowing for near-silent operation and high speed sync with flash.
However, because of the leaf shutter, the GR II can only go up to 1/2500s between f/2.8 and f/4 which can be limiting. To compensate, it has a built-in ND filter with a two-stop effect. It goes as high as 1/4000s at f/5.6 and above.
On the X70, the fastest mechanical shutter speed is 1/4000s but you can revert to the electronic shutter and use speeds as fast as 1/32000s. However, doing so will disable the use of flash.
Video and Other Features
Neither camera is renowned for its video capabilities, which is logical given that many of the competitors now shoot 4K. They can both shoot Full HD but the X70 is capable of 60fps while the GR II only goes up to 30fps. Whereas you can only change the exposure compensation while you record with the GR II, you have full control over all settings including shutter speed, aperture and ISO on the X70.
The X70 has better video quality overall. Although not perfect (aliasing and moiré can be visible), it is definitely better than the Ricoh GR II which (ironically) lacks sharpness and displays excessive aliasing.
Each camera comes with a handful of extra features that can improve your shooting experience.
The X70 has a self timer with 2s and 10s options, as well as Interval Timer Shooting with up to 999 shots and intervals between 1 second and 24 hours.
The GR II also has a self timer with 2s and a custom option that lets you take up to 10 images at a set interval of up to 10s. With interval shooting, you can take an infinite number of images at intervals between 1 second and 60 minutes.
The GR II also has the added bonus of an Interval Composite mode for light painting and star trails. At intervals between 1 second and 60 minutes, you can take an infinite number of images and either save each individual image or save each image so that it shows the composite gradually building.

For those who enjoy getting experimental, you can take double exposures with the X70 and unlimited multiple exposures with the GR II.
The X70 provides a number of bracketing modes, most of which are only available as JPGs. They are as follows: AE bracketing (RAW + JPG), ISO bracketing (JPG), Film Simulation bracketing (JPG), WB bracketing (JPG) and DR bracketing (JPG).
The GR II also has many bracketing modes which also produce JPGs for everything but AE bracketing. They are as follows: AE bracketing (1/3 and 1/2 EV), WB bracketing, WB preset bracketing, Effect bracketing, DR bracketing, and Contrast bracketing.
Both cameras accept a wide conversion lens that turns the 28mm field of view into 21mm. It is called the WCL-X70 for the X70 and the GW-3 for the GR II.
Finally, we mustn’t forget that both cameras have WiFi capabilities, and the GR II also has NFC. With the Fujifilm app, you can control the camera and download your images onto your smart device. With the GR II, you can also remotely control the camera and transfer images, and the app has lots of options to access all the camera settings. However you can’t download the app from the Apple or Android store. Once you connect to the camera’s network, you have to open a link in your native smartphone browser (Safari or Chrome).
Conclusion
Although both the Fujifilm X70 and Ricoh GR II are premium compacts with a 16MP APS-C sensor and a 28mm field of view, they each have their own set of strengths and weaknesses, many of which might strongly influence your final decision to go with one or the other.
There is no doubt the X70’s retro design is more aesthetically pleasing, and there is nothing quite like having a physical aperture ring, shutter speed dial and exposure dial if that’s what you’re accustomed to. In addition to having a tilting touchscreen, which is always handy for composing at awkward angles and quickly choosing your autofocus point, the camera is also endowed with Fujifilm’s beautiful Film Simulation Modes, which have gained cult status within the Fuji community. Finally, the hybrid autofocus system is more effective, especially when it comes to tracking moving subjects.
But if you thought the Ricoh GR II was out of the running, think again. Of all the cameras with an APS-C sensor I’ve tested, I don’t think I’ve ever seen so much razor-like sharpness. It is truly impressive across the frame and through the aperture range. The layout of the dials, buttons and menu is also very intuitive, albeit quite different from other cameras, and I especially like the Adj. ISO toggle, as all your most important settings are literally at the tip of your thumb. The B&W effects are amongst the nicest I’ve ever used, and it is packed with extra features, such as Snap Focus and Interval Composite, that will push your creativity and facilitate the shooting experience.
Check price of the Fujifilm X70 on
Amazon | Amazon UK | B&H Photo | eBay
Check price of the Ricoh GR II
Sample Images


